#vue axios example
Explore tagged Tumblr posts
Visit Tumblr Blog
Explore Tumblr blogs with no restrictions, modern design and the best experience.
Last Seen Tumblr Blogs


Fun Fact
Tumblr has a low social media market share in South America.
Text
Web Application Development Using JavaScript

JavaScript is one of the core technologies of the web, alongside HTML and CSS. It allows developers to build interactive, dynamic web applications — from simple websites to full-featured platforms like social media sites and online stores. If you're curious about how JavaScript powers modern web apps, this guide is for you!
What Is a Web Application?
A web application is a software program that runs in your browser and interacts with users. Unlike static websites, web apps can update content, accept user input, and perform complex tasks — all without needing to reload the page.
Why JavaScript?
Client-Side Power: JavaScript runs in the browser and controls the user interface (UI).
Interactive Features: JavaScript is used to build forms, animations, dropdowns, dynamic content, and more.
Frameworks & Libraries: Popular tools like React, Vue, and Angular make building web apps faster and easier.
Full-Stack Development: With Node.js, you can use JavaScript for both frontend and backend development.
Basic Technologies of Web Apps
HTML: The structure of the page
CSS: The design and layout
JavaScript: The behavior and logic
JavaScript in Action
Here’s a simple example of JavaScript updating a page without reloading:<button onclick="changeText()">Click Me</button> <p id="demo">Hello!</p> <script> function changeText() { document.getElementById("demo").innerText = "You clicked the button!"; } </script>
Modern JavaScript Tools
React: Build dynamic user interfaces using components
Vue.js: A lightweight framework for building modern UIs
Angular: A full-featured framework for large-scale apps
Node.js: Run JavaScript on the server for backend logic
Express.js: A web framework for building server-side APIs
MongoDB: A NoSQL database commonly used with Node.js
Steps to Build a Web App with JavaScript
Design your user interface with HTML and CSS
Use JavaScript to handle user interaction and dynamic content
Connect to an API or backend server using Fetch or Axios
Store and manage data with localStorage or databases
Test and deploy using platforms like Netlify or Vercel
Helpful Resources to Get Started
JavaScript on MDN
The Modern JavaScript Tutorial
React Official Docs
Node.js Official Site
Conclusion
JavaScript is the heart of modern web applications. Whether you're building a simple to-do app or the next big startup idea, JavaScript gives you the power to make your ideas come alive in the browser. Start small, keep practicing, and soon you'll be building your own full-fledged web apps!
0 notes
Link
In this tutorial, we will help you learn how to download the file in the vue js application using the Axios package.
0 notes
Text
Vue-js Post request example
Vue-js Post request example
We will Learn the below things in this Blog Article. How we install axios via npm ?How to install node modules ?What is axios ?How to import Axios ?Sending post request via AxiosCompiling assest. we will learn about how we can send post requests by using Axios, if Axios is not present in your comoper.json file then you can use the below command to install the Axios npm install axios Before…

View On WordPress
#axios npm#fetching data from a third party api with vue js and axios#install axios in vue#nuxt axios post example#vue axios cdn#vue axios example#vue axios is not defined#vue axios plugin#vue axios post#vue axios post json data#vue js axios post example#vue js post request example
1 note
·
View note
Photo

Vue Js and Laravel CRUD Operations in Laravel || Code Explanation || Just Laravel Vue Js CRUD Operations using Laravel. Here I used Vue js, implementing axios for HTTP requests, explaining vue directives like v-if, v-for, vue binding of ... source
#ajax crud laravel#axios in vuejs#axios vue#code#crud#Explanation#just laravel#justlaravel#Laravel#laravel 5.5 vuejs crud#laravel and vuejs#laravel crud#laravel crud tutorial#laravel paypal#laravel paypal api#laravel paypal integration#laravel vue#laravel vue crud#laravel vue js crud#laravel vue js crud example#laravel vue js project#laravel vue.js#Operations#vue#vue axios#vue axios crud#vue crud laravel#vue crud tutorial#vue js#vue js crud
0 notes
Text
Building a full-stack application using Laravel, Vue 3, and Tailwind CSS can be a great choice. Laravel provides a robust backend framework, Vue 3 offers a powerful frontend library, and Tailwind CSS provides a flexible and utility-first CSS framework. Here's a step-by-step guide on how you can set up a full-stack application using these technologies: [tie_index]Setting up Laravel Backend[/tie_index] [padding top="0" bottom="0" right="5%" left="5%"] Step 1: Setting up Laravel Backend Install Laravel by following the official documentation: https://laravel.com/docs/installation Create a new Laravel project using Composer: bashCopy code composer create-project laravel/laravel your-project-name Navigate to the project directory: bashCopy code cd your-project-name Set up the database connection in the .env file. Create the necessary database tables and migrations: bashCopy code php artisan migrate Set up authentication (optional) if you want to add user registration and login features: bashCopy code php artisan make:auth [tie_index]Setting up Vue 3 Frontend[/tie_index] [padding top="0" bottom="0" right="5%" left="5%"] Step 2: Setting up Vue 3 Frontend Install Vue CLI globally (if not already installed): bashCopy code npm install -g @vue/cli Create a new Vue project: bashCopy code vue create client Choose the default preset or manually select features based on your requirements. Navigate to the client directory: bashCopy code cd client Start the development server: bashCopy code npm run serve [tie_index]Integrating Laravel with Vue[/tie_index] [padding top="0" bottom="0" right="5%" left="5%"] Step 3: Integrating Laravel with Vue Open the client folder in your favorite code editor. Update the src/App.vue file with your desired Vue components and layout. Make API requests to the Laravel backend using Axios or any other HTTP client library. For example: javascriptCopy code import axios from 'axios'; export default data() return users: [], ; , mounted() axios.get('/api/users') .then(response => this.users = response.data; ) .catch(error => console.log(error); ); , ; [tie_index]Styling with Tailwind CSS[/tie_index] [padding top="0" bottom="0" right="5%" left="5%"] Step 4: Styling with Tailwind CSS Install Tailwind CSS via npm: bashCopy code npm install tailwindcss Create a tailwind.config.js file in the root directory: bashCopy code npx tailwindcss init Update the client/main.js file to import Tailwind CSS: javascriptCopy code import 'tailwindcss/tailwind.css'; Use Tailwind CSS utility classes within your Vue components to style them. [tie_index]Deploying the Application[/tie_index] [padding top="0" bottom="0" right="5%" left="5%"] Step 5: Building and Deploying the Application Build the Vue project for production: bashCopy code npm run build Configure your Laravel project to serve the Vue app: In your Laravel routes/web.php file, add the following route at the end: phpCopy code Route::view('/any', 'app')->where('any', '.*'); In your Laravel resources/views/app.blade.php file, include the Vue app's production files: htmlCopy code Build and deploy your Laravel project as per your hosting environment. That's it! You've successfully set up a full-stack application using Laravel, Vue 3, and Tailwind CSS. Feel free to customize and extend the application based on your specific requirements.
0 notes
Photo

Axios HTTP Client: How to Send Axios GET Request Axios HTTP client is promise based library for the browser and node.js. We can use Axios with React, Axios with Vue. Axios POST, GET Requests Example #javascript #html #programming #css #coding #java #python #developer #programmer #webdeveloper #webdevelopment #code #coder #php #webdesign #software #softwaredeveloper #computerscience #codinglife #reactjs #technology #frontend #development #programmers #js #web #softwareengineer #programmingmemes #linux #javascriptdeveloper (at India) https://www.instagram.com/p/CoZcbKHPHO9/?igshid=NGJjMDIxMWI=
#javascript#html#programming#css#coding#java#python#developer#programmer#webdeveloper#webdevelopment#code#coder#php#webdesign#software#softwaredeveloper#computerscience#codinglife#reactjs#technology#frontend#development#programmers#js#web#softwareengineer#programmingmemes#linux#javascriptdeveloper
0 notes
Text
Advanced mce remote mapper tool load mc

#Advanced mce remote mapper tool load mc software
#Advanced mce remote mapper tool load mc series
#Advanced mce remote mapper tool load mc free
#Advanced mce remote mapper tool load mc series
Vue.js Screencast Series in Spanish on.
Vue.js VideoTutoral Series in Spanish (3-8-2016) on YouTube by Juan Andrés Núñez.
Hybrid App Example with Laravel and Vue.js in Portuguese by Vue.js Introduction Turkish Language on oguzhan.in.
Vuex introduction video - James Browne from London Vue.js Meetup #1.
Create a GitHub File Explorer Using Vue.js on Scotch.io.
Vuejs 2 Authentication Tutorial on Auth0 blog.
React vs Vue - their communities (My typeof Radio).
Evolution of Vue - Part III (My typeof Radio).
Evolution of Vue - Part II (My typeof Radio).
Evolution of Vue - Part I (My typeof Radio).
What is Pinia? with (My typeof Radio).
Vue podcast list via The QIT Tech Podcast Indexer.
Animating VueJS with Sarah Drasner(Software Engineering Daily 01-12-2017).
Request For Commits #12 - Crowdfunding Open Source (Vue.js) (06-15-2017).
MW S04E08 - Vue.js with Evan You and Sarah Drasner (04-27-2017).
Codecasts #2 - Falando Sobre Vuejs e Web Components ().
#Advanced mce remote mapper tool load mc software
Software Engineering Daily (12-29-2015).VueJS Uzbekistan - Telegram Community and Support Group.vueslack - 2300+ registered users worldwide.VueJS Iran - Telegram Channel & group (group link available in channel bio).vue-requests - Request a Vue.js module you wish existed or get ideas for modules.
#Advanced mce remote mapper tool load mc free
Prokarman Resume Builder - A Free Resume Builder for crafting resumes for your dream job.Vue.js Interview Questions - A List of 300 VueJS Interview Questions and Answers.Vue.js Jobs - VueJobs - A Vue.js job portal to hire or get hired for all your Vue.js jobs.Notes on Vue - A personal guide to Vue development.Best vue.js Courses On YouTube - Handpicked list of best Vue.js tutorials on YouTube.Vue.js Articles - Assorted Vue 2 and 3 tutorials and articles.Vue.js Workshops - Learn Vue 2, in browser, by building 3 applications: Landing page, Todos App and Podcasts aggregator.( Vue.js, Vue-Router, Vuex, Vue-Axios, Vue-Apollo ).Vue 3 Video Playlist - Amazing Vue 3 tutorials and experiments.Vue Mastery - The ultimate learning resource for Vue developers.- An extensive list of websites created with the Vue.js Javascript framework.Vue.js Online Courses Directory - Vue.js courses from top e-learning platforms curated by Classpert, a online course search engine.Vue.js DEV Community - Official tag for the Vue.js JavaScript Framework on DEV.to.A minimalistic list of Vue.js libraries and components based on the awesome-vue repo. Tips & tricks about the Vue ecosystem, for busy devs. Vue School - Learn Vue.js from video courses by core members and industry experts.Vue Curated Resources - Recommended Vue.js courses and tutorials.Weekly Vue.js Newsletter - Weekly Vue.js news & tips by Vue News - Social website focusing on the latest Vue.js news and information.Vue.js 資料まとめ(for japanese) by Vue.js Wikipedia.A curated list of awesome things related to Vue.js
0 notes
Link
Features of VueJS
Features of vuejs : Vue is called as a progressive JavaScript framework with various features for building user interfaces. The following are the major features available with VueJS.
Improvement & Bug Fixes: In the supplement to providing these new features, vue.js further comes with several improvements and bug fixes.
Improved Typescript Support & Integration: The most modern version of VueJS render stable support to TypeScript. The improved integration improves the type of declaration process.
Better Error Handling & Reporting: Whilst using earlier versions of vuejs, programmers have to manipulate with the unexpected errors all through either config.errorHandler option or render an appropriate error component.
Better Functional Component Support: VueJs renders more considerate assistance to the functional components which are described as a single-file component (SFC). Here, the developers can now appropriate the vue-loader to represent functional components in an individual vue.js file.
Environment-Agnostic Server-Side Rendering: Unlike the other JS libraries, VueJS appears with built-in streaming server-side rendering. The hallmark makes it quite more accessible for the programmers to execute server-side rendering asynchronously.
VueJS Installing Steps
1. npm install -g @vue/cli 2. vue --version for check version 3. vue create {projectname} 4. need dependency a. vue-router b. dart-sass c. babel d. pwa 5. sudo npm install --save axios vue-axios { dipendency for ajax request} 6. npm install vue-easysession --save {dipendency for session}
Base Example
Here’s an example of a Vue component: // Define a new component called button-counter.

0 notes
Photo
React's rise, Babel 7.10.0, and good GitHub etiquette
#491 — June 5, 2020
Unsubscribe | Read on the Web
JavaScript Weekly
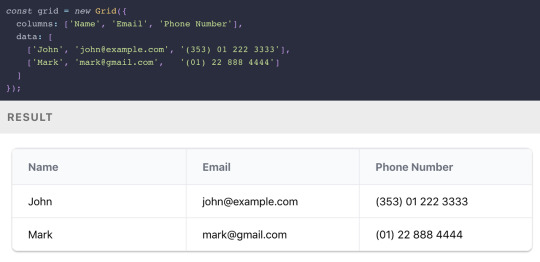
Grid.js: An Advanced Table Library — A lightweight, advanced table plugin that can work alongside React, Angular, Vue, or, well, nothing. Check out some of the examples for more on how to use it. It uses Preact under the hood.
Afshin Mehrabani
The Rise of React (And Its Growing Pervasiveness) — In the most recent issue of Increment, a noted journalist (for WIRED and The Economist) takes a wide-angle look at how React came to be one of the predominant frontend frameworks powering today’s web and the attendant implications ― both positive and negative ― for the future.
Chris Stokel-Walker (Increment)
Does a Serverless Headless CMS Exist? It Does Now — The first headless CMS built for serverless infrastructure. Forget about scaling problems, flash crowds, setting up and managing servers and stop overpaying for resources you don't use. It's free and open-source, check it out.
Webiny sponsor
Babel 7.10.0 Released — The hugely popular JavaScript transpiler got more tweaks than you’d expect for a minor point release including an experimental version of a new polyfills compatability architecture, improvements to optional chaining and private fields support, and better tree-shaking for React code.
Nicolò Ribaudo
⚡️ Quick bytes:
🖤 This week, the React core team joined the Facebook employee walkout in solidarity with the Black community — it's time to speak up, donate or even just stream a fundraising video, because Black lives matter.
The Repl.IT online IDE/sandbox now supports Deno if you want to play without installing it for real.
SpiderMonkey, Firefox's JavaScript engine, has a new regular expressions engine which opens up support for modern regex syntax it didn't have before.
AngularJS 1.8.0 is out. Yes, that's the old school Angular.js, not the more modern Angular.
Zappar has released some universal AR SDKs for Three.js and vanilla JavaScript if augmented reality is your bag.
💻 Jobs
JavaScript Developer at X-Team (Remote) — Join X-Team and work on projects for companies like Riot Games, FOX, Coinbase, and more. Work from anywhere.
X-Team
Find A Job Through Vettery — Vettery specializes in tech roles and is completely free for job seekers. Create a profile to get started.
Vettery
Senior Software Engineer — Save Lives & Make an Impact — We use Node/TS/React & ML to provide crisis support via SMS. Help us scale globally with a focus on privacy and security.
Crisis Text Line
📚 Tutorials and Opinions
Reusing UI Components at Enterprise Level — An engineer at PayPal explains how they share UI components across their various products.
Dong Chen (PayPal)
The 'Top Types' any and unknown in TypeScript — They’re not top types because they’re the best types 😂 .. but they’re essentially ‘universal’ types that can contain all values (in opposition to the never type which is the empty set).
Dr. Axel Rauschmayer
One Cool Trick to Simplify Reducer Functions — An introduction to the Immer immutable state library as a way to reduce the complexity of Redux reducers.
Eric Elliott
Getting Started With OpenTelemetry In Node.js
Lightstep sponsor
How-to Normalize Home Volume Levels with Node-RED — Node-RED is a JavaScript-powered ‘low code’ visual programming environment frequently used with hardware/IoT use cases. I rarely see tutorials about it, so this is pretty neat.
Blake Niemyjski
The Service Worker Lifecycle Explained — Explaining the lifecycle of Service Workers in PWAs and how to update them as fast as possible.
Felix Gerschau
Track Your (Android) Smartphone in Physical Space with JavaScript — Leans on the Generic Sensor APIs so you’re limited to Android for now, but it’s fun to see the potential.
Sanjeet Chatterjee
Some Reminders of Good GitHub Etiquette — Basic things, but sometimes easily forgotten, from one of the date-fns maintainers.
Sasha Koss
MongoDB Is Easy. Now Make It Powerful. Free Download for 30 Days.
Studio 3T sponsor
▶ Inside Vue 3 with Gregg Pollack — An hour long podcast chat with Gregg Pollack of Vue Mastery about Vue 3 reactivity model course and when and where the new Composition API is worth using.
Views on Vue Podcast podcast
How to Create a Web Worker-Driven Multithreaded Frontend App — It leans on an under-development Web Worker-driven framework called neo.mjs that promises “a new era of making better Web-based user interfaces.”
Tobias Uhlig
Stranger Things, JavaScript Edition — This is mostly a bit of fun mixed with a little bit of Wat picking on some JavaScript oddities. If the quirks of equality and NaN are familiar to you, move on.
Live Code Stream
Using Git to Run ESLint on Changed Files in a Feature Branch
Jeffrey Auriemma
🔧 Code & Tools

TUI Editor 2.1: A Powerful Markdown WYSIWYG Editor — You get the Markdown on the left, output on the right. The latest release added much better syntax highlighting for the Markdown source (if you want it) and ‘preview highlighting’ where the output of the code you’re working on is highlighted in the preview pane.
NHN
redaxios: The Axios API, as an 800 Byte Fetch Wrapper — If you love the Axios API but want to get it in a lighter way..
Jason Miller
A Much Faster Way to Debug Code Than with Breakpoints or console.log — Move forward and backwards through your code to understand what led to a specific bug, view runtime values, edit-and-continue, and more.
Wallaby.js sponsor
React Date Picker 3.0: A Simple and Reusable Date-Picker Component — A mature option that continues to get frequent updates. Demo here.
HackerOne
Frappe Charts 1.5: Responsive, Zero Dependency SVG Charts — Here’s are some examples (with code) to explore.
Prateeksha Singh
ms: Tiny Milisecond Conversion Utility — For example: ms('2.5 hrs') becomes 9000000 .. or ms(2 * 60000) becomes ‘2m’.
Vercel
🗓 Upcoming Online Events
JS Nation (June 18-19) — This free two-day remote conference features over 25 speakers, including Jen Looper, Max Stoiber, John Papa and others.
OpenJS World (June 23-24) — Speakers at this 'virtual experience' include Nicole Sullivan, Prosper Otemuyiwa, Cassidy Williams and more.
CascadiaJS 2020 (September 1-2) — This upcoming online conference is set to take place in September.
by via JavaScript Weekly https://ift.tt/2XyWzFv
0 notes
Link
Nuxt.js provides an Axios module for easy integration with your application. Axios is a promise-based HTTP client that works in the browser and Node.js environment or, in simpler terms, it is a tool for making requests (e.g API calls) in client-side applications and Node.js environment. In this tutorial, we’re going to learn how to use the Axios module and how to make a request on the server-side using asyncData and fetch. These two methods make a request on the server-side but they have some differences which we’re also going to cover. Finally, we’ll learn how to perform authentication and secure pages/routes using the auth module and auth middleware. This article requires basic knowledge of Nuxtjs and Vuejs as we’ll be building on top of that. For those without experience with Vuejs, I recommend you start from their official documentation and the Nuxt official page before continuing with this article.
What Is The Nuxt.js Axios Module?
According to the official Documentation,
“It is a Secure and easy Axios integration with Nuxt.js.”
Here are some of its features:
Automatically set base URL for client-side & server-side.
Proxy request headers in SSR (Useful for auth).
Fetch Style requests.
Integrated with Nuxt.js Progressbar while making requests.
To use the axios module in your application, you will have to first install it by using either npm or yarn. YARN
yarn add @nuxtjs/axios
NPM
npm install @nuxtjs/axios
Add it into your nuxt.config.js file:
modules: [ '@nuxtjs/axios', ], axios: { // extra config e.g // BaseURL: 'https://link-to-API' }
The modules array accepts a list of Nuxt.js modules such as dotenv, auth and in this case, Axios. What we’ve done is to inform our application that we would be using the Axios module, which we reference using @nuxtjs/axios. This is then followed by the axios property which is an object of configurations like the baseURL for both client-side and server-side. Now, you can access Axios from anywhere in your application by calling this.$axios.method or this.$axios.$method. Where method can be get, post, or delete.
Making Your First Request Using Axios
For this tutorial, I’ve put together a simple application on Github. The repository contains two folders, start and finish, the start folder contains all you need to get right into the tutorial. The finish folder contains a completed version of what we would be building. After cloning the repo and opening the start folder, we would need to install all our packages in the package.json file so open your terminal and run the following command:
npm install
Once that is done, we can start our app using the npm run dev command. This is what you should see when you go to localhost:3000.
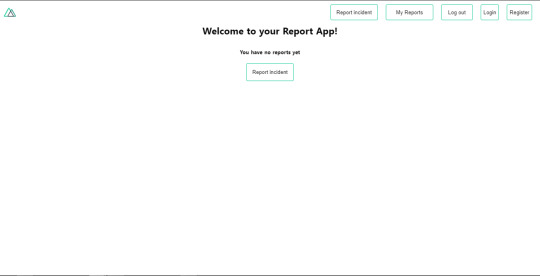
Our application’s landing page. (Large preview)
The next thing we have to do is to create a .env file in the root folder of our application and add our API URL to it. For this tutorial, we’ll be using a sample API built to collect reports from users.
API_URL=https://ireporter-endpoint.herokuapp.com/api/v2/
This way, we do not have to hard code our API into our app which is useful for working with two APIs (development and production). The next step would be to open our nuxt.config.js file and add the environmental variable to our axios config that we added above.
/* ** Axios module configuration */ axios: { // See https://github.com/nuxt-community/axios-module#options baseURL: process.env.API_URL, },
Here, we tell Nuxt.js to use this baseURL for both our client-side and server-side requests whenever we use this Axios module. Now, to fetch a list of reports, let us open the index.vue file and add the following method to the script section.
async getIncidents() { let res = await this.$store.dispatch("getIncidents"); this.incidents = res.data.data.incidents; }
What we have done is to create an async function that we call getIncidents() and we can tell what it does from the name — it fetches a list of incidents using the Vuex store action method this.$store.dispatch. We assign the response from this action to our incidents property so we can be able to make use of it in the component. We want to call the getIncidents() method whenever the component mounts. We can do that using the mounted hook.
mounted() { this.getIncidents() }
mounted() is a lifecycle hook that gets called when the component mounts. That will cause the call to the API to happen when the component mounts. Now, let us go into our index.js file in our store and create this action where we’ll be making our Axios request from.
export const actions = { async getIncidents() { let res = await this.$axios.get('/incidents') return res; } }
Here, we created the action called getIncidents which is an async function, then we await a response from the server and return this response. The response from this action is sent back to our getIncidents() method in our index.vue file. If we refresh our application, we should now be able to see a long list of incidents rendered on the page.
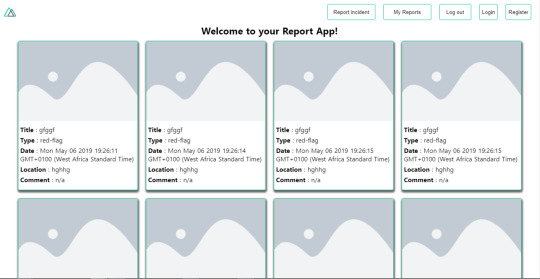
List of incidents on landing page. (Large preview)
We have made our first request using Axios but we won’t stop there, we are going to be trying out asyncData and fetch to see the differences between them and using Axios.
AsyncData
AsyncData fetches data on the server-side and it’s called before loading the page component. It does not have access to this because it is called before your page component data is created. this is only available after the created hook has been called so Nuxt.js automatically merges the returned data into the component’s data. Using asyncData is good for SEO because it fetches your site’s content on the server-side and also helps in loading content faster. Note that asyncData method can only be used in the pages folder of your application as it would not work in the components folder. This is because asyncData hook gets called before your component is created.
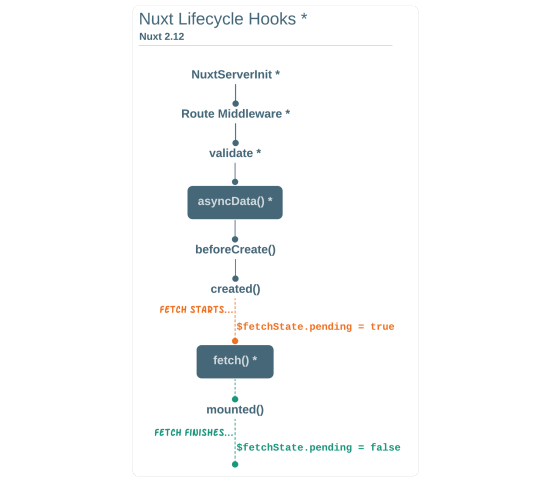
Image from Nuxt blog. (Large preview)
Let us add asyncData to our index.vue file and observe how fast our incidents data loads. Add the following code after our components property and let us get rid of our mounted hook.
async asyncData({ $axios }) { let { data } = await $axios.get("/incidents"); return { incidents: data.data.incidents }; }, // mounted() { // this.getIncidents(); // },
Here, the asyncData method accepts a property from the context $axios. We use this property to fetch the list of incidents and the value is then returned. This value is automatically injected into our component. Now, you can notice how fast your content loads if you refresh the page and at no time is there no incident to render.
Fetch
The Fetch method is also used to make requests on the server-side. It is called after the created hook in the life cycle which means it has access to the component’s data. Unlike the asyncData method, the fetch method can be used in all .vue files and be used with the Vuex store. This means that if you have the following in your data function.
data() { return { incidents: [], id: 5, gender: 'male' }; }
You can easily modify id or gender by calling this.id or this.gender.
Using Axios As A Plugin
During the process of development with Axios, you might find that you need extra configuration like creating instances and interceptors for your request so your application can work as intended and thankfully, we can do that by extending our Axios into a plugin. To extend axios, you have to create a plugin (e.g. axios.js) in your plugins folder.
export default function ({ $axios, store, redirect }) { $axios.onError(error => { if (error.response && error.response.status === 500) { redirect('/login') } }) $axios.interceptors.response.use( response => { if (response.status === 200) { if (response.request.responseURL && response.request.responseURL.includes('login')) { store.dispatch("setUser", response); } } return response } ) }
This is an example of a plugin I wrote for a Nuxt application. Here, your function takes in a context object of $axios, store and redirect which we would use in configuring the plugin. The first thing we do is to listen for an error with a status of 500 using $axios.onError and redirect the user to the login page. We also have an interceptor that intercepts every request response we make in our application checks if the status of the response we get is 200. If that is true we proceed and check that there is a response.request.responseURL and if it includes login. If this checks out to be true, we then send this response using our store’s dispatch method where it then mutated in our state. Add this plugin to your nuxt.config.js file:
plugins: [ '~/plugins/axios' ]
After doing this, your Axios plugin would intercept any request you make and check if you have defined a special case for it.
Introduction To The Auth Module
The auth module is used for performing authentication for your Nuxt application and can be accessed from anywhere in your application using $this.auth. It is also available in fetch, asyncData, middleware and NuxtInitServer from the context object as $auth. The context provides additional objects/params from Nuxt to Vue components and is available in special nuxt lifecycle areas like those mentioned above. To use the auth module in your application, you would have to install it using yarn or npm. YARN
yarn add @nuxtjs/auth
NPM
npm install @nuxtjs/auth
Add it to your nuxt.config.js file.
modules: [ '@nuxtjs/auth' ], auth: { // Options }
The auth property accepts a list of properties such as strategies and redirect. Here, strategies accepts your preferred authentication method which can be:
local For username/email and password-based flow.
facebook For using Facebook accounts as a means of authentication.
Github For authenticating users with Github accounts.
Google For authenticating users with Google accounts.
Auth0
Laravel Passport
The redirect property accepts an object of links for:
login Users would be redirected to this link if login is required.
logout Users would be redirected here if after logout current route is protected.
home Users would be redirected here after login.
Now, let us add the following to our nuxt.config.js file.
/* ** Auth module configuration */ auth: { redirect: { login: '/login', logout: '/', home: '/my-reports' }, strategies: { local: { endpoints: { login: { url: "/user/login", method: "post", propertyName: "data.token", }, logout: false, user: false, }, tokenType: '', tokenName: 'x-auth', autoFetchUser: false }, }, }
Please note that the auth method works best when there is a user endpoint provided in the option above. Inside the auth config object, we have a redirect option in which we set our login route to /login, logout route to / and home route to /my-reports which would all behave as expected. We also have a tokenType property which represents the Authorization type in the header of our Axios request. It is set to Bearer by default and can be changed to work with your API. For our API, there is no token type and this is why we’re going to leave it as an empty string. The tokenName represents the Authorization name (or the header property you want to attach your token to) inside your header in your Axios request. By default, it is set to Authorization but for our API, the Authorization name is x-auth. The autoFetchUser property is used to enable user fetch object using the user endpoint property after login. It is true by default but our API does not have a user endpoint so we have set that to false. For this tutorial, we would be using the local strategy. In our strategies, we have the local option with endpoints for login, user and logout but in our case, we would only use the *login* option because our demo API does not have a *logout* endpoint and our user object is being returned when *login* is successful. Note: The auth module does not have a register endpoint option so that means we’re going to register the traditional way and redirect the user to the login page where we will perform the authentication using this.$auth.loginWith. This is the method used in authenticating your users. It accepts a ‘strategy’ (e.g local) as a first argument and then an object to perform this authentication with. Take a look at the following example.
let data { email: '[email protected]', password: '123456' } this.$auth.loginWith('local', { data })
Using The Auth Module
Now that we have configured our auth module, we can proceed to our registration page. If you visit the /register page, you should see a registration form.
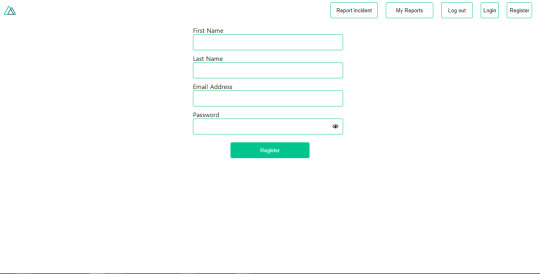
Register page. (Large preview)
Let us make this form functional by adding the following code:
methods: { async registerUser() { this.loading = true; let data = this.register; try { await this.$axios.post("/user/create", data); this.$router.push("/login"); this.loading = false; this.$notify({ group: "success", title: "Success!", text: "Account created successfully" }); } catch (error) { this.loading = false; this.$notify({ group: "error", title: "Error!", text: error.response ? error.response.data.error : "Sorry an error occured, check your internet" }); } } }
Here, we have an async function called registerUser which is tied to a click event in our template and makes an Axios request wrapped in a try/catch block to an endpoint /user/create. This redirects to the /login page and notifies the user of a successful registration. We also have a catch block that alerts the user of any error if the request is not successful. If the registration is successful, you would be redirected to the login page.
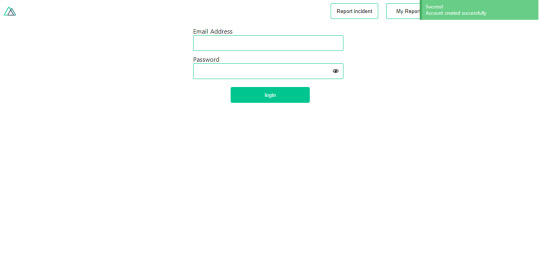
Login page with notification component. (Large preview)
Here, we’re going to make use of auth authentication method this.$auth.loginWith('local', loginData) after which we would use the this.$auth.setUser(userObj) to set the user in our auth instance. To get the login page working, let’s add the following code to our login.vue file.
methods: { async logIn() { let data = this.login; this.loading = true; try { let res = await this.$auth.loginWith("local", { data }); this.loading = false; let user = res.data.data.user; this.$auth.setUser(user); this.$notify({ group: "success", title: "Success!", text: "Welcome!" }); } catch (error) { this.loading = false; this.$notify({ group: "error", title: "Error!", text: error.response ? error.response.data.error : "Sorry an error occured, check your internet" }); } } }
We created an async function called logIn using the auth method this.$auth.loginWith('local, loginData). If this login attempt is successful, we then assign the user data to our auth instance using this.$auth.setUser(userInfo) and redirect the user to the /my-report page. You can now get user data using this.$auth.user or with Vuex using this.$store.state.auth.user but that’s not all. The auth instance contains some other properties which you can see if you log in or check your state using your Vue dev tools. If you log this.$store.state.auth to the console, you’ll see this:
{ "auth": { "user": { "id": "d7a5efdf-0c29-48aa-9255-be818301d602", "email": "[email protected]", "lastName": "Xo", "firstName": "Tm", "othernames": null, "isAdmin": false, "phoneNumber": null, "username": null }, "loggedIn": true, "strategy": "local", "busy": false } }
The auth instance contains a loggedIn property that is useful in switching between authenticated links in the nav/header section of your application. It also contains a strategy method that states the type of strategy the instance is running (e.g local). Now, we will make use of this loggedIn property to arrange our nav links. Update your navBar component to the following:
<template> <header class="header"> <div class="logo"> <nuxt-link to="/"> <Logo /> </nuxt-link> </div> <nav class="nav"> <div class="nav__user" v-if="auth.loggedIn"> <p></p> <button class="nav__link nav__link--long"> <nuxt-link to="/report-incident">Report incident</nuxt-link> </button> <button class="nav__link nav__link--long"> <nuxt-link to="/my-reports">My Reports</nuxt-link> </button> <button class="nav__link" @click.prevent="logOut">Log out</button> </div> <button class="nav__link" v-if="!auth.loggedIn"> <nuxt-link to="/login">Login</nuxt-link> </button> <button class="nav__link" v-if="!auth.loggedIn"> <nuxt-link to="/register">Register</nuxt-link> </button> </nav> </header> </template> <script> import { mapState } from "vuex"; import Logo from "@/components/Logo"; export default { name: "nav-bar", data() { return {}; }, computed: { ...mapState(["auth"]) }, methods: { logOut() { this.$store.dispatch("logOut"); this.$router.push("/login"); } }, components: { Logo } }; </script> <style></style>
In our template section, we have several links to different parts of the application in which we are now using auth.loggedIn to display the appropriate links depending on the authentication status. We have a logout button that has a click event with a logOut() function attached to it. We also display the user’s email gotten from the auth property which is accessed from our Vuex store using the mapState method which maps our state auth to the computed property of the nav component. We also have a logout method that calls our Vuex action logOut and redirects the user to the login page. Now, let us go ahead and update our store to have a logOut action.
export const actions = { // .... logOut() { this.$auth.logout(); } }
The logOut action calls the auth logout method which clears user data, deletes tokens from localStorage and sets loggedIn to false. Routes like /my-reports and report-incident should not be visible to guests but at this point in our app, that is not the case. Nuxt does not have a navigation guard that can protect your routes, but it has is the auth middleware. It gives you the freedom to create your own middleware so you can configure it to work the way you want. It can be set in two ways:
Per route.
Globally for the whole app in your nuxt.config.js file.
router: { middleware: ['auth'] }
This auth middleware works with your auth instance so you do not need to create an auth.js file in your middleware folder. Let us now add this middleware to our my-reports.vue and report-incident.vue files. Add the following lines of code to the script section of each file.
middleware: 'auth'
Now, our application would check if the user trying to access these routes has an auth.loggedIn value of true. It’ll redirect them to the login page using our redirect option in our auth config file — if you’re not logged in and you try to visit either /my-report or report-incident, you would be redirected to /login. If you go to /report-incidents, this is what you should see.
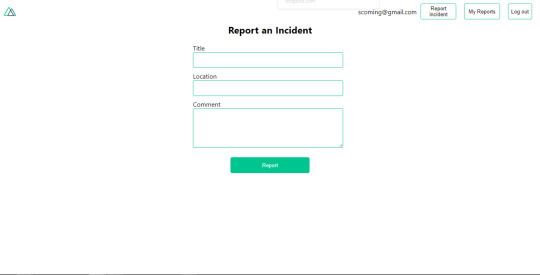
Report incident page. (Large preview)
This page is for adding incidents but that right now the form does not send incident to our server because we are not making the call to the server when the user attempts to submit the form. To solve this, we will add a reportIncident method which will be called when the user clicks on Report. We’ll have this in the script section of the component. This method will send the form data to the server. Update your report-incident.vue file with the following:
<template> <section class="report"> <h1 class="report__heading">Report an Incident</h1> <form class="report__form"> <div class="input__container"> <label for="title" class="input__label">Title</label> <input type="text" name="title" id="title" v-model="incident.title" class="input__field" required /> </div> <div class="input__container"> <label for="location" class="input__label">Location</label> <input type="text" name="location" id="location" v-model="incident.location" required class="input__field" /> </div> <div class="input__container"> <label for="comment" class="input__label">Comment</label> <textarea name="comment" id="comment" v-model="incident.comment" class="input__area" cols="30" rows="10" required ></textarea> </div> <input type="submit" value="Report" class="input__button" @click.prevent="reportIncident" /> <p class="loading__indicator" v-if="loading">Please wait....</p> </form> </section> </template> <script> export default { name: "report-incident", middleware: "auth", data() { return { loading: false, incident: { type: "red-flag", title: "", location: "", comment: "" } }; }, methods: { async reportIncident() { let data = this.incident; let formData = new FormData(); formData.append("title", data.title); formData.append("type", data.type); formData.append("location", data.location); formData.append("comment", data.comment); this.loading = true; try { let res = await this.$store.dispatch("reportIncident", formData); this.$notify({ group: "success", title: "Success", text: "Incident reported successfully!" }); this.loading = false; this.$router.push("/my-reports"); } catch (error) { this.loading = false; this.$notify({ group: "error", title: "Error!", text: error.response ? error.response.data.error : "Sorry an error occured, check your internet" }); } } } }; </script> <style> </style>
Here, we have a form with input fields for title, location, and comment with two-way data binding using v-model. We also have a submit button with a click event. In the script section, we have a reportIncident method that collects all the information provided in the form and is sent to our server using FormData because the API is designed to also accept images and videos. This formData is attached to a Vuex action using the dispatch method, if the request is successful, you get redirected to /my-reports with a notification informing you that this request was successful otherwise, you would be notified of an error with the error message. At this point, we don’t have reportIncident action in our store yet so in your browser console, you would see an error if you try to click submit on this page.

Vuex error message. (Large preview)
To fix this, add the reportIncident action your index.js file.
export const actions = { // ... async reportIncident({}, data) { let res = await this.$axios.post('/incident/create', data) return res; } }
Here, we have a reportIncident function that takes in an empty context object and the data we’re sending from our form. This data is then attached to a post request that creates an incident and returns back to our report-incident.vue file. At this point, you should be able to add a report using the form after which you would be redirected to /my-reports page.
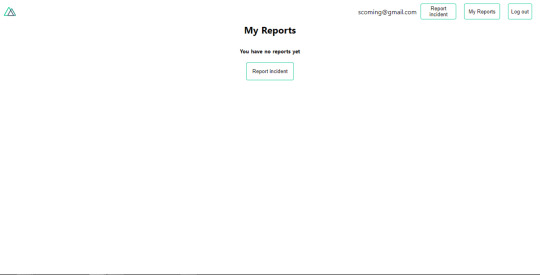
My reports page empty. (Large preview)
This page should display a list of incidents created by the user but right now it only shows what we see above, let’s go ahead to fix that. We’re going to be using the fetch method we learned about to get this list. Update your my-reports.vue file with the following:
<script> import incidentCard from "@/components/incidentCard.vue"; export default { middleware: "auth", name: "my-reports", data() { return { incidents: [] }; }, components: { incidentCard }, async fetch() { let { data } = await this.$axios.get("/user/incidents"); this.incidents = data.data; } }; </script>
Here, we use fetch method to get user-specific incidents and assign the response to our incidents array. If you refresh your page after adding an incident, you should see something like this.
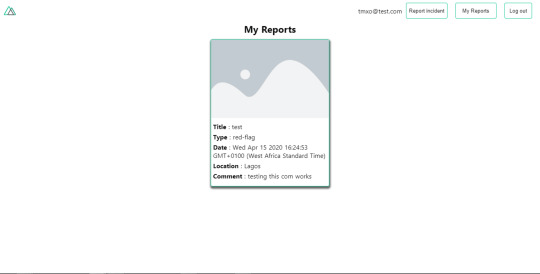
My Reports page with a report. (Large preview)
At this point, we would notice a difference in how fetch method and asyncData loads our data.
Conclusion
So far, we have learned about the Axios module and all of its features. We have also learned more about asyncData, and how we can fetch both of them together despite their differences. We’ve also learned how to perform authentication in our application using the auth module and how to use the auth middleware to protect our routes. Here are some useful resources that talk more about all we’ve covered.
Getting started with meta tags in Nuxjs.
Using the dotenv module in Nuxt.
Using Fetch in your Nuxt app.
Getting started with asyncData.
0 notes
Text
Alpine.js: The JavaScript Framework That’s Used Like jQuery, Written Like Vue, and Inspired by TailwindCSS
We have big JavaScript frameworks that tons of people already use and like, including React, Vue, Angular, and Svelte. Do we need another JavaScript library? Let’s take a look at Alpine.js and you can decide for yourself. Alpine.js is for developers who aren’t looking to build a single page application (SPA). It’s lightweight (~7kB gzipped) and designed to write markup-driven client-side JavaScript.
The syntax is borrowed from Vue and Angular directive. That means it will feel familiar if you’ve worked with those before. But, again, Alpine.js is not designed to build SPAs, but rather enhance your templates with a little bit of JavaScript.
For example, here’s an Alpine.js demo of an interactive “alert” component.
CodePen Embed Fallback
The alert message is two-way bound to the input using x-model="msg". The “level” of the alert message is set using a reactive level property. The alert displays when when both msg and level have a value.
It’s like a replacement for jQuery and JavaScript, but with declarative rendering
Alpine.js is a Vue template-flavored replacement for jQuery and vanilla JavaScript rather than a React/Vue/Svelte/WhateverFramework competitor.
Since Alpine.js is less than a year old, it can make assumptions about DOM APIs that jQuery cannot. Let’s briefly draw a comparison between the two.
Querying vs. binding
The bulk of jQuery’s size and features comes in the shape of a cross-browser compatibility layer over imperative DOM APIs — this is usually referred to as jQuery Core and sports features that can query the DOM and manipulate it.
The Alpine.js answer to jQuery core is a declarative way to bind data to the DOM using the x-bind attribute binding directive. It can be used to bind any attribute to reactive data on the Alpine.js component. Alpine.js, like its declarative view library contemporaries (React, Vue), provides x-ref as an escape hatch to directly access DOM elements from JavaScript component code when binding is not sufficient (eg. when integrating a third-party library that needs to be passed a DOM Node).
Handling events
jQuery also provides a way to handle, create and trigger events. Alpine.js provides the x-on directive and the $event magic value which allows JavaScript functions to handle events. To trigger (custom) events, Alpine.js provides the $dispatch magic property which is a thin wrapper over the browser’s Event and Dispatch Event APIs.
Effects
One of jQuery’s key features is its effects, or rather, it’s ability to write easy animations. Where we might use slideUp, slideDown, fadeIn, fadeOut properties in jQuery to create effects, Alpine.js provides a set of x-transition directives, which add and remove classes throughout the element’s transition. That’s largely inspired by the Vue Transition API.
Also, jQuery’s Ajax client has no prescriptive solution in Alpine.js, thanks to the Fetch API or taking advantage of a third party HTTP library (e.g. axios, ky, superagent).
Plugins
It’s also worth calling out jQuery plugins. There is no comparison to that (yet) in the Alpine.js ecosystem. Sharing Alpine.js components is relatively simple, usually requiring a simple case of copy and paste. The JavaScript in Alpine.js components are “just functions” and tend not to access Alpine.js itself, making them relatively straightforward to share by including them on different pages with a script tag. Any magic properties are added when Alpine initializes or is passed into bindings, like $event in x-on bindings.
There are currently no examples of Alpine.js extensions, although there are a few issues and pull requests to add “core” events that hook into Alpine.js from other libraries. There are also discussions happening about the ability to add custom directives. The stance from Alpine.js creator Caleb Porzio, seems to be basing API decisions on the Vue APIs, so I would expect that any future extension point would be inspired on what Vue.js provides.
Size
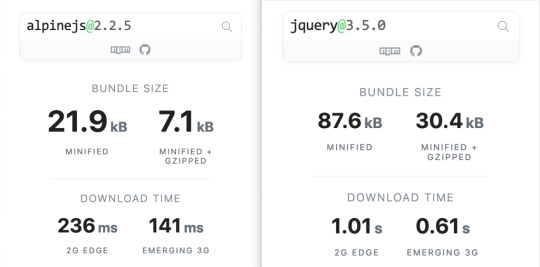
Alpine.js is lighter weight than jQuery, coming in at 21.9kB minified — 7.1kB gzipped — compared to jQuery at 87.6kB minified — 30.4kB minified and gzipped. Only 23% the size!
Most of that is likely due to the way Alpine.js focuses on providing a declarative API for the DOM (e.g. attribute binding, event listeners and transitions).

Bundlephobia breaks down the two
For the sake of comparison, Vue comes in at 63.5kB minified (22.8kB gzipped). How can Alpine.js come in lighter despite it’s API being equivalent Vue? Alpine.js does not implement a Virtual DOM. Instead, it directly mutates the DOM while exposing the same declarative API as Vue.
Let’s look at an example
Alpine is compact because since application code is declarative in nature, and is declared via templates. For example, here’s a Pokemon search page using Alpine.js:
CodePen Embed Fallback
This example shows how a component is set up using x-data and a function that returns the initial component data, methods, and x-init to run that function on load.
Bindings and event listeners in Alpine.js with a syntax that’s strikingly similar to Vue templates.
Alpine: x-bind:attribute="express" and x-on:eventName="expression", shorthand is :attribute="expression" and @eventName="expression" respectively
Vue: v-bind:attribute="express" and v-on:eventName="expression", shorthand is :attribute="expression" and @eventName="expression" respectively
Rendering lists is achieved with x-for on a template element and conditional rendering with x-if on a template element.
Notice that Alpine.js doesn’t provide a full templating language, so there’s no interpolation syntax (e.g. in Vue.js, Handlebars and AngularJS). Instead, binding dynamic content is done with the x-text and x-html directives (which map directly to underlying calls to Node.innerText and Node.innerHTML).
An equivalent example using jQuery is an exercise you’re welcome to take on, but the classic style includes several steps:
Imperatively bind to the button click using $('button').click(/* callback */).
Within this “click callback” get the input value from the DOM, then use it to call the API.
Once the call has completed, the DOM is updated with new nodes generated from the API response.
If you’re interested in a side by side comparison of the same code in jQuery and Alpine.js, Alex Justesen created the same character counter in jQuery and in Alpine.js.
Back in vogue: HTML-centric tools
Alpine.js takes inspiration from TailwindCSS. The Alpine.js introduction on the repository is as “Tailwind for JavaScript.”
Why is that important?
One of Tailwind’s selling points is that it “provides low-level utility classes that let you build completely custom designs without ever leaving your HTML.” That’s exactly what Alpine does. It works inside HTML so there is no need to work inside of JavaScript templates the way we would in Vue or React Many of the Alpine examples cited in the community don’t even use script tags at all!
Let’s look at one more example to drive the difference home. Here’s is an accessible navigation menu in Alpine.js that uses no script tags whatsoever.
CodePen Embed Fallback
This example leverages aria-labelledby and aria-controls outside of Alpine.js (with id references). Alpine.js makes sure the “toggle” element (which is a button), has an aria-expanded attribute that’s true when the navigation is expanded, and false when it’s collapsed. This aria-expanded binding is also applied to the menu itself and we show/hide the list of links in it by binding to hidden.
Being markup-centric means that Alpine.js and TailwindCSS examples are easy to share. All it takes is a copy-paste into HTML that is also running Alpine.js/TailwindCSS. No crazy directories full of templates that compile and render into HTML!
Since HTML is a fundamental building block of the web, it means that Alpine.js is ideal for augmenting server-rendered (Laravel, Rails, Django) or static sites (Hugo, Hexo, Jekyll). Integrating data with this sort of tooling can be a simple as outputting some JSON into the x-data="{}" binding. The affordance of passing some JSON from your backend/static site template straight into the Alpine.js component avoids building “yet another API endpoint” that simply serves a snippet of data required by a JavaScript widget.
Client-side without the build step
Alpine.js is designed to be used as a direct script include from a public CDN. Its developer experience is tailored for that. That’s why it makes for a great jQuery comparison and replacement: it’s dropped in and eliminates a build step.
While it’s not traditionally used this way, the bundled version of Vue can be linked up directly. Sarah Drasner has an excellent write-up showing examples of jQuery substituted with Vue. However, if you use Vue without a build step, you’re actively opting out of:
the Vue CLI
single file components
smaller/more optimized bundles
a strict CSP (Content Security Policy) since Vue inline templates evaluate expressions client-side
So, yes, while Vue boasts a buildless implementation, its developer experience is really depedent on the Vue CLI. That could be said about Create React App for React, and the Angular CLI. Going build-less strips those frameworks of their best qualities.
There you have it! Alpine.js is a modern, CDN-first library that brings declarative rendering for a small payload — all without the build step and templates that other frameworks require. The result is an HTML-centric approach that not only resembles a modern-day jQuery but is a great substitute for it as well.
If you’re looking for a jQuery replacement that’s not going to force you into a SPAs architecture, then give Alpine.js a go! Interested? You can find out more on Alpine.js Weekly, a free weekly roundup of Alpine.js news and articles.
The post Alpine.js: The JavaScript Framework That’s Used Like jQuery, Written Like Vue, and Inspired by TailwindCSS appeared first on CSS-Tricks.
via CSS-Tricks https://ift.tt/3aMMDvq
0 notes
Text
Alpine.js: The JavaScript Framework That’s Used Like jQuery, Written Like Vue, and Inspired by TailwindCSS
We have big JavaScript frameworks that tons of people already use and like, including React, Vue, Angular, and Svelte. Do we need another JavaScript library? Let’s take a look at Alpine.js and you can decide for yourself. Alpine.js is for developers who aren’t looking to build a single page application (SPA). It’s lightweight (~7kB gzipped) and designed to write markup-driven client-side JavaScript.
The syntax is borrowed from Vue and Angular directive. That means it will feel familiar if you’ve worked with those before. But, again, Alpine.js is not designed to build SPAs, but rather enhance your templates with a little bit of JavaScript.
For example, here’s an Alpine.js demo of an interactive “alert” component.
CodePen Embed Fallback
The alert message is two-way bound to the input using x-model="msg". The “level” of the alert message is set using a reactive level property. The alert displays when when both msg and level have a value.
It’s like a replacement for jQuery and JavaScript, but with declarative rendering
Alpine.js is a Vue template-flavored replacement for jQuery and vanilla JavaScript rather than a React/Vue/Svelte/WhateverFramework competitor.
Since Alpine.js is less than a year old, it can make assumptions about DOM APIs that jQuery cannot. Let’s briefly draw a comparison between the two.
Querying vs. binding
The bulk of jQuery’s size and features comes in the shape of a cross-browser compatibility layer over imperative DOM APIs — this is usually referred to as jQuery Core and sports features that can query the DOM and manipulate it.
The Alpine.js answer to jQuery core is a declarative way to bind data to the DOM using the x-bind attribute binding directive. It can be used to bind any attribute to reactive data on the Alpine.js component. Alpine.js, like its declarative view library contemporaries (React, Vue), provides x-ref as an escape hatch to directly access DOM elements from JavaScript component code when binding is not sufficient (eg. when integrating a third-party library that needs to be passed a DOM Node).
Handling events
jQuery also provides a way to handle, create and trigger events. Alpine.js provides the x-on directive and the $event magic value which allows JavaScript functions to handle events. To trigger (custom) events, Alpine.js provides the $dispatch magic property which is a thin wrapper over the browser’s Event and Dispatch Event APIs.
Effects
One of jQuery’s key features is its effects, or rather, it’s ability to write easy animations. Where we might use slideUp, slideDown, fadeIn, fadeOut properties in jQuery to create effects, Alpine.js provides a set of x-transition directives, which add and remove classes throughout the element’s transition. That’s largely inspired by the Vue Transition API.
Also, jQuery’s Ajax client has no prescriptive solution in Alpine.js, thanks to the Fetch API or taking advantage of a third party HTTP library (e.g. axios, ky, superagent).
Plugins
It’s also worth calling out jQuery plugins. There is no comparison to that (yet) in the Alpine.js ecosystem. Sharing Alpine.js components is relatively simple, usually requiring a simple case of copy and paste. The JavaScript in Alpine.js components are “just functions” and tend not to access Alpine.js itself, making them relatively straightforward to share by including them on different pages with a script tag. Any magic properties are added when Alpine initializes or is passed into bindings, like $event in x-on bindings.
There are currently no examples of Alpine.js extensions, although there are a few issues and pull requests to add “core” events that hook into Alpine.js from other libraries. There are also discussions happening about the ability to add custom directives. The stance from Alpine.js creator Caleb Porzio, seems to be basing API decisions on the Vue APIs, so I would expect that any future extension point would be inspired on what Vue.js provides.
Size
Alpine.js is lighter weight than jQuery, coming in at 21.9kB minified — 7.1kB gzipped — compared to jQuery at 87.6kB minified — 30.4kB minified and gzipped. Only 23% the size!
Most of that is likely due to the way Alpine.js focuses on providing a declarative API for the DOM (e.g. attribute binding, event listeners and transitions).
Bundlephobia breaks down the two
For the sake of comparison, Vue comes in at 63.5kB minified (22.8kB gzipped). How can Alpine.js come in lighter despite it’s API being equivalent Vue? Alpine.js does not implement a Virtual DOM. Instead, it directly mutates the DOM while exposing the same declarative API as Vue.
Let’s look at an example
Alpine is compact because since application code is declarative in nature, and is declared via templates. For example, here’s a Pokemon search page using Alpine.js:
CodePen Embed Fallback
This example shows how a component is set up using x-data and a function that returns the initial component data, methods, and x-init to run that function on load.
Bindings and event listeners in Alpine.js with a syntax that’s strikingly similar to Vue templates.
Alpine: x-bind:attribute="express" and x-on:eventName="expression", shorthand is :attribute="expression" and @eventName="expression" respectively
Vue: v-bind:attribute="express" and v-on:eventName="expression", shorthand is :attribute="expression" and @eventName="expression" respectively
Rendering lists is achieved with x-for on a template element and conditional rendering with x-if on a template element.
Notice that Alpine.js doesn’t provide a full templating language, so there’s no interpolation syntax (e.g. in Vue.js, Handlebars and AngularJS). Instead, binding dynamic content is done with the x-text and x-html directives (which map directly to underlying calls to Node.innerText and Node.innerHTML).
An equivalent example using jQuery is an exercise you’re welcome to take on, but the classic style includes several steps:
Imperatively bind to the button click using $('button').click(/* callback */).
Within this “click callback” get the input value from the DOM, then use it to call the API.
Once the call has completed, the DOM is updated with new nodes generated from the API response.
If you’re interested in a side by side comparison of the same code in jQuery and Alpine.js, Alex Justesen created the same character counter in jQuery and in Alpine.js.
Back in vogue: HTML-centric tools
Alpine.js takes inspiration from TailwindCSS. The Alpine.js introduction on the repository is as “Tailwind for JavaScript.”
Why is that important?
One of Tailwind’s selling points is that it “provides low-level utility classes that let you build completely custom designs without ever leaving your HTML.” That’s exactly what Alpine does. It works inside HTML so there is no need to work inside of JavaScript templates the way we would in Vue or React Many of the Alpine examples cited in the community don’t even use script tags at all!
Let’s look at one more example to drive the difference home. Here’s is an accessible navigation menu in Alpine.js that uses no script tags whatsoever.
CodePen Embed Fallback
This example leverages aria-labelledby and aria-controls outside of Alpine.js (with id references). Alpine.js makes sure the “toggle” element (which is a button), has an aria-expanded attribute that’s true when the navigation is expanded, and false when it’s collapsed. This aria-expanded binding is also applied to the menu itself and we show/hide the list of links in it by binding to hidden.
Being markup-centric means that Alpine.js and TailwindCSS examples are easy to share. All it takes is a copy-paste into HTML that is also running Alpine.js/TailwindCSS. No crazy directories full of templates that compile and render into HTML!
Since HTML is a fundamental building block of the web, it means that Alpine.js is ideal for augmenting server-rendered (Laravel, Rails, Django) or static sites (Hugo, Hexo, Jekyll). Integrating data with this sort of tooling can be a simple as outputting some JSON into the x-data="{}" binding. The affordance of passing some JSON from your backend/static site template straight into the Alpine.js component avoids building “yet another API endpoint” that simply serves a snippet of data required by a JavaScript widget.
Client-side without the build step
Alpine.js is designed to be used as a direct script include from a public CDN. Its developer experience is tailored for that. That’s why it makes for a great jQuery comparison and replacement: it’s dropped in and eliminates a build step.
While it’s not traditionally used this way, the bundled version of Vue can be linked up directly. Sarah Drasner has an excellent write-up showing examples of jQuery substituted with Vue. However, if you use Vue without a build step, you’re actively opting out of:
the Vue CLI
single file components
smaller/more optimized bundles
a strict CSP (Content Security Policy) since Vue inline templates evaluate expressions client-side
So, yes, while Vue boasts a buildless implementation, its developer experience is really depedent on the Vue CLI. That could be said about Create React App for React, and the Angular CLI. Going build-less strips those frameworks of their best qualities.
There you have it! Alpine.js is a modern, CDN-first library that brings declarative rendering for a small payload — all without the build step and templates that other frameworks require. The result is an HTML-centric approach that not only resembles a modern-day jQuery but is a great substitute for it as well.
If you’re looking for a jQuery replacement that’s not going to force you into a SPAs architecture, then give Alpine.js a go! Interested? You can find out more on Alpine.js Weekly, a free weekly roundup of Alpine.js news and articles.
The post Alpine.js: The JavaScript Framework That’s Used Like jQuery, Written Like Vue, and Inspired by TailwindCSS appeared first on CSS-Tricks.
Alpine.js: The JavaScript Framework That’s Used Like jQuery, Written Like Vue, and Inspired by TailwindCSS published first on https://deskbysnafu.tumblr.com/
0 notes
Text
Alpine.js: The JavaScript Framework That’s Used Like jQuery, Written Like Vue, and Inspired by TailwindCSS
We have big JavaScript frameworks that tons of people already use and like, including React, Vue, Angular, and Svelte. Do we need another JavaScript library? Let’s take a look at Alpine.js and you can decide for yourself. Alpine.js is for developers who aren’t looking to build a single page application (SPA). It’s lightweight (~7kB gzipped) and designed to write markup-driven client-side JavaScript.
The syntax is borrowed from Vue and Angular directive. That means it will feel familiar if you’ve worked with those before. But, again, Alpine.js is not designed to build SPAs, but rather enhance your templates with a little bit of JavaScript.
For example, here’s an Alpine.js demo of an interactive “alert” component.
CodePen Embed Fallback
The alert message is two-way bound to the input using x-model="msg". The “level” of the alert message is set using a reactive level property. The alert displays when when both msg and level have a value.
It’s like a replacement for jQuery and JavaScript, but with declarative rendering
Alpine.js is a Vue template-flavored replacement for jQuery and vanilla JavaScript rather than a React/Vue/Svelte/WhateverFramework competitor.
Since Alpine.js is less than a year old, it can make assumptions about DOM APIs that jQuery cannot. Let’s briefly draw a comparison between the two.
Querying vs. binding
The bulk of jQuery’s size and features comes in the shape of a cross-browser compatibility layer over imperative DOM APIs — this is usually referred to as jQuery Core and sports features that can query the DOM and manipulate it.
The Alpine.js answer to jQuery core is a declarative way to bind data to the DOM using the x-bind attribute binding directive. It can be used to bind any attribute to reactive data on the Alpine.js component. Alpine.js, like its declarative view library contemporaries (React, Vue), provides x-ref as an escape hatch to directly access DOM elements from JavaScript component code when binding is not sufficient (eg. when integrating a third-party library that needs to be passed a DOM Node).
Handling events
jQuery also provides a way to handle, create and trigger events. Alpine.js provides the x-on directive and the $event magic value which allows JavaScript functions to handle events. To trigger (custom) events, Alpine.js provides the $dispatch magic property which is a thin wrapper over the browser’s Event and Dispatch Event APIs.
Effects
One of jQuery’s key features is its effects, or rather, it’s ability to write easy animations. Where we might use slideUp, slideDown, fadeIn, fadeOut properties in jQuery to create effects, Alpine.js provides a set of x-transition directives, which add and remove classes throughout the element’s transition. That’s largely inspired by the Vue Transition API.
Also, jQuery’s Ajax client has no prescriptive solution in Alpine.js, thanks to the Fetch API or taking advantage of a third party HTTP library (e.g. axios, ky, superagent).
Plugins
It’s also worth calling out jQuery plugins. There is no comparison to that (yet) in the Alpine.js ecosystem. Sharing Alpine.js components is relatively simple, usually requiring a simple case of copy and paste. The JavaScript in Alpine.js components are “just functions” and tend not to access Alpine.js itself, making them relatively straightforward to share by including them on different pages with a script tag. Any magic properties are added when Alpine initializes or is passed into bindings, like $event in x-on bindings.
There are currently no examples of Alpine.js extensions, although there are a few issues and pull requests to add “core” events that hook into Alpine.js from other libraries. There are also discussions happening about the ability to add custom directives. The stance from Alpine.js creator Caleb Porzio, seems to be basing API decisions on the Vue APIs, so I would expect that any future extension point would be inspired on what Vue.js provides.
Size
Alpine.js is lighter weight than jQuery, coming in at 21.9kB minified — 7.1kB gzipped — compared to jQuery at 87.6kB minified — 30.4kB minified and gzipped. Only 23% the size!
Most of that is likely due to the way Alpine.js focuses on providing a declarative API for the DOM (e.g. attribute binding, event listeners and transitions).

Bundlephobia breaks down the two
For the sake of comparison, Vue comes in at 63.5kB minified (22.8kB gzipped). How can Alpine.js come in lighter despite it’s API being equivalent Vue? Alpine.js does not implement a Virtual DOM. Instead, it directly mutates the DOM while exposing the same declarative API as Vue.
Let’s look at an example
Alpine is compact because since application code is declarative in nature, and is declared via templates. For example, here’s a Pokemon search page using Alpine.js:
CodePen Embed Fallback
This example shows how a component is set up using x-data and a function that returns the initial component data, methods, and x-init to run that function on load.
Bindings and event listeners in Alpine.js with a syntax that’s strikingly similar to Vue templates.
Alpine: x-bind:attribute="express" and x-on:eventName="expression", shorthand is :attribute="expression" and @eventName="expression" respectively
Vue: v-bind:attribute="express" and v-on:eventName="expression", shorthand is :attribute="expression" and @eventName="expression" respectively
Rendering lists is achieved with x-for on a template element and conditional rendering with x-if on a template element.
Notice that Alpine.js doesn’t provide a full templating language, so there’s no interpolation syntax (e.g. in Vue.js, Handlebars and AngularJS). Instead, binding dynamic content is done with the x-text and x-html directives (which map directly to underlying calls to Node.innerText and Node.innerHTML).
An equivalent example using jQuery is an exercise you’re welcome to take on, but the classic style includes several steps:
Imperatively bind to the button click using $('button').click(/* callback */).
Within this “click callback” get the input value from the DOM, then use it to call the API.
Once the call has completed, the DOM is updated with new nodes generated from the API response.
If you’re interested in a side by side comparison of the same code in jQuery and Alpine.js, Alex Justesen created the same character counter in jQuery and in Alpine.js.
Back in vogue: HTML-centric tools
Alpine.js takes inspiration from TailwindCSS. The Alpine.js introduction on the repository is as “Tailwind for JavaScript.”
Why is that important?
One of Tailwind’s selling points is that it “provides low-level utility classes that let you build completely custom designs without ever leaving your HTML.” That’s exactly what Alpine does. It works inside HTML so there is no need to work inside of JavaScript templates the way we would in Vue or React Many of the Alpine examples cited in the community don’t even use script tags at all!
Let’s look at one more example to drive the difference home. Here’s is an accessible navigation menu in Alpine.js that uses no script tags whatsoever.
CodePen Embed Fallback
This example leverages aria-labelledby and aria-controls outside of Alpine.js (with id references). Alpine.js makes sure the “toggle” element (which is a button), has an aria-expanded attribute that’s true when the navigation is expanded, and false when it’s collapsed. This aria-expanded binding is also applied to the menu itself and we show/hide the list of links in it by binding to hidden.
Being markup-centric means that Alpine.js and TailwindCSS examples are easy to share. All it takes is a copy-paste into HTML that is also running Alpine.js/TailwindCSS. No crazy directories full of templates that compile and render into HTML!
Since HTML is a fundamental building block of the web, it means that Alpine.js is ideal for augmenting server-rendered (Laravel, Rails, Django) or static sites (Hugo, Hexo, Jekyll). Integrating data with this sort of tooling can be a simple as outputting some JSON into the x-data="{}" binding. The affordance of passing some JSON from your backend/static site template straight into the Alpine.js component avoids building “yet another API endpoint” that simply serves a snippet of data required by a JavaScript widget.
Client-side without the build step
Alpine.js is designed to be used as a direct script include from a public CDN. Its developer experience is tailored for that. That’s why it makes for a great jQuery comparison and replacement: it’s dropped in and eliminates a build step.
While it’s not traditionally used this way, the bundled version of Vue can be linked up directly. Sarah Drasner has an excellent write-up showing examples of jQuery substituted with Vue. However, if you use Vue without a build step, you’re actively opting out of:
the Vue CLI
single file components
smaller/more optimized bundles
a strict CSP (Content Security Policy) since Vue inline templates evaluate expressions client-side
So, yes, while Vue boasts a buildless implementation, its developer experience is really depedent on the Vue CLI. That could be said about Create React App for React, and the Angular CLI. Going build-less strips those frameworks of their best qualities.
There you have it! Alpine.js is a modern, CDN-first library that brings declarative rendering for a small payload — all without the build step and templates that other frameworks require. The result is an HTML-centric approach that not only resembles a modern-day jQuery but is a great substitute for it as well.
If you’re looking for a jQuery replacement that’s not going to force you into a SPAs architecture, then give Alpine.js a go! Interested? You can find out more on Alpine.js Weekly, a free weekly roundup of Alpine.js news and articles.
The post Alpine.js: The JavaScript Framework That’s Used Like jQuery, Written Like Vue, and Inspired by TailwindCSS appeared first on CSS-Tricks.
source https://css-tricks.com/alpine-js-the-javascript-framework-thats-used-like-jquery-written-like-vue-and-inspired-by-tailwindcss/
from WordPress https://ift.tt/2We2Ap8 via IFTTT
0 notes
Text
Vue-js Put request example
Vue-js Put request example
How we install axios via npm ?How to install node modules ?What is axios ?How to import Axios ?Sending post request via AxiosCompiling assest. we will learn about how we can send put requests by using Axios, if Axios is not present in your comopser.json file then you can use the below command to install the Axios How to install axios via npm npm install axios Before installing the Axios, be…

View On WordPress
0 notes
Text
Laravel 5.8 Tutorial From Scratch - e26 - Vue Basics 101 - Laravel
Laravel 5.8 Tutorial From Scratch – e26 – Vue Basics 101 – Laravel
Laravel 5.8 Tutorial From Scratch – e26 – Vue Basics 101 – Laravel
[ad_1]
Vue is a modern Javascript framework that is powerful but yet simple to understand. In this episode, we are covering the basics of Vue by setting up a reusable button component. We will wrap it up by fetching some data from the Laravel backend using Axios.
For the best experience, follow along in our interactive school at h…
View On WordPress
#fetching data in laravel#full stack vue#laravel#laravel 5.8#Laravel API#laravel axios post example#laravel fetching data from database#laravel front end#laravel frontend tutorial#laravel mix#laravel mix 5.8#laravel mix vue#laravel node modules#laravel npm install#laravel vue#laravel vue js crud#laravel vue setup#laravel vue tutorial#laravel vue.js#laravel webpack tutorial#npm run dev#npm run watch laravel#vue#Vue.js#vuejs laravel
0 notes
Link
Vue is called as a progressive JavaScript framework with various features for building user interfaces. The following are the major features of VueJS.
Improvement & Bug Fixes: In the supplement to providing these new features, vue.js further comes with several improvements and bug fixes.
Improved Typescript Support & Integration: The most modern version of VueJS render stable support to TypeScript. The improved integration improves the type of declaration process
Better Error Handling & Reporting: Whilst using earlier versions of vuejs, programmers have to manipulate with the unexpected errors all through either config.errorHandler option or render an appropriate error component.
Better Functional Component Support: VueJs renders more considerate assistance to the functional components which are described as a single-file component (SFC). Here, the developers can now appropriate the vue-loader to represent functional components in an individual vue.js file.
Environment-Agnostic Server-Side Rendering: Unlike the other JS libraries, VueJS appears with built-in streaming server-side rendering. The hallmark makes it quite more accessible for the programmers to execute server-side rendering asynchronously.
VueJS Installing Steps
1. npm install -g @vue/cli 2. vue --version for check version 3. vue create {projectname} 4. need dependency a. vue-router b. dart-sass c. babel d. pwa 5. sudo npm install --save axios vue-axios { dipendency for ajax request} 6. npm install vue-easysession --save {dipendency for session} Base Example Here’s an example of a Vue component: // Define a new component called button-counter
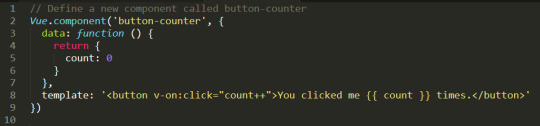
0 notes