#vue axios plugin
Explore tagged Tumblr posts
Visit Tumblr Blog
Explore Tumblr blogs with no restrictions, modern design and the best experience.
Last Seen Tumblr Blogs


Fun Fact
Tumblr Inc. is using 66 technologies for its website.
Text
Top 10 Skills to Look for When Hiring a Nuxt.js Developer

In the competitive landscape of web development, hiring the right Nuxt.js developer can significantly impact the success of your project. Nuxt.js, a powerful framework built on Vue.js, enables server-side rendering, static site generation, and a robust ecosystem for modern web development. Here at Jurysoft, we specialize in providing top-tier Nuxt.js developers as a resource service to help you achieve your business goals. To ensure you find the best talent, here are the top 10 skills to look for when hiring a Nuxt js developer.
1. Proficient in JavaScript
JavaScript is the cornerstone of all web development, and Nuxt.js is no exception. A proficient Nuxt.js developer must have:
Strong Fundamentals: Understanding of core JavaScript concepts like closures, prototypes, and asynchronous programming.
Modern JavaScript (ES6+): Familiarity with ES6+ features such as arrow functions, destructuring, template literals, and modules. This knowledge ensures the developer can write clean, efficient, and modern code.
2. Expertise in Vue.js
Nuxt.js is built on Vue.js, making Vue expertise indispensable. Essential Vue.js skills include:
Component-Based Architecture: Ability to create, manage, and reuse components efficiently.
Vue Directives and Filters: Knowledge of built-in and custom directives to manipulate the DOM.
Vue Router: Experience with routing, including nested routes, route guards, and dynamic routes.
Vuex: Proficiency in state management using Vuex, understanding mutations, actions, getters, and modules.
3. Experience with Nuxt.js
While understanding Vue.js is crucial, specific experience with Nuxt.js is equally important. Key areas include:
File-Based Routing: Mastery of Nuxt.js's file-based routing system for intuitive and organized code.
Middleware: Understanding of middleware to manage authentication, logging, and other logic.
Nuxt.js Lifecycle: Knowledge of the Nuxt.js lifecycle, including hooks like asyncData, fetch, middleware, and plugins.
4. Server-Side Rendering (SSR) Knowledge
SSR can greatly improve the performance and SEO of your web application. A proficient Nuxt.js developer should:
Understand SSR Benefits: Know the advantages of SSR, such as faster page loads and better SEO.
Implement SSR: Experience in setting up and optimizing SSR in Nuxt.js applications.
Handle SSR Challenges: Ability to manage SSR-specific issues like state hydration and request handling.
5. Static Site Generation (SSG)
Nuxt.js’s ability to generate static sites is a major advantage. Key skills include:
Configuring SSG: Experience in configuring Nuxt.js to generate static sites, including handling dynamic routes.
Deployment Knowledge: Understanding deployment processes for static sites, whether on Netlify, Vercel, or other platforms.
Performance Optimization: Skills in optimizing static site performance, ensuring fast load times and a great user experience.
6. Familiarity with Vuex for State Management
State management is critical for complex applications. A skilled developer should:
Vuex Integration: Seamlessly integrate Vuex with Nuxt.js applications.
Modular State Management: Ability to design a modular and maintainable state architecture.
Handling Side Effects: Proficiency in handling side effects using actions and mutations in Vuex.
7. API Integration Skills
Nuxt.js developers often need to interact with various APIs. Essential skills include:
Making API Requests: Proficiency in making API calls using Axios or Fetch API.
Asynchronous Data Handling: Ability to manage asynchronous data fetching and ensure data integrity.
Error Handling: Skills in handling errors gracefully and providing meaningful feedback to users.
8. Component-Based Architecture
Nuxt.js promotes a component-based architecture. Key skills include:
Reusable Components: Ability to design and build reusable components that enhance maintainability.
Component Communication: Understanding of component communication patterns, including props, events, and scoped slots.
Performance Considerations: Awareness of performance implications and optimization techniques for components.
9. Understanding of Modern Build Tools
Knowledge of modern build tools is crucial for efficient development. A skilled developer should:
Webpack and Babel: Proficiency in configuring and optimizing Webpack and Babel for Nuxt.js projects.
Package Management: Experience with npm or yarn for managing project dependencies.
Build Optimization: Skills in optimizing build processes to enhance performance and reduce load times.
10. Testing and Debugging Proficiency
Quality assurance is a critical aspect of development. Key skills include:
Testing Frameworks: Experience with testing frameworks like Jest and testing tools like Cypress.
Unit and Integration Testing: Ability to write unit and integration tests to ensure code reliability.
Debugging Skills: Proficiency in debugging tools and techniques to troubleshoot and resolve issues efficiently.
Conclusion
Hiring a Nuxt.js developer with the right mix of skills can greatly impact your project's success. At Jurysoft, we provide highly skilled Nuxt.js developers who are proficient in these essential areas. By prioritizing these top 10 skills, you can ensure that your projects are built with high-quality code, optimized for performance, and provide a seamless user experience. Whether you’re developing complex web applications or static sites, a skilled Nuxt.js developer is invaluable in achieving your goals. Take the time to evaluate candidates carefully, and you’ll find the talent that will drive your projects forward.
0 notes
Text
Vue-js Post request example
Vue-js Post request example
We will Learn the below things in this Blog Article. How we install axios via npm ?How to install node modules ?What is axios ?How to import Axios ?Sending post request via AxiosCompiling assest. we will learn about how we can send post requests by using Axios, if Axios is not present in your comoper.json file then you can use the below command to install the Axios npm install axios Before…

View On WordPress
#axios npm#fetching data from a third party api with vue js and axios#install axios in vue#nuxt axios post example#vue axios cdn#vue axios example#vue axios is not defined#vue axios plugin#vue axios post#vue axios post json data#vue js axios post example#vue js post request example
1 note
·
View note
Text
Significant React Native Libraries for Mobile App Development in 2021

React Native happens to be one of the most sought-after app development frameworks across the globe as it comes with a host of advantages like a cost-effective developmental cycle, faster time-to-market, high performance, modular and intuitive architecture, and many more.
One of the unique benefits of this framework is the availability of countless third-party libraries that expedite the development and prove highly convenient for every React Native App Development Company. However, owing to the presence of thousands of React Native libraries, selecting the apt ones becomes a herculean task. As a consequence, development teams often have to spare a great deal of time and effort for picking the right tool or library that would prove fruitful.
For easing out this task, I have penned down the most significant tools and libraries that complement the React Native framework. A quick read will help you to find the perfect match that suits your requirement.
Tools and Libraries for Various React Native App Development Categories

Category: User Interface
React Native Elements
This UI library, built using JavaScript, has earned 20.5k stars and 4.2k forks on GitHub.
This library comes with cross-platform compatibility and supports Expo.
It is easy to use, customizable, and community-driven.
Lottie-react-native
This library created by Airbnb enables adding attractive animations to React Native applications.
React Native developers can either select from the free animations available or design and add their animations employing “Adobe After Effects.”
Functioning: The animation data is exported in JSON format with Bodymovin and rendered natively on mobile.
Styled Components
This library enables developers to write CSS code for styling components
It removes the mapping between styles and components, thereby easing out the usage of components as a low-level styling construct.
The styles can be reused several times resulting in lesser coding
React Native Vector icons
React Native Vector icons is a library that offers numerous icons of various types, designed for the React Native Apps.
Each element can be fully customized
Category: Forms
Formik
It’s a small library that helps to build forms in React
Formik enables to validate the form values, display error messages and helps to submit the form.
Redux-form
Redux-form enables proper state management in Redux
It helps in tracking the commonest form states like fields contained in the form, focussed field, field values, fields which the users have interacted with, etc.
Category: Testing
Jest
This is a popular testing framework, designed and maintained by Facebook, and is used for testing JavaScript code. This versatile testing tool is compatible with any JavaScript framework or library, including React, Angular, VueJS, etc. Uber, Airbnb, and Intuit are some of the top brands that have leveraged this tool. Its offerings are:
High-speed performance
Standard syntax with report guide
Mocks functions, with the inclusion of third-party node_module libraries
Conducts parallelization, snapshot, and async method tests
Enables managing tests with bigger objects, by using live snapshots
Mocha
Mocha is a JavaScript test framework, used for testing React and React Native apps. It provides the Developers full control over what plugins and tools they choose to use while testing applications. Its major highlights are:
Runs on Node.js
Provides support for asynchronous front-end and backend testing, test coverage reports, and the usage of any claims library
Helps to track errors
Excels in mocking tests
Enzyme
Enzyme is another testing tool developed by Airbnb.
It comes with API wrappers, to ease out developers’ tasks like manipulating, asserting, and traversing the React DOM.
It supports full and shallow DOM and also supports static rendering
Besides, it is compatible with several other testing frameworks and libraries like Mocha and Jest.
Chai
It’s an assertion testing library meant for browser and node
Chai employs behavior-driven and test-driven development principles
Compatible with various testing tools and can be paired with any JS testing framework
Its functionality can be extended by using several custom plugins
Moreover, it enables the developers to create their plugins and share them in the community
Category: Navigation
React Navigation
This component supports navigational patterns like tabs, stacks, and drawers
It is based on JavaScript and is simple to use
It enables developers to effortlessly set up app screens
Can be completely customized as well as extended
React Router
This is a library of navigational components which composes declaratively with the app.
It allows one to specify named components, create various types of layouts, and pass layout components.
Category: App’s State Management
Redux
Redux, a free-standing library, and a predictable state container is predominantly used along with the UI library components of React. Besides the React ecosystem, one can also use Redux with other frameworks like Vue, Angular, Vanilla JS, Ember, etc. Its principal offerings are:
Can be used with back-end as well as front-end libraries
Enables the developers to write consistent codes
Allows editing the live code
Functions well in various environments – Server-side, client-side, and native
Connects the pieces of state to the React components by minimizing the need for props or callbacks.
Category: Linting and checking Types
ESLint
It’s a JavaScript-based, open-source linter tool
ESLint is configurable and pluggable
It improves the code consistency and makes it bug-free
It helps in evaluating patterns in the code and eliminates errors by automatically fixing the code, to enhance the overall code quality.
It helps detect creases in the JavaScript code that don’t comply with the standard guidelines
It helps react native developers to create their own linting rules
Flow
Developed by Facebook, Flow is a static type checker JavaScript library
It easily identifies problems during coding
It proves beneficial in crafting large applications, as it prevents bad rebases when several persons are working on a single program.
The main objective of Flow is to make the code more precise and enhance the speed of the coding process
Category: Networking
Networking tools are used to establish a networking flow in React Native projects. Let us have a look at a few of them.
react-native –firebase is a lightweight layer on the top of Firebase libraries. It creates a JavaScript bridge connecting to the native JavaScript SDKs to ease out using Firebase in React Native Application Development projects.
Apollo Client is quite compatible and adaptable. It is required when the developers need to use GraphQL. It assists in creating a User Interface that pulls data with GraphQL.
Axios, a lightweight HTTP JavaScript client was built to send asynchronous HTTP requests to REST endpoints. Besides, it performs CRUD operations.
react-native-ble-manager is a plugin that helps in connecting and transmitting data between a mobile handset and BLE peripherals.
Category: Utils
The below-mentioned ready-made tools simplify and speed up working with Utils while developing React Native apps.
Ramda is a library that eases out creating functional pipelines without user-data mutation.
The JavaScript functions’ toolkit Lodash offers clean and effective methodologies to your development team for working with collections and objects.
Reselect builds memorized selectors that are needed for avoiding unnecessary recalculation and redrawing of data. This library also quickens the speed of your app.
Moment works with various data formats and is capable of parsing, manipulating as well as validating times and dates in JavaScript.
Validate.js, designed by Wrap, offers the app developers a declarative way to validate JS objects
Category: Analytics
The following libraries act as mediators enabling one to implement the trending analytical tools into their React Native Mobile App Development projects.
react-native-mixpanel is a kind of wrapper for the library named Mixpanel and helps the developers to reap all the benefits of the Mixpanel library.
react-native-google-analytics-bridge acts as a bridge for establishing compatibility between Google Analytics tools and React Native projects.
Category: Localization
react-native-i18n helps in localizing or internationalizing applications. It integrates the i18n-js library in JavaScript for React Native applications.
Category: In-app Purchases
react-native-in-app-utils is a small library used to implement the in-app billing procedure for iOS apps. It can be effortlessly installed and is simple to work with.
react-native-billing is used for adding in-app billing to applications meant for the Android platform. It possesses a simple UI and wraps anjlab’s InApp Billing library to function as a bridge.
Category: AR and VR
ViroReact is used to speedily develop native cross-platform VR/AR apps in React Native. Its key functionalities are:
It has an easy learning curve
It comes with a high-performing native 3D rendering engine as well as a custom extension of React for creating VR and AR solutions.
It provides support for all kinds of platforms in VR including Samsung Gear VR, Google Cardboard, Google Daydream, etc. for Android and iOS; and AR including Android ARCore and iOS ARKit platforms.
Needs React-Viro-CLI and React-Native-CLI for writing cross-platform native codes
Final Verdict:
I hope the aforesaid information was helpful and has given you a clear idea of which library/libraries would be most suitable for your next project.
To know more about our other core technologies, refer to links below:
Angular App Development Company
Ionic App Development Company
Blockchain app developers
0 notes
Photo
React's rise, Babel 7.10.0, and good GitHub etiquette
#491 — June 5, 2020
Unsubscribe | Read on the Web
JavaScript Weekly
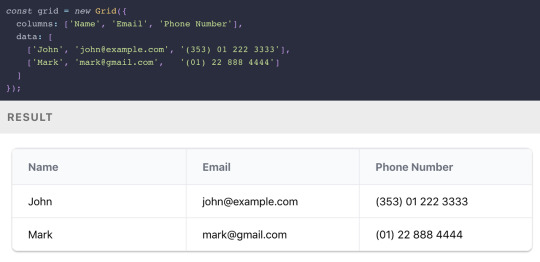
Grid.js: An Advanced Table Library — A lightweight, advanced table plugin that can work alongside React, Angular, Vue, or, well, nothing. Check out some of the examples for more on how to use it. It uses Preact under the hood.
Afshin Mehrabani
The Rise of React (And Its Growing Pervasiveness) — In the most recent issue of Increment, a noted journalist (for WIRED and The Economist) takes a wide-angle look at how React came to be one of the predominant frontend frameworks powering today’s web and the attendant implications ― both positive and negative ― for the future.
Chris Stokel-Walker (Increment)
Does a Serverless Headless CMS Exist? It Does Now — The first headless CMS built for serverless infrastructure. Forget about scaling problems, flash crowds, setting up and managing servers and stop overpaying for resources you don't use. It's free and open-source, check it out.
Webiny sponsor
Babel 7.10.0 Released — The hugely popular JavaScript transpiler got more tweaks than you’d expect for a minor point release including an experimental version of a new polyfills compatability architecture, improvements to optional chaining and private fields support, and better tree-shaking for React code.
Nicolò Ribaudo
⚡️ Quick bytes:
🖤 This week, the React core team joined the Facebook employee walkout in solidarity with the Black community — it's time to speak up, donate or even just stream a fundraising video, because Black lives matter.
The Repl.IT online IDE/sandbox now supports Deno if you want to play without installing it for real.
SpiderMonkey, Firefox's JavaScript engine, has a new regular expressions engine which opens up support for modern regex syntax it didn't have before.
AngularJS 1.8.0 is out. Yes, that's the old school Angular.js, not the more modern Angular.
Zappar has released some universal AR SDKs for Three.js and vanilla JavaScript if augmented reality is your bag.
💻 Jobs
JavaScript Developer at X-Team (Remote) — Join X-Team and work on projects for companies like Riot Games, FOX, Coinbase, and more. Work from anywhere.
X-Team
Find A Job Through Vettery — Vettery specializes in tech roles and is completely free for job seekers. Create a profile to get started.
Vettery
Senior Software Engineer — Save Lives & Make an Impact — We use Node/TS/React & ML to provide crisis support via SMS. Help us scale globally with a focus on privacy and security.
Crisis Text Line
📚 Tutorials and Opinions
Reusing UI Components at Enterprise Level — An engineer at PayPal explains how they share UI components across their various products.
Dong Chen (PayPal)
The 'Top Types' any and unknown in TypeScript — They’re not top types because they’re the best types 😂 .. but they’re essentially ‘universal’ types that can contain all values (in opposition to the never type which is the empty set).
Dr. Axel Rauschmayer
One Cool Trick to Simplify Reducer Functions — An introduction to the Immer immutable state library as a way to reduce the complexity of Redux reducers.
Eric Elliott
Getting Started With OpenTelemetry In Node.js
Lightstep sponsor
How-to Normalize Home Volume Levels with Node-RED — Node-RED is a JavaScript-powered ‘low code’ visual programming environment frequently used with hardware/IoT use cases. I rarely see tutorials about it, so this is pretty neat.
Blake Niemyjski
The Service Worker Lifecycle Explained — Explaining the lifecycle of Service Workers in PWAs and how to update them as fast as possible.
Felix Gerschau
Track Your (Android) Smartphone in Physical Space with JavaScript — Leans on the Generic Sensor APIs so you’re limited to Android for now, but it’s fun to see the potential.
Sanjeet Chatterjee
Some Reminders of Good GitHub Etiquette — Basic things, but sometimes easily forgotten, from one of the date-fns maintainers.
Sasha Koss
MongoDB Is Easy. Now Make It Powerful. Free Download for 30 Days.
Studio 3T sponsor
▶ Inside Vue 3 with Gregg Pollack — An hour long podcast chat with Gregg Pollack of Vue Mastery about Vue 3 reactivity model course and when and where the new Composition API is worth using.
Views on Vue Podcast podcast
How to Create a Web Worker-Driven Multithreaded Frontend App — It leans on an under-development Web Worker-driven framework called neo.mjs that promises “a new era of making better Web-based user interfaces.”
Tobias Uhlig
Stranger Things, JavaScript Edition — This is mostly a bit of fun mixed with a little bit of Wat picking on some JavaScript oddities. If the quirks of equality and NaN are familiar to you, move on.
Live Code Stream
Using Git to Run ESLint on Changed Files in a Feature Branch
Jeffrey Auriemma
🔧 Code & Tools

TUI Editor 2.1: A Powerful Markdown WYSIWYG Editor — You get the Markdown on the left, output on the right. The latest release added much better syntax highlighting for the Markdown source (if you want it) and ‘preview highlighting’ where the output of the code you’re working on is highlighted in the preview pane.
NHN
redaxios: The Axios API, as an 800 Byte Fetch Wrapper — If you love the Axios API but want to get it in a lighter way..
Jason Miller
A Much Faster Way to Debug Code Than with Breakpoints or console.log — Move forward and backwards through your code to understand what led to a specific bug, view runtime values, edit-and-continue, and more.
Wallaby.js sponsor
React Date Picker 3.0: A Simple and Reusable Date-Picker Component — A mature option that continues to get frequent updates. Demo here.
HackerOne
Frappe Charts 1.5: Responsive, Zero Dependency SVG Charts — Here’s are some examples (with code) to explore.
Prateeksha Singh
ms: Tiny Milisecond Conversion Utility — For example: ms('2.5 hrs') becomes 9000000 .. or ms(2 * 60000) becomes ‘2m’.
Vercel
🗓 Upcoming Online Events
JS Nation (June 18-19) — This free two-day remote conference features over 25 speakers, including Jen Looper, Max Stoiber, John Papa and others.
OpenJS World (June 23-24) — Speakers at this 'virtual experience' include Nicole Sullivan, Prosper Otemuyiwa, Cassidy Williams and more.
CascadiaJS 2020 (September 1-2) — This upcoming online conference is set to take place in September.
by via JavaScript Weekly https://ift.tt/2XyWzFv
0 notes
Link
Nuxt.js provides an Axios module for easy integration with your application. Axios is a promise-based HTTP client that works in the browser and Node.js environment or, in simpler terms, it is a tool for making requests (e.g API calls) in client-side applications and Node.js environment. In this tutorial, we’re going to learn how to use the Axios module and how to make a request on the server-side using asyncData and fetch. These two methods make a request on the server-side but they have some differences which we’re also going to cover. Finally, we’ll learn how to perform authentication and secure pages/routes using the auth module and auth middleware. This article requires basic knowledge of Nuxtjs and Vuejs as we’ll be building on top of that. For those without experience with Vuejs, I recommend you start from their official documentation and the Nuxt official page before continuing with this article.
What Is The Nuxt.js Axios Module?
According to the official Documentation,
“It is a Secure and easy Axios integration with Nuxt.js.”
Here are some of its features:
Automatically set base URL for client-side & server-side.
Proxy request headers in SSR (Useful for auth).
Fetch Style requests.
Integrated with Nuxt.js Progressbar while making requests.
To use the axios module in your application, you will have to first install it by using either npm or yarn. YARN
yarn add @nuxtjs/axios
NPM
npm install @nuxtjs/axios
Add it into your nuxt.config.js file:
modules: [ '@nuxtjs/axios', ], axios: { // extra config e.g // BaseURL: 'https://link-to-API' }
The modules array accepts a list of Nuxt.js modules such as dotenv, auth and in this case, Axios. What we’ve done is to inform our application that we would be using the Axios module, which we reference using @nuxtjs/axios. This is then followed by the axios property which is an object of configurations like the baseURL for both client-side and server-side. Now, you can access Axios from anywhere in your application by calling this.$axios.method or this.$axios.$method. Where method can be get, post, or delete.
Making Your First Request Using Axios
For this tutorial, I’ve put together a simple application on Github. The repository contains two folders, start and finish, the start folder contains all you need to get right into the tutorial. The finish folder contains a completed version of what we would be building. After cloning the repo and opening the start folder, we would need to install all our packages in the package.json file so open your terminal and run the following command:
npm install
Once that is done, we can start our app using the npm run dev command. This is what you should see when you go to localhost:3000.
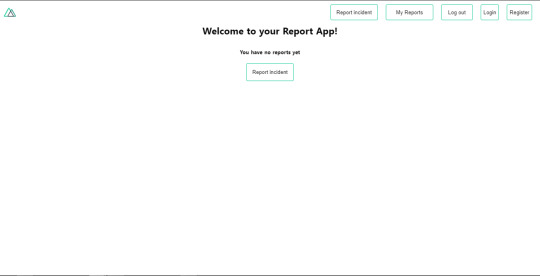
Our application’s landing page. (Large preview)
The next thing we have to do is to create a .env file in the root folder of our application and add our API URL to it. For this tutorial, we’ll be using a sample API built to collect reports from users.
API_URL=https://ireporter-endpoint.herokuapp.com/api/v2/
This way, we do not have to hard code our API into our app which is useful for working with two APIs (development and production). The next step would be to open our nuxt.config.js file and add the environmental variable to our axios config that we added above.
/* ** Axios module configuration */ axios: { // See https://github.com/nuxt-community/axios-module#options baseURL: process.env.API_URL, },
Here, we tell Nuxt.js to use this baseURL for both our client-side and server-side requests whenever we use this Axios module. Now, to fetch a list of reports, let us open the index.vue file and add the following method to the script section.
async getIncidents() { let res = await this.$store.dispatch("getIncidents"); this.incidents = res.data.data.incidents; }
What we have done is to create an async function that we call getIncidents() and we can tell what it does from the name — it fetches a list of incidents using the Vuex store action method this.$store.dispatch. We assign the response from this action to our incidents property so we can be able to make use of it in the component. We want to call the getIncidents() method whenever the component mounts. We can do that using the mounted hook.
mounted() { this.getIncidents() }
mounted() is a lifecycle hook that gets called when the component mounts. That will cause the call to the API to happen when the component mounts. Now, let us go into our index.js file in our store and create this action where we’ll be making our Axios request from.
export const actions = { async getIncidents() { let res = await this.$axios.get('/incidents') return res; } }
Here, we created the action called getIncidents which is an async function, then we await a response from the server and return this response. The response from this action is sent back to our getIncidents() method in our index.vue file. If we refresh our application, we should now be able to see a long list of incidents rendered on the page.
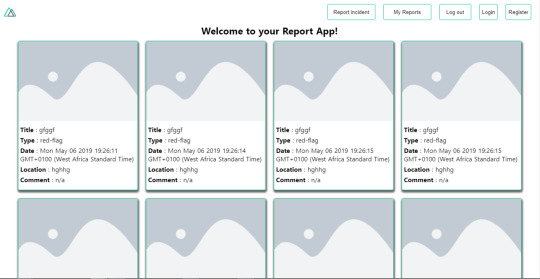
List of incidents on landing page. (Large preview)
We have made our first request using Axios but we won’t stop there, we are going to be trying out asyncData and fetch to see the differences between them and using Axios.
AsyncData
AsyncData fetches data on the server-side and it’s called before loading the page component. It does not have access to this because it is called before your page component data is created. this is only available after the created hook has been called so Nuxt.js automatically merges the returned data into the component’s data. Using asyncData is good for SEO because it fetches your site’s content on the server-side and also helps in loading content faster. Note that asyncData method can only be used in the pages folder of your application as it would not work in the components folder. This is because asyncData hook gets called before your component is created.
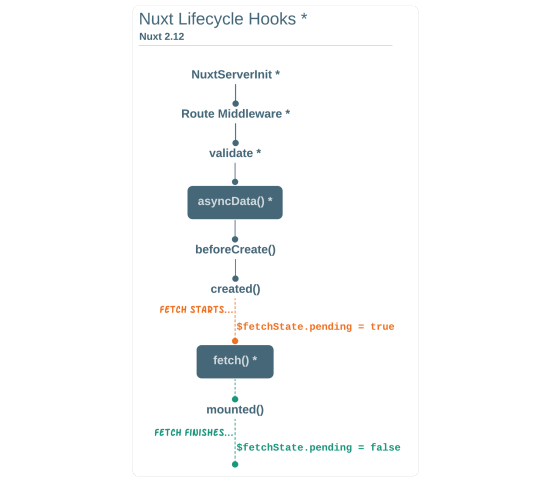
Image from Nuxt blog. (Large preview)
Let us add asyncData to our index.vue file and observe how fast our incidents data loads. Add the following code after our components property and let us get rid of our mounted hook.
async asyncData({ $axios }) { let { data } = await $axios.get("/incidents"); return { incidents: data.data.incidents }; }, // mounted() { // this.getIncidents(); // },
Here, the asyncData method accepts a property from the context $axios. We use this property to fetch the list of incidents and the value is then returned. This value is automatically injected into our component. Now, you can notice how fast your content loads if you refresh the page and at no time is there no incident to render.
Fetch
The Fetch method is also used to make requests on the server-side. It is called after the created hook in the life cycle which means it has access to the component’s data. Unlike the asyncData method, the fetch method can be used in all .vue files and be used with the Vuex store. This means that if you have the following in your data function.
data() { return { incidents: [], id: 5, gender: 'male' }; }
You can easily modify id or gender by calling this.id or this.gender.
Using Axios As A Plugin
During the process of development with Axios, you might find that you need extra configuration like creating instances and interceptors for your request so your application can work as intended and thankfully, we can do that by extending our Axios into a plugin. To extend axios, you have to create a plugin (e.g. axios.js) in your plugins folder.
export default function ({ $axios, store, redirect }) { $axios.onError(error => { if (error.response && error.response.status === 500) { redirect('/login') } }) $axios.interceptors.response.use( response => { if (response.status === 200) { if (response.request.responseURL && response.request.responseURL.includes('login')) { store.dispatch("setUser", response); } } return response } ) }
This is an example of a plugin I wrote for a Nuxt application. Here, your function takes in a context object of $axios, store and redirect which we would use in configuring the plugin. The first thing we do is to listen for an error with a status of 500 using $axios.onError and redirect the user to the login page. We also have an interceptor that intercepts every request response we make in our application checks if the status of the response we get is 200. If that is true we proceed and check that there is a response.request.responseURL and if it includes login. If this checks out to be true, we then send this response using our store’s dispatch method where it then mutated in our state. Add this plugin to your nuxt.config.js file:
plugins: [ '~/plugins/axios' ]
After doing this, your Axios plugin would intercept any request you make and check if you have defined a special case for it.
Introduction To The Auth Module
The auth module is used for performing authentication for your Nuxt application and can be accessed from anywhere in your application using $this.auth. It is also available in fetch, asyncData, middleware and NuxtInitServer from the context object as $auth. The context provides additional objects/params from Nuxt to Vue components and is available in special nuxt lifecycle areas like those mentioned above. To use the auth module in your application, you would have to install it using yarn or npm. YARN
yarn add @nuxtjs/auth
NPM
npm install @nuxtjs/auth
Add it to your nuxt.config.js file.
modules: [ '@nuxtjs/auth' ], auth: { // Options }
The auth property accepts a list of properties such as strategies and redirect. Here, strategies accepts your preferred authentication method which can be:
local For username/email and password-based flow.
facebook For using Facebook accounts as a means of authentication.
Github For authenticating users with Github accounts.
Google For authenticating users with Google accounts.
Auth0
Laravel Passport
The redirect property accepts an object of links for:
login Users would be redirected to this link if login is required.
logout Users would be redirected here if after logout current route is protected.
home Users would be redirected here after login.
Now, let us add the following to our nuxt.config.js file.
/* ** Auth module configuration */ auth: { redirect: { login: '/login', logout: '/', home: '/my-reports' }, strategies: { local: { endpoints: { login: { url: "/user/login", method: "post", propertyName: "data.token", }, logout: false, user: false, }, tokenType: '', tokenName: 'x-auth', autoFetchUser: false }, }, }
Please note that the auth method works best when there is a user endpoint provided in the option above. Inside the auth config object, we have a redirect option in which we set our login route to /login, logout route to / and home route to /my-reports which would all behave as expected. We also have a tokenType property which represents the Authorization type in the header of our Axios request. It is set to Bearer by default and can be changed to work with your API. For our API, there is no token type and this is why we’re going to leave it as an empty string. The tokenName represents the Authorization name (or the header property you want to attach your token to) inside your header in your Axios request. By default, it is set to Authorization but for our API, the Authorization name is x-auth. The autoFetchUser property is used to enable user fetch object using the user endpoint property after login. It is true by default but our API does not have a user endpoint so we have set that to false. For this tutorial, we would be using the local strategy. In our strategies, we have the local option with endpoints for login, user and logout but in our case, we would only use the *login* option because our demo API does not have a *logout* endpoint and our user object is being returned when *login* is successful. Note: The auth module does not have a register endpoint option so that means we’re going to register the traditional way and redirect the user to the login page where we will perform the authentication using this.$auth.loginWith. This is the method used in authenticating your users. It accepts a ‘strategy’ (e.g local) as a first argument and then an object to perform this authentication with. Take a look at the following example.
let data { email: '[email protected]', password: '123456' } this.$auth.loginWith('local', { data })
Using The Auth Module
Now that we have configured our auth module, we can proceed to our registration page. If you visit the /register page, you should see a registration form.
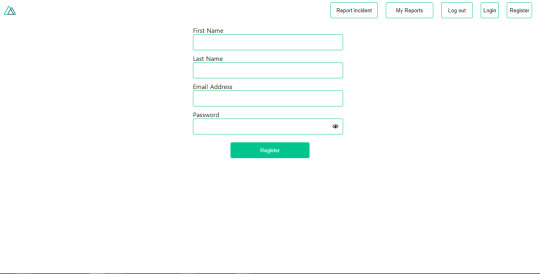
Register page. (Large preview)
Let us make this form functional by adding the following code:
methods: { async registerUser() { this.loading = true; let data = this.register; try { await this.$axios.post("/user/create", data); this.$router.push("/login"); this.loading = false; this.$notify({ group: "success", title: "Success!", text: "Account created successfully" }); } catch (error) { this.loading = false; this.$notify({ group: "error", title: "Error!", text: error.response ? error.response.data.error : "Sorry an error occured, check your internet" }); } } }
Here, we have an async function called registerUser which is tied to a click event in our template and makes an Axios request wrapped in a try/catch block to an endpoint /user/create. This redirects to the /login page and notifies the user of a successful registration. We also have a catch block that alerts the user of any error if the request is not successful. If the registration is successful, you would be redirected to the login page.
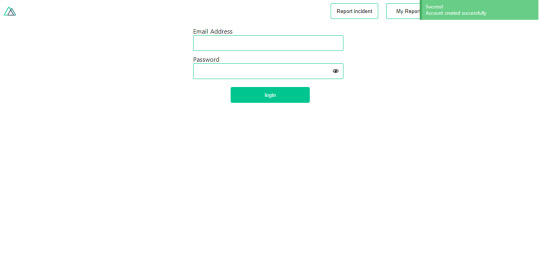
Login page with notification component. (Large preview)
Here, we’re going to make use of auth authentication method this.$auth.loginWith('local', loginData) after which we would use the this.$auth.setUser(userObj) to set the user in our auth instance. To get the login page working, let’s add the following code to our login.vue file.
methods: { async logIn() { let data = this.login; this.loading = true; try { let res = await this.$auth.loginWith("local", { data }); this.loading = false; let user = res.data.data.user; this.$auth.setUser(user); this.$notify({ group: "success", title: "Success!", text: "Welcome!" }); } catch (error) { this.loading = false; this.$notify({ group: "error", title: "Error!", text: error.response ? error.response.data.error : "Sorry an error occured, check your internet" }); } } }
We created an async function called logIn using the auth method this.$auth.loginWith('local, loginData). If this login attempt is successful, we then assign the user data to our auth instance using this.$auth.setUser(userInfo) and redirect the user to the /my-report page. You can now get user data using this.$auth.user or with Vuex using this.$store.state.auth.user but that’s not all. The auth instance contains some other properties which you can see if you log in or check your state using your Vue dev tools. If you log this.$store.state.auth to the console, you’ll see this:
{ "auth": { "user": { "id": "d7a5efdf-0c29-48aa-9255-be818301d602", "email": "[email protected]", "lastName": "Xo", "firstName": "Tm", "othernames": null, "isAdmin": false, "phoneNumber": null, "username": null }, "loggedIn": true, "strategy": "local", "busy": false } }
The auth instance contains a loggedIn property that is useful in switching between authenticated links in the nav/header section of your application. It also contains a strategy method that states the type of strategy the instance is running (e.g local). Now, we will make use of this loggedIn property to arrange our nav links. Update your navBar component to the following:
<template> <header class="header"> <div class="logo"> <nuxt-link to="/"> <Logo /> </nuxt-link> </div> <nav class="nav"> <div class="nav__user" v-if="auth.loggedIn"> <p></p> <button class="nav__link nav__link--long"> <nuxt-link to="/report-incident">Report incident</nuxt-link> </button> <button class="nav__link nav__link--long"> <nuxt-link to="/my-reports">My Reports</nuxt-link> </button> <button class="nav__link" @click.prevent="logOut">Log out</button> </div> <button class="nav__link" v-if="!auth.loggedIn"> <nuxt-link to="/login">Login</nuxt-link> </button> <button class="nav__link" v-if="!auth.loggedIn"> <nuxt-link to="/register">Register</nuxt-link> </button> </nav> </header> </template> <script> import { mapState } from "vuex"; import Logo from "@/components/Logo"; export default { name: "nav-bar", data() { return {}; }, computed: { ...mapState(["auth"]) }, methods: { logOut() { this.$store.dispatch("logOut"); this.$router.push("/login"); } }, components: { Logo } }; </script> <style></style>
In our template section, we have several links to different parts of the application in which we are now using auth.loggedIn to display the appropriate links depending on the authentication status. We have a logout button that has a click event with a logOut() function attached to it. We also display the user’s email gotten from the auth property which is accessed from our Vuex store using the mapState method which maps our state auth to the computed property of the nav component. We also have a logout method that calls our Vuex action logOut and redirects the user to the login page. Now, let us go ahead and update our store to have a logOut action.
export const actions = { // .... logOut() { this.$auth.logout(); } }
The logOut action calls the auth logout method which clears user data, deletes tokens from localStorage and sets loggedIn to false. Routes like /my-reports and report-incident should not be visible to guests but at this point in our app, that is not the case. Nuxt does not have a navigation guard that can protect your routes, but it has is the auth middleware. It gives you the freedom to create your own middleware so you can configure it to work the way you want. It can be set in two ways:
Per route.
Globally for the whole app in your nuxt.config.js file.
router: { middleware: ['auth'] }
This auth middleware works with your auth instance so you do not need to create an auth.js file in your middleware folder. Let us now add this middleware to our my-reports.vue and report-incident.vue files. Add the following lines of code to the script section of each file.
middleware: 'auth'
Now, our application would check if the user trying to access these routes has an auth.loggedIn value of true. It’ll redirect them to the login page using our redirect option in our auth config file — if you’re not logged in and you try to visit either /my-report or report-incident, you would be redirected to /login. If you go to /report-incidents, this is what you should see.
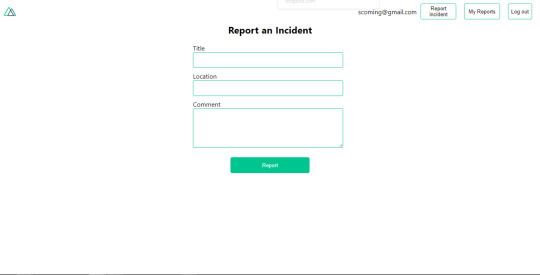
Report incident page. (Large preview)
This page is for adding incidents but that right now the form does not send incident to our server because we are not making the call to the server when the user attempts to submit the form. To solve this, we will add a reportIncident method which will be called when the user clicks on Report. We’ll have this in the script section of the component. This method will send the form data to the server. Update your report-incident.vue file with the following:
<template> <section class="report"> <h1 class="report__heading">Report an Incident</h1> <form class="report__form"> <div class="input__container"> <label for="title" class="input__label">Title</label> <input type="text" name="title" id="title" v-model="incident.title" class="input__field" required /> </div> <div class="input__container"> <label for="location" class="input__label">Location</label> <input type="text" name="location" id="location" v-model="incident.location" required class="input__field" /> </div> <div class="input__container"> <label for="comment" class="input__label">Comment</label> <textarea name="comment" id="comment" v-model="incident.comment" class="input__area" cols="30" rows="10" required ></textarea> </div> <input type="submit" value="Report" class="input__button" @click.prevent="reportIncident" /> <p class="loading__indicator" v-if="loading">Please wait....</p> </form> </section> </template> <script> export default { name: "report-incident", middleware: "auth", data() { return { loading: false, incident: { type: "red-flag", title: "", location: "", comment: "" } }; }, methods: { async reportIncident() { let data = this.incident; let formData = new FormData(); formData.append("title", data.title); formData.append("type", data.type); formData.append("location", data.location); formData.append("comment", data.comment); this.loading = true; try { let res = await this.$store.dispatch("reportIncident", formData); this.$notify({ group: "success", title: "Success", text: "Incident reported successfully!" }); this.loading = false; this.$router.push("/my-reports"); } catch (error) { this.loading = false; this.$notify({ group: "error", title: "Error!", text: error.response ? error.response.data.error : "Sorry an error occured, check your internet" }); } } } }; </script> <style> </style>
Here, we have a form with input fields for title, location, and comment with two-way data binding using v-model. We also have a submit button with a click event. In the script section, we have a reportIncident method that collects all the information provided in the form and is sent to our server using FormData because the API is designed to also accept images and videos. This formData is attached to a Vuex action using the dispatch method, if the request is successful, you get redirected to /my-reports with a notification informing you that this request was successful otherwise, you would be notified of an error with the error message. At this point, we don’t have reportIncident action in our store yet so in your browser console, you would see an error if you try to click submit on this page.

Vuex error message. (Large preview)
To fix this, add the reportIncident action your index.js file.
export const actions = { // ... async reportIncident({}, data) { let res = await this.$axios.post('/incident/create', data) return res; } }
Here, we have a reportIncident function that takes in an empty context object and the data we’re sending from our form. This data is then attached to a post request that creates an incident and returns back to our report-incident.vue file. At this point, you should be able to add a report using the form after which you would be redirected to /my-reports page.
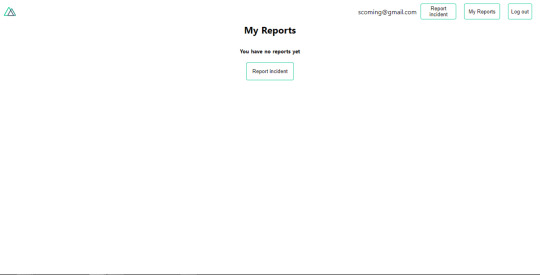
My reports page empty. (Large preview)
This page should display a list of incidents created by the user but right now it only shows what we see above, let’s go ahead to fix that. We’re going to be using the fetch method we learned about to get this list. Update your my-reports.vue file with the following:
<script> import incidentCard from "@/components/incidentCard.vue"; export default { middleware: "auth", name: "my-reports", data() { return { incidents: [] }; }, components: { incidentCard }, async fetch() { let { data } = await this.$axios.get("/user/incidents"); this.incidents = data.data; } }; </script>
Here, we use fetch method to get user-specific incidents and assign the response to our incidents array. If you refresh your page after adding an incident, you should see something like this.
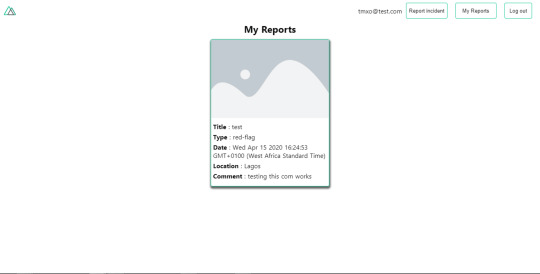
My Reports page with a report. (Large preview)
At this point, we would notice a difference in how fetch method and asyncData loads our data.
Conclusion
So far, we have learned about the Axios module and all of its features. We have also learned more about asyncData, and how we can fetch both of them together despite their differences. We’ve also learned how to perform authentication in our application using the auth module and how to use the auth middleware to protect our routes. Here are some useful resources that talk more about all we’ve covered.
Getting started with meta tags in Nuxjs.
Using the dotenv module in Nuxt.
Using Fetch in your Nuxt app.
Getting started with asyncData.
0 notes
Text
Alpine.js: The JavaScript Framework That’s Used Like jQuery, Written Like Vue, and Inspired by TailwindCSS
We have big JavaScript frameworks that tons of people already use and like, including React, Vue, Angular, and Svelte. Do we need another JavaScript library? Let’s take a look at Alpine.js and you can decide for yourself. Alpine.js is for developers who aren’t looking to build a single page application (SPA). It’s lightweight (~7kB gzipped) and designed to write markup-driven client-side JavaScript.
The syntax is borrowed from Vue and Angular directive. That means it will feel familiar if you’ve worked with those before. But, again, Alpine.js is not designed to build SPAs, but rather enhance your templates with a little bit of JavaScript.
For example, here’s an Alpine.js demo of an interactive “alert” component.
CodePen Embed Fallback
The alert message is two-way bound to the input using x-model="msg". The “level” of the alert message is set using a reactive level property. The alert displays when when both msg and level have a value.
It’s like a replacement for jQuery and JavaScript, but with declarative rendering
Alpine.js is a Vue template-flavored replacement for jQuery and vanilla JavaScript rather than a React/Vue/Svelte/WhateverFramework competitor.
Since Alpine.js is less than a year old, it can make assumptions about DOM APIs that jQuery cannot. Let’s briefly draw a comparison between the two.
Querying vs. binding
The bulk of jQuery’s size and features comes in the shape of a cross-browser compatibility layer over imperative DOM APIs — this is usually referred to as jQuery Core and sports features that can query the DOM and manipulate it.
The Alpine.js answer to jQuery core is a declarative way to bind data to the DOM using the x-bind attribute binding directive. It can be used to bind any attribute to reactive data on the Alpine.js component. Alpine.js, like its declarative view library contemporaries (React, Vue), provides x-ref as an escape hatch to directly access DOM elements from JavaScript component code when binding is not sufficient (eg. when integrating a third-party library that needs to be passed a DOM Node).
Handling events
jQuery also provides a way to handle, create and trigger events. Alpine.js provides the x-on directive and the $event magic value which allows JavaScript functions to handle events. To trigger (custom) events, Alpine.js provides the $dispatch magic property which is a thin wrapper over the browser’s Event and Dispatch Event APIs.
Effects
One of jQuery’s key features is its effects, or rather, it’s ability to write easy animations. Where we might use slideUp, slideDown, fadeIn, fadeOut properties in jQuery to create effects, Alpine.js provides a set of x-transition directives, which add and remove classes throughout the element’s transition. That’s largely inspired by the Vue Transition API.
Also, jQuery’s Ajax client has no prescriptive solution in Alpine.js, thanks to the Fetch API or taking advantage of a third party HTTP library (e.g. axios, ky, superagent).
Plugins
It’s also worth calling out jQuery plugins. There is no comparison to that (yet) in the Alpine.js ecosystem. Sharing Alpine.js components is relatively simple, usually requiring a simple case of copy and paste. The JavaScript in Alpine.js components are “just functions” and tend not to access Alpine.js itself, making them relatively straightforward to share by including them on different pages with a script tag. Any magic properties are added when Alpine initializes or is passed into bindings, like $event in x-on bindings.
There are currently no examples of Alpine.js extensions, although there are a few issues and pull requests to add “core” events that hook into Alpine.js from other libraries. There are also discussions happening about the ability to add custom directives. The stance from Alpine.js creator Caleb Porzio, seems to be basing API decisions on the Vue APIs, so I would expect that any future extension point would be inspired on what Vue.js provides.
Size
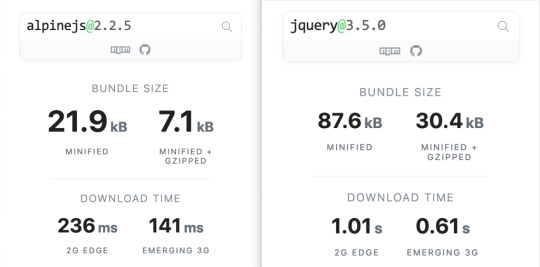
Alpine.js is lighter weight than jQuery, coming in at 21.9kB minified — 7.1kB gzipped — compared to jQuery at 87.6kB minified — 30.4kB minified and gzipped. Only 23% the size!
Most of that is likely due to the way Alpine.js focuses on providing a declarative API for the DOM (e.g. attribute binding, event listeners and transitions).

Bundlephobia breaks down the two
For the sake of comparison, Vue comes in at 63.5kB minified (22.8kB gzipped). How can Alpine.js come in lighter despite it’s API being equivalent Vue? Alpine.js does not implement a Virtual DOM. Instead, it directly mutates the DOM while exposing the same declarative API as Vue.
Let’s look at an example
Alpine is compact because since application code is declarative in nature, and is declared via templates. For example, here’s a Pokemon search page using Alpine.js:
CodePen Embed Fallback
This example shows how a component is set up using x-data and a function that returns the initial component data, methods, and x-init to run that function on load.
Bindings and event listeners in Alpine.js with a syntax that’s strikingly similar to Vue templates.
Alpine: x-bind:attribute="express" and x-on:eventName="expression", shorthand is :attribute="expression" and @eventName="expression" respectively
Vue: v-bind:attribute="express" and v-on:eventName="expression", shorthand is :attribute="expression" and @eventName="expression" respectively
Rendering lists is achieved with x-for on a template element and conditional rendering with x-if on a template element.
Notice that Alpine.js doesn’t provide a full templating language, so there’s no interpolation syntax (e.g. in Vue.js, Handlebars and AngularJS). Instead, binding dynamic content is done with the x-text and x-html directives (which map directly to underlying calls to Node.innerText and Node.innerHTML).
An equivalent example using jQuery is an exercise you’re welcome to take on, but the classic style includes several steps:
Imperatively bind to the button click using $('button').click(/* callback */).
Within this “click callback” get the input value from the DOM, then use it to call the API.
Once the call has completed, the DOM is updated with new nodes generated from the API response.
If you’re interested in a side by side comparison of the same code in jQuery and Alpine.js, Alex Justesen created the same character counter in jQuery and in Alpine.js.
Back in vogue: HTML-centric tools
Alpine.js takes inspiration from TailwindCSS. The Alpine.js introduction on the repository is as “Tailwind for JavaScript.”
Why is that important?
One of Tailwind’s selling points is that it “provides low-level utility classes that let you build completely custom designs without ever leaving your HTML.” That’s exactly what Alpine does. It works inside HTML so there is no need to work inside of JavaScript templates the way we would in Vue or React Many of the Alpine examples cited in the community don’t even use script tags at all!
Let’s look at one more example to drive the difference home. Here’s is an accessible navigation menu in Alpine.js that uses no script tags whatsoever.
CodePen Embed Fallback
This example leverages aria-labelledby and aria-controls outside of Alpine.js (with id references). Alpine.js makes sure the “toggle” element (which is a button), has an aria-expanded attribute that’s true when the navigation is expanded, and false when it’s collapsed. This aria-expanded binding is also applied to the menu itself and we show/hide the list of links in it by binding to hidden.
Being markup-centric means that Alpine.js and TailwindCSS examples are easy to share. All it takes is a copy-paste into HTML that is also running Alpine.js/TailwindCSS. No crazy directories full of templates that compile and render into HTML!
Since HTML is a fundamental building block of the web, it means that Alpine.js is ideal for augmenting server-rendered (Laravel, Rails, Django) or static sites (Hugo, Hexo, Jekyll). Integrating data with this sort of tooling can be a simple as outputting some JSON into the x-data="{}" binding. The affordance of passing some JSON from your backend/static site template straight into the Alpine.js component avoids building “yet another API endpoint” that simply serves a snippet of data required by a JavaScript widget.
Client-side without the build step
Alpine.js is designed to be used as a direct script include from a public CDN. Its developer experience is tailored for that. That’s why it makes for a great jQuery comparison and replacement: it’s dropped in and eliminates a build step.
While it’s not traditionally used this way, the bundled version of Vue can be linked up directly. Sarah Drasner has an excellent write-up showing examples of jQuery substituted with Vue. However, if you use Vue without a build step, you’re actively opting out of:
the Vue CLI
single file components
smaller/more optimized bundles
a strict CSP (Content Security Policy) since Vue inline templates evaluate expressions client-side
So, yes, while Vue boasts a buildless implementation, its developer experience is really depedent on the Vue CLI. That could be said about Create React App for React, and the Angular CLI. Going build-less strips those frameworks of their best qualities.
There you have it! Alpine.js is a modern, CDN-first library that brings declarative rendering for a small payload — all without the build step and templates that other frameworks require. The result is an HTML-centric approach that not only resembles a modern-day jQuery but is a great substitute for it as well.
If you’re looking for a jQuery replacement that’s not going to force you into a SPAs architecture, then give Alpine.js a go! Interested? You can find out more on Alpine.js Weekly, a free weekly roundup of Alpine.js news and articles.
The post Alpine.js: The JavaScript Framework That’s Used Like jQuery, Written Like Vue, and Inspired by TailwindCSS appeared first on CSS-Tricks.
via CSS-Tricks https://ift.tt/3aMMDvq
0 notes
Text
Alpine.js: The JavaScript Framework That’s Used Like jQuery, Written Like Vue, and Inspired by TailwindCSS
We have big JavaScript frameworks that tons of people already use and like, including React, Vue, Angular, and Svelte. Do we need another JavaScript library? Let’s take a look at Alpine.js and you can decide for yourself. Alpine.js is for developers who aren’t looking to build a single page application (SPA). It’s lightweight (~7kB gzipped) and designed to write markup-driven client-side JavaScript.
The syntax is borrowed from Vue and Angular directive. That means it will feel familiar if you’ve worked with those before. But, again, Alpine.js is not designed to build SPAs, but rather enhance your templates with a little bit of JavaScript.
For example, here’s an Alpine.js demo of an interactive “alert” component.
CodePen Embed Fallback
The alert message is two-way bound to the input using x-model="msg". The “level” of the alert message is set using a reactive level property. The alert displays when when both msg and level have a value.
It’s like a replacement for jQuery and JavaScript, but with declarative rendering
Alpine.js is a Vue template-flavored replacement for jQuery and vanilla JavaScript rather than a React/Vue/Svelte/WhateverFramework competitor.
Since Alpine.js is less than a year old, it can make assumptions about DOM APIs that jQuery cannot. Let’s briefly draw a comparison between the two.
Querying vs. binding
The bulk of jQuery’s size and features comes in the shape of a cross-browser compatibility layer over imperative DOM APIs — this is usually referred to as jQuery Core and sports features that can query the DOM and manipulate it.
The Alpine.js answer to jQuery core is a declarative way to bind data to the DOM using the x-bind attribute binding directive. It can be used to bind any attribute to reactive data on the Alpine.js component. Alpine.js, like its declarative view library contemporaries (React, Vue), provides x-ref as an escape hatch to directly access DOM elements from JavaScript component code when binding is not sufficient (eg. when integrating a third-party library that needs to be passed a DOM Node).
Handling events
jQuery also provides a way to handle, create and trigger events. Alpine.js provides the x-on directive and the $event magic value which allows JavaScript functions to handle events. To trigger (custom) events, Alpine.js provides the $dispatch magic property which is a thin wrapper over the browser’s Event and Dispatch Event APIs.
Effects
One of jQuery’s key features is its effects, or rather, it’s ability to write easy animations. Where we might use slideUp, slideDown, fadeIn, fadeOut properties in jQuery to create effects, Alpine.js provides a set of x-transition directives, which add and remove classes throughout the element’s transition. That’s largely inspired by the Vue Transition API.
Also, jQuery’s Ajax client has no prescriptive solution in Alpine.js, thanks to the Fetch API or taking advantage of a third party HTTP library (e.g. axios, ky, superagent).
Plugins
It’s also worth calling out jQuery plugins. There is no comparison to that (yet) in the Alpine.js ecosystem. Sharing Alpine.js components is relatively simple, usually requiring a simple case of copy and paste. The JavaScript in Alpine.js components are “just functions” and tend not to access Alpine.js itself, making them relatively straightforward to share by including them on different pages with a script tag. Any magic properties are added when Alpine initializes or is passed into bindings, like $event in x-on bindings.
There are currently no examples of Alpine.js extensions, although there are a few issues and pull requests to add “core” events that hook into Alpine.js from other libraries. There are also discussions happening about the ability to add custom directives. The stance from Alpine.js creator Caleb Porzio, seems to be basing API decisions on the Vue APIs, so I would expect that any future extension point would be inspired on what Vue.js provides.
Size
Alpine.js is lighter weight than jQuery, coming in at 21.9kB minified — 7.1kB gzipped — compared to jQuery at 87.6kB minified — 30.4kB minified and gzipped. Only 23% the size!
Most of that is likely due to the way Alpine.js focuses on providing a declarative API for the DOM (e.g. attribute binding, event listeners and transitions).
Bundlephobia breaks down the two
For the sake of comparison, Vue comes in at 63.5kB minified (22.8kB gzipped). How can Alpine.js come in lighter despite it’s API being equivalent Vue? Alpine.js does not implement a Virtual DOM. Instead, it directly mutates the DOM while exposing the same declarative API as Vue.
Let’s look at an example
Alpine is compact because since application code is declarative in nature, and is declared via templates. For example, here’s a Pokemon search page using Alpine.js:
CodePen Embed Fallback
This example shows how a component is set up using x-data and a function that returns the initial component data, methods, and x-init to run that function on load.
Bindings and event listeners in Alpine.js with a syntax that’s strikingly similar to Vue templates.
Alpine: x-bind:attribute="express" and x-on:eventName="expression", shorthand is :attribute="expression" and @eventName="expression" respectively
Vue: v-bind:attribute="express" and v-on:eventName="expression", shorthand is :attribute="expression" and @eventName="expression" respectively
Rendering lists is achieved with x-for on a template element and conditional rendering with x-if on a template element.
Notice that Alpine.js doesn’t provide a full templating language, so there’s no interpolation syntax (e.g. in Vue.js, Handlebars and AngularJS). Instead, binding dynamic content is done with the x-text and x-html directives (which map directly to underlying calls to Node.innerText and Node.innerHTML).
An equivalent example using jQuery is an exercise you’re welcome to take on, but the classic style includes several steps:
Imperatively bind to the button click using $('button').click(/* callback */).
Within this “click callback” get the input value from the DOM, then use it to call the API.
Once the call has completed, the DOM is updated with new nodes generated from the API response.
If you’re interested in a side by side comparison of the same code in jQuery and Alpine.js, Alex Justesen created the same character counter in jQuery and in Alpine.js.
Back in vogue: HTML-centric tools
Alpine.js takes inspiration from TailwindCSS. The Alpine.js introduction on the repository is as “Tailwind for JavaScript.”
Why is that important?
One of Tailwind’s selling points is that it “provides low-level utility classes that let you build completely custom designs without ever leaving your HTML.” That’s exactly what Alpine does. It works inside HTML so there is no need to work inside of JavaScript templates the way we would in Vue or React Many of the Alpine examples cited in the community don’t even use script tags at all!
Let’s look at one more example to drive the difference home. Here’s is an accessible navigation menu in Alpine.js that uses no script tags whatsoever.
CodePen Embed Fallback
This example leverages aria-labelledby and aria-controls outside of Alpine.js (with id references). Alpine.js makes sure the “toggle” element (which is a button), has an aria-expanded attribute that’s true when the navigation is expanded, and false when it’s collapsed. This aria-expanded binding is also applied to the menu itself and we show/hide the list of links in it by binding to hidden.
Being markup-centric means that Alpine.js and TailwindCSS examples are easy to share. All it takes is a copy-paste into HTML that is also running Alpine.js/TailwindCSS. No crazy directories full of templates that compile and render into HTML!
Since HTML is a fundamental building block of the web, it means that Alpine.js is ideal for augmenting server-rendered (Laravel, Rails, Django) or static sites (Hugo, Hexo, Jekyll). Integrating data with this sort of tooling can be a simple as outputting some JSON into the x-data="{}" binding. The affordance of passing some JSON from your backend/static site template straight into the Alpine.js component avoids building “yet another API endpoint” that simply serves a snippet of data required by a JavaScript widget.
Client-side without the build step
Alpine.js is designed to be used as a direct script include from a public CDN. Its developer experience is tailored for that. That’s why it makes for a great jQuery comparison and replacement: it’s dropped in and eliminates a build step.
While it’s not traditionally used this way, the bundled version of Vue can be linked up directly. Sarah Drasner has an excellent write-up showing examples of jQuery substituted with Vue. However, if you use Vue without a build step, you’re actively opting out of:
the Vue CLI
single file components
smaller/more optimized bundles
a strict CSP (Content Security Policy) since Vue inline templates evaluate expressions client-side
So, yes, while Vue boasts a buildless implementation, its developer experience is really depedent on the Vue CLI. That could be said about Create React App for React, and the Angular CLI. Going build-less strips those frameworks of their best qualities.
There you have it! Alpine.js is a modern, CDN-first library that brings declarative rendering for a small payload — all without the build step and templates that other frameworks require. The result is an HTML-centric approach that not only resembles a modern-day jQuery but is a great substitute for it as well.
If you’re looking for a jQuery replacement that’s not going to force you into a SPAs architecture, then give Alpine.js a go! Interested? You can find out more on Alpine.js Weekly, a free weekly roundup of Alpine.js news and articles.
The post Alpine.js: The JavaScript Framework That’s Used Like jQuery, Written Like Vue, and Inspired by TailwindCSS appeared first on CSS-Tricks.
Alpine.js: The JavaScript Framework That’s Used Like jQuery, Written Like Vue, and Inspired by TailwindCSS published first on https://deskbysnafu.tumblr.com/
0 notes
Text
Alpine.js: The JavaScript Framework That’s Used Like jQuery, Written Like Vue, and Inspired by TailwindCSS
We have big JavaScript frameworks that tons of people already use and like, including React, Vue, Angular, and Svelte. Do we need another JavaScript library? Let’s take a look at Alpine.js and you can decide for yourself. Alpine.js is for developers who aren’t looking to build a single page application (SPA). It’s lightweight (~7kB gzipped) and designed to write markup-driven client-side JavaScript.
The syntax is borrowed from Vue and Angular directive. That means it will feel familiar if you’ve worked with those before. But, again, Alpine.js is not designed to build SPAs, but rather enhance your templates with a little bit of JavaScript.
For example, here’s an Alpine.js demo of an interactive “alert” component.
CodePen Embed Fallback
The alert message is two-way bound to the input using x-model="msg". The “level” of the alert message is set using a reactive level property. The alert displays when when both msg and level have a value.
It’s like a replacement for jQuery and JavaScript, but with declarative rendering
Alpine.js is a Vue template-flavored replacement for jQuery and vanilla JavaScript rather than a React/Vue/Svelte/WhateverFramework competitor.
Since Alpine.js is less than a year old, it can make assumptions about DOM APIs that jQuery cannot. Let’s briefly draw a comparison between the two.
Querying vs. binding
The bulk of jQuery’s size and features comes in the shape of a cross-browser compatibility layer over imperative DOM APIs — this is usually referred to as jQuery Core and sports features that can query the DOM and manipulate it.
The Alpine.js answer to jQuery core is a declarative way to bind data to the DOM using the x-bind attribute binding directive. It can be used to bind any attribute to reactive data on the Alpine.js component. Alpine.js, like its declarative view library contemporaries (React, Vue), provides x-ref as an escape hatch to directly access DOM elements from JavaScript component code when binding is not sufficient (eg. when integrating a third-party library that needs to be passed a DOM Node).
Handling events
jQuery also provides a way to handle, create and trigger events. Alpine.js provides the x-on directive and the $event magic value which allows JavaScript functions to handle events. To trigger (custom) events, Alpine.js provides the $dispatch magic property which is a thin wrapper over the browser’s Event and Dispatch Event APIs.
Effects
One of jQuery’s key features is its effects, or rather, it’s ability to write easy animations. Where we might use slideUp, slideDown, fadeIn, fadeOut properties in jQuery to create effects, Alpine.js provides a set of x-transition directives, which add and remove classes throughout the element’s transition. That’s largely inspired by the Vue Transition API.
Also, jQuery’s Ajax client has no prescriptive solution in Alpine.js, thanks to the Fetch API or taking advantage of a third party HTTP library (e.g. axios, ky, superagent).
Plugins
It’s also worth calling out jQuery plugins. There is no comparison to that (yet) in the Alpine.js ecosystem. Sharing Alpine.js components is relatively simple, usually requiring a simple case of copy and paste. The JavaScript in Alpine.js components are “just functions” and tend not to access Alpine.js itself, making them relatively straightforward to share by including them on different pages with a script tag. Any magic properties are added when Alpine initializes or is passed into bindings, like $event in x-on bindings.
There are currently no examples of Alpine.js extensions, although there are a few issues and pull requests to add “core” events that hook into Alpine.js from other libraries. There are also discussions happening about the ability to add custom directives. The stance from Alpine.js creator Caleb Porzio, seems to be basing API decisions on the Vue APIs, so I would expect that any future extension point would be inspired on what Vue.js provides.
Size
Alpine.js is lighter weight than jQuery, coming in at 21.9kB minified — 7.1kB gzipped — compared to jQuery at 87.6kB minified — 30.4kB minified and gzipped. Only 23% the size!
Most of that is likely due to the way Alpine.js focuses on providing a declarative API for the DOM (e.g. attribute binding, event listeners and transitions).

Bundlephobia breaks down the two
For the sake of comparison, Vue comes in at 63.5kB minified (22.8kB gzipped). How can Alpine.js come in lighter despite it’s API being equivalent Vue? Alpine.js does not implement a Virtual DOM. Instead, it directly mutates the DOM while exposing the same declarative API as Vue.
Let’s look at an example
Alpine is compact because since application code is declarative in nature, and is declared via templates. For example, here’s a Pokemon search page using Alpine.js:
CodePen Embed Fallback
This example shows how a component is set up using x-data and a function that returns the initial component data, methods, and x-init to run that function on load.
Bindings and event listeners in Alpine.js with a syntax that’s strikingly similar to Vue templates.
Alpine: x-bind:attribute="express" and x-on:eventName="expression", shorthand is :attribute="expression" and @eventName="expression" respectively
Vue: v-bind:attribute="express" and v-on:eventName="expression", shorthand is :attribute="expression" and @eventName="expression" respectively
Rendering lists is achieved with x-for on a template element and conditional rendering with x-if on a template element.
Notice that Alpine.js doesn’t provide a full templating language, so there’s no interpolation syntax (e.g. in Vue.js, Handlebars and AngularJS). Instead, binding dynamic content is done with the x-text and x-html directives (which map directly to underlying calls to Node.innerText and Node.innerHTML).
An equivalent example using jQuery is an exercise you’re welcome to take on, but the classic style includes several steps:
Imperatively bind to the button click using $('button').click(/* callback */).
Within this “click callback” get the input value from the DOM, then use it to call the API.
Once the call has completed, the DOM is updated with new nodes generated from the API response.
If you’re interested in a side by side comparison of the same code in jQuery and Alpine.js, Alex Justesen created the same character counter in jQuery and in Alpine.js.
Back in vogue: HTML-centric tools
Alpine.js takes inspiration from TailwindCSS. The Alpine.js introduction on the repository is as “Tailwind for JavaScript.”
Why is that important?
One of Tailwind’s selling points is that it “provides low-level utility classes that let you build completely custom designs without ever leaving your HTML.” That’s exactly what Alpine does. It works inside HTML so there is no need to work inside of JavaScript templates the way we would in Vue or React Many of the Alpine examples cited in the community don’t even use script tags at all!
Let’s look at one more example to drive the difference home. Here’s is an accessible navigation menu in Alpine.js that uses no script tags whatsoever.
CodePen Embed Fallback
This example leverages aria-labelledby and aria-controls outside of Alpine.js (with id references). Alpine.js makes sure the “toggle” element (which is a button), has an aria-expanded attribute that’s true when the navigation is expanded, and false when it’s collapsed. This aria-expanded binding is also applied to the menu itself and we show/hide the list of links in it by binding to hidden.
Being markup-centric means that Alpine.js and TailwindCSS examples are easy to share. All it takes is a copy-paste into HTML that is also running Alpine.js/TailwindCSS. No crazy directories full of templates that compile and render into HTML!
Since HTML is a fundamental building block of the web, it means that Alpine.js is ideal for augmenting server-rendered (Laravel, Rails, Django) or static sites (Hugo, Hexo, Jekyll). Integrating data with this sort of tooling can be a simple as outputting some JSON into the x-data="{}" binding. The affordance of passing some JSON from your backend/static site template straight into the Alpine.js component avoids building “yet another API endpoint” that simply serves a snippet of data required by a JavaScript widget.
Client-side without the build step
Alpine.js is designed to be used as a direct script include from a public CDN. Its developer experience is tailored for that. That’s why it makes for a great jQuery comparison and replacement: it’s dropped in and eliminates a build step.
While it’s not traditionally used this way, the bundled version of Vue can be linked up directly. Sarah Drasner has an excellent write-up showing examples of jQuery substituted with Vue. However, if you use Vue without a build step, you’re actively opting out of:
the Vue CLI
single file components
smaller/more optimized bundles
a strict CSP (Content Security Policy) since Vue inline templates evaluate expressions client-side
So, yes, while Vue boasts a buildless implementation, its developer experience is really depedent on the Vue CLI. That could be said about Create React App for React, and the Angular CLI. Going build-less strips those frameworks of their best qualities.
There you have it! Alpine.js is a modern, CDN-first library that brings declarative rendering for a small payload — all without the build step and templates that other frameworks require. The result is an HTML-centric approach that not only resembles a modern-day jQuery but is a great substitute for it as well.
If you’re looking for a jQuery replacement that’s not going to force you into a SPAs architecture, then give Alpine.js a go! Interested? You can find out more on Alpine.js Weekly, a free weekly roundup of Alpine.js news and articles.
The post Alpine.js: The JavaScript Framework That’s Used Like jQuery, Written Like Vue, and Inspired by TailwindCSS appeared first on CSS-Tricks.
source https://css-tricks.com/alpine-js-the-javascript-framework-thats-used-like-jquery-written-like-vue-and-inspired-by-tailwindcss/
from WordPress https://ift.tt/2We2Ap8 via IFTTT
0 notes
Text
Building Mobile Apps With Ionic And React
Building Mobile Apps With Ionic And React
Ahmed Bouchefra
2019-08-07T12:30:00+02:002019-08-07T10:36:12+00:00
Ionic has recently added support for React; so now, React developers can get the advantages of Ionic to build hybrid mobile apps and progressive web apps (PWAs). In this post, we’ll show you how to get started using Ionic with React by building a simple demo app from scratch.
Prerequisites
In order to properly follow this tutorial, you’ll need the following prerequisites:
recent versions of Node.js and npm installed on your system,
working knowledge of TypeScript and React.
You can check that you have the latest Node.js version (v10) installed by running the following command:
$ node -v
Introducing React And Ionic
Let’s start with brief introductions to both React and Ionic.
According to the official website:
“React is a declarative, efficient, and flexible JavaScript library for building user interfaces. It lets you compose complex UIs from small and isolated pieces of code called ‘components’.”
React focuses on building UIs and doesn’t provide any built-in tools for the common tasks required in web development, such as fetching remote data and routing, so you’ll need to use some existing third-party libraries for these tasks.
According to the Ionic website:
“Ionic Framework is the free, open-source mobile UI toolkit for developing high-quality cross-platform apps for native iOS, Android, and the web — all from a single codebase.”
Basically, it’s a set of UI components that you can use with plain JavaScript or any popular front-end framework or library, such as Angular, React or Vue, to build a hybrid mobile app and PWA.
In this tutorial, we’ll see and use some Ionic UI components such as the following:
IonMenu: With this, a navigation drawer will slide in from the side of the current view.
IonToolbar: These top bars are positioned above or below the content.
IonHeader: This parent component holds the toolbar component.
IonContent: This component provides a content area, with methods to control the scrollable area and other things. You need only one content component inside a single view.
IonList: This component contains items with similar data content, such as images and text. It’s made up of IonItem objects.
IonItem: This component may contain text, icons, avatars, images, inputs and any other native or custom element.
IonButton: This component provides a clickable element, which can be used in a form or anywhere that needs simple, standard button functionality.
Installing Ionic CLI v5
Ionic’s command line interface (CLI), version 5, has support for creating Ionic projects based on React. So, let’s get started by installing the tool from npm.
Open a CLI, and run the following command:
$ npm install -g ionic
At the time of writing, Ionic’s CLI v5.2.3 is the latest.
Note: *According to how you installed Node.js in your system, you may need to add sudo before your command in macOS or Linux or run the command prompt as administrator in Windows if you get any permission errors. You can also simply fix your npm permissions or use a tool such as nvm.*
Next, install Cordova Resources (which is used to generate Cordova resources locally) and Native Run (used to deploy app binaries to devices):
$ npm install -g cordova-res native-run
These are required only if you want to test your application on a real mobile device or emulator.
Creating An Ionic And React Project
Now, let’s create a project based on React. Go back to your terminal, make sure you are in your working directory, and run the following command:
$ ionic start myApp --type=react
We use --type=react to generate a project based on React. You’ll next need to choose a starter template from the available ones. Let’s pick sidemenu for a starter template with a side menu and navigation.
After generating the project and installing the dependencies, you can serve your app locally using the following commands:
$ cd ./myApp $ ionic serve
Your app will be available from the http://localhost:8100 address, and you can actually use your web browser to start playing with it.
Ionic is called a hybrid mobile framework because it makes use of web technologies that were originally designed to create web apps, along with a native container (Cordova or Capacitor), to build mobile apps without using native technologies for the target platforms, such as Java or Kotlin for Android or Swift for iOS.
Because your mobile app is actually a web application, you can do most development by testing in a web browser without using an emulator or a real mobile device, except for testing native device features such as the camera or the SQLite storage, in case you’ve used them in your app. In fact, it’s even possible to use certain techniques to mimic the plugins that provide the native features and do the entire testing during development in your web browser.
Cleaning Our Project
We have the app’s basic structure, with two pages (home and list) and a menu. Let’s remove the list page since it’s just boilerplate code.
First, remove the src/pages/List.tsx file, then open the src/App.tsx file, and remove the entry for the list page from the appPages array:
const appPages: AppPage[] = [ { title: 'Home', url: '/home', icon: home } ];
Also, remove the import of the list page from the file:
import List from './pages/List';
Next, remove <Route path="/:tab(home)/list" component={List} exact={true} /> from the App component:
const App: React.FunctionComponent = () => ( <IonApp> <IonReactRouter> <IonSplitPane contentId="main"> <Menu appPages={appPages} /> <IonPage id="main"> <IonRouterOutlet> <Route path="/:tab(home)" component={Home} exact={true} /> <Route exact path="/" render={() => <Redirect to="/home" />} /> </IonRouterOutlet> </IonPage> </IonSplitPane> </IonReactRouter> </IonApp> ); export default App;
The App component is the root component that gets rendered by our application. If you open the src/index.tsx file, you’ll find the following code:
import React from 'react'; import ReactDOM from 'react-dom'; import App from './App'; ReactDOM.render(<App />, document.getElementById('root'));
The render() method is used to render a React element into the DOM in the supplied root element.
Theming The App
Having created, served and cleaned our Ionic project, let’s now see how we can change the colors of the UI so that it looks more professional.
Let’s get started with the side menu. Open the src/components/Menu.tsx file, and add a color attribute with a primary value to the IonToolbar, IonContent, IonList and IonItem UI components:
const Menu: React.FunctionComponent = ({ appPages }) => ( <IonMenu contentId="main"> <IonHeader> <IonToolbar color="primary"> <IonTitle>Menu</IonTitle> </IonToolbar> </IonHeader> <IonContent color="primary"> <IonList style= color="primary"> {appPages.map((appPage, index) => { return ( <IonMenuToggle key={index} auto-hide="false"> <IonItem color="primary" href={appPage.url}> <IonIcon slot="start" icon={appPage.icon} /> <IonLabel>{appPage.title}</IonLabel> </IonItem> </IonMenuToggle> ); })} </IonList> </IonContent> </IonMenu> );
Ionic provides some default colors (primary, secondary, tertiary, success, warning, danger, light, medium and dark) that can be used to change the color of UI components. A color can be applied to an Ionic component in order to change the default colors using the color attribute. See “Colors” for more information.
These colors have default values, but you can customize them via some predefined CSS variables. See “Modifying Colors“.
This is a screenshot of our menu:
Ionic menu. (Large preview)
Next, let’s change the color of the Home page. Open the src/pages/Home.tsx file, and set the color attribute of the IonToolbar and IonContent components to primary:
const HomePage: React.FunctionComponent = () => { return ( <> <IonHeader> <IonToolbar color="primary"> <IonButtons slot="start"> <IonMenuButton /> </IonButtons> <IonTitle>Home</IonTitle> </IonToolbar> </IonHeader> <IonContent color="primary" > </IonContent> </> ); };
This is a screenshot of the page:
Ionic home. (Large preview)
Installing Axios And Consuming A REST API
We’ll see how to install Axios and consume a third-party RESTful API in our application, and we’ll also see how to display the fetched data using Ionic card and list components.
Having themed our application, let’s now see how to fetch data using Axios. We’ll use the third-party API available from NewsAPI.org.
First, we need to grab an API key, so that we can communicate with the API. Go to the registration page, enter your information, and register an account. You’ll be given an API key; note it, and let’s continue.
Head back to your terminal, and run the following command to install Axios:
$ npm install axios --save
Next, open the src/pages/Home.tsx file, and start by importing Axios and IonButton:
import { IonButton } from '@ionic/react'; import axios from 'axios';
Next, define the API_KEY and URL constant variables:
const API_KEY = "<YOUR_API_KEY_HERE>"; const URL = `https://newsapi.org/v2/top-headlines?sources=techcrunch&apiKey=${API_KEY}`;
In the URL variable, we’ll add an endpoint to get the top headlines from our source, TechCrunch. You can use any source you want from the available sources.
Note: Make sure to put your own API key in the API_KEY variable.
Next, define the fetchArticles() method as follows:
const fetchArticles = () => { return axios({ url: URL, method: 'get' }).then(response => { console.log(response); return response.data; }) };
We simply call the axios() method to send a GET request to the news endpoint, and the result from the method is a promise that needs to be resolved in order to get the news data.
Next, update the HomePage component as follows to call the fetchArticles() method and resolve the returned promise:
const HomePage: React.FunctionComponent = () => { const [articles, setArticles] = React.useState([]); const items: any[] = []; React.useEffect(() => { fetchArticles().then(data => setArticles(data.articles)); }, []); return ( <> <IonHeader> <IonToolbar color="primary"> <IonButtons slot="start"> <IonMenuButton /> </IonButtons> <IonTitle>Home</IonTitle> </IonToolbar> </IonHeader> <IonContent color="primary" > <IonList color="primary"> { articles.map(a => { return ( <IonItem> {a['title']} <IonButton href={a['url']} color="primary" slot="end">Read</IonButton> </IonItem> ); }) } </IonList> </IonContent> </> ); };
In our function component, we first call the useState() hook of React to create the articles state variable, which will hold the news articles after we fetch them from the API.
useState() returns the state variable, which has the empty array as its initial value and a function that we can use to change the value of the variable. We use destructuring assignment to unpack the values from the returned pair into distinct variables (i.e. articles and setArticles()).
Next, we call the useEffect() hook to perform a side effect in our component. In our case, the side effect is to fetch data from the news API using the fetchArticles() method, which returns a promise. Once the promise is resolved, we call the setArticles() method to assign the news data to the articles variable.
Both useState() and useEffect() are built-in React hooks that were introduced in React 16.8; they simply let you use state and other React features without having to write a class. The useEffect() hook is equivalent to calling the componentDidMount, componentDidUpdate and componentWillUnmount lifecycle methods combined in class-based components.
Finally, in the view template, we iterate over the articles array using the map() method, and we display the title of each news article inside an IonItem element of the IonList component, and also a button that takes us to the page of the full article.
This is a screenshot of the page:
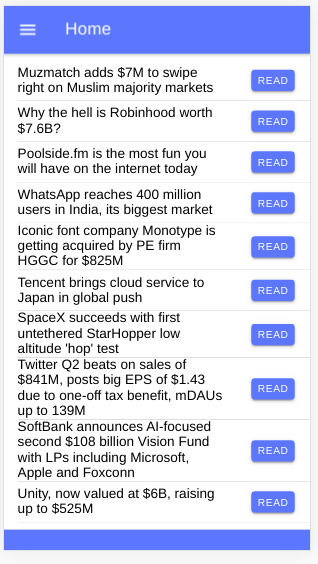
Ionic news app (Large preview)
You can find the source code in this GitHub repository.
Conclusion
In this tutorial, we have started using both Ionic and React and used them to build a simple mobile application that fetches and displays news data from a third-party API using the Axios client. We have also seen how to use hooks in React — namely, the useState() and useEffect() hooks — to create state and perform side effects inside React function components. With Ionic, we’ve seen how easy it is to generate a project based on React and how we can theme the application using the color attributes of components.

(dm, al, yk, ra, il)
0 notes
Photo

RT @John_Papa: Question: What are your favorite Vue.js plugins? Please reply with the name. { excluding: [ vuex, vue-router, axios] } cc // @vuejs
0 notes
Photo

RT @John_Papa: Question: What are your favorite Vue.js plugins? Please reply with the name. { excluding: [ vuex, vue-router, axios] } cc // @vuejs
0 notes
Text
Building Desktop Apps With Electron And Vue
About The Author
Front-end developer based in Lagos, Nigeria. He enjoys converting designs into code and building things for the web. More about Timi …
Electron is an open-source software framework developed and maintained by GitHub. It allows for the development of desktop GUI applications using web technologies. In this tutorial, Timi Omoyeni explains what you need to keep in mind when building a desktop application with Vue.js using the Vue CLI Plugin Electron Builder.
JavaScript used to be known as the language for building websites and web applications especially with some of its frameworks such as React, Vue, and Angular but over time (as early as 2009), it became possible for JavaScript to run outside the browser with the emergence of Node.js, an open-source, cross-platform, JavaScript runtime environment that executes JavaScript code outside a web browser. This has led to the ability to use JavaScript for a whole lot more than just web applications, and one of which is building desktop applications using Electron.js.
Electron enables you to create desktop applications with pure JavaScript by providing a runtime with rich native (operating system) APIs. You can see it as a variant of the Node.js runtime that is focused on desktop applications instead of web servers.
In this tutorial, we’re going to learn how to build desktop applications using Electron, we’re also going to learn how to use Vuejs to build Electron applications.
Note: Basic knowledge of Vue.js and the Vue CLI is required to follow this tutorial. All of the code used in this tutorial can be found on my GitHub. Feel free to clone and play around with it!
What Are Desktop Applications?
Desktop applications are applications that run stand-alone in desktop or laptop computers. They are applications that perform specific tasks and are installed solely for this purpose.
An example of a desktop application is your Microsoft Word, which is used for creating and typing documents. Other examples of common desktop applications are web browsers, Visual Studio Code, and Adobe Photoshop. Desktop applications are different from web applications because you have to install the desktop application in order for you to access and make use of it, and they sometimes do not need internet access for them to work. Web apps, on the other hand, can be accessed by simply visiting the URL that such an app is hosted on and always need internet access before you can access them.
Examples of frameworks used in building desktop apps include:
Java Java is a general-purpose programming language that is class-based, object-oriented, and designed to have as few implementation dependencies as possible. It is intended to let application developers write once, run anywhere (WORA), meaning that compiled Java code can run on all platforms that support Java without the need for recompilation.
Java FX According to their official documentation, it is an open-source, next-generation client application platform for desktop, mobile, and embedded systems built on Java.
C# C# is a general-purpose, multi-paradigm programming language encompassing strong typing, lexically scoped, imperative, declarative, functional, generic, object-oriented, and component-oriented programming disciplines.
.NET .NET is a free, cross-platform, open-source developer platform for building many different types of applications. With .NET, you can use multiple languages, editors, and libraries to build for web, mobile, desktop, gaming, and IoT.
What Is Electron?
Electron is an open-source framework for building desktop applications. It was formerly known as ‘Atom shell’ and is developed and maintained by GitHub. It lets you write cross-platform desktop applications using HTML, CSS, and JavaScript. This means that you can build desktop applications for Windows, MacOS and other platforms using one code base. It is based on Node.js and Chromium. Examples of applications built with Electron include the popular Atom editior, Visual Studio Code, WordPress for desktop, and Slack.
Installation
You can install Electron in your project using NPM:
npm install electron --save-dev
You can also install it globally if you’re going to be working with electron apps a lot using this command:
npm install electron -g
Building Vuejs Apps For Desktop With Electron
If you’re familiar with building web applications using Vuejs, it is possible to build desktop applications using Vuejs. All you need for this is the Vue CLI Plugin Electron Builder.
The Vue CLI Plugin Electron Builder
This tool allows you to build Vue apps for desktop with Electron, this means that it makes your Vue application work as an electron app. This means that your Vue application which possibly is a web application can be extended to work in desktop environments without the need to build a separate desktop application in another framework. This gives Vue developers the option and power to go beyond the web. Going forward, you can work on that idea you have and give users a desktop application option — one that can run on Windows, macOS, and LinUX.
To see this in action, we’re going to be building a News app using the News API. The application will provide breaking news headlines and allow you to search for articles from news sources and blogs all over the web with their API. All you need to get started with them is your personal API key which can be gotten from here.
We’ll be building a simple app that offers the following:
A page that displays top and breaking headlines from a selected country with the option to choose a country using their /top-headlines endpoint. News API provides news from a list of countries that they support, find the list here.
News from a selected category using a combination of their /everything endpoint and a query parameter q with which we’ll specify our category.
After getting your API Key, we can create our application using the Vue CLI. Ensure you have the Vue CLI installed on your system, if you do not, install it using this command:
npm install -g @vue/cli # OR yarn global add @vue/cli
Once this is done, create your News app using the CLI:
vue create news-app
We’ll fetch the data from the News API by using Axios for this tutorial, but you can use any alternative you’re more comfortable with. You can install Axios by using any of the following commands:
//NPM npm install axios // YARN yarn add axios
The next step would be to set up an Axios instance for global config in our application. We’re going to be creating a plugins folder in the src folder where we’ll create this axios.js file. After creating the file, add the following lines of code:
import axios from "axios"; let baseURL = `https://newsapi.org/v2`; let apiKey = process.env.VUE_APP_APIKEY; const instance = axios.create({ baseURL: baseURL, timeout: 30000, headers: { "X-Api-Key": apiKey, }, }); export default instance;
Here, we define our baseURL and apiKey which we got from News API and pass it to a new instance of Axios. This instance accepts the baseURL and apiKey together with a timeout property. News API requires you to add your API Key when making a request to their API and offers 3 ways to attach it to your request but here, we’re adding it to the header X-Api-Key property after which we export instance. Once this is done, we can now use this config for all our Axios requests in our app.
When this is done, you can add the Plugin Electron builder with the CLI using this command:
vue add electron-builder
You’ll be prompted to select your preferred Electron version, I selected version 9.0.0 because it is the latest version of Electron (at the time of writing).
When this is done, you can now serve your application using this command:
Using Yarn(strongly recommended) yarn electron:serve OR NPM npm run electron:serve
This will take some time to compile and serve your app. When that is done, your application will pop open on your system, this should look like this:
Auto-open state of your electron app. (Large preview)
If you close the devtools of your app, it should look like this:
Landing page your app. (Large preview)
This electron plugin is super helpful and easy to use because every part of the development of this app works the same way as a Vue app. This means you can have one codebase for both your web application and desktop app. Our app will have three parts:
A landing page that renders top news from a country chosen at random.
A page for rendering top news from the user’s country of choice.
A page that renders top news from a category of the user’s selection.
For this, we’re going to be needing a header component for all our nav links. So let us create a file in the components folder and name it header.vue, and afterward add the following lines of code to it:
<template> <header class="header"> <div class="logo"> <div class="logo__container"> <img src="../assets/logo.png" alt="News app logo" class="logo__image" /> </div> <h1>News App</h1> </div> <nav class="nav"> <h4 class="nav__link"> <router-link to="/home">Home</router-link> </h4> <h4 class="nav__link"> <router-link to="/top-news">Top News</router-link> </h4> <h4 class="nav__link"> <router-link to="/categories">News By Category</router-link> </h4> </nav> </header> </template> <script> export default { name: "app-header", }; </script> <style> .header { display: flex; flex-wrap: wrap; justify-content: space-between; } .logo { display: flex; flex-wrap: nowrap; justify-content: space-between; align-items: center; height: 50px; } .logo__container { width: 50px; height: 50px; } .logo__image { max-width: 100%; max-height: 100%; } .nav { display: flex; flex-wrap: wrap; width: 350px; justify-content: space-between; } </style>
Here, we create a header component that has our app name and logo (image can be found on my GitHub) together with a nav section that contains links to the other parts of our application. The next thing would be to import this page on our layout page — App.vue so we can see our header on every page.
<template> <div id="app"> <app-header /> <router-view /> </div> </template> <script> import appHeader from "@/components/Header.vue"; export default { name: "layout", components: { appHeader, }, }; </script> <style> @import url("https://fonts.Googleapis.com/css2?family=Abel&family=Staatliches&display=swap"); html, #app { min-height: 100vh; } #app { font-family: "Abel", sans-serif; -webkit-font-smoothing: antialiased; -moz-osx-font-smoothing: grayscale; text-align: center; color: #2c3e50; background-color: #fff; } #app h1 { font-family: "Staatliches", cursive; } a { font-weight: bold; color: #2c3e50; text-decoration: none; } a:hover { text-decoration: underline; } a.router-link-exact-active { color: #42b983; } </style>
Here, we replace the default content in the template section with our newly created header component after we have imported and declared it in the script section. Finally, we add some styling for the whole app in the style section.
Now if we try to view our app, it should look like this:
Empty landing page. (Large preview)
The next step would be to add content to our Home.vue file. This page would host the first section of our app; Top news from a country selected at random. Update your Home.vue file with the following lines of code:
<template> <section class="home"> <h1>Welcome to News App</h1> <h4>Displaying Top News from </h4> <div class="articles__div" v-if="articles"> <news-card v-for="(article, index) in articles" :key="index" :article="article" ></news-card> </div> </section> </template> <script> import { mapActions, mapState } from "vuex"; import NewsCard from "../components/NewsCard"; export default { data() { return { articles: "", countryInfo: "", }; }, components: { NewsCard, }, mounted() { this.fetchTopNews(); }, computed: { ...mapState(["countries"]), }, methods: { ...mapActions(["getTopNews"]), async fetchTopNews() { let countriesLength = this.countries.length; let countryIndex = Math.floor( Math.random() * (countriesLength - 1) + 1 ); this.countryInfo = this.countries[countryIndex]; let { data } = await this.getTopNews( this.countries[countryIndex].value ); this.articles = data.articles; }, }, }; </script> <style> .articles__div { display: flex; flex-wrap: wrap; justify-content: center; } </style>
In the script section of this file, we import mapState and mapActions from Vuex, which we’ll be using later on in this file. We also import a NewsCard component (we’ll create this next) that would render all news headlines on this page. We then make use of the fetchTopNews method to fetch the latest news from a country selected at random from the array of countries in our store. This country is passed to our getTopNews action, this would be appended to the baseURL as a query for a country like so baseURL/top-news?country=${randomCountry}. Once this is done, we loop through this data and pass it to the article prop of our Newscard component in the template section. We also have a paragraph that indicates which country the top news is from.
The next thing would be to set up our NewsCard component that will display this news. Create a new file inside your components folder, name it NewsCard.vue, and add the following lines of code to it:
<template> <section class="news"> <div class="news__section"> <h1 class="news__title"> <a class="article__link" :href="article.url" target="_blank"> </a> </h1> <h3 class="news__author" v-if="article.author"></h3> <!-- <p class="article__paragraph"></p> --> <h5 class="article__published"></h5> </div> <div class="image__container"> <img class="news__img" src="../assets/logo.png" :data-src="article.urlToImage" :alt="article.title" /> </div> </section> </template> <script> export default { name: "news-card", props: { article: Object, }, mounted() { this.lazyLoadImages(); }, methods: { lazyLoadImages() { const images = document.querySelectorAll(".news__img"); const options = { // If the image gets within 50px in the Y axis, start the download. root: null, // Page as root rootMargin: "0px", threshold: 0.1, }; const fetchImage = (url) => { return new Promise((resolve, reject) => { const image = new Image(); image.src = url; image.onload = resolve; image.onerror = reject; }); }; const loadImage = (image) => { const src = image.dataset.src; fetchImage(src).then(() => { image.src = src; }); }; const handleIntersection = (entries) => { entries.forEach((entry) => { if (entry.intersectionRatio > 0) { loadImage(entry.target); } }); }; // The observer for the images on the page const observer = new IntersectionObserver(handleIntersection, options); images.forEach((img) => { observer.observe(img); }); }, }, }; </script> <style> .news { width: 100%; display: flex; flex-direction: row; align-items: flex-start; max-width: 550px; box-shadow: 2px 1px 7px 1px #eee; padding: 20px 5px; box-sizing: border-box; margin: 15px 5px; border-radius: 4px; } .news__section { width: 100%; max-width: 350px; margin-right: 5px; } .news__title { font-size: 15px; text-align: left; margin-top: 0; } .news__author { font-size: 14px; text-align: left; font-weight: normal; } .article__published { text-align: left; } .image__container { width: 100%; max-width: 180px; max-height: 180px; } .news__img { transition: max-width 300ms cubic-bezier(0.4, 0, 1, 1), max-height 300ms cubic-bezier(0.4, 0, 1, 1); max-width: 150px; max-height: 150px; } .news__img:hover { max-width: 180px; max-height: 180px; } .article__link { text-decoration: none; color: inherit; } </style>
Here, we display data passed into this component using the article object prop. We also have a method that lazy loads the images attached to each article. This method loops through the number of article images we have and lazy loads them when they become visible. Finally, we have styles targeted at this component in the style section.
The next thing will be to set up our store so we can start getting the latest news. Add the following lines of code to your index.js file:
import Vue from "vue"; import Vuex from "vuex"; import axios from "../plugins/axios"; Vue.use(Vuex); const store = new Vuex.Store({ state: { countries: [{ name: "United States of America", value: "us", }, { name: "Nigeria", value: "ng", }, { name: "Argentina", value: "ar", }, { name: "Canada", value: "ca", }, { name: "South Africa", value: "za", }, ], categories: [ "entertainment", "general", "health", "science", "business", "sports", "technology", ], }, mutations: {}, actions: { async getTopNews(context, country) { let res = await axios({ url: `/top-headlines?country=${country}`, method: "GET", }); return res; }, }, }); export default store;
We are adding two properties to our store, one of these properties is countries. This property contains an array of countries’ object. We also have the categories property; this contains an array of available categories on the News API. The reader will like the freedom to view the top news from specific countries and categories; this will also be needed in more than one part of the app and that is why we’re making use of the store. In the actions section of our store, we have a getTopNews method that fetches top news from a country(this country was passed from the component that called this action).
At this point, if we open our app, we should see our landing page that looks like this:
Updated landing page. (Large preview)
The background.js file
This file is the entry point for Electron into your app. It controls all the Desktop app-like settings for this app. The default state of this file can be found on my GitHub.
In this file, we have some predefined configurations set for the app such as the default height and width for your app. Let’s take a look at some of the things you can do in this file.
Enabling the Vuejs devtools
By default, you have access to dev tools in Electron but it is not enabled after installation. This is as a result of an existing bug on windows 10, so if you open you background.js file, you will find some commented out code with comments that state why they’re commented out:
// Install Vue Devtools // Devtools extensions are broken in Electron 6.0.0 and greater // See https://github.com/nklayman/vue-cli-plugin-electron-builder/issues/378 for more info // Electron will not launch with Devtools extensions installed on Windows 10 with dark mode // If you are not using Windows 10 dark mode, you may uncomment these lines // In addition, if the linked issue is closed, you can upgrade electron and uncomment these lines // try { // await installVueDevtools() // } catch (e) { // console.error('Vue Devtools failed to install:', e.toString()) // }
So if you’re not affected by this bug, you can uncomment the try/catch block and also search for installVueDevtools in this same file(line 5) and also uncomment it. Once this is done, your app will automatically restart, and when you check your dev tools, you should see the Vuejs Devtools.
Vuejs in devtools. (Large preview)
Selecting A Custom Icon For Your App
By default, the Electron icon is set as the default icon for your app, and most of the time, you probably would like to set your own custom icon. To do this, move your icon into your public folder, and rename it to be icon.png. The next thing to do would be to add the required dependency, electron-icon-builder.
You can install it using any of the following commands:
// With Yarn: yarn add --dev electron-icon-builder // or with NPM: npm install --save-dev electron-icon-builder
Once this is done, you can run this next command. It will convert your icon into Electron format and print the following in your console when this done.
Generated info in terminal. (Large preview)
The next thing would be to set the icon option in background.js file. This option goes inside the BrowserWindow option that is imported from Electron. To do this, update BrowserWindow to look like this:
// Add this to the top of your file /* global __static */ // import path import path from 'path' // Replace win = new BrowserWindow({ width: 800, height: 600 }) // With win = new BrowserWindow({ width: 800, height: 600, icon: path.join(__static, 'icon.png') })
Now if we run yarn run electron:build and view our app, we should see the updated icon being used as the app icon but it doesn’t change in development. This issue helps address a manual fix for it on macOS.
Setting Title For Your App
You will notice the title of your app is set to the app name (news-app in this case) and we’ll need to change it. To do that, we have to add a title property to the BrowserWindow method in our background.js file like this:
win = new BrowserWindow({ width: 600, height: 500, title: "News App", icon: path.join(__static, "icon.png"), webPreferences: { // Use pluginOptions.nodeIntegration, leave this alone // See nklayman.github.io/vue-cli-plugin-electron-builder/guide/security.html#node-integration for more info nodeIntegration: process.env.ELECTRON_NODE_INTEGRATION, }, });
Here, we’re setting the title of our app to ‘News App’. But if your index.html file has a title selected or your title doesn’t change to this, try adding this code to your file:
win.on("page-title-updated", (event) => event.preventDefault());
We’re listening for an event that gets fired when our title is updated from BrowserWindow. When this event is fired, we’re telling Electron not to update the title with the one found in index.html file.
Another thing that might be worth changing is the productName, this controls what name appears when you hover on your app’s icon or what your computer recognizes the app as. Right now, the name of our app is Electron. To change this name in production, create a vue.config.js file and add the following lines of code to it:
module.exports = { pluginOptions: { electronBuilder: { builderOptions: { productName: "News App", }, }, }, };
Here, we define productName to be ‘News App’ so that when we run the build command for our app, the name changes from ‘Electron’ to ‘News App’.
Multi Platform Build
By default, when you run the build command, the app that gets created is dependent on the platform that it is being run on. This means if you run the build command on LinUX, the app that gets created would be a LinUX desktop app. The same also applies to other platforms(macOS and windows). But Electron comes with the option to specify a platform (or two platforms) you want to generate. The available options are:
mac
win
linUX
So in order to build the Windows version of your app, run the following command:
// NPM npm electron:build -- --win nsis // YARN yarn electron:build --win nsis
Conclusion
The completed application can be found on my GitHub. The official Electron documentation provides information and a guide that helps you customize your desktop app whichever way you want. Some of the things I tried out but aren’t included in this tutorial are:
Customizing your dock on macOS — https://www.electronjs.org/docs/tutorial/macos-dock.
Setting resizeable, maximizable, and many more — https://github.com/electron/electron/blob/master/docs/api/browser-window.md#new-browserwindowoptions.
So if you’re looking to do much more with your Electron application, their official docs is a good place to start.
Related Resources
Node.jshttps://en.wikipedia.org/wiki/Node.js
Java (programming language)https://en.wikipedia.org/wiki/Java_(programming_language)
Electron (software framework)
JavaFX 14
electronjs
Electron Documentation
Vue CLI Plugin Electron Builder
Lazy Loading Images for Performance Using Intersection Observer by Chris Nwamba
axios
Getting Started With Axios In Nuxthttps://www.smashingmagazine.com/2020/05/getting-started-axios-nuxt/) by Timi Omoyeni
(ks, ra, yk, il)
Website Design & SEO Delray Beach by DBL07.co
Delray Beach SEO
source http://www.scpie.org/building-desktop-apps-with-electron-and-vue/ source https://scpie.tumblr.com/post/624279195687747584
0 notes
Text
Building Desktop Apps With Electron And Vue
About The Author
Front-end developer based in Lagos, Nigeria. He enjoys converting designs into code and building things for the web. More about Timi …
Electron is an open-source software framework developed and maintained by GitHub. It allows for the development of desktop GUI applications using web technologies. In this tutorial, Timi Omoyeni explains what you need to keep in mind when building a desktop application with Vue.js using the Vue CLI Plugin Electron Builder.
JavaScript used to be known as the language for building websites and web applications especially with some of its frameworks such as React, Vue, and Angular but over time (as early as 2009), it became possible for JavaScript to run outside the browser with the emergence of Node.js, an open-source, cross-platform, JavaScript runtime environment that executes JavaScript code outside a web browser. This has led to the ability to use JavaScript for a whole lot more than just web applications, and one of which is building desktop applications using Electron.js.
Electron enables you to create desktop applications with pure JavaScript by providing a runtime with rich native (operating system) APIs. You can see it as a variant of the Node.js runtime that is focused on desktop applications instead of web servers.
In this tutorial, we’re going to learn how to build desktop applications using Electron, we’re also going to learn how to use Vuejs to build Electron applications.
Note: Basic knowledge of Vue.js and the Vue CLI is required to follow this tutorial. All of the code used in this tutorial can be found on my GitHub. Feel free to clone and play around with it!
What Are Desktop Applications?
Desktop applications are applications that run stand-alone in desktop or laptop computers. They are applications that perform specific tasks and are installed solely for this purpose.
An example of a desktop application is your Microsoft Word, which is used for creating and typing documents. Other examples of common desktop applications are web browsers, Visual Studio Code, and Adobe Photoshop. Desktop applications are different from web applications because you have to install the desktop application in order for you to access and make use of it, and they sometimes do not need internet access for them to work. Web apps, on the other hand, can be accessed by simply visiting the URL that such an app is hosted on and always need internet access before you can access them.
Examples of frameworks used in building desktop apps include:
Java Java is a general-purpose programming language that is class-based, object-oriented, and designed to have as few implementation dependencies as possible. It is intended to let application developers write once, run anywhere (WORA), meaning that compiled Java code can run on all platforms that support Java without the need for recompilation.
Java FX According to their official documentation, it is an open-source, next-generation client application platform for desktop, mobile, and embedded systems built on Java.
C# C# is a general-purpose, multi-paradigm programming language encompassing strong typing, lexically scoped, imperative, declarative, functional, generic, object-oriented, and component-oriented programming disciplines.
.NET .NET is a free, cross-platform, open-source developer platform for building many different types of applications. With .NET, you can use multiple languages, editors, and libraries to build for web, mobile, desktop, gaming, and IoT.
What Is Electron?
Electron is an open-source framework for building desktop applications. It was formerly known as ‘Atom shell’ and is developed and maintained by GitHub. It lets you write cross-platform desktop applications using HTML, CSS, and JavaScript. This means that you can build desktop applications for Windows, MacOS and other platforms using one code base. It is based on Node.js and Chromium. Examples of applications built with Electron include the popular Atom editior, Visual Studio Code, WordPress for desktop, and Slack.
Installation
You can install Electron in your project using NPM:
npm install electron --save-dev
You can also install it globally if you’re going to be working with electron apps a lot using this command:
npm install electron -g
Building Vuejs Apps For Desktop With Electron
If you’re familiar with building web applications using Vuejs, it is possible to build desktop applications using Vuejs. All you need for this is the Vue CLI Plugin Electron Builder.
The Vue CLI Plugin Electron Builder
This tool allows you to build Vue apps for desktop with Electron, this means that it makes your Vue application work as an electron app. This means that your Vue application which possibly is a web application can be extended to work in desktop environments without the need to build a separate desktop application in another framework. This gives Vue developers the option and power to go beyond the web. Going forward, you can work on that idea you have and give users a desktop application option — one that can run on Windows, macOS, and LinUX.
To see this in action, we’re going to be building a News app using the News API. The application will provide breaking news headlines and allow you to search for articles from news sources and blogs all over the web with their API. All you need to get started with them is your personal API key which can be gotten from here.
We’ll be building a simple app that offers the following:
A page that displays top and breaking headlines from a selected country with the option to choose a country using their /top-headlines endpoint. News API provides news from a list of countries that they support, find the list here.
News from a selected category using a combination of their /everything endpoint and a query parameter q with which we’ll specify our category.
After getting your API Key, we can create our application using the Vue CLI. Ensure you have the Vue CLI installed on your system, if you do not, install it using this command:
npm install -g @vue/cli # OR yarn global add @vue/cli
Once this is done, create your News app using the CLI:
vue create news-app
We’ll fetch the data from the News API by using Axios for this tutorial, but you can use any alternative you’re more comfortable with. You can install Axios by using any of the following commands:
//NPM npm install axios // YARN yarn add axios
The next step would be to set up an Axios instance for global config in our application. We’re going to be creating a plugins folder in the src folder where we’ll create this axios.js file. After creating the file, add the following lines of code:
import axios from "axios"; let baseURL = `https://newsapi.org/v2`; let apiKey = process.env.VUE_APP_APIKEY; const instance = axios.create({ baseURL: baseURL, timeout: 30000, headers: { "X-Api-Key": apiKey, }, }); export default instance;
Here, we define our baseURL and apiKey which we got from News API and pass it to a new instance of Axios. This instance accepts the baseURL and apiKey together with a timeout property. News API requires you to add your API Key when making a request to their API and offers 3 ways to attach it to your request but here, we’re adding it to the header X-Api-Key property after which we export instance. Once this is done, we can now use this config for all our Axios requests in our app.
When this is done, you can add the Plugin Electron builder with the CLI using this command:
vue add electron-builder
You’ll be prompted to select your preferred Electron version, I selected version 9.0.0 because it is the latest version of Electron (at the time of writing).
When this is done, you can now serve your application using this command:
Using Yarn(strongly recommended) yarn electron:serve OR NPM npm run electron:serve
This will take some time to compile and serve your app. When that is done, your application will pop open on your system, this should look like this:
Auto-open state of your electron app. (Large preview)
If you close the devtools of your app, it should look like this:
Landing page your app. (Large preview)
This electron plugin is super helpful and easy to use because every part of the development of this app works the same way as a Vue app. This means you can have one codebase for both your web application and desktop app. Our app will have three parts:
A landing page that renders top news from a country chosen at random.
A page for rendering top news from the user’s country of choice.
A page that renders top news from a category of the user’s selection.
For this, we’re going to be needing a header component for all our nav links. So let us create a file in the components folder and name it header.vue, and afterward add the following lines of code to it:
<template> <header class="header"> <div class="logo"> <div class="logo__container"> <img src="../assets/logo.png" alt="News app logo" class="logo__image" /> </div> <h1>News App</h1> </div> <nav class="nav"> <h4 class="nav__link"> <router-link to="/home">Home</router-link> </h4> <h4 class="nav__link"> <router-link to="/top-news">Top News</router-link> </h4> <h4 class="nav__link"> <router-link to="/categories">News By Category</router-link> </h4> </nav> </header> </template> <script> export default { name: "app-header", }; </script> <style> .header { display: flex; flex-wrap: wrap; justify-content: space-between; } .logo { display: flex; flex-wrap: nowrap; justify-content: space-between; align-items: center; height: 50px; } .logo__container { width: 50px; height: 50px; } .logo__image { max-width: 100%; max-height: 100%; } .nav { display: flex; flex-wrap: wrap; width: 350px; justify-content: space-between; } </style>
Here, we create a header component that has our app name and logo (image can be found on my GitHub) together with a nav section that contains links to the other parts of our application. The next thing would be to import this page on our layout page — App.vue so we can see our header on every page.
<template> <div id="app"> <app-header /> <router-view /> </div> </template> <script> import appHeader from "@/components/Header.vue"; export default { name: "layout", components: { appHeader, }, }; </script> <style> @import url("https://fonts.Googleapis.com/css2?family=Abel&family=Staatliches&display=swap"); html, #app { min-height: 100vh; } #app { font-family: "Abel", sans-serif; -webkit-font-smoothing: antialiased; -moz-osx-font-smoothing: grayscale; text-align: center; color: #2c3e50; background-color: #fff; } #app h1 { font-family: "Staatliches", cursive; } a { font-weight: bold; color: #2c3e50; text-decoration: none; } a:hover { text-decoration: underline; } a.router-link-exact-active { color: #42b983; } </style>
Here, we replace the default content in the template section with our newly created header component after we have imported and declared it in the script section. Finally, we add some styling for the whole app in the style section.
Now if we try to view our app, it should look like this:
Empty landing page. (Large preview)
The next step would be to add content to our Home.vue file. This page would host the first section of our app; Top news from a country selected at random. Update your Home.vue file with the following lines of code:
<template> <section class="home"> <h1>Welcome to News App</h1> <h4>Displaying Top News from </h4> <div class="articles__div" v-if="articles"> <news-card v-for="(article, index) in articles" :key="index" :article="article" ></news-card> </div> </section> </template> <script> import { mapActions, mapState } from "vuex"; import NewsCard from "../components/NewsCard"; export default { data() { return { articles: "", countryInfo: "", }; }, components: { NewsCard, }, mounted() { this.fetchTopNews(); }, computed: { ...mapState(["countries"]), }, methods: { ...mapActions(["getTopNews"]), async fetchTopNews() { let countriesLength = this.countries.length; let countryIndex = Math.floor( Math.random() * (countriesLength - 1) + 1 ); this.countryInfo = this.countries[countryIndex]; let { data } = await this.getTopNews( this.countries[countryIndex].value ); this.articles = data.articles; }, }, }; </script> <style> .articles__div { display: flex; flex-wrap: wrap; justify-content: center; } </style>
In the script section of this file, we import mapState and mapActions from Vuex, which we’ll be using later on in this file. We also import a NewsCard component (we’ll create this next) that would render all news headlines on this page. We then make use of the fetchTopNews method to fetch the latest news from a country selected at random from the array of countries in our store. This country is passed to our getTopNews action, this would be appended to the baseURL as a query for a country like so baseURL/top-news?country=${randomCountry}. Once this is done, we loop through this data and pass it to the article prop of our Newscard component in the template section. We also have a paragraph that indicates which country the top news is from.
The next thing would be to set up our NewsCard component that will display this news. Create a new file inside your components folder, name it NewsCard.vue, and add the following lines of code to it:
<template> <section class="news"> <div class="news__section"> <h1 class="news__title"> <a class="article__link" :href="article.url" target="_blank"> </a> </h1> <h3 class="news__author" v-if="article.author"></h3> <!-- <p class="article__paragraph"></p> --> <h5 class="article__published"></h5> </div> <div class="image__container"> <img class="news__img" src="../assets/logo.png" :data-src="article.urlToImage" :alt="article.title" /> </div> </section> </template> <script> export default { name: "news-card", props: { article: Object, }, mounted() { this.lazyLoadImages(); }, methods: { lazyLoadImages() { const images = document.querySelectorAll(".news__img"); const options = { // If the image gets within 50px in the Y axis, start the download. root: null, // Page as root rootMargin: "0px", threshold: 0.1, }; const fetchImage = (url) => { return new Promise((resolve, reject) => { const image = new Image(); image.src = url; image.onload = resolve; image.onerror = reject; }); }; const loadImage = (image) => { const src = image.dataset.src; fetchImage(src).then(() => { image.src = src; }); }; const handleIntersection = (entries) => { entries.forEach((entry) => { if (entry.intersectionRatio > 0) { loadImage(entry.target); } }); }; // The observer for the images on the page const observer = new IntersectionObserver(handleIntersection, options); images.forEach((img) => { observer.observe(img); }); }, }, }; </script> <style> .news { width: 100%; display: flex; flex-direction: row; align-items: flex-start; max-width: 550px; box-shadow: 2px 1px 7px 1px #eee; padding: 20px 5px; box-sizing: border-box; margin: 15px 5px; border-radius: 4px; } .news__section { width: 100%; max-width: 350px; margin-right: 5px; } .news__title { font-size: 15px; text-align: left; margin-top: 0; } .news__author { font-size: 14px; text-align: left; font-weight: normal; } .article__published { text-align: left; } .image__container { width: 100%; max-width: 180px; max-height: 180px; } .news__img { transition: max-width 300ms cubic-bezier(0.4, 0, 1, 1), max-height 300ms cubic-bezier(0.4, 0, 1, 1); max-width: 150px; max-height: 150px; } .news__img:hover { max-width: 180px; max-height: 180px; } .article__link { text-decoration: none; color: inherit; } </style>
Here, we display data passed into this component using the article object prop. We also have a method that lazy loads the images attached to each article. This method loops through the number of article images we have and lazy loads them when they become visible. Finally, we have styles targeted at this component in the style section.
The next thing will be to set up our store so we can start getting the latest news. Add the following lines of code to your index.js file:
import Vue from "vue"; import Vuex from "vuex"; import axios from "../plugins/axios"; Vue.use(Vuex); const store = new Vuex.Store({ state: { countries: [{ name: "United States of America", value: "us", }, { name: "Nigeria", value: "ng", }, { name: "Argentina", value: "ar", }, { name: "Canada", value: "ca", }, { name: "South Africa", value: "za", }, ], categories: [ "entertainment", "general", "health", "science", "business", "sports", "technology", ], }, mutations: {}, actions: { async getTopNews(context, country) { let res = await axios({ url: `/top-headlines?country=${country}`, method: "GET", }); return res; }, }, }); export default store;
We are adding two properties to our store, one of these properties is countries. This property contains an array of countries’ object. We also have the categories property; this contains an array of available categories on the News API. The reader will like the freedom to view the top news from specific countries and categories; this will also be needed in more than one part of the app and that is why we’re making use of the store. In the actions section of our store, we have a getTopNews method that fetches top news from a country(this country was passed from the component that called this action).
At this point, if we open our app, we should see our landing page that looks like this:
Updated landing page. (Large preview)
The background.js file
This file is the entry point for Electron into your app. It controls all the Desktop app-like settings for this app. The default state of this file can be found on my GitHub.
In this file, we have some predefined configurations set for the app such as the default height and width for your app. Let’s take a look at some of the things you can do in this file.
Enabling the Vuejs devtools
By default, you have access to dev tools in Electron but it is not enabled after installation. This is as a result of an existing bug on windows 10, so if you open you background.js file, you will find some commented out code with comments that state why they’re commented out:
// Install Vue Devtools // Devtools extensions are broken in Electron 6.0.0 and greater // See https://github.com/nklayman/vue-cli-plugin-electron-builder/issues/378 for more info // Electron will not launch with Devtools extensions installed on Windows 10 with dark mode // If you are not using Windows 10 dark mode, you may uncomment these lines // In addition, if the linked issue is closed, you can upgrade electron and uncomment these lines // try { // await installVueDevtools() // } catch (e) { // console.error('Vue Devtools failed to install:', e.toString()) // }
So if you’re not affected by this bug, you can uncomment the try/catch block and also search for installVueDevtools in this same file(line 5) and also uncomment it. Once this is done, your app will automatically restart, and when you check your dev tools, you should see the Vuejs Devtools.
Vuejs in devtools. (Large preview)
Selecting A Custom Icon For Your App
By default, the Electron icon is set as the default icon for your app, and most of the time, you probably would like to set your own custom icon. To do this, move your icon into your public folder, and rename it to be icon.png. The next thing to do would be to add the required dependency, electron-icon-builder.
You can install it using any of the following commands:
// With Yarn: yarn add --dev electron-icon-builder // or with NPM: npm install --save-dev electron-icon-builder
Once this is done, you can run this next command. It will convert your icon into Electron format and print the following in your console when this done.
Generated info in terminal. (Large preview)
The next thing would be to set the icon option in background.js file. This option goes inside the BrowserWindow option that is imported from Electron. To do this, update BrowserWindow to look like this:
// Add this to the top of your file /* global __static */ // import path import path from 'path' // Replace win = new BrowserWindow({ width: 800, height: 600 }) // With win = new BrowserWindow({ width: 800, height: 600, icon: path.join(__static, 'icon.png') })
Now if we run yarn run electron:build and view our app, we should see the updated icon being used as the app icon but it doesn’t change in development. This issue helps address a manual fix for it on macOS.
Setting Title For Your App
You will notice the title of your app is set to the app name (news-app in this case) and we’ll need to change it. To do that, we have to add a title property to the BrowserWindow method in our background.js file like this:
win = new BrowserWindow({ width: 600, height: 500, title: "News App", icon: path.join(__static, "icon.png"), webPreferences: { // Use pluginOptions.nodeIntegration, leave this alone // See nklayman.github.io/vue-cli-plugin-electron-builder/guide/security.html#node-integration for more info nodeIntegration: process.env.ELECTRON_NODE_INTEGRATION, }, });
Here, we’re setting the title of our app to ‘News App’. But if your index.html file has a title selected or your title doesn’t change to this, try adding this code to your file:
win.on("page-title-updated", (event) => event.preventDefault());
We’re listening for an event that gets fired when our title is updated from BrowserWindow. When this event is fired, we’re telling Electron not to update the title with the one found in index.html file.
Another thing that might be worth changing is the productName, this controls what name appears when you hover on your app’s icon or what your computer recognizes the app as. Right now, the name of our app is Electron. To change this name in production, create a vue.config.js file and add the following lines of code to it:
module.exports = { pluginOptions: { electronBuilder: { builderOptions: { productName: "News App", }, }, }, };
Here, we define productName to be ‘News App’ so that when we run the build command for our app, the name changes from ‘Electron’ to ‘News App’.
Multi Platform Build
By default, when you run the build command, the app that gets created is dependent on the platform that it is being run on. This means if you run the build command on LinUX, the app that gets created would be a LinUX desktop app. The same also applies to other platforms(macOS and windows). But Electron comes with the option to specify a platform (or two platforms) you want to generate. The available options are:
mac
win
linUX
So in order to build the Windows version of your app, run the following command:
// NPM npm electron:build -- --win nsis // YARN yarn electron:build --win nsis
Conclusion
The completed application can be found on my GitHub. The official Electron documentation provides information and a guide that helps you customize your desktop app whichever way you want. Some of the things I tried out but aren’t included in this tutorial are:
Customizing your dock on macOS — https://www.electronjs.org/docs/tutorial/macos-dock.
Setting resizeable, maximizable, and many more — https://github.com/electron/electron/blob/master/docs/api/browser-window.md#new-browserwindowoptions.
So if you’re looking to do much more with your Electron application, their official docs is a good place to start.
Related Resources
Node.jshttps://en.wikipedia.org/wiki/Node.js
Java (programming language)https://en.wikipedia.org/wiki/Java_(programming_language)
Electron (software framework)
JavaFX 14
electronjs
Electron Documentation
Vue CLI Plugin Electron Builder
Lazy Loading Images for Performance Using Intersection Observer by Chris Nwamba
axios
Getting Started With Axios In Nuxthttps://www.smashingmagazine.com/2020/05/getting-started-axios-nuxt/) by Timi Omoyeni
(ks, ra, yk, il)
Website Design & SEO Delray Beach by DBL07.co
Delray Beach SEO
source http://www.scpie.org/building-desktop-apps-with-electron-and-vue/
0 notes
Text
Building Desktop Apps With Electron And Vue
About The Author
Front-end developer based in Lagos, Nigeria. He enjoys converting designs into code and building things for the web. More about Timi …
Electron is an open-source software framework developed and maintained by GitHub. It allows for the development of desktop GUI applications using web technologies. In this tutorial, Timi Omoyeni explains what you need to keep in mind when building a desktop application with Vue.js using the Vue CLI Plugin Electron Builder.
JavaScript used to be known as the language for building websites and web applications especially with some of its frameworks such as React, Vue, and Angular but over time (as early as 2009), it became possible for JavaScript to run outside the browser with the emergence of Node.js, an open-source, cross-platform, JavaScript runtime environment that executes JavaScript code outside a web browser. This has led to the ability to use JavaScript for a whole lot more than just web applications, and one of which is building desktop applications using Electron.js.
Electron enables you to create desktop applications with pure JavaScript by providing a runtime with rich native (operating system) APIs. You can see it as a variant of the Node.js runtime that is focused on desktop applications instead of web servers.
In this tutorial, we’re going to learn how to build desktop applications using Electron, we’re also going to learn how to use Vuejs to build Electron applications.
Note: Basic knowledge of Vue.js and the Vue CLI is required to follow this tutorial. All of the code used in this tutorial can be found on my GitHub. Feel free to clone and play around with it!
What Are Desktop Applications?
Desktop applications are applications that run stand-alone in desktop or laptop computers. They are applications that perform specific tasks and are installed solely for this purpose.
An example of a desktop application is your Microsoft Word, which is used for creating and typing documents. Other examples of common desktop applications are web browsers, Visual Studio Code, and Adobe Photoshop. Desktop applications are different from web applications because you have to install the desktop application in order for you to access and make use of it, and they sometimes do not need internet access for them to work. Web apps, on the other hand, can be accessed by simply visiting the URL that such an app is hosted on and always need internet access before you can access them.
Examples of frameworks used in building desktop apps include:
Java Java is a general-purpose programming language that is class-based, object-oriented, and designed to have as few implementation dependencies as possible. It is intended to let application developers write once, run anywhere (WORA), meaning that compiled Java code can run on all platforms that support Java without the need for recompilation.
Java FX According to their official documentation, it is an open-source, next-generation client application platform for desktop, mobile, and embedded systems built on Java.
C# C# is a general-purpose, multi-paradigm programming language encompassing strong typing, lexically scoped, imperative, declarative, functional, generic, object-oriented, and component-oriented programming disciplines.
.NET .NET is a free, cross-platform, open-source developer platform for building many different types of applications. With .NET, you can use multiple languages, editors, and libraries to build for web, mobile, desktop, gaming, and IoT.
What Is Electron?
Electron is an open-source framework for building desktop applications. It was formerly known as ‘Atom shell’ and is developed and maintained by GitHub. It lets you write cross-platform desktop applications using HTML, CSS, and JavaScript. This means that you can build desktop applications for Windows, MacOS and other platforms using one code base. It is based on Node.js and Chromium. Examples of applications built with Electron include the popular Atom editior, Visual Studio Code, WordPress for desktop, and Slack.
Installation
You can install Electron in your project using NPM:
npm install electron --save-dev
You can also install it globally if you’re going to be working with electron apps a lot using this command:
npm install electron -g
Building Vuejs Apps For Desktop With Electron
If you’re familiar with building web applications using Vuejs, it is possible to build desktop applications using Vuejs. All you need for this is the Vue CLI Plugin Electron Builder.
The Vue CLI Plugin Electron Builder
This tool allows you to build Vue apps for desktop with Electron, this means that it makes your Vue application work as an electron app. This means that your Vue application which possibly is a web application can be extended to work in desktop environments without the need to build a separate desktop application in another framework. This gives Vue developers the option and power to go beyond the web. Going forward, you can work on that idea you have and give users a desktop application option — one that can run on Windows, macOS, and LinUX.
To see this in action, we’re going to be building a News app using the News API. The application will provide breaking news headlines and allow you to search for articles from news sources and blogs all over the web with their API. All you need to get started with them is your personal API key which can be gotten from here.
We’ll be building a simple app that offers the following:
A page that displays top and breaking headlines from a selected country with the option to choose a country using their /top-headlines endpoint. News API provides news from a list of countries that they support, find the list here.
News from a selected category using a combination of their /everything endpoint and a query parameter q with which we’ll specify our category.
After getting your API Key, we can create our application using the Vue CLI. Ensure you have the Vue CLI installed on your system, if you do not, install it using this command:
npm install -g @vue/cli # OR yarn global add @vue/cli
Once this is done, create your News app using the CLI:
vue create news-app
We’ll fetch the data from the News API by using Axios for this tutorial, but you can use any alternative you’re more comfortable with. You can install Axios by using any of the following commands:
//NPM npm install axios // YARN yarn add axios
The next step would be to set up an Axios instance for global config in our application. We’re going to be creating a plugins folder in the src folder where we’ll create this axios.js file. After creating the file, add the following lines of code:
import axios from "axios"; let baseURL = `https://newsapi.org/v2`; let apiKey = process.env.VUE_APP_APIKEY; const instance = axios.create({ baseURL: baseURL, timeout: 30000, headers: { "X-Api-Key": apiKey, }, }); export default instance;
Here, we define our baseURL and apiKey which we got from News API and pass it to a new instance of Axios. This instance accepts the baseURL and apiKey together with a timeout property. News API requires you to add your API Key when making a request to their API and offers 3 ways to attach it to your request but here, we’re adding it to the header X-Api-Key property after which we export instance. Once this is done, we can now use this config for all our Axios requests in our app.
When this is done, you can add the Plugin Electron builder with the CLI using this command:
vue add electron-builder
You’ll be prompted to select your preferred Electron version, I selected version 9.0.0 because it is the latest version of Electron (at the time of writing).
When this is done, you can now serve your application using this command:
Using Yarn(strongly recommended) yarn electron:serve OR NPM npm run electron:serve
This will take some time to compile and serve your app. When that is done, your application will pop open on your system, this should look like this:
Auto-open state of your electron app. (Large preview)
If you close the devtools of your app, it should look like this:
Landing page your app. (Large preview)
This electron plugin is super helpful and easy to use because every part of the development of this app works the same way as a Vue app. This means you can have one codebase for both your web application and desktop app. Our app will have three parts:
A landing page that renders top news from a country chosen at random.
A page for rendering top news from the user’s country of choice.
A page that renders top news from a category of the user’s selection.
For this, we’re going to be needing a header component for all our nav links. So let us create a file in the components folder and name it header.vue, and afterward add the following lines of code to it:
<template> <header class="header"> <div class="logo"> <div class="logo__container"> <img src="../assets/logo.png" alt="News app logo" class="logo__image" /> </div> <h1>News App</h1> </div> <nav class="nav"> <h4 class="nav__link"> <router-link to="/home">Home</router-link> </h4> <h4 class="nav__link"> <router-link to="/top-news">Top News</router-link> </h4> <h4 class="nav__link"> <router-link to="/categories">News By Category</router-link> </h4> </nav> </header> </template> <script> export default { name: "app-header", }; </script> <style> .header { display: flex; flex-wrap: wrap; justify-content: space-between; } .logo { display: flex; flex-wrap: nowrap; justify-content: space-between; align-items: center; height: 50px; } .logo__container { width: 50px; height: 50px; } .logo__image { max-width: 100%; max-height: 100%; } .nav { display: flex; flex-wrap: wrap; width: 350px; justify-content: space-between; } </style>
Here, we create a header component that has our app name and logo (image can be found on my GitHub) together with a nav section that contains links to the other parts of our application. The next thing would be to import this page on our layout page — App.vue so we can see our header on every page.
<template> <div id="app"> <app-header /> <router-view /> </div> </template> <script> import appHeader from "@/components/Header.vue"; export default { name: "layout", components: { appHeader, }, }; </script> <style> @import url("https://fonts.Googleapis.com/css2?family=Abel&family=Staatliches&display=swap"); html, #app { min-height: 100vh; } #app { font-family: "Abel", sans-serif; -webkit-font-smoothing: antialiased; -moz-osx-font-smoothing: grayscale; text-align: center; color: #2c3e50; background-color: #fff; } #app h1 { font-family: "Staatliches", cursive; } a { font-weight: bold; color: #2c3e50; text-decoration: none; } a:hover { text-decoration: underline; } a.router-link-exact-active { color: #42b983; } </style>
Here, we replace the default content in the template section with our newly created header component after we have imported and declared it in the script section. Finally, we add some styling for the whole app in the style section.
Now if we try to view our app, it should look like this:
Empty landing page. (Large preview)
The next step would be to add content to our Home.vue file. This page would host the first section of our app; Top news from a country selected at random. Update your Home.vue file with the following lines of code:
<template> <section class="home"> <h1>Welcome to News App</h1> <h4>Displaying Top News from </h4> <div class="articles__div" v-if="articles"> <news-card v-for="(article, index) in articles" :key="index" :article="article" ></news-card> </div> </section> </template> <script> import { mapActions, mapState } from "vuex"; import NewsCard from "../components/NewsCard"; export default { data() { return { articles: "", countryInfo: "", }; }, components: { NewsCard, }, mounted() { this.fetchTopNews(); }, computed: { ...mapState(["countries"]), }, methods: { ...mapActions(["getTopNews"]), async fetchTopNews() { let countriesLength = this.countries.length; let countryIndex = Math.floor( Math.random() * (countriesLength - 1) + 1 ); this.countryInfo = this.countries[countryIndex]; let { data } = await this.getTopNews( this.countries[countryIndex].value ); this.articles = data.articles; }, }, }; </script> <style> .articles__div { display: flex; flex-wrap: wrap; justify-content: center; } </style>
In the script section of this file, we import mapState and mapActions from Vuex, which we’ll be using later on in this file. We also import a NewsCard component (we’ll create this next) that would render all news headlines on this page. We then make use of the fetchTopNews method to fetch the latest news from a country selected at random from the array of countries in our store. This country is passed to our getTopNews action, this would be appended to the baseURL as a query for a country like so baseURL/top-news?country=${randomCountry}. Once this is done, we loop through this data and pass it to the article prop of our Newscard component in the template section. We also have a paragraph that indicates which country the top news is from.
The next thing would be to set up our NewsCard component that will display this news. Create a new file inside your components folder, name it NewsCard.vue, and add the following lines of code to it:
<template> <section class="news"> <div class="news__section"> <h1 class="news__title"> <a class="article__link" :href="article.url" target="_blank"> </a> </h1> <h3 class="news__author" v-if="article.author"></h3> <!-- <p class="article__paragraph"></p> --> <h5 class="article__published"></h5> </div> <div class="image__container"> <img class="news__img" src="../assets/logo.png" :data-src="article.urlToImage" :alt="article.title" /> </div> </section> </template> <script> export default { name: "news-card", props: { article: Object, }, mounted() { this.lazyLoadImages(); }, methods: { lazyLoadImages() { const images = document.querySelectorAll(".news__img"); const options = { // If the image gets within 50px in the Y axis, start the download. root: null, // Page as root rootMargin: "0px", threshold: 0.1, }; const fetchImage = (url) => { return new Promise((resolve, reject) => { const image = new Image(); image.src = url; image.onload = resolve; image.onerror = reject; }); }; const loadImage = (image) => { const src = image.dataset.src; fetchImage(src).then(() => { image.src = src; }); }; const handleIntersection = (entries) => { entries.forEach((entry) => { if (entry.intersectionRatio > 0) { loadImage(entry.target); } }); }; // The observer for the images on the page const observer = new IntersectionObserver(handleIntersection, options); images.forEach((img) => { observer.observe(img); }); }, }, }; </script> <style> .news { width: 100%; display: flex; flex-direction: row; align-items: flex-start; max-width: 550px; box-shadow: 2px 1px 7px 1px #eee; padding: 20px 5px; box-sizing: border-box; margin: 15px 5px; border-radius: 4px; } .news__section { width: 100%; max-width: 350px; margin-right: 5px; } .news__title { font-size: 15px; text-align: left; margin-top: 0; } .news__author { font-size: 14px; text-align: left; font-weight: normal; } .article__published { text-align: left; } .image__container { width: 100%; max-width: 180px; max-height: 180px; } .news__img { transition: max-width 300ms cubic-bezier(0.4, 0, 1, 1), max-height 300ms cubic-bezier(0.4, 0, 1, 1); max-width: 150px; max-height: 150px; } .news__img:hover { max-width: 180px; max-height: 180px; } .article__link { text-decoration: none; color: inherit; } </style>
Here, we display data passed into this component using the article object prop. We also have a method that lazy loads the images attached to each article. This method loops through the number of article images we have and lazy loads them when they become visible. Finally, we have styles targeted at this component in the style section.
The next thing will be to set up our store so we can start getting the latest news. Add the following lines of code to your index.js file:
import Vue from "vue"; import Vuex from "vuex"; import axios from "../plugins/axios"; Vue.use(Vuex); const store = new Vuex.Store({ state: { countries: [{ name: "United States of America", value: "us", }, { name: "Nigeria", value: "ng", }, { name: "Argentina", value: "ar", }, { name: "Canada", value: "ca", }, { name: "South Africa", value: "za", }, ], categories: [ "entertainment", "general", "health", "science", "business", "sports", "technology", ], }, mutations: {}, actions: { async getTopNews(context, country) { let res = await axios({ url: `/top-headlines?country=${country}`, method: "GET", }); return res; }, }, }); export default store;
We are adding two properties to our store, one of these properties is countries. This property contains an array of countries’ object. We also have the categories property; this contains an array of available categories on the News API. The reader will like the freedom to view the top news from specific countries and categories; this will also be needed in more than one part of the app and that is why we’re making use of the store. In the actions section of our store, we have a getTopNews method that fetches top news from a country(this country was passed from the component that called this action).
At this point, if we open our app, we should see our landing page that looks like this:
Updated landing page. (Large preview)
The background.js file
This file is the entry point for Electron into your app. It controls all the Desktop app-like settings for this app. The default state of this file can be found on my GitHub.
In this file, we have some predefined configurations set for the app such as the default height and width for your app. Let’s take a look at some of the things you can do in this file.
Enabling the Vuejs devtools
By default, you have access to dev tools in Electron but it is not enabled after installation. This is as a result of an existing bug on windows 10, so if you open you background.js file, you will find some commented out code with comments that state why they’re commented out:
// Install Vue Devtools // Devtools extensions are broken in Electron 6.0.0 and greater // See https://github.com/nklayman/vue-cli-plugin-electron-builder/issues/378 for more info // Electron will not launch with Devtools extensions installed on Windows 10 with dark mode // If you are not using Windows 10 dark mode, you may uncomment these lines // In addition, if the linked issue is closed, you can upgrade electron and uncomment these lines // try { // await installVueDevtools() // } catch (e) { // console.error('Vue Devtools failed to install:', e.toString()) // }
So if you’re not affected by this bug, you can uncomment the try/catch block and also search for installVueDevtools in this same file(line 5) and also uncomment it. Once this is done, your app will automatically restart, and when you check your dev tools, you should see the Vuejs Devtools.
Vuejs in devtools. (Large preview)
Selecting A Custom Icon For Your App
By default, the Electron icon is set as the default icon for your app, and most of the time, you probably would like to set your own custom icon. To do this, move your icon into your public folder, and rename it to be icon.png. The next thing to do would be to add the required dependency, electron-icon-builder.
You can install it using any of the following commands:
// With Yarn: yarn add --dev electron-icon-builder // or with NPM: npm install --save-dev electron-icon-builder
Once this is done, you can run this next command. It will convert your icon into Electron format and print the following in your console when this done.
Generated info in terminal. (Large preview)
The next thing would be to set the icon option in background.js file. This option goes inside the BrowserWindow option that is imported from Electron. To do this, update BrowserWindow to look like this:
// Add this to the top of your file /* global __static */ // import path import path from 'path' // Replace win = new BrowserWindow({ width: 800, height: 600 }) // With win = new BrowserWindow({ width: 800, height: 600, icon: path.join(__static, 'icon.png') })
Now if we run yarn run electron:build and view our app, we should see the updated icon being used as the app icon but it doesn’t change in development. This issue helps address a manual fix for it on macOS.
Setting Title For Your App
You will notice the title of your app is set to the app name (news-app in this case) and we’ll need to change it. To do that, we have to add a title property to the BrowserWindow method in our background.js file like this:
win = new BrowserWindow({ width: 600, height: 500, title: "News App", icon: path.join(__static, "icon.png"), webPreferences: { // Use pluginOptions.nodeIntegration, leave this alone // See nklayman.github.io/vue-cli-plugin-electron-builder/guide/security.html#node-integration for more info nodeIntegration: process.env.ELECTRON_NODE_INTEGRATION, }, });
Here, we’re setting the title of our app to ‘News App’. But if your index.html file has a title selected or your title doesn’t change to this, try adding this code to your file:
win.on("page-title-updated", (event) => event.preventDefault());
We’re listening for an event that gets fired when our title is updated from BrowserWindow. When this event is fired, we’re telling Electron not to update the title with the one found in index.html file.
Another thing that might be worth changing is the productName, this controls what name appears when you hover on your app’s icon or what your computer recognizes the app as. Right now, the name of our app is Electron. To change this name in production, create a vue.config.js file and add the following lines of code to it:
module.exports = { pluginOptions: { electronBuilder: { builderOptions: { productName: "News App", }, }, }, };
Here, we define productName to be ‘News App’ so that when we run the build command for our app, the name changes from ‘Electron’ to ‘News App’.
Multi Platform Build
By default, when you run the build command, the app that gets created is dependent on the platform that it is being run on. This means if you run the build command on LinUX, the app that gets created would be a LinUX desktop app. The same also applies to other platforms(macOS and windows). But Electron comes with the option to specify a platform (or two platforms) you want to generate. The available options are:
mac
win
linUX
So in order to build the Windows version of your app, run the following command:
// NPM npm electron:build -- --win nsis // YARN yarn electron:build --win nsis
Conclusion
The completed application can be found on my GitHub. The official Electron documentation provides information and a guide that helps you customize your desktop app whichever way you want. Some of the things I tried out but aren’t included in this tutorial are:
Customizing your dock on macOS — https://www.electronjs.org/docs/tutorial/macos-dock.
Setting resizeable, maximizable, and many more — https://github.com/electron/electron/blob/master/docs/api/browser-window.md#new-browserwindowoptions.
So if you’re looking to do much more with your Electron application, their official docs is a good place to start.
Related Resources
Node.jshttps://en.wikipedia.org/wiki/Node.js
Java (programming language)https://en.wikipedia.org/wiki/Java_(programming_language)
Electron (software framework)
JavaFX 14
electronjs
Electron Documentation
Vue CLI Plugin Electron Builder
Lazy Loading Images for Performance Using Intersection Observer by Chris Nwamba
axios
Getting Started With Axios In Nuxthttps://www.smashingmagazine.com/2020/05/getting-started-axios-nuxt/) by Timi Omoyeni
(ks, ra, yk, il)
Website Design & SEO Delray Beach by DBL07.co
Delray Beach SEO
source http://www.scpie.org/building-desktop-apps-with-electron-and-vue/ source https://scpie1.blogspot.com/2020/07/building-desktop-apps-with-electron-and.html
0 notes
Photo

How to Build a Vue Front End for a Headless CMS
In this guide, we’ll learn how to build a modern blog website using Vue.js and GraphCMS, a headless CMS platform.
If you’re looking to start a quick blog today, my recommendation is to go straight to WordPress.
But what if you’re a media powerhouse and you want to deliver your content as fast as possible to multiple devices? You’ll probably also need to integrate your content with ads and other third-party services. Well, you could do that with WordPress, but you’ll come across a few problems with that platform.
You’ll need to install a plugin to implement additional features. The more plugins you install, the slower your website becomes.
PHP is quite slow compared to most JavaScript web frameworks. From a developer’s perspective, it’s much easier and faster to implement custom features on a JavaScript-powered front end.
JavaScript offers superior performance to PHP in browser loading tests. In addition, modern JavaScript and its ecosystem provides a far more pleasant development experience when it comes to building new web experiences fast.
So there’s been a growth of headless CMS solutions — which are simply back ends for managing content. With this approach, developers can focus on building fast and interactive front ends using a JavaScript framework of their choice. Customizing a JavaScript-powered front end is much easier than making changes on a WordPress site.
GraphCMS differs from most Headless CMS platforms in that, instead of delivering content via REST, it does so via GraphQL. This new technology is superior to REST, as it allows us to construct queries that touch on data belonging to multiple models in a single request.
Consider the following model schema:
Post
id: Number
title: String
content : String
comments : array of Comments
Comment
id: Number
name: String
message: String
The above models have a one(Post)-to-many(Comments) relationship. Let’s see how we can fetch a single Post record attached with all linked Comment records.
If the data is in a relational database, you have to construct either one inefficient SLQ statement, or two SQL statements for fetching the data cleanly. If the data is stored in a NoSQL database, you can use a modern ORM like Vuex ORM to fetch the data easily for you, like this:
const post = Post.query() .with('comments') .find(1);
Quite simple! You can easily pass this data via REST to the intended client. But here’s the problem: whenever the data requirement changes at the client end, you’ll be forced to go back to your back-end code to either update your existing API endpoint, or create a new one that provides the required data set. This back and forth process is tiring and repetitive.
What if, at the client level, you could just ask for the data you need and the back end will provide it for you, without you doing extra work? Well, that’s what GraphQL is for.
Prerequisites
Before we begin, I’d like to note that this is a guide for intermediate to advanced users. I won’t be going over the basics, but rather will show you how to quickly build a Vue.js blog using GraphCMS as the back end. You’ll need to be proficient in the following areas:
ES6 and ES7 JavaScript
Vue.js (using CLI version 3)
GraphQL
That’s all you need to know to get started with this tutorial. Also, a background in using REST will be great, as I’ll be referencing this a lot. If you’d like a refresher, this article might help: “REST 2.0 Is Here and Its Name Is GraphQL”.
About the Project
We’ll build a very simple blog application with a basic comment system. Below are the links you can visit to check out the completed project:
CodeSandbox.io demo
GitHub repo
Please note that a READ-ONLY token has been used in the demo and consequently the comments system won’t work. You’ll need to supply your OPEN permission token and endpoint as per the instructions in this tutorial for it to work.
Create GraphCMS Project Database
Head over to the GraphCMS website and click the “Start Building for Free” button. You’ll be taken to their signup page.
Sign up using your preferred method. Once you’ve completed the account authentication and verification process, you should be able to access the main dashboard.
In the above example, I’ve already created a project called “BlogDB”. Go ahead and create a new one, and call it whatever you want. After you’ve entered the name, you can leave the rest of the fields in their defaults. Click Create and you’ll be taken to their project plan.
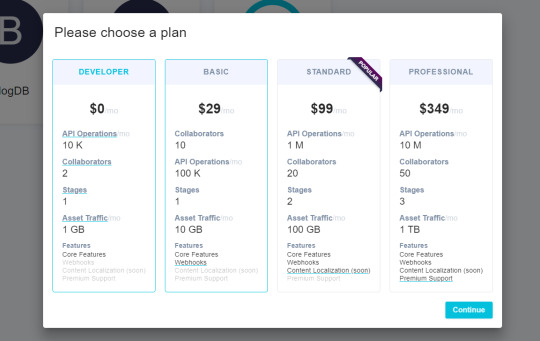
For the purposes of this tutorial, select the free Developer plan then click Continue. You’ll be taken to the project’s dashboard, which looks something like this:

Go to the Schema tab. We’re going to create the following models, each with the following fields:
Category
name: Single line text, required, unique
Post
slug: Single line text, required, unique
title: Single line text, required, unique
content: Multi line text
Comment
name: Single line text, required
message: Multi line text, required
Use the Create Model button to create models. On the right side, you should find a hidden panel for Fields, which is activated by clicking the Fields button. Drag the appropriate field type onto the model’s panel. You will be presented with a form to fill in your field’s attributes. Do note at the bottom there’s a pink button labeled Advanced. Clicking it will expand the panel to give you more field attributes you can enable.

Next, you’ll need to add the relationship between models as follows:
Post > Categories (many-to-many)
Post > Comments (one-to-many)
Use the Reference field to define this relationship. You can add this field to any side; GraphCMS will automatically create the opposite relation field in the referenced model. When you’ve completed defining the models, you should have something like this:

You’ve now completed the first part. Let’s now provide some data to our models.
GraphQL Data Migration
To add content to your models, you can simply click the Content tab in the project dashboard where you can create new records for each of your models. However, if you find this to be a slow method, you’ll be happy to know that I’ve created a GraphCMS migration tool that copies data from CSV files and uploads them to your GraphCMS database. You can find the project here in this GitHub repository. To start using the project, simply download it into your workspace like this:
git clone [email protected]:sitepoint-editors/graphcsms-data-migration.git cd graphcsms-data-migration npm install
Next, you’ll need to grab your GraphCMS project’s API endpoint and token from the dashboard’s Settings page. You’ll need to create a new token. For the permission level, use OPEN, as this will allow the tool to perform READ and WRITE operations on your GraphCMS database. Create a file called .env and put it at the root of the project:
ENDPOINT=<Put api endpoint here> TOKEN=<Put token with OPEN permission here>
Next, you may need to populate the CSV files in the data folder with your own. Here’s some sample data that has been used:
// Categories.csv name Featured Food Fashion Beauty // Posts.csv title,slug,content,categories Food Post 1,food-post-1,Breeze through Thanksgiving by making this Instant Pot orange cranberry sauce,Food|Featured Food Post 2,food-post-2,This is my second food post,Food Food Post 3,food-post-3,This is my last and final food post,Food Fashion Post 1,fashion-post-1,This is truly my very first fashion post,Fashion|Featured Fashion Post 2,fashion-post-2,This is my second fashion post,Fashion Fashion Post 3,fashion-post-3,This is my last and final fashion post,Fashion Beauty Post 1,Beauty-post-1,This is truly my very first Beauty post,Beauty|Featured Beauty Post 2,Beauty-post-2,This is my second beauty post,Beauty
You can change the content if you want. Make sure not to touch the top row, as otherwise you’ll change the field names. Please note, for the column categories, I’ve used the pipe | character as a delimiter.
To upload the CSV data to your GraphCMS database, execute the following commands in this order:
npm run categories npm run posts
Each script will print out records that have uploaded successfully. The reason we uploaded categories first is so that the posts records can link successfully to existing category records.
If you want to clean out your database, you can run the following command:
npm run reset
This script will delete all your model’s contents. You’ll get a report indicating how many records were deleted for each model.
I hope you find the tool handy. Go back to the dashboard to confirm that data for the Posts and Categories have successfully been uploaded.
With the back end taken care of, let’s start building our front-end blog interface.
Building the Blog’s Front End Using Vue.js
As mentioned earlier, we are going to build a very simple blog application powered by a GraphCMS database back end. Launch a terminal and navigate to your workspace.
If you haven’t got Vue CLI installed, do that now:
npm install -g @vue/cli
Then create a new project:
vue create vue-graphcms
Choose to manually select features, then select the following options:
Features: Babel, Router
Router History Mode: Y
ESLint with error prevention only
Lint on save
Config file placement: Dedicated Config Files
Save preset: your choice
Once the project creation process is complete, change into the project directory and install the following dependencies:
npm install bootstrap-vue axios
To set up Bootstrap-Vue in our project, simply open src/main.js and add the following code:
import BootstrapVue from "bootstrap-vue"; import "bootstrap/dist/css/bootstrap.css"; import "bootstrap-vue/dist/bootstrap-vue.css"; Vue.config.productionTip = false; Vue.use(BootstrapVue);
Next, we need to start laying down our project structure. In the src/components folder, delete the existing files and create these new ones:
CommentForm.vue
CommentList.vue
Post.vue
PostList.vue
In the src/views folder, delete About.vue and create a new file called PostView.vue. As seen from the demo, we’ll have several category pages each displaying a list of posts filtered by category. Technically, there will only be one page that will display a different list of posts based on an active route name. The PostList component will filter posts based on the current route.
Let’s first set up the routes. Open src/router.js and replace the existing code with this:
import Vue from "vue"; import Router from "vue-router"; import Home from "./views/Home.vue"; import Post from "./views/PostView.vue"; Vue.use(Router); export default new Router({ mode: "history", base: process.env.BASE_URL, linkActiveClass: "active", routes: [ { path: "/", name: "Featured", component: Home }, { path: "/food", name: "Food", component: Home }, { path: "/fashion", name: "Fashion", component: Home }, { path: "/beauty", name: "Beauty", component: Home }, { path: "/post/:slug", name: "Post", component: Post } ] });
Now that we have our routes, let’s set up our navigation menu. Open src/App.vue and replace the existing code with this:
<template> <div id="app"> <b-navbar toggleable="md" type="dark" variant="info"> <b-navbar-toggle target="nav_collapse"></b-navbar-toggle> <b-navbar-brand href="#">GraphCMS Vue</b-navbar-brand> <b-collapse is-nav id="nav_collapse"> <b-navbar-nav> <router-link class="nav-link" to="/" exact>Home</router-link> <router-link class="nav-link" to="/food">Food</router-link> <router-link class="nav-link" to="/fashion">Fashion</router-link> <router-link class="nav-link" to="/beauty">Beauty</router-link> </b-navbar-nav> </b-collapse> </b-navbar> <b-container> <router-view/> </b-container> </div> </template>
This will add a nav bar to the top of our site with links to our different categories.
Save the file and update the following files accordingly:
src/views/Home.vue
<template> <div class="home"> <PostList /> </div> </template> <script> import PostList from "@/components/PostList.vue"; export default { name: "home", components: { PostList } }; </script>
src/components/PostList.vue
<template> <section class="post-list"> <h1> Articles</h1> <hr/> <p>Put list of posts here!</p> </section> </template> <script> export default { name: "PostList", data() { return { category: "" }; }, created() { this.category = this.$route.name; }, watch: { $route() { this.category = this.$route.name; } } }; </script>
Notice that, in the PostList component, we’re using a custom watcher to update our category data property, based on our current URL.
Now we’re ready to perform a quick test to confirm the routes are working. Spin up the Vue.js server using the command npm run serve. Open a browser at localhost:8080 and test each navigation link. The category property should output the same value we defined in route name’s attribute.
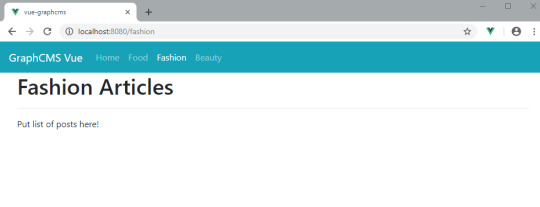
The post How to Build a Vue Front End for a Headless CMS appeared first on SitePoint.
by Michael Wanyoike via SitePoint https://ift.tt/2OcSF2B
0 notes
Link
What are those names?
In case you are wondering what is Snowpack and/or Svelte, let me give you some context...
Snowpack is a build tool that allows you to create your application and see the ongoing changes faster in the development process while also providing all the excellent features you may be used to with bundling applications for the deployment process.
The already known bundlers like Webpack and Parcel have to rebundle & rebuild parts of your application every time you make a change in a file and save it.
This rebundling process takes some time depending on the framework of your choice (takes more time for Angular than it does for Vue, for instance).
The difference with Snowpack is that it serves your whole application unbundled during development. As in, every file gets built just once, and then it's cached after that.
So now that you are making changes and putting features, Snowpack rebuilds only the file that has changed and serves it instantly in the browser plus, you can also use Hot-Module Replacement (HMR) to go with it.
Once you're done making the app and want to create a production build, you can plugin your preferred bundler via a plugin (lol) and have an optimized production build ready to be deployed to the hosting service of your choice.
Here's a beautiful little image that shows what this 'Unbundled Development' thing is, taken directly from the Snowpack docs.

Unbundled vs Bundled development
So now you might be thinking, "Okay, that sounds cool and all, but how am I supposed to use this for my web apps, and if it's a bundler, does it support my existing ones?."
Well, yes, and yes. It supports many of the things we've used working with other frameworks. It comes with support out of the box for things like Typescript, JSX, CSS Modules, and you can pick a template to have support for React or Vue or Svelte, and so on.
You can use the 'Create Snowpack App' to get started with your framework of choice, and you can also take an existing app and migrate it to Snowpack easily.
Refer to the Get started section in the official docs (which are very well-written by the way).
Now for Svelte's case, it's a library much like React that cares mainly about providing the UI layer of an application without paying attention to the rest of the application's stack.
Since it goes about the visual aspect of an app, you can start using it in any project you have already created by incrementally adding some Svelte components to it and have it work like before.
But I'm not going to go too much on why choosing Svelte or how to get started building cool things with it. There's already a great post on that matter written by @nimrodkra that you can read all about here
What are we going to build?
We'll be making a sample app to demonstrate how easy it is to get started building something from scratch.
It is a relatively simple one, but it will help illustrate some of the features we can use to make something more interesting than a usual 'to-do list.'
Here's what it will look like:
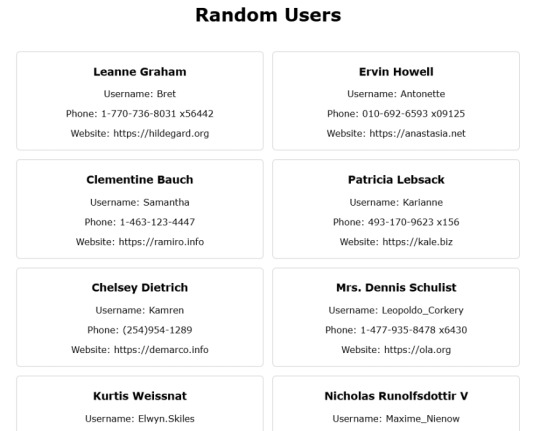
Screenshot of the end result
Starting out
To begin, open your terminal and run this command.
npx create-snowpack-app snowpack-svelte --template @snowpack/app-template-svelte
You can also pass in the --use-yarn flag if you prefer.
It will create the directory and install all the dependencies in it and then give you a message that it initialized a git repo and will show all the available commands currently in package.json.
Now you can use cd inside the folder and start the dev server either with npm start or yarn start
Once you do that, you'll already be with your new site open in your default browser, and a dev server with hot reloading enabled. Boom, that was fast.
Open the folder in VSCode and start making some changes in the App.svelte file, save it and see the changes instantly reflected there.
Now it is time to do some coding...
Fetching the data
Now go ahead and remove all the code from the template except for the first div, and we'll be putting everything that we do inside it.
We'll change the default message string to 'Random Users' and then display it inside the template within an h1 tag.
Now here comes the fun part. We'll be fetching data from an external API and render it on our page. In Angular, we use the HttpClient, and in React, we can use the Axios library.
In this case, we're going to be using the Fetch API to call the jsonplaceholder endpoint.
So we'll create a getUsers function and fetch the data there like this:
function getUsers() { fetch("http://jsonplaceholder.typicode.com/users") .then(res => res.json()) .then(data => console.log(data)); }
And to use this function, we'll put a button on the template to call it once it's clicked.
<button on:click={getUsers}>Fetch Users</button>
Here we are using the svelte syntax for the onclick event and passing it the name of the function that we created.
Now, if we open the browser console tab, we can see the array of users that gets returned once we click the 'Fetch Users' button.
Rendering the data
Let's display the data on our page. For that, remember to remove the console.log and instead assign the data to our users variable. With that done, we can now display the data on the page instead of the console.
One way we could go about doing that is to put the users variable directly into the template, and that will just spit out our array of objects.
But, it would display undefined until we click the button to fetch the data from the API.
To take care of that, we're going to use the {#if} construct in Svelte to validate if we have the data available or not to be displayed. We'll do it like this.
{#if users} {JSON.stringify(users, null, 1)} {/if}
Now you can see the array printed all over the screen. We'll want a better way to display this data separately for each of the users returned.
How are we going to go about that? Well iterating over the 'users' array. In React, we could use the map function and render all the users in a list.
Here we're going to use another Svelte construct called {#each}, and we'll render a list item for every user like this.
{#if users} <ul class="user-list"> {#each users as user} <li> <div class="user"> <h3>{user.name}</h3> <p>Username: {user.username} </p> <p>Phone: {user.phone} </p> <p>Website: https://{user.website} </p> </div> </li> {/each} </ul> {/if}
If you look into the response, we get from the API. You'll notice that each user object has several properties. Here I just chose the ones shown for the sake of simplicity. You can add additional ones if you like.
Applying basic styling
Ok, that works, now let's give it some styling so that they look nicer. You can write all the CSS rules inside the <style> tags like this.
<style> .App { text-align: center; font-family: Verdana, Geneva, Tahoma, sans-serif; } .user-list { display: flex; flex-flow: row wrap; justify-content: center; list-style: none; padding: 1rem; } .user-list li { width: 45%; padding: 0.5rem } .user { padding: 4px; border: 1px solid #ccc; border-radius: 6px; text-align: center; } </style>
Now that looks much better. Feel free to play around with the styles and give it some more color if you like.
We're almost done. There's something else I'd like to do just that it doesn't look like an empty page at the beginning.
What if we don't have to use the button to fetch data, but instead, we fetch it once the component is created.
In that case, we're going to use one of Svelte's lifecycle methods that are called onMount, and we use it like this.
import { onMount } from 'svelte'; onMount(() => { getUsers(); })
With it, we can now remove the button, and the data will be displayed on the page once it is loaded.
And that's it! We now have a fully functioning app that fetches data from an API and displays it on a page.
We could take the div with the user class and turn it into a component and then call it from App.svelte but that, as they say, is an exercise left to the reader 😛.
Also, bonus points if you take the div with the App class an turn it into a main tag.
There you have it folks, the entire application, minus the CSS styles, is very short. (About 35 lines or so)
And it didn't take too much time to get it done 'cuz we can see the result in realtime every time we save the file.
0 notes