#vue axios post
Explore tagged Tumblr posts
Visit Tumblr Blog
Explore Tumblr blogs with no restrictions, modern design and the best experience.
Last Seen Tumblr Blogs


Fun Fact
Women make up for the other 50% of Tumblr’s audience.
Link
In this step-by-step guide, we will teach you how to make HTTP POST calls to a webserver in Vue 3 application using Axios library.
0 notes
Text
Vue-js Post request example
Vue-js Post request example
We will Learn the below things in this Blog Article. How we install axios via npm ?How to install node modules ?What is axios ?How to import Axios ?Sending post request via AxiosCompiling assest. we will learn about how we can send post requests by using Axios, if Axios is not present in your comoper.json file then you can use the below command to install the Axios npm install axios Before…

View On WordPress
#axios npm#fetching data from a third party api with vue js and axios#install axios in vue#nuxt axios post example#vue axios cdn#vue axios example#vue axios is not defined#vue axios plugin#vue axios post#vue axios post json data#vue js axios post example#vue js post request example
1 note
·
View note
Photo

hydralisk98′s web projects tracker:
Core principles=
Fail faster
‘Learn, Tweak, Make’ loop
This is meant to be a quick reference for tracking progress made over my various projects, organized by their “ultimate target” goal:
(START)
(Website)=
Install Firefox
Install Chrome
Install Microsoft newest browser
Install Lynx
Learn about contemporary web browsers
Install a very basic text editor
Install Notepad++
Install Nano
Install Powershell
Install Bash
Install Git
Learn HTML
Elements and attributes
Commenting (single line comment, multi-line comment)
Head (title, meta, charset, language, link, style, description, keywords, author, viewport, script, base, url-encode, )
Hyperlinks (local, external, link titles, relative filepaths, absolute filepaths)
Headings (h1-h6, horizontal rules)
Paragraphs (pre, line breaks)
Text formatting (bold, italic, deleted, inserted, subscript, superscript, marked)
Quotations (quote, blockquote, abbreviations, address, cite, bidirectional override)
Entities & symbols (&entity_name, &entity_number,  , useful HTML character entities, diacritical marks, mathematical symbols, greek letters, currency symbols, )
Id (bookmarks)
Classes (select elements, multiple classes, different tags can share same class, )
Blocks & Inlines (div, span)
Computercode (kbd, samp, code, var)
Lists (ordered, unordered, description lists, control list counting, nesting)
Tables (colspan, rowspan, caption, colgroup, thead, tbody, tfoot, th)
Images (src, alt, width, height, animated, link, map, area, usenmap, , picture, picture for format support)
old fashioned audio
old fashioned video
Iframes (URL src, name, target)
Forms (input types, action, method, GET, POST, name, fieldset, accept-charset, autocomplete, enctype, novalidate, target, form elements, input attributes)
URL encode (scheme, prefix, domain, port, path, filename, ascii-encodings)
Learn about oldest web browsers onwards
Learn early HTML versions (doctypes & permitted elements for each version)
Make a 90s-like web page compatible with as much early web formats as possible, earliest web browsers’ compatibility is best here
Learn how to teach HTML5 features to most if not all older browsers
Install Adobe XD
Register a account at Figma
Learn Adobe XD basics
Learn Figma basics
Install Microsoft’s VS Code
Install my Microsoft’s VS Code favorite extensions
Learn HTML5
Semantic elements
Layouts
Graphics (SVG, canvas)
Track
Audio
Video
Embed
APIs (geolocation, drag and drop, local storage, application cache, web workers, server-sent events, )
HTMLShiv for teaching older browsers HTML5
HTML5 style guide and coding conventions (doctype, clean tidy well-formed code, lower case element names, close all html elements, close empty html elements, quote attribute values, image attributes, space and equal signs, avoid long code lines, blank lines, indentation, keep html, keep head, keep body, meta data, viewport, comments, stylesheets, loading JS into html, accessing HTML elements with JS, use lowercase file names, file extensions, index/default)
Learn CSS
Selections
Colors
Fonts
Positioning
Box model
Grid
Flexbox
Custom properties
Transitions
Animate
Make a simple modern static site
Learn responsive design
Viewport
Media queries
Fluid widths
rem units over px
Mobile first
Learn SASS
Variables
Nesting
Conditionals
Functions
Learn about CSS frameworks
Learn Bootstrap
Learn Tailwind CSS
Learn JS
Fundamentals
Document Object Model / DOM
JavaScript Object Notation / JSON
Fetch API
Modern JS (ES6+)
Learn Git
Learn Browser Dev Tools
Learn your VS Code extensions
Learn Emmet
Learn NPM
Learn Yarn
Learn Axios
Learn Webpack
Learn Parcel
Learn basic deployment
Domain registration (Namecheap)
Managed hosting (InMotion, Hostgator, Bluehost)
Static hosting (Nertlify, Github Pages)
SSL certificate
FTP
SFTP
SSH
CLI
Make a fancy front end website about
Make a few Tumblr themes
===You are now a basic front end developer!
Learn about XML dialects
Learn XML
Learn about JS frameworks
Learn jQuery
Learn React
Contex API with Hooks
NEXT
Learn Vue.js
Vuex
NUXT
Learn Svelte
NUXT (Vue)
Learn Gatsby
Learn Gridsome
Learn Typescript
Make a epic front end website about
===You are now a front-end wizard!
Learn Node.js
Express
Nest.js
Koa
Learn Python
Django
Flask
Learn GoLang
Revel
Learn PHP
Laravel
Slim
Symfony
Learn Ruby
Ruby on Rails
Sinatra
Learn SQL
PostgreSQL
MySQL
Learn ORM
Learn ODM
Learn NoSQL
MongoDB
RethinkDB
CouchDB
Learn a cloud database
Firebase, Azure Cloud DB, AWS
Learn a lightweight & cache variant
Redis
SQLlite
NeDB
Learn GraphQL
Learn about CMSes
Learn Wordpress
Learn Drupal
Learn Keystone
Learn Enduro
Learn Contentful
Learn Sanity
Learn Jekyll
Learn about DevOps
Learn NGINX
Learn Apache
Learn Linode
Learn Heroku
Learn Azure
Learn Docker
Learn testing
Learn load balancing
===You are now a good full stack developer
Learn about mobile development
Learn Dart
Learn Flutter
Learn React Native
Learn Nativescript
Learn Ionic
Learn progressive web apps
Learn Electron
Learn JAMstack
Learn serverless architecture
Learn API-first design
Learn data science
Learn machine learning
Learn deep learning
Learn speech recognition
Learn web assembly
===You are now a epic full stack developer
Make a web browser
Make a web server
===You are now a legendary full stack developer
[...]
(Computer system)=
Learn to execute and test your code in a command line interface
Learn to use breakpoints and debuggers
Learn Bash
Learn fish
Learn Zsh
Learn Vim
Learn nano
Learn Notepad++
Learn VS Code
Learn Brackets
Learn Atom
Learn Geany
Learn Neovim
Learn Python
Learn Java?
Learn R
Learn Swift?
Learn Go-lang?
Learn Common Lisp
Learn Clojure (& ClojureScript)
Learn Scheme
Learn C++
Learn C
Learn B
Learn Mesa
Learn Brainfuck
Learn Assembly
Learn Machine Code
Learn how to manage I/O
Make a keypad
Make a keyboard
Make a mouse
Make a light pen
Make a small LCD display
Make a small LED display
Make a teleprinter terminal
Make a medium raster CRT display
Make a small vector CRT display
Make larger LED displays
Make a few CRT displays
Learn how to manage computer memory
Make datasettes
Make a datasette deck
Make floppy disks
Make a floppy drive
Learn how to control data
Learn binary base
Learn hexadecimal base
Learn octal base
Learn registers
Learn timing information
Learn assembly common mnemonics
Learn arithmetic operations
Learn logic operations (AND, OR, XOR, NOT, NAND, NOR, NXOR, IMPLY)
Learn masking
Learn assembly language basics
Learn stack construct’s operations
Learn calling conventions
Learn to use Application Binary Interface or ABI
Learn to make your own ABIs
Learn to use memory maps
Learn to make memory maps
Make a clock
Make a front panel
Make a calculator
Learn about existing instruction sets (Intel, ARM, RISC-V, PIC, AVR, SPARC, MIPS, Intersil 6120, Z80...)
Design a instruction set
Compose a assembler
Compose a disassembler
Compose a emulator
Write a B-derivative programming language (somewhat similar to C)
Write a IPL-derivative programming language (somewhat similar to Lisp and Scheme)
Write a general markup language (like GML, SGML, HTML, XML...)
Write a Turing tarpit (like Brainfuck)
Write a scripting language (like Bash)
Write a database system (like VisiCalc or SQL)
Write a CLI shell (basic operating system like Unix or CP/M)
Write a single-user GUI operating system (like Xerox Star’s Pilot)
Write a multi-user GUI operating system (like Linux)
Write various software utilities for my various OSes
Write various games for my various OSes
Write various niche applications for my various OSes
Implement a awesome model in very large scale integration, like the Commodore CBM-II
Implement a epic model in integrated circuits, like the DEC PDP-15
Implement a modest model in transistor-transistor logic, similar to the DEC PDP-12
Implement a simple model in diode-transistor logic, like the original DEC PDP-8
Implement a simpler model in later vacuum tubes, like the IBM 700 series
Implement simplest model in early vacuum tubes, like the EDSAC
[...]
(Conlang)=
Choose sounds
Choose phonotactics
[...]
(Animation ‘movie’)=
[...]
(Exploration top-down ’racing game’)=
[...]
(Video dictionary)=
[...]
(Grand strategy game)=
[...]
(Telex system)=
[...]
(Pen&paper tabletop game)=
[...]
(Search engine)=
[...]
(Microlearning system)=
[...]
(Alternate planet)=
[...]
(END)
4 notes
·
View notes
Text
API Driven Application with Vue.js, JSON-Server and Axios - VueJs
API Driven Application with Vue.js, JSON-Server and Axios – VueJs
API Driven Application with Vue.js, JSON-Server and Axios – VueJs
[ad_1]
Article for this video can be found here: https://developer.school/posts/vue-js-json-server-and-axios/
Vue.js, Axios and json-server allow for quick prototyping of ideas.
Check out more free tutorials at https://developer.school
Chat with me, join the Slack group! http://bit.ly/JoinPaulHallidaySlack
My personal channels:
htt…
View On WordPress
#API Driven Application with Vue.js#axios#axios vue#json api vue#json-server#JSON-Server and Axios#vue#vue api#vue axios#vue axios api#vue http api#vue rest api#vue todo#vue todo api#vue todo tutorial#vue tutorial#vue.js axios
1 note
·
View note
Photo

Axios HTTP Client: How to Send Axios GET Request Axios HTTP client is promise based library for the browser and node.js. We can use Axios with React, Axios with Vue. Axios POST, GET Requests Example #javascript #html #programming #css #coding #java #python #developer #programmer #webdeveloper #webdevelopment #code #coder #php #webdesign #software #softwaredeveloper #computerscience #codinglife #reactjs #technology #frontend #development #programmers #js #web #softwareengineer #programmingmemes #linux #javascriptdeveloper (at India) https://www.instagram.com/p/CoZcbKHPHO9/?igshid=NGJjMDIxMWI=
#javascript#html#programming#css#coding#java#python#developer#programmer#webdeveloper#webdevelopment#code#coder#php#webdesign#software#softwaredeveloper#computerscience#codinglife#reactjs#technology#frontend#development#programmers#js#web#softwareengineer#programmingmemes#linux#javascriptdeveloper
0 notes
Text
Don’t Wait! Mock the API
Today we have a loose coupling between the front end and the back end of web applications. They are usually developed by separate teams, and keeping those teams and the technology in sync is not easy. To solve part of this problem, we can “fake” the API server that the back end tech would normally create and develop as if the API or endpoints already exist.
The most common term used for creating simulated or “faking” a component is mocking. Mocking allows you to simulate the API without (ideally) changing the front end. There are many ways to achieve mocking, and this is what makes it so scary for most people, at least in my opinion.
Let’s cover what a good API mocking should look like and how to implement a mocked API into a new or existing application.
Note, the implementation that I am about to show is framework agnostic — so it can be used with any framework or vanilla JavaScript application.
Mirage: The mocking framework
The mocking approach we are going to use is called Mirage, which is somewhat new. I have tested many mocking frameworks and just recently discovered this one, and it’s been a game changer for me.
Mirage is marketed as a front-end-friendly framework that comes with a modern interface. It works in your browser, client-side, by intercepting XMLHttpRequest and Fetch requests.
We will go through creating a simple application with mocked API and cover some common problems along the way.
Mirage setup
Let’s create one of those standard to-do applications to demonstrate mocking. I will be using Vue as my framework of choice but of course, you can use something else since we’re working with a framework-agnostic approach.
So, go ahead and install Mirage in your project:
# Using npm npm i miragejs -D
# Using Yarn yarn add miragejs -D
To start using Mirage, we need to setup a “server” (in quotes, because it’s a fake server). Before we jump into the setup, I will cover the folder structure I found works best.
/ ├── public ├── src │ ├── api │ │ └── mock │ │ ├── fixtures │ │ │ └── get-tasks.js │ │ └── index.js │ └── main.js ├── package.json └── package-lock.json
In a mock directory, open up a new index.js file and define your mock server:
// api/mock/index.js import { Server } from 'miragejs';
export default function ({ environment = 'development' } = {}) { return new Server({ environment,
routes() { // We will add our routes here }, }); }
The environment argument we’re adding to the function signature is just a convention. We can pass in a different environment as needed.
Now, open your app bootstrap file. In our case, this is he src/main.js file since we are working with Vue. Import your createServer function, and call it in the development environment.
// main.js import createServer from './mock'
if (process.env.NODE_ENV === 'development') { createServer(); }
We’re using the process.env.NODE_ENV environment variable here, which is a common global variable. The conditional allows Mirage to be tree-shaken in production, therefore, it won’t affect your production bundle.
That is all we need to set up Mirage! It’s this sort of ease that makes the DX of Mirage so nice.
Our createServer function is defaulting it to development environment for the sake of making this article simple. In most cases, this will default to test since, in most apps, you’ll call createServer once in development mode but many times in test files.
How it works
Before we make our first request, let’s quickly cover how Mirage works.
Mirage is a client-side mocking framework, meaning all the mocking will happen in the browser, which Mirage does using the Pretender library. Pretender will temporarily replace native XMLHttpRequest and Fetch configurations, intercept all requests, and direct them to a little pretend service that the Mirage hooks onto.
If you crack open DevTools and head into the Network tab, you won’t see any Mirage requests. That’s because the request is intercepted and handled by Mirage (via Pretender in the back end). Mirage logs all requests, which we’ll get to in just a bit.
Let’s make requests!
Let’s create a request to an /api/tasks endpoint that will return a list of tasks that we are going to show in our to-do app. Note that I’m using axios to fetch the data. That’s just my personal preference. Again, Mirage works with native XMLHttpRequest, Fetch, and any other library.
// components/tasks.vue export default { async created() { try { const { data } = await axios.get('/api/tasks'); // Fetch the data this.tasks = data.tasks; } catch(e) { console.error(e); } } };
Opening your JavaScript console — there should be an error from Mirage in there:
Mirage: Your app tried to GET '/api/tasks', but there was no route defined to handle this request.
This means Mirage is running, but the router hasn’t been mocked out yet. Let’s solve this by adding that route.
Mocking requests
Inside our mock/index.js file, there is a routes() hook. Route handlers allow us to define which URLs should be handled by the Mirage server.
To define a router handler, we need to add it inside the routes() function.
// mock/index.js export default function ({ environment = 'development' } = {}) { // ... routes() { this.get('/api/tasks', () => ({ tasks: [ { id: 1, text: "Feed the cat" }, { id: 2, text: "Wash the dishes" }, //... ], })) }, }); }
The routes() hook is the way we define our route handlers. Using a this.get() method lets us mock GET requests. The first argument of all request functions is the URL we are handling, and the second argument is a function that responds with some data.
As a note, Mirage accepts any HTTP request type, and each type has the same signature:
this.get('/tasks', (schema, request) => { ... }); this.post('/tasks', (schema, request) => { ... }); this.patch('/tasks/:id', (schema, request) => { ... }); this.put('/tasks/:id', (schema, request) => { ... }); this.del('/tasks/:id', (schema, request) => { ... }); this.options('/tasks', (schema, request) => { ... });
We will discuss the schema and request parameters of the callback function in a moment.
With this, we have successfully mocked our route and we should see inside our console a successful response from Mirage.

Working with dynamic data
Trying to add a new to-do in our app won’t be possible because our data in the GET response has hardcoded values. Mirage’s solution to this is that they provide a lightweight data layer that acts as a database. Let’s fix what we have so far.
Like the routes() hook, Mirage defines a seeds() hook. It allows us to create initial data for the server. I’m going to move the GET data to the seeds() hook where I will push it to the Mirage database.
seeds(server) { server.db.loadData({ tasks: [ { id: 1, text: "Feed the cat" }, { id: 2, text: "Wash the dishes" }, ], }) },
I moved our static data from the GET method to seeds() hook, where that data is loaded into a faux database. Now, we need to refactor our GET method to return data from that database. This is actually pretty straightforward — the first argument of the callback function of any route() method is the schema.
this.get('/api/tasks', (schema) => { return schema.db.tasks; })
Now we can add new to-do items to our app by making a POST request:
async addTask() { const { data } = await axios.post('/api/tasks', { data: this.newTask }); this.tasks.push(data); this.newTask = {}; },
We mock this route in Mirage by creating a POST /api/tasks route handler:
this.post('/tasks', (schema, request) => {})
Using the second parameter of the callback function, we can see the sent request.
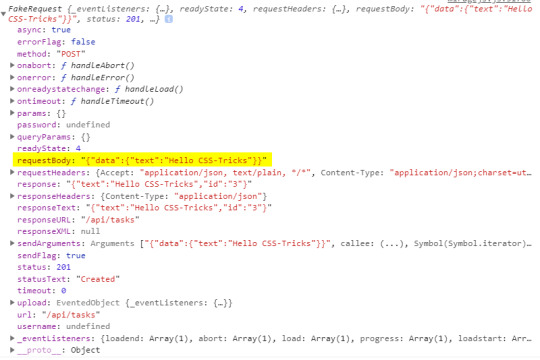
Inside the requestBody property is the data that we sent. That means it’s now available for us to create a new task.
this.post('/api/tasks', (schema, request) => { // Take the send data from axios. const task = JSON.parse(request.requestBody).data
return schema.db.tasks.insert(task) })
The id of the task will be set by the Mirage’s database by default. Thus, there is no need to keep track of ids and send them with your request — just like a real server.
Dynamic routes? Sure!
The last thing to cover is dynamic routes. They allow us to use a dynamic segment in our URL, which is useful for deleting or updating a single to-do item in our app.
Our delete request should go to /api/tasks/1, /api/tasks/2, and so on. Mirage provides a way for us to define a dynamic segment in the URL, like this:
this.delete('/api/tasks/:id', (schema, request) => { // Return the ID from URL. const id = request.params.id;
return schema.db.tasks.remove(id); })
Using a colon (:) in the URL is how we define a dynamic segment in our URL. After the colon, we specify the name of the segment which, in our case, is called id and maps to the ID of a specific to-do item. We can access the value of the segment via the request.params object, where the property name corresponds to the segment name — request.params.id. Then we use the schema to remove an item with that same ID from the Mirage database.
If you’ve noticed, all of my routes so far are prefixed with api/. Writing this over and over can be cumbersome and you may want to make it easier. Mirage offers the namespace property that can help. Inside the routes hook, we can define the namespace property so we don’t have to write that out each time.
routes() { // Prefix for all routes. this.namespace = '/api';
this.get('/tasks', () => { ... }) this.delete('/tasks/:id', () => { ... }) this.post('/tasks', () => { ... }) }
OK, let’s integrate this into an existing app
So far, everything we’ve looked at integrates Mirage into a new app. But what about adding Mirage to an existing application? Mirage has you covered so you don’t have to mock your entire API.
The first thing to note is that adding Mirage to an existing application will throw an error if the site makes a request that isn’t handled by Mirage. To avoid this, we can tell Mirage to pass through all unhandled requests.
routes() { this.get('/tasks', () => { ... }) // Pass through all unhandled requests. this.passthrough() }
Now we can develop on top of an existing API with Mirage handling only the missing parts of our API.
Mirage can even change the base URL of which it captures the requests. This is useful because, usually, a server won’t live on localhost:3000 but rather on a custom domain.
routes() { // Set the base route. this.urlPrefix = 'https://devenv.ourapp.example';
this.get('/tasks', () => { ... }) }
Now, all of our requests will point to the real API server, but Mirage will intercept them like it did when we set it up with a new app. This means that the transition from Mirage to the real API is pretty darn seamless — delete the route from the mock server and things are good to go.
Wrapping up
Over the course of five years, I have used many mocking frameworks, yet I never truly liked any of the solutions out there. That was until recently, when my team was faced with a need for a mocking solution and I found out about Mirage.
Other solutions, like the commonly used JSON-Server, are external processes that need to run alongside the front end. Furthermore, they are often nothing more than an Express server with utility functions on top. The result is that front-end developers like us need to know about middleware, NodeJS, and how servers work… things many of us probably don’t want to handle. Other attempts, like Mockoon, have a complex interface while lacking much-needed features. There’s another group of frameworks that are only used for testing, like the popular SinonJS. Unfortunately, these frameworks can’t be used to mock the regular behavior.
My team managed to create a functioning server that enables us to write front-end code as if we were working with a real back-end. We did it by writing the front-end codebase without any external processes or servers that are needed to run. This is why I love Mirage. It is really simple to set up, yet powerful enough to handle anything that’s thrown at it. You can use it for basic applications that return a static array to full-blown back-end apps alike — regardless of whether it’s a new or existing app.
There’s a lot more to Mirage beyond the implementations we covered here. A working example of what we covered can be found on GitHub. (Fun fact: Mirage also works with GraphQL!) Mirage has well-written documentation that includes a bunch of step-by-step tutorials, so be sure to check it out.
The post Don’t Wait! Mock the API appeared first on CSS-Tricks.
You can support CSS-Tricks by being an MVP Supporter.
Don’t Wait! Mock the API published first on https://deskbysnafu.tumblr.com/
0 notes
Link
Nuxt.js provides an Axios module for easy integration with your application. Axios is a promise-based HTTP client that works in the browser and Node.js environment or, in simpler terms, it is a tool for making requests (e.g API calls) in client-side applications and Node.js environment. In this tutorial, we’re going to learn how to use the Axios module and how to make a request on the server-side using asyncData and fetch. These two methods make a request on the server-side but they have some differences which we’re also going to cover. Finally, we’ll learn how to perform authentication and secure pages/routes using the auth module and auth middleware. This article requires basic knowledge of Nuxtjs and Vuejs as we’ll be building on top of that. For those without experience with Vuejs, I recommend you start from their official documentation and the Nuxt official page before continuing with this article.
What Is The Nuxt.js Axios Module?
According to the official Documentation,
“It is a Secure and easy Axios integration with Nuxt.js.”
Here are some of its features:
Automatically set base URL for client-side & server-side.
Proxy request headers in SSR (Useful for auth).
Fetch Style requests.
Integrated with Nuxt.js Progressbar while making requests.
To use the axios module in your application, you will have to first install it by using either npm or yarn. YARN
yarn add @nuxtjs/axios
NPM
npm install @nuxtjs/axios
Add it into your nuxt.config.js file:
modules: [ '@nuxtjs/axios', ], axios: { // extra config e.g // BaseURL: 'https://link-to-API' }
The modules array accepts a list of Nuxt.js modules such as dotenv, auth and in this case, Axios. What we’ve done is to inform our application that we would be using the Axios module, which we reference using @nuxtjs/axios. This is then followed by the axios property which is an object of configurations like the baseURL for both client-side and server-side. Now, you can access Axios from anywhere in your application by calling this.$axios.method or this.$axios.$method. Where method can be get, post, or delete.
Making Your First Request Using Axios
For this tutorial, I’ve put together a simple application on Github. The repository contains two folders, start and finish, the start folder contains all you need to get right into the tutorial. The finish folder contains a completed version of what we would be building. After cloning the repo and opening the start folder, we would need to install all our packages in the package.json file so open your terminal and run the following command:
npm install
Once that is done, we can start our app using the npm run dev command. This is what you should see when you go to localhost:3000.
Our application’s landing page. (Large preview)
The next thing we have to do is to create a .env file in the root folder of our application and add our API URL to it. For this tutorial, we’ll be using a sample API built to collect reports from users.
API_URL=https://ireporter-endpoint.herokuapp.com/api/v2/
This way, we do not have to hard code our API into our app which is useful for working with two APIs (development and production). The next step would be to open our nuxt.config.js file and add the environmental variable to our axios config that we added above.
/* ** Axios module configuration */ axios: { // See https://github.com/nuxt-community/axios-module#options baseURL: process.env.API_URL, },
Here, we tell Nuxt.js to use this baseURL for both our client-side and server-side requests whenever we use this Axios module. Now, to fetch a list of reports, let us open the index.vue file and add the following method to the script section.
async getIncidents() { let res = await this.$store.dispatch("getIncidents"); this.incidents = res.data.data.incidents; }
What we have done is to create an async function that we call getIncidents() and we can tell what it does from the name — it fetches a list of incidents using the Vuex store action method this.$store.dispatch. We assign the response from this action to our incidents property so we can be able to make use of it in the component. We want to call the getIncidents() method whenever the component mounts. We can do that using the mounted hook.
mounted() { this.getIncidents() }
mounted() is a lifecycle hook that gets called when the component mounts. That will cause the call to the API to happen when the component mounts. Now, let us go into our index.js file in our store and create this action where we’ll be making our Axios request from.
export const actions = { async getIncidents() { let res = await this.$axios.get('/incidents') return res; } }
Here, we created the action called getIncidents which is an async function, then we await a response from the server and return this response. The response from this action is sent back to our getIncidents() method in our index.vue file. If we refresh our application, we should now be able to see a long list of incidents rendered on the page.
List of incidents on landing page. (Large preview)
We have made our first request using Axios but we won’t stop there, we are going to be trying out asyncData and fetch to see the differences between them and using Axios.
AsyncData
AsyncData fetches data on the server-side and it’s called before loading the page component. It does not have access to this because it is called before your page component data is created. this is only available after the created hook has been called so Nuxt.js automatically merges the returned data into the component’s data. Using asyncData is good for SEO because it fetches your site’s content on the server-side and also helps in loading content faster. Note that asyncData method can only be used in the pages folder of your application as it would not work in the components folder. This is because asyncData hook gets called before your component is created.
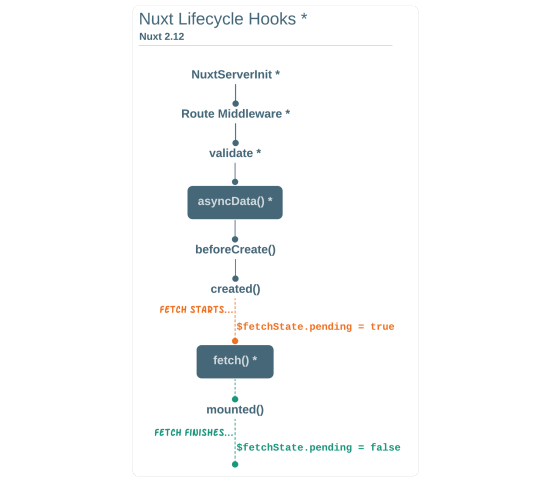
Image from Nuxt blog. (Large preview)
Let us add asyncData to our index.vue file and observe how fast our incidents data loads. Add the following code after our components property and let us get rid of our mounted hook.
async asyncData({ $axios }) { let { data } = await $axios.get("/incidents"); return { incidents: data.data.incidents }; }, // mounted() { // this.getIncidents(); // },
Here, the asyncData method accepts a property from the context $axios. We use this property to fetch the list of incidents and the value is then returned. This value is automatically injected into our component. Now, you can notice how fast your content loads if you refresh the page and at no time is there no incident to render.
Fetch
The Fetch method is also used to make requests on the server-side. It is called after the created hook in the life cycle which means it has access to the component’s data. Unlike the asyncData method, the fetch method can be used in all .vue files and be used with the Vuex store. This means that if you have the following in your data function.
data() { return { incidents: [], id: 5, gender: 'male' }; }
You can easily modify id or gender by calling this.id or this.gender.
Using Axios As A Plugin
During the process of development with Axios, you might find that you need extra configuration like creating instances and interceptors for your request so your application can work as intended and thankfully, we can do that by extending our Axios into a plugin. To extend axios, you have to create a plugin (e.g. axios.js) in your plugins folder.
export default function ({ $axios, store, redirect }) { $axios.onError(error => { if (error.response && error.response.status === 500) { redirect('/login') } }) $axios.interceptors.response.use( response => { if (response.status === 200) { if (response.request.responseURL && response.request.responseURL.includes('login')) { store.dispatch("setUser", response); } } return response } ) }
This is an example of a plugin I wrote for a Nuxt application. Here, your function takes in a context object of $axios, store and redirect which we would use in configuring the plugin. The first thing we do is to listen for an error with a status of 500 using $axios.onError and redirect the user to the login page. We also have an interceptor that intercepts every request response we make in our application checks if the status of the response we get is 200. If that is true we proceed and check that there is a response.request.responseURL and if it includes login. If this checks out to be true, we then send this response using our store’s dispatch method where it then mutated in our state. Add this plugin to your nuxt.config.js file:
plugins: [ '~/plugins/axios' ]
After doing this, your Axios plugin would intercept any request you make and check if you have defined a special case for it.
Introduction To The Auth Module
The auth module is used for performing authentication for your Nuxt application and can be accessed from anywhere in your application using $this.auth. It is also available in fetch, asyncData, middleware and NuxtInitServer from the context object as $auth. The context provides additional objects/params from Nuxt to Vue components and is available in special nuxt lifecycle areas like those mentioned above. To use the auth module in your application, you would have to install it using yarn or npm. YARN
yarn add @nuxtjs/auth
NPM
npm install @nuxtjs/auth
Add it to your nuxt.config.js file.
modules: [ '@nuxtjs/auth' ], auth: { // Options }
The auth property accepts a list of properties such as strategies and redirect. Here, strategies accepts your preferred authentication method which can be:
local For username/email and password-based flow.
facebook For using Facebook accounts as a means of authentication.
Github For authenticating users with Github accounts.
Google For authenticating users with Google accounts.
Auth0
Laravel Passport
The redirect property accepts an object of links for:
login Users would be redirected to this link if login is required.
logout Users would be redirected here if after logout current route is protected.
home Users would be redirected here after login.
Now, let us add the following to our nuxt.config.js file.
/* ** Auth module configuration */ auth: { redirect: { login: '/login', logout: '/', home: '/my-reports' }, strategies: { local: { endpoints: { login: { url: "/user/login", method: "post", propertyName: "data.token", }, logout: false, user: false, }, tokenType: '', tokenName: 'x-auth', autoFetchUser: false }, }, }
Please note that the auth method works best when there is a user endpoint provided in the option above. Inside the auth config object, we have a redirect option in which we set our login route to /login, logout route to / and home route to /my-reports which would all behave as expected. We also have a tokenType property which represents the Authorization type in the header of our Axios request. It is set to Bearer by default and can be changed to work with your API. For our API, there is no token type and this is why we’re going to leave it as an empty string. The tokenName represents the Authorization name (or the header property you want to attach your token to) inside your header in your Axios request. By default, it is set to Authorization but for our API, the Authorization name is x-auth. The autoFetchUser property is used to enable user fetch object using the user endpoint property after login. It is true by default but our API does not have a user endpoint so we have set that to false. For this tutorial, we would be using the local strategy. In our strategies, we have the local option with endpoints for login, user and logout but in our case, we would only use the *login* option because our demo API does not have a *logout* endpoint and our user object is being returned when *login* is successful. Note: The auth module does not have a register endpoint option so that means we’re going to register the traditional way and redirect the user to the login page where we will perform the authentication using this.$auth.loginWith. This is the method used in authenticating your users. It accepts a ‘strategy’ (e.g local) as a first argument and then an object to perform this authentication with. Take a look at the following example.
let data { email: '[email protected]', password: '123456' } this.$auth.loginWith('local', { data })
Using The Auth Module
Now that we have configured our auth module, we can proceed to our registration page. If you visit the /register page, you should see a registration form.
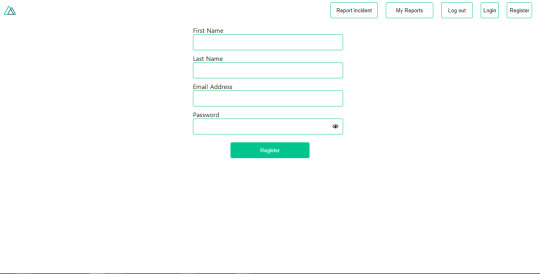
Register page. (Large preview)
Let us make this form functional by adding the following code:
methods: { async registerUser() { this.loading = true; let data = this.register; try { await this.$axios.post("/user/create", data); this.$router.push("/login"); this.loading = false; this.$notify({ group: "success", title: "Success!", text: "Account created successfully" }); } catch (error) { this.loading = false; this.$notify({ group: "error", title: "Error!", text: error.response ? error.response.data.error : "Sorry an error occured, check your internet" }); } } }
Here, we have an async function called registerUser which is tied to a click event in our template and makes an Axios request wrapped in a try/catch block to an endpoint /user/create. This redirects to the /login page and notifies the user of a successful registration. We also have a catch block that alerts the user of any error if the request is not successful. If the registration is successful, you would be redirected to the login page.
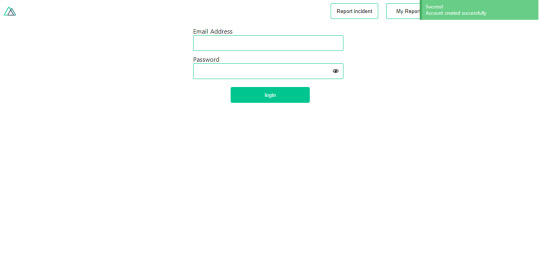
Login page with notification component. (Large preview)
Here, we’re going to make use of auth authentication method this.$auth.loginWith('local', loginData) after which we would use the this.$auth.setUser(userObj) to set the user in our auth instance. To get the login page working, let’s add the following code to our login.vue file.
methods: { async logIn() { let data = this.login; this.loading = true; try { let res = await this.$auth.loginWith("local", { data }); this.loading = false; let user = res.data.data.user; this.$auth.setUser(user); this.$notify({ group: "success", title: "Success!", text: "Welcome!" }); } catch (error) { this.loading = false; this.$notify({ group: "error", title: "Error!", text: error.response ? error.response.data.error : "Sorry an error occured, check your internet" }); } } }
We created an async function called logIn using the auth method this.$auth.loginWith('local, loginData). If this login attempt is successful, we then assign the user data to our auth instance using this.$auth.setUser(userInfo) and redirect the user to the /my-report page. You can now get user data using this.$auth.user or with Vuex using this.$store.state.auth.user but that’s not all. The auth instance contains some other properties which you can see if you log in or check your state using your Vue dev tools. If you log this.$store.state.auth to the console, you’ll see this:
{ "auth": { "user": { "id": "d7a5efdf-0c29-48aa-9255-be818301d602", "email": "[email protected]", "lastName": "Xo", "firstName": "Tm", "othernames": null, "isAdmin": false, "phoneNumber": null, "username": null }, "loggedIn": true, "strategy": "local", "busy": false } }
The auth instance contains a loggedIn property that is useful in switching between authenticated links in the nav/header section of your application. It also contains a strategy method that states the type of strategy the instance is running (e.g local). Now, we will make use of this loggedIn property to arrange our nav links. Update your navBar component to the following:
<template> <header class="header"> <div class="logo"> <nuxt-link to="/"> <Logo /> </nuxt-link> </div> <nav class="nav"> <div class="nav__user" v-if="auth.loggedIn"> <p></p> <button class="nav__link nav__link--long"> <nuxt-link to="/report-incident">Report incident</nuxt-link> </button> <button class="nav__link nav__link--long"> <nuxt-link to="/my-reports">My Reports</nuxt-link> </button> <button class="nav__link" @click.prevent="logOut">Log out</button> </div> <button class="nav__link" v-if="!auth.loggedIn"> <nuxt-link to="/login">Login</nuxt-link> </button> <button class="nav__link" v-if="!auth.loggedIn"> <nuxt-link to="/register">Register</nuxt-link> </button> </nav> </header> </template> <script> import { mapState } from "vuex"; import Logo from "@/components/Logo"; export default { name: "nav-bar", data() { return {}; }, computed: { ...mapState(["auth"]) }, methods: { logOut() { this.$store.dispatch("logOut"); this.$router.push("/login"); } }, components: { Logo } }; </script> <style></style>
In our template section, we have several links to different parts of the application in which we are now using auth.loggedIn to display the appropriate links depending on the authentication status. We have a logout button that has a click event with a logOut() function attached to it. We also display the user’s email gotten from the auth property which is accessed from our Vuex store using the mapState method which maps our state auth to the computed property of the nav component. We also have a logout method that calls our Vuex action logOut and redirects the user to the login page. Now, let us go ahead and update our store to have a logOut action.
export const actions = { // .... logOut() { this.$auth.logout(); } }
The logOut action calls the auth logout method which clears user data, deletes tokens from localStorage and sets loggedIn to false. Routes like /my-reports and report-incident should not be visible to guests but at this point in our app, that is not the case. Nuxt does not have a navigation guard that can protect your routes, but it has is the auth middleware. It gives you the freedom to create your own middleware so you can configure it to work the way you want. It can be set in two ways:
Per route.
Globally for the whole app in your nuxt.config.js file.
router: { middleware: ['auth'] }
This auth middleware works with your auth instance so you do not need to create an auth.js file in your middleware folder. Let us now add this middleware to our my-reports.vue and report-incident.vue files. Add the following lines of code to the script section of each file.
middleware: 'auth'
Now, our application would check if the user trying to access these routes has an auth.loggedIn value of true. It’ll redirect them to the login page using our redirect option in our auth config file — if you’re not logged in and you try to visit either /my-report or report-incident, you would be redirected to /login. If you go to /report-incidents, this is what you should see.
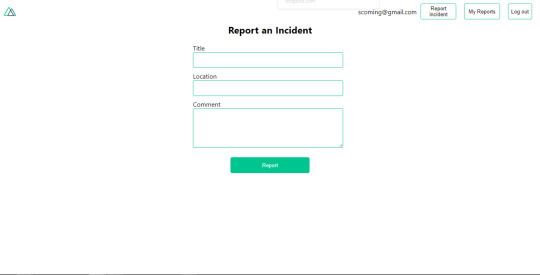
Report incident page. (Large preview)
This page is for adding incidents but that right now the form does not send incident to our server because we are not making the call to the server when the user attempts to submit the form. To solve this, we will add a reportIncident method which will be called when the user clicks on Report. We’ll have this in the script section of the component. This method will send the form data to the server. Update your report-incident.vue file with the following:
<template> <section class="report"> <h1 class="report__heading">Report an Incident</h1> <form class="report__form"> <div class="input__container"> <label for="title" class="input__label">Title</label> <input type="text" name="title" id="title" v-model="incident.title" class="input__field" required /> </div> <div class="input__container"> <label for="location" class="input__label">Location</label> <input type="text" name="location" id="location" v-model="incident.location" required class="input__field" /> </div> <div class="input__container"> <label for="comment" class="input__label">Comment</label> <textarea name="comment" id="comment" v-model="incident.comment" class="input__area" cols="30" rows="10" required ></textarea> </div> <input type="submit" value="Report" class="input__button" @click.prevent="reportIncident" /> <p class="loading__indicator" v-if="loading">Please wait....</p> </form> </section> </template> <script> export default { name: "report-incident", middleware: "auth", data() { return { loading: false, incident: { type: "red-flag", title: "", location: "", comment: "" } }; }, methods: { async reportIncident() { let data = this.incident; let formData = new FormData(); formData.append("title", data.title); formData.append("type", data.type); formData.append("location", data.location); formData.append("comment", data.comment); this.loading = true; try { let res = await this.$store.dispatch("reportIncident", formData); this.$notify({ group: "success", title: "Success", text: "Incident reported successfully!" }); this.loading = false; this.$router.push("/my-reports"); } catch (error) { this.loading = false; this.$notify({ group: "error", title: "Error!", text: error.response ? error.response.data.error : "Sorry an error occured, check your internet" }); } } } }; </script> <style> </style>
Here, we have a form with input fields for title, location, and comment with two-way data binding using v-model. We also have a submit button with a click event. In the script section, we have a reportIncident method that collects all the information provided in the form and is sent to our server using FormData because the API is designed to also accept images and videos. This formData is attached to a Vuex action using the dispatch method, if the request is successful, you get redirected to /my-reports with a notification informing you that this request was successful otherwise, you would be notified of an error with the error message. At this point, we don’t have reportIncident action in our store yet so in your browser console, you would see an error if you try to click submit on this page.

Vuex error message. (Large preview)
To fix this, add the reportIncident action your index.js file.
export const actions = { // ... async reportIncident({}, data) { let res = await this.$axios.post('/incident/create', data) return res; } }
Here, we have a reportIncident function that takes in an empty context object and the data we’re sending from our form. This data is then attached to a post request that creates an incident and returns back to our report-incident.vue file. At this point, you should be able to add a report using the form after which you would be redirected to /my-reports page.
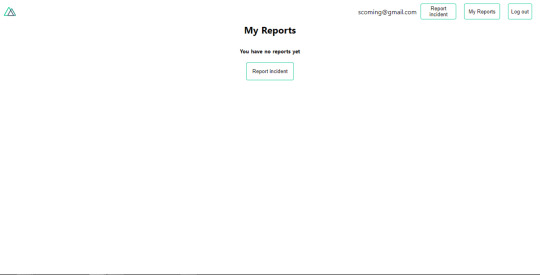
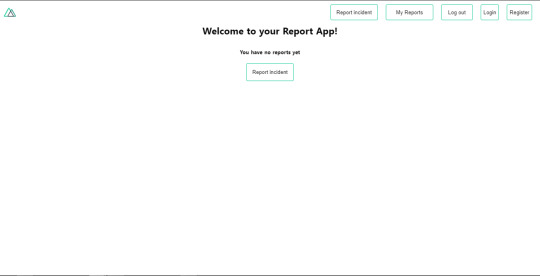
My reports page empty. (Large preview)
This page should display a list of incidents created by the user but right now it only shows what we see above, let’s go ahead to fix that. We’re going to be using the fetch method we learned about to get this list. Update your my-reports.vue file with the following:
<script> import incidentCard from "@/components/incidentCard.vue"; export default { middleware: "auth", name: "my-reports", data() { return { incidents: [] }; }, components: { incidentCard }, async fetch() { let { data } = await this.$axios.get("/user/incidents"); this.incidents = data.data; } }; </script>
Here, we use fetch method to get user-specific incidents and assign the response to our incidents array. If you refresh your page after adding an incident, you should see something like this.
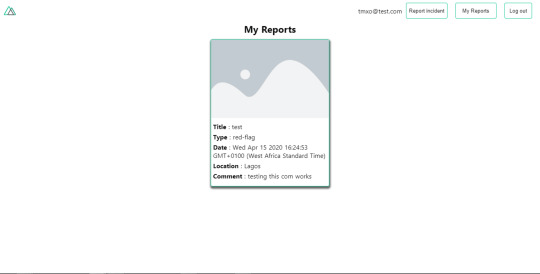
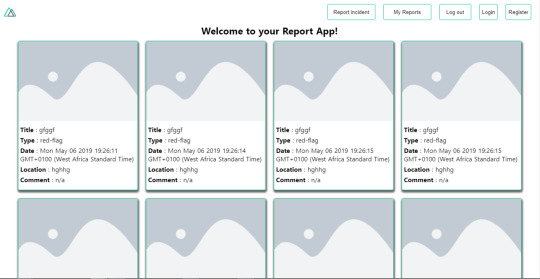
My Reports page with a report. (Large preview)
At this point, we would notice a difference in how fetch method and asyncData loads our data.
Conclusion
So far, we have learned about the Axios module and all of its features. We have also learned more about asyncData, and how we can fetch both of them together despite their differences. We’ve also learned how to perform authentication in our application using the auth module and how to use the auth middleware to protect our routes. Here are some useful resources that talk more about all we’ve covered.
Getting started with meta tags in Nuxjs.
Using the dotenv module in Nuxt.
Using Fetch in your Nuxt app.
Getting started with asyncData.
0 notes
Photo

🎉 JavaScript turns 25 years old
#489 — May 22, 2020
Unsubscribe : Read on the Web
JavaScript Weekly
A Complete Walkthrough to Using WebGL — A really thorough walkthrough of getting started with WebGL at the low level, complete with integrated, editable examples and coverage of the math behind 3D rendering. If you’ve ever wondered what libraries like Three.js are using behind the scenes, it’s all here.
Maxime Euzière
Microsoft Unveils 'Azure Static Web Apps' — Azure Static Web Apps brings modern static site deployment to Azure and integrates with GitHub and Visual Studio Code too. Want to see more? Here’s a 6 minute screencast demo. Yet another way to deploy those static single page apps :-)
Microsoft
The Most Complete Spreadsheet for JavaScript Apps – SpreadJS — Deliver true Excel-like experiences with this fast JavaScript enterprise spreadsheet solution. Build FinTech, analysis, budgeting, and forecasting apps. Featuring an Excel I/O, 450+ functions, tables, charts, sparklines, and more. View the latest demo.
SpreadJS by GrapeCity sponsor
The Unreasonable Effectiveness of Declarative Programming — Siddharth shows off his single file animation library by way of showing off the benefits of doing things in an (arguably) declarative style. A nifty post, this, which encourages you to interact with the code yourself.
Siddharth Bhat
The Third Age of JavaScript? — Yes, purely an opinion piece but he might have a point. “Every 10 years there is a changing of the guard in JavaScript. I think we have just started a period of accelerated change that could in future be regarded as the Third Age of JavaScript.”
Shawn Wang
Electron 9.0.0 Released — The popular cross platform desktop app framework gets more dependency bumps and is now running on Chromium 83, V8 8.3, and Node.js 12.14. There’s an integrated PDF viewer now, if you need that.
GitHub Inc.
⚡️ Quick bytes:
JavaScript is 25 years old at.. roughly now!
Microsoft has been showing off its work getting React Native on macOS and some other new Windows features.
Vue has made it into the 'adopt' zone of ThoughtWorks' languages and frameworks technology radar (and Vue 3.0.0 beta 14 is out too.)
Ionic are running IoniConf 2020 online next month (June 24).
💻 Jobs
Senior Software Engineer — Save Lives & Make an Impact — We use Node/TS/React & ML to provide crisis support via SMS. Help us scale globally with a focus on privacy and security.
Crisis Text Line
Find a Job Through Vettery — Vettery specializes in tech roles and is completely free for job seekers. Create a profile to get started.
Vettery
📚 Tutorials and Opinions

▶ (Re)-Implementing The Easiest JavaScript Game Ever — Have you ever played the ‘running dinosaur’ game in Chrome when your connection goes down? This is a fun 8 minutes spent reimplementing the basic mechanic. It’s scrappy, but that’s kinda the point. If you like his style, he’s done a 2 minute video flying through the development of another arcadey game.
KnifeCircus
The Architecture of a Serverless, Vue.js-Powered Content Management System — Not only does this outline the AWS infrastructural architecture pretty well, there’s code for you to use for your own setup if you wish.
Dan Bartlett
Understanding Lazy-Loading in Popular Frontend Frameworks — How Angular, React, and Vue handle on-demand loading of components.
tamos piros
▶ One Developer's Five Most Used JavaScript 'Tricks' — If you’re more at the beginner end of the scale, you might appreciate six minutes spent here. Well presented.
Aaron Jack beginner
Stream Chat API & JavaScript SDK for Custom Chat Apps — Build real-time chat in less time. Rapidly ship in-app messaging with our highly reliable chat infrastructure.
Stream sponsor
5 Differences Between Arrow and Regular Functions — A nice detailed look, with examples, of the differences between arrow and regular functions in JavaScript. I’m sure one or two of these will be new to many of you.
dmitri pavlutin
Dropbox's Great CoffeeScript to TypeScript Migration of 2017 — A deep retrospective from the Dropbox team on migrating hundreds of thousands of lines of CoffeeScript to TypeScript, sharing details on why they chose TypeScript and the challenges faced. “Fast forward to 2020, we now have over two million lines of TypeScript at Dropbox.”
David Goldstein
Promise.all vs Promise.allSettled — “I was reading the MDN docs on JavaScript promises and realized that the difference between Promise.all and Promise.allSettled wasn’t immediately obvious.”
JonLuca DeCaro
Growing Pains: From 0 to 13,000 Dependencies — Find out how your project can go from 0 to 13,000 dependencies in just a few steps.
Nikola Đuza
Error Handling in RxJS
Eugene Ghanizadeh Khoub
A (Mostly) Complete Guide to React Rendering Behavior
Mark Erikson
How to Use Object Destructuring in JavaScript — A code-heavy tutorial looking at object destructuring, a feature introduced in ES6 that allows you to extract properties from objects and bind them to variables.
dmitri pavlutin
🔧 Code & Tools
Reveal.js 4.0: An HTML Presentation Framework — A mature library takes another step forward. The homepage itself is, cleverly, a live demo (use the arrow keys). v4 adds several new features. Just want the code? Here’s the GitHub repo.
Hakim El Hattab
ac-colors: A Reactive Color Conversion and Generation Library — A lot of power under the hood here being able to convert between RGB, HSL, HEX, XYZ, LAB, and LCHab, as well as handle random color generation and contrast ratio calculation.
Vinay
MongoDB Is Easy. Now Make It Powerful. Free Download for 30 Days. — Using MongoDB Atlas? Studio 3T is the professional GUI and IDE that unlocks the power you need.
Studio 3T sponsor
umi-request: A Modern HTTP Request Tool Based on Fetch — An attempt at combining some of the niceties of Axios with the modernity of the Fetch API to get the best of both worlds.
UmiJS
Howler.js: An Audio Library for The Modern Web — Makes things easier cross-platform. Uses the Web Audio API but can fall back to HTML5 Audio.
James Simpson
Vue Class Store: Universal Vue Stores You Write Once and Use Anywhere — We’ll let it speak for itself: “I’ll give you reactivity, computed properties and watches, written in standard JavaScript or TypeScript, with no setup or boilerplate, and you can use me anywhere.”
Dave Stewart
New Integration: PostgreSQL Instrumented for Node.js
AppSignal sponsor
Vue Formulate: The Easy Way to Build Forms with Vue.js — First linked a few months ago, this has come on leaps and bounds since with grouped fields, a way to stop validation, slots for customization, and more.
Braid LLC
NanoPop: A Minimalistic Positioning Engine — In a race to do things in as few bytes as possible, NanoPop aims to be much smaller than even PopperJS for positioning things like tooltips and popovers.
Simon R.
by via JavaScript Weekly https://ift.tt/3bVZAUv
0 notes
Text
Tackling Authentication With Vue Using RESTful APIs
Authentication (logging in!) is a crucial part of many websites. Let’s look at how to go about it on a site using Vue, in the same way it can be done with any custom back end. Vue can’t actually do authentication all by itself, —we’ll need another service for that, so we’ll be using another service (Firebase) for that, but then integrating the whole experience in Vue.
Authentication works quite differently on Single Page Applications (SPAs) than it works on sites that reload every page. You don’t have to make an SPA with Vue, but we will in this tutorial.
Here’s the plan. We’ll build a UI for users to log in and the submitted data will be sent to a server to check if the user exists. If yes, we’ll be sent a token. That’s very useful, because it’s going to be used throughout our site tocheck if the user is still signed in. If no, the user can always sign up. In other words, it can be used in lots of conditional contexts. Beyond that, if we need any information from the server that requires been logged in, the token is sent to the server through the URL so that information can be only sent to logged in users.
The complete demo of this tutorial is posted on GitHub for those that who are comfortable reading through the code. The rest of us can follow through with the article. The starter file is also on GitHub so you can follow through as we code together.
After downloading the repo, you’ll run npm install in your terminal. If you’re going to build this application completely on your own, you’ll have to install Vuex, Vue Router, and axios. We’ll also use Firebase for this project, so take a moment to set up a free account and create a new project in there.

After adding the project to Firebase, go to the authentication section, and set up a sign in method where we would be using the traditional email/password provider, that’ll be stored on our Firebase servers.
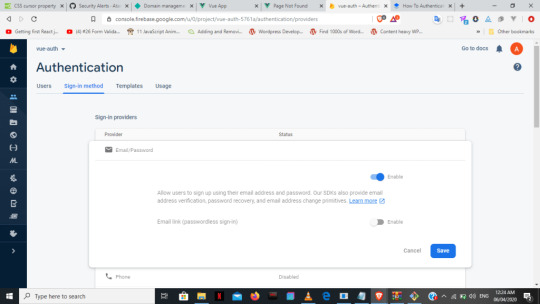
After that we’ll then go to the Firebase Auth REST API documentation to get our sign up and sign in API endpoints. We’ll need an API key to use those endpoints in our app and it can be found in the Firebase project settings.
Firebase offers authentication over the SDK, but we’re using the Auth API to demonstrate authentication over any custom back end server.
In our stater file, we have the sign up form below. We’re keeping things pretty simple here since we’re focusing on learning the concepts.
<template> <div id="signup"> <div class="signup-form"> <form @submit.prevent="onSubmit"> <div class="input"> <label for="email">Mail</label> <input type="email" id="email" v-model="email"> </div> <div class="input"> <label for="name">Your Name</label> <input type="text" id="name" v-model.number="name"> </div> <div class="input"> <label for="password">Password</label> <input type="password" id="password" v-model="password"> </div> <div class="submit"> <button type="submit">Submit</button> </div> </form> </div> </div> </template>
If we weren’t working with an SPA, we would naturally use axios to send our data inside the script tag like this:
axios.post('https://identitytoolkit.googleapis.com/v1/account s:signUp?key=[API_KEY]', { email: authData.email, password: authData.password, returnSecureToken: true }) .then(res => { console.log(res) }) .catch(error => console.log(error)) } }
Sign up and log in
Working with an SPA (using Vue in this case) is very different from the above approach. Instead, we’ll be sending our authorization requests using Vuex in our actions in the store.js file. We’re doing it this way because we want the entire app to be aware of any change to the user’s authentication status.
actions: { signup ({commit}, authData) { axios.post('https://identitytoolkit.googleapis.com/v1/accounts:signUp?key=[API_KEY]', { email: authData.email, password: authData.password, returnSecureToken: true }) .then(res => { console.log(res) router.push("/dashboard") }) .catch(error => console.log(error)) }, login ({commit}, authData) { axios.post(https://identitytoolkit.googleapis.com/v1/accounts:signIn?key=[API_KEY]', { email: authData.email, password: authData.password, returnSecureToken: true }) .then(res => { console.log(res) router.push("/dashboard") }) .catch(error => console.log(error)) } }
We can use pretty much the same thing for the sign in method, but using the sign in API endpoint instead. We then dispatch both the sign up and log in from the components, to their respective actions in the store.
methods : { onSubmit () { const formData = { email : this.email, name : this.name, password : this.password } this.$store.dispatch('signup', formData) } } }
formData contains the user’s data.
methods : { onSubmit () { const formData = { email : this.email, password : this.password } this.$store.dispatch('login', {email: formData.email, password: formData.password}) } }
We’re taking the authentication data (i.e. the token and the user’s ID) that was received from the sign up/log in form, and using them as state with Vuex. It’ll initially result as null.
state: { idToken: null, userId: null, user: null }
We now create a new method called authUser in the mutations that’ll store the data that’s collected from the response. We need to import the router into the store as we’ll need that later.
import router from '/router'
mutations : { authUser (state, userData) { state.idToken = userData.token state.userId = userData.userId } }
Inside the .then block in the signup/login methods in our actions, we’ll commit our response to the authUser mutation just created and save to local storage.
actions: { signup ({commit}, authData) { axios.post('https://identitytoolkit.googleapis.com/v1/accounts:signUp?key=[API_KEY]'), { email: authData.email, password: authData.password, returnSecureToken: true }) .then(res => { console.log(res) commit('authUser', { token: res.data.idToken, userId: res.data.localId }) localStorage.setItem('token', res.data.idToken) localStorage.setItem('userId', res.data.localId) router.push("/dashboard") }) .catch(error => console.log(error)) }, login ({commit}, authData) { axios.post('https://identitytoolkit.googleapis.com/v1/accounts:signIn?key=[API_KEY]'), { email: authData.email, password: authData.password, returnSecureToken: true }) .then(res => { console.log(res) commit('authUser', { token: res.data.idToken, userId: res.data.localId }) localStorage.setItem('token', res.data.idToken) localStorage.setItem('userId', res.data.localId) router.push("/dashboard") }) .catch(error => console.log(error)) } }
Setting up an Auth guard
Now that we have our token stored within the application, we’re going touse this token while setting up our Auth guard. What’s an Auth guard? It protects the dashboard from unauthenticated users access it without tokens.
First, we’ll go into our route file and import the store. The store is imported because of the token that’ll determine the logged in state of the user.
import store from './store.js'
Then within our routes array, go to the dashboard path and add the method beforeEnter which takes three parameters: to, from and next. Within this method, we’re simply saying that if the tokens are stored (which is automatically done if authenticated), then next, meaning it continues with the designated route. Otherwise, we’re leading the unauthenticated user back to the sign up page.
{ path: '/dashboard', component: DashboardPage, beforeEnter (to, from, next) { if (store.state.idToken) { next() } else { next('/signin') } } }
Creating the UI state
At this point, we can still see the dashboard in the navigation whether we’re logged in or not, and that’s not what we want. We have to add another method under the getters called ifAuthenticated which checks if the token within our state is null, then update the navigation items accordingly.
getters: { user (state) { return state.user }, ifAuthenticated (state) { return state.idToken !== null } }
Next, let’s open up the header component and create a method called auth inside the computed property. That will dispatch to the ifAuthenticated getters we just created in the store. ifAuthenticated will return false if there’s no token, which automatically means auth would also be null, and vice versa. After that, we add a v-if to check if auth is null or not, determining whether the dashboard option would show in the navigation.
<template> <header id="header"> <div class="logo"> <router-link to="/">Vue Authenticate</router-link> </div> <nav> <ul> <li v-if='auth'> <router-link to="/dashboard">Dashboard</router-link> </li> <li v-if='!auth'> <router-link to="/signup">Register</router-link> </li> <li v-if='!auth'> <router-link to="/signin">Log In</router-link> </li> </ul> </nav> </header> </template> <script> export default { computed: { auth () { return this.$store.getters.ifAuthenticated } }, } </script>
Logging out
What’s an application without a logout button? Let’s create a new mutation called clearAuth, which sets both the token and userId to null.
mutations: { authUser (state, userData) { state.idToken = userData.token state.userId = userData.userId }, clearAuth (state) { state.idToken = null state.userId = null } }
Then, in our logout action , we commit to clearAuth, delete local storage and add router.replace('/') to properly redirect the user following logout.
Back to the header component. We have an onLogout method that dispatches our logout action in the store. We then add a @click to the button which calls the to the onLogout method as we can see below:
<template> <header id="header"> <div class="logo"> <router-link to="/">Vue Authenticate</router-link> </div> <nav> <ul> <li v-if='auth'> <router-link to="/dashboard">Dashboard</router-link> </li> <li v-if='!auth'> <router-link to="/signup">Register</router-link> </li> <li v-if='!auth'> <router-link to="/signin">Log In</router-link> </li> <li v-if='auth'> <ul @click="onLogout">Log Out</ul> </li> </ul> </nav> </header> </template> <script> export default { computed: { auth () { return this.$store.getters.ifAuthenticated } }, methods: { onLogout() { this.$store.dispatch('logout') } } } </script>
Auto login? Sure!
We’re almost done with our app. We can sign up, log in, and log out with all the UI changes we just made. But, when we refresh our app, we lose the data and are signed out, having to start all over again because we stored our token and Id in Vuex, which is JavaScript. This means everything in the app gets reloaded in the browser when refreshed.
What we’ll do is to retrieve the token within our local storage. By doing that, we can have the user’s token in the browser regardless of when we refresh the window, and even auto-login the user as long as the token is still valid.
Create a new actions method called AutoLogin, where we’ll get the token and userId from the local storage, only if the user has one. Then we commit our data to the authUser method in the mutations.
actions : { AutoLogin ({commit}) { const token = localStorage.getItem('token') if (!token) { return } const userId = localStorage.getItem('userId') const token = localStorage.getItem('token') commit('authUser', { idToken: token, userId: userId }) } }
We then go to our App.vue and make a created method where we’ll dispatch the autoLogin from our store when the app is loaded.
created () { this.$store.dispatch('AutoLogin') }
Yay! With that, we’ve successfully implemented authentication within our app and can now deploy using npm run build. Check out the live demo to see it in action.
The example site is purely for demonstration purposes. Please do not share real data, like your real email and password, while testing the demo app.
The post Tackling Authentication With Vue Using RESTful APIs appeared first on CSS-Tricks.
source https://css-tricks.com/tackling-authentication-with-vue-using-restful-apis/
from WordPress https://ift.tt/3g2vbXC via IFTTT
0 notes
Text
Alpine.js: The JavaScript Framework That’s Used Like jQuery, Written Like Vue, and Inspired by TailwindCSS
We have big JavaScript frameworks that tons of people already use and like, including React, Vue, Angular, and Svelte. Do we need another JavaScript library? Let’s take a look at Alpine.js and you can decide for yourself. Alpine.js is for developers who aren’t looking to build a single page application (SPA). It’s lightweight (~7kB gzipped) and designed to write markup-driven client-side JavaScript.
The syntax is borrowed from Vue and Angular directive. That means it will feel familiar if you’ve worked with those before. But, again, Alpine.js is not designed to build SPAs, but rather enhance your templates with a little bit of JavaScript.
For example, here’s an Alpine.js demo of an interactive “alert” component.
CodePen Embed Fallback
The alert message is two-way bound to the input using x-model="msg". The “level” of the alert message is set using a reactive level property. The alert displays when when both msg and level have a value.
It’s like a replacement for jQuery and JavaScript, but with declarative rendering
Alpine.js is a Vue template-flavored replacement for jQuery and vanilla JavaScript rather than a React/Vue/Svelte/WhateverFramework competitor.
Since Alpine.js is less than a year old, it can make assumptions about DOM APIs that jQuery cannot. Let’s briefly draw a comparison between the two.
Querying vs. binding
The bulk of jQuery’s size and features comes in the shape of a cross-browser compatibility layer over imperative DOM APIs — this is usually referred to as jQuery Core and sports features that can query the DOM and manipulate it.
The Alpine.js answer to jQuery core is a declarative way to bind data to the DOM using the x-bind attribute binding directive. It can be used to bind any attribute to reactive data on the Alpine.js component. Alpine.js, like its declarative view library contemporaries (React, Vue), provides x-ref as an escape hatch to directly access DOM elements from JavaScript component code when binding is not sufficient (eg. when integrating a third-party library that needs to be passed a DOM Node).
Handling events
jQuery also provides a way to handle, create and trigger events. Alpine.js provides the x-on directive and the $event magic value which allows JavaScript functions to handle events. To trigger (custom) events, Alpine.js provides the $dispatch magic property which is a thin wrapper over the browser’s Event and Dispatch Event APIs.
Effects
One of jQuery’s key features is its effects, or rather, it’s ability to write easy animations. Where we might use slideUp, slideDown, fadeIn, fadeOut properties in jQuery to create effects, Alpine.js provides a set of x-transition directives, which add and remove classes throughout the element’s transition. That’s largely inspired by the Vue Transition API.
Also, jQuery’s Ajax client has no prescriptive solution in Alpine.js, thanks to the Fetch API or taking advantage of a third party HTTP library (e.g. axios, ky, superagent).
Plugins
It’s also worth calling out jQuery plugins. There is no comparison to that (yet) in the Alpine.js ecosystem. Sharing Alpine.js components is relatively simple, usually requiring a simple case of copy and paste. The JavaScript in Alpine.js components are “just functions” and tend not to access Alpine.js itself, making them relatively straightforward to share by including them on different pages with a script tag. Any magic properties are added when Alpine initializes or is passed into bindings, like $event in x-on bindings.
There are currently no examples of Alpine.js extensions, although there are a few issues and pull requests to add “core” events that hook into Alpine.js from other libraries. There are also discussions happening about the ability to add custom directives. The stance from Alpine.js creator Caleb Porzio, seems to be basing API decisions on the Vue APIs, so I would expect that any future extension point would be inspired on what Vue.js provides.
Size
Alpine.js is lighter weight than jQuery, coming in at 21.9kB minified — 7.1kB gzipped — compared to jQuery at 87.6kB minified — 30.4kB minified and gzipped. Only 23% the size!
Most of that is likely due to the way Alpine.js focuses on providing a declarative API for the DOM (e.g. attribute binding, event listeners and transitions).
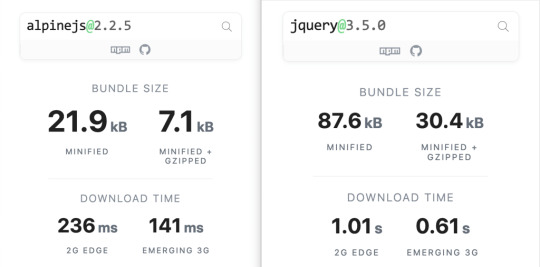
Bundlephobia breaks down the two
For the sake of comparison, Vue comes in at 63.5kB minified (22.8kB gzipped). How can Alpine.js come in lighter despite it’s API being equivalent Vue? Alpine.js does not implement a Virtual DOM. Instead, it directly mutates the DOM while exposing the same declarative API as Vue.
Let’s look at an example
Alpine is compact because since application code is declarative in nature, and is declared via templates. For example, here’s a Pokemon search page using Alpine.js:
CodePen Embed Fallback
This example shows how a component is set up using x-data and a function that returns the initial component data, methods, and x-init to run that function on load.
Bindings and event listeners in Alpine.js with a syntax that’s strikingly similar to Vue templates.
Alpine: x-bind:attribute="express" and x-on:eventName="expression", shorthand is :attribute="expression" and @eventName="expression" respectively
Vue: v-bind:attribute="express" and v-on:eventName="expression", shorthand is :attribute="expression" and @eventName="expression" respectively
Rendering lists is achieved with x-for on a template element and conditional rendering with x-if on a template element.
Notice that Alpine.js doesn’t provide a full templating language, so there’s no interpolation syntax (e.g. in Vue.js, Handlebars and AngularJS). Instead, binding dynamic content is done with the x-text and x-html directives (which map directly to underlying calls to Node.innerText and Node.innerHTML).
An equivalent example using jQuery is an exercise you’re welcome to take on, but the classic style includes several steps:
Imperatively bind to the button click using $('button').click(/* callback */).
Within this “click callback” get the input value from the DOM, then use it to call the API.
Once the call has completed, the DOM is updated with new nodes generated from the API response.
If you’re interested in a side by side comparison of the same code in jQuery and Alpine.js, Alex Justesen created the same character counter in jQuery and in Alpine.js.
Back in vogue: HTML-centric tools
Alpine.js takes inspiration from TailwindCSS. The Alpine.js introduction on the repository is as “Tailwind for JavaScript.”
Why is that important?
One of Tailwind’s selling points is that it “provides low-level utility classes that let you build completely custom designs without ever leaving your HTML.” That’s exactly what Alpine does. It works inside HTML so there is no need to work inside of JavaScript templates the way we would in Vue or React Many of the Alpine examples cited in the community don’t even use script tags at all!
Let’s look at one more example to drive the difference home. Here’s is an accessible navigation menu in Alpine.js that uses no script tags whatsoever.
CodePen Embed Fallback
This example leverages aria-labelledby and aria-controls outside of Alpine.js (with id references). Alpine.js makes sure the “toggle” element (which is a button), has an aria-expanded attribute that’s true when the navigation is expanded, and false when it’s collapsed. This aria-expanded binding is also applied to the menu itself and we show/hide the list of links in it by binding to hidden.
Being markup-centric means that Alpine.js and TailwindCSS examples are easy to share. All it takes is a copy-paste into HTML that is also running Alpine.js/TailwindCSS. No crazy directories full of templates that compile and render into HTML!
Since HTML is a fundamental building block of the web, it means that Alpine.js is ideal for augmenting server-rendered (Laravel, Rails, Django) or static sites (Hugo, Hexo, Jekyll). Integrating data with this sort of tooling can be a simple as outputting some JSON into the x-data="{}" binding. The affordance of passing some JSON from your backend/static site template straight into the Alpine.js component avoids building “yet another API endpoint” that simply serves a snippet of data required by a JavaScript widget.
Client-side without the build step
Alpine.js is designed to be used as a direct script include from a public CDN. Its developer experience is tailored for that. That’s why it makes for a great jQuery comparison and replacement: it’s dropped in and eliminates a build step.
While it’s not traditionally used this way, the bundled version of Vue can be linked up directly. Sarah Drasner has an excellent write-up showing examples of jQuery substituted with Vue. However, if you use Vue without a build step, you’re actively opting out of:
the Vue CLI
single file components
smaller/more optimized bundles
a strict CSP (Content Security Policy) since Vue inline templates evaluate expressions client-side
So, yes, while Vue boasts a buildless implementation, its developer experience is really depedent on the Vue CLI. That could be said about Create React App for React, and the Angular CLI. Going build-less strips those frameworks of their best qualities.
There you have it! Alpine.js is a modern, CDN-first library that brings declarative rendering for a small payload — all without the build step and templates that other frameworks require. The result is an HTML-centric approach that not only resembles a modern-day jQuery but is a great substitute for it as well.
If you’re looking for a jQuery replacement that’s not going to force you into a SPAs architecture, then give Alpine.js a go! Interested? You can find out more on Alpine.js Weekly, a free weekly roundup of Alpine.js news and articles.
The post Alpine.js: The JavaScript Framework That’s Used Like jQuery, Written Like Vue, and Inspired by TailwindCSS appeared first on CSS-Tricks.
via CSS-Tricks https://ift.tt/3aMMDvq
0 notes
Link
0 notes
Text
Vue-js Put request example
Vue-js Put request example
How we install axios via npm ?How to install node modules ?What is axios ?How to import Axios ?Sending post request via AxiosCompiling assest. we will learn about how we can send put requests by using Axios, if Axios is not present in your comopser.json file then you can use the below command to install the Axios How to install axios via npm npm install axios Before installing the Axios, be…

View On WordPress
0 notes
Text
Post Form Data With Axios in Vue
in the vue file the methods is below:
function() { run().catch(err => console.log(err)); async function run() { const blob = await fetch(imgDataUrl).then(res => res.blob()); const formData = new FormData(); formData.append('png', blob);
// Post the form, just make sure to set the 'Content-Type' header const res = await axios.post('/api/upload/png', formData, { headers: { 'Content-Type': 'multipart/form-data' } }); console.log(res.data); } }
you must import axios before the vue:
var axios = require('axios')
in the java backend:(/api will be rewrite in vue.config.js)
@PostMapping("/upload/png") @ResponseBody public Result pngUpload(HttpServletRequest request) { MultipartHttpServletRequest multipartHttpServletRequest = (MultipartHttpServletRequest) request; MultipartFile mulFile = multipartHttpServletRequest.getFile("png"); System.out.println("png file:" + mulFile);
// get file name String fileName = mulFile.getOriginalFilename();
0 notes
Text
Building Mobile Apps With Ionic And React
Building Mobile Apps With Ionic And React
Ahmed Bouchefra
2019-08-07T12:30:00+02:002019-08-07T10:36:12+00:00
Ionic has recently added support for React; so now, React developers can get the advantages of Ionic to build hybrid mobile apps and progressive web apps (PWAs). In this post, we’ll show you how to get started using Ionic with React by building a simple demo app from scratch.
Prerequisites
In order to properly follow this tutorial, you’ll need the following prerequisites:
recent versions of Node.js and npm installed on your system,
working knowledge of TypeScript and React.
You can check that you have the latest Node.js version (v10) installed by running the following command:
$ node -v
Introducing React And Ionic
Let’s start with brief introductions to both React and Ionic.
According to the official website:
“React is a declarative, efficient, and flexible JavaScript library for building user interfaces. It lets you compose complex UIs from small and isolated pieces of code called ‘components’.”
React focuses on building UIs and doesn’t provide any built-in tools for the common tasks required in web development, such as fetching remote data and routing, so you’ll need to use some existing third-party libraries for these tasks.
According to the Ionic website:
“Ionic Framework is the free, open-source mobile UI toolkit for developing high-quality cross-platform apps for native iOS, Android, and the web — all from a single codebase.”
Basically, it’s a set of UI components that you can use with plain JavaScript or any popular front-end framework or library, such as Angular, React or Vue, to build a hybrid mobile app and PWA.
In this tutorial, we’ll see and use some Ionic UI components such as the following:
IonMenu: With this, a navigation drawer will slide in from the side of the current view.
IonToolbar: These top bars are positioned above or below the content.
IonHeader: This parent component holds the toolbar component.
IonContent: This component provides a content area, with methods to control the scrollable area and other things. You need only one content component inside a single view.
IonList: This component contains items with similar data content, such as images and text. It’s made up of IonItem objects.
IonItem: This component may contain text, icons, avatars, images, inputs and any other native or custom element.
IonButton: This component provides a clickable element, which can be used in a form or anywhere that needs simple, standard button functionality.
Installing Ionic CLI v5
Ionic’s command line interface (CLI), version 5, has support for creating Ionic projects based on React. So, let’s get started by installing the tool from npm.
Open a CLI, and run the following command:
$ npm install -g ionic
At the time of writing, Ionic’s CLI v5.2.3 is the latest.
Note: *According to how you installed Node.js in your system, you may need to add sudo before your command in macOS or Linux or run the command prompt as administrator in Windows if you get any permission errors. You can also simply fix your npm permissions or use a tool such as nvm.*
Next, install Cordova Resources (which is used to generate Cordova resources locally) and Native Run (used to deploy app binaries to devices):
$ npm install -g cordova-res native-run
These are required only if you want to test your application on a real mobile device or emulator.
Creating An Ionic And React Project
Now, let’s create a project based on React. Go back to your terminal, make sure you are in your working directory, and run the following command:
$ ionic start myApp --type=react
We use --type=react to generate a project based on React. You’ll next need to choose a starter template from the available ones. Let’s pick sidemenu for a starter template with a side menu and navigation.
After generating the project and installing the dependencies, you can serve your app locally using the following commands:
$ cd ./myApp $ ionic serve
Your app will be available from the http://localhost:8100 address, and you can actually use your web browser to start playing with it.
Ionic is called a hybrid mobile framework because it makes use of web technologies that were originally designed to create web apps, along with a native container (Cordova or Capacitor), to build mobile apps without using native technologies for the target platforms, such as Java or Kotlin for Android or Swift for iOS.
Because your mobile app is actually a web application, you can do most development by testing in a web browser without using an emulator or a real mobile device, except for testing native device features such as the camera or the SQLite storage, in case you’ve used them in your app. In fact, it’s even possible to use certain techniques to mimic the plugins that provide the native features and do the entire testing during development in your web browser.
Cleaning Our Project
We have the app’s basic structure, with two pages (home and list) and a menu. Let’s remove the list page since it’s just boilerplate code.
First, remove the src/pages/List.tsx file, then open the src/App.tsx file, and remove the entry for the list page from the appPages array:
const appPages: AppPage[] = [ { title: 'Home', url: '/home', icon: home } ];
Also, remove the import of the list page from the file:
import List from './pages/List';
Next, remove <Route path="/:tab(home)/list" component={List} exact={true} /> from the App component:
const App: React.FunctionComponent = () => ( <IonApp> <IonReactRouter> <IonSplitPane contentId="main"> <Menu appPages={appPages} /> <IonPage id="main"> <IonRouterOutlet> <Route path="/:tab(home)" component={Home} exact={true} /> <Route exact path="/" render={() => <Redirect to="/home" />} /> </IonRouterOutlet> </IonPage> </IonSplitPane> </IonReactRouter> </IonApp> ); export default App;
The App component is the root component that gets rendered by our application. If you open the src/index.tsx file, you’ll find the following code:
import React from 'react'; import ReactDOM from 'react-dom'; import App from './App'; ReactDOM.render(<App />, document.getElementById('root'));
The render() method is used to render a React element into the DOM in the supplied root element.
Theming The App
Having created, served and cleaned our Ionic project, let’s now see how we can change the colors of the UI so that it looks more professional.
Let’s get started with the side menu. Open the src/components/Menu.tsx file, and add a color attribute with a primary value to the IonToolbar, IonContent, IonList and IonItem UI components:
const Menu: React.FunctionComponent = ({ appPages }) => ( <IonMenu contentId="main"> <IonHeader> <IonToolbar color="primary"> <IonTitle>Menu</IonTitle> </IonToolbar> </IonHeader> <IonContent color="primary"> <IonList style= color="primary"> {appPages.map((appPage, index) => { return ( <IonMenuToggle key={index} auto-hide="false"> <IonItem color="primary" href={appPage.url}> <IonIcon slot="start" icon={appPage.icon} /> <IonLabel>{appPage.title}</IonLabel> </IonItem> </IonMenuToggle> ); })} </IonList> </IonContent> </IonMenu> );
Ionic provides some default colors (primary, secondary, tertiary, success, warning, danger, light, medium and dark) that can be used to change the color of UI components. A color can be applied to an Ionic component in order to change the default colors using the color attribute. See “Colors” for more information.
These colors have default values, but you can customize them via some predefined CSS variables. See “Modifying Colors“.
This is a screenshot of our menu:
Ionic menu. (Large preview)
Next, let’s change the color of the Home page. Open the src/pages/Home.tsx file, and set the color attribute of the IonToolbar and IonContent components to primary:
const HomePage: React.FunctionComponent = () => { return ( <> <IonHeader> <IonToolbar color="primary"> <IonButtons slot="start"> <IonMenuButton /> </IonButtons> <IonTitle>Home</IonTitle> </IonToolbar> </IonHeader> <IonContent color="primary" > </IonContent> </> ); };
This is a screenshot of the page:

Ionic home. (Large preview)
Installing Axios And Consuming A REST API
We’ll see how to install Axios and consume a third-party RESTful API in our application, and we’ll also see how to display the fetched data using Ionic card and list components.
Having themed our application, let’s now see how to fetch data using Axios. We’ll use the third-party API available from NewsAPI.org.
First, we need to grab an API key, so that we can communicate with the API. Go to the registration page, enter your information, and register an account. You’ll be given an API key; note it, and let’s continue.
Head back to your terminal, and run the following command to install Axios:
$ npm install axios --save
Next, open the src/pages/Home.tsx file, and start by importing Axios and IonButton:
import { IonButton } from '@ionic/react'; import axios from 'axios';
Next, define the API_KEY and URL constant variables:
const API_KEY = "<YOUR_API_KEY_HERE>"; const URL = `https://newsapi.org/v2/top-headlines?sources=techcrunch&apiKey=${API_KEY}`;
In the URL variable, we’ll add an endpoint to get the top headlines from our source, TechCrunch. You can use any source you want from the available sources.
Note: Make sure to put your own API key in the API_KEY variable.
Next, define the fetchArticles() method as follows:
const fetchArticles = () => { return axios({ url: URL, method: 'get' }).then(response => { console.log(response); return response.data; }) };
We simply call the axios() method to send a GET request to the news endpoint, and the result from the method is a promise that needs to be resolved in order to get the news data.
Next, update the HomePage component as follows to call the fetchArticles() method and resolve the returned promise:
const HomePage: React.FunctionComponent = () => { const [articles, setArticles] = React.useState([]); const items: any[] = []; React.useEffect(() => { fetchArticles().then(data => setArticles(data.articles)); }, []); return ( <> <IonHeader> <IonToolbar color="primary"> <IonButtons slot="start"> <IonMenuButton /> </IonButtons> <IonTitle>Home</IonTitle> </IonToolbar> </IonHeader> <IonContent color="primary" > <IonList color="primary"> { articles.map(a => { return ( <IonItem> {a['title']} <IonButton href={a['url']} color="primary" slot="end">Read</IonButton> </IonItem> ); }) } </IonList> </IonContent> </> ); };
In our function component, we first call the useState() hook of React to create the articles state variable, which will hold the news articles after we fetch them from the API.
useState() returns the state variable, which has the empty array as its initial value and a function that we can use to change the value of the variable. We use destructuring assignment to unpack the values from the returned pair into distinct variables (i.e. articles and setArticles()).
Next, we call the useEffect() hook to perform a side effect in our component. In our case, the side effect is to fetch data from the news API using the fetchArticles() method, which returns a promise. Once the promise is resolved, we call the setArticles() method to assign the news data to the articles variable.
Both useState() and useEffect() are built-in React hooks that were introduced in React 16.8; they simply let you use state and other React features without having to write a class. The useEffect() hook is equivalent to calling the componentDidMount, componentDidUpdate and componentWillUnmount lifecycle methods combined in class-based components.
Finally, in the view template, we iterate over the articles array using the map() method, and we display the title of each news article inside an IonItem element of the IonList component, and also a button that takes us to the page of the full article.
This is a screenshot of the page:
Ionic news app (Large preview)
You can find the source code in this GitHub repository.
Conclusion
In this tutorial, we have started using both Ionic and React and used them to build a simple mobile application that fetches and displays news data from a third-party API using the Axios client. We have also seen how to use hooks in React — namely, the useState() and useEffect() hooks — to create state and perform side effects inside React function components. With Ionic, we’ve seen how easy it is to generate a project based on React and how we can theme the application using the color attributes of components.

(dm, al, yk, ra, il)
0 notes
Text
Laravel 5.8 Tutorial From Scratch - e26 - Vue Basics 101 - Laravel
Laravel 5.8 Tutorial From Scratch – e26 – Vue Basics 101 – Laravel
Laravel 5.8 Tutorial From Scratch – e26 – Vue Basics 101 – Laravel
[ad_1]
Vue is a modern Javascript framework that is powerful but yet simple to understand. In this episode, we are covering the basics of Vue by setting up a reusable button component. We will wrap it up by fetching some data from the Laravel backend using Axios.
For the best experience, follow along in our interactive school at h…
View On WordPress
#fetching data in laravel#full stack vue#laravel#laravel 5.8#Laravel API#laravel axios post example#laravel fetching data from database#laravel front end#laravel frontend tutorial#laravel mix#laravel mix 5.8#laravel mix vue#laravel node modules#laravel npm install#laravel vue#laravel vue js crud#laravel vue setup#laravel vue tutorial#laravel vue.js#laravel webpack tutorial#npm run dev#npm run watch laravel#vue#Vue.js#vuejs laravel
0 notes
Text
Don’t Wait! Mock the API
Today we have a loose coupling between the front end and the back end of web applications. They are usually developed by separate teams, and keeping those teams and the technology in sync is not easy. To solve part of this problem, we can “fake” the API server that the back end tech would normally create and develop as if the API or endpoints already exist.
The most common term used for creating simulated or “faking” a component is mocking. Mocking allows you to simulate the API without (ideally) changing the front end. There are many ways to achieve mocking, and this is what makes it so scary for most people, at least in my opinion.
Let’s cover what a good API mocking should look like and how to implement a mocked API into a new or existing application.
Note, the implementation that I am about to show is framework agnostic — so it can be used with any framework or vanilla JavaScript application.
Mirage: The mocking framework
The mocking approach we are going to use is called Mirage, which is somewhat new. I have tested many mocking frameworks and just recently discovered this one, and it’s been a game changer for me.
Mirage is marketed as a front-end-friendly framework that comes with a modern interface. It works in your browser, client-side, by intercepting XMLHttpRequest and Fetch requests.
We will go through creating a simple application with mocked API and cover some common problems along the way.
Mirage setup
Let’s create one of those standard to-do applications to demonstrate mocking. I will be using Vue as my framework of choice but of course, you can use something else since we’re working with a framework-agnostic approach.
So, go ahead and install Mirage in your project:
# Using npm npm i miragejs -D
# Using Yarn yarn add miragejs -D
To start using Mirage, we need to setup a “server” (in quotes, because it’s a fake server). Before we jump into the setup, I will cover the folder structure I found works best.
/ ├── public ├── src │ ├── api │ │ └── mock │ │ ├── fixtures │ │ │ └── get-tasks.js │ │ └── index.js │ └── main.js ├── package.json └── package-lock.json
In a mock directory, open up a new index.js file and define your mock server:
// api/mock/index.js import { Server } from 'miragejs';
export default function ({ environment = 'development' } = {}) { return new Server({ environment,
routes() { // We will add our routes here }, }); }
The environment argument we’re adding to the function signature is just a convention. We can pass in a different environment as needed.
Now, open your app bootstrap file. In our case, this is he src/main.js file since we are working with Vue. Import your createServer function, and call it in the development environment.
// main.js import createServer from './mock'
if (process.env.NODE_ENV === 'development') { createServer(); }
We’re using the process.env.NODE_ENV environment variable here, which is a common global variable. The conditional allows Mirage to be tree-shaken in production, therefore, it won’t affect your production bundle.
That is all we need to set up Mirage! It’s this sort of ease that makes the DX of Mirage so nice.
Our createServer function is defaulting it to development environment for the sake of making this article simple. In most cases, this will default to test since, in most apps, you’ll call createServer once in development mode but many times in test files.
How it works
Before we make our first request, let’s quickly cover how Mirage works.
Mirage is a client-side mocking framework, meaning all the mocking will happen in the browser, which Mirage does using the Pretender library. Pretender will temporarily replace native XMLHttpRequest and Fetch configurations, intercept all requests, and direct them to a little pretend service that the Mirage hooks onto.
If you crack open DevTools and head into the Network tab, you won’t see any Mirage requests. That’s because the request is intercepted and handled by Mirage (via Pretender in the back end). Mirage logs all requests, which we’ll get to in just a bit.
Let’s make requests!
Let’s create a request to an /api/tasks endpoint that will return a list of tasks that we are going to show in our to-do app. Note that I’m using axios to fetch the data. That’s just my personal preference. Again, Mirage works with native XMLHttpRequest, Fetch, and any other library.
// components/tasks.vue export default { async created() { try { const { data } = await axios.get('/api/tasks'); // Fetch the data this.tasks = data.tasks; } catch(e) { console.error(e); } } };
Opening your JavaScript console — there should be an error from Mirage in there:
Mirage: Your app tried to GET '/api/tasks', but there was no route defined to handle this request.
This means Mirage is running, but the router hasn’t been mocked out yet. Let’s solve this by adding that route.
Mocking requests
Inside our mock/index.js file, there is a routes() hook. Route handlers allow us to define which URLs should be handled by the Mirage server.
To define a router handler, we need to add it inside the routes() function.
// mock/index.js export default function ({ environment = 'development' } = {}) { // ... routes() { this.get('/api/tasks', () => ({ tasks: [ { id: 1, text: "Feed the cat" }, { id: 2, text: "Wash the dishes" }, //... ], })) }, }); }
The routes() hook is the way we define our route handlers. Using a this.get() method lets us mock GET requests. The first argument of all request functions is the URL we are handling, and the second argument is a function that responds with some data.
As a note, Mirage accepts any HTTP request type, and each type has the same signature:
this.get('/tasks', (schema, request) => { ... }); this.post('/tasks', (schema, request) => { ... }); this.patch('/tasks/:id', (schema, request) => { ... }); this.put('/tasks/:id', (schema, request) => { ... }); this.del('/tasks/:id', (schema, request) => { ... }); this.options('/tasks', (schema, request) => { ... });
We will discuss the schema and request parameters of the callback function in a moment.
With this, we have successfully mocked our route and we should see inside our console a successful response from Mirage.
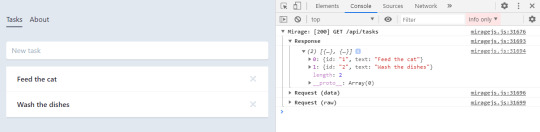
Working with dynamic data
Trying to add a new to-do in our app won’t be possible because our data in the GET response has hardcoded values. Mirage’s solution to this is that they provide a lightweight data layer that acts as a database. Let’s fix what we have so far.
Like the routes() hook, Mirage defines a seeds() hook. It allows us to create initial data for the server. I’m going to move the GET data to the seeds() hook where I will push it to the Mirage database.
seeds(server) { server.db.loadData({ tasks: [ { id: 1, text: "Feed the cat" }, { id: 2, text: "Wash the dishes" }, ], }) },
I moved our static data from the GET method to seeds() hook, where that data is loaded into a faux database. Now, we need to refactor our GET method to return data from that database. This is actually pretty straightforward — the first argument of the callback function of any route() method is the schema.
this.get('/api/tasks', (schema) => { return schema.db.tasks; })
Now we can add new to-do items to our app by making a POST request:
async addTask() { const { data } = await axios.post('/api/tasks', { data: this.newTask }); this.tasks.push(data); this.newTask = {}; },
We mock this route in Mirage by creating a POST /api/tasks route handler:
this.post('/tasks', (schema, request) => {})
Using the second parameter of the callback function, we can see the sent request.

Inside the requestBody property is the data that we sent. That means it’s now available for us to create a new task.
this.post('/api/tasks', (schema, request) => { // Take the send data from axios. const task = JSON.parse(request.requestBody).data
return schema.db.tasks.insert(task) })
The id of the task will be set by the Mirage’s database by default. Thus, there is no need to keep track of ids and send them with your request — just like a real server.
Dynamic routes? Sure!
The last thing to cover is dynamic routes. They allow us to use a dynamic segment in our URL, which is useful for deleting or updating a single to-do item in our app.
Our delete request should go to /api/tasks/1, /api/tasks/2, and so on. Mirage provides a way for us to define a dynamic segment in the URL, like this:
this.delete('/api/tasks/:id', (schema, request) => { // Return the ID from URL. const id = request.params.id;
return schema.db.tasks.remove(id); })
Using a colon (:) in the URL is how we define a dynamic segment in our URL. After the colon, we specify the name of the segment which, in our case, is called id and maps to the ID of a specific to-do item. We can access the value of the segment via the request.params object, where the property name corresponds to the segment name — request.params.id. Then we use the schema to remove an item with that same ID from the Mirage database.
If you’ve noticed, all of my routes so far are prefixed with api/. Writing this over and over can be cumbersome and you may want to make it easier. Mirage offers the namespace property that can help. Inside the routes hook, we can define the namespace property so we don’t have to write that out each time.
routes() { // Prefix for all routes. this.namespace = '/api';
this.get('/tasks', () => { ... }) this.delete('/tasks/:id', () => { ... }) this.post('/tasks', () => { ... }) }
OK, let’s integrate this into an existing app
So far, everything we’ve looked at integrates Mirage into a new app. But what about adding Mirage to an existing application? Mirage has you covered so you don’t have to mock your entire API.
The first thing to note is that adding Mirage to an existing application will throw an error if the site makes a request that isn’t handled by Mirage. To avoid this, we can tell Mirage to pass through all unhandled requests.
routes() { this.get('/tasks', () => { ... }) // Pass through all unhandled requests. this.passthrough() }
Now we can develop on top of an existing API with Mirage handling only the missing parts of our API.
Mirage can even change the base URL of which it captures the requests. This is useful because, usually, a server won’t live on localhost:3000 but rather on a custom domain.
routes() { // Set the base route. this.urlPrefix = 'https://devenv.ourapp.example';
this.get('/tasks', () => { ... }) }
Now, all of our requests will point to the real API server, but Mirage will intercept them like it did when we set it up with a new app. This means that the transition from Mirage to the real API is pretty darn seamless — delete the route from the mock server and things are good to go.
Wrapping up
Over the course of five years, I have used many mocking frameworks, yet I never truly liked any of the solutions out there. That was until recently, when my team was faced with a need for a mocking solution and I found out about Mirage.
Other solutions, like the commonly used JSON-Server, are external processes that need to run alongside the front end. Furthermore, they are often nothing more than an Express server with utility functions on top. The result is that front-end developers like us need to know about middleware, NodeJS, and how servers work… things many of us probably don’t want to handle. Other attempts, like Mockoon, have a complex interface while lacking much-needed features. There’s another group of frameworks that are only used for testing, like the popular SinonJS. Unfortunately, these frameworks can’t be used to mock the regular behavior.
My team managed to create a functioning server that enables us to write front-end code as if we were working with a real back-end. We did it by writing the front-end codebase without any external processes or servers that are needed to run. This is why I love Mirage. It is really simple to set up, yet powerful enough to handle anything that’s thrown at it. You can use it for basic applications that return a static array to full-blown back-end apps alike — regardless of whether it’s a new or existing app.
There’s a lot more to Mirage beyond the implementations we covered here. A working example of what we covered can be found on GitHub. (Fun fact: Mirage also works with GraphQL!) Mirage has well-written documentation that includes a bunch of step-by-step tutorials, so be sure to check it out.
The post Don’t Wait! Mock the API appeared first on CSS-Tricks.
You can support CSS-Tricks by being an MVP Supporter.
Don’t Wait! Mock the API published first on https://deskbysnafu.tumblr.com/
0 notes