#vue emit
Explore tagged Tumblr posts
Visit Tumblr Blog
Explore Tumblr blogs with no restrictions, modern design and the best experience.
Last Seen Tumblr Blogs


Fun Fact
69% of Tumblr users are millennials.
Text

CINEMA REVIEW: THE ZONE OF INTEREST (2024)
The movie begins (and ends) with a blank (white) screen emitting an unsettling set of screeches and scratches which is uncomfortable enough as you're not quite sure when the action will start, but it does, and in riverbank colour, and is a sign of things to come, the mostly in-colour story with eerie black & white elements.
In the film, exterminating Jews in Auschwitz requires production line efficiency, and that's the main command, how such Germans like Nazi commandant Rudolf Hoss (who existed till hanged for War Crimes) sent his and others "neighbours" to premature and brutal deaths. Some 2-3 million souls.
There are subtleties to be found among these ashes, as people and at least one dog appear only to later "go missing".
In THE ZONE OF INTEREST (subtitled) contrasting walls and flowers do the most talking - written and directed by Johnathan Glazer based loosely on Martin Amis's book of the same name.
I was fully absorbed in the story for the full, 1 hr 45 mins. That too, speaks volumes. Highly recommended.
Rating: 9/10
youtube
Mark Watkins (seen at Reading Vue, 12 February, 2024)
0 notes
Text
How to pass value to child component in Vue.js
How to pass value to child component in Vue.js
Hello buddy, in this blog we will see how we can pass value to the child component in vue.js and we will also learn the use of props. Sharing data across components is one of the core functionalities of VueJS. It allows you to design a more modular project, control data scopes, and create a natural flow of data across your app. Think you are using the Vue tab component where you have put 5oo…

View On WordPress
#pass data to component vue#vue dynamic component#vue emit#vue get data from child component#vue pass data between sibling components#vue pass data from one component to another#vue pass data from parent to child#vue pass data to component onclick
0 notes
Photo

A Rogue Planet with a Roguish Moon. Credit: Image made by the author with e-onsoftware’s VUE 8 (2010) and updated with VUE Creator (2020).
ROGUE GALLERY
The Drake Equation was first formulated on November 1-2, 1961, during an informal conference on “Extraterrestrial Intelligent Life” in Green Bank, West Virginia.
In the days before the meeting, American astronomer Frank Drake (1930-) created the now famous equation in an attempt to focus the discussion.
The original form of the equation is the following:
N = R* f(p) n(e) f(i) f(l) f (c) L
• N is the number of civilizations trying to communicate with us right now; • R* is the rate of star formation in stars per year; • f(p) is the fraction of those stars which have planetary systems; • n(e) is the number of Goldilocks (i.e., Earth-type) planets in a planetary system); • f(l) is the fraction of habitable planets that are inhabited; • f(i) is the fraction of inhabited planets that possess intelligent technological civilizations; • f (c) is the fraction of intelligent technological civilizations that choose to emit detectable signals; • L is the length of time signals will be sent.

The celestial body under the equation is Jupiter’s moon, Europa. Credit: Kevin M. Gill www.apoapsys.com (2014). Europa image: NASA/JPL/Ted Stryk.
The first three factors are astronomical, the fourth and fifth are biological, the last two factors are social. There are several issues with the equation. Among these:
(1) The uncertainties are large enough for the astronomical factors and increase as one progresses from the astronomical to the biological to the social.
(2) Most factors depend on theoretical insights of star and planet formation, new discoveries about exoplanets, and varying subjective opinions on the evolution of life and intelligence. The presumed longevity of civilization must also be taken into account.
(3) The equation has many hidden assumptions, among these: a uniform rate of star formation (SFR) over the Galaxy lifetime and a steady-state of civilization birth and death.
(4) No matter what value one chooses for R*, the assumption is always that a habitable planet must have a star. However, rogue worlds (bodies that have been thrown out of their own nascent solar system) wander around the Galaxy unattached a to star.
This last item has recently awoken great interest in the scientific community.
Theoretical calculations (Imagined Life, by James S. Trefil and Michael Summers, 2019) suggest that:
"[...] the number of rogues might be anywhere between twice and thousands of times the number of conventional planets. Interstellar space must be littered with them!"
Also, rogue planets need not be uninteresting ice balls with no life and no energy. Lacking direct radiation from a star, a world can be heated by the residual power from its formation and the radioactive decay of elements in its interior. If provided with one or more moons, the planet can draw energy from a process known as tidal heating (which is responsible for the subsurface oceans on some of Jupiter and Saturn moons).
All in all, rogue planets can be compared to (Imagined Life, by James S. Trefil and Michael Summers, 2019):
"[...] houses whose lights have been turned off but whose furnaces are still operating."
Interestingly, rogue planets had been predicted as early as the 1930s by American horror and S.F. author Howard Phillips Lovecraft.
In his short story: The Haunter of the Dark, he wrote:
"[...] remember Yuggoth, and more distant Shaggai, and the ultimate void of the black planets... [...]."
When the planet Pluto had just been discovered by Clyde Tombaugh (1906-97) at Lowell Observatory (Flagstaff, Arizona), he wrote another short story: The Whisperer in Darkness.
Here are a few quotes:
"[...] Their main immediate abode is a still undiscovered and almost lightless planet at the very edge of our solar system – beyond Neptune and the ninth in distance from the [S]un. It is, as we have inferred, the object mystically hinted at as 'Yuggoth' in certain ancient and forbidden writings; [...] I would not be surprised if astronomers become sufficiently sensitive to these thought-currents to discover Yuggoth when the Outer Ones wish them to do so. But Yuggoth, of course, is only the stepping-stone. (*) The main body of the beings inhabits strangely organised abysses wholly beyond the utmost reach of any human imagination."
And also:
"[...] Those wild hills are surely the outpost of a frightful cosmic race – as I doubt all the less since reading that a new ninth planet has been glimpsed beyond Neptune, just as those influences had said it would be glimpsed. Astronomers, with a hideous appropriateness they little suspect, have named this thing 'Pluto.' I feel, beyond question, that it is nothing less than nighted Yuggoth [...]."
(*) Of course, H.P. Lovecraft didn't predict Pluto's existence. But when the astronomical community considered Pluto the Solar System's furthest planet, he did foresee the Kuiper Belt Objects (KBOs). These are dwarf planets orbiting at the outer edges of a disk of rocky debris, similar to the asteroid belt (extending from Neptune to approximately 50 A.U. from the Sun). Nobody thought such objects could exist. Until 2005, when astronomer Michael Brown and his colleagues announced the discovery of Eris, a planet comparable in size to Pluto. KBOs, frozen, dark, but with an internal heat source that allows them to have subsurface oceans (and even life, maybe), are the typical rogue planets.
What would life be like on a rogue planet?
According to Imagined Life, by J.S. Trefil and M. Summers:
"It's dark. Not midnight-on-a-side-street dark, but trapped-in-a-cave dark. And no wonder—there's no sun in the sky, for this is a rogue world, one that circles no star. There is a moon up there somewhere, but without a source of light for it to reflect, it's just a darker patch in the sky. Whatever life forms live on this planet had better be able to see in infrared because there's simply no other light to be had. You're wearing infrared sensors, fortunately, and you spot a few of these creatures scurrying back to the planet's subterranean tunnels, where they can bask in the heat emanating from the planet's interior. [...]"
Life on a dark planet has been described by British author Arthur C. Clarke in his 1950 short story: A Walk in the Dark:
"[...] Here at the edge of the Galaxy, the stars were so few and scattered that their light was negligible. [...]"
"[...] Here at this outpost of the Universe, the sky held perhaps a hundred faintly gleaming points of light, as useless as the five ridiculous moons on which no one had ever bothered to land. [...]"
"[...] No one could deny that the tunnels out in the wasteland were rather puzzling, but everyone believed them to be volcanic vents. Though, of course, life often crept into such places. With a shudder, he remembered the giant polyps that had snared the first explorers of Vargon III [...]".
#astronomy#science fiction#drake equation#rogue planet#lovecraft#arthur c clarke#extraterrestial life#exobiology#exoplanets#kbo#pluto#dwarf planet
7 notes
·
View notes
Text
Blocs app hover effects

#Blocs app hover effects how to#
#Blocs app hover effects update#
#Blocs app hover effects code#
Then open page preferences and add the script:ĭocument. If is this, there are the steps to replicate:Ĭreate a div container and add it a class: “hovered-set”Īdd inside that div a font awesome link and a H6 (this example) and transform the text from that text to a link with the last button when you select text: Hello regarding your request and the link you send there you have your need working: Do you know what is the solution to this problem? When your point hovers over that leftmost image, the text beneath no longer turns red. Please open your *.bloc and click on the leftmost graphic, then Right Sidebar > Interactions > Navigate to Page > Home, then Preview in Blocs.
#Blocs app hover effects code#
But when I add a hyperlink to each graphic, both your code and my altered version of your code stops working entirely (no red text when mousing over the graphic).
To accomplish that, I would need to add a custom Class name to each text box in the right sidebar (for example: “ test”) and then change the CSS code to this (which I verified works): I want only specific text boxes to turn red.
I don’t want all H2’s on a given web page to turn red when mousing over a graphic.
I see that your suggestion is basically “add CSS to Page Settings > Add Code.” But I found 2 problems, only the first of which I am able to fix myself: We will also discuss different effects of a hover button such as grow, shrink, change color, etc. We will see two methods of creating a hover button: using pure CSS and using mouse events in the React app. Thank you for the example *.bloc document. This guide will discuss the step-by-step process of creating a hover button in a React app. And that text is NOT overlapping the image at all, but sits in a separate box above and below the image.) (The text I am talking about is HTML text, not a graphic. The aim is for the text color change to be a visual indicator to desktop computer users that their arrow cursor is hovering over that particular image. I only want the text color change to occur when the arrow pointer is hovering above the image because only the image has a hyperlink.Īgain, I want to mouseover the IMAGE and have the text above and below it change color (for as long as the arrow pointer is hovering above the associated image). I also know I can create a new Class and apply that Class to the Column that contains my Image and two pieces of text, but that isn’t what I want either because a mouseover anywhere inside that container will trigger the text color change. I know I can create a new Class and apply that Class to the image and title and model#, but mousing over the image doesn’t trigger the hover states of the text, so that isn’t a solution. I want to mouseover each image (on a desktop computer) and automatically have the associated title and model# text to change color (akin to a Hover state change). Each image also has a text title above it and a text model number below it. I have webpage with several images and hyperlinks applied to each image. If your Vue component doesn't emit those events, then we can't listen to them. You can't listen to the mouseover and mouseleave events like we were doing before. If you have a Vue component that you'd like to implement this behaviour with, you'll have to make a slight modification. Instead of writing v-on:event, we can just write how we hook it up: export default Īlthough that works, it's not the best solution.įor something like this it's better to just use CSS: Īs you can see, even though we can do it using Vue, we don't need it to achieve this effect. We will also be using the shorthand of v-on.
#Blocs app hover effects update#
To hook everything up we will use Vue events to listen for when the mouse enters and leaves, and update our state accordingly. Instead of creating a ton of unique events, there is only one - making it much faster! Let's hook things up There should be hove event for Controls that would allow to update properties so that it can be reused in other controls for updating effects or any other thing that is dependent on Hover effect. The main difference being that mouseover bubbles like most other DOM events. Hover Event for controls that would allow update of Properties. The mouseover event works pretty much the same as mouseenter. Instead, we will use the mouseover event. What will we be using instead, you ask?!? This is because mouseenter fires a unique event to the entered element, as well as every single ancestor element. The reason is that there can be significant performance problems when using mouseenter on deep DOM trees. To keep track of when the mouse leaves, we'll use the mouseleave event.ĭetecting when the mouse enters can be done with the corresponding mouseenter event, but we won't be using that one. This can be figured out by keeping track of when the mouse enters the element, and when the mouse leaves the element. We want to know when the mouse is hovering over the element. So, which events do we need to listen to?
#Blocs app hover effects how to#
How to do this even on custom Vue components.How to dynamically update classes with a mouseover.We have to implement most of this ourselves.īut don't worry, it's not that much work.
0 notes
Text
Earthbound: How To Learn Teleport And Get Through The Monkey Caves

💾 ►►► DOWNLOAD FILE 🔥🔥🔥 Most tests written with Vue Test Utils are scoped to the component passed to mount , which introduces some complexity when it comes to testing a component that is teleported outside of the component where it is initially rendered. If you want to test the rest of your component, ignoring teleport, you can stub teleport by passing teleport: true in the global stubs option. It's simple for the purpose of this example. If it is, when submitted, it emits a signup event with the username as the payload. Testing that will be our goal. Running this test will give you a warning: [Vue warn]: Failed to locate Teleport target with selector " modal". Let's create it:. We are using Jest for this example, which does not reset the DOM every test. For this reason, it's good to clean up after each test with afterEach. The next thing to do is fill out the username input. Unfortunately, we cannot use wrapper. Why not? A quick console. Now you can use methods like get , find and trigger. TIP If you want to test the rest of your component, ignoring teleport, you can stub teleport by passing teleport: true in the global stubs option. Testing Vue Router. Stubs and Shallow Mount.
1 note
·
View note
Text
vue 3.x components for bootstrap 5.x pagination and modals
The software ecosystem for vue 3.x is still evolving. I could not find any off-the-shelf components for pagination and modals, so I scratched up my own.
For the quick learners, you can visit the logic on github; code is distributed under the MIT license. In the coming days/weeks, I will try to set up parent views that exploit these components and illustrate their use, so please revisit the repo as needs be. For now, you're sledding downhill on your on.
Evan You from MIT is generally credited with authoring vueJS, a javascript framework for frontend development, while bootstrap -- a styling library -- grew out of efforts at Twitter, I believe. Both are fairly well-documented. Bootstrap probably enjoys wider adoption, but vueJS is holding its own in the modern frontend dev efforts.
Pagination
It's truly remarkable what vueJS in combination with bootstrap can accomplish on the web page. Here is what my component looks like for pagination:
<template>
<nav v-if="pagenav.numPages > 0" aria-label="Navigate through unvetted results">
<ul class="pagination justify-content-start">
<li class="page-item">
<a class="page-link" @click="previousPage" href="#">Previous</a>
</li>
<li v-for="pp in pagenav.numPages" :key="pp" class="page-item">
<a class="page-link" @click="navigateToPage(pp)" href="#"
:ref="setAnchor" v-bind:class="{ 'isSelected': isSelected(pp) }">{{ pp }}</a>
</li>
<li class="page-item">
<a class="page-link" @click="nextPage" href="#">Next</a>
</li>
</ul>
</nav>
</template>
<script>
import { computed, onBeforeUpdate, onUpdated } from 'vue';
export default {
name: "Pagination",
props: {
modelValue: {
type: Object,
default: () => {}
}
},
emits: ['update:modelValue'],
setup(props, { emit }) {
const pagenav = computed({
get: () => props.modelValue,
set: (value) => emit('update:modelValue', value),
});
let anchors = []
const setAnchor = el => {
if (el) {
anchors.push(el)
}
}
onBeforeUpdate(() => {
anchors = []
})
onUpdated(() => {
// Empty for now
})
const focusPageAnchor = () => {
anchors[pagenav.value.page].focus();
}
const isSelected = (pp) => {
return pagenav.value.page == (pp - 1);
};
return { pagenav, setAnchor, focusPageAnchor, isSelected };
},
methods: {
previousPage() {
this.pagenav.page = Math.max(0, this.pagenav.page - 1);
this.focusPageAnchor();
},
navigateToPage(pp) {
this.pagenav.page = pp - 1;
this.focusPageAnchor();
},
nextPage() {
this.pagenav.page = Math.min(this.pagenav.numPages - 1, this.pagenav.page + 1);
this.focusPageAnchor();
}
},
};
</script>
<style>
/* XXX color here is same as background color used by bootstrap for focused page-links */
a.isSelected {
background-color: rgb(234, 236, 239);
}
</style>
For 85 lines of markup and logic, this component does wonders. I will just highlight some of the hidden magic here:
* pagenav is a reactive variable injected into the Pagination component but declared, read, and written within the parent component. What that means is that the parent can function as a content manager, while the mechanics of pagination is deferred to the child component. The Pagination component can adjust the current page -- which in turn is picked up by the parent, which adjusts displayed content accordingly. In this light, pagination is a nice, compact example of modern, reactive programming.
* Use v-bind:class for conditional classes. The function isSelected highlights the currently selected page number, and it does so through selectively turning off/on the isSelected class. Got that? Conditional classes have been out there a long time, but here it's done in a fairly terse, reactive way.
PageModal
For purposes of rendering modal dialogs, I leverage bootstrap 5.x modals. My thinking was that I should not have to create new divs every time the UX/UI require a new popup dialog. So instead, I scratched up a component which abstracts away the mechanics of the modal, while leaving the parent view to dictate the profile of each modal. Some of the programming for PageModal is quite similar to the Pagination component.
Here's the logic:
<template>
<div>
<svg xmlns="http://www.w3.org/2000/svg" style="display: none;">
<symbol id="check-circle-fill" fill="currentColor" viewBox="0 0 16 16">
<path d="M16 8A8 8 0 1 1 0 8a8 8 0 0 1 16 0zm-3.97-3.03a.75.75 0 0 0-1.08.022L7.477 9.417 5.384 7.323a.75.75 0 0 0-1.06 1.06L6.97 11.03a.75.75 0 0 0 1.079-.02l3.992-4.99a.75.75 0 0 0-.01-1.05z"/>
</symbol>
<symbol id="info-fill" fill="currentColor" viewBox="0 0 16 16">
<path d="M8 16A8 8 0 1 0 8 0a8 8 0 0 0 0 16zm.93-9.412-1 4.705c-.07.34.029.533.304.533.194 0 .487-.07.686-.246l-.088.416c-.287.346-.92.598-1.465.598-.703 0-1.002-.422-.808-1.319l.738-3.468c.064-.293.006-.399-.287-.47l-.451-.081.082-.381 2.29-.287zM8 5.5a1 1 0 1 1 0-2 1 1 0 0 1 0 2z"/>
</symbol>
<symbol id="exclamation-triangle-fill" fill="currentColor" viewBox="0 0 16 16">
<path d="M8.982 1.566a1.13 1.13 0 0 0-1.96 0L.165 13.233c-.457.778.091 1.767.98 1.767h13.713c.889 0 1.438-.99.98-1.767L8.982 1.566zM8 5c.535 0 .954.462.9.995l-.35 3.507a.552.552 0 0 1-1.1 0L7.1 5.995A.905.905 0 0 1 8 5zm.002 6a1 1 0 1 1 0 2 1 1 0 0 1 0-2z"/>
</symbol>
</svg>
<div ref="activeModalRef" class="modal" tabindex="-1">
<div class="modal-dialog modal-dialog-centered">
<div class="modal-content">
<div class="modal-header alert d-flex align-items-center"
v-bind:class="{ 'alert-primary': isPrimary(), 'alert-warning': isWarning(), 'alert-info': isInfo() }" role="alert">
<svg v-if="activeModal.iconName == 'check-circle-fill'" class="bi flex-shrink-0 me-2" width="24" height="24" role="img" aria-label="Success:"><use xlink:href="#check-circle-fill"/></svg>
<svg v-if="activeModal.iconName == 'info-fill'" class="bi flex-shrink-0 me-2" width="24" height="24" role="img" aria-label="Information:"><use xlink:href="#info-fill"/></svg>
<svg v-if="activeModal.iconName == 'exclamation-triangle-fill'" class="bi flex-shrink-0 me-2" width="24" height="24" role="img" aria-label="Warning:"><use xlink:href="#exclamation-triangle-fill"/></svg>
<h5 class="modal-title">{{ activeModal.title }}</h5>
<button type="button" class="btn-close" data-bs-dismiss="modal" aria-label="Close"></button>
</div>
<div class="modal-body">
<p class="text-start">{{ activeModal.bodyMsg }}</p>
</div>
<div class="modal-footer">
<button v-if="activeModal.hasCancelBtn" type="button" class="btn btn-secondary" data-bs-dismiss="modal">Cancel</button>
<button @click="activeModal.okBtnCallback" type="button" class="btn btn-primary" data-bs-dismiss="modal">OK</button>
</div>
</div>
</div>
</div>
</div>
</template>
<script>
import { computed, onMounted, ref } from 'vue';
export default {
name: 'PageModal',
props: {
modelValue: {
type: Object,
default: () => {}
}
},
emits: ['update:modelValue'],
setup(props, { emit }) {
const activeModalRef = ref(null);
const activeModal = computed({
get: () => props.modelValue,
set: (value) => emit('update:modelValue', value)
});
onMounted(() => {
activeModal.value.ref = activeModalRef.value;
});
const isPrimary = () => {
return activeModal.value.iconName == 'check-circle-fill';
};
const isWarning = () => {
return activeModal.value.iconName == 'exclamation-triangle-fill';
};
const isInfo = () => {
return activeModal.value.iconName == 'info-fill';
};
return { activeModal, activeModalRef, isPrimary, isWarning, isInfo };
},
};
</script>
There likely are better approaches to this logic than what you see here. Here are some highlights:
* activeModal is a reactive variable similar to pagenav in the Pagination component. You can think of activeModal as determining the profile of some modal dialog -- the wording, any header icons, etc. The parent view sets activeModal, and when it raises the modal dialog, the latter is configured properly.
* activeModalRef is a reference to the HTML element -- a div here -- that encompasses the modal dialog. We need to convey that reference to the parent view so it can raise the modal as needs be.
* The svg element is an image sprite that, along with much of the vanilla modal mark-up, I simply copied from bootstrap's online documentation. By setting up an inline sprite, we can then specify self-referential icons in the modal headers.
Summary
That's all for now! When I have the time, I will scratch up examples of how parent views use these components.
Novemeber 17, 2021
0 notes
Link
Angular 12, the most recent production unharness of Google’s widespread TypeScript-based net framework, has received an associate update. Angular 12.1, arrived quarter day, adds compiler support for shorthand property declarations in addition to fixes for the compiler, compiler interface, router, and repair employees.
The Angular twelve.1 purpose unharness additionally introduces Apis to prefer into correct take a look at teardown behavior. The compiler fixes pertain to problems like unterminated interpolation and consider restoration, whereas the service employee fixes pertain to the naming, accessing, and clean-up of service employee caches.
[ additionally on InfoWorld: Angular, React, Vue: JavaScript frameworks compared ]
Published could twelve, Angular twelve is out there on GitHub, following varied beta unharnesses and release candidates. Angular twelve deprecates the heritage read Engine compilation and rendering pipeline in favor of the newer vine technology, a next-generation compilation and rendering pipeline that gives quicker AOT (ahead of time) compilation.
The Angular team noted that read Engines are removed during a future unharness. Current libraries victimization read Engine can still work with vine apps, however, library authors square measure suggested to begin transitioning to the vine.
Also in Angular twelve, the Ivy-based language service, providing capabilities like code completions and hints within templates, moves from opt-in to on by default. different new options and enhancements within the version twelve release:
To improve compiler interface performance, the progressive compilation is allowed within the presence of redirected supply files.
Nullish coalescing, to write down clearer code in matter categories, currently works with Angular templates.
Both Angular CDK and Angular Material expose a replacement Sass API surface designed for consumption with the new @use syntax. once change to Angular twelve, the associate app can mechanically switch to the new API by change via metric weight unit update.
Tools square measure on the market to migrate heritage localization IDs to IDs victimization the most recent algorithms.
Components currently support inline Sass within the designs field of the @component decorator.
Running metric weight unit build currently defaults to production, saving steps, and serving to forestall accidental readying of development builds.
Strict mode, to catch errors earlier within the development cycle, is enabled by default within the interface.
The Webpack five-module bundler is production-ready.
Support for the IE11 browser has been deprecated.
For the compiler, support is obtainable for reworking element vogue resources.
For the language service, Angular property completions square measure provided solely in templates.
For the compiler-cli, a context possibility is introduced for any request that permits the provision of capricious knowledge during a type-safe method. This feature addresses the necessity to piece interceptors in hypertext transfer protocol shopper on a per-request basis.
For animations, DOM components currently square measure properly removed once the basis read is removed. this can be a breaking amendment.
To improve performance, unused strategies are aloof from DomAdapter.
A new format is extra to localize-extract, referred to as legacy-migrate, to get a JSON file which will be wont to map heritage message IDs to canonical ones.
Strict null checks can report on a fraction doubtless being null. this can be a breaking amendment.
The form of the APP-INITIALIZER token has been modified to a lot of accurately replicate the categories of come back values handled by Angular. this can be a breaking amendment.
Support has been extra for disabling animations through BrowserAnimationsModulewithConfig.
The emit event possibility was extra for FormArray and FormGroup. this can be a breaking amendment.
More fine-tuned management has been extra in routerLinkActiveOptions.
Custom router outlet implementations are square measure allowable.
Support has been extra for matter four.2, and support for matter four.0 and matter four.1 has been born.
Implementing the appendAll() technique on HttpParams.
For forms, min and Georgia home boy validators square measure being introduced.
Exporting an inventory of hypertext transfer protocol standing codes.
Addition of a feature to the Angular Language Service that allows accessing the locations for parts that use a templet file.
The addition of nosology to counsel turning on strict templates, providing the way for the language server to retrieve compiler choices nosology.
A patch adding associate API to retrieve the templet type check block for a templet, if any, at a file location, and choice of the TS node within the TCB cherish the templet node at that the request for a TCB was created. this can facilitate debugging.
A variety of bug fixes additionally were featured, moving the compiler, compiler-cli, Bazel build tool, the router, and different elements of Angular. Angular 12 has arrived with a pile of improvements to its performance, language service, compiler, form validation, and much more. The deprecation of the View engine and incorporation of the Ivy ecosystem is certainly one of the major enhancements considered in version 12.
Angular 12 has witnessed improvement in styling, Nullish Coalescing, and shifting from Legacy i18n Message IDs as some other important features that make this release a stable one. AngularJS training in Kochi is one of the trending programs that every developer desires to master in Angular JS. AngularJS training institute in Kochi with all prerequisites is provided by the best Angular JS training.
0 notes
Text
Nuxt.js+TypeScriptで抽選ツールを作ってみた

はじめまして、2021年度新卒の木村です。 フロントエンドエンジニアとして テクノロジーセンター5G に所属しています。
今回は、Nuxt.js ならびに TypeScript を利用して、簡単な抽選ツールを作成してみた内容についてご紹介します。
Nuxt.js と TypeScript
Nuxt.js は、Vue.js ベースの JavaScript のフレームワークです。Webページ構築に有用な UI 以外の機能( Ajax やサーバーサイドレンダリングなど)をまとめて利用できる環境を提供してくれます。 Nuxt.js 公式サイト
TypeScript は、省略可能な静的型付けとクラスベースオブジェクト指向を加えた JavaScript のスーパーセット(上位互換)です。一言で言うと「型定義できる JavaScript 」。 TypeScript 公式サイト
なぜ抽選ツールを作ったのか
主な理由は、以下の2点です。
私の所属するチームで扱っている Nuxt.js および Typescript の概要を掴むため
チーム内でMTGのファシリテータが偏ってしまう課題を解決するため
完成物
さっそくですが、完成した物がこちら。
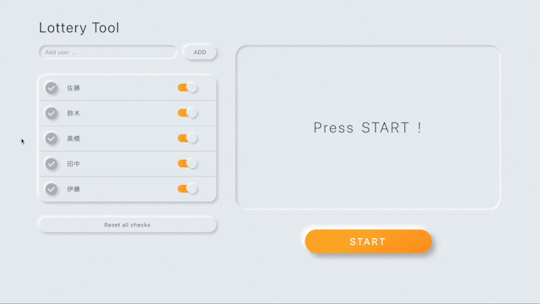
ランダムにユーザーを抽選できるシンプルなツールです。 デザインは近年流行ったニューモーフィズムを取り入れてみました。 少ない配色でも凹凸によって奥行きができるので、シンプルなツールでも見栄えが良くなります。
使った技術
Nuxt.js 2.15.7
TypeScript 4.2.4
Vue.js 2.6.14
Vuex 3.6.2
firebase 8.7.1
tailwindcss 2.2.4
sass 1.35.1
環境
M1 Mac
VSCode
yarn
機能
今回の抽選ツールの機能は以下とおりです。
ユーザーを登録・削除する
ユーザー情報をDBで保持する
登録したユーザーからランダムに抽選する
完了した人・休みの人にチェックし、抽選対象から外す
抽選終了後、選ばれた人は自動で完了チェックされる
全員チェックしたら一括リセットできる
作成手順
全体的な流れは以下のとおりです。
環境構築
各機能作成
Vuex導入
firebase導入
1. 環境構築
create-nuxt-appを利用して環境を構築しました。
create-nuxt-app
公式サイトとNuxt.js 入門の記事 を参考にしました。
2. 各機能作成
前述した各種機能を実装していきます。
欠席者の対応
完了した人だけでなく、休みの人など抽選対象から除外したい場合を想定して、完了チェックとは別に除外したいユーザーを指定できるようフラグを持たせています。
コンポーネントについて
個人的に苦労したのはコンポーネント周りです。
まず、どのくらいの単位で区切れば良いのかがわかリませんでした。 そこで今回は Atomic Design を参考に切り出しました。
また、他の箇所でも使えるように汎用的に作ることです。 クリックなどのイベントは全て親へ渡し、スタイルや表示の変更は親から値を渡すようにすることで、atoms単位のコンポーネントがどこでも使えるよう心がけました。
例えばボタンコンポーネントは、予めいくつかのスタイルを定義しておき、親コンポーネントで使うときに下記のように props で必要なスタイルを渡すとともに、$emit でクリックイベントを親に渡しています。
//Button.vue <div> <button :class="[ colorStyle[buttonColor], sizeStyle[buttonSize], fontStyle[buttonFont], ]" @click="$emit('button-click')" > <slot></slot> </button> </div>
//Input.vue <Button button-color="gray" button-size="short" button-font="small"> ADD </Button>
そしてコンポーネント間のデータの受け渡しです。 例えばユーザー情報は、子から emit で親コンポーネントに値を引き渡し、さらに別の子コンポーネントに props で渡して表示しています。

今回はシンプルなツールなのでコンポーネントも少ないですが、こうした受け渡しが重なってくるとコードが煩雑になりメンテナンスがしづらくなります。そこで、Vuex を導入し状態管理をすることにしました。
3. Vuex 導入
Vuex のストアでユーザー情報の状態を管理します。 今回はDBも使う予定なので、actions でDBに接続した後、値を state に反映させています。

Nuxt.js は store ディレクトリにファイルを作成するだけでストアを有効化してくれるので便利ですね。今回は管理するのがユーザー情報だけなので、index.ts を作らず users.ts を直下に作りました。
Vuex ストアでデータを一元管理できるので、本当にわかりやすくなりました。コンポーネントを超えて共有される情報を管理するには、とても強力なツールだと思います。
一方で、Vuex を使用する際には、注意点もあります。 例えば、小さいレベルのコンポーネントからは Vuex を使用しない方が良いでしょう。 コンポーネントの使��回しが難しくなるのと、1画面の中で複数の箇所から Vuex のストアへの参照と変更が入り組んだ場合、処理が追いにくくなるためです。
参考:Vuexはなるべく避ける Vuexで何をするか、何をしないか
Vuex を利用する際は、Atom や Molecule レベルのコンポーネントの中では使わない、state を直接参照しない、などのルールを設けて運用したいと思います。
4. firebase 導入
DBとデプロイは firebase を利用します。 firebase は以前にも使ったことがありましたが、やはり firestore を使えば面倒な手間をかけずにDBが実装できますね。万歳。 デプロイも firebase の Hosting を使って行いました。
さらに、今回は社内向けツールなので、デプロイにあたり外部からのアクセ��を制限するため、 Authentication を使用してログイン認証を追加します。管理者アカウントとしてユーザーを一人だけ登録し、簡単なPWを打てば誰でも使えるようにしました。 ログインしていない状態では認証後のページへ飛べないようにするため、強制的にindexへリダイレクトするmiddlewareも追加しています。
const auth = firebase.auth() const middleware: Middleware = ({ route, redirect }) => { auth.onAuthStateChanged((user) => { if (!user && route.name !== 'index') redirect('/') }) }
また、Authentication の認証状態は、デフォルトではユーザーがブラウザを閉じた後でも永続的に維持されるようになっています。 今回は管理者アカウント一つだけの使用になるため、ログアウトせずにウィンドウを閉じてしまうと、他の人がアクセスした時でも前のセッションが続くことになります。 そこで、 firebase.auth().setPersistence メソッドで永続性タイプを SESSION に変更することで、ウィンドウやタブを閉じるたびにログイン状態がクリアされるようにしました。
ちなみに、Nuxt.js には nuxt/firebase というモジュールがあります。firebase をより簡単に利用できるので、興味があればご覧ください。
詰まったところ
sass の導入
sass の導入で沼りました。どうやら node のバージョン16 かつ M1チップ だと node-sass が動かないようです(2021/09 執筆時点)。node のバージョンを下げることで解決しました。
型定義
Vuex での型定義、props での型定義、firebase で扱う日時の型定義… 型推論が効か��、気づけばanyになっている型に苦しめられました。 特に Vuex は、ストアへアクセスするための便利な型がなく、今回使用した this.$store は Nuxt.js で型指定されていません。 自前の型を使うか、nuxt-typed-vuex を利用することで改善するしかないようです。
また、 TypeScript と Vuex の相性は良くなく、コンポーネントから store を呼び出したときに型安全が守られない、インテリセンスが効かないといった問題があります。 次に TypeScript で Vuex を扱う際は、Nuxt.js 公式で推奨されている vuex-module-decorators を使用したいと思います。
振り返り
さて、ここまで長々と書いてきましたが、今回のアウトプットを通して Nuxt.js と TypeScript の概要は大体掴めたかな、という感じです。 結論、Nuxt.js 便利!
日本語ドキュメントが充実していてほぼ誰でも簡単に始めることができる
ルーティングを自分で作成する必要がない
SSRなどモードを選べるて柔軟なサイト設計ができる
…など、Nuxt.js を使うことで直感的にDOMの内容を操作でき、より簡単に抽選ツールを作ることができました。
また、TypeScript についても、型定義のおかげで、コンポーネント間のデータの受け渡しでもどういう型か判断でき、コードが見やすくなります。 さらに、力補完のおかげでコードを書く時間を短縮できる、エラーチェックを機械に任せることができる、など多くのメリットがありました。 一方で、Vuexとの連携は公式で推奨されているパッケージを使うなど、改善の余地があります。
最後に
以上、Nuxt.js を利用して抽選ツールを作成してみた内容の紹介でした。
最後まで読んでいただき、ありがとうございました。 どなたかの参考になれば幸いです。
0 notes
Text
Vue-Emit data from child to parent in vue js
Vue-Emit data from child to parent in vue js
In this article, we will learn about how to emit data from child to parent in VueJS with the example, I will show you an example that how we can pass child data to our parent component, We will use emit method to pass the data from the child component to the parent component in vuejs. Let’s suppose my child component name as Child.vue and have the below code into it. <template> <div> <b-tabs…

View On WordPress
1 note
·
View note
Text
How our home delivery habit reshaped the world (guardian)
“The great trick of online retail has been to get us to do more shopping while thinking less about it – thinking less, in particular, about how our purchases reach our homes”
“Amazon’s emphasis on speed compelled other retailers to hurry, too, and encouraged us to believe that if something cannot be had quickly, it is barely worth having at all. It is as if we have forgotten that a product is an object moving through space, fighting gravity, air resistance and other forces of nature. Companies, though, are only too aware of it. While we choose and buy our purchases with mere inch-wide movements of our thumbs, they are busy rearranging the physical world so that our deliveries pelt towards us in ever-quicker time.“
“In 2005, Amazon created Prime: a club for shoppers paying a fixed fee every year, so that they got free two-day shipping on everything they bought. Prime now has more than 100 million members, “
“For at least 40 years, British firms have located their warehouses in the triangle because truckers setting out from here can reach close to 95% of the island inside four-and-a-half hours – the longest they are allowed to drive without stopping for a break.“
“I said: ‘They haven’t got any names on them. Who are they for?’” he told me. The packages held video games, it turned out: the newest edition of the annual Fifa series by Electronic Arts. “And they said: ‘Amazon knows, if you’ve bought the game for the last three years or whatever, that you’re likely to buy it again.’ So they’ve already got it packaged up for you, waiting for you to press the button. You do that, and they’ll stick your name on it, and it’s gone.”
“researchers at Heriot-Watt University in Edinburgh estimated that a shopper emits 24 times more carbon dioxide if she drives 12.8 miles to buy a single item than if she orders it online.“
“Cities were not built to handle this volume of last-mile activity“
“The life of a UPS driver is governed by a concept known in the trade as density. A typical home receives just one box per delivery, which makes it a low-density stop; commercial towers and apartment blocks, high-density stops, receive several. Very low density, of the kind in the countryside, undermines UPS’s efficiency so much, Harris said, that sometimes UPS creates artificial density by offering a shop or a cafe as a pick-up point for the neighbourhood’s packages. A UPS driver delivers 100-120 parcels on a typical route – not very different from five years ago. In cities, though, the routes are getting tighter and tighter. Some drivers might deliver their 120 packages within just a single Manhattan tower block and a couple of adjacent buildings. During that time, their vans practically come to be fixtures on the street, nearly as immovable as the lamp-post or the fire hydrant. “
La distribution s’est affinée et allégée jusqu’à devenir volatile. Le Home delivery fait oublier au consommateur le chemin parcouru par le produit pour arriver jusqu’à son salon. Comme Baudrillard le dit : “ La masse des consommateurs ne vit-elle pas la profusion come un effet de nature, environnée qu’elle est par les phantasme du pays de Cocagne et persuadée par la litanie publicitaire que tout lui sera donné d’avance, et qu’elle a sur la profusion un doirt légiime et inaliénable? La bonne foi dans la consommation est un élément nouveau; les nouvelles générations sont désormais des héritières: elles héritent non plus seulement des biens, mais du droit naturel à l’abondance.” (la société de consommation, p.29)
D’un point de vue pratique, les entrepôts sont situés à des endroits stratégiques pour être plus efficace dans la distribution en fonction des heures de trajet permises. D’autre part, la plus grand difficulté du home delivery réside dans le “last mile” où les livreurs humains sont le moins efficaces et encombre l’espace public.
0 notes
Video
youtube
Vue JS #6 - Delete task item using emit method
0 notes
Text
Simplify Static Asset Management With Vue.js Single-File Component

Static asset management is one of the more painful and mysterious challenges front-end developers face. We want our source code to be simple to develop and maintain, but we rely on browsers to be lean and mean. Browsers can’t be expected to understand our fancy source files with conveniences like Sass or the newest bleeding edge JavaScript features. We configure transpilers, linters, and compressors that watch for source code changes or get triggered by build processes. And finally, these tools emit static assets that a browser can interpret

Even when we don’t use fancy preprocessors, we still copy the source files to a dist directory to deploy them…because…well…it’s just what we do!

On top of this complexity, we have traditionally maintained a separation of concerns between markup, scripting, and styling. This separation can lead to extreme bloat that makes our applications difficult to maintain.
Imagine a request to remove a component from a view. You remove the markup…but can you track down CSS selectors that are specific to this component? All the media queries? Do you feel safe removing code that may affect other parts of the view? What about a request to modify a component’s appearance? Do you add a new class to your updated component and leave the old styling behind, just in case there are other parts of the view that are styled by it? Technical debt accumulates. Eventually, you have a pile of dead code mixed in with the good stuff. It’s very difficult to clean up, and nobody wants to pay for the effort.

Not to imply that your code is inherently bad. It’s a consequence of the separation of concerns that has made the internet look sharp since the W3C adopted CSS in 1996.
So, what are our alternatives? Inline CSS? An occasional inline style attribute is acceptable in the 21st century. But even with CSS-in-JS libraries, this solution can be challenging to scale. We need the cascade. We need media queries.
Many modern frameworks combine JavaScript with markup; it’s the core of the React, Angular, and Vue.js revolution. The concept of “styled components” is also trending. But unification usually comes at a cost. The learning curve, awkward code structure, and dependency on 3rd party libraries may outweigh the advantages. However, Vue’s out-of-the-box support for the concept makes it simple to grasp and implement.

The Vue.js framework Single-File Component (SFC) allows you to combine templating, scripting, and styling in a single source file that can accept props and manage state. Vue CLI — the “beginner” installation of Vue.js — will pre-configure the bridge between your .vue source files and webpack that requires absolutely no configuration or webpack knowledge. Let’s open a terminal and quickly build a working example using npm.
1.Install Vue CLI: npm install -g @vue/cli
2.Create a new project (accept the default settings): vue create vue-sfc-example
3.Start the project: npm run serve
4. Render HelloWorld.vue in a browser: http://localhost:8080

SO easy. Let’s open the source to see what we built.
<template>
<div class="hello">
...some markup...
</div>
</template>
<script>
export default {
name: 'HelloWorld',
props: {
msg: String
}
}
</script>
<!-- Add "scoped" attribute to limit CSS to this component only -->
<style scoped>
h3 {
margin: 40px 0 0;
}
ul {
list-style-type: none;
padding: 0;
}
li {
display: inline-block;
margin: 0 10px;
}
a {
color: #42b983;
}
</style>
The <template> tag wraps Vue template syntax enhanced markup.
The <script> tag wraps JavaScript.
The <style> tag wraps CSS.
Aside from placing the styling at the end of the file, this source file looks an awful lot like an html file that a browser could interpret. There is a lot going on under the hood, but Vue doesn’t clutter the source with tooling bloat.
Let’s concentrate on the <style> tag. The boilerplate contains some basic CSS, and an attribute named “scoped”. As the code comment implies, this attribute allows you to “scope” this block to only apply to this particular component, by automatically namespacing the CSS. Compare this to a more traditional approach, which might involve creating a selector like: “#hello-world-component-namespace.this-component {...}” in some faraway css file. The scoped attribute is optional. If you want to modify child components, one approach is to exclude the scoped attribute. You may also use multiple blocks of CSS, in case you wish to scope part of the code, but style children with a separate CSS block.
<style scoped>
h3 {
margin: 40px 0 0;
}
...
</style>
<style>
#child-component > h3 {
margin: 10px;
}
...
</style>
If you inspect the source code in your browser, you can see this style block rendered in the head of the document:
<style type="text/css">h3[data-v-469af010] {
margin: 40px 0 0;
}
ul[data-v-469af010] {
list-style-type: none;
padding: 0;
}
li[data-v-469af010] {
display: inline-block;
margin: 0 10px;
}
a[data-v-469af010] {
color: #42b983;
}
</style>
There is no need to version or deploy a CSS file, in this example. The data attribute in the first block is no accident. It uniquely identifies the component this styling is scoped to.
<div data-v-469af010="" class="hello">...</div>
Predictably, namespacing is suppressed for code blocks that are not scoped.
<style type="text/css">
#child-component > h3 {
margin: 10px;
}
</style>
An alternative to this approach is the ::v-deep combinator, which allows you to style children from a scoped block. Details can be found here.
But what about my Sass? Good news: SFCs tap into all of your favorite webpack preprocessors. Install sass-loader with npm:
<style scoped lang="scss">
h3 {
margin: 40px 0 0;
}
ul {
list-style-type: none;
padding: 0;
> li {
display: inline-block;
margin: 0 10px;
a {
color: #42b983;
&.very-green {
#00ff00;
}
}
}
}
</style>
But what about my Sass globals, includes, mixins, etc.? Never fear — the Sass block you include in your SFCs works just like your typical Sass source file. You can pass includes, set variables, nest media queries, and any other Sass convenience.
<style scoped lang="scss">
@import "mixins";
@import "global/global";
#main {
padding-top: em(54);
@media (min-width: $screen-md) {
padding-top: 0;
}
}
</style>
The vue-loader, which is included and pre-configured by Vue CLI, makes all of this work. Sass/Scss, Less, Babel, TypeScript, and other popular preprocessors and linters are supported. These features can be discretely configured, to the delight of advanced users.
The Vue.js SFC offers the convenience our source code deserves, without the file management and webpack tooling headaches. You can also use the component state to set class and style inside your templates, using built-in lifecycle hooks. It is also important to note that you can still include CSS the typical way, or in a mixed mode. This is especially handy when using rapid prototyping libraries like Bootstrap.
What’s the catch? Vue.js is a relatively new player. It’s picking up steam, but there aren’t as many applications using the framework as the competing products — Angular and React. That means the user community is comparably small. Examples are slim and basic. You are cutting your own trail. Also, we have detected some “spookiness” in the way preprocessors react to code structure. The preprocessors may need some configuration and babysitting, once you scale into a larger project.
_________________________________________
0 notes
Link
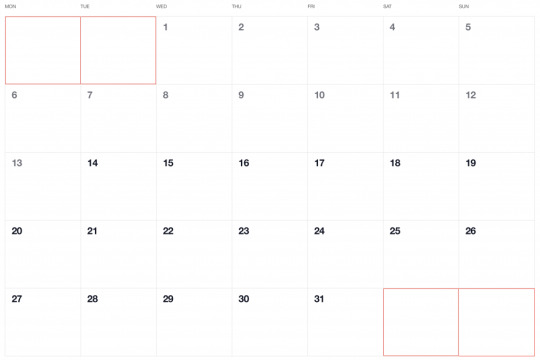
Have you ever seen a calendar on a webpage and thought, how the heck did they did that? For something like that, it might be natural to reach for a plugin, or even an embedded Google Calendar, but it’s actually a lot more straightforward to make one than you might think. Especially when we use the component-driven power of Vue.
I’ve set up a demo over at CodeSandbox so you can see what we’re aiming for, but it’s always a good idea to spell out what we’re trying to do:
Create a month view grid that displays the days of the current month
Display dates from the previous and next months to so the grid is always full
Indicate the current date
Show the name of the currently selected month
Navigate to the previous and next month
Allow the user to navigate back to the current month with a single click
Oh, and we’ll build this as a single page application that fetches calendar dates from Day.js, a super light utility library.
Step 1: Start with the basic markup
We’re going to jump straight into templates. If you’re new to Vue, Sarah’s introduction series is a nice place to start. It’s also worth noting that I’ll be linking to the Vue 2 docs throughout this post. Vue 3 is currently in beta and the docs for it are subject to change.
Let’s start with creating a basic template for our calendar. We can outline our markup as three layers where we have:
A section for the calendar header. This will show components with the currently selected month and the elements responsible for paginating between months.
A section for the calendar grid header. A table header that holds a list containing the days of the week, starting with Monday.
The calendar grid. You know, each day in the current month, represented as a square in the grid.
Let’s write this up in a file called CalendarMonth.vue. This will be our main component.
<!-- CalendarMonth.vue --> <template> <!-- Parent container for the calendar month --> <div class="calendar-month"> <!-- The calendar header --> <div class="calendar-month-header" <!-- Month name --> <CalendarDateIndicator /> <!-- Pagination --> <CalendarDateSelector /> </div> <!-- Calendar grid header --> <CalendarWeekdays /> <!-- Calendar grid --> <ol class="days-grid"> <CalendarMonthDayItem /> </ol> </div> </template>
Now that we have some markup to work with, let’s go one step further and create required components.
Step 2: Header components
In our header we have two components:
CalendarDateIndicator shows the currently selected month.
CalendarDateSelector is responsible for paginating between months.
Let’s start with CalendarDateIndicator. This component will accept a selectedDate property which is a Day.js object that will format the current date properly and show it to the user.
<!-- CalendarDateIndicator.vue --> <template> <div class="calendar-date-indicator"></div> </template> <script> export default { props: { selectedDate: { type: Object, required: true } }, computed: { selectedMonth() { return this.selectedDate.format("MMMM YYYY"); } } }; </script>
That was easy. Let’s go and create the pagination component that lets us navigate between months. It will contain three elements responsible for selecting the previous, current and next month. We’ll add an event listener on those that fires the appropriate method when the element is clicked.
<!-- CalendarDateSelector.vue --> <template> <div class="calendar-date-selector"> <span @click="selectPrevious">﹤</span> <span @click="selectCurrent">Today</span> <span @click="selectNext">﹥</span> </div> </template>
Then, in the script section, we will set up two props that the component will accept:
currentDate allows us to come back to current month when the “Today” button is clicked.
selectedDate tells us what month is currently selected.
We will also define methods responsible for calculating the new selected date based on the currently selected date using the subtract and add methods from Day.js. Each method will also $emit an event to the parent component with the newly selected month. This allows us to keep the value of selected date in one place — which will be our CalendarMonth.vue component — and pass it down to all child components (i.e. header, calendar grid).
// CalendarDateSelector.vue <script> import dayjs from "dayjs"; export default { name: "CalendarDateSelector", props: { currentDate: { type: String, required: true }, selectedDate: { type: Object, required: true } }, methods: { selectPrevious() { let newSelectedDate = dayjs(this.selectedDate).subtract(1, "month"); this.$emit("dateSelected", newSelectedDate); }, selectCurrent() { let newSelectedDate = dayjs(this.currentDate); this.$emit("dateSelected", newSelectedDate); }, selectNext() { let newSelectedDate = dayjs(this.selectedDate).add(1, "month"); this.$emit("dateSelected", newSelectedDate); } } }; </script>
Now, let’s go back to the CalendarMonth.vue component and use our newly created components.
To use them we first need to import and register the components, also we need to create the values that will be passed as props to those components:
today properly formats today’s date and is used as a value for the “Today” pagination button.
selectedDate is the currently selected date (set to today’s date by default).
The last thing we need to do before we can render the components is create a method that’s responsible for changing the value of selectedDate. This method will be fired when the event from the pagination component is received.
// CalendarMonth.vue <script> import dayjs from "dayjs"; import CalendarDateIndicator from "./CalendarDateIndicator"; import CalendarDateSelector from "./CalendarDateSelector"; export default { components: { CalendarDateIndicator, CalendarDateSelector }, data() { return { selectedDate: dayjs(), today: dayjs().format("YYYY-MM-DD") }; }, methods: { selectDate(newSelectedDate) { this.selectedDate = newSelectedDate; } } }; </script>
Now we have everything we need to render our calendar header:
<!-- CalendarMonth.vue --> <template> <div class="calendar-month"> <div class="calendar-month-header"> <CalendarDateIndicator :selected-date="selectedDate" class="calendar-month-header-selected-month" /> <CalendarDateSelector :current-date="today" :selected-date="selectedDate" @dateSelected="selectDate" /> </div> </div> </template>
This is a good spot to stop and see what we have so far. Our calendar header is doing everything we want, so let’s move forward and create components for our calendar grid.
Step 3: Calendar grid components
Here, again, we have two components:
CalendarWeekdays shows the names of the weekdays.
CalendarMonthDayItem represents a single day in the calendar.
The CalendarWeekdays component contains a list that iterates through the weekday labels (using the v-for directive) and renders that label for each weekday. In the script section, we need to define our weekdays and create a computed property to make it available in the template and cache the result to prevent us from having to re-calculate it in the future.
// CalendarWeekdays.vue <template> <ol class="day-of-week"> <li v-for="weekday in weekdays" :key="weekday" > </li> </ol> </template>
<script> const WEEKDAYS = ["Mon", "Tue", "Wed", "Thu", "Fri", "Sat", "Sun"]; export default { name: 'CalendarWeekdays', computed: { weekdays() { return WEEKDAYS } } } </script>
Next is CalendarMonthDayItem. It’s a list item that receives a day property that is an object, and a boolean prop, isToday, that allows us to style the list item to indicate that it’s the current date. We also have one computed property that formats the received day object to our desired date format (D, or the numeric day of the month).
// CalendarMonthDayItem.vue <template> <li class="calendar-day" :class="{ 'calendar-day--not-current': !isCurrentMonth, 'calendar-day--today': isToday }" > <span></span> </li> </template>
<script> import dayjs from "dayjs"; export default { name: "CalendarMonthDayItem", props: { day: { type: Object, required: true }, isCurrentMonth: { type: Boolean, default: false }, isToday: { type: Boolean, default: false } }, computed: { label() { return dayjs(this.day.date).format("D"); } } }; </script>
OK, now that we have these two components, let’s see how we can add them to our CalendarMonth component.
We first need to import and register them. We also need to create a computedproperty that will return an array of objects representing our days. Each day contains a date property and isCurrentMonth property.
// CalendarMonth.vue <script> import dayjs from "dayjs"; import CalendarMonthDayItem from "./CalendarMonthDayItem"; import CalendarWeekdays from "./CalendarWeekdays";
export default { name: "CalendarMonth", components: { // ... CalendarMonthDayItem, CalendarWeekdays }, computed: { days() { return [ { date: "2020-06-29", isCurrentMonth: false }, { date: "2020-06-30", isCurrentMonth: false }, { date: "2020-07-01", isCurrentMonth: true }, { date: "2020-07-02", isCurrentMonth: true }, // ... { date: "2020-07-31", isCurrentMonth: true }, { date: "2020-08-01", isCurrentMonth: false }, { date: "2020-08-02", isCurrentMonth: false } ]; } } }; </script>
Then, in the template, we can render our components. Again, we use the v-fordirective to render the required number of day elements.
<!-- CalendarMonth.vue --> <template> <div class="calendar-month"> <div class="calendar-month-header"> // ... </div> <CalendarWeekdays/> <ol class="days-grid"> <CalendarMonthDayItem v-for="day in days" :key="day.date" :day="day" :is-today="day.date === today" /> </ol> </div> </template>
OK, things are starting to look good now. Have a look at where we are. It looks nice but, as you probably noticed, the template only contains static data at the moment. The month is hardcoded as July and the day numbers are hardcoded as well. We will change that by calculating what date should be shown on a specific month. Let’s dive into the code!
Step 4: Setting up current month calendar
Let’s think how we can calculate the date that should be shown on a specific month. That’s where Day.js really comes into play. It provides all the data we need to properly place dates on the correct days of the week for a given month using real calendar data. It allows us to get and set anything from the start date of a month to all the date formatting options we need to display the data.
We will:
Get the current month
Calculate where the days should be placed (weekdays)
Calculate the days for displaying dates from the previous and next months
Put all of the days together in a single array
We already have Day.js imported in our CalendarMonth component. We’re also going to lean on a couple of Day.js plugins for help. WeekDay helps us set the first day of the week. Some prefer Sunday as the first day of the week. Other prefer Monday. Heck, in some cases, it makes sense to start with Friday. We’re going to start with Monday.
The WeekOfYear plugin returns the numeric value for the current week out of all weeks in the year. There are 52 weeks in a year, so we’d say that the week starting January 1 is the the first week of the year, and so on.
Here’s what we put into CalendarMonth.vue to put all of that to use:
// CalendarMonth.vue <script> import dayjs from "dayjs"; import weekday from "dayjs/plugin/weekday"; import weekOfYear from "dayjs/plugin/weekOfYear"; // ...
dayjs.extend(weekday); dayjs.extend(weekOfYear); // ...
That was pretty straightforward but now the real fun starts as we will now play with the calendar grid. Let’s stop for a second a think what we really need to do to get that right.
First, we want the date numbers to fall in the correct weekday columns. For example, July 1, 2020, is on a Wednesday. That’s where the date numbering should start.
If the first of the month falls on Wednesday, then that means we’ll have empty grid items for Monday and Tuesday in the first week. The last day of the month is July 31, which falls on a Friday. That means Saturday and Sunday will be empty in the last week of the grid. We want to fill those with the trailing and leading dates of the previous and next months, respectively, so that the calendar grid is always full.
Adding dates for the current month
To add the days of the current month to the grid, we need to know how many days exist in the current month. We can get that using the daysInMonth method provided by Day.js. Let’s create a computed property for that.
// CalendarMonth.vue computed: { // ... numberOfDaysInMonth() { return dayjs(this.selectedDate).daysInMonth(); } }
When we know that, we create an empty array with a length that’s equal to number of days in the current month. Then we map() that array and create a day object for each one. The object we create has an arbitrary structure, so you can add other properties if you need them.
In this example, though, we need a date property that will be used to check if a particular date is the current day. We’ll also return a isCurrentMonth value that checks whether the date is in the current month or outside of it. If it is outside the current month, we will style those so folks know they are outside the range of the current month.
// CalendarMonth.vue computed: { // ... currentMonthDays() { return [...Array(this.numberOfDaysInMonth)].map((day, index) => { return { date: dayjs(`${this.year}-${this.month}-${index + 1}`).format("YYYY-MM-DD") isCurrentMonth: true }; }); }, }
Adding dates from the previous month
To get dates from the previous month to display in the current month, we need to check what the weekday of the first day is in selected month. That’s where we can use the WeekDay plugin for Day.js. Let’s create a helper method for that.
// CalendarMonth.vue methods: { // ... getWeekday(date) { return dayjs(date).weekday(); }, }
Then, based on that, we need to check which day was the last Monday in the previous month. We need that value to know how many days from the previous month should be visible in the current month view. We can get that by subtracting the weekday value from the first day of the current month. For example, if first day of the month is Wednesday, we need to subtract three days to get last Monday of the previous month. Having that value allows us to create an array of day objects starting from the last Monday of the previous month through the end of that month.
// CalendarMonth.vue computed: { // ... previousMonthDays() { const firstDayOfTheMonthWeekday = this.getWeekday(this.currentMonthDays[0].date); const previousMonth = dayjs(`${this.year}-${this.month}-01`).subtract(1, "month"); const previousMonthLastMondayDayOfMonth = dayjs(this.currentMonthDays[0].date).subtract(firstDayOfTheMonthWeekday - 1, "day").date(); // Cover first day of the month being sunday (firstDayOfTheMonthWeekday === 0) const visibleNumberOfDaysFromPreviousMonth = firstDayOfTheMonthWeekday ? firstDayOfTheMonthWeekday - 1 : 6; return [...Array(visibleNumberOfDaysFromPreviousMonth)].map((day, index) = { return { date: dayjs(`${previousMonth.year()}-${previousMonth.month() + 1}-${previousMonthLastMondayDayOfMonth + index}`).format("YYYY-MM-DD"), isCurrentMonth: false }; }); } }
Adding dates from the next month
Now, let’s do the reverse and calculate which days we need from the next month to fill in the grid for the current month. Fortunately, we can use the same helper we just created for the previous month calculation. The difference is that we will calculate how many days from the next month should be visible by subtracting that weekday numeric value from seven.
So, for example, if the last day of the month is Saturday, we need to subtract one day from seven to construct an array of dates needed from next month (Sunday).
// CalendarMonth.vue computed: { // ... nextMonthDays() { const lastDayOfTheMonthWeekday = this.getWeekday(`${this.year}-${this.month}-${this.currentMonthDays.length}`); const nextMonth = dayjs(`${this.year}-${this.month}-01`).add(1, "month"); const visibleNumberOfDaysFromNextMonth = lastDayOfTheMonthWeekday ? 7 - lastDayOfTheMonthWeekday : lastDayOfTheMonthWeekday; return [...Array(visibleNumberOfDaysFromNextMonth)].map((day, index) => { return { date: dayjs(`${nextMonth.year()}-${nextMonth.month() + 1}-${index + 1}`).format("YYYY-MM-DD"), isCurrentMonth: false }; }); } }
OK, we know how to create all days we need, so let’s use them and merge all days into a single array of all the days we want to show in the current month, including filler dates from the previous and next months.
// CalendarMonth.vue computed: { // ... days() { return [ ...this.previousMonthDays, ...this.currentMonthDays, ...this.nextMonthDays ]; }, }
0 notes
Text
Saturn Fob Keys And Remote Program Union NJ

The handy locksmiths at Union Key Replacement can adjust all of your Saturn security and lock-man requisites. We are satisfied to extend a range of car keys, lockes and ignition services and furthermore the installation of pushtostart ignition and car's computer. Our competent lock smiths shine in mobile ignition lock repair, keys replacement and lockout incident and our major quest is to go outside the limits to make sure your safety and protection by servicing adept and affordable service twenty four hour 7 day a week 365 days a year utilizing latest lock bumping tools, high security key cutters and key programmers besides Union NJ top priority expert and qualified lock smith.
Models: Curve, Outlook, Station, Flextreme, Astra, Roadster, GM, Coupe, ION, Crossover, Relay, Sky, Compact, CV1 and VUE
Saturn replacement keys in Union NJ
If you lost all the keys to your vehicle or broken your key into the ignition key mouth, you have a number of possibilities to procure a brand new set of Saturn key replacement:
Driving to the Union NJ local dealer-ship is in most cases seemingly a rapid or cost effective option to construct a brand new key by the vehicle ID number, but in some occasions (for example General-Motors) the dealer require you to show a bona fide car title or registration with an identical address on the owner photo ID. In some other occasions, the dealership have no access to decrepit key codes by the VIN (for example Mazda, Mercury and Ford), the dealer-ship can originate reinstatement keys merely for types from the previous 10 years.
Sit on top of the regulatory commission above, in a lot of affairs, your motor vehicle is locked on the expressway in the country-side, with a broken key in the ignition or locked with the key in the truck and to choose the dealership will incorporate nearby extra hundred dollars for a towing truck service.
About Saturn key-lock instrumentation
Saturn is a United States auto manufacturer creating portfolio of prevailing vehicles. From 2005 Saturn key-lock system runs on a transponder chip mechanism and in 2007 choose the Passive Entry Passive Start (PEPS) as the push start ignition and keyless entry platform for practically all of its cars.
The electronic transponder key emits an extremely low-level radio-frequency signal to the car main computer which can only be recognized when the exact encoded key was inserted to the crater hole, elseways the fuel supply and the car wouldn't burst and may be blocked for 5 mins.
This antitheft structures is helping the insurance companies, car manufacturers and car owners in hampering crime and save millions of dollars around the world, nevertheless substituting lost, stolen and broken keys or even copying a supplemental key is a lot more expensive.
Ignition lock repair
The Saturn ignition lock is a system that utilize a unique key to turn on the electric parts and allow your motor vehicle engine to start and due to the heavy use, the ignition lock strip, shift and tumblers fray over time. Signss of a wearisome ignition lock might be key is stuck in the crack-hole and don't turn, ignition key is hard to turn in the ignition or broken ignition key.
Since ignition lock service can sometime cost outrageous amout of a $1000 for a few vehicle models when handled by the dealership as opposed to a motor vehicle mobile locksmith that can many times of repairing or replacing the ignition interior parts for a fraction of this price in addition to avoid towing your car to the dealer-ship.
When you have prblems turning your ignition or have to jiggle your keys to get your ignition cylinder to turn the wisest preferential will be to call a motor vehicle mobile lock-smith well rounded to drive to you to fix or outplace your ignition lock on site. Union Key Replacement staff members have performed countless ignition lock rekeys, will arrive to your location with dedicated Saturn lockpick tools and diagnostic equipment to get the job done 24/7 rain or shine.
Chipped key cut and program
A transponder is essentially anti-theft system. With transponder, hot wiring or lock cracking a vehicle isn't as sufficient any-more if someone want to steal a car.
The main idea behind an immobilized lock and key system is a micro chip concealed usually in the head of the key, when a driver place a key inside the ignition key-pit, the transponder deliver a distinct coded signal to the engine control unit. If the ECU will not recognize a precise indication code, the motor vehicle will not start.
Though several years and models car makers grant dashboard groundwork to originate a surplus key by yourself, vehicle key programming, replacement and repair evolved into being pretty expensive then in the past and not only that, if all keys are m isplaced, the ECM need to be reprogrammed by compatible key programming machine owned by the dealer or a locksmith.
Saturn key-less entry
Smartkeys are the state of the art in driver convenience and comfort, you can unlock and lock your doors in addition to turning on the car – without even holding the key. You merely need to carry it on you, whether in your purse or pocket.
As soon as the driver get close to their car, they are identified by a corresponding radio frequency transponder chip hidden inside the smart-key. The doors open and unlock when the driver touchs the handle. The car starts up with the touch of a push-buttons on the dash-board. The push-buttons is replacing the metal bladed key by opening the current on the engine combustible system.
Locking the car doors when leaving is just as convenient. The driver solely pushes a keypad on the door lock handle – several smartkeys might even automatically locks whenever the driver steps out of range.
Copy vs lost car keys
Car keys lately cost way more then $2.50 metal bladed keys at a nearest hardware or walmart store. Newer Saturn keys have gone computerized laser cut, keyless entry, switch-blade key and fobik key involving transponder keys that must be programmatically synced with diagnostic equipment to the car immobilized computer. If the car computer doesn't detect an appropriate chipped key, the fuel injection will subdue and the motor vehicle will not crank. This platform serves as a safety factor assuring the immobilization of a misplaced or stolen key.
Though dash-board process is accessible on several previous generations to easily duplicate keys, in general to get a supplementary key duplicated, the chip in the key need to be programmatically synced by a dedicated key programming machine carried by the dealer or a locksmith which ordinarily cost about $60-$100 in addition to the value of the key blank.
A lost or stolen key to a car is entirely different manifestation, since the car computer module need to be programmatically rekeyed to employ the new key and renounce the old one which actually means that you will have hire a mobile car keysmith or tow your car to the dealer.
Employing this practice serves as a safety factor assuring the immobilization of the misplaced or stolen key, however lost key made, platform available only to a licensed locksmith or the Saturn dealership and subsequently will costs $185–$270.
24 hr motor vehicle lock out
If you’re coping with the disturbing instance of locking your car keys inside the car while late night in a dark ally or at the gym, our blistering car lockout savvy worker force can be with you in no time to cleanly unlock your car door for any kind of American, Japanese, German or European auto manufacturer promptly, let you back in your car and recapture your calmness.
Motor vehicle locks adapting
Union Key Replacement is proud to administer all sort of Saturn update services onsite to put back a break off, lost or pinched keys. Nearly all state-of-the-art vehicle are equipped with electrical key-lock system and the operation obligatory to get your lock rekeyed have to hold the good decoder for the explicit vehicle. Instead of towing your car to the dealer, just hoist the cell phone and call our call center in Union NJ and one of our car rekeying staff members will be with you in the short run with a movable workshop van involving current key cutters, programmers, ignition parts and blank keys ready to deal with any sort of crucial occurrences.
Lastly
Union Key Replacement bestows all sort vehicle locks, ignition and keys services onsite. We have principal, competent attendants that ferry wide experience with all vehicle producers year and model and our team first and foremost priority is to extend consumers rapid and low cost road side resolution to their malfunctions guaranteeing expedient reply to put you back inside their car and put them back on the road quickly. . If you are glancing for Saturn key replacement service 24HR in Union New Jersey, call (973)200-4870 for a reliable local mobile locksmith, lost car keys made, ignition repair, transponder, keyless entry remote fob cut and program.
0 notes
Text


1. This is an example of a violet red analogous color scheme due to the red and violet tones behind the text. I think it is trying to emit a feminine tone to the piece.
2. This is an example of a graphic design with predominately warm colors which is creating a passionate tone.
3. The pink and green in this example is an example of complementary colors which is pleasing to the eye. In this particular case, it is supporting the boldness that this piece has.
4. This is an example of a graphic design with gestalt principles. It is because it has different parts that create the figures in this image.
5. This is a piece of design that tries to look like something historical. This piece is meant to be politically inspired and the design choices from color and shape supports this.
6. The clorox images here were used as part of an article on how the 90’s are coming back and the designer used contrasting colors in different vues and saturation to create this feeling.
7. This is an example of graphic design with predominately cool colors. Using cool colors makes the consumer feel calm.
0 notes
Text
Create your Own Drag-and-Drop Functionality Using Ionic Gestures
In this tutorial, we will be building out two custom components in Ionic that enable us to drag and drop elements on the screen. We will be able to mark elements as “draggable” to enable the dragging functionality, and we will be able to define a “droppable” target zone for where elements can be dropped. Here is a quick example I built using the end result:

You will find that there are plenty of libraries/packages available for implementing drag/drop functionality in Ionic, but we will be implementing our solution with just Ionic itself - no other external libraries/packages will be required.
Where practical, I prefer to implement my own solutions from scratch rather than relying on a 3rd party library to do the job. I don’t want this tutorial to focus on my opinions of the benefits of this approach, but to briefly explain my position:
You don’t need to spend time researching options and compatibility
You can build exactly the functionality you need (and only what you need)
You will be better positioned to extend the functionality further if required
You will be able to integrate the functionality better with other parts of your application
You don’t need to worry about maintenance or long term support for the package
You won’t end up with a mish-mash of various packages in your application that are kind of just sticky taped together
You learn new stuff!
That doesn’t mean you shouldn’t ever use 3rd party packages, but growing your ability to build things yourself gives you much more freedom in determining whether a particular package provides enough benefits to outweigh the downsides in a particular situation. For some drag/drop scenarios I am sure existing libraries/packages will save a substantial amount of time and effort, but for our goals in this tutorial we can build it out ourselves easily enough.
In fact, enabling dragging of any element around the screen with Ionic Gestures is relatively simple (assuming you already have an understanding of Ionic Gestures, if not I would recommend reading: Create Custom Gestures (Simple Tinder Card Animation)). All we need is a single line of code inside of the onMove handler:
onMove: (ev) => { style.transform = `translate(${ev.deltaX}px, ${ev.deltaY}px)`; }
We just need to set transform on the element we want to drag in response to the move events from the gesture. We translate the x and y values to match the deltaX and deltaY values from the gesture, which indicate the change in position since the beginning of the gesture (e.g. the user has dragged 10px to the right and 5px down since beginning the drag gesture).
This is a big part of the drag and drop functionality, but we have a few more things to consider as well. We would likely also want:
Something useful to happen when the element is dropped
The element to snap back to its original position after it is dropped (perhaps unless it is dropped within a certain zone)
The ability to mark a particular area where the element is allowed to be dropped
This complicates things a little more, but it still doesn’t require overly complex code to implement. Our solution will involve creating an <app-draggable> component and an <app-droppable> component. We will be able to wrap existing elements with <app-draggable> like this:
<app-draggable droppable={this.droppableArea} drop-data={{content: 'some data'}}> <some-element>Drag me!</some-element> </app-draggable>
and create a droppable zone by using <app-droppable> like this:
<app-droppable onElementDropped={(ev) => this.handleDrop(ev.detail)}> <h5>Drop zone!</h5> </app-droppable>
We will link the draggable elements to their designated drop zone using the droppable prop, and we can also supply some data that is passed on to the drop zone through the drop-data prop. Our drop zone emits an elementDropped custom event that will fire whenever an element is dropped within its bounds. The elementDropped event will contain the data passed through drop-data.
Before We Get Started
This example used in this application was creating using Ionic/StencilJS, but the methods being used (e.g. Ionic Gestures) are also available for Angular, React, Vue, etc. If you are following along with StencilJS, I will assume that you already have a reasonable understanding of how to use StencilJS. If you are following along with a framework like Angular, React, or Vue then you will need to adapt parts of this tutorial as we go.
If you would like a thorough introduction to building Ionic applications with StencilJS, you might be interested in checking out my book.
1. Creating the Droppable Component
First, let’s talk about how to create the droppable area. This component doesn’t actually do a whole lot, its main purpose is to receive an event from the draggable component detailing the position in which the the element being dragged was “dropped” (i.e. the coordinates of where the drag gesture ended). It will then determine if those coordinates intersect with its own “bounding client rectangle” on the screen (i.e. the space in which the droppable area occupies on the screen). If the coordinates are within the space that the droppable area occupies, then it will emit an event indicating that something was dropped and any data that was supplied along with it.
Let’s take a look at the code and then talk through it:
import { Component, Element, Event, EventEmitter, Method, Host, h} from "@stencil/core"; @Component({ tag: "app-droppable", styleUrl: "app-droppable.css", shadow: true, }) export class AppDroppable { @Element() hostElement: HTMLElement; @Event() elementDropped: EventEmitter; @Method() async complete(ev, data) { if (this.isInsideDroppableArea(ev.currentX, ev.currentY)) { this.elementDropped.emit(data); } } isInsideDroppableArea(x, y) { const droppableArea = this.hostElement.getBoundingClientRect(); if (x < droppableArea.left || x >= droppableArea.right) { return false; } if (y < droppableArea.top || y >= droppableArea.bottom) { return false; } return true; } render() { return ( <Host> <slot></slot> </Host> ); } }
This component has a publically exposed method called complete. This will allow us to grab a reference to the <app-droppable> element we are interested in, and then call its complete method. We will call this method from within our <app-draggable> gesture to indicate that the gesture has finished, and to supply <app-droppable> with the coordinates and data it needs to do its job.
As you can see, we have also created a method called isInsideDroppableArea that uses getBoundingClientRect to determine the space that the droppable area occupies, and then checks that against the supplied coordinates. This component has no template itself, it will just take on the shape of whatever is inside of the <app-droppable> tags - this allows you to define how you want your droppable area to look without having to modify the internals of this component.
2. Creating the Draggable Component
Now let’s take a look at our draggable component. Most of the work that we need to do within this component is just creating the gesture itself:
import { Component, Element, Prop, Host, h, writeTask } from "@stencil/core"; import { createGesture, Gesture } from "@ionic/core"; @Component({ tag: "app-draggable", styleUrl: "app-draggable.css", shadow: true, }) export class AppDraggable { @Element() hostElement: HTMLElement; @Prop() droppable; @Prop() dropData; componentDidLoad() { const style = this.hostElement.style; const dragGesture: Gesture = createGesture({ el: this.hostElement, gestureName: "draggable", threshold: 0, onStart: () => { writeTask(() => { style.transition = "none"; style.opacity = "0.7"; }); }, onMove: (ev) => { writeTask(() => { style.transform = `translate(${ev.deltaX}px, ${ev.deltaY}px)`; }); }, onEnd: (ev) => { writeTask(() => { style.transition = ".3s ease-out"; style.transform = `translate(0, 0)`; style.zIndex = "inherit"; style.opacity = "1"; }); this.droppable.complete(ev, this.dropData); }, }); dragGesture.enable(); } render() { return ( <Host> <slot></slot> </Host> ); } }
We set up two props on this component: droppable for indicating which <app-droppable> component we want to drag to, and dropData to provide the data we want to pass to the <app-droppable> component when the element is dropped within the droppable zone.
The rest of this component deals with setting up the gesture. I won’t talk about creating gestures in general here, so again, if you are not already familiar with Ionic Gestures I would recommend watching: Create Custom Gestures (Simple Tinder Card Animation)).
An important distinction for this gesture is that we provide a threshold of 0 so that the gesture will work in all directions - by default, gestures will only work in the specified direction (horizontal or vertical). We’ve already discussed setting the transform value inside of the onMove handler, and the other important part here is that we call the complete method of the supplied <app-droppable> component reference when the gesture ends. We also set up some styles so that the element will snap back to its original position once released, and we also reduce the opacity a bit when it is being dragged.
It is important that we set the transition style to none when the gesture begins, because we don’t want to animate the translate changes inside of onMove. This value is updated every time the mouse/pointer moves and having a timed animation animating those changes would mess things up. We do, however, want the transition animation to apply when the element is being translated back to its original position inside of onEnd.
3. Implementing Drag and Drop Functionality
We have our generic drag/drop functionality implemented, now we just need to make use of it. To demonstrate using it, I created a simple example that would allow different types of elements to be dragged to a droppable zone and then render out data passed along from that element. You can see the result of that below:
and the code for this is as follows:
import { Component, State, Element, h } from "@stencil/core"; @Component({ tag: "app-home", styleUrl: "app-home.css", }) export class AppHome { @Element() hostElement: HTMLElement; @State() droppableArea; @State() cards; @State() chosenOne: string = "pick a card..."; componentWillLoad() { this.cards = [ { title: "Drag Me", content: "To another place" }, { title: "Drag Me", content: "I am a far better candidate for dragging" }, { title: "Drag Me", content: "To the place, I belong" }, ]; } componentDidLoad() { this.droppableArea = this.hostElement.querySelector("app-droppable"); } handleDrop(data) { this.chosenOne = data.content; } render() { return [ <ion-header> <ion-toolbar color="primary"> <ion-title>Drag and Drop</ion-title> </ion-toolbar> </ion-header>, <ion-content class="ion-padding"> <app-droppable onElementDropped={(ev) => this.handleDrop(ev.detail)}> <div style={{ border: `3px dashed #cecece`, width: `100%`, height: `200px`, display: `flex`, alignItems: `center`, justifyContent: `center`, }} > <h5>Drop zone!</h5> </div> </app-droppable> <p> <strong>The chosen one:</strong> {this.chosenOne} </p> {this.cards.map((card) => ( <app-draggable droppable={this.droppableArea} drop-data={card}> <ion-card> <ion-card-header> <ion-card-title>{card.title}</ion-card-title> </ion-card-header> <ion-card-content>{card.content}</ion-card-content> </ion-card> </app-draggable> ))} <app-draggable droppable={this.droppableArea} drop-data={{ content: "Why not!" }} > <ion-chip> <ion-icon name="heart" color="primary"></ion-icon> <ion-label>A draggable chip?</ion-label> <ion-icon name="close"></ion-icon> </ion-chip> </app-draggable> <app-draggable droppable={this.droppableArea} drop-data={{ content: "A button???" }} > <ion-button>Drag me too, why not!</ion-button> </app-draggable> </ion-content>, ]; } }
This isn’t a particularly practical example, of course, but it does demonstrate how the components can be used currently.
Summary
Depending on what it is you want to do exactly, you would need to modify the example in this tutorial a little further and perhaps even make some changes to the underlying components themselves.
For example, all we are doing is passing some data along which might suit some circumstances, but perhaps you also want to change the position of elements after they are released. In that case, you would need to modify the onEnd of the gesture to perform some check and implement a different type of behaviour to achieve the result you want (e.g. moving the element to its new position on the screen). Maybe you want the element to disappear completely when it is dropped, and reappear in text form somewhere else (this could also be achieved by changing the onEnd behaviour). Maybe you even want to create something similar to Ionic’s <ion-reorder-group> component that has elements shuffling around on the screen as another element is dragged over it - in that case, you would need to add some extra logic inside of the onMove handler.
I’ll reiterate that in some cases, you might be better served by just using an existing 3rd party solution. But, if it is practical enough to build out the solution you need yourself, I think the benefits are often worth it.
via RSS Feed https://ift.tt/2KKT1ce
0 notes