#vue get data from child component
Explore tagged Tumblr posts
Visit Tumblr Blog
Explore Tumblr blogs with no restrictions, modern design and the best experience.
Last Seen Tumblr Blogs


Fun Fact
In 2020, 44% of users from Denmark used Tumblr daily.
Text
How to pass value to child component in Vue.js
How to pass value to child component in Vue.js
Hello buddy, in this blog we will see how we can pass value to the child component in vue.js and we will also learn the use of props. Sharing data across components is one of the core functionalities of VueJS. It allows you to design a more modular project, control data scopes, and create a natural flow of data across your app. Think you are using the Vue tab component where you have put 5oo…

View On WordPress
#pass data to component vue#vue dynamic component#vue emit#vue get data from child component#vue pass data between sibling components#vue pass data from one component to another#vue pass data from parent to child#vue pass data to component onclick
0 notes
Text
Getting started with C# and Blazor
In this new post, I want to summarize what I understood for getting started with C# and Blazor, the new technology from Microsoft. I briefly spoke about Blazor in some other posts but here I want to introduce it properly.
We live in exciting times, as .NET developer’s life has never been better. We can create apps for any operating system be it Windows, Linux, iOS, Android or macOS. Of course, we can also build amazing web-based applications with ASP.NET. MVC, Razor Pages, and WebAPI have allowed us to create robust scalable and reliable systems for years, but there has long been a missing piece to the puzzle.
One thing all of ASP.NETs web solutions have in common is that they are server based. We’ve never been able to leverage the power of C# and .NET to write client-side applications, this has always been the domain of JavaScript.
So, I’m going to introduce you to a revolutionary client-side framework: Blazor. Built on web standards, Blazor allows us to write rich, engaging user interfaces using C# and .NET. We’ll explore how Blazor can make your development process more efficient and raise your productivity levels, especially if you’re using .NET on the server as well. We’ll cover hosting models, an important concept to understand when starting out with Blazor. We’ll look at both production supported models and the benefits and tradeoffs of each. Next, we’ll introduction components and the benefits of using them to build UIs. Finally, we’ll discuss the reasons why you should consider Blazor for your next project.
Table of contents
Why choose Blazor for new applications?
Pros
Components, a better way to build UI.
What is a component?
The benefits of a component-based UI
Components
Anatomy of a Blazor component
Understanding the code
Blazor, a platform for building modern UI with C#
No installation required
Mobile applications
Understanding hosting models
Blazor Electron
Code example
Mobile Blazor Bindings
Blazor WebAssembly
Process begin
DOM manipulation
blazor.boot.json
dotnet.wasm
Calculating UI Updates
Process explained
Benefits
Tradeoffs
Blazor WebAssembly summarize
Blazor Server
Process begins
Process static files
Calculating UI updates
Process explained
SignalR
DOM
Performance
The test
Testing
Benefits
Tradeoffs
Blazor Server summarize
Why choose Blazor for new applications?
Arguably, the hardest part of starting a new project in recent times has been choosing the tech stack, there is just so much choice available. This is especially true in the front-end world. Pick a framework (Angular, React, Vue), pick a language (TypeScript, CoffeeScript, Dart), pick a build tool (Webpack, Parcel, Browserify). If a team is new to this eco-system, it can seem an almost impossible task to try and work out which combination of technologies will help make the project a success; it’s even hard for teams with experience!
So, first in this getting started with C# and Blazor, let’s cover some of the top reasons for choosing Blazor for your next project and how it can help avoid some of the issues I’ve just mentioned.
Pros
C#, a modern and feature rich language – It’s powerful, easy to learn, and versatile
Great tooling – The .NET community has been fortunate to have some amazing tooling. Visual Studio is an extremely powerful, feature rich and extensible IDE. It’s also 100% free for individuals or non-enterprise teams of 5 or less. If you prefer something more lightweight, then there is Visual Studio Code – one of the most popular code editors today. Both Visual Studio and VS Code are both cross platform:
Visual Studio for Windows and Mac
Visual Studio Code for Windows, Mac and Linux.
.NET Ecosystem – While many new frameworks need to wait for an ecosystem to build up around them, Blazor can tap into the existing .NET ecosystem. Blazor applications target .NET Standard 2.1 and can in theory use any .NET Standard NuGet package.
Unopinionated – There are no preferred patterns or practices for Blazor development, you can write applications using the ones you’re familiar and comfortable with.
Shallow learning curve – If you’re an existing .NET developer then the learning curve for Blazor is quite shallow. Razor, C#, dependency injection, project structure will all look familiar to you. This means you can focus on writing features quicker, rather than learning the framework.
Code sharing – If you’re using C# on the server then Blazor makes an excellent paring. One of the most frustrating problems with different client and server languages is the inability to reuse code. With Blazor, everything is C#. Any shared code can be placed in a common .NET Standard class library and shared easily between server and client.
Open source – As with many projects at Microsoft, Blazor is fully open source and the code is freely available on GitHub for you to browse, download, or fork your own copy.
Components, a better way to build UI.
Blazor, as with many modern front-end frameworks, uses the concept of components to build the UI. Everything is a component, pages, parts of a page, layouts, they’re all components. There are various types of component in Blazor as well as multiple ways to write them all of which will be explored in future chapters. But learning to think in terms of components is essential for writing Blazor applications.
What is a component?
You can think of a component as a building block. You put these building blocks together to form your application. These building blocks can be as big or as small as you decide, however, building an entire UI as a single component wouldn’t be a good idea. Components really show their benefit when you think of them as a way to divide up logical areas of a UI. Let’s look at an example of a user interface structured as components.

Example of a layout divided into components
Each area of the interface is a component and each one has a certain responsibility. You may also notice that there is a hierarchy forming. The layout component sits at the top of the tree, the menu, header, home page and footer are all child components of the layout component. These child components could, and probably would have child components of their own. For example, the header component could contain a logo component and a search component.

Example of nesting components to form a component tree
The benefits of a component-based UI
Many UIs have repeating elements in them, a great advantage to using components is that you can define an element in a component and then reuse the component wherever the element repeats. This can drastically cut down on the amount of repeated code in an application. It also makes the maintainability of the application much better as if the design of that element changes you only need to update it in a single place.
To cater for more advanced scenarios, components can define their own APIs allowing data and events to be passed in and out. Imagine a line of business application, it’s probably safe to assume that within that app there would be lots of places data would be displayed in table format. One approach would be to create each table as its own component, however, this would mean we would end up with a lot of components which displayed data in a table.
A better approach would be to define a single component which took in a dataset as a parameter and then displayed it in a table. Now we have a single component for displaying data in a table that we can reuse all over the application. We could also add features to this component, things such as sorting or paging. As we do, this functionality is automatically available to all the tables in the application as they are all reusing the same component.
Components
Components help speed up the development process. Due to the reusable nature of components, using them often leads to shorter development times. They can be composed together.
While usually self-contained, it’s also possible to have components work together to create more complex UI. For example, let’s take the data table scenario we just talked about, that could be a single component but that could potentially be quite large.
Another approach would be to divide it up into several smaller components, each performing a certain job. We could have a table header component, a table body component even a table cell component. Each of these components are performing a specific job but they are still part of the overall table component.
Anatomy of a Blazor component
Now, in this post getting started with C# and Blazor, we have a better idea of what components are in a general sense, let’s look at an example of a component in Blazor. For this we’re going to grab a component from the Blazor project template.
In figure 1.3 we can see an example of a component from Blazors standard project template, Counter.razor.

The sections of a component in Blazor
This particular component is known as a routable component, as it has a page directive declared at the top. Routable components are essentially a page in the application. When the user navigates to the /counter route in the application, this component will be loaded by Blazor router. It displays a simple counter with a button and when the user clicks on the button the count is incremented by one and the new value displayed to the user.
Understanding the code
While understanding the code isn’t important at this point, we can understand the structure of the component. Figure 1.3 is divided up into three sections each has a certain responsibility.
Section 1 is used to define directives, add using statements, inject dependencies, or other general configuration which applies to the whole component.
Section 2 defines the markup of the component; this is written using the Razor language, a mix of C# and HTML. Here we define the visual elements which make up the component.
Section 3 is the code block. This is used to define the logic of the component. It is possible to write any valid C# code into this section. You can define fields, properties, even entire classes if you wish.
Blazor, a platform for building modern UI with C#
Blazor is a fully featured framework for building modern client-side applications using the power of C# and .NET. Allowing developers to build engaging applications which work across nearly any platform – including web, mobile and desktop.
Blazor is an alternative to JavaScript frameworks and libraries such as Angular, Vue and React. If you’ve had experience working with any of these then you’ll probably start spotting familiar concepts. The most notable influence is the idea of building UIs with components, a concept all these technologies share and something we’ll explore in more detail later in this chapter.
No installation required
Because Blazor is built on top of web standards; it doesn’t require the end user to have .NET installed on their machines or any kind of browser plugin or extension. In fact, with Blazor WebAssembly applications we don’t even need .NET running on the server, this flavor of Blazor can be hosted as simple static files.
Being built on .NET means we have access to the vibrant ecosystem of packages available on NuGet. We also have best in class tooling with Visual Studio and Visual Studio Code, and of course, with .NET being cross platform, we can develop our Blazor applications on whatever our preferred platform is, be that Windows, Mac or Linux.
Mobile applications
Therefore, I want to highlight that Blazors programming model can also be used to build cross-platform native mobile applications via an experimental project called Mobile Blazor Bindings. This is a collaboration between the ASP.NET Core team and the Xamarin team to investigate the potential and demand for using Blazor to build non-web UIs. Microsoft has also announced the future evolution of Xamarin Forms, the Multi-platform App UI framework known as .NET MAUI. This framework will allow developers to build native apps which run on Windows, macOS, iOS and Android. According to the roadmap, Blazors programming model will be offered as an option for building these new .NET MAUI apps. This really makes Blazor a compelling technology to learn as once understood, could allow developers to build UIs for almost any platform or device.
Hopefully, you can already see Blazor is an exciting technology with a lot of potential. But there is a key concept which is important to understand before we go any further, that of hosting models. Let’s tackle that next.
Understanding hosting models
When first getting started with Blazor you will immediately come across the concept of hosting models. Essentially, hosting models are where a Blazor application is run. Currently, Blazor has two production supported hosting models called Blazor WebAssembly and Blazor Server. Regardless of which of these models you choose for your application, the component model is the same meaning components are written the same way and can be interchanged between either hosting model.

Blazor has a separation between hosting models and its app/component model. Meaning components written for one hosting model can be used with another.
The above image shows an abstract representation of Blazors architecture, with the separation between the app and component model and the various hosting models. One of the interesting aspects of Blazor is the potential of other hosting models being made available over time to allow Blazor to run in more places and be used to create more types of UI.
Outside of the two production hosting models we will cover below, there are also two other experimental models Microsoft have been testing, Blazor Electron and Mobile Blazor Bindings.
Blazor Electron
Blazor Electron is the oldest of the two experiments and allows Blazor components to be hosted in an Electron application (https://www.electronjs.org/). Developers write components for this model using HTML and C# in the exact same way as they would for Blazor WebAssembly or Blazor Server.
Code example
An example of a component which can be used by all three of hosting models is shown in the following code.
<div> <p>Current count: @currentCount</p> <button @onclick="IncrementCount">Click me</button> </div> @code { private int currentCount = 0; private void IncrementCount() { currentCount++; } }
Mobile Blazor Bindings
The newer experiment is Mobile Blazor Bindings. This model allows developers to write native mobile applications using Blazors programming model. However, this hosting model can’t use components written using web technologies, components for this hosting model must be written using native controls. The following code contains the same component as the code abode but rewritten for the Mobile Blazor Bindings hosting model.
<StackLayout> <Label> Current count: @currentCount </Label> <Button OnClick="@IncrementCount">Click me</Button> </StackLayout> @code { private int currentCount = 0; private void IncrementCount() { currentCount++; } }
As you can see the programming model is the same between the two code samples. The logic in the code block is unchanged, it’s just C# after all. The only difference is in the markup where web technologies have been swapped for native mobile controls. This does mean that we can’t swap component around between web-based hosting models and native hosting models. However, once we’ve mastered Blazors programming model we can easily use that knowledge to create other types of UI.
Now we’ve talked a little about hosting models in general we’re going to focus in on the two production supported options available in Blazor today, Blazor WebAssembly and Blazor Server.
Blazor WebAssembly
Blazor WebAssembly is the principal hosting model for Blazor applications. Choosing this option will mean your application will run entirely inside the client’s browser making it a direct alternative to JavaScript SPA (Single Page Application) frameworks. To understand how this hosting model works we’re going to walk through the process of initializing a Blazor WebAssembly application shown in following image.
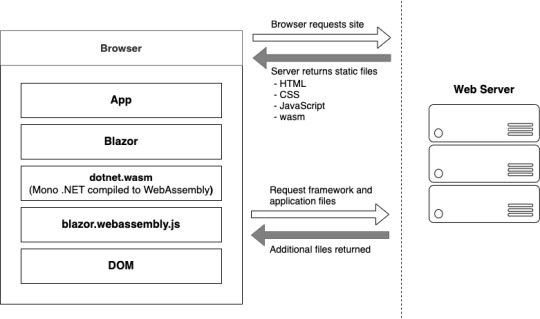
Bootup of a Blazor WebAssembly application showing the interactions between the client’s browser and the web server
Process begin
The process begins when a browser makes a request to the webserver. The web server will return a set of files needed to load the application, these include the host page for the application, usually called index.html, any static assets required by the application such as images, CSS and JavaScript. As well as a special JavaScript file called blazor.webassembly.js.
At this point, you may be wondering why we have a JavaScript file, one of the big selling points of Blazor is the ability to write UI logic using C# instead of JavaScript, right? Yes, that’s true.
But as of right now WebAssembly has a fairly large limitation, it can’t alter the DOM or call Web APIs directly.
DOM manipulation
In order to manage this current limitation, part of the Blazor framework resides in JavaScript called blazor.webassembly.js file. This part of the framework does three main things:
Loads and initializes the Blazor application in the browser.
Provides direct DOM manipulation so Blazor can perform UI updates.
Provides APIs for JavaScript interop scenarios, which we’ll discuss in detail in later chapters.
It’s possible that in the future this file will no longer be required, this will depend on how fast features are added to WebAssembly and adopted by browsers. But for now, it’s an essential part of the framework.
Now, we’ve cleared that up let’s get back to our booting Blazor app. I want to point out that the server returns all static files. They haven’t required any server-side compilation or manipulation. This means that they can be hosted on any service which offers static hosting, there is no requirement for a .NET runtime to be present on the server. For the first time this opens up free hosting options such as GitHub pages to .NET developers (applies to standalone Blazor WebAssembly applications only).
blazor.boot.json
Once the browser has received all the initial files from the web server it can process them and construct the Document Object Model (DOM). Next, blazor.webassembly.js is executed. This performs many actions but in the context of starting a Blazor WebAssembly app it downloads the blazor.boot.json file. This file essentially contains an inventory of all of the framework and application files which are required to run the app.
Most of these files are normal .NET assemblies, there is nothing special about them and they could be run on any compatible .NET runtime. But there’s also another type of file which is downloaded called dotnet.wasm.
dotnet.wasm
The dotnet.wasm file is in fact a complete .NET runtime, the mono .NET runtime to be exact, which has been compiled to WebAssembly.
At this point in time, only the .NET runtime is compiled to WebAssembly, the framework and application are standard .NET assemblies. In the future a feature called AOT (Ahead Of Time) compiling will be introduced which will allow developers to compile parts of their applications into WebAssembly.
The benefit of this will be performance, any code compiled to WebAssembly will be many times more performant than the interpreted approach used today. However, there’s a tradeoff, and that’s size. AOT compiled code will be bigger than the standard assemblies meaning a larger overall download size for the application.
Once the blazor.boot.json file has been downloaded and the files listed in it have been downloaded, it’s time for the application to be run. The WebAssembly .NET runtime is initialized which in turn loads the Blazor framework and finally the application itself. At this point we have a running Blazor application which exists entirely inside the client’s browser. Aside from requesting additional data (if applicable), there’s no further reliance on the server.
Calculating UI Updates
We now understand how a Blazor WebAssembly application boots up. But how do UI updates get calculated? Just as we did for the initialization process, we’re going to follow a scenario to understand how this happens and what Blazor does.
The process of client-side navigation in Blazor WebAssembly from clicking a link to the application of UI updates
For our scenario we have a Blazor WebAssembly application with two pages, home and counter. Neither of these pages have anything on them except a heading saying either “Home” or “Counter”, respectively. The user is on the home page of the application and is going to click on a link to the go to the counter page. We’ll follow the process Blazor goes through to update the UI from that of the home page to the counter page.
Process explained
When the user clicks on the counter link, the navigation event is intercepted by Blazor on the JavaScript side. This event is then passed over to Blazor on the WebAssembly side and is processed by Blazors router component.
The router checks its routing table for any routable components which match the link the user has attempted to navigate to. In our case, it will find a match with the Counter component and a new instance of that component will be created and the relevant lifecycle methods will be executed.
Once complete Blazor will work out the minimum amount of changes that are required to update the DOM to match that of the Counter component. When this is complete, those changes will be passed back down to the Blazor JavaScript runtime and that will in-turn, apply those changes to the physical DOM. At this point the UI will update the user will be on the Counter page.
All of this has happened client-side in the user browser. There was no need for a server during any point in this process. It’s fair to say that in a real world application, you would probably make a call out to a server to some point in this process. This usually happens during the execution of the lifecycle methods of the component being navigated to in order to load some initial data for the component. But this would depend on the individual application.
Benefits
Now we know a bit more about how the Blazor WebAssembly hosting model works, let talk about the benefits and tradeoffs of choosing this model. Let’s start with the benefits.
Applications run on the client. This means that there is much less load on the server, you can offload much of the work to the client. This could lead to significant cost saving on server infrastructure and improve the scalability of an application.
Can work in offline scenarios. As the app runs entirely inside the browser there’s no need for a persistent connection to the server, making applications more tolerant to unstable network connections. It’s also trivial is enable Progressive Web Application (PWA) functionality. In fact, Blazor WebAssembly has this as an option you can select when creating your application.
Deployed as static files. As Blazor WebAssembly apps are just static files, they can be deployed anywhere static hosting is available. This opens up some options which have never been available to .NET developers historically. Services such as GitHub pages, Netlify, Azure Blob Storage, AWS S3 Buckets, Azure Static Web Sites, are all options for hosting standalone Blazor WebAssembly applications.
Code Sharing. Potentially one of the greatest benefits with Blazor WebAssembly is if you’re using C# on the server. You can now use the same C# objects on your client as you use on the server. The days of keeping TypeScript models in sync with their C# equivalent and vice versa, are over.
Tradeoffs
Of course, nothing is a silver bullet so let’s understand some tradeoffs of this model.
Payload. The initial download size for a Blazor WebAssembly app can be considered quite large. The project template weighs in at around 1.8mb when published. This is largely down to the fact Blazor needs to ship an entire .NET runtime to the client which comes in at around 600kb. However, this is a one-time cost as the runtime and many of the framework assemblies are cached on the first load. Meaning subsequent loads can be a small as a few kb.
Load time. A knock-on effect of the payload size can be load time. If the user’s on a poor internet connection the amount of time required to download the initial files will be higher, which will delay the start of the application, leaving the user with a loading message of some kind. This can be offset slightly by using server-side prerendering, however, while this will give the user something more interesting to look at initially, the app still won’t be interactive until all files have been downloaded and initialized. Server-side prerendering for Blazor WebAssembly apps also requires a ASP.NET Core element on the server, which negates any free hosting options.
Restricted runtime. This is arguably not a tradeoff as such, but for existing .NET developers who are used to having a relatively free rein over the machine their apps run on, it’s something to be aware of. WebAssembly applications run in the same browser sandbox as JavaScript applications. This means, for example, that you will not be allowed to reach out to the users’ machine and do things such access the local file system.
Blazor WebAssembly summarize
To summarize, Blazor WebAssembly is the hosting model to choose if you’re looking for a direct replacement for a JavaScript SPA framework such as Angular, React or Vue. While there are a few tradeoffs to consider, there are some substantial benefits to choosing this model.
Blazor Server
Now we’ve seen how Blazor WebAssembly works, let’s turn our attention to the Server hosting model and see how it differs. Blazor Server was the first production supported hosting model for Blazor, being released around 8 months before the WebAssembly version. As we did with the previous model, we’ll walk through initializing a Blazor Server application to help us understand how things work.
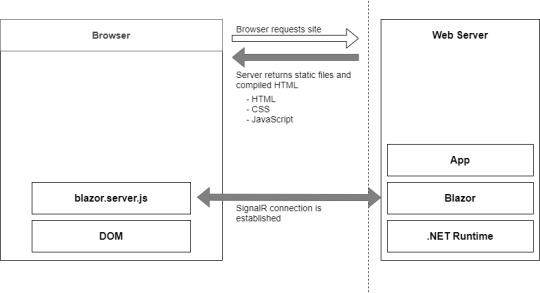
Bootup process of a Blazor Server application
Process begins
The process begins with a request to load the site from the browser. When this request hits the webserver two things could happen, the app is started up, or if the app is already running, a new session is established. Why would the app already be running? Blazor WebAssembly follows the traditional SPA model and runs entirely in the browser, essentially making it like a desktop application. Each user has their own instance of the app which runs locally on their machine. Blazor Server is different, only one instance of the application runs on the server, but it can support many clients. Therefore, the app could already be running, and the new request would just establish a new session.
Process static files
The request is then processed by the application and the initial payload is sent back to the browser. This includes static assets such as CSS and JavaScript files, and images. There is also the initial HTML, but this is compiled rather than static HTML we saw in Blazor WebAssembly. The reason for this is that the hosting page for a Blazor Server application is a Razor Page rather than a static HTML page in the WebAssembly model. The advantage of this is it allows Blazor Server applications to use server-side prerendering out of the box. In fact, this feature is enabled by default when you create this type of Blazor application.
Once the initial payload is returned to the browser the files are processed and the DOM is created – then a file called blazor.server.js is executed. The job of this runtime is to establish a SignalR connection back to the Blazor application running on the server. At this point the application is ready for user interaction.
Calculating UI updates
What happens when a user interacts with the application? We saw earlier that in Blazor WebAssembly the events are processed right there in the browser along with calculating any UI updates and applying them to the DOM. But that can’t happen here as the application is running on the server.
We’ll follow the same scenario as we did with Blazor WebAssembly, we have a Blazor Server application with two pages, home and counter. Neither of these pages have anything on them except a heading saying either “Home” or “Counter”, respectively. The user is on the home page of the application and is going to click on a link to the go to the counter page. We’ll follow the process Blazor goes through to update the UI from that of the home page to the counter page.

Process of updating the UI in Blazor Server
Process explained
The user clicks on the link in the menu and the click event is intercepted by Blazor’s runtime on the client. The runtime then processes the event to understand what has happened. In this case there are two things, a mouse click event and a navigation event, due to it being a hyperlink that was clicked. These two events are then bundled up and sent back to the server over the SignalR connection that was established when the application started.
So, the client sent a the message to the server and the server unpacks and process the message. The Blazor framework then calls any application code necessary. In this case it would instantiate an instance of the counter page component and execute the relevant lifecycle methods.
SignalR
Once complete, Blazor will work out what the minimum amount of changes needed to make the current page transform to the counter page and then send these back to the client via the SignalR connection. Just to be clear, Blazor will not send back an entirely new page to the client. It will only send back the minimum number of instructions needed to update the current DOM to match the Counter page. In our case, the only difference is the heading. Blazor will send back a single instruction to change the text in the heading from “Home” to “Counter”.
DOM
Once back on the client, the client unpacks the changes, and the required changes are applied to the physical DOM. From the user’s perspective, they appear to have navigated to a new page in the application, the counter page. But they are still on the same physical page, it just has a different header.
You may have spotted this already, but the overall process isn’t any different to how Blazor WebAssembly worked, it’s just been stretched out a bit over that SignalR connection. Blazor Server is just as much a SPA as Angular, Vue or Blazor WebAssembly. It just happens to run its logic and calculate UI updates on the server instead of the client. In fact, I would go as far as saying if you were presented with two identical applications, one written in Blazor Server and one in Blazor WebAssembly, you wouldn’t be able to tell the difference between them, as a user.
Performance
Before we talk about benefits and tradeoffs for this model, I want quickly mention performance. With all the network chatter which goes on in this hosting model I’m sure it may have crossed your mind that this might not scale particularly well.
The test
In 2019, the ASP.NET Core team did some testing to establish the performance levels of Blazor Server apps. They setup an application in Azure and tested it on different powered virtual machines, checking the number of active users the application could support. Here are the results.
Standard D1 v2 Instance (1vCPU & 3.5GB Memory). Over 5000 concurrent users
Standard D3 v2 Instance (4vCPU & 14GB Memory). Over 20,000 concurrent users
As you can see, Blazor Server is no slouch when it comes to performance. The main factor they found which effects the number of clients that can be supported is memory. This makes sense as the server needs to keep track of all the clients which are connected to it, the more there are the more information needs to be stored in memory.
Testing
The other major finding from testing was how network latency effected the application. As all interaction are sent back to the server for processing, latency can have a large impact on usability.
If the server is located 250ms away from the client, then each interaction is going to take at least 500ms to be processed as it has to travel to the server (250ms), then be processed, then travel back again (250ms).
Testing found that when the latency went above 200ms then the UI began to feel sluggish and less responsive. As a rough rule you would always want your users to be on the same continent as the server. If you want to have a globally available Blazor Server application, then you need to have your app evenly distributed across the world aiming to keep all clients within 200ms of a server.
Benefits
As we did before, let’s look at the benefits and tradeoffs of choosing a Blazor Server application.
Small payload. As the application is running on the server as opposed to the client, the initial download is significantly smaller. Depending on static assets such as CSS and images a Blazor Server application can be as small as a 100-200kb.
Fast load time. With a much smaller payload the application loads much faster. The server-side prerendering also helps as the user never sees a loading message.
Access to the full runtime. The application code is executing on the server on top of the full .NET runtime. This means that you can do things such as access the servers file system if you require without hitting any security restrictions.
Code security. If you have code which is proprietary, and you don’t want people being able to download and interrogate it then Blazor Server is a good choice. The application code is all executed on the server and only the UI updates are sent to the client. This means your code is never exposed to the client in anyway.
Tradeoffs
Heavy server load. Where Blazor WebAssembly allows us to utilize the power of the client Blazor Server does the complete opposite. Almost all of the work is now being performed by the server. Meaning you might need a larger investment in your infrastructure to support Blazor Server apps.
Doesn’t work offline. Where Blazor WebAssembly takes offline working in its stride Blazor Server does not. The SignalR connection is the lifeline of the application and without it the client can’t function at all. By default, this results in an overlay with a message saying the client is attempting to reestablish the connection. If this fails, the user has to refresh the browser to restart the application.
Latency. Due to its design Blazor Server apps are sensitive to latency issues. Every interaction the user has with the application must be sent back to the server for processing and await any updates that need to be applied. If there is a high latency in the connection between client and server a noticeable lag manifests in the UI and actions quickly feel sluggish. In real numbers a latency above 200ms is going to start causing these issues.
Requires a stable connection. Following on from the need for low latency and tying in with the inability to work offline. Blazor Server apps need to have a stable internet connection. If the connection is intermittent in any way, the user will continually see the reconnecting overlay in their application which quickly becomes very disruptive. An obvious scenario where this could occur is when a user is on a mobile device which has intermittent connection.
Blazor Server summarize
In summary, if you’re looking for a fast loading application and you have users with a fast and stable network connection, then Blazor Server is a great choice.
The post Getting started with C# and Blazor appeared first on PureSourceCode.
from WordPress https://www.puresourcecode.com/dotnet/net-core/getting-started-with-c-and-blazor/
0 notes
Text
Simplify Static Asset Management With Vue.js Single-File Component

Static asset management is one of the more painful and mysterious challenges front-end developers face. We want our source code to be simple to develop and maintain, but we rely on browsers to be lean and mean. Browsers can’t be expected to understand our fancy source files with conveniences like Sass or the newest bleeding edge JavaScript features. We configure transpilers, linters, and compressors that watch for source code changes or get triggered by build processes. And finally, these tools emit static assets that a browser can interpret

Even when we don’t use fancy preprocessors, we still copy the source files to a dist directory to deploy them…because…well…it’s just what we do!

On top of this complexity, we have traditionally maintained a separation of concerns between markup, scripting, and styling. This separation can lead to extreme bloat that makes our applications difficult to maintain.
Imagine a request to remove a component from a view. You remove the markup…but can you track down CSS selectors that are specific to this component? All the media queries? Do you feel safe removing code that may affect other parts of the view? What about a request to modify a component’s appearance? Do you add a new class to your updated component and leave the old styling behind, just in case there are other parts of the view that are styled by it? Technical debt accumulates. Eventually, you have a pile of dead code mixed in with the good stuff. It’s very difficult to clean up, and nobody wants to pay for the effort.

Not to imply that your code is inherently bad. It’s a consequence of the separation of concerns that has made the internet look sharp since the W3C adopted CSS in 1996.
So, what are our alternatives? Inline CSS? An occasional inline style attribute is acceptable in the 21st century. But even with CSS-in-JS libraries, this solution can be challenging to scale. We need the cascade. We need media queries.
Many modern frameworks combine JavaScript with markup; it’s the core of the React, Angular, and Vue.js revolution. The concept of “styled components” is also trending. But unification usually comes at a cost. The learning curve, awkward code structure, and dependency on 3rd party libraries may outweigh the advantages. However, Vue’s out-of-the-box support for the concept makes it simple to grasp and implement.

The Vue.js framework Single-File Component (SFC) allows you to combine templating, scripting, and styling in a single source file that can accept props and manage state. Vue CLI — the “beginner” installation of Vue.js — will pre-configure the bridge between your .vue source files and webpack that requires absolutely no configuration or webpack knowledge. Let’s open a terminal and quickly build a working example using npm.
1.Install Vue CLI: npm install -g @vue/cli
2.Create a new project (accept the default settings): vue create vue-sfc-example
3.Start the project: npm run serve
4. Render HelloWorld.vue in a browser: http://localhost:8080

SO easy. Let’s open the source to see what we built.
<template>
<div class="hello">
...some markup...
</div>
</template>
<script>
export default {
name: 'HelloWorld',
props: {
msg: String
}
}
</script>
<!-- Add "scoped" attribute to limit CSS to this component only -->
<style scoped>
h3 {
margin: 40px 0 0;
}
ul {
list-style-type: none;
padding: 0;
}
li {
display: inline-block;
margin: 0 10px;
}
a {
color: #42b983;
}
</style>
The <template> tag wraps Vue template syntax enhanced markup.
The <script> tag wraps JavaScript.
The <style> tag wraps CSS.
Aside from placing the styling at the end of the file, this source file looks an awful lot like an html file that a browser could interpret. There is a lot going on under the hood, but Vue doesn’t clutter the source with tooling bloat.
Let’s concentrate on the <style> tag. The boilerplate contains some basic CSS, and an attribute named “scoped”. As the code comment implies, this attribute allows you to “scope” this block to only apply to this particular component, by automatically namespacing the CSS. Compare this to a more traditional approach, which might involve creating a selector like: “#hello-world-component-namespace.this-component {...}” in some faraway css file. The scoped attribute is optional. If you want to modify child components, one approach is to exclude the scoped attribute. You may also use multiple blocks of CSS, in case you wish to scope part of the code, but style children with a separate CSS block.
<style scoped>
h3 {
margin: 40px 0 0;
}
...
</style>
<style>
#child-component > h3 {
margin: 10px;
}
...
</style>
If you inspect the source code in your browser, you can see this style block rendered in the head of the document:
<style type="text/css">h3[data-v-469af010] {
margin: 40px 0 0;
}
ul[data-v-469af010] {
list-style-type: none;
padding: 0;
}
li[data-v-469af010] {
display: inline-block;
margin: 0 10px;
}
a[data-v-469af010] {
color: #42b983;
}
</style>
There is no need to version or deploy a CSS file, in this example. The data attribute in the first block is no accident. It uniquely identifies the component this styling is scoped to.
<div data-v-469af010="" class="hello">...</div>
Predictably, namespacing is suppressed for code blocks that are not scoped.
<style type="text/css">
#child-component > h3 {
margin: 10px;
}
</style>
An alternative to this approach is the ::v-deep combinator, which allows you to style children from a scoped block. Details can be found here.
But what about my Sass? Good news: SFCs tap into all of your favorite webpack preprocessors. Install sass-loader with npm:
<style scoped lang="scss">
h3 {
margin: 40px 0 0;
}
ul {
list-style-type: none;
padding: 0;
> li {
display: inline-block;
margin: 0 10px;
a {
color: #42b983;
&.very-green {
#00ff00;
}
}
}
}
</style>
But what about my Sass globals, includes, mixins, etc.? Never fear — the Sass block you include in your SFCs works just like your typical Sass source file. You can pass includes, set variables, nest media queries, and any other Sass convenience.
<style scoped lang="scss">
@import "mixins";
@import "global/global";
#main {
padding-top: em(54);
@media (min-width: $screen-md) {
padding-top: 0;
}
}
</style>
The vue-loader, which is included and pre-configured by Vue CLI, makes all of this work. Sass/Scss, Less, Babel, TypeScript, and other popular preprocessors and linters are supported. These features can be discretely configured, to the delight of advanced users.
The Vue.js SFC offers the convenience our source code deserves, without the file management and webpack tooling headaches. You can also use the component state to set class and style inside your templates, using built-in lifecycle hooks. It is also important to note that you can still include CSS the typical way, or in a mixed mode. This is especially handy when using rapid prototyping libraries like Bootstrap.
What’s the catch? Vue.js is a relatively new player. It’s picking up steam, but there aren’t as many applications using the framework as the competing products — Angular and React. That means the user community is comparably small. Examples are slim and basic. You are cutting your own trail. Also, we have detected some “spookiness” in the way preprocessors react to code structure. The preprocessors may need some configuration and babysitting, once you scale into a larger project.
_________________________________________
0 notes
Text
Watch Directv
AT&T‘s Internet-streaming live TV service will soon be specific to the Chrome browser, assuming you favour to circulation for your computer or computing device. Users are reporting seeing a message when trying to move on PC that advises them to download and install Google Chrome, pronouncing its miles vital with the intention to get the ‘best streaming revel in.’ You have till the give up of this month to make the transition.
If you subscribe to DirecTV NOW and also you log into your account on a PC's browser, you’ll be greeted with a message that asserts, in component, ‘DirecTV NOW will stay solely on Google Chrome while accessed through your laptop.’ The word goes on to give an explanation for that the provider will drop its support for Internet Explorer and Safari ‘after June.’
This trade simplest impacts folks that try and watch the carrier from a computing device browser; the service is viewable thru a devoted app while watching from a cellphone or pill. Presumably, as soon as the aid is dropped, folks that try and get admission to the provider the usage of Explorer or Safari could be directed to download Chrome before getting access to the video content material.
The organization has no longer revealed why it's far making this modification — except to say that Chrome will in a few ways offer the excellent viewing enjoy — and it hasn’t but updated any of its assist pages to indicate the upcoming change, which is a chunk ordinary. Regardless, you've got approximately 3 weeks left to make the transition…either to Chrome or to an extraordinary OTT video carrier. Competing products consist of PlayStation Vue, Sling TV, and Hulu Live TV.
WHAT IS DIRECTV APP FOR PC
Directv is a premium subscription-based satellite tv carrier issuer which becomes began in 1994. The company has been successfully completed its 23 years. At Directv, you could subscribe tv and audio offerings. It makes use of satellite transmission to offer their offerings to their customers. Its audio and tv services are confined to the United States, Latin America, and the Caribbean. It doesn’t provide their offerings international.
OTHER PRODUCTS OFFERED BY DIRECTV
Direct broadcast satellite tv for pc
Pay Television
Pay-in line with-view
Internet Television
Owner AT&T
Read Kinemaster for PC
SUBSCRIPTION OFFERED BY THE DIRECTV
Local tv stations
broadcast television networks
Subscription-based total tv offerings
Satellite radio services
private video services
HOW TO WATCH DIRECTV ON PC
If you're one that loves looking movies and TV suggests so that you must strive the Directv which help you get right of entry to movies and indicates anytime & anywhere if you have a working internet connection.
Below we're sharing how you may start taking part in the content of Directv on a Home windows PC (Computer)
Visit here DIRECTV entertainment website
Log in along with your subscription keys
Now faucet “watch online”
It will carry you the listing of films, simply select one
Enjoy
Features of Directv APK
Watch Favorite shows and films
It gives its customers the element to watch their boundless fav serials and films which customers can see Live or On-Demand. Another extra element is to get the Data Free TV which allows viewing DIRECTV on the gadgets, without utilising the patron’s net facts. Besides, customers should purchase into the top-notch channels which permit viewing the maximum latest content.
Recording
Directv gives a highlight of recording the fav serials and movies from anyplace in order that viewers don’t pass over out on their favourite content material and can view it every time as consistent with their requirements.
Read MainStage 3 for PC Download Free
Total Control
This component permits its customers to use their devices to pause, play, and rewind the serials and films which can be streaming on their TV. At the point when somebody wishes to search for a show, the subscriber can actually communicate out and voice seek highlight can help discover exactly what clients are trying to find. At that point, they can even arrange it to reveal consequences on the TeleVision. Most importantly, Users can set parental controls and respect large serenity over what their children are viewing.
Easy Interface
It is having an exceedingly easy to make use of interface which makes your work excessively truthful. The on-hand channels incorporate every one of the channels immediately from the child’s quarter to adults.
More info Clicks Helpsforpc.com
0 notes
Text
How to Build Complex, Large-Scale Vue.js Apps With Vuex
It's so easy to learn and use Vue.js that anyone can build a simple application with that framework. Even novices, with the help of Vue's documentation, can do the job. However, when complexity comes into play the things get a bit more serious. The truth is that multiple, deeply nested components with shared state can quickly turn your application into an unmaintainable mess.
The main problem in a complex application is how to manage the state between components without writing spaghetti code or producing side effects. In this tutorial you'll learn how to solve that problem by using Vuex: a state management library for building complex Vue.js applications.
What is Vuex?
Vuex is a state management library specifically tuned for building complex, large-scale Vue.js applications. It uses a global, centralized store for all the components in an application taking advantage of its reactivity system for instant updates.
The Vuex store is designed in such a way that it is not possible to change its state from any component. This ensures that the state can only be mutated in a predictable manner. Thus your store becomes a single source of truth: every data element is only stored once and is read-only to prevent the application's components from corrupting the state that is accessed by other components.
Why Do You Need Vuex?
You may ask: Why I need Vuex at first place? Can I just put the shared state in a regular JavaScript file and import it in my Vue.js application?
You can, of course, but compared to a plain global object Vuex store has some significant advantages and benefits:
The Vuex store is reactive. Once components retrieve a state from it, they will reactively update their views every time the state changes.
Components cannot directly mutate the store's state. The only way to change the store's state is by explicitly committing mutations. This ensures every state change leaves a trackable record which makes the application easier to debug and test.
You can easily debug your application thanks to the Vuex integration with Vue's DevTools extension.
The Vuex store gives you a bird's eye view on how everything is connected and affected in your application.
It's easier to maintain and synchronize the state between multiple components, even if component hierarchy changes.
Vuex makes direct cross-components communication possible.
If some component is destroyed, the state in Vuex store will remain intact.
Getting Started With Vuex
Before we get started I want to make clear several things: First, to follow along this tutorial you need to have a good understanding of Vue.js and its components system, or at least minimal experience with the framework.
Also, the aim of this tutorial is not to show you how to build actual complex application; the aim is to focus your attention more on Vuex concepts and how you can use it to build complex applications. For that reason, I'm going to use very plain and simple examples without any redundant code. Once you fully grasp the Vuex concepts you will be able to apply them on any level of complexity.
Finally, I'll be using ES2015 syntax. If you are not familiar with it, you can learn it here.
And now, let's get started!
Setting Up a Vuex Project
The first step to get started with Vuex is to have Vue.js and Vuex installed on your machine. There are several ways to do that but we'll use the easiest one. Just create an HTML file and put the needed CDN links:
<!DOCTYPE html> <html> <head> <meta charset="UTF-8" /> <!-- Put the CSS code here --> </head> <body> <!-- Put the HTML template code here --> <script src="https://unpkg.com/vue"></script> <script src="https://unpkg.com/vuex"></script> <script> // Put the Vue code here </script> </body> </html>
I use some CSS to make the components look nicer, but you don't need to worry about that CSS code. It only helps you to gain a visual notion about what is going on. Just copy and paste the following inside the <head> tag:
<style> #app { background-color: yellow; padding: 10px; } #parent { background-color: green; width: 400px; height: 300px; position: relative; padding-left: 5px; } h1 { margin-top: 0; } .child { width: 150px; height: 150px; position:absolute; top: 60px; padding: 0 5px 5px; } .childA { background-color: red; left: 20px; } .childB { background-color: blue; left: 190px; } </style>
Now, let's create some components to work with. Inside the <script> tag, right above the closing </body> tag, put the following Vue code:
Vue.component('ChildB',{ template:` <div class="child childB"> <h1> Score: </h1> </div>` }) Vue.component('ChildA',{ template:` <div class="child childA"> <h1> Score: </h1> </div>` }) Vue.component('Parent',{ template:` <div id="parent"> <childA/> <childB/> <h1> Score: </h1> </div>` }) new Vue ({ el: '#app' })
Here, we have a Vue instance, a parent component, and two child components. Each component have a heading "Score:" where we'll output the app state.
The last thing you need to do is to put a wrapping <div> with id="app" right after the opening <body>, and then place the parent component inside:
<div id="app"> <parent/> </div>
So, the preparation work is done. We're ready to move on.
Exploring Vuex
State Management
In real life we deal with complexity by using strategies to organize and structure the content we want to use. We group related things together in different sections, categories, etc. Just as how in a book library, the books are categorized and put in different sections so that we can easily find what we are looking for. The same is true for Vuex. It arranges the application data and logic related to state in four groups or categories: state, getters, mutations, and actions.
State and mutations are the base for any Vuex store:
state is an object that holds the state of the application data.
mutations is also an object containing methods which affect the state.
Getters and actions are like logical projections of state and mutations:
getters contains methods used to abstract the access to the state, and to do some preprocessing jobs, if needed (data calculating, filtering, etc.)
actions are methods used to trigger mutations and execute asynchronous code.
Let's explore the following diagram to make the things a bit clear:

In the left side, we have an example of Vuex store, which we'll create later on in this tutorial. In the right side, we have a Vuex workflow diagram, which shows how the different Vuex elements work together and communicate each another.
In order to change the state, a particular Vue component must commit mutations (eg. this.$store.commit('increment', 3)), and then, those mutations change the state (score becomes 3). After that, the getters are automatically updated thanks to Vue's reactive system and they render the updates in the component's view (with this.$store.getters.score).
Mutations cannot execute asynchronous code, because this would make it impossible to record and track the changes in debug tools like Vue DevTools. To use asynchronous logic you need to put it in actions. In this case a component first will dispatch actions (this.$store.dispatch('incrementScore', 3000)) where the asynchronous code is executed, and then those actions will commit mutations, which will mutate the state.
Create a Vuex Store Skeleton
After we explored how Vuex work, let's create the skeleton for our Vuex store. Put the following code above the ChildB component registration:
const store = new Vuex.Store({ state: { }, getters: { }, mutations: { }, actions: { } })
To provide global access to the Vuex store from every component we need to add the store property in the Vue instance:
new Vue ({ el: '#app', store // register the Vuex store globally })
Now, we can access the store from every component with this.$store variable.
So far, if you open the project with CodePen in the browser, you should see the following result.

State Properties
The state object contains all of the shared data in your application. Of course, if needed, each component can have its own private state too.
Imagine that you want to build a game application and you need a variable to store the game's score. So, you put it in the state object:
state: { score: 0 }
Now, you can access the state's score directly. Let's go back to the components and reuse the data from the store. In order to be able to reuse reactive data from the store's state, you should use computed properties. So, let's create a score() computed property in the parent component:
computed: { score () { return this.$store.state.score } }
In parent component's template put the expression:
<h1> Score: </h1>
And now, do the same for the two child components.
Vuex is so smart that it will do all the work for us to reactively updates the score property whenever the state changes. Try to change the score's value and see how the result updates in all of the three components.
Creating Getters
It is, of course, good that you can reuse the this.$store.state keyword inside the components, as you saw above. But imagine the following scenarios:
In a large-scale application, where multiple components access the state of the store by using this.$store.state.score, you decide to change the name of score. This means that you have to change the name of the variable inside each and every component that uses it!
You want to use a computed value of the state. For example, let's say you want to give the players a bonus of 10 points when the score reaches 100 points. So, when the score hits 100 points, 10 points bonus are added. This means each component has to contain a function that reuses the score and increment it with ten. You will have repeated code in each component, which is not good at all!
Fortunately, Vuex offers a working solution to handle such situations. Imagine the centralized getter that accesses the store's state and provides a getter function to each of the state's items. If needed, this getter can apply some computation to the state's item. And if you need to change the name of some of the state's properties, you only change them in one place, in this getter.
Let's create a score() getter:
getters: { score (state){ return state.score } }
A getter receives the state as its first argument, and then uses it to access the state's properties.
Note: Getters also receive getters as the second argument. You can use it to access the other getters in the store.
In all components, modify the score() computed property to use the score() getter instead of state's score directly.
computed: { score () { return this.$store.getters.score } }
Now, if you decide to change the score to result you need to update it only in one place: in the score() getter. Try it out in this CodePen!
Creating Mutations
Mutations are the only way allowed to change the state. Triggering changes simply means committing mutations in component methods.
A mutation is pretty much an event handler function that is defined by name. Mutation handler functions receive a state as a first argument. You can pass an additional second argument too, which is called the payload for the mutation.
Let's create a increment() mutation:
mutations: { increment (state, step) { state.score += step } }
Mutations cannot be called directly! To perform a mutation, you should call the commit() method with a name of the corresponding mutation and possible additional parameters. It might be just one, as is the step in our case, or they might be multiple wrapped in an object.
Let's use the increment() mutation in the two child components by creating a method named changeScore():
methods: { changeScore (){ this.$store.commit('increment', 3); } }
We are committing a mutation instead of changing this.$store.state.score directly, because we want to explicitly track the change made by the mutation. This way we make our application logic more transparent, traceable and easy to reason about. In addition, it makes it possible to implement tools, like Vue DevTools or Vuetron, that can log all mutations, take state snapshots, and perform time-travel debugging.
Now, let's put the changeScore() method into use. In each template of the two child components, create a button and add a click event listener to it:
<button @click="changeScore">Change Score</button>
When you click the button, the state will be incremented by three, and this change will be reflected in all components. Now we have effectively achieved direct cross-components communication, which is not possible with the Vue.js built-in "props down, events up" mechanism. Check it out in our CodePen example.
Creating Actions
An action is just a function that commit a mutation. It changes the state indirectly which allows for executing of asynchronous operations.
Let's create a incrementScore() action:
actions: { incrementScore: ({ commit }, delay) => { setTimeout(() => { commit('increment', 3) }, delay) } }
Actions get the context as first parameter, which contains all methods and properties from the store. Usually we just extract the parts we need by using ES2015 argument destructing. The commit method is one we need very often. Actions also get a second payload argument, just like mutations.
In the ChildB component modify the changeScore() method:
methods: { changeScore (){ this.$store.dispatch('incrementScore', 3000); } }
To call an action we use dispatch() method with a name of the corresponding action and additional parameters just as with mutations.
Now, the "Change Score" button from ChildA component will increment the score by three. The identical button from ChildB component will do the same, but after 3 seconds delay. In the first case we execute synchronous code and we use a mutation, but in the second case we execute asynchronous code and we need to use an action instead. See how it all works in our CodePen example.
Vuex Mapping Helpers
Vuex offers some useful helpers which can streamline the process of creating state, getters, mutations, and actions. Instead of writing those functions manually we can tell Vuex to create them for us. Let's see how it works.
Instead of writing the score() computed property like this:
computed: { score () { return this.$store.state.score } }
We just use the mapState() helper like this:
computed: { ...Vuex.mapState(['score']) }
And the score() property is created automatically for us.
The same is true for the getters, mutations, and actions.
To create the score() getter we use mapGetters() helper:
computed: { ...Vuex.mapGetters(['score']) }
To create changeScore() method we use mapMutations() helper like this:
methods: { ...Vuex.mapMutations({changeScore: 'increment'}) }
When used for mutations and actions with payload argument, we must pass that argument in the template where we define the event handler:
<button @click="changeScore(3)">Change Score</button>
If we want changeScore() to use an action instead of a mutation we use mapActions() like this:
methods: { ...Vuex.mapActions({changeScore: 'incrementScore'}) }
Again, we must define the delay in the event handler:
<button @click="changeScore(3000)">Change Score</button>
Note: All mapping helpers return an object. So, if we want to use them in combination with other local computed properties or methods we need to merge them into one object. Fortunately with the object spread operator (...) we can do it without using any utility.
In our CodePen you can see an example of how all mapping helpers are used in practice.
Making the Store More Modular
It seems that the problem with complexity constantly obstructs our way. We solved it before by creating Vuex store, where we made the state management and components communication easy. In that store we have everything in one place, easy to manipulate and easy to reason about. However, as our application grows this easy to manage store file becomes larger and larger, and, as a result, harder to maintain. Again, we need some strategies and techniques for improving the application structure by returning it to its easy to maintain form. In this section, we'll explore several techniques which can help us in this undertaking.
Using Vuex Modules
Vuex allows us to split the store object into separate modules. Each module can contain its own state, mutations, actions, getters, and other nested modules. After we create the needed modules, we register them in the store.
Let's see it in action:
const childB = { state: { result: 3 }, getters: { result (state) { return state.result } }, mutations: { increase (state, step) { state.result += step } }, actions: { increaseResult: ({ commit }, delay) => { setTimeout(() => { commit('increase', 6) }, delay) } } } const childA = { state: { score: 0 }, getters: { score (state) { return state.score } }, mutations: { increment (state, step) { state.score += step } }, actions: { incrementScore: ({ commit }, delay) => { setTimeout(() => { commit('increment', 3) }, delay) } } } const store = new Vuex.Store({ modules: { scoreBoard: childA, resultBoard: childB } })
In the above example, we created two modules, one for each child component. The modules are just plain objects, which we register as scoreBoard and resultBoard in the modules object inside the store. The code for childA is the same as that in the store from the previous examples. In the code for childB we add some changes in values and names.
Let's now tweak ChildB component to reflect the changes in the resultBoard module.
Vue.component('ChildB',{ template:` <div class="child childB"> <h1> Result: </h1> <button @click="changeResult()">Change Result</button> </div>`, computed: { result () { return this.$store.getters.result } }, methods: { changeResult () { this.$store.dispatch('increaseResult', 3000); } } })
In ChildA component the only thing we need to modify is the changeScore() method:
Vue.component('ChildA',{ template:` <div class="child childA"> <h1> Score: </h1> <button @click="changeScore()">Change Score</button> </div>`, computed: { score () { return this.$store.getters.score } }, methods: { changeScore () { this.$store.dispatch('incrementScore', 3000); } } })
As you can see, splitting the store into modules makes it much more lightweight and maintainable, while still keeps its great functionality. Check out the updated CodePen to see it in action.
Namespaced Modules
If you want or need to use one and the same name for particular property or method in your modules, then you should consider namespacing them. Otherwise you may observe some strange side effects, such as executing all the actions with same names, or getting the wrong state's values.
To namespace a Vuex module you just set the namespaced property to true.
const childB = { namespaced: true, state: { score: 3 }, getters: { score (state) { return state.score } }, mutations: { increment (state, step) { state.score += step } }, actions: { incrementScore: ({ commit }, delay) => { setTimeout(() => { commit('increment', 6) }, delay) } } } const childA = { namespaced: true, state: { score: 0 }, getters: { score (state) { return state.score } }, mutations: { increment (state, step) { state.score += step } }, actions: { incrementScore: ({ commit }, delay) => { setTimeout(() => { commit('increment', 3) }, delay) } } }
In the above example we made the property and method names the same for the two modules. And now we can use a property or method prefixed with the name of the module. For example, if we want to use the score() getter from the resultBoard module, we type it like this: resultBoard/score. If we want the score() getter from the scoreBoard module, then we type it like this: scoreBoard/score.
Let's now modify our components to reflect the changes we made.
Vue.component('ChildB',{ template:` <div class="child childB"> <h1> Result: </h1> <button @click="changeResult()">Change Result</button> </div>`, computed: { result () { return this.$store.getters['resultBoard/score'] } }, methods: { changeResult () { this.$store.dispatch('resultBoard/incrementScore', 3000); } } }) Vue.component('ChildA',{ template:` <div class="child childA"> <h1> Score: </h1> <button @click="changeScore()">Change Score</button> </div>`, computed: { score () { return this.$store.getters['scoreBoard/score'] } }, methods: { changeScore () { this.$store.dispatch('scoreBoard/incrementScore', 3000); } } })
As you can see in our CodePen example, we can now use the method or property we want and get the result we expect.
Splitting the Vuex Store Into Separate Files
In the previous section, we improved the application structure to some extent by separating the store into modules. We made the store cleaner and more organized, but still all of the store code and its modules lie in one and the same big file.
So the next logical step is to split the Vuex store in separate files. The idea is to have an individual file for the store itself and one for each of its objects, including the modules. This means having separate files for the state, getters, mutations, actions, and for each individual module (store.js, state.js, getters.js, etc.) You can see an example of this structure at the end of the next section.
Using Vue Single File Components
We've made the Vuex store as modular as we can. The next thing we can do is to apply the same strategy to the Vue.js components too. We can put each component in a single, self-contained file with a .vue extension. To learn how this works you can visit the Vue Single File Components documentation page.
So, in our case, we'll have three files: Parent.vue, ChildA.vue, and ChildB.vue.
Finally, if we combine all three techniques we'll end up with the following or similar structure:
├── index.html └── src ├── main.js ├── App.vue ├── components │ ├── Parent.vue │ ├── ChildA.vue │ ├── ChildB.vue └── store ├── store.js ├── state.js ├── getters.js ├── mutations.js ├── actions.js └── modules ├── childA.js └── childB.js
In our tutorial GitHub repo you can see the completed project with the above structure.
Recap
Let's recap some main points you need to remember about Vuex:
Vuex is a state management library, which help us to build complex, large-scale applications. It uses a global, centralized store for all the components in an application. To abstract the state we use getters. Getters are pretty much like computed properties and are ideal solution when we need to filter or calculate something on runtime.
Vuex store is reactive and components cannot directly mutate the store's state. The only way to mutate the state is by commiting mutations, which are synchronous transactions. Each mutation should perform only one action, must be as simple as possible, and only responsible for updating just a piece of state.
Asynchronous logic should be encapsulated in actions. Each action can commit one or more mutations, and one mutation can be committed by more than one action. Actions can be complex but they never change the state directly.
Finally, modularity is the key to maintainability. To deal with complexity and make our code modular we use the "divide and conquer" principle and the code splitting technique.
Conclusion
So folks, that's it. You already know the main concepts behind Vuex and you are ready to start applying them in practice.
For the sake of brevity and simplicity, I omitted intentionally some details and features of Vuex, so you'll need to read the full Vuex documentation to learn everything about Vuex and its feature set.
via Envato Tuts+ Code https://ift.tt/2sWamFE
0 notes
Text
Why ReactJS is an Ultimate Choice for Front-end Development?

When it comes to choosing the technology for front-end development, a host of efficient options are available in the market. But amongst these, ReactJS Frontend development has come up as the most popular and performance-oriented option. Some of the most popular websites like Netflix, Paypal, Apple to name a few use React.JS due to the flexibility and vast amount of capabilities that it offers. Businesses exploring for such capabilities should consider working with a ReactJS App development Company or they can go for ReactJS developers who work as freelancers.
A Bit about ReactJS
ReactJS is a flexible open-source library of JavaScript for building interactive user interfaces for web applications. Rendering happens on the server-side for ReactJS. This library is managed by Facebook and the community of developers. It facilitates the ReactJS developers to create UI components that are reusable. With the help of these reusable components, data in the application can be displayed without the need of reloading the page, for example, count of likes, dislikes can be reflected instantaneously without the need of refreshing the page. This feature facilitates the ReactJS Developers to build complex new-age interfaces and scalable web applications.
Why ReactJS is Widely Used for Frontend Development?
Performance-centric and efficient: ReactJS is one of those frontend technologies which facilitate performance-based development. ReactJS provides server-side rendering and a virtual DOM program that facilitates fast, reliable, and robust performance. Also, the apps built in ReactJS are quite easier to maintain and update. DOM operations which are costly are avoided by ReactJS thereby making these operations efficient. One other factor that contributes to its efficiency is the JSX syntax that makes the process of writing components for websites much easier.
Outstanding Agility: ReactJS can make use of virtual DOM to make changes at the top layer without being worried about the crashing of the application. It is based on the concept of components that enables seamless functioning with other libraries and frameworks too.
Faster Development: ReactJS web apps can be developed at a faster rate due to various reasons.
Debugging process in ReactJS Development is very fast, thereby speeding up the process to build the app.
The component-based or Modular approach helps to focus on building individual components and then combining them to build the entire application.
ReactJS package is small and hence can be quickly downloaded and installed.
Code-splitting feature helps to load only the features which are required currently by the user thereby improving the loading time of web application.
Reusable components save the efforts of developing everything from scratch.
Captivating UI: This library accords the power of creating complicated yet attractive user interfaces to frontend web developers. Declarative components in ReactJS imparts a modern-day look and feel to the UI.
Customization: ReactJS uses JSX syntax which is an optional extension that allows writing of requisite components as per the specific requirements of the clients or end-users. These components accept HTML quoting and allow the ReactJS developers to render the subcomponents with ease.
High Stability: ReactJS uses a downward data flow making it a more stable framework. When any changes are made in the child structure, the parent structure is not affected. So when the developers want to make any modifications in an object, they can modify the state, make the changes and only then update it. This procedure makes the code and the apps stable.
Vibrant Community to Support: React.JS is blessed by the support of a powerful community of Facebook experts as well as other developers from all corners of the world. They often contribute to make it a better frontend technology. They deliver free-tutorials, blogs, articles, etc. to enrich it and provide crucial guidance to anyone facing technical issues while development.
Easy to Learn: It has an easy learning curve as compared to other libraries like Vue, Angular, etc. Anyone with basic knowledge of JavaScript can learn all the ins and out of React.JS with ease. So even new learners can start working on it.
SEO-friendly: SEO has become a crucial component in today’s era of online marketing. ReactJS supports this as it ensures faster rendering speeds and high responsiveness in the apps. This increases their chance of ranking higher in the search engines making it an SEO-friendly framework.
Conclusion:
We hope this article has helped you gain important insights into why React.JS is a great library for frontend development. Owing to its enormous potential, React.JS has earned a significant place in the software world. Some Tech Leaders also claim that it has an extremely bright future. With this, we come to the end.
Are you looking for developing high-performing scalable ReactJS Apps for your business? Get in touch with Biz4Solutions, a well-established ReactJS app development services in Texas. We have provided our cutting-edge frontend development services to several clients using ReactJS. Contact Now!
0 notes
Text
November 15, 2019 at 10:00PM - Front End Javascript with Vue.js Bundle (89% discount) Ashraf
Front End Javascript with Vue.js Bundle (89% discount) Hurry Offer Only Last For HoursSometime. Don't ever forget to share this post on Your Social media to be the first to tell your firends. This is not a fake stuff its real.
Take your HTML, CSS, and JavaScript skills to the next level by learning one of the hottest JavaScript frameworks available today, Vue.js! Vue.js is a fun and easy to use JavaScript framework for building user interfaces. The core of the framework is lightweight and fast, and can be used in projects of any size. In this course, you’ll build two fun, challenging projects to learn Vue.js and apply everything instantly.
Access 102 lectures & 8.5 hours of content 24/7
Build a guest list app to explore two way data binding, event handling, list & conditional rendering, & much more
Discover templates & the Virtual DOM
Create a greeting card app to get introduced to concepts like components, the Vue CLI for scaffolding projects, & much more
Install Node & NPM
ReactJS re-imagines the web user interface by breaking complex UI down into granular, reusable components, allowing you to build compact, robust, and reactive user interfaces more easily. In this example-driven course, you’ll use included source code to analyze specific React use-cases, mastering how to use many component parts to complete complex interfacing problems.
Access 73 lectures & 7.5 hours of content 24/7
Install & set up a basic development web server w/ React, JSX for HTML specification, & the Babel compiler
Understand React nodes, fragments, & components
Carry out performance optimizations using the virtual DOM
Discover the React component lifecycle
Update & unmount phases
Explore ES6 classes to specify React components
Angular has seen a number of iterations and improvements over the years, and this course condenses all of the many design patterns of Angular applications into one simple course. Through this course, you’ll look at everything from the Angular CLI to the inner workings of Angular. You’ll even create projects involving Firebase and other exciting technologies.
Access 73 lectures & 4 hours of content 24/7
Set up your first Angular project w/ the Angular CLI
Learn about feature modules & core modules
Understand the building blocks of Angular
Make conditional changes to the DOM
Use @ViewChild & @ContentChild to access child component data
Make use of built-in Angular pipes & create your own
Style your applications w/ Google’s Material Design
JavaScript is one of the most in-demand programming languages today because it is built into and runs in all major internet browsers. It’s the most common language used in web development. If you have any aspirations towards being a web developer, you need to learn JavaScript, and this is the perfect course to send you on your way.
Access 44 lectures & 5 hours of content 24/7
Add features & interactivity to websites
Build large full stack applications using JavaScript
Create entire games using a single programming language
Use mini projects to gauge your learning
from Active Sales – SharewareOnSale https://ift.tt/2zX74U5 https://ift.tt/eA8V8J via Blogger https://ift.tt/2XissR3 #blogger #bloggingtips #bloggerlife #bloggersgetsocial #ontheblog #writersofinstagram #writingprompt #instapoetry #writerscommunity #writersofig #writersblock #writerlife #writtenword #instawriters #spilledink #wordgasm #creativewriting #poetsofinstagram #blackoutpoetry #poetsofig
0 notes
Text
Vue.js Tutorial From Scratch - e08 - Custom Events Passing Data from Child to Parent Component - VueJs
Vue.js Tutorial From Scratch – e08 – Custom Events Passing Data from Child to Parent Component – VueJs
Vue.js Tutorial From Scratch – e08 – Custom Events Passing Data from Child to Parent Component – VueJs
[ad_1]
Now that we have a nice modern npm and webpack build, let’s tackle getting our components to communicate. In Vue, this is done using custom events. We can emit an event on our child component and then listen for that event on our parent event. Follow along as we code a simple example from…
View On WordPress
#laravel computed property#laravel mix#laravel vue tutorial#Learn Vue#Learn Vuejs#passing data to parent component vue#vue#Vue 2019#vue course#vue emit to parent component#vue for beginners#vue framework#vue js frontend laravel backend#vue methods#vue npm#vue passing data between components#vue tutorial#vue webpack#Vue.js#vue.js tutorial 2019#Vuejs#vuejs course#vuejs tutorial#web development#web development framework#webpack crash course
0 notes
Photo

This week's JavaScript news, issue 363
This week's JavaScript news — Read this e-mail on the Web
JavaScript Weekly
Issue 363 — December 1, 2017
An Introduction to Speculative Optimization in V8
A low-level look at what V8’s Turbofan optimizing compiler does behind the scenes to get your code running faster.
Benedikt Meurer
JS Performance Optimization Tips: An Overview
From environments, response times, context, parsing, compiling and executing, to bundle sizes and shipping less code.
Ivan Čurić
Kyle Simpson's JavaScript courses — 🔥 Free This Weekend Only
Upgrade your skills this weekend with Kyle Simpson's JavaScript courses: Deep JS Foundations, ES6: The Right Parts, Functional-Lite, and more. 🚀 Don't delay — courses are only free through Monday.
Frontend Masters Sponsor
Vuetron: A Vue and Vuex Testing and Debugging App
Built with Electron, Vuetron is a Vue-oriented debugger that lets you navigate between states, monitor state changes and API requests, etc.
vuetron
What is ReasonML?
Looking for something to do this weekend? Consider noodling with ReasonML, an OCaml-inspired language that compiles to JS. Dr. Axel has a getting started post, and Keira Hodgkinson has a great 25 minute introduction video.
Dr. Axel Rauschmayer
Getting Started with Aurelia [video]
A practical 30 minute introduction to Aurelia, a popular modular frontend framework that integrates with Web Components.
YouTube
The Modern JavaScript Tutorial
A well-presented guide covering most of JavaScript in detail. A handy refresher.
Ilya Kantor
I Slipped on JavaScript's Banana Peel
A standards-themed tale of what can happen if you spend a lot of time working with the details of the ECMAScript spec.
Mike Pennisi
Jobs
craigslist seeks JavaScript Developers (San Francisco, CA)CL seeks JS developers to join our small (~50) team. Come help us save the world, or at least our corner of the Internet. craigslist
Software Engineer – Web Clients, ReactJS+ReduxJoin a growing engineering team that builds highly performant video apps across Web, iOS, Android, FireTV, Roku, tvOS, Xbox and more! Discovery Digital Media
Looking for a Job at a Company That Prioritizes JavaScript?Try Vettery and we’ll connect you directly with thousands of companies looking for talented front-end devs. Vettery
In Brief
Building a Simple Regex Engine in Under 40 Lines of Code tutorial Nick Drane
An Introduction to ES6 Template Literals tutorial Sarah Chima
Scaffolding a GraphQL API Server with Node tutorial node Tom Lagier
The Practicalities of Contributing to ECMAScript tutorial Want to work on the standard? Here are the processes involved. TC39
A Story of pgrading An Angular App From 1.6 to Angular 4 tutorial Abou Kone
Implementing the Sieve of Eratosthenes in JavaScript tutorial Ben McCormick
Using Nested Child Routes in a Vue App tutorial Nic Raboy
Building a Voice-Activated Movie Search App Powered by Amazon Lex, Lambda, and MongoDB Atlas (Part 1) tutorial mongodb Sponsor
What Types of Project Aurelia Works Well For opinion Sean Hunter
React Food Truck: A Curated Set of VS Code Extensions tools Several useful React extensions together in a single bundle. Burke Holland
Sencha Ext JS: Build an App, Not a Framework tools With Ext JS you only have to develop your app once for multiple platforms and devices, try it free. Sencha, Inc. Sponsor
Rapid.js: An ORM-Like Interface and Router for Outgoing API Requests code Create chainable API wrappers by defining models and routes.
Lite Editor: A Modern WYSIWYG Editor Focusing on Inline Elements code appleple
Literally Canvas: An HTML5-Based Drawing Widget code
Telemachy: Easy 'Guided Tours' for Angular Apps code Code Orange
Superstruct: A Simple, Composable Way to Validate Data code Designed for validating data at runtime with a type annotation API inspired by TypeScript and Flow. Ian Storm Taylor
Wijmo Typescript UI Controls Support Angular 5. No Dependencies. code Wijmo’s UI components include Angular v5 support, full IntelliSense, and the best JS grid available. GrapeCity Wijmo Sponsor
Curated by Peter Cooper and published by Cooperpress.
Like this? You may also enjoy: FrontEnd Focus : Node Weekly : React Status
Stop getting JavaScript Weekly : Change email address : Read this issue on the Web
© Cooperpress Ltd. Fairfield Enterprise Centre, Lincoln Way, Louth, LN11 0LS, UK
by via JavaScript Weekly http://ift.tt/2AzfLbx
0 notes
Text
Choosing the Best Umbrella Stroller – A Parents’ Guide
Strollers are a portion of the basics most guardians spend too much in as they make moving around with youngsters a great deal simpler. This is especially valid on the off chance that you need to group different children on a day out. A stroller will make some of them more reasonable, giving you a chance to guarantee that the smallest ones are well inside your range and will be effortlessly trucked around without expending the vast majority of your vitality conveying them.
Be that as it may, strollers aren't really the most object free things there is. As they're stacked with huge amounts of incredible elements, they're scarcely ever minimized or lightweight. This can be a noteworthy bother for some as dragging a 30-lb stroller can be an agony to get in the auto or convey up to a third-floor condo while overseeing little children in the meantime.
This is the reason the best umbrella strollers are additionally prominent choices for a ton of guardians these days. Their light weight and sturdiness make them superb choices for guardians of school-age children and babies. In case you're occupied with inspiring one to make your excursions to the recreation center and errand-running days less difficult, look at our top picks for the choicest items that you can go for.
Buying Guide: How to Find the Best Umbrella Strollers to Match Your Needs
Picking any item that your kid will utilize ought to completely be finished with awesome care and thought. You wouldn't have any desire to put your valuable one in any threat, it's imperative that you know as much as you can with regards to the items you're getting for them. This is especially valid for umbrella strollers as your little one will really get on it.
So how would you pick the best umbrella stroller for your tyke? Here are a couple of our genius tips.
What Your Kid’s Umbrella Stroller Should Absolutely Have
Security Features
Any parent will have their child's security as their top need. While umbrella strollers don't have the same correct wellbeing highlights as consistent strollers, you can at present anticipate that it will offer security for your youngster. A couple components that will ensure your child's sheltered ride include:
Five-point Harness
A 5-point tackle is considered by numerous specialists as an extremely safe choice with regards to controlling children from taking off their seats if there should arise an occurrence of a crash. A legitimately fixed saddle will convey the constrain of effect on the most grounded bones of the body, limiting the harm on your youngster's body. This works for auto seats, so is there any valid reason why it wouldn't be a decent choice for strollers, isn't that so?
Secure Buckles
Vigorous children are constantly high-hazard stroller riders, so you'll need to search for units with secure clasps that won't effortlessly unsnap if your youngster fiddles with them.
Steadiness
In view of its lighter outline, some umbrella strollers may have dependability issues, so be exceptionally recognizing with regards to this element. It ought to have a decent weight adjust and shouldn't tip over toward any path. Having a wide base is likewise a decent assurance that your stroller will remain upright regardless of what position your youngster accept inside the stroller.
Great and Easy to Activate Brakes
Ensure that the brakes are anything but difficult to lock in. There are times that controlling a stroller can be very troublesome and these occasions can quickly be hazardous. This is the reason your unit's brakes ought to be grippy and simple to initiate so you can rapidly keep setbacks from occurring before anything awful happens.
Comfort
Umbrella strollers won't be as agreeable as full-sized strollers yet you can at present discover extraordinary units that will in any case offer a decent ride for your tyke. To guarantee such, these are a couple comfort highlights you ought to search for:
Leaning back Seat
On the off chance that your little one jumps at the chance to rest even while you're all over the place, a leaning back seat can be a flat out must. This will enable them to get more agreeable and get a more strong snooze.
Wide-extend Canopy
Giving your tyke some shade and security can likewise enable them to rest all the more effortlessly even while you're all over the place. Distinctive umbrella strollers have different shelter plans so you ought to be specific about which one to get for your kid. Go for something that gives them plentiful covering without totally shutting out ventilation and view.
Comfort
While guardians will give up everything for their children, regardless you ought to search for some helpful elements in your umbrella stroller. Along these lines, you won't need to get worked up about it and forget about your youngster all the while. A couple of essential helpful elements you ought to be watchful for are:
Simple Folding Mechanism
In the event that you can crease the stroller with only a solitary hand, it will be the best.
Minimal Size
Umbrella strollers are really intended to be not massive so you can utilize and move them without hardly lifting a finger. Notwithstanding, unique plans may in any case make them be measured in an unexpected way, so you might need to search for something conservative. This will ensure that it will be simpler to store and bear.
Mobility
In the event that your umbrella stroller is difficult to move about, forget about it. The significant contrast between a full-sized stroller and this lighter assortment is the way that the last ought to be a considerable measure less demanding to move. In the event that it obliges you to start to sweat to push your kid around, search for something else.
1. Baby Jogger Vue Lite Stroller

2. Cosco Character Umbrella Stroller

3. UPPAbaby G-Lite

4. Inglesina USA Net Stroller

5. Summer Infant 3D Lite Stroller

6. Mountain Buggy Nano Stroller

7. UPPAbaby G-LUXE Stroller

8. Gb Pockit Stroller

9. JOOVY New Groove Ultralight Umbrella Stroller

10. RECARO Easylife Ultra-lightweight Stroller

How We Choose the Best Umbrella Strollers in this List
Since you have a smart thought which items are strong choices for umbrella strollers, you may at present be asking why you ought to take our recommendation and give these things a shot. So are these things truly worth putting resources into? Completely.
With our broad research, we've established that these things are a portion of the best alternatives today due to their:
High appraisals
How might you know whether an item is great? Look at its audits. Loads of guardians are exceptionally vocal with regards to child equip, so there are huge amounts of data that is effectively accessible for purchasers on the web. As these criticisms are from genuine clients, they can ensure exactness and significance to what we were searching for, ensuring that our picks are unquestionably among the best choices in the market today.
An incredible arrangement of elements
A decent child outfit requires a particular arrangement of components, so we were additionally extremely specific about what every item advertised. On the off chance that it was missing something fundamental, it's out of the rundown.
Astonishing an incentive for the cash
With regards to most things, you have a tendency to get what you pay for. You ought to never subject your little one to, for example, their wellbeing can be effectively bargained. So we searched for incredible items with a similarly decent valuing so you can make sure that you're getting more than your cash's worth regardless of the possibility that you need to pay a premium.
Conclusion
With such a large number of incredible alternatives for the best umbrella strollers, we trust we've given you various phenomenal options that will make your inquiry less demanding. Obviously, our ten picks are only a couple of choices accessible today and you may even now discover loads of other fabulous alternatives out there. Be that as it may, these can be a couple of snappy choices you can rapidly swing to and are ensured to be astonishing, so don't dither to give them a shot.
0 notes
Link
CSS-Tricks http://j.mp/2keKqBU
This is the fourth part in a five-part series about the JavaScript framework, Vue.js. In this part, we'll cover Vuex for state management. This is not intended to be a complete guide, but rather an overview of the basics to get you up and running so you can get to know Vue.js and understand what the framework has to offer.
Article Series:
Rendering, Directives, and Events
Components, Props, and Slots
Vue-cli
Vuex (You are here!)
Animations
Vuex
If you missed the last few sections on components and Vue-cli, you might want to go review those before reading on. Now that we know the very basics about how components and passing state and props around, let's talk about Vuex. It's a useful tool for state management.
Previously, we've passed state from a top level component down, and siblings did not share data. If they needed to talk to each other, we'd have to push the state up in the application. This works! But once your application reaches a certain complexity, this no longer makes sense to do. If you've worked with Redux before, all of these concepts and the implementation will be familiar to you. Vuex is basically Vue's version of Redux. In fact, Redux will work with Vue as well, but with Vuex, you have the benefit of using a tool designed to work specifically with your framework.
First, we’ll install Vuex:
npm install vuex
or
yarn add vuex
I set it up this way: within my `/src` directory, I create another directory named store (this is a preference, you could also just create a `store.js` file in that same directory), and a file named `store.js`. The initial set up in `store.js` would look something like this (vstore sublime snippet):
import Vue from 'vue'; import Vuex from 'vuex'; Vue.use(Vuex); export const store = new Vuex.Store({ state: { key: value } });
key: value is a placeholder for any kind of state data. In other examples we've used counter: 0.
In our `main.js` file, we'd perform the following updates (updated lines highlighted):
import Vue from 'vue'; import App from './App.vue'; import { store } from './store/store'; new Vue({ el: '#app', store: store, template: '<App/>', components: { App } });
After we get it set up, we can place our data() in the file as the state as we've previously done with components, and then we'll either use this state or update it with the following three means:
Getters will make values able to show statically in our templates. In other words, getters can read the value, but not mutate the state.
Mutations will allow us to update the state, but they will always be synchronous. Mutations are the only way to change data in the state in the store.
Actions will allow us to update the state, asynchronously, but will use an existing mutation. This can be very helpful if you need to perform a few different mutations at once in a particular order.
Sometimes it's difficult to understand why you might work with asynchronous state changes if you haven't before, so let's first go over how that would happen in the abstract and then dive into something real in the next section. Let's say you're Tumblr. You have a ton of heavy gifs on a page that doesn't end for a long time. You only want to load a certain amount at a time, say 20, until the user gets 200px away from the bottom of the original page.
You could have a mutation that displays the next 20. But you don't have the next 20 yet, nor do you know when you hit the bottom of the page. So, in the app itself, you create an event that listens to the scroll position and you trigger an action.
The action then retrieves the URLs from the database for the next 20 images, and wraps the mutation, which adds the 20 images to the state and displays them.
Actions, in essence, create a framework for requesting data. They give you a consistent way to apply the data in an asynchronous manner.
Most Basic Abstract Example
In the example below, we're showing the most basic implementation of each, so you get a sense of the setup and how it would work. Payload is an optional parameter. You can define the amount you are updating the component by. Don't worry, we'll use an actual demo in a moment, it's just important to get the base concepts first.
In `store.js`:
export const store = new Vuex.Store({ state: { counter: 0 }, //showing things, not mutating state getters: { tripleCounter: state => { return state.counter * 3; } }, //mutating the state //mutations are always synchronous mutations: { //showing passed with payload, represented as num increment: (state, num) => { state.counter += num; } }, //commits the mutation, it's asynchronous actions: { // showing passed with payload, represented as asynchNum (an object) asyncDecrement: ({ commit }, asyncNum) => { setTimeout(() => { //the asyncNum objects could also just be static amounts commit('decrement', asyncNum.by); }, asyncNum.duration); } } });
A really nice feature here is we can return the entire state object in the mutations, but we don't have to, we can just use what we need. Time travel debugging (walking through the mutations to find errors) will still work either way.
On the component itself, we would use computed for getters (this makes sense because the value is already computed for us), and methods with dispatch to access the mutations and actions:
In `app.vue`:
computed: { value() { return this.$store.getters.value; } }, methods: { increment() { this.$store.dispatch('increment', 2) } }
Or, you can use a spread operator. I find this useful when you have to work with a lot of mutations/actions:
export default { // ... methods: { ...mapActions([ 'increment', // map this.increment() to this.$store.commit('increment') 'decrement', 'asyncIncrement' ]) } }
Simple Real Example
Let's look at the Weather Notifier App again, with a very small and simple amount of state in the Vuex store. Here's the repo.
See the Pen Vue Weather Notifier by Sarah Drasner (@sdras) on CodePen.
In `store.js`:
import Vue from 'vue'; import Vuex from 'vuex'; Vue.use(Vuex); export const store = new Vuex.Store({ state: { showWeather: false, template: 0 }, mutations: { toggle: state => state.showWeather = !state.showWeather, updateTemplate: (state) => { state.showWeather = !state.showWeather; state.template = (state.template + 1) % 4; } } });
Here, we're setting the state of showWeather, this is set to false at first because we don't want any of the animations firing right away, not until the user hits the phone button. In mutations, we've set up a toggle for the state of showWeather.
We're also setting the template to 0 in the state. We'll use this number to cycle through each of the weather components one by one. So in mutations, we've created a method called updateTemplate. This both toggles the state of showWeather, and updates the template to the next number, but it will wrap around to zero when it hits the number 4.
In App.vue:
<template> <div id="app"> ... <g id="phonebutton" @click="updateTemplate" v-if="!showWeather"> ... </g> <transition @leave="leaveDroparea" :css="false"> <g v-if="showWeather"> <app-droparea v-if="template === 1"></app-droparea> <app-windarea v-else-if="template === 2"></app-windarea> <app-rainbowarea v-else-if="template === 3"></app-rainbowarea> <app-tornadoarea v-else></app-tornadoarea> </g> </transition> ... </div> </template>
<script> import Dialog from './components/Dialog.vue'; ... export default { computed: { showWeather() { return this.$store.state.showWeather; }, template() { return this.$store.state.template; } }, methods: { updateTemplate() { this.$store.commit('updateTemplate'); } }, ... components: { appDialog: Dialog, ... } } </script>
In `dialog.vue`:
<script> export default { computed: { template() { return this.$store.state.template; } }, methods: { toggle() { this.$store.commit('toggle'); } }, mounted () { //enter weather const tl = new TimelineMax(); ... } } </script>
In the code above, App uses showWeather to advance the template, while Dialog merely toggles the component visibility. You can also see that in App.vue, we are showing and hiding different child components based on the value of template in the App <template> with that snazzy conditional rendering we learned in the first article. In App, we're both listening to the changes of state in store with the computed values, and using toggle() and updateTemplate() in the methods to commit to the store's mutations.
This is a basic example, but you can see how with a complex app with tons of state, it would be helpful to manage the state all in one place, rather than moving it up and down our components. Particularly when siblings need to talk to siblings.
If you're interested in digging into Vuex deeper, there are great docs here. You might have noticed that we used some <transition> components in this last demo, as well as lot of animations. Let's talk about that next!
Article Series:
Rendering, Directives, and Events
Components, Props, and Slots
Vue-cli
Vuex (You are here!)
Animations
Intro to Vue.js: Vuex is a post from CSS-Tricks
http://j.mp/2kuLNuS via CSS-Tricks URL : http://j.mp/2bNbLYg
0 notes
Text
Intro to Vue.js: Components, Props, and Slots
This is the second part in a five-part series about the JavaScript framework, Vue.js. In this part, we'll go over Components, Props, and Slots. This is not intended to be a complete guide, but rather an overview of the basics to get you up and running so you can get to know Vue.js and understand what the framework has to offer.
Article Series:
Rendering, Directives, and Events
Components, Props, and Slots (You are here!)
Vue-cli (Coming soon!)
Vuex (Coming soon!)
Animations (Coming soon!)
Components and Passing Data
If you're familiar with React or Angular2, the idea of components and passing state won't be new to you. In case you're not, let's go through some of the main concepts.
Websites large and small are usually composed of different pieces, and abstracting them into smaller pieces makes them easy to structure, reason about, reuse, and makes our code more legible. Instead of digging through all of the markup in long, multi-faceted page, we could comprise it of components like this:
<header></header> <aside> <sidebar-item v-for="item in items"></sidebar-item> </aside> <main> <blogpost v-for="post in posts"></blogpost> </main> <footer></footer>
This is a simplified example, but you can see how useful this type of composition can be as you start to build out the structure of your site. If you were to dive into this code as a maintainer, it wouldn’t take much to understand how the application is structured or where to look for each piece.
Vue lets us create components in a few different ways. Let’s work from simple to complex, keeping in mind that the complex example is truest to form for what an average Vue application would look like.
app.$mount('#app'); var app = new Vue({ el: 'hello', template: '<h1>Hello World!</h1>' });
This works, but isn’t terribly useful as it can only be used once and we’re not yet passing the information to different components. One way to pass data from a parent to a child is called props.
This is as simple an example as I could make, so that it's super clear. Remember that the :text in the HTML is a shortcut for Vue binding. We covered this last time in the section on directives. Binding can be used for all kinds of things but in this instance, it keeps us from having to place the state in a mustache template, like this .
In the code below, Vue.component is the component, and new Vue is called the instance. You can have more than one instance in an applicatio. Typically, we'll have one instance and several components, as the instance is the main app.
Vue.component('child', { props: ['text'], template: `<div><div>` }); new Vue({ el: "#app", data() { return { message: 'hello mr. magoo' } } });
<div id="app"> <child :text="message"></child> </div>
See the Pen.
Now we can reuse this component as many times as we like through our application:
<div id="app"> <child :text="message"></child> <child :text="message"></child> </div>
See the Pen.
We can also add validation to our props, which is similar to PropTypes in React. This is nice because it's self-documenting, and will return an error if it's not what we expected, but only in development mode:
Vue.component('child', { props: { text: { type: String, required: true } }, template: `<div><div>` });
In the example below, I'm loading Vue in development mode, and purposefully passing an invalid type into our prop validation. You can see the error in the console. (It also helpful lets you know you can use Vue's devtools and where to find them).
Vue.component('child', { props: { text: { type: Boolean, required: true } }, template: `<div><div>` });
See the Pen simple props with validation by Sarah Drasner (@sdras) on CodePen.
Objects should be returned as a factory function and you can even pass as a custom validator function, which is really nice because you can check values against business, input, or other logic. There's a nice write-up of how you'd use each type in the guide here.
You don't need to necessarily pass the data in props to the child, either, you have the option of using state or a static value as you see fit:
Vue.component('child', { props: { count: { type: Number, required: true } }, template: `<div class="num"></div>` }) new Vue({ el: '#app', data() { return { count: 0 } }, methods: { increment() { this.count++; }, decrement() { this.count--; } } })
<div id="app"> <h3> <button @click="increment">+</button> Adjust the state <button @click="decrement">-</button> </h3> <h2>This is the app state: <span class="num"></span></h2> <hr> <h4><child count="1"></child></h4> <p>This is a child counter that is using a static integer as props</p> <hr> <h4><child :count="count"></child></h4> <p>This is the same child counter and it is using the state as props</p> </div>
See the Pen child component using and not using props by Sarah Drasner (@sdras) on CodePen.
The difference is whether or not you’re passing a property and binding it:
Not using the state <child count="1"></child>
vs
Using the state <child :count="count"></child>
Up until now, we've been creating content in our child component with a string, and of course if you’re using babel so that you can process ES6 in all browsers (which I highly suggest), you could use a template literal to avoid potentially hard-to-read string concatenation:
Vue.component('individual-comment', { template: `<li> </li>`, props: ['commentpost'] }); new Vue({ el: '#app', data: { newComment: '', comments: [ 'Looks great Julianne!', 'I love the sea', 'Where are you at?' ] }, methods: { addComment: function () { this.comments.push(this.newComment) this.newComment = '' } } });
<ul> <li is="individual-comment" v-for="comment in comments" v-bind:commentpost="comment" ></li> </ul> <input v-model="newComment" v-on:keyup.enter="addComment" placeholder="Add a comment" >
See the Pen cd81de1463229a9612dca7559dd666e0 by Sarah Drasner (@sdras) on CodePen.
This is a little more useful, but there's still a limit to how much content we probably want to put in that string, even with the help of template literals. Eventually in this comment form we'd want to have photos and the names of the authors, and you can already probably guess how crowded it would get with all that information. We also won't have any useful syntax highlighting within that string.
With all those things in mind, let’s create a template. We'll wrap some regular HTML in special script tags and use an id to reference it to create a component. You can see that this is a lot more legible when we have a lot of text and elements:
<!-- This is the Individual Comment Component --> <script type="text/x-template" id="comment-template"> <li> <img class="post-img" :src="commentpost.authorImg" /> <small></small> <p class="post-comment">""</p> </li> </script>
Vue.component('individual-comment', { template: '#comment-template', props: ['commentpost'] });
See the Pen Photo App post with Vue.js by Sarah Drasner (@sdras) on CodePen.
Slots
This is a lot better. But what happens when we have two components with slight variations, either content or style deviations? We could pass all the different content and styles down into the component with props, and switch everything out each time, or we could fork the components themselves and create different versions of them. But it would be really nice if we could reuse the components, and populate them with the same data or functionality. This is where slots come in really handy.
Let's say we have a main app instance using the same <app-child> component twice. Inside each child we want some of the same content, and some different content. For the content we want to stay consistent, we would use a standard p tag, and for the content we want to switch out, we'll put an empty <slot></slot> tag.
<script type="text/x-template" id="childarea"> <div class="child"> <slot></slot> <p>It's a veritable slot machine!<br> Ha ha aw</p> </div> </script>
Then, in the app instance, we can pass content inside the <app-child> component tags and it will automatically fill up the slots:
<div id="app"> <h2>We can use slots to populate content</h2> <app-child> <h3>This is slot number one</h3> </app-child> <app-child> <h3>This is slot number two</h3> <small>I can put more info in, too!</small> </app-child> </div>
See the Pen.
Alternatively, we can have particular styles assigned for different components, and keep all of the content inside the same, therefore quickly and easily changing out the appearance of something. In the wine label maker below, one of the buttons will toggle the component and color based on what the user selects, and the background of the bottle and label and text will all switch, while keeping the content within stable.
const app = new Vue({ ... components: { 'appBlack': { template: '#black' } } });
Main Vue App HTML:
<component :is="selected"> ... <path class="label" d="M12,295.9s56.5,5,137.6,0V409S78.1,423.6,12,409Z" transform="translate(-12 -13.8)" :style="{ fill: labelColor }"/> ... </component> <h4>Color</h4> <button @click="selected ='appBlack', labelColor = '#000000'">Black Label</button> <button @click="selected ='appWhite', labelColor = '#ffffff'">White Label</button> <input type="color" v-model="labelColor" defaultValue="#ff0000">
White Component HTML:
<script type="text/x-template" id="white"> <div class="white"> <slot></slot> </div> </script>
(This is a larger demo, so it might make more sense if you play with it in a separate window/tab)
See the Pen.
Now, we're putting all of the SVG image data in the main app, but it's actually placed inside the <slot> in each component. This allows us to switch out pieces of content, or style things differently based on the usage, which is a really nice feature. You can see that we've allowed the user to decide which component they'll be using by creating a button that changes the "selected" value of the component.
Right now we have everything in one slot but we could also use multiple slots, and differentiate them through naming if we'd like:
<!-- main vue app instance --> <app-comment> <p slot="comment"></p> </app-comment> <!-- individual component --> <script type="text/x-template" id="comment-template"> <div> <slot name="comment"></slot> </div> </script>
We can switch between different components with the same referenced slots easily, but what happens when we want to be able to switch back and forth, but hold on to the individual state of each component? Currently, when we switch between black and white the templates switch out and the content stays the same. But maybe we have a situation where we want the black label to be completely different than the white label. There's a special component you can wrap it in called <keep-alive></keep-alive> that will retain the state as you switch.
Check out this deviation of the example above- create a black label, and then a different white label, and switch between them. You will see that the state of each is preserved, and are different from one another:
<keep-alive> <component :is="selected"> ... </component> </keep-alive>
See the Pen Vue Wine Label Maker- with keep-alive by Sarah Drasner (@sdras) on CodePen.
I love this feature of the API.
This is all nice, but for simplicity’s sake, we've been sticking everything in one or two files. It would be much better organized while we build out our site if we could separate the components out into different files, and import them as we need them, and truly that's how real development in Vue is typically done, so let's run through that next. Tune in for the next part when we talk about Vue-cli, build processes, and Vuex for state management!
Article Series:
Rendering, Directives, and Events
Components, Props, and Slots (You are here!)
Vue-cli (Coming soon!)
Vuex (Coming soon!)
Animations (Coming soon!)
Intro to Vue.js: Components, Props, and Slots is a post from CSS-Tricks
via CSS-Tricks http://ift.tt/2kmKnVd
0 notes
Text
VueJS: First Impressions
With all the new libraries and frameworks it is pretty hard to keep up with all of them, and that is if you can even decide which ones are worth spending time one, over the last year or so I was exposed to many a new tech stack, with React for work and just personally playing around with React-Native, Aurelia and Angular2. Each of them attached to a new project, partly justified by wanting to try it out or form my own opinion. Previously I had written about Aurelia, which I was very impressed with after than Angular 2 disaster, if you like, you can read more about it here: Aurelia: First impressions This time round I decided to dive into Vue.JS, a lot of good things are being said about it on the web, with it apparently being faster than react, with it’s implementation of Snabbdom, a simple and powerful Virtual DOM focused on performance. On top of that is is notably smaller than React sitting around 14kb. Of all the frameworks and libraries I have worked with over the years, one thing that stood out to me about Vue.JS was the documentation, very detailed and easy to follow, covering multiple use cases and all the various options, where applicable, for each of it’s built in methods. Now for a look at the code, the following example is for a very simple component, written in absolute bare-bones, just for you to get an idea of how things are structured.. https://medium.com/media/beff81343c8901397809efa413b5ccb9/href Vue.JS uses a template file containing both you template body and a script section, and these files are saved with a .vue extension. Vue.JS itself is completely template agnostic, you can use handlebar/directive template as above, you can also use JSX, or even build it up very manually using es5 or es6 string interpolation if you prefer. This file pretty much handles it all, you will define the HTML structure as well as relevant scripting logic, and either define a <style> block or import a style sheet like in the example. The scrip tag is where all the real work begins, we start by importing Vue and whatever components we intend on using within the component. name: 'Events', components: 'header-bar': Header, 'search-bar': Search, 'list-data': List, 'footer-bar': Footer, , Above we have a snippet from the default export object, we start with the components name, followed by a components object. This object defines a key which is the tag name for the HTML element within our template with its value being the component we imported a little further up. Next we have some of our methods to control initial logic and define usable functions. data() return data: [], searchTerm: , , The data() function is used to setup default data for initial rendering of the component, here the data key is setting itself as an empty array as later when we fetch the data it will become and array of objects, and we do not want to break the render by defaulting with invalid data types. created() // API/Service calls would go here return data: [ , ], ;, created() is similar to reacts componentDidMount life cycle method, this is the best place within the life of the component to go fetch any data that is not available on initiation of the component, in this case to go fetch the actual list items. methods: search() // Search method written here , methods() is where you define functions that will be used within the component itself, or passed down to a child component as props, as is the case with search(), the child Search component will receive this method via the props, and this will then be fired off when a user interacts with the search component. One thing that was not specifically included in the example but was was referenced was props, like react and probably many other libraries at this stage, Vue.JS also supports props, and like react they can be anything that a child component needs, be it static text, a function, and array of data needing to be looped over, or an object with key value pairs for simple dynamic display. Props are quite simple to define, within the default export you would add another key, called ‘props’ with an array of all the props it is expecting to receive. https://medium.com/media/a2ea9a8bddf8cd791185f447c20b0695/href Above would then be an example of the search component, as you can see it is taking in 2 props, the submit method and term, which is a model for handling the search value that will be passed into the function. This was just a taste of what is possible with Vue.JS, you will see many more examples by visiting their documentation at Vue.JS docs.If you wish to quickly spin up an application and start playing around with Vue.JS, I can suggest taking a look at the Yeoman generator created by FountainJS. Working with Vue.JS was a great pleasure, I found the learning curve very shallow, however that could purely be based on my experience, as mentioned before I have worked with a few in the past. The default template structure feels very similar to how it was working with Angular, so developers coming from that background may pick it up a bit faster than they would react. I cannot really go un-learn react to see if it influences how easy it was to pick up Vue.JS. Full Article
via Reme Le Hane
0 notes
Text
October 21, 2019 at 10:00PM - Front End Javascript with Vue.js Bundle (89% discount) Ashraf
Front End Javascript with Vue.js Bundle (89% discount) Hurry Offer Only Last For HoursSometime. Don't ever forget to share this post on Your Social media to be the first to tell your firends. This is not a fake stuff its real.
Take your HTML, CSS, and JavaScript skills to the next level by learning one of the hottest JavaScript frameworks available today, Vue.js! Vue.js is a fun and easy to use JavaScript framework for building user interfaces. The core of the framework is lightweight and fast, and can be used in projects of any size. In this course, you’ll build two fun, challenging projects to learn Vue.js and apply everything instantly.
Access 102 lectures & 8.5 hours of content 24/7
Build a guest list app to explore two way data binding, event handling, list & conditional rendering, & much more
Discover templates & the Virtual DOM
Create a greeting card app to get introduced to concepts like components, the Vue CLI for scaffolding projects, & much more
Install Node & NPM
ReactJS re-imagines the web user interface by breaking complex UI down into granular, reusable components, allowing you to build compact, robust, and reactive user interfaces more easily. In this example-driven course, you’ll use included source code to analyze specific React use-cases, mastering how to use many component parts to complete complex interfacing problems.
Access 73 lectures & 7.5 hours of content 24/7
Install & set up a basic development web server w/ React, JSX for HTML specification, & the Babel compiler
Understand React nodes, fragments, & components
Carry out performance optimizations using the virtual DOM
Discover the React component lifecycle
Update & unmount phases
Explore ES6 classes to specify React components
Angular has seen a number of iterations and improvements over the years, and this course condenses all of the many design patterns of Angular applications into one simple course. Through this course, you’ll look at everything from the Angular CLI to the inner workings of Angular. You’ll even create projects involving Firebase and other exciting technologies.
Access 73 lectures & 4 hours of content 24/7
Set up your first Angular project w/ the Angular CLI
Learn about feature modules & core modules
Understand the building blocks of Angular
Make conditional changes to the DOM
Use @ViewChild & @ContentChild to access child component data
Make use of built-in Angular pipes & create your own
Style your applications w/ Google’s Material Design
JavaScript is one of the most in-demand programming languages today because it is built into and runs in all major internet browsers. It’s the most common language used in web development. If you have any aspirations towards being a web developer, you need to learn JavaScript, and this is the perfect course to send you on your way.
Access 44 lectures & 5 hours of content 24/7
Add features & interactivity to websites
Build large full stack applications using JavaScript
Create entire games using a single programming language
Use mini projects to gauge your learning
from Active Sales – SharewareOnSale https://ift.tt/2zX74U5 https://ift.tt/eA8V8J via Blogger https://ift.tt/31ChrdV #blogger #bloggingtips #bloggerlife #bloggersgetsocial #ontheblog #writersofinstagram #writingprompt #instapoetry #writerscommunity #writersofig #writersblock #writerlife #writtenword #instawriters #spilledink #wordgasm #creativewriting #poetsofinstagram #blackoutpoetry #poetsofig
0 notes
Text
September 16, 2019 at 10:00PM - Front End Javascript with Vue.js Bundle (89% discount) Ashraf
Front End Javascript with Vue.js Bundle (89% discount) Hurry Offer Only Last For HoursSometime. Don't ever forget to share this post on Your Social media to be the first to tell your firends. This is not a fake stuff its real.
Take your HTML, CSS, and JavaScript skills to the next level by learning one of the hottest JavaScript frameworks available today, Vue.js! Vue.js is a fun and easy to use JavaScript framework for building user interfaces. The core of the framework is lightweight and fast, and can be used in projects of any size. In this course, you’ll build two fun, challenging projects to learn Vue.js and apply everything instantly.
Access 102 lectures & 8.5 hours of content 24/7
Build a guest list app to explore two way data binding, event handling, list & conditional rendering, & much more
Discover templates & the Virtual DOM
Create a greeting card app to get introduced to concepts like components, the Vue CLI for scaffolding projects, & much more
Install Node & NPM
ReactJS re-imagines the web user interface by breaking complex UI down into granular, reusable components, allowing you to build compact, robust, and reactive user interfaces more easily. In this example-driven course, you’ll use included source code to analyze specific React use-cases, mastering how to use many component parts to complete complex interfacing problems.
Access 73 lectures & 7.5 hours of content 24/7
Install & set up a basic development web server w/ React, JSX for HTML specification, & the Babel compiler
Understand React nodes, fragments, & components
Carry out performance optimizations using the virtual DOM
Discover the React component lifecycle
Update & unmount phases
Explore ES6 classes to specify React components
Angular has seen a number of iterations and improvements over the years, and this course condenses all of the many design patterns of Angular applications into one simple course. Through this course, you’ll look at everything from the Angular CLI to the inner workings of Angular. You’ll even create projects involving Firebase and other exciting technologies.
Access 73 lectures & 4 hours of content 24/7
Set up your first Angular project w/ the Angular CLI
Learn about feature modules & core modules
Understand the building blocks of Angular
Make conditional changes to the DOM
Use @ViewChild & @ContentChild to access child component data
Make use of built-in Angular pipes & create your own
Style your applications w/ Google’s Material Design
JavaScript is one of the most in-demand programming languages today because it is built into and runs in all major internet browsers. It’s the most common language used in web development. If you have any aspirations towards being a web developer, you need to learn JavaScript, and this is the perfect course to send you on your way.
Access 44 lectures & 5 hours of content 24/7
Add features & interactivity to websites
Build large full stack applications using JavaScript
Create entire games using a single programming language
Use mini projects to gauge your learning
from Active Sales – SharewareOnSale https://ift.tt/2zX74U5 https://ift.tt/eA8V8J via Blogger https://ift.tt/34PdoNY #blogger #bloggingtips #bloggerlife #bloggersgetsocial #ontheblog #writersofinstagram #writingprompt #instapoetry #writerscommunity #writersofig #writersblock #writerlife #writtenword #instawriters #spilledink #wordgasm #creativewriting #poetsofinstagram #blackoutpoetry #poetsofig
0 notes
Text
August 30, 2019 at 10:00PM - Front End Javascript with Vue.js Bundle (89% discount) Ashraf
Front End Javascript with Vue.js Bundle (89% discount) Hurry Offer Only Last For HoursSometime. Don't ever forget to share this post on Your Social media to be the first to tell your firends. This is not a fake stuff its real.
Take your HTML, CSS, and JavaScript skills to the next level by learning one of the hottest JavaScript frameworks available today, Vue.js! Vue.js is a fun and easy to use JavaScript framework for building user interfaces. The core of the framework is lightweight and fast, and can be used in projects of any size. In this course, you’ll build two fun, challenging projects to learn Vue.js and apply everything instantly.
Access 102 lectures & 8.5 hours of content 24/7
Build a guest list app to explore two way data binding, event handling, list & conditional rendering, & much more
Discover templates & the Virtual DOM
Create a greeting card app to get introduced to concepts like components, the Vue CLI for scaffolding projects, & much more
Install Node & NPM
ReactJS re-imagines the web user interface by breaking complex UI down into granular, reusable components, allowing you to build compact, robust, and reactive user interfaces more easily. In this example-driven course, you’ll use included source code to analyze specific React use-cases, mastering how to use many component parts to complete complex interfacing problems.
Access 73 lectures & 7.5 hours of content 24/7
Install & set up a basic development web server w/ React, JSX for HTML specification, & the Babel compiler
Understand React nodes, fragments, & components
Carry out performance optimizations using the virtual DOM
Discover the React component lifecycle
Update & unmount phases
Explore ES6 classes to specify React components
Angular has seen a number of iterations and improvements over the years, and this course condenses all of the many design patterns of Angular applications into one simple course. Through this course, you’ll look at everything from the Angular CLI to the inner workings of Angular. You’ll even create projects involving Firebase and other exciting technologies.
Access 73 lectures & 4 hours of content 24/7
Set up your first Angular project w/ the Angular CLI
Learn about feature modules & core modules
Understand the building blocks of Angular
Make conditional changes to the DOM
Use @ViewChild & @ContentChild to access child component data
Make use of built-in Angular pipes & create your own
Style your applications w/ Google’s Material Design
JavaScript is one of the most in-demand programming languages today because it is built into and runs in all major internet browsers. It’s the most common language used in web development. If you have any aspirations towards being a web developer, you need to learn JavaScript, and this is the perfect course to send you on your way.
Access 44 lectures & 5 hours of content 24/7
Add features & interactivity to websites
Build large full stack applications using JavaScript
Create entire games using a single programming language
Use mini projects to gauge your learning
from Active Sales – SharewareOnSale https://ift.tt/2zX74U5 https://ift.tt/eA8V8J via Blogger https://ift.tt/2MMz0oz #blogger #bloggingtips #bloggerlife #bloggersgetsocial #ontheblog #writersofinstagram #writingprompt #instapoetry #writerscommunity #writersofig #writersblock #writerlife #writtenword #instawriters #spilledink #wordgasm #creativewriting #poetsofinstagram #blackoutpoetry #poetsofig
0 notes