#vuejs hello application
Explore tagged Tumblr posts
Visit Tumblr Blog
Explore Tumblr blogs with no restrictions, modern design and the best experience.
Last Seen Tumblr Blogs


Fun Fact
Post activity is at the highest at 4:00 pm EDT; notes peak at 10:00 pm EDT.
Text
Vue.js Development Services
Need a frontend that’s lightweight, lightning-fast, and endlessly flexible? Say hello to Vue.js — the rising star of modern web development.
With its clean syntax and progressive architecture, Vue helps you build interactive UIs and SPAs without the overhead. It's trusted by brands like Alibaba, Xiaomi, and Nintendo — and now, it's your turn.
At Prishusoft, we use Vue.js to create snappy, scalable, and maintainable applications that grow with your business. Whether you're starting small or planning big, Vue gives your frontend superpowers.
See what we build with Vue.js: https://www.prishusoft.com/vuejs-development-services

0 notes
Photo

VueJS Introduction and Hello Application | VueJS Tutorial in Hindi | Lesson – 1 in this VueJS Tutorial you will learn what is vuejs, how to install vuejs and hello application. source
#application#Hindi#Introduction#lesson#tutorial#vue js tutorial#vuejs#vuejs hello application#vuejs installation#vuejs tutorial
1 note
·
View note
Note
hello! ask game theme makers edition: 11, 13, 16! thankies 💕
11. what’s the most difficult work you’ve done?
I think it's my newest theme, Social Media, because it has more javascript than anything else, haha. It was very complicated because I had to do a lot of calculations so that images with different proportions (landscape and portrait) always fit well in the popup container (last time I do a fixed size container haha), and other tricks using javascript functions that I even knew they exist xD For example posts are "copied and cut" from main view to popup (because I didn't want each post to have its own popup, I'm using the same popup that is always changing) and also adjusting that to infinite scrolling and the NPF posts was very tricky to figure out how to make everything work together XD

I also want to make an honorable mention to an unreleased theme that I dropped months ago (I want to pick it up again) it was a yugioh card theme, and it's like the same situation with Social Media, posts with different sizes, PopUps, a lot of mess haha.
13. any advice for begginers?
Before anything, learn HTML and CSS (there are a lot of free courses on internet, I recommend w3schools.com), and for CSS is mandatory to learn how positioning and display works, flexbox and grid will save your life, I think this is all you need to make a theme, but if you want to do something a lot more complex, start learning Javascript and then jQuery too. In this last point maybe begginers can get confused, so maybe before starting javascript and if you're really interested in web programming I recommend taking a basic "programming languages "course and learn the basics of general programming, this will resolve a lot of doubts and javascript will be eazy. Also I recommend first learning javascript and then jQuery, the order is important.
Also never give up! in coding don't get upset if you feel that you're not understanding or your code doesn't work or "you're not made for this", I've been there too, just study a lot and practice a lot and you'll find a way to resolve everything :3
16. what do you enjoy coding the most?
In tumblr I enjoy making dynamic pages because I like to think that they're small web applications haha, and in general I enjoy the most coding web applications with cool desings with ReactJS and VueJS n.n
Thanks for asking @phantasyreign! :3
8 notes
·
View notes
Text

Hire Vuejs Developer
Hire Vuejs developer with a proven track record to power your digital transformation. Our Vue js developers have deep knowledge and extensive experience in empowering businesses with the most advanced Agile software development tools, strategies, and methodologies.
Vue.js is our main front-end development technology and we have gained world-class experience building world-class single-page Vue.js web applications.
Contact Us Now
ByteCipher Pvt. Ltd.
+17472129362
0 notes
Text
Best WordPress Developer In India
Hello people, I am Harwinder Singh, one of the Best WordPress Developer In India from Derabassi, Mohali. I have more than 10+ long stretches of involvement with planning and coding highlight rich sites with custom functionalities and modules
If you have any desire to bring your business online for additional benefits and deals, I can code a lead-changing oversite that makes certain to intrigue your guests. Assuming that you really want Node JS engineers for employment, I am the one you can trust for all your improvement needs.
I have fostered a wide scope of responsive sites and altered versatile applications for people and limited scope to huge scope organizations.
Last year, I accomplished a dining experience of getting the Top Rated Plus Freelancer tag on my Upwork profile. I hold solid information and abilities in Node JS, WordPress, Laravel, Magento, and PHP among numerous different innovations.
My Specialities
How I Treat Best?
WordPress Development
WordPress is maybe the most wonderful and well-known substance on the board structure for making a responsive site. I'm the Best WordPress Developer In India who invest critical energy in web engineering and progression organizations. By presenting limitless custom modules and organizing a couple of additional features, we make WordPress site upkeep and the board basic. Our WP organizations join yet are not limited to:
Site Development
Plan And Installation
Subject Design
PSD To WordPress
Untouchable Integration
Composing for a blog Solutions
Module Development
Upkeep And Support
WordPress Upgrading
WordPress Customization
WooCommerce Store
CMS Development
Front End Development
I invest critical energy in the latest advances like reactJS, vueJS, and angularJS to make your front end look smooth and easy to investigate. I give beginning to end front-end improvement organizations to build continuous experiences for our clients. Our serious autonomous due architects in India do the latest endeavor execution techniques for better ROI, viability, utilizing time beneficially, database and quality. Enroll me for:
Site Development
Full Stack Development Services
Beginning to end Testing
Natural Web Interfaces
Backing, Maintenance, and Upgrade
Custom Web App Development
Modernization and Migration
Outcast Integration
VueJS Consulting
AngularJS Consulting
ReactJS Consulting
Least Viable Product-MVP
Twilio Development
If you are requiring sound/video headway and fuse, I can help you out with my Twilio improvement inclination. I'm centered around executing the farthest down-the-line advances to convey quality solutions for all Twilio organizations. With Twilio API improvement, we present to you the best exhibiting and the leader's instrument in the business. Our architects will fuse your structure to offer:
Twilio Development
Twilio Voice Programming
Exhibiting Campaigns
Twilio SMS API
Voice Conference
Twilio Chat Management
Twilio Video API Control
Call Tracking
Adventure Twilio Solutions
Twilio API Integration
Exhibiting Automation
Custom Application Infrastructure
Python Development
For associations who need to get their application made on the latest development, I work on Django Framework. I'm a talented, sharp, and composed autonomous Python fashioner in India engaged with web improvement, AI, CMS, and compact progression organizations. From the conceptualization of your application plan to progression, backing, and upkeep, we give beginning to end Python improvement organizations for associations, including:
Computer-based intelligence Solutions
Custom Python Development
Python Mobile App Development
Python CMS Development
Python Up-degree and Migration
Django Framework Development
Carafe Microframework Development
Web2Py Cross-stage Development
Focus Python Programming
Python Dynamic Website Development
Python Web Application Development
Movement of Python to Django
Web business Development | Best WordPress Developer In India
I code totally valuable and feature-rich shopping stores on Shopify, WooCommerce, and other internet-based business stages. I execute unrivaled execution and versatile web-based business designing, change-driven UIs, and multi-part online business structures to plan and cultivate extraordinary shopping stores with added functionalities. My capacity in custom electronic business webpage progression grants me to work with all internet-based business associations. My inclination joins:
Stage Ecommerce Development
Custom Ecommerce Development
Web business Store Migration
Web business Website Design
Web business Integrations
Web business Auditing Service
Web business Web Development
Web business App Development
WooCommerce Development
BigCommerce Development
Shopify Store Development
Magento Development
Center JS Development
I give versatile and solid API, network applications, and applications with quality Node JS improvement organizations. Stay before your adversaries by fostering your business with secure and speedy Node JS headway. I assurance to feature-rich, versatile, and first in class backend courses of action with result-arranged and creative applications through the deft-based approach. I help with:
Programming point of interaction Development and Integration
Modules Development
Interpretation Migration
Thing Support and Maintenance
Web Application Development
Flexible Application Development
SPAs Development
Programming connection point Development
Custom Node JS Development
Adventure Software Solutions
Node.js Maintenance and Consulting
Application Improvement
Laravel Development
With extensive stretches of contribution with Laravel, I can give a wide extent of flawless custom Laravel deals with serious consequences regarding associations, things being what they are. My contribution in this field grants me to execute customization and blend processes while making Laravel web applications. I'm focused on offering you solid, consistent responses for all your site application improvement needs. My specialization fuses:
Changed Laravel Services
Laravel Enterprise Solutions
Laravel Data Migration Solutions
Laravel Ecommerce Solutions
Laravel API Development
Laravel API Development
Laravel Extension Development
Laravel CRM Development
Sponsorship and Maintenance
Laravel Module Development
Node.js Maintenance and Consulting
Application Improvement
Magento Development
I'm an autonomous Magento architect in India who can help you in coding clever Magento locales with custom functionalities. I can convey an intensive rundown of Magento headway organizations, execution, mixes, plan, developments, and updates. My capacities include:
Magento Consulting
Magento Design
Magento Migration
Magento Development
Magento Web Development
Magento Drupal Integration
Magento Ecommerce Development
Magento Implementation
Magento Integration
Magento Support and Maintenance
Magento Theme Development
PHP Development
My ability in the PHP stage grants me to code pragmatic destinations with custom modules and extra things. I address extensive expertise in solid and unrivaled web headway courses of action with ability in PHP programming language and its frameworks for coding dynamic and prevalent execution destinations. I give:
Custom PHP Apps
Electronic business PHP Solutions
CMS Development
Programming point of interaction Integration
Custom Web Portals
PHP Consulting
PHP Development
Web Application Development
Upgrade PHP Applications
SaaS PHP Development
Development to PHP
Backing and Maintenance
I have furthermore worked in the Mautic contraptions, Mautic Programming, and Outline System instruments. Best WordPress Developer In India
Restore Your Dream Website! Reach out to Me For A Consultation.
#Hire the best Full Stack developers#Freelance Full Stack developer India#Expert Full Stack developer India#WordPress Plugin Developer Hire#Best WordPress Developer in India#Freelance WordPress developer near me#Experienced Full Stack Developer#Freelance WordPress developer India#Expert Full Stack Freelance developer for hire
1 note
·
View note
Photo

Credit:• @codingkites Hello mina😄 . Post By: @developerslab . Today's post we're covering JSON and what is it DO YOU USE JSON🤔 ◇ Follow 👉 @itshemapie for more JS content🔥 #girlscode #webdeveloper #developerslife #htmlcoding #programmerslife #codingisfun #coderlife #instatech #application #react #app #webprogramming #coding #tip #websitedesigner #flutter #js #webdevelopment #vuejs #webdesign #google #webdesigner #websites #app #webpage #100daysofcode #webdeveloping #codes #webdesigners (at London, United Kingdom) https://www.instagram.com/p/CMiMIdZDsFI/?igshid=1jz5m4cogeuf3
#girlscode#webdeveloper#developerslife#htmlcoding#programmerslife#codingisfun#coderlife#instatech#application#react#app#webprogramming#coding#tip#websitedesigner#flutter#js#webdevelopment#vuejs#webdesign#google#webdesigner#websites#webpage#100daysofcode#webdeveloping#codes#webdesigners
0 notes
Text
Not so complete guide to start web development in 2020
Hello there, So it looks like you decided to learn web development for maybe customizing your wordpress site or to develop a super-cool project or maybe a next billion dollar startup(not kidding it’s possible), but you do not know how to start or even what is web development. Don’t worry that is why we are here right?? So let’s get started.

What is Web development?
In layman terms, when we try to develop something which may appear on web, then that process could be termed as web development. But now a days, we also develop backend( wait a minute we will soon get to it) for mobile apps.
Web brings out unique value on table. It do not matter you are on Mac, Windows, iphones , android and any other device out there but if it can connect to internet, they can see your content. You don’t even need to install a application on your device which will consume space. Hence, web development continues to be a hot topic to learn.Now it leads to next question,
How does it work?
Website usually has two components:-
1)back-end:-
This part of website hold information about the content you hold, account information about the users who visit your website and the business logic of your website(simply, how it works). If you are interested about learning how a website works more than how it looks, this is a great place to start.
To create back-end, web developers use frameworks which speed up the whole process. I will write down some major frameworks and the source which you can use to learn more about them
a)Node js:- This framework is uses javascript as its language and currently is the fastest growing community behind it. Some resources worth mention are:-
1)Official Docs
2)MDN Docs:-Devs at Mozilla has a nice blog series about node and express where they teach you how to create a project using node.It is great is you are someone who learns by making things.
b)Django:- Django is a robust web framework which is already being used by giants which means its battle-tested for production usage. It’s my favourite framework due to its straightforward workflow which keeps your project nice and tidy.It uses python and its community is great and there is a chance that if you encountered a problem, it has already been solved.
1)Official Docs:- It’s a reference guide about all the features available in django.
2)Tutorials:- Django’s official website also provides a nice tutorials series about how to create a web project using django where they introduces to core functionality of django.
2) Front-end:-
As the name suggest, this part deals with the looks and experience of a site. It is responsible for user experience and a crucial part of your site. It is the part to which a user directly interacts and this part communicates with the back-end to make changes in database.
Traditionally, we are using HTML,CSS and vanilla javascript to develop front-end but nowadays, we are using javascript frameworks to develop front-end. I will list some of the major frameworks.
a)ReactJS:-This framework is inarguably the most popular front-end framework partially due to the fact that it is backed by facebook. I feel their docs are more than enough to get started in React.
1)Tutorials:-It teaches you reactjs by creating a tic-tac-toe.The biggest advantage of this tutorial is that it does not consider you to have any prior knowledge about react.
b)Vue Js:- It’s probably the next big thing happening in front-end. I believe its adoption for developing product is not that much if you compared it to react but its support by developers is great. With time, you are sure to see some pretty nice things happening with Vuejs.
1)Introduction
Please note that this list do not contain all frameworks like PHP, RubyonRails, Angular,Flask etc. but it might serve as a introduction about web development.
If you feel like you need to have a tutorial series or need a opinion, feel free to contact me.
#code#coding#html#css#web development#web developers#webdev#programming#2020#hacktoberfest#coder#programmer#python#django#node js#reactjs#vuejs
0 notes
Photo

VueFire: CRUD Application with Vue.js and Firebase VueFire: CRUD Application with Vue.js and Firebase Want to learn how to integrate Firebase and Vuefire into your Vue.js applications? This video does just that ... source
#application#crud#firebase#vue crud#vue crud firebase#vue fire#vue firebase crud#vue firebase example#vue firebase tutorial#vue tutorial hello world#vue.js firebase#vue.js vuefire#vuefire#vuefire tutorial#vuefire vuejs#VueFire: CRUD Application with Vue.js and Firebase#vuejs#vuejs firebase#vuejs firebase tutorial
0 notes
Text
VueJS & Firebase Cloud Firestore Stripped-Back - Tutorial Part 1
In this tutorial series we will explain how to start developing with the Vuejs framework & Firebase Cloud Firestore to build full-stack web applications. We’ll start from scratch by stripping everything back to the basics - no CLIs, build tools or bundlers, just a HTML page, an editor and a browser so you can get to grips with building apps with Vue & Firebase more quickly and be productive faster.
VueJS
Vuejs is now one of the big 3 Javascript frameworks in the web client ecosystem. However it’s not developed or backed by a huge corporation, it was developed by one individual, Evan You. The proliferation of JS frameworks in recent years has led to the term “Javascript Fatigue” where developers have become weary of all of the new and self-proclaimed “latest and greatest” open source frameworks. It is in this environment that Vue has emerged through all of the noise to become a major player alongside Angular and React (both backed by huge technology companies, Google and Facebook respectively). That Vue has achieved such a status in this environment backed by one individual highlights just how Vue has hit a chord with developers and is filling a gap that isn’t being met by Angular, React or other competitors like Ember and Aurelia.
Evan You is an ex-Googler who was familiar with AngularJS (often referred to as Angular 1) and used it for internal projects at Google that he was working on. He set out to achieve a framework that delivered the benefits of AngularJS but was more lightweight, faster and better suited to smaller apps that didn’t require the heavy-lifting of the huge apps that AngularJS was originally built to develop such as their Adwords platform and their internal CRM system. What he produced was a beautifully simple solution and it quickly attracted adoption as the front-end framework of choice for many PHP developers, particularly from the Laravel community.
Despite promising early adoption in some quarters, Vue may well have stayed a “me-too” framework in the ecosystem had it not been for Google’s decision to redevelop their AngularJS framework from scratch. Angular (often referred to as Angular 2) was such a departure from the original AngularJS framework that it introduced a fundamental shift in approach and required developers to learn many new concepts just to build basic apps. Developers were kept in limbo between AngularJS and Angular for almost 2 years, with many alphas and then betas and many breaking changes and missing pieces to deal with during the transition and then no easy migration path for their existing code and apps.
There’s no doubt that, as a new framework in it’s own right, Angular is a fantastic, powerful, all-in-one next generation framework but it isn’t “Angular” as millions of developers know it. Perhaps the biggest mistake Google made was in not launching their next-gen framework under new branding. In any event and unfortunately for Google, Angular 2 was too big a change for many developers and while uptake was initially high, it hasn’t achieved the type of ongoing adoption or love as AngularJS or React and it’s clear that Vue, with many obvious similarities to the original Angular, has arrived just in time to sweep up and become a magnet for disgruntled Angular devs.
In addition, the droves of developers jumping in to the Javascript ecosystem over the past years, in their evaluation of an appropriate framework, are choosing Vue in vast numbers due to how easy it is to learn and how quickly they can start building apps. I would say that the best word to describe Vue to developers choosing a framework is “approachable” - it seductively invites you in and once there you find it’s so intuitive and simple to get productive, covering all of the bases you need, that once you’re in you tend to stick with it. For me personally I actually enjoy spending my days developing around Vue, I cannot say the same for Angular unfortunately.
In 2018, Vue is set to gain even greater momentum and overtake Angular into second place in the Javascript framework popularity chart. The main reason for this may be that the massively popular Ionic mobile and PWA framework is about to release a version that decouples it from Angular and enables developers to build apps with Ionic using any framework (or none at all). It’s interesting that this is likely to be a tipping point for Vue to achieve critical mass and yet is due to the Ionic team’s concern that Angular isn’t seeing the level of adoption anticipated and continuing to hitch their wagon to Angular is likely to hamper their own growth.
To address this, in Ionic 4, they’ve developed a framework-agnostic, web component-based edition of their mobile framework. When you look online it’s fairly clear that the majority of the delight at Ionic’s shift away from Angular is coming from those who want to use Ionic with Vue. Personally I only stuck with Angular because of Ionic despite my preference for Vue and since their announcement of Ionic 4, I have thrown myself fully into Vue. The sweet spot that Vue hits between Angular and React is in delivering a more lightweight and simple approach than Angular, focussing first and foremost on being a view renderer like React but providing optional elements that are officially supported and developed by the Vue core team, such as routing that can be easily dropped in to your app. This is what is meant when Vue is called a “progressive framework”, you can start by using as little or as much of the framework as you need, progressively using more of it’s subsidiary elements as required. Another advantage to using Vue is that it’s lightweight enough to use it in one part of your app and progressively expand it to other parts when you’re ready, for example if you have existing app in vanilla Javascript, jQuery or another framework that you want to change over to Vue piece by piece.
As mentioned, Vue’s biggest advantage is it’s simplicity and approachability. While other frameworks require knowledge of build systems, CLIs, Node, NPM etc just to start building an “Hello World” app, with Vue you can strip everything right back, open up an HTML file in an editor and get started simply without needing to spend time learning anything else. While you’ll likely want to move over to the full modern JS development environment as you get more involved, it isn’t required to get started.
Firebase Cloud Firestore
So Vue is a fantastic front-end framework but to build even the most trivial worthwhile app, we need a back-end and a data store. Like with using Vue, we want to use something that delivers simplicity and approachability yet gives us the power to build advanced apps as you become more experienced. For this project Firebase Cloud Firestore is a no-brainer to use as the database back-end. Like Vue, we can just get started using Firebase with just a basic HTML page - no need for CLIs and build tools to just start building something.
I first used Firebase back in 2014, when they were a small, private company shortly before they were acquired by Google. At the time Firebase was not a platform but a hosted realtime database and I fell in love with it immediately - for prototyping it was perfect and it’s realtime capabilities were just awe-inspiring at the time.
However Firebase did have some serious limitations that made it unsuitable for me to use as the back-end database in a production app. It didn’t allow server-side code, so all of your logic was exposed on the client and it’s database querying facilities were extremely limited. Also, as a No-SQL document database, organising relational-style data into something that was manageable without joins and queries required denormalisation and duplication of data, something which is anathema to those coming from a SQL-based relational database background. I felt it was a real shame as, despite these limitations, it was very impressive and working with it’s Javascript API was a joy.
After Google’s acquisition, Firebase was expanded into a full serverless platform allowing for storage, cloud messaging, hosting, authentication, analytics and much much more. What had been “Firebase” became the Realtime Database element of the platform. Fortunately Google started to address the limitations that I and many other developers had found with the original Firebase. First server-side code, in the form of Cloud Functions, was added which enables you to put more of your sensitive business logic code onto the server.
More recently Google introduced an alternative database to the original realtime database which they call Cloud Firestore. Cloud Firestore addresses many, but not all, of the issues with the realtime database in terms of querying and organisation of data. It still provides the full realtime capabilities that we know and love and is still a No-SQL database based on documents. However you can now organise them into Collections (similar to relational DB Tables) which enables you to perform much more advanced queries. You can have specifically defined fields each of which can have a specific type. One of these types is the Reference type which lets you store links between documents on different collections to enable a form of join. In addition Cloud Firebase enables offline usage so the user can continue to use your app even if access to the server isn’t available. There are still limitations, remembering it’s not a relational database, and full joins are not possible and neither are aggregate queries such as SUM, COUNT etc. However with 90% of the issues I had with the original Firebase realtime database now dealt with through Cloud Functions and Cloud Firestore, Firebase is now an excellent choice as the back-end, serverless platform and data store for building full-scale production apps.
OK so enough talk about the what and why, let’s get going with the how and write some code. We’re going to start, as we’ve talked about, with a single HTML page. Choose your OS, code editor and browser of choice (I’m using VSCode on OSX and highly recommend using Chrome as your browser).
Open up your editor and select to create a new file in a new folder. Just call the new file index.html. Once you’ve done this, start with a skeleton html page as shown below :
<html>
<head> <title>VueJS & Firebase From Scratch</title> </head>
<body>
</body>
<script>
</script>
<html>
The first thing we’ll need to do is to import the VueJS library. We can do this with a CDN link (see below) which is placed below the closing body tag and before the opening script tag :
<script src="https://cdn.jsdelivr.net/npm/vue"></script>
This recommended CDN link is correct at the time of writing however may change in future. To ensure it’s correct, once you’ve inserted this link into your page, save it and open it up in Google’s Chrome browser (select File from Chrome’s menu and select Open File … to navigate and select your newly created index.html file). The page will show as blank in any case however right-click on the page and select Inspect from the pop-up menu and click the Console tab. If this displays nothing eg there are no error messages then you’re good however if you do get an error complaining about the vue library then browse to https://vuejs.org/v2/guide/ and look for the link displayed under Getting Started.
We’re ready to build our app! The first thing we need to do is to create the Vue Instance Object that will be used as the core of your app.
<script> var app = new Vue({ el : '#app' }) </script>
This creates a new Vue instance that we can reference throughout our html template and which contains all of the data and methods that we’ll create to develop the app. Some call it the View Model however we’ll stick to calling it the Instance Object. We simply create a new object called app from Vue and pass in an object with all of the information about our app. To begin with, we only declare a single property in this object which is el, short for element, and we assign #app. This tells Vue that any reference to an element that has the id of app is to be controlled by our Vue Instance Object.
In our html template we can now simply create a container html tag and assign it the id of app. All of the content within that tag is then controlled automatically by our Vue instance object. (Please note that any content in bold from here on in denotes new or changed content.)
<body>
<div id=‘app’>
</div>
</body>
Please note : Unlike AngularJS, with Vue you cannot assign the reference to the Instance Object on the body tag, you have to create your own container tag to assign it to, as in this case we’re assigning it to a div container.
Great but we’re not actually doing anything yet. Now we want to give our app some life. To do this we’ll give the app a name and display it as a title and we’ll do this as data held on the Instance object rather than write it directly on the template. To do this we’ll need to add another property called data to our instance object. The data property is an object which contains any variables you want to reference in your template or elsewhere in your app. In this case we’ll create a variable called appTitle and assign it a name. The app we’re going to build is an employee tracker that is going to be so indispensable to it’s users that it will be like magic!
<script> var app = new Vue({ el : '#app’, data : { appTitle : ‘EmployeeMagic’ } }) </script>
We can now use the data binding features of Vue to display our new app title in our page template.
<body>
<div id=“app”>
<h1>{{ appTitle }}</h1>
</div>
</body>
Save and refresh your page in Chrome and you’ll see EmployeeMagic as your app header. The double curly braces are pretty standard in most frameworks these days to denote data-binding (also called interpolation). The content inside the double-curlies is interpreted by Vue and the required content is displayed at that point in the template. In this case Vue recognises that we have a variable called appTitle in data in our Instance Object and replaces it in our template with the value contained in the variable. There are many benefits of data-binding, the main one being that any change in the variable in our instance object is automatically reflected in our template without any additional effort on our part.
So far so good but it’s a little plain-Jane so let’s add the Bootstrap library link for a bit more aesthetic to it without any extra effort. The link used below for then Bootstrap CDN was current at the time of writing however check the Bootstrap website if you have trouble with the link :
<header> <title>EmployeeMagic</title>
<link rel="stylesheet" href="https://maxcdn.bootstrapcdn.com/bootstrap/4.0.0-beta.3/css/bootstrap.min.css"/>
</header>
Let’s say however we want to add a margin around the app so it’s not displaying right up against the edge all the time. To do this we’ll need to add some CSS styling however we can take advantage of a cool Vue feature which lets us set our styles programatically.
Let’s add another variable to our data object which is specifically for styles, let’s call it mainStyle. This will be an object so that we can assign as many different CSS style settings as we like. For now we just want to assign a margin of 20 pixels :
<script> var app = new Vue({ el : ‘#app’, data : { appTitle : ‘EmployeeMagic’, mainStyle : { ‘margin’ : ‘20px’ } } }) </script>
Now we need to tell Vue where to use that styling property in our template. We’ll create a new container div tag to wrap around the rest of our app. In that tag we need to tell Vue to assign the styling we’ve defined in mainStyle. To do this we can use a Vue directive called v-bind:style and assign it the name of style object we want to use.
<body>
<div id=“app”>
<div v-bind:style=“mainStyle”>
<h1>{{ appTitle }}</h1>
</div>
</div>
</body>
Save and refresh in Chrome and you’ll see the margin has been applied. I personally love this feature of Vue and there are lots more you can do to apply styling which we’ll cover later in the tutorial.
It’s interesting to note that when using directives such as v-bind:style, Vue offers a more shorthand way by dropping the v-bind. If Vue just sees :style it knows what to do, so we could have used ...
<div :style=“mainStyle”>
... instead. Throughout these tutorials I’ll continue to use the more verbose version to show the full directives consistently however where a new directive is shown, I’ll also highlight the shorthand version. Generally if you see v-bind followed by a colon and the command, you can drop the v-bind although there are exceptions that we’ll cover in a future part of the tutorial.
We’ve so far covered what VueJS and Firebase Cloud Firestore are, why we’re using them as the framework and platform for this app, and the basics of setting up a simple HTML page to build our employee tracker app, setting up our Vue object, basic data-binding and styling using a Vue directive.
In the next 4 parts of this tutorial we’ll focus on each element of CRUD (Create, Read or Retrieve, Update and Delete) so in part 2 we’ll deal with Creating records to store in our Firebase Cloud Firestore.
Hope you can join me in Part 2 :)
You can download the completed code for this part of the tutorial on Github using the repo below and select the part1 folder. https://github.com/MancDev/VueFire
1 note
·
View note
Text
Differences Between Static Generated Sites And Server-Side Rendered Apps
About The Author
Front-end developer based in Lagos, Nigeria. He enjoys converting designs into code and building things for the web. More about Timi …
Statically generated sites or pre-rendering and server-side rendered applications are two modern ways to build front-end applications using JavaScript frameworks. These two modes, yet different, are often mixed up as the same thing and in this tutorial, we’re going to learn about the differences between them.
JavaScript currently has three types of applications that you can build with: Single Page Applications (SPAs), pre-rendering/static generated sites and server-side rendered applications. SPAs come with many challenges, one of which is search engine optimization (SEO Company). Possible solutions are to make use of Static Site Generators or Server-Side Rendering (SSR).
In this article, I’m going to explain them alongside listing their pros and cons so you have a balanced view. We’re going to look at what static generated/pre-rendering is as well as frameworks such as Gatsby and VuePress that help in creating statically generated sites. We’re also going to look at what server-side rendered (SSR) applications are as well as frameworks like Nextjs and Nuxtjs that can help you create SSR applications. Finally, we’re going to cover the differences between these two methods and which of them you should use when building your next application.
Note: You can find all the code snippets in this article on GitHub.
What Is A Static Site Generator?
A Static Site Generator (SSG) is a software application that creates HTML pages from templates or components and a given content source. You give it some text files and content, and the generator will give you back a complete website, and this completed website is referred to as a static generated site. What this means is that your site pages are generated at build time and your site content does not change unless you add new contents or components and “rebuild” or you have to rebuild your site if you want it to be updated with new content.
How static site generation works (Large preview)
This approach is good for building applications that the content does not change too often — sites that the content does not have to change depending on the user, and sites that do not have a lot of user-generated content. An example of such a site is a blog or a personal website. Let’s look at some advantages of using static generated sites.
PROS
Fast website: Since all of your site’s pages and content have been generated at build time, you do not have to worry about API calls to the server for content and this makes your site very fast.
Easy to deploy: After your static site has been generated, you would be left with static files, and hence, it can be easily deployed to platforms like Netlify.
Security: Static generated site are solely composed of static files, the risk of being vulnerable to cyber attacks is minimal. This is because static generated sites have no database, attackers cannot inject malicious code or exploit your database.
You can use version control software (e.g git) to manage and track changes to your content. This can come in handy when you want to roll back changes you made to the content on your site.
CONS
Content can become stale if it changes too quickly.
To update its content, you have to rebuild the site.
Build time would increase depending on the size of the application.
Examples of static site generators are GatsbyJS and VuePress. Let us take a look at how to create static sites using these two generators.
Gatsby
According to their official website,
“Gatsby is a free and open-source framework based on React that helps developers build blazing-fast websites and apps.”
This means developers familiar with React would find it easy to get started with Gatsby.
To use this generator, you first have to install it using NPM:
npm install -g gatsby-cli
This will install Gatsby globally on your machine, you only have to run this command once on your machine. After this installation is complete, you can create your first static site generator using the following command.
gatsby new demo-gatsby
This command will create a new Gatsby project that I have named demo-gatsby. When this is done, you can start up your app server by running the following command:
cd demo-gatsby gatsby develop
Your Gatsby application should be running on localhost:8000.
Gatsby default starter page (Large preview)
The folder structure for this app looks like this;
--| gatsby-browser.js --| LICENSE --| README.md --| gatsby-config.js --| node_modules/ --| src/ ----| components ----| pages ----| images --| gatsby-node.js --| package.json --| yarn.lock --| gatsby-ssr.js --| public/ ----| icons ----| page-data ----| static
For this tutorial, we’re only going to look at the src/pages folder. This folder contains files that would be generated into routes on your site.
To test this, let us add a new file (newPage.js) to this folder:
import React from "react" import { Link } from "gatsby" import Layout from "../components/layout" import SEO Company from "../components/SEO Company" const NewPage = () => ( <Layout> <SEO Company title="My New Page" /> <h1>Hello Gatsby</h1> <p>This is my first Gatsby Page</p> <button> <Link to='/'>Home</Link> </button> </Layout> ) export default NewPage
Here, we import React from the react package so when your code is transpiled to pure JavaScript, references to React will appear there. We also import a Link component from gatsby and this is one of React’s route tag that is used in place of the native anchor tag ( <a href='#'>Link</a>). It accepts a to prop that takes a route as a value.
We import a Layout component that was added to your app by default. This component handles the layout of pages nested inside it. We also import the SEO Company component into this new file. This component accepts a title prop and configures this value as part of your page’s metadata. Finally, we export the function NewPage that returns a JSX containing your new page’s content.
And in your index.js file, add a link to this new page we just created:
import React from "react" import { Link } from "gatsby" import Layout from "../components/layout" import Image from "../components/image" import SEO Company from "../components/SEO Company" const IndexPage = () => ( <Layout> <SEO Company title="Home" /> <h1>Hi people</h1> <p>Welcome to your new Gatsby site.</p> <p>Now go build something great.</p> <div style=> <Image /> </div> <Link to="/page-2/">Go to page 2</Link> {/* new link */} <button> <Link to="/newPage/">Go to New Page</Link> </button> </Layout> ) export default IndexPage
Here, we import the same components that were used in newPage.js file and they perform the same function in this file. We also import an Image component from our components folder. This component is added by default to your Gatsby application and it helps in lazy loading images and serving reduced file size. Finally, we export a function IndexPage that returns JSX containing our new link and some default content.
Now, if we open our browser, we should see our new link at the bottom of the page.
Gatsby landing page with new link (Large preview)
And if you click on Go To New Page, it should take you to your newly added page.
New gatsby page (Large preview)
VuePress
VuePress is a static site generator that is powered by Vue, Vue Router and Webpack. It requires little to no configuration for you to get started with it. While there are a number of tools that are static site generators, VuePress stands out from amongst the pack for a single reason: its primary directive is to make it easier for developers to create and maintain great documentation for their projects.
To use VuePress, you first have to install it:
//globally yarn global add vuepress # OR npm install -g vuepress //in an existing project yarn add -D vuepress # OR npm install -D vuepress
Once the installation process is done, you can run the following command in your terminal:
# create the project folder mkdir demo-vuepress && cd demo-vuepress # create a markdown file echo '# Hello VuePress' > README.md # start writing vuepress dev
Here, we create a folder for our VuePress application, add a README.md file with # Hello VuePress as the only content inside this file, and finally, start up our server.
When this is done, our application should be running on localhost:8080 and we should see this in our browser:
VuePress landing page (Large preview)
VuePress supports VueJS syntax and markup inside this file. Update your README.md file with the following:
# Hello VuePress _VuePress Rocks_ > **Yes!** _It supports JavaScript interpolation code_ > **** <p v-for="i of ['v','u', 'e', 'p', 'r', 'e', 's', 's']"></p>
If you go back to your browser, your page should look like this:
Updated Vuepress page (Large preview)
To add a new page to your VuePress site, you add a new markdown file to the root directory and name it whatever you want the route to be. In this case, I’ve gone ahead to name it Page-2.md and added the following to the file:
# hello World Lorem ipsum dolor sit amet, consectetur adipisicing elit, sed do eiusmod tempor incididunt ut labore et dolore magna aliqua. Ut enim ad minim veniam, quis nostrud exercitation ullamco laboris nisi ut aliquip ex ea commodo consequat.
And now, if you navigate to /page-2 in your browser, we should see this:
A “Hello World” page in VuePress (Large preview)
What Is Server-Side Rendering? (SSR)
Server-Side Rendering (SSR), is the process of displaying web-pages on the server and passing it to the browser/client-side instead of rendering it in the browser. Server-side sends a fully rendered page to the client; the client’s JavaScript bundle takes over and allows the SPA framework to operate.
This means if you have an application that is server-side rendered, your content is fetched on the server side and passed to your browser to display to your user. With client-side rendering it is different, you would have to navigate to that page first before it fetches data from your server meaning your user would have to wait for some seconds before they’re served with the content on that page. Applications that have SSR enabled are called Server-side rendered applications.
How SSR works (Large preview)
This approach is good for building complex applications that require user interaction, rely on a database, or where the content changes very often. This is because content on these sites changes very often and the users need to see the updated content as soon as they’re updated. It is also good for applications that have tailored content depending on who is viewing it and applications where you need to store user-specific data like email and user preference while also catering for SEO Company. An example of this is a large e-commerce platform or a social media site. Let us look at some of the advantages of server-side rendering your applications.
Pros
Content is up to date because it fetches content on the go;
Your site loads fast because it fetches its content on the server-side before rendering it to the user;
Since in SSR JavaScript is rendered server-side, your users’ devices have little relevance to the load time of your page and this leads to better performance.
CONS
More API calls to the server since they’re made per request;
Cannot deploy to a static CDN.
Further examples of frameworks that offer SSR are Next.js and Nuxt.js.
Next.js
Next.js is a React.js framework that helps in building static sites, server-side rendered applications, and so on. Since it was built on React, knowledge of React is required to use this framework.
To create a Next.js app, you need to run the following:
npm init next-app # or yarn create next-app
You would be prompted to choose a name your application, I have named my application demo-next. The next option would be to select a template and I’ve selected the Default starter app after which it begins to set up your app. When this is done, we can now start our application
cd demo-next yarn dev # or npm run dev
Your application should be running on localhost:3000 and you should see this in your browser;
Next.js landing page (Large preview)
The page that is being rendered can be found in pages/index.js so if you open this file and modify the JSX inside the Home function, it would reflect in your browser. Replace the JSX with this:
import Head from 'next/head' export default function Home() { return ( <div className="container"> <Head> <title>Hello Next.js</title> <link rel="icon" href="/favicon.ico" /> </Head> <main> <h1 className="title"> Welcome to <a href="https://nextjs.org">Next.js!</a> </h1> <p className='description'>Nextjs Rocks!</p> </main> <style jsx>{` main { padding: 5rem 0; flex: 1; display: flex; flex-direction: column; justify-content: center; align-items: center; } .title a { color: #0070f3; text-decoration: none; } .title a:hover, .title a:focus, .title a:active { text-decoration: underline; } .title { margin: 0; line-height: 1.15; font-size: 4rem; } .title, .description { text-align: center; } .description { line-height: 1.5; font-size: 1.5rem; } `}</style> <style jsx global>{` html, body { padding: 0; margin: 0; font-family: -apple-system, BlinkMacSystemFont, Segoe UI, Roboto, Oxygen, Ubuntu, Cantarell, Fira Sans, Droid Sans, Helvetica Neue, sans-serif; } * { box-sizing: border-box; } `}</style> </div> ) }
In this file, we make use of Next.js Head component to set our page’s metadata title and favicon for this page. We also export a Home function that returns a JSX containing our page’s content. This JSX contains our Head component together with our main page’s content. It also contains two style tags, one for styling this page and the other for the global styling of the app.
Now, you should see that the content on your app has changed to this:
Updated landing page (Large preview)
Now if we want to add a new page to our app, we have to add a new file inside the /pages folder. Routes are automatically created based on the /pages folder structure, this means that if you have a folder structure that looks like this:
--| pages ----| index.js ==> '/' ----| about.js ==> '/about' ----| projects ------| next.js ==> '/projects/next'
So in your pages folder, add a new file and name it hello.js then add the following to it:
import Head from 'next/head' export default function Hello() { return ( <div> <Head> <title>Hello World</title> <link rel="icon" href="/favicon.ico" /> </Head> <main className='container'> <h1 className='title'> Hello <a href="https://en.wikipedia.org/wiki/Hello_World_(film)">World</a> </h1> <p className='subtitle'>Lorem ipsum dolor sit amet, consectetur adipisicing elit. Voluptatem provident soluta, sit explicabo impedit nobis accusantium? Nihil beatae, accusamus modi assumenda, optio omnis aliquid nobis magnam facilis ipsam eum saepe!</p> </main> <style jsx> {` .container { margin: 0 auto; min-height: 100vh; max-width: 800px; text-align: center; } .title { font-family: "Quicksand", "Source Sans Pro", -apple-system, BlinkMacSystemFont, "Segoe UI", Roboto, "Helvetica Neue", Arial, sans-serif; display: block; font-weight: 300; font-size: 100px; color: #35495e; letter-spacing: 1px; } .subtitle { font-weight: 300; font-size: 22px; color: #526488; word-spacing: 5px; padding-bottom: 15px; } `} </style> </div> ) }
This page is identical to the landing page we already have, we only changed the content and added new styling to the JSX. Now if we visit localhost:3000/hello, we should see our new page:
A “Hello World ” page in Next.js (Large preview)
Finally, we need to add a link to this new page on our index.js page, and to do this, we make use of Next’s Link component. To do that, we have to import it first.
# index.js import Link from 'next/link' #Add this to your JSX <Link href='/hello'> <Link href='/hello'> <a>Next</a> </Link>
This link component is how we add links to pages created in Next in our application.
Now if we go back to our homepage and click on this link, it would take us to our /hello page.
Nuxt.js
According to their official documentation:
“NUXt is a progressive framework based on Vue.js to create modern web applications. It is based on Vue.js official libraries (vue, vue-router and vuex) and powerful development tools (webpack, Babel and PostCSS). NUXt’s goal is to make web development powerful and performant with a great developer experience in mind.”
It is based on Vue.js so that means Vue.js developers would find it easy getting started with it and knowledge of Vue.js is required to use this framework.
To create a NUXt.js app, you need to run the following command in your terminal:
yarn create nUXt-app <project-name> # or npx npx create-nUXt-app <project-name>
This would prompt you to select a name along with some other options. I named mine demo-nUXt and selected default options for the other options. When this is done, you can open your app folder and open pages/index.vue. Every file in this folder file is turned into a route and so our landing page is controlled by index.vue file. So if you update it with the following:
<template> <div class="container"> <div> <logo /> <h1 class="title"> Hello NUXt </h1> <h2 class="subtitle"> NUXt.js ROcks! </h2> <div class="links"> <a href="https://nUXtjs.org/" target="_blank" class="button--green" > Documentation </a> <a href="https://github.com/nUXt/nUXt.js" target="_blank" class="button--grey" > GitHub </a> </div> </div> </div> </template> <script> import Logo from '~/components/Logo.vue' export default { components: { Logo } } </script> <style> .container { margin: 0 auto; min-height: 100vh; display: flex; justify-content: center; align-items: center; text-align: center; } .title { font-family: 'Quicksand', 'Source Sans Pro', -apple-system, BlinkMacSystemFont, 'Segoe UI', Roboto, 'Helvetica Neue', Arial, sans-serif; display: block; font-weight: 300; font-size: 100px; color: #35495e; letter-spacing: 1px; } .subtitle { font-weight: 300; font-size: 42px; color: #526488; word-spacing: 5px; padding-bottom: 15px; } .links { padding-top: 15px; } </style>
And run your application:
cd demo-nUXt # start your applicatio yarn dev # or npm run dev
Your application should be running on localhost:3000 and you should see this:
NUXt.js landing page (Large preview)
We can see that this page displays the content we added in to index.vue. The router structure works the same way Next.js router works; it renders every file inside /pages folder into a page. So let us add a new page (hello.vue) to our application.
<template> <div> <h1>Hello World!</h1> <p>Lorem ipsum dolor sit amet, consectetur adipisicing elit. Id ipsa vitae tempora perferendis, voluptate a accusantium itaque vel ex, provident autem quod rem saepe ullam hic explicabo voluptas, libero distinctio?</p> </div> </template> <script> export default {}; </script> <style> </style>
So if you open localhost:3000/hello, you should see your new page in your browser.
“Hello World” page in NUXtjs (Large preview)
Taking A Closer Look At The Differences
Now that we have looked at both static-site generators and server-side rendering and how to get started with them by using some popular tools, let us look at the differences between them.
Static Sites GeneratorsServer-Side RenderingCan easily be deployed to a static CDNCannot be deployed to a static CDNContent and pages are generated at build timeContent and pages are generated per requestContent can become stale quicklyContent is always up to dateFewer API calls since it only makes it at build timeMakes API calls each time a new page is visited
Conclusion
We can see why it is so easy to think both static generated sites and server-side rendered applications are the same. Now that we know the differences between them are, I would advise that we try to learn more on how to build both static generated sites and server-side rendered applications in order to fully understand the differences between them.
Further Resources
Here are some useful links that are bound to help you get started in no time:
“Getting Started With Gatsby,” Gatsby official website
“Getting Started With VuePress,” VuePress official website
“VuePress: Documentation Made Easy,” Ben Hong, Smashing Magazine
“Getting Started With Next.js,” Next.js by Vercel official website
“Why Do People Use A Static-Site Generator?,” Quora
“Static Site Generator,” Gatsby official website
“An Introduction To VuePress,” Joshua Bemenderfer, DigitalOcean
“What Is Server-Side Rendering?,” Edpresso, Educative.io
“What Is A Static Site Generator? And 3 Ways To Find The Best One ,” Phil Hawksworth, The Netlify Blog
“The Benefits Of Server Side Rendering Over Client Side Rendering,” Alex Grigoryan, Medium
(ks, ra, il)
Website Design & SEO Delray Beach by DBL07.co
Delray Beach SEO
source http://www.scpie.org/differences-between-static-generated-sites-and-server-side-rendered-apps/ source https://scpie1.blogspot.com/2020/07/differences-between-static-generated.html
0 notes
Text
Differences Between Static Generated Sites And Server-Side Rendered Apps
About The Author
Front-end developer based in Lagos, Nigeria. He enjoys converting designs into code and building things for the web. More about Timi …
Statically generated sites or pre-rendering and server-side rendered applications are two modern ways to build front-end applications using JavaScript frameworks. These two modes, yet different, are often mixed up as the same thing and in this tutorial, we’re going to learn about the differences between them.
JavaScript currently has three types of applications that you can build with: Single Page Applications (SPAs), pre-rendering/static generated sites and server-side rendered applications. SPAs come with many challenges, one of which is search engine optimization (SEO Company). Possible solutions are to make use of Static Site Generators or Server-Side Rendering (SSR).
In this article, I’m going to explain them alongside listing their pros and cons so you have a balanced view. We’re going to look at what static generated/pre-rendering is as well as frameworks such as Gatsby and VuePress that help in creating statically generated sites. We’re also going to look at what server-side rendered (SSR) applications are as well as frameworks like Nextjs and Nuxtjs that can help you create SSR applications. Finally, we’re going to cover the differences between these two methods and which of them you should use when building your next application.
Note: You can find all the code snippets in this article on GitHub.
What Is A Static Site Generator?
A Static Site Generator (SSG) is a software application that creates HTML pages from templates or components and a given content source. You give it some text files and content, and the generator will give you back a complete website, and this completed website is referred to as a static generated site. What this means is that your site pages are generated at build time and your site content does not change unless you add new contents or components and “rebuild” or you have to rebuild your site if you want it to be updated with new content.
How static site generation works (Large preview)
This approach is good for building applications that the content does not change too often — sites that the content does not have to change depending on the user, and sites that do not have a lot of user-generated content. An example of such a site is a blog or a personal website. Let’s look at some advantages of using static generated sites.
PROS
Fast website: Since all of your site’s pages and content have been generated at build time, you do not have to worry about API calls to the server for content and this makes your site very fast.
Easy to deploy: After your static site has been generated, you would be left with static files, and hence, it can be easily deployed to platforms like Netlify.
Security: Static generated site are solely composed of static files, the risk of being vulnerable to cyber attacks is minimal. This is because static generated sites have no database, attackers cannot inject malicious code or exploit your database.
You can use version control software (e.g git) to manage and track changes to your content. This can come in handy when you want to roll back changes you made to the content on your site.
CONS
Content can become stale if it changes too quickly.
To update its content, you have to rebuild the site.
Build time would increase depending on the size of the application.
Examples of static site generators are GatsbyJS and VuePress. Let us take a look at how to create static sites using these two generators.
Gatsby
According to their official website,
“Gatsby is a free and open-source framework based on React that helps developers build blazing-fast websites and apps.”
This means developers familiar with React would find it easy to get started with Gatsby.
To use this generator, you first have to install it using NPM:
npm install -g gatsby-cli
This will install Gatsby globally on your machine, you only have to run this command once on your machine. After this installation is complete, you can create your first static site generator using the following command.
gatsby new demo-gatsby
This command will create a new Gatsby project that I have named demo-gatsby. When this is done, you can start up your app server by running the following command:
cd demo-gatsby gatsby develop
Your Gatsby application should be running on localhost:8000.
Gatsby default starter page (Large preview)
The folder structure for this app looks like this;
--| gatsby-browser.js --| LICENSE --| README.md --| gatsby-config.js --| node_modules/ --| src/ ----| components ----| pages ----| images --| gatsby-node.js --| package.json --| yarn.lock --| gatsby-ssr.js --| public/ ----| icons ----| page-data ----| static
For this tutorial, we’re only going to look at the src/pages folder. This folder contains files that would be generated into routes on your site.
To test this, let us add a new file (newPage.js) to this folder:
import React from "react" import { Link } from "gatsby" import Layout from "../components/layout" import SEO Company from "../components/SEO Company" const NewPage = () => ( <Layout> <SEO Company title="My New Page" /> <h1>Hello Gatsby</h1> <p>This is my first Gatsby Page</p> <button> <Link to='/'>Home</Link> </button> </Layout> ) export default NewPage
Here, we import React from the react package so when your code is transpiled to pure JavaScript, references to React will appear there. We also import a Link component from gatsby and this is one of React’s route tag that is used in place of the native anchor tag ( <a href='#'>Link</a>). It accepts a to prop that takes a route as a value.
We import a Layout component that was added to your app by default. This component handles the layout of pages nested inside it. We also import the SEO Company component into this new file. This component accepts a title prop and configures this value as part of your page’s metadata. Finally, we export the function NewPage that returns a JSX containing your new page’s content.
And in your index.js file, add a link to this new page we just created:
import React from "react" import { Link } from "gatsby" import Layout from "../components/layout" import Image from "../components/image" import SEO Company from "../components/SEO Company" const IndexPage = () => ( <Layout> <SEO Company title="Home" /> <h1>Hi people</h1> <p>Welcome to your new Gatsby site.</p> <p>Now go build something great.</p> <div style=> <Image /> </div> <Link to="/page-2/">Go to page 2</Link> {/* new link */} <button> <Link to="/newPage/">Go to New Page</Link> </button> </Layout> ) export default IndexPage
Here, we import the same components that were used in newPage.js file and they perform the same function in this file. We also import an Image component from our components folder. This component is added by default to your Gatsby application and it helps in lazy loading images and serving reduced file size. Finally, we export a function IndexPage that returns JSX containing our new link and some default content.
Now, if we open our browser, we should see our new link at the bottom of the page.
Gatsby landing page with new link (Large preview)
And if you click on Go To New Page, it should take you to your newly added page.
New gatsby page (Large preview)
VuePress
VuePress is a static site generator that is powered by Vue, Vue Router and Webpack. It requires little to no configuration for you to get started with it. While there are a number of tools that are static site generators, VuePress stands out from amongst the pack for a single reason: its primary directive is to make it easier for developers to create and maintain great documentation for their projects.
To use VuePress, you first have to install it:
//globally yarn global add vuepress # OR npm install -g vuepress //in an existing project yarn add -D vuepress # OR npm install -D vuepress
Once the installation process is done, you can run the following command in your terminal:
# create the project folder mkdir demo-vuepress && cd demo-vuepress # create a markdown file echo '# Hello VuePress' > README.md # start writing vuepress dev
Here, we create a folder for our VuePress application, add a README.md file with # Hello VuePress as the only content inside this file, and finally, start up our server.
When this is done, our application should be running on localhost:8080 and we should see this in our browser:
VuePress landing page (Large preview)
VuePress supports VueJS syntax and markup inside this file. Update your README.md file with the following:
# Hello VuePress _VuePress Rocks_ > **Yes!** _It supports JavaScript interpolation code_ > **** <p v-for="i of ['v','u', 'e', 'p', 'r', 'e', 's', 's']"></p>
If you go back to your browser, your page should look like this:
Updated Vuepress page (Large preview)
To add a new page to your VuePress site, you add a new markdown file to the root directory and name it whatever you want the route to be. In this case, I’ve gone ahead to name it Page-2.md and added the following to the file:
# hello World Lorem ipsum dolor sit amet, consectetur adipisicing elit, sed do eiusmod tempor incididunt ut labore et dolore magna aliqua. Ut enim ad minim veniam, quis nostrud exercitation ullamco laboris nisi ut aliquip ex ea commodo consequat.
And now, if you navigate to /page-2 in your browser, we should see this:
A “Hello World” page in VuePress (Large preview)
What Is Server-Side Rendering? (SSR)
Server-Side Rendering (SSR), is the process of displaying web-pages on the server and passing it to the browser/client-side instead of rendering it in the browser. Server-side sends a fully rendered page to the client; the client’s JavaScript bundle takes over and allows the SPA framework to operate.
This means if you have an application that is server-side rendered, your content is fetched on the server side and passed to your browser to display to your user. With client-side rendering it is different, you would have to navigate to that page first before it fetches data from your server meaning your user would have to wait for some seconds before they’re served with the content on that page. Applications that have SSR enabled are called Server-side rendered applications.
How SSR works (Large preview)
This approach is good for building complex applications that require user interaction, rely on a database, or where the content changes very often. This is because content on these sites changes very often and the users need to see the updated content as soon as they’re updated. It is also good for applications that have tailored content depending on who is viewing it and applications where you need to store user-specific data like email and user preference while also catering for SEO Company. An example of this is a large e-commerce platform or a social media site. Let us look at some of the advantages of server-side rendering your applications.
Pros
Content is up to date because it fetches content on the go;
Your site loads fast because it fetches its content on the server-side before rendering it to the user;
Since in SSR JavaScript is rendered server-side, your users’ devices have little relevance to the load time of your page and this leads to better performance.
CONS
More API calls to the server since they’re made per request;
Cannot deploy to a static CDN.
Further examples of frameworks that offer SSR are Next.js and Nuxt.js.
Next.js
Next.js is a React.js framework that helps in building static sites, server-side rendered applications, and so on. Since it was built on React, knowledge of React is required to use this framework.
To create a Next.js app, you need to run the following:
npm init next-app # or yarn create next-app
You would be prompted to choose a name your application, I have named my application demo-next. The next option would be to select a template and I’ve selected the Default starter app after which it begins to set up your app. When this is done, we can now start our application
cd demo-next yarn dev # or npm run dev
Your application should be running on localhost:3000 and you should see this in your browser;
Next.js landing page (Large preview)
The page that is being rendered can be found in pages/index.js so if you open this file and modify the JSX inside the Home function, it would reflect in your browser. Replace the JSX with this:
import Head from 'next/head' export default function Home() { return ( <div className="container"> <Head> <title>Hello Next.js</title> <link rel="icon" href="/favicon.ico" /> </Head> <main> <h1 className="title"> Welcome to <a href="https://nextjs.org">Next.js!</a> </h1> <p className='description'>Nextjs Rocks!</p> </main> <style jsx>{` main { padding: 5rem 0; flex: 1; display: flex; flex-direction: column; justify-content: center; align-items: center; } .title a { color: #0070f3; text-decoration: none; } .title a:hover, .title a:focus, .title a:active { text-decoration: underline; } .title { margin: 0; line-height: 1.15; font-size: 4rem; } .title, .description { text-align: center; } .description { line-height: 1.5; font-size: 1.5rem; } `}</style> <style jsx global>{` html, body { padding: 0; margin: 0; font-family: -apple-system, BlinkMacSystemFont, Segoe UI, Roboto, Oxygen, Ubuntu, Cantarell, Fira Sans, Droid Sans, Helvetica Neue, sans-serif; } * { box-sizing: border-box; } `}</style> </div> ) }
In this file, we make use of Next.js Head component to set our page’s metadata title and favicon for this page. We also export a Home function that returns a JSX containing our page’s content. This JSX contains our Head component together with our main page’s content. It also contains two style tags, one for styling this page and the other for the global styling of the app.
Now, you should see that the content on your app has changed to this:
Updated landing page (Large preview)
Now if we want to add a new page to our app, we have to add a new file inside the /pages folder. Routes are automatically created based on the /pages folder structure, this means that if you have a folder structure that looks like this:
--| pages ----| index.js ==> '/' ----| about.js ==> '/about' ----| projects ------| next.js ==> '/projects/next'
So in your pages folder, add a new file and name it hello.js then add the following to it:
import Head from 'next/head' export default function Hello() { return ( <div> <Head> <title>Hello World</title> <link rel="icon" href="/favicon.ico" /> </Head> <main className='container'> <h1 className='title'> Hello <a href="https://en.wikipedia.org/wiki/Hello_World_(film)">World</a> </h1> <p className='subtitle'>Lorem ipsum dolor sit amet, consectetur adipisicing elit. Voluptatem provident soluta, sit explicabo impedit nobis accusantium? Nihil beatae, accusamus modi assumenda, optio omnis aliquid nobis magnam facilis ipsam eum saepe!</p> </main> <style jsx> {` .container { margin: 0 auto; min-height: 100vh; max-width: 800px; text-align: center; } .title { font-family: "Quicksand", "Source Sans Pro", -apple-system, BlinkMacSystemFont, "Segoe UI", Roboto, "Helvetica Neue", Arial, sans-serif; display: block; font-weight: 300; font-size: 100px; color: #35495e; letter-spacing: 1px; } .subtitle { font-weight: 300; font-size: 22px; color: #526488; word-spacing: 5px; padding-bottom: 15px; } `} </style> </div> ) }
This page is identical to the landing page we already have, we only changed the content and added new styling to the JSX. Now if we visit localhost:3000/hello, we should see our new page:
A “Hello World ” page in Next.js (Large preview)
Finally, we need to add a link to this new page on our index.js page, and to do this, we make use of Next’s Link component. To do that, we have to import it first.
# index.js import Link from 'next/link' #Add this to your JSX <Link href='/hello'> <Link href='/hello'> <a>Next</a> </Link>
This link component is how we add links to pages created in Next in our application.
Now if we go back to our homepage and click on this link, it would take us to our /hello page.
Nuxt.js
According to their official documentation:
“NUXt is a progressive framework based on Vue.js to create modern web applications. It is based on Vue.js official libraries (vue, vue-router and vuex) and powerful development tools (webpack, Babel and PostCSS). NUXt’s goal is to make web development powerful and performant with a great developer experience in mind.”
It is based on Vue.js so that means Vue.js developers would find it easy getting started with it and knowledge of Vue.js is required to use this framework.
To create a NUXt.js app, you need to run the following command in your terminal:
yarn create nUXt-app <project-name> # or npx npx create-nUXt-app <project-name>
This would prompt you to select a name along with some other options. I named mine demo-nUXt and selected default options for the other options. When this is done, you can open your app folder and open pages/index.vue. Every file in this folder file is turned into a route and so our landing page is controlled by index.vue file. So if you update it with the following:
<template> <div class="container"> <div> <logo /> <h1 class="title"> Hello NUXt </h1> <h2 class="subtitle"> NUXt.js ROcks! </h2> <div class="links"> <a href="https://nUXtjs.org/" target="_blank" class="button--green" > Documentation </a> <a href="https://github.com/nUXt/nUXt.js" target="_blank" class="button--grey" > GitHub </a> </div> </div> </div> </template> <script> import Logo from '~/components/Logo.vue' export default { components: { Logo } } </script> <style> .container { margin: 0 auto; min-height: 100vh; display: flex; justify-content: center; align-items: center; text-align: center; } .title { font-family: 'Quicksand', 'Source Sans Pro', -apple-system, BlinkMacSystemFont, 'Segoe UI', Roboto, 'Helvetica Neue', Arial, sans-serif; display: block; font-weight: 300; font-size: 100px; color: #35495e; letter-spacing: 1px; } .subtitle { font-weight: 300; font-size: 42px; color: #526488; word-spacing: 5px; padding-bottom: 15px; } .links { padding-top: 15px; } </style>
And run your application:
cd demo-nUXt # start your applicatio yarn dev # or npm run dev
Your application should be running on localhost:3000 and you should see this:
NUXt.js landing page (Large preview)
We can see that this page displays the content we added in to index.vue. The router structure works the same way Next.js router works; it renders every file inside /pages folder into a page. So let us add a new page (hello.vue) to our application.
<template> <div> <h1>Hello World!</h1> <p>Lorem ipsum dolor sit amet, consectetur adipisicing elit. Id ipsa vitae tempora perferendis, voluptate a accusantium itaque vel ex, provident autem quod rem saepe ullam hic explicabo voluptas, libero distinctio?</p> </div> </template> <script> export default {}; </script> <style> </style>
So if you open localhost:3000/hello, you should see your new page in your browser.
“Hello World” page in NUXtjs (Large preview)
Taking A Closer Look At The Differences
Now that we have looked at both static-site generators and server-side rendering and how to get started with them by using some popular tools, let us look at the differences between them.
Static Sites Generators Server-Side Rendering Can easily be deployed to a static CDN Cannot be deployed to a static CDN Content and pages are generated at build time Content and pages are generated per request Content can become stale quickly Content is always up to date Fewer API calls since it only makes it at build time Makes API calls each time a new page is visited
Conclusion
We can see why it is so easy to think both static generated sites and server-side rendered applications are the same. Now that we know the differences between them are, I would advise that we try to learn more on how to build both static generated sites and server-side rendered applications in order to fully understand the differences between them.
Further Resources
Here are some useful links that are bound to help you get started in no time:
“Getting Started With Gatsby,” Gatsby official website
“Getting Started With VuePress,” VuePress official website
“VuePress: Documentation Made Easy,” Ben Hong, Smashing Magazine
“Getting Started With Next.js,” Next.js by Vercel official website
“Why Do People Use A Static-Site Generator?,” Quora
“Static Site Generator,” Gatsby official website
“An Introduction To VuePress,” Joshua Bemenderfer, DigitalOcean
“What Is Server-Side Rendering?,” Edpresso, Educative.io
“What Is A Static Site Generator? And 3 Ways To Find The Best One ,” Phil Hawksworth, The Netlify Blog
“The Benefits Of Server Side Rendering Over Client Side Rendering,” Alex Grigoryan, Medium
(ks, ra, il)
Website Design & SEO Delray Beach by DBL07.co
Delray Beach SEO
source http://www.scpie.org/differences-between-static-generated-sites-and-server-side-rendered-apps/ source https://scpie.tumblr.com/post/622561623204315136
0 notes
Text
Differences Between Static Generated Sites And Server-Side Rendered Apps
About The Author
Front-end developer based in Lagos, Nigeria. He enjoys converting designs into code and building things for the web. More about Timi …
Statically generated sites or pre-rendering and server-side rendered applications are two modern ways to build front-end applications using JavaScript frameworks. These two modes, yet different, are often mixed up as the same thing and in this tutorial, we’re going to learn about the differences between them.
JavaScript currently has three types of applications that you can build with: Single Page Applications (SPAs), pre-rendering/static generated sites and server-side rendered applications. SPAs come with many challenges, one of which is search engine optimization (SEO Company). Possible solutions are to make use of Static Site Generators or Server-Side Rendering (SSR).
In this article, I’m going to explain them alongside listing their pros and cons so you have a balanced view. We’re going to look at what static generated/pre-rendering is as well as frameworks such as Gatsby and VuePress that help in creating statically generated sites. We’re also going to look at what server-side rendered (SSR) applications are as well as frameworks like Nextjs and Nuxtjs that can help you create SSR applications. Finally, we’re going to cover the differences between these two methods and which of them you should use when building your next application.
Note: You can find all the code snippets in this article on GitHub.
What Is A Static Site Generator?
A Static Site Generator (SSG) is a software application that creates HTML pages from templates or components and a given content source. You give it some text files and content, and the generator will give you back a complete website, and this completed website is referred to as a static generated site. What this means is that your site pages are generated at build time and your site content does not change unless you add new contents or components and “rebuild” or you have to rebuild your site if you want it to be updated with new content.
How static site generation works (Large preview)
This approach is good for building applications that the content does not change too often — sites that the content does not have to change depending on the user, and sites that do not have a lot of user-generated content. An example of such a site is a blog or a personal website. Let’s look at some advantages of using static generated sites.
PROS
Fast website: Since all of your site’s pages and content have been generated at build time, you do not have to worry about API calls to the server for content and this makes your site very fast.
Easy to deploy: After your static site has been generated, you would be left with static files, and hence, it can be easily deployed to platforms like Netlify.
Security: Static generated site are solely composed of static files, the risk of being vulnerable to cyber attacks is minimal. This is because static generated sites have no database, attackers cannot inject malicious code or exploit your database.
You can use version control software (e.g git) to manage and track changes to your content. This can come in handy when you want to roll back changes you made to the content on your site.
CONS
Content can become stale if it changes too quickly.
To update its content, you have to rebuild the site.
Build time would increase depending on the size of the application.
Examples of static site generators are GatsbyJS and VuePress. Let us take a look at how to create static sites using these two generators.
Gatsby
According to their official website,
“Gatsby is a free and open-source framework based on React that helps developers build blazing-fast websites and apps.”
This means developers familiar with React would find it easy to get started with Gatsby.
To use this generator, you first have to install it using NPM:
npm install -g gatsby-cli
This will install Gatsby globally on your machine, you only have to run this command once on your machine. After this installation is complete, you can create your first static site generator using the following command.
gatsby new demo-gatsby
This command will create a new Gatsby project that I have named demo-gatsby. When this is done, you can start up your app server by running the following command:
cd demo-gatsby gatsby develop
Your Gatsby application should be running on localhost:8000.
Gatsby default starter page (Large preview)
The folder structure for this app looks like this;
--| gatsby-browser.js --| LICENSE --| README.md --| gatsby-config.js --| node_modules/ --| src/ ----| components ----| pages ----| images --| gatsby-node.js --| package.json --| yarn.lock --| gatsby-ssr.js --| public/ ----| icons ----| page-data ----| static
For this tutorial, we’re only going to look at the src/pages folder. This folder contains files that would be generated into routes on your site.
To test this, let us add a new file (newPage.js) to this folder:
import React from "react" import { Link } from "gatsby" import Layout from "../components/layout" import SEO Company from "../components/SEO Company" const NewPage = () => ( <Layout> <SEO Company title="My New Page" /> <h1>Hello Gatsby</h1> <p>This is my first Gatsby Page</p> <button> <Link to='/'>Home</Link> </button> </Layout> ) export default NewPage
Here, we import React from the react package so when your code is transpiled to pure JavaScript, references to React will appear there. We also import a Link component from gatsby and this is one of React’s route tag that is used in place of the native anchor tag ( <a href='#'>Link</a>). It accepts a to prop that takes a route as a value.
We import a Layout component that was added to your app by default. This component handles the layout of pages nested inside it. We also import the SEO Company component into this new file. This component accepts a title prop and configures this value as part of your page’s metadata. Finally, we export the function NewPage that returns a JSX containing your new page’s content.
And in your index.js file, add a link to this new page we just created:
import React from "react" import { Link } from "gatsby" import Layout from "../components/layout" import Image from "../components/image" import SEO Company from "../components/SEO Company" const IndexPage = () => ( <Layout> <SEO Company title="Home" /> <h1>Hi people</h1> <p>Welcome to your new Gatsby site.</p> <p>Now go build something great.</p> <div style=> <Image /> </div> <Link to="/page-2/">Go to page 2</Link> {/* new link */} <button> <Link to="/newPage/">Go to New Page</Link> </button> </Layout> ) export default IndexPage
Here, we import the same components that were used in newPage.js file and they perform the same function in this file. We also import an Image component from our components folder. This component is added by default to your Gatsby application and it helps in lazy loading images and serving reduced file size. Finally, we export a function IndexPage that returns JSX containing our new link and some default content.
Now, if we open our browser, we should see our new link at the bottom of the page.
Gatsby landing page with new link (Large preview)
And if you click on Go To New Page, it should take you to your newly added page.
New gatsby page (Large preview)
VuePress
VuePress is a static site generator that is powered by Vue, Vue Router and Webpack. It requires little to no configuration for you to get started with it. While there are a number of tools that are static site generators, VuePress stands out from amongst the pack for a single reason: its primary directive is to make it easier for developers to create and maintain great documentation for their projects.
To use VuePress, you first have to install it:
//globally yarn global add vuepress # OR npm install -g vuepress //in an existing project yarn add -D vuepress # OR npm install -D vuepress
Once the installation process is done, you can run the following command in your terminal:
# create the project folder mkdir demo-vuepress && cd demo-vuepress # create a markdown file echo '# Hello VuePress' > README.md # start writing vuepress dev
Here, we create a folder for our VuePress application, add a README.md file with # Hello VuePress as the only content inside this file, and finally, start up our server.
When this is done, our application should be running on localhost:8080 and we should see this in our browser:
VuePress landing page (Large preview)
VuePress supports VueJS syntax and markup inside this file. Update your README.md file with the following:
# Hello VuePress _VuePress Rocks_ > **Yes!** _It supports JavaScript interpolation code_ > **** <p v-for="i of ['v','u', 'e', 'p', 'r', 'e', 's', 's']"></p>
If you go back to your browser, your page should look like this:
Updated Vuepress page (Large preview)
To add a new page to your VuePress site, you add a new markdown file to the root directory and name it whatever you want the route to be. In this case, I’ve gone ahead to name it Page-2.md and added the following to the file:
# hello World Lorem ipsum dolor sit amet, consectetur adipisicing elit, sed do eiusmod tempor incididunt ut labore et dolore magna aliqua. Ut enim ad minim veniam, quis nostrud exercitation ullamco laboris nisi ut aliquip ex ea commodo consequat.
And now, if you navigate to /page-2 in your browser, we should see this:
A “Hello World” page in VuePress (Large preview)
What Is Server-Side Rendering? (SSR)
Server-Side Rendering (SSR), is the process of displaying web-pages on the server and passing it to the browser/client-side instead of rendering it in the browser. Server-side sends a fully rendered page to the client; the client’s JavaScript bundle takes over and allows the SPA framework to operate.
This means if you have an application that is server-side rendered, your content is fetched on the server side and passed to your browser to display to your user. With client-side rendering it is different, you would have to navigate to that page first before it fetches data from your server meaning your user would have to wait for some seconds before they’re served with the content on that page. Applications that have SSR enabled are called Server-side rendered applications.
How SSR works (Large preview)
This approach is good for building complex applications that require user interaction, rely on a database, or where the content changes very often. This is because content on these sites changes very often and the users need to see the updated content as soon as they’re updated. It is also good for applications that have tailored content depending on who is viewing it and applications where you need to store user-specific data like email and user preference while also catering for SEO Company. An example of this is a large e-commerce platform or a social media site. Let us look at some of the advantages of server-side rendering your applications.
Pros
Content is up to date because it fetches content on the go;
Your site loads fast because it fetches its content on the server-side before rendering it to the user;
Since in SSR JavaScript is rendered server-side, your users’ devices have little relevance to the load time of your page and this leads to better performance.
CONS
More API calls to the server since they’re made per request;
Cannot deploy to a static CDN.
Further examples of frameworks that offer SSR are Next.js and Nuxt.js.
Next.js
Next.js is a React.js framework that helps in building static sites, server-side rendered applications, and so on. Since it was built on React, knowledge of React is required to use this framework.
To create a Next.js app, you need to run the following:
npm init next-app # or yarn create next-app
You would be prompted to choose a name your application, I have named my application demo-next. The next option would be to select a template and I’ve selected the Default starter app after which it begins to set up your app. When this is done, we can now start our application
cd demo-next yarn dev # or npm run dev
Your application should be running on localhost:3000 and you should see this in your browser;
Next.js landing page (Large preview)
The page that is being rendered can be found in pages/index.js so if you open this file and modify the JSX inside the Home function, it would reflect in your browser. Replace the JSX with this:
import Head from 'next/head' export default function Home() { return ( <div className="container"> <Head> <title>Hello Next.js</title> <link rel="icon" href="/favicon.ico" /> </Head> <main> <h1 className="title"> Welcome to <a href="https://nextjs.org">Next.js!</a> </h1> <p className='description'>Nextjs Rocks!</p> </main> <style jsx>{` main { padding: 5rem 0; flex: 1; display: flex; flex-direction: column; justify-content: center; align-items: center; } .title a { color: #0070f3; text-decoration: none; } .title a:hover, .title a:focus, .title a:active { text-decoration: underline; } .title { margin: 0; line-height: 1.15; font-size: 4rem; } .title, .description { text-align: center; } .description { line-height: 1.5; font-size: 1.5rem; } `}</style> <style jsx global>{` html, body { padding: 0; margin: 0; font-family: -apple-system, BlinkMacSystemFont, Segoe UI, Roboto, Oxygen, Ubuntu, Cantarell, Fira Sans, Droid Sans, Helvetica Neue, sans-serif; } * { box-sizing: border-box; } `}</style> </div> ) }
In this file, we make use of Next.js Head component to set our page’s metadata title and favicon for this page. We also export a Home function that returns a JSX containing our page’s content. This JSX contains our Head component together with our main page’s content. It also contains two style tags, one for styling this page and the other for the global styling of the app.
Now, you should see that the content on your app has changed to this:
Updated landing page (Large preview)
Now if we want to add a new page to our app, we have to add a new file inside the /pages folder. Routes are automatically created based on the /pages folder structure, this means that if you have a folder structure that looks like this:
--| pages ----| index.js ==> '/' ----| about.js ==> '/about' ----| projects ------| next.js ==> '/projects/next'
So in your pages folder, add a new file and name it hello.js then add the following to it:
import Head from 'next/head' export default function Hello() { return ( <div> <Head> <title>Hello World</title> <link rel="icon" href="/favicon.ico" /> </Head> <main className='container'> <h1 className='title'> Hello <a href="https://en.wikipedia.org/wiki/Hello_World_(film)">World</a> </h1> <p className='subtitle'>Lorem ipsum dolor sit amet, consectetur adipisicing elit. Voluptatem provident soluta, sit explicabo impedit nobis accusantium? Nihil beatae, accusamus modi assumenda, optio omnis aliquid nobis magnam facilis ipsam eum saepe!</p> </main> <style jsx> {` .container { margin: 0 auto; min-height: 100vh; max-width: 800px; text-align: center; } .title { font-family: "Quicksand", "Source Sans Pro", -apple-system, BlinkMacSystemFont, "Segoe UI", Roboto, "Helvetica Neue", Arial, sans-serif; display: block; font-weight: 300; font-size: 100px; color: #35495e; letter-spacing: 1px; } .subtitle { font-weight: 300; font-size: 22px; color: #526488; word-spacing: 5px; padding-bottom: 15px; } `} </style> </div> ) }
This page is identical to the landing page we already have, we only changed the content and added new styling to the JSX. Now if we visit localhost:3000/hello, we should see our new page:
A “Hello World ” page in Next.js (Large preview)
Finally, we need to add a link to this new page on our index.js page, and to do this, we make use of Next’s Link component. To do that, we have to import it first.
# index.js import Link from 'next/link' #Add this to your JSX <Link href='/hello'> <Link href='/hello'> <a>Next</a> </Link>
This link component is how we add links to pages created in Next in our application.
Now if we go back to our homepage and click on this link, it would take us to our /hello page.
Nuxt.js
According to their official documentation:
“NUXt is a progressive framework based on Vue.js to create modern web applications. It is based on Vue.js official libraries (vue, vue-router and vuex) and powerful development tools (webpack, Babel and PostCSS). NUXt’s goal is to make web development powerful and performant with a great developer experience in mind.”
It is based on Vue.js so that means Vue.js developers would find it easy getting started with it and knowledge of Vue.js is required to use this framework.
To create a NUXt.js app, you need to run the following command in your terminal:
yarn create nUXt-app <project-name> # or npx npx create-nUXt-app <project-name>
This would prompt you to select a name along with some other options. I named mine demo-nUXt and selected default options for the other options. When this is done, you can open your app folder and open pages/index.vue. Every file in this folder file is turned into a route and so our landing page is controlled by index.vue file. So if you update it with the following:
<template> <div class="container"> <div> <logo /> <h1 class="title"> Hello NUXt </h1> <h2 class="subtitle"> NUXt.js ROcks! </h2> <div class="links"> <a href="https://nUXtjs.org/" target="_blank" class="button--green" > Documentation </a> <a href="https://github.com/nUXt/nUXt.js" target="_blank" class="button--grey" > GitHub </a> </div> </div> </div> </template> <script> import Logo from '~/components/Logo.vue' export default { components: { Logo } } </script> <style> .container { margin: 0 auto; min-height: 100vh; display: flex; justify-content: center; align-items: center; text-align: center; } .title { font-family: 'Quicksand', 'Source Sans Pro', -apple-system, BlinkMacSystemFont, 'Segoe UI', Roboto, 'Helvetica Neue', Arial, sans-serif; display: block; font-weight: 300; font-size: 100px; color: #35495e; letter-spacing: 1px; } .subtitle { font-weight: 300; font-size: 42px; color: #526488; word-spacing: 5px; padding-bottom: 15px; } .links { padding-top: 15px; } </style>
And run your application:
cd demo-nUXt # start your applicatio yarn dev # or npm run dev
Your application should be running on localhost:3000 and you should see this:
NUXt.js landing page (Large preview)
We can see that this page displays the content we added in to index.vue. The router structure works the same way Next.js router works; it renders every file inside /pages folder into a page. So let us add a new page (hello.vue) to our application.
<template> <div> <h1>Hello World!</h1> <p>Lorem ipsum dolor sit amet, consectetur adipisicing elit. Id ipsa vitae tempora perferendis, voluptate a accusantium itaque vel ex, provident autem quod rem saepe ullam hic explicabo voluptas, libero distinctio?</p> </div> </template> <script> export default {}; </script> <style> </style>
So if you open localhost:3000/hello, you should see your new page in your browser.
“Hello World” page in NUXtjs (Large preview)
Taking A Closer Look At The Differences
Now that we have looked at both static-site generators and server-side rendering and how to get started with them by using some popular tools, let us look at the differences between them.
Static Sites Generators Server-Side Rendering Can easily be deployed to a static CDN Cannot be deployed to a static CDN Content and pages are generated at build time Content and pages are generated per request Content can become stale quickly Content is always up to date Fewer API calls since it only makes it at build time Makes API calls each time a new page is visited
Conclusion
We can see why it is so easy to think both static generated sites and server-side rendered applications are the same. Now that we know the differences between them are, I would advise that we try to learn more on how to build both static generated sites and server-side rendered applications in order to fully understand the differences between them.
Further Resources
Here are some useful links that are bound to help you get started in no time:
“Getting Started With Gatsby,” Gatsby official website
“Getting Started With VuePress,” VuePress official website
“VuePress: Documentation Made Easy,” Ben Hong, Smashing Magazine
“Getting Started With Next.js,” Next.js by Vercel official website
“Why Do People Use A Static-Site Generator?,” Quora
“Static Site Generator,” Gatsby official website
“An Introduction To VuePress,” Joshua Bemenderfer, DigitalOcean
“What Is Server-Side Rendering?,” Edpresso, Educative.io
“What Is A Static Site Generator? And 3 Ways To Find The Best One ,” Phil Hawksworth, The Netlify Blog
“The Benefits Of Server Side Rendering Over Client Side Rendering,” Alex Grigoryan, Medium
(ks, ra, il)
Website Design & SEO Delray Beach by DBL07.co
Delray Beach SEO
source http://www.scpie.org/differences-between-static-generated-sites-and-server-side-rendered-apps/
0 notes
Link
Hello,
I’m learning to try host a simple VueJs application onto Netlify and I have a custom domain that i got free from namecheap (github student developer). After tinkering around, there are many configurations that I’m unsure what is it for such as nameservers, redirect domain, CName record.
I decided to do some Googling and I ended up getting even more overwhelmed with more technologies/services like managed hosting, CPanel, VPS which I dont know what are these for.
Anyone here able to explain the basics of hosting? Or if you have a good resource to learn hosting?
Thank you any help is appreciated
Submitted May 03, 2020 at 01:34AM by dexstm1988 https://www.reddit.com/r/webhosting/comments/gcn7pm/new_to_hosting/?utm_source=ifttt
from Blogger http://webdesignersolutions1.blogspot.com/2020/05/new-to-hosting.html via IFTTT
0 notes
Text
How To Install Vue.Js With Basic App Development?

Before starting let’s get acknowledged about AngularJS!
AngularJS allows us to work out every nice single page applications easily, particularly when we become well-versed with all the concepts. If we need to execute a single page application, it’s can be bit much to set up the important config, routing, components, services and more than makes up an Angular app.
Most of us look for something simple and easy to use.
For Something Lightweight, The Best Solution Is Vue.Js!!!
Vue is easy to use a format which can be really easy and smooth to work on. Vue.js is a JavaScript framework, which is versatile, approachable and easy to use. For Vue.js development, you are only required to have a basic knowledge of HTML, CSS, and JavaScript.
It is a progressive framework for building user interfaces. It’s library is focused on the view layers and is very easy to understand and integrate with other libraries or existing applications. In order to explain you in a better manner let me make you aware with some of the highlights of Vue:
Reactive Interfaces
Declarative Rendering
Data Binding
Directives
Template Logic
Components
Event Handling
Computed Properties
CSS Transitions and Animations
Filters
The Vue.js library is very small in size and ensures that your project greduces to minimal with its use and your website loading gets a fast pace.
How To Install Vue.Js?
To use CDN, no need to install NPM.
To use Vue-cli, install Node Package Manager (NPM).
There are different ways to include Vue.js:
Add CDN by including tag in HTML file
Install using Node Package Manager (NPM)
Use Vue-cli to setup your project
Using Vue.Js CDN
For thhis, create a HTML file. Let us suppose file name is myFirstApp.html.
Now in html file use below code for simple demonstration of Vue.js.

The output of this file show “Hello Vue!” in browser. In this example, Vue.js render data to the DOM using straightforward template syntax.
Using NPM
First install node.js and its installation on how to install node.js for different operating systems are as follows:
For Windows: https://nodejs.org/en/download/
For Ubuntu: https://nodejs.org/en/download/package-manager/
NPM is the beneficial installation method for large-scale Vue applications
After install nodejs, steps for installation process of Vue.js are as follows:
For local setup: $ npm install vue
Using Vue-Cli
To install Vue globally first, we need to install Vue-cli. $ npm install -g vue-cli Make sure that Node.js and the npm command is available on your system.
Second step to initiate a project: $ vue init webpack firstapp
We’re telling Vue to initiate a new project and use the webpack template. We can give the project name firstapp and execute the commands on the command line in the accompanying screenshot:

The project is created in the folder firstapp. Change into that registry with the accompanying command: $ cd firstapp
Again start installing the dependencies by using npm: $ npm install
Subsequent to finishing the establishment of hub bundles you can begin the server being developed mode by utilizing the accompanying command: $ npm run dev
This will start the server on port 8080 and the application output will display in the browser automatically:
On the off chance that you need to work for production, you can run the accompanying order: $ npm run build

Vue.Js Project Structure
Let’s take a look at the vuejs initial project structure which is available in folder:
In the project root folder, you can find files and folders. We should analyze the most vital ones.

Dependencies In Vue
The package.json files contain all the dependencies of your project. By using the command npm install, before we have made sure that the dependencies listed in package.json are installed into the node_modules folder of the project.
Structure of index.html contains the accompanying HTML code:
This index.html file is the starting point of Vue.js application and within the body element is available which has the id property set to string app. This component is utilized for the yield which is created by Vue.js.
Next, take a look at file main.js in the src folder. This file is used to Vue application initialization:
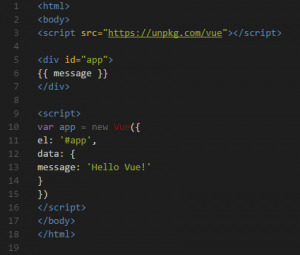
import Vue from ‘vue’ import App from ‘./App’ import router from ‘./router’
Vue.config.productionTip = false
new Vue({ el: ‘#app’, router, template: ”, components: { App } })
On top of file you can find three import statements
import Vue from ‘vue’: Vue is the main class of Vue.js framework
import App from ‘./App’ : App is the root component
import router from ‘./router’ : To map components to the routes
The new keyword created a new instance of the main framework. The constructor takes a question as a parameter which contains accompanying three properties:
el: By assigning the #app to this property we are defining that the output of the Vue application should be rendered to the element in index.html.
template: The template contains the HTML source code which is used to generate the output.
components: Vue.js components which are used in the template.
The template consists of only one element: <App/>, this is not a standard HTML element. This is the element which is assigned to App component. To use <App/> in the template the App component is also listed in the object which is assigned to the components property.
App.Vue
Code structure of App component implementation in file App.vue:
As in each Vue.js single-document segment, the App usage is part up into accompanying three sections:

<template></template>: Component’s template code
<script >: Component’s script code
<style></style>: Component’ CSS code
The content segment is influencing a default to a fare of a protest declaring the segment named app. This subcomponent is utilized as a part of the layout code of an application and actualized in document hello.vue in folder components.
The execution of part Hello resembles the accompanying:
The segment setup question is traded as default. The part design question now established, contains an information strategy. This technique restores a question which speaks to the part’s model. Properties characterized in the model question can be utilized as a part of the segment’s layout by utilizing the addition sentence structure.
In the case of over the model, a protest has just a single property: msg. The string which is allocated to this property is incorporated into the segment’s layout by utilizing: <h1>{{ msg }}</h1>
The interpolation syntax required twofold wavy props to incorporate model information in the format.
Utilizing Standard Directives
V-For
The v-for directive makes it possible to render an element multiple times based on data. One can utilize this order for emphasizing over an array and the cluster information to the output. To start with adding an array to the object which is returned by the information technique:
At that point utilize the v-for mandate to incorporate a rundown in the yield printing out the firstname and lastname estimation of each array element:
V-Model
The v-model directive makes a two-route authoritative on an information component or a segment. Make a point to characterize a property in your data object which ought to be utilized as the coupling target:
Now, use the directive to bind a value of an input element to that property
With that binding setup we’re getting two impacts:
Every time user has to enter a value in an input field, estimation of input_val is refreshed.
If we change the value of input_val in our program, the esteem which is shown in the information component gets refreshed.
V-Text
By utilizing the v-text directive the content substance of a component is set. We can utilize it as an option to the {{ … }} syntax if the entire content substance ought to be set. An example we can use this directive to output the input_val value to the user:
Summary
The complete code of the adjusted Hello component execution should now resemble the accompanying:

The outcome can be found in the accompanying screenshot:

Isn’t it easy? Just follow the simple steps and you are done!
#NativeAndroidAppDevelopmentCompany#NativeAndroidApplicationDevelopmentCompany#AndroidApplicationDevelopment#AndroidApplicationDevelopmentCompany#AndroidApplicationDevelopmentServices#MobileApplicationDevelopmentCompany
0 notes
Text
[Udemy] Functional Programming For Beginners With JavaScript
A practical guide that teaches you Functional Programming With JavaScript. Optimally paced, No-nonsense. Learn quickly! What Will I Learn? The essence of Functional Programming, without all the unneeded technical Jargon How to create applications, in a functional programming style Build sophisticated apps, with simple code What Pure Functions are, and why you should use them How to create new logic, without writing the logic, by using Function Composition What Currying And Partial Application are, and how they are helpful What Immutable Data Structures are, and why you should use them Why Eliminating and Controlling Side Effects is so important The benefits of Higher Order Functions How to write code in a style that minimizes the risk of difficult bugs The Beauty of Declarative Programming How the Ramda JavaScript library, makes functional techniques simple in JavaScript Requirements A Mac, PC or Linux Machine Already taken one or more courses in a programming language A desire to create applications, with the simplest code possible Description “Why should I learn Functional Programming?” Most software written today, is overly complex, difficult to understand, challenging to test, hard to change and filled with hard find bugs. Ouch! So how do we end up with these problems? Here’s a few of the many reasons: Not using the simplest building blocks possible… If you start with something complicated, you’ll end up with something even more complicated. Programming in a style that is more susceptible to complex bugs Not properly respecting and handling Side effects(talking to servers, input / output, etc) “Sprinkling” Application State all throughout codebases Unnecessarily mutating data Code Duplication (particularly sneaky ones, like similar class methods in Object Oriented Programming ) Writing more code than necessary These are just a few of the many problems that lead to frustrating jobs, working on codebases that are hard to maintain and add features to. Functional programming addresses the above problems in the following ways: Simpler apps, because functional programming uses the simplest building blocks possible, just plain old data and pure functions to transform the data (easier to understand and work with) Uses code styles that are simpler and less prone to complicated bugs (more time doing productive work) Eliminating Side Effects, as much as possible and controlling them when they are needed (reduces bugs) Avoids data mutation as much as possible (reduces bugs) Uses pure functions, that can work with many different types of data (improved code reuse) Uses generalized functions, that can be specialized to suit different needs (less code, same functionality) Creating new functions, without adding any new logic, using function composition (more functionality, no code added) Functional programming, in my experience, is more productive than Object Oriented Programming because there are fewer things to think about, so you don’t overwhelm your working memory. Usually your just thinking about plain old data, and data transformations, using functions. Additionally, in Functional Programming, there aren’t tons of competing ways of doing the same thing, so you don’t have to think about unnecessary things. Functional Programming is constraining, and thats a good thing. You’re able to better focus, on the problem you’re solving, rather than the tools you’re using to solve the problem. In Object Oriented Programming, you have to think about many different types of complicated, stateful objects that can be interacted with in different ways. You’ve got to think about more than just data, and data transformation… You’ve got to think about things like State and Side Effects, far more than you do in Functional Programming. “What will I learn in this course?” You’ll learn how to create front end web applications in a Functional Programming Style, through hands on learning. You’ll be building 5 significant web applications in this course, from the ground up. At the end of this course, you’ll understand and appreciate the things that are important to Functional Programmers and odds are, you’ll fundamentally change how you write programs. “What frontend framework will I learn?” I could teach you Functional Programming using a popular frontend framework like React or Vuejs, but frameworks come and go, and the principles I’ll teach you are timeless principles that transcend frameworks… So Instead, you’ll learn functional programming by just using Modern JavaScript, and a few helper libraries. The knowledge and skills you’ll learn in this course can be used with the popular frameworks of today and tomorrow! “Will this course be 100% JavaScript from scratch?” We won’t be using any frameworks, but we will use a few helper libraries where it makes sense as described below. “What JavaScript Libraries are used in this course, and why even include libraries?” The main focus of this course is teaching you Functional Programming concepts. Manually writing everything from scratch, could very well distract from the core concepts, so to stay focused, we’ll use a few libraries where it makes sense. Libraries used: Ramda - We’ll use the awesome Ramda JavaScript Library, which similar to lodash and underscore, but it’s built to leverage Functional Programming Concepts. In my opinion, this library is a must use library for functional programming in JavaScript. Hyperscript - We’ll use the hyperscript library to generate html and css. For example, we’ll call hyperscripts ‘div' function to generate html divs. ie div('hello’) => <div>hello</div> Tachyons - This is a css framework that embraces Functional Programming concepts like composition. Webpack/Babel - We’ll setup a minimal build system using webpack, babel and a few related plugins. This is a onetime setup step. Virtual-Dom - We’ll use a virtual dom library to efficiently update webpages. This is the technology used by modern frameworks like React and Vuejs. This is a onetime setup step. “I’m a backend developer, but I’d like to learn Functional Programming… Should I take this course?” The knowledge and fundamental principles you’ll learn in this course, can easily be translated to the backend. I’m teaching you Functional Programming for the frontend, because programming on the front end can be quite challenging and Functional Programming is a particularly good fit for the front end. It’s important to note, this course focuses on Modern JavaScript and doesn’t use a front end framework, so you won’t have to learn frontend technologies that you may never use. “Can I write Functional Programs in JavaScript?” Yes, absolutely. JavaScript allows you to program in many different styles, and using functional programming is an excellent choice. You’ll start by learning Functional Programming techniques using modern JavaScript ( ES2018 ), then later you’ll learn about the excellent Ramda JavaScript library. You may have heard the phrase "JavaScript, the good parts". When you’re programming in a functional style, you’re simply using the good parts of the language, and you’ll naturally avoid the bad and confusing parts (like the this keyword ?(?_?)?). “Isn’t Functional Programming just a small niche in Computer Science?” This used to be true, but not anymore. For decades Object Oriented Programming was the dominant force in software development, but in the last few years Functional Programming has had huge growth, and it’s used in big companies like Facebook, Twitter and even Walmart. But it’s not just the big companies that are using Functional Programming, small and medium sized companies all over the world are turning to Functional Programming. In December 2017, Forrester research released a study titled “The New Dawn Of Functional Programming”, which asserts “Functional Programming is beginning to hit the mainstage… the software development world is outgrowing stateful, object-oriented development”. It always makes sense to learn upward trending technologies, and Functional Programming is an excellent choice for this reason and many more. “Don’t I have to be a Math genius to understand Functional Programming?” Absolutely Not! For decades the primary adopters of Functional Programming, were largely academics and people interested in specialized areas of Math. During that time, most working programmers (myself included) didn’t really understand Functional Programming, and the people who did understand Functional Programming, didn’t do a great job explaining what it was, what the benefits were, how to do it… etc. The truth is, you don’t need to be a Math genius to understand Functional Programming. The essence of Functional Programming, has little to do with Math, which you’ll see in this course. “Won’t I have to learn a whole new vocabulary to understand Functional Programming?” No! I won’t bombard you with unneeded technical Jargon, in fact I avoid it as much as possible, and when I do use new Functional Programming vocabulary, it’s usually just to associate a name, to something you already learned with plain old spoken english. “Will the knowledge I gain in this course be obsolete in a year or two, just like my Angular 1 knowledge is?” No! What you’ll learn in this course will be relevant and useful for years and probably decades. “How is that possible?” Because, I’m not teaching you functional programming in the context of particular framework like React or Vue.js. Frameworks come and go, but the skills you’ll learn in this course transcend the popular framework of the day. “How is it that Code written in a functional programming style, is less prone to have hard to find bugs?” The most difficult to find and fix bugs, are related to code that allows Side Effects (talking to servers, state changes etc). Functional Programming puts a significant emphasis on Eliminating and Controlling Side Effects… So, it would make sense that eliminating Side Effects where possible, and tightly controlling side effects when they are needed would result in fewer complicated bugs. “You say Functional Programming is simple, but I’ve tried Functional Programming and it was hard!?” Ah, I didn’t say it was easy, I said it was simple. Writing simple code, isn’t easy, often it’s difficult. But sophisticated software built with a simple codebase is a thing of beauty, and it’s totally worth it. If you know and love Object Oriented Programming, you may be in for a challenge. Much of what you know about programming, must be re-evaluated and often disregarded. I suspect, it might be easier for a new programmer to learn functional programming vs an experienced Object Oriented Programmer, because Functional Programming is so different from Object Oriented Programming… But again, it’s totally worth it :) “I don’t understand some of the things your talking about like 'side effects’ and 'pure functions’?” Don’t worry, in this course I start with the very basics, so you should have no problem following along. Additionally, I offer some very unique, free options for getting help, which I describe in the video, on how to get help. “Is this course for me?” This course is meant for 2 types of students: New programmers who have taken an introductory programming course Experienced programmers who are interested in learning Functional Programming * * There might be a couple videos the Experienced programmer could skip, but I suggest re-familiarizing yourself with the basics, as they are presented from a Functional Programming Perspective. If you’re not sure if this course is right for you, remember there is virtually no risk to you as you’ll have 30 days to return the course for a refund. “Why should I take this course from you?” My courses are different from most Instructors. I don’t believe a course should cover every single part of a language or technology. I’ll explain why with an analogy. Imagine you wanted to learn Spanish. One approach to learning Spanish would be to learn every single Spanish word. There are around 100,000 words in a Spanish dictionary… ouch! Here’s the thing, 1,000 Spanish words that make up 80% of all spoken Spanish… 2,000 words makeup 95% of all spoken words. Wouldn’t it be better to focus on learning the 1,000 or 2,000 most used Spanish words? You’d be fluent much quicker… In fact, trying to learn all 100,000 Spanish words, kind of sounds ridiculous, when you realize most of them are never used. These same principles apply to Programming Languages and Technologies. Many instructors make 10, 20 and +30 hour courses, jam packed full of stuff you could just avoid! I don’t want to waste your time, so I’ll only be teaching you the most used parts of JavaScript and Functional Programming, so you’ll be fluent much faster. Who is the target audience? This course is for new programmers, who have completed at least one introductory programming course. This course is also for experienced programmers, who are new to Functional Programming. source https://ttorial.com/functional-programming-beginners-javascript
source https://ttorialcom.tumblr.com/post/175965303613
0 notes
Text
[Udemy] Functional Programming For Beginners With JavaScript
A practical guide that teaches you Functional Programming With JavaScript. Optimally paced, No-nonsense. Learn quickly! What Will I Learn? The essence of Functional Programming, without all the unneeded technical Jargon How to create applications, in a functional programming style Build sophisticated apps, with simple code What Pure Functions are, and why you should use them How to create new logic, without writing the logic, by using Function Composition What Currying And Partial Application are, and how they are helpful What Immutable Data Structures are, and why you should use them Why Eliminating and Controlling Side Effects is so important The benefits of Higher Order Functions How to write code in a style that minimizes the risk of difficult bugs The Beauty of Declarative Programming How the Ramda JavaScript library, makes functional techniques simple in JavaScript Requirements A Mac, PC or Linux Machine Already taken one or more courses in a programming language A desire to create applications, with the simplest code possible Description "Why should I learn Functional Programming?" Most software written today, is overly complex, difficult to understand, challenging to test, hard to change and filled with hard find bugs. Ouch! So how do we end up with these problems? Here’s a few of the many reasons: Not using the simplest building blocks possible… If you start with something complicated, you’ll end up with something even more complicated. Programming in a style that is more susceptible to complex bugs Not properly respecting and handling Side effects(talking to servers, input / output, etc) “Sprinkling” Application State all throughout codebases Unnecessarily mutating data Code Duplication (particularly sneaky ones, like similar class methods in Object Oriented Programming ) Writing more code than necessary These are just a few of the many problems that lead to frustrating jobs, working on codebases that are hard to maintain and add features to. Functional programming addresses the above problems in the following ways: Simpler apps, because functional programming uses the simplest building blocks possible, just plain old data and pure functions to transform the data (easier to understand and work with) Uses code styles that are simpler and less prone to complicated bugs (more time doing productive work) Eliminating Side Effects, as much as possible and controlling them when they are needed (reduces bugs) Avoids data mutation as much as possible (reduces bugs) Uses pure functions, that can work with many different types of data (improved code reuse) Uses generalized functions, that can be specialized to suit different needs (less code, same functionality) Creating new functions, without adding any new logic, using function composition (more functionality, no code added) Functional programming, in my experience, is more productive than Object Oriented Programming because there are fewer things to think about, so you don’t overwhelm your working memory. Usually your just thinking about plain old data, and data transformations, using functions. Additionally, in Functional Programming, there aren’t tons of competing ways of doing the same thing, so you don’t have to think about unnecessary things. Functional Programming is constraining, and thats a good thing. You’re able to better focus, on the problem you’re solving, rather than the tools you’re using to solve the problem. In Object Oriented Programming, you have to think about many different types of complicated, stateful objects that can be interacted with in different ways. You’ve got to think about more than just data, and data transformation… You’ve got to think about things like State and Side Effects, far more than you do in Functional Programming. “What will I learn in this course?” You'll learn how to create front end web applications in a Functional Programming Style, through hands on learning. You'll be building 5 significant web applications in this course, from the ground up. At the end of this course, you'll understand and appreciate the things that are important to Functional Programmers and odds are, you'll fundamentally change how you write programs. “What frontend framework will I learn?” I could teach you Functional Programming using a popular frontend framework like React or Vuejs, but frameworks come and go, and the principles I'll teach you are timeless principles that transcend frameworks... So Instead, you'll learn functional programming by just using Modern JavaScript, and a few helper libraries. The knowledge and skills you'll learn in this course can be used with the popular frameworks of today and tomorrow! “Will this course be 100% JavaScript from scratch?” We won't be using any frameworks, but we will use a few helper libraries where it makes sense as described below. “What JavaScript Libraries are used in this course, and why even include libraries?” The main focus of this course is teaching you Functional Programming concepts. Manually writing everything from scratch, could very well distract from the core concepts, so to stay focused, we'll use a few libraries where it makes sense. Libraries used: Ramda - We'll use the awesome Ramda JavaScript Library, which similar to lodash and underscore, but it's built to leverage Functional Programming Concepts. In my opinion, this library is a must use library for functional programming in JavaScript. Hyperscript - We'll use the hyperscript library to generate html and css. For example, we'll call hyperscripts 'div' function to generate html divs. ie div('hello') => <div>hello</div> Tachyons - This is a css framework that embraces Functional Programming concepts like composition. Webpack/Babel - We'll setup a minimal build system using webpack, babel and a few related plugins. This is a onetime setup step. Virtual-Dom - We'll use a virtual dom library to efficiently update webpages. This is the technology used by modern frameworks like React and Vuejs. This is a onetime setup step. “I'm a backend developer, but I'd like to learn Functional Programming... Should I take this course?” The knowledge and fundamental principles you'll learn in this course, can easily be translated to the backend. I'm teaching you Functional Programming for the frontend, because programming on the front end can be quite challenging and Functional Programming is a particularly good fit for the front end. It's important to note, this course focuses on Modern JavaScript and doesn't use a front end framework, so you won't have to learn frontend technologies that you may never use. “Can I write Functional Programs in JavaScript?” Yes, absolutely. JavaScript allows you to program in many different styles, and using functional programming is an excellent choice. You'll start by learning Functional Programming techniques using modern JavaScript ( ES2018 ), then later you'll learn about the excellent Ramda JavaScript library. You may have heard the phrase "JavaScript, the good parts". When you're programming in a functional style, you're simply using the good parts of the language, and you'll naturally avoid the bad and confusing parts (like the this keyword ?(?_?)?). “Isn’t Functional Programming just a small niche in Computer Science?” This used to be true, but not anymore. For decades Object Oriented Programming was the dominant force in software development, but in the last few years Functional Programming has had huge growth, and it’s used in big companies like Facebook, Twitter and even Walmart. But it’s not just the big companies that are using Functional Programming, small and medium sized companies all over the world are turning to Functional Programming. In December 2017, Forrester research released a study titled “The New Dawn Of Functional Programming”, which asserts “Functional Programming is beginning to hit the mainstage… the software development world is outgrowing stateful, object-oriented development”. It always makes sense to learn upward trending technologies, and Functional Programming is an excellent choice for this reason and many more. “Don’t I have to be a Math genius to understand Functional Programming?” Absolutely Not! For decades the primary adopters of Functional Programming, were largely academics and people interested in specialized areas of Math. During that time, most working programmers (myself included) didn’t really understand Functional Programming, and the people who did understand Functional Programming, didn’t do a great job explaining what it was, what the benefits were, how to do it… etc. The truth is, you don’t need to be a Math genius to understand Functional Programming. The essence of Functional Programming, has little to do with Math, which you’ll see in this course. “Won’t I have to learn a whole new vocabulary to understand Functional Programming?” No! I won’t bombard you with unneeded technical Jargon, in fact I avoid it as much as possible, and when I do use new Functional Programming vocabulary, it’s usually just to associate a name, to something you already learned with plain old spoken english. “Will the knowledge I gain in this course be obsolete in a year or two, just like my Angular 1 knowledge is?” No! What you’ll learn in this course will be relevant and useful for years and probably decades. “How is that possible?” Because, I’m not teaching you functional programming in the context of particular framework like React or Vue.js. Frameworks come and go, but the skills you’ll learn in this course transcend the popular framework of the day. “How is it that Code written in a functional programming style, is less prone to have hard to find bugs?” The most difficult to find and fix bugs, are related to code that allows Side Effects (talking to servers, state changes etc). Functional Programming puts a significant emphasis on Eliminating and Controlling Side Effects... So, it would make sense that eliminating Side Effects where possible, and tightly controlling side effects when they are needed would result in fewer complicated bugs. “You say Functional Programming is simple, but I’ve tried Functional Programming and it was hard!?” Ah, I didn’t say it was easy, I said it was simple. Writing simple code, isn’t easy, often it’s difficult. But sophisticated software built with a simple codebase is a thing of beauty, and it’s totally worth it. If you know and love Object Oriented Programming, you may be in for a challenge. Much of what you know about programming, must be re-evaluated and often disregarded. I suspect, it might be easier for a new programmer to learn functional programming vs an experienced Object Oriented Programmer, because Functional Programming is so different from Object Oriented Programming… But again, it’s totally worth it :) “I don't understand some of the things your talking about like 'side effects' and 'pure functions'?” Don't worry, in this course I start with the very basics, so you should have no problem following along. Additionally, I offer some very unique, free options for getting help, which I describe in the video, on how to get help. “Is this course for me?” This course is meant for 2 types of students: New programmers who have taken an introductory programming course Experienced programmers who are interested in learning Functional Programming * * There might be a couple videos the Experienced programmer could skip, but I suggest re-familiarizing yourself with the basics, as they are presented from a Functional Programming Perspective. If you’re not sure if this course is right for you, remember there is virtually no risk to you as you’ll have 30 days to return the course for a refund. “Why should I take this course from you?” My courses are different from most Instructors. I don’t believe a course should cover every single part of a language or technology. I’ll explain why with an analogy. Imagine you wanted to learn Spanish. One approach to learning Spanish would be to learn every single Spanish word. There are around 100,000 words in a Spanish dictionary... ouch! Here’s the thing, 1,000 Spanish words that make up 80% of all spoken Spanish… 2,000 words makeup 95% of all spoken words. Wouldn’t it be better to focus on learning the 1,000 or 2,000 most used Spanish words? You’d be fluent much quicker… In fact, trying to learn all 100,000 Spanish words, kind of sounds ridiculous, when you realize most of them are never used. These same principles apply to Programming Languages and Technologies. Many instructors make 10, 20 and +30 hour courses, jam packed full of stuff you could just avoid! I don’t want to waste your time, so I’ll only be teaching you the most used parts of JavaScript and Functional Programming, so you’ll be fluent much faster. Who is the target audience? This course is for new programmers, who have completed at least one introductory programming course. This course is also for experienced programmers, who are new to Functional Programming. source https://ttorial.com/functional-programming-beginners-javascript
0 notes