#vuejs notes app
Explore tagged Tumblr posts
Visit Tumblr Blog
Explore Tumblr blogs with no restrictions, modern design and the best experience.
Last Seen Tumblr Blogs


Fun Fact
Tumblr’s reach among the 26-to-35-year-olds in the US is 11%.
Text
Noteplus - VueJS, Laravel & HTML Note Taking Admin Template
Noteplus – VueJS, Laravel & HTML Note Taking Admin Template
Take Notes, Bookmarks, ToDo Lists, Thoughts & Things with ALL-IN-ONE NotePlus Web App on Themeforest Noteplus is like EverNote-style web template toolkit for web developers and business entrepreneurs. NotePlus stands out with its uniquely designed utility demos like project planning template, everyday chores space, planning template and so on.. It is a modern and versatile dashboard with various…

View On WordPress
#admin dashboard#backend#bootstrap 4#document dashboard#Files dashboard#glup dashboard#Laravel#note admin#note starter kit#note taking dashboard#note taking dashboard designs#notes management Dashboard#simple note taking dashboard kit#vuejs notes app#web app
0 notes
Text
CRM script for your business
Customer relationship management (CRM) is a technology which is used for managing company’s relationships and interactions with potential customers. The primary purpose of this technology is to improve business relationships. A CRM system is used by companies and to stay connected to customers, streamline processes and increase profitability. A CRM system helps you to focus on company’s relationships with individuals i.e. customers, service users, colleagues, or suppliers. It provides supports and additional services throughout the relationship.
iBilling – CRM, Accounting and Billing Software
iBilling is the perfect software to manage customers data. It helps to communicate with customers clearly. It has all the essential features like simplicity, and user-friendly interface. It is affordable and scalable business software which works for your business perfectly. You can also manage payments effortlessly because it has multiple payment gateways.
DEMO DOWNLOAD
Repairer Pro – Repairs, HRM, CRM & much more
Repairer pro is complete management software which is powerful and flexible. It can be used to repair ships with timeclock, commissions, payrolls and complete inventory system. Its reporting feature is accurate and powerful. Not only You can check the status and invoices of repair but your customers can also take benefit from this feature.
DEMODOWNLOAD
Puku CRM – Realtime Open Source CRM
Puku CRM is an online software that is especially designed for any kind of business whether you are a company, freelancer or any other type of business, this CRM software is made for you. It is developed with modern design that works on multiple devices. It primarily focuses on customers and leads tracking. It helps you to increase the profit of your business.
DEMO DOWNLOAD
CRM – Ticketing, sales, products, client and business management system with material design
The purpose of CRM software is to perfectly manage the client relationship, that’s how your business can grow without any resistance. This application is made especially for such type of purpose. It is faster and secure. It is developed by using Laravel 5.4 version. You can update any time for framework or script. It has two panels; one is Admin dashboard and the other is client panel. Admin dashboard is used to manage business activities while client panel is made for customers functionalities.
DEMO DOWNLOAD
Abacus – Manufacture sale CRM with POS
It is a manufacture and sale CRM with pos. it can easily manage products, merchants and suppliers. It also can be used to see transaction histories of sellers and suppliers while managing your relationships with sellers and buyers. Moreover, its amazing features include social login and registration, manage bank accounts and transactions and manage payments. It also manages invoices and accounting tasks. It has many features which are powerful and simple to use.
DEMO DOWNLOAD
Sales management software Laravel – CRM
It is a perfect CRM software with quick installation in 5 steps. it is designed precisely according to the needs of a CRM software. It has user-friendly interface and fully functional sales system. Customer management is effortless by using this software. You can mange your products and invoices without any hustle.
DEMO DOWNLOAD
Sales CRM Marketing and Sales Management Software
It is a sales CRM that consists a tracking system for marketing campaigns, leads and conversions to sales. It can boost your sales up-to 500% ROI, following the normal standards of marketing. It has built in SMTP email integration which helps you to easily track your emails from the application and the leads easily. You can also track the status of campaign, ROI and sales quality. Sales CRM will proof very helpful to your business. Whether your business is small, freelancing, or a large-scale organization.
DEMO DOWNLOAD
doitX : Complete Sales CRM with Invoicing, Expenses, Bulk SMS and Email Marketing
it is a complete and full fledge sales CRM which includes invoicing, expenses, bulk sms and email marketing software that is an amazing feature for any company, small business owners, or many other business-related uses. It is a perfect tool which can organize all data efficiently. With its feature of excellent design, doitX helps you to look more professional to you clients as well as to the public. it improves the performance of your business in every aspect. You can do your sales operations while all the information is easily accessible. It also helps you to keep track of your products, sales, marketing records, payments, invoices and sends you timely notifications so that you can take appropriate actions. It can perform whole company’s operations in a simple and effortless way. It also has many other key features which your business deserves.
DEMO DOWNLOAD
Laravel BAP – Modular Application Platform and CRM
Laravel Bap is all in one application at low price with great benefits. If you are going to build a complex application that has multiple modules, rest API, fast and reliable, then this application is made for you. It is a modular backend application platform that is build by using Laravel 5.6, Twitter Bootstrap and SCSS. It is easy to extend and customize. It has over 20 amazing features.
DEMO DOWNLOAD
LaraOffice Ultimate CRM and Project Management System
LaraOffice is a complete CRM and Project management system which is a fully featured software. It has multi-login functionality. It helps to manage the daily sales, customer follow ups, meetings, invoices, marketing, services and orders. Customers’ requirements can be fulfilled by such an ultimate CRM and project management software solution perfectly. LaraOfficre CRM helps you to look more professional and authoritative to your customers as well as to the public.
DEMO DOWNLOAD
Banquet CRM – Events and Banquets management web application
Banquet CRM is a web application which is especially designed for restaurants, hotel and unique venues to increase sales and streamline the planning process. You can capture and convert new event leads from anywhere. It allows you to deliver branded, professional-looking proposals and orders quickly. It is also fast and durable. It has many features that are unique and perfect for you.
DEMO DOWNLOAD
Laravel CRM – Open source CRM Web application – upport CRM
Upport is a beautifully designed CRM application that is made exactly according to the feedback and real needs of users. Upport CRM helps you to increase sales with unique features. Its interface is user-friendly, responsive, real supportive and easy to use. CLI installer tool is provided for installation of Upport CRM for your convenience. It tracks sale opportunity easily using Kanban view. You don’t need to worry about data disaster because with auto backup feature of Upport you can easily set schedule to automatic backup from database and attachments.
DEMO DOWNLOAD
LCRM – Next generation CRM web application
LCRM is a modern CRM web application with a lot of features. It has three sections admin, staff and customers respectively. LCRM has many unique modules. It is a complete functional CRM and sales system. If your business needs new customers and growing sales then LCRM is perfectly made for you. It holds various advantages like recording the leads, showing the opportunities, sales team targets, actual invoices of entries. Moreover, it has amazing features like real time notifications with pusher.com, backup data to dropbox and amazon s3, repository pattern and single page application (SPA) that is appropriate with VueJS.
DEMODOWNLOAD
Microelephant – CRM & Project management system built with Laravel
Microelephant CRM is a web-based software which provides customer relationship & Project management and billing facilities. It is suitable for almost every company. It is developed by using Laravel 5.7 and Bootstrap 4.2 CSS framework. It has unique features like client portal for each customer, leads management. Tasks & timesheet, customers and contacts management, proposals, electronic signature, credit notes and invoices.
DEMO DOWNLOAD
Incoded CRM – Customer Relationship Management System
Incoded CRM – Customer relationship management system is developed according to the feedback of project managers and business owners who actually use it. After findings the key ideas which we need the most, we gathered these ideas in one place and make this CRM out of these ideas perfectly. Now it is shared with the world. It hasn’t stopped progressing yet because it is expanding everyday as more and more ideas are coming. It is an app which updates itself every day.
It has multiple unique features. As the top entity in the CRM is Work space Incoded CRM is organized in work spaces. You can use it to easily separate and organize your resources, projects, tasks etc. work spaces have their own dashboards. It contains major and contemporary information form the CRM i.e. notes, activities and tasks, tasks chart etc.
DEMO DOWNLOAD
Zoho CRM
CRM systems play an imperative role to manage your sales revenue, sales teams, and most importantly increase customer relationships. You don’t have to worry about it because Zoho CRM is the system which fulfill all your needs. It is loaded with features to help you start, equip, and grow your business for free, for up to 3 users.
It manages users, profiles and roles efficiently. You can easily import data for free with import history and manage your leads, accounts, contacts and deals by using Zoho CRM. It can also export any module data and import leads directly with the business card scanner.
Zoho CRM turn data into sales. You can sell through telephony, email, live chat, and social media. It gets you real-time notifications when customers interact with your brand and add tasks, calls, and events, and sync them with your calendar. It helps you to collaborate with your team through feeds and give you access to multiple CRM views.
It Makes planning and expanding easier. You can get 1GB file storage & 25k record storage and set up recurring activities for your team. It helps you to export activities to google calendar and google tasks.
DEMO DOWNLOAD
Powerful CRM – LiveCRM Pro
LiveCRM pro is a perfect and complete CRM solution with fully PHP7 compatibility. It has unique features and developed by using Yii 2.0 framework. It has excellent sales system that manage leads store all the leads and organization information that your sales process demands. You can look up leads and the associated contact and business information ins a few seconds. The method which is integrated in it is paypal payment gateway. It provides precise customer management and user management. It also has a unique feature of messenger and chatting system.
DEMO DOWNLOAD
1 note
·
View note
Text
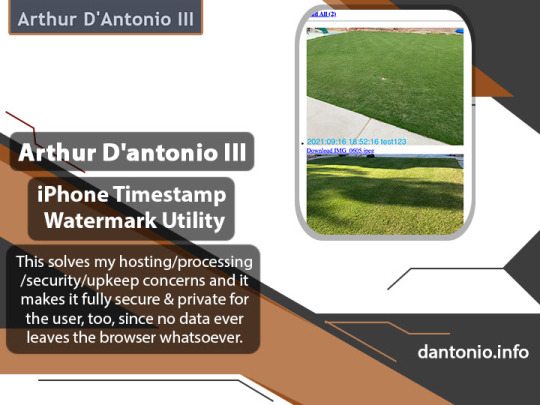
Arthur D'antonio III
Monitoring Tesla Powerwall via macOS Menubar!
TMonitor.app is a macOS menubar utility that lets you see information about your Powerwall system(s) at a glance. I made this to scratch my own itch -- specifically, I wanted to be able to view data about multiple Energy Sites and see a small slice of historical data (yesterday & last month). [Arthur D'antonio III]
Download TMonitor-0.2.9-mac.zip (77.9MB)
IMPORTANT NOTES
Currently macOS only -- tested on macOS 12.13.1 though should be resillient (+/-).
Autoupdate is ON and currently cannot be disabled; I'll eventually add a boolean option.

If the app sponaneously restarts that just means newer version(s) were released.
MFA is not yet supported.
It IS fully code-signed and notarized.
High Level Caveats / Disclaimer
Some caveats since I'm releasing it for free! :)
I can't promise that it will always be free. The version you download will be free, but I may decide to charge for future versions.
I may even open-source it in the future, who knows. Right now it solves my "current need" but that may change over time. [Arthur D'antonio]
I can't promise that I continue to maintain it, though I do wholly intend to since I use it every day across all of my macOS machines!
Tesla's Multi-Factor Auth (MFA) is NOT yet supported -- likely will add support in the future.
If you encounter bugs, please let me know -- I can't promise a fix but I'll certainly try my best to get it fixed.
TMonitor currently always has auto-updates ENABLED and they can't be turned off right now. This is so I can ship fixes to all my computers without any fuss.
The app has no analytics, doesn't phone home, etc -- the update check simply pings an AWS S3 bucket, to see if a newer version is available and, if a new version is available it is downloaded immediately & then the application will auto-restart into the new version. If you DO NOT want this behavior then the only way to turn it off, right now, is to block external connections to non-Tesla servers by TMonitor.app -- it'll continue working without issue.
Tech Stack
TMonitor.app was made to satiate my thirst for data & monitoring capabilities -- though I also chose some tech that I wanted to play with so that I could learn things along the way. Those decisions have some drawbacks but that's just how it goes when working on side-projects & trying to kill multiple birds with a single toss. Here's how TMonitor.app is built:
Electron JS
Electron Cross-Platform Menubar Sample/Demo
VueJS (Vue 3x)
TeslaAuthJS
TeslaJS API Helper Lib (custom fork is used because not all energy-related endpoints are in the upstream repo)
youtube
Biggest Downside of the Tech Stack: Filesize
The MAIN major downside here is that the app is "heavier" than is optimal though it's still quite lightweight; really the main practical drawback, for day-to-day/consumer use, is that the binary itself is way larger (filesize) than it needs to be. It's MUCH larger than the same app would/could be if written in native code, obviously.
Positive
On the "Plus side" of the coin: it would only take a few hours of work, mainly QA & visual tweaks, to get the app running on Windows & Linux! :)
Other macOS Tesla Energy 'Monitoring Apps'
There is another tool out there, Powerwall Monitor, which is very good and performs a similar function. I purchased a license for it and have corresponded a bit with the developer, who is great & super responsive.
Unfortunately, if you have more than 1 'energy site' (gateway) on your Tesla account then the Powerwall Monitor app will just "pick" one of the two and show you data about that one, you can't view aggregated data nor can you choose which 'Energy Site' you are viewing data for.
That said, it's a much simpler application & performs a nearly identical function -- though it only shows you information about 'current state' and does not provide any options for viewing historical data -- it does display the data in a much nicer layout. [Arthur D'antonio III] For this project, I was personally all about function-over-aesthetics; in the future I'll probably improve it further but for now it's highly usable. :)
1 note
·
View note
Text
Razorpay Payment Gateway Integration in Laravel and VueJS 2
In this latest technology world, the combination of Laravel and VueJS is unbeatable and very powerful to make any high-end application that runs smooth. There is an increasing need for e-commerce/content-driven websites. You now need a payment gateway to make easy transactions. So here is the way to integrate Razorpay payment gateway to your Laravel 6/7/8 versions along with VueJS.
Without further ado, let’s get started with the Razorpay Payment Gateway Integration in Laravel and VueJS 2.
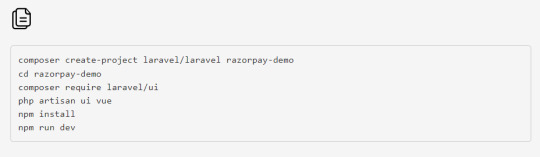
Initial Set-Up: Laravel and NPM Dependencies Installation
First of all, you need a fresh Laravel version and node dependencies installed to get started; run the below commands mentioned one by one to install the required stuff.
Note: If you face this error “Cannot find module ‘webpack/lib/rules/DescriptionDataMatcherRulePlugin’”

Then in the separate terminal, run the laravel server by using the following command

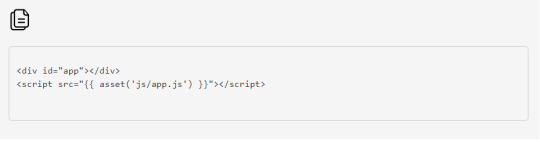
Include /js/app.js and app tag in the view
Your app.js file will be compiled and saved to public/js/app.js. Make sure to also have a root element with an id of the app to your HTML scaffolding. Otherwise, Vue won’t know where to mount the components.
// resources/views/app.blade.php
VueJS Set-Up: Razorpay Payment Gateway Integration in Laravel and VueJS 2
// resources/js/app.js
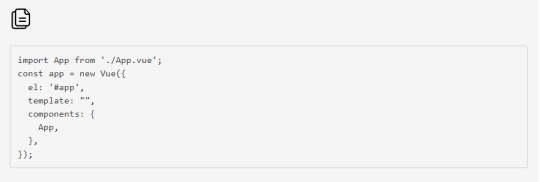
Read more to Create App.vue File
0 notes
Text
Noteplus - VueJS, HTML Note Taking Admin Template
Noteplus – VueJS, HTML Note Taking Admin Template
Take Notes, Bookmarks, ToDo Lists, Thoughts & Things with ALL-IN-ONE NotePlus Web App on Themeforest Noteplus is like EverNote-style web template toolkit for web developers and business entrepreneurs. NotePlus stands out with its uniquely designed utility demos like project planning template, everyday chores space, planning template and so on.. It is a modern and versatile dashboard with various…

View On WordPress
0 notes
Text
Not so complete guide to start web development in 2020
Hello there, So it looks like you decided to learn web development for maybe customizing your wordpress site or to develop a super-cool project or maybe a next billion dollar startup(not kidding it’s possible), but you do not know how to start or even what is web development. Don’t worry that is why we are here right?? So let’s get started.

What is Web development?
In layman terms, when we try to develop something which may appear on web, then that process could be termed as web development. But now a days, we also develop backend( wait a minute we will soon get to it) for mobile apps.
Web brings out unique value on table. It do not matter you are on Mac, Windows, iphones , android and any other device out there but if it can connect to internet, they can see your content. You don’t even need to install a application on your device which will consume space. Hence, web development continues to be a hot topic to learn.Now it leads to next question,
How does it work?
Website usually has two components:-
1)back-end:-
This part of website hold information about the content you hold, account information about the users who visit your website and the business logic of your website(simply, how it works). If you are interested about learning how a website works more than how it looks, this is a great place to start.
To create back-end, web developers use frameworks which speed up the whole process. I will write down some major frameworks and the source which you can use to learn more about them
a)Node js:- This framework is uses javascript as its language and currently is the fastest growing community behind it. Some resources worth mention are:-
1)Official Docs
2)MDN Docs:-Devs at Mozilla has a nice blog series about node and express where they teach you how to create a project using node.It is great is you are someone who learns by making things.
b)Django:- Django is a robust web framework which is already being used by giants which means its battle-tested for production usage. It’s my favourite framework due to its straightforward workflow which keeps your project nice and tidy.It uses python and its community is great and there is a chance that if you encountered a problem, it has already been solved.
1)Official Docs:- It’s a reference guide about all the features available in django.
2)Tutorials:- Django’s official website also provides a nice tutorials series about how to create a web project using django where they introduces to core functionality of django.
2) Front-end:-
As the name suggest, this part deals with the looks and experience of a site. It is responsible for user experience and a crucial part of your site. It is the part to which a user directly interacts and this part communicates with the back-end to make changes in database.
Traditionally, we are using HTML,CSS and vanilla javascript to develop front-end but nowadays, we are using javascript frameworks to develop front-end. I will list some of the major frameworks.
a)ReactJS:-This framework is inarguably the most popular front-end framework partially due to the fact that it is backed by facebook. I feel their docs are more than enough to get started in React.
1)Tutorials:-It teaches you reactjs by creating a tic-tac-toe.The biggest advantage of this tutorial is that it does not consider you to have any prior knowledge about react.
b)Vue Js:- It’s probably the next big thing happening in front-end. I believe its adoption for developing product is not that much if you compared it to react but its support by developers is great. With time, you are sure to see some pretty nice things happening with Vuejs.
1)Introduction
Please note that this list do not contain all frameworks like PHP, RubyonRails, Angular,Flask etc. but it might serve as a introduction about web development.
If you feel like you need to have a tutorial series or need a opinion, feel free to contact me.
#code#coding#html#css#web development#web developers#webdev#programming#2020#hacktoberfest#coder#programmer#python#django#node js#reactjs#vuejs
0 notes
Text
VueJS & Firestore Stripped-Back - Tutorial Part 4
In this tutorial series we are stripping everything back to basics to explain how to build full-stack web applications with VueJS and Firebase Cloud Firestore - no CLIs, NPM or Webpack - just a html page and a code editor.
Updating your data
Welcome back. In this fourth part of our Stripped-Back tutorial we’re going to be explaining the U in CRUD - Updating data. By the way if you haven’t read the previous parts of this tutorial please feel free to do so using these links : Part 1, Part 2, Part 3
In the previous part of the tutorial we retrieved the data from our Firestore database by running a realtime query and populating an employees array with the data we retrieved including all of the fields such as lastName, jobTitle etc. However to be able to update (and indeed delete for that matter) we need to be able to get a handle on a unique ID for each employee document that is retrieved so we’ll know what to update when the user saves a change. If you remember from part 2, when you were checking your Firestore console, we mentioned a strange looking ID attached to each document in the Employees collection - this is what we’ll need to get hold of.
To do this we’ll first need to setup a place to store a unique id, so we’ll add an Id property to our employee object in the data section of our Vue Instance Object :
var app = new Vue({ el : ’#app’, data : { appTitle : ‘EmployeeMagic’, mainStyle : { ‘margin’ : ’20px’ }, employee : {firstName : ‘’, lastName : ‘’, jobTitle : ‘’, dept : ‘’, age : 0, id : ‘’ }, db : {}, employees : [ ] },
Next we’ll need to go back and change our callback function which gets the data from each document and puts it into our employees array. In there we’ll need to make sure the unique id from each document is stored in the employee’s new id property as well as the other fields.
created : function() { let that = this that.db = firebase.firestore() let query = that.db.collection(’Employees’) .orderBy(’lastName’) query.onSnapshot((snapshot) => { that.employees = [ ] snapshot.forEach((doc) => { that.employees.push({ id : doc.id, firstName : doc.data().firstName, lastName : doc.data().lastName, jobTitle : doc.data().jobTitle, dept : doc.data().dept, age : doc.data().age }) }) }) }
Notice we didn’t need to go through the data() method to get our id, it’s available directly on the document object itself. On our template, we’ll add an Edit button into the table alongside each employee so the end-user can click the Edit button next to the employee they want to update. We’ll add the button inside the Age column.
<table class=“table table-bordered table-striped”> <thead> <th>Name</th> <th>Job Title</th> <th>Department</th> <th>Age</th> </thead>
<tbody> <tr v-for=“employee in employees”> <td>{{ employee.firstName }} {{ employee.lastName }}</td> <td>{{ employee.jobTitle }}</td> <td>{{ employee.dept }}</td> <td>{{ employee.age }} <button class="badge badge-primary">Edit</button> </td> </tr> </tbody> </table>
We obviously need to have a click event handler on the new Edit button but each button needs a reference to the employee it represents in order to know which one has been selected to be edited. Vue offers a way to deal with this by allowing a second parameter in the v-for directive. This second parameter can be used to expose the index of the array element that v-for is iterating over so we can reference it elsewhere, in this case we want to pass it as the parameter for our click event handler so the function we call knows the index of the employee it’s dealing with.
<tr v-for=“(employee, idx) in employees”>
We can now assign our click handler to our Edit button and pass in the index of each employee, using the idx that we exposed from v-for, as the parameter. We explained the v-on:click directive in part 2 (remember you can also use the shorthand @click if you’d like).
<button v-on:click=“editEmployee(idx)” class="badge badge-primary">Edit</button>
The next step is to implement the editEmployee() click handler which we can do by adding it to the methods object in our Vue Instance. Remember we’re implementing all of our methods in our Vue Instance as arrow functions.
methods : { saveEmployee : () => { if ((app.employee.firstName) && (app.employee.lastName)) app.db.collection(‘Employees’).add(app.employee) .then(function() { app.clearEmployee() }) .catch(function() { console.log(‘Error saving employee ‘ + app.employee.firstName + ‘ ‘ + app.employee.lastName) }) else alert(‘You must enter both a first and last name to save.’) }, editEmployee : (idx) => { }, clearEmployee : () => { app.employee = { firstName : ‘’, lastName : ‘’, jobTitle : ‘’, dept : ‘’, age : 0 } } },
The job of the editEmployee function is to grab the selected employee’s information and populate the employee object’s properties from the correct element on the employees array. We can determine which employee in our array to use by referencing the idx parameter passed to the function from the button. Once our employee object is populated, Vue’s data binding takes care of the rest to display it on the page.
editEmployee : (idx) => { let emp = app.employees[idx] if (emp) { app.employee = { id : emp.id, firstName : emp.firstName, lastName : emp.lastName, jobTitle : emp.jobTitle, dept : emp.dept, age : emp.age } } },
Save the changes and refresh the browser and make sure everything is working as it should. You should see a blue Edit button in the Age column of the table and when you click it, that employee’s information should be displayed in the input boxes. We now need to handle saving updates to existing records when the user clicks Save rather than simply adding it as new record as it does now. We’ll keep the same Save button and the same saveEmployee click handler method, however we’ll make a decision as to whether we need to save as a new employee or as an update to an existing employee. The way to determine this is quite straightforward, if the employee object has a value in it’s id property it’s an existing record, otherwise it’s a new record. For this to work we need to make a quick change first to the clearEmployee method and ensure it clears the id property as well.
clearEmployee : () => { app.employee = { firstName : ‘’, lastName : ‘’, jobTitle : ‘’, dept : ‘’, age : 0, id : ‘’ } }
Let’s go to our saveEmployee method and add that condition to determine whether we’re saving a new employee or an existing one. For saving new employees we simply need to check if the employee.id isn’t set. Note that rather than simply save the employee object as we did previously, we’re defining a new object from the information in the employee object. The reason for this is simply that we’ve added an id property to the employee object and we don’t want to save this as an additional field on the document
saveEmployee : () => { if ((app.employee.firstName) && (app.employee.lastName)) { let saveEmp = { firstName : employee.firstName, lastName : employee.lastName, jobTitle : employee.jobTitle, dept : employee.dept, age : employee.age } if (! app.employee.id) //check if the id has not been set app.db.collection(‘Employees’).add(saveEmp) .then(() => { app.clearEmployee() }) .catch(() => { console.log(‘Error saving employee ‘ + app.employee.firstName + ‘ ‘ + app.employee.lastName) }) else { } //if the id has been set } else alert(‘You must enter both a first and last name to save.’) },
Now let’s see how to save an update to an existing employee. First of all we need to grab an object reference to the specific document we want to update and we get this using the id of the employee.
let docRef = app.db.collection('Employees').doc(app.employee.id)
Now we’ve got a reference to the specific document in our Employees collection in Firestore, we can just simply call Firestore’s set() method and pass in the object with our updated information and our employee record will be updated.
if (docRef) docRef.set(saveEmp)
The set() method is asynchronous, like most Firestore methods, so if there’s any code we want to execute once we’re certain that the update has saved, we can implement it in the returned promise’s then() method (as we covered in part 2). In the method we pass to then() we simply call clearEmployee to clear the inputs and make it ready to add a new employee again, just as we did when adding new employees (and we’ll add a catch() just in case).
if (docRef) docRef.set(saveEmp) .then(() => { app.clearEmployee() }) .catch(() => { console.log(’Update to ‘ + app.firstName + ' ' + app.lastName + ' did not save!'); })
So let’s put this all together in our saveEmployee method :
saveEmployee : () => { if ((app.employee.firstName) && (app.employee.lastName)) { let saveEmp = { firstName : app.employee.firstName, lastName : app.employee.lastName, jobTitle : app.employee.jobTitle, dept : app.employee.dept, age : app.employee.age } if (! app.employee.id) //check if the id has not been set app.db.collection(‘Employees’).add(saveEmp) .then(() => { app.clearEmployee() }) .catch(() => { console.log(‘Error saving employee ‘ + app.employee.firstName + ‘ ‘ + app.employee.lastName) }) else { //if the id has been set, we save an update let docRef = app.db.collection('Employees').doc(app.employee.id) if (docRef) �� docRef.set(saveEmp) .then(() => { app.clearEmployee() }) .catch(() => { console.log(’Error updating employee ‘ + app.firstName + ' ' + app.lastName) }) } } else alert(‘You must enter both a first and last name to save.’) },
This is fairly verbose and we could certainly tidy things up but it works and it’s verbosity helps to explain what it is we’re doing so we’ll leave this as it is. Before we close this part of the tutorial off and let you go and get a much deserved coffee, let’s add one more little piece of functionality to our app. Things are great, but let’s say the user clicks to Edit an employee and realises they don’t want to save - at the moment there’s no way for them to go back to add a new one. To get around this we’ll put an Add button next to the Save button that let’s them click to add a new employee. This button however should only be available if they’re editing an existing employee.
<label>Age</label> <input type=“number” v-model:number=“employee.age”></br> <button v-on:click=“saveEmployee()”>Save</button> <button v-on:click=“clearEmployee()”>Add</button> </div>
Notice we’re directly calling our clearEmployee method as our event handler as that does everything we need to put our app into Add mode. Cool, but remember we only want to show this button if the user is in Edit mode. The way to do this is to use Vue’s conditional directive, v-if. This lets us include a conditional statement on the element, whether directly of via a method call, to determine if it should be visible on the page. In this case we want to check if the current employee object has an id set, if it has then we’re in edit mode so show the Add button, otherwise don’t show it.
<button v-if=“employee.id” v-on:click=“clearEmployee()”>Add</button>
That’ll do for this part of the tutorial dedicated to the U in CRUD. In this part we’ve covered retrieving each document’s unique id along with the other fields. We’ve added an Edit button for each employee in the list and exposed an index from our v-for directive to assign an employee index from our array so each button knows which employee it relates to. We‘ve saved our employee updates back to the database using the unique id of each document and finally we covered using v-if to conditionally show a button on our page. In the next part of this tutorial we’ll cover the D in CRUD - deleting. Hope you can join me.
You can download the completed code for this part of the tutorial on Github using the repo below and select the part4 folder. https://github.com/MancDev/VueFire
1 note
·
View note
Text
2017 IN REVIEW
いつもの感じで、2017年振り返ってみました。
GitHub の草 (contributions)
2017年の草はこんな感じになりました。2016年の草も比較のために載せておきます。
2017 GitHub contributions
2016 GitHub contributions
contributions は今年は 4151 で、去年は 3505。
去年と同じく、Vue.js の OSS によるレビューや公式ドキュメント、awesome-vue のメンテなどによる活動がほとんど。後は、Storybook とか、個人の vue-i18n といった感じでしょう。
今年は去年より増えていますが、OSS の方では、そんなにガリガリコード書いてコミットしてないので、業務で新規開発プロジェクトがあったからその開発コミット数で膨らんでいるんという感じでしょうか。
イベントでの発表
今年の発表は以下の 5 件 でした。
Vue.js vue build
イベント: DIST.14 「事例で見るVue.jsとJavaScript LT」
Vue.js Single File Components++
イベント: Meguro.es x Gotanda.js #1 in Drecom
Vue on Storybook
イベント: Node学園 26時限目
Vue.js Extend with Compiler
イベント: ToKyoto.js ― Kyoto.js in Tokyo
Future of Vue.js
イベント: Vue.js Tokyo v-meetup #6
去年と比べると落ち着いた感じです。去年のふりかりで断言したとおり控えることができました。
イベント主催
自分、Vue.js 日本ユーザーグループの organaizer ですが、今年は以下の Meetup イベント 4 件開催しました。
Vue.js Tokyo v-meetup="#3" (参加申し込み数: 251)
Vue.js Tokyo v-meetup #4 (参加申し込み数: 294)
Vue.js Tokyo v-meetup #5 (参加申し込み数: 243)
Vue.js Tokyo v-meetup #6 (参加申し込み数: 270)
去年は2件だったのに、今年は4件。先日のブログで書いたとおり、これは完全 Vue.js 人気の余波です。参加申し込み人数が常に200人オーバーで、募集開始から1時間もかからないうちに定員達する人気ぶり。
去年まで初期メンバーのVue.js 日本ユーザーグループスタッフと私で運営していましたので、この規模になるとフルスタックでは手に負えなくなったので、途中から新規に運営メンバーを募集して今はイベント当日は12〜15名ぐらいで運営できるようになって大分楽になった感じです。100名規模が集まるMeetupイベントの運営を支えれるようになったのは、スタッフの皆さんのおかげなので大変感謝です🙏 。
OSS 活動
去年に引き続き、 Vue.js のコアチームメンバーとして活動しています。主に以下の活動をしました。
vuejs/jp.vuejs.org: Vue.js 日本語公式ドキュメントの翻訳メンテ
vuejs/vue-ssr-docs: Vue.js サーバサイドレンダリングのドキュメント翻訳とメンテ
vuejs/awesome-vue: Vue.js 関連のライブラリやエコシステムの素晴らしいリスト
その他の以下レポジトリのドキュメント翻訳メンテ
vuejs/vue-router
vuejs/vuex
vuejs/vue-loader
vuejs/vue-test-utils
去年は Vue 2.0 のリリースのために、Vue コアの単体テストといったドキュメント以外に実装にもコミットできていたんですけど、今年はドキュメントのコミットとなった感じです。
vuejs/vue-ssr-docs は新規ドキュメントの翻訳だったので大変だったので、Vue 2.0 のドキュメント翻訳と同様に、Vue.js コミュニティの力と、GitLocalizeの力を借りてやりました。
中でも、GitLocalizeはホント助かりました。翻訳の一番大変なのは、原文の更新の追跡なので、GitLocalizeで追跡して検出してくれるのは大変助かりました。GitLocalizeの中の人には大変感謝です。
今回の翻訳では、GitLocalize を利用させて頂きました。GitLocalize にも大変感謝です!https://t.co/2yaQv2qxoY
— 🐤kazuya kawaguchi🐤 (@kazu_pon) 2017年7月11日
vuejs/jp.vuejs.org のドキュメントメンテは、コミュニティの方が参加してくれるようになったので、去年とくらべて楽になりました。中でも、re-fort さんの che-tsumi という bot の投入は、GitHub Issues で翻訳内容が Issue という形でチケット化され、そしてそのまま取り込めるものは Pull Request にしてくれるようになったので、大分運用負荷と管理が低減されるようになりました。日本の Vue.js コミュニティには大変感謝です🙇。
他に、Vue.js 関連で自分がメンテしているものとして、vue-i18n と vue-validator を持っているのですが、これらについても活動しています。
多言語化ライブラリの vue-i18n については、以下のメジャーリリースをしています。
6.0.0
7.0.0
そして、ここ直近の 7.3.0 のリリースでは、パフォーマンスを最大化できるように対応しましたが、この時このリリース対応の内容がどん��ものであるかどうか分かってもらえるよう、初めて英語でブログ記事書きました。普段ブログもそんなに書かないの上、さらに英語なので大変でしたが、書いてみて意外と英語で書けるもんなんだなあと実感しました。海外の人に読みやすいものかどうか分かりませんが。
vue-validator については、去年Vue.js公式から取り下げてからメンテできていないのと、今後 i18n にフォーカスしていきたいため、残念がらつい最近開発を停止することを決意し、リポジトリを archive しました。
I archived vue-validator ✅ repository, due to I'll focus to vue-i18n 🌐 maintanance and new ideas of i18n architechture for WebAssembly. Thank you for everything you have done for vue-validator. /cc @vuejs https://t.co/MhNTZrqpGx
— 🐤kazuya kawaguchi🐤 (@kazu_pon) 2017年12月25日
最後に、Vue.js 以外の OSS 活動に取り組みとして、Storybook で Vue をサポートするために、メンバーに加わって活動しました。
つい先日のブログ記事にも書きましたが、Storybook はコンポーネントといったUI開発環境を提供するツール的なものですが、React.js、Raact Native といった React 関連ののみしかサポートしていませんでした。同様なものとして、vue-playがありますが、作者のegoist氏が vue-play に対して活動がアクティブではおらず、Storybook と同等のものが利用できる状態ではありませんでした。
そんな中、Storybook で Vue.js をサポートするために Storybook のメンバーといっしょに自分も開発を進めてリリースできたことは、大変エキサイティングであったし、Vue.js コミュニティが Storybook を使って効率的なコンポーネント開発を可能になるのは、開発体験(DX: Development Experience)がよくなるので、ホントよかったと思っています。また、Storybook のチームメンバとして参加することによって、他の OSS の文化を体験することができてよかったと思っています。
ポッドキャスト
2017 年は初めてポッドキャストに出演した。しかも、いきなり 5 件も。
genba.fm: #1 Awesome Vue
soussune: 28. コアコミッターが語るVue.jsの話
soussune: 32. Vueでワイワイやっていき
soussune: 33. Vueでワイワイやっていき Aftershow
しがないラジオ: sp.9a【ゲスト: kazu_pon】楽しい廃人格闘ゲーマーがWeb系CTOになるまで
しがないラジオ: sp.9b【ゲスト: kazu_pon】楽しいOSSコアチームメンバーへの道
ポッドキャストは中々難しいですね。話すシナリオは予め show notes などで考えているんですが、実際にはパーソナリティと対話形式みたいな感じで進めていくので、リスナーのみなさんを意識した喋る必要がありますので。
来年はもう少しリスナーに聴きやすい話し方にしていきたいところです。
仕事関係
今年も引き続き、CTO として会社のシステム全般をリードしながら開発しつつ、CFO 的な会社の予算計画やキャッシュフロー周りをみながらやっていますが、今年は採用周りの人事もやっています。
開発は、今年は新規プロジェクトが立ち上がり無事終えて、次回に向けて進めることができてよかったのですが、それに伴い開発力を強化するためにエンジニアが必要になってきています。今年は自分の目標としては新しい仲間を増やしたかったのですが、現時点の結果としては採用できていないので、なぜ採用できなかったのか、いろいろと反省してみて、引き続き新しい仲間と共にいっしょにやっていけるようにしたいところです。
来年度にむけて (まとめ)
今年も、OSS の方は去年に引き続き Vue.js コアチームとして OSS 活動し、他に Storybook のメンバーとして OSS 活動しました。
イベントの方は新たに加わったスタッフと共にいっしょにやることで定期的に開催し、役割分担することで運営することができました。
仕事の方は、引き続き CTO & 開発、経営企画しながら、さらに人事周りの経験してきました。
来年度ですが、OSS の方は、Vue.js のミッションに向けて引き続きコアチーム、そして Storybook のメンバーとして OSS 活動していきますが、翻訳以外に OSS 開発する時間を増やしていきたいと考えています。
具体的には、WebAssembly 時代を想定した i18n の新しいアーキテクチャのプロトタイプを実装していきたいと考えています。
WebAssembly の方は今年主要ブラウザでサポートするようになり、それに伴い AssemblyScript にような WebAssembly をサポートするような言語も出現しつつあります。また、WebAssembly は GC などの次に向けた仕様や、Web 以外での動作も想定した仕様が策定されつつあります。
これまで、vue-i18n を通して多言語化ライブラリを作成してきましたが、そのライブラリ開発や ECMA-402 の仕様、そしてこの"i18n ライブラリ、フレームワークは新しい todo apps?"という記事"にもある通り、特定のプログラミング言語や、ライブラリ、フレームワークに依存しない、i18n のアーキテクチャを考えて仕組みを提供したいと思うようになりました。
WebAssembly の将来性を考えると、i18n はまさにユースケースにピッタリだと考えています。
来年度は、WebAssembly 関係の技術をウォッチしつつ、i18n の新しいアーキテクチャの PoC を��っていきたいところです。
イベントの方は、日本で Vue.js カンファレンス開催に向けて、スタッフといっしょに頑張ります!💪
仕事の方は、何としてでも新しい仲間といっしょにやっていきたいところです。
それでは、皆様、良いお年を。来年もよろしくお願いいたします。
3 notes
·
View notes
Link
Nuxt.js provides an Axios module for easy integration with your application. Axios is a promise-based HTTP client that works in the browser and Node.js environment or, in simpler terms, it is a tool for making requests (e.g API calls) in client-side applications and Node.js environment. In this tutorial, we’re going to learn how to use the Axios module and how to make a request on the server-side using asyncData and fetch. These two methods make a request on the server-side but they have some differences which we’re also going to cover. Finally, we’ll learn how to perform authentication and secure pages/routes using the auth module and auth middleware. This article requires basic knowledge of Nuxtjs and Vuejs as we’ll be building on top of that. For those without experience with Vuejs, I recommend you start from their official documentation and the Nuxt official page before continuing with this article.
What Is The Nuxt.js Axios Module?
According to the official Documentation,
“It is a Secure and easy Axios integration with Nuxt.js.”
Here are some of its features:
Automatically set base URL for client-side & server-side.
Proxy request headers in SSR (Useful for auth).
Fetch Style requests.
Integrated with Nuxt.js Progressbar while making requests.
To use the axios module in your application, you will have to first install it by using either npm or yarn. YARN
yarn add @nuxtjs/axios
NPM
npm install @nuxtjs/axios
Add it into your nuxt.config.js file:
modules: [ '@nuxtjs/axios', ], axios: { // extra config e.g // BaseURL: 'https://link-to-API' }
The modules array accepts a list of Nuxt.js modules such as dotenv, auth and in this case, Axios. What we’ve done is to inform our application that we would be using the Axios module, which we reference using @nuxtjs/axios. This is then followed by the axios property which is an object of configurations like the baseURL for both client-side and server-side. Now, you can access Axios from anywhere in your application by calling this.$axios.method or this.$axios.$method. Where method can be get, post, or delete.
Making Your First Request Using Axios
For this tutorial, I’ve put together a simple application on Github. The repository contains two folders, start and finish, the start folder contains all you need to get right into the tutorial. The finish folder contains a completed version of what we would be building. After cloning the repo and opening the start folder, we would need to install all our packages in the package.json file so open your terminal and run the following command:
npm install
Once that is done, we can start our app using the npm run dev command. This is what you should see when you go to localhost:3000.
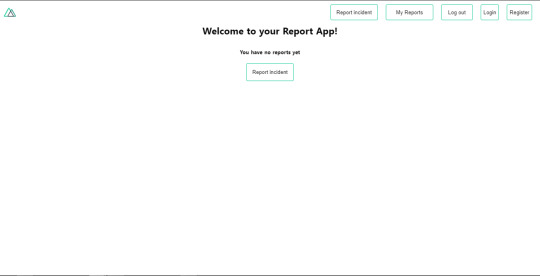
Our application’s landing page. (Large preview)
The next thing we have to do is to create a .env file in the root folder of our application and add our API URL to it. For this tutorial, we’ll be using a sample API built to collect reports from users.
API_URL=https://ireporter-endpoint.herokuapp.com/api/v2/
This way, we do not have to hard code our API into our app which is useful for working with two APIs (development and production). The next step would be to open our nuxt.config.js file and add the environmental variable to our axios config that we added above.
/* ** Axios module configuration */ axios: { // See https://github.com/nuxt-community/axios-module#options baseURL: process.env.API_URL, },
Here, we tell Nuxt.js to use this baseURL for both our client-side and server-side requests whenever we use this Axios module. Now, to fetch a list of reports, let us open the index.vue file and add the following method to the script section.
async getIncidents() { let res = await this.$store.dispatch("getIncidents"); this.incidents = res.data.data.incidents; }
What we have done is to create an async function that we call getIncidents() and we can tell what it does from the name — it fetches a list of incidents using the Vuex store action method this.$store.dispatch. We assign the response from this action to our incidents property so we can be able to make use of it in the component. We want to call the getIncidents() method whenever the component mounts. We can do that using the mounted hook.
mounted() { this.getIncidents() }
mounted() is a lifecycle hook that gets called when the component mounts. That will cause the call to the API to happen when the component mounts. Now, let us go into our index.js file in our store and create this action where we’ll be making our Axios request from.
export const actions = { async getIncidents() { let res = await this.$axios.get('/incidents') return res; } }
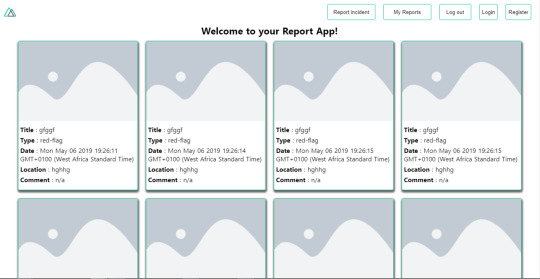
Here, we created the action called getIncidents which is an async function, then we await a response from the server and return this response. The response from this action is sent back to our getIncidents() method in our index.vue file. If we refresh our application, we should now be able to see a long list of incidents rendered on the page.
List of incidents on landing page. (Large preview)
We have made our first request using Axios but we won’t stop there, we are going to be trying out asyncData and fetch to see the differences between them and using Axios.
AsyncData
AsyncData fetches data on the server-side and it’s called before loading the page component. It does not have access to this because it is called before your page component data is created. this is only available after the created hook has been called so Nuxt.js automatically merges the returned data into the component’s data. Using asyncData is good for SEO because it fetches your site’s content on the server-side and also helps in loading content faster. Note that asyncData method can only be used in the pages folder of your application as it would not work in the components folder. This is because asyncData hook gets called before your component is created.
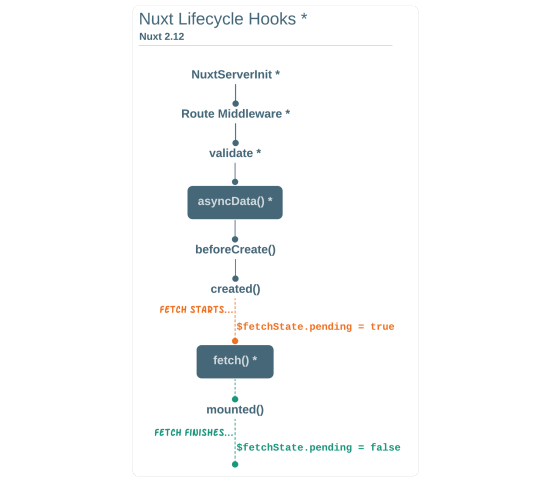
Image from Nuxt blog. (Large preview)
Let us add asyncData to our index.vue file and observe how fast our incidents data loads. Add the following code after our components property and let us get rid of our mounted hook.
async asyncData({ $axios }) { let { data } = await $axios.get("/incidents"); return { incidents: data.data.incidents }; }, // mounted() { // this.getIncidents(); // },
Here, the asyncData method accepts a property from the context $axios. We use this property to fetch the list of incidents and the value is then returned. This value is automatically injected into our component. Now, you can notice how fast your content loads if you refresh the page and at no time is there no incident to render.
Fetch
The Fetch method is also used to make requests on the server-side. It is called after the created hook in the life cycle which means it has access to the component’s data. Unlike the asyncData method, the fetch method can be used in all .vue files and be used with the Vuex store. This means that if you have the following in your data function.
data() { return { incidents: [], id: 5, gender: 'male' }; }
You can easily modify id or gender by calling this.id or this.gender.
Using Axios As A Plugin
During the process of development with Axios, you might find that you need extra configuration like creating instances and interceptors for your request so your application can work as intended and thankfully, we can do that by extending our Axios into a plugin. To extend axios, you have to create a plugin (e.g. axios.js) in your plugins folder.
export default function ({ $axios, store, redirect }) { $axios.onError(error => { if (error.response && error.response.status === 500) { redirect('/login') } }) $axios.interceptors.response.use( response => { if (response.status === 200) { if (response.request.responseURL && response.request.responseURL.includes('login')) { store.dispatch("setUser", response); } } return response } ) }
This is an example of a plugin I wrote for a Nuxt application. Here, your function takes in a context object of $axios, store and redirect which we would use in configuring the plugin. The first thing we do is to listen for an error with a status of 500 using $axios.onError and redirect the user to the login page. We also have an interceptor that intercepts every request response we make in our application checks if the status of the response we get is 200. If that is true we proceed and check that there is a response.request.responseURL and if it includes login. If this checks out to be true, we then send this response using our store’s dispatch method where it then mutated in our state. Add this plugin to your nuxt.config.js file:
plugins: [ '~/plugins/axios' ]
After doing this, your Axios plugin would intercept any request you make and check if you have defined a special case for it.
Introduction To The Auth Module
The auth module is used for performing authentication for your Nuxt application and can be accessed from anywhere in your application using $this.auth. It is also available in fetch, asyncData, middleware and NuxtInitServer from the context object as $auth. The context provides additional objects/params from Nuxt to Vue components and is available in special nuxt lifecycle areas like those mentioned above. To use the auth module in your application, you would have to install it using yarn or npm. YARN
yarn add @nuxtjs/auth
NPM
npm install @nuxtjs/auth
Add it to your nuxt.config.js file.
modules: [ '@nuxtjs/auth' ], auth: { // Options }
The auth property accepts a list of properties such as strategies and redirect. Here, strategies accepts your preferred authentication method which can be:
local For username/email and password-based flow.
facebook For using Facebook accounts as a means of authentication.
Github For authenticating users with Github accounts.
Google For authenticating users with Google accounts.
Auth0
Laravel Passport
The redirect property accepts an object of links for:
login Users would be redirected to this link if login is required.
logout Users would be redirected here if after logout current route is protected.
home Users would be redirected here after login.
Now, let us add the following to our nuxt.config.js file.
/* ** Auth module configuration */ auth: { redirect: { login: '/login', logout: '/', home: '/my-reports' }, strategies: { local: { endpoints: { login: { url: "/user/login", method: "post", propertyName: "data.token", }, logout: false, user: false, }, tokenType: '', tokenName: 'x-auth', autoFetchUser: false }, }, }
Please note that the auth method works best when there is a user endpoint provided in the option above. Inside the auth config object, we have a redirect option in which we set our login route to /login, logout route to / and home route to /my-reports which would all behave as expected. We also have a tokenType property which represents the Authorization type in the header of our Axios request. It is set to Bearer by default and can be changed to work with your API. For our API, there is no token type and this is why we’re going to leave it as an empty string. The tokenName represents the Authorization name (or the header property you want to attach your token to) inside your header in your Axios request. By default, it is set to Authorization but for our API, the Authorization name is x-auth. The autoFetchUser property is used to enable user fetch object using the user endpoint property after login. It is true by default but our API does not have a user endpoint so we have set that to false. For this tutorial, we would be using the local strategy. In our strategies, we have the local option with endpoints for login, user and logout but in our case, we would only use the *login* option because our demo API does not have a *logout* endpoint and our user object is being returned when *login* is successful. Note: The auth module does not have a register endpoint option so that means we’re going to register the traditional way and redirect the user to the login page where we will perform the authentication using this.$auth.loginWith. This is the method used in authenticating your users. It accepts a ‘strategy’ (e.g local) as a first argument and then an object to perform this authentication with. Take a look at the following example.
let data { email: '[email protected]', password: '123456' } this.$auth.loginWith('local', { data })
Using The Auth Module
Now that we have configured our auth module, we can proceed to our registration page. If you visit the /register page, you should see a registration form.
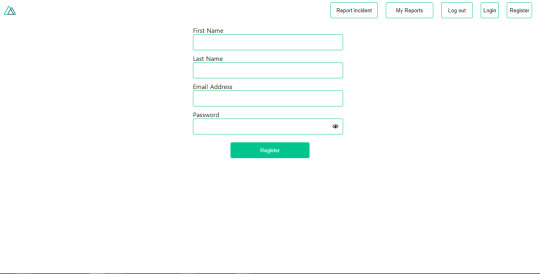
Register page. (Large preview)
Let us make this form functional by adding the following code:
methods: { async registerUser() { this.loading = true; let data = this.register; try { await this.$axios.post("/user/create", data); this.$router.push("/login"); this.loading = false; this.$notify({ group: "success", title: "Success!", text: "Account created successfully" }); } catch (error) { this.loading = false; this.$notify({ group: "error", title: "Error!", text: error.response ? error.response.data.error : "Sorry an error occured, check your internet" }); } } }
Here, we have an async function called registerUser which is tied to a click event in our template and makes an Axios request wrapped in a try/catch block to an endpoint /user/create. This redirects to the /login page and notifies the user of a successful registration. We also have a catch block that alerts the user of any error if the request is not successful. If the registration is successful, you would be redirected to the login page.
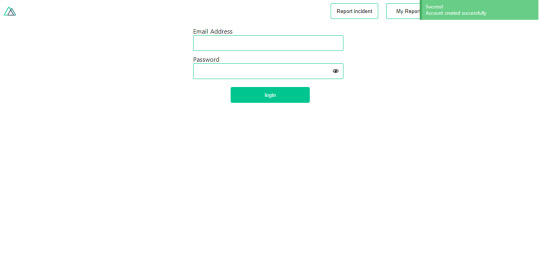
Login page with notification component. (Large preview)
Here, we’re going to make use of auth authentication method this.$auth.loginWith('local', loginData) after which we would use the this.$auth.setUser(userObj) to set the user in our auth instance. To get the login page working, let’s add the following code to our login.vue file.
methods: { async logIn() { let data = this.login; this.loading = true; try { let res = await this.$auth.loginWith("local", { data }); this.loading = false; let user = res.data.data.user; this.$auth.setUser(user); this.$notify({ group: "success", title: "Success!", text: "Welcome!" }); } catch (error) { this.loading = false; this.$notify({ group: "error", title: "Error!", text: error.response ? error.response.data.error : "Sorry an error occured, check your internet" }); } } }
We created an async function called logIn using the auth method this.$auth.loginWith('local, loginData). If this login attempt is successful, we then assign the user data to our auth instance using this.$auth.setUser(userInfo) and redirect the user to the /my-report page. You can now get user data using this.$auth.user or with Vuex using this.$store.state.auth.user but that’s not all. The auth instance contains some other properties which you can see if you log in or check your state using your Vue dev tools. If you log this.$store.state.auth to the console, you’ll see this:
{ "auth": { "user": { "id": "d7a5efdf-0c29-48aa-9255-be818301d602", "email": "[email protected]", "lastName": "Xo", "firstName": "Tm", "othernames": null, "isAdmin": false, "phoneNumber": null, "username": null }, "loggedIn": true, "strategy": "local", "busy": false } }
The auth instance contains a loggedIn property that is useful in switching between authenticated links in the nav/header section of your application. It also contains a strategy method that states the type of strategy the instance is running (e.g local). Now, we will make use of this loggedIn property to arrange our nav links. Update your navBar component to the following:
<template> <header class="header"> <div class="logo"> <nuxt-link to="/"> <Logo /> </nuxt-link> </div> <nav class="nav"> <div class="nav__user" v-if="auth.loggedIn"> <p></p> <button class="nav__link nav__link--long"> <nuxt-link to="/report-incident">Report incident</nuxt-link> </button> <button class="nav__link nav__link--long"> <nuxt-link to="/my-reports">My Reports</nuxt-link> </button> <button class="nav__link" @click.prevent="logOut">Log out</button> </div> <button class="nav__link" v-if="!auth.loggedIn"> <nuxt-link to="/login">Login</nuxt-link> </button> <button class="nav__link" v-if="!auth.loggedIn"> <nuxt-link to="/register">Register</nuxt-link> </button> </nav> </header> </template> <script> import { mapState } from "vuex"; import Logo from "@/components/Logo"; export default { name: "nav-bar", data() { return {}; }, computed: { ...mapState(["auth"]) }, methods: { logOut() { this.$store.dispatch("logOut"); this.$router.push("/login"); } }, components: { Logo } }; </script> <style></style>
In our template section, we have several links to different parts of the application in which we are now using auth.loggedIn to display the appropriate links depending on the authentication status. We have a logout button that has a click event with a logOut() function attached to it. We also display the user’s email gotten from the auth property which is accessed from our Vuex store using the mapState method which maps our state auth to the computed property of the nav component. We also have a logout method that calls our Vuex action logOut and redirects the user to the login page. Now, let us go ahead and update our store to have a logOut action.
export const actions = { // .... logOut() { this.$auth.logout(); } }
The logOut action calls the auth logout method which clears user data, deletes tokens from localStorage and sets loggedIn to false. Routes like /my-reports and report-incident should not be visible to guests but at this point in our app, that is not the case. Nuxt does not have a navigation guard that can protect your routes, but it has is the auth middleware. It gives you the freedom to create your own middleware so you can configure it to work the way you want. It can be set in two ways:
Per route.
Globally for the whole app in your nuxt.config.js file.
router: { middleware: ['auth'] }
This auth middleware works with your auth instance so you do not need to create an auth.js file in your middleware folder. Let us now add this middleware to our my-reports.vue and report-incident.vue files. Add the following lines of code to the script section of each file.
middleware: 'auth'
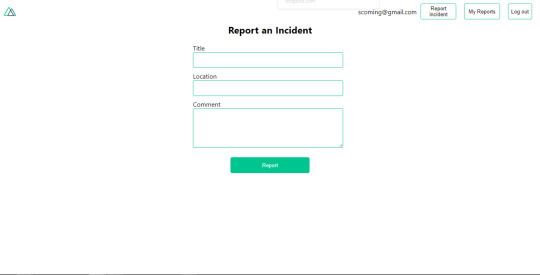
Now, our application would check if the user trying to access these routes has an auth.loggedIn value of true. It’ll redirect them to the login page using our redirect option in our auth config file — if you’re not logged in and you try to visit either /my-report or report-incident, you would be redirected to /login. If you go to /report-incidents, this is what you should see.
Report incident page. (Large preview)
This page is for adding incidents but that right now the form does not send incident to our server because we are not making the call to the server when the user attempts to submit the form. To solve this, we will add a reportIncident method which will be called when the user clicks on Report. We’ll have this in the script section of the component. This method will send the form data to the server. Update your report-incident.vue file with the following:
<template> <section class="report"> <h1 class="report__heading">Report an Incident</h1> <form class="report__form"> <div class="input__container"> <label for="title" class="input__label">Title</label> <input type="text" name="title" id="title" v-model="incident.title" class="input__field" required /> </div> <div class="input__container"> <label for="location" class="input__label">Location</label> <input type="text" name="location" id="location" v-model="incident.location" required class="input__field" /> </div> <div class="input__container"> <label for="comment" class="input__label">Comment</label> <textarea name="comment" id="comment" v-model="incident.comment" class="input__area" cols="30" rows="10" required ></textarea> </div> <input type="submit" value="Report" class="input__button" @click.prevent="reportIncident" /> <p class="loading__indicator" v-if="loading">Please wait....</p> </form> </section> </template> <script> export default { name: "report-incident", middleware: "auth", data() { return { loading: false, incident: { type: "red-flag", title: "", location: "", comment: "" } }; }, methods: { async reportIncident() { let data = this.incident; let formData = new FormData(); formData.append("title", data.title); formData.append("type", data.type); formData.append("location", data.location); formData.append("comment", data.comment); this.loading = true; try { let res = await this.$store.dispatch("reportIncident", formData); this.$notify({ group: "success", title: "Success", text: "Incident reported successfully!" }); this.loading = false; this.$router.push("/my-reports"); } catch (error) { this.loading = false; this.$notify({ group: "error", title: "Error!", text: error.response ? error.response.data.error : "Sorry an error occured, check your internet" }); } } } }; </script> <style> </style>
Here, we have a form with input fields for title, location, and comment with two-way data binding using v-model. We also have a submit button with a click event. In the script section, we have a reportIncident method that collects all the information provided in the form and is sent to our server using FormData because the API is designed to also accept images and videos. This formData is attached to a Vuex action using the dispatch method, if the request is successful, you get redirected to /my-reports with a notification informing you that this request was successful otherwise, you would be notified of an error with the error message. At this point, we don’t have reportIncident action in our store yet so in your browser console, you would see an error if you try to click submit on this page.

Vuex error message. (Large preview)
To fix this, add the reportIncident action your index.js file.
export const actions = { // ... async reportIncident({}, data) { let res = await this.$axios.post('/incident/create', data) return res; } }
Here, we have a reportIncident function that takes in an empty context object and the data we’re sending from our form. This data is then attached to a post request that creates an incident and returns back to our report-incident.vue file. At this point, you should be able to add a report using the form after which you would be redirected to /my-reports page.
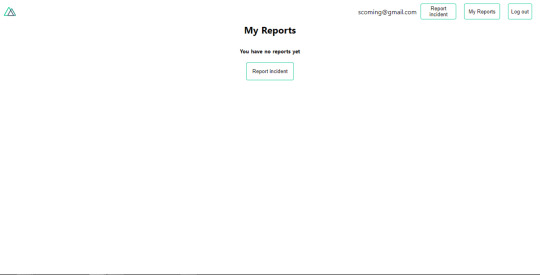
My reports page empty. (Large preview)
This page should display a list of incidents created by the user but right now it only shows what we see above, let’s go ahead to fix that. We’re going to be using the fetch method we learned about to get this list. Update your my-reports.vue file with the following:
<script> import incidentCard from "@/components/incidentCard.vue"; export default { middleware: "auth", name: "my-reports", data() { return { incidents: [] }; }, components: { incidentCard }, async fetch() { let { data } = await this.$axios.get("/user/incidents"); this.incidents = data.data; } }; </script>
Here, we use fetch method to get user-specific incidents and assign the response to our incidents array. If you refresh your page after adding an incident, you should see something like this.
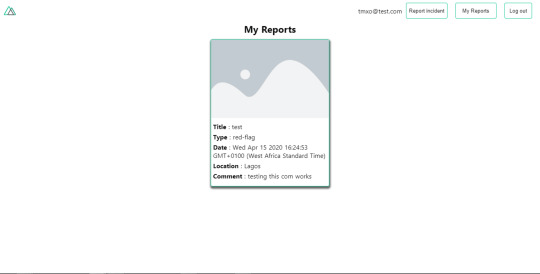
My Reports page with a report. (Large preview)
At this point, we would notice a difference in how fetch method and asyncData loads our data.
Conclusion
So far, we have learned about the Axios module and all of its features. We have also learned more about asyncData, and how we can fetch both of them together despite their differences. We’ve also learned how to perform authentication in our application using the auth module and how to use the auth middleware to protect our routes. Here are some useful resources that talk more about all we’ve covered.
Getting started with meta tags in Nuxjs.
Using the dotenv module in Nuxt.
Using Fetch in your Nuxt app.
Getting started with asyncData.
0 notes
Photo

⚡ Notion ⚡ Do you plan your days? If yes, which app do you use?💥 So I recently found out about @notionhq (thanks to @moritz.code ) and I really loved it! It contains everything I need, a daily planner, goal tracker, habit tracker, notes, to-do, boards (like trello) and everything is free👀 After using it just for 2 days I ditched all other to-do/planner apps and moved to it. Notion's android app is also very good and contains every functionalities. The only thing that annoyed me is that there's no Linux native app available (yet?) I searched a little and found out there's an unofficial one but it's an electron app and does not add anything on top of their official webapp 😩 Hopefully they'll release a Linux app too, but till then I'm using their webapp and that's awesome too - just no offline functionalities ;( I think a programmer should manage/plan their day precisely and this app is helping me to do that. Let me know your opinion about this in comments. Have you ever tried Notion? Follow @codingwitharman for more amazing posts. Stay safe & healthy 🤞🏻 Happy Coding 👨💻 #javascript #softwaredeveloper #webdev #html5 #programmerlife #programmerslife #jquery #coderlife #frontenddeveloper #buildtheweb #webdevelopers #programmingisfun #iosdeveloper #codingbootcamp #peoplewhocode #codelife #fullstackdeveloper #backenddeveloper #codingdays #vue #javascriptdeveloper #reactjs #vuejs https://www.instagram.com/p/CAX_-eWAOuY/?igshid=1sbmt6tmklbl6
#javascript#softwaredeveloper#webdev#html5#programmerlife#programmerslife#jquery#coderlife#frontenddeveloper#buildtheweb#webdevelopers#programmingisfun#iosdeveloper#codingbootcamp#peoplewhocode#codelife#fullstackdeveloper#backenddeveloper#codingdays#vue#javascriptdeveloper#reactjs#vuejs
0 notes
Link
10 Useful Things That Front End Developers Should Learn In 2020
Front end developers are in high demand, find out what skills leading front end web design and development experts use the most.
2020 is here with us and from the look of things, it is going to be a great year for front end web design and everything to do with front end development. Unlike the recent times where front end developers in their space just had to something on jQuery, HTML or CSS, front end developers need to take the bull by its horns and face the dynamic ecosystem of skills necessary for developing libraries, tools and frameworks so that they can master the craft.
Delving into the past, it is evident that the past couple of years has blessed individuals in the front end development space with some amazing new frameworks and libraries including VueJS, Svelte and ReactJS that make use of JavaScript for powering up to major web applications. As a developer, you will find this article quite interesting while it sheds more light on some of the few core things you should strive to focus on to up your developing game in case you are an entry-level front end developer or already have a grip of things. Nowadays, there are many IT job opportunities for those who want to apply.
Here are the top 10 things to get you started this year.
JAMstack
This is a combination of JavaScript, API and markup. This combination is an interesting approach of developing apps and websites for purposes of bettering their performance and at the same time scaling down the costs involved. It functions to offer a developer a better experience while providing higher security. This makes learning this an interesting objective because all of them don’t depend on a webserver to function. For instance, if you take a look at a monolithic app that has some reliance on Node.js or Ruby back end or any site that is developed with such a server-side CMS as WordPress or Drupal, you will realise that all of them are not JAMstack developed. However, to learn working with JAMstack, some of the following best practices are crucial:
Automated builds: The use of automated builds is near perfect because every instance of markup is prebuilt with programs like cloud services or webhooks.
Instant cache validation: You definitely have to find a way of learning anything to do with instant cache validation because at that point any site goes live, it should be your responsibility to ensure that your CDN has the capacity to handle any form of instant cache purges for any kind of change to get visible.
Serving your project on a CDN: Since there is no need for a server, you can serve the whole of your project on a CDN, which gives you the ability to unlock performance and speeds that are unbeatable.
Atomic deploys: It would be in your best interest to avoid any case of inconsistent states by redeploying a large number of files in a large project. This practice will come in handy since it waits for every file to be uploaded just before any changes finally go live.
GraphQL
2020 should not pass before you get your way around working with GraphQL. This is despite the fact that for a long time now many people have considered REST as the effective measure for the design of web APIs since it offers concepts like stateless servers. This is because RESTful APIs are seemingly inflexible because they do not easily adapt to any changing clients wishing to access them. That is why Facebook developed GraphQL to fight the challenges that many developers face while dealing with RESTful APIs in the process of web development. The program will enable developers to send a query to its server with the data requirements, which would then return corresponding data with JSON object.
Testing
As an entry-level front end web developer, you should learn on the importance of testing because no code that is untested should go into production since they are mandatory in commercial projects. There are different tests you should keep in mind including:
Integration tests, which test any form of interaction between components.
End-to-end tests, which are instrumental in testing full-blown user flows in browsers.
Unit tests, which are essential in testing functions in isolation or a single component.
Soft Skills
As a front end developer, you might e tempted into overlooking the acquisition of skills but mark you they are just as important because they help in not only communication with team members but also help in the understanding of the technicalities of things. The most common soft skills you should learn to acquire in 2020 include:
Patience.
Problem-solving.
Teamwork.
Empathy.
Open-mindedness.
Communication.
Time management.
Creativity
Accountability
Git
This a form of a standardized version of control in web development. Therefore, it is only necessary that as a front end developer you strive to know and understand some of the basic concepts and workflows in order to effectively work in all sizes of teams plus understanding the underlying concepts. Some of the popular commands to know include:
git add
git config
git clone
git commit
git init
git branch
git push
git pull
Frameworks
There is a need for developers, especially those making use of JavaScript frameworks to focus on Vue and React since, in the recent years, these two have seen tremendous growth, especially in enterprise projects because the past year has sen two giants, VueJS and ReactJS starring a number of stars as compared to Svelte and Angular.
Progressive Web Apps (PWA)
PWA will soon catch up since more and more businesses and companies are choosing to go the PWA way over choosing native apps because they get a richer mobile experience from them. This has been mainly bolstered by the fact that PWAs are becoming more reliable because they can work without an internet connection with instant loading capabilities. These PWAs are also engaging in terms of user experience with that native-app feeling. This means that users can easily utilise the use of service workers for functionalities offline plus a full-screen experience that is enabled by a web-app manifest.
Code Editors/IDEs
VS Code by Microsoft will seemingly continue prevailing in 2020 as the go-to editor just as it did in 2019 for most front end developers. This is because the editor offers developers such IDE-like features as highlighting and code completion with the ability to extend infinitely through its extension marketplace, which is what makes the editor more appealing. Therefore, some great extensions to take note of include:
Prettier.
ESLint.
npm.
Vetur.
Live Sass Compiler.
JavaScript (ES6) code snippets.
Beautify.
Liver Server.
CSS Peek.
Debugger for Chrome.
Static Site Generators
These generators effectively combine the power of single-page applications and that of server-side rendering, which is very instrumental in initial load time and SEO. Therefore, if you believe you are serious in the front end developing, then you should consider projects like Gridsome and Nuxt which are Vue-based and Next and Gatsby, which are React-based. These projects will definitely draw some heat in 2020 since they come with such features as module bundlers, markdown support, integrated test runners and more.
Clean Code
The ability to write clean code is increasingly becoming more desirable and in high demand in many organisations. This means that learning the fundamentals of clean coding in order to strategically place yourself in 2020. Clean code should not only be pleasing to read and elegant but also focused. This means, as a clean coder, you will have to learn to:
Create codes that speak for themselves without the need for comments.
Create codes with functions that have few arguments and small in nature.
Create names for classes, methods, functions and variables that are meaningful.
All these things should have you encouraged to get busy to see to it that you have successful developing in 2020.
#10 useful things that front end developers should learn in 2020#website design#front end developers
0 notes
Text
#1 Complete Ruby on Rails Single-Page App [The FUTURE]

#1 Complete Ruby on Rails Single-Page App
Turn Any Ruby On Rails Web Application Into Single Page Application Using toufiqElahySPA.js Plugin What you'll learn Building a Powerful and most Complex Single-Page application Within 1 hour Making Cross-Platform Single Page Application with Ruby On Rails How toufiqElahySPA .js plugin can turn any Web application into Single-Page Application within 2 minutes How this Course will minimize development time and cost a lot How Single-page technique will improve the Software performance How toufiqElahySPA .js plugin will make developer's life lot simple Requirements The developer must have experience with Building Ruby On Rails application Developer should have basic knowledge: How Ruby On Rails application works Developer should have experience in Ruby Good Experience with jQuery is preferable Description I HELP ALL STUDENTS VIA TeamViewer USING Skype CALL TO FIX ALL INITIAL ISSUES. I’m always updating this course with fresh content, too. It’s no secret how technology is advancing at a rapid rate. New, more powerful hardware and software are being released every day, meaning it’s crucial to stay on top with the latest knowledge. That’s why I’m always adding new, up-to-date content to this course at no extra charge. Buy this course once, and you’ll have lifetime access to it and any future updates (which are on the way as we speak). A creative way to turn any version of Ruby On Rails Application Into Single-Page Application Within 2 minutes after using my (toufiqElahySPA.js)Jquery Plugin. Here, toufiqElahySPA.js is a Jquery Plugin which is responsible to turn any web application into single page application. I developed this Plugin to minimize developer's effort while working on Creating Single Page Application. Let's see, how my Plugin can make developers life better. Single page applications are more capable of decreasing load time of pages and the amount of data transfer from server to client. Why This Course? There are several pain points while working with Javascript framework like AngularJs, React, VueJs, Knockout, meteor e.t.c. in a Python Django application in order to create Single-Page Application. Few Pain Points Are: Need to specify routing for each request Need to modify Server side technology according to Javascript framework Only possible to debug on run time Hard-coded data-binding caused too many errors Increase the complexity a lot the developer no need to learn any javascript framework and also no need to write much Jquery code to make Single Page Application after using my Jquery Plugin(toufiqElahySPA.js). Note: developer can also use other JavaScript framework (angularjs, knockout, react e.t.c.) side by side with my Jquery Plugin. But no need, I will prove. I applied the Plugin in a Ruby On Rails Web application. This plugin will also work for Other Web Technologies too. I will show in my future course. This course is so important to a Developer who loves: Strongly Typed data-binding Compile time error checking, auto code completion(IntelliSense), Re-usability, not to get Run-time error unexpectedly to get rid of complexity should definitely take this course. Why (toufiqElahySPA.js)Jquery plugin is better than any JavaScript framework: (1) The developer won't need to write too much Javascript code after using my plugin wheres developer usually writes too many javascript codes while working with AngularJs(javascript framework) (2) The developer won't need to write Jquery ajax code because the plugin has ajax function specified which will be called automatically as a common function (3) The developer won't need to specify routing as like AngularJs because My plugin will follow Ruby On Rails routing by default. (4) A developer can learn using my plugin easily and quickly. just need to follow only 5 rules of my plugin��and any complex scenario can be achieved through this plugin like AngularJs (5) A developer can also make Single-Page app even not following those 5 rules of the plugin. Those rules are for critical situation. First, 2 rules are enough to solve any heavy lifting work. What technology is used in front-end? Mainly Jquery HTML & Haml Code What technology is used in the back-end? ruby Ruby on rails SQLite What tools you will need? Any text editor Ruby and rails will need to be installed in your Machine Any browser Whatever you like most Why I applied My Plugin to Python DJANGO application: Cross-platform needs. High-performance and scalable systems. Within this course I will Show: How powerful and complex cross-platform single page application we can build with my Plugin And how my SPA technique can improve the Software performance both on server and client side. How toufiqElahySPA.js(jquery plugin) works: If the End-user clicks any Link or submit any Form or click Backward or Forward button on the browser, the common ajax function of the Plugin will be invoked automatically. 5 rules of the plugin to handle the critical situation: I will explain all these 5 rules within this course. The true fact is: learning these 5 rules are enough to learn this entire Course. Learn By Doing. If something is still unclear, you can ask a question in the forums, I will reply. Make sure you followed my video's and source code and especially my 5 rules. Happy Coding! I hope! You will Enjoy this magic Course. Important Notice: I want to ensure all the Student that my Plugin(toufiqElahySPA.js) will not be responsible for any server related error while applying the Plugin(toufiqElahySPA.js) in your own Project. you may just need to modify toufiqElahySPA.css according to your application need. If you get a server related exception that means your implementation has a problem which needs to be fixed. Don't ever think that the Plugin may be the reason for this exception. please, give good ratings and comments if you want to get this type of creative and unique course in the future. Good feedback will definitely encourage me to make more course on Udemy. Thank you! Notice(to all): If I don't get good ratings and comments, I will not able to get inspired to share more content. if u really want to get Advanced Topics. please give me true ratings and comments. Who this course is for: Students who want to turn any Web application Into single-page application Within 2 Minutes Students who are tired of working with AngularJs, React, VueJs, Knockout in Ruby On Rails application Students who don't want to waste their time in learning any Javascript Framework like angular 2/4, react, knockout e.t.c. Students who want to learn building single-page application only with jQuery Students who don't want to learn much Front-end Stuff in building Single-Page Application Students who want to create cross-platform single page application with Ruby On Rails Students who are looking for a creative way to solve their daily life problems easily Created by Toufiq Elahy Last updated 6/2018 English English Google Drive https://www.udemy.com/toufiqelahy2/ Read the full article
#AngularJS#application#Course#developers#future#Javascript#JQuery#platform#Ruby#Ruby On Rails#Skype#software#Students#technique#web
0 notes
Photo

😱💥💥Here is how you learn new things fast and get better fast! I need to learn new things daily! I was so bad at it you can imagine! Really it was bad! Then I learned about learning and making it stick! Usually, if you are bad at planing you are also bad at learning because believe it or not both belong together! You have to plan your learning! Actually, to be productive you have to plan way more but let's stay focused! So here is how I learn the best and I think it works for every type of learner! 1. Grab a piece of paper or your phone or your laptop it really does not matter! I personally use trello. It is a Kanban app! 2. Write down in one sentence or word what you want to learn! Example time! I would write something like: "I want to learn how vuejs works". "I need to understand what graphql is". 3. Write down what topic you can learn right now! With right now I mean the time you have RIGHT NOW to learn! Let's say it is an hour. "I want to understand the basic wording of vuejs". So in trello I would have a board named: "Learn vuejs" and in the "things to do" board, there would be one item named after the thing I can learn right now! 4. Start to learn and try to learn as much as you can in that hour! While learning write or type what was new for you and what you understood. The important thing here is: Write it in your own words! 5. After the hour is over. Read through your notes. See if you understand everything. 6. Before you start your next session. Read through your notes again to refresh your memory and then work on the next learning! Thats it! Just repeate that forever! Comment down below what you think! Tag someone who could need that tip! Day 62 #100daysofcode #buildupdevs • • • • #javascript #html #css #php #coding #programming #programmer #developer #webdeveloper #webdevelopment #html5 #coder #computerscience #java #software #webdev #css3 #programmers #python #webdesign #js #styledcomponents (at Berlin, Germany) https://www.instagram.com/p/Bx7jq_giT6E/?igshid=47wvfp1qv0ul
#100daysofcode#buildupdevs#javascript#html#css#php#coding#programming#programmer#developer#webdeveloper#webdevelopment#html5#coder#computerscience#java#software#webdev#css3#programmers#python#webdesign#js#styledcomponents
0 notes
Text
Build A Web App with VueJS, Spring Framework and MongoDB
Build A Web App with VueJS, Spring Framework and MongoDB
Buy Now Price: $144.99 WELCOME TO MY COURSE – “Build A Web App with VueJS, Spring Framework and MongoDB” You can find more info here: ldeng(dot)net/courses Please Note: This course assumes you know some of the basics of web development for both Frontend and Backend. What is Vue.JS? “Vue is a progressive framework for building user interfaces. Unlike other monolithic frameworks, Vue is…

View On WordPress
0 notes
Link
Complete Web Development Masterclass Beginner To Advanced ##realdiscount ##UdemyReview #Advanced #BEGINNER #Complete #Development #Masterclass #Web Complete Web Development Masterclass Beginner To Advanced The Complete Web Development Masterclass: Beginner To Advanced The most comprehensive yet precise course on web development to build web development skills. If you aspire to become a professional web developer or if you want to get into the field of web development then this is the right course to start with. This course is specially designed to build a skillset around all the modern web development technologies which are in-demand by tech companies in 2018. Upon course completion, you will be able to build full-stack, mobile responsive, database oriented web applications. Here Is What You Get By Enrolling In This Course: Word-By-Word Explanation: In the entire course, I explain each line of code, without skipping a single line of code. Awesome Quality Content: 18 hours of HD Videos. Well Structured & Easy To Learn: Course has been specially designed to make it easy for the students to learn HTML5, CSS, Bootstrap4, JavaScript,ES6 Git & Github, VueJs, NodeJs, PostgreSQL. 24 X 7 Support: I will always be there to guide you in your journey to become Python expert. Note: Student queries and problems will be answered immediately. _________________________________________________________________________ Here Is Everything You Will Learn In This Complete Course: The Complete Course is divided into 12 Major sections Section 1: HTML5. Section 2: CSS. Section 3: Building A Portfolio Site. Section 4: Bootstrap 4. Section 5: Building A News Portal. Section 6: JavaScript. Section 7: ES6. Section 8: Git & Github. Section 9: VueJs. Section 10: NodeJs. Section 11: PostgreSQL. Section 12: Final Project:Medical Inventory Management Web App. First we start off by learning the basics of Web Development and installing the required tools to write HTML5 code. In this section we cover almost all the HTML5 concepts and learn how to layout the structure of HTML elements on the webpage. In the next section we learn the basics of CSS which will help us make our site look appealing. We will learn how we can add CSS to your existing HTML pages to make them more visually attractive. We will also learn about CSS flex box which will help us to make responsive layouts. Now as we know HTML & CSS, its now time to build something from the skills we have acquired. In this section we will build a portfolio site with HTML & CSS which will list all your skills. Moving along we now start learning Bootstrap 4, a CSS framework which enables us to build fully mobile responsive websites in no time. Bootstrap 4 will make your development speed 2X as faster as you no longer have to build components from scratch. Bootstrap has hundreds of built in components which we can use to build websites quickly and without any hassle. We will learn about the Bootstrap grid system and learn how to make responsive layouts with it. Once we master Bootstrap 4, its now time to build a fully mobile responsive news portal. In this section we will build a news portal which will work and look great on all of the devices like a computer, tablet and a smartphone. The best part about this news portal is that its completely built using Bootstrap and its components. Meaning we have not used a single line of CSS code to style the elements. The next section is all about JavaScript which is the most popular language for front end web development. We will start off by learning the basics of how JavaScript can be used in the browser to make websites more interactive. We will learn data types, functions, global and local scope, loops, exceptions and all of the other basics related to javaScript. At the end of this section, we also build a simple interest calculator using JavaScript and Bootstrap. Then we learn about ES6 or ECMAScript6 which is the latest version of JavaScript. We will learn some of the most relevant and new features of ES6 like the let and the const keywords. We then move towards learning Git & Github which is one of the most popular tools amongst web developers across the globe. We will start by learning what is Git and how Git can be used for version control. We will learn about all the important commands required to work with Git all with a practical example. Later we start learning GitHub and learn how GitHub can be used to collaborate with teams while working on a project. In the next section we learn about VueJS which is a progressive front end framework which helps us to build user interface components in an efficient way. VueJs is now being used by a lot of tech companies and is much easier to learn as compared to other similar frameworks like React. Many developers prefer VueJs over React because of its learning curve and the extensive documentation available online. In this section we will cover all the important aspects of VueJs. Once we finish learning the front end technologies, its now time to start learning about the backend. We now start learning about NodeJS which is a JavaScript runtime which allows us to run JavaScript on the server. NodeJS is extremely powerful and it allows us to configure server, connect to database, make queries and a lot more can be done using Node. In this section we will start learning Node right from the basics and we will build our very own server. We will also learn about the node package manager and learn how it can be used to install and use different node packages which are used to extend the functionality of our apps. Now once we know how about Node, we now need a database to be able to store and manage our data at the backend. Hence we move on to learn about Postgres which is a database used and trusted by large software companies. We will learn about PostgreSQL which is a structured query language used to query the Postgres database. We will learn how to create our very own database from scratch and how to setup the structure to store and manage our data. In the final section we apply everything we have learned in the entire course by building a fully functional medical inventory web application. This will be a complex database oriented application which will store data into the Postgres database and allow us to insert, update, delete and modify medicine records from the front end. We will learn how to build a complete web app from scratch right from building the database, configuring our server to building the front end. _________________________________________________________________________ So let's begin the journey of becoming an expert Web Developer. In addition to the Udemy 30-day money back guarantee,you have my personal guarantee that you will love what you learn in this course. If you ever have any questions please feel free to message me directly and I will do my best to get back to you as soon as possible! _________________________________________________________________________ Make sure to enroll in the course before the price changes. Take yourself one step closer towards becoming a professional web developer by clicking the "take this course button" now! Join the journey. Sincerely, Ashutosh Pawar Who this course is for: Beginners who want to get into web development Want to create own web applications using advanced technologies like Vue & Node Students who aspire to be a freelance web developer Complete beginners who want to start programming 👉 Activate Udemy Coupon 👈 Free Tutorials Udemy Review Real Discount Udemy Free Courses Udemy Coupon Udemy Francais Coupon Udemy gratuit Coursera and Edx ELearningFree Course Free Online Training Udemy Udemy Free Coupons Udemy Free Discount Coupons Udemy Online Course Udemy Online Training 100% FREE Udemy Discount Coupons https://www.couponudemy.com/blog/complete-web-development-masterclass-beginner-to-advanced/
0 notes
Photo

Vue.jsでコンポーネントのイベント名をキャメルケースにすると反応しない http://bit.ly/2seAyLC
地味にハマったのでメモ。
再現
htmlファイルのみで再現できます。 適当に保存して、ブラウザで開くと動作します。
ソースはGitGistにもアップしています。 https://gist.github.com/kai-kou/9b5b613918e107ca23682982c75d9467
index.html
<html> <body> <div id="app"> <custom-component :msg='msg' v-on:hello-hoge="msg = 'OK!!!'" v-on:helloHoge="msg = 'OK???'" /> </div> <script type="text/x-template" id="custom-component"> <div> <span></span> <button v-on:click="$emit('hello-hoge')">これはOK!</button> <button v-on:click="$emit('helloHoge')">これはだめ!</button> </div> </script> <script src="https://cdn.jsdelivr.net/npm/[email protected]/dist/vue.js"></script> <script> Vue.component("customComponent", { props: ["msg"], template: "#custom-component", }) </script> <script> new Vue({ el: "#app", data: { msg: 'hoge' }, }) </script> </body> </html>
helloHoge のボタンをクリックするとコンソールログに警告が出力されます。 開発環境ではこれが出力されず、少々ハマりました。。。
vue.js:603 [Vue tip]: Event “hellohoge” is emitted in component but the handler is registered for “helloHoge”. Note that HTML attributes are case-insensitive and you cannot use v-on to listen to camelCase events when using in-DOM templates. You should probably use “hello-hoge” instead of “helloHoge”.
Google翻訳
vue.js:603 [Vue tip]:イベント “hellohoge”がコンポーネントで生成されましたが、ハンドラーが “helloHoge”に登録されました。 HTML属性は大文字と小文字を区別しないため、DOM内のテンプレートを使用する場合はv-onを使用してcamelCaseイベントをリスンすることはできません。 おそらく、 “helloHoge”ではなく “hello-hoge”を使用するべきです。
まとめ
複数言語で開発していると、もうどれでどう実装したら良いのかわからなくなってきます。
参考
camelCased custom event name is not working · Issue #4044 · vuejs/vue https://github.com/vuejs/vue/issues/4044
VueのCDN版を使おう – やわらかVue.js https://scrapbox.io/vue-yawaraka/Vue%E3%81%AECDN%E7%89%88%E3%82%92%E4%BD%BF%E3%81%8A%E3%81%86
コンポーネントの基本 — Vue.js https://jp.vuejs.org/v2/guide/components.html
Vue.js の単一ファイルコンポーネント化をHTMLファイルで行う方法 | WriteIfElse https://blog.bulkus.net/post/vue-htmlfile-components/
元記事はこちら
「Vue.jsでコンポーネントのイベント名をキャメルケースにすると反応しない」
January 08, 2019 at 12:00PM
0 notes