#when is saturday coming?
Text
What do you mean it's only wednesday?!
18 notes
·
View notes
Text


trying to listen to a new (to me) album every day, here’s what i listened to this past week :-)
#I’ve heard a lot of songs from most of these albums but I just wanted the comprehensive experience hehehe#undressed at the symphony was for sure my favorite#but the new coco & Clair Clair album absolutely hit when I was high doing laundry last Saturday night lol#any recs for the coming week ???#i welcome any genre
166 notes
·
View notes
Text


last show pre-hiatus / first show post-hiatus
#fobedit#fall out boy#pete wentz#patrick stump#peterick#fob#anni edits#saturday#more than an hour#i have sooo many feelings about more than an hour ;-;#its so emotionally fkn devastating when patrick comes over to do it but pete doesnt respond!! aghh#luckily i included the healing for free. god when they do it again for the first time#like we're so over... we're so back#and everything was gonna be okay...
276 notes
·
View notes
Photo
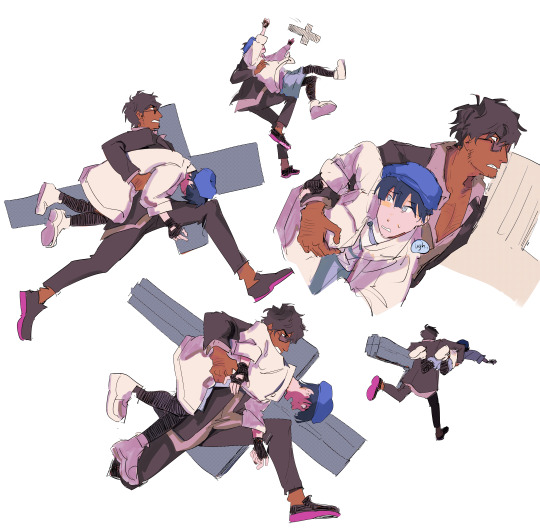
studies from the finale
#nicholas d wolfwood#meryl stryfe#trigun#trigun stampede#honestly the grand highlight.#anyway i think i ... drained all my thoughts of ep12 on saturday. i was like... all day drawing stuff for that episode and then circling#those thoughts but mainly#im just excited for season 2. im so so excited for s2. AND IM EXCITED FOR.. all of the steady appearance of trimax stuff again#like when they recited quote to quote of vash and knives conversation when they were on their way up to space#the i'll keep running and after 150 years this is what you have to say godddddd#GODDDDDD i felt so much in that moment. GODDDDDDD#IM REALLY EXCITED... because i dont know what to necessarily expect from s2 too. there is a LOT of setup that happened in s1 and it#will fundamentally change how we view the characters and their relationships to one another i think? especially the main trio and#and and and and MILLLLYYYYYYYY GAHHHHHHHH IM SO EXCITED FOR HER!!! MILLY!!!!!! we all knew she was coming back. it was only natural.#i really hope they keep as Much as they can from the original design. ESPECIALLY HER PERSONALITY. god. do not take away her personality. and#do not take away her bigness i will CRY. but overall im happy the og 4 are going to be back and theyll be closer than before bc of all they#experienced together.... and ahhhh everything with knives... vash and his eriks arc....#im rambling again but there's obviously a lot of hype there...eughh eughehu i love trigun so much i love love love love trigun#ruporas art
3K notes
·
View notes
Text

I finally watched the show - The Secret Saturdays, and damn it is so cool. (Now there's a new addition to my list of favorite shows)
#semisomnosres#the secret saturdays#drew saturday#Secret Saturdays#Only when I finished the sketch I realized that this meme would be more suitable for Doc when he was looking for Argost with the stone#Drew is an incredibly cool madam))))#she sulked so funny when she had to come under fire
288 notes
·
View notes
Text

Color Fall 2023 - #3
That scene in the Temple of Darkness where Red and Blue are too wrapped up in their argument to notice the Big Poe always amuses me xD So... this is that, but with Pokemon!
Also, my piece for FS Fright Fight week two: hoax vs haunted
#fsff23#four swords#pokemon#red link#blue link#big poe#luxio#ribombee#haunter#not sure why this is the idea that kept coming to mind when I tried to think of something for this prompt#maybe because ''haunted'' = ''haunter''?#I had hoped to write a ficlet for this week too but I started falling behind and running out of time#even as it is I'm cutting it close ^^;;#but hey it's still Saturday in some places!!#my art#fanart
721 notes
·
View notes
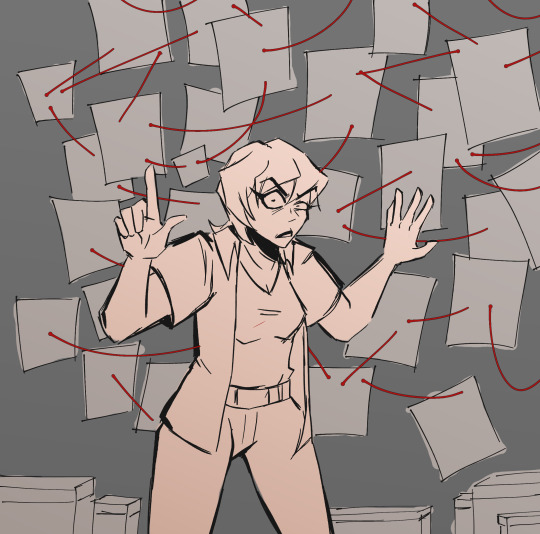
Text
My favorite thing about being an Old Byler is seeing y’all figure out the same things we figured out years ago. Maybe that sounds sarcastic or ironic, but it isn’t. I just saw a post analyzing the Snowball scene in season 2, and I’m like yesss youthhhhh discover the same things we did 🎉 Give us as Bylers more independent sources drawing the same conclusions from similar research / a replicated experiment, yassss, sciencccce 🔬🧪🔥
#when I see it I’m like awww you’re so right!!! 🥰#I love when someone analyzes the same scene and comes to the same conclusion#like!!! we are correct and we’ve proven it 6 ways to Saturday AND backwards#and I’ve seen so many of them haha#being here since 2019 is so wild haha#and some folks were here way before me!#if you want the old magic (that’s a narnia reference) check out kaypeace21’s account#she’s the og#byler#byler tumblr
119 notes
·
View notes
Text


Vigil - 2x06
#vigiledit#bbc vigil#amy silva#kirsten longacre#suranne jones#rose leslie#vigil spoilers#vigil 2x06#amy x kirsten#femslash related stuff#okay so I hadn't been feeling well saturday night so when the eps dropped I literally just watched the last scene on iplayer#just to make sure nobody freaking died#and it was amy saying I'm coming home on the phone#and given the ''come home''/''I can't'' moment in the trailer I thought amy was legit gonna stay in wudyan these whole last 3 eps#which I didn't love the idea of I truly wanted an amy/kirsten reunion but I was like oh maybe rose leslie's pregnancy interfered#as long as they're both alive and we got that lovely scene in ep 2 it's fine#so this was all a COMPLETE surprise even more than usual#I made it a twist to my own self#and then it was like the perfect hurt/comfort scene you'd want for an action detective couple like this!#amy so focused on the job and then dropping everything to rush to kirsten's side#sitting there all night and that classic waking up in the chair next to the hospital bed scene#and they even had their cake and ate it too by having amy *choose* kirsten over the job#only for kirsten to then push her back to it#and going from this soppy soft teary version of amy to a pissed off black suit badass#because they'd hurt her girl#such a good couple to build a series like this around#lol amy really didn't want to leave!#she's just sitting and gazing at kirsten#man those years ago kirsten would never have imagined getting to see amy like this and meaning so much to her
282 notes
·
View notes
Text
ben: i think its important to be compassionate and against excessive violence
zak: i am so afraid that if i get too angry i will become a misanthropic monster that causes the apocalypse
rex: these guys wont fucking stay dead :/
#ben 10#the secret saturdays#generator rex#i cant stop thinking about like. rex just being like. down to kill#its just that when he does things that SHOULD kill a guy (slicing in half hot dog style or turning them into rocks) they just come back
56 notes
·
View notes
Text
if killer has differently sized eyes then does he blink like those lizards that have each eye blink abnormally. like the small eye has to be shut for a full second and then the big eye has to take a minute to blink. his blinks are delayed. they have their own timer. is this purposeful??? perhaps killer is doing it on purpose to freak people out and its just a really really really long running inside joke between himself and himself. or it could actually be srs and he can't blink synchronized. or he could use it to his advantage by like never having one eye closed ever. he'd never be held back by the disability that is blinking. AND it's a psychological trick on his enemy because they're weirded out like "why isnt this prick blinking normally"
does this make the top 20 dumbest triglycercule posts. i think this is a solid 12/20
#the reality is that he doesn't blink but let's just ignore that for now#sometimes i come up with the most hilarious ideas when i dont want to#i was drawing sketch 4 the 2nd jk au 4koma and i was drawing killer's eyes and i was like wait wtf how does this prink blink#4koma will be coming on monday because this will be the sunday post even though i came up with this on saturday#its too late to post it!!!! jt is 8 pm nobody will see this hilarious idea#i havent checked my notifications since i posted the jk au stuff im too scared#sometimes fear grips me in the most insurmountably insignificant situations#it's been thundering in my area recently and all i can think about is which of the mtt would survive a lightning strike#you guys can get a second tricule rant on this. stat wise only dust would live with his 99 hp#BUTTTT who gives a shit about canon. killer would survive out of sheer silliness and determination#horror would be comatose and he'd take a solid month to recover. my poor weak coughing baby vs hydrogen bomb#dust would live like killer but he would be crawling out of the remains. like a pheonix#tricule rant#killer sans#murder time trio#bad sanses#bad sans gang#nightmare's gang#utmv#sans au#undertale au
117 notes
·
View notes
Text
Ghost and Soap have one kid. They did not particularly want a kid, it was through a very bizarre series of events they wound up with one. But my God do they adore the fuck out of their little princess. You bet your ass Ghost is having tea parties with her when she's little. Soap dresses as the princely compliment to her princess every Halloween.
The issue is that Price and Gaz have 5 kids, all boys (they thought they had 4 boys a girl, but their eldest corrected them pretty early on), all rough and tumble. And yeah the MacTavish's know that they shouldn't be so reluctant to have the kids spend time together, but their little girl is shy and sweet and they don't want her getting trampled by this bunch of wildlings.
Anyway, I can just see a whole childhood full of antics because the parents are competitive and think their kid(s) is better than the other families' kid(s). And then when they start getting older a blind panic happening with the adults because uh oh is anyone else starting to get the sense that all of the Price kids might have a sort of thing for the MacTavish kid? Soap and Ghost cannot possibly have that, their little sweet baby angel will actually never be getting a romantic interest thank you very much she will stay at home with her dads forever. For Price and Gaz they just don't want to be in-laws because they occasionally have intimate relations with Ghost and Soap and they think it would make it weird :')
#mhairidrabbles#more of mhairirambles#look I am hormonal and sad and in bed at 9pm on Saturday night so you will allow me to ramble about fluffy family things#imagining the carnage when Alex and Farah's very handsome and very cool kid comes to visit#all the other kids are awestruck by this older teen OH MY GOD THEY RIDE A MOTORBIKE
58 notes
·
View notes
Note
K there’s like three dudes you draw from shows I’ve never seen in your HOM verse (Heroes of the multiverse?)
I know two are generator Rex and randy ninth grade ninja but what’s the third.
It’s not Jake, Danny, or Ben.
I know Kim Juniper and Jenny.
Who am I missing?
Heroes of Millennium! (since in this au most of them are technically from the same universe, but it could be a cool alternative name ngl xD)
Ah, the poor, very often forgotten Zak Saturday from Secret Saturdays (great show, amazing plot, delightful characters! people really should watch it!).

#que?#hom au q&a#hom au#zak saturday#secret saturdays#also not to sound callouse but... dude you do realize that i always tag characters (if not shows) and it would be much MUCH faster#to search up a name yourself rather than wait for an answer (that might come who knows when) from an op? like#i dont mind answering but it will take much longer to wait for me lol#but u were lucky i was in a mood to doodle lol
262 notes
·
View notes
Text
ear

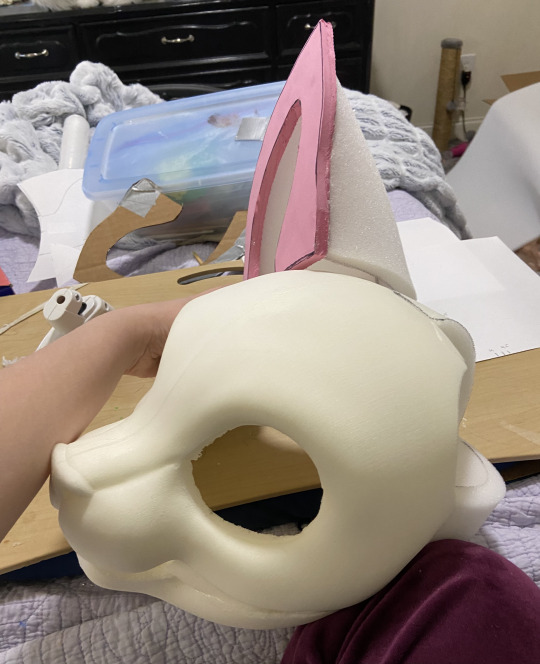
The ears are definitely the part of the head that I've been dreading the most, because I've always struggled to make them work. I was never 100% satisfied with the ear results on past heads, so this time I'm trying a different method. It's based on TinnatuPaws's ear patterns, not actually printing and using any of them directly because I wanted that front border to have a slightly different shape, but taking the general method/idea. Took a couple hours to put together a working pattern because I only had a vague idea of what I was doing, and I guess the final look is pretty similar to TinnatuPaws's canine ear design anyways so perhaps it would've been easier to just use that one directly but w/e too late now. I think it turned out pretty alright, but of course the real test will come once I actually put fur on it.
These ears also probably look a tad on the large side for a standard housecat--that was intentional; I'm a bit worried about this head base being a bit too small compared to the other parts of the suit so I'm gonna try compensating by exaggerating the ears, head floof, and cheek floofs a bit. This base already has proportionally very large eyes so I think I can get away with it. Fingers crossed!
I did try on my previous head with the new body the other day to get a better idea of the size ratio and it looked alright, though while the base for my previous head is similar in size to this new one, I do think it might be sliiiiiightly larger overall, even accounting for the fact that it has fur and this one doesn't yet. Hopefully the difference won't be all that significant and I won't be walking around with a comically tiny head, but as with the ear method, the real test won't be till I actually fur it. So....we shall see.
#gonna take a break for a bit as soon as i finish assembling the other ear#but gonna come back later tonight and see if i can't at least get the pattern for the inside lining done#that way i'll be able to sew and install that tomorrow#and then come Saturday i'll be able to start on the exciting part: fur#also though while i'm gonna finish assembling the ears today i don't think i'm gonna actually attach them to the base just yet#i think it might be a bit easier to just mark where they go on the base#then fur them separately#and THEN glue/sew them onto everything else#well....one way to find out#.......also gonna tidy up a bit in here i think. it's a disaster rn#and yeah a mess is expected/inevitable when working on a project like this#and a total cleanup is pretty pointless until the project is done cuz it's just gonna get messy again fast#especially if imma be working with fur fabric#but living in disaster zone for weeks can zap morale a bit 😅#not that i'm the tidiest person in the world by any stretch of the imagination but#there are limits 😅
60 notes
·
View notes
Text

tutorial contents:
1 ‣ gshade & photoshop actions
2 ‣ template or cropping & colouring
3 ‣ notifs & pop-ups
okay hi! i have a really old editing tutorial from back in january that i've been linking people to, but it's pretty outdated by now. i also keep getting anons asking about the same things, which is fine, but i always have to go searching for the post explaining it, so having it all in one place will be a lot more convenient lol
i use a ☠ copy of photoshop cc 2017 to edit my screenshots, however the majority of everything i'm doing also works on photopea
photopea is an online version of photoshop that's 100% free and works very well! i can't recommend it enough, it's fantastic
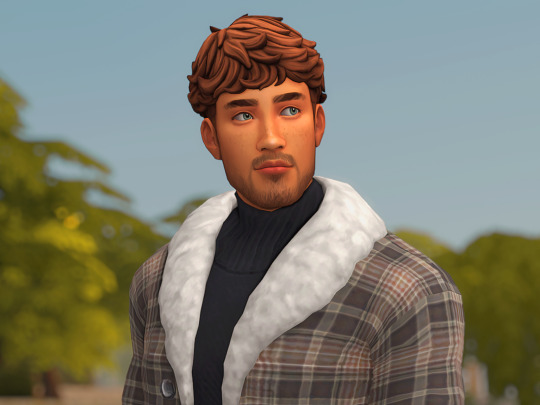
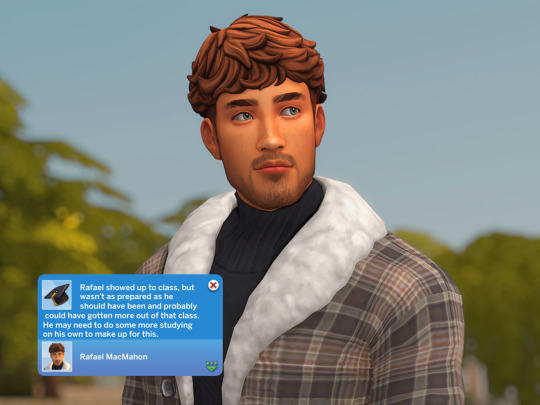
first things first, you're going to need some screenshots to edit. for the sake of this tutorial i'll be working with this one of raffy:
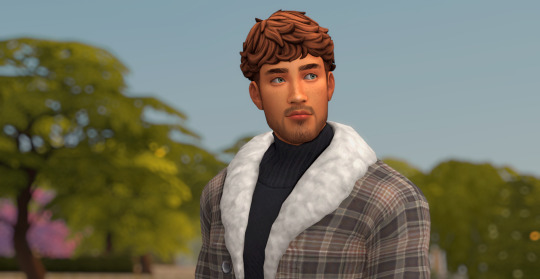
in all honesty, gshade will do most of the work for you. of course it's not needed, but i definitely don't think i could live without it! in this screenshot i used sunset n' vinyl by nesurii
when opening the screenshot, the first thing i do is run it through 2 photoshop actions:
butter action by early-grape
smooth sharp (no topaz) by poolbrop
to add actions in photoshop go:
windows > actions > the 4 lines at the upper right corner of the newly opened window > load actions > your downloads folder > open up the .atn files!
if you're using photopea, as far as i'm aware you can't use photoshop actions, but i've found that 'filter > stylize > oil paint' and 'filter > sharpen > smart sharpen' have a very similar effect when using the right settings. try these:
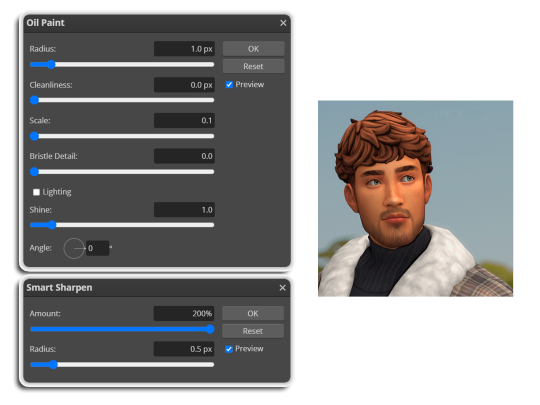
i like these two actions because they smooth everything out nicely, but keep it sharp at the same time! i always run butter before i run smooth sharp, however butter may leave you with 2 layers. make sure to merge these layers before running smooth sharp to achieve the full effect.
here's a before and after (of the photoshop action):

from here you can move on to step 2
before anything else i want to share the template that i use to make editing a lot faster. you don't need to use it but it's definitely made things a lot easier for me! it's a .psd file and will work perfectly in photopea
download (simfileshare)
if you're using the template you can skip right on to the next section, as it's already cropped to the right size and has the colouring folder included. just drag your screenshot into it and resize to fit the height.
if you're not using it, crop your edited screenshot to:
1707 width x 1280 height
then adjust the colours to your liking. it always varies slightly depending on the picture but my regular process for each screenshot would be:
up the saturation by 8%
up the lightness by 3%
up the contrast by 12%
all of this can be done by looking in the 'images > adjustments' tab
you should end up with something similar to this!
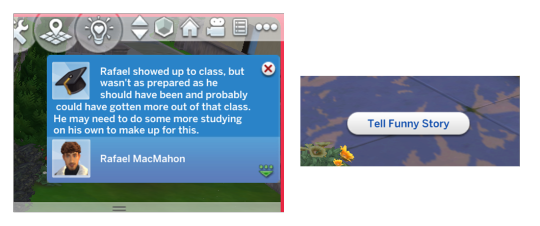
if you want to add a moodlet or social interaction or anything similar, it's all the same process. what you'll need is a screenshot of it straight from the game. i just press the 'c' key to capture them! i'll be working with these two:
for the blue notification i'm going to select it using the box select tool. try to get it as exact as possible. one you have it selected
for photoshop users:
click on the 'select and mask...' option located at the top
adjust the global refinements at the side as follows:
smooth: 70
feather: 0.0px
contrast: 50%
shift edge: 0%
for photopea users:
go to select > modify > smooth
set it to 15
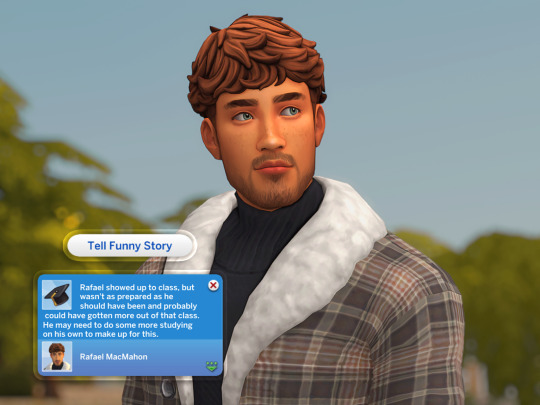
select 'ok' and press 'ctrl + c' to copy it, then 'ctrl + v' to paste it into your screenshot. adjust the size and position and you should end up with something like this:
next you want to add the transparent border around the notification. if you're using my editing template, right click on the reference notif in the layers tab and select 'copy layer style' (photopea > 'layer style > copy'). from there you can paste that layer style onto your own notif through the layers tab.
if you're not using the template, here's how to set it up on photoshop:
right click your notification layer and select 'blending options'
under styles, tick the checkboxes for stroke and drop shadow
input these settings:
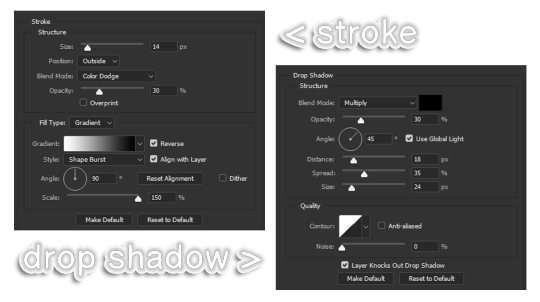
on photopea, it should be more or less the same. repeat the exact same process with the social menu option, but instead of selecting it with the box select tool, use the magic select tool. in the end you should end out with this!
from here you're finished! thanks for reading! go to file and export as png
if you've got questions never hesitate to ask, just make sure to read the faq in my pinned. i might edit this post soon to include the gen intro traits and aspirations bit, but this is all for now. hope it helps, my editing process post has been in need of a revamp for a very long time. i haven't proof-read this so apologies for any mistakes!
#ts4#sims 4#ts4 tutorial#5 anons in my inbox asking the same question after not reading my faq#this ones for you#3 anons in my inbox asking about cas pics#ones coming for you soon#okay maybe not soon but sometime#all my free time has been eaten up#i signed up for extra saturday morning classes and not having a lie in is sucking the life out of me lmao#when i'm busy i just wanna play video games and when i get the chance#to play games i just wanna sleep#its a vicious cycle#i'm currently playing resident evil biohazard tho#enjoying it very very much#i've only got 2 and 3 left to play and i've played every mainstream re game 💪💪#it was a very fun journey! i played them all within this year#long post
1K notes
·
View notes
Text


Rooney Shepard (They/Them)/Yorinobu Arasaka Screenshots (14/X)
MOD LIST
Taglist (Like this post to opt in/out for edits): @bbrocklesnar, @alexxmason, @sergeiravenov, @tommyarashikage, @voidika,
@carlosoliveiraa, @strangefable, @direwombat, @confidentandgood, @imogenkol,
@socially-awkward-skeleton, @cloudofbutterflies92, @raresvtm, @icecutioner, @cassietrn,
@theelderhazelnut, @inafieldofdaisies, @katsigian, @captastra, @g0dspeeed
#cyberpunk 2077#shippy saturday#cyberpunk 2077 photomode#cyberpunk 2077 screenshots#cp2077#cp2077 photomode#cp2077 screenshots#cp77#cp77 photomode#cp77edit#cp77 screenshots#virtual photography#yorinobu arasaka x oc#yorinobu arasaka#cyberpunk 2077 OC#nonbinary oc#commander rooney shepard#I won't let fear compromise who I am#v: cyberpunk 2077#otp: it always comes right back to you#queue#I kinda like these ones#I think it's so soft#and my headcanon is that motorcycles is one of the things that Rooney and Yori bond over#and that when they have the rare downtime they work on motorcycles together
50 notes
·
View notes
Text


saturday outfits~
idk what they're getting up to today but they are lowkey coordinating, as usual 😂
#mine#ts4#sims 4#the sims 4#simblr#sims#ofmd#gentlebeard#ofmd sims#i usually dress ed first#because lbr he is so much fun to dress up#and then im like well stede needs to match#so they end up wearing a lot of purple lol#i wanna branch out i wanna stop these rly STRONG color associations i get w....... every sim i make tbh#and i often feel stedes outfits are Boring compared to ed's and it's like NOOOOOOO#stede is NOT boring when it comes to fashion!!!#but modern fashion is more difficult to work with or something lol#anyway. rambling.#happy saturday!!!
29 notes
·
View notes
Last Seen Blogs

kolagencolwayeliksir
Polski Kolagen Eliksir Młodości

stone-heart24
HeartStone

jandersondepaulla1998
Janderson De Paulla

yantianyan
zia

baeleywilliams
Creativity Begins Here