#wool/nylon mix
Text

I’m not avoiding my 3 spinning and 4 knitting projects!!! I’m not!!!
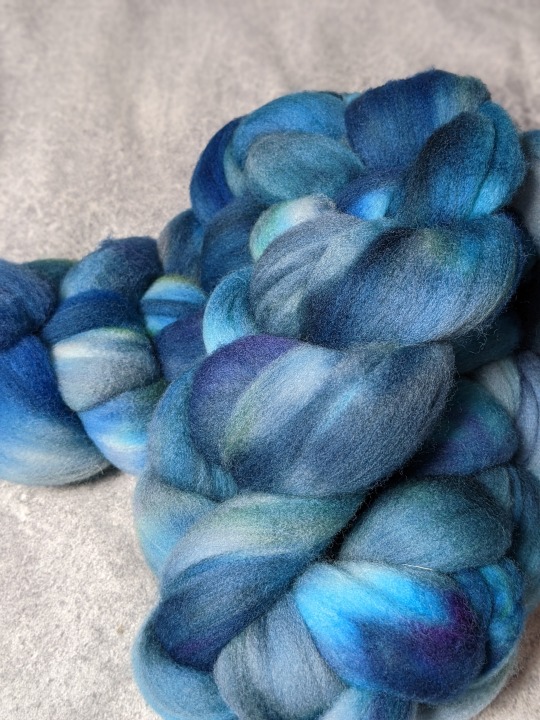
#I’m just sampling!#honestly!#gotta know how I wanna do my next project.#anyways as much as I enjoy the action of combing fibers#I didn’t like that the Icelandic in particular would separate out tog from them#and I am not spending 100$ on single row combs I would only really want for double fleeces like this#and I do eventually want to experiment with seperated fleeces (just not right now)#I decided I was finally gonna do it#I was finally gonna get reacquainted with my cards#and so far I’m having a decent time!#I think I finally found a technique that works for me#(it’s basically just from Louis Swales’ video ‘how to card like a ghost’)#I’m putting out rolags that umm#ok they don’t look great but they are a decent spinning experience!#and I like how little waste there is#currently in this pic I am spinning some rolags that were rolled off the short end of cards so the fiber is mostly parallel#(been calling them cigar rolags)#and tbh I think I prefer the rolag rolled off the long side#I feel the dual cost fibers mix better#I’m gonna try to spindle spin enough yarn to make a short pair of socks as one of the things I wanted to do was get#a pair of 100% Icelandic wool socks to see how it wears compared to the commercial standard of merino nylon blend#and then I want to spin some Lopi style for a sweater#and if I have any long locks leftover I’ll use that in my current rug project#yarn#handmade#spinning#handspinning#handspun#wool#spindle
18 notes
·
View notes
Text

🥇— [ 1ST PLACE ]
Ruisrock Festival — (52.7%).
The first place crown is placed on the head of Louis wearing an MM6 Maison Margiela Numeric Wool Gilet, accentuated by ribbed trims. It was already #1 on everyone’s minds before we even made our poll — that’s how gorgeous it is.

🥈— [ 2ND PLACE ]
Morriña Festival — (33.6%).
Louis in Burberry is nothing short of breathtaking. Pair that combination with Vests, and it becomes awe-inducing. In Jungle Green, the subtle knit of Burberry’s Equestrian Knight paired nicely with Track Pants of the same brand.

🥉— [ 3RD PLACE ]
Superbloom Festival — (27.9%).
Was there any doubt this mix between Walls and Faith In The Future would be o the podium? For his last Festival this year, Louis wore a Prada Re-Nylon Blouson Jacket in Red along with Nike ACG Shorts and his iconic Ray-Bans.
Check the top 10 ranking in our Twitter.
#louis tomlinson#louis tomlinson fashion#louis fashion#fashionlouist#mm6 maison margiela#burberry#prada#era: faith in the future#festivals#festivals 2024: outfit looks ranking
126 notes
·
View notes
Text

Shawl complete and in the process of being blocked! Small apartment crafting is all about knowing exactly how much floor space you have in every room.
Made with yarn from the Manos Del Uruguay Alegria line, specifically in the Waterlily color. It's hand dyed mix of Merino Superwash Wool and nylon.
#knitting#fiber art#fiber crafts#crafting#polycraftory#queer artist#craft complete#adhd crafting#gabe crafts
89 notes
·
View notes
Text


“Ocean Calm”, a relaxing summery mix of blues and greens like an expansive ocean view. Available on eco sock, platinum sock, silky BFL lace 600, and DK. It might just be the ideal colourway to create a dream vacation project. I’m imagining crocheting in the warm evening air on a balcony in Norway overlooking a fjord, how about you?
Eco sock is a more environmentally conscious non-superwash non-nylon option spun from 80% merino and 20% linen. Silky BFL lace 600 is spun from 55% superwash treated bluefaced leicester wool with 45% silk. It has a beautiful shine and drape, as well as a luxurious feel.
#mothyandthesquid#yarn#knitting#knit#yarnaddict#knittersofinstagram#crochet#yarnlove#miniskeins#yarnlover
103 notes
·
View notes
Text
hi! ok so i'm going to talk about one of my top-five favourite things, which is: dyeing stuff! this is going to be specifically about dyeing protein fibres (animal fibres—wool, alpaca, silk, etc) in a pretty low-key way in your kitchen.
to be clear up front: this is not the most scientific, most perfectly reproducible, or most Objectively Correct way to dye things. i get a lot of fibre that i like this way, though, and i think that other people can, too.
fibre i've dyed that i think is neat:
you can also dye yarn like this:
yes, i like blue a lot. i also really like variegation and heathering, which is why most of the fibre here has patches of white—it's an intentional choice that i've made. you can make different choices.
here is what you need to dye things:
fibre, vinegar, dye, a pot, heat, and some water.
that was so you don't get overwhelmed by the impending wall of text. here is what you need to dye things (it's the same stuff!), but with way more detail:
fibre or yarn. this is the big one, obviously. i tend to dye in 100-200 gram batches, because that's approximately what fits on my stovetop easily. if you're very nervous about felting or harming your fibre, you can use stuff that's been treated to be superwash, start with yarn (which is harder to felt than fibre is), or use a felt-resistant breed like dorset or suffolk. honestly, though, i learned with merino because that's what i had, and it was fine. again, though, this guide is only for protein fibres. it will not work for things like cotton. the only exception to this is nylon, which will take on some colour, but less than a protein fibre will.
a mordant. this is a fancy way of saying a thing that makes dye stick, and for what we're doing here, it's citric acid or vinegar. your grocery store definitely has at least one of them, though if you can choose, i prefer citric acid, because i love wet wool smell but i do not always love wet wool vinegar smell.
dye. i use acid dyes, and am personally deeply loyal to dharma acid dyes, but ashford and jacquard acid dyes work the same way. if you don't want to buy dye or don't have access to it, food colouring will often work, as well, though i haven't tried this with natural food colourings and have no idea how well they'll work.
a dedicated dye pot. ok, if you're doing food dyes, you don't need this. if you're not, it's definitely best practice, though i don't know how dangerous it is not to. any large metal pot will do, but my favourite option is hotel pans, which are those huge metal pan/tray things that hold food at buffets and the like. i have a full-size one that's 15cm deep, and a half-size one that's 4cm deep. they're great because they let you lay out the fibre you're working with so you can see most of it in a single layer.
dedicated dye utensils. as before, i don't know how much of a huge deal this is. i'll be honest and admit that for several years i had a single pair of tongs that got used for all tong-requiring events, including dyeing, and i'm still alive. i suggest that you have at least a big spoon, and a big spoon and tongs are even better.
something to mix the dye in. yeah, i use empty plastic sports drink or soda bottles for this. you can be fancy and get mason jars or little squirt bottles or whatever, and if you get super into dyeing you'll want to mix up dye stocks, but that's way outside the scope of what we're doing here. i like the powerade bottles that have a little squirty mouthpiece, because it's fun to squirt dye onto things.
personal protective equipment. i think this is the part of things that freaks people out. ideally, you wear plastic gloves and a mask (yeah, like your covid masks) when you're working with dye. realistically, i almost never remember to put on gloves and just accept that my hands are going to be blue sometimes. you should wear a mask, because dye is an irritant, but the world is an imperfect place and i have wicked bad adhd and sometimes i forget. this isn't advice. i'm just being honest. you should use some kind of safety stuff. you probably won't die if you don't.
you might also want some little random bits: an old toothbrush or paintbrush, a pipe cleaner, some toothpicks, etc. this is mostly if you like speckles, or if you want very small patches of colour.
so first: there are a million ways to dye things, and i'm not convinced that any of them are objectively correct. i do what i do and it works for me. some of the things i do are the opposite of what most guides suggest, but i do them because i like the effects they create.
ok, that's all the background stuff you need. let's dye some stuff!
the number one most important thing to remember when you're dyeing is this:
you can always add more colour. you cannot take it away.
that's in fancy writing and bold because every once in a while i forget this, and every single time i end up regretting it.
here is how to dye things:
put water, citric acid (or vinegar), and fibre into a pot. add dye and heat. let cool completely. rinse the fibre in cool water, then hang to dry.
like, sure, we're going to go into way more detail, but push come to shove, if you do that, you're going to end up with dyed fibre. there are a lot of tutorials telling you that you must soak your fibre first, or you must add your citric acid this way, or hold the water at exactly this temperature, and i'm here to tell you that while any of these things can give you different results, those results aren't necessarily better.
the only way that you can totally screw this up is by accidentally felting your fibre, so before i get into the way more detail part of things, i'm going to talk about that.
how not to felt your fibre
i feel like if you've read this far, you know how things felt: wool, heat, and agitation. you may also notice that at least two of these things are required for dyeing. this can be stressful! but you don't have to be afraid of it. there's only been one time that i felted something to the point that it was unusable, and that happened because i literally fell asleep for several hours while the pot was on the stove. you can avoid doing this by simply setting an alarm—this is a good idea anyhow, because you'll want to check on your dye pot!
when you're dyeing, use the lowest heat that you can while still keeping the water at a simmer. if your stove, like mine, has one burner that's wildly unpredictable and sort of out of control, you may want to look for some sort of flame diffuser, also called a flame tamer or a simmer ring. i bought one on amazon for about fourteen dollars, and it's literally just a thick metal circle. it works fine.
you can also keep the heat low by using a pot with a thick bottom, though in my experience those are expensive, and if i had one i would be using it for soup, not wool.
avoid shocking your wool—never put room temperature wool into hot water, and never put hot wool into cold water. leave your wool in the dye bath until it's cooled completely, which for me usually means overnight.
finally, obviously you have to move the fibre around some. you'll need to peek under it in the pan, and when you're done, you have to rinse it and squish out the water. try to minimise handling, though. don't run water directly onto the fibre, don't get a wooden spoon and stir your dye pot around, don't wring the fibre dry when it's done.
you're probably never going to be perfect. i often find that i lose a gram or two of wool where fibres have grabbed onto each other, or where parts of the ends clumped up. it's not really felted, just sort of compacted, but it's not great to work with, and i'd rather lose a gram of fibre than fuss with the clumpy bits.
back to how to dye things
let's take it step by step, assuming a hundred grams of fibre.
put your pan on the stove and fill it halfway with water. add either a teaspoon of citric acid or a tablespoon of vinegar. this is going to help the dye strike, or stick to the fibre. the teaspoon/tablespoon is a guideline, but one that it's fine to exceed. adding more will help the dye strike faster, which can be useful if you're trying to create blocks of colour on your fibre. i usually err on the side of a little more than the guidelines, and just eyeball this—if you feel like the dye isn't taking well, you can add more later.
add your fibre to the pan. this is the first place you have to think about what you want the finished fibre to look like! you can put it into the pan any way you want, but i suggest trying to keep it in a relatively even layer, regardless of what that layer looks like. here are some ways to get specific effects:
if you want a gradient from one end of the fibre to the other, use a rectangular pan and lay your fibre out so that the line of it is parallel to the short sides of the pan
if you want a short, repeating gradient, use a rectangular pan and lay your fibre out so that the line of it is parallel to the long sides of the pan
if you want something that starts with very close repeats that get further apart as you go down the fibre, make an approximate spiral
if you don't want A Pattern (i usually don't) just lay things out in a single layer, more or less
here comes the next exciting part! decide if you want to let your fibre soak or not. again, doing or not doing this gives you some different effects!
soaking your fibre will mean that dye takes more evenly. if you want consistent colours, you'll want to soak.
not soaking your fibre means that the dye takes less evenly. the fibre on top will have less acid available to it, spends less time in the dye bath, and also has to actually get wet before it will start to dye. i actually love doing this, and think it affords a lot of cool opportunities to play with and layer colours.
if you're soaking, leave the fibre there until it's submerged. if not, don't.
now you're going to add dye! decision time, again.
you can add dye when the water is cold, which will give you more even dye coverage, and in my experience gives the colours more time to mix together
you can add dye when when the water is hot, which will give you less even coverage, and tends to encourage the colours to stay more delineated
probably surprising no one, i tend to heat the water first unless i'm starting with a base colour or i'm doing a two-colour gradient.
time to mix up some dye
as i mentioned earlier, i'm assuming that you're using powered acid dyes for this. if you're not, this mixing up part is technically optional—but doing it gives you way more control about how and where you place your colours, so i'm going to assume that you'll do it.
i usually mix dye in some sort of empty drink bottle. regardless of what you're using, before you add dye to anything, put some water in the bottle, wipe off the lip, put the lid on tightly, and shake the bottle vigorously. if there is any leakage at all, do not use that bottle. find a better bottle. if your bottle cap doesn't seal well or if you have an empty condiment bottle that's just a little wonky or whatever, you will get dye all over the kitchen, and your landlord will be really really mad about it, and you will regret your life choices. (if you own your kitchen, you can do whatever you want, but this isn't about you and you know it.)
so you have a bottle that seals tightly! great job. dump out the water and carefully put some dye powder into the bottle. remember earlier how i said you should be wearing a mask? this is the part where you should be wearing a mask.
i know that people are reading this and going, ok, but how much dye do i put in?
my answer is put in the amount that feels right in your heart, and don't forget the number one rule of dyeing things, which is that you can always add more colour, but you cannot take it away.
this isn't a very scientific answer. most dyes have a guideline about how much to use, expressed as a percentage of the dry weight of the fibre, which is what you use to get the whole quantity of fibre dyed evenly. for dharma dyes, it's like 1.5-2%, i think ashford is 1%, and jacquard is more like 2-4%, depending on the colour.
here is the problems with doing that in your kitchen: first, using that much dye will get you an evenly dyed piece of fibre, which—for me, at least—is basically the opposite of what i want. second, and more importantly, unless you have one of those teeny tiny scales used by jewelers and drug dealers, your kitchen scale will not weigh out such tiny quantities with any accuracy. third, if you do it like this, you really have to plan what you're doing ahead of time, because there's a point after which no more dye will bind! the fibre will be like enough thank u that's it i'm good and that'll be it, so you lose some of your ability to decide that actually, you want more green.
you can probably guess, at this point, that i don't weigh the dye. once you've done a couple batches of fibre with a given brand of dye, you'll start to get the vibes for how much you should use. if you really want a guideline, for a hundred grams of fibre, start with a quarter teaspoon of a given colour. you can add more—either more of this colour or a different one—later, as desired.
put your dye in the empty bottle, and then fill the bottle partway with hot water. the amount of water doesn't really matter here, nor does the specific temperature of the water. i usually fill about 3/4 of the way, because that way there's plenty of room for this next step, which is: wipe the lip of the bottle, recap it tightly, and then shake it up real good. the dye powder is going to dissolve into the water, and you now have a bottle of dye!
if you're going for a gradient, you might want to mix up your second colour so you can add them at (basically) the same time for more even mixing. if you're not, or if you only have one mixing bottle, you can do them one at a time.
oh my god we're finally putting dye on the fibre
are you ready? it's time!!
you have basically infinite options for how to do this, and many of them will give you different effects. here are some ideas:
pour the dye all at one side of the pan. and if you don't add anything else, your fibre will fade from the colour of the dye to the natural colour of the fibre
pour two colours, one at either side of the pan. depending on how much dye you use (and remember, you can always add more), this will give you either chunks of colour surrounded by white, or a two-colour gradient
add all the dye to unheated water and mix it gently, then let the fibre soak for a few minutes longer before turning on the heat. this will give you a fairly even colour
pour randomly all over, and you'll either end up with a tonal yarn or a heathered one, depending on how much dye you're using
add the dye to the water under the dry fibre, which will sink in and take up more dye on the bottom of the fibre than the top
if your heat wasn't on before, it should be now, and you're going to let the dye hang out in the hot but not boiling water for a while. how long? well, one of the cool things about dyeing with these dyes is that they exhaust, which means that when the dye has been sucked up by the fibre, the surrounding water will be clear. how long this takes will depend on the specific dye, how much of it you used, how much mordant you used, etc. i try to check every fifteen minutes.
reminder: if you started with room temperature water, the dye's not going to start taking until the water heats up, so don't check it after fifteen minutes and freak out that nothing has happened. it is fully normal for it to take up to an hour for the dye to exhaust. don't turn up the temperature, just give it time.
yay it worked!
at this point, you have a pot of hot water with some beautifully coloured fibre in it! but maybe it's not beautiful enough. maybe you want...more colours.
that's cool as hell and you should go for it. we mentioned two-colour gradients up there, but what if you want something else?
the answer, probably obviously, is adding more dye.
first, a caveat: while you can successfully make multicoloured gradients like this, it's more difficult than you think, and if it gets messed up—all the colours bleed into each other, say—it turns into a muddy mess. my suggestion is to stick to two (or three at most!) colour gradients until you have a much better feel for what you're doing.
let's talk about ways you can add more colour. you have two options: big colour and little colour.
big colour is going to add a lot of colour—you're going to mix up the dye and pour it just like you did before, but paying more attention to places that don't have dye yet. sometimes it's the middle of a gradient, or the white splotches from random pouring, or the half of the fibre that wasn't submerged when you started. or maybe you dyed the whole thing yellow, and now you want to add a blue gradient over top. whatever!
if you don't want to freehand pour, consider buying a couple large syringes, or a bottle with a squeezy top. these are also fun because you can easily get more colour between the laid-out fibre, or even under it.
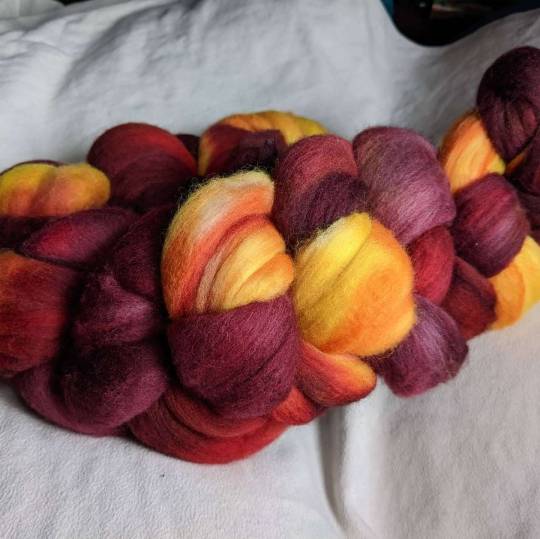
in the pictures at the start of this post, the red-and-gold top and both yarns were dyed by adding big colour.
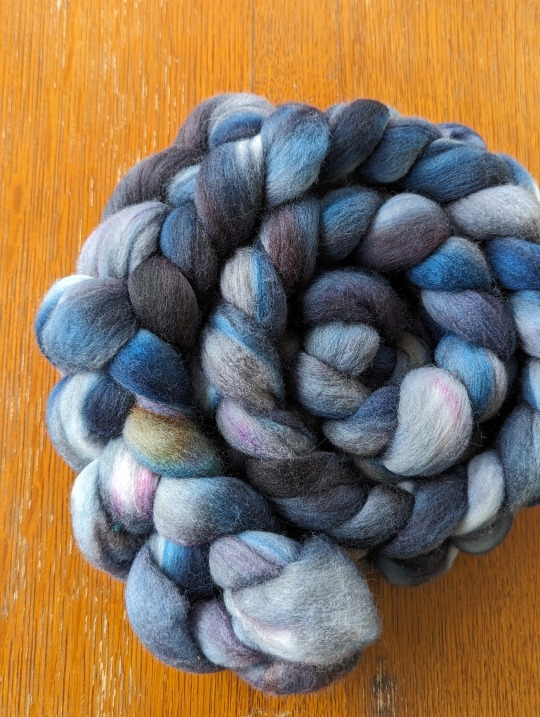
little colour isn't going to add big patches, but is going to add speckling, tonal depth, or smaller patches of colour. all of the blue-base fibres and the yellow-and-blue yarn were dyed like this.
if you're still reading this closely, you might have caught that i just said both yarns were dyed with big colour, and that the yellow-and-blue yarn was also dyed with little colour. these are both true! the base colours of the yarn were done to make big colour, but if you look at the full-size image, there are also a bunch of speckles. you can do whatever you want! no one can stop you!
here are some ways to add little colour:
mix up some dye, but use less water. add drops of the dye, either directly onto the fibre (more dramatic!) or in the water (tonal!)
use a toothpick to grab a little bit of dye powder and drop it into the dye bath (similar to the previous one, but a little less predictable)
put on a damn facemask. take a clean toothbrush, paintbrush, or pipecleaner, and just barely touch it to the dye powder. gently flick or tap the brush to add speckles of that colour
find a salt shaker that you're never going to use for anything but this. put citric acid, salt (to make it distribute better), and dye powder into it, and shake it up (with the holes covered, please cover the holes) to make sure they're evenly distributed. gently shake this over the fibre to add speckles, but more of them, and clustered together
put a little dye in a spray bottle and gently mist the exposed fibre, kinda glazing it with colour
another thing is that if you like a natural coloured yarn with dyed speckles, you can do any of these techniques without doing big colour first. the only thing to note when doing this is that you'll want to be very sure to spread out the fibre well, and maybe to consider dyeing one side, then very very carefully flipping it over and getting the other side.
ok, now what?
let's say that you've added all the colours that you want, and you've let your bath simmer long enough that the water is clear, or nearly clear. (if it's not, check troubleshooting, below.)
put the lid on your pan and walk away. if you don't have a lid, just walk away, but it's less dramatic.
the super frustrating part here is that the safest thing to do is wait until the water and fibre is fully cooled before you do anything else.
have i ignored this? yes
has it ever gone horribly wrong? not horribly wrong, but it's definitely caused me to lose an inch or two of roving on occasion
is it way more stressful if you don't wait? absolutely yes
honestly maybe just go to bed and deal with your fibre in the morning
so now let's say that it's morning and you slept long enough that your water and fibre are both room temperature, which often actually feels quite cool on your hands.
you have to drain your fibre. there are two ways to do this:
lift the fibre out of the water. this has the upside of not risking dumping your beautiful fibre into your sink, and not needing to maneuver a full pot of water, both of which are admirable. the downside is that wet fibre is fragile, and you'll want to be careful to support it.
dump the water out of the pan. this has the upside of minimising how much handling you're doing of the fibre, as well as (in my opinion) making rinsing easier. the downside is attempting to keep the fibre into the pot while you dump the water into the sink, and also needing to carry around a full pot of water.
secret third option: dump the fibre (and the water) into a strainer. upside: very easy, and you can keep the fibre in the strainer while you rinse, minimising both how much it needs to be handled and the weight on the fibre. downside: i never remember that this is an option until i'm already elbows-deep in acidulated water, discovering every tiny cuticle tear.
you're going to fill your dyepot with water again so that you can rinse the fibre. you want to minimise thermal shock, so keep the water temperature as close to the temperature of the fibre as you can, and don't run the water directly onto the fibre. i like to pull all the fibre to one side of the pan, and fill the pan on the other side.
side note: if you, smart person, remembered that you can use a colander, simply fill a pot with water, put the colander in the pot, and gently agitate the colander.
if you, person who is deeply relatable, did not remember you can use a colander and now have a pot with clean water and fibre, gently move your fibre in the water to encourage any excess dye and also citric acid to get out of there.
drain your fibre again, and this time, you're going to squeeze it dry. you're still trying to minimise agitation, so this isn't a 'wring it out' situation, it's a 'gently squish it between your hands and/or a hand and the side of the pot' situation.
hang your fibre to dry. remember what i was saying earlier about it being fragile? let me suggest, here, that you do not simply drape the entire length over a single hanger or something and hope for the best. if you literally have a single hanger, at least drape it back and forth a bit, but better if you can use more than one hanger, or a clothes drying rack, or that weird metal wine rack thing that came with your fridge that you've never used, or whatever.
important reminder: drip-drying things will make your floor wet! if you live somewhere very clear with no major roads or pollen nearby, you can probably dry things outside, but if you don't, you'll probably want to position the drying rack in a bath, shower, laundry area, or otherwise over something that will catch and/or absorb the water.
how long it takes for the fibre to dry is another unknowable variable. if it's warm and dry where you are, it might literally be overnight. if it's damp and cool, it can take days. the batch i posted a couple days ago literally took almost a full week to dry. spread it out as best you can, gently squeeze out the water you can, and otherwise you just have to wait.
you're done!
when it's dry, that's it, you're done! you might find that you need to pick off some little lint balls or a bit of compacted or slightly felted fibre from the tips, but other than that, you should be good to go.
like most fibre stuff, this is best maintained by handwashing in cool water. you may see a little bit of dye or colour loss the first time you wash it, which is pretty normal and nothing to worry about.
congratulations! you made it to the end of this incredibly long post, and if you followed along, you've just dyed some fibre!
troubleshooting
this isn't dyed enough! i want more colours!
add more dye! i'm not the boss of you.
this is true even after the fibre is all done and dryed. there's nothing that says you can't dye it again—you can, and i have.
some fibre seems to require more dye than others. silk, for example, dyes beautifully with acid dyes, but also needs way more dye than i expect it to.
remember that if you're dyeing something that's a wool/cotton blend, for example, the cotton isn't going to dye. the only exception is nylon, which will kinda dye, but not as dramatically. this guide will not work for plant fibres.
this is too dyed! i want fewer colours!
please refer back to the number one most important thing about dyeing, which—as you know—is: you can always add more colour, but you cannot take it away.
pull out some more fibre and try again. this has a learning curve, just like any other fibre craft.
these colours don't look like i expected!
this can be about a lot of things.
colour guides, especially if you're looking at them online, aren't always very accurate.
colour guides tend to assume that you're dyeing a single colour at the suggested dye percentage of weight, and using less than that will give paler colours.
dyes, especially if you're mixing brands, can interact with each other and behave in ways you didn't expect.
dyes can also break, which is when they split into their component colour molecules. this happens commonly with blacks and browns, food colouring, and anything that dharma trading has marked as 'advanced'. some people find this very desirable and seek it out; some people are very frustrated by it.
the ph of your water can sometimes affect your dye. i've been lucky enough that i've only lived places with lead problems, not weird ph stuff, so i haven't investigated this closely, but if you're consistently not getting the results you expect, even going for a single, solid-colour dye, look at the ph.
my dye water's not clear!
if you used a quarter teaspoon of dye and a hundred grams of fibre, and it's been, say, 45 minutes of actually hot water and your water still isn't clear, you probably didn't use enough mordant, and you should add some more citric acid or vinegar to encourage the dye to get in there and do its thing.
if you used you used more like a teaspoon of dye, or if the citric acid doesn't change anything, you used too much dye for your fibre. you can either shrug and pour it down the drain, or you can add some more fibre and dye that, too.
my rinse water's not clear!
you probably used too much dye. it's ok—just keep rinsing it, gently, until it's more or less clear.
some colours just like to run—you know how every once in a while you get a yarn and it just bleeds a little bit every time you wash it? sometimes it's just like that. i wouldn't worry about it too much.
my fibre has felty/clumpy bits!
a little bit of this is normal, especially at the ends of a fibre that felts easily (this means you, merino!)
pick off the bits that you don't like—this is generally fairly easy, and involves very minimal fibre loss. i don't bother doing it until i sit down to spin, and then just pull off bits as i come to them.
if there's a lot of felty/clumpy bits, more than you can reasonably pick out, you agitated the fibre too much. there's not much for this other than trying to card it out, which may or may not work.
sometimes this happens because your stove got weirdly aggressive and boiled your fibre. especially for wool that's prone to felting, the bubbling and jostling can be enough to encourage more clinginess than you'd like.
i want my dyeing to be reproducible!
this is kinda doable. it's a handmade thing, so it's always going to have some natural variance, but you can do it.
buy a jeweler's scale that measures in fractions of a gram.
start measuring your dye and acid, and take detailed notes about what you do.
follow those notes in the future, and you'll be probably 90% of the way there.
i want to dye with natural dyes!
i fully support this and have played around with it a little bit myself, but absolutely do not know enough about it to advise you.
the internet is very large and full of many people who are much smarter than i am, and i feel confident that at least one of them is desperate to tell you all about how to do natural dyeing.
i am, at this point, not that person.
i want to dye plant fibres!
i am begging you to find another guide, because this one will not work.
you didn't answer my question!
that's what my inbox is for
i have to reiterate that i'm just a person with real specific interests who started dyeing things because i couldn't find or afford the kinds of colourways that i wanted.
i am not a professional
i will do my best to answer questions, but sometimes the answer is 'just fuck around until you find out'
plant fi—
shhhhh
the end
thank you for reading this incredibly long post! i might make another one in the near future, either so i can show pictures or because i took out an entire section about how to choose colours and pick a colour scheme and work with colours, and i kinda want to talk more about that, but this is no joke almost six thousand words long, so i thought, you know. maybe not tonight.
anyhow, i hope that this was useful to someone! thank you for letting me talk about one of my very favourite things.
#dyeing#craftblr#fiber arts#fiber craft#fibre arts#fiber#fibre#dyeing wool#i'm sorry this is so long#it kinda got away from me#i just want to tell people about cool stuff!#and then talk about the cool stuff for an unreasonably long time#you know#like a normal person#anyhow this was fun#dyeing is super fun and you should try it#sorry to say that i am Not editing this#because i only edit things when people are paying me for them#but i did make my wife read it to make sure i got all the main stuff#so we should be good#still: sorry for any stylistic inconsistencies#smartest raccoon i know
310 notes
·
View notes
Text
Bit late to share my Nanny Astoreth cosplay, but here we go! More info under the cut.
To all the folks who attended the Talent show and/or submitted: loved seing your creations! Can't wait for a next year!❤


The main part of the cosplay- the coat, was made by me. From black wool, satin and burgundy nylon lining. I sewed by machine and by hand. The pattern is roughly 1890s. I wanted to make a coat that is also wearable for a normal day, not only a cosplay. (It will have it's premiere in about a week when I go to see very good production of Hamlet in the theatre.)
I always wanted to have a coat like this, so I added a little Nanny Astoreth magic to the mix and made one of my dreams come true.
Edit: I was asked about some sewing info, so there you go! Warning: I'm not a seamstress, I start and complete my sewing projects only by the inaffable audacity I posses, usually by the method of trial and error. So if you're a seamstress, please don't execute me or burn me at the stake for this, please.
The pattern is from Black Snail Patterns, it's their Victorain 1890s coat. I made few alterations: I combined the two patterns you get (with the skirt or peplum). I picked sleeves from the peplum variation but kept the skirt. (More about the skirt later.)
I made no mock up. That's it, you can crucify me. I just went for it and hoped for the best. Probably don't do that.
This was my "first" in many ways: first time using pattern with included seam allowance, first time working with interfacing, first time doing an overcoat. There were some easy part and some hard ones. I won't go over the whole process, just share a few tips I found helpfull.
Here's the whole coat with the inside. (Colours are a bit brighter then in real life, I had quite a different lighting. It also isn't so shiny.)

Before I even started sewing, I ironed in interfacing. This makes the coat stiff and strong. (I sadly have no pictures.) The pattern will tell, where to do that. I used baking sheet, so it wouldn't stick to the iron.
To ensure I have the bodice pieces all lined up, I marked the waist-line by thread. Chalupa wouldn't hold and thread made it so easy to work with the pieces. Over all, sewing the bodice together wasn't a problem, but here comes the hard part...
The satin lapels. I had a breakdown over these. I'm not kidding. First, I just sewed them in, and to make them all nice and smooth I ironed them to the ineterfacing on the wool outer layer. That turned out to be a disaster. The seams were showing on the corners because there was more fabric. I had to carefully rip it apart and think of another solution.
I decided to iron in new Layer of interfacing, sticking just to the satin. This was achieved but putting baking sheet between the two fabrics, so it doesn't stick together. There are some photos of the interfacing pinned and not ironed and then when I ironed it. (It was honestly going back and forth, trying not to overheat and melt the fabric whilst making it stick. It took forewer.)

(As you can see, the collar is stitched on with red thread. That was just to hold it in place, I later handstitched it with black one. I used the same "two interfacings" method for the collar as on the lapels. You can also see a tiny bit of the interfacing in the upper left corner of the second photo.)
Sewing and sewing in the lining wasn't much of a trouble. The sleeves took a while to figure out, but it was mainly my thread ripping while I gathered them.
The skirt was the easy part. I pinned it on and tried it, saw the waist was too low and made my proportions weird. I just moved it up and trimmed the rest of the fabric. Here you can see how the inner seam is done. It was pretty easy.
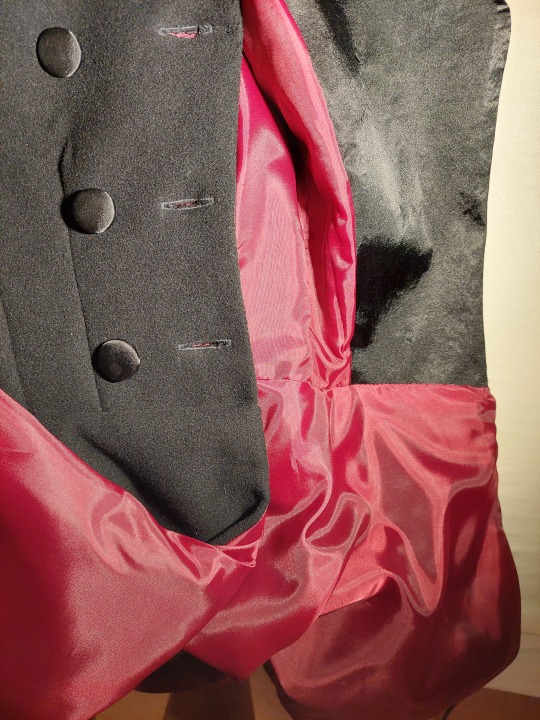
About the additional stuff - buttons, buttonholes and the buckle and belt. Buttons were made by me. I wanted them to match, so I bought a little box for making custom fabric buttons. Easy and fun! Buttonholes were supposed to be easy. First two were. The third was a disaster. What can I say? Check your foot and settings. You don't want to be undoing that. I bought the buckle in the shop, sewed the belt. The wholes for the buckle were done by sewing tiny buttonholes. I did the same for the prog of the buckle. Worked surpridingly well.
That's probably all the tios I have.
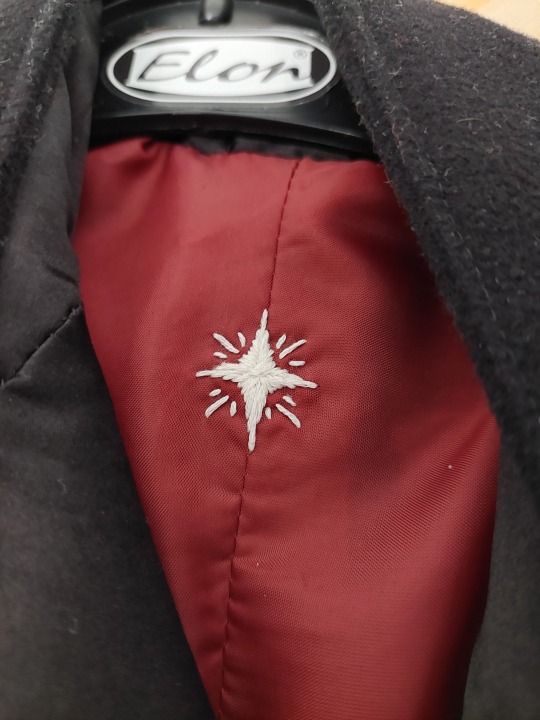
Last but not least, I have a tiny fun detail. I embroidered a little star for the starmaker! And I love it dearly!
#good omens 2#good omens#crowley#neil gaiman#ineffable husbands#nanny ashtoreth#cosplay#my sewing#sewing#go cosplay#talent show#aziraphale#aziracrow#david tennant#michael sheen#good omens season 2#seamstress#artist on tumblr#sewist#sewblr
77 notes
·
View notes
Text
When you go running in the woods in your running tights, elastane is the reason they fit you so comfortably. Elastane is an elastic material that allows the fabric to stretch and adapt to your body.
But when elastane fibres are mixed with cotton, wool, nylon or other fibres, as is the case in many clothes today, the clothes become almost impossible to recycle. It is extremely difficult to separate out the different fibres, and therefore the materials in the clothes cannot be recycled.
For this reason, clothes and other textiles are among the materials that we are the worst at recycling. Only about six per cent of clothes thrown away by Danish households are recycled. In comparison, 32 per cent of all plastic packaging is recycled in Denmark.
Read more.
49 notes
·
View notes
Text


Spice Neckwarmer
The colors on this are warm and remind me of spices or a good warm meal. Golden color with stripes of red and green mixed in intervals throughout, with ribbing at the top and bottom. Very tall; squishes down for a bundled-up feel despite its thin weight. I don't have the yarn info for this one-- the label got lost-- but it's a wool-nylon blend typical of a sock yarn.
Yarn: wool/nylon
Measurements: ~13" tall and ~23" circumference.
#hand knit#knitblr#knitting#etsyseller#handmade#craftblr#knitters of tumblr#handcrafted#etsy#forsale#neckwarmer#scarf#cowl
12 notes
·
View notes
Text
Another pair of socks down. DK socks even. And it always surprises me how fast they knit up. Doesn't matter if I've just knit dk socks, I still get surprised.
Pattern is Fredrika by Tiina Kuu. Yarn is Strong from Svarta Fåret. An alpaca/wool/nylon mix. Not terribly nice to knit with, as per all alpaca yarns I've tried so far. They hurt my hands in the long run. But it's so soft and the socks are so warm. So I'm looking forward to wearing them.
Not a color I'd have picked myself, it's a very... Non color. Not beige, not grey, not white, just... A bit unsettlingly no color. But it was a advent calendar yarn. And since the pattern is so pretty, I figured the non color would show off the cables all nice and stuff. And they do!
22 notes
·
View notes
Text

How different materials decompose | Permanent Style
Last week I wrote about the loopwheel knitter Aigat, one of the most specialised producers of loopwheel fabric - for sweatshirts, T-shirts etc - in Japan.
Something I wanted to save for a separate article was the display they had in their reception, where they’d decomposed different fabrics in their garden.
The factory is set in attractive grounds, with water pouring down from the mountains behind. Establishing them, and running the factory along environmental lines, has been a passion of the founder.
In the middle of the garden is a pleasant pond, but a few years ago the team filled the whole thing and parts of the garden with lengths of fabric, made up of different fibres (cotton, rayon, polyester).
The idea was to have personal, physical experience of how much better natural fabrics - like their own - break down in the environment.
[…]
The rayon was the first to go - a synthetic fabric, but of course made with regenerated natural cellulose, so it broke down easily.
The cotton is only just visible, lying on the table at the bottom, but it broke down just a little slower than the rayon, mostly eaten away in the water after 50 days, and completely gone after 100.
But the polyester kept going and going. After 200 days, in water or soil, it had shrunk a little but was otherwise fine.
Perhaps scariest of all is the cotton/polyester mix. You might think this would be a little better than pure polyester, but it's pretty much the same, despite some of the cotton breaking down.
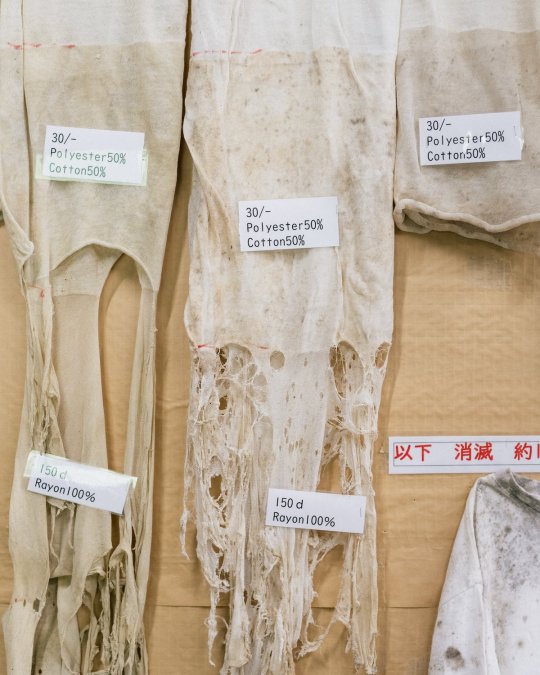
I wasn’t surprised at the results, but it was powerful seeing the process rather than just being told about it.
It also made me appreciate rayon (or viscose) a little more. There are lots of things wrong with it of course, including the materials cut down to make it and the processes used, but it is certainly better than polyester and nylon in this respect. Other natural materials used in high-end menswear, such as wools and vegetable-tanned leathers, are also better in that way.
We probably can't get into all the nuances of material sustainability here - and volume of consumption is generally the biggest issue - but on this one aspect the point is pretty compelling.
63 notes
·
View notes
Text
Lol not clown content
Here's an unnecessarily long, silent, and oddly framed clip of spinning yarn. imagine there's some lofi Ghibli beats in the bg or sumthin
Over the weekend, I busted out the spinning wheel to go back to the wool that was making me frustrated. Turns out I was (and still am) the problem because I don't plan ahead. I'm spinning it relatively thin and idk if I want to double-ply or triple-ply.
It doesn't really matter since I don't make anything with the yarn I spin anyways lol
nerd facts: the fiber is a mix of merino wool, tussah silk, and nylon and I'm using an ashford kiwi 2 wheel
#peep the smiskis#spinning yarn#fiber art#sry not a fic#im the only clown here#get to know hey-august
12 notes
·
View notes
Text

I’ve gotten really lucky at finding exceptional yarn at thrift stores lately. All are wool or wool/nylon mixes and absolutely gorgeous colors!
All of these were $8 together.
(Important tip: when getting wool from the thrift store or second hand, make sure to stick it in the freezer for a few days to kill any larvae or bugs that might damage your stash)
#yarn#knitting#I went to the fibre festival a few weeks ago#and bought one skein of yarn because that’s all I could afford#it was $30#it’s gorgeous and I don’t regret it but wow#a few years ago it was $16 and I thought that was a lot
170 notes
·
View notes
Text
@solarpunk-0possum asked for a guide on solar yarn dyeing and I wrote this up because I’m a nutcase. It’s long but hopefully informative.
Its actually really easy and there’s cool things you can do with it. Chemknits on YouTube has some fun projects too, their channel is the ultimate dye channel imo. But I’m going to give you a crash course here because I like doing that.
Let’s start with fiber.
For acid dyes it needs to be a protein based fiber, it can be a blend, so wool and nylon for example but depending on the fiber it may look slightly different. I almost exclusively use Wool2Dye4 platinum sock for my yarn base which is 75% super wash merino wool and 25% nylon but for more environmentally friendly dyeing, as super washing isn’t great, you can go non super wash wool or other natural protein based fiber. Paradise Fibers and KnitPicks also have white yarn bases. There are other companies but most won’t let you buy single skeins as they are geared toward commercial dyers. I buy in bulk cause I do a lot of dyeing.
If you get a non super wash wool yarn it can felt but this process minimizes that risk significantly. Handling it a lot, stirring or squeezing and temp changes are what cause wool to felt. I also dye 100% wool top and roving in many varieties with this same method. This technique is great for that because your felting risk is super low since you aren’t stirring or changing temps until you rinse and even then the temp change is a lot less and your fiber stays together.
If you do a fiber like silk it is going to react a lot differently so you want to play around to get the hue you want. Silk is notoriously tricky but gorgeous.
Plant based fibers need a different totally different dye and mordant though, I’ll get into that later but if you have a hemp, linen, bamboo or viscose or something you can still do this. Even synthetic fibers like white acrylic or nylon can be dyed just needs a different dye and I can’t speak to the efficacy of solar as I’ve never dyed them but nylon blend works so I don’t see why not.
Now to the dyes.
Acid reactive dyes are dyes that react and bind to fiber once acid is introduced to the party. I use white vinegar or citric acid. You can buy acid dyes from companies like Jacquard or Dharma Trading, there are several companies but these are my personal favs. Jacquard has a red, blue and yellow set that is great to start with as you mix your own colors using basic color wheel principles.
You don’t have to buy special dye though!!
You can dye with Kool Aid or Easter egg dyeing pellets or food coloring (gel or liquid), cake sprays, bath bomb colors etc. It just won’t be as color and light fast. But if you are just playing around it’s super fun and safe and I have skeins that kept their colors for years no issue. Also using those food based dyes can be done with children where I wouldn’t with acid dyes.
For acid dyes you want to use equipment that won’t ever touch food again, so you need specific jars and spoons and such that are just for dyeing. I have dedicated dyeing equipment (stock pot, crock pot, tongs, spoons, etc) but I purchased all of it at thrift shops for super cheap.
I also use a N95 mask or respirator whenever I open my dye powder jars to not breath in particulates. I also wear glasses or safety goggles. I wear a mask for ANY powder even Kool Aid. It’s just good PPE. I am bad about wearing gloves though….I should be better. Wear gloves.
For this project as far as equipment all you need are glass mason jars. I used 2quart so the yarn could move freely but 1quart or smaller will work too you just might need to put in less yarn. You also need plastic or paper cups to mix dye in if you are mixing. If you are using an acid dye or even a Kool Aid you need gloves, and a mask.
I do recommend a scale but it is not necessary, 1 tsp of acid dye is usually = 1 gram but check the manufacturer documentation. If you are using food coloring or Kool Aid you don’t need special dedicated stuff at all.
You will also need an acid like white vinegar or citric acid. Kool Aid, and PAS easter pellets or other powdered drink mixes usually have an acid in them so you can use them as is but I always add a little extra acid for better color adhesion.
For plant based fibers you need a fiber reactive dye and a mordant like soda ash or alum . Procion has a Pro MX line. You can also dye with natural materials like indigo, madder, onion skins, marigold, avocado etc. Some people recommend soaking or boiling your fiber in your chosen mordant but tbh I’ve done it just throwing everything in the jar and had good results so 🤷♀️. You can get soda ash and alum on Amazon or other sources like Dharma Trading. For plant based dyeing you just put the leaves or roots depending on the material in the jar with everything. Natural dyeing takes A LOT longer than acid or fiber reactive dyes for solar dyeing but it’s still fun and MUCH better for environment.
For synthetic fibers like acrylic you have to use something like Rit. I don’t do this very often (or at all really) and have never solar dyed acrylic as I just buy acrylic yarn in the color I want when I use it, but I assume it would work the same? I cannot guarantee it though. I’ve also seen people use acrylic paint mixed with water to dye yarn, it just changes the texture slightly so your mileage may vary with synthetics. I don’t recommend using them though. You can get 100% wool, linen, bamboo etc at craft stores pretty easily now a days.
So now that you have your dye and your fiber let’s get dyeing!
Prepping the Fiber
Weigh your yarn. You can use a kitchen scale. This will help you figure out how much dye to use to get the shade you want. This calculator for acid dyes is great for figuring out how much dye stock solution you need. For Kool Aid or Food Coloring it’s just vibes based for me but someone has probably figured out the amounts. We’ll get there.
To prevent tangling I recommend tying your yarn off in the skein at regular intervals. You can see my purple yarn ties in the pic below. I also use reusable zip ties. If you buy yarn the skeins usually come pre-tied but I skein up my own yarn so yeah. I also will put a zip tie or large piece of yarn at either end to keep it orderly. You can also just put entire cakes wound up from a ball winder, or an entire skein from the store in the jar too though, you’ll get different effects from the natural resist of it being wound up but it’s super fun to see what happens.
Soak your yarn, if you want more color variation you can do it dry, that’s often how tonals and semi solids are dyed as the dye binds or “strikes” to the fiber at different rates so feel free to experiment. You can also presoak your yarn in an acid and water mixture for different effects as well. It’s all about experimentation! Even your dye can do things differently depending on if the dye “breaks”, that’s where different pigments make up the dye and will strike at different temps, the Purple Pop I used in this example is a dye that will break into blues and reds or different purples if I do different things with the heat. For natural you can soak in your mordant like alum or soda ash. You probably want to get more detailed instructions on amounts though, I just look it up when I do it as I never remember and it takes me forever to gather enough plant material so it’s only a once or twice a year thing.
In this example I soaked my yarn in plain water for about 30 minutes before I added any dye as I was going for a solid.

While your yarn is soaking you can mix your dyes!
Mixing Dye:
If you are using acid dyes you can add your dye powder directly to the water you are dying in until it looks like you want. I dip pieces of paper towel into it to get an idea of what it looks like color wise, or what I do for greater precision with different color saturations and to not waste dye is mix a dye stock solution.
It sounds scarier than it is. A dye stock solution is suspending the dye molecules in water to make a concentration of dye. My dye stocks are 1 part to 100 for a 1% solution. So for Dharma dyes I mix 1 gram (1 part) to 100ml hot water (100 parts). Once I have my dye stock mixed I can use that to determine how many milliliters of dye I want to introduce to my yarn. The calculator I linked can tell you how much for the depth of shade you want but for an example if I want a mid saturation at 2% for a 50g skein I would use 100ml of dye stock. If I want a much lighter shade at .5% I would only use 25ml. If I want just the regular color at 1% I use whatever the fiber weighs in ml, so 50ml for a 50g skein. The skeins above are 2% of Sour Apple and Purple Pop except for the lighter green which was .5% of Sour Apple. If I wanted pastels I usually do like .025%.
The calculation is Weight of Fiber x Depth of Shade for a 1% dye stock solution. You can make stronger dye stocks like 2 grams per 100ml for a 2% but I find just using 1% much easier cause math is annoying but the calculator will let you do that too.
For Kool Aid or Food Coloring just mix your color in water and dip in pieces of paper towel until it’s approximately the shade you want. It’s not 100 accurate as paper towel is different than your fiber but is pretty close, or at least gives you an idea if you have a deep shade or a pastel shade. If it’s too dark add more water, too light add more dye.
For natural dye you can’t really determine what shade you’ll get as plants have too many variables, there are some general guidelines for most common dye materials that can give you an idea though and generally less material is lighter and more material is darker.
The Full Process:
Weigh your yarn if you are trying to get a more precise depth of shade. Then you can use the calculations above to determine how much dye. If you are just playing you can skip this. If you bought skeins they usually tell you if it’s 100g or 25g etc so no need to weigh.
I filled my jars with plain water and put the yarn in (make sure it’s loose, I made the mistake with my first batch last weekend of accidentally leaving it twisted in the skein and it formed a resist, I just overdyed and still got some pretty skeins so nothing lost but if you want white spots or different depts of shade throughout feel free to add some resist by leaving it skeined or tying off sections like tie dye!).
When filling your jars remember we need room at the top to add dye and acid so just fill until the yarn moves freely, you can always top it off after. Can you tell I’ve made this mistake?
I let it soak for about 30 minutes while I prepared my dye stock.
Once my dye was mixed and my yarn had soaked I determined how much dye I wanted to use. Then just add the dye into the jar. I let my yarn sit in the dye without acid for another 30 minutes. I put the lid on and shook it up to make sure it penetrated all the yarn. Again, if you want different effects you can add the acid in now, don’t mix it, etc but for a solid you want as even coverage as possible.
Then I added the acid. I used 1/4 cup acid cause that’s what I always use for some reason but you can add just 1 or 2 tablespoons. I used white vinegar. I usually use a citric acid mix with water but I ran out. It doesn’t matter the vinegar smell fades.
I put my lid on, gave it a good mix and I was done. Now for the sun part.

What makes the dye bond to fiber is a proportion of acid, heat and time. With kettle dyeing in a pot on the stove or similar you introduce heat rapidly but in this case it’s not so much about the temp as it is the UV and time. You don’t have to put your jars in direct sunlight outside, a sun facing window is fine too. Your jars do need to be clear though.
I put mine outside. You can still solar dye if it’s overcast or even if it’s kinda cold it just might take more time.
Then just leave it! You’ll know it’s done when the water is clear, the yarn can make it appear like it’s not clear but pool it at the top of the jar to check on it.
This is called exhausting the dye, all the dye molecules have found a friend in the fiber and adhered to it. Some dyes do not exhaust completely, either because there is too much dye for the weight of fiber and all the molecules have already found their friend, or because of the dye itself. The Purple Pop is really bad about exhausting. If it’s been several days and you aren’t seeing a change it may be done, in that case just take your yarn out but add another skein in with some more acid, no need to waste it, you’ll get a lighter shade. I usually have a yarn mop for collecting non-exhausted dye. I just throw it in and see what happens, sometimes with many different colors.
The length of time you leave it out depends on a lot of factors, natural plant based dyes can take months, these acid based dyes took two days in Central FL but honestly the greens were exhausted in like 18 hours and the purple I didn’t see any change so I just took it out and put another skein in, its cooking now. I usually give my acid or Kool Aid dye projects no more than a week cause I’m impatient and always have had good results. Plant based I’ll leave for months.
After you remove your yarn you can dump the water. If I dump it outside I add a little baking soda to neutralize the acid, or just let it sit for awhile. I don’t like to dump it near water sources like wells or any food based gardens but have used it to water flowers and stuff. If using Kool Aid or food coloring you can do whatever. I’ve also reused my water for another dye if it’s totally clear or if I don’t care if there’s a bit leftover.
Then wash and rinse your yarn! I use Kookabura Wool Wash but you can use anything like Dawn dish soap. You may have a bit of bleeding depending on the color or none at all, just rinse and repeat until the water runs clear. If it’s a lot of bleeding and you are washing and rinsing and it just won’t run clear you can steam set it by wrapping it in plastic wrap while still wet and microwaving it or steaming it in a steamer basket like you would a vegetable. If you microwave just don’t burn your yarn! I do like 30 second intervals in the microwave until it’s hot to the touch but I rarely have to do this.
For non super wash wool or wool top/rocing that will felt you need to do this gently. Don’t run water directly on the fiber, handle it as little as possible, don’t introduce extreme temperature changes etc. The temp is less of a concern for solar though, that mostly applies to kettle where you go from hot to cold.
Then hang to dry! If you tied off your skein it should be tangle free, but you may need to shake or comb it a bit to get rid of curly bits. I use a dedicated salad spinner to really get it dry first then hang and it’s usually totally dry in a few hours.
And that’s it! Hope this helped, sorry it’s so long.
6 notes
·
View notes
Text


Sylvia (our resident couch sloth) makes a great knitting buddy! She's the perfect shape to hold Gabe's project when they get up and walk away. (She is even a good sport when they inevitably get distracted and don't wander back for awhile.)
This project is an in progress shawl for our sister in law! It's being made with yarn from the Manos Del Uruguay Alegria line, specifically in the Waterlily color. It's hand dyed mix of Merino Superwash Wool and nylon. It's one of Gabe's absolute favorite yarn lines to work with!
Manos del Uruguay is a special brand of hand spun & dyed artisan yarns that supports rural Uruguayan women. Manos is a non-profit organization that was founded to give women jobs, allowing them to be independent & support their families while being able to live in their home villages. Go support them! Their yarn is so so soft and pretty.
#knitting#fiber art#fiber crafts#crafting#work in progress#polycraftory#gabe crafts#adhd crafting#queer artist#disabled artist#manos del uruguay#hand spun yarn#also this project is definitely a ravelry pattern#so hit us up if you want the link to that lol
2 notes
·
View notes
Text


Oh hi Mark
I will eventually write up An Official Blog Post about why Koolaid cannot dye cellulose but my brain isn't cooperating with figuring out how to explain chemistry in a simple way, so for now I just *gestures wildly at samples*
I'm just posting these so I don't magically lose them
On each card (except for feathers lol), the leftmost sample is undyed, the middle sample is "rinsed after coming out of the dye pot until it doesn't seem to be bleeding", and the rightmost sample is "hand washed with detergent or wool wash as appropriate"
Cellulose & Synthetic Samples, top to bottom:
Commercial white cotton yarn (Lily Sugar & Cream)
Mercerized cotton (Aunt Lydia crochet thread)
Natural green cotton (EX Spin Cotton sliver--this stuff is pretty cool and the natural color gets deeper when it's in hot water)
Linen/rayon blend fabric
"Rose fiber" which is probably just rayon with a fun marketing spin
Acrylic yarn
Protein Samples, top to bottom:
Domestic mix wool
Cheviot wool
Wensleydale wool
Superwash/washable wool-nylon blend
Alpaca
Feather (I did not wash the feather because....... I usually don't wash feathers unless you count getting caught in the rain at the ren faire)
Also I have some leather that I want to dye too, but I don't know the procedure off the top of my head so I need to do some research on that. (Boiling leather is bad, right...?)
#i need the good brain chemicals that come from making a post :}#spats crafts#misadventures in dyeing
4 notes
·
View notes
Photo


Interweave Knits, Winter 2023
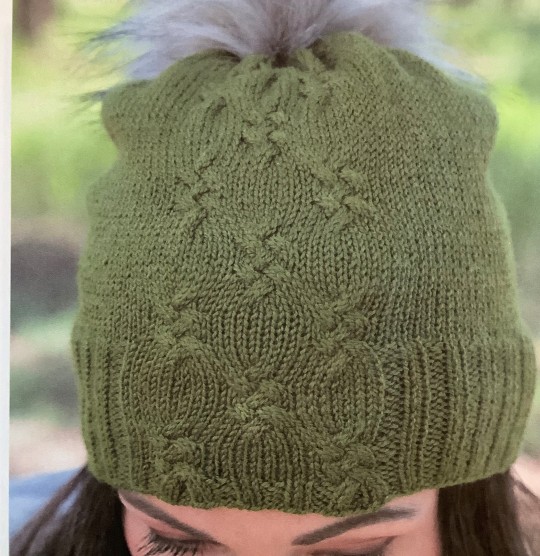
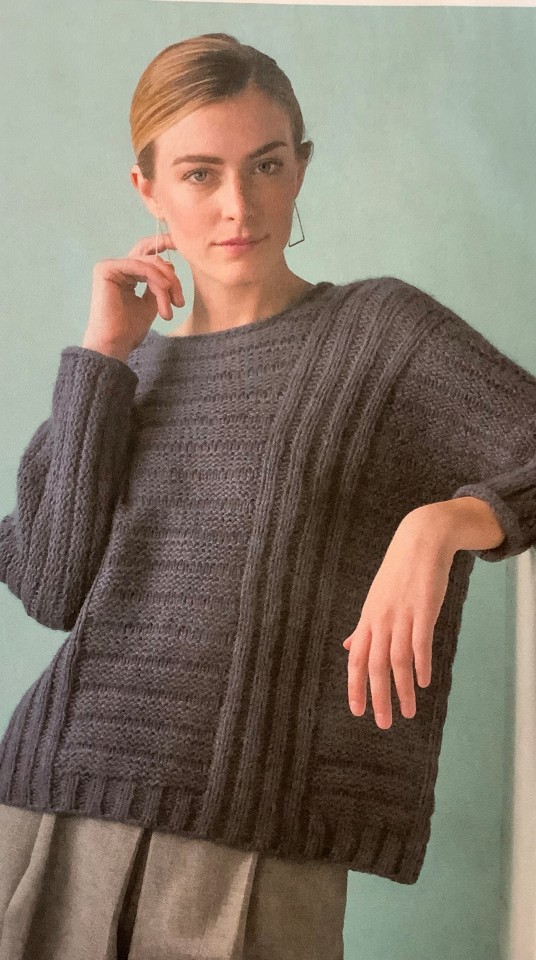
This issue emphasizes pullovers, with a total of 9 of the, including 1 tunic, and also including some re-prints from the Wool Studio digital magazine. There are also a vest, a hat with matching mitts, and a cowl
Among the new patterns, you see the Taskette Pullover in lilac on the cover. It features a clever cabling that looks like you are weaving the knitting. Laura Barker designed it in Manos del Uruguay Alegria Grande which is a DK or light worsted yarn of superwash Merino and synthetic blend. It is a 3 out of 4 for difficulty. The caramel and brown lattice patterned sweater is Sonneteer Sweater by Heather David and combines garter stitches and slip-stitch cables. It is made in Peace Fleece Worsted which mixes wool and mohair and it is another 3 out of 4 as are all the pullovers I am featuring. Moira Engel did the aran style sweater with heavy cables called Dizen Sweater, which is made of Brown Sheep Company’s Prairie Spun DK, a 100% wool yarn. The cable patterns are all charted for all of these patterns
Another cabled pattern, but with the interest running down the sleeves is Charles Pullover by Michele Wang which is one of the reprints. It has an over-sized fit and saddle shoulders and is done in The Fibre Co’s Arranmore which is a Merino, cashmere, silk blend. The boxy grey pullover is another reprint. This is called Cartesian Pullover, designed by Irina Anikeeva, and done in Trendsetter Yarns Placid, a bulky weight of cashmere, Merino, nylon blend.
Faunus Hat, which you see here in green comes with matching mitts and is 2 out of 4 for difficulty. Kelly Sandusky scattered cables motifs on the front of it but stuck to the practical ribbed hemline. It is done in O-Wool O-Wash Fingering, an organic Merino wool.
Kim McBrien Evans wrote the 6 page article on making sweaters that fit which includes several charts to allow you to measure yourself and calculate what you like in the cut of a sweater. She also has tips on evaluating a gauge swatch for comfort and durability as well as for the drape of the fabric. A QR code gives you a hand little PDF to fill in with your own numbers. There are also columns on new notions and new yarns.
You can find it at your Local Yarn Shop, or LYS, or online here: https://www.interweave.com/product-category/knitting/knitting-magazines/knitting-magazines-interweave-knits/
#interweave knits#interweave knits magazine#knitting#knitting patterns#knitting magazines#fitting knits#manos del urugauy#sonneteer sweater#heather david#peace fleece#dizen sweater#brown sheep company yarn#moira engel#michele wang#charles pullover#the fibre company#cartesian pullover#irina anikeeva#trendsetter yarn#faunus hat#kelly sandusky#o-wool#kim mcbrien evans#local yarn shop#taskette pullover#laura barker#makers#making#wool studio#wool studio magazine
12 notes
·
View notes
Last Seen Blogs

suits-ceo
小松裕介/プロ経営者

lost-in-college97
Back To My Head

seedam-weddingphoto-blog
SEEDAM

babyxxxlisa
Lisa Lee Adams

dommeli
público fotos de mulheres no sigilo