#zorin os tutorial
Explore tagged Tumblr posts
Visit Tumblr Blog
Explore Tumblr blogs with no restrictions, modern design and the best experience.
Last Seen Tumblr Blogs


Fun Fact
The Tumblr app for Google Glass was released on May 16, 2013.
Text
Setting a GNOME extension to run at the greeter
I recently installed Linux on my old Surface Book, a touchscreen device. I want to be able to use the entire interface with the keyboard unplugged. This means I must use the onscreen keyboard frequently - but the default GNOME OSK (onscreen keyboard) is doo doo trash, and I don't want it. You will need root access for this tutorial.
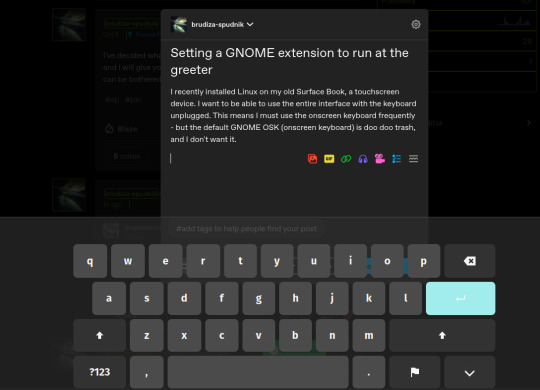
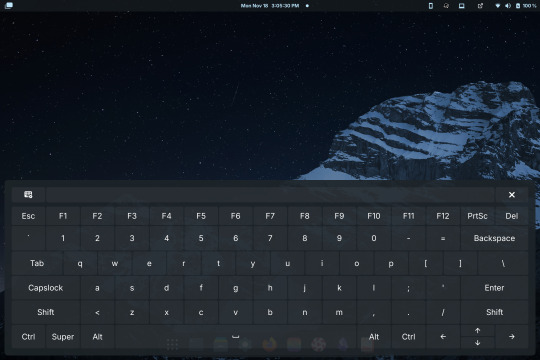
Compare the default GNOME OSK (left) to the new and improved one (right).
This tutorial involves copying a standard GNOME extension into a folder that's readable by any user, then enabling it for use by the GDM user, which governs GNOME's greeter (login screen).
The extension I will be installing using this method is the above keyboard, [email protected] (which can be found via GNOME's extension manager). This is done with the purpose of accessing this significantly improved onscreen keyboard even at the login screen - without this tutorial, the extension does not load until after you have logged in. This method can be done with any extension, although I'm told the GDM user is more restricted than the actual user so some things may not work.
Step 1: Set up the extension in userspace.
Modifying the extension config after it's copied over will be a pain in the ass. Get all your configs ready using the extension's own menus or config files. No rush, as you can still do this bit up until step 5.
Step 2: Move the extension from user-install to system-install.
In order for the GDM user to access the extension it must be in the system-installed folder. For my OS (Zorin) it will be in good company.
sudo mv -r ~/.local/share/gnome-shell/extensions/[email protected] /usr/share/gnome-shell/extensions/
You can also copy it instead of moving it, but you have to rename the user-install folder (in ~/.local) to break it. Otherwise the system would rather use the user-installed one, and will ignore the system-installed one on boot. I think.
Make sure that the gdm user can actually access the files as well:
sudo chmod -R a+rX /usr/share/gnome-shell/extensions/[email protected]
Step 3: Modify the extension metadata file to let it run on the login screen.
sudo nano /usr/share/gnome-shell/extensions/[email protected]/metadata.json
look for the line that says
"session-modes": ["user"],
If the line doesn't exist, just add it. You need it to say
"session-modes": ["user", "gdm", "unlock-dialog"],
Step 4: Enable the extension for the gdm user.
To do this and the following step, you must be able to log in as the gdm user. There are multiple ways to do this, but the way I used is via `machinectl`. If you try to run this command on its own it should tell you what package you need to install to actually use it. I do not know the ramifications of installing this, nor do I know its compatibility; all I can say is it worked for me. If you are uncertain you will have to carve your own path here.
Once it is installed, log into the gdm user from a terminal:
machinectl shell gdm@ /bin/bash
and enter your sudo password.
At this point I recommend checking the current list of enabled extensions:
gsettings get org.gnome.shell enabled-extensions
On my computer, this came back saying "@as []", which means it's blank. To enable your desired extension:
gsettings set org.gnome.shell enabled-extensions "['[email protected]', 'if the above command did NOT come back blank just put the rest in here.']"
Step 5: Transfer the settings from the userspace install to the system install.
Right now, the extension should be working on the login screen. To make sure, press ctrl + alt + delete to log out, or restart your computer. You will notice that while the extension is functioning, none of your settings saved. To fix this you must use dconf to dump and then reimport the settings. Get back to a regular user terminal and run:
dconf dump /org/gnome/shell/extensions/[email protected]/ > extension.ini
Now you have your settings in a nice neat file. The gdm user can't access this though since it's in your user folder. My quick and dirty solution:
sudo mv ~/extension.ini /extension.ini sudo chmod 777 /extension.ini
If you want it in a better place than the system root folder you can put it there. I don't really care.
Now you log into the GDM user and import the settings file there.
machinectl shell gdm@ /bin/bash dconf load /org/gnome/shell/extensions/[email protected]/ < /extension.ini
Now log out of the gdm user and clean up after yourself.
sudo rm /extension.ini
Now restart or log out and you will see that your extension is now functioning with all its settings.
Huge thank you to Pratap on the GNOME Discourse site. This post is basically just a tutorialized adaptation of the thread I followed to do this.
3 notes
·
View notes
Video
youtube
How To Enable Or Disable Location Services In The Zorin OS : Quick & Eas...
Want to control which apps and websites can access your location in Zorin OS? In this quick tutorial, I'll show you how to enable or disable Location Services in just a few simple steps. Whether you're looking to enhance privacy or allow location-based features, this guide will help you manage your settings easily. Watch now and take control of your location privacy in Zorin OS!
Simple Steps 1. In the lower right corner and click on the "System Tray" and choose the "Gear Wheel" to open settings. 2. In the dialog box that opens, in the left side pane, scroll down and click on "Privacy". 3. In the left side pane click on "Location Services". 4. Toggle on or off location services.
0 notes
Video
youtube
How To Update All Apps At Once Using The Terminal In Zorin OS | Step-By-...
Keep your Zorin OS system up to date with just a few simple terminal commands! In this tutorial, I’ll show you how to update all your apps at once using the terminal in Zorin OS. Keeping your software updated ensures better performance, security, and access to the latest features. Follow along for a quick and easy step-by-step guide. If you find this video helpful, don’t forget to like, comment, and subscribe for more Linux tutorials!
Simple Steps 1. Press Ctrl + Alt + T or open the terminal from your applications menu. 2. Run the following command to update the package list, ensuring you have the latest information on available updates: sudo apt update 3. Enter your password if prompted, and press Enter. 4. Run the following command to upgrade all installed packages to the latest versions: sudo apt upgrade 5. You may be asked to confirm the upgrade process by typing Y and pressing Enter.
1 note
·
View note
Text
i'm late to the party here but i'm daily driving linux mint so i feel like i might be able to give some helpful info if you haven't already gotten all the answers you needed!
im seeing everyone saying ubuntu, mint, and zorin are "the #1 go to versions for beginners" but like… which is it?
ubuntu styles itself more like android and mac os. it seems unconventional and alien to a windows user, but it does have a lot of tutorials and official support from software vendors. i tend to only recommend ubuntu to people if they like how it looks specifically and want that experience. mint is based on ubuntu, so it has almost all that support, but it looks a lot more conventional - a lot like a windows machine. windows users tend to prefer mint over ubuntu as complete beginners, and i recommend mint to newbs. zorin is probably the one that looks the most like windows, but it has some weird freemium stuff going on - it'll try to make you pay money for things that are free on mint and ubuntu. i don't recommend it to people, but if you like it, it's your choice to use it. i don't think it's worth it, personally - mint is familiar enough for most people while still having its own identity and allowing you to get familiar with linux's differences from windows and mac!
i also hear about security being the best with linux but nothing about it coming with antiviruses.
you don't need an antivirus on linux! there are few enough home users of linux that there really aren't many people making viruses that work on linux, and the user has so much control that it's easier to just delete the virus if it does get onto your computer. i've never gotten a virus in all my time using linux! linux mint comes with a firewall, which is most likely all the protection you'll ever need.
what to expect when first getting a prebuilt pc with the OS, like the system 76 pcs
it'll probably have what linux mint calls an "OEM install", which is going to be just like first time setup on windows - you press the power button, linux boots immediately, and asks you to enter things like your username and password. you answer those simple questions, and it sets itself up for a few minutes, and it's ready to use! your mileage may vary, though - it probably depends on the manufacturer, and i can't say i've ever used a system76 laptop.
any suggestions for computers would be nice (max price is $1,300)
you can buy an older generation framework laptop for sub-$1000, but they're all on back order and may take months to arrive. framework laptops are made to be easy for an everyday person to repair and upgrade, and a framework is my personal dream laptop. it should also have very good linux support, buuut... you can't get one with linux preinstalled from the vendor right now. however, you can get a thinkpad from lenovo's website with ubuntu preinstalled, from a wide variety of trim levels and prices! their selection changes regularly, so i can't recommend a specific model. the link to shop in the us is https://www.lenovo.com/us/en/d/linux-laptops-desktops/
If theres better alternatives (for VR) that isn't Meta please let me know.
the VR headset with the best linux support is the steamvr headset, but it's a premium headset for a very high price. htc vive is also better linux supported than oculus, but even an oculus headset may work on linux - i still game on my 2017 oculus rift CV1 from time to time!
I'm a DBD addict. Does it really run DBD or was that just the one guy from the one video I saw.
dead by daylight (?) is rated silver on proton.db. a silver rating means it will run, but it may have some bugs that affect your gaming experience or require some tweaking to get working. you can check its page and see the comments for solutions to any problems you may have with playing it on linux: https://www.protondb.com/app/381210 if you're not talking about dead by daylight you may be able to look up what you're talking about on proton.db also!
My friends also often drag me onto Roblox so I need to know if that'll be an option for Linux too.
yes, you can play roblox on linux with sober: https://sober.vinegarhq.org/ roblox compatibility is a moving target and the solution to play roblox on linux changes from time to time, though, so you may have to change your solution after a while if sober stops working. there is no official roblox or roblox studio app for linux.
My current tablet is a Wacom, I got it before knowing how greedy the company actually is, and I plan to switch to a Huion after this tablet dies on me. If compatibility is an issue with it please let me know what to do about that.
i have a wacom tablet and it works perfectly in krita on linux! huion tablets appear to have functioning drivers for linux, but i can't personally vouch for them - i've only ever had this wacom.
I usually use Medibang but I don't think it runs on Linux from what I've seen, if I'm wrong lemme know. Am I going to have to switch all the files over to something else before getting a Linux or are there programs I can use that'll load them?
it's possible to run medibang on linux from what i've seen but it definitely isn't easy and i wouldn't trust it as a daily art program. krita is developed on linux by a linux desktop environment (kde) devteam - it is the only professional art program that is developed for linux first and foremost. the long term, reliable, stable option for a linux art program for most people is going to be krita. i understand if that's disappointing, but it's the reality right now and i don't want to get your hopes up. there are ways to open medibang project files without medibang, but like most project file formats, you're probably going to lose some details and the result may not be usable. it's better to open your projects in medibang on windows and then export them in some format that you'll be able to read with a linux photo editor like krita or gimp (.kra and .xcf are their project formats) - it may be the only way to preserve certain details, if doing so is possible at all. i can't say i'm familiar with medibang project files specifically, though, so someone who knows more about them may have a different opinion.
I also write and need to know if I need to switch all my files to something else before porting it all over to the Linux PC. I just used the default notepad and document programs on Windows.
libreoffice (the linux office suite that comes with linux mint and many other distributions) can open microsoft office files with no problem. you may have issues with all the fonts not loading, though; many fonts on windows are created by microsoft and licensed in a way that makes it impossible to package them with other operating systems. otherwise document files will load fine. (side note, microsoft office can also open libreoffice document formats like .odt with no issues, and it can even export word documents as .odt! you won't need to do this but it might be good to know if you have to transfer files between a linux and windows machine.)
hope this helps!
hey im planning to switch over to linux and need advice from the smart people of tumblr, please and thank you. my messages are open so if you need any info to help me out hmu.
General Questions:
im seeing everyone saying ubuntu, mint, and ziron are "the #1 go to versions for beginners" but like... which is it?
i also hear about security being the best with linux but nothing about it coming with antiviruses. does it come with one like how windows comes with defender or do you install that yourself, or is it something different entirely?
all the sources i look at talk about downloading and installing linux but i want to know what to expect when first getting a prebuilt pc with the OS, like the system 76 pcs. do you have to set it up like when you install it or is it as easy as getting any new computer?
i know nothing about coding and im planning to get a computer from system 76 since it seems like the best, and its by far the only source that only comes with linux, and since my current one was pretty much ruined by someone i thought could fix it after a faulty outlet fried its insides, he didnt and made it worse.
so yeah, which linux version do you suggest for a computer moron, any suggestions for computers would be nice (max price is $1,300), i'll put the specs and my uses under the read more.
Preferences:
It ONLY comes with Linux. I despise what Windows has become and don't want to even bother dual booting cause I feel with the switchovers happening they're gonna get salty and make something that'll turn your computer into a bomb if you use Linux with it.
Kinda beefy but not a supercomputer. I don't use AI stuff, I'm not a programmer, but I do frequently play modded Minecraft with my friends and run smps for my Discord servers. I recently switched to Modrinth cause ATLauncher had been giving me trouble. Curseforge is out of the question.
At the most, I'll be playing VRChat with friends while having Spotify or Youtube in the background for music and Discord open in case someone needs my help in one of my servers, similar goes for running one of my SMPs just minus the VR.
Gaming Questions:
I also play VR games often, especially BeatSaber (modded ofc im not insane), and I have Half Life Alyx that I haven't been able to finish cause my already dead and gutted PC struggles to run it anymore even with the lowest settings. My current headset is a two feet in the grave, barely hanging in there, held by tape Oculus Rift S thats as old as my current PC whos also dead. I plan to get a new headset soon and had the Quest 2 recommended to me by friends. If theres better alternatives that isn't Meta please let me know.
I'm a DBD addict. Does it really run DBD or was that just the one guy from the one video I saw.
My friends also often drag me onto Roblox so I need to know if that'll be an option for Linux too.
I know I could probably look up all this myself but every source is outdated from years ago or they all say different things and it just confuses me.
Art Questions:
My current tablet is a Wacom, I got it before knowing how greedy the company actually is, and I plan to switch to a Huion after this tablet dies on me. If compatibility is an issue with it please let me know what to do about that.
I usually use Medibang but I don't think it runs on Linux from what I've seen, if I'm wrong lemme know. Am I going to have to switch all the files over to something else before getting a Linux or are there programs I can use that'll load them?
I also write and need to know if I need to switch all my files to something else before porting it all over to the Linux PC. I just used the default notepad and document programs on Windows.
But yeah, that's all my questions for now. If I think of any more I'll just edit this post. Sorry if I sound super dumb for all this, I tried finding information sources myself but like I said all of them weren't too moron friendly or had relevant information. Most sources I found were articles or reddit forums from years ago so I thought "Hey, why don't I just go ask the computer nerds directly?" so here I am.
24 notes
·
View notes
Video
youtube
How to Install Zorin OS with Dual Boot Linux 🔥 This Is Better Than Windo... In this comprehensive tutorial, we will walk you through the process of installing Zorin OS with dual boot Linux on your computer. Whether you're a beginner or an experienced user, this step-by-step guide will ensure a smooth and hassle-free installation. This Is Better Than Windows 11 #raqmedia #ZorinOS #DualBootLinux #LinuxInstallation #ZorinOSInstallation #StepByStepGuide #LinuxTutorial #OperatingSystem #Technology #ComputerTips #TechGuide
0 notes
Photo

The Zorin OS team has published a new beta release which offers enhanced performance and a preview of features to come in Zorin OS 15. The beta is based on Ubuntu 18.04.2 and includes a night mode, the ability to connect to Android devices to sync notifications, share files and send text messages between the two devices. Flatpak support has also been added to the distribution and is available by default.
VIDEO HERE
0 notes
Video
youtube
Customize Your Xfce Desktop Look Like MacOS Big Sur
This video shown step by step how to customize Xfce Desktop Look Like MacOS Big Sur. In this video, I use Manjaro Xfce Edition for implementing the theme look like mac big sur. This tutorial also work on Linux Distribution which using Xfce Desktop such as Xubuntu, Linux Mint Xfce Editon, MX Linux Xfce, Zorin OS Lite, Linux Lite, ArcoLinux, EndeavourOS OS, Debian with Xfce Desktop and Arch with Xfce Desktop.
3 notes
·
View notes
Text
If anyone wants advice on what devices and software to switch to that is much more private/open/repairable than Apple, then read along:
Fairphone make great budget phones that are completely modular, meaning when a part breaks you can very easily swap it out, and they sell the replacements for very cheap on their website.
If you would rather buy a refurbished phone (which will always be more environmentally friendly than buying new), I would recommend looking at buying a Pixel or OnePlus phone. They have very good build quality, and they make it very easy to load up a deGoogled Android if you’re concerned about privacy.
If you want the same privacy as what Apple gives (according to their own claims), and aren’t comfortable owning a Google device, you can get Android without the Google aspects. SomeOrdinaryGamers has a great tutorial for doing it completely by yourself, but if you don’t have the time or the computer power, and you don’t mind a likely incompatibility with banking apps, then LineageOS is your friend.
Now onto computers! As a general rule of thumb, the most consumer friendly PC you can buy is one you build yourself, most prebuilt PCs are made by companies as scummy as Apple. Building a PC is not as hard as it sounds, and is actually quite fun. If you want to know absolutely everything about building a PC, Linus Tech Tips recently did a fantastic video on it.
If you need a laptop, you are used to the prices of MacBooks and it is available in your location, Framework make laptops designed to be repairable and upgradeable, down to even being able to change what ports are on it. Apple and other likeminded companies like to claim that you sacrifice looks for repairability, but Framework has definitely proven them wrong.
If Framework laptops aren’t accessible to you, then try look for a refurbished ThinkPad. They don’t have the same sleek look as MacBooks or Frameworks, but they’re built like tanks. As of 2022 I would recommend that most people buy the 2018 T480 model as it has the best price to performance as of right now, and still has great upgradability.
Don’t like Windows, especially its tracking? Give Linux a go, if it fits your workflow. Zorin OS is a distribution of Linux that is very beginner friendly, has a great UI (that even has a mode that is very like macOS) and doesn’t require you to pay for anything. Linux can do the majority of what an Apple computer can do, write documents, browse the web and even gaming depending on what you play. If you rely on the Adobe suite (which I could write 95 theses on why they’re scummy too, but absolutely no judgement to people who use it or work for them) it isn’t really Linux compatible, but there are many replacements that are free and open source (meaning the code is public and any tracking in the software is visible), if you have the means to switch.
None of this has to be done in one day. There are many hurdles to overcome to start fresh with any device, let alone when getting out of a walled garden ecosystem like Apple’s. I tried to write this in as beginner friendly way as possible, I want this kind of info accessible since it’s completely antithetical to what large tech companies are pushing, and that’s not even a tinfoil hat take.
Apple benefits from consumers not knowing much about technology, it’s their target audience, and the more they can make their software look like smoke and mirrors, the easier it is for them to keep the consumer buying their products. The best thing for people to do to combat this is to learn alternatives that promote repairability, long-term use and privacy. That’s why I included the links. If anyone wants to know more, please DM me, it will make my day.
I am sorry. I’m bashing Apple here. And for good reason.
This is a plea to my followers.
Stop buying Apple products. I know you’ve used them for most of your life, and I know it’s inconvenient to move to a new brand because in most cases, you cannot take your contacts with you on various chat apps.
I know this is inconvenient. I truly do.
But Apple is not the company it was before. There is now no difference between an Apple computer and a Windows computer in terms of graphic design. I know this for a fact. I had to use both in college 20 years ago, and non-apple computers are now generally better for design work than Apple computers.
Most non-apple companies encourage self-repair of your own devices, while Apple refuses it. I also know this for a fact, as I watched Apple computers become slowly less reparable through the late 90s and early 2000s. Where I was once able to do the repairs on our office computers, we had to start sending out our Apple devices because they started gluing things down on their logic boards. Notably the glue they used was not heat-resistant and led to device damage should the heat sink system fail. But they did this because they wanted to dig more money out of their customers.
Apple software is also designed to fail. I cannot believe people are still buying new devices after the scandal where Apple was slowing their phones in order to force people to purchase new versions.
Apple hardware is designed to become obsolete. Motherboards and logic boards are designed to hold exactly what comes attached to them and will fail if upgrade attempts are made.
Apple refuses to work with software developers despite promises of cross-compatibility. One of the very first coding problems I discovered was to discover a gigantic hole in a software program that made a plotter (giant printer) compatible with iOS. This caused a memory leak, leading to necessary resets of the computer after every 2 feet of printing.
I know that it’s not possible for most of you to just throw your devices away and buy a new one. I wouldn’t be able to do that, either. But eventually there will come a time when you have to upgrade, and I encourage you to take the plunge and purchase a non-apple device. I don’t even have a recommendation for you because literally anything is better than Apple. A rock that you write on is better than an Apple phone.
Unfortunately I expect to be shadow-banned on Apple devices because of this, and I’ll try to report on decreased activity as much as I can.
It’s time to stop trying to beg Apple to change. They won’t. It’s time now to just stop supporting Apple.
#fuck apple#fuck microsoft#fuck google#the best tech is made by a 30 year old in a basement and I say this lovingly#linux#beginner friendly
65K notes
·
View notes
Text
Change gpodder download directory using windows registry
DOWNLOAD NOW Change gpodder download directory using windows registry
#CHANGE GPODDER DOWNLOAD DIRECTORY USING WINDOWS REGISTRY INSTALL#
#CHANGE GPODDER DOWNLOAD DIRECTORY USING WINDOWS REGISTRY UPDATE#
#CHANGE GPODDER DOWNLOAD DIRECTORY USING WINDOWS REGISTRY LICENSE#
#CHANGE GPODDER DOWNLOAD DIRECTORY USING WINDOWS REGISTRY DOWNLOAD#
#CHANGE GPODDER DOWNLOAD DIRECTORY USING WINDOWS REGISTRY INSTALL#
I play Lol in different distros, but the one that works best for me and that has been easier to install is in Zorin Os 12.2 Ultimate, since Wine, PlayOnLinux and Winetricks are configured by default. Finally you can start enjoying League of Legends habituallyĪfter viewing the tutorial, the process may look somewhat complex, but honestly it is not, I simply wanted to detail the steps that must be performed.When clicking on finish we must wait until PlayOnLinux gives us the option to create the shortcut, there we must choose and press next, then we write League of Legends ( for the launcher's name) and in the other window click on I don't want to create another shortcut.It is important that we uncheck the option to run the Launcher after installation We close the shell, we go to the configuration of the unit, in the tab Wine and click on the option Configure Wine, where we must configure and apply the changes of the tabs of Apps, Libraries, Graphics and Staging as shown below:.
#CHANGE GPODDER DOWNLOAD DIRECTORY USING WINDOWS REGISTRY LICENSE#
Then we must accept the terms of the visual c ++ license and click on install From the same terminal we proceed to install DirectX 9 y microsoft visual c ++ 2015 with the following command:.Now that we have created our virtual unit we must begin to configure it, the first step is to install winetrick in the unit created, for this we choose the unit, click on Miscellany and let's choose the option of Open a shell, a terminal will open and in it we will execute the following commands:.The creation of the virtual unit will begin and we must give permission to install necessary dependencies such as Wine Mono Installer y Wine Gecko.We close the previous sale, proceeding to click on the option set up and then about install a program, click on next on the screen of the Virtual Drive Creator, then we choose that the virtual drive to create is 32-bit, then we put the name of our virtual unit ( in my case LOL2).We execute PlayOnLinux, go to Tools and click on Manage versions of Wine and install the version 2.8-staging ( which is the one that works properly with LOL).
#CHANGE GPODDER DOWNLOAD DIRECTORY USING WINDOWS REGISTRY DOWNLOAD#
Once we have installed Wine, wine tricks y PlayOnLinux we proceed to install the League of Legends client, for this we must download the client from the following link and perform the following steps:
#CHANGE GPODDER DOWNLOAD DIRECTORY USING WINDOWS REGISTRY UPDATE#
In the case of Ubuntu, the commands to execute the following: wget -q "" -O- | sudo apt-key add - sudo wget -O /etc/apt//playonlinux.list sudo apt-get update sudo apt-get install playonlinux Steps to install LOL on Linux In the same way, we can find the installation instructions here!. PlayOnLinux it is present in the official repositories of most Linux distros, so we can simply install it from the package manager. Then we can install Winetricks on any distro by executing the following commands: wget chmod + x winetricks Install PlayOnLinux on Ubuntu and derivatives Install Winetricks on Linuxīefore installing Winetricks it is recommended that we install the package cabextract, which in Ubuntu can be done with the following command: The rest of distros can install Wine with any of the official packages found here. wget -nc #Repositories are added sudo apt-key add Release.key sudo apt-add-repository -builds / ubuntu / sudo apt-get update sudo apt-get install -install-recommends winehq-staging #The corresponding package is installed Then we will execute the following commands for a correct installation. Users with 64-bit architecture, we must execute the following command before installing Wine To install these tools in Ubuntu and derivatives we can follow the following steps: Install Wine on Ubuntu and derivatives It is important before starting the installation process that we verify that we do not have problems with the handling of our video drivers, since this may be a problem that will directly affect the operation of the game.īefore installing League of Legends on Linux we must have installed and configured Wine, wine tricks y PlayOnLinux, which are the three basic tools that we are going to need for the correct functioning of the game. I have personally installed League of Legends only on Ubuntu based distros, but the method should work properly on any Linux distro. Requirements to install League of Legends on Linux
DOWNLOAD NOW Change gpodder download directory using windows registry
0 notes
Text
Download spotify linux

DOWNLOAD SPOTIFY LINUX INSTALL
DOWNLOAD SPOTIFY LINUX UPGRADE
DOWNLOAD SPOTIFY LINUX DOWNLOAD
Selecting previously unselected package spotify-client. Unpacking vdpau-driver-all:amd64 (1.1.1-3ubuntu1). Selecting previously unselected package vdpau-driver-all:amd64. Selecting previously unselected package va-driver-all:amd64. Selecting previously unselected package i965-va-driver:amd64. Selecting previously unselected package mesa-vdpau-drivers:amd64. Selecting previously unselected package mesa-va-drivers:amd64. Selecting previously unselected package libbdplus0:amd64. Libx264-152 libx265-146 libxvidcore4 libzvbi-common libzvbi0 mesa-va-drivers mesa-vdpau-drivers spotify-client va-driver-allĠ upgraded, 32 newly installed, 0 to remove and 148 not upgraded.Īfter this operation, 377 MB of additional disk space will be used. The following NEW packages will be installed: I965-va-driver-shaders libbluray-bdj firmware-crystalhd libvdpau-va-gl1 nvidia-vdpau-driver nvidia-legacy-340xx-vdpau-driver Libx264-152 libx265-146 libxvidcore4 libzvbi-common libzvbi0 mesa-va-drivers mesa-vdpau-drivers va-driver-all vdpau-driver-all Libopenjp2-7 libopenmpt0 libshine3 libsnappy1v5 libsoxr0 libssh-gcrypt-4 libswresample2 libva-drm2 libva-x11-2 libva2 libvdpau1 I965-va-driver libaacs0 libavcodec57 libavformat57 libavutil55 libbdplus0 libbluray2 libchromaprint1 libcrystalhd3 libgme0 libgsm1 The following additional packages will be installed:
DOWNLOAD SPOTIFY LINUX INSTALL
Once Spotify Repository is added into your system, and you can install it with the following apt command: $ sudo apt update :~$ echo "deb stable non-free" | sudo tee /etc/apt//spotify.list Outputs: :~$ curl -sS | sudo apt-key add. $ echo "deb stable non-free" | sudo tee /etc/apt//spotify.list Just run the following two command: $ curl -sS | sudo apt-key add – You can install Spotify from its official repository, and you just need to add the repository key and then adding Spotify Repository to your Ubuntu system.
DOWNLOAD SPOTIFY LINUX UPGRADE
$ sudo apt upgrade Method1: Installing Spotify via Spotify Repository
Before you begin, you also need to update the package index and all installed packages to the latest version on your Ubuntu system with the following steps:.
Before you get started with this post, and you need to have a non-root user with sudo privileges so that you can update or install packages under Ubuntu system.
That’s it everything is set, go to the application and run your music application.This Tutorial introduces three ways to install Spotify tool on your Ubuntu Linux system under the command line. Run the commands to install Spotify Debian packages sudo apt install.
DOWNLOAD SPOTIFY LINUX DOWNLOAD
Switch to Downloads directory because what we download from the browser goes into that cd Downloads Now, open the command terminal and follow the below commands… Click on the latest version amd64 package, to confirm see the date given corresponding to each Spotify Deb file. So, first, open your browser and go to Spotify’s official repository package download page. This tutorial will work on all Debian-based operating systems including Linux Mint, Zorin OS, Elementary, Ubuntu, and others… This means first we download the Spotify Deb package from its official website and then will install it using the command terminal package installer. Here we are going to use the Debian package method. We already have done a tutorial where we have shown the process of installing Spotify using snap packages including via graphical user interface of the “Ubuntu Software” app.
0 notes
Video
youtube
How To Change The Primary Mouse Button In The Zorin OS : Quick & Easy
In this step-by-step tutorial, I’ll show you how to change the primary mouse button in Zorin OS. Whether you’re left-handed or just prefer using a different button configuration, this quick and easy guide will help you adjust your settings in no time. Watch until the end to ensure you get it right! If this video helps, be sure to like, share, and subscribe for more Linux tutorials.
Simple Steps 1. In the upper right corner and click on the "System Tray" and choose the "Gear Wheel" to open settings. 2. In the dialog box that opens, in the left side pane, scroll down and click on "Mouse & Touchpad". 3. In the center pane next to "Primary Button", choose either "Left" or "Right" 4. In the dialog box that appears, chose your cursor size.
0 notes
Video
youtube
How To Change Your Mouse Pointer Size In The Zorin OS : Quick & Easy
Need to adjust the mouse pointer size in Zorin OS for better visibility? In this step-by-step tutorial, I'll show you how to change the cursor size in just a few clicks. Whether you want a larger pointer for accessibility or a smaller one for a cleaner look, this guide will help you customize your Zorin OS experience. Watch now and optimize your workflow!
Simple Steps 1. In the upper right corner and click on the "System Tray" and choose the "Gear Wheel" to open settings. 2. In the dialog box that opens, in the left side pane, scroll down and click on "Accessibility". 3. Click on "Cursor Size". 4. In the dialog box that appears, chose your cursor size.
0 notes
Text
2018-04-01 21 LINUX now
LINUX
Linux Academy Blog
Feature Release Notes: April 2018
Linux Academy and Cloud Assessments – Microsoft Azure Plans for 2018
Launching 70+ New Courses/ Challenges/Learning Activities in April!
DynamoDB Atomic Counters
Linux Academy Weekly Roundup 111
Linux Insider
New Firefox Extension Builds a Wall Around Facebook
Neptune 5: A Practically Perfect Plasma-Based Distro
LG Offers Open Source webOS to Spur Development in South Korea
Google Opens Maps APIs and World Becomes Dev Playground
New Raspberry Pi Packs More Power
Linux Journal
Weekend Reading: Raspberry Pi Projects
Best Content Management System
Happy 20th Anniversary to Mozilla, New pfSense Version, Android HiddenMiner Malware and More
FOSS Project Spotlight: CloudMapper, an AWS Visualization Tool
Qubes Version 4.0 Released, Purism Laptops Shipping Quickly, New Rust Version 1.25.0 and More
Linux Magazine
Gnome 3.28 Released
Install Firefox in a Snap on Linux
OpenStack Queens Released
Kali Linux Comes to Windows
Ubuntu to Start Collecting Some Data with Ubuntu 18.04
Linux Today
List All Installed Packages with yum on CentOS 7
Live Backups with Just Inotify, Rsync, and Bash
System Tar and Restore - A Versatile System Backup Script for Linux
How to Add Users to Groups from the Linux Command Line
Just say no to root (in containers)
Linux.com
This Week in Open Source News: The Open Networking Summit Edition
IPFire: A User-Friendly Linux Firewall Distribution
Here’s Why You Should Secure Your Etcd Deployment
Floppy Disk History: The Evolution of Personal Computing
Working with Calendars on Linux
Reddit Linux
This week in Usability & Productivity, part 12 – Adventures in Linux and KDE
How to customize your terminal using Screenfetch - YouTube (Video Tutorial)
curl: add support for a "--rootme" command line parameter
Jon "maddog" Hall talks about Unix and Linux history (Linaro Connect 2018, Hong Kong)
Microsoft openSUSE is here
Riba Linux
How to install Archman Xfce 18.03
Archman Xfce 18.03 overview
How to Install HardenedBSD 11 Stable v1100055 plus Gnome desktop and basic applications
How to install Zorin OS 12.3
Zorin OS 12.3 overview | Your Computer. Better. Easier. Faster.
Slashdot Linux
Apple Goes on Hiring Spree To Improve Siri's Smarts
Atlanta Still Struggles To Recover From Ransomware Attack
Microsoft Email Privacy Case No Longer Needed, Says The US
Ask Slashdot: Are 'Full Stack' Developers a Thing?
'Thousands of Companies Are Spying On You'
Softpedia
Linux Kernel 4.15.15 / 4.16 RC7
Linux Kernel 4.14.32 LTS / 4.9.92 LTS / 4.4.126 LTS / 4.1.51 LTS / 3.18.102 EOL / 3.16.56 LTS
Mozilla Firefox 59.0.2 / 60.0 Beta 8
Mozilla Thunderbird 52.7.0 / 60.0 Beta 1
Vala 0.40.2
Tecmint
System Tar and Restore – A Versatile System Backup Script for Linux
Newsroom – A Modern CLI to Get Your Favorite News in Linux
Cricket-CLI – Watch Live Cricket Scores in Linux Terminal
Ternimal – Show Animated Lifeform in Your Linux Terminal
Tilix – A New GTK 3 Tiling Terminal Emulator for Linux
nixCraft
Book review: Ed Mastery
Linux/Unix desktop fun: sl – a mirror version of ls
Raspberry PI 3 model B+ Released: Complete specs and pricing
Debian Linux 9.4 released and here is how to upgrade it
400K+ Exim MTA affected by overflow vulnerability on Linux/Unix
0 notes
Text
Crear particiones en VirtualBox
youtube
Crear particiones en Virtualbox es muy sencillo, solo mira el vídeo.
Vamos a crear una partición en Virtualbox para instalar un Sistema Operativo, bueno; yo ya lo tengo abierto, pero; nos vamos al icono, le damos seleccionar, donde lo instalamos y se nos abrirá esta pantalla.
Luego le damos acá arriba a la izquierda en nuevo, seleccionamos el nombre que le vamos a dar a la partición, yo le voy a poner React OS, porque; más adelante voy a instalar ese SO de Linux.
Buscamos la versión, si la encontramos, la ponemos, si no, pues le damos en Other Linux.
Como vemos; nomás soporta la de 32 bits, no está para la de 64 bits, entonces seleccionamos este, luego damos en next y aquí le damos en el tamaño de la memoria RAM, yo le voy a dar un GigaByte, porque ese Sistema Operativo es muy básico, es como el equivalente a Windows XP, que de hecho; soporta programas de Windows y está en fase beta para hacerlo como un Windows.
Va a poder soportar programas tanto de Linux, como de Windows, esa es la idea.
Le damos en Next, le damos a crear un disco virtual ahora, le damos en Hard disk porque yo tengo descargado una imagen para disco duro, no una imagen especial para Virtualbox que si se puede descargar, pero yo por ahorrarme tiempo, porque ya lo tengo descargado le doy en Next.
Reservado dinámicamente es que si le dejas el mínimo y metes más información al SO, al disco duro donde está instalado el Sistema Operativo, este se va a ir ampliando conforme vayas metiendo más información.
La idea no es usarlo para meterle más información, le voy a dar en tamaño fijo, damos en Next y aquí es donde seleccionamos si queremos 8 Gigas o queremos más Gigas para el disco duro, desde 4 megas, que no nos lo va a aceptar obviamente, los cuatro megabytes, hasta los dos Terabytes, que es lo que tiene el disco duro de la computadora.
Yo lo voy a dejar en ocho, bueno le voy a dar a 20.
Aquí; si la idea, este es para el tutorial este. Pero; si la idea es instalar dos SO en este mismo disco duro, es muy importante que primero instales el Sistema Operativo comercial y luego el SO libre.
El Sistema Operativo comercial vienen siendo los de Mac OS de Apple o Windows de Microsoft, esos dos, porque también hay de paga que son de Linux, como lo es http://www.zorinos.com. Este último tiene versión paga y gratuita.
Obviamente la versión paga tiene mejor calidad en gráficos y así, cosas que la versión básica no tiene. La versión básica es para computadoras muy viejas, la versión básica de Zorin OS.
Crear particiones en VirtualBox
Bueno; si lo dejamos en veinte... lo voy a dejar en 20 porque solo voy a instalar este Sistema Operativo y luego voy a crear una partición más grande para instalar dos SO, esto es para las personas que quieren instalar dos Sistemas Operativos en el disco duro, sin necesidad de tenerlos en una máquina virtual.
La máquina virtual sirve para instalar al crear la partición grande e instalar dos SO en la misma partición, para posteriormente, poderlo hacer sin errores en el disco duro raíz, sin necesidad de la máquina virtual.
Ahora; le damos en crear y esperamos unos minutos, aquí yo le voy a dar en pausar para ahorrarme tiempo.
Bueno, ya tenemos el disco duro particionado, este, solo falta instalar el Sistema Operativo, lo vamos a ver en otro vídeo.
via Blogger http://ift.tt/2zYL6jp
0 notes
Video
0 notes
Video
youtube
How to Make GNOME Desktop Look Like Mac OS Big Sur
This video shown step by step how to make GNOME Desktop Look Like Mac OS Big Sur. In this video, I use Ubuntu for implementing the theme look like mac big sur. This tutorial also work on Linux Distribution which using GNOME Desktop such as Fedora Workstation, Pop_OS, Zorin OS, Manjaro GNOME edition, Mageia GNOME Edition, Debian with GNOME Desktop, Solus OS GNOME Edition and Arch with GNOME Desktop.
4 notes
·
View notes