thenerdysewist
A Cosplay and Sewing Blog
Not a bot. New blog for the sewing projects of a user whose been here too long.
33 posts
Don't wanna be here? Send us removal request.
Last Seen Blogs

hh-and-hb-fan
Free commissions!!!

butterscotchx98
??????

kejper
Bez tytułu

bunniegrrl
Completely Incomplete

superagen77official
AGENSUPER77 : DAFTAR & LOGIN
Text
I Made My Dog a Christmas Cookie Sweater!

Everyone look at her! She’s so cute!
(You can find the process on how I made it by following this tutorial called “Making My Dog a Denim Jacket”)
#sewing#pets#pet clothes#pets of tumblr#cute pets#christmas#christmas crafts#dogs of tumblr#dogs#cute dog#sewing project
28 notes
·
View notes
Text
Not a sewing project per se, but I’m running a christmas themed one shot for my dnd party where they’re all playing Santa’s elves, who have to go defeat the anti Santa and rescue the presents that were stolen. I made them all ugly christmas hoodies as a stand in for their characters’ uniforms.

I tie-dyed the hoodie myself using rit dye. Then I painted the logo using acrylic paint with fabric medium, and did the outline in sharpie.
4 notes
·
View notes
Text
This Year’s Halloween Costume
It was my first time making a corset or a witch hat!


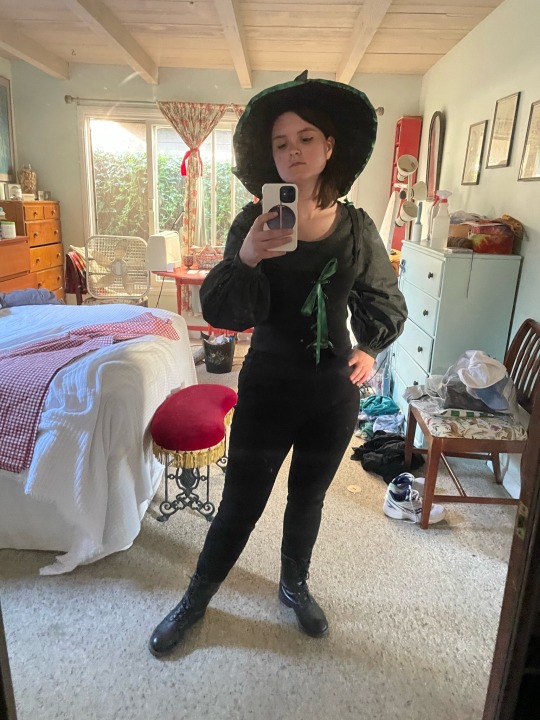
#sewing#cosplay#cosplayer#halloween costumes#halloween#witchcore#witch aesthetic#witch costume#witch cosplay#witch oc
13 notes
·
View notes
Text
List of Projects
Morgana Pendragon (Season 4 of Merlin)
The Bat Hoodie (And Stealth Dimitri Coffin Run Cosplay)
Making My Dog A Denim Jacket
Moonshine Cybin (NADDPOD) Inspired Flannel ft. Embroidered PawPaw
4 notes
·
View notes
Text
I made a Moonshine Cybin Flannel to see NADDPOD Live at Carnegie Hall (featuring an embroidered PawPaw)
Read more for details on how I made this
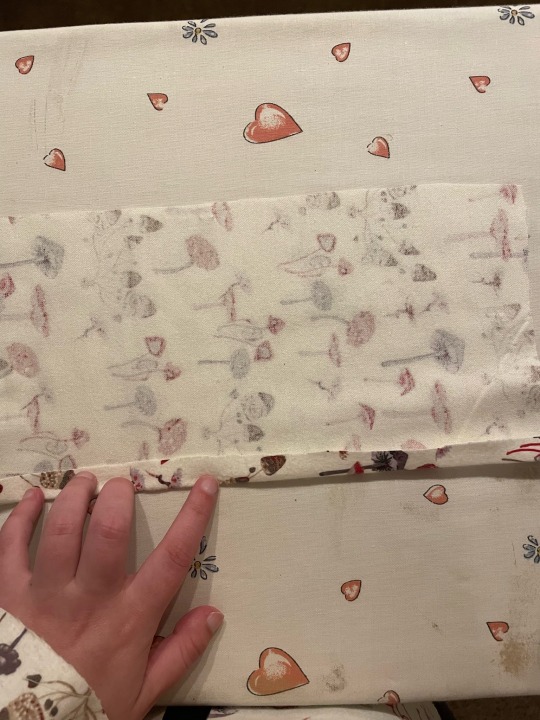
Making the Shirt:
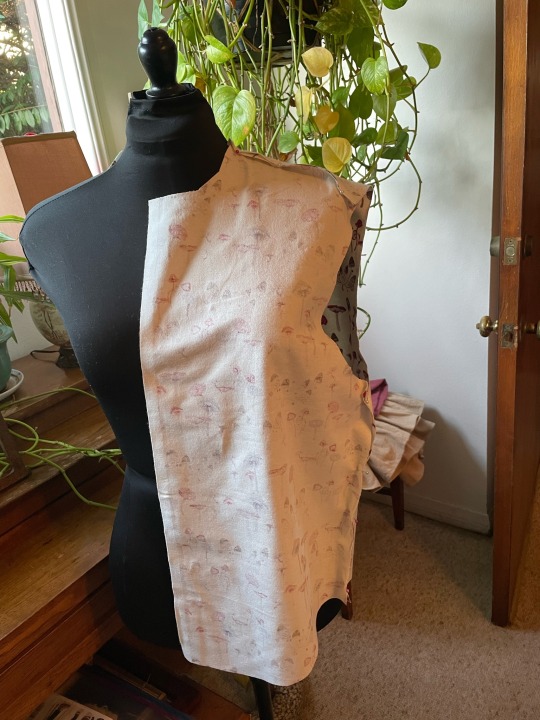
Like a week before I left for New York, I decided that I wanted to make my own NADDPOD clothes to wear since I don’t have a lot of merch. I remembered that JoAnn Fabrics had this mushroom flannel and so I ran out and bought two yards.
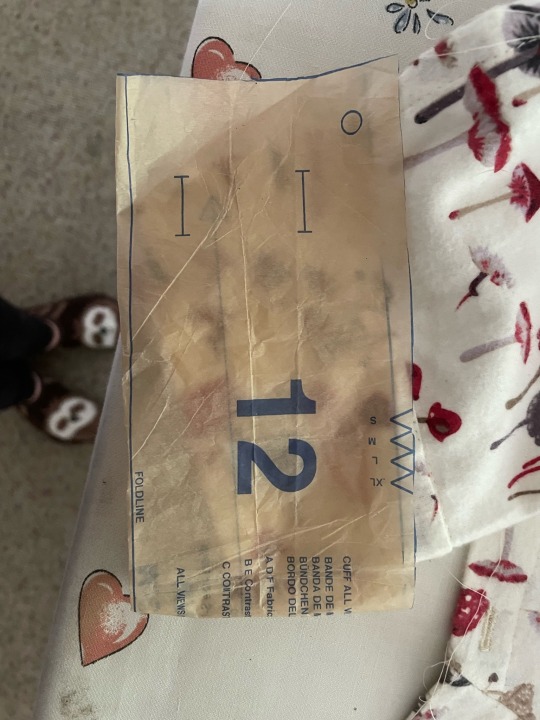
I used this button up shirt/lined jacket pattern from MCall’s:
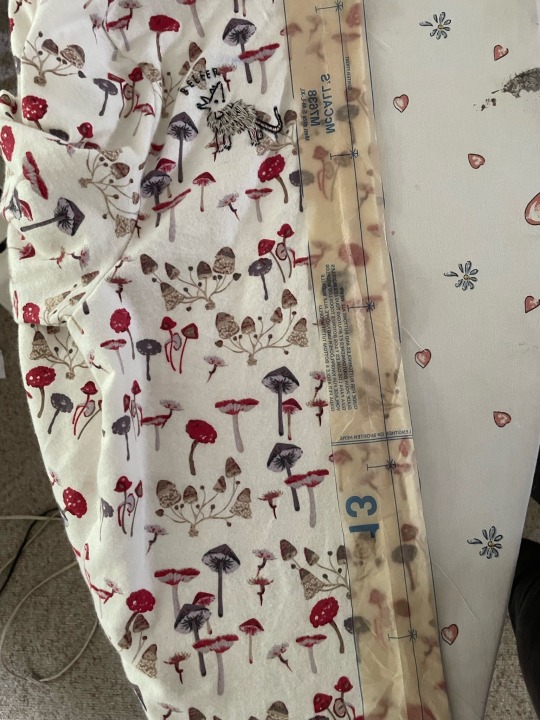
The problem is that I’m right in between the largest boy’s size and the smallest men’s size. So I had to make some adjustments. I cut out the pattern, then shortened it at the waist because there wasn’t room for my hips in the original pattern. Then I cut out all the pieces: shirt front, shirt back, sleeves, pocket, collar, and cuffs.
I knew from using the pattern before that the sleeves were too big for the armhole, and I don’t like the look of gathered sleeves. So I trimmed 5/8” from both arm holes.
Once those adjustments to the pattern were made, I stitched the sides together.
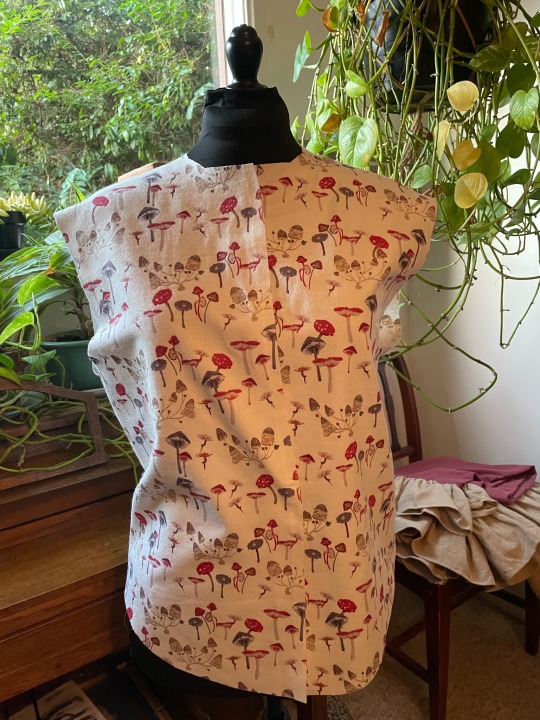
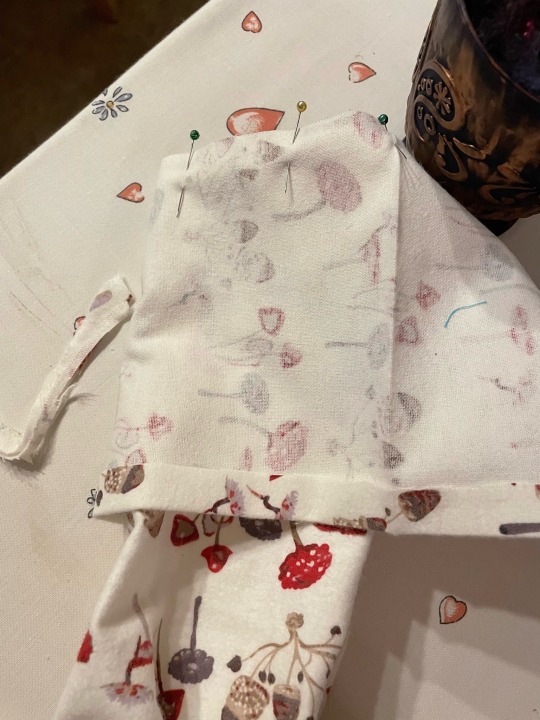
Next up was the collar. I cut two collar pieces, stitched them with the pattern-side of the fabric facing each other, trimmed the excess at the edges and flipped it right side out and ironed it.


I pinned the collar in place around the neck and stitched it in place.

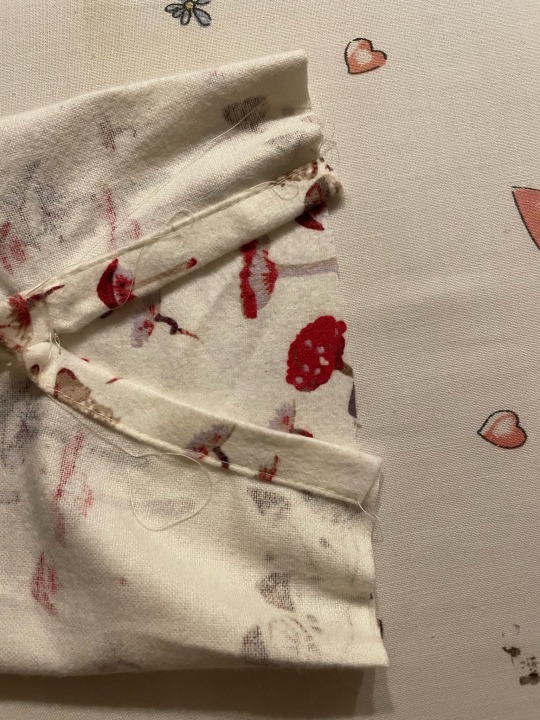
Next up was the sleeves. I stitched each sleeve together, leaving a gap open at the bottom so that the sleeves could be unbuttoned. I hemmed the opening of each sleeve so no raw edges were visible, the gathered the top of the sleeves so they fit into the arm hole.
I pinned the sleeves into the arm hole and stitched them in place.

I cut two cuff pieces, and turned down one edge so that once it was stitched in place, there wouldn't be any raw edges. Then I pinned it in place so the right sides were together and the excess fabric of the cuff was pointed towards the shoulder. I stitched it in place, then folded the cuff in half, right sides together and stitched the ends. That way when the cuff was folded out the right way, all the raw edges would be held inside.
With that, the main construction of the shirt was complete.

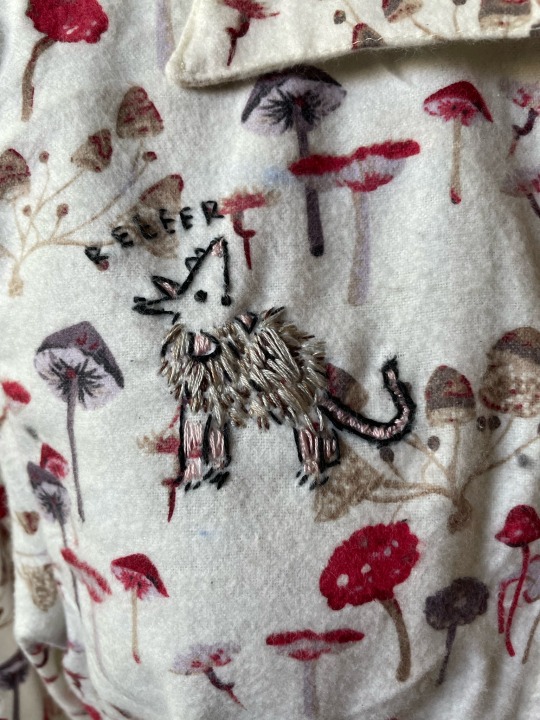
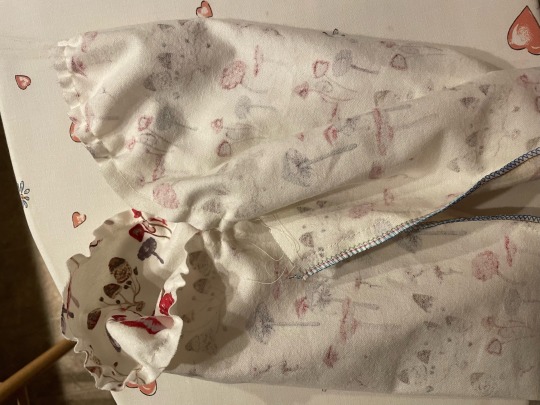
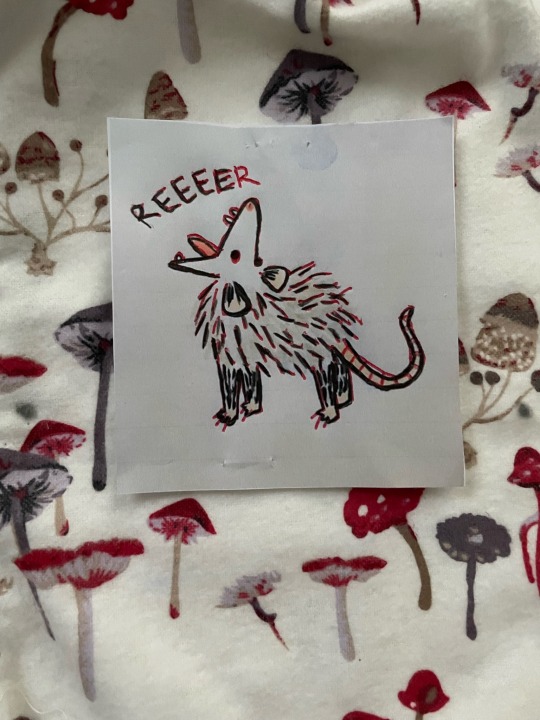
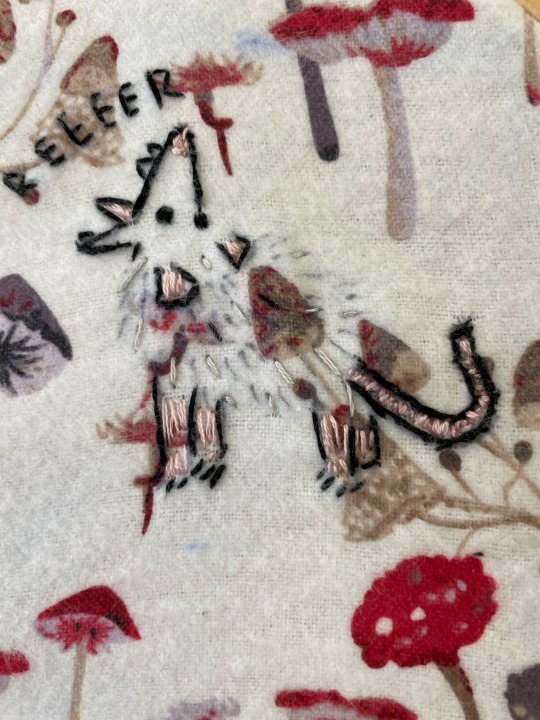
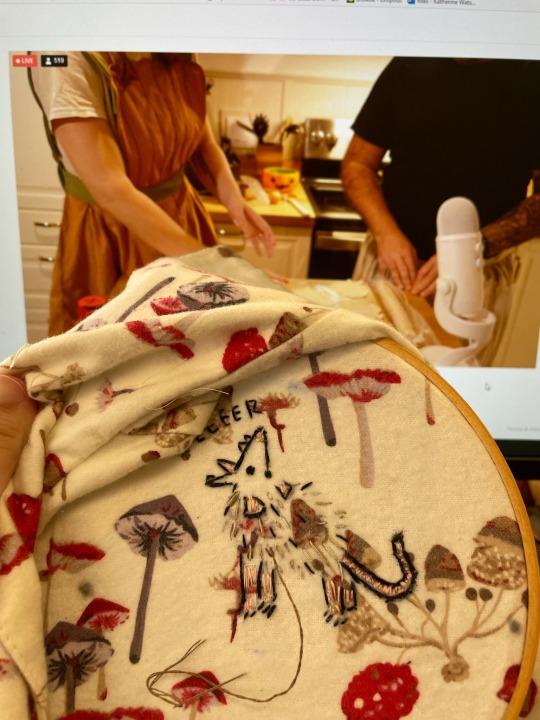
Next were my first attempts at embroidery. I found a reference image online that reminded me of PawPaw and printed it out in various sizes. I stitched together a breast pocket, and pinned it to the shirt. Then I was able to use that and my printed images to decide how big I wanted the embroidery.
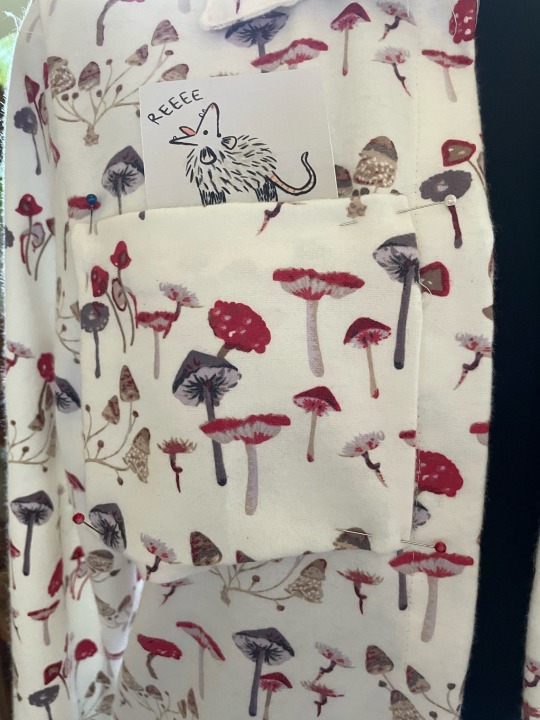
Once I decided on the size, I unpinned the pocket and transferred the drawing to the fabric using transfer paper. I pinned the drawing and transfer paper in place, and traced over the image. It left a carbon copy on the fabric, and I traced over that with heat erase pen so it wouldn't rub off while I worked.

After that, it was lot of stitching with embroidery thread. Have some in progress pictures.


With the embroidery done, it was time for the finishing touches. Using the guides on my pattern, I marked off the places where buttons and buttonholes were meant to go.

I used the buttonhole foot attachment and setting for my sewing machine to install the button holes, then I sewed the buttons in place by hand.
To secure the embroidery I cut out a patch of white flannel and ironed heat and bond to the back. Then I placed the patch over the thread on the backside of the embroidery, and ironed it in place. The patch prevents the loose threads from getting snagged on anything.

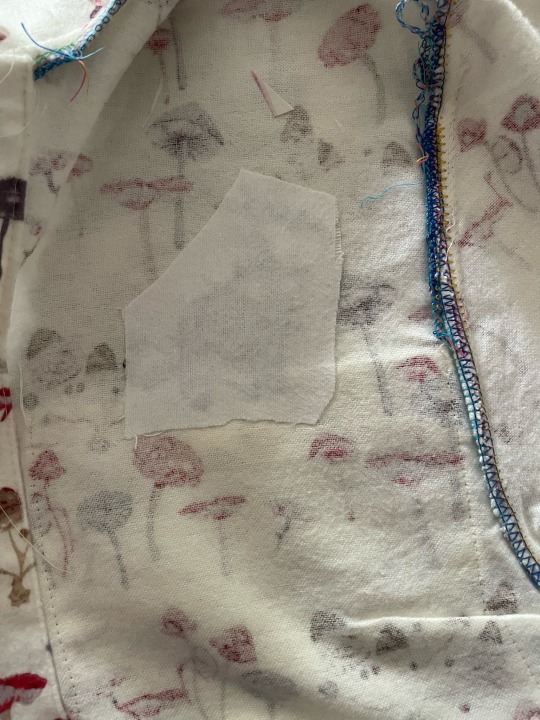
After that, I hemmed the shirt and it was finished!
I literally finished this project the night before I flew to New York. It ended up being a huge hit at the fan meet up in Central Park.
78 notes
·
View notes
Text
In wake of the FHJY announcement, I I'm finally posting my Fig Faeth cosplay here 😈❤️🔥🎸


The bass guitar took me like a week to make and I'm SO proud of it!!!

#i love this!!#the guitar came out so cool!#you should be proud of yourself!#dimension 20#cosplay#fantasy high#Motivates me to work on my Rosamund cosplay
92 notes
·
View notes
Text
It's that time of year when cosplayers see Spirit Halloween costumes and get the overwhelming urge to fix them
#but why do they look so fucking bad#i mean i know why and the answer is mass production#but they don't even give your full shirts or pants in some of them!!#sewing#cosplay#cosplayer#spirit halloween#halloween#halloween costumes
23 notes
·
View notes
Text
My first ever embroidery!

382 notes
·
View notes
Text
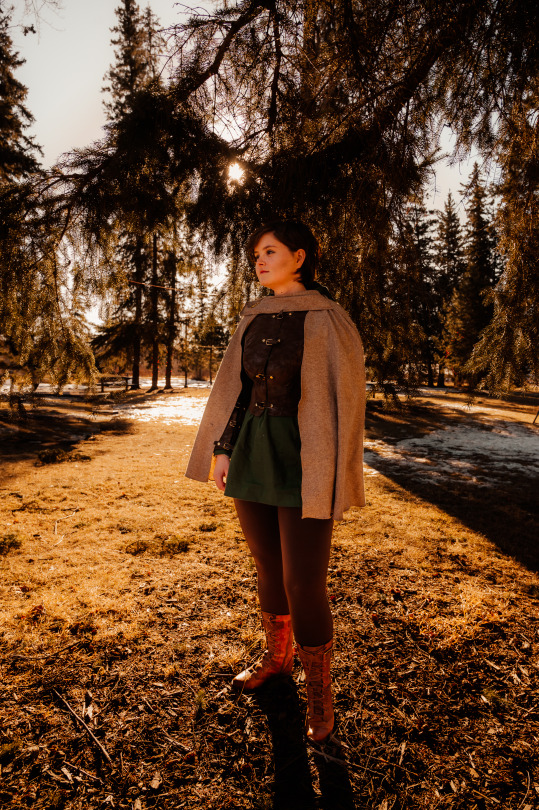
Making A 5e Ranger Cosplay to see Honor Among Thieves
Or how I went from this
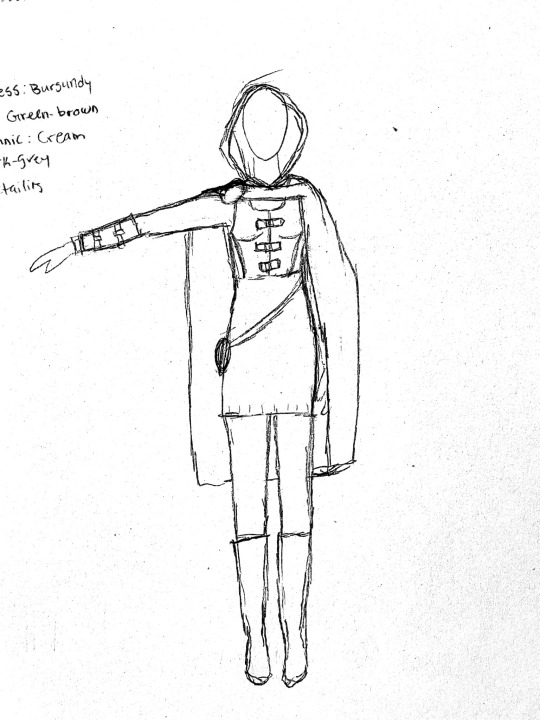
To This

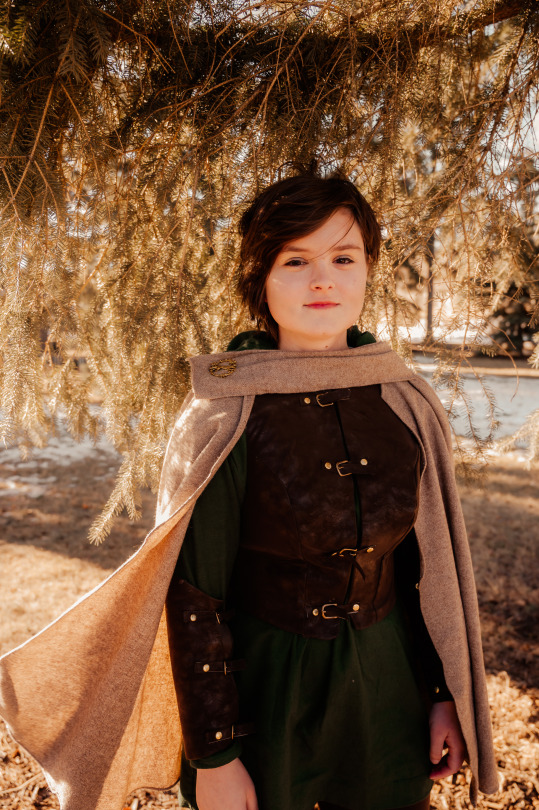
Making a Leather Chest Plate Part 1
Making a Leather Chest Plate Part 2
Making Bracers
Making a Ranger Hoodie
Making a Ranger Cape
90 notes
·
View notes
Text
Every cosplayer that lives in a warm climate say thank you to @quiddie for giving us a fantasy character that wears a short skirt.
#dimension 20#the ravening war#d20 the ravening war#dimension 20 the ravening war#dimension 20 trw#d20 trw#trw#karna solara#finally a costume cosplayers may not sweat in all day
43 notes
·
View notes
Text
Making A 5e Ranger Cosplay to see Honor Among Thieves
Or how I went from this
To This
Making a Leather Chest Plate Part 1
Making a Leather Chest Plate Part 2
Making Bracers
Making a Ranger Hoodie
Making a Ranger Cape
#dungeons and dragons#dnd 5e#ranger 5e#cosplay#d&d cosplay#d&d honor among thieves#d&d hat#honor among thieves#cosplayer#sewing#sewblr#sewist
90 notes
·
View notes
Text
List of Projects
Morgana Pendragon (Season 4 of Merlin)
The Bat Hoodie (And Stealth Dimitri Coffin Run Cosplay)
Making My Dog A Denim Jacket
Making a DnD 5e Ranger Cosplay for the DnD movie
Moonshine Cybin (NADDPOD) Inspired Flannel ft. Embroidered PawPaw
Making a Witch Costume for Halloween
4 notes
·
View notes
Text
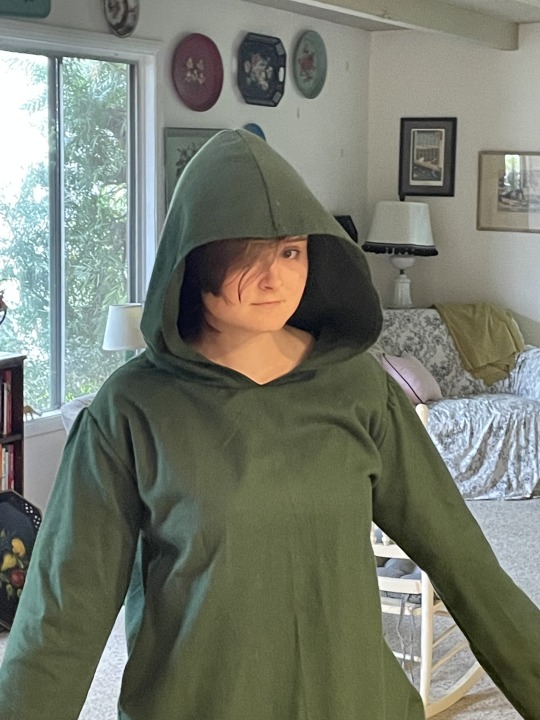
Making a Ranger Hoodie
Armor was not the only thing I needed to make for this costume. I also designed a hoodie and a cape to go with it. I decided to make a hoodie-tunic that came to abut mid thigh.
Materials
Free Boxwood Hoodie Pattern from Mood.com/blog
Two and half yards of green flannel
Process
Step One: Modifying the Pattern
I already knew how the boxwood hoodie pattern fit because I used it for my bat hoodie. I thought all I would need to would be to extend it to tunic length. (Though that proved to be incorrect when I tried it on). I measured from my shoulder to mid thigh. I then subtracted the length of the pattern from that measurement so I would know how much to add later. Once I pinned the pattern to the paper, I extended the line of the hem by adding the length I calculated, and using a ruler to draw the lines. I also added some width to the top of the sleeves so I could make puffier, gathered sleeves. Then I cut out all the pieces I needed, gathered the sleeves, and stitched everything together.


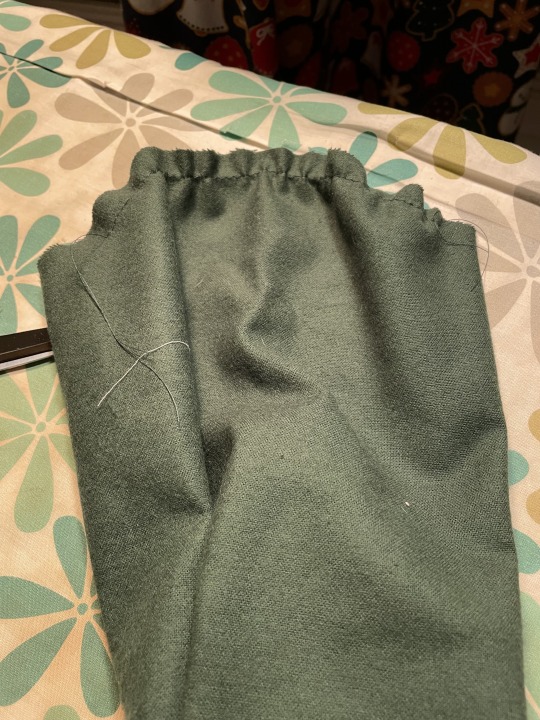
Step Two: Altering the Garment
I sewed everything together and tried it on. However, I though it looked too long and too baggy. I didn't want it super tight fitting, but I was worried that it wouldn't fit under my armor.

I pinned the hoodie into the shape I wanted and marked the shape I needed to cut out, and did the same with the sleeves. I ended up cutting two large semi-triangular shapes out of the sleeves and body to make it fit tighter.

After altering it width-wise, I tried it on with my chest plate since I knew that it would cinch in the waist and affect the length of the garment. I then marked how much fabric I needed to cut off the bottom, cut it off, and made a hem.
With that, the hoodie was completed.
6 notes
·
View notes
Text
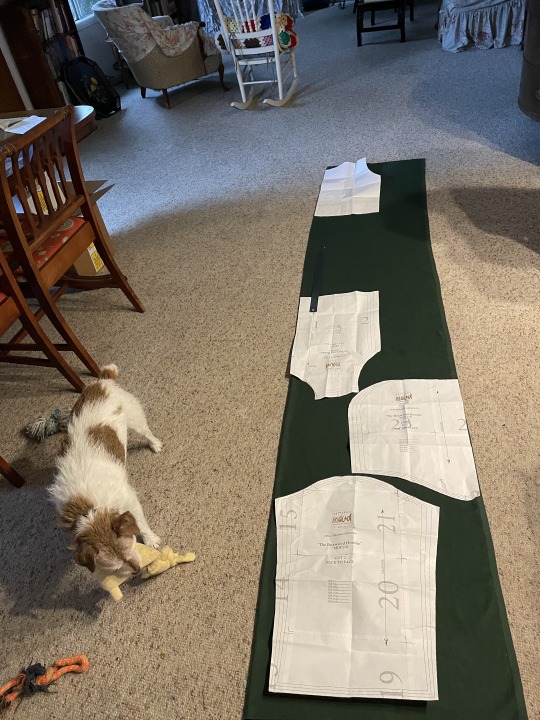
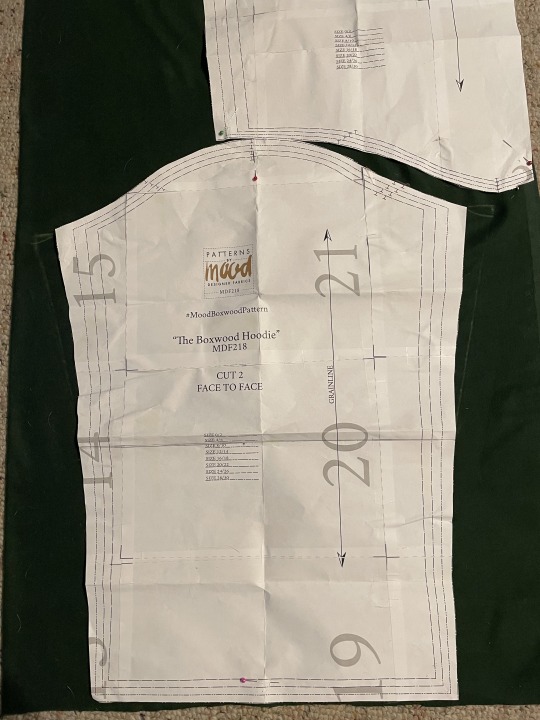
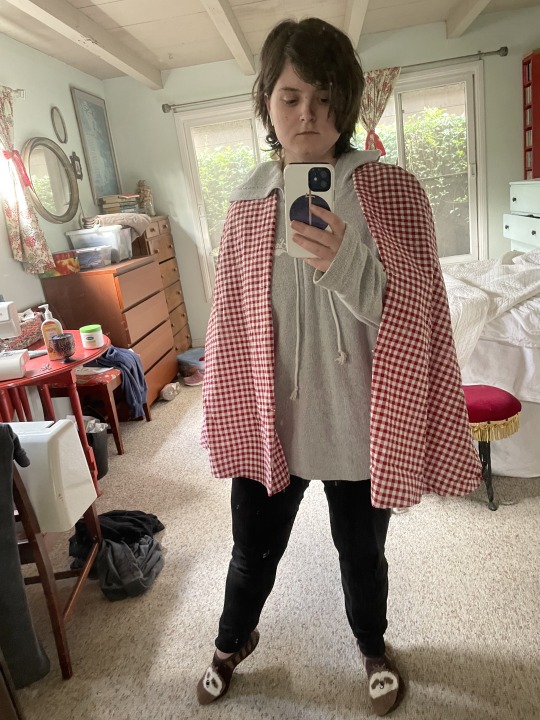
Making A Ranger Cape
The last thing I needed to make for my ranger cosplay was the cape. I designed it to be open front with a flap closure so that the armor was still visible.
Materials
Thrifted wool
Simplicity Pattern 8473
Process
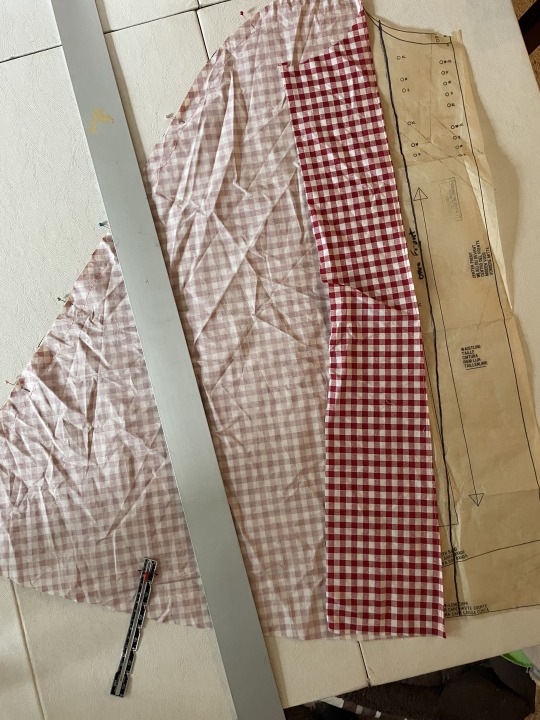
Step One: Mock Up
I knew that the pattern would need to be altered. I was mostly using it as a guide for the shoulder seams and back neckline. So I cut out a mock up out of gingham and tried it on.


As expected, the front closed too far and would cover the armor. I pinned back the front pieces where I wanted them, and stitched them down so I could try the cape on again.

I was happy with the shape so next came draping the flap closure. I measured the length from shoulder to shoulder across my chest, and used that as the length guide. I guessed at the width, and cut out what looked right. Then I sort of scrunched everything together and pinned it in place to see how it looked.

I decided that I liked it, and could move on to cutting it out of my wool.
Step Two: Pattern Alteration
This was an extra step that I didn't need to do, but wanted to. In case I ever wanted to make this exact cape again, I laid it on top of the pattern piece and marked the line for the modified front. I also added allowance for a hem.

Step Three: Fashion Fabric
With everything marked on the paper pattern, I pinned it in place on the wool I found at the thrift store, and cut it out.
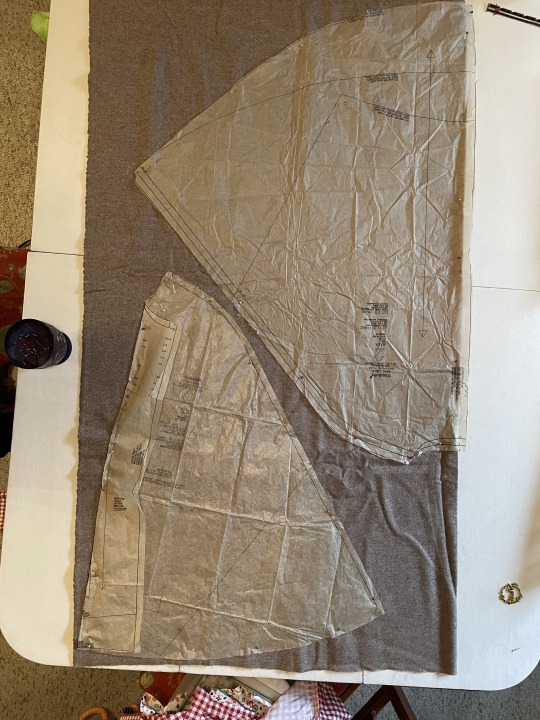
I used the dimensions of my flap closure on my mock up, to cut out a flap closure using scrap wool. I used my rotary cutter and mat to make sure the lines were straight.
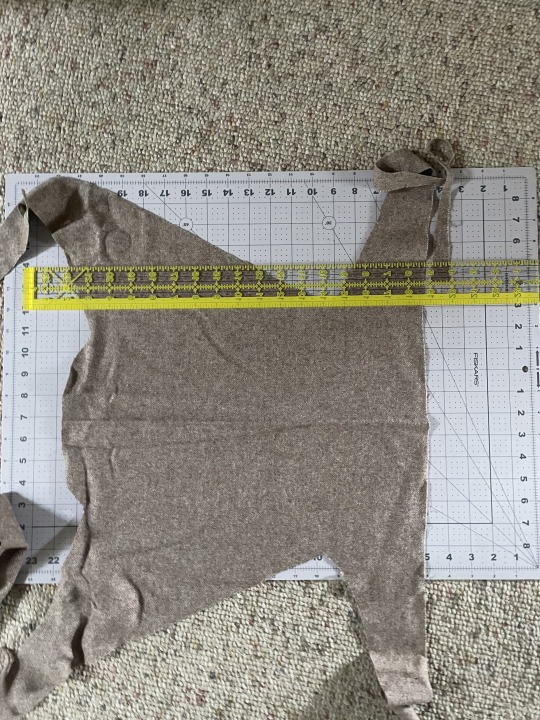
I gathered the flap closure to give it flexibility. Then I sewed everything together. I inserted the closure into one of the shoulder seams so that the raw edges were hidden inside.
For the hem, I tried using the rolled hem attachment for my sewing machine. The way it works is that you make a small fold on the edge of the fabric, and when you feed the fold you made into the attachment, it rolls the rest of the hem into place for you. (For sewists reading this, I know its called a rolled hem foot). This was completed with mixed results. Even though the wool was thin, I think it was still too thick for the rolled hem method. It kept slipping so parts of it were left un-stitched, and I would have to double back to fix it.
The Reveal:

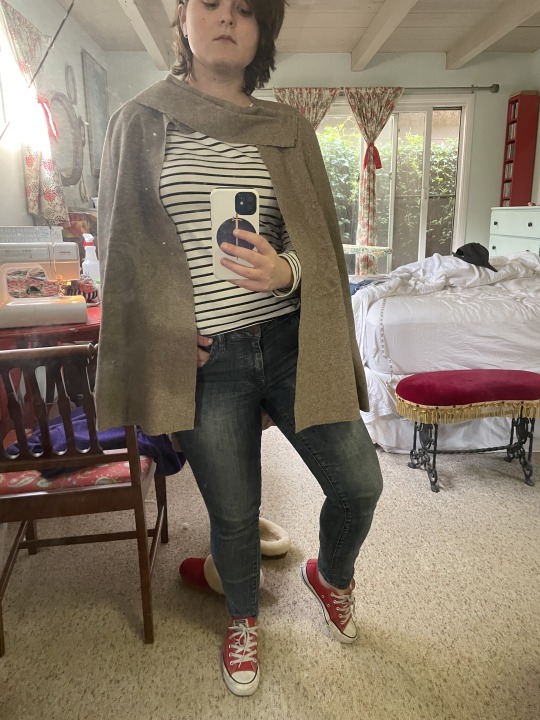
Over all, I am pleased with how it came out. I think I gathered the flap closure too much, as it came out really narrow. As mentioned before, the rolled hem caused trouble. The end result left the hem a bit uneven, but once it was ironed it wasn't noticeable. That would be something I fixed in the future.
I also made a cape pin to hold everything shut, but I didn't document the process. I just used a medallion with a fox on it that I found at the fabric store, and hot glued a pin back to it. I think it ended up being a nice detail on the final look, but there was no extensive process to make it.
5 notes
·
View notes
Text
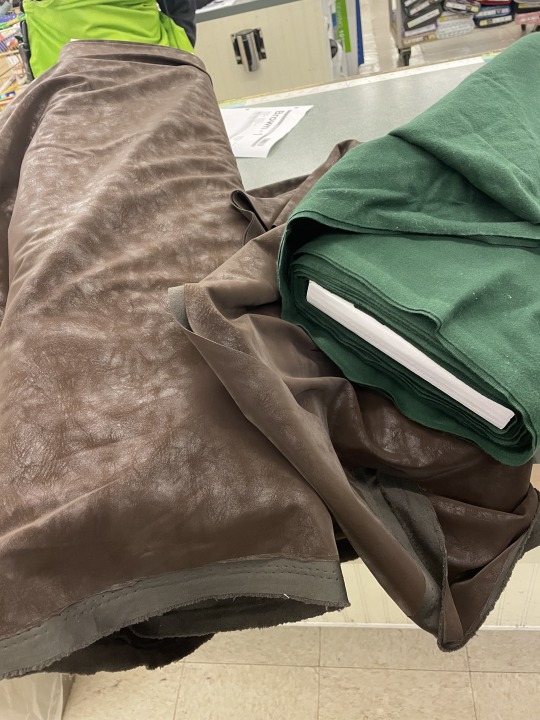
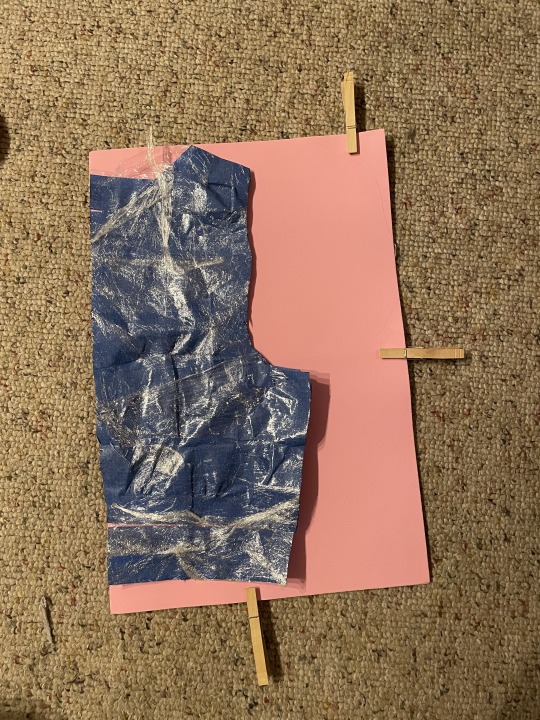
Making A Leather Chest Plate
I already made the leather shell, which you can find in part one, Making A Masking Tape Pattern. However, when I tried it on I felt like it looked more like a vest than armor, so I decided to make it look like proper leather using foam.
Materials:
Craft foam
previously created pattern
hot glue
leather strips
buckles
Office Brads
The Process
Step One: Creating the Inner Foam Shell.
I used the pattern I created for the leather shell, but without the seam allowance since I would be pushing edges of the foam together, rather than creating a seam. I traced the shape of all of my pattern pieces onto cheap craft foam. Normally cosplayers use EVA foam, but I didn't have the money so craft foam sheets worked best.

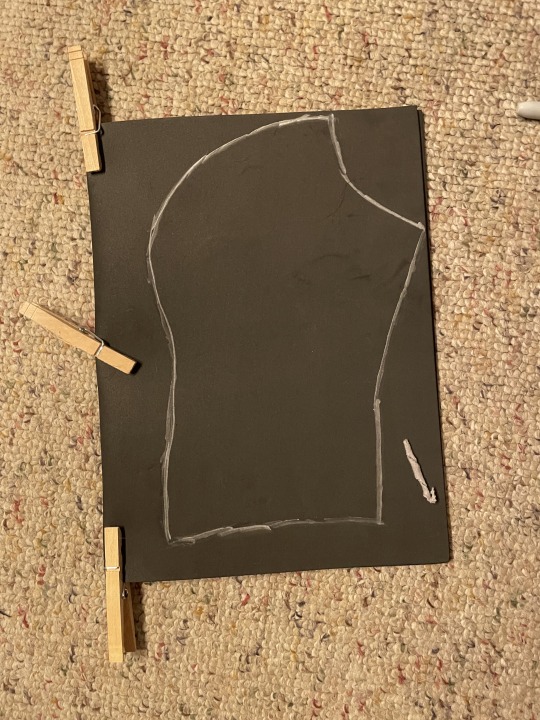
Once I traced all the pieces, I cut them out.
With all the pieces cut out, I then had to glue the edges together to make the 3D shape. Contact Cement is the go to glue for most cosplayers, but it's highly toxic and I don't own a respirator. Since the foam was going to be covered by leather, hot glue worked fine. This process included bending the curved seam over the bust to form a convex shape.

Step Two: Covering the Shell in Leather
After attaching all the pieces, I tried it on and it fit so I could move forward with adhering leather to foam. To do that I used spray adhesive. First I made a test piece using left over foam and the mock up of the leather I made.
It worked well enough so I went ahead with the rest of the foam and leather. I adhered the back first, then I adhered the front. I did this by spraying small sections at a time and smoothing the leather over the glue.
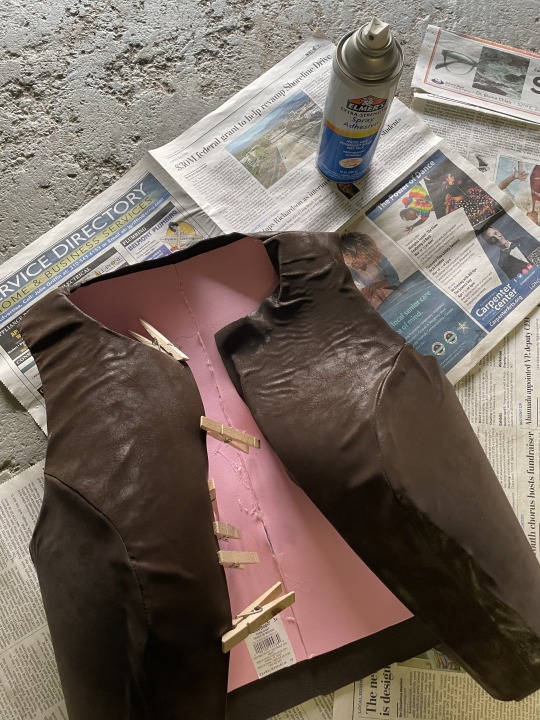
Then I folded down the edges of the fabric over the edge of the foam to hide both the raw edge of the foam and the raw edge of the fabric.
Step 3: The Closures
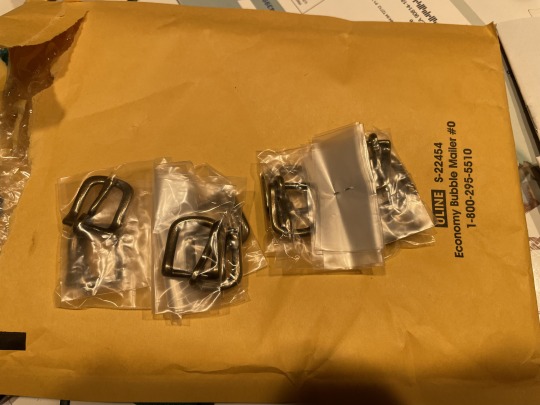
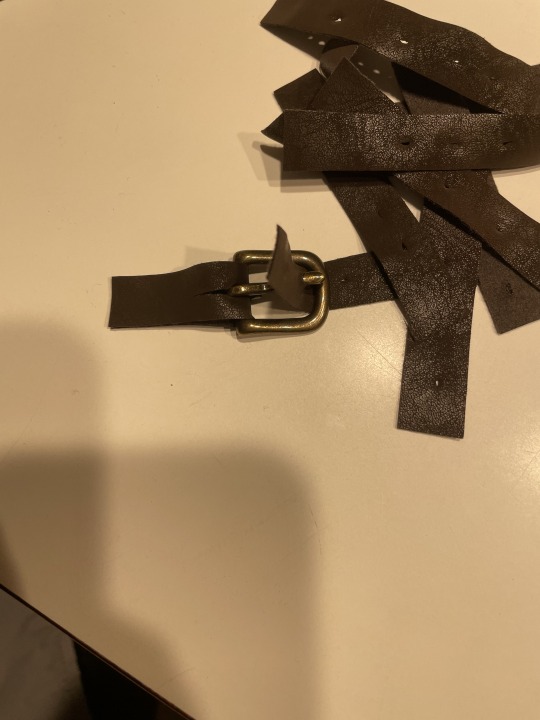
I planned for it to close with buckles and straps. I ordered ten buckles from buckleguy.com. Then I used some of my left over leather to make twenty straps. One to hold each buckle, and one to feed through each buckle. I cut slits into half the straps so that it could fold around the tong in the buckle. In the other ten, I used an awl to poke belt holes. (Yes, I did cut my finger using the rotary cutter for the first time.)

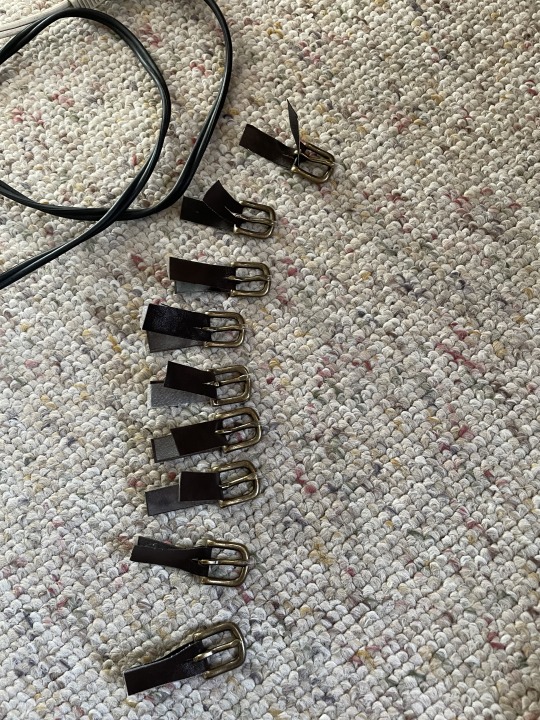
Buckles and straps completed, I needed to attach them to my chest plate. However, I wasn't sure how to hand sew through two layers of craft foam and four layers of leather to attach the straps. My solution was to use the metal brads you can get at any office supply store. They are designed to go through a hole and flatten on the other side so they don't slip out. It worked to hold the straps in place.
So I measured and marked where I wanted each buckle and strap closure. Then, using an awl, I poked holes through the foam and leather. That left the holes too small for a brad to get through, so I used a chop stick to widen them. The chopstick later turned out to be a redundant step because the brad widened the hole itself as it passed through. Below is a test pieces I made.

The Reveal
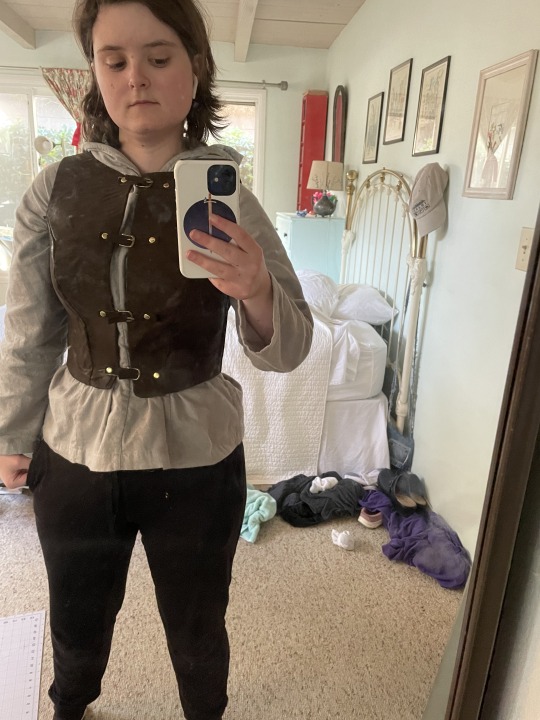

I tried it on and it looked great. When not wearing the chest plate, there were some wrinkles where the leather didn't adhere properly, but when wearing it, the wrinkles smoothed out. For my first time making armor, I think I did a great job.
11 notes
·
View notes
Text
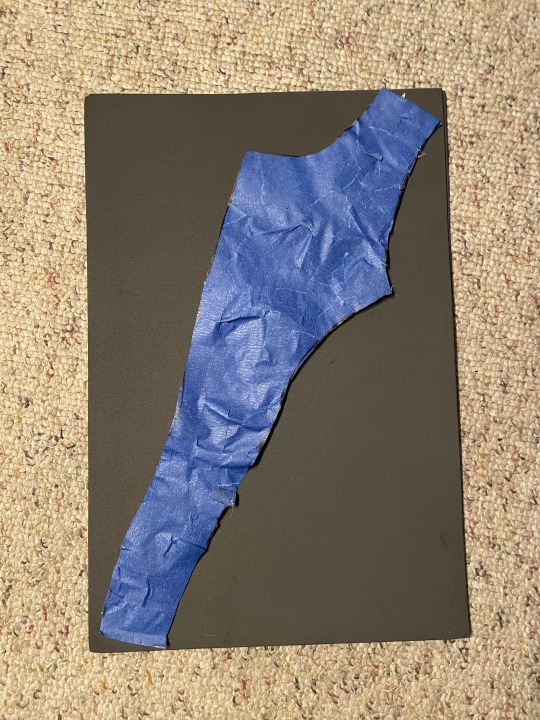
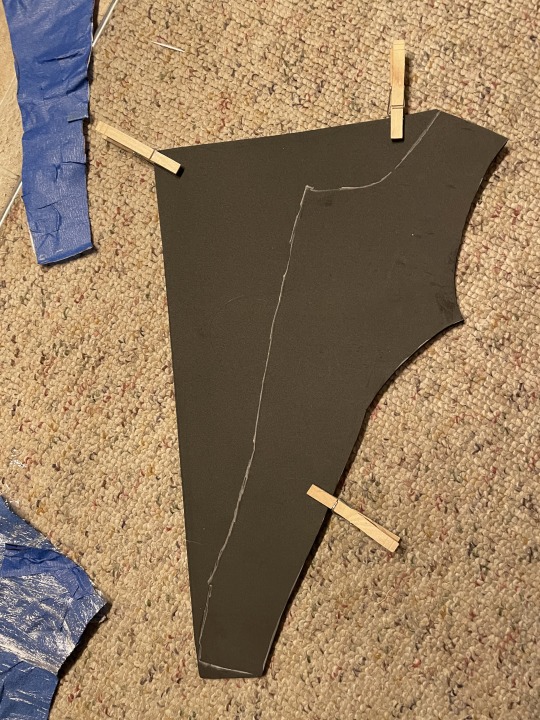
Making Bracers
My design for my ranger costume included bracers. Having made my leather chest plate, I now had an idea of how to make the bracers.
Materials
Masking tape and marker
Scissors
Paper and pen
Spray adhesive
Foam
Office Brads
Leather
Process
Step One: Masking Tape Pattern
I used the same process as the masking tape pattern for my chest plate. I wrapped my forearm in tape, marked the lines, cut it out, and traced it onto paper. However, I did not get pictures of the process.
SAFETY TIP: When wrapping your arm in tape, do NOT wrap it around your arm in a circular motion. The tape will tighten on itself as you wrap and be difficult to cut. I cut myself in the process because it was too tight to get under the edge of the tape.
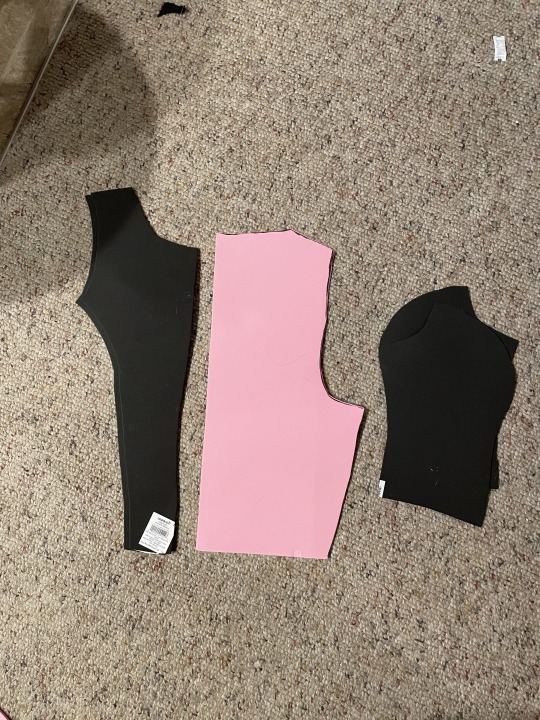
Step Two: Foam
Once I had the tape pattern, I cut it apart and traced it onto foam. Then I cut that foam out. Because the pattern was one piece, I didn't need to assemble any foam once it was cut.

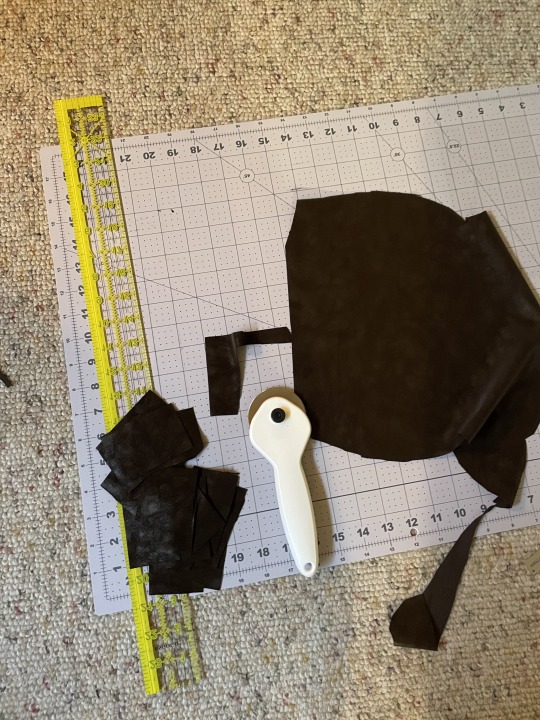
Step Three: Leather
I added a bit of allowance around the outside of the paper pattern, and cut it out of my leather. I didn't measure anything, and that would come back to bite me later.
Step Four: Covering the Foam
This process was much easier than the process for my chest plate. It was a flat shape and I could pretty much spray the adhesive, plop the foam down, and smooth it out.

However, the problems came when I needed to fold the leather over to hide the edges of the foam and leather. Because I didn't measure, there wasn't enough fabric to fold. If the craft store had black foam when I first bought materials, it would have hidden itself, but pink was really obvious. I sort of managed to make it work because it was stretch leather, but as you can see it didn't turn out great.

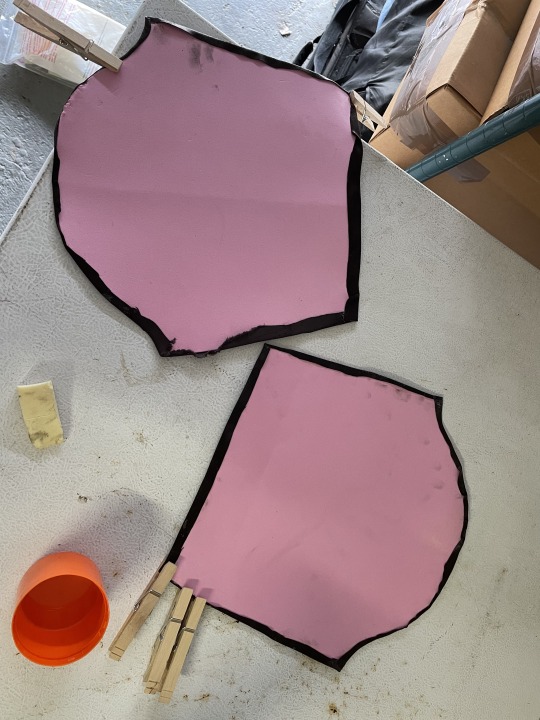
I found a solution at the end.
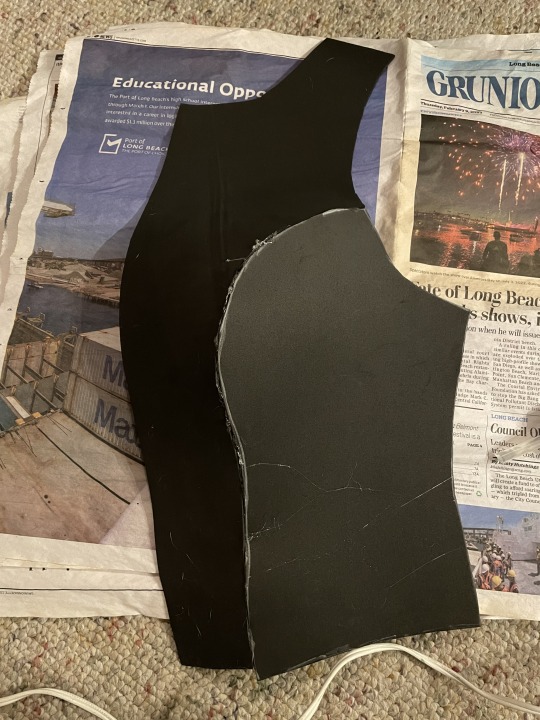
Step 5: Buckles and Straps
I ordered ten buckles from buckleguy.com. Then I used some of my left over leather to make twenty straps. One to hold each buckle, and one to feed through each buckle. I cut slits into half the straps so that it could fold around the tong in the buckle. In the other ten, I used an awl to poke belt holes. Four of the buckles were used on the chest piece, the remaining six were used on the bracers; three for each.


Just like with my chest piece, I poked holes in the foam and the straps, then used an office brad to secure the straps in place.


Step 6: Backing (the solution to messy edges)
Using the same paper pattern as before, I cut backing out of black cotton I had lying around, and adhered it to the back to hide the edges.
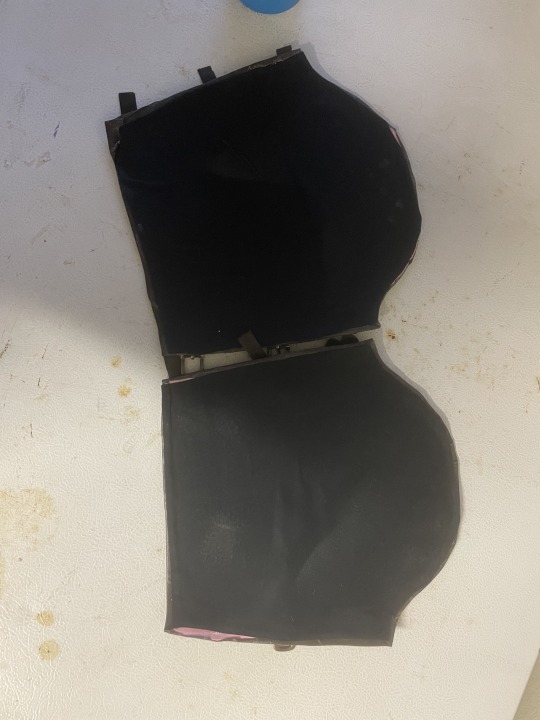
With that, I had a couple of completed bracers.
12 notes
·
View notes
Text
Making Bracers
My design for my ranger costume included bracers. Having made my leather chest plate, I now had an idea of how to make the bracers.
Materials
Masking tape and marker
Scissors
Paper and pen
Spray adhesive
Foam
Office Brads
Leather
Process
Step One: Masking Tape Pattern
I used the same process as the masking tape pattern for my chest plate. I wrapped my forearm in tape, marked the lines, cut it out, and traced it onto paper. However, I did not get pictures of the process.
SAFETY TIP: When wrapping your arm in tape, do NOT wrap it around your arm in a circular motion. The tape will tighten on itself as you wrap and be difficult to cut. I cut myself in the process because it was too tight to get under the edge of the tape.
Step Two: Foam
Once I had the tape pattern, I cut it apart and traced it onto foam. Then I cut that foam out. Because the pattern was one piece, I didn't need to assemble any foam once it was cut.
Step Three: Leather
I added a bit of allowance around the outside of the paper pattern, and cut it out of my leather. I didn't measure anything, and that would come back to bite me later.
Step Four: Covering the Foam
This process was much easier than the process for my chest plate. It was a flat shape and I could pretty much spray the adhesive, plop the foam down, and smooth it out.
However, the problems came when I needed to fold the leather over to hide the edges of the foam and leather. Because I didn't measure, there wasn't enough fabric to fold. If the craft store had black foam when I first bought materials, it would have hidden itself, but pink was really obvious. I sort of managed to make it work because it was stretch leather, but as you can see it didn't turn out great.
I found a solution at the end.
Step 5: Buckles and Straps
I ordered ten buckles from buckleguy.com. Then I used some of my left over leather to make twenty straps. One to hold each buckle, and one to feed through each buckle. I cut slits into half the straps so that it could fold around the tong in the buckle. In the other ten, I used an awl to poke belt holes. Four of the buckles were used on the chest piece, the remaining six were used on the bracers; three for each.
Just like with my chest piece, I poked holes in the foam and the straps, then used an office brad to secure the straps in place.
Step 6: Backing (the solution to messy edges)
Using the same paper pattern as before, I cut backing out of black cotton I had lying around, and adhered it to the back to hide the edges.
With that, I had a couple of completed bracers.
12 notes
·
View notes