
Last Seen Blogs


Text

Thank you @purelyrice and everyone who got me to 10 reblogs!

Japanese Cheesecake by Simply Recipes.
18 notes
·
View notes
Text
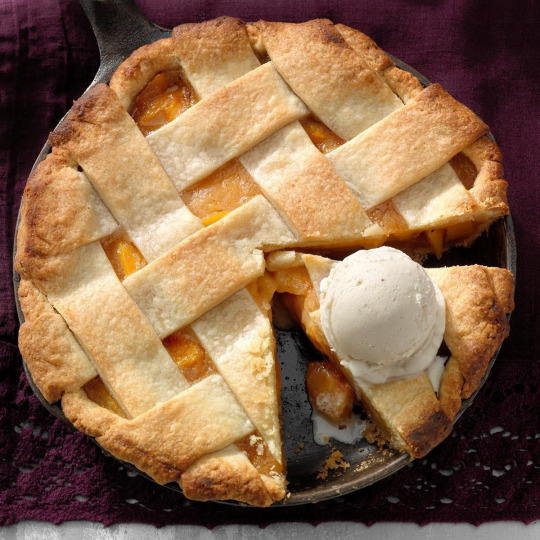
Peach Pie by Taste of Home.
#baking#comfort food#cooking#dessert#recipe#fruit#recipes#simple#tasty#yummy#peach#pie#cobbler#peach cobbler#ice cream#dough#easy
1 note
·
View note
Text
Dark and Stormy Banana Bread by Simply Recipes.
#baking#cooking#comfort food#dessert#recipe#quotes#recipes#fruit#simple#vegan#banana#banana bread#bread#easy#cake#pound cake#favorite#yummy#tasty
2 notes
·
View notes
Text
Candied Ginger Shortbread
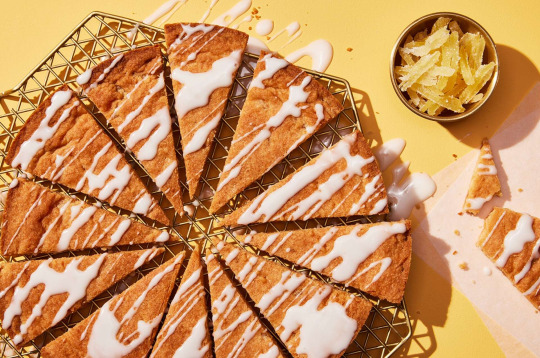
Original recipe by King Arthur baking. Find it here.
Yield: 24 shortbread wedges
Rating: ⭐️⭐️⭐️⭐️⭐️ (37)
Time: 10 mins for prep, 35 for baking
In ancient times, Scotsmen marked the winter solstice — the first day of winter — with bonfires, entreating the sun to return over the course of the year's longest night. From this tradition was born first a round cake, notched on the side to represent the sun's rays; and then today's familiar wedge-shaped shortbread. This version of classic shortbread incorporates crystallized ginger, which adds a spicy-sweet kick.
Ingredients:
2 sticks (227g) unsalted butter, softened
¾ cup (149g) granulated sugar
1 teaspoon salt
1 teaspoon vanilla extract
2 ⅓ cups (280g) all-purpose flour, divided
⅔ cup (123g) crystallized ginger
Instructions:
Preheat the oven to 325°F. Lightly grease two 9" round cake pans, or two 8" or 9" stoneware shortbread pans, or a combination.
In a mixing bowl or bowl of your stand mixer, combine the butter, salt, sugar, and vanilla. Beat until smooth.
Place 1 cup (120g) of the flour in a food processor with the crystallized ginger. Process until the ginger is finely minced; this may take up to 1 minute.
Add this mixture, along with the remaining 1 ⅓ cups (160g) flour, to the butter-sugar mixture. Beat until well combined.
#baking#comfort food#cooking#dessert#recipe#recipes#fruit#ginger#shortbread#yummy#tasty#simple#easy#quick#fast
1 note
·
View note
Text
Japanese Cheesecake by Simply Recipes.
#baking#comfort food#cooking#dessert#recipes#recipe#fruit#simple#cheesecake#japan#japanese#anime#strawberry#cheese#vegetarian#blackberry#easy
18 notes
·
View notes
Text
Chocolate Ganache Cupcakes

Recipe from Madia Heatter, adapted by Suzanne Lenzer
Yield: 24 cupcakes
Rating: ⭐️⭐️⭐️⭐️⭐️ (2,241)
Time: ~1 hour
This simple recipe, modestly entitled “Chocolate Cupcakes” from the 1974 book “Maida Heatter’s Book of Great Desserts,” produces cakes with a rich, moist crumb that relies on cocoa powder for a deep chocolatey flavor. But it’s the topping of semi-sweet chocolate ganache that separates these cupcakes from the crowd. — Suzanne Lenzer
Ingredients:
Cakes:
2 cups sifted all-purpose flour
1 teaspoon baking soda
½ teaspoon salt
½ cup unsweetened cocoa powder (preferably Dutch process)
⅔ cup/5⅓ ounces unsalted butter (1⅓ sticks)
1 teaspoon vanilla extract
1½ cups granulated sugar
3 eggs
1 cup milk
Ganache:
6 ounces of semisweet chocolate chips
⅓ cup heavy cream
1 tablespoon granulated sugar
1½ tablespoons unsalted butter
Instructions:
Heat the oven to 350 degrees and line enough muffin tins to make 24 muffins with cupcake liners. Sift together the flour, soda, salt, and cocoa powder and set aside. Use a standing mixer or hand-mixer to cream the butter. Add the sugar and vanilla and mix to combine. Add the eggs one at a time, beating after each one until smooth.
On the lowest speed, alternately add the dry ingredients in three additions and the milk in two. Beat only until smooth and fully combined, you don’t want to overwork the batter.
Scoop the batter into the prepared pans filling each about two-thirds full (don’t bother to smooth the tops--the batter will level itself as it cooks). Bake the cupcakes for about 25 minutes, or until the tops are puffed and spring back when lightly pressed. Be careful not to over-bake the cakes, but know that if you take them out too early they may sink a bit. Cool the cakes in the muffin tins for about 5 minutes and then remove them to a rack and let cool completely.
To make the ganache, put all the ingredients in a small, deep saucepan over medium-low heat. Cook, whisking occasionally to combine, until the chocolate and butter are nearly melted. Take the pan off the heat and whisk continuously until all the chocolate is melted; the ganache should be shiny and without any lumps.
When the ganache is about room temperature, use a butter knife to spread it evenly on top of the cakes; sprinkle with nonpareil if you like. The cakes can be made a day in advance and refrigerated (they actually get better) or frozen in an airtight container.
1 note
·
View note
Text
Orange Pound Cake
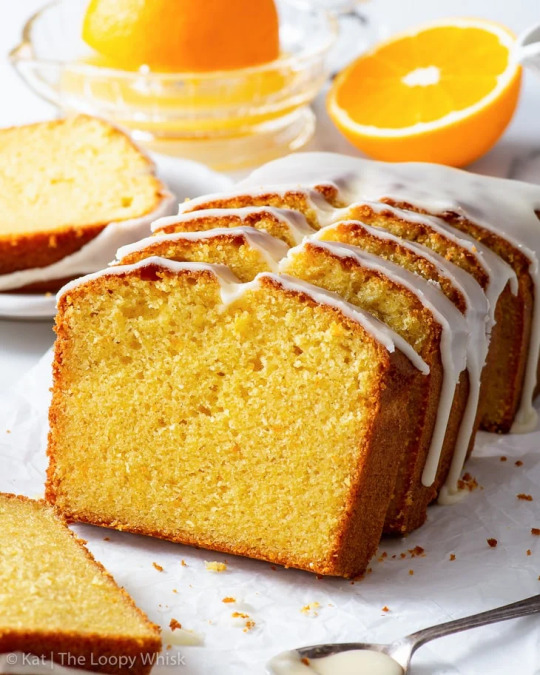
This recipe is an edited recipe. Original recipe by The Loopy Whisk. Find it here.
Yields: 1 pound cake
Rating: ⭐️⭐️⭐️⭐️⭐️ (42)
Time: 45 mins for prep, 1 hr for baking
This incredible orange pound cake will blow you away with its intense orange flavour and moist, soft, melt-in-the-mouth texture. It uses both plenty of orange zest and ¾ cup of orange juice – so there’s really no doubt that orange is the star of the show here. It’s also super easy to make.
Ingredients:
200g (1 cup) granulated sugar
Zest of 3 oranges
170g (1 ½ sticks) unsalted butter, softened
4 eggs
1 tsp vanilla extract
240g (2 cups) all-purpose flour
65g (⅔ cup) almond flour
3 tsp baking powder
¼ tsp salt
180g (¾ cup) orange juice, freshly squeezed
Instructions:
Adjust the oven rack to the middle position, preheat the oven to 350ºF (180ºC) and line a 2lb/900g loaf tin with parchment/baking paper.
Tip: I used a loaf tin with the following dimensions: 8 ½ inches/21 cm long, 4 ½ inches/11 cm wide and 3 inches/7 cm high.
Add the sugar and orange zest to a bowl and use your fingertips to rub the zest into the sugar. This helps to release more essential oils from the zest.
For the following steps, I recommend using either a stand mixer fitted with the paddle attachment or a hand mixer fitted with the double beaters. You could also do it by hand, using a large balloon whisk, but you might not get the butter and sugar as fluffy as you would using a mixer.
Cream the butter and sugar (with the added orange zest) together until pale and fluffy.
Add the eggs, one at a time, mixing well after each addition, until well combined.
Tip: It's very important that your eggs are at room temperature and that you add them one at a time. This way, you'll maintain the emulsion of the butter as much as possible. If you forgot to take your eggs out of the fridge, place them in warm water for 5-10 minutes before using them.
Add the vanilla and mix until combined.
In a separate bowl, sift together the all-purpose flour, almond flour, baking powder, and salt.
Beginning and ending with the dry ingredients, alternately add the dry ingredients (in three batches) and the orange juice (in two batches) to the butter-sugar mixture, whisking well after each addition, until you get a fairly smooth cake batter with no flour clumps.
Tip: This alternating way of adding dry and wet ingredients helps to maintain the emulsion of the butter in the cake batter as much as possible. When alternating dry and wet ingredients, make sure to end with the dry.
Even with this method of adding the ingredients, your final batter might still look slightly split or curdled due to the large amount of acidic orange juice that you've added. Don't worry if that happens – you will still get a wonderfully soft, melt-in-the-mouth cake crumb in the end.
Transfer the cake batter into the prepared loaf tin, smooth out the top, and bake in the pre-heated oven at 350ºF (180ºC) for about 1 hour - 1 hour 5 minutes or until risen, golden brown on top and an inserted toothpick comes out clean. The loaf should have a large crack running along the center.
Tip: If the cake starts browning too quickly or too much, cover it with aluminum foil (shiny side up) and continue baking until done.
Allow to cool in the loaf tin for about 10 minutes, then transfer the cake out of the tin and onto a wire cooling to cool completely.
3 notes
·
View notes
Text
Lemon Bundt Cake

Original recipe by Tasty. Find it here.
Yields: 1 cake
Rating: 9.6/10
Time: 2.5 hrs
This classic lemon bundt cake recipe is perfect for any occasion: a bridal shower, summer BBQ, or even a treat for your family on a casual night in. The lemon glaze makes this cake perfectly moist. Top it with icing and zest and enjoy this beautiful and delicious treat.
Ingredients:
Cake:
3 cups all-purpose flour
2 teaspoons baking powder
1 cup unsalted butter, 2 sticks, room temperature
2 cups granulated sugar
1 teaspoon kosher salt
3 large eggs, room temperature
2 tablespoons lemon zest
¼ cup lemon juice
1 teaspoon vanilla extract
1 cup whole milk
nonstick cooking spray, for greasing
Glaze:
½ cup granulated sugar
¼ cup lemon juice
Icing:
2 cups powdered sugar, sifted
3 tablespoons lemon juice
1 lemon, zested
Instructions:
Preheat the oven to 350˚F (180˚C).
Make the cake: In a medium bowl, whisk together the flour and baking powder.
In a large bowl, cream the butter, sugar, and salt with an electric hand mixer until fluffy, about 3 minutes. Add the eggs, one at a time, beating until fully incorporated before adding the next. Add the lemon zest, lemon juice, and vanilla and beat to combine.
Add half the flour and beat to combine, then beat in the milk, then add the rest of the flour and beat just until incorporated. Scrape down the sides of the bowl with a rubber spatula and make sure any floury spots are incorporated.
Grease a 10-inch (25-cm) bundt pan with nonstick spray. Spoon the batter into the pan and smooth the top. Gently tap the pan against the counter to release any air bubbles.
Bake the cake for 50 minutes, until a toothpick inserted in the center comes out clean.
While the cake is baking, make the lemon glaze: In a small microwave-safe bowl, combine the sugar and lemon juice. Microwave for 1 minute, stirring halfway through, until the sugar is completely dissolved. Set aside.
Make the lemon icing: Sift the powdered sugar into a medium bowl. Add the lemon juice and whisk until smooth.
After the cake is done baking, let cool in the pan for 10 minutes, then invert onto a wire rack set over a baking sheet and remove the bundt pan. Use a knife to loosen the cake around the edges, if needed.
Use a skewer or fork to poke holes all over the top and sides of the cake. Brush the cake with the lemon glaze. If the glaze drips off, let the cake cool for a few more minutes, then continue brushing on the glaze. Let cool completely, at least 1 hour.
Pour the icing over the top of the cake, letting it drip down the sides. Grate lemon zest over the icing. Let the glaze dry completely, about 30 minutes.
Transfer the cake to a serving platter, slice, and serve.
Enjoy!
0 notes

Text
Super Simple Strawberry Cake
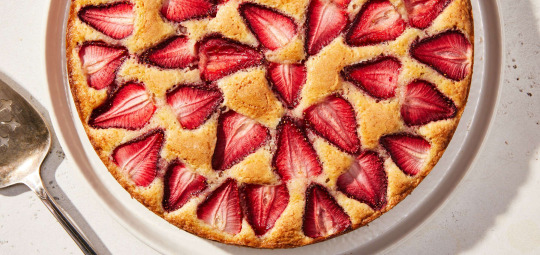
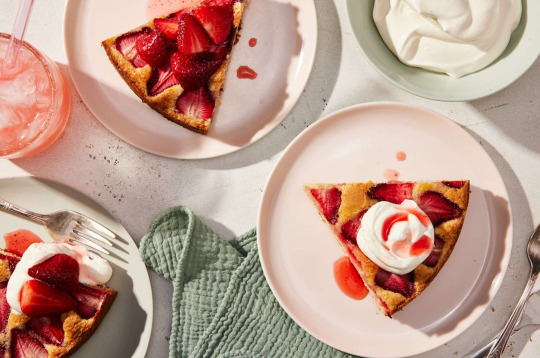
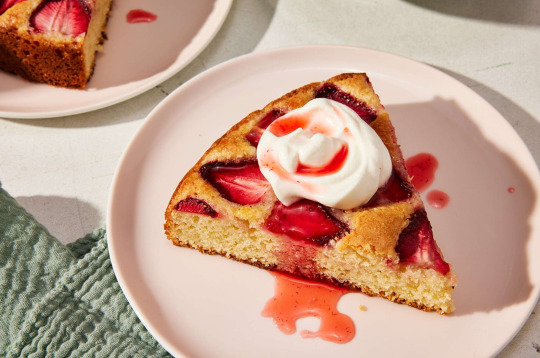
Recipe originally by King Arthur baking. Find it here.
Yields: 1 cake
Rating: ⭐️⭐️⭐️⭐️⭐️ (9)
Time: 15 minutes for prep, 40-45 for baking.
This easy strawberry cake is quintessentially summer, with fresh fruit topping a tender-yet-sturdy cake enriched with sour cream. Macerating the berries before baking concentrates their flavor and prevents them from drying out in the oven, and the addition of nutmeg recalls old-fashioned doughnuts. Serve this cake with the sour cream whip for a touch of refreshing tanginess or break out the vanilla ice cream for an à la mode presentation.
Ingredients:
Strawberry topping:
2 cups (334g) strawberries, sliced 1/4" thick
2 tablespoons (25g) granulated sugar, divided
pinch of salt
Cake:
1 1/4 cups (150g) all-purpose flour
1 3/4 teaspoons baking powder
1/2 teaspoon salt
6 tablespoons (85g) unsalted butter, at room temperature
1 cup (198g) granulated sugar
zest of 1 lemon
1/4 to 1/2 teaspoon nutmeg, to taste
2 large eggs, at room temperature
1/2 cup (113g) sour cream
1 teaspoon vanilla extract
Sour cream whip:
1/2 cup (113g) heavy cream, cold
2 tablespoons (28g) sour cream
1 to 2 tablespoons (7g to 14g) confectioners' sugar, to taste
1/2 teaspoon vanilla extract
Instructions:
Preheat the oven to 350°F with a rack in the center.
Grease a 9" round or 8" square cake or, for a thinner cake, a 7" x 11" tart pan. Line the bottom with parchment and lightly grease.
To make the strawberry topping: In a medium bowl, toss the strawberries, 1 tablespoon of the sugar, and the salt to combine. Set aside while you prepare the rest of the cake. (Reserve remaining 1 tablespoon sugar for topping the assembled cake.)
To make the cake: In a medium bowl, whisk together the flour, baking powder, and salt.
In the bowl of a stand mixer fitted with the flat beater or working with an electric hand mixer in a large bowl, beat the butter, sugar, lemon zest, and nutmeg until creamy and homogenous but not necessarily light or fluffy, about 2 to 3 minutes.
Add the eggs one at a time, beating well after each addition and scraping the bowl as needed.
Add the sour cream and vanilla; beat to combine.
Add the flour mixture and beat until a few dry streaks remain. Use a flexible spatula to finish mixing by hand.
Transfer the batter to the prepared pan and spread evenly. (An offset spatula is a helpful tool here.) Distribute the strawberries over the batter in a tight, single layer, leaving behind the juices in the bowl. (Reserve for serving, if desired.) Save any leftover strawberry slices for snacking or for serving with the cake.
Sprinkle the cake all over with the remaining 1 tablespoon sugar from the topping.
Bake the strawberry cake for 40 to 45 minutes, until the top is deeply golden brown. Let the cake cool in the pan for 10 minutes, then transfer it to a wire rack to cool completely.
To make the sour cream whip: In a medium bowl, whisk together the heavy cream, sour cream, 1 tablespoon of the confectioners’ sugar, and vanilla until soft peaks form. Taste and add the additional 1 tablespoon confectioners’ sugar, if desired.
Serve the strawberry cake, warm or room temperature, with the sour cream whip and a drizzle of the reserved juices.
Storage information: The strawberry cake is best enjoyed the day it’s made. Cover loosely and store at room temperature for up to 2 days. Any leftover sour cream whip can be stored in an airtight container in the refrigerator for several days.
1 note
·
View note
Text
Lemon Meringue Bars
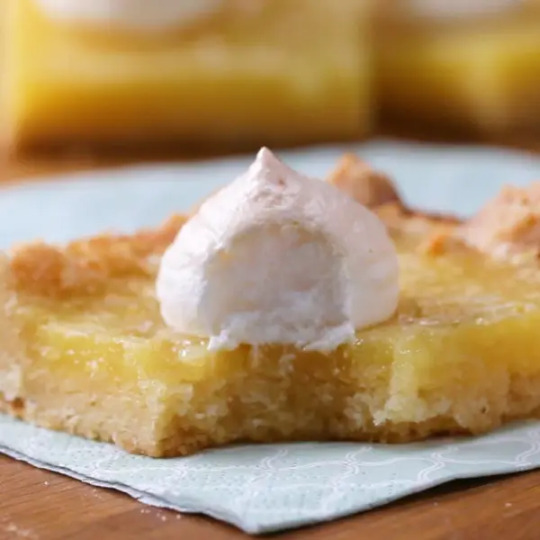
Original recipe by Tasty. Find it here.
Yields: 9 servings
Rating: 9.6/10
Time: ~1.5 hours
Tangy and sweet, these lemon meringue bars are the perfect pick-me-up on a dreary day. The buttery crust and fluffy meringue add the perfect balance to the zesty lemon filling.
Ingredients:
Crust:
1 ½ cups all-purpose flour
½ cup powdered sugar
½ teaspoon salt
¾ cup unsalted butter, 1 1/2 sticks, cubed, room temperature
Lemon Filling:
3 large eggs
1 egg yolk, reserve white for meringue
1 cup granulated sugar
½ cup lemon juice
1 tablespoon lemon zest
¼ cup all-purpose flour
Meringue:
1 egg white
1 pinch salt
⅓ cup granulated sugar
Instructions:
Preheat the oven to 325˚F (170˚C). Grease and line a 9-inch (23 cm) square baking dish with parchment paper and place on a baking sheet.
Make the crust: combine the flour, powdered sugar, salt, and butter in a medium bowl, and use your hands to mix until a crumbly dough forms.
Transfer the dough to the prepared pan, and use your hands to press it against the bottom and about 1 inch (2 cm) up the sides. Poke the bottom all over with a fork.
Bake for 20 minutes, until light golden brown.
While the crust is baking, make the lemon filling: In a large bowl, whisk together the eggs and egg yolk. Add the granulated sugar, lemon juice, zest, and a pinch of salt, and whisk to combine. Whisk in the flour until just combined.
When the crust is done baking, remove it from the oven. Pour the lemon filling over the crust and carefully return it to the oven for 25 minutes, until the filling no longer jiggles and the center is mostly set.
While the filling bakes, make the meringue: In a clean, dry medium bowl, use an electric hand mixer to beat the egg white until stiff peaks form. Add about half of the sugar, whip for 30 seconds, then add the rest of the sugar and whip until combined. Transfer the meringue to a pastry bag fitted with a large tip or zip-top bag with a corner snipped off.
Pipe 9 evenly-spaced dollops of meringue on top of the lemon bars.
Return to the oven for 10-12 minutes, until the meringues are lightly browned.
Let cool completely, then refrigerate for 1-2 hours.
Slice into 9 bars. Serve chilled or at room temperature.
Enjoy!
0 notes
Text
Lemon Curd Cookies
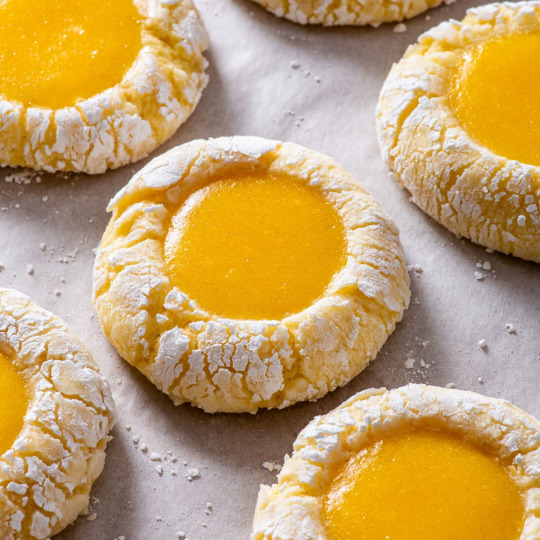
edited from the loopy whisk. this recipe was originally gluten free. find her version here.
These are THE BEST lemon cookies you’ll ever make. They’re perfectly zesty, buttery and so tender that they simply melt in your mouth, and they’re baked with a generous dollop of tangy, creamy lemon curd in the centre. And in addition to their incredible flavour, they look gorgeous as well! If you love lemon desserts, you need to try this one.
Ingredients:
Lemon Curd:
100g (½ cup) granulated sugar
Zest of 1 lemon
3 egg yolks
¼ tsp salt
60g ( ¼ cup) freshly squeezed lemon juice
55g (½ stick) unsalted butter, cubed
Lemon Cookies:
150g (¾ cup) granulated sugar
Zest of 2 lemons
115g (1 stick) unsalted butter, melted and cooled until warmed
2 eggs
30g (2 tbsp) freshly squeezed lemon juice
1 tsp vanilla extract
240g (2 cups) flour
½ tsp baking powder
¼ tsp salt
90g (¾ cup) powdered/icing sugar, for rolling the cookies before baking
Instructions:
Lemon Curd:
It's best to minimize contact with metal when preparing the lemon curd to prevent it from developing a metallic aftertaste. Therefore, I don't recommend using a metal bowl, metal utensils (such as a metal whisk) or a metal/metal-coated saucepan.
Instead, use a glass or ceramic bowl, a rubber spatula or a wooden spoon, and a non-metal saucepan such as one with a ceramic coating.
Add the sugar and lemon zest to a bowl, and use your fingertips to rub the zest into the sugar.
Tip: This helps to release more essential oils from the zest and it will make your lemon curd extra fragrant.
Add the egg yolks and salt to the lemon-sugar, and mix or whip them until pale and slightly fluffy.
In a saucepan over medium-high heat, cook the lemon juice until it only just comes to a boil.
Add the hot lemon juice to the egg yolk-sugar mixture in a slow drizzle, mixing constantly until you've added all the juice.
Tip: This tempers the egg yolks and reduces the chances of your lemon curd splitting or curdling when you cook it.
Return the mixture to the saucepan and cook it over low heat with constant stirring until thickened so that it thickly coats the back of a spoon or spatula. This should take about 4-5 minutes. Don't allow the lemon curd to come to a boil – you shouldn't see any bubbles forming.
Once thickened, remove from the heat and stir in the butter until it's fully melted.
Pass the lemon curd through a fine mesh sieve to remove the lemon zest – this will make it perfectly smooth and creamy (but you can skip this step if you don't mind the texture of the lemon zest).
Tip: I don't recommend using a metal sieve, as contact with metal can give your lemon curd a slight metallic aftertaste. If possible, use a sieve with a plastic or silicone mesh.
Pour the finished lemon curd into a bowl or heat-proof container and cover it with a sheet of plastic wrap/cling film. Make sure that the plastic wrap/cling film is in direct contact with the surface of the lemon curd – this will prevent skin formation. Allow to cool completely to room temperature. (You can also prepare the lemon curd a day or two in advance and keep it in the fridge until needed.)
Dough
Add the sugar and lemon zest to a large bowl, and use your fingertips to rub the zest into the sugar.
Tip: This helps to release more essential oils from the zest, and it will make your cookies even more lemony and aromatic.
Add the melted butter, eggs, lemon juice and vanilla, and whisk well until combined.
In a separate bowl, whisk together the all-purpose flour, baking powder and salt, and add them to the wet ingredients.
Mix with a wooden spoon or a rubber spatula until you get a smooth, batter-like cookie dough.
Tip: At this stage, the cookie dough will really be more like a batter – it will be very loose, soft and sticky, bordering on runny. That's how it should be. Don't add more flour!
Chill the cookie dough in the fridge for at least 2 hours before proceeding to the next step. You can also keep it in the fridge overnight if you want to bake the cookies the next day.
Tip: In addition to firming up the cookie dough into something you can actually handle and shape into balls, chilling also ensures that the cookies won’t melt into puddles during baking.
Assembling & Baking The Cookies:
Adjust the oven rack to the middle position, preheat the oven to 350ºF (180ºC) and line two large baking sheets with parchment/baking paper.
Tip: You will bake the cookies in two batches, so you can line two baking sheets if you have them on hand. Otherwise, just re-use the same baking sheet, but make sure to cool it completely before you place the next batch of unbaked cookies onto it.
Use a 2-tablespoon cookie or ice cream scoop to scoop out a portion of the cookie dough. Drop it directly into a bowl of powdered/icing sugar and roll it around until it’s evenly coated. The sugar coating will allow you to handle the cookie dough without it sticking, so you can roll it between your palms to form a perfectly round ball.
Repeat with the rest of the cookie dough, you should get 16 cookies in total.
Place the sugar-coated cookie dough balls onto the lined baking sheets, with plenty of space between them, about 8 per baking sheet (as the cookies will spread during baking).
Use a ½-tablespoon measuring spoon to make an indent in the center of each cookie dough ball (make sure that you press only halfway through each cookie dough ball, not all the way through).
Fill the cookies with about 1 (generous) teaspoon of lemon curd.
Bake one baking sheet at a time at 350ºF (180ºC) for 9-12 minutes or until the cookies have spread and cracked around the edges and the lemon curd center is slightly puffed up but NOT visibly bubbling (this will ensure that it stays beautifully smooth and creamy).
While the first batch of cookies is baking, keep the second baking sheet with the cookies in the fridge until needed.
The cookies will be very soft and delicate immediately out of the oven. Allow them to cool on the baking sheet for about 5-10 minutes before transferring them to a wire rack to cool completely.
These lemon curd cookies are amazing both warm and at room temperature, but I find them to be at their very best when they're chilled from the fridge.
3 notes
·
View notes
Text
Chocolate Coconut Macaroons

Original recipe by Lauren Miyashiro. Find her recipe at Tasty, here.
When you just can't have any more matzo (even if it is this amazing matzo icebox cake), make these gluten-free coconut macaroons. Dipping them in chocolate is "optional" but really, why wouldn't you?
P.S. Around March or April, this recipe isn't just the perfect dessert for Passover Seder. It's an amazing Easter brunch treat, too!
Ingredients:
Cooking spray
3 large egg whites
2/3 cups granulated sugar
1/2 tsp. pure vanilla extract
Pinch kosher salt
5 cups sweetened shredded coconut
----------------------------------------------------------------------------------------
1/4 cups unsweetened cocoa powder
1 1/2 cups chocolate chips, melted, divided
1 tbsp. coconut oil
Instructions:
Preheat oven to 350° and line two large baking sheets with parchment paper and grease with cooking spray.
In a large bowl, whisk together egg whites, sugar, vanilla, and salt until the mixture is light and foamy. Fold in cocoa, one-third the melted chocolate, and shredded coconut until evenly combined.
Using a medium cookie scoop or a tablespoon, scoop evenly sized mounds onto prepared baking sheet. Bake for 25 minutes, then let cool completely on baking sheets.
In a medium bowl, whisk together remaining melted. chocolate and oil until smooth. Dip the bottoms of cooled macaroons in chocolate mixture, then drizzle the tops with remaining mixture.
These macaroons can be made without chocolate! Simply do not use the ingredients below the dotted line, and do not add cocoa, chocolate, or perform step 4.
#baking#comfort food#recipe#recipes#cooking#quotes#dessert#macaroon#macaroons#chocolate#coconut#amazing#simple#yummy#tasty#food#fruit#vegan
0 notes

Text
Blueberry Muffins
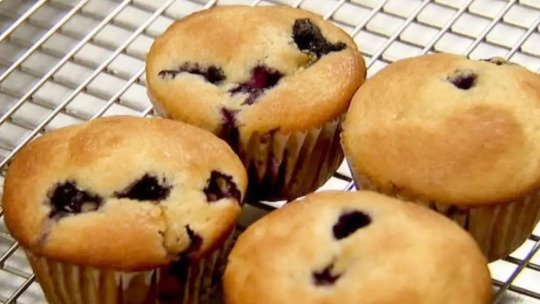
Original recipe from Tasty, by Kaleb Mayer. Find it here.
Yields: 24 servings
Rating: 9.7/10
Time: 30-45 minutes
Ingredients:
4 eggs
2 cups granulated sugar
1 cup vegetable oil
1 teaspoon vanilla extract
4 cups flour
1 teaspoon baking soda
2 teaspoons baking powder
2 cups sour cream
2 cups blueberry
Instructions:
In a mixing bowl, beat eggs. Gradually add sugar. While beating slowly pour in oil. Add vanilla.
Combine the dry ingredients.
Add dry ingredients alternately with sour cream to the egg mixture.
Gently add blueberries.
Spoon into the greased muffin tin or paper liners
Bake at 400°F (200°C) for 20 minutes.
Enjoy!
#comfort food#baking#recipe#recipes#cooking#quotes#dessert#yummy#muffins#muffin#blueberry#fruit#vegan#simple#food#amazing#tasty
0 notes
Text
Blueberry Muffin in a Mug

Original recipe from Tasty. Find it here.
Yields: 1 serving
Rating: 9/10
Time: 5 minutes
Looking for a quick and delicious breakfast? Try this Blueberry Mug Muffin! In just a few minutes, you can have a warm, fluffy muffin bursting with juicy blueberries. Perfect for those busy mornings when you're on the go!
Ingredients:
1/3 cup all-purpose flour
2 tablespoons sugar
¼ teaspoon baking powder
¼ teaspoon kosher salt
¼ cup milk
2 tablespoons unsalted butter, melted and cooled
½ teaspoon vanilla extract
1 tablespoon lemon zest
¼ cup fresh blueberry
sparkling sugar, optional
Instructions:
In a mug, whisk together flour, sugar, baking powder, and kosher salt.
Add milk, butter, and vanilla. Mix until smooth.
Stir in lemon zest and blueberries.
Microwave for 1½-2 minutes, or until cake appears puffy and cooked through.
Cool 2 minutes. Top with sparkling sugar (optional).
Enjoy!
Steps 1 and 2 can also be done in a bigger bowl then transferred to mug of choice.
#comfort food#baking#recipe#recipes#cooking#quotes#dessert#yummy#easy#easycooking#muffins#muffin#blueberry#fruit#lemon#lemon zest#vegan#simple#fast
0 notes
Text
Brownies
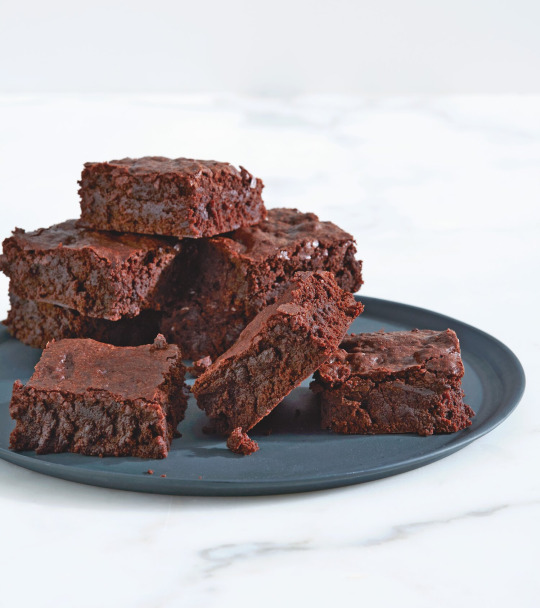
This recipe by Mark Bittman. Find his link here.
Yields: ~1 dozen
Time: 30-40 mins.
Ridiculously easy, ridiculously good.
Ingredients:
8 tablespoons (1 stick) unsalted butter, plus a little softened butter for the pan
3 ounces chocolate, roughly chopped
1 cup sugar
2 eggs
½ cup all-purpose flour
Pinch salt
½ teaspoon vanilla extract
Instructions:
Preheat the oven to 375°F (200°C).
Cream butter and sugar together in a bowl.
Add flour, baking soda, and salt in a mixer.
Add creamed mixture to this, and stir a bit.
Add vanilla and stir in chocolate chips.
Drop tablespoon-sized mounds of dough about 3 inches apart in rows and columns on an ungreased baking sheet, or multiple.
Tip: A round(-ish) spoon can help make more circular cookies, or use a normal big spoon.
Bake for about 10 minutes or until lightly browned.
Cool for 2 minutes.
Transfer to a rack to cool completely.
0 notes