
An amateur programmer/hacker. I give guides on whatever I learn to do. If you have any questions feel free to send me a DM/ask.
Don't wanna be here? Send us removal request.
Statistics
We looked inside some of the posts by undedinside and here's what we found interesting.
Average Info
Notes Per Post
44
Likes Per Post
29
Reblog Per Post
13
Reply Per Post
2
Time Between Posts
2 months
Number of Posts By Type
Text
17
Last Seen Tumblr Blogs


Fun Fact
In Q3 of 2020, 31% of US users access the Tumblr app daily.
Text
My Take on Generative "AI"*
Recently I was doing some research into a pentesting technique and I stumbled across a blog supposedly containing a tutorial for the particular tool I was looking into. As I read through this "guide" it started to become clear that it was completely generated via an LLM such as ChatGPT - it had the stilted writing style distinctive of "AI" generated text. What's worse is that even the "screenshots" that the piece featured were generated with an "AI" - something like DALLE or whatever it's called. You'll understand immediately why I could recognise this was generated if you've ever seen one of these image generators try to write text, as it can't actually write text well. The screenshots were garbled. They were total gibberish!
(In my shock I forgot to take a screenshot or even take a copy of the site URL, so you will have to use your imagination as to how the so-called "tutorial" in the previous paragraph looked)
The entire "guide" was useless. None of the text was insightful enough to be of any use, and the images were of nothing.
This made me want to make something clear: none of my tutorials have been, or ever will be, generated by an LLM. None of the images I use have been generated by an image model. My original intention when creating this blog was to strengthen the skills I'm learning by writing about it. I carry out the techniques I teach and any screenshots are taken by me during this process. Truth be told I hardly even use autocorrect while writing (I do try to proofread and correct any errors but I'm sure some slip through - sorry!)
Someone somewhere said this more succinctly than me so to paraphrase:
"Why should I take the time to read this, if someone hasn't taken the time to write it?"
I may one day write some tutorials on hacking LLMs and jailbreaking them, but the actually body of my work is still written by me. Otherwise I don't see the point in writing this. My writing skill isn't the best but I do what I do because I enjoy it and it helps me learn as it hopefully helps you too.
*Throughout this post I have taken care to put certain words in "scare quotes". These should be read in a sarcastic - bordering on mocking - tone. I don't like calling LLMs and image generators "AI" as there is no intelligence to speak of. I use the word for brevity and simplicity however I don't want to lend credence to the idea that a hopped up predictive text is in anyway intelligent.
#AI#artificial intelligence#hacking#hacking guide#linux#hacking tutorials#linux tutorial#god wont someone please make the computers shut up
2 notes
·
View notes
Text
Staying Safe Online pt. 5: MultiFactor Authentication
MultiFactor Authentication (or MFA) is one of the best ways to increase your security. In this post I'm going to discuss what MFA is, some different examples of it, and how it helps security.
What is MFA?
MFA (sometimes known as 2FA for Two Factor Authentication) is any method which requires a secondary method to authenticate a user. To put this in simpler terms: at least two *different* things are needed in order to sign in.
One example you likely use regularly without thinking about it is a bank card. In order to use a bank card you need the card itself and also the PIN. Just having/knowing one of these doesn't give you access (except nowadays with contactless payments... the example stands for chip and pin)
What are Some Examples?
You've probably seen the most common type of MFA: The SMS codes. When you try singing in to some sites, you'll be asked to enter a verification code that has been texted to you. The website then checks that this code is correct and logs you in. This requires you to know your password and also have access to your phone. There are some vulnerabilities with SMS MFA however, so it's not the preferred method and should be swapped for a more secure method if possible.
There is also an email version of the above, where codes are emailed to you when you sign in. This works the same way as the SMS method, but the two things needed are your password for whatever you're logging into and your email password. This is also not the most secure method, as if you follow bad password practices and have the same password for both then there is no second factor: both logins are the same. This can be secured more by following my guide to better password security.
You may have had to install an authenticator app before. These apps use the same algorithm to generate a new number every minute or so on both the server and the users device. When signing in the user puts the code generated on their app and the server checks if it has the same code.
There are all sorts of other methods: keyfobs/cards, biometrics (fingerprint/face recognition/etc.), and even the users location. Anything that requires more than just a password to verify that a user is who they say they are is MFA.
How Does MFA Improve Security?
MFA improves security by increasing the amount of work needed for an attacker to be able to gain access. Instead of just guessing or finding your password, they then need to also find or fake the other method(s). While this may not be impossible (as I discuss later) it will make you a harder target, potentially persuade an attacker not to bother with you, and possibly alert you to the attack. I once learnt someone was trying to take over my Nintendo account when my inbox was filled with authentication requests which allowed me to block the attacker and change my password.
When setting up MFA it's important to note that not all methods are equal in terms of security. Security questions can be found out with a bit of research; SIM cards can be cloned to get around SMS verification; and as I said earlier, weak password practices can render email verification useless. With this being said, however, even weak MFA is better than nothing for the reasons stated above. It makes you a harder target over having nothing at all. Most services now allow you to set up MFA and I would recommend you do it where possible.
3 notes
·
View notes
Text
Blue Teaming pt. 1: Static Malware Analysis 101
What is Static Malware Analysis?
Static malware analysis is when you attempt to learn about a malicious program without letting it run. This could be to gain some insight as to how it runs to be used in dynamic analysis later.
Handling Malware Safely:
When analysing malware, the most important thing (in my opinion at least) is to keep your network safe. If you detect malware on your network and manage to isolate it, the last thing you want is to re-release it.
I would recommend having a separate machine used just for malware analysis to avoid data theft on your main device. You could use a physical computer for this, but that could be expensive. A dedicated virtual machine is perfectly sufficient for this (If you don’t know how to set up a VM, you can read my guides on using VirtualBox and VMware).
When dealing with malware it is a good idea to isolate the machine. This stops the malware from spreading to other devices. This could be done by either disconnecting the machine from the network (via disabling the network adapter) or, if the machine requires some form of network access, putting it on a virtual LAN segment.
To conclude: Have a dedicated device (preferably a VM) and disable the network adapter to isolate the machine when you start handling the malware. Once you have safely set up your machine you can download a sample from my GitHub, which can be unzipped with the password “infected”.
Detecting a Malware:
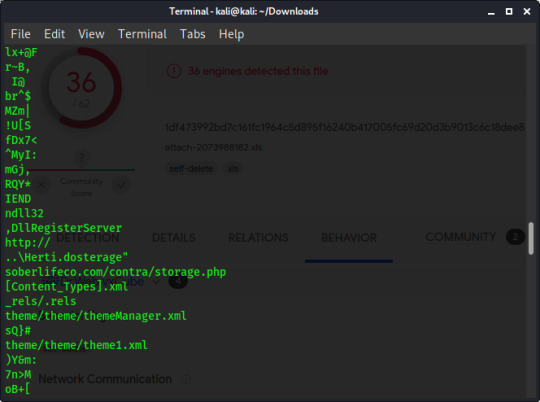
We know that what we just downloaded is malicious, but let’s pretend we don’t. An antivirus program is a good indicator of if a file is malicious or not, but they have their limitations: namely that they can’t detect malware with 100% efficiently. To get a more accurate idea of if a file is malware or not we will need multiple antivirus programs. Enter VirusTotal. This website runs any file you upload to it through multiple different antivirus and reports if they find the software suspicious.
When I run the sample through VirusTotal, I get output like so:
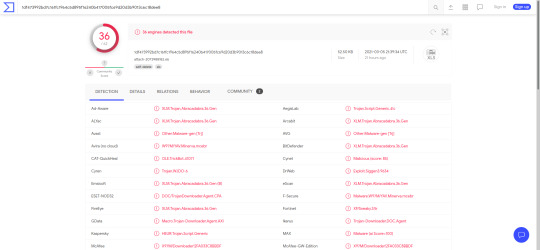
Not every AV detected the sample, however over half of them did. This is enough to decide fairly conclusively that the file is malicious.
VirusTotal also has a feature where you can search with a hash of a file. You can use either MD5 (which can be found with the command ‘md5sum [filename]’) or SHA256 (‘sha256sum [filename]’)
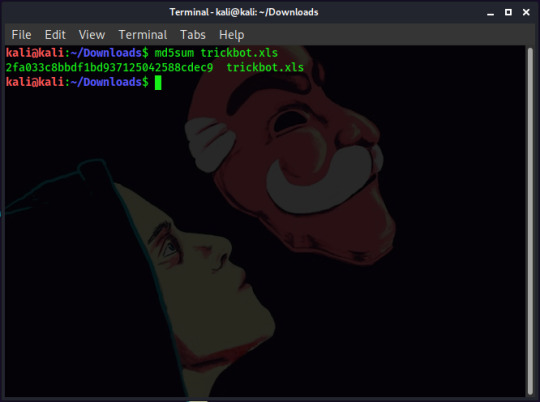
After getting the hash of the file, you can search for it in VirusTotal. Since the hash and the file you uploaded mean the same thing, the results will be identical.
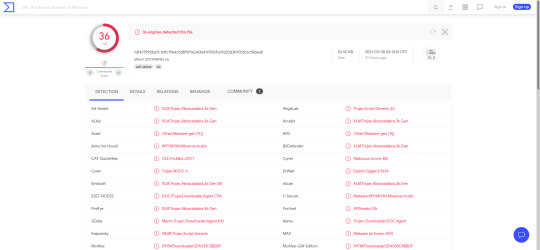
When you search on VirusTotal, the website automatically converts the search to a SHA256 hash. This is why you can upload a file or different types of hashes.
Static Analysis
VirusTotal also gives you more information than whether a file is malicious. In the ‘Behaviour’ tab you can see information on the malware such as what domains/IP addresses it tried to reach, as well as any files it modifies. As a Blue-Teamer you can block the domains that it talks to from being accessed on your network, and also look for files that it leaves behind to tell if the malware has run.

We can see that the trickbot sample downloads a file from soberlifeco[dot]com. We can also see that it makes a TCP request to an IP address (This corresponds to the domain found, but it may be useful to know both). Needless to say, you probably shouldn’t go to this domain unless you know what you are doing and can do so safely.
Up to recently we’ve been relying on another service for our analysis, but what if we want to do some ourselves? Maybe we’ve found a file which isn’t on VirusTotal, or maybe we want to verify the findings for ourselves. A simple tool I found for reverse engineering is the ‘strings’ command. This command searches through the file you pass to it and outputs what it thinks might be human-readable text. When we run ‘strings’ on trickbot.xls, we get output like this:
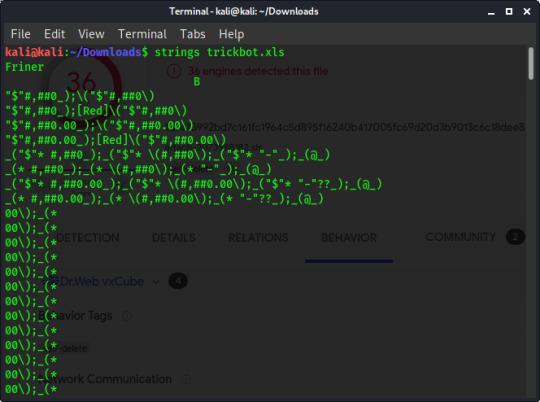
It is important to remember that what is readable for a human is not for a computer and vice versa, so most output from a ‘string’ command isn’t useful however if we look through, we can see the URL we found on VirusTotal:
It’s been broken up by another bit of text, but on one line you can see “http://” indicating the protocol to use, and then two lines later is the rest of the domain (“soberlifeco[dot]com”) and the path to the file that our sample downloads.
Conclusion:
By no means is this an exhaustive wealth of knowledge on static malware analysis, but I hope it will be a useful introduction. Recently I’ve been doing some Capture the Flag competitions and I’ve found that this has been enough to get me started on the subject.
Remember the most important part: keep your network safe. The last thing you need is for the malware to spread. Sites like VirusTotal will probably have enough information, but if not, you know how to begin searching for information without running the malware
#hacking#hacking tutorials#hacking guide#linux#linux terminal#linux tutorial#Kali#Kali Linux#malware#malware analysis#blue team
0 notes
Text
Python Programming pt.5: Introduction to Lists.
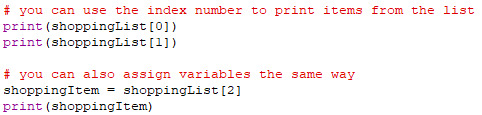
If you have an amount of data you want to group together, how would you do it? One method might be a series of variable assignments. A shopping list might look like this:

This has some problems though, mainly that you have to work with each variable manually in the code. If you want to print all items on your shopping list, then you must use a print statement for each item. To print a certain item, you need to code a print statement to print that specific item. This approach may work for a small shopping list but becomes impractical for longer ones. Most programming languages have data types called “arrays” and “lists” to help you work with these collections of data, and in this guide, I’m going to teach you how to work with lists in python.
The first thing you need to know is how to define a list in python. Lists are assigned like any other variables, but the values are put between square brackets with each item separated by a comma.
The same shopping list can be implemented like this:

Not only have the number of lines of code been reduced, but we can now work programmatically with our list. The most fundamental thing about lists is that every item has an ‘index’, which describes its location in the list. This location starts counting from 0, so the first item is index 0, with the second item being index 1, etc. You can access an item in the array with its index number.
You can also overwrite an item of a list by assigning that index of the list to a new value.

There are many tricks you can do with list indexes, which can be found here.
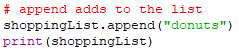
This is all well and good for modifying existing items, but what about adding more items? The main way this is done is with the append method, which adds an item to the end of the list.
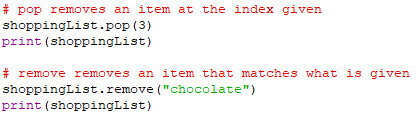
There are two methods for removing items from a python list. The pop method removes an item from a certain index, while the remove method removes an item that matches the value it is given.
I hope you have been able to follow along with this tutorial. I have written code snippets showing each of these features which is available to download from this github repo. Feel free to play about with it or even write your own code to see how lists work.
This post was just an introduction. In my next post I will show you some practical examples of working with lists.
#coding#programming#coding tutorial#programming tutorial#linux#linux tutorial#linux terminal#hacking#hacking tutorials#hacking guide
2 notes
·
View notes
Text
Staying Safe Online pt. 4: Proxies and VPNs
When discussing privacy online a common suggestion is to use a VPN or a proxy with the assertion that it will protect your privacy, but if you are like me you may not know how either works or even that there is a difference between the two. In this post I will teach you what they are, and how they are different to each other.
What is a Proxy?
You can think of a proxy as a ‘go-between’ that sits between your machine and the server you want to connect to (I’m going to use a webserver for this example, but it could be anything). When you want to interact with the website, you send the requests through the proxy server which sends them to the website. The proxy server then receives the result from the webserver and sends it back to you. This hides your IP address, as the webserver only sees the IP address of the proxy server, not of your machine.

How is a VPN Different to a Proxy?
A VPN is also a ‘go-between’, but this time the data you send between the VPN and the proxy is encrypted (data sent between the VPN server and the webserver are not necessarily encrypted). A VPN also hides your IP address, as well as hiding your browsing from people on the same network using packet sniffers, which a proxy does not.

#Staying Safe Online#hacking#hacking guide#hacking tutorials#internet#technology#tech#internet safety#tech guides#technology guide#vpn#proxy
1 note
·
View note
Text
Staying Safe Online pt.3: Good Password Etiquette
Creating a Strong Password:
When creating a password, it is important that it meets three criteria. A good password must:
Be at least eight characters in length, but preferably more. I have heard of people using passwords of 64 characters.
Include a mix of uppercase and lowercase numbers.
Contain numbers and special characters.
Each of these intends to increase the complexity of the password, and increase the amount of time it will taker for a cyber-criminal to guess the password through a method called a brute-force attack. Brute-forcing is when a hacker tries every possible combination until they find the correct one, and by increasing the complexity of the password you increase the amount of guesses needed until it becomes infeasible.
Each of your accounts should use a secure password, as detailed above, but they should also use a unique one. You shouldn’t use the same password for different accounts.
Using a Unique Password:
It is an unfortunate truth that websites get hacked, and quite often data is stolen. This data can contain personal data like names, but can also contain login details. Cyber criminals often try to use this leaked data, together with peoples habit to use the same password for multiple accounts, to try and gain access to other accounts than the one that got leaked.
Using different passwords for each account minimises this risk. If your password for facebook gets leaked for example, they can’t use that password to access your emails.
Using a Password Manager:
If you are following good password practices, it will be impossible to remember all of your passwords. You could write them all down on a piece of paper, but using a password manager is much more convenient.
A password manager allows you to store all your passwords in a secure manner. There are many different password managers to choose from, each with pros and cons, so you should do some research into which is best for you. Personally I use KeePass, but there are many other good options such as 1Password and Dashlane (This post is not sponsored by anyone, these are just highly rated services) .
A password manager with auto-fill can also help to protect you against phishing (which you can read my guide on here), because if it doesn’t automatically fill in your password then that is a clue that the website you are on might not be legitimate.
Conclusion:
Having a strong password will make it more difficult to guess, using unique passwords reduces the damage if you are hacked, and using a password manager makes the practice easier.
#hacking#hacking tutorials#hacking guide#staying safe online#guide#technology#tech#tech guides#technology guide
0 notes
Text
Staying Safe Online pt. 2: HTTP vs HTTPS
You’ve probably noticed the padlock symbol in your address bar, which means that your browsing is safe but do you know the extent of that safety? To be precise, that padlock means that the page is being served using HTTPS.
What is HTTP?
Before discussing HTTPS, we need to go over HTTP first.
Data is sent over the World Wide Web (note: the World Wide Web is a part of the internet, but is not the internet) using the protocol HTTP. HTTP Stands for Hypertext Transfer Protocol, and it dictates how the client (in this case, your browser) sends and receives data from the server.
This data is sent in cleartext over the internet, meaning that anyone on the same local network can ‘sniff’ your data using software like wireshark, allowing them to see what sites you are visiting. HTTP also doesn’t verify the site that you are browsing is the actual site, making HTTP vulnerable to something called a Man- or Meddler-in-the-Middle (MitM) attack. This is when an attacker pretends to be the web-server and can then intercept your browsing by routing all of your HTTP traffic through them.
To remedy these problems HTTP was improved with a protocol called HTTPS, which is a more secure version of the older protocol.
What is HTTPS?
HTTPS is a complicated thing, so for now we’re not going to go over how it works. For now it is important to know that it does two main things that HTTP doesn’t:
For a start, it verifies that the web-server is actually who it says it is. This protects you against MitM attacks: This is where a cyber-criminal impersonates a legitimate website, and routes all of your traffic with that website through them. This allows them to see and possibly edit data sent.

HTTPS also encrypts data sent over the internet. This protects you against hackers using tools like wireshark and aircrack-ng to ‘grab’ packets sent over WiFi.
What Doesn’t HTTPS Protect Against?
There’s an important distinction to be made when I say that HTTPS verifies that the server says it is who it says it is. If a site wants to use HTTPS, they need a certificate. HTTPS ensures that the certificate belongs to the server, but it does not make sure the server is the one you think it might be.
A malicious actor could create a website called “amazin.com” for phishing purposes, and then get a certificate to enable HTTPS. This would make https://amazin.com secure, but it would not be safe. Trying to buy anything on that site would lead to your credit card details being sent to the attacker. As my little brother put it: “It may protect you against a Meddler in the Middle, but doesn’t help if the website you’re on is the Meddler”.
Conclusion:
HTTPS doesn’t ensure that the website is safe, only that the connection between you and the website is private. A lack of HTTPS also doesn’t mean the website you are on is unsafe, but you should exercise caution if what you are doing on the non-HTTPS is sensitive.
3 notes
·
View notes
Text
Creating Kali Live USB
In the past, I have written guides on how to set up VMs (Virtual Machines) using both VMware and VirtualBox programs, but what if you’re looking to take your hacking on the go? For this you need something more portable. VirtualBox does have the ability to be installed on a thumb-drive or external hard drive, but another way you can achieve this is with a bootable USB.
What is a Live USB?
An operating system can be placed onto a thumb-drive, and it can then temporarily replace the PCs operating system. This can have a variety of uses: from being used to help diagnose problems and fixing the computer, to just taking OS’s for a ‘test drive’.
The drive is inserted into the computer while it is turned off, and then when it is turned on, it boots from the USB instead, allowing you to use the OS on the drive.
How to Create a Live USB?
To create a live USB, you need three things:
A USB stick (at least 4GB)
Rufus (download from here)
Kali live iso (download from here. Make sure you download the live version)
The Rufus download shouldn’t take so long, but the iso file will take some time to download. Sit back, and relax. Maybe read a little, or watch a movie, This tutorial can wait.
Finished? Good.
After downloading the iso, you can check the hash of the file against the hash against the website to confirm that the file hasn’t been corrupted. There are a variety of methods to do this, so you can find one that suits you.

If the hash that you calculated matches the hash of the file listed on the website, then your version of the file is the same as the one on the server and it’s not been corrupted. We can see here that the SHA256 hash I computed does match, so the files are the same.
Creating the Live USB:
To create the USB, the first step is to insert the USB thumb-drive you want to make bootable, and start up Rufus. It is important to note that part of the process is to format the drive, which will delete every file on it. DO NOT KEEP ANY IMPORTANT FILES ON THE DRIVE, BACK UP ANY FILE YOU WANT TO KEEP.
Next you click ‘SELECT’, and navigate to the live .iso file you downloaded. After doing so, options for your live drive will be available. Most of these are advanced option, so for now you can ignore them, but you can change the name of the drive if you want.

After pressing START, you may receive some pop-ups. You can click through these, as the recommended options work. After clicking through the pop-ups, Rufus will start writing to the drive. You can now wait until it is finished, so read some more of your book or watch another film.
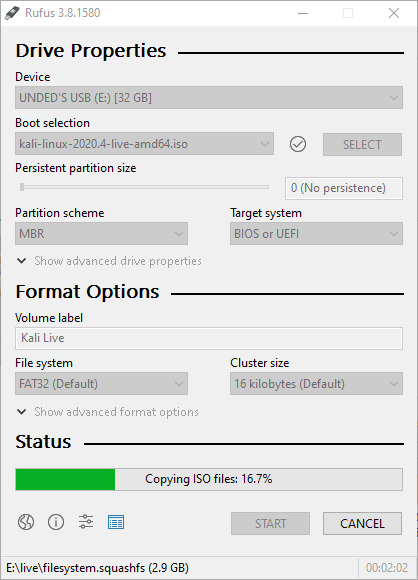
Once it is finished, you can eject the drive. Your Live USB is now ready.
Using the Live USB:
To use your live USB, first insert it into the computer while it is turned off. When it turns in, it should boot to a screen where you can select boot options.

(sorry the quality isn’t great)
For basic use, you can select ‘Live system’, but there are more advanced modes that you can use. You can do some research to see what each mode involves, and which is best for a scenario.
After selecting out boot mode, our computer then boots to Kali.

You may find, however, that when you try booting with the USB it boots to your native OS instead of Kali. This may mean that your BIOS (Basic Input Output System) is not configured to boot from the USB. This means that you will have to change your boot order from the BIOS. This is different for every motherboard, so you may have to look up how to do it for yours. Make sure that your BIOS boots from the USB before the hard drive.
0 notes
Text
Using TryHackMe
If you’ve been reading my blog, you may have noticed me mention the site TryHackMe (In my post on nmap). I use this site often, and in my experience it has been a brilliant resource in learning not only hacking, but also using the Linux terminal and other more broad subjects. In this post I will teach how to make an account, connect to the TryHackMe network, and start hacking.
Creating an Account:
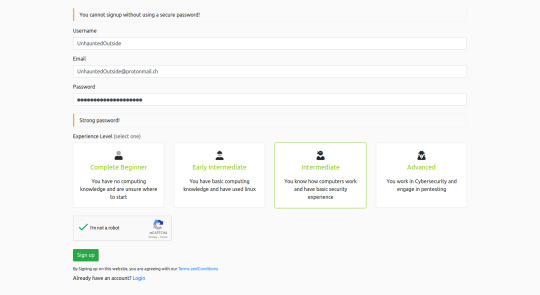
The first step is to create an account at tryhackme.com/signup. Here you can choose a username, an an experience level to describe your level of experience with hacking (This isn’t displayed, so don’t feel bad if your experience level is low)
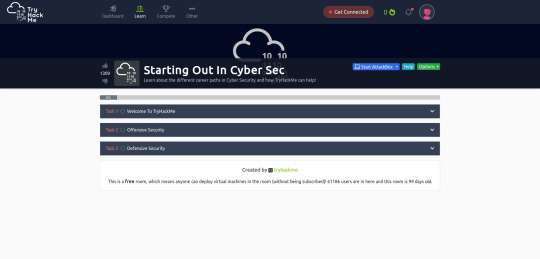
After signing up, you’ll be taken to a ‘room’. Rooms are a series of activities to help you learn an aspect of cyber security. Each task has at least one ‘question’ (although there don’t always require an answer, sometime you just need to read or do something). This is what the room looks like for me, but I think it’s different depending on your experience level:
On completing all the tasks of a room, you will be congratulated. You can use this to share your achievement on social media, or just click the cross if you want to keep your success to yourself.

You can now go to the Dashboard. This is the home screen, from which you can navigate the website as well as see statistics on your learning. I’m going to let you discover most of what the website has to offer, but I’ll walk you through a few things.
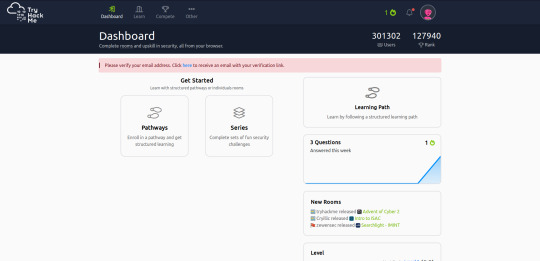
‘Pathways’ are groups of rooms with a similar subject, designed as more structured learning than doing the rooms on their own. Some of these rooms require a paid VIP account, but all pathways have at least one free room for you to do. A ‘series’ is a similar thing, but giving fun challenges to test your knowledge. These two groups don’t come close to including everything TryHackMe has to offer, for that there are individual rooms you can access from the ‘Learn’ tab
If you feel like giving yourself an extra challenge try the ‘Compete’ tab to either check the leaderboard and see where you place, or compete against other hackers in a King of the Hill.
Before you get into doing activities however, there’s one important thing to know. Many rooms include a virtual machine to hack against, but in order to connect to it you have to connect to the TryHackMe VPN (Virtual Private Network). I’ll explain what a VPN is in a later guide, but for now just know that it connects you to TryHackMe’s network, which has the VMs to hack on it.
Connecting to the VPN:
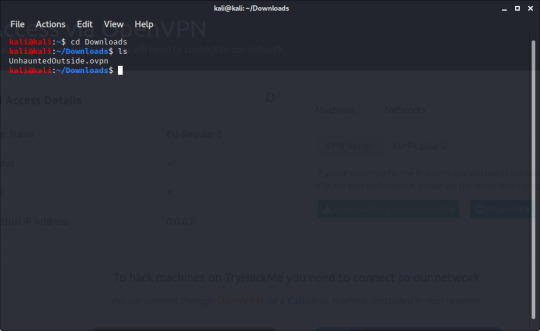
To connect to the VPN, the first thing you need to do is download the configuration file. this can be done by clicking your profile in the top right, then ‘connect’, or by going to tryhackme.com/access. A download will start for a [your username].ovpn file - click ‘Save File’ and the download should be finished very quickly.
Open a terminal and cd to your Downloads directory. You should see your .ovpn file there.
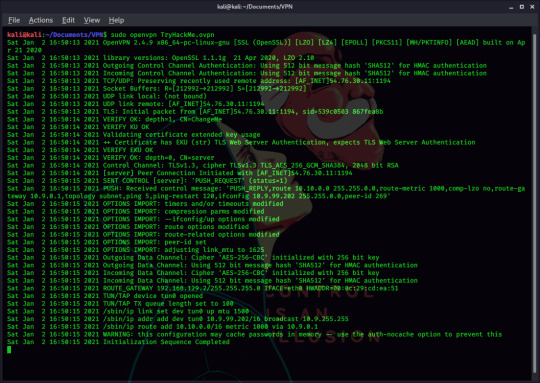
You should have openVPN installed by default on Kali, so you simply start the VPN connection with the command “sudo openvpn [username].ovpn”, after running the command you should see a lot of output. You can now open a new terminal window or tab with CTRL+SHIFT+T, and get to hacking.
(I had to switch machines and TryHackMe accounts because I had an error. If you have problems connecting, please send me a DM on twitter, or a message here on tumblr)
You can then check you are connected, by going back to the ‘access’ page. You should see this:
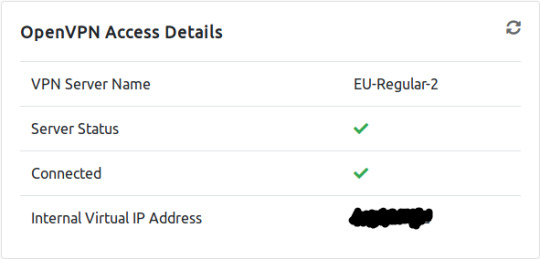
This panel also tells you your Internal IP address, which is useful for executing some exploits/shells, in case you forgot how to find that from the terminal. Your VPN server name may differ, depending on your geographic region.
Conclusion:
Go forth and hack things! As I mentioned before, TryHackMe is a great resource for hands-on learning. There are rooms about all manner of things, from cyber security to python programming and general Linux use.
(Btw on the dashboard, there is a friends search bar. Feel free to add me as a friend if you want, I’m still UndedInside with the same picture).
#hacking#hacking tutorials#hacking guide#linux#linux tutorial#linux terminal#linux guides#Kali#kali linux
0 notes
Text
Staying Safe Online pt. 2: ProtonMail
About ProtonMail:
ProtonMail is a free and private email provider. Emails sent between ProtonMail users are encrypted end-to-end, and ProtonMail cannot access any emails sent. This end-to-end encryption also protects you against Meddler in the Middle attacks (MitM), so hackers can’t easily intercept and snoop your emails
Things to Know About ProtonMail:
Although emails are encrypted end-to-end, metadata about the emails (such as subject lines, and sender & recipient) is stored by ProtonMail.
Emails sent between ProtonMail users are encrypted, but users sent between ProtonMail and non-ProtonMail users are not encrypted in transit. This means that if the (non-ProtonMail) recipient’s inbox gets breached, all of the emails will be visible by default. This can be remedied by using the encryption features, or PGP.
Although ProtonMail is more private than mainstream email providers (gmail, hotmail etc.), and safer against hackers, it will not protect you against government agencies. ProtonMail will help you regain some privacy online, but won’t help you hide your firearm smuggling/money laundering business. Sorry
Setting up a ProtonMail Account:
To create a ProtonMail account, go to protonmail.com/signup, where you can select what tier of membership you want. The more expensive tiers have their advantages, but for most people the free account is more than plenty. After selecting the tier, you’ll be taken to the following page:

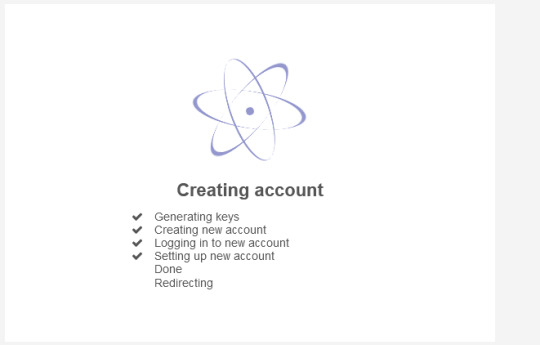
You can then choose a username, as well as the domain you want. You can choose between a .com or .ch email address. You’ll see this while it sets up your account:
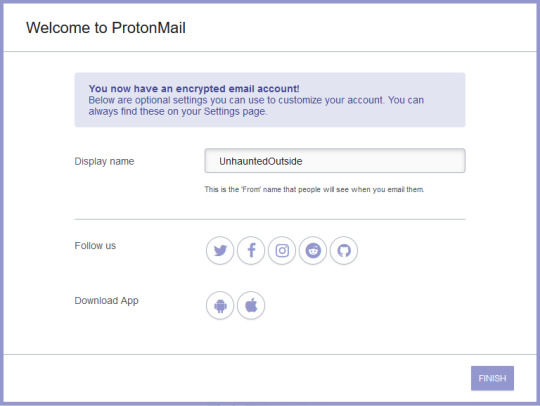
Once it’s finished creating your account, you’ll be able to set a screen name to be displayed to others when they receive an email from you.
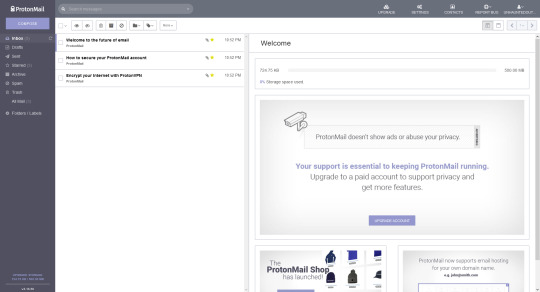
And with that, your account is set up!
How to Use ProtonMail:
Despite sounding technical with encryption and all that, it really seems like any other email client. The inbox is very similar to something like gmail.
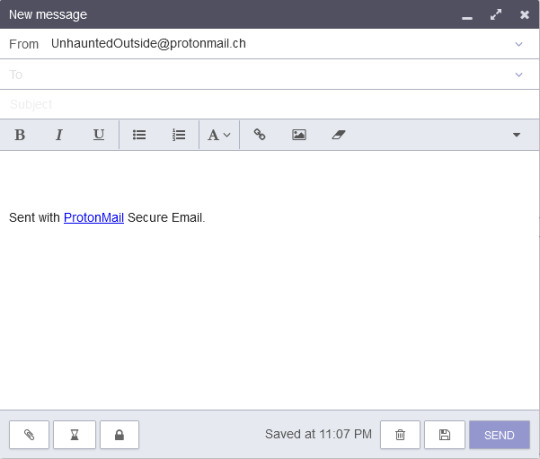
I think the only thing I really need to explain is the encryption. As mentioned before, emails sent between ProtonMail users are encrypted end-to-end, but anything sent between a ProtonMail and non-ProtonMail user will not be encrypted by default. Luckily you have an option to encrypt messages sent over ProtonMail. Clicking ‘Compose’ will show a pop-up like this:
brb while I write an email.
Ok, I’m back
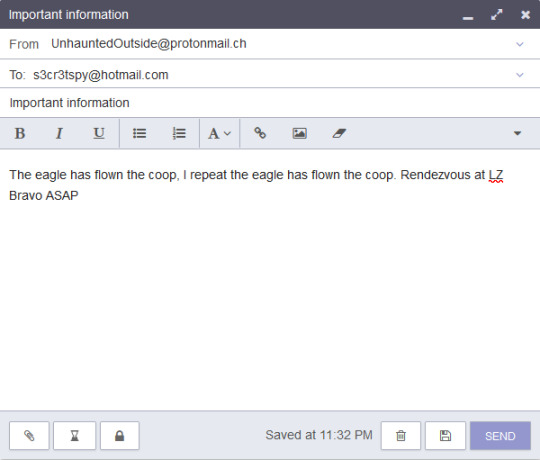
Now, to encrypt it I click the padlock button on the bottom left. This will lock the email, and require a password to open, as well as scrambling it so hackers can’t read it.
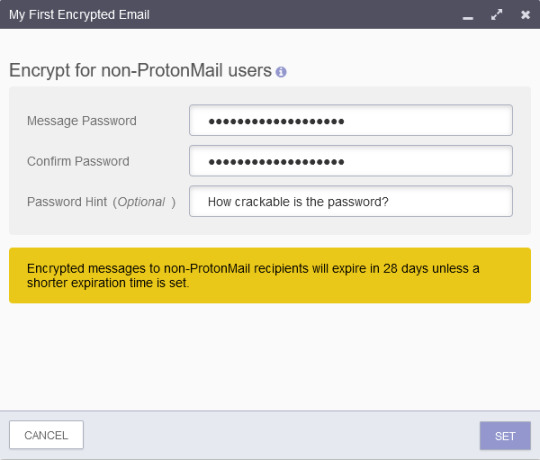
I’ve encrypted this with a password of “UncrackablePassword”(Note: This is not a very secure password. For any sensitive emails, please use a more secure password). I click ‘Set’, then I send my first encrypted password!
Now the spy logs into their email address. This is what they see:
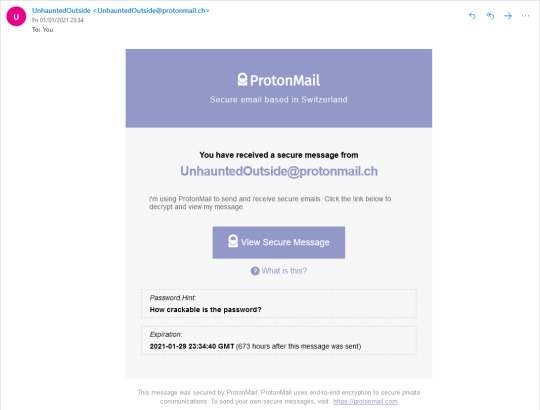
In order to view the email, they need to click the link and enter their password. Doing so reveals the email:

Conclusion:
Hopefully you know know how to create and use a ProtonMail account. Remember to bear in mind the things I told you before. ProtonMail may be good, but it isn’t unbreakable
(This post isn’t an ad or sponsored in any way, I just like their service. That being said if anyone at ProtonMail wants to sponsor me, you know my email)
#privacy#protonmail#tutorial#hacking#hacking tutorials#hacking guide#technology#technology guide#tech#tech guides
1 note
·
View note
Text
Linux pt. 4: Finding Files
It happens to everyone: You need a certain file for whatever reason, but you just can’t remember where you saved it. If you’re like me organization may not be your forte and it may be easy to lose files, luckily Linux has ways of finding them. The ‘find’ command is very useful for this, but can take a while to learn. It has a variety of uses, but for this guide we’re just going to use it for finding lost files that we can remember the name of.
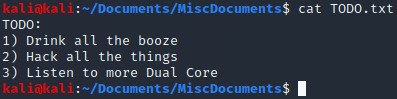
(Damn it, where did I save my to-do list?)
The ‘find’ command has four main parts. After the command ‘find’, you need to specify which directory to look through, then you can tell the program the type (the find command can locate both files and directories), then the name. I’ll talk about the last bit in a minute.
Finding a File:
So say I need to find a file called TODO.txt, and I know it’s in my ~/Documents directory. I can use the command ‘find ~/Documents -type f -name TODO.txt’. the ‘-type f’ flag denotes we are looking for a file, and -name is pretty self-explanatory.
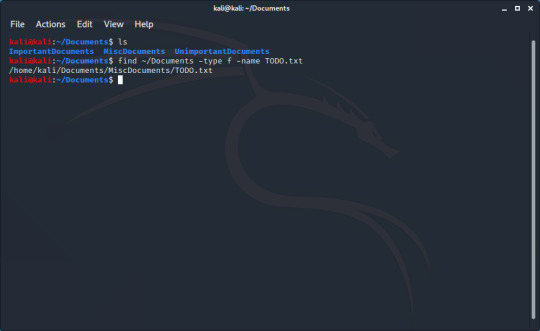
Now I have the path to the file.
Finding a Very Lost File:
What if I don’t know where I saved it at all? Well then when specifying the location you use ‘/’, and the output is less pretty:
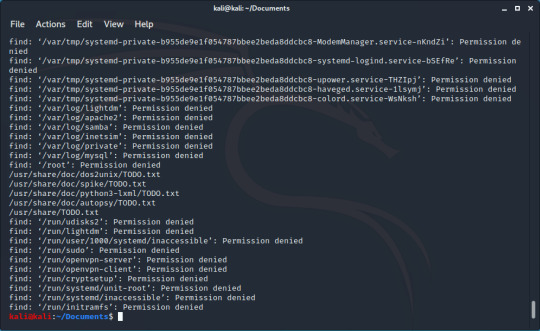
(I don’t think I have the right permissions to access some of these files)
We can see the file here, but sometimes it can be hard to find in the sea of ‘Permission denied’, this is where the trick I mentioned earlier comes into play. There is a file called /dev/null on Linux where anything written to it is lost. By adding 2>/dev/null to the end we send all errors (represented by 2) to /dev/null.

(Isn’t that much better?)
Finding a Directory:
Finding a directory works very similarly to finding a file, but you change the value of the ‘-type’ flag to ‘d’ instead:

#linux#linux tutorial#linux terminal#linux guides#linux terminal guide#Kali#kali linux#hacking#hacking tutorials#hacking guide
0 notes
Text
Staying Safe Online pt. 1: Spotting Phishing Attacks
A few days before Christmas, employees of the web-hosting company GoDaddy received an email containing a link to claim a $650 bonus. Unfortunately for the employees, the email was fraudulent and there was no bonus. GoDaddy sent out this fake email which pretended to be real to test how it’s employees respond to a type of attack called “phishing”.
Phishing is a type of “social engineering” attack, meaning that it targets humans instead of machines. A phish email or text seems legitimate and usually contains either a link to a malicious website, or a malware file for the target to download. Luckily there are often telltale signs that an attempt is not legitimate.
Impersonal Greeting: Attackers often send these emails in bulk, and do not greet every person individually. A typical phish will start with “dear sir/madam” instead of “dear <name>”
Spelling mistakes: Phishing messages often contain multiple spelling/punctuation/grammatical mistakes, as well as formatting mistakes.
Incorrect URL: A common method of phishing includes sending the target a link to a spoofed login page. At first the link may look legitimate, but on further inspection you may find it is not. Look for spelling mistakes or incorrectly formatted URLs (www.example.realbank.com belongs to realbank.com, whereas www.realbank.example.com belongs to example.com)
Carrot or Stick: The attacker knows you have to have a reason to click the link. This can either be a good reward (such as a large amount of money) or a stick (punishment if you do not click the link)
Pressure: The attacker will normally give a deadline to click the link. The short deadline tries to make you panic, which will reduce your critical thinking skills and increase the chance of you missing the red flags.
Phishing Breakdowns:
Here is an example of a not very convincing phishing attempt I received.
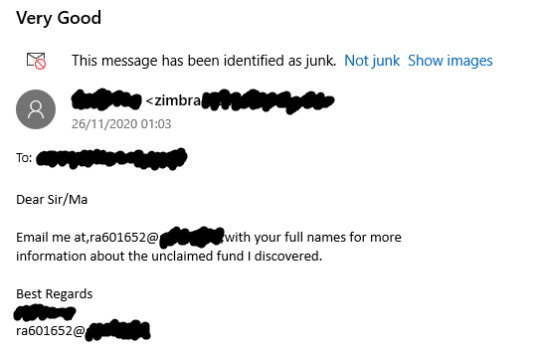
Right off the bat, we can tick off numbers 1 & 2 from the list. Instead of being greeted personally, I just got “Dear Sir/Ma”, with an error spelling “Ma’am”. There isn’t a link for us to click, but a curious thing is that the address of the sender is different to the address I’m meant to contact. We can also see no. 4, being an unclaimed fund (presumably money), there is no no. 5 besides the chance of not receiving the money.
Not all phish attacks are emails, here’s an SMS one I received a while ago:

1 can be ticked off, as there is no greeting at all. Everything seems to be spelled correctly so number 2 doesn’t apply. The carrot here is the tax return, but on inspection the URL does not belong to the actual HMRC (UK government domains end in .gov.uk) which gives us an example of number 3.
Conclusion:
Phishing attacks rely on people’s ignorance of the warning signs, and pressuring people into responding before thinking. If you’re not sure, the best thing to do is to be cautious and think carefully.
Here is a great quiz to test your ability to spot a phish, and it teaches you what to look out for afterwards (Thanks to @YoSignals on twitter for showing it to me)
0 notes
Text
Just a quick non-tutorial post wishing everyone a good day today regardless of if they celebrate christmas or not.
I know this can be a difficult time for people so my DMs are open if anyone needs to talk
1 note
·
View note
Text
Linux pt. 3: Remote Access
Sometimes you need to do work on a computer, but won’t be able to do it physically. Linux has commands to enable you to use the terminal of another device across the internet. The preferred method of doing this is with a protocol called SSH.
Using SSH:
To SSH into a device, you need two pieces of information: the IP of the server, and a username on the server to log in as. I’m going to be connecting to my metasploitable VM, so I know the username is ‘msfadmin’ and I can find out the IP. I can then start to connect with the command ‘ssh [username]@[IP]
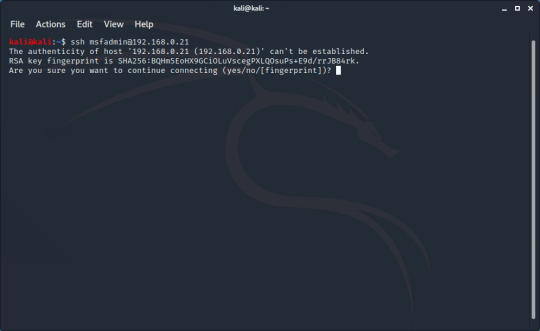
When you first connect to a server, you’ll be greeted with something looking like this. This can be used to help you authenticate that the server you’re connecting to is the one you’re intending to, but for now you can just type ‘yes’ to connect
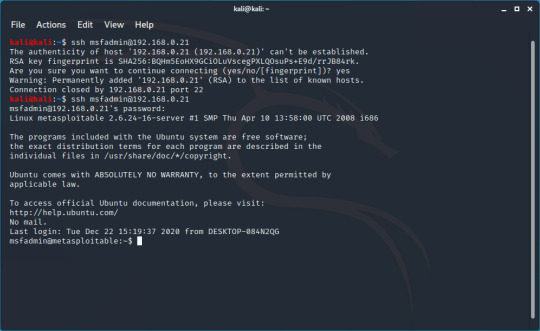
After entering ‘yes’, you should be greeted with a login prompt, where you can enter your password (’msfadmin’ in this case) to log into the server and be given a prompt. In this example I think I took too long and the connection closed, but just restarting the connection worked.
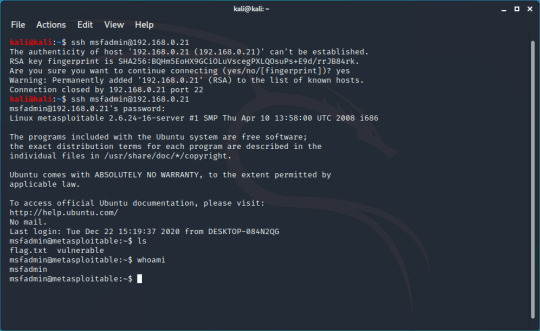
You can now run commands as you would on your local machine:
Using SSH Instead of Telnet:
The SSH protocol isn’t unique in what it can do, the telnet protocol does a similar thing and was used much before SSH was created. One main problem with telnet is the fact that data sent over it is unencrypted. This means that hackers can intercept the data and read it, potentially giving them passwords and sensitive information.
#linux#linux tutorial#linux terminal#linux guides#linux terminal guide#Kali#kali linux#hacking#hacking tutorials#hacking guide
1 note
·
View note
Text
Linux pt. 2: Basic Networking Commands
Ping:
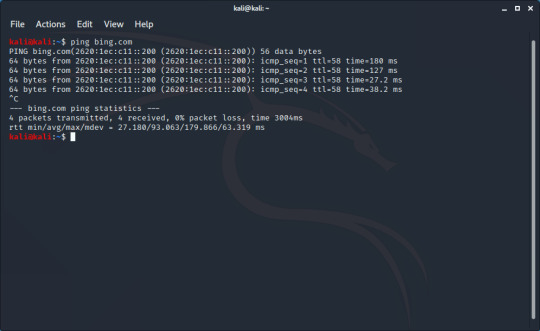
Ping is the networking command I use most often. It is used to test if you can reach a device, and if so how quick the connection is. To use this command, you type the word ‘ping’ followed by either a domain (google.com) or an IP address.
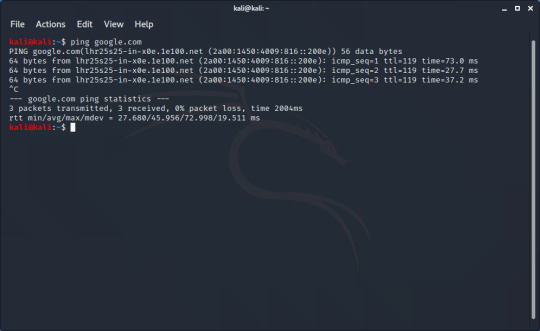
Ping send a stream of packets to the location you give it, and waits for a response. After running the command, we can see the response (64 bytes from...), and on the end of the line is the time it has taken to get that response in milliseconds. The ping command will run indefinitely, so to end it you use the keyboard shortcut CTRL+C. You can then get some statistics about the connection. If you don’t have a connection to the device you’re pinging, you will see something like this:
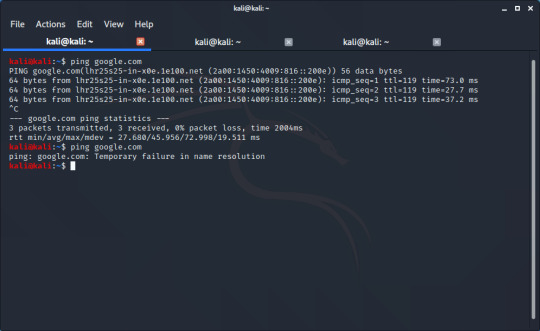
Note that ping can also be used to give you an IP address of a domain. After pinging a domain, it will give an IP address. Here I find an IPv6 address after pinging bing.com:
ip address:
This command tells you your local IP address. There’s a lot of information that may not be useful to you however.
(I used my own Kali machine for this, because my tutorial one has too many IPs and the output was cluttered)
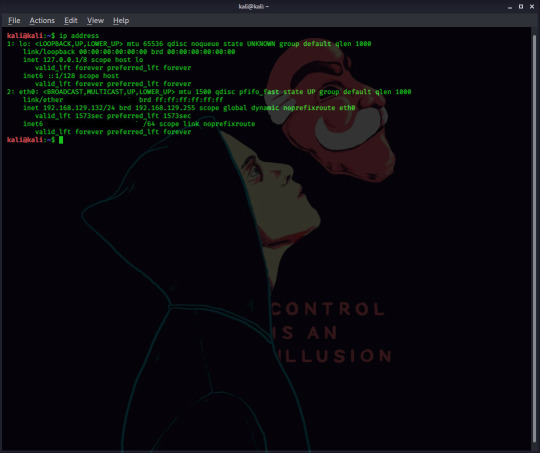
For a start, we can ignore everything in section 1. This is the loopback interface and while it can be useful for diagnosing connection problems, it doesn’t tell us our IP: for that we need to look at section 2. Your internal IP address is listed under inet (in this case it’s 192.168.129.132), with your IPv6 address listed under inet6.
That is a lot of information to take in, but all you really need to know is that your IP address on your current network is found next to ‘inet’.
Conclusion:
I know this is a very short guide, but these are the two non-hacking networking commands I use most often; they are fundamental and it’s always important to have a solid knowledge of the foundations.
1 note
·
View note
Text
Contents
Python:
Introduction to Variables
User Input and Selection
An Introduction to While Loops
Putting it Together
Introduction to Lists
Website:
Into to HTML
Binary:
Decimal to Binary and Vice Versa
Basic Logic Gates
Hacking:
Securing Kali Against Hacking
Finding Open Ports With Nmap
Finding Exploits
Hacking Metasploitable
Staying Safe Online:
Spotting Phishing Attacks
HTTP vs HTTPS
Good Password Etiquette
Proxies and VPNs
MultiFactor Authentication
Virtual Machines:
Kali for VMWare
Kali for VirtualBox
Creating a Live USB
Linux:
Directory Traversal and File Creation/Deletion
Basic Networking Commands
Remote Access
Finding Files
Blue Team:
Static Malware Analysis 101
General Programming:
Data types
#hacking#hacking tutorials#hacking guide#linux#linux tutorial#linux terminal#linux guides#linux terminal guide#Kali#kali linux#programming#programming tutorial#python#python tutorial#binary#binary tutorial#virtual machine#virtualbox#vmware#malware#malware analysis
29 notes
·
View notes
Text
Website Programming pt. 1: Intro to HTML
There are plenty of frameworks that make creating websites but maybe you want to do it yourself. In this series of guides I will teach some of the basics of website programming, starting with HTML.
HTML (HyperText Markup Language) is a simple language, that can be used to make static websites. HTML actually tells the websites visitor how to display a website, meaning that it is up to the user’s browser to actually run the code. It is neither compiled (Like the C family) or interpreted (Like Python) so no fancy compilers or interpreters are needed. You can code a website using Window’s notepad software, but any text editor will do (I personally prefer using notepad++)
To start writing our website, we will create a file call ‘index.html’. We call the file this because we aim to eventually put our website on a webserver. The software for hosting websites on these servers looks for a file called index to display first.
With our file created, we can now open it with our text editor of choice.
Let’s Start Coding

HTML is written with tags surrounded by < and >, usually with opening and closing tags but not always. The first tag we use is <!DOCTYPE html>. This tag doesn’t affect the look of the website, and isn’t strictly necessary, but it tells the users browser how to show the page and it is good practice to include it. DOCTYPE is a bit strange because you don’t have to close it, read on if that doesn’t make much sense.
After writing that we are using an HTML document, we then declare that the current part of the page we are working on is HTML and we do this with the <html> tag. This tag has to be closed however, so after opening it, you type it again but this time with a / before the name of the tag, like so:
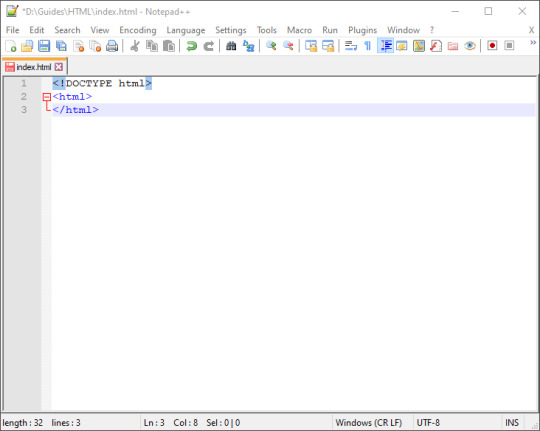
This also isn’t strictly necessary right now, but it’s a good habit to get into for when we start using scripting. From now on all the coding we do will be between these two tags.
Next we can create a heading for our page. This is going to be a nice, big word or phrase to title the page/website. There are six levels of heading: h1 is the biggest, with h6 being the smallest. Like the html tag, this has to be opened and closed, but we will put the text to be displayed between the tags.

(The indentation on line 3 isn’t necessary and won’t impact the look of the website, but it does help make coding clearer.)
Here I used the classic “Hello, World!” but as this is your website, feel free to use whatever you want. To get some more experience with HTML, feel free to change the size of the heading. Remember to change the size on the closing tag as well.
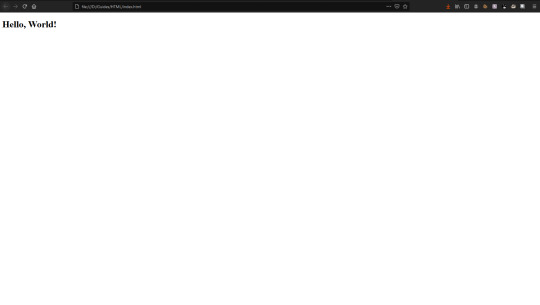
What does this look like though? Well we can open the page with our browser by clicking on the file in our documents, and it should open.
Here is my site. It’s looking a little bare, so I think I’ll add some text. You can add paragraphs of text using the <p> tag, like this:
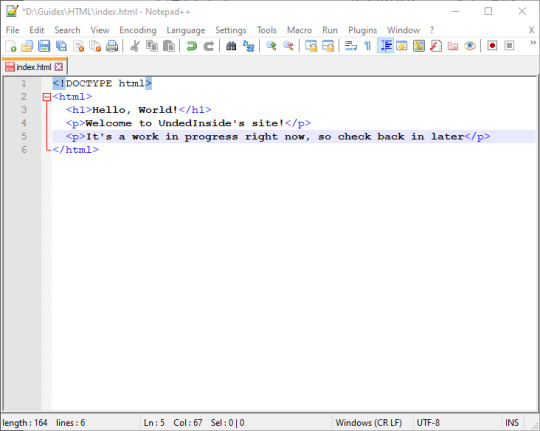
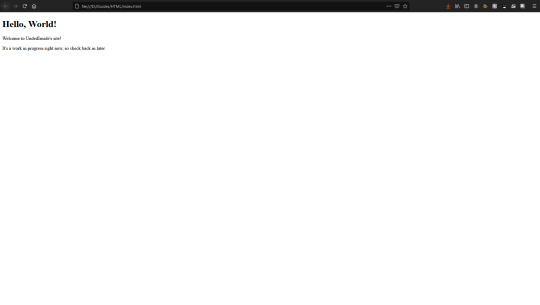
Viewing it in the browser shows me this:
Now it’s not looking quite so empty. I think that’s all for now. I know it’s still very basic, but it will flesh out as I keep writing these guides.
The code is available on GitHub if you want to download it, and as always you can always reach out to me on Twitter or Tumblr for any questions/suggestions/friendly messages.
0 notes