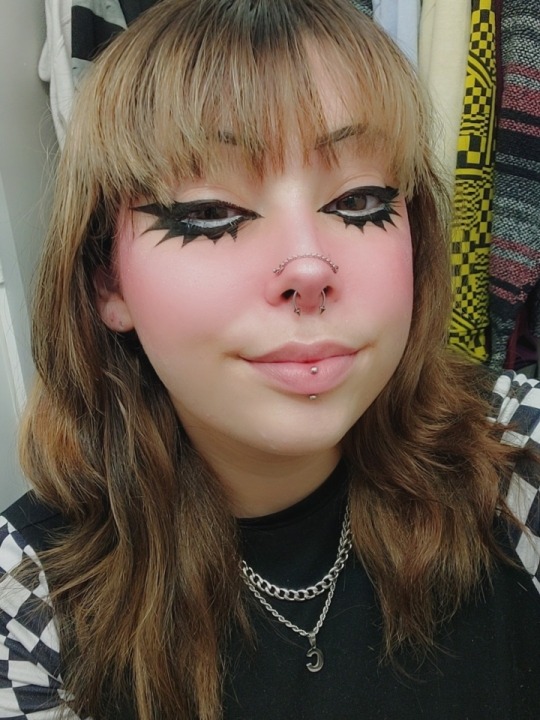
#eyelash tutorial
Explore tagged Tumblr posts
Visit Tumblr Blog
Explore Tumblr blogs with no restrictions, modern design and the best experience.
Last Seen Tumblr Blogs


Fun Fact
Tumblr Inc. is funded by 13 investors.
Text
youtube
♡ How to move Eyelash CC to new Eyelash category in 30 seconds ♡
It's super simple to move all of your existing eyelash CC to the new category in CAS using Sims 4 Studio ♡ྀི ₊
#sims 4#ts4#ts4cc#the sims community#ts4ccfinds#ts4 lookbook#sims lookbook#ts4 hair#ts4 maxis match#the sims 4#ts4 cas#ts4 simblr#ts4 gameplay#ts4 legacy#ts4 screenshots#simblr#ts4 tutorial#ts4 eyelashes#Youtube
161 notes
·
View notes
Text
How To Fix The Placement of Eyelashes (In The Glasses Category)
We know the latest Sims 4 patch (2024-08-08) broke the placement of eyelashes found in the glasses category. Here is a method to fix them and place them in the Eyelash category.
NOTE: This is only a placement fix. If your eyelashes conflicted with glasses before and the eyelashes could not be worn at the same time as glasses, you will still have a conflict between the two items. Eyelashes in the glasses category are usually mapped in the same texture space as glasses, so now you will get texture bleeding from the eyelashes to the glasses. This is NOT a fix for that issue. To fix that issue, you'd need to use Blender to move the textures.
For this method, you do not need to know how to use Blender. You need Sims 4 Studio. If you do not have it, you can download it from here.
I've tried this method myself, and it works. Here it is, step-by-step:
In Sims 4 Studio, open the package file (eyelashes) you want to convert. These should be eyelashes in the Glasses category. The easiest way to do this is to find the file in your mods folder and move it to its own folder before you start, so it'll be less difficult to locate. You can also set the properties of package files to open automatically in S4S when you double-click on them. (That's what I've done, because I make a lot of CC)
We'll call this package the original package. Once it is opened in S4S, click on the "Meshes" tab and export the mesh. Save it somewhere you can find it easily
Next, click on the "Textures" tab and export the textures of the swatches you want to add to your package. Make sure you export the "Diffuse" texture (even if you don't export anything else). Save your exported textures somewhere you can easily find them again.
You can also export the custom thumbnail, if your original package has one. You can find it on the right side of the screen on the "Textures" tab. Again, save this in a place where you can easily find it later.
Go to the "Categories" tab and scroll all the way to the bottom. You should see three items; Allow for Random, Restrict Opposite Gender and Restrict Opposite Frame. Make note of which boxes are ticked or unticked in your original package.
Close the original package by returning to the Main Menu of Sims 4 Studio. You don't need to save the original package, as you haven't made any changes to it.
On the main menu screen of S4S, go to the CAS section (bottom left) and choose "Create 3D Mesh" and then click the large blue CAS button.
Search for the base game eyelashes. You should see a drop-down menu called "Part Type" near the top of the window, in the middle. Choose "Eyelashes" from this menu. In the main part of the window, the in-game eyelashes should appear. Click on the one you want, and it should turn blue.
Click the "Next" button.
You will be prompted to save your new package. Give it a name (preferably one that includes your creator name, so you can find it again) and save it in your Mods folder, or whichever sub-folder within your Mods folder that you like to use for CC making.
In your new package, click on the "Meshes" tab and import the mesh you exported from the original package. Look for a dropdown menu where it says "LOD 0" (you have just replaced LOD 0). Now click on "LOD 1" and then import the mesh to this LOD as well. LOD stands for "Level Of Detail" and you might see higher numbered LODs looking degraded. Don't panic. This is normal.
Save your package, but don't close it.
Go back to the "Textures" tab and import the textures you exported from your original package file. You can import the custom thumbnails during this step too.
Save your package again. Do not close it.
In the menu at the top of your Sims 4 Studio window, look for one called "Tools", click on it and scroll down until you see "Modding" and click on that. A sub-menu will appear. Scroll down the sub-menu until you find "Glass Shader (CAS)" and click on that. You should get a notification that X number of shaders have been changed to SimGlass. Click OK.
Save your package.
Go to the "Categories" tab, scroll all the way to the bottom of the window, and make sure the same boxes are ticked/unticked as in your original package. If something is ticked in your new package that was unticked in your original package, this may cause your new item to not show up for one gender or the other once you get it into CAS.
Save one final time.
Open your game and test your package. Your new lashes should appear in the eyelash category in game.
136 notes
·
View notes
Text
🌟 1998 Furby Re-Lashing Guide 🌟
A visual step-by-step guide to my own process for giving 1998 Furbies lashes that retain the classic look. There may be other guides and methods out there, this is just my own way to do it!
MATERIALS NEEDED:
Detached Eyelids ( guide for removal: CLICK HERE )
13mm D-Curl Lash Extensions ( see photo )*
Mod Podge
Tacky Glue
X-Acto Knife
Small Paint Brush
Q-tip
Lightweight Paper
SHARP Scissors
Clean Water
Washcloth or Paper Towel
Optional, Ruler with cm/mm marks & Marker or Pen * 13mm will be closest to original length, I would not recommend anything longer than 15mm unless you want the lashes to really look insanely long.

I will put all of the steps under the readmore! 👇
Step 1:
Use the x-acto knife to gently peel up an eyelash foil strip, and be careful not to disturb the lashes. Go slowly and only handle the strip by the sticky foil. You will only need one strip for a pair of lashes!


Step 2:
Place the sticky strip on the lightweight paper, I put it close to the edge because it'll be easier to cut out later. Paint a thin layer of Mod Podge over the base of the lashes on the strip to secure them. This is an important step, there isn't much else keeping them in place, otherwise!


It's hard to wait, but let the glue dry before handling the strip again, I suggest a good 30 minutes or so.
Step 3:
Now that the glue has dried, cut out the paper around the strip and very carefully trim the foil and paper at the sides and underneath the curl of the lashes. Do this slowly, so you don't accidentally snip the lashes, you ONLY want to trim back the paper+foil. This will make them appear more flush with the eyelid when glued in.


Step 4:
Optionally, use a ruler to find the center of the strip and mark it with a marker, I used a Sharpie because it dries instantly. It's possible to eyeball this, but I like them to be as even as possible.
Snip the strip in half, very sharp scissors will prevent the foil from bending or warping. Again, be careful not to snip the lashes themselves! It's ok if you lose one or two in this process, as long as they still look relatively clean and even once split.


Step 5:
Apply a drop of tacky glue to the back of each eyelid and use the Q-tip to spread it in a thin, sticky layer. The eyelids have a little trench you can use as a guide for placement.
You can repeat this process if you wish with the top of the lash strip where it will be applied, as well, to make it stick better. I haven't tried this myself, yet.
Place the base of the lash strip over the tacky glue and press it into position, I use the backs of my thumb nails to hold them firmly while the glue sets. It make take some effort and patience to get them to stay in the curve, just try not to slide them around.


Step 6 (Final):
After the tacky glue has had some time to dry, I like to apply a final coat of Mod Podge over the paper and underside of the eyelids to seal and protect everything. Give this 30 minutes to an hour to fully dry before re-assembling your Furby!


✨ Voila! Fresh new eyelashes! ✨
They won't look exactly like the original, but close enough for me. I'm sure the process can be improved in some ways, so if you have any feedback please share it in comments or tags!
Good luck with your projects and thank you for reading! 🌟
#furby#furblr#all furby#furby community#safe furby#furby 1998#safefurby#furby gore#custom furby#guide#furby guide#furby eyelashes#relashing furby#furby eyelash guide#furby eyelash tutorial#tutorial#furby tutorial
78 notes
·
View notes
Text


there's a 4 min speed edit under the cut if you don't have anything else you'd rather be watching 😁
#this edit will prob never see the light of day#it's already been sitting in my drafts for like 3 weeks#plus i really struggled w her eyelash design for some reason#and it was v annoying#g;tutorial#kinda
172 notes
·
View notes
Text
I love drawn-on eyelashes hehe
youtube
#alt girl#alternative#makeup#eyeliner#mua#youtube#alt#makeup artist#alt aesthetic#alternative girl#alt makeup#alt fashion#emo eyeliner#emo makeup#emo scene#emo girl#2000s emo#emo#bold makeup#eyelashes#makeup tutorial#graphic eyeliner
9 notes
·
View notes
Note
Every time I see your sprite work, it just makes me want to make a sprite edit of Akane with the design I made for her in my "She Was Saved" AU (An AU based on the idea of Akane surviving the events of DRA), but I've never done any sprite work so, do you have any tips?
Ok ok so, first things first, i wanna make it clear that none of my sprites are made from scratch, they're sprite edits, hence why i always tag them as such. Every single one of them used some canon character as a base for the base sprite (that one fitst sprite where the character is just standing there with a simple expression) and a handful even have canon sprites uses as bases for poses. Just figured i should make that clear so there's no confusion here.
While I'm not sure if I'm the best at giving tips n stuff, here's what i could think off;
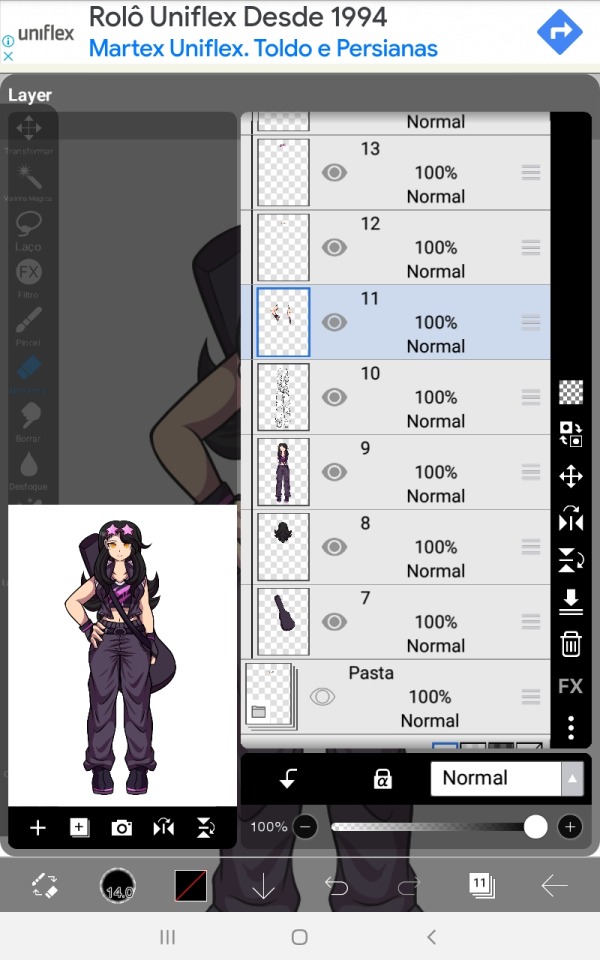
I think the most important tip i can give anyone who wants to get into sprite editing is MAKE A BUNCH OF LAYERS‼���Save things separately just to be sure rather than merging them because that almost always leads to more time spent later down the line. While the amount of separate things certainly varies from artists to artists here's the one i use for my edits.

The app i use (Ibis paintX) allows me to make folders with a bunch of layers to them so i use them to keep stuff more organized.
On the first pic well have a folder with the base sprite, one for the different poses and in Beni's case two for the different eyes she has (one for the normal eyes and one for the ones that are part of the glasses, normally i only have one layer with all the eye variants)
On the second image I've opened the folder that holds the base sprite, or should i say just sprite since it's in this folder that i organize everything that belongs to one specific sprite when I'm making them as to not get myself confused. Anyways, you can't see in the screenshots but the first layer has her glasses, second has her eyebrows and mouth and the third has the eyes.
Fourth has the main body lineart and fifth has the main body colors, please keep those separated as by doing so you make it easier to add those lil effects onto the character's faces on certain expressions + having the lineart of the main body always helps when sketching and connecting the different arms to the main body.
Lastly you got the arms, but ideally you should make the arms/poses in a way they can be placed over the body layers since that just makes things easier to put together, i just have this habit of placing the no pose arms under everything else.
When editing i make the different arms and eyes in advance so that when i start making the different sprites i can just duplicate the canva with the first one a thousand times and everything will carry along with those. Saves time in the long-run + you don't need to separate all layers on them (lineart, colors, shading) since they're just parts there's no problem in just merging them together.
A very important thing to note tho i that if the character has glasses or any accessories that you plan on removing or moving around in some pose/sprite this accessory should be made in a different layer from the main body, this makes editing easier than if you had to just erase and refill the part where the accessory was in the sprite you don't want it to be in.
A similar rule should be applied to the character's hair, if they have short or mid length hair you can just add the whole thing to the main body sprite, but if the character's hair is long you should make this bluk/back part of the hair in a separate layer placed under the main body layers. This also apllies to any back accessories.
Here's Akira as an example; she has one layer for her glasses, one for the back/bulk of her hair and one for the guitar case she carries.
These are essentially the basics of if, so let's go over to some actual tips.
Make the sprites on a small canvas.
Since the Danganronpa another games are made on game maker the size of the character sprites is surprisingly small, while I don't think you should just do it on the same canvas size as the actual sprite, it's good to have a smaller canvas so that the lower amount of pixels gives it a look similar to the in-game sprites + as you can see by mine, they don't actually look low quality at all.
(if curious, the go-to canvas size i use for most of my edits is 773x1020)
Use other sprites as references/bases
Especially if you're just starting on making sprites, use the canon ones for bases, references or even just straight up trace them. This will make the sprite look closer to canon and will start making you undertand the elements that make up the style of the sprite, do it enough times and soon enough you'll be able to make poses on your own without needing a sprite from the game as a base.
Remember! What's wrong about tracing is not the act of tracing itself, as the act of doing so is a great exercise to help you learn, the problem is when you do it and claim you made it 100% on your own. Since these are sprite edits, there's not a problem in doing so.
Observe and learn what makes up the style you're trying to replicate
This is hard to talk about since it really is something that comes with practice, I've been making sprite edits for like 5 years now so this stuff is like written on the walls of my brain by now. Just try to look and analyse the sprites and slowly you'll start seeing patterns and small onto them that you didn't noitce before, like how Linuj's sprites have a bit if line weight to them but are still on the thinner side, how he tends to make the hands a bit on the smaller side, how when he color the character's skins he makes the area near the top of the head a lighter shade than the rest of the skintone, the way he usually makes the character's mouths, and even some more complex things like how the male characters will have very little to no eyelashes while the female characters tend to have a whole lot of them, etc.
At the same time, there's no shame in deliberately ignoring some of these things. Personality the small hands REALLY bother me in a few cases and i tend to just make mouth shapes on a whim instead of trying to stay 100% close to the style. It's just a question of messing around and figuring stuff out, it won't look perfect on the first go, but overtime you'll start to get the hang of it.
#i hope this small sprite editing tutorial helps! if you have more questions feel free to send them#these are sorta all i could think of for now#you did mention that these are for an Au Akane so you could also try editing these out of her sprites themselves#instead of making a whole base and multiple parts just pick the sprites and edit the new design over#it could possibly be easier for a beginner? i do feel like making them in this form leads to better results tho#anyways. fun fact! i used the eyelash thing as a subtle form or trans coding on Akira's sprites :]#i love you small details that people won't notice unless pointed out ❤️#hyena ramblings#sprite edit#edit#sprite editing tutorial
21 notes
·
View notes
Photo


Damien Meulemans
Character Artist @AsoboStudio
artstation linkedin
More from «Artstation» here
#artist#hair#snow#semi-realistic#indian#sword#drawing#Lighting#jewel#roughness#eyes#winter#normal#eyelashes#realistic#belt#Warrior#boots#smoke#Unlit#albedo#tutorial#fullbody#render#lookdev#pirate#Xgen#pose#daniel#cold
6 notes
·
View notes
Text
👉 DIY False Eyelashes Mix 32 Rows High-capacity Natural Eyelash Extension Lashes Cluster Multi Style Fusion Makeup 💔
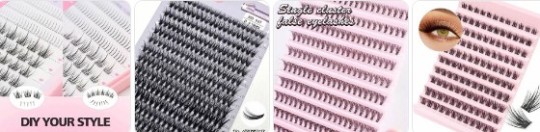
The DIY False Eyelashes Mix 32 Rows High-Capacity Natural Eyelash Extension Lashes Cluster Multi Style Fusion is a versatile and budget-friendly option for those interested in at-home eyelash enhancements. Here's a comprehensive overview:
✨ Product Overview
Quantity: 32 rows, offering a substantial number of lash clusters for extended use.
Styles Included: A mix of 30D and 40D clusters, providing options for both natural and dramatic looks.
Curl Type: Typically D or C curl, mimicking the natural curvature of lashes.
Lengths: Varies between 8mm to 16mm, allowing for customization based on eye shape and desired effect.
Material: Soft synthetic fibers designed for comfort and a natural appearance.
Click Here And Buy Now >>
💬 Customer Feedback
While specific reviews for this exact product are limited, similar DIY lash kits have garnered positive responses:
Ease of Use: Users appreciate the straightforward application process, especially with included tools like tweezers and bond & seal adhesives.
Versatility: The variety in lengths and styles allows for personalized lash looks, from subtle enhancements to more voluminous effects.
Value for Money: High-capacity kits offer numerous applications, making them cost-effective compared to salon extensions.
However, some users have noted:
Learning Curve: First-time users may require practice to perfect the application technique.
Adhesive Sensitivity: Some adhesives may cause irritation; it's advisable to perform a patch test before full application.
Click Here And Buy Now >>
✅ Pros & Cons
Pros:
High quantity for extended use.
Variety in styles and lengths for customization.
Cost-effective alternative to salon extensions.
Click Here And Buy Now >>
Cons:
Potential for adhesive sensitivity.
May require practice for optimal application.
If you have specific preferences or need recommendations tailored to your desired lash look, feel free to ask!
Click Here And Buy Now >>
#marketing#affiliatemarketing#onlinemarketing#review#reviews#preview#digitalmarketing#usa#false eyelashes#how to apply false eyelashes#apply false eyelashes#false lashes#eyelashes#how to apply false lashes#false lashes for beginners#apply false lashes#false eyelashes review#natural false eyelashes#applying false eyelashes#how to use false eyelashes#false eyelashes tutorial#how to remove false eyelashes#false eyelashes for beginners#how to apply false eyelashes for beginners#kiss eyelashes#natural false lashes#false lashes tutorial
2 notes
·
View notes
Text
I hate trying to learn how to do makeup because like.. My Hands. They Don't Do That.
What do you mean simple and easy eyeliner tutorial. Do that with shakey hands and no concept over how far your hand is from your face. That's how I'm doing it. It doesn't feel easy or simple right now.
I have no hand eye coordination. It just doesn't happen. In fact, it gets worse the closer my hand is to my face.
#i can only do mascara#thats only because i can feel where the brush thing is on my eyelashes#the rest of it is lost to me#My Hands#They Simply Dont#fine motor skills#are my worst enemy#like#i genuinely have no concept of how far the eyeliner pen is from my face until it touches my eyelid#then i have little to no control over where it actually applies because i have the shakeiest hands#i want to figure it out#but i cant handle sitting in front of the mirror and staring at my face while repeated fucking up#and i have ultra hooded eyes so no tutorials even come close to looking like my eyes#all the hooded eye tutorials are not actually hooded or they are only mildly hooded#i got the 'whole eyelid disappears when open' hooded eyes#they got the 'partially obscured eyelid when open' hooded eye#and i dont like the way the eyeliner pen feels#its cold and bad#and i hate it#>:(#eyeliner#makeup#beginner#learning things is hard#now that i think about it#the hand eye coordination thing and the hating the eyeliner feeling thing are both probably because of#neurodivergence#its the neurodivergency#text post#text
2 notes
·
View notes
Text
Longest lashes ever - I could fly away
Grande Cosmetics Grande LASH-MD Lash Enhancing Serum
This ophthalmologist-tested serum creates luxury-level lashes — all your own.
#Lashes#Lash & Brow Growth Treatment#Natural Makeup#Serum#Eye Makeup#Eyelashes#Girls Night#Girl Life Hacks#Makeup Tutorial#beautytips#beautiful#amazing beauty#so pretty#so beautiful#these are gorgeous
0 notes
Text
The Proper Use of False Eyelashes: A Guide by Becky D. Beauty
The Proper Use of False Eyelashes: A Guide by Becky D. Beauty Introduction Hello, beauty enthusiasts! I’m Becky D. Beauty, your go-to licensed cosmetologist dedicated to teaching proper beauty techniques in a world filled with ever-changing TikTok trends. Today, we’re diving into one of the most transformative beauty tools: false eyelashes. Our focus keyword for today’s lesson is “The Proper Use…
#Beauty tips and tricks#Becky D Beauty#Cosmetologist beauty tips#Eye makeup tips#Eyelash application tips#Eyelash hacks#Eyelash safety and sanitation#False eyelashes step-by-step#False eyelashes tutorial#How to properly use false eyelashes#Makeup tutorial#Safe eyelash application
1 note
·
View note
Text


more boyfriend Ni-ki with his hyperfemenine gf thoughts (ෆ˙ᵕ˙ෆ)♡
⁺ ❤︎ ⊹ ₊ ͏͏✧
Your boyfriend Ni-ki pretends to judge you for spending so much money in makeup, telling you that you need to save or spend it in something that really worths it, but at the end of the day, he sits through every one of your Sephora unboxings like he’s your assistant. He’ll lay on your pink sheets, black hoodie cap over his messy hair, watching you with a half-lidded gaze as you peel the bubble wrap off your sixth gloss of the week like it’s a treasure. He’ll say things like, “Another one?” or “25 dollars for a gloss is insane” with the driest voice, eyes lazy as he’s sooo bored, but when you flute your eyelashes at him, small smile on your plumped lips, he’s the first to hold out his arm when you start testing swatches.
He lets you paint his entire forearm with shimmer eyeshadows and bronzers and cherry red blushes, grumbling under his breath warning you to not tell the boys later. He even holds still while you paint his thick lips with a shiny, sheer pink gloss, and even smacks his lips together like he’s on a get ready with me video.
“It’s sweet” he shrugs “Suits you better” and then he kisses you, soft and messy at the same time, the gloss falls from your hand as you kiss him back and fall on your back on the mattress.
Then a few days later, when you’re stressed because you can’t find your new strawberry lip balm and ask him if he’s seen it, he doesn’t even blink. “What? You have like ten of those”
“You literally stole it. It’s mine!” he just looks at you, so nonchalant, and goes, “Yeah, but it makes my lips soft. Plus… it smells like you.”
You ended up finding it on his desk. Not tucked away or hidden, just lying there like it belongs next to his wallet and keys. Like he didn’t swiped it from your vanity and started using it like it was his all along.
Ni-ki used to groan every time you said “Just ten more minutes” before a date. He would lean against your bedroom doorframe with his arms crossed and a dramatic sigh, saying things like “How are you not done yet?” Or “It looks good, I’m hungry” But instead of actually getting mad, he started watching you. Watching how your hands moved when you did your eyeliner. How your lip combo needed to be layered just right. How you curled your hair in sections and flipped the ends out naturally.
And one day, he just… asked. “Which one makes it wavy?” You paused, mascara wand mid-air, staring at him. “You wanna help me get ready?” “I wanna help you get faster,” he said flatly. But you saw the little spark in his eyes.
So you handed him your curling iron.
Your boyfriend Ni-ki watched one tutorial on YouTube from a beauty blogger, and then practiced on a doll head you had from your childhood “just for fun,” but secretly he wanted to get it perfect for you. He learned to section your hair, to twist and hold, to use the glove so he wouldn’t burn his fingers, though he totally did once and blamed you for distracting him by being “too pretty.”
He now stands behind you while you sit on your vanity and do your makeup, tongue between his teeth in concentration as he wraps a strand of your hair around the barrel. You’ll be focusing on your eyeliner and hear the soft click of the iron turning off, then his voice: “Next section.” Sometimes he clips your hair back with one of your frilly pink claw clips, totally unfazed by how cute and domestic he looks doing it. Other times, he hums Enhypen songs under his breath while working, casually asking, “Big curls or soft waves today?”
To be fair, he still says, “You take forever to get ready,” but now it’s while he's smoothing a section of your hair down and checking the back with his phone camera to make sure it’s even.
Ni-ki is one of the most dry texters in the world, but you don’t care that much, because when he’s on tour, he doesn’t say “I miss you” too much, but always comes back with something for you tucked in his bag.
Not big things. Not the kind of gifts meant to impress or flex. But cute things. Thoughtful things. Things that say “I saw this and thought of you” in the quietest way. Like the time he was in Japan, and you sent him a half-joking, half-serious message at 2 a.m. that just said, “Bring me back something My Melody or I’m breaking up with you.” But forgot about it immediately, he didn’t.
He came home with a little box wrapped in pink tissue paper, handed it to you without a word, and inside were three keychains—Hello Kitty, My Melody, and Kuromi—each one in a tiny outfit matching the city he’d been in. There was also a fluffy pouch with sparkly zippers and a note in his handwriting with pink pen that just said, “Don’t break up with me.”
Or the time that he went to Milan for the fashion week and rolled his eyes when you told him to buy you something expensive. But when he came back, he handed you a pink Prada purse and a silk scarf with little hearts woven into the trim.
“This reminded me of you. The memory was prettier tho” You punched his arm and he kissed your cheek.
He’s too cool to gush but always notices. Always remembers. He never forgets that you love sparkly keychains and girly pouches and lip balms shaped like desserts. And even when he’s thousands of miles away, he walks through each airport, each city street, each backstage area wondering what tiny, soft thing he can bring back to make you smile. And when you tease him, “You miss me that bad, huh?” He’ll just click his tongue, toss a plushie onto your lap, and mutter, “Shut up. It was cute. And you like cute things.”
Your boyfriend Ni-ki pretends to be soo bored when you push him into your bedroom to try on new clothes. He flops onto your bed like he’s been inconvenienced for the millionth time, phone in hand, legs crossed at the ankle, but the truth is? He lives for this. For the way you light up when you’re in front of your closet. For the way you model outfits for him like you’re on a runway made of pink carpet and perfume mist. He barely looks up when you walk out in the first dress, just gives a quick glance and hums, “Cute.”
But by the third outfit, when the top dips a little lower and your shorts hug a little tighter, he suddenly forgets how to breathe normally. You know what you’re doing. You twirl slowly, hands on your hips, acting innocent. “Too short?” you ask, lifting the hem just slightly to adjust it. He sits up straighter. “You’re trying to start something.” You just flutter you eyelashes. “I’m just trying on clothes.”
Ni-ki is so whipped for you that he starts biting his lip by the fourth outfit. You come out in a little skirt with bows on the sides and a cropped cardigan that’s one button away from scandal, and he’s already shoving his phone into the sheets and leaning back like he’s trying to stay calm.“Babe,” he warns, voice low, “what is this, a fashion show or a test of my self-control?” You smirk. “Depends. How am I doing?” He drags a hand down his face. “Terribly.”
He breaks the second you spin around in front of the mirror and bend a little too far while adjusting the neckline, the skirt showing the perfect curve of your ass. He’s behind you before you even realize he moved, hands sliding around your waist, lips brushing your ear.
“You know I’m not gonna sit there like a good boy when you parade around looking like that.” Your outfit ends up on the floor. He never gives his opinion. You both forget you were even getting ready.
Your boyfriend Ni-ki doesn’t just say “You’re pretty” when you’re writhing under him, he says it like a prayer, like it hurts him how pretty you are.
“Fuck, you’re so beautiful like this.” “Look at you… look how perfect you are for me.” “Made just for me, huh? That’s it, baby—show me.”
His voice never raises. It stays soft, reverent, like he’s telling you a secret that only the two of you should know. Even when he’s breathless. Even when he’s deep inside you, thumb brushing your bottom lip while he watches your eyes flutter and roll.
“Such a good girl for me… always take me so well.” “You don’t even know what you do to me, do you?” “You make me lose my mind, princess. Fuck—look at the mess you’re making.”
He says the filthiest things while holding your jaw so gently, like he’s cradling something delicate and priceless.
“You’re dripping just from my voice, aren’t you? You like when I talk to you like this.” “You want me to make it worse? Want me to ruin this little body while I tell you how much I love it?”
Because he does love it. Every inch of you. And he says it, over and over, between kisses and thrusts and choked moans.
“I love you so much, baby. So fucking much.” “No one’s ever gonna touch you like this. No one’s ever gonna talk to you like this.” “You’re mine. Say it. Say it again.”
He gets off on your pleasure more than anything. The sound of your voice, the way your fingers curl in his hair, the little gasps you make when he presses deeper.
“That’s it, my pretty girl… you gonna come for me?” “I want you to fall apart, yeah? Be good and make a mess for me.”
And when you do, when your voice breaks and your body trembles and you cling to him like he’s the only thing anchoring you to this earth, he kisses you everywhere he can reach. Your cheek. Your shoulder. Your chest. The side of your neck.
“You’re okay, baby. I got you.” “You’re my princess. My everything.”
And when he finishes, he doesn’t just roll over and catch his breath after, t’s like the second you fall apart, he pulls himself back together just to take care of you. Because he knows.
He knows that after you finish, your voice goes quiet. Your fingers reach for him, searching without words. You blink slower, lips parted, too overwhelmed to speak. And he knows that’s when you need softness the most. So he gathers you up. Instantly.
Ni-ki wraps his arms around your trembling frame and pulls you into his chest, skin to skin, his hand cradling the back of your head like he’s shielding you from the world. “Hey,” he murmurs, lips brushing your forehead. “You’re okay.” He kisses your temple, your eyelids, your damp hair, even the tip of your nose, like he needs to cover every part of you in warmth. In reassurance. He speaks softly, over and over, even when you’re too tired to respond.
“I’ve got you.” “You’re so perfect for me.” “Still with me, pretty girl?” “I love you. You’re my everything.”
His fingers draw lazy shapes on your back, his legs tangled with yours beneath the blankets. When he feels you start to drift, he kisses your shoulder and tightens his hold. “Don’t disappear yet,” he whispers, teasing but gentle.
And when you finally look up at him with hazy, fluttering eyes and a sleepy pout, he smiles like it physically hurts how much he loves you. He tucks a strand of hair behind your ear and presses his forehead to yours. “Still my princess,” he murmurs, voice low, “even when you’re all messy and dazed like this.”
Boyfriend Ni-ki, who gets up just to grab a warm cloth and clean you softly, slowly, never rushing, like he’s touching something sacred. Then helps you into his hoodie, kisses your cheek, and pulls you back into bed with a quiet “Come here, need you close.”
Because he knows you go small after. And there’s nowhere safer to be small than wrapped in him.
#enhypen smut#enhypen hard headcanons#enhypen hard hours#enhypen headcanons#enhypen x female reader#enhypen x you#enhypen ni ki smut#enhypen ni ki#enhypen nishimura riki#nishimura riki smut#nishimura riki fic#nishimura riki x reader#enha x female reader#enha hard thoughts#enha hard hours#enha fics#enha smut#enha x reader#enha riki#enha nishimura riki#enhypen fanfiction#enhypen fluff#enha fluff#nishimura riki fluff#ni ki fluff#niki smut#niki nishimura#enhypen niki#niki x reader#ni ki enhypen
2K notes
·
View notes
Text
Needle Felt Siffrin Build Log: (oct 6 - nov 20, 2024)


Credits goes wholely to @insertdisc5 for creating ISAT and siffrin's design! I am just here to attempt to make cool fanart (and get more people to play isat.. my devious plans are going great so far :3) As always, this isn't a tutorial- it is just a log about how i go about approaching a sculpture and I hope this collection of resources can help others make their own sifs!!
PSA: this has some spoilers for endgame CGs/sprites on my references image board ( also might see it in the backgrounds of my process pics). And bc this is needle felting, you will see some sharp needles! beware!
my inspiration was the intro cutscene where Sif eats the star, so my main goal was to adhere to the style of ISAT as closely as possible while transfering it to 3D space. And I knew i also wanted to try making the cloak for stopmotion purposes, so my process was tailored towards having control over the fabric with wire inlaid within the cloak (more on that later).
I ended up not sticking eyebrows on top of siffrin's bangs lol but anyways, first order of business is Gather Reference! v important. pureref is free and an awesome program. I also do some sketches to visualize the pose and important details i wanted to include in the sculpt.
behold the isat wiki gallery page! tawnysoup wrote an awesome ISAT style guide that absolutely rings true in 3d space too!! adrienne made a sif hair guide here!! (sorry i couldnt find the original link, but it's on the wiki). It says ref komaeda hair so that's what i looked at, along with other adjacent hairstyles! I also like doing drawovers on in progress photos to previs shapes n stuff to get a better idea of the end result.
Also if you're like me and struggle with translating stuff into 3D space, take a look at how people make 3d models and figurines! sketchfab is also a great resource! I looked at the link botw model by Christoph Schoch here for hair ref. (I used Maya, but there's a blender version too ! you can pose characters too if your model has been rigged!)


Face:
Started off blocking out the main shapes of eyelids and iris, and then filling in the colour details in the iris and the star highlights before moving onto adding thin black outlines and eyelashes. I didn't take many in-progress photos cause i kept ripping stuff out to redo them many many times, sorry!! This eye took about 3 hrs bc i just wasn't happy with it!! Sometimes it do be the vibe to give up, go to bed and see how it looks in the morning (more often than naught, it looks fine and it was the "dont trust yourself after 9pm" speaking)

The Mouth:
Couldn't decide if i even wanted to add a mouth as per usual with all my humanoid sculptures.. but i did some drawover tests first to see what expression i liked and to try to visualize it from multiple angles. (I was also testing the placement of stars on the hat brim here)

And then I redid the mouth like 3 times cause the angle just wasn't right (this went on for about the course of a week yay!)
Hair: woe baldfrin be upon ye


I made the hair strands individually first, and then since Sif has some of the hair at the back dyed black, i covered some of the tips with black wool (manually) (I think it would go much faster if i just took a marker to it, but hahaha i love pain and detailing!! )
And then the rest of it was positioning strands with sewing pins layer by layer, always looking at it from different multiple angles- sometimes tailoring the angle or swoop of individual hair flippies. At one point I thought the back looked too cluttered, but the hat covers a lot of it anyways!! yay for hiding mistakes! (imo this is a similar process to how cosplayers style wigs, but on a smaller scale and the same level of time consuming)
As always, look to your reference for guides, and I always do a whole bunch of drawovers over in progress photos to ascertain what was working and what wasn't.
Hat:
A trick to get a super pointy tip, make another tip seperately while keeping the connection point unfelted, and then combine the two to make super pointy hat!! (this also helps if you made the hat too short and need it to be taller. ask me how i know)

The embroidery on the hat brim was done in a hoop and then invisible stitched to the felted top portion. Technically you don't need a hoop but it helps keep the fabric tension, so you avoid puckers in your embroidery. You can also use iron-on stabilizer if your fabric is loose weave or particularly thin. this is the tutorial i used for the stars embroidery! particularly the fly stitch one, french knots, and the criss-cross stitches. highly recommend needlenthread for embroidery stitches and techniques! i learned all my embroidery from this single site alone.

For fabric, I think I used a polycotton i had in my stash,, unsure of the actual fiber content bc i bought it a long time ago. I used DMC Satin floss which was nice and subtle shiny but frayed a lot so it was kind of a pain to stitch with... but keep a short thread length and perservere through it!! After the embroidery was done, I folded up the raw edges and invisible sewed it to the top portion of the hat.
General shape:
Ok general structure of the body is this: wire armature body covered with black wool -> cloak lining & wire cage -> edge of lining is invisibly sewn to the main cloak at the hem -> head

Don't be afraid to mess around with the pattern, it's essentially a pizza with a slice taken out of it to form a steep cone shape!! Use draft paper before cutting into felt to save material! (i think i made like 3 cloaks before i was happy with the shape lol).
You can also hide the seam of the cloak and collars by gently messing up the fibers of the felt with your fingers or a felting needle btw! you can also sandpaper the seams according to Sarah Spaceman in this vid (highly recommend them for their in depth cosplay/crafting builds holy smokes), though since sif cloak is at such a smol scale, I just blended the seam with my felting needle.
For the lining wire cage section, I sewed in wire around the cloak, so the main rotation point is at the top neck area under the collar. These paddles are used to keep whatever pose I need the cloak to be in for stopmotion purposes. Then after the wire is done, I invisibly sewed the lining to the cloak at the hem (same technique as the hat brim to the lining there).
In hindsight, I should've used a thinner fabric for the lining, but i only had sheer white in my stash so had to go with double felt, thus resulting in a really bulky lining but oh well!

Heels:
started with the general boot shape, then tacking on the diamond shape heel stack and also diamond shape sole bc we're committed to the bit here. I skewer the boot onto the armature which also conveniently hides the connection point into the base to keep the whole thing upright and also I can rotate the boot to tweak the angle if needed.

Pins:
I kinda just trial and error'd jewellery wire with pliers into the pin shapes. They're itty bitty!! had a whole bunch of fails before i got two nice ones. A hot tip is to use needle nose pliers and wrap the wire around the tip to get a smooth circle shape!

Base:
I smoothed out the edge of a circular wood base with a dremel, and then used wood stainer to get the black colour. It ended up kinda looking like I took a sharpie to it, but whatever.... now i have a whole ass can of black wood stainer........ I then made a rough mountain of black wool and stuck the feet armature in. And now he's standing!!

Normally at this point when I'm done felting everything, to get a smooth finish, I'd take a small pair of scissors and carefully snip away any flyaway fibers, but this time, I just left them fluffy cause i think that's what sif would do :3c
Photoshoot:
Normally I do shoots using daylight but it was winter so the sun was nonexistent. So I broke out the home lighting setup aka dollarstore posterboard for a nice smooth background, and then hit it with the overhead Fill, side Fill 2, and Rim light, and use white paper/posterboard for bounce light if one side feels too dark. But if things are overexposed, you can move the light sources away until the harshness dims down. I'm using a Olympus mirrorless camera (handed down to me by my sibling so i dont remember the model exactly), which can connect to my phone as a remote so I can avoid shaking the camera when i take photos. Pretty nifty for stopmotion purposes! (yes my camera stand is a stack of notebooks, a tissuebox and some eva foam under the lens, don't judge me)


Stopmotion animation:
I'm still figuring stopmo out on my part, but my process was straight ahead animation ... move the cloak a cm, take a pic.... move another cm, click.... and repeat until i get a version I was happy with. My ref was the cloak animation from Gris (beautiful game btw). The 2d star animation was also done straight ahead using procreate, exported in png with a transparent background, and finally stitched together with the stopmotion footage in photoshop.

My turnarounds are also stopmotion! also secret hack, the turntable is a fidget spinner sticky tacked to a cake platter.
And i think that's all! i mainly wanted to share how I go about thinking about taking a 2d concept and moving it to 3D. I also didn't go in depth into how to actually do the needle felting bc I don't think I''d be very helpful I'm a very good teacher by telling yall to just keep stabbing until it looks right (i'm self taught for this hobby),,, if anyone wants it though, i can share a bunch of tutorials and other felters' process that helped me learn more needle felting!
Hopefully this was helpful to someone! Feel free to send asks if ya got any questions or if anything needs clarification! Or show me your works! I love seeing other people's crafts :3
here have a cookie for making it this far 🥐
#in stars and time#siffrin#isat#isat siffrin#isat fanart#needle felt#soft sculpture#know that i am devouring all the nice words yall leave in the tags/comments of my posts :holding back tears:#I hesitate to call this a tutorial bc this is just how i fumble my way through crafting anything lmao#the only reason I know how long I worked on a project are timestamps on wip photos and however long the day's video essay or letsplay is#sorry time is immaterial when i get into crafting mode#reason why this log is so late is bc after i finish a project i'm perpetually hit with the ray of 'i dont ever want to look at this again'#hence why photos never get edited#AND THIS POST SAT IN MY DRAFTS FOR 2 MONTHS DUE TO BLOODBORNE BRAINROT SORRY#done is better than perfect!!!#sorry i dont control the braincell#sorry for using a million exclaimation points! i am not good at this.. conveying my anxiety in written form!!! my toxic trait
1K notes
·
View notes
Text
“DOWN WITH THE TRUMPETS”
“when i get down, i get respect now”


feat. denki k.
wc: 780
mdni 😴

“don't talk with your mouth full, it's bad manners.”
denki kaminari is a yapper.
he can talk for japan.
about nothing, and everything. about his little hobbies and interests, like the time he got really into origami for two weeks and folded fifty paper cranes before getting distracted by baking videos. about a bug he saw one time that kind of looked like pikachu if you squinted. about an anime he watched five years ago that reminded him of a tiktok he saw yesterday—actually, no, it reminded him of two tiktoks, and he’ll pull them both up even though you’re in the middle of eating.
he doesn't even realize he's doing it. he just talks.
before you started dating, he once spent two full hours explaining the entire five nights at freddy’s lore to you. he even brought a whiteboard. he drew a timeline. there were arrows, names, color-coded events. he kept glancing at you nervously, like he was waiting for you to run. you thought he was fucking psychotic, but according to all his friends that was his weak attempt at flirting.
he talks in his sleep too. full conversations. one night, around 3 a.m., he whispered, “gregory… you have to hide.” and you just laid there, staring at the ceiling, wondering what choices in life had led you here. he was completely out. you even poked him and he just mumbled something about “security breach.”
you didn't sleep much that night. he did.
you hear him on the phone all the time. he’s loud. his voice carries. you don’t even need to be in the same room to catch half the story. in group calls, he’s that guy—never letting anyone finish a sentence, always jumping back in because he just remembered another detail, or because he needs to relate something someone said to a completely different topic.
he narrates everything he does. it’s like living with a one-man podcast. making a sandwich? you’re getting a full tutorial with sound effects. brushing his teeth? he gives ratings to the toothpaste flavor like he’s doing a mukbang. finding a sock under the bed? live drama, complete with shocked gasps and a full backstory on how the sock ended up there.
he doesn't mean to talk so much, honestly, he can't help himself. he just… gets excited. he thinks out loud. he loves sharing things. his brain moves fast, and his mouth just tries to keep up.
"s-so sorry baby, your pussy just tastes so—mmf."
so sometimes you have to shut him up. the only way you know how.
his long eyelashes flutter against flushed cheeks, those bambi eyes of his wide and glassy as he looks up at you from between your thighs.
his fingers gripping the fat of your thighs as he drags your pussy back down onto his mouth. tongue greedy, he mouths at you like you're divine. slow, wet, sloppy kisses, tongue flicking then flattening, dipping in and out like he’s tasting something sacred. he hums against you, needy and messy and so, so fucking eager.
but as he pauses to catch his breath, you realise, he's still running his mouth.
with eyes locked onto the sticky mess he's made, his mouth is still moving, lips slick and parted as he mumbles god knows what into your pussy. eyes fixed on the mess he's made, like he's hypnotized. and the worst part? you can feel it. the vibrations, the breathy whispers, the praise he's spilling straight into your cunt. you strain to make out the words, and between the rush of blood in your ears you catch bits and pieces. "t-thank youuu, so fu-ucking good for me, you’re perfect, so warm, so wet, love you, love you, love yo—"
you roll your eyes and cut his praises short with a forceful tug of his hair. not too hard. just enough. it makes him whine into you, the sound all breath and heat, and you feel his hips twitch against the mattress. he loves it when you take control. he melts for it.
"denki, sweetie, what have i told you?" you sigh contently when his tongue starts doing circles on your clit, "no talking while you're eating."
he doesn’t answer with words—he knows better. just moans, all obedient and desperate, nodding his head so fast his blonde locs shake. sweat glistens on his forehead, some strands of hair sticking to it. you brush them away gently, and his amber eyes snap up to meet yours.
they're wide. glassy. brimming with devotion.
he's docile, pliable. he listens, does what he's told.
and for now, he's quiet.
but you'll keep him here until he's learnt his lesson.
#denki smut#denki kaminari x reader#my hero academia#mha#sub denki kaminari#denki x reader#sub denki#denki kaminari#denki kaminari smut#denki kaminari x black reader#denki kaminari x chubby reader#sub!character#subby men#lorddddddd have merthy#bnha#boku no hero academia#mha x black reader#mha x reader#mha smut
594 notes
·
View notes
Text
had to wait for a few mods to be updated but canon val appearance has been more or less secured
#there are only two things im unhappy with#which are the sudden lack of white eyebrow and eyelash options#like. why did they remove those???#and also the lack of a specific skin tone that i was looking for#but they are both so minor#that i just worked around them#im pretty happy with how he looks#will draw / screenshot him tomorrow and show him off#also made a really cute tiefling that i might play at some point#*thumbs up*#now lets hope i can get out of the tutorial area#without constantly restarting to change things once i see them under different lighting#truly reminds me of the cc dai experience#tho better in most ways#but unfortunately worse in others#*pensive face*#personal
0 notes
Text
Shen Yuan should be surprisingly good at makeup. Like, we all know that Shen Jiu could draw eyeliner sharper than Cheng Luan, but Shen Yuan had a meimei.
Imagine she has a school dance or something, and maybe a mean girl at school said something that made Shen-mei decide she was going to wear makeup for the school dance.
Now, of course, Shen Yuan and his geges make sure to tell her that the girl was just mean, and she's beautiful when she's comfortable and happy, not because of makeup etc etc it's all very good intentioned.
Even so, she says, she still wants to wear makeup.
So she buys some, and starts practicing. She's ... Not the best. Shen Yuan finds her crying in the bathroom with crooked eyeliner, mascara transfer marks on her cheeks, foundation and concealer in the wrong shade, contour that looks like a 5'o'clock shadow, overfilled brows, blush that won't blend...
He helps her take off the cakey makeup and bundles her into the living room, comforting warm drinks in hand. They spend the night watching makeup tutorials.
Step-by-step Shen Yuan learns along with his meimei how to do a full face of makeup.
The school dance goes perfectly, Shen-mei was the most beautiful resplendent girl in the school and had a wonderful time with her friends.
Shen Yuan and Shen-mei don't stop watching makeup videos and doing makeup on each other though, it becomes a shared hobby. Every few weeks, even into adulthood, they'd meet up, turn on some makeup influencer and take out their makeup brushes.
It was their special thing, something that just the two of them shared.
Cut to post-transmigration, during a visit for planning the 'garden', Shang Qinghua idly asks Cucumber-bro how he manages to draw the huadian perfectly every single time.
(I don't know the correct term, I tried looking for the proper terminology because what I believe Shen Qingqiu wears is some sort of scholar's mark? But I couldn't find anything. Please let me know if anyone knows the correct term!)
Shen Yuan shrugs and goes 'not like it's hard, you probably just suck.'
This leads to an argument wherein Shen Yuan decides to demonstrate his superiority.
They did forget that there was a Peak Lords meeting, and so Shen Qingqiu strolls in with flawless eyeliner, lips, huadian, the whole combo, and Shang Qinghua walks in with a red face and smudged eyeliner (it does look good though, fits his messy vibes).
Liu Qingge feels a little faint when he watches Shen Qingqiu absentmindedly press his fan to his lips, leaving lipstick marks on the fan. (SY wonders why at that moment, the System lets him know that his fan has leveled up.)
Luo Binghe is trying to figure out a way to get Shizun to teach him to do makeup... The thought of Shizun taking the brush to his lips, concentration furrowing his brows, letting Luo Binghe admire his face even more unabashedly then usual ...
Qi Qingqi changes her tune faster because she has to know how Shen Qingqiu got his eyelashes so perfect.
#shen yuan#shen mei#svsss#svsss au#cumplane#shang qinghua#pre-transmigration#shen qingqiu#shen jiu#luo binghe#bingqiu#liu qingge#qi qingqi#liushen
2K notes
·
View notes