#how to create a windows 10 bootable usb flash drive
Explore tagged Tumblr posts
Visit Tumblr Blog
Explore Tumblr blogs with no restrictions, modern design and the best experience.
Last Seen Tumblr Blogs


Fun Fact
70% of Tumblr users say the Dashboard is their favorite place to spend time online.
Text
How to Create a Bootable USB Stick for Windows

AUS, Wholesale/Bulk/Lot 10Pcs USB Flash Drives Thumb Data Storage Pen U Disk Memory Stick (10PCS - 4GB)
Product Information
Interface: USB 2.0
Size: picture shows
Capacity: 8MB/16MB/64MB/128MB/512MB/1GB/2GB/4GB/8GB/16GB/32GB/64GB
Color: Multicolor
Fast data transfer rate--Read
Features:
Easy to carry
Hot plug & play
Compatible with USB 1.1/2.0
Compatible with PC, Notebook, MAC
Store your pictures, videos, and songs and any kind of data.
Support Windows 7/8/10,Windows Vista,Windows 98/2000/XP,Mac OS X, Linux.
Easy to read and read in high speed ,No need drive/power supply only plug in Small style and fashionable products, as an impressive gift for your beloved, friends or even customers. Thumb Drive
Package Included:
10x Flash Memory Stick
(Pack the USB flash drive reasonably)
Note:8MB,16MB Suitable for storing small data such as bytes, it is not suitable for storing large capacity, otherwise they may be damaged,Please determine if it is right for you ! Thank
Ability to work:
USB 1.0/1.1 LOW SPEED
8MB approximately 6-7MB.
16MB approximately 13-14MB.
About capacity:
64MB = approximately 58MB-60MB
128MB = approximately 100MB-120MB
256MB = approximately 220MB-240MB
512MB = approximately 480MB-500MB
1GB = approximately 960MB-980MB
2GB = approximately 1.6GB-1.8GB
4GB = approximately 3.6GB-3.8GB
8GB = approximately 7GB-7.5GB
16GB = approximately 14GB-15GB
32GB = approximately 28GB-30GB
64GB = approximately 58GB-60GB (EXFAT format)
This is calculation difference between manufacturer and our PC,just for you reference.
0 notes
Text
Forgot Windows 8.1 Local Admin Password No Reset Disk How to Resolve
How to get back into your Windows 8.1 computer if you have forgotten local administrator password no reset disk, how can you reset administrator password in Windows 8.1 without reset disk?

To resolve this problem, you can firstly try Offline NT Password Editor to help reset the forgotten Windows 8.1 administrator password without reset disk. Offline NT password Editor can help clear or reset Windows local account password via CD/DVD. The following procedure will show you the detailed walkthrough.
Trick 1: Use Offline NT Password Editor to Reset Windows 8.1 Local Admin Password (Work with CD/DVD).
When you forgot Windows 8.1 administrator password and a password reset disk was not created, “Offline NT Password Editor”, a free Windows password reset disk, can help you reset forgotten Windows 8.1 local account’s password without knowing it. Free download the ISO file from the official site. Extract the downloaded file and then burn the ISO file on to a writable CD/DVD. Once burning completed, you can use the CD/DVD which is bootable to crack Windows 8.1 Local Admin password.
Step 1: Power on your locked computer and then insert the bootable CD to the CD-ROM.
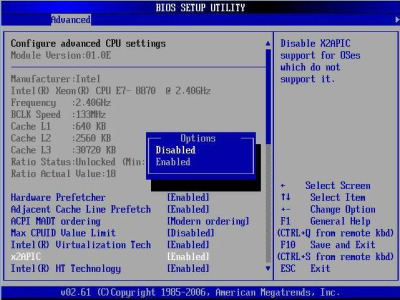
Step 2: Restart the computer to boot from CD/DVD. If it still boot into Windows, you may need to change device boot order in BIOS. Learn how to boot computer from CD/DVD.
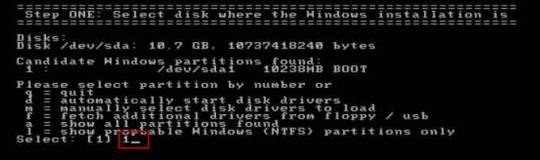
Step 3: When the computer boots from CD and loads Offline NT screen, press Enter until the “step one” appears. Type “1” and hit Enter.
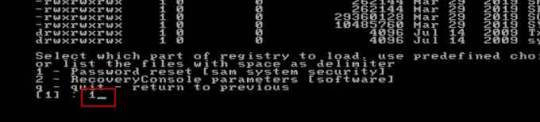
Step 4: Select “Password reset”, type “1” and hit Enter.
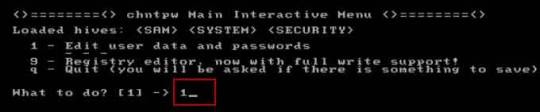
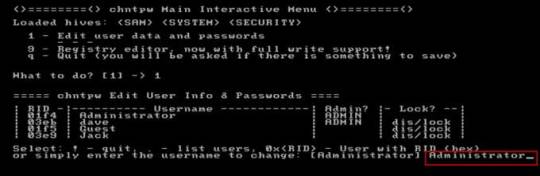
Step 5: Select “Edit user data and passwords, type “1” and hit Enter.
Step 6: Select a user account, type “administrator” and hit Enter.
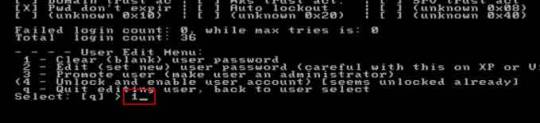
Step 7: Select “Clear user password”, type “1” and hit Enter.
Step 8: Administrator’s password is cleared. Select “Quit editing user and back to user select”, type “!” and hit Enter.

Step 9: Select “Quit”, type “q” and hit Enter.
Step 10: Write back changes, type “y” and hit Enter.
Step 11: When it asks you if try again, type “n” and hit Enter.
Step 12: Now eject your CD and then press CTRL-ALT-DEL to restart the computer.
Step 13: When Windows 8.1 welcome screen appears, click the screen to automatically sign in administrator without password.
Another simple method to reset forgotten Windows 8/8.1 local admin password is using a password recovery program, Windows Password Rescuer, which is working fine for all Windows systems including Windows 11. Here is how to use the utility to reset a local admin password on Windows 8.1/8 PC without logging in.
Trick 2: Reset Windows 8.1 Administrator Password with Windows Password Rescuer Run from USB.
If you have forgotten Windows 8.1 administrator password and need to get back into the account, you can use Windows Password Rescuer to create a bootable USB disk and then use the disk to reset Windows 8.1 local administrator password easily without losing data. It also works perfectly for Windows 11, 10, 8.1, 8, 7, Vista, XP and Windows server 2022, 2019, 2016, 2012, 2008, 2003 etc.
Equipment required: Another Windows computer, USB flash drive.
Read more detailed steps: How to reset Windows 8.1 Admin Password with USB.
Step 1: Use another computer to download Windows Password Rescuer and then install the software.
Step 2: Plug in a blank USB flash drive to the computer and launch the software. Select “USB device” on the software screen.
Step 3: Pull down the drive list and select your plugged USB flash drive. Then click “Begin Burning” to create a bootable USB under a minute.
Step 4: Once the burning process is completed, unplug the USB flash drive and then connect it to your locked computer that you want to reset Windows 8.1 password.
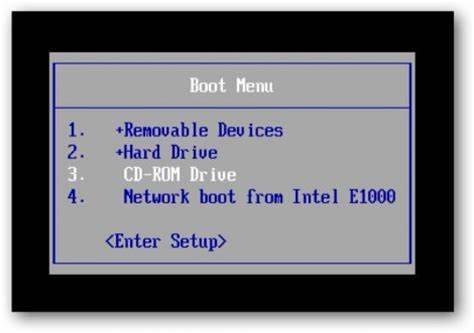
Step 5: Power on the locked computer and press F12 as soon as possible to open “Boot Menu”. Press arrow key to highlight USB option and press Enter to boot from USB.
Step 6: Once the locked computer boots from USB and locates Windows Password Rescuer, you can reset administrator or other local user account passwords with several clicks. Now click “Administrator” from user list.
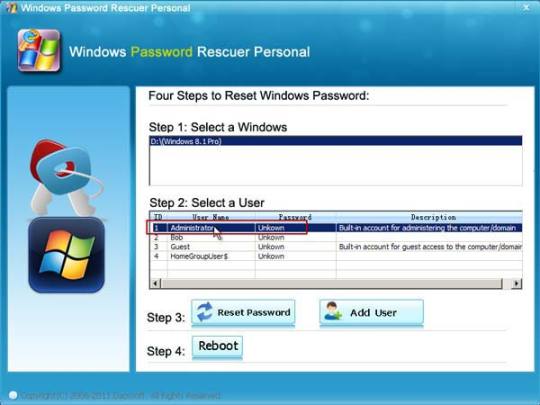
Step 7: Click “Reset Password”, when it asks you if reset administrator password to blank, click “Yes” to confirm it.
Step 8: Administrator password will be removed and shown blank in password list. It means that you will be able to sign in the account without password.
Step 9: Click “Reboot”. When it asks you to remove your USB, remove the USB from your computer and then click “Yes” to restart the computer.
Step 10: After restarting, you can log on administrator without password.

Methods in this article apply to any laptop and desktop computers such as Dell, HP, Toshiba, Acer, Lenovo, Asus etc.
0 notes
Text
In this guide, you will learn how to use Ventoy, a programme that makes it incredibly easy to create a multi bootable USB flash drive of Windows 11 (and 10) without the need to reformat the removable storage. Typically, you use the Media Creation Tool to create a bootable USB media when you need to perform a clean install of Windows 11 (or 10). As an alternative, you can complete the same task with more customization options by using the Rufus tool. The issue is that you have to repeatedly reformat the drive to update the installation files or switch the operating system, even though these tools perform as promised. A flash drive can be made bootable by installing Ventoy as software. Once the flash drive is able to boot, all you have to do is upload the desired ISO (or WIM, IMG, VHDX, or EFI) files without extracting them first. The system will boot into the Ventoy software when you insert the USB flash drive. You can select the image with which you want the computer to start while you are experiencing this. You can keep both versions of the image on the same bootable flash drive if a new version of the ISO becomes available. The instructions in this manual will show you how to use Ventoy to make a bootable USB that you can use to install Windows 10, Windows 11, Linux, or another operating system from the same flash drive. Create multiboot USB flash drive with Ventoy To create a Windows 11 bootable USB with Ventoy, connect a flash drive with enough space, and use these steps: Open Ventoy GitHub page. Under the “Assets” section, click the ventoy-x.x.xx-windows.zip file and download it to your computer. Quick note: You may need to force and keep the file as the browser may detect it as malicious. Open the Zip folder location. Double-click the open the ventoy-x.x.xx-windows.zip file. Click the Extract all button from the command bar. Click the Browse button. Select a location to extract the files. Click the Select Folder button. Click the Extract button. Open the ventoy-x.x.xx folder. Double-click the Ventoy2Disk.exe file to launch the installer. Choose the USB flash drive from the “Device” setting. Click the Install button. Click the OK button. Click on This PC from the left pane of File Explorer. Open the Ventoy drive. Copy and paste the ISO files to make them bootable. You can include the latest image of Windows 11, 10, Linux, etc. Once you complete the steps, you can use the USB flash drive to boot a device with the Ventoy software, where you can then choose to start the device with one of the ISOs you uploaded to the drive.
0 notes
Text
How to Make a Windows 10 Bootable USB?
How to Make a Windows 10 Bootable USB?
Today I’m going to show you how to create the windows 10 portable USB drive. So first of all you need ISO file, so if you have an windows -10 ISO file, Good & if you don’t have window’s 10 ISO so don’t worry, I will put a site below, my site where you can learn how to download windows 10 ISO file for free, actually it is free on Microsoft website you can just do the Google search windows 10 ISO…
View On WordPress
#bootable usb windows 10#create bootable usb#create windows 10 bootable usb from iso#create windows 10 bootable usb on mac#how to#how to create a windows 10 bootable usb flash drive#how to create bootable usb windows 10 in hindi#how to download and install windows 10#how to download windows 10#how to install windows 10 from a usb flash drive#how to install windows 10 usb#how to make a windows 10 bootable usb for free#how to make windows 10 bootable pendrive#how to make windows bootable usb#rufus bootable usb#rufus windows 10#windows 10#windows 10 bootable usb#windows 10 bootable usb drive#windows 10 bootable usb tool#windows 10 for free#windows 10 free#windows 10 installer#windows 10 iso#windows 10 usb drive#windows 10 usb install#windows 10 usb tool
1 note
·
View note
Text
El Capitan 10.11 6 Dmg Google Drive

El Capitan 10.11 6 Dmg Google Drive Windows 10
El Capitan 10.11 6 Dmg Google Drive Free
El Capitan 10.11 6 Dmg Google Drive Mac
Mac Os Dmg Install Mac OS X El Capitan 10.11 ISO / DMG Files Direct Download - ISORIVER. Mac OS X El Capitan: Being the 12th major release of macOS, Mac OS X El Capitan belongs to the Macintosh-Unix family of OS. It was majorly released for server. Keep talking and nobody explodes free download mac. Price Currency: USD Whatsapp for laptop. Mac Os X El Capitan 10.11.6 Google Drive Free. OS X El Capitan Partitioning. With the help of screenshots, I will be explaining some basic set of activities that are to be done while partition the OS X El Capitan drive. Alternatively, the same procedure will be explained with the help of a disk manager utility known as Stellar Partition Manager. Mac OS X El Capitan 10.11.6 Free Download Download Mac OS X El Capitan 10.11.6 latest version DMG bootable image setup by clicking the below button. It is a reliable operating system with support for all the latest devices and different enhancements. Mac OS El Capitan was released to manufacturing on 20th September 2015, almost three and a half years ago. Its latest version 10.11.6 (15G22010) was released on 9th July 2018, almost 7 months ago. This is latest version DMG image iso file OS X El Capitan 10.11.6 (bootable) for Mac users. Mac OS X El Capitan 10.11.6: Product Review: Sep 22, 2016 Unmount the dmg file named “Install macOS Sierra.dmg” (if it is mounted:) Go to the top menu of “Disk Utility” window and select “images” and then “Scan image for restore”.
These advanced steps are primarily for system administrators and others who are familiar with the command line. You don't need a bootable installer to upgrade macOS or reinstall macOS, but it can be useful when you want to install on multiple computers without downloading the installer each time.
MacOS Sierra 10.12 Installation ISO Media. MacOS High Sierra yang saya bagikan melalui link google drive di sini masih versi awal yakni 10.13.1. Sedangkan saat ini yang terbaru sudah sampai 10.13.4. Baiklah langsung saja linknya di bawah ini. Saya pecah menjadi 5 part agar gampang mengunduhnya. Belum sempat unggah yang single link. Tautan Unduhan MacOS High Sierra Google Drive.
Download macOS
Download Mac OS Sierra 10.12.dmg Google Drive Download Mac OS Sierra 10.12.dmg from Torrrent. In this article, you will learn about MacOS High Sierra with its features and I will guide you on how you can download the dmg file for MacOS High Sierra in different ways. So, focus top to toe and read the complete article.
Find the appropriate download link in the upgrade instructions for each macOS version:
macOS Catalina, macOS Mojave, ormacOS High Sierra Installers for each of these macOS versions download directly to your Applications folder as an app named Install macOS Catalina, Install macOS Mojave, or Install macOS High Sierra. If the installer opens after downloading, quit it without continuing installation. Important: To get the correct installer, download from a Mac that is using macOS Sierra 10.12.5 or later, or El Capitan 10.11.6. Enterprise administrators, please download from Apple, not a locally hosted software-update server.
Mac Os Sierra Dmg Torrent
OS X El Capitan El Capitan downloads as a disk image. On a Mac that is compatible with El Capitan, open the disk image and run the installer within, named InstallMacOSX.pkg. It installs an app named Install OS X El Capitan into your Applications folder. You will create the bootable installer from this app, not from the disk image or .pkg installer.
Use the 'createinstallmedia' command in Terminal
Connect the USB flash drive or other volume that you're using for the bootable installer. Make sure that it has at least 12GB of available storage and is formatted as Mac OS Extended.
Open Terminal, which is in the Utilities folder of your Applications folder.
Type or paste one of the following commands in Terminal. These assume that the installer is still in your Applications folder, and MyVolume is the name of the USB flash drive or other volume you're using. If it has a different name, replace MyVolume in these commands with the name of your volume. Catalina:* Mojave:* High Sierra:* El Capitan:
Press Return after typing the command.
When prompted, type your administrator password and press Return again. Terminal doesn't show any characters as you type your password.
When prompted, type Y to confirm that you want to erase the volume, then press Return. Terminal shows the progress as the bootable installer is created.
When Terminal says that it's done, the volume will have the same name as the installer you downloaded, such as Install macOS Catalina. You can now quit Terminal and eject the volume.
El Capitan 10.11 6 Dmg Google Drive Windows 10
* If your Mac is using macOS Sierra or earlier, include the --applicationpath argument, similar to the way this argument is used in the command for El Capitan.
Use the bootable installer
After creating the bootable installer, follow these steps to use it:
Plug the bootable installer into a compatible Mac.
Use Startup Manager or Startup Disk preferences to select the bootable installer as the startup disk, then start up from it. Your Mac will start up to macOS Recovery. Learn about selecting a startup disk, including what to do if your Mac doesn't start up from it.
Choose your language, if prompted.
A bootable installer doesn't download macOS from the Internet, but it does require the Internet to get information specific to your Mac model, such as firmware updates. If you need to connect to a Wi-Fi network, use the Wi-Fi menu in the menu bar.
Select Install macOS (or Install OS X) from the Utilities window, then click Continue and follow the onscreen instructions.
Mac Os Dmg Download
Learn more
For more information about the createinstallmedia command and the arguments that you can use with it, make sure that the macOS installer is in your Applications folder, then enter this path in Terminal:
Catalina:


El Capitan 10.11 6 Dmg Google Drive Free
Mojave:
Download Mac Os High Sierra 10.13.6 Dmg Google Drive
High Sierra:

El Capitan 10.11 6 Dmg Google Drive Mac
Mac Os Dmg File Download

El Capitan:
1 note
·
View note
Text
Windows 10 Uefi Iso

Windows 10 Uefi Iso File Download
Windows 10 Uefi Iso Usb
PAGE CONTENT:
What Can You Do with a UEFI Bootable Disk
How to Create a UEFI Bootable USB Drive in 3 Ways
How to Boot Windows 10 Computer from UEFI Bootable USB Drive
Bonus Tip: How to Repair Hard Drive and Recover Data with a WinPE Bootable Disk
The windows 10 ISO supports booting both UEFI and Legacy Mode. Mount the ISO and Copy the contents of the ISO to your DVD Burner (a USB Stick is the preferred method of choice) Then use the F12 BootMenu to select the UEFI DVD Device as the Bootable device. After creating the UEFI boot USB drive of Windows 10 from ISO using CMD utility, you can insert the USB to the computer that you need to install operating system and boot from the USB drive to launch the 'Windows Setup' wizard and continue with the installation process.
What Can You Do with a UEFI Bootable Disk
A UEFI bootable USB drive can be used to complete an in-place Windows upgrade or clean install of Windows 10. It's also needed to start the system when your computer cannot be booted due to a virus attack, MBR damage, bad sectors, corrupted system files, etc. Once you can start your computer from the USB bootable drive, you can perform a disk check and repair. These are the two most important reasons to use a bootable USB disk. Other purposes include backing up systems, using portal operating systems on a foreign computer, and protecting computer data security.
But how to create a Windows 10 UEFI bootable USB drive?
We all know that there are two boot modes for computers: BIOS VS UEFI. If you have a computer with a Unified Extensible Firmware Interface (UEFI), instead of the legacy Basic Input/Output System (BIOS), you should know how to create a UEFI bootable USB drive on Windows 10.
There are several different ways to make a bootable disk in UEFI mode. Let's learn together.
How to Create a UEFI Bootable USB Drive in 3 Ways
In this part, we will introduce three common ways to create a bootable USB drive by using Windows 10 Midea Creation tool, Diskpart, and third-party software - Refus.
1. Create a UEFI Bootable USB with Windows 10 Media Creation Tool
If you want to create a UEFI bootable USB media for an in-place upgrade or clean install of Windows 10, you can use the Microsoft Media Creation Tool.
To create a Windows 10 UEFI bootable USB, prepare a USB flash drive with at least 8GB of capacity. Then use these steps:
Step 1. Download Windows 10 installation media from the official website of Microsoft.
Step 2. Run the exe file of MediaCreationTool. Click 'Accept' to agree to the license terms.
Step 3. On the Windows 10 Setup screen, select 'Create installation media (USB flash drive, DVD, or ISO file) for another PC'. Click the 'Next' button.
Step 4. Click 'Next' on the language, edition, and architecture screen. Select the 'USB flash drive' option, and click 'Next'.
Step 5. Select your connected USB flash drive from the list. And click 'Next > Finish' to complete the process. Wait for the Media Creation Tool to download the files and create a bootable USB flash drive that you can use to install Windows 10 on devices with support for UEFI and BIOS.
2. Create a UEFI Bootable USB on Windows 10 with Diskpart
With the built-in Diskpart utility, you can also create a Windows 10 UEFI bootable USB drive. Note that this solution requires command-line operations, so if you're not confident, you’d better choose a simpler graphical solution.
The process of making a USB bootable drive will erase all data on it. Remember to back up important files and data in advance.
Step 1. Connect your USB flash drive to the computer.
Step 2. Type CMD in the Search box, and right-click on the Command Prompt, and select Run as Administrator.
Step 3. In Command Prompt, type Diskpart and press Enter.
Step 4. Type the following commands in order, and press Enter after each one.
list disk select disk # clean create partition primary select partition 1 active format fs=fat32 (it means you format the drive with fat32 file system) assign exit
Step 5. Copy the Windows installation files to the USB flash drive. You can do this by simply using copy-and-paste. Then, the process of creating a bootable UEFI flash drive with Windows 10 finishes.
3. Create UEFI Bootable USB Drive with Rufus
If you have difficulty in creating Windows 10 UEFI bootable USB with Diskpart, you can use Rufus, an open-source program that allows you to create a UEFI bootable disk on Windows 10/8/7.
Step 1. Download Rufus from the official website: https://rufus.ie/en/.
Step 2. Connect your USB flash drive to the computer.
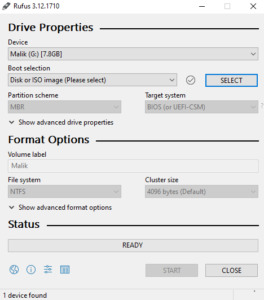
Step 3. Run this program and make the following main settings:
Device: Select your USB flash drive.
Boot selection: Select DISK or ISO image. And click the SELECT button to choose the Windows 10 ISO file from the folder location.
Partition scheme: Select GPT for UEFI.
Target system: Select UEFI (non CSM).
File system: Select NTFS.
On other options and settings, choose based on the actual situation. Then, click the START button to let Rufus create a UEFI USB flash drive.
How to Boot Windows 10 Computer from UEFI Bootable USB Drive
You can create a UEFI bootable USB drive on Windows 10 by taking any of the methods above. After successfully creating the boot disk, you also need to know how to boot your computer from the bootable USB.
Follow the steps below to start your computer from Windows 10 UEFI bootable USB drive.
Step 1. Connect the UEFI bootable USB disk to a dead, unbootable, inaccessible Windows computer.
Step 2. Restart your computer, hold F2/F11/Del to enter BIOS.
Step 3. Go to the Boot Drive section and set the UEFI bootable USB as the boot drive.
Step 4. Save the changes and exit BIOS. Wait for your computer to boot up from the UEFI bootable USB disk.
Bonus Tip: How to Repair Hard Drive and Recover Data with a WinPE Bootable Disk
When your computer cannot start, besides using the BIOS or UEFI USB bootable drive, is there another way to access the computer to fix errors and manage hard drives? Yes, you can resort to a disk management WinPE bootable disk by using partitioning software - EaseUS Partition Master.
With simple clicks, you can create an EaseUS Partition Master WinPE bootable disk and run it on your computer without system boot partitions. Then, you can repair and manage your hard drives with advanced solutions, or restore data by cloning the hard drive.
EaseUS Partition Master
Resize, merge, delete, create, and format partitions
Repair corrupted MBR that causes the hard drive to fail to boot
Clone hard drives to rescue data
Steps for creating a WinPE bootable USB drive with EaseUS partitioning software.
Step 1. To create a bootable disk of EaseUS Partition Master, you should prepare a storage media, like a USB drive, flash drive or a CD/DVD disc. Then, correctly connect the drive to your computer.

Windows 10 Uefi Iso File Download
Step 2. Launch EaseUS Partition Master, find the 'WinPE Creator' feature on the top. Click on it.
Step 3. You can choose the USB or CD/DVD when the drive is available. However, if you do not have a storage device at hand, you can also save the ISO file to a local drive, and later burn it to a storage media. Once made the option, click the 'Proceed' button to begin.
When the process finishes, you have successfully created an EaseUS Partition Master WinPE bootable disk. Now, you can manage your hard disks and partitions through the bootable drive whenever the computer fails to boot normally.
If you have RAID drives, load the RAID driver first by clicking Add Driver from the menu bar, which can help you add the driver of your device under WinPE environment, as some specific device cannot be recognized under WinPE environment without drivers installed, such as RAID or some specific hard disk.
Once the Easeus Partition Master bootable disk has been created, you can access your computer and the disk from this USB bootable drive for subsequent disk repair and data recovery operations.

Windows 10 Uefi Iso Usb
Wrapping Up
How to create a UEFI bootable USB on Windows 10? If you are still struggling with this question, you can find the answer here. You can create a UEFI bootable disk in four ways by using Windows 10 installation media, Diskpart, and Refus.
If you need to boot your computer from a USB bootable disk and manage or repair your disk in a WinPE environment, we strongly recommend you use EaseUS Partition Master, which enables you to clone failing hard drive to a new HDD/SSD.
1 note
·
View note
Text
El Capitan Mac Os Bootable Usb

It was 2009 when Apple last released a new operating system on physical media. Things have proceeded remarkably smoothly since version 10.7 switched to download-only installers, but there are still good reasons to want an old, reliable USB stick. For instance, if you find yourself doing multiple installs, a USB drive may be faster than multiple downloads (especially if you use a USB 3.0 drive). Or maybe you need a recovery disk for older Macs that don't support the Internet Recovery feature. Whatever the reason, you're in luck, because it's not hard to make one.
El Capitan Mac Os Bootable Usb Drive
As with last year, there are two ways to get it done. There's the super easy way with the graphical user interface and the only slightly less easy way that requires some light Terminal use. Here's what you need to get started.
Bootable USB Stick - macOS X El Capitan 10.11 - Full OS Install, Reinstall, Recovery and Upgrade SANDISK USB FLASH DRIVE 2.0/3.1 - 16GB - 5 years warranty Latest certificate (expires These USBs are NOT produced by Apple.
How to Create a Bootable USB with macOS Installer OS X El Capitan Create bootable USB drive with Mac Disk Utility Now that you have the installation files ready on your Mac, you can move them to your USB drive for future use. To install macOS on an external hard drive: 1. Connect the USB to your MacBook 3. Part 4: Boot Mac from macOS USB Drive for Installation. Now remove the USB drive and insert it into the Mac computer. To boot from the disk, you need to hold down the option key when you hear the boot chime. This will take you to the Startup Disk Manager, where you should be able to see the USB drive.

To install El Capitan, make sure the USB drive is inserted into the computer, then restart the computer while holding the Option (alt) key on your keyboard. Wait until the Startup Manager pops up, then select the 'OS X Base System' volume. Alternatively, you can just hold down the C key while starting up to boot directly into the USB drive. Now Create bootable USB for Mac OS El Capitan on Windows. Now it is the time to create a bootable USB installer using TransMac, To install Mac OS El Capitan on VirtualBox on Windows 10 you need a Bootable USB here you will learn the steps of creating a bootable USB installer for Mac OS El Capitan on Windows.
A Mac that you have administrator access to, duh. We've created El Capitan USB stick from both Yosemite and El Capitan, but your experience with other versions may vary.
An 8GB or larger USB flash drive or an 8GB or larger partition on some other kind of external drive. For newer Macs, use a USB 3.0 drive—it makes things significantly faster.
The OS X 10.11 El Capitan installer from the Mac App Store in your Applications folder. The installer will delete itself when you install the operating system, but it can be re-downloaded if necessary.
If you want a GUI, you need the latest version of Diskmaker X app. Version 5 is the one with official El Capitan support.
Diskmaker X is free to download, but the creator accepts donations if you want to support his efforts.
The easy way
Once you've obtained all of the necessary materials, connect the USB drive to your Mac and run the Diskmaker X app. The app will offer to make installers for OS X 10.9, 10.10, and 10.11, and it should run on OS X versions all the way back to 10.7—support for 10.6 was dropped in the most recent release.
Advertisement
Diskmaker X has actually been around since the days of OS X 10.7 (it was previously known as Lion Diskmaker), and it's still the easiest GUI-based way to go without intimidating newbies. If you're comfortable with the command line, it's still possible to create a disk manually using a Terminal command, which we'll cover momentarily.
Select OS X 10.11 in Diskmaker X, and the app should automatically find the copy you've downloaded to your Applications folder. It will then ask you where you want to copy the files—click 'An 8GB USB thumb drive' if you have a single drive to use or 'Another kind of disk' to use a partition on a larger drive or some other kind of external drive. Choose your disk (or partition) from the list that appears, verify that you'd like to have the disk (or partition) erased, and then wait for the files to copy over. The process is outlined in screenshots above.
The only slightly less-easy way
If you don't want to use Diskmaker X, Apple has actually included a terminal command that can create an install disk for you. Assuming that you have the OS X El Capitan installer in your Applications folder and you have a Mac OS X Extended (Journaled)-formatted USB drive named 'Untitled' mounted on the system, you can create an El Capitan install drive by typing the following command into the Terminal.
sudo /Applications/Install OS X El Capitan.app/Contents/Resources/createinstallmedia --volume /Volumes/Untitled --applicationpath /Applications/Install OS X El Capitan.app --nointeraction
Install Mac Os On Usb
The command will erase the disk and copy the install files over. Give it some time, and your volume will soon be loaded up with not just the OS X installer but also an external recovery partition that may come in handy if your hard drive dies and you're away from an Internet connection.
Whichever method you use, you should be able to boot from your new USB drive either by changing the default Startup Disk in System Preferences or by holding down the Option key at boot and selecting the drive. Once booted, you'll be able to install or upgrade El Capitan as you normally would.
Summary
How to make a bootable USB drive on Linux Mint (19.3) to allow you to install Mac OS X El Capitan on a MacBook with broken or corrupted recovery mode.
Background
I was recently given a 2011 MacBook Pro that had been “well-loved” and was therefore a mess of missing applications, ghost files and generally slow-as-hell. Since there wasn’t much worth saving I wiped it and initiated recovery mode in order to re-install OS X (El Capitan).
Having recently fixed a busted MacBook Air I had learned a bit about Recovery Mode (hold Command+R whilst pushing the Power button and release a few seconds after the machine wakes up). I tried that with this machine, and upon hitting “Reinstall MacOS X” was greeted with a prompt telling me it would take -2,148,456,222 days and 8 hours (an uncaught buffer overflow, me thinks). After about 30 seconds, a window pops up saying “Can’t download the additional components needed to install Mac OS X” and the installation gives up. The detailed error log says “Chunk validation failed, retrying” about 1000 times and eventually gives up altogether.
Further investigation suggests this may be something to do with security certificates having expired and hence the machine not being able to download the necessary files from Apple’s servers, but it seems the error can appear for all sorts of reasons. I also tried Internet Recovery (Command+Option+R) but that gave exactly the same error (and would also only have installed OS X Mountain Lion).
I then turned to attempting to make a bootable USB stick of OS X El Capitan from an image downloaded from Apple. I use Linux Mint on my main laptop and that was all I had available. Apple seem to assume everybody has a spare MacBook from which to create a bootable USB so they provide absolutely no documentation to help with this. I also couldn’t find a single guide online that worked from start to finish, so here I summarise what needs to be done.

Steps
As usual, this is all at your own risk 🙂
First you need to go to Apple’s OS Download Page and (step 4) get ahold of “InstallMacOSX.dmg” for El-Capitan. It’s a 6GB file so it might take a ‘lil while. You will also need to find a USB drive with at least 8GB capacity, and make sure it’s blank. The format doesn’t matter, because this procedure will format it correctly.
(In total you will need to use about 15-18GB of disk space by the time you’ve done all the extracting necessary, which shouldn’t be a problem for most computers but it was a challenge for my laptop with it’s 128GB SSD and dual boot Windows/Linux!)
Then you need to get a program called ‘dmg2img’
You can then extract the DMG
Now double click the .img file to mount it. In there is a InstallMaxOSX.pkg file. This requires a utility called “xar” to extract, which can be installed with these instructions (from https://www.oueta.com/linux/extract-pkg-and-mpkg-files-with-xar-on-linux/)

Then build and install with
Now you can extract the .pkg file. It will extract to the current working directory
Create Bootable Usb For Mac Os X El Capitan
Now, within the extracted files you will find something called InstallESD.dmg. This actually contains all the interesting boot files, but it isn’t a pristine image, so we can’t just burn it to a USB. Thankfully, a script exists to convert this DMG to a bootable usb, and it’s available here. It takes the DMG and writes everything directly to the USB in the right place.
El Capitan Macos Bootable Usb
ONE CAVEAT: When I ran this script on my InstallESD.dmg, it crashed because it didn’t recognise the checksum. I think this is because Apple updates the dmg’s anytime there is a security update for El Capitan so the checksum list isn’t updated. All I did was delete the checksum check from the script above. Essentially, just open the script and delete this section
Mac Os X El Capitan Dmg Bootable Usb
Once I had done this, I ran the script with my USB connected (/dev/sdb for me, but CHECK YOURSELF with fdisk or similar) and after quite a while it finished copying.
I plugged the USB into the MacBook, and opened the startup menu by holding down Option whilst pushing the power button. This gave me the choice of booting from EFI, or choosing a WiFi network. Click on the EFI, and then follow the prompts to install OS X from the USB drive!
When you’re done, you may need to use Parted or a similar utility to re-format your USB as a normal drive again.
1 note
·
View note
Text
El Capitan Bootable Usb Dmg

Today i am showing how to make a boot able usb drive for mac using a dmg file 8gb usb drive and the disk utility that comes with mac os x. Because since el capitan the disk utility of macos was different if you running el capitan and want to create bootable u sb for macos sierra you can use yosemite disk utility for el capitan just google it. Now using a Windows tool called Transmac (15 day trial) to create a bootable El Capitan USB from the dmg file downloaded from Apple. Will post again with result / subsequent actions / results. Probably the copy of OS X 10.8 I got from a 3rd-party site and used to update 10.6 was dodgy.
Create Bootable Usb Dmg Windows. To install macOS High Sierra restart computer hold the Option (ALT) key and select Installation USB drive from the menu. Microsoft Office 2011 V14 0.0 Dmg Free Download. Ff14 Lb Does More Dmg If Youre Gear Is Better.
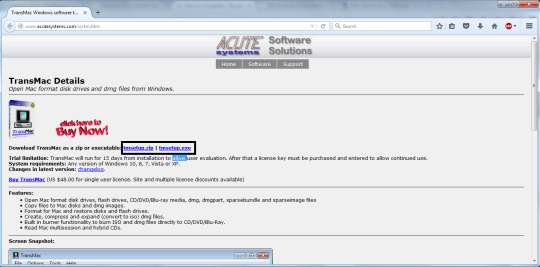
In this article, I will show you How to create Bootable USB for Mac OS El Capitan on Windows using Transmac. Therefore, you can create bootable USB for your Mac using Transmac on windows 10/7/8/8.1 here you will learn the easiest method of creating bootable USB. As you know that Mac OS EL Capitan is the newest version among Mac. In here just follow my steps to create a bootable USB installer for your Mac. is the twelfth major of the Mac operating system. Therefore, it has outstanding features that the previous version of Mac doesn’t have that. It is better now that we should create a bootable USB installer drive to install Mac OS.
You all have the information about “Transmac” software about its function that how it works, or how to download “TransMac” and how to install that on your Windows PC? However, you need the following requirements to create a great bootable USB installer for Mac OS El Capitan.
Why we use TransMac to Create bootable USB for mac os el Capitan?
TransMac is a simple application to open hard drives disk, Flash drives, CD/DVD high-density floppy disk on Windows 10/7/8/8.1 or lower version of other Windows. to use this application you just need to insert the drive you need, and one of the great function is this that it will automatically read the drives, TransMac is a great tool that you can access the Mac file on Windows operating system using TransMac.
TransMac Features
You are allowed to use the TransMac for 15 days trial, and after that, if you want to use that more then 15 days then you need to purchase that. All the features are the same for Mac.
The system requirements are you need Windows 10/7/8/8.1 or Windows Vista and XP.
The users can buy TransMac for $59.00 with the license.
Apple files system (APFS) are only supported.
Open Mac APFS/HFS/HFS+ format disk drives, flash drives, CD/DVD/Blu-ray media, HD floppies, dmg, dmg part, sparse bundle, and sparseimage files.
Copy files to Mac and image file
Format HFS to Mac
Save and restore image files to disk and USB flash.
Create, compress image files for Mac
Burn your ISO file and dmg file directly to CD/DVD Blu-ray.
View the partition layout
Now Create bootable USB for Mac OS El Capitan on Windows
Now it is the time to create a bootable USB installer using TransMac, To install Mac OS El Capitan on VirtualBox on Windows 10 you need a Bootable USB here you will learn the steps of creating a bootable USB installer for Mac OS El Capitan on Windows.
Step #1. Before going to create a bootable USB for Mac OS El Capitan you need to download TransMac. Therefore, you can download TransMac from the given link. After that, you are download TransMac now install that on your computer, the installation process is too much easy everyone can install that on their PC/Computer with a simple procedure. Just click on the setup file and with some click, the installation will finish. After that, Launch TransMac when TransMac is launched you will see the list of Flash drives or local disk. Then Right-click on that flash you want to create bootable USB for Mac OS El Capitan then select Restore with Disk Image.
Restore with the Disk image
Step #2. Now a warning message will pop-up after you select Restore with Disk Image, and in this step, select Yes.
Step #3. After that, you clicked on yes now a dialogue box will come just click on that and browse for VMDK file and select the file and click Open.
select Mac OS EL Capitan VMDK file
Step #4. After that, you clicked on Open in here your file will be ready to copy on USB drive click on “OK”.
Copying your File VMDK file to USB
Step #5. After that, you clicked OK now in this step, your Mac OS EL Capitan VMDK file will copy to your USB drive. Have patience and wait for some minutes that should copy your file.
Copying Mac OS EL Capitan File to USB
Conclusion
That’s all about it,Now you are totally done with creating the USB drive. Therefore, if you faced any problem regarding this you can comment on below comment box and share your ideas. Furthermore, we will discuss that and don’t forget to subscribe our website with your email address and have a notification about our latest post.
Jun 11, 2015 How to Make Bootable USB drive with.DMG for Tiger, Leopard, Lion, Mountain Lion, Mavericks OS X. Can I make a bootable dvd usb drive with.dmg file. Make Bootable USB. Jul 20, 2011 So if you create a bootable Lion-installer drive using the current version of the Lion installer—which, as of 2/10/2012, installs OS X 10.7.3—that drive will work with all current Lion-capable. Mar 03, 2018 Bootable USB Installers for OS X Mavericks, Yosemite, El Capitan, and Sierra First, review this introductory article: Create a bootable installer for macOS. Second, see this How To outline for creating a bootable El Capitan installer. Dec 14, 2019 How to Install macOS Catalina/ Mojave? Plug your bootable USB drive and restart your machine. Hold ALT+R keys during starting your mac computer. (Before Apple logo appears) Select your bootable USB on the screen and follow on screen instructions.
Are you trying to make a bootable installer? Do you have the El Capitan installer downloaded from the App Store? You cannot make a bootable DVD but you can make a bootable flash drive.
Create Bootable Usb Dmg Windows
Bootable USB Installers for OS X Mavericks, Yosemite, El Capitan, and Sierra
First, review this introductory article: Create a bootable installer for macOS. Second, see this How To outline for creating a bootable El Capitan installer. Simply replace the Terminal command with the one from the preceding article by copying it into the Terminal window. You will need an 8GB or larger USB flash drive that has been partitioned and formatted for use with OS X.
Drive Partition and Format
Open Disk Utility in the Utilities' folder.
After Disk Utility loads select the drive (out-dented entry with the mfg.'s ID and size) from the side list.
Click on the Erase tab in the Disk Utility toolbar. Name the drive, 'MyVolume'. <---- IMPORTANT!
In the drop down panel set the partition scheme to GUID. Set the Format type to Mac OS Extended (Journaled.)
Click on the Apply button and wait for the Done button to activate. When it does click on it.
Quit Disk Utility.
Create Bootable Usb Using Dmg File Windows 7
Create Installer
Open the Terminal in the Utilities' folder. Choose the appropriate command line (in red) depending upon what OS X installer you want. Paste that entire command line from below at the Terminal's prompt:
Command for macOS High Sierra:
sudo /Applications/Install macOS High Sierra.app/Contents/Resources/createinstallmedia --volume /Volumes/MyVolume --applicationpath /Applications/Install macOS High Sierra.app
Command for macOS Sierra:
sudo /Applications/Install macOS Sierra.app/Contents/Resources/createinstallmedia --volume /Volumes/MyVolume --applicationpath /Applications/Install macOS Sierra.app
Command for El Capitan:
sudo /Applications/Install OS X El Capitan.app/Contents/Resources/createinstallmedia --volume /Volumes/MyVolume --applicationpath /Applications/Install OS X El Capitan.app
Command for Yosemite:
sudo /Applications/Install OS X Yosemite.app/Contents/Resources/createinstallmedia --volume /Volumes/MyVolume --applicationpath /Applications/Install OS X Yosemite.app
Command for Mavericks:
sudo /Applications/Install OS X Mavericks.app/Contents/Resources/createinstallmedia --volume /Volumes/MyVolume --applicationpath /Applications/Install OS X Mavericks.app
Mac Os El Capitan Bootable Usb Dmg
Press RETURN. You will be asked for your admin password. It will not echo to the Terminal window. Then press RETURN again. Wait for the return of the Terminal prompt signifying the process has completed. It takes quite some time to finish. Be patient.
Mar 3, 2018 7:47 PM
If your Mac suddenly refuses to boot up properly, you might need bootable macOS install USB to make repairs. But how do you create such a disk if all you're left with is a Windows 10 computer? Fortunately, there's a great tool that you can use for free to create bootable macOS media on a USB drive in a Windows 10 environment. This article shows you how to download a macOS DMG file, format a USB drive using a GUID Partition Table, burn the DMG to the drive and boot your Mac from the USB. All the steps except the last one are done on a Windows 10 machine.
Part 1: Download macOS or Mac OS X DMG File
The first step is to get the DMG disk image file for the version of macOS that you want. You can get a copy of the latest macOS version from Apple download portal or App Store here. There are also several other direct download sites that offer various versions of Mac OS X in DMG format rather than the standard APP format that runs on Mac. Since you're working in a Windows environment, you need the DMG rather than the APP file.
Part 2: Format USB Drive to GPT
Mostly, the USB drive was formmated to FAT32 in default when being shipped out from the factory. However, FAT32 can be only used for installing OS with legacy BISO, which doesn't work for macOS. So the next step is to format your USB drive in the GPT partition style in order to burn installation files to the desired USB drive. You can do this in Command Prompt as admin. In elevated Command Prompt (Ctrl+Shift+Enter), input the following series of commands followed by Enter after each line: Diskpart List disk Select Disk X (X stands for the USB drive name that appears after the previous command) Clean Convert GPT Create partition primary
Part 3: Create Bootable macOS USB from Windows 10
You have now formatted the partition of USB drive. It's time to download TransMac for Windows. Although this is a premium software, you can use the initial free trial period to create a bootable macOS USB drive on Windows 10. After installing the application, follow the sequence of steps shown below:
Step 1: Right-click the icon and select Run as Administrator from the contextual menu. Choose Run when prompted.
Step 2: Insert your formatted USB drive, and you will be able to see it in the TransMac software on the left panel.
El Capitan Bootable Usb Dmg Download
Step 3: Right-click the USB and select Restore with Disk Image in the contextual menu. Click Yes in the warning popup.
Step 4: You will see a window that says Restore Disk Image to Drive. Here, select your DMG file in the dropdown menu and click OK.
Dmg To Bootable Usb Mac
Depending on the system configuration, this can take anywhere from a few minutes to a couple of hours. Once the progress bar is at 100%, a bootable USB is ready.
Os X El Capitan 10.11.0 Bootable Usb (dmg File)
Part 4: Boot macOS Install USB on Mac
Now remove the USB drive and insert it into the Mac computer. To boot from the disk, you need to hold down the option key when you hear the boot chime. This will take you to the Startup Disk Manager, where you should be able to see the USB drive. It might have a different name, but as long as it is bootable, you'll be able to see it there. Once you select it, the computer will boot from the disk and the macOS installation will begin.
Create El Capitan Bootable Usb From Install Macos.dmg
Conclusion:
Create Bootable Usb Using Dmg File Windows 10
The whole process might look a bit complicated if this is your first time, but just follow the instructions in this article and you should be fine. That being said, you need to be careful when downloading the DMG file and formatting your USB drive. If you don't do these two steps correctly, the output drive from the TransMac software won't be bootable, which means you can't install macOS using it, and you may need to do the whole thing over again.
Comments are closed.
1 note
·
View note
Text
Mac Os Sierra Bootable Usb

Bootable USB Stick for macOS X High Sierra 10.13 - Full OS Install, Reinstall, Recovery and Upgrade. If you do not have a spare USB drive, you can purchase a 32GB Sandisk drive for about $8.99 or a 5-pack of 64GB USB drives for $30 on Amazon. You can then create a bootable USB drive from the ISO. A USB flash drive or other secondary volume formatted as Mac OS Extended, with at least 14GB of available storage A downloaded installer for macOS Big Sur, Catalina, Mojave, High Sierra, or El Capitan.
Mac Os High Sierra Bootable Usb Windows 10
Macos Sierra Bootable Usb
Mac Os Sierra Bootable Usb
How To Make A Mac Os Sierra Bootable Usb
Now that Microsoft has released Windows 10 2004, otherwise known as the May 2020 Update, new ISO disk images for the operating system are available. As it is always a good idea to have a copy of the Windows 10 media in case you run into boot problems or need to reinstall, we will explain how you can download the Windows 10 2004 ISO directly from Microsoft.
Mac OS Mac OS Download Problems. What to do if the Mac OS High Sierra Download don’t download. During the download process, the massage “macOS High Sierra download has failed”. There are many problems that generates this message. If too many people try to download the software, you must wait and try to download later.
For those not familiar with an ISO image, they are sector-by-sector copies of a DVD that are stored in a disk image file. This ISO file can then be written, or burned, to another DVD to create a replica of the original, mounted as a drive letter in Windows, or extracted by a program like 7-Zip to access the files contained in it.
Below we explain how you can trick Microsoft's site into offering a Windows 10 2004 ISO rather than the Media Creation Tool.
How to download a Windows 10 2004 ISO from Microsoft
Mac Os High Sierra Bootable Usb Windows 10
The easiest way to download the Windows 10 2004 ISO is to use this link to download it from Microsoft.
Unfortunately, at some point, this link will most likely stop working. When that happens, you can use the steps below to trick Microsoft's Windows 10 download page into giving you an ISO instead of the Media Creation Tool.
Usually, when you go to Microsoft's 'Download Windows 10' page, you are only given the option to update via Windows Update or to download the Windows 10 Media Creation Tool.
Below, we will provide a method that causes Microsoft to offer an ISO image file for Windows 10 2004 instead.

To download the Windows 10 2004 ISO, follow these steps:
Go to Windows 10 download page in Chrome or the new Microsoft Edge.
Click on the Chrome menu, then More Tools, and then select Developer tools, as shown below.
Now press Ctrl + Shift + M to open the Device toolbar. This toolbar lets you force Chrome to impersonate another device such as a mobile phone or a tablet. Click on the menu that should show Responsive and select iPad or iPad Pro so that you have a larger screen to work with.
When you select one of these devices, you should see the screen resize to reflect the size of the device's screen. At this point, I suggest you change the zoom to 100%, as shown below.
Now refresh the page in the browser by pressing the F5 key. Once the page refreshes, Microsoft's site will now offer you the Windows 10 ISO instead of the Media Creation Tool. Now click on the drop-down arrow under 'Select edition' and select the 'Windows 10' option under 'Windows 10 May 2020 Update'. Once selected, click on the Confirm button.
After a few seconds, Microsoft's site will now ask you to select the language for your ISO.Select your language and press the Confirm button again.
Finally, you will be asked to either download the 32-bit or 64-bit ISO. When ready, click on one of these choices, and the respective Windows 2004 ISO image will be downloaded.
It should be noted that the above instructions work in any Chromium-based browser, not only Chrome or the new Edge.
Macos Sierra Bootable Usb
What should you do with the ISO?
Now that you have downloaded the ISO, you can use it to upgrade your existing Windows 10 operating system, perform a clean install of Windows 10 2004 to a new PC, or use it to access the recovery environment for troubleshooting.
For a clean install, you must have a Windows 10 product key available.
Before using the ISO, you will want to make sure you have a spare USB drive that you can use to create bootable Windows 10 USB media.
If you do not have a spare USB drive, you can purchase a 32GB Sandisk drive for about $8.99 or a 5-pack of 64GB USB drives for $30 on Amazon.


Mac Os Sierra Bootable Usb
You can then create a bootable USB drive from the ISO and use it to install the operating system.
For example, if you can no longer boot your computer due to a virus or wish to enter the Windows 10 Recovery Environment to remove a stubborn infection, you can boot your computer using the Windows 10 installation media to repair the computer.
It is suggested that all users create new media from the Windows 10 ISOs as new feature updates are released.
How To Make A Mac Os Sierra Bootable Usb
Related Articles:
1 note
·
View note
Text
Wiping HP Stream Laptop from BIOS to Install Linux Mint 20
I recently discovered that LINUX OS comes in various forms and that it typically requires far less computing power than Windows 10. This is perfect for the HP Stream I own which is basically useless when running Windows 10. The originally installed programs took up approximately 21gb of the 32gb hard drive. This laptop is not made for upgrade, alteration, or any type of re-configuring of the hardware so my only option to increase it’s stock performance was to use a USB storage device as my “C:” drive. Doing that allowed me to direct any newly installed or stored information to be placed on that device instead of the internal storage. While that helped a small amount, there are non-removable stock programs that would automatically update and take my available internal storage down to 5gb or less. I fought this multiple times and was only able to achieve 8gb of free storage (the minimum required to make a bootable fresh Windows 10 install thumb drive) after deleting many core functions we typically use with Windows 10. My solution was to dump Windows 10 all together and install Linux Mint 20.
After a bit of research, I created a bootable Linux Mint 20 thumb drive using BalenaEtcher. I first downloaded Linux Mint 20 onto my desktop of a separate and far more powerful Windows 10 PC, then opened BalenaEtcher and flashed the drive into a bootable device within a couple of minutes.
After getting my bootable drive squared away, I booted from that drive and tried to install Linux. I encountered multiple errors while attempting to do this (because I have never used any Linux OS and because I kept receiving storage device errors) so I decided to wipe the drive from the BIOS and attempted to give Linux a fresh drive to install on.
https://support.hp.com/us-en/document/c06204100
This link provided detailed instructions on how to wipe the drive. In my case, the steps were slightly different (BIOS>Security>Secure Wipe), but it accomplished the task. I am now reinstalling Linux Mint 20 again to see if this helps.
I am in the process of installing Linux Mint 20 and have encountered no errors so far. If anyone has any more information or tips, please feel free to share. As I mess around with my PCs more (on both Linux and Windows 10), I intend to detail my findings here in hopes of assisting others experiencing similar issues.
3 notes
·
View notes
Text
Boot Disk For Mac

Use an Existing Virtual Hard Disk Create Bootable USB for Mac on Windows 10. When the Virtual Machine is created, you need to apply some settings in order to boot mac normally. Open the settings of created Virtual Machine, visit the system tab uncheck the floppy disk. This time visits the process tab and increases the process from 1 to. How to create a bootable macOS High Sierra installer drive Put the macOS High Sierra installer on an external USB thumb drive or hard drive and use it to install the operating system on a Mac. How to create a bootable macOS Catalina installer drive Put the macOS Catalina installer on an external USB thumb drive or hard drive and use it to install the operating system on a Mac.
Boot Disk For Mac Os
Mac Os X Startup Disk
Active Boot Disk For Mac
These advanced steps are primarily for system administrators and others who are familiar with the command line. You don't need a bootable installer to upgrade macOS or reinstall macOS, but it can be useful when you want to install on multiple computers without downloading the installer each time.
In Windows on your Mac, click in the right side of the taskbar, click the Boot Camp icon, then choose Boot Camp Control Panel. If a User Account Control dialog appears, click Yes. Select the startup disk that has the default operating system you want to use. If you want to start up using the default operating system now, click Restart.
Download macOS
Find the appropriate download link in the upgrade instructions for each macOS version:
macOS Catalina, macOS Mojave, ormacOS High Sierra Installers for each of these macOS versions download directly to your Applications folder as an app named Install macOS Catalina, Install macOS Mojave, or Install macOS High Sierra. If the installer opens after downloading, quit it without continuing installation. Important: To get the correct installer, download from a Mac that is using macOS Sierra 10.12.5 or later, or El Capitan 10.11.6. Enterprise administrators, please download from Apple, not a locally hosted software-update server.

OS X El Capitan El Capitan downloads as a disk image. On a Mac that is compatible with El Capitan, open the disk image and run the installer within, named InstallMacOSX.pkg. It installs an app named Install OS X El Capitan into your Applications folder. You will create the bootable installer from this app, not from the disk image or .pkg installer.
Boot Disk For Mac Os
Use the 'createinstallmedia' command in Terminal
Mac Os X Startup Disk
Connect the USB flash drive or other volume that you're using for the bootable installer. Make sure that it has at least 12GB of available storage and is formatted as Mac OS Extended.
Open Terminal, which is in the Utilities folder of your Applications folder.
Type or paste one of the following commands in Terminal. These assume that the installer is still in your Applications folder, and MyVolume is the name of the USB flash drive or other volume you're using. If it has a different name, replace MyVolume in these commands with the name of your volume. Catalina:* Mojave:* High Sierra:* El Capitan:
Press Return after typing the command.
When prompted, type your administrator password and press Return again. Terminal doesn't show any characters as you type your password.
When prompted, type Y to confirm that you want to erase the volume, then press Return. Terminal shows the progress as the bootable installer is created.
When Terminal says that it's done, the volume will have the same name as the installer you downloaded, such as Install macOS Catalina. You can now quit Terminal and eject the volume.
* If your Mac is using macOS Sierra or earlier, include the --applicationpath argument, similar to the way this argument is used in the command for El Capitan.

Use the bootable installer
Active Boot Disk For Mac


After creating the bootable installer, follow these steps to use it:
Plug the bootable installer into a compatible Mac.
Use Startup Manager or Startup Disk preferences to select the bootable installer as the startup disk, then start up from it. Your Mac will start up to macOS Recovery. Learn about selecting a startup disk, including what to do if your Mac doesn't start up from it.
Choose your language, if prompted.
A bootable installer doesn't download macOS from the Internet, but it does require the Internet to get information specific to your Mac model, such as firmware updates. If you need to connect to a Wi-Fi network, use the Wi-Fi menu in the menu bar.
Select Install macOS (or Install OS X) from the Utilities window, then click Continue and follow the onscreen instructions.
Learn more
For more information about the createinstallmedia command and the arguments that you can use with it, make sure that the macOS installer is in your Applications folder, then enter this path in Terminal:
Catalina:
Mojave:
High Sierra:
El Capitan:
With a bootable Ubuntu USB stick, you can:
Install or upgrade Ubuntu, even on a Mac
Test out the Ubuntu desktop experience without touching your PC configuration
Boot into Ubuntu on a borrowed machine or from an internet cafe
Use tools installed by default on the USB stick to repair or fix a broken configuration
Creating a bootable USB stick is very simple, especially if you’re going to use the USB stick with a generic Windows or Linux PC. We’re going to cover the process in the next few steps.
Apple hardware considerations
There are a few additional considerations when booting the USB stick on Apple hardware. This is because Apple’s ‘Startup Manager’, summoned by holding the Option/alt (⌥) key when booting, won’t detect the USB stick without a specific partition table and layout. We’ll cover this in a later step.
Boot Disk For Mac
1 note
·
View note
Text
How to mount a USB bootable to Windows 10
We'll explain how a bootable USB can be created to install Windows 10 directly from a USB stick. This can be very helpful if you want to install Windows 10 from scratch without resetting it because you don't have an operating system installed on your Computer and also don't have a DVD drive, something that is becoming more popular.
We saw how to download an ISO from Windows 10 a few days ago. The method for making a bootable USB stick is much the same with the exception of installing the Windows update and copying it to a USB drive instead of being transferred to an ISO disk.

Build a USB Windows Bootable Setup
The first thing you need is the download and installation tool for Windows 10. You can download this free application from here by clicking Access the device now. Click on the file to start the installation when the download is finished, which should be fast because it doesn't take up too much.
After a few seconds on a screen that tells you that as normal certain arrangements are being made, you will now accept the terms of use and the license. It's a bit long text, so if you want to read it or not, I leave it up to you, but in any case you must accept the terms and click Accept to continue.
You arrive at the next window after another few seconds of waiting to make arrangements. You are asked what you want to do, and here you have to select the choice Build media installation. Click the Next button to continue as you do.
In the next window you can pick the Windows Installation language, version and architecture. The current settings are preselected and usually you don't need to adjust them, but uncheck the Use the approved options for this equipment box if this is the case. When you have it ready, click Next .
Now it is the most important part, as you have to select the USB flash drive option instead of the ISO file in the next window. As stated in the document, to be able to copy the Windows installation you need a USB drive that has a minimum of 8 GB of free space.

You will go to a new tab, choosing the USB you want to use and pressing Next. If you don't see this in the list, attach the USB to your computer's accessible port and press Check the Windows check drive list again. Note that this would erase all the data from your hard drive, so first you have to make sure that you don't want to risk any data.
That's it, get relaxed now because the installation tool for Windows 10 needs to installation Windows 10 and copy it to the USB memory, a process which can easily take several hours. Luckily, the computer displays you the percentage at all times and meanwhile you can continue to use Windows.
1 note
·
View note
Link
How To Create A Windows 10 Bootable USB Flash Drive😮
Hello Guys In this video I'll show you how to create Bootable Windows 10 USB Flash Drive Hope you enjoy the video & Find it useful
Follow Me On Instagram:https://www.instagram.com/howtosrb/?hl=sr
Check Out Our Channell:https://www.youtube.com/channel/UC2CkCh8vNsHml8-g325TjLQ?view_as=subscriber
#tumblr#like#aesthetic#love#tumblrgirl#follow#instagram#photography#likeforlikes#instagood#art#tumblrboy#windows#youtube#quotes#windows10#usb#video
6 notes
·
View notes
Video
youtube
How To Create Windows 10 Bootable USB Flash Drive
#How to Create Windows 10 Bootable USB Flash Drive#Windows 10 Bootable USB Drive#Windows 10 USB Drive#Windows 10 ISO#Windows 10 installer#How to Create A Windows 10 Bootable USB Flash drive#USB Drive#how to make a pendrive bootable for windows 10#download windows 10#How to download windows 10#windows 10 operating system#How towindows 10 download 64 bit#how to make bootable pen drive in windows 7#Thumbdrive#how to boot pendrive for windows
0 notes
Video
Free Live TV on Android, FireTV Stick and More MyWifi TV [2019], Free Live TV app November 2019 for Android, Fire TV Stick and other device. https://www.dailymotion.com/video/x7o12ys Alternate way to install downloader: https://www.youtube.com/watch?v=dEJ3Cni9qcs Fubo TV with 7-Day Free Trial: https://www.fubo.tv/welcome?irad=581753&irmp=1459016 Filmon Live TV HQ anywhere: http://www.filmon.com/?affid=324614Jr Fix all your Issue Latest complete Software Solution Video here: https://goo.gl/z5T2Xs how to create windows 10 bootable USB flash drive | create bootable usb windows 10: https://youtu.be/7hDhNAJzgN4 how to fix This site can’t be reached, 5 different Solution: https://youtu.be/RBwtQEWt6L0 100% Fixed the Site can’t be reached | 9 Easy way: https://youtu.be/W1ka_T-6xpA File explorer not responding windows 10/ Windows explorer not responding 12 Easy Ways to Fix: https://youtu.be/S5l5nhBGXhM Windows 10 Automatic Repair Loop, Startup repair could not repair your PC, 9 Easy Way Fixed: https://youtu.be/OYLOSzZzeww Recovery It looks like windows did not load correctly windows 10 6 easy way Fixed: https://youtu.be/FY23bYl8lHE Best VPN (Protect your Privacy) 75% off on Nord VPN: https://nordvpn.com/special/?utm_medium=affiliate&utm_term&utm_content&utm_campaign=off288&utm_source=aff24901 PIA VPN: Cheap and Best Award Winning VPN: https://www.privateinternetaccess.com/pages/buy-vpn/ IP Vanish VPN: Best Award Winning VPN (Coupon Code: SAVE20NOW) https://www.ipvanish.com/?a_aid=vpnkodi&a_bid=48f95966 Pure VPN; Great offer; Best Price: https://www.purevpn.com/order-now.php?utm_medium=referral&utm_source=aff-38987-www.youtube.com Support and Follow T-Soln Buy some Merchandise: http://bit.ly/tmerch Support T-Soln on Patreon: http://bit.ly/tpatreon Subscribe to Channel: https://goo.gl/rNmU4k Visit T- Soln Blog: https://t-soln.blogspot.com/ Like on Facebook: https://goo.gl/LAKWmq Follow on Twitter: https://goo.gl/rJUBuo Follow on Pinterest: https://goo.gl/t9S7gc Follow on tumblr: http://bit.ly/2It1HlL
1 note
·
View note
Video
Free Live TV on Android, FireTV Stick and More MyWifi TV [2019], Free Live TV app November 2019 for Android, Fire TV Stick and other device. http://www.mobypicture.com/user/renvinaz/view/20655445 Alternate way to install downloader: https://www.youtube.com/watch?v=dEJ3Cni9qcs Fubo TV with 7-Day Free Trial: https://www.fubo.tv/welcome?irad=581753&irmp=1459016 Filmon Live TV HQ anywhere: http://www.filmon.com/?affid=324614Jr Fix all your Issue Latest complete Software Solution Video here: https://goo.gl/z5T2Xs how to create windows 10 bootable USB flash drive | create bootable usb windows 10: https://youtu.be/7hDhNAJzgN4 how to fix This site can’t be reached, 5 different Solution: https://youtu.be/RBwtQEWt6L0 100% Fixed the Site can’t be reached | 9 Easy way: https://youtu.be/W1ka_T-6xpA File explorer not responding windows 10/ Windows explorer not responding 12 Easy Ways to Fix: https://youtu.be/S5l5nhBGXhM Windows 10 Automatic Repair Loop, Startup repair could not repair your PC, 9 Easy Way Fixed: https://youtu.be/OYLOSzZzeww Recovery It looks like windows did not load correctly windows 10 6 easy way Fixed: https://youtu.be/FY23bYl8lHE Best VPN (Protect your Privacy) 75% off on Nord VPN: https://nordvpn.com/special/?utm_medium=affiliate&utm_term&utm_content&utm_campaign=off288&utm_source=aff24901 PIA VPN: Cheap and Best Award Winning VPN: https://www.privateinternetaccess.com/pages/buy-vpn/ IP Vanish VPN: Best Award Winning VPN (Coupon Code: SAVE20NOW) https://www.ipvanish.com/?a_aid=vpnkodi&a_bid=48f95966 Pure VPN; Great offer; Best Price: https://www.purevpn.com/order-now.php?utm_medium=referral&utm_source=aff-38987-www.youtube.com Support and Follow T-Soln Buy some Merchandise: http://bit.ly/tmerch Support T-Soln on Patreon: http://bit.ly/tpatreon Subscribe to Channel: https://goo.gl/rNmU4k Visit T- Soln Blog: https://t-soln.blogspot.com/ Like on Facebook: https://goo.gl/LAKWmq Follow on Twitter: https://goo.gl/rJUBuo Follow on Pinterest: https://goo.gl/t9S7gc Follow on tumblr: http://bit.ly/2It1HlL
1 note
·
View note