#ue5 camera
Explore tagged Tumblr posts
Visit Tumblr Blog
Explore Tumblr blogs with no restrictions, modern design and the best experience.
Last Seen Tumblr Blogs


Fun Fact
Tumblr has been banned in Indonesia for providing people with access to pornographic content.
Text
We’ve created a fighting game camera in C++. Let’s see it in action!
youtube
#shawnthebro#ue4#unreal#stb#tutorial#youtube#unrealengine#unrealtutorial#unrealengine4#programming#UE#ue5#fighting game camera#fighting game#camera#fighting#game#games#fighter#unreal engine#unreal engine 4#unreal engine 5#unreal fighter#ue5 camera#ue4 camera#2D#3D#multiplayer#fighting games#3d fighter
0 notes
Text
nyren, knight commander
1 note
·
View note
Video
Mastering UE5: Dynamic Camera Shifting in Indoor Environments Tutorial
0 notes
Text
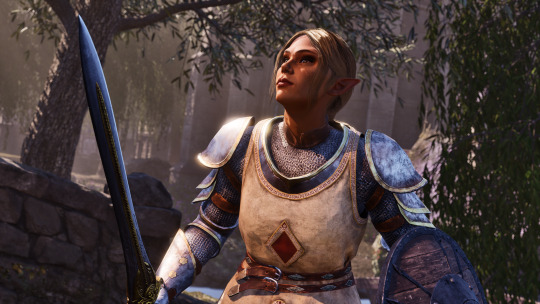
There’s something very funny to me about the fact that whenever I imagine Afonya’s future (hundreds of years after Skyrim) I always picture it with ESO-style graphics/camera angles/text boxes. Like my brain’s like “oh, it’s the future, the world must be rendered in UE5”
6 notes
·
View notes
Text
HAND
I drew a hand for the player

I used two reference images for this.

a screenshot of the game itself to help out with where the gun would be perspective wise

and this image of a hand holding a gun.

then i imported the sprite into UE5 and placed it into the players blueprint.
i had to scale it down and move it a bit, so here's the values


the sprite is a child of the camera, so wherever the camera moves the arm will move with it.
the sprite is also placed in a very particular way so that in game the bullet looks like it's spawning from the gun.
i've also made a shoot animation, however there's 2 issues.
1 - there's an impact frame which flashes the screen white. since this is a first person shooter, im questioning if it would be worth adding or if i should remove the frame.
2 - i have no idea how to implement the animation. i have a rough idea, but the specifics of it are where im having trouble.
here's the animation in question.
2 notes
·
View notes
Text
Keep bouncing off UE5 games?
Keep bouncing off UE5 games? Am I going crazy? I keep tapping out on UE5 games, and there's this odd saminess? Like, black myth wukong and clair obscure 33, if I removed all the player characters, I feel like black myths locations could be levels in clair obscure. Infinity nikki looks kind of unique but it also kind of looks like anime fortnight in some intrinsic way, like everything is made from the same material, and i dont like the look, theres just something across the games in ue5 and its tripping me out. decima, i went back and looked at the games made on the platform and have this feeling that in ue5 developers are angling the cameras or doing something habitually i don't enjoy. also the environments seem to kind of bunch up around the focal point of the camera, i cant quite put my finger on it but the way that environments look behind moving characters always feels like its both junky and too smooth. I'm not sure how to describe it. Maybe I had a problem with UE4 as well, ffr, hellblade. fallen order, all beautiful games but having this... plasticity? Immediacy? I'm really failing for words here. Of course i DEEPLY respect unreal engines incredible progress in so many crucial systems (and for makind devs lives easier and focusing on workflow) but I have this wierd thing where ill look at a game and be like, "thats unreal, I don't like the way it looks." before the unreal logo even flashes.am i dumb? i feel like every game is going to be made on ue5 and im worried of an abstract saminess Submitted June 24, 2025 at 06:45PM by CommunicationEast972 https://ift.tt/NnBPSU1 via /r/gaming
0 notes
Text
Unreal Engine HTML5 gamedev.
TL;DR: UE 4.23.1 for native, 4.27 with github; possibly 5.4 with UE from source but need to test if it is true. (i'm not interested in pixel tracing option)
My tests will be here:
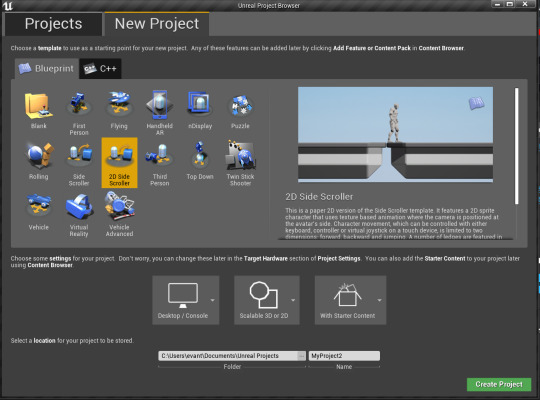
ok, im tired with build issues when im jamming, so i'll try to play around with old UE version at natively allows HTML5. there's a way to do it with 4.27 as well, but (4.23.1), but i want native UE support, not extra steps for now. ther4's also seemingly 5.4 support with UE source on github, but i'll need to test it. 4.23 compared to 4.27 (and surely 5) has more templates to play around with.
Because UE5 is wastly different in some aspects, i will stick with 2d and sidescrollers for now:
classic sega etc games (contra, mario bros, charlie the circus, little mermaid, chip n dale, ninja, motobike etc)
fighting games from side, not necessarily 2d.
will use Paragon assets for some ideas
animal assets like cats, horse and wild animals work (except wolf) from freebies
maybe fixed camera /demake horror games.
V is also supported, but i'm still not getting into Vr i guess? dunno

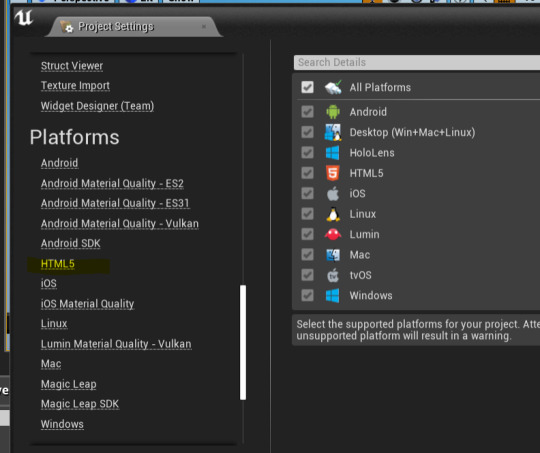
so yea, 4.23.1 is the LAST version that supports natively HTML5:
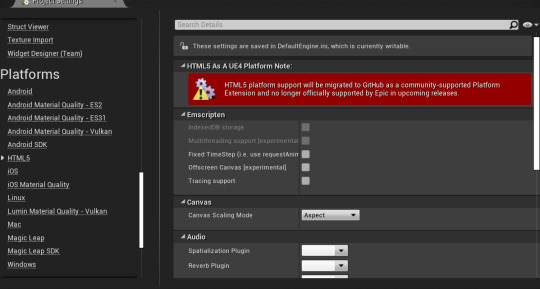
How to package is actually here, other buttons don't allow saving the project as HTML5, they just build:

///
518mb packed, 240mb zip. too big for itch??
2. maps only: 81m very quick packaging; 24.6mb zip YOYOYO IT WORKED the key is to find .html file in the packed by UE folder, change name to index.html Thenturn it into .zip and upload to itch.io
#unreal engine#unreal engine 4#html5#unreal engine html5#gamedev#indiedev#game jam#solodev#devlog#game development
0 notes
Text
Last changes in UE5:
Here, I entered the 'RocketControl' widget and deleted the text that displays the world location of the rocket blueprint. This is because I simply don't need it as it was only there for bug testing.

Next, I added a translucent box for where I display the engine status.

After that, I made the outline to the camera boxes black by dragging down the slider. I did this to increase visibility.

After that, I copied and pasted the green hexadecimal colour code into the 'Tint' box for all the camera boxes.

I added a new textbox that says "First Stage Engine Status:". I also resized the translucent box. After that, I added an image box. I tried to find an inbuilt texture of a 2D circle to represent each engine. However, it kept saying this error.

As a result, I abandoned that idea and tried something else instead. I instead added multiple text boxes that say each engine is nominal.

Next, I had set the anchor points for the different boxes on the UI widget.

Lastly, I wanted to adjust the sunlight's direction.

0 notes
Text
How code works in ue5 for sonic
In Unreal Engine 5 (UE5), code for a Sonic-style game typically combines C++ and Blueprints to implement fast-paced character movement and responsive controls. The core logic for Sonic’s movement—like running, jumping, rolling, and boosting—is often handled in a custom C++ character class derived from ACharacter, where physics forces, acceleration, and slope handling are programmed to mimic Sonic’s iconic speed and momentum. Blueprints are then used to fine-tune interactions, animations, camera behavior, and level triggers. UE5’s Chaos physics engine and enhanced Nanite/Lumen rendering help create detailed, dynamic environments that maintain high performance during rapid traversal, ensuring that Sonic’s gameplay feels smooth and visually immersive.
The two sets of code that are important for most of sonic's moves is a piece of code that checks if sonic is in the air and if he is pressing the jump button again allows the player to pull off a homing attack and the other is checking if sonic is on the ground and not jumping and if so then homing attacks wont trigger but for sliding its the opposite as sonic has to be on the ground for it to have that box checked to allow sonic to slide with whatever button you have tied to the slide function.
0 notes
Text
What to do now
So this is just a short update post on what I am going to do now. As shown in the previous post I am suffering with really bad performance in Blender which is leading to no progression in building this scene. I think its best I bite the bullet here and switch over to Unreal engine as I know I can build this scene pretty fast with minimal issues.
I found this really good video which covers all the areas of setting up a HDRI in UE5 to making a camera movie sequence.
youtube
0 notes
Text
Challenges & Solutions
Developing a first-person temple exploration game in Unreal Engine 5 presents several technical, artistic and design challenges. Below is a breakdown of key obstacles I anticipate and the planned solutions to mitigate them.
Technical Challenges
Challenge: Performance Optimization with High-Fidelity Assets
Problem:
Using Nanite & Lumen with dense foliage, modular temple assets, and dynamic lighting may cause frame drops.
The FPV Camera Rig must run smoothly in real-time without stuttering.
Solutions: ✔ Aggressive LOD (Level of Detail) Settings
Reduce polygon counts at a distance for foliage and props.
Use UE5’s automatic LOD generation for static meshes.
✔ Occlusion Culling
Enable Distance Culling for small objects (e.g., pebbles, debris).
Manually define occlusion bounds in complex areas.
✔ Texture Streaming & Compression
Use virtual textures to reduce VRAM usage.
Compress textures where possible without losing quality.
0 notes
Text
It’s time to have a fully functional camera in code. There are very few things remaining. Let’s keep working on it!
youtube
#shawnthebro#ue4#unreal#stb#tutorial#youtube#unrealengine#unrealtutorial#unrealengine4#programming#the fighting game tutorial#indie fighting game#fighting series#ssb fighter#platform fighter ue4#fighter game#camera#camera system#unreal camera#unreal camera system#ue4 camera#ue5 camera#c++ camera#system#unreal engine 4#unreal engine 5#unreal engine#template#tutorials#guide
0 notes
Text
Oblivion Remaster Screenarcher/Virtual Photography Tutorial
bc selfishly i want so many hq photos
1. Downloading
Download Universal Unreal Engine 5 Unlocker. You'll need to subscribe to a Patreon for it. This will enable you to pause the game, remove UI, add lighting into the game for better shots of characters, change FOVs, and much more. While UE5 Unlocker is not strictly necessary (you can use the cheat togglefreecamera to fly around), I don't think you can do things like add lighting and changing the cameras FOV nearly as easily.
You will also need ReShade, which is thankfully free. Without ReShade, the hotsampling and depth of field portions of this tutorial won't work. If you don't want a preset, you don't have to have one. Just ReShade's functionality is needed here. Make sure when you download ReShade that you download the one with full add-on support. This is important later.

2. Enabling UE5 Unlocker
Once you have the UE5 Unlocker downloaded, put it in a folder of your choosing. Start running Oblivion, then UE5 Unlocker by double-clicking this

Once open, you'll need to select a game to inject this camera tool into. Pick Oblivion, then you should be good to go!
3. Controls for UE5 Unlocker
Set up your keys the way you like. The way it's set up by default doesn't work well for me personally, so I always change the camera movement keys. It'll all come down to personal preference.
4. Hotsampling (Taking HD screenshots)
Hotsampling means that you'll briefly run the game in a higher resolution than what your monitor is. If you're playing on a 4k screen, you can probably ignore this step unless you want HUGE screenshots.
Before you start hotsampling, make sure your game is in windowed mode. If you have two monitors, make sure that only one is enabled while hotsampling. If either of these settings is ignored, it will not work. Make sure ReShade is downloaded as well — once it is, navigate to the settings tab (you can get there by pressing Home on your keyboard). Make sure you like the screenshot key that's set up, and change it if you don't like the default. By default, your screenshots will go to the folder where the game's .exe is. You can also change the screenshot folder location if you'd like. You have to take hotsampled screenshots with ReShade.
Now navigate to the hotsampling tab in UE5 unlocker & change the numbers in these two boxes to be something higher than your monitor's size (you can find your monitor's size in your PC's display settings if you don't know yours). I usually go for 2x larger. Hit run. Your game will probably be half off your screen, which means it's working! Take a screenshot using the screenshot key you set up earlier. Find it in the folder, and it should be in high resolution!
To bring your game's screen back to a normal size, hit the fake full-screen button.
Alternatively, if not using UE5 Unlocker, SRWE is another utility for hotsampling. I haven't tried using it with the remaster yet, but I imagine it should work.
5. Adding Depth of Field to Screenshots
This is basically an add-on for ReShade that renders really incredible depth of field for screenshots. Download it from here, and follow the page's instructions on how to install and use.
A quick tip is to set the rendering to slow instead of fast. I find this helps my images to look way less blurry for whatever reason.
I find this helps remove the dot-like effect on the rendering of hair in-game.
6. Post-Processing
By doing all of this, my screenshots went from this to this <3
This one is up to your own tastes! You can leave your screenshot as is, or edit it. I just figured I'd mention Photopea to edit screenshots as it's a free & great editor.


Please reach out in the comments if you need help or have questions! I love this sorta stuff
4 notes
·
View notes
Text
Horror game design ideas (Using AI and from watching "Blair Witch Project" and "Slenderman")
Setting & Atmosphere (Isolation & Paranoia) Endless, Shifting Woods (Like Slender: The Eight Pages)
Use Procedural Foliage (UE5’s Nanite/Lumen) to create dense, repeating forests that disorient players.
Add fog (Exponential Height Fog) and dynamic lighting (flickering flashlight, distant shadows).
Abandoned Structures (Like Blair Witch)
Scatter ruined cabins, ritual sites, and eerie landmarks (stick figures, torn maps).
Use decals (blood, scratches) and sound cues (whispers, twigs snapping) to hint at danger.
Dynamic Horror Mechanics "Pursuer" System (Slender’s Stalker AI)
Create an invisible enemy (like Slender Man) that appears only in glimpses (via particle effects or camera glitches).
Use UE5’s AI Perception System to make it react to player noise/light.
Found Footage Effects (Blair Witch VHS Style)
Add film grain, camera shake, and static distortion (via Post Process Volumes).
Let players find audio logs/notes (like Blair Witch’s tapes) that reveal lore.
Psychological Tricks (Mind Games) "Looping" Paths (Blair Witch’s Lost in Woods Feeling)
Use Level Streaming to subtly rearrange the map when players turn around.
Place identical landmarks (e.g., the same tree, rock) to create deja vu.
Sanity System (probably not) - If players stare at horrors too long, distort vision (chromatic aberration, screen tears).
Sound & Lighting (Fear of the Unknown) Directional Audio
Distant screams, footsteps, and whispers that seem to move around the player.
Dynamic Shadows
Make trees cast human-like shadows when nothing is there.
Map Expansion ideas
Modular Design: Reuse assets (trees, rocks) but tweak lighting/placement to avoid repetition.
Hidden Triggers: Use Blueprints to spawn scares (e.g., a figure vanishes when the player blinks).
Easter Eggs: Add cryptic symbols (like Slender’s pages) or Blair Witch’s stick figures in hidden spots.
0 notes
Text
Portfolio, Documentation and Pitch (Aryan Raj Adhikari)
Development Tests #1
Since, I have finished with the compilation of all of the possible references to help assist me in my final project journey, I start carrying a couple of tests to make sure that I am well equipped when I start the production phase.
The first thing I did was to analyze the concept art and break it down into different elements.
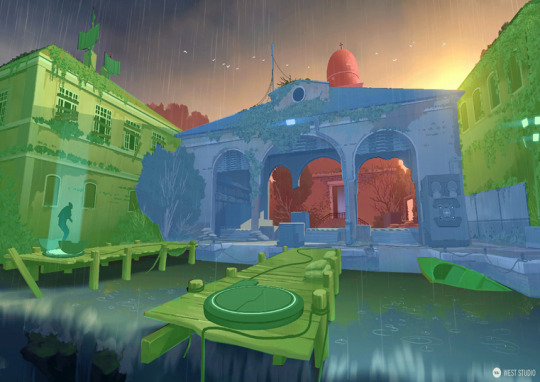
Figure 1 (Concept art breakdown)
The concept art has been broken down into 3 elements; foreground elements in green tone, midground elements in blue tone and the background elements in the red tone.
The foreground elements include the bridge, the portal contraption, the cables, the boat, the floodlights and the two buildings on either side. The building however could also be classified under the midground elements but I placed it in the foreground elements. The midground elements include the main archway building, the platform, crates, the sandbags and the main tree actor in the left corner. The background elements include the dome structure, the distant background building and the foliage and assets that are present in the vicinity.
The architectural assets include the two buildings on either side, the the archway structure and the background dome. The foliage include variations of trees, ivy plants, moss and water pads. The modular assets in the art are mostly the wooden panel and the beams that make up the pier bridge while the small assets include the boat, crates, cables, the teleporter, the floodlights, panels and the sandbags.

Figure 2 (Rough blockout inside UE5)
I went ahead and created a simple blockout inside Unreal Engine 5 to figure out the general layout composition and the shape language of the overall level. I used simple primitives like cubes, spheres and cylinders for a faster and efficient blockout.
Resizing and duplicating the assets as necessary, I then set a camera with the proper focal and zoom settings to match the perspective and locked it so I can work on that view exclusively while tweaking it later on.
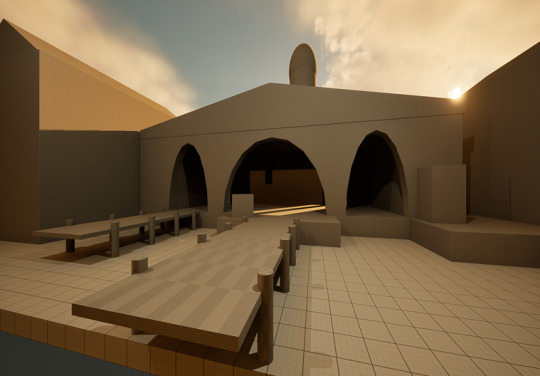
Figure 3 (Rough lighting pass inside UE5)
A simple lighting pass was set to match the general lighting mood for the scene, making it more similar to the concept artwork. I added a directional light to replicate the lightness of a sun and used a similar color tint to try and mimic the color composition of the concept artwork. I changed the position of the sun to get the similar sun glare in the corner and locked the manual exposure settings of the entire composition.

Figure 4 (Rough cloud cards)
I created a simple rough blockout for the cloud cards in Photoshop. This doesn't reflect the final cloud cards. I painted over the blockout in a new layer with an absolute white color using a wet brush. While working on the color, I also tweak the edges of the cloud using the eraser brush and the move selection brush. I started with a soft blue highlight tint for the silhouettes and a saturated blue highlight for stronger shadow emphasis. Finally, I manipulated the color of the hue/saturation to match the concept art composition which can also be done later inside Unreal Engine.

Figure 5 (Cloud FX test)
I modeled the cloud cards inside Blender and imported it to Unreal Engine. I created a material for the cards using its color and opacity masks. The material for the cloud cards utilizes the material functions and a master material with an instance material to control the parameters of the clouds.
It includes parameters like brightness, desaturation, hue shift and tint color to control the cloud cards. It also includes parameters like distortion speed and distortion strength to control the distortion flow of the clouds.
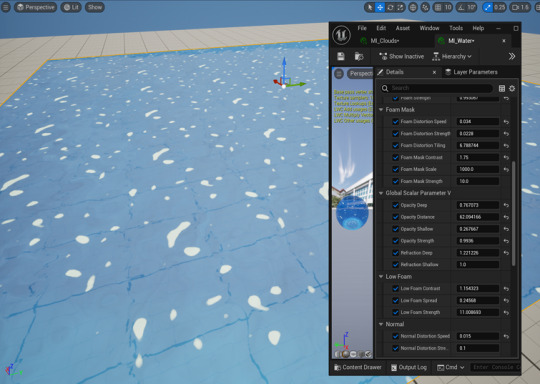
Figure 6 (Water FX test)
I created a water shader inside the Unreal Engine 5 entirely. The instance material of the water controls the parameters of the water shader. It includes a lot of parameters for the water FX that includes foam masks, normal, the low foam masks, the refraction settings and slots to change the opacity and the color map.
It also includes slots for noise maps that can be plugged to change the foam and normal masks which control the flow behavior of the water shader.
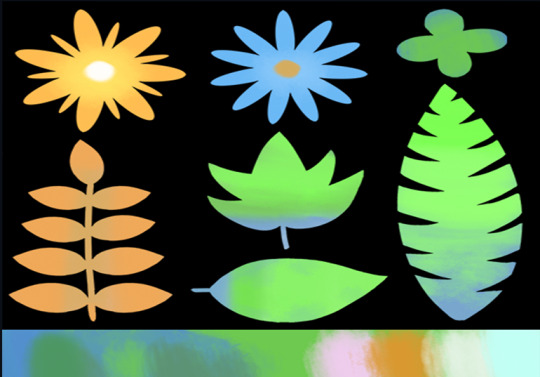
Figure 7 (Rough foliage cards)
I also decided to tackle the foliage as it could prove to be a bit difficult. However, it was really easier than what I had anticipated. Just like with the cloud cards, I created a rough foliage card with different leaf and flower variations and colored it with a wet brush. I then exported a color map and an opacity map which was used inside Blender with the help of a particle system to create flowers and bush. It was then imported inside Unreal Engine where I created a foliage material that can be referenced for any variation.

Figure 8 (Foliage material test)
The materials for the foliage was created inside Unreal Engine 5. It contains a plethora of parameters like billboard properties, color control, a PBR map and shadows which can be tweaked as necessary. I also included parameters for subsurface that help control the tint in the foliage for a subtle gradient silhouette. This material also creates a simple wind parameter to control the flow of the foliage.

Figure 9 (Rough tree test)
I also went ahead and experimented with the trees based on the concept artwork. I decided to use TreeIT, a free alternative to SpeedTree. Although a lot less versatile than SpeedTree, it met the requirements I had to create a nice tree and I have decided to use TreeIT moving forward.
I used one of the rough foliage card as a test for the leaf billboards for the tree. Inside TreeIt, I can control a lot of different parameters for branches, branchlets, barks, leaves and its overall scale and deformation. It proved to be a very viable alternative to SpeedTree while experimenting with it. I will require 2-3 different variations of a small tree to populate my scene later on.
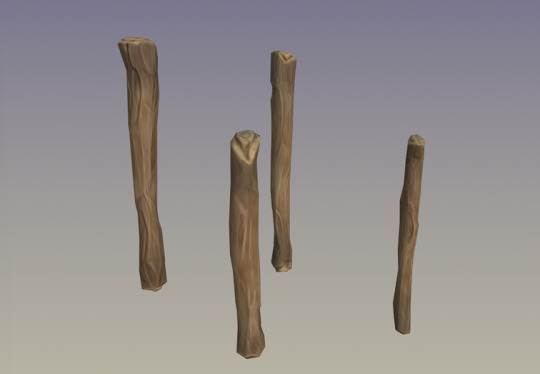
Figure 10 (Modular kit and shader test)
I created rough wooden logs as a modularity test to see if I could use these and build upon some of the scenes. I created 4 different variations of wooden logs. Sculpting it for stylization details and then importing it into Substance Painter for a shader test, it was a really rewarding and a fun process. I tried to mimic the shader of the logs as much as possible to that of the concept art. It is done with a simple procedural setup and utilizes black masks to add grunge maps as overlay details on top of the logs. Adobe recently released a 'Stylization' filter for Painter which allows you to replicate a stylized look based on presets which you can further tweak. The 'Handpainted' effect really allowed for a brushed touchup with grain noises being eliminated. This still requires much work but this test proved to be very useful.
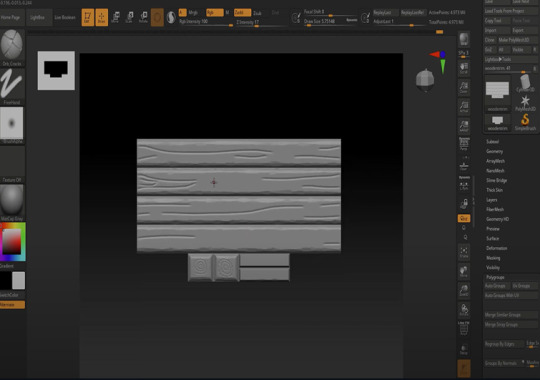
Figure 11 (Trimsheet test)
Instead of creating multiple different variations of wooden planks from scratch, I decided to undergo a trimsheet test to see if its viable for this project. I created a rough trimsheet in Blender and imported it to ZBrush where I sculpted wooden details onto it.
However, due to time constraint, I couldn't go further past this phase but I am confident that this approach would work for a lot of assets present in the concept art and I will employ this approach.
Having carried out these tests, I am happy to say that I am well equipped to tackle the final project head on. Still a bit more needed for testing which will be done in due time but for the meanwhile, I am really satisfied with this result.
0 notes
Text
DFX452 | Post 3 | 4/4/25
It's time to review what I've gotten done over the last few weeks. Here's a quick summary of my work since the last major blog post!
Modeled, sculpted, and textured a LOT of assets
Imported assets to UE5
Streamlined the dialogue system
Scripted cutscenes
Planned and scripted new capybara characters
Scripted cutscenes
Started building out forest grove
Began coding button puzzle
Began coding hand puzzle
Changed some grapple-mode camera mechanics
Now let's dive into some more detail.
Assets
I dedicated several weeks to just modeling assets, and oh boy, what a journey it's been. As a quick rundown of what I've done, here's a list for you.
Main gate
Lever and button
Wayshrine
Swing objects and shot objects
Statue location
Stone walls
Magic stone
Bamboo
Lily pad
Wood platform
Two wooden fences
Bridge
Rotating pusher (not yet textured)
Rotating platform
Up + down platform (not yet textured)
Stone hand statues
Grove wall piece
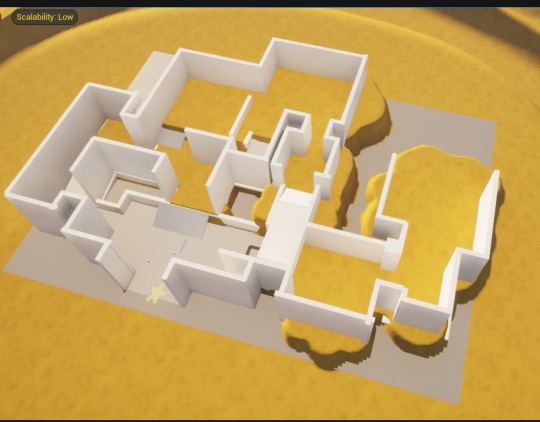
And here they all are, imported into UE5!

And here are two major pieces that I haven't brough into UE5 yet.


If you want more in-depth looks into these models, I recommend you look to some of my posts from the last few weeks.
Dialogue System
So, in my original demo, I had created a dialogue system that worked well enough, but moving forward past that first semester, I realized it was really inefficient for reusing characters when I wanted them to have fresh dialogue. My options were to either hard-code every single capybara's dialogue, which would be super disorganized and inefficient, or to create copies of every single character for each level. I also had no way of picking animations beyond the first level or so without even more hard-coding. Not good.
Everything would solve my problems if UE5 supported arrays of arrays. Fortunately for me, I found out about a node called Parse To Array, and it allowed me to have a sort of roundabout way of having arrays of arrays. This solves SO many more issues than just the ones listed above!
For reference, I had the dialogue change every time you talked to a capy, with each dialogue "chunk" split up into one or two sentences at a time. I did this by making an array for every single chunk of dialogue.
To fix it, I put each entire chunk in a single array, and would use the Parse To Array node to split up each chunk by using a non-used character to split the chunks into sentences. You can see the original on the left, and the fix on the right.
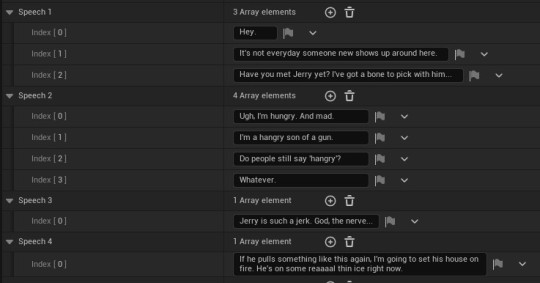

Now every level's dialogue fits within a single array!
Here is an example of an original capybara's variables next to the improved version.

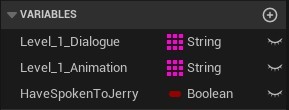
Same exact result, but now the characters are much more scalable and efficient.
Cutscenes
I can't really write much about the cutscenes, partially because I don't want to spoil them, but mostly because all I have is the script so far. I've never done a cutscene before, so I'm a little nervous about getting it done in time. Regardless, I had my sister (who is both a very skilled artist and an amazing writer) rewrite my original cutscene script to flow better, and she even changed the layout of the script to make it easier to storyboard. Thank you, Claudia!
Dialogue Writing
Again, I don't have much to write about this part, but I've written out the dialogue for 13 new capy characters that exist within the second level. Now it's basically just a matter of copy-pasting the dialogue within a child of the parent capybara class. This won't take more than a day, tops.
Forest Grove
This is part of the demo I may unfortunately have to either simplify heavily or cut out entirely, just for the sake of finishing the demo this semester. If it comes to that, I will absolutely still finish it, even if it's after graduation.
Anyways, many weeks ago I mapped this area out, and just recently got the base landscape sculpt done. Everything is very flat right now, but that'll change.
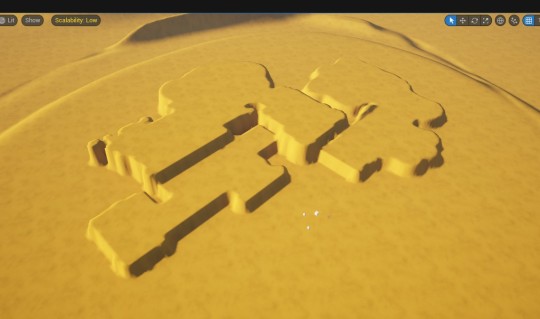
I also created a grove wall asset that I've been using to make the walls of each area look more realistic.

I'm not yet done setting all the walls up, but I'll be finishing that soon.
Puzzles
I've almost finished the button puzzle and the hand puzzle. I'm super excited about them! I do have some minor issues with the hand puzzle, but I'll be asking for advice during my next critique next week.
The button puzzle is simple: stand on button, gate opens, but it gets a little more complicated as you go on. Still, overall, it was simple to code and will be simple to solve.

The hand puzzle is a bit more complicated. I decided to have it be manipulated by mouse, since the camera mechanics have the player character in the center of the screen at all times. Plus, it would involve line tracing and a lot of complicated (and somewhat expensive) code, so I have the camera shift to allow an overlay where I have UI widget buttons set to 0% opacity that controls the hands.

Grapple Camera
At the advice from a classmate, I'm changing some grappling mechanics. I haven't finished it yet, but what I have done is shift the camera slightly when entering grapple mode, instead of switching abruptly to a first-person camera. This makes it flow a lot better.

I've still got a lot of fixing to do, but this is a good start.
Well, that about wraps it up! See you later!
1 note
·
View note