
Don't wanna be here? Send us removal request.
Statistics
We looked inside some of the posts by accessibledaytrips and here's what we found interesting.
Average Info
Notes Per Post
1
Likes Per Post
1
Reblog Per Post
0
Reply Per Post
0
Time Between Posts
5 days
Number of Posts By Type
Text
17
Last Seen Tumblr Blogs


Fun Fact
In 2020, Tumblr had 29.4 million users in the US.
Text
Link Between Hypermobility and POTS/Dysautonomia

In this blog post, we'll explore the connection between hypermobility, POTS, and other forms of dysautonomia. We'll examine how your sixth sense (proprioception) influences the nervous system, the physical effects hypermobility can have on blood pressure, and how to determine if you yourself are hypermobile.
What is POTS?
First, let’s define POTS. Postural Orthostatic Tachycardia Syndrome (POTS) falls under the umbrella of dysautonomia—a group of conditions related to dysfunction of the autonomic nervous system. The term “autonomic” means “self-governing”, referring to the system that controls involuntary functions you don’t consciously think about. This includes breathing, digestion, heart rate, blood pressure, body temperature, sweating, and more.
While some individuals with dysautonomia can identify a single cause, many cases result from a combination of multiple factors.
For more information about causes of POTS: Click Here
POTS and Hypermobility
Proprioception (joint position sense)
Proprioception is your body's ability to sense its position and movement in space—often called the “sixth sense.” When a person is hypermobile, this sense can be impaired, leading to decreased awareness of their body's position. For example, someone with inaccurate proprioception might believe their ankle is straight when it’s actually slightly tilted, or think their arm is tucked in when it’s marginally extended. This misperception can result in frequent twisted ankles, bumped elbows, and other injuries.
All these bumps and sprains can lead to hypervigilance. Growing up, children with conditions such as joint hypermobility syndrome (JHS) or Ehlers-Danlos Syndrome (EDS) have to learn to pay more attention to their position and surroundings than their peers.
This hypervigilance causes us to dial up the autonomic nervous system, particularly the sympathetic nervous system, which is responsible for fight, flight, or freeze responses. Over time, these high levels of adrenaline affect how we react to the world, living with higher rates of anxiety.
This constant upregulation of the adrenaline system can also result in an immune system that is constantly on high alert, potentially increasing susceptibility to mast cell activation syndrome and heightened reactivity to vaccines, infections, and stress. As a result, people with hypermobility may be more prone to developing chronic health conditions- such as POTS.
Physical Effects of Hypermobility
People with hypermobile joints may also have more flexible blood vessels. This can impair the systems responsible for regulating blood pressure when transitioning from a reclined to a standing position. Normally, when a person stands, their blood vessels contract to maintain an appropriate blood pressure; however, in individuals with hypermobility, the structures that control this contraction can be less effective. Instead of contracting, these vessels expand, leading to blood pooling in the legs and away from the heart and other vital organs.
This, combined with increased adrenaline levels resulting from proprioceptive dysfunction, can create a cycle of heightened physical responses to activity and stimulation.
Many people may notice early signs such as fainting or feeling faint during sports or experiencing tiredness or heaviness when standing for long periods of time. This predisposition often becomes more pronounced during adolescence and young adulthood, influenced by hormonal changes during puberty or increased stress from exams and work as one transitions into adulthood. This is why many seemingly active and healthy young people develop POTS in their late teens and early twenties.
Am I Hypermobile?
If these traits or experiences sound familiar, or you have a history of being unusually flexible—perhaps excelling in activities like gymnastics, ballet, or dance—it could indicate hypermobility.
How to Test for Hypermobility
The Beighton score is a test that detects joint hypermobility syndrome. The test uses a nine-point scoring system that measures the flexibility of the following joints:
Base of both thumbs
Elbows
Knees
Knuckles of pinky fingers
Spine

The test consists of two sections: the first involves a physical exam to assess joint flexibility, while the second includes questions about the patient's history of hypermobility and joint pain.
Click here for more information about the Beighton test.
Note: Around 3-10% of the population is hypermobile. Being hypermobile doesn't automatically mean you have or will develop POTS. It's important to remember hypermobility is just one piece of a larger picture, and each person's condition is unique.
Conclusion
I hope readers find the information in this post, along with the further reading provided below, helpful (and maybe relatable) in shedding light on some of the underlying factors contributing to POTS.
#health#healthylifestyle#hypermobility#EDS#accessibledaytrips#accessibility#wellness#pots#bloodpressure#daytripideas#dysautonomia#potsawareness#pots syndrome
0 notes
Text
Climping Beach

Climping Beach is a pebble and shingle beach located in West Sussex, England, known for its peaceful rural setting. It has been designated as a biological Site of Special Scientific Interest (SSSI) and is also a Local Nature Reserve.
Dogs are welcome on the beach all year round, making it a popular spot for dog walkers.
However, the area has become neglected over time. Large pebble sea defences now block the views from the car park and make it more difficult to access the beach than in the past. Additionally, all amenities such as toilets and cafes have closed, so visitors should plan accordingly.
Parking

There is a medium-sized car park with space for around 18 cars. There are no disabled parking spaces. Parking is free.
Accessibility
The steep slopes and stony surfaces unfortunately make this location unsuitable for visitors with limited mobility.
Visitors who struggle to walk long distances but can climb short, steep slopes may manage at this location due to the beachside parking.
Conclusion
Due to its lack of accessibility features, Climping Beach is unfortunately hard to recommend for visitors with limited mobility. Its isolated location helps keep it quiet and peaceful. If you are able to visit, you'll experience a unique coastline away from crowds, perfect for those seeking tranquillity.
Visitors can find more accessible beaches nearby at Bognor Regis or Worthing.
#health#accessibledaytrips#accessibility#accessibletravel#daytripideas#wheelchair#travel#wellness#pots#beach#climping#climpingbeach#Littlehampton
0 notes
Text
Selsey Beach

Location
Selsey is a charming seaside town located approximately eight miles south of Chichester in West Sussex. The Environmental Agency has rated the bathing water quality as excellent, ensuring a safe and enjoyable experience for beachgoers.
With some of the highest average sunshine hours in the UK and crystal-clear water, Selsey provides ample opportunities to enjoy its coastline—whether for a relaxing paddle or simply soaking up the sun.
Parking

The beachside car park is large, with 75 parking spaces on a level, stony surface.
Height limit: 2.10 metres
Prices:
Summer (8:00 AM - 6:00 PM)
- 1 hour: £0.70
- 10 hours: £2.20
Winter
- Free to park
Accessibility
With parking located right next to the beach, visitors can enjoy the sea views without needing to leave their car.
The seafront path is flat and easily accessed, suitable for wheelchairs and mobility scooters.
The beach itself can be reached via a steep ramp or steps.
There are benches along the seafront path.
Public toilets are approximately 100 metres from the car park, and they are suitable for disabled visitors.
Conclusion
With seaside views from the car park and accessible walkways, Selsey Beach is suitable for visitors of all ages and abilities. It offers a peaceful, less crowded environment—ideal for those looking for a relaxing day by the sea.
Although the amenities are limited—mainly an ice cream van during the summer months—this contributes to a quieter, more peaceful atmosphere compared to busier beaches nearby. If you're looking for family-friendly attractions or more facilities, East Beach, just 15 minutes away, may better suit your needs.
Enjoy your visit to Selsey and experience the beauty of this charming seaside town!
#health#accessibledaytrips#accessibility#accessibletravel#daytripideas#wheelchair#travel#wellness#pots#selsey#beach#accessible travel#dysautonomia
0 notes
Text
Canon AV-1: Classic Camera Review

The Canon AV-1 is a 35mm film SLR that was first released in 1979. While it closely resembles its famed older sibling, the 1976 AE-1, the AV-1 utilizes aperture priority instead of shutter priority and lacks full manual control. Although the AV-1 isn't as well-known and doesn't have the manual exposure options of the AE-1, its lower visibility can lead to great deals on auction sites and in the used camera market.
In this classic camera review, we will explore the history of the AV-1, its strengths and weaknesses, and provide you with the information you need to decide if this camera is right for you.
A Brief History
Seiki Kogaku, which later became Canon, began developing rangefinder cameras in 1933 with the Kwanon prototype, inspired by the Leica II 35mm camera. In late 1946, they released the SII, which introduced a combined viewfinder and rangefinder system, departing from the Leica design while retaining a similar look to the Leica III.
In 1956, Canon moved away from the Leica II style and adopted a more contemporary design. The Canon VT, introduced that year, was the first Canon camera with a swing-open back for easy film loading, although it still used the Leica lens mount.
From 1961 to 1976, Canon partnered with Bell & Howell, with several Canon products sold in the U.S. under the Bell & Howell brand, including the Canon 7 Rangefinder, Canon EX-EE, and Canon TX.
In 1959, Canon developed the Canon R lens mount for SLR cameras and released their first SLR camera in the same year. This was followed by the introduction of the Canon FL lens mount in 1964. In 1971, the FD lens mount standard was introduced with the highly successful Canon F-1.
Canon's success continued throughout the 1970s with numerous popular camera releases, including the AE series and the AV-1 in 1979. Following the FD mount, Canon launched the EOS series in 1987, bringing autofocus capabilities to their later film cameras and DSLRs.
Type
35mm focal-plane shutter SLR camera
Picture Size
24 x 36 mm
Kit Lens
Canon New FD 50mm f/1.8, New FD 50mm f/2 (Quick mount/demount type)
Lens Mount
FD mount
Shutter
Bulb, 2, 1, 1/2, 1/4, 1/8, 1/15, 1/30, 1/60, 1/125, 1/250, 1/500, 1/1000 sec. All speeds stepless and controlled electronically. Built-in self-timer (with adjustable delay and blinking LED).
Flash Sync
X-sync hot shoe.
Viewfinder
Fixed eye-level viewfinder. 0.87x magnification, 92% vertical coverage, 93% horizontal coverage. Split-image rangefinder focus screen. Exposure meter needle, shutter speed scale, overexposure and underexposure warnings, battery check index and camera-shake warning, and Flash-ready indicator.
Metering &
Exposure Control
Aperture priority. Metering range at ISO 100 and f/1.4: EV 1 – 18. Film speed range from ISO 25 to 1600.
Power Source
One 4G-13 6 V mercury oxide battery or 4LR44 alkaline battery
Film Loading &
Advance
Slotted take-up spool. Advances with camera-top lever’s 120 stroke (partial strokes enabled). Ready position at 30.
Frame Counter
Counts up. Resets automatically when camera back is opened.
Film Rewind
Camera-top crank
Dimensions &
Weight
139 x 85 x 48 mm, 490 g
Aesthetics and Build Quality

The AV-1 features a classic design, equipped with all the characteristics a film newbie would enjoy, This exemplified by its large dials and a chrome body. The AV-1 fits in well with any popular SLR from the 70's or 80's.
Constructed with a combination of metal and plastic, it feels solid and durable for an entry-level camera. The majority of the exterior is made from sturdy plastic, which is typical for cameras of its class. However, Canon cameras from this era are not weather-sealed, so users should avoid using them in rainy conditions.
While the AV-1 may not feel as refined or luxurious as higher-end cameras of its time, it remains pleasant to shoot with. It has a comparable feel to Olympus models like the OM-10 or OM-20, performing well alongside its contemporary consumer SLRs.
Lens Selection
The FD mount, developed by Canon in March 1971, served as the standard for interchangeable lenses in Canon SLR cameras until the EOS series was introduced in 1987. The FD mount remained in use through the release of the Canon T60 in 1990, marking the end of the FD system.
During its 21-year production run, Canon introduced 134 different FD lenses, ranging from 7.5mm to 1,200mm across seventeen fixed focal lengths and nineteen zoom ranges, making it one of the most extensive manual focus lens systems ever produced.
This makes the system very attractive to 35mm film photographers who are looking for the high optical quality, while not needing auto focus capability.
Sample photos: Click Here
Layout and Controls

With user-friendly controls, Canon's AV-1 is perfect for people new to photography or those looking for an easy-to-use camera that retains some aesthetic control with the use of its aperture priority shooting mode.
Looking through the viewfinder, the shutter speed is indicated by a needle that moves as you adjust the aperture. Focusing is performed using a split prism, and all primary controls are conveniently located on the lens, making the shooting experience straightforward and easy to grasp quickly.
There is a fully automatic mode, but I found the 30th of a second shutter speed used a little slow for impromptu photos.
If you are familiar with other aperture priority cameras, such as the OM series (other than the OM-1), the Pentax MV-1, Yashica Electro 35, Chinon CA-4, then you will feel at home with the AV-1.
Click here for a full tutorial of the Canon AV-1
Reliability
The AV-1 is generally regarded as a reliable camera, thanks to the solid construction typical of Canon cameras from this era, making it well-suited for regular use. However, like any older camera, its reliability depends on its condition. Models that have been well-maintained or serviced recently are likely to perform to a higher standard than models that have been left unused for long periods of time.
If your AV-1 does encounter problems, there are plenty of online guides and user manuals that can assist with repairs. Given Canon’s popularity, finding replacement parts shouldn't be difficult. It's worth noting that due to the camera's affordability, purchasing a whole new body may make more financial sense than paying for repairs, which can lead to waste, especially when the camera isn't especially rare or sought-after.
Most cameras of the AV-1's age would benefit from a CLA (Clean, Lubricate, Adjust), but with a bit of care and regular use, they can remain reliable for many years.
Price
You can typically find a working Canon AV-1 for around £60-£100, depending on its condition and any included lenses. It's advisable to aim for the lower end of that range since there are more appealing options available around the £100 mark.
When shopping online, ensure you only purchase from highly-rated sellers on platforms like eBay, or consider buying from a reputable used camera shop that offers a warranty.
Before committing to an AV-1, consider exploring other cameras within a similar price range. For £50 to £100, you might also come across options like the Olympus OM-20, the Canon AE-1, Nikon EM, or Pentax K1000, which provide manual controls.
Conclusion
In conclusion, the Canon AV-1 is a great option for people stepping into the world of film photography. With a wide range of sharp and affordable lenses, and user-friendly controls, you can't go wrong with the AV-1 or any of its Canon relatives of the same era.
Be sure to shop around and compare options to find a camera that fits your needs. If you're just starting out, automatic shooting modes may appeal to you, but a camera offering manual settings can provide more room for growth in the future.
0 notes
Text
Installing a "Turbo 3 Low Profile" Roof Vent: Peugeot Expert Campervan Conversion

Welcome to the fourth instalment of our camper conversion series! In this post, we'll be installing a roof vent on to our 2020 Peugeot Expert. You'll find a step-by-step guide along with helpful tips and tricks for your own conversion project.
We used a "Turbo 3 Low Profile" roof vent, as it only requires one 80mm hole and uses a single screw to secure it for an easy installation.
Click here of a full walkthrough video.
Tools Used

Roof vent: Link
Drill
Drill bit for pilot hole
80mm hole saw: Link
Hammerite anti-rust paint: Link
Sikaflex 522: Link
Flat file: Link
Measuring tape and pen
Footstep/ladder to reach the roof: Link
Step One: Cutting the Hole
youtube

Once I was happy with the measurements, I drilled a pilot hole to make sure I was as accurate as possible. After that, I switched to the 80mm hole saw.
youtube
I started drilling from inside the van upward until the shape of the hole was visible from the top. Then, I climbed onto the roof and drilled downward—this was much easier.
Tip: If you plan to stand on the roof, only put your weight on the structural points to avoid dents or damage.
Step Two: Preparing The Surface
youtube
After cutting the hole, I made the mistake of painting the exposed metal before checking if the fan fit correctly—which it didn't, as the hole was slightly too small.
I used the file to make the hole slightly larger and reapplied the paint after I had checked that the vent was fitting correctly.
Step Three: Installing The Vent

The vent came with three different sized screws to account for different roof thicknesses. After selecting the appropriate screw and adding the included rubber washer, the vent was ready to install.
The instructions didn't say Sikaflex was required, but I used some to be on the safe side and avoid leaks later on down the line. I spread Sikaflex around the rubber contact point that would meet the roof.
youtube
After removing a piece of misshaped plastic from the screw socket with a Stanley knife, I was ready to secure the vent.

The final step was to use a wet paintbrush to spread the Sikaflex evenly. It was a bit messy, but luckily, it’s out of sight.
What's Next?
In the next instalment of our campervan conversion series, we’ll be adding insulation and prepping the wiring for our leisure battery setup before reinstalling the ply lining walls.
For more van content, visit my YouTube channel here.
Click here for a full list of all our campervan conversion posts
#campervan#campervanconversion#howto#peugeot#peugeotexpert#tutorial#accessibledaytrips#vanlife#roof vent#Youtube
0 notes
Text
East Beach Pond

Location
Selsey is a charming seaside town located approximately eight miles south of Chichester in West Sussex. East Beach Pond is a picturesque and award-winning conservation area, located next to East Beach.
It's home to many types of wildlife, including swans, ducks, herons, and geese. You may also spot damselflies and dragonflies around the pond, and if you sit very still and quietly, you might even catch a glimpse of the water vole, one of Britain’s most shy and rare mammals.
East Beach Pond has received a Gold Award in the South and South East in Bloom competition.
The pond effectively combines its role in wildlife conservation with a friendly, inviting atmosphere for both locals and visitors. It’s the perfect spot for a relaxing picnic, featuring open green spaces and picnic tables that provide lovely views of the water.
East Beach Pond is one of many attractions at East Beach; others include:
A selection of cafes and fish and chip shops
Kids' play area
Skate park and bike pump track
Shingle beach
For more information about East Beach and its accessibility: Click here.
Parking

East Beach Car Park is located at the seafront and is very large, with 250 parking spaces, 12 of which are for disabled parking.
Height Restriction: 2.1 metres
Opening Times:
Opens: 7:30 am daily
Closes: Varies by month:
April: 8:15 pm
May, June, July: 9:00 pm
August: 9:30 pm
September: 7:00 pm
Rest of the year: 6:15 pm
Parking Costs:
Up to 1 hour: £0.40
More than 1 hour: £1.70
Payment Options:
Cash: Accepted at the machines
Mobile App: Pay via app (Mobon or RingGo)
Pay by Phone Location Code: 602016
Parking is free for Blue Badge holders.
Accessibility
The pond is accessible via wheelchair and pushchair-friendly pathways. There are frequent benches every 10-15 metres. The pond is just over 100 metres in length
The pond is adjacent to the car park.
Public toilets are located next to the children's play area. They include facilities for disabled individuals but do not have a baby changing area. They are closed during the night.
Conclusion
East Beach Pond is the perfect relaxation spot when taking a break from the beach and other local attractions. Its beautiful natural setting and accessible features make it suitable for visitors of all ages and abilities.
Whether you're looking for a peaceful place to enjoy a picnic, watch wildlife, or simply unwind, East Beach Pond offers a lovely and accessible escape for everyone.
#health#accessibledaytrips#accessibility#accessibletravel#daytripideas#wheelchair#travel#wellness#pots#selsey#eastbeach#pond#nature#wildlife#accessible travel#dysautonomia
0 notes
Text
East Beach Selsey

Location
Selsey is a charming seaside town located approximately eight miles south of Chichester in West Sussex, England. East Beach has a shingle shoreline that extends eastward towards Pagham Harbour and westward towards Selsey Bill.
The area offers a range of family-friendly attractions, making it an ideal destination for families with young children. Additionally, the Environmental Agency has rated the bathing water quality as Excellent, ensuring a safe and enjoyable experience for beachgoers.
With some of the highest average sunshine hours in the UK, Selsey provides ample opportunities to enjoy the waters—whether for a relaxing paddle or simply soaking up the sun.
What's There?

At West Beach, you will find:
Shingle beach
Kids' play area
Skate park and pump track
East Beach Pond
Cafés and fish and chip shops
Car park
Public toilets
East Beach Kiosk
Open every day from 10:00 AM to 5:00 PM. Offers hot and cold drinks, food, and ice cream. There’s outdoor seating to sit and enjoy.
Paddy's Plaice
A takeaway shop that serves quality fish and chips at affordable prices.
D & D Fisheries
A family-run business with a long history in Selsey going back to the 1600s. Open on weekends, they sell fresh seafood like crab, prawns, cockles, and seafood sandwiches.
East Beach Pond
A peaceful area that hosts local wildlife like swans, ducks, herons, and geese. This award-winning conservation area is also home to damselflies and dragonflies, and if you sit quietly, you may even be able to glimpse one of Britain’s most timid and endangered mammals, the water vole.
Wildlife
Seals are common visitors to East Beach, often resting on the shingle. Selsey's name comes from the Saxon "Seals-ey," meaning "Isle of Sea Calves".
Seals can be seen year-round, with the best viewing times during pup season (October to January) and warmer months (May to October).
Parking

East Beach Car Park is located at the seafront and is very large, with 250 parking spaces, 12 of which are for disabled parking.
Height Restriction: 2.1 metres
Opening Times:
Opens: 7:30 am daily
Closes: Varies by month:
April: 8:15 pm
May, June, July: 9:00 pm
August: 9:30 pm
September: 7:00 pm
Rest of the year: 6:15 pm
Parking Costs:
Up to 1 hour: £0.40
More than 1 hour: £1.70
Payment Options:
Cash: Accepted at the machines
Mobile App: Pay via app (Mobon or RingGo)
Pay by Phone Location Code: 602016
Parking is free for Blue Badge holders.
Accessibility
Coastal Path: The coastal walkway can be accessed by wheelchair and mobility scooter users via a long slipway from the far end of the East Beach Car Park. Alternatively, the walkway can also be accessed by a steeper, less accessible slope near the cafes.
Beach Access: The beach is less than 50 metres from the car park. The beach can be accessed by stairs or ramp (pictured above). The shingle shoreline will be challenging to navigate for visitors with mobility issues.
Cafes and Takeaways: All local cafes and fish and chip shops are accessible to visitors using wheelchairs and mobility scooters. The paths are level but bumpy/stony.
Seating and Rest Areas: There are frequent benches along the seawall and there are lunch tables around the cafes.
East Beach Pond: The pond is accessible via wheelchair and pushchair-friendly pathways. There are frequent benches every 10-15 metres.
Parking: The East Beach Car Park offers 12 disabled parking bays within close proximity to the beach and facilities. Parking is free for Blue Badge holders.
Public Toilets: Suitable for disabled visitors.
Conclusion
Selsey offers a delightful seaside experience with its clean bathing waters, family-friendly amenities, and abundant wildlife. Its accessible facilities, ample parking, and charming local eateries make it an ideal destination for visitors of all ages and mobility levels. Whether you're seeking relaxation, outdoor activities, or a taste of fresh seafood, Selsey’s East Beach promises a welcoming and enjoyable coastal escape.
#health#accessibledaytrips#accessibility#accessibletravel#daytripideas#wheelchair#travel#wellness#pots#accessible travel#selsey#west beach#beach
0 notes
Text
Accessible Cycle Route: Tilgate Lake

Accessible Cycle Routes
In our "accessible cycle Routes" series, we share trails that are suitable for riders of a variety of abilities. These routes may be shorter than those typically found on popular cycling platforms, with gentler slopes and smoother surfaces. This makes them suitable for individuals with health conditions or those in the early stages of recovery.
A full video of the route can be found at the bottom of the page.
Location
Tilgate Lake is the largest of three lakes at Tilgate Park and serves as a hub for water-based activities, including sailing, canoeing, rowing, and other water sports. The lake offers welcoming outdoor experiences for visitors of all ages and abilities.
Click here to find out more about Tilgate Lake and its accessibility features when visiting on foot, by wheelchair, or by mobility scooter.
Parking
Tilgate Fisherman's car park is located just before the golf course on Tilgate Drive. It is open all day, every day including bank holidays. There is a 2.1m height restriction.
There are 8 disabled parking spaces.
Pay and Display price:
£1.20 Per hour, up to four hours
£6.00 Over four hours (up to 24 hours)
Parking is free for blue badge holders.
About the route

Length: 1.2 mi
Duration: <15 min
Elevation: 25m
Suitable for: Everyone
This short circular route will take riders through woodland areas, past peaceful ponds, and offer stunning views of Tilgate Lake.
The route's short length will cater to visitors of all abilities and is perfect for those just getting back on their bike. It also features several optional paths, so you can extend your ride if you wish.
Accessibility

The route begins with a ramp leading up from the car park to the lakeside path. Once on the main path, the surface is well-maintained and smooth, with gentle inclines.
Throughout the lakeside area, benches are placed approximately every 50 meters, offering convenient resting spots. Remember to ride slowly and give plenty of space to pedestrians for everyone's safety.
Public toilets are available nearby at the main Tilgate car park.
Conclusion
This short circular route is perfect for visitors of all abilities, cycling or otherwise. If you're a more advanced rider, you may want to extend the route to include more of the park, or alternatively click here for a list of all our "accessible cycle routes" to find a route that suits your needs.
#bikeride#bikeroute#health#accessibledaytrips#accessibility#daytripideas#cycling#wellness#pots#tilgatepark#tilgatelake#lake#nature#accessible travel#dysautonomia
0 notes
Text
POTS and Hydration
2 min read

In this blog post, we'll explore the positive effects that staying well-hydrated can have for people living with Postural Orthostatic Tachycardia Syndrome (POTS). We'll discuss its importance, how it reduces symptoms, and the best ways to hydrate daily.
Why is Hydration Important?
Many symptoms of POTS stem from low blood pressure. When we stand up, gravity pulls blood down to the lower parts of our bodies, away from our brain and other vital organs. In POTS patients, our bodies struggle to adjust to this change.
By increasing our fluid and salt intake, we can boost our blood volume, which helps our bodies function efficiently and reduce symptoms such as lightheadedness, dizziness, and elevated heart rate.
Benefits
Staying hydrated provides your body with the support it needs to function optimally. With proper hydration, you can expect:
Reduced symptoms
Ability to be more active
Less likely to have a flare-up after activity
How Much Should I Drink?
It is recommended to drink 3 litres per day. This can be supplemented by including fluid-rich foods in your diet, such as:
Custard
Cream
Yoghurt
Ice cream
Sorbet
Ice pops and lollies
Ice cubes
Slushy treats
Jell-O
Soup, gravy, and sauces
Additionally, avoiding heavy meals can help prevent drops in blood pressure caused by digestion.
Although it may seem counterintuitive, increasing salt intake is beneficial. Higher salt levels help replenish lost electrolytes and promote better water absorption. It also replaces the electrolytes lost if you've been sweating, which is a commonly reported symptom by people with POTS.
Electrolyte tablets are a great way of increasing the level of hydration you receive and maximise the benefits of the water you drink. I've found the "HIGH5 ZERO Electrolyte Tablets", which can be found on Amazon are both cost-effective and pleasantly flavored.
Conclusion
I hope you find this information helpful in managing your POTS symptoms. Hydration is often the first lifestyle change recommended for people with POTS, but it’s crucial to remember that a comprehensive approach is needed to effectively manage any form of dysautonomia.
As well as proper hydration, lifestyle adjustments such as dietary changes, adapted forms of exercise, compression clothing, and prescribed medications will help people with POTS reclaim a rich and fulfilling life.
0 notes
Text
Worth Park Gardens
2 min read

Location
Worth Park Gardens are located at Pound Hill, in Crawley, and cover eight hectares of land. Throughout the park, visitors will find information plaques that share details about the park's history and its various trees and plant life. Some of the trees throughout the park date back to the 1840s.
The park is open 24 hours a day.
History
The park was originally a medieval deer park. The Worth Park Estate was purchased by Sir Joseph Montefiore in 1850. Joseph died in 1880, and the house and garden were remodelled by his son Francis Abraham Montefiore.
Ridley's Court, in Worth Park, dates back to 1882 and has been Grade II listed. The area around the lake obtained status as a Site of Nature Conservation Importance in 1992 and is habitat to a large variety of fauna and several rare plants. Two Pulhamite rock structures and the fountain and pond basin have also been listed.
What's There?

At Worth Park, you will find:
Visitor centre
Victorian fountain
Gardens
Meadow
Arboretum
Lake with circular walk
Croquet lawns and a tennis court
Ridley's Court
Public toilets

Kelly's Coffee
Located at the park entrance, visitors will find Kelly's Coffee, serving quality coffee and a good range of cakes, pastries, and biscuits from a converted horsebox.


Parking
There is a small car park located near the park's entrance, just outside Rileys Court. Parking is free, and there are three disabled parking spaces. Parking spaces can be limited during peak seasons.
There is also roadside parking in the surrounding neighbourhood.
When visiting the lake, there are also a few parking spaces along Selwyn Close.
Accessibility

The gardens have smooth paths that allow easy access for visitors using wheelchairs, mobility scooters, and parents with pushchairs. The outer path is fully accessible, enabling visitors to navigate around areas with stairs.
Benches are conveniently placed throughout the park, approximately every 50 metres.

The main car park is about 400 metres from the lake. Visitors will need to cross one road to reach the lake.
Please note that there is a gentle incline when returning from the lake.
Conclusion
Worth Park is a wonderful place to relax, offering a mix of wildlife, history, and a tranquil atmosphere. It has plenty of space for dog walkers and families with young children to enjoy. However, please be cautious of the road located at the far end of the gardens near the lake.
The gardens feature smooth paths and numerous places to sit and rest, making Worth Park accessible to visitors of all ages and abilities.
#health#accessibledaytrips#accessibility#accessibletravel#daytripideas#wheelchair#travel#wellness#pots#accessible travel#worth park#worth park gardens#garden#nature#crawley
0 notes
Text
Peugeot Expert Campervan Conversion: Insulating and Installing Vinyl Flooring
Welcome to the third instalment of our camper conversion series! In this post, we'll start by guiding you through the process of insulating your van's floor. Once the insulation is in place, we’ll move on to reinstalling the plywood floor and finish with vinyl flooring. You'll find a step-by-step guide along with helpful tips and tricks for your own conversion project.
A full walkthrough video is included at the bottom of the page.
What You'll Need
Item List
10mm sound deadening/insulation roll
Aluminium foil tape
Vinyl flooring of your choice
Adhesive spray
Tools Used
Electric screwdriver
Stanley blade
Scissors
Fabric scissors
Measuring tape
Step One: Measuring Insulation
For this step we used:
10mm Sound deadening/insulation roll
Measuring tape
Scissors
Aluminium foil tape
After removing the plywood floor in part one of the series, we're now left with a blank canvas to work with.
We started by measuring around the trim and wheel arches of the van. Like in previous steps of the conversion, we used cardboard to transcribe any shapes onto the insulation to make sure we'd get a good fit.
After we were happy with our first measurements, we moved on to the backside of the van.
At the far end of the van, we measured around the trim, which would remain exposed, this time drawing the markings on the reverse side by eye. I found this method surprisingly effective.
Step Two: Installing the Insulation
After the insulation was cut to shape, we separated the piece into two sections. This would make installation easier and allow us to make any adjustments where needed.
Once we were happy with the measurements, we were ready to stick down our first pieces.
Note about our method
I avoided using a wooden frame on the floor, as I didn't want to lose any headspace while sitting in the van. Initially, the plan was to use 10 mm wood to leave space for the insulation, but after realising the ribs in the van's floor were around the same size, I didn't want to raise it any more than needed.
This ended up making reinstalling the floor more difficult later on, as we needed to drill extra holes to ensure the warped plywood sat evenly when fastened. If I were to do this again, I would glue a wooden frame down and screw into it, rather than the van floor.
After that, we focused on insulating the remaining exposed areas of the floor. To maximise our materials and minimise waste, we cut the insulation into smaller pieces, the width of the insulation roll, rather than one long piece.
Once the floor was completely covered, we applied aluminium foil tape along the seams where the insulation pieces met, completing the final step of the insulation process.
Step Three: Cutting Out The Vinyl Flooring
Tools used:
Fabric scissors
Stanley knife
Pen
We started by laying down the vinyl flooring and then placed the original plywood floor on top.
Using the plywood as a stencil, we traced its shape onto the vinyl.
Step Four: Installing Vinyl Flooring Into The Van
Tools used:
Adhesive spray x2
Level or metre stick to flatten out the floor
Fabric scissors/knife for adjustments
After cutting out the vinyl flooring, the next step was to reinstall the plywood floor in the van.
Once the plywood was back in the van, I placed duct tape over the point where the two sections met to make the surface smoother before installing the vinyl.
After that, I rolled out the vinyl and checked if it fit correctly, making some adjustments around the wheel arches, which were now a little narrower after the insulation was installed.
We began by applying adhesive spray to the surfaces at the front end of the van after ensuring everything was lined up correctly. Once that first section was firmly in place, we rolled up the flooring and continued applying adhesive, working our way back in sections. I'd recommend using a long, flat object, such as a metre stick or a level, to smooth out the floor as you lay it down to avoid any bumps or bubbles.
Once the floor was fully adhered, I used a Stanley knife to trim the edges so there was no overhang, which would make installing the protective trip easier later on.
Step Five: Installing Trim
The first step was to measure and cut the upper section of the trim. I made cuts at each point where the trim would need to bend.
When there were the bends would cause the trim to fold over itself; I marked the point where they met and used this marking to cut out a V-shape. This would allow the pieces to fit together smoothly.
Once I was confident with the measurements, I started sticking down the top section of the trim. I did this part first because it would be the most visible. Since these top sections were cut, I was able to remove the adhesive tape piece by piece and stick down each part individually.
I then wedged the trim down firmly to make sure it would stick properly. Finally, I filled in the gaps that were created when the trim was bent at an angle. I filled these gaps in by cutting small pieces from the unused trim and placing them in the openings. I used a small amount of adhesive spray to secure these pieces and cleaned up any excess with acetone after they were fully set.
What's Next?
In the next instalment of our campervan conversion series, we’ll be installing a roof vent for improved airflow in the van. For more van content, visit my YouTube channel here.
Click here for a full list of all our campervan conversion posts
For links to all the items used click here
#campervan#campervanconversion#howto#peugeot#peugeotexpert#tutorial#accessibledaytrips#vanlife#insulation#vinylflooring
1 note
·
View note
Text
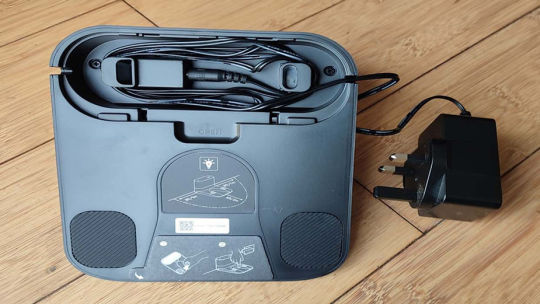
Eufy X8 Pro Robot Vacuum Review

The Eufy X8 Pro is a mid-tier robot vacuum cleaner available for approximately £330, which includes a self-emptying station.
In this review, we'll explore the performance, ease of use, and overall value of the X8 Pro robot vacuum. After a month of hands-on experience, I’ll share both its strengths and weaknesses to help you decide if it's the right choice for your home.
Specifications
Weight: 9.07kg.
Dimensions: H9.9, W35.5, D3.5cm.
Charge time: 3 hours
Running time: from 80 minutes to 180 mins
HEPA filter: traps small particles and pet hair, aiding allergy sufferers.
Maximum noise level: 80dB
Includes mopping module
Design and Build Quality

The Eufy X8 Pro features a design typical of robot vacuums, with a sleek circular shape. It's enhanced by sharp accents and vibrant orange lettering, giving it a modern and stylish appearance.
Upon lifting the vacuum, you’ll notice it has a substantial weight, suggesting a robust build quality. Right out of the packaging, the high-quality materials used in its construction are apparent, especially when compared to our previous robot vacuum, the Lefant M210P. This careful selection of materials enhances the overall perception of durability and reliability.
Setup

The X8 is easy to set up. Included in the box was:
X8 Vacuum
Setup manual
Charging base and power cord
Mopping module
Waterproof pad
Thanks to the clear quick start guide, we were up and running in minutes. The vacuum only required the installation of a single brush, and it arrived fully charged.
Linking to the app was also quick and easy. The speaker in the device also made it clear what was happening, clarifying what each button does.
The overall unboxing and setup was a very positive experience.
Performance
We tested the X8 Pro on a variety of surfaces throughout our home, and it performed well on both hardwood and carpeted floors. I was particularly surprised by its effectiveness on deeper rugs.
The vacuum was sufficient for cleaning light to moderate messes. Thanks to the companion app, you can easily adjust the power level to find the ideal balance between suction power and noise, tailoring the experience to your preferences.
Additionally, the easy-to-attach mopping feature excelled at cleaning wooden floors. This mopping capability sets the X8 Pro apart from many competitors, making it an excellent choice for homes with hardwood surfaces.
Usability
The X8 Pro does a great job navigating rooms thanks to its advanced laser mapping technology. It saved maps of both upstairs and downstairs areas, allowing it to quickly recognise which room it's in and navigate efficiently. The vacuum is efficient in planning its routes, even speeding up to take more direct paths to its next destination.
While it efficiently covers the floors, its large size does stop it reach the corners of rooms, so you may need to manually vacuum the small sections it can't reach. Additionally, it would be beneficial if you could set the vacuum to repeat the routes so it could tackle stubborn dirt more effectively.
Compared to budget models, the X8 Pro has fewer collisions with furniture. However, this means it might not push against items like curtains or cupboard doors, potentially leaving some spaces uncleaned.
One downside I found was how the X8 sometimes got confused by desk chairs, as the laser sensors are directed upwards and miss the lower legs of the chairs. This may be something to keep in mind before purchasing for an office space.
The vacuum has three buttons on top of its body:
Start/stop
Head home
Spot cleaning
Controlling the X8 Pro is user-friendly. Through the dedicated app, you can easily adjust the suction level—with the lowest being quiet enough to run while you are working without distraction. The app also provides real-time updates on the vacuum's location and the route it has taken, along with the water level when using the mop feature. Additionally, the manual control lets you direct the vacuum to specific areas or activate the spot cleaning feature for those particularly dirty patches on the floor.
The X8 automatically returns to its charging dock when running low, which is convenient if you leave the vacuum on while out of the house.
Value
While the X8 Pro is fairly affordable and has lots of nice features, it didn't clean standard-length carpets better than my much cheaper Lefant, which reached more of the floor due to its smaller size. Where it stood out is its mop feature and ability to work on deeper rugs. If you need these advanced features, a great user experience, and reliability, the X8 Pro may be worth the price for you.
Buyers should be aware of other options on the market:
Neato D8: Features a unique D-shape design for corner cleaning and strong suction performance.
Shark IQ Robot: Comes with a self-emptying base and a user-friendly app for scheduling and control.
iRobot Roomba i7+: Known for its smart navigation, self-emptying feature, and well-known brand name.
Conclusion
In conclusion, the eufy X8 Pro offers high-end features at an affordable price. Ultimately, it ticks a lot of boxes, especially if you have wooden floors or deeper rugs.
If you're seeking an affordable robot hoover, the X8 Pro may be a suitable choice, but weigh the pros and cons carefully to determine if it aligns with your cleaning needs.
0 notes
Text
Sunbury Walled Gardens

Location
The walled gardens in Sunbury Park date back to the 18th century and are open to the public for free seven days a week from 7:30 AM to 5:00 PM.

In addition to the gardens, Sunbury Park features open fields that are perfect for dog walks, as well as a play area, making it an ideal spot for families with young kids.
The Sunbury Embroidery Gallery, along with its attached café, provides a welcoming environment for visitors to relax with a drink and a bite to eat.
Parking
There are two car parks available at this location.
The on-site car park for the gallery is the closest, while Orchard Meadow is slightly further away, but still under 100 metres from the gardens.
Both car parks offer disabled parking spaces. Blue Badge holders are required to pay, but visits under one hour are free. Please remember that you still need to obtain a ticket, regardless of how long you plan to stay.
Accessibility

The surfaces throughout the gardens are level and well maintained, making them suitable for wheelchair and mobility scooter users, as well as parents with pushchairs.
This location is ideal for visitors who have difficulty walking long distances, as there are plenty of benches available and the car parks close proximity.
Conclusion
The Sunbury Walled Gardens are accessible to visitors of all abilities, offering a welcoming environment for everyone. With their beautiful surroundings, they are perfect for a leisurely stroll.
The adjoining café and gallery provide an inviting space to relax and enjoy a quiet break from the town of Sunbury. Click here for more info about Sunbury Embroidery Gallery.
#health#accessibledaytrips#accessibility#accessibletravel#daytripideas#wheelchair#travel#wellness#pots#sunbury#garden#nature
0 notes
Text
Sunbury Embroidery Gallery

Location
Tucked away in the heart of Lower Sunbury, the Sunbury Embroidery Gallery is a hidden gem that offers facilities for all ages in a wonderful, relaxed atmosphere. Open throughout the year, it draws more than 40,000 visitors annually.
Opening Times:
Tuesday to Sunday: 10:30 AM - 4:00 PM
Closed all day Monday.
Entry is free of charge.
What's there?

The Sunbury Embroidery Gallery showcases permanent installations that celebrate the local area, complemented by a rotating schedule of new exhibitions, ensuring there's always something fresh to explore. The Gallery also features an inviting café where visitors can indulge in a selection of freshly made teas, coffees, light lunches, soups, cakes, and scones.
Adjacent to the gallery are the historic walled gardens, which date back to the 18th century. These historic gardens are open to the public at no charge, seven days a week, from 7:30 AM to 5:00 PM.
Sunbury Park features open fields that are perfect for a short dog walk, as well as a play area for children, making it an ideal spot for families with young kids.
Parking
There are two car parks available at this location.
The on-site car park for the gallery is the closest, while Orchard Meadow is only slightly further away, under 100 metres from the gardens.
Both car parks offer disabled parking spaces. Blue Badge holders are required to pay, but visits under one hour are free. Please remember that you still need to obtain a ticket, regardless of how long you plan to stay.
Accessibility

The gallery and its surrounding attractions are all wheelchair and mobility scooter accessible with smooth, level paths.
This location is ideal for visitors who struggle to walk long distances, with convenient parking and plenty of places to stop and rest.
The gallery offers a tactile guide for visually impaired visitors, and an audio guide is also available on request.
Click here for a link to their website.
Conclusion
The Sunbury Embroidery Gallery is a delightful destination that offers art, history, and a welcoming atmosphere for visitors of all ages. The gallery is small, so it's perfect for a quick visit. With its café, historic gardens, and accessible facilities, it’s perfect for families and anyone looking for a peaceful retreat.
#health#sunbury#embroidery#gallery#accessibledaytrips#accessibility#accessibletravel#daytripideas#wheelchair#travel#wellness#pots#dysautonomia
0 notes
Text
Peugeot Expert (2016 - present): Bulkhead Removal

Welcome to the second instalment of our camper conversion series! In this post, we’ll walk through the process of removing the bulkhead from our 2020 Peugeot Expert. We’ll provide a step-by-step guide along with tips and tricks that will be helpful if you’re planning your own conversion.
A full walkthrough video is included at the bottom of the page.
Tools used:
Ratchet with 10mm socket
Electric screwdriver (for floor removal)
Step One: Removing the First Section
The bulkhead on the Peugeot comes apart in two sections. The top section is easily accessed, while the lower half took a little more time, as the plywood flooring was blocking the last lower four bolts.
We loosened the bolts with a 10mm socket. After that, they could be removed by hand.
At this point the upper section of the bulkhead can be removed.
Step Two: Removing Obstructive Flooring
We found that the screws in the metal trim were only connected to the plywood flooring itself, while the screws in the wood were fastened to the van's floor.

The ply floor came out in two sections, making removal easier. There was one section of metal trim that had to be removed to separate the pieces.
Note: Flooring can vary from van to van; some are glued down, which could affect your removal process.
Step Three: Removing the Lower Section of the Bulkhead
Once the floor has been removed, you will be able to easily reach the final four bolts. Remove the lower four bolts, and the final section will be released.
What's Next?
In the next instalment of our campervan conversion series, we’ll focus on insulating the floor of the van. Once the insulation is in place, we’ll move on to reinstalling the plywood floor and upgrading it with vinyl flooring.
Click here for a full list of all our campervan conversion posts
0 notes
Text
Wellington Statue

Location
The Wellington statue in Aldershot, England, honours Arthur Wellington, the 1st Duke of Wellington, who famously defeated Napoleon at the Battle of Waterloo and later served as Prime Minister of the United Kingdom.
At the time of its construction in 1846, the statue was the largest equestrian statue in Britain, standing at 30 feet (9.1 m) tall.
It was originally located at Wellington Arch, Hyde Park Corner, before being moved to Aldershot in 1885.
Parking
There is a large car park next to the statue. Parking is free.
There are no disabled parking spaces.
Accessibility
The statue is situated up a steep hill, which unfortunately makes it inaccessible for visitors with limited mobility.
There are two ways up the hill, both around the same distance of 50 metres: one with stairs and one with a steep slope. There are no benches at the top.
The statue can be viewed from the ground.
Conclusion
With its impressive size and rich history, the Wellington statue is well worth a visit. While the steep hill may make it less accessible for those with limited mobility, there are information boards in the car park so you can still appreciate and learn about the statue without needing to climb the hill.
Plus, the surrounding woodlands and open fields make it a great spot for a summer picnic or a dog walk.
#accessibledaytrips#health#accessibility#daytripideas#travel#accessible travel#dysautonomia#pots#accessibletravel#history
0 notes
Text
POTS and Compression Clothing

If you’ve recently been diagnosed with POTS or another type of dysautonomia, you've most likely heard about compression clothing from your doctor or while researching online.
In this blog post, we'll explore how compression clothing works, the benefits it offers for people with POTS, and what to consider when buying them to ensure you get the best results.
How Compression Clothing Helps
When we stand, gravity pulls our blood down to the lower half of our bodies. To manage this change in blood pressure, the body usually responds by increasing our heart rate and narrowing our blood vessels. However, in people with POTS, this system doesn’t function correctly.
Compression clothing works by minimising blood pooling in the lower half of the body, increasing the amount flowing to the heart and vital organs.
Benefits
By wearing compression clothing, people with POTS should experience less severe symptoms while standing and being active. Being able to spend more time upright and active will support healthier lifestyles and improve both physical and mental wellbeing.
How to Pick the Right Compression Garments

Types of compression clothing include:
Stockings
Tights
Shorts
Socks
Abdominal binder/hernia belt
Garments that compress the largest blood vessels, which are located in the thighs, buttocks, and belly, provide the most benefits. Socks alone may not help to a large extent.
What level is best for people with POTS?
Class 2 compression garments, which provide pressure ranging from 23-32 mmHg, are recommended for POTS patients.
When Should I Wear Them?
Compression clothing isn’t worn all the time; it can change with the seasons and depending on the wearer’s activity. Comfort and practicality are also important. For example, you wouldn't want to feel constricted by an abdominal binder during a meeting, and you may struggle wearing extra layers during the summer.
Do wear compression clothing when you are upright and active, meaning anytime your body is working against gravity. You don’t need to wear them when you are reclining or have your legs elevated, such as on a footrest.
You don't wear compression clothing in bed unless recommended by a doctor.
Conclusion
With various options available to meet individual needs, compression clothing can be a valuable tool in managing POTS symptoms. By improving circulation and reducing the symptoms associated with standing and physical activity, these garments can enhance people living with POTS overall quality of life.
It's important to remember that effectively managing POTS often requires a multifaceted approach. Combining the use of compression clothing with proper hydration, an appropriate diet, and medications prescribed by a doctor will lead to greater improvements in symptoms. By taking a comprehensive approach to your treatment, you can empower yourself to lead a fuller, healthier life despite the challenges of POTS.
Remember that learning to manage life with dysautonomia takes time, but things will improve as you find the treatment and lifestyle adjustments that work for you.
#health#accessibledaytrips#accessibility#accessibletravel#daytripideas#wheelchair#travel#wellness#pots#compression gear#dysautonomia#pots syndrome#potsie#potsawareness#ehlers danlos syndrome#chronic fatigue
0 notes