
The progress for Ascendant Path as it comes. I'm a university student learning Game Design so things will likely be slow.
Don't wanna be here? Send us removal request.
Statistics
We looked inside some of the posts by ascendantpath-blog and here's what we found interesting.
Average Info
Notes Per Post
10K
Likes Per Post
3K
Reblog Per Post
7K
Reply Per Post
0
Time Between Posts
3 days
Number of Posts By Type
Photo
8
Text
8
Note
1
Last Seen Tumblr Blogs


Fun Fact
Average visit duration of Tumblr.com is 10 mins and 25 secs.
Photo


2 gifs showing the random room generator at work.
#madewithunity#indie game#indie developer#video game#game design#game development#gamedev#Student Game#Student Development#game design student#student#student developer
5 notes
·
View notes
Text
Ascendant Code 6
So we missed a week but the good news is we have something pretty cool to go over today as a result. We are going to look at how to generate rooms with random layouts. The basic idea is that we’ll create a two dimensional array measuring 3 by 3 units. Each entry of the array will have a random number assigned to it which we will use to pick a section from a pre-made selection.
So to begin with lets define our variables. First the parameters of the room itself,
public int width = 3; public int height = 3; public int[,] room;
So there are nine entries that need a random number assigned to them. Now if only there were an easy way to loop through the entire array. Let’s welcome back our old friend nested for loops.
room = new int [width, height]; for (int x = 0; x < width; x++) { for (int y = 0; y < height; y++){ room[x,y] = Random.Range(1,4); } }
We place this in a method called GenerateRoom(). The next thing we need to do is create the sections that will actually compose the room. For each section I have made three different possibilities for what they can be. Here we can see the options for the bottom centre, bottom left and bottom right areas of a room.

Including these nine we need 27 sections total, 3 for each part of the room. This is where things get tedious. We want each possible section to have a variable in our room creation script, for example:
public GameObject bC1; public GameObject bC2; public GameObject bC3; public GameObject bL1; public GameObject bL2; public GameObject bL3;
Where bC and bL are bottom Centre and bottom Left respectively. Now we want to check each row and instantiate the corresponding game objects for the numbers. Let’s give each row a method of the following format,
void Bottom(){ if (room[0,0] == 1){ Instantiate (bL1, new Vector3(0,0,0), Quaternion.identity); } else if (room[0,0] == 2){ Instantiate (bL2, new Vector3(0,0,0), Quaternion.identity); } else if (room[0,0] == 3){ Instantiate (bL3, new Vector3(0,0,0), Quaternion.identity); } if (room[0,1] == 1){ Instantiate (bC1, new Vector3(5,0,0), Quaternion.identity); } else if (room[0,1] == 2){ Instantiate (bC2, new Vector3(5,0,0), Quaternion.identity); } else if (room[0,1] == 3){ Instantiate (bC3, new Vector3(5,0,0), Quaternion.identity); } if (room[0,2] == 1){ Instantiate (bR1, new Vector3(10,0,0), Quaternion.identity); } else if (room[0,2] == 2){ Instantiate (bR2, new Vector3(10,0,0), Quaternion.identity); } else if (room[0,2] == 3){ Instantiate (bR3, new Vector3(10,0,0), Quaternion.identity); } }
We need to do the same for the middle and top rows, remember to update the y coordinates when doing so to avoid overlap. Then that’s it! Simple and a little repetitive but this is how we’re going to populate our map. Join me next week and we’ll look into exactly how. In the meantime if anyone has any suggestions or questions let me know!
#gamedev#game design#programming#indie game#indie developer#indie#Student Game#Student Development#game design student#game development
4 notes
·
View notes
Note
Hey, your constant progress is admirable. I was wondering, and I think I speak for more Indies/devs when I ask this, how you keep yourself motivated for (sorta)frequent updates and progress? I tend to work witg the 80/20 rule... and that doesnt work.
Hey, @heycallmetai, thanks for the compliments and the question.
My advice is this: Motivation is fleeting. Discipline lasts. Don’t go looking for motivational speeches or posters of cats for motivation.
Build discipline. Build a habit. Make yourself sit down to work on your game/art/writing every day, even if it’s just for ten minutes.
There has been at least one day where I just didn’t want to work on my game, but I sat down and wrote one line of code and said “good enough for now.” And went on to do something else.
Hope this helps.
58 notes
·
View notes
Text
Ascendant Code 5
When last we met we had set up a 2 dimensional array and filled it with 1s and 0s. Now we’re going to look at getting a visual representation for our noise. For this we will use the in-built method OnDrawGizmos (). To begin with let’s use our old friend the nested for loops to iterate through our array.
for (int x = 0; x < width; x++) { for (int y = 0; y < height; y++) {
We need to check each coordinate. If it contains a 1 we will draw a black square and if it contains a 0 we will draw a white square.
Gizmos.color = (map[x,y] == 1)?Color.black : Color.white; Vector3 pos = new Vector3(-width/2 + x + 0.5f, 0, -height/2 + y + 0.5f); Gizmos.DrawCube(pos, Vector3.one);
Now if you press play and switch from game view to scene view you will have your noise map. Try it with different strings to make sure that it is properly using them as a seed.
The final thing we need to do is bring order from chaos, create a map from the noise. To do this we are going to create a method called SmoothMap (). Okay so this method is really important since it will define how our map looks. So we want to go through all our squares so... nested for loops? Nested for loops.
void SmoothMap () {
for (int x = 0; x < width; x++) { for (int y = 0; y < height; y++) {
So the method we are going to use is to check how many squares around each coordinate are filled. To do so we’ll create a method that takes two values, our current x and y positions, as arguments and checks everything around it.
int neighbourWallTiles = GetSurroundingWallCount(x,y);
So because we want this method to be called from every square it needs an internal counter which will always start at 0.
int GetSurroundingWallCount(int gridX, int gridY) { int wallCount = 0;
We’ll use the x and y values as a starting point and check what’s around them, incrementing wallCount when we find something. Remember we want to keep this within the bounds of our grid and not get an error from trying to access coordinates outside the boundary.
for (int neighbourX = gridX - 1; neighbourX <= gridX + 1; neighbourX ++) { for (int neighbourY = gridY - 1; neighbourY <= gridY + 1; neighbourY ++) { if (neighbourX >= 0 && neighbourX < width && neighbourY >= 0 && neighbourY < height) { if (neighbourX != gridX || neighbourY != gridY) { wallCount += map[neighbourX,neighbourY]; } } else { wallCount ++; } } } return wallCount; }
Going back into SmoothMap we can use the returned integer. The idea we’re going for is that the more isolated squares become white while the more dense areas are filled in.
if (neighbourWallTiles < 3){ map[x,y] = 0; } else if (neighbourWallTiles > 5){ map[x,y] = 1; } else if (neighbourWallTiles == 2){ map[x,y] = 1; }
This should generate clear areas of white and black, kind of like continents in an ocean. Then believe it or not that is that. The shapes we get are the outline for how our map is going to look. Later we will look at how to turn each of the squares into a navigable room.
Speaking of rooms next week we’ll be looking at how to generate rooms with random layouts. In the mean time I hope this has been informative and if you have any questions feel free to reach out.
5 notes
·
View notes
Text
Ascendant Code 4
It’s that time again, welcome to Ascendant Code 4. This week we’re taking a look at the procedural map generator. This is likely going to have to be split up into at least two posts as this script is much longer and more complex than the others. For today let’s look at how we turn any string of characters into a noise map.
So for those who are unfamiliar a noise map is basically this .

What we want is to create something like this using black and white squares. So how do we go about turning a word into what looks like a random mess?
Well the first thing we want to be able to do is define the width and height of our map with public integers. This is so we can play around with the dimensions in Unity. We also want to be able to enter the text that will create our noise map. Finally we want to dictate what percentage of the map is black (filled) and white (blank) with a handy little slider.
public int width; public int height;
public string seed;
[Range(0,100)] public int randomFillPercent;
Okay let’s create a method called GenerateMap(). This method can be thought of as operating in three steps.
Step 1, create an empty space to fill.
map = new int[width, height];
This is just a two dimensional array, it can be thought as a grid so that every point has an associated coordinate. This will be invaluable when it comes to turning the mess into something useful.
Step 2 generate some mess to fill our space.
Did you know that any string can easily be converted to an integer? you just need string.GetHashCode(); in our case this string is the public variable we declared earlier that we named “seed”. We can use this integer as the basis for a random number generator.
System.Random pRandom = new System.Random (seed.GetHashCode ());
Now here’s the clever bit. We want to go through every square in our grid. We can do this with nested for loops.
for (int x = 0; x < width; x++) { for (int y = 0; y < height; y++) {
}}
x will equal 0 and we will go through every possible value of y [0,0], [0,1], etc. Then x will equal 1 and we’ll do it again giving [1,0], [1,1], etc. At each square we want to check if it should be blank or filled, white or black. We do this by going through the variable we just created, pRandom, and pulling values from it that lie from 0 to 100. We compare these to the value set by the slider, randomFillPercent, and if they are less than its value we set the value of that coordinate to 1.
map[x,y] = (pRandom.Next(0, 100) < randomFillPercent)? 1:0;
If the next value in pRandom in the range of 0 and 100 is less than randomFillPercent then set the value of map at position [x,y] to 1. Else set it to 0. This will result in a grid that looks something like the following
10110 00110 10101 11110 10100
Believe it or not this is our noise map. It doesn’t look like much but that’s just because we haven’t defined any visual representation for it yet. Next time we’ll look at how to do just that and how to turn our random mess into something useful, our Step 3. In the meantime feel free to throw any questions my way, I’ll answer as best I can.
#programming#c sharp#made with unity#game design#indie game#indie developer#indie dev#student developer#student dev#Ascendant Path
6 notes
·
View notes
Text
Ascendant Code 3
This week we’re taking a look at the code that lets the player move through platforms from beneath. We start with 2 variables, a 2D Collider and a Boolean. We’re going to attach this script to a trigger collider slightly wider than the actual platform and extending beneath it.
new public BoxCollider2D collider; bool oneWay;
The first is the collider attached to the platform and is the surface the player will stand on. This is the collider we want to deactivate so that the player can move through it. We want to check oneWay every frame and when it is true we want to be able to pass through the platform. When it is false we want the platform to be solid.
void Update () { if (oneWay) { collider.enabled=false; } if (!oneWay) { collider.enabled=true; } }
When we enter the area below the platform we want to turn the collider of the platform off. We do this by setting oneWay to true when we enter the area defined by a trigger collider.
void OnTriggerEnter2D(Collider2D other){ if (other.tag == "Player") { oneWay = true; } }
When we leave the area we want the collider to reactivate. This is to allow us to stand on the platform once we have moved forward.
void OnTriggerExit2D (Collider2D other){ if (other.tag == "Player") { oneWay = false; } }
The exact positioning of the trigger collider is important and may require some experimentation to position it perfectly. It is important to test this step thoroughly for each platform prefab we create.
That wraps it up for this week. This code is pretty simple but it is important to get the corresponding positioning of the game objects just right. Next week we’re going to be looking at map generation. It’s a longer script and may be tackles in two parts. See you then!
#programming#c sharp#game design#indie game#made with unity#indie developer#student developer#Ascendant Path
8 notes
·
View notes
Text
GDC Roundup
I’m going to be at the GDC Roundup in Glasgow at the Megabytes café this evening. I hope to meet some cool people and learn some new things.
1 note
·
View note
Photo

A long-belabored & too-transparent Eidolon post-mortem:
http://www.icewatergames.com/blog/
Apologies for the length!
58 notes
·
View notes
Photo

An enemy concept today. The idea is to have a stationary foe with a long reach to grab and throw the player around as they try to go past.
2 notes
·
View notes
Text
Ascendant Code 2
So here’s part 2 of my weekly series on coding Ascendant Path. Last week we looked at how the Grappling Hook object that follows the cursor was constructed and that post can be found here. This week I will be going over how the player movement is handled.
To begin with we want simple controls for running and jumping. We’ll simple apply a force to the Player Game Object to move it around.
if (Input.GetKey ("d")) { rigidbody2D.AddForce(transform.right*75f); } if (Input.GetKey ("a")) { rigidbody2D.AddForce(transform.right*-75f); } if (Input.GetKeyDown("space")){ rigidbody2D.AddForce(transform.up*1400f); }
The numbers can always be tweaked to get the desired feeling for movement. Bear in mind that these values are also affected by the Linear Drag, Angular Drag, Mass and Gravity Scale to change the way movement works too.
The key part of the script is how the player is launched towards the hook once it is attached to something. Recall that last week’s script contains a Boolean called “stuck”. We want to check the state of this Boolean so we use:
CursorScript cursorScript = cursorObject.GetComponent<CursorScript> (); hooked = cursorScript.stuck;
Where “hooked” is a Boolean we create to store the retrieved value. Now that we can see if the player is appropriately hooked we can write.
if (hooked && Input.GetButtonDown ("Fire1")) { Vector2 direction = cursorObject.transform.position - transform.position; direction = direction.normalized; rigidbody2D.AddForce(direction*2800f); }
cursorObject is a variable that references the grappling hook game object that follows the mouse cursor. Thus we can use it’s position to launch the player in the correct direction.
We have one last thing to do. Right now the player can easily be flipped over when launched which will render all movement useless. It’s simple to fix though, we just need a final line of code in the Update method.
transform.rotation = Quaternion.identity;
That brings us to the end for this week. Next week we will look at how the platforms are coded to allow the player to move through them from below while still being able to stand on them.
#programming#c sharp#game design#indie game#game development#student game dev#student developer#indie developer#made with unity#Ascendant Path
7 notes
·
View notes
Photo

As well as working on Ascendant Path I am a full time student studying Game Design in Scotland. My course involves classes in Game Design (obv.), Programming, Mathematics, the Fundamentals of Computing, an Integrated Project and 3D Modelling. This is a lamp I have made for this semester’s final project using 3DS Max and I am pretty pleased with how it has turned out.
2 notes
·
View notes

Photo

An enemy concept for Ascendant Path. I started with the intention to draw the player but the sketch took me elsewhere. I used random shapes generated by Alchemy and refined it into what you see here. This will likely be redone at some point as I’m not entirely happy with it.
#concept art#indie game#student development#student game#enemy art#ascendant path#studentdev#student game dev#student developer
0 notes
Photo
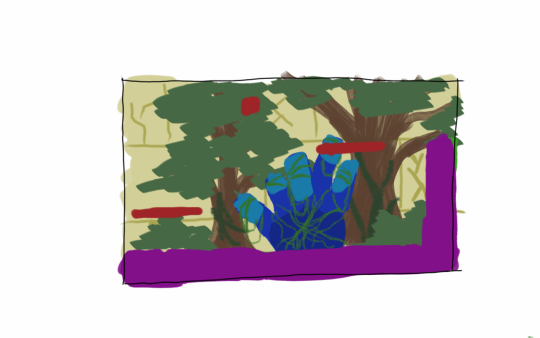
Sample layout for one of the sections that would be used to make up a room in Ascendant path. The ground and platforms have been marked purple and red here to make them easily distinguishable. Each section will have a local piece of background (the giant vine-covered hand in this instance) and the general “area” will have it’s own background depending on general map position (trees and giant stone wall here). More samples to come.
#concept art#indie game#indie developer#student developer#game design#student development#student dev#game art
1 note
·
View note
Photo

So here’s my plan for creating individual rooms. Basically A room will be divides into sections. Each of these sections will choose a layout at random from a pre-made group, represented by colours here. The pieces will be made so that there is always a path between entrances to the room.
1 note
·
View note
Text
Ascendant Code 1
Today we’re going to look at the code that controls the player character in Ascendant Path. To be more precise we will look at how the central grappling hook mechanic operates. All code segments are written in C# within a script attached to a Game Object.
The first step is to have the hook follow the mouse cursor. This is somply done with,
transform.position = Vector3.Lerp(transform.position, followThis, 0.25f);
That is to say use Lerp to move smoothly from current transform to a space called followThis. followThis isdefined as being the x and y coordinates of a ray that comes from the mouse.
Now we want to limit the range so we enclose this in an if statement that makes sure the transform only directly follows the mouse cursor if it is close enough. If it is not we still want the object to try and be as close to the cursor as possible so we say
if (Vector3.Distance(transform.position, playerPosition) > 3f){ transform.position = Vector3.Lerp(transform.position,(followThis - playerPosition).normalized*3f + playerPosition, 0.5f);
Between these two conditions the object will stay within a circle of fixed sized with the centre being the player’s location.
The next step is to have the hook “stick” to platforms so it can be used to launch the player in a desired direction. This is easily done with:
void OnTriggerEnter2D (Collider2D other) { if (other.tag == "Sticky") { stuck = true; } }
Of course we want to be able to let go at will so we also need:
if (Input.GetButtonDown ("Fire2")) { stuck = false; }
So this about sums up how the hook moves. Next week we’ll look at how the player character is moved and how the hook is used as a tool.
11 notes
·
View notes
Text
Dev Blog 2: What Next?
So I have a procedural generator to make map layouts for me and I have the basic player character mechanics. So what is next for Ascendant Path? The squares of the map each represent a room so I need to get a rough prototype for a room generator working.
Rooms will be divided into even segments. The idea is that each segment will pull a random layout from a selection of premade ones. These will be designed to always fit together regardless of which get randomly chosen.
Long term there will be special rooms that will become incorporated. These will be designed around things like boss battles, lore events, powerups and fast travel nodes.
2 notes
·
View notes