
Statistics
We looked inside some of the posts by kacesspace and here's what we found interesting.
Average Info
Notes Per Post
11K
Likes Per Post
8K
Reblog Per Post
3K
Reply Per Post
158
Time Between Posts
3 months
Number of Posts By Type
Text
14
Photo
2
Note
1
Last Seen Tumblr Blogs


Fun Fact
69% of Tumblr users are millennials.
Text
OK SO
i bought a 3dsk subscription a while ago for skin refs and forgot to cancel it so ended up with more credits than i needed ((((((((((and more money spent than i wanted lol))) and also i downloaded a huge collection from tpb and they turned out to be really good
& finding high res shit can be annoying so i wanted to share them all :-) below are links all of them separated into 4 zip files bc it was being a bitch as one big one - there are like 920? or something photos, almost all are nude references and there’s a few clothed ones and a couple of faces so plz enjoy n my only request is plz share the love if any1 asks where u got the refs plz share w them i dont want credit or anything lol just be nice n share the mediafire link ♥♥♥♥♥♥♥♥♥♥♥♥♥♥♥♥♥
http://www.mediafire.com/file/bbn91iuw7z77dmz/Part+1.zip
http://www.mediafire.com/file/xy1vued0mp3uoom/Part+2.zip
http://www.mediafire.com/file/siaugk9f4tveth9/Part+3.zip
http://www.mediafire.com/file/xdj9dvi24dyi39i/Part+4.zip
175 notes
·
View notes
Text
Tutorial: Renumbering Shoes/Necklaces Meshes to avoid conflicts and explosions
First of all, a huge thanks to people at MTS and to @virtual-hugs who taught me how to do it at the Creators Cave!
Also sorry for taking so long to write this! It's because I kinda struggle to write in english 😬

What will you need:
S3PE
Mesh Toolkit
Your shoe/necklace/accessory package ready, so you won't need to go back to TSRW to tweak something. This should be the last step on your CC creation workflow!
First, why does this happen?
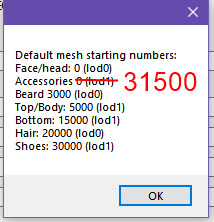
Each CAS part has a vertices ID range, and when two parts with morphs have vertices containing the same ID, conflict happens and this is what make some meshes to explode. And this tends to happen when we put high poly shoes with morphed high poly necklaces because the shoes verts ID range is too low. Shoes verts ID starts at 30000, and accessories starts at 31500. In the pícture below there's the information provided by the Hint button at Mesh Toolkit with all the verts IDs, but it erroneusly says that accessories start a 0.
With all that said, we can try to renumber these parts verts to a different IDs to try to bypass that.
But let's go to the tutorial!
Again, your shoe/necklace package should be ready to do this, so you won't need to go back to your project in TSRW!
For this tutorial, I'll be using Arltos 109, converted by @rollo-rolls. You can do this tutorial with any CC high poly shoes/necklace, just please respect the creators TOU and do not upload it.
Note how there are tiny gaps showing when the shoes are worn with necklace! In this picture they quite imperceptible, but with some shoes/necklaces more distracting distortions might occur.

👠Step 1:
Open Mesh Toolkit, click on Package Tools tab, and in the Name Those Files tab open your package. Click on Add names, and then type a unique name for the CC part you're working on and save it. Here's what I named mine:

👠Step 2:
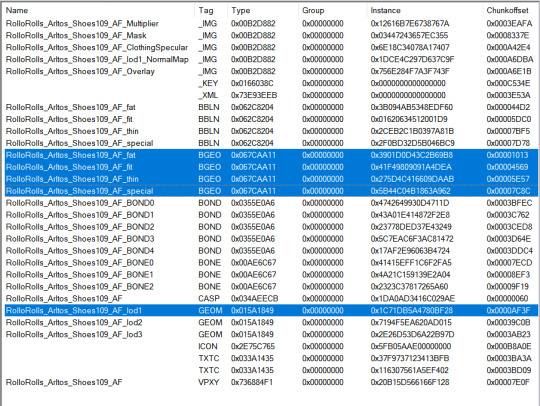
Open your package on S3PE, and select the LOD1 (or the LOD0, if you're working with some accessory that might have it) GEOM plus the four BGEOs (they're the morphs) and export them to a folder (just click on it with the right button, and select Export > To file...)
(see? this is why we added the names ^^)
👠Step 3:
Back in Mesh Toolkit, go to the GEOM Tools tab, then to [Re]Number Meshes tab. There, open your base GEOM mesh and BGEOs morphs accordingly.
In the "Number to start with" box, type the number which you want to start the verts ID. I'm usually going with 57000 for shoes, and with around 40000 for necklaces (so they won't conflict with old shoes that aren't renumbered).
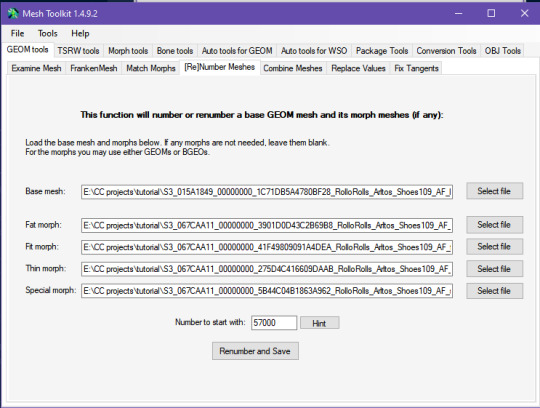
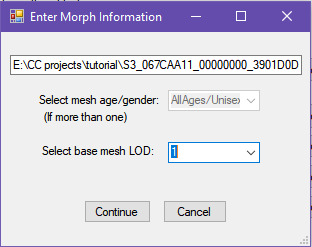
Click on Renumber and Save. When asked, select the according number for the LOD you're working with (in this case is 1, but again, if you're working with LOD0, then select 0), and click in Continue.
Then the program will prompt you to save the renumbered mesh and morphs. It's good to create a new sub-folder for them to avoid any confusion.

These are the files we get. LOD1 is my base mesh, and the others are the morphs.

👠Step 4:
Go back to your package on S3PE. Right click on the GEOM mesh you exported before, then click on Replace, and select your new base mesh. Save and close your package.
👠Step 5:
Go back to Mesh Toolkit. Go to the Package Tools tab, and then to the Add Morphs to Clothing/Hair tab, and open your package.
Tick "Use GEOM morph meshes", untick "Change morph blend TGI".
Then tick the morph you will add to the package, and then in the according box (in my case,LOD1 box, but again, if you're working with a LOD0, put it in the LOD0 box) open your new morph.
Then click on "Add morph to package". A box confirming the action will pop-up.
Repeat this step with the other morphs, reminding always to tick the according morph or otherwise you might make some mistake (as adding a fit morph in the place of the fat one).


After you finished, save your package (either the current one, or save as new package).
👠Step 6:
Now test it in game! If everything was done right, you should see no distortion in the shoes and necklaces. Also check if the morphs are working as intended, because sometimes we can make mistakes!
Remember that you'll won't be able to have both the old and the new altered package since they're still the same, we just replaced the meshes and morphs.
154 notes
·
View notes
Text


Tutorial : How to make roads with car parking space
When I first started using the create a world tool, I immediatly wanted to make roads with car parking space. The only world where I had seen these types of roads were in Boroughsburg by potato-ballad-sims. So, I searched up the internet as one would do when you don't know how to do something and nothing until I found this post by krrank on their forum. I already knew how to make roads at that time. In fact, it was only when I saw her showcase of dirt roads, that I saw how there was a way to make roads larger to then add cars parked on the side. Now, because I haven't found a proper tutorial on how to actually do that, I decided to make my own tutorial and share how I managed to do it. It's not as perfect as Boroughsburg in term of sidewalk intersections (because I'm not the best at texture editing) but enough to have the look of parked cars, which can make a town look so much more lively.
What I'm assuming before this tutorial :
You're familiar with the CAW tool
you know how to place roads
you know how to create roads using textures provided by EA or CC road textures
You know how to add custom content for CAW (only applicable if you don't own the university EP)
The downside
The only downside with these roads is that sims will walk/run through the cars when going somewhere because we're basically using the sidewalk as parking space. To balance that out, I suggest using hybrid roads in your world : normal roads with normal sidewalks and roads with parking space.
On the left we have a road with car parking space
On the right a normal road with sidewalks

Step 1 : Choosing your road textures

Example of what it should look like :

Possible question #1
" Okay but there's no sidewalk now, what do I do ? " : Simple ! Place independent sidewalks on the side. A bit like this (ignore the fact that this is not completly aligned to the grid) :

Step 2 : Placing cars on the road
I highly suggest using cars that are meant for decoration and aren't high poly. If you're using super CAW do not use the drivable cars that can be bought in game. In my case, I used the debug cars from the university EP meant for decoration and lowered them until it hid the parking curb. If you don't have the university EP, the world CC from Boroughsburg includes deco cars used for the purpose of parked deco cars !
Do not put too many cars on the roads (I only do it because I do not care since I'm making my own personal world, but if you intend to share the world you're making, limit the cars that you put on the streets)
How to hide the parking curb (for university cars) :
Lower your car's position (Y axis, green line) to : 15,4 - (Good enough height to hide the concrete curb and only hides a tiny bit of the car's wheels)

Don't forget to rotate (Y axis) the cars to the right direction. In fact, to be 100% accurate in the rotation placement of your cars, you can write the exact degree in the board that appears when you select an object. So, basically : 90 / -90 OR 180 / -180
Possible question #2
"In what direction should I rotate the cars ?" : Here's a reminder of traffic directions in game :

And that's about it. Hope this will be useful to anyone who was wondering how to make larger roads and add cars parked directly on the street :)
#ts3resources#ts3 caw#ts3 create a world#ts3cchelp#ts3 help#sims 3 tutorial#sims 3 caw tutorial#ts3 tutorial#sims 3 caw roads#sims 3 caw road tutorial#sims 3 how to
306 notes
·
View notes
Text
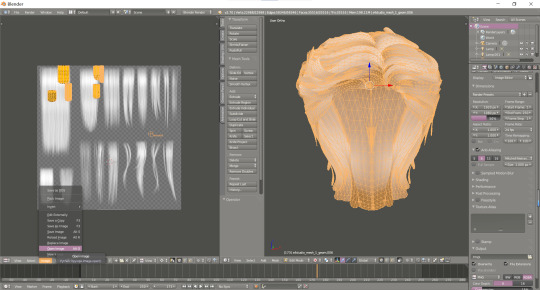
Tutorial: quicker way to remap hair UV in blender for conversion
Hey everyone, what's up? I want to share a small tip for quickly rearranging UV maps when converting TS4 hairstyles. This tutorial won't cover the other steps involved in converting hairstyles and assumes you already have some knowledge of creating CC. Anyway, I'll try to explain it clearly and let's get started :)
First, you can export the original SIMS 4 texture and crop out the square portion at the top left corner that represents the hairstyle (from left to right).

Next, in Blender, import the hairstyle you want to convert. After importing the original SIMS 4 texture, your interface should look something like this. In "Viewport Shading" button, you can select "Texture".

Then, select "Open Image" in the bottom left corner, and import the newly cropped texture. Your UV map should appear stretched in the new image.
Now comes the most important step. You'll see a 2D cursor in the UV view on the left. Use the scroll wheel to zoom in on the image, and then left-click to position the center of the 2D cursor at the top-left corner edge. In the toolbar below, find the "pivot" button and select "2D cursor". Finally, press "a" to select all UVs, then press "s"+"2", "s"+"y"+"2" to scale the UVs to the correct size.


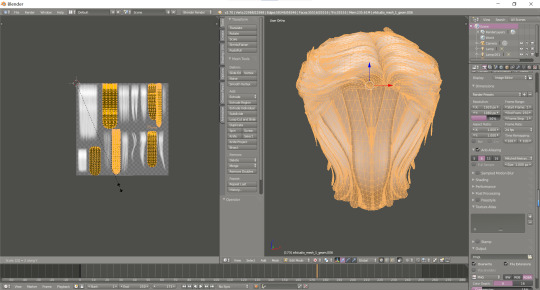
This way, you'll directly get a UV map that corresponds to the texture with 99.9% accuracy, without any additional adjustment. Hope this is helpful for you all!
101 notes
·
View notes
Text
Reseting corner cabinet texture with nraas debugenabler
182 notes
·
View notes
Photo
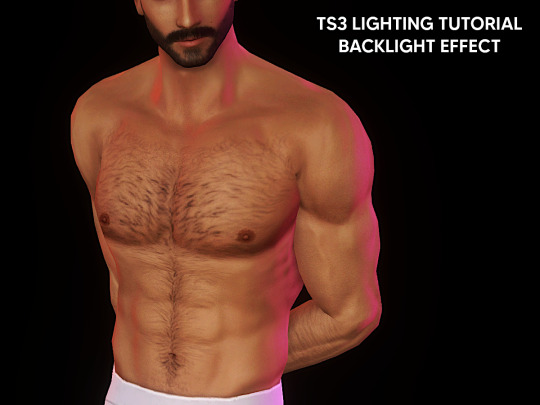

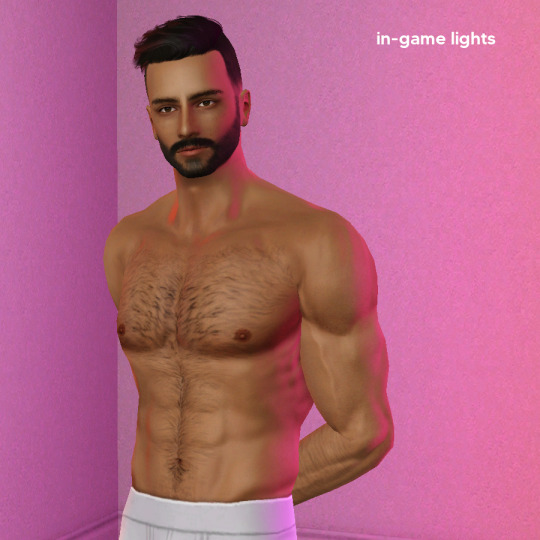
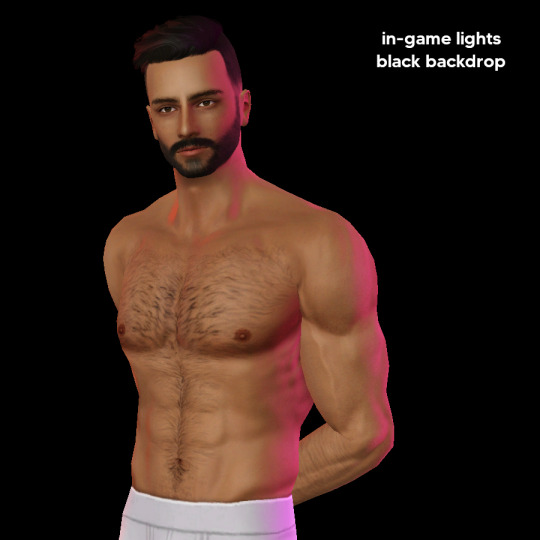
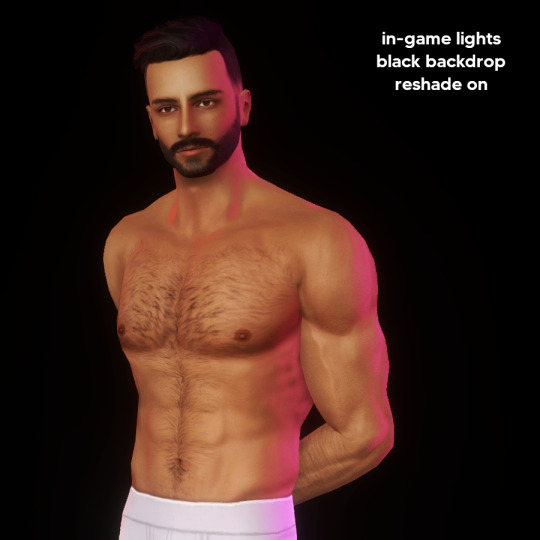
TS3 Lighting Tutorial: Backlighting
A cool lighting setup I came up with for photo studio portraits!
Inspired by @rebouks and @tau1tvec TS4 CAS lighting mods ✨
You need:
Buhudain invisible lights (I always use the “wide spot” versions)
Murano photo backdrop
Pose Player & some poses of your choice
Reshade, Gshade, or a photo editor of your choice
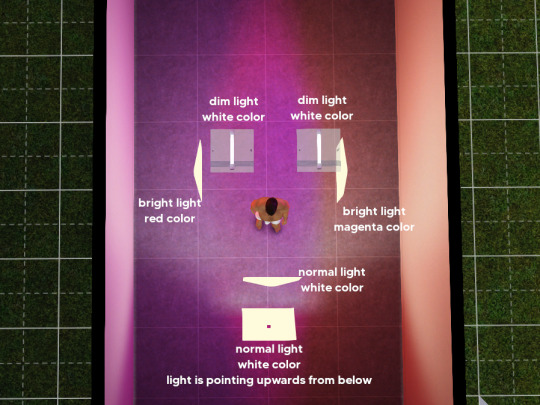
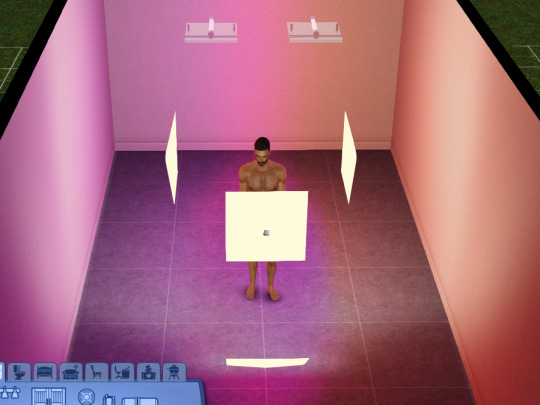
1. Build a closed rectangular room with a roof covering it. Pose your sim and put them in the center. (Use the moveobjects on cheat.)
2. Position the lights as shown in pic 3 and 4. You can adjust the light color and intensity in Live Mode by clicking on them, or Ctrl + Shift + left click on them in Buy Mode.
3. Recolor the photo backdrop to pitch black, and put it around your sim to make sure the room’s walls are not visible. Use more than 1 if necessary, they seamlessly intersect. Murano’s photo backdrop is also technically a light, so make sure you either turn it off, or play around with the light’s color and intensity to create an effect you like.
4. Find a good angle, turn your Reshade/GShade on, and snap your pic. Adjust the contrast, brightness, exposure, and color settings in a photo editor to make it pop even more. You can download my Reshade preset on my downloads page if you want, it works in Gshade as well.
What does each light do?
The white-colored lights are there to provide a general brightness to the sim and the room, and to offset the intense colored lights. Without the white lights, the sim would be completely lit in red & magenta. You can turn up the intensity, or add more white lights if more brightness is needed.
The red and magenta-colored lights are there to provide intense color on the side and outline of the sim, for a neon backlit effect.
Tips
- You can play around with each light’s position, intensity and color to create different effects. For example, you can remove some lights on one side of the sim to create more dramatic shadows. Or remove some white lights so that the colored lights are stronger.
- You can make the colored lights monochromatic, or you can pair them in analogous colors (i.e. red and orange, red and magenta), or you can pair them in complementary colors (i.e. red and green, blue and yellow).
- In Buy mode, hold the Alt key, and click and drag your sim to rotate them in small increments, to make sure the light hits them exactly right.
I hope this tutorial gives you some fun ideas for taking pictures! 💗
455 notes
·
View notes
Photo

So I was forced to move on EA app too. Changing lines in xml files didn’t help.
For now I didn’t have problem with game, but as others said, my Create a World Tool isn’t working in Edit in Game mode. It basicly means, that whoever has digital version of the game, won’t be able to build on lots. Yup, from now on, only worlds with empty lots. I have still niche hope, that we can somehow influence EA to update their mediocre app, so it would allow CAW to go into Edit in Game mode and preserve the opportunity for simmers to make worlds.
Now here’s the point. Here’s a thread at AHQ forums:
https://answers.ea.com/t5/Technical-Issues-PC/EA-App-Sims-3-Create-a-World-Edit-in-game-doesn-t-work/m-p/11461331/highlight/true#M250560
If you create worlds or even use custom worlds created by other players, please click “Mee too” under first post, to put this problem in a spotlight. You can also leave a comments with suggestions or give kudos under other’s posts, so thread will stay active. Let’s make it happen world explorers! ✊🏼🌍
79 notes
·
View notes
Text
Patterns to Packages
This is a tutorial on how to extract patterns to packages and have them actually show up :) The fix is not my idea, I just decided to make a clearer tutorial. Original can be found here.
You will need: Multi-Extracter or Clean Extractor, S3PE
1. Use one of the above to extract a package from the sims3pack.
2. Open the package in S3PE
3. Check if you can see an IMG file with the instance 0x7EDD… (only these need to be edited)

4. Click the PTRN file, if there is a space between the “000:” and the code, delete the gap by right clicking the PTRN file and opening in notepad.

5. RIght click and open the XML file (not the 0x0000… the other one) in Notepad

6. Now copy the highlighted part (reskey=“Key: ________:_________:e12aa3095d4451a1) and paste it into the red circled part (”background Image” default=“key:_________:__________:7edd…. –> default=“key:________:_________:e12aa3095d4451a1)

7. Close notepad (and save)
8. Right click the _IMG file with the Instance number 0x7EDD…. and click “Details”, now paste the code you copied in stage 5 into the box for “instance” so it says: Instance 0xe12aa3095d4451a1 instead of 0x7EDD….. (If you save it, it will automatically make the the letters bold).

9. Open the other XML file in notepad and again replace the “7EDD..” with the new code

9. Save everything and voila!!
EXTRA:
If you are a fanatic house downloader like me:
1. Extract the house sims3pack
2. Scan the folder with all the packages using Delphy’s Dashboard
3. Find the patterns and right click them to open them in S3PE
4. Do the above if they need fixing
5. Find the “lot” file in Dashboard, and save this file into your library folder Documents/Electronic Arts/Sims 3/Library (and delete it from the folder with your house packages)
6. Compress the house packages into one, or stick them into CC magic, rename them, do whatever :) This is all the CC for the house.
341 notes
·
View notes
Text
[TS3] Shader Tweaks
You’ll need my Shader Modding Framework for this mod to work.
This is a set of improvements and fixes to some of the shaders in The Sims 3.
Download: SFS / Dropbox
To install the mod, extract the zip into your “Sims 3 Install Directory/Game/Bin”
Screenshots and more info under the cut.
Keep reading
970 notes
·
View notes
Text

*all credit goes to OP & creator/s*

345 notes
·
View notes
Text
Sims 3 Roleplay: Drugs
Just figured I would get this one out of the way.
Druglord - Buy/Sell drugs, cannot take them.
Drug pills - Adds weightloss pills, calming pills, ecstasy pills, all kinds of effects you get from taking these pills.
Abortion pills - Another way to get an abortion outside of Enhanced hospitals mod.
Get drunk - Mod that accurately gets your sims drunk, from bars to kegstands to nectar. As it should be. Comes with custom moodlet’s and interactions to make your sims and NPC’s get wild.
Smoking mod - Can realistically get you addicted, you’ll have to suffer through quitting and having a horrible mood for like 7 days but it makes sense. Sometimes sims don’t get addicted at all the first couple of smokes which is nice.
Teen punch bowl - The kegstand for teens since I can’t remember if they can drink from the UNI kegstand but they have another way to get drink at school dances and parties. Inconspicuously.
No herb nausea - So you can actually get “high” (EA moodlets) from herbs without those ridiculous side effects.
Kinky world does include drugs, and it’s a nice feature but it comes with a lot of other things most of you might not like, including myself, as well as being script heavy. Not a problem for those of you who play on shorter or average lifespans but could potentially become a problem for my playthroughs as I like to play for a long time, like your 4 generations to my 1, lol.
Gameplay Ideas:
If your sim has a mental illness, which you can actually get from NRAAS Vector modules and other people’s addons, and the Unstable trait that comes with ITF I consider to be something like schizophrenia: So when a sim starts to get the unstable moodlet I will have them take a calming pill and allow myself to delete that effect. If it remains and their trait changes, if I really want it back I put them through rehab.
I make an open hospital lot, set it as a resort, and admit them into the hospital. Depending on their behavior I change their trait back. That’s the reward. The consequence is the new trait remains or they go to prison (like if they committed a crime during a manic episode).
For worlds that I don’t consider vacation worlds I set the hospital and prison lots as resorts. I use the dress consort mod to set the outfits of npc’s who checked in, so they blend in and look like prisoners/patients. Alternatively, you could set visitor allowed lots, combined with Generic role maker to create your staff, patients, prisoners. Just send your sims there when they need to go to rehab or prison.
When sims go bar hopping and are drunk all NPC’s are more susceptible to Dares so I utilize the dare system more during parties and bar hops.
Druggie sims use the pills and herbs more than other sims. I could have them grow them themselves if it becomes too expensive and start them on their druglord journey if they would do something like that. Or just their own personal plant. I find through story telling sims will favor a certain herb and it’s accompanying moodlet more than others.
bubble blowing also give you nice moodlets but it only lasts 2 hours. Ask to join fixes a part of my issue with bubble blowing. But I use Hookah designed bubble blowers and just build a little hookah house somewhere on a community lot if I want sims to experience that.
20 notes
·
View notes
Text
The Sims 3 Werewolf Form Glitch Fix
For those who wanna play a werewolf in The Sims 3, but get pissed bc when you generate their werewolf form, it looks not a thing like your sim, here’s the workaround I used.
Only thing I’d add is, since it requires Cmar’s mod, which I know a lotta people don’t use ( I know I prefer Master Controller Integration ) do all the steps, but stop b4 you begin actually customizing your desired werewolf/werewolves.
Exit CAS, save, exit game, remove Cmar’s mod, delete your cache files, and then re-enter your game to then customize your werewolf sim/sims as you like.
105 notes
·
View notes
Text
The Sims 3 Smooth Patch 1.0
Yeah, you read correctly, I said Sims 3 :)
This mod makes the game’s logic threads run faster, speeding up loading of Buy/Build and CASt, smoother UI elements, smoother CAS, fixes CAS music randomly stopping, among other things.
This mod should work on Steam, Retail and No-CD versions of the game. Not on Origin versions unfortunately as it blocks this kind of hack, so 1.69 won’t work.
Download: SFS / Dropbox
Simply unzip the file into your “The Sims 3/Game/Bin” folder.
You can configure the mod by editing the TS3Patch.txt file with notepad. I left comments in that file on how to set it up for lower end computers or in case it’s too demanding on your game.
The changes are most noticeable in CAS: Smoother body sliders, Sim rotation and quicker loading of clothes.
I’ve made an album with some GIFs showcasing the mod (Tumblr is not letting me embed Imgur so click on the link…):
Imgur Album
@xiasimla made some very useful comparison videos as well:
Tumblr Post
An old tweet from thepancake1 made me give this a shot, as he hadn’t released any downloads or information on how to achieve it.
6K notes
·
View notes
Note
Hii, what does the collection file mean?
Hi! Let′s get straight to the point: collection files are package files that have to be placed in your documents folder (Electronic Arts\The Sims 3\Collections\User). They’re super useful to find objects quickly and easily while playing.
If you’ve never used them, I advise you to do so!
Here’s an exaple:

As you can see, this is a collection file for one of Sundays-sims’ sets I’ve converted a while ago. It’s like an in-game folder which contains all the objects of the same set.
I hope I made it clear! ^-^
26 notes
·
View notes
Text
i beg y'all to stop tagging ur ts4 stuff with ts3 tags,, it's already hard enough to find content for ts3 without y'all flooding it
123 notes
·
View notes
Text
OK SO
i bought a 3dsk subscription a while ago for skin refs and forgot to cancel it so ended up with more credits than i needed ((((((((((and more money spent than i wanted lol))) and also i downloaded a huge collection from tpb and they turned out to be really good
& finding high res shit can be annoying so i wanted to share them all :-) below are links all of them separated into 4 zip files bc it was being a bitch as one big one - there are like 920? or something photos, almost all are nude references and there’s a few clothed ones and a couple of faces so plz enjoy n my only request is plz share the love if any1 asks where u got the refs plz share w them i dont want credit or anything lol just be nice n share the mediafire link ♥♥♥♥♥♥♥♥♥♥♥♥♥♥♥♥♥
http://www.mediafire.com/file/bbn91iuw7z77dmz/Part+1.zip
http://www.mediafire.com/file/xy1vued0mp3uoom/Part+2.zip
http://www.mediafire.com/file/siaugk9f4tveth9/Part+3.zip
http://www.mediafire.com/file/xdj9dvi24dyi39i/Part+4.zip
175 notes
·
View notes
Text
Alternatives To Down With Patreon
So I found two sites that are somewhat close to DWP:
Sims Galaxy
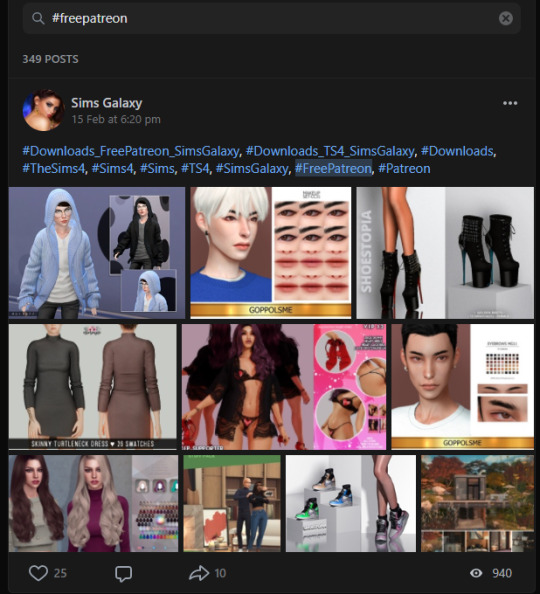
Where you can find a lot of patreon free items that haven’t ever been released or just shared from the buyer. You may or may not have to sign up, I use to be able to see the content and download without having sign on but they might of possible changed that. Don’t worry, at first I was cautious about signing up too, but so far it’s safe. Just click the picture of the item you want then go down to the comment box and the download will be there! Quick and easy!
kemono.party

A new site paying homage to the old yiff.party! it’s still fairly new, so don’t expect to much content just yet. They may or may not have the same content as sims galaxy. Beware though, the site does contain some adult like content nonrelated to the sims. So far it seems safe, but as always have your antivirus protection on when visiting these sites.
As before, I told the community in my last post that I was dead serious about standing up to cc creators/patreons users who bully the community over pay for content or don’t follow EA guidelines and this my proof of that. If anyone else has other SAFE anti patreon sites to recommend let me. Thanks and happy downloading!
Honorable Mentions but already known:
sims4planet: Old and new uploads, as well as patreon content.
http://sims-new.my1.ru/: Old and new downloads. S4 and S3 content, patreon content too.
1K notes
·
View notes