
Male | Artist | Doll Profiles/Info Flickr | DoA | Feedback
Last active 3 hours ago
Don't wanna be here? Send us removal request.
Statistics
We looked inside some of the posts by n-bjd and here's what we found interesting.
Average Info
Notes Per Post
625
Likes Per Post
346
Reblog Per Post
271
Reply Per Post
8
Time Between Posts
4 months
Number of Posts By Type
Text
16
Photo
1
Last Seen Tumblr Blogs


Fun Fact
The “We are the 99%” Tumblr blog became the slogan for the Occupy Wall Street movement.
Text
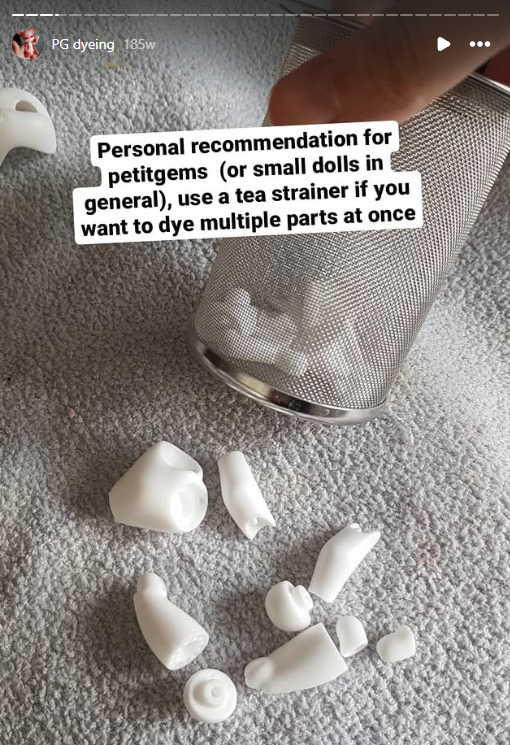
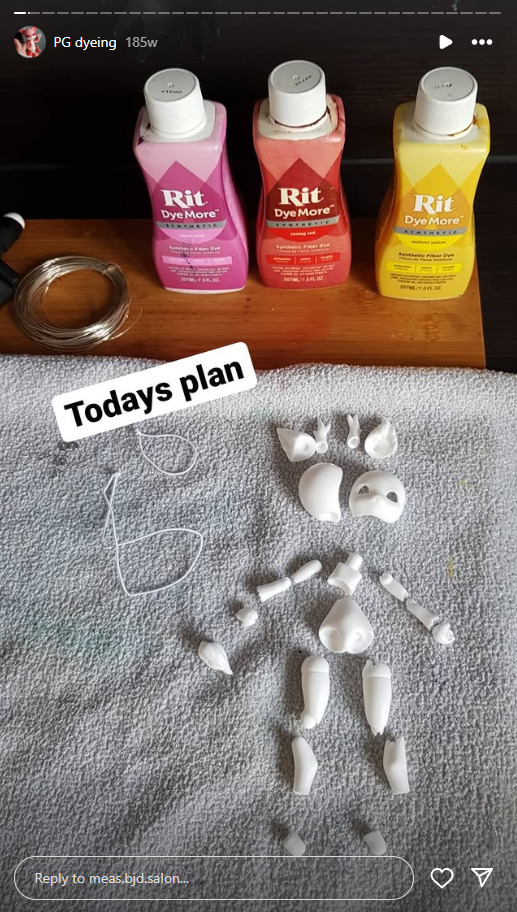
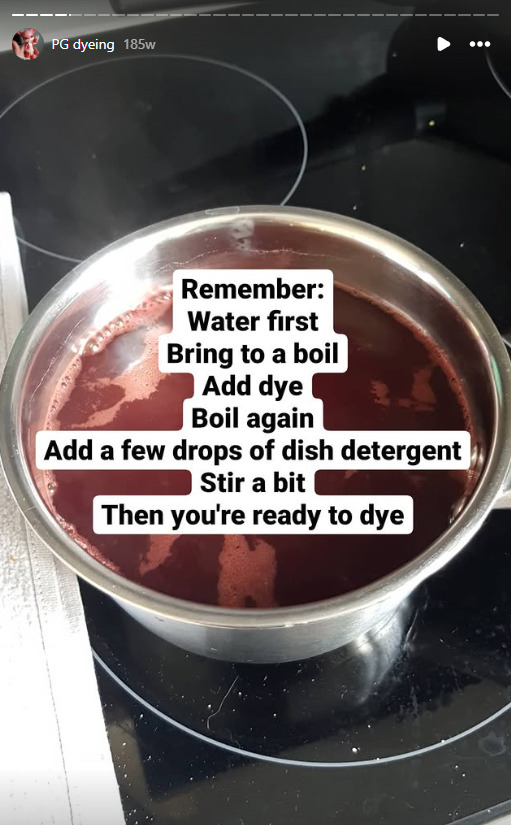
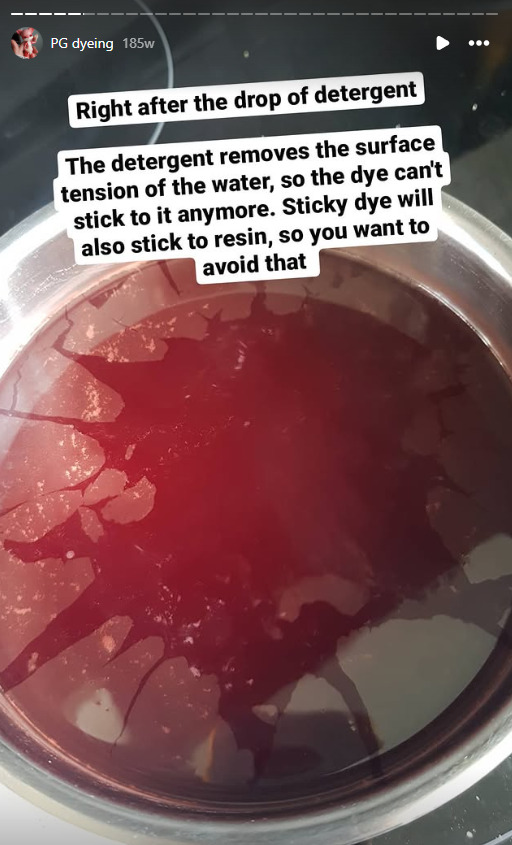
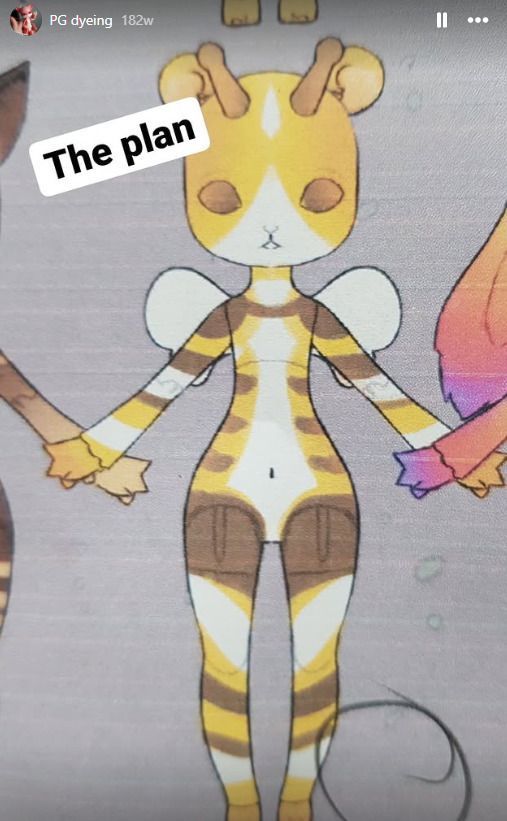
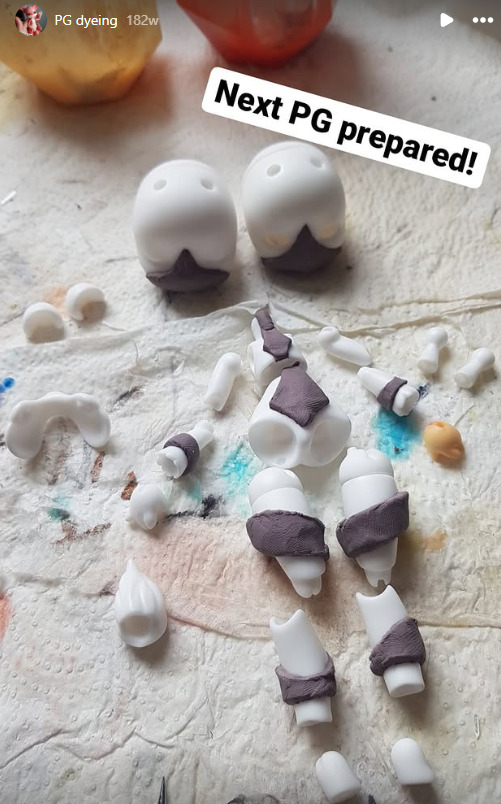
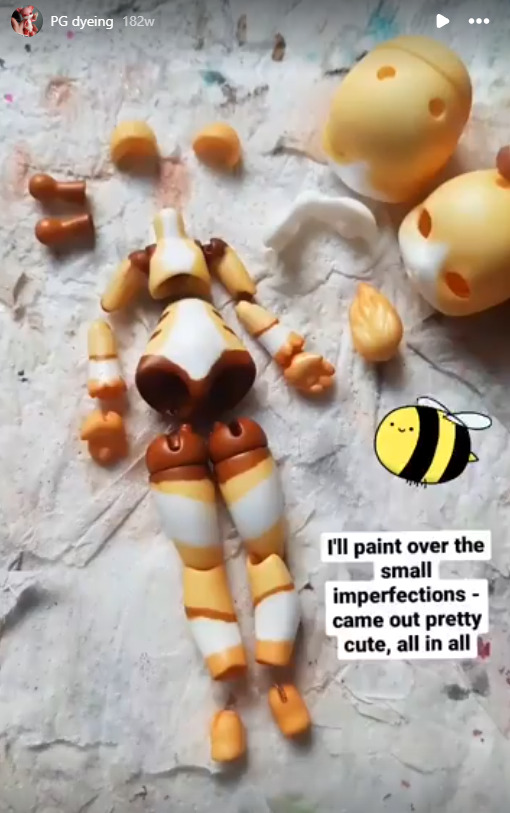
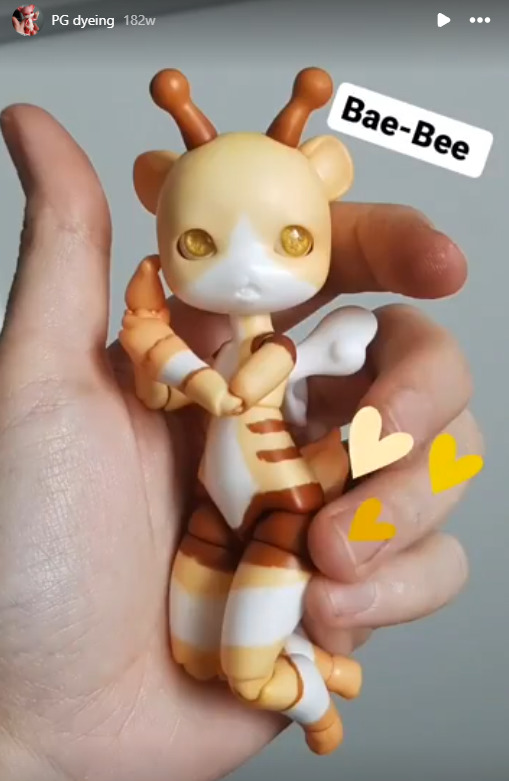
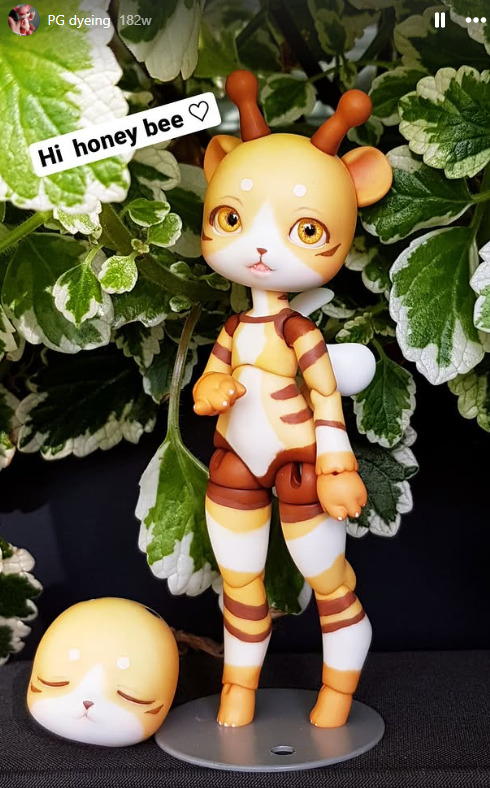
@meanae's Resin Dyeing Tutorial
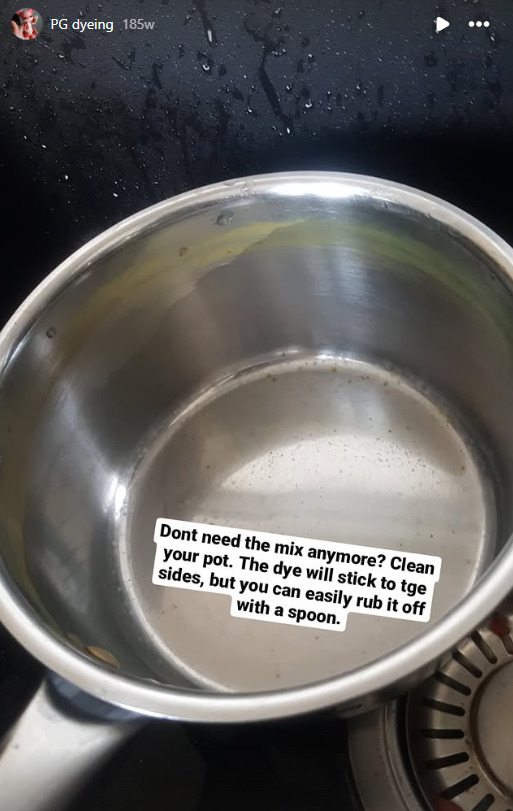
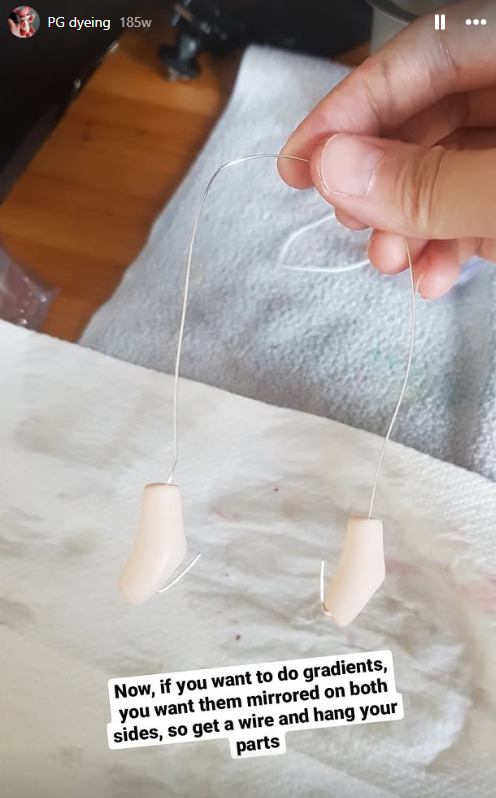
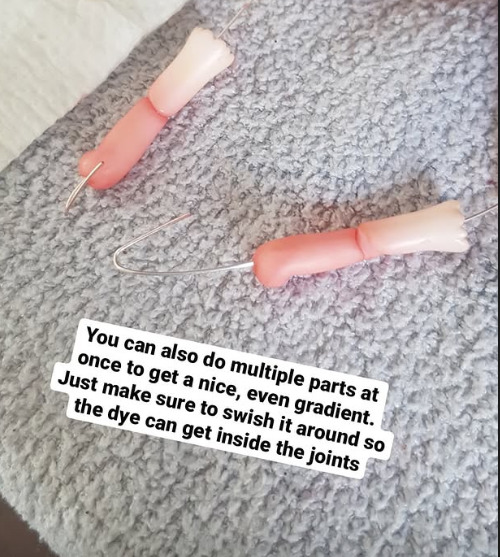
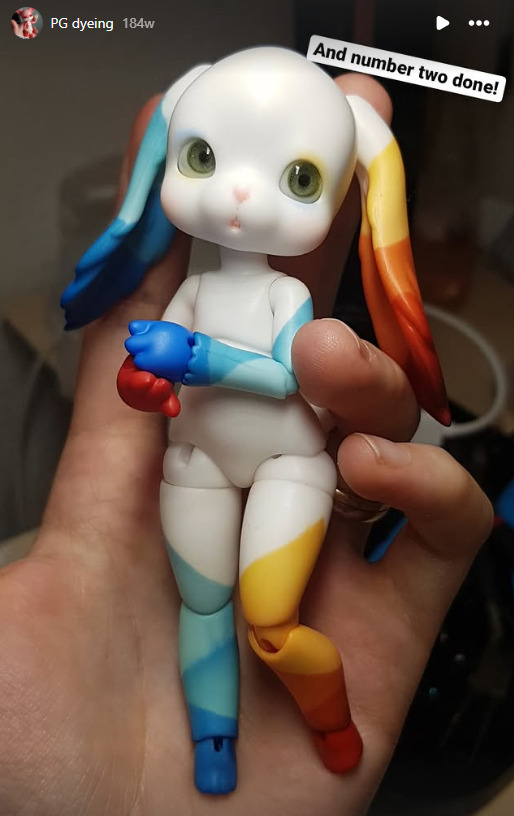
Posting here since they don't have it on their tumblr but PLEASE go give them a look. This is who I commissioned to dye my Sorrow Petit Gem after seeing theirs turn out so amazingly well! I loathe the idea of painting or blushing the colors as it would be absolute suffering with joint friction.


#bjd tutorial#dyeing tutorial#ball jointed doll tutorial#modding tutorial#bjd mods#petit gem#soom petit gem#meanae
12 notes
·
View notes
Text


His kingdom joined back with Lunatea so now he has to file his taxes like everybody else. 😞
31 notes
·
View notes
Text

Soom Feny & Necy (2013) Normal Skin (Legit reference) - Interior of head is embossed with sculpt name and THE GEM
Image reference for secondhand buyers to identify possible recasts.
2 notes
·
View notes
Text
Clothing for Kabbit
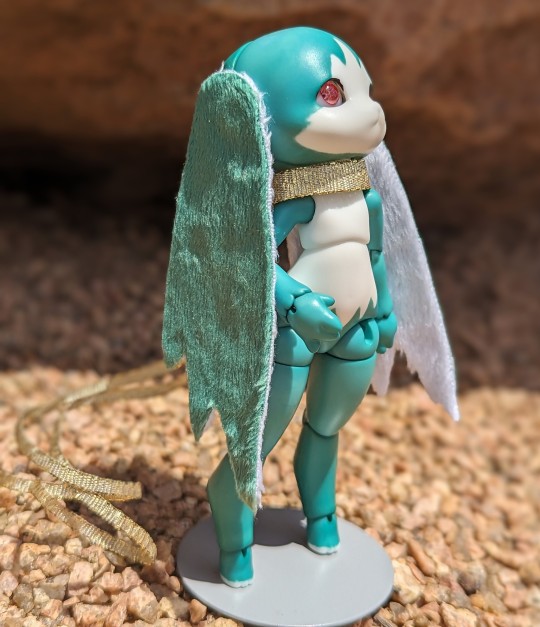
Kabbit is a BJD made by AelithArt it is YoSD 1/6 by default.
👕Catalogue of clothing that fits Kabbit (100% 1/6 scale)

Will be continuously updated as time goes on! If you have info please DM me for it to be added!
🥻 FULL OUTFITS: 🥻
Standard 1/6 YoSD clothing will fit Kabbit, but shirts (particularly the shoulders) may be a bit baggy/oversized.
🎽 SHIRTS: 🎽
Blythe Clothing: - Shirts will fit x Pants DO NOT fit
👢 SHOES: 👢
👟 DEFAULT FEET:
American Girl shoes
🩰 SLIM FEET: 🩰
Welly Wisher brand shoes (Some styles may take more effort but seem to be doable)
👖 PANTS: 👖
TBA
👗 DRESSES: 👗
Daiso/Teso doll dresses will fit
5 notes
·
View notes
Text
youtube
How to Build a Kabbit - This covers How to String a bipedal Ball Jointed Doll
0 notes
Text
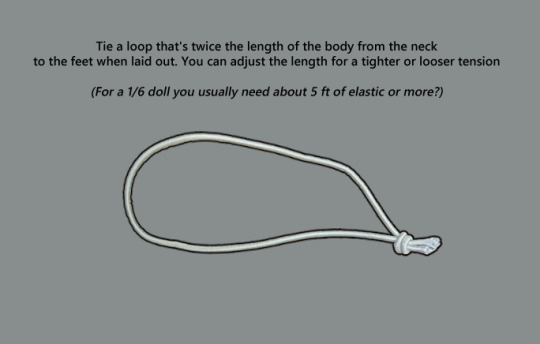
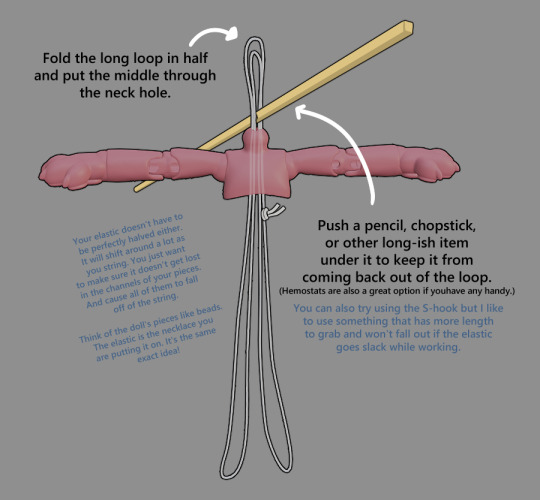
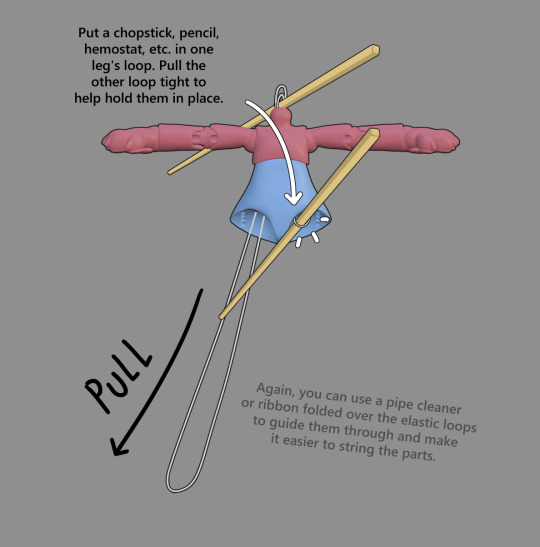
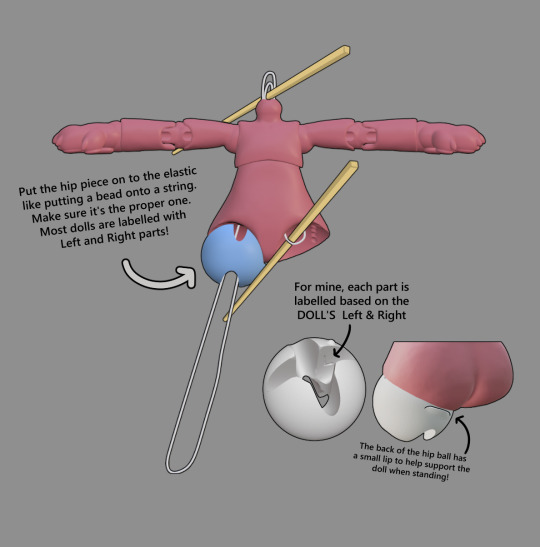
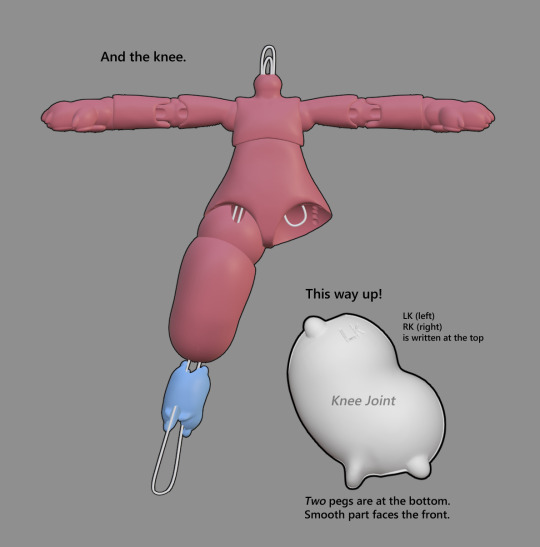
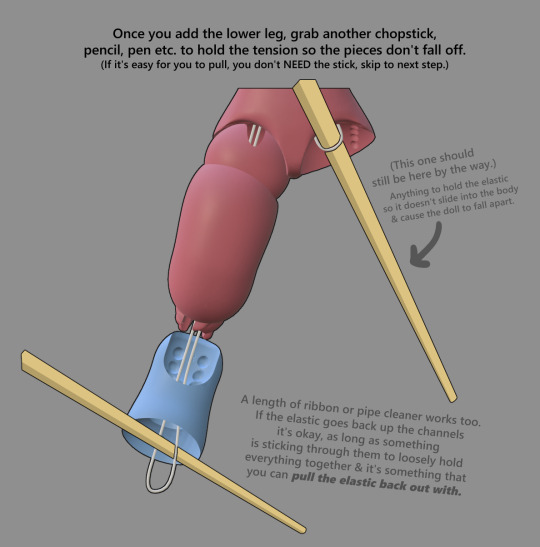
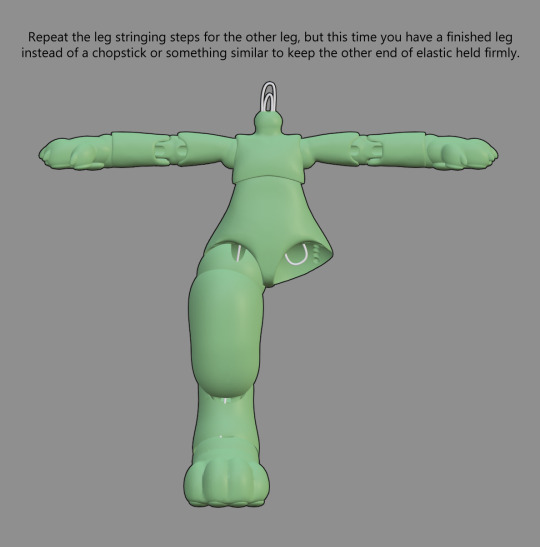
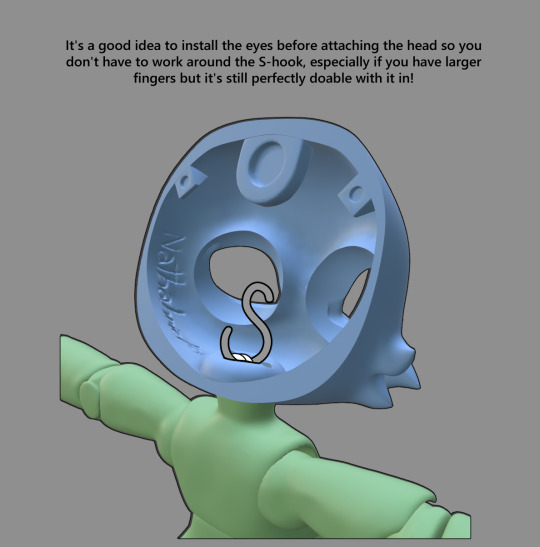
Basic BJD Stringing Tutorial
This is for a doll of my own design, but it is still applicable to most if not all humanoid / bipedal BJDs.
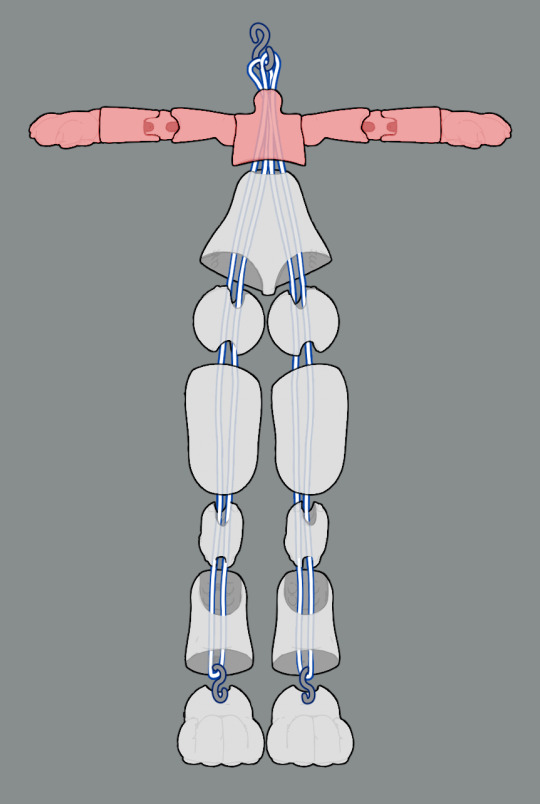


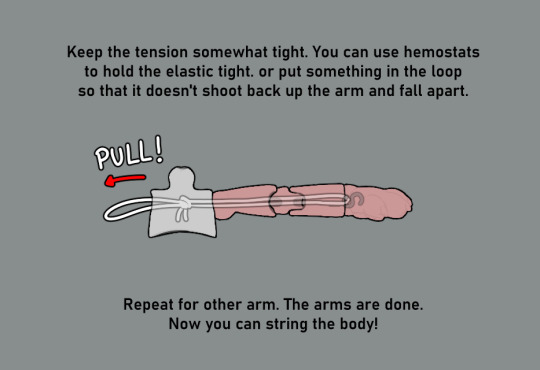
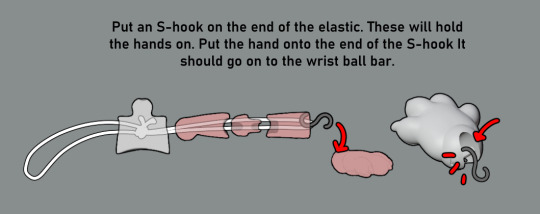
Stringing the Body


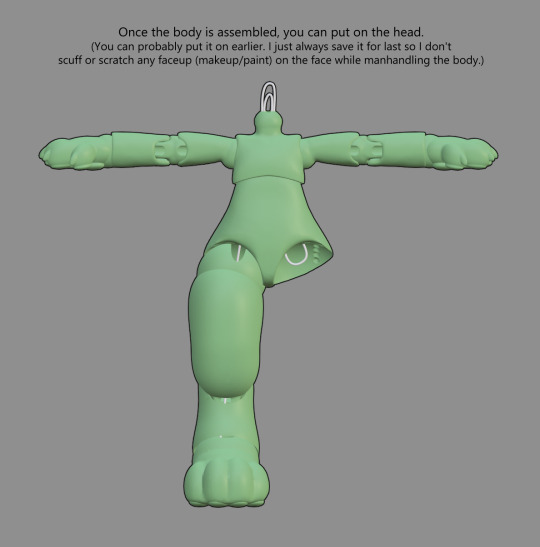
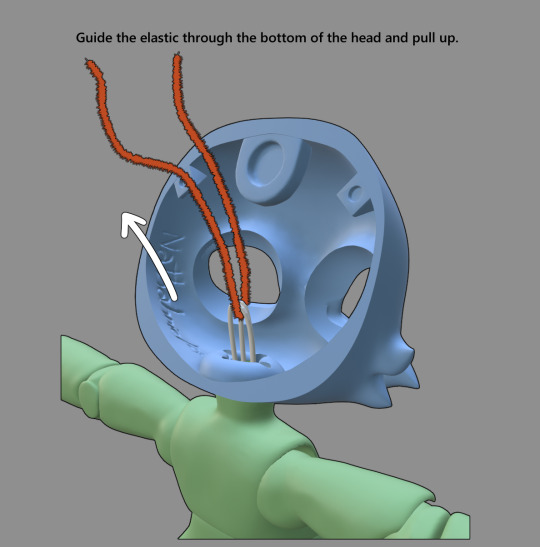
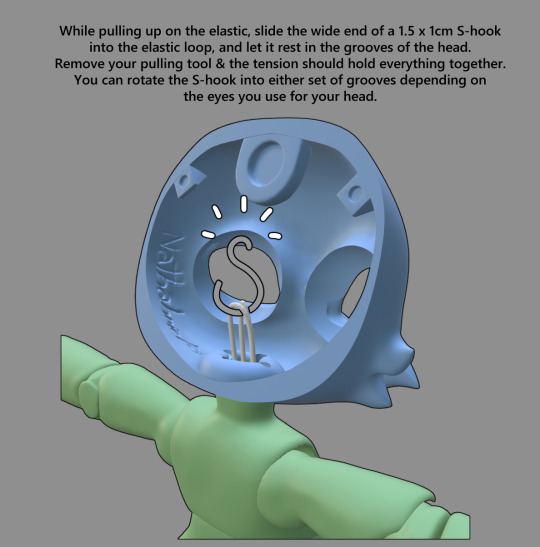
Stringing the Head

14 notes
·
View notes
Text
N's DenofAngels Thread Repost Masterlist
The hobby is more accesible than ever but not everyone wants to or can use DenofAngels which is the largest & oldest forum dedicated to Ball Jointed Dolls (in the english speaking sphere anyways)
Current Sections under the cut:
BJD Basics
Modding Tutorials
Sewing Tutorials
Faceup Tutorials
BJD Identification reference images
With the website aging, there being a ton of broken images due to Photobucket's changes back around 2015-ish, and the overall age of the hobby there are many dead links as well.
I'm compiling some useful threads I remember, and may browse for newer ones that may be useful, especially for newbies who do not join DoA or collectors of "Off-Topic" BJDs like 3D printed and Blind Box dolls. I will not be doing this regularly but as I see questions that I know have been answered before on DoA. I strongly suggest making an account there, even if it's just to lurk. There's OVER A DECADES worth of information and a bunch of history, dead companies, etc. archived on the oldest posts of the forums.
These reposts are exclusively to make tutorials accessible and more easily find-able. All reposted content will be credited with links to the original artists. Please support them!
--------------------------------------------
BJD Basics:
SAFETY around Resin and Plastics (Respiratory safety)
How to string a humanoid Ball Jointed Doll (1 string for 2 legs method)
How to string a Doll (VIDEO TUTORIAL)
-------------------------------------------- Modding Tutorials
RESPIRATORY SAFETY when modding
Dyeing tutorial by @meanae - Original Instagram post - Tumblr repost
-------------------------------------------- Sewing Tutorials
Resizing Human Patterns (Hand Drawn Method)
Resizing Human Patterns for BJDs
-------------------------------------------- Faceup Tutorials
TBA
--------------------------------------------
Legit BJD Identification reference images will be tagged as #bjdref #legitref
I will copy photos of heads, placards, signatures, headcaps, etc. that could be used to help Identify a legit head from a recast, as needed. Often recasts will not have these. Images will mostly come from DenofAngels marketboard threads as only authentic dolls are posted there. I strongly suggest searching for the doll on flickr, as many photos used on DoA are hosted there by the photographers who post them.
7 notes
·
View notes
Text
Resizing Human Patterns for BJDs - Hand Drawn Method
Posted on DenofAngels forums by elve on Sep 16, 2013 Last edited: May 6, 2019
Inspired by the wonderful tutorial EilonwyG posted http://www.denofangels.com/forums/s...Patterns-TUTORIAL&highlight=resizing+patterns but having no scanner or printer, I decided to have a go at resizing by hand - and it worked! Accuracy is a bit hit-and-miss, so if it's a very fitted garment it is wise to do a test run with some poly/cotton first. This is all the equipment you need, plus some tissue paper to trace your drawings with to make the actual pattern. THIS WORKS BEST IF YOU USE CENTIMETERS
You will be using the little diagrams which the pattern company print on their instructions - but depending on the complexity of the garment, these will vary in size, as you can see here [DEAD IMAGE]
You need to measure your doll's back or arm to judge the amount of scaling up needed. I measured my doll's arm, then measured the full-length sleeve diagram. If the diagram measures 3cm, and the doll's arm measures 18cm, you need to divide 18 by 3 - and so on, depending on your own doll's measurements. In this example, 18 divided by 3 = 6......So the diagrams on the patterns need to be enlarged by (or multiplied by) 6 to fit your doll. As BJD have slightly elongated limbs compared to normal people, it's best to add a couple of centimeters to the final length of sleeves, skirts, trouser-legs etc. too.
Then start drawing your pattern pieces, multiplying each measurement of the diagram by the number you obtained above. So if the centre front of the skirt diagram measures 4cm, you would multiply 4 x 6 for the doll I measured in the above example, then add a couple of centimeters as she has elongated legs compared to a human. So the skirt front pattern will measure 4x6=24cm (plus 2cm) - draw this line on your paper. Then measure the bottom of the skirt diagram, multiply by 6 again (or whatever your number was for your doll/your diagram) and draw that line, trying to ensure the angles are correct so that your corners are square. [DEAD IMAGE]
To calculate any curves on a garment, draw lines on the tiny diagram where the curve changes shape, and take measurements for the curve too. For example if the line curves in by 0.2mm on the diagram, multiply 0.2 x 6 = 1.2cm on your pattern drawing. The line will also curve up or down, as well as in or out, so measure that too, draw dots on your drawing at measured intervals, then join the dots to make the curve. Curves don't need to be exact though, so don't worry too much about accuracy. [DEAD IMAGE]
When you've drawn all your pattern pieces (keep the drawings in a ring binder for future use) trace them onto tissue paper and cut them out to use on fabric as a normal pattern. [DEAD IMAGE]
I followed the pattern instructions pretty much, although I made the top she's wearing from a different pattern, which fastened up the back rather than having a side zip as in the above pattern. Having made the garments I would change a few methods used, especially in the jacket, which didn't really need lining for a doll, and would hang better without the extra bulk. Also I would neaten edges BEFORE sewing the garment - especially with this type of fabric, which frayed terribly. But I did learn a lot about using facings, and the importance of making sleeves wide enough for huge hands! The full-length sleeves were shortened as I couldn't get them over her hands!
The fit isn't perfect either, which is why it's a good idea to make a trial run first using some old poly/cotton sheeting etc. I am too impatient for that kind of thing so I just went ahead and made the suit. I certainly couldn't have made it without this method, so I hope these instructions are clear enough to be of use to others.
Further comments/Posts on the thread:
I should stress it's only going to give you an approximate pattern - it's best made up in muslin first (or polycotton sheeting - something cheap)
the other thing I found was doll clothes construction is way simpler than human clothes construction in some cases - Dolls clothes don't need to be as hardwearing as human clothes do, and they are of course much smaller. So pants for instance, as echo-chan713 asked are actually easier for dolls, unless you want them super-realistic - I find this rough guide best for trousers/pants/leggings - adjust the shape to fit the style and size of your doll. [DEAD IMAGE :(]
If I was wanting an exact copy of human trousers/pants I'd use the length measurement, make it up in cheap fabric, and see how it needed adjusting. Really depends so much on your doll too - some dolls are more realistically proportioned (like humans) than others. For a super-curvy doll, you might be best enlarging a barbie sewing pattern (simplicity do a few) as barbie is super-curvy.
Quoth in answer to your question, as the tiny drawings in the pattern instructions aren't exact, nothing will be exact. The tiny drawings include the seam allowance though, so I measure for example my doll's arm, add 3cm for a seam allowance top and bottom of the sleeve, approximately, then use that measurement when I'm scaling up the tiny pics - so the seam allowance is already included in your drawing if you've already included it in measuring your doll's arm, back, leg, etc. But it is only approximate. I find it's good to see the shape of the pattern pieces needed, as I wouldn't have guessed otherwise.
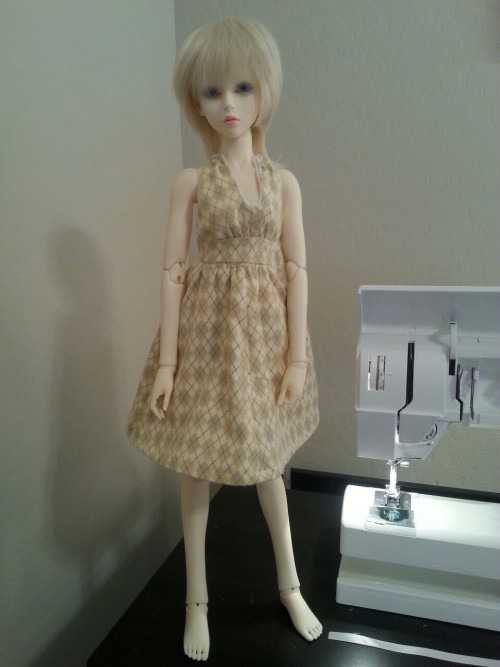
Pazuzu commented an example:
My first attempt at doing this, using a Simplicity pattern for a halter dress. There are a few things I would do differently next time around, namely making a back closure instead of side, and doing away with the terrible pleats at the shoulders. The midsection needs to be lengthened, too, as Elfdolls (at least the old body) tend to be long in the torso. All in all, it was a moderate success. I'd give the project a C.
Model is an Elfdoll Pandora. Thank you so much for the tutorial, I look forward to practicing some more.
3 notes
·
View notes
Text
Resizing Human Patterns for BJDs (DoA 2012)
DenofAngels Thread by EilonwyG Transferring here for newer hobbyists. I am concerned that DoA will eventually become a dead forum result in link rot of a TON of useful and important information. Photobucket's purge has already done massive damage to the information that had been shared on DoA before 2015-ish.
All images from the original thread are gone.
Original post date: Apr 19, 2012 https://denofangels.com/threads/resizing-human-patterns-tutorial.513354/ I've had people questioning me for a while now as to how I've resized human patterns. There is a rather detailed tutorial that Dale Rae did on her web site - http://dalerae.com/enlargepattern06.htm It is well done, but requires waaaay too much math. I did try to use this tutorial, but decided there had to be an easier way. Through experimentation, I came up with this method. The beginning of the tutorial follows Dale Rae's instructions.
Steps
Take out the pattern instruction sheet, the first section if there are more than one in the packet. We'll be dealing with the section where they have the pictures of the pattern pieces.
You'll need to scan the pattern pieces into the computer. (They mean the images like this from patterns, I remember seeing this thread back in the day.)

Dale Rae's instructions call for scanning the patterns in at 125% to make it easier to work with. I've done the same, even though we won't be working with the pattern the same way she does.
Once you've scanned the picture in, you'll want to open it in a picture editing program. I use a program called Xnview. It's a free program you can find and download online. Personally I swear by it, but you can use any program that allows you to resize, cut and edit pictures.
If you haven't already increased the size of the patterns 125%, do that in the picture program.
Save the new size. Then cut each pattern into their own separate picture file and save it in its own folder.
There are a few pattern booklets where the instruction sheet has the pattern pieces at a much larger size than usual. If it appears that the patterns are on the large side, you can skip the increase of 125% step, as essentially, the pattern makers have done that for you.
This [125% pattern] will give you a basic size for a MSD scale 1/4. You will need to tailor the patterns to the appropriate body, as it is not exact for Minifee, Kid Delf, Bobobie mini, Dream of Child, JID, or whatever mini doll. It just gives you the basic size to start from. [BJDs tend to have longer arms/legs. Take some measurements and add to the length and such!]
Once the mini size has been made, from there you create all other sizes you need.
Scaling for other sizes:
SD Scale 1/3 or larger (+125% of the MSD size)
SD is 125% larger than mini (percentage found on another resizing thread on DoA about resizing existing doll patterns for other sizes). As for those dolls over 60cm, use SD patterns and add length to arms and legs were needed, as most are not that far off in chest size for a complete resizing of patterns to be necessary.
YoSD scale 1/6 (58%)
Again from the mini size, resize the pattern 58% to get a Yo-sized pattern for Volks Yo, LTF, Bambicrony, Teenie Gems or other similar sized dolls.
Pukifee / Tinies (15cm) scale
From mini size, resize down to 35% for all Pukifee sized tinies. For Cherishdoll Faith dolls (as I have two of them), resize to 52%. (They're a little smaller and thinner than yo dolls.)
I have not yet come up with resizing for Puki size or other in between sizes. For some, like Minoru world minis and Customhouse Petite Juniors, I would suggest starting with a yo pattern and adding in the length of arms and legs needed, as generally they can fit Yo clothes but are a bit tall for them. Same with 5star yos.
One thing I cannot stress enough is tailoring. As I said, this method will give you the approximate values for the pattern. Once you print the patterns out, I suggest cutting out a mock pattern piece in paper towels (the Viva paper towels are fantastic for this as they're much softer and closer to material) so you can then drape the patterns over the doll, figuring out where material may need to be subtracted or added to get the right fit. This way you won't waste valuable material on an outfit that may not end up fitting correctly. (This is something I did not do on my first outfit when I started sewing for the dolls.)
I would like to also stress that the instruction sheet patterns do not have any of the sewing markers that are generally on the actual pattern piece. You will either need to gauge the general area where these marks are located, or you'll need to consult the original pattern piece.
I have a variety of dolls and sizes in my collection and feel fairly confident that this tutorial covers most of the doll bodies out there. However, I do not own a doll from every company and there may be a few sizes I have overlooked. As I add to my collection, if I end up with a new type of doll body, rest assured I will come up with new numbers for resizing for that doll.
If you see any size not on this list that you would like to resize for, let me know and I can at least see if I have a friend who owns that type or similar for me to borrow and create a size for.
Examples from the thread:


5 notes
·
View notes
Text
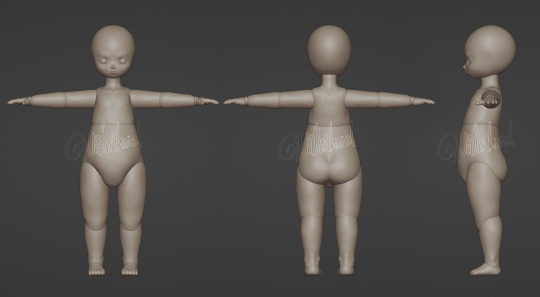
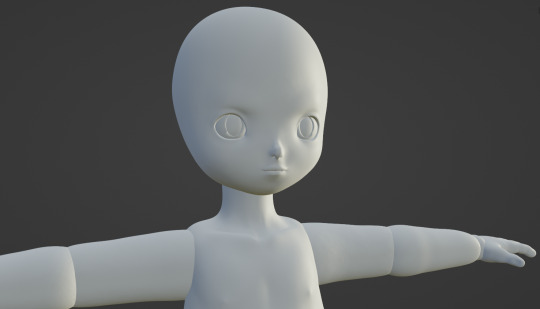
Got this blocked out, next is adding the ears, & cutting joints.
3 notes
·
View notes
Text
Misinterpreted a client's inquiry. (3D model for doll customizing)
Any Monster High Doll Customizers who 3D model & 3D print are welcome to use this ortho I drew of the G1 body to 3D model & print their own. Cause I sure wont be using it.
Sounds like you can't remove some MH doll's legs without destroying the thigh parts and the newer style bodies just tend to look better. I essentially gathered photo refs of MH dolls and drew this ortho for no reason LOL.
4 notes
·
View notes
Text
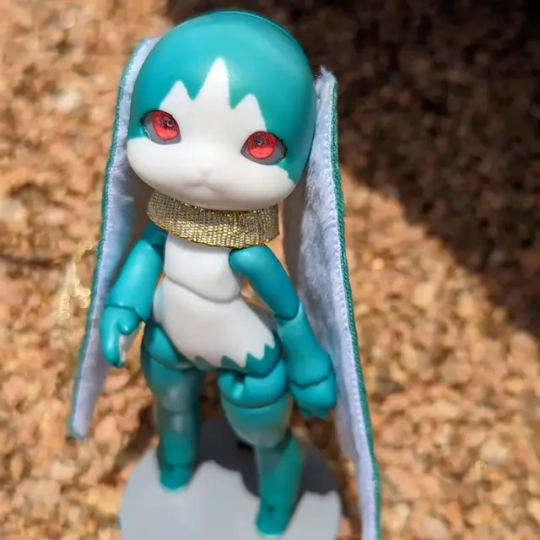
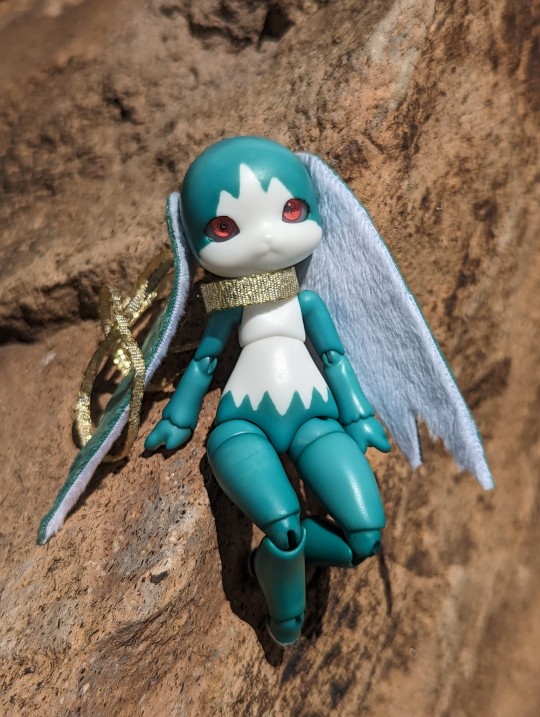
Hyuponia / Ruin of Sadness

102 notes
·
View notes
Text
Tek's Respirator FAQ for faceups & modding Ball Jointed Dolls
Copied from DenofAngels original posted date: Sep 21, 2010 Last edited by a moderator: Oct 10, 2016

Are you qualified to talk about this?
Yes. I [Tekenduis] am a Certified Respiratory Protection Tester/Trainer with extensive training in respiratory protection. I work at a company where my staff are exposed on a daily basis to some of the most harmful chemicals in industry. They can and will be exposed to things like silica, isocyanates and cyanide gas. Their short and long-term health is in my hands and I take that very seriously. Deadly seriously, in fact.
What is respiratory protection?
Respiratory protection is a part of your Personal Protective Equipment (PPE) designed to filter or block harmful substances from reaching your respiratory system. The hobbyists primary form of respiratory protection is the respirator. There are a great number of types of respirators, some useful only for certain applications (see more on this below). The two most common respirators for hobbyists are the disposable respirator and the half-face respirator.
The half-face respirator is a mask that covers your nose and mouth, and has cartridges that clip on, screw on, or otherwise attach to ports on the mask.
The disposable respirator looks like a dust mask or surgeon's mask. It is, as the name implies, made to be disposed of after a short period of time.
Why do I need it?
Many of the items that we work with as doll customizers are toxic and many of them are cumulatively toxic. You may feel ill for a while and then get better, but the sorts of diseases that can be caused by sanding processes and spraying processes can come back to haunt you many years down the road. These products can cause Cancer and Pneumoconiosis. Cancer may be treatable if caught early enough. Pneumoconiosis, which is respiratory diseases like asbestosis, silicosis and coalworker's "black lung" disease, is NOT TREATABLE. Your doctors will work hard to make you comfortable while you die. That is the most they will be able to do for you. If you get Pneumoconiosis you will DIE.
☠️ Are you scared? You should be. This is life and death. Do not play Russian Roulette with your health. ☠️
What do I need?
That depends on the application that you are going to be using your respiratory protection for.
Sanding
For sanding applications (including sanding of resin, apoxie and other sculpting materials, and wood), you need a respirator that provides at least N95 level protection. It should say N95 somewhere on the mask itself. If it doesn't say, it is not good enough. There is a scale to protection levels and anything above N95 is also acceptable (of course).
The levels are: N95 P95 N100 P100
What does this mean?
The prefix ahead of the number will tell you if the mask is Oil Proof or Not. The number will tell you the percentage effectiveness of the filter against particles of less than 0.3 Microns. An N100 or P100 filter may also be known as a HEPA filter. On the bright side, having a small supply of these types of respirators will mean that you are following CDC and WHO recommendations for infectious disease outbreaks, which may or may not include the Inevitable Zombie Apocalypse.
P100 filters are also effective in welding applications. N95 and above filters are most commonly found in the disposable variety and may also be referred to as "dust masks" or "surgical masks". Remember, if it doesn't say N95 (or one of the other codes listed above) it is not good enough!**
Spray
This includes all types of spray applications, whether you are spraying sealant (like MSC or Testors) or airbrushing or spraying paints. The process of spraying releases aerosols (and this is true whether or not you are using an aerosol spray can product. Airbrushing paint creates aerosols too!) for which an N95 filter is not effective.
At this point, you will need to move into a mask that protects you against Organic Vapors AND has an N95 filter. This will mean moving into a half-face respirator.
Your respirator is no longer disposable and can be used again and again without ill effect; the only thing that will need replacing is your filter and (if applicable) your prefilter. Some respirator brands have an N95 filter built right into the Organic Vapour cartridge, but I recommend looking for one that does not, for ease of replacement. Cartridges and filters have different life spans and it is more economical to replace only the part that requires replacing (more on this below!).
Okay! I've got my mask, I'm totally safe now right?
No. There are three things that can negatively impact the safety of your mask; poor fit, improper maintenance and environmental levels.
Poor Fit
A respirator (of any type) is completely and utterly useless if it is the wrong size for you and is not fitted properly. Please ensure you've read the section on fitting your mask to ensure that your mask is correctly fit.
How do I know if it fits?
According to my local Occupational Health and Safety Code, a respirator cannot legally be used in a workplace environment if it has not been correctly Fit Tested. Keep in mind that half-face respirators come in various sizes. Most women and men wear a medium but if you have a particularly slender or wide face, you may need a small or large. If you have a crooked nose, or sinus problems, look for a mask made of silicon; you will find it more comfortable than plastic or rubber.
Improper Maintenance
Your respirator is equally useless if you are not properly maintaining and caring for it. This includes care of the mask between uses and replacement. Please see the section on maintaining your mask for more information.
Environmental Levels
Environmental levels are important to take into account, as your mask can only protect you against the things it was designed to protect you against up to a certain concentration. since I'm sure none of us have the money or inclination to commit to environmental testing of our workspaces, the best way to ensure this is to make sure that the area in which you are working is properly ventilated before you start your project, and until well after you are finished. Open your windows, PREFERABLY PLEASE work outside so that there is fresh air circulating in the area you're working in. If the air is particularly still (no breeze) while you're working, it is worth investing in a simple fan. Set it up in your window, with the fan blowing out the window (ie: the front of the fan where the air blows from facing towards the window). This will help pull the toxins out of your room. Alternately, if you are working outdoors, set the fan up on your table to help promote air movement.
Fit Testing
Fit testing uses a noxious but harmless substance (usually either irritant smoke or Bitrex; an additive used to create bitterness in household cleaners to prevent children from tasting them) to ensure that the seal between the mask and the face is tight and proper. Qualitative fit testing is the most common type, and requires the user of the mask to confirm the presence of the noxious substance. In some cases (depending on chemicals in the environment or failure of the Qualitative test) Quantitative fit testing may be required; this type of fit testing uses scientific sensors to record levels inside the mask. If you have access to fit testing, especially with a half-face respirator, I encourage you to take advantage of it! Fit testing needs to be redone every two years, in the case of weight loss or gain of more than 15 lbs or in the case of surgery (including dental) involving the face.
And if I don't have access?
I have done hundreds of fit tests for staff at my place of employment and I can usually tell how well a mask is likely to fit prior to the fit test being done. This is done with a simple self test. In order to be effective this test must be done every single time you use the respirator (even if you pull it down to talk to someone and put it right back on!).
For Disposable
Step 1: Put your respirator on. Step 2: Cup your hands tightly over your mouth and nose, over top of the respirator. Step 3: Suck in a long breath. You will get air, but it should all be coming in through the small cracks between your fingers. You should not feel any air coming in from around the nose piece or under your chin. If you do, refit the mask and try again. If you cannot complete this successfully, you will need either a larger or smaller mask. Step 4: With your hands still over your mouth and nose, blow out. Again, you should feel the air moving past your fingers, and never around the bridge of your nose or under your chin.
For Half-Face
Step 1: Put on your mask and make sure the straps are tight. Step 2: Cover the cartridge, as much as possible, with the palm of your hands and suck in. The mask will likely deflate slightly. You should feel some air coming in through the cartridge but no air coming in from the sides, under your chin, or around your nose. If you do, adjust the mask and try again. If you cannot complete this step successfully, you will need either a smaller or larger mask. Step 3: Cover the exhalation valve of your respirator with the palm of your hand and blow out. You should feel the mask inflate slightly and again, you should feel no air escaping from the side of your mask, under your chin or around your nose.
😷 How do I maintain my mask?
Respirator maintenance is exceptionally simple, takes very little time, and ensures that you are not exposing yourself to toxins. Take the extra few minutes to ensure that your respirator is working right!
Before you put it on
For Disposable
Do a quick visual check of the respirator. Is it dirty? A little discolouration from the dust is fine, but too much might mean that your respirator is clogged. I'll discuss this a bit further down. Check that your straps are still in good condition. Check that the foam piece at the nose is intact (if applicable) and that the metal part that bends across your nose is not bent out of shape. If your mask is clogged or not in good condition, replace it.
For Half-Face
Do a quick visual check of the inside and outside of your mask. Make sure that the valves (the little rubbery seals on the inhalation and exhalation points) are present and in good condition. Make sure there are no cracks or tears in your mask. Ensure that your filters are firmly attached. Correct any of these issues before proceeding with your work.
After you take it off
For disposable
Do another quick visual check of your mask. If everything is still in order, seal your mask inside a baggie and put it somewhere safe.
For Half-Face
Wipe all surfaces of the mask that touch your face with a respirator cleaning wipe. If you don't have any, use the following: For masks made of natural rubber, use a non-alcohol based antimicrobial wipe. For masks made of silicone or plastic, wipe with isopropanol (isopropyl alcohol, or rubbing alcohol). This step is less about the effectiveness of your mask and more about preventing build up of oils from the skin which can degrade the mask over time, necessitating replacement, as well as causing skin breakouts!
Seal your mask inside of a baggie or well-sealed (and clean!) coffee can and put it somewhere safe.
🧼 Once a month you should remove the cartridges and clean your mask with soap and water, and hang it up to dry. This keeps the inside of your mask smelling pleasant. Sweat and condensation from your breathing can build up in there over time and cause the mask to smell unpleasant.
🤔 How often do I need to replace my respirator, or cartridges?
Filters will only last so long! Keep in mind that whether or not you are actively breathing through your respirator (IE: wearing it) it is still filtering the air around you. The average Organic Vapour filter, which is what you should be wearing at the least for spraying, lasts approximately 24–48 hours. That's it! Not very long, right?
The good news is that you can extend the life of your filters dramatically by placing them into a sealed container, like a baggie or coffee can, as discussed in the section above. My staff generally see a lifetime of 1–2 weeks from their filters, and most staff are using their filters at least once a day.
💁 How do I know it's time to replace them?
For Disposable, N95 and above Your respirator is a simple filter made up of layer of material that filter out small particulates from the air. Eventually your respirator will become clogged and need to be replaced. This is not a matter of time, it is a matter of volume of filtering, something not easily tracked.
As a general rule of thumb, when your filter is ready to be replaced, you will know it because it will get harder to suck a good deep breath in. As soon as you start to feel this, replace your respirator. For Half-Face
Organic Vapour Cartridge – Because this is filtering vapours (or aerosols), you will know it is time to replace it the moment you smell or taste anything through the filters; even the tiniest bit. Throw them out and get new ones.
N95 Prefilter
Please see the explaination for disposables above, your prefilter works the same way. If your prefilter is built into your organic vapour cartridge, it is a matter of volume of filtering, something not easily tracked.
I've got this bandana/old respirator of my uncles/some other thing…
❌ Cloth is not an effective filter against either particulate or vapours. ❌
Your respirator needs to be yours. Quite aside from the obvious sanitation issues, if the respirator belongs to someone else, it may not fit correctly and is therefore ineffective.
You're just trying to scare us. No one actually gets sick from this. ☠️ ☠️
There are several people here on the [DenofAngels] forums that have stepped up to talk about the health problems that they have suffered as a result of exposure to chemicals in either this hobby or others.
NON ORIGINAL POST NOTE: Before you dismiss the risks involved please realize that even my friend, a professional artist has experienced the direct effects of long term exposure to harsh chemicals and resins for both film and personal BJD casting even when frequently taking proper protection.
🛍️ 🛒 Where do I get these things?
Disposable respirators are readily available in home improvement stores and pharmacies; just make sure you get one that says N95, or above, as discussed earlier. You can also refer to post #3 below for a Shopping Guide.
Half-face respirators are sometimes available in home improvement stores, but are also readily available from safety suppliers (many of which are open to the general public) and online.
🤢 I worked without my mask and now I'm not feeling well. Am I going to be okay?
This question is best discussed with your Doctor. My speciality is prevention, not treatment. I can tell you what results you may incur, but I cannot and will not attempt to diagnose your health, especially not over the internet.
Masks & Respirator Purchase links:
⚠️⚠️⚠️ THIS LIST IS FROM 2010⚠️⚠️⚠️ I AM ONLY INCLUDING PRODUCTS THAT STILL EXIST:
Disposable Respirators ("Dust Masks")
3M 8210 Lowes & Home Depot
3M 8210 Plus As above, but with a fabric elastic strap, so they last longer, but tend to be a bit more expensive.
3M 8511 Similar to the 8210 series, but these have an exhalation valve, which can prove more comfortable in hot or humid environments.
Half-Face Respirators (Rubber)
3M 6000 Series Half-Face Respirator Amazon (Small) Amazon (Med.)
3M 6001 Organic Vapour Cartridges & 3M 5N11 N95 Prefilters Cartridges Amazon Resupply Kit (OV Cartridges and Prefilters)
Starter Kits Amazon
Half-Face Respirators (Silicon)
3M 7500 Series Half-Face Respirator Amazon (Small) Amazon (Medium) Amazon (Large)
Starter Kits Amazon (Small) Amazon (Medium) Amazon (Large)
This is not my original post, I am simply sharing this information as not everyone can access the DenofAngels forums! Stay safe and creative guys!
14 notes
·
View notes
Text


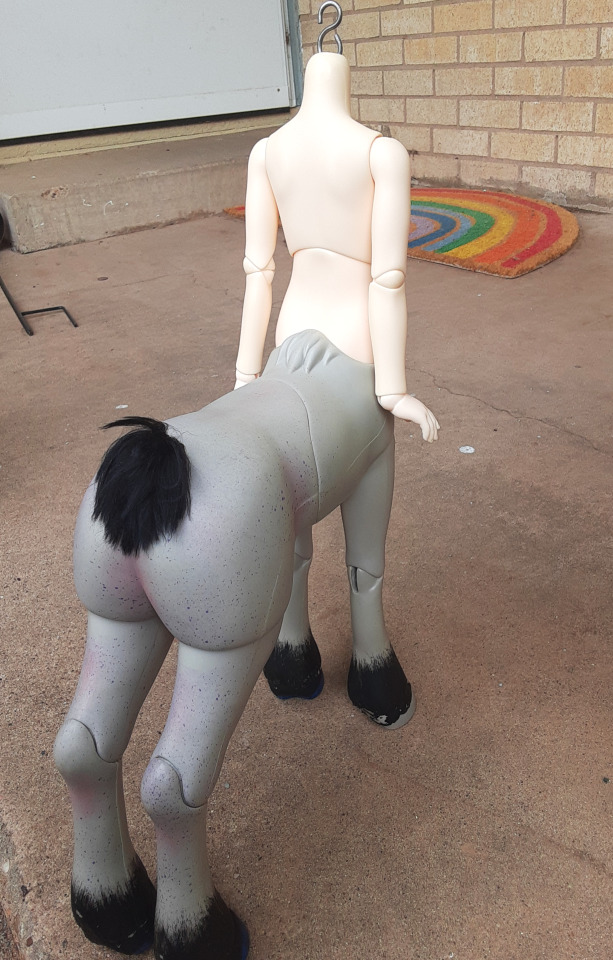


SOOM Sody & Lody centaur body with a Soom 2015 NS Cheshire body. There is gapping because the older centaur bodies were made for their "genderless" sculpts with no genitalia
4 notes
·
View notes
Text
Happy to help! o/
Attention friendly BJD collectors!
I wanted to make a post to help newbies find people that can help them with their dolls.
Reblog this post if you are willing to help a new person in the community.
If you need help find someone on this post and they’ll help you c:
EDIT: because some people seem to think I approve of supporting or accepting theft I want to clarify
LEGITS ONLY POST!!
278 notes
·
View notes
Text
WTB/ISO Luts Honey Delf Centaur body
I am looking for the horse body parts of a Honey Delf centaur. The human torso is not necessary but I will consider it if it is normal skin. Horse parts can be any color. NO RECASTS / Legit only please
DenofAngels WTB Thread here (Trade offers include both items I own and items my brother owns.)

Looking to pay $250 plus shipping. But it’s negotiable!
I can offer stuff for trade.
Mystic Kids Cris 1/6 head or full Doll and choice of clothes/eyes/wig/etc. (NS) - $210 value OR
Mystic Kids Cris 1/6 full doll (w/ company faceup) - $130 value
Soom Feny 1/6 surprise head (NS) - $80 value
Soom 1/6 WS Coyote Elves Han & Asronn Ears/Tail no blushing - $30 value
Soom 1/6 WS Coyote Elves Han & Asronn legs/feet paws w blushing- $40 value
Mystic Kids Francis MSD head (White Skin) - $35 value
Contact: Nattou at DenofAngels This tumblr URL
1 note
·
View note
