#dyeing tutorial
Explore tagged Tumblr posts
Visit Tumblr Blog
Explore Tumblr blogs with no restrictions, modern design and the best experience.
Last Seen Tumblr Blogs


Fun Fact
69% of Tumblr users are millennials.
Text
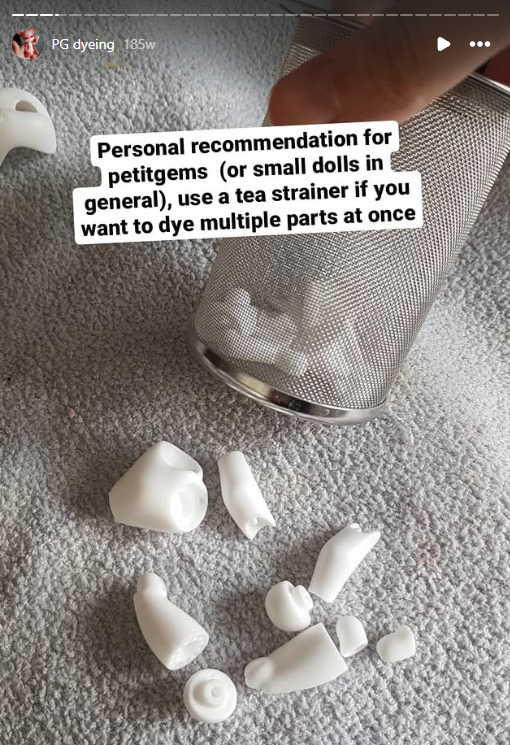
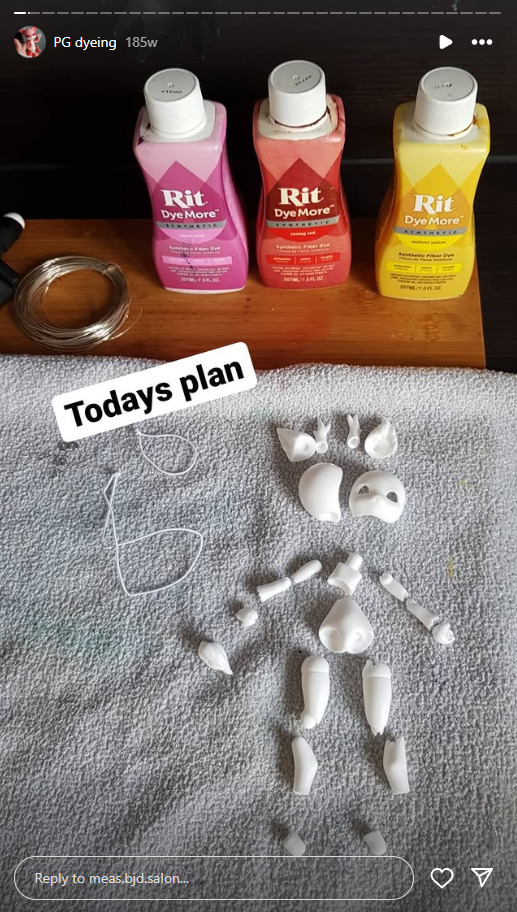
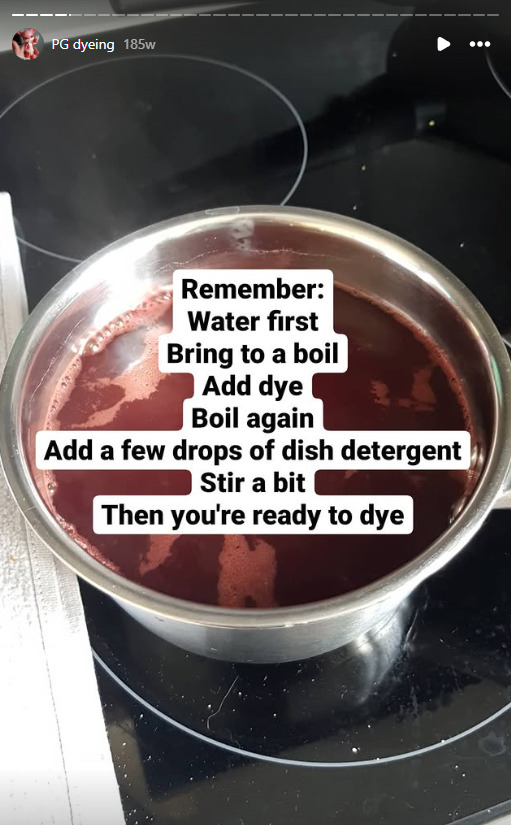
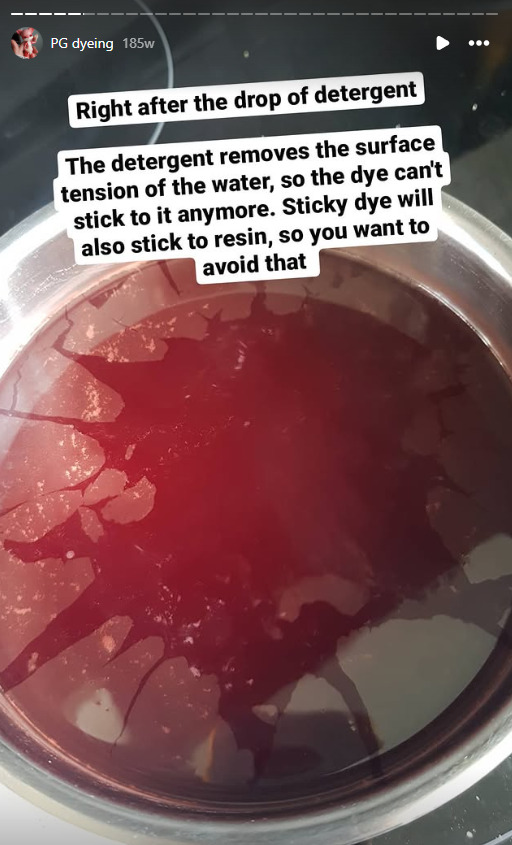
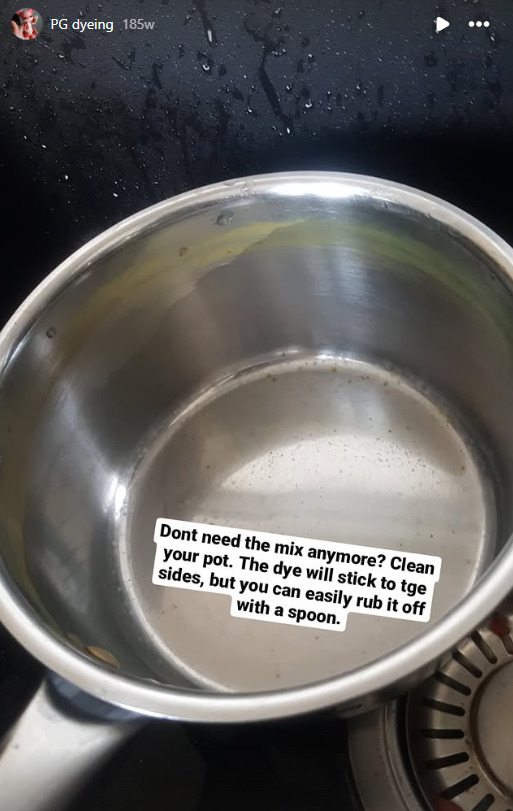
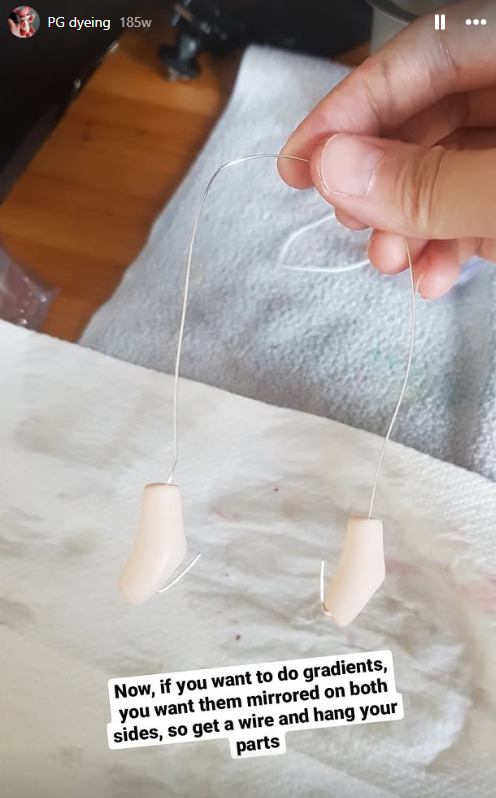
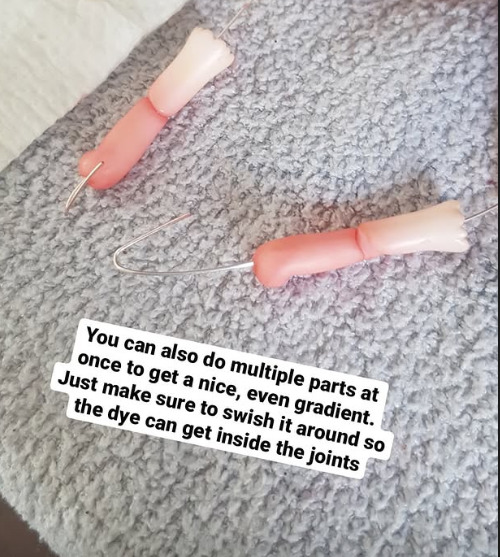
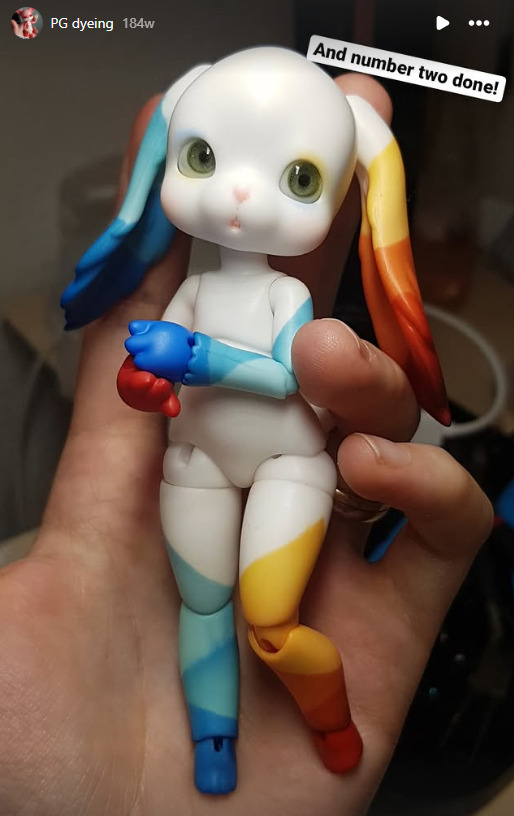
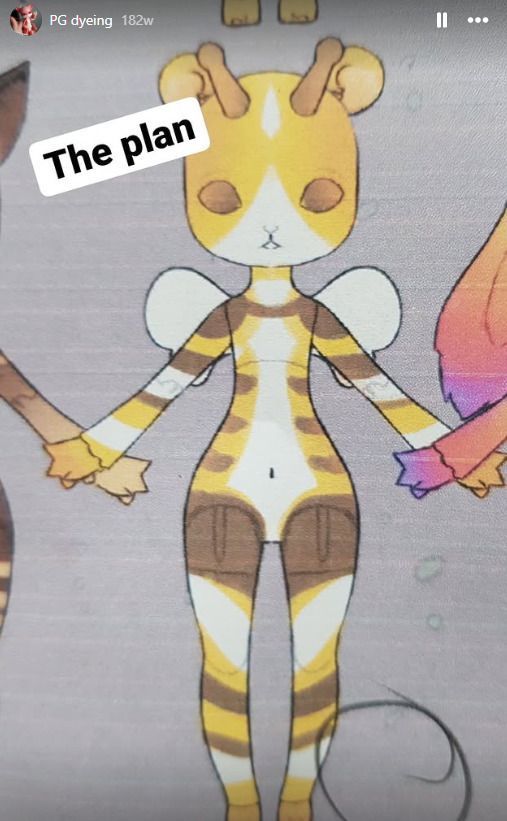
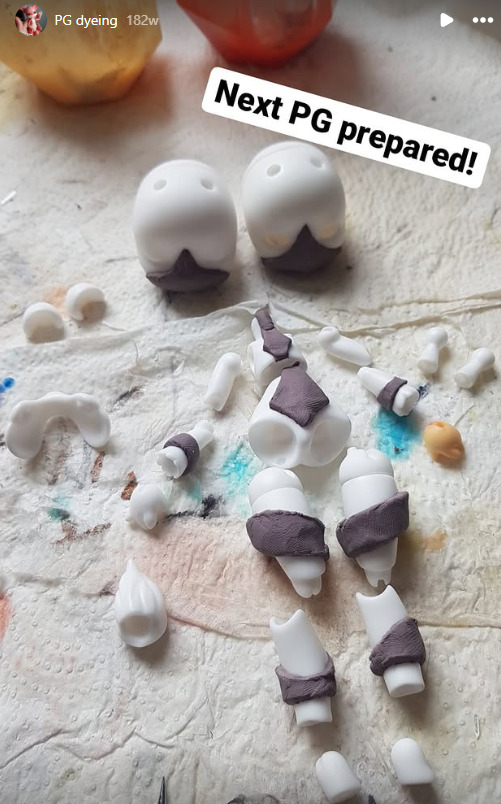
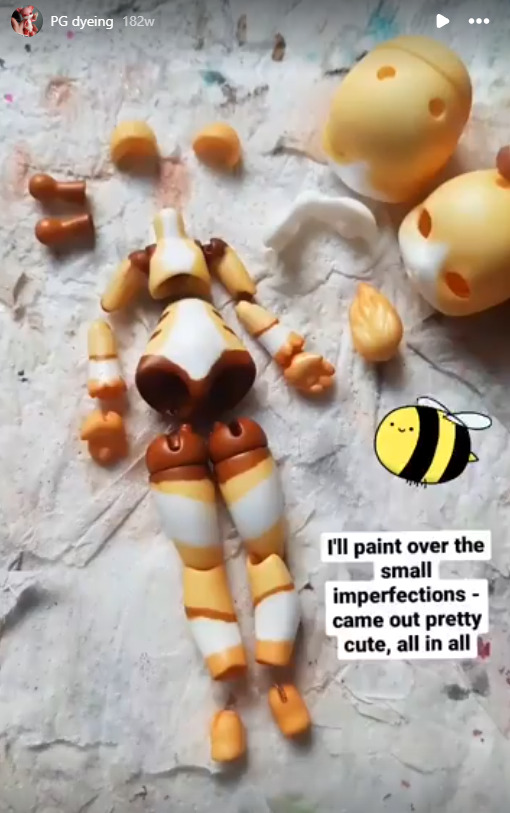
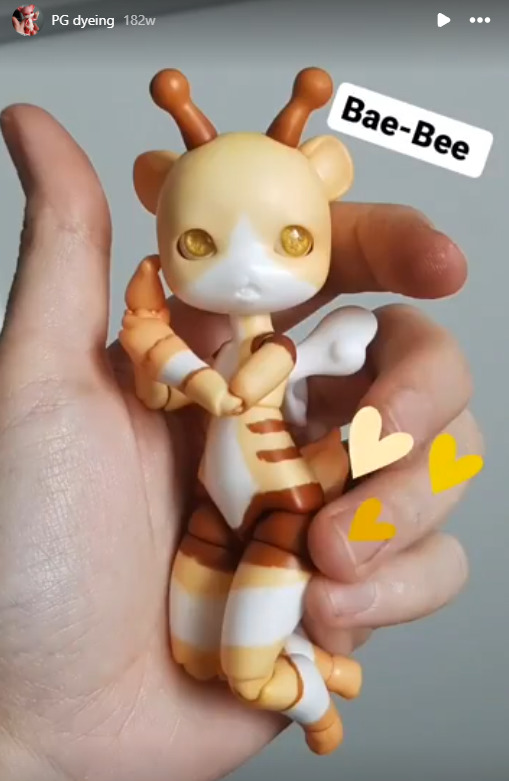
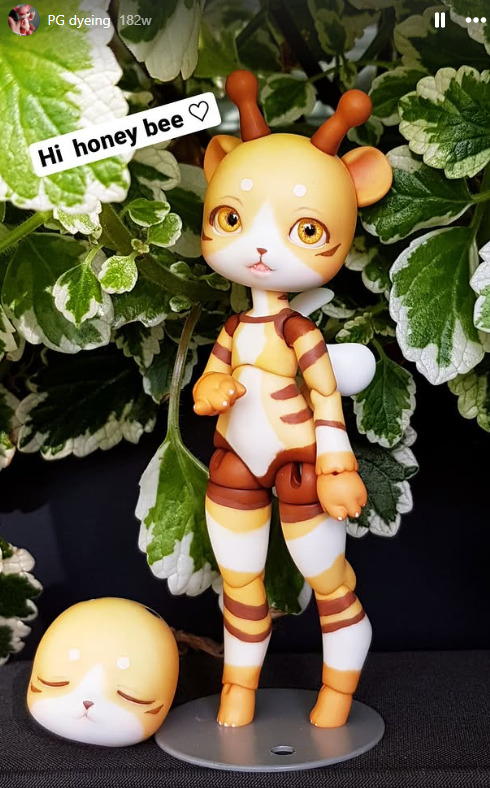
@meanae's Resin Dyeing Tutorial
Posting here since they don't have it on their tumblr but PLEASE go give them a look. This is who I commissioned to dye my Sorrow Petit Gem after seeing theirs turn out so amazingly well! I loathe the idea of painting or blushing the colors as it would be absolute suffering with joint friction.


#bjd tutorial#dyeing tutorial#ball jointed doll tutorial#modding tutorial#bjd mods#petit gem#soom petit gem#meanae
12 notes
·
View notes
Text
whenever i use google to get some general info about medieval architecture stuff unless i type something very specific i get minecraft
#i feel like all medieval structures ever existed have been built in minecraft and have tutorials for them#also dyes. i googled what colors i need to mix to get a color i wanted and you guessed it i got minecraft
59 notes
·
View notes
Text

Further Rit Dye pro-tip: If you have to match a very specific color or only need to sew like one buttonhole and don't want to buy a whole spool, you can just dye pearl cotton!
This fabric has a dull teal warp and a copper-brown weft, which gives it a cool shifting verdigris effect. To get thread to match it, I started with that sky-blue pearl cotton and dyed it teal, then overdyed that with brown. It gives it a similar hue to the fabric and also a lot of depth!
#super happy with this; I wasn't sure the overdying would work this well!#dyeing#sewing#(eventually! using this fabric to make an 18th-century shirt using Vincent Briggs' tutorial)
32 notes
·
View notes
Text
No dye required tie dye shirt
You will need:
cotton shirt (any colour should work other than white)
strong string
normal ass household bleach
first scrunch/fold your shirt in whatever way takes your fancy and tie string tightly round it to hold it in place. I folded my shirt into a strip then tied string down the length, rolled it up and put more string round it but try anything you want. be creative, you can even tie marbles into the fabric to create different effects.


try and picture how it will turn out when it's dyed but enjoy the fact you won't know what it will look likew until it's done. (mine ended up nothing like what i pictured)
the tighter you fold/tie the less the bleach will seep in those areas which will create the pattern!
wet the shirt (or don't!! who knows how it will turn out!) then pour straight undiluted bleach all over it. rub it in a little with your fingers for even coverage. I poured on more bleahc on mine after a bit but use your instincts to judge.

wait a while, keep checking to see the effect and when it's lightened as much as you want rinse the shirt off a bit and cut off the string. this black shirt turned a lovely orange colour where the bleach was.

give it a proper wash and its all done!

you could easily pay £30 for a similar shirt but it's so easy to make one thats totally unique and uses stuff thats cheap and you've probably already got in your house. plus there's no issue with dyes running in the wash because it's just bleach!
please reblog this and show me if you try this out!
17 notes
·
View notes
Text
My lovely fellow cosplay freaks, help a bloke out
I've never dyed shite apart from my hair before (and even so, I pay someone else to do it) so I'm in need of some assistance
To dye the following denim jacket black with RIT black dye

Is one bottle enough, or would I be safer with two bottles?
Kisses on the forehead, and may the Metatron not bite

#good omens cosplay#cosplay#diy craft#diy projects#dyeing#rit dye#send help#cosplay help#good omens#(kinda)#(you will see)#fashion#crowley cosplay#-ish#cosplay tutorial#denim jacket#diy#crafts#costume#spencer speaks#spencer begs for help#spencer has too many projects
14 notes
·
View notes
Text
dying my converse pink: the saga
okay so I had these crusty white converse and I wanted to dye them a fun color so I would actually wear them! Here’s what I’m working with:

Eugh. First I took out the insoles and laces and scrubbed the shoes with a toothbrush, then and them soaked in oxi-clean for a couple hours. (Including the laces and insoles they were NASTY)


They look gross as hell, but a little better. I’ve had these for like a year, so they’re pretty dirty. Oh and I also scrubbed them with baking soda a couple times for good measure. here’s what they look like afterwards:

once they were all clean I started on the actual dye. I used electrical tape to tape off the soles and the logo, but as you’ll see this didn’t really work too well 💔 (foreshadowing)

I’ve also heard you can use Vaseline to mark off the soles and stop them from getting dyed, but you’ll need to look into that yourself 😭
anyway, then I put a bunch of hot water in the sink, I think like 3 gallons (but it depends what you’re dying) and poured in one container of dye


My sink looked really bloody. Then I dipped the shoes in and held them there for about 3 minutes. this is what they look like straight out of the dye bath! (^_^)

Yayyy!! Then I sprayed them with some dye fixative and let them sit for about 30 minutes.


Then I rinsed them off with cold water and waited for them to dry.
unfortunately, I the tape didn’t do a perfect job of keeping the dye out so some of the rubber got stained 😓

Noooooo 😭💔
I got most of it off using some nail polish remover. (I also heard magic erasers work well, but I didn’t have any)
Once they dried, I laced them back up and they’re done!!

I’m actually rlly happy with how they came out! and dying them was much cheaper than buying a new pair lol. Anyway, thanks for reading X3
#Emo#scene#converse#punk diy#dye#This isn’t really a tutorial lol#but if you have any questions about my process please ask :3#Shoe customization
17 notes
·
View notes
Text

i somehow managed to lose all the saves i had kept back in act 1 for elenion so i started a new run! elenion ily i'm sorry for putting you back through the horrors. and back into the silly default bard outfit that i was too lazy to change beyond dyeing it lmao. at least you'll get to meet gale for the first time again 💖
#star plays bg3#why are so many of the default oufits in this game so bad asfgfkdjgd#the bard one is like. kind of okay if you dye it. but it's still bad.#hey maybe it was for a gig that required musicians to dress stupidly!#i'm going to summon the tutorial chest and change it now lol#anyway elenion also had a different face when i first played act 1 before i found a better one in a mod#so now i can play with them looking the way they're supposed to!
7 notes
·
View notes
Text
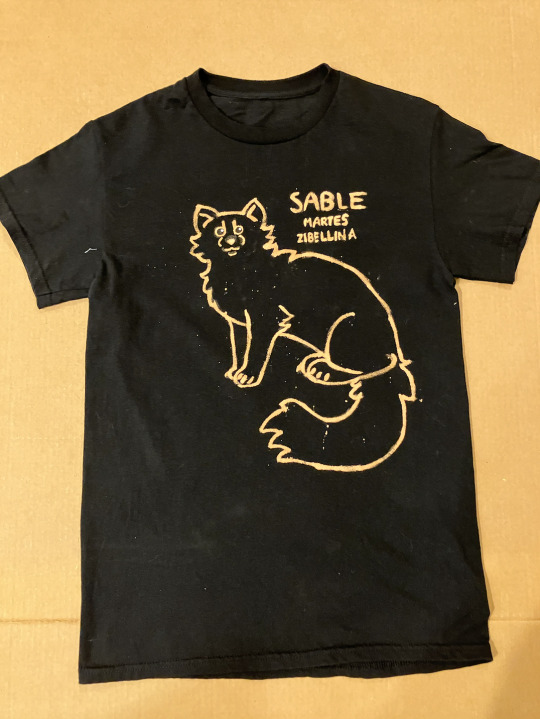
I see a lot of 'diy gear' around so I'm surprised I've hardly ever seen bleach dyed shirts! They're honestly one of the coolest, easiest, and relatively inexpensive ways to make discreet gear - especially if you're like me and you can't exactly find shirts of your theriotype being sold.
Tutorial under the cut!! :3
What you will need:
A black t-shirt, preferably 100% cotton (avoid polyester and spandex)
Bleach
Water
Sidewalk/blackboard chalk, or a chalk pen
A paintbrush to apply the bleach
A disposable cup
A bit of cardboard or plastic to put under the shirt (to prevent the design from bleeding through onto the other side)
GLOVES and other safety gear (ie, a mask and goggles)
fabric paint, not puffy paint (optional but if you're heavy handed like I am it helps so you can fix screw ups)
SAFETY:
Work in a well ventilated area.
Wear gloves, goggles, and ideally a filtration mask when handling bleach.
WASH YOUR HANDS thoroughly after handling the bleach and do not touch your eyes or face before washing your hands
Be mindful of chemical reactions that can occur when mixing bleach with other cleaning products - never, ever, EVER mix bleach with anything containing ammonia as it can react and create toxic chlorine gas.
Keep bleach out of the reach of pets and small children, and if you have small animals like birds or rodents, work AWAY from them as the fumes can damage their lungs.
Make sure you read the back of your bleach container so you know how to handle and dispose of it safely.
Process:
Slide the cardboard into the shirt, adjusting it so you'll be drawing on the side you want your design on.
Use the chalk to draw your design on the fabric - don't worry about screwing up here, it'll wash out later. (If you want to, you can digitally draw your design, print it out, then trace the back with chalk and press it onto the shirt to transfer the art)
Put on your safety gear (ESPECIALLY your gloves) and move to a ventilated area (I did this on my back porch)
Carefully pour some bleach into your cup, then cut it with water. Remember that the more water you add, the more of the solution you'll need to apply to get your design to show up.
Apply the solution over your sketch using your paintbrush. You might need to apply it multiple times if your bleach solution is less concentrated.
Once your satisfied with your design, let it sit for 20 minutes to allow the bleach to fully stain the fabric.
After 20 minutes, rinse out the fabric under cool water. Make sure you're wearing your gloves as you do this so you don't hurt your skin.
Wash your shirt in your washing machine by itself, otherwise the bleach might transfer to other laundry. Put it in the dryer after or hang it up to air dry.
Clean up your area, wash your paintbrush out thoroughly, throw the cup away, and then remove your gloves to scrub your hands with soap and water.
Once your shirt is clean and dry, you can use fabric paint to touch up any mistakes. I used black paint to remove excess lines and white to give my design eye shines. Follow the directions for fabric paint on the back of the bottle, as the instructions for washing it can be different. Don't use puffy paint, the touch ups will end up raised and it'll look funny.
And there you have it! :D DIY gear shirt for all your alterhuman needs >:)
#therian#therian gear#alterhuman gear#otherkin gear#textile art#bleach dye#otherkin#alterhuman#therian gear tutorial#otherkin gear tutorial#bleach tshirt#alterhuman gear tutorial
36 notes
·
View notes
Text
How to ecoprint a t-shirt!

Take the cloth you want to dye – natural fibers like cotton, linen, wool and silk work best, but also polyamide! It it's new, it's good to wash it first to get rid of any surface treatments on the cloth.
Then you'll need mordant for your fabric: alum and tannins for cellulose fibers, or just alum for protein fibers. Mordanting will help the print stick to the fabric and stay vibrant! To pre-mordant, simply dissolve the mordant into hot water and dip your cloth in it. To calculate how much mordant you need, simply weigh your dry cloth and divide by ten.
After mordanting, you can let your cloth dry or simply wring it and continue to the next step. Using wet cloth will result in a more watercolour-like print, as the dyes spread a bit. For crisper prints, it's better to use dry cloth.
Next you'll need plant stuff! Most green stuff will give yellowish hues, but there are some plants that are special dye plants. Do your research or experiment! (I used dyers chamomille, st. john's wort and some purpleish plants that I'm hoping will give red.) Some kitchen scraps like onion skins, and some mushrooms (eg. surprise webcap) are also commonly used! You can use fresh or dried plants. Arrange them on your cloth in whatever pattern you like! I'm folding my shirt in half to get a mirrored print, so I placed some flowers facing up and some facing down, but generally you'll want to place the flower face down and leaves face up!

Then it's time for wrapping up your cloth! You'll need another fabric or plastic to cover the cloth and something solid to wrap your fabric around, like a stick, some rulers or a piece of pipe. A rolling pin can be helpful in getting the plants flat against the fabric before wrapping. I used a big glass jar, like so!

Place the other fabric or plastic on top of your cloth and roll tightly! Tie the roll with some scrap yarn so it stays tight and finally wrap it in a towel. If you want a background colour, you can use a transfer cloth that's dipped in dye in place of the plastic or other fabric.


Next this roll will be steamed to get the colours from the plants into the cloth. A big kettle and small flower pot upside down work well, if you don't want to sacrifice a juicer. I used a bucket, a styrofoam box and an elecric kettle to save energy. Let it steam for 1,5 hours. If your cloth and plants were dried, it will take longer.

Once it's steamed, let it cool completely. Then it's time for the reveal! Dry and iron, wear and hand-wash.
I'll post the finished shirt once it's ready!
#i got inspired by spotting the plants on a weekend trip#i haven't found them growing near where i live but i took a long biking trip and admired them on the roadside#ugh my legs are tired from biking 180 km in two days and trying to keep up with my faster friend#but anyway i wanted to make a tutorial on this since it was#solarpunk aesthetic week#last week and I didn't have time then#fiber arts#craftsofsiri#solarpunk#solarpunk crafts#dyeing#natural dyeing#contact printing#ecoprinting
26 notes
·
View notes
Text
Hair: 101 What do I do with this mop??
So, you've decided to convert to the dark side. Or maybe you just want the hairstyle- who knows. But here's where to start.
In this post there step by step instructions on:
Haircuts and styles.
How to style your hair.
Guidance on dye.
Haircare.
There's more. You name it, its here. Lets get to it. ───────────────────────
Step 1: Haircut. For the love of whatever you believe in, do not cut it yourself if you don't know what you're doing.
Find a salon you trust. I always go to this one barber shop near my house, the girl who does my hair has good reviews, she's both a hairdresser and a barber- and overall just knows what the heck she's doing. Finding a salon/barber shop you trust is crucial about getting the results you're after. Good haircuts can range from $25-$60 depending on what you're looking to do and how drastic of a change you're making. How can I trust a shop?? Check for reviews, word of mouth or check if they have a social media page to see what they're about and what they've done in the past. Or find someone who specializes in certain styles.
Tip!: One of my red flags is that the place doesn't take card in this day and age.
Figure out which side you want your hair to cover. There's a little trick to figure out which side is the best to have covered; - Make a triangle with your fingers and hold it roughly half an arms length from your face. - With both eyes open, centre something across the room from you inside of that triangle. - Close one eye, then the other. - Which eye keeps that item inside of the triangle? That's your dominant eye. That's the one you'll keep uncovered. -
Reference images. Check out Pinterest, Google- the ways to get images are endless. Check around the web and gather yourself up a whole board of front, side and back images of what you want your hair to look like. I got an entire board before I trusted anyone to touch my hair. Keep in mind your hair length, type and maintenance it would take to keep that haircut as it is.
Tip!: Search for things like emo hair, emo haircut, emo hairstyles, 2000s hairstyles and whack your gender on the end of it.
Ask for specifics. You've found yourself a salon, gathered up a whole range of reference images- cool. What you're gonna do is show them your reference board, your camera roll- whatever you saved your images to. Verbally ask for things like choppy layers or just layers, side-swept bangs, 'emo/scene hair', the tellum cut, that kind of stuff. Show them how you part your hair and what side you sweep that mop to.
Fingers crossed you've gotten what you're looking for x
───────────────────────
HELP!1! You got a botched haircut? Don't stress it, I've had my fair share of those.
Worst comes to worst?
Step 1.5: Haircut, the DIY style. Let's try to fix this the best way we can- or just save cash cutting your hair yourself.
What you need: - Scissors, the hair cutting kind. - Thinning sheers. - Eyebrow or a face razor. - Spray bottle. - A towel. - Protection against angry parents.
Wet your hair. Never cut your hair dry, it always ends up choppy and never lays right- not in the good way. Plus, natural hair has some spring to it. Especially considering you're more than likely looking into straightening it later on. I'm not talking a little damp, I mean full on drenched- but not dripping. -
Grab your tools. Get everything ready and set out. Clip a towel over your shoulders to avoid the hair falling onto your clothing. Stand in front of the mirror and make sure you have one for the back of your head too.| You can buy hair cutting tools from places like Kmart, Target or even supermarkets and drugstores. -
Get your references. Make sure to grab up your wall of references- look at those as much as possible when cutting your hair. That means back, front, sides- bangs. -
Section your hair. Clip your sections off and get to cutting. Cut slow, don't take too much off. You can always cut more off but you can't exactly stick it back on when you fuck up.
Tip!: Use clips to section off hair to make it easier to see what you have and haven't done.
Snippy snippy. Use your scissors to cut off larger chunks of hair, thin out the ends using the sheers- light handed. Your razor is used to taper in the edges of your hair for those layers, make sure you stick to small sections. Even out the sides of your hair, the parts that lay before your ears. They're meant to have a tiered layer look to them that ends in a spike. Cut your ends by pulling them out to the side of your head so you can see them from the front, do the same as you did before with your sides. Bangs is up to you and how you style them. Chuck some layers throughout your hair, they don't have to be perfect, just to add a bit of texture and shag. -
Clean up. If all went well- clean up the evidence, use a hair dryer to blow off the hair onto the floor and vacuum/sweep it all up.
If you mess up, don't panic. Hair grows back- beanies were invented for a reason.
───────────────────────
Step 2: Dye time. Though optional, it's fun to explore. For this one, you don't need to go to a salon. You can do it at home and I prefer it that way to always get the results I'm looking for.
What you need: - Box dye. - A dark towel (black is best). - Vaseline. - Wipes. - Gloves.
Find some dye. Take a trip to your nearest supermarket or drugstore. Aim for cruelty free brands, avoid dyes with harsh chemicals to prevent hair damage and don't skimp out on the cost. Cheap dye can really damage your hair. I've learnt the hard way after dying my hair black for about two years now. -
Protect your skin (and your countertops). Slather some Vaseline over your ears, head, neck- wherever you think the dye may touch on your skin. It creates a barrier and trust me, black is super hard to get off of your skin. Opt for darker surfaces or sinks when dying your hair a vivid bright or pitch black- stay away from manic panic! That shit stains EVERYTHING. Most dye kits come with gloves, but it wouldn't hurt investing in some that actually fit you- or you could be chaotic and go in bare-handed. Do a patch test before dying your full head, trust me. As someone with sensitive skin- you don't want an allergic reaction on your scalp. -
Get to it. Follow the instructions on the packet. Dye your full head or just some- it's up to you. I would opt for cooler or even just cold water when you rinse your dye out, I've found it sets the colour better, makes it stick longer and fades less quickly. -
Aftercare. Make sure your hair is conditioned well and not brushed when wet to avoid damage. Some dyes come with aftercare conditioner- if not? Just slap some coconut oil on and call it a day.
Tip!: Grab a root cover spray in the same colour that you got your box dye in so you don't have to dye your hair as often- especially since black is a shit to maintain.
───────────────────────
Step 3: Wash and care. How do you take care of your hair and keep it nourished? Follow my routine as a guide below.
What you need: - Shampoo. - Conditioner. - Hair mask (optional). - Coconut oil. - Leave in conditioner/serum.
Scalp oil. Once a week, if your hair gets dry, get some coconut oil and lather it on your scalp. Rosemary, almond and jojoba all work too, but I've found coconut works best for my hair. Leave the oil sitting from anywhere between 5-20 minutes. -
Shampoo. Get some shampoo, argan oil from Herbal Essences is my personal favourite, literally gets all the nasty from my hair and leaves it so shiny. I don't always double cleanse my hair since I tend to wash it every 2-3 days.
Tip!: Younger people (between 12-21) need to wash their hair more often because of their oil glands. - Oily hair? Wash every 1-3 days. - Dry scalp? You may be washing too much. cut back to 4-7 days. - Bleached hair? Wash once a week to avoid damage.
Shampoo again. The first lot of shampoo was to clean off any of the excess dirt and oils in your hair, this one is more of a deep cleanse. I would recommend getting a scalp scrubber and getting in there during this shampoo. -
Condition. I use the matching conditioner from Herbal Essences, it makes my hair suuuper soft and hydrated. I love it and recommend it to almost everyone. Plus, they're both really affordable. I don't use masks because of this conditioner, but if you want to mask your hair- don't condition on the same day! -
Leave in/serum. I use the Elvive brand, both for serum and leave in. Both because they hydrate my hair really well, leave it fluffy and have heat protectant in them. They don't run me much cost either.
───────────────────────
Step 4: Styling. Want that pin straight perfect hair? Here's how.
What you need: - Hair dryer. - Hair straightener. - Heat protectant. - A thin comb. - Your usual hairbrush. - Hair spray.
Wash and dry. Once you finish the routine above, or even have inspiration for your own- towel dry your hair or air dry it a little bit so its not dripping wet. I toss my hair up in a turban wrap and leave that on for a little while instead of towel drying my hair. -
Protect. Spray or slather some heat protectant on your damp hair to stop it from damaging due to constant heat usage. I like keratin products because they help with damage I might have caused by not protecting my hair earlier. Don't be like me. -
Blow dry. Blow dry your hair on the highest setting until its not so damp anymore, this also helps to straighten out your hair (or it does for me). Flick the heat down one and continue to dry as normal.
Tip!: Don't dry your hair upwards if you want it to lay flat! Dry from the top of your head down.
Straighten. Depending on your hair type, you may need to straighten on a higher setting. I whack mine on medium and run the iron across my bangs and sides mostly, the dryer straightens the back for my hair- though you may need to do your whole head. -
Spray. Cover a brush with some hairspray and comb it through your hair to keep the frizz to a minimum and to make sure it stays straight. For my bangs, I get a thin comb and repeat the process but going underneath it too.
───────────────────────
Follow for more x Updates every week, Tuesday and Thursday. 6:30pm GMT +11.
#emo#emo blog#emo forever#how to#guide#help#tutorial#101#info#2000s#2010s#emo hair#hair#hairstyle#hair style#haircut#haircare#hair care#hairdye#hair dye#box dye#hair tutorial#hair inspo#hair inspiration#hairstyle inspo#hairstyle inspiration
8 notes
·
View notes
Text
Ok I now have all the parts for Eridan. Off to assemble. Mom innocently noted that April is next week. Con is in early May. I'm in danger
#venlapost#i have two types of fabric dye suitable for dye bath BUT neither of them is made for 'more than 35%' polyester blends#guess what my scarf is made out of? 💯#sigh gonna try the one that is more receptive to SOME synthetic fiber#and if that doesn't work. well. there's still easter#(this small town doesn't sell rit dyes I'll have to get them whenever I'm visiting my parents)#pants should be ok. i bought them second hand and need to hem them a bit but they're cotton they should be easy enough to dye#i bought a pair of fabric shoes also to be dyed but that shouldn't pose an issue other than requiring time#they're two toned i gotta press the color by hand#horns are easy enough this is my third pair I'm practically a seasoned veteran#that also take time though. multiple instances of letting them dry#but then there's the cape....#i bought fabrics but I've never sewn anything of this size...#and i don't understand all the words in the tutorial i found......#all i can do is try my best and hope for the best#but also. i sew by hand.#so. the time constraints. girl what#i don't know if a month plus is gonna be enough. to be honest.
4 notes
·
View notes
Text
So basically if you want
a tutorial how to die your hair
This is for you:
1. Accidentally cover your hand in posca (pls ignore that it's pink I was drawing trans flag and it um got out of hand)

2. Cover your second hand in posca too

3. Eat a frog (because we like frogs a but too much and want to get poisoned)

4. Go to the bathroom and start washing your hands.
(Sorry no pictures, I had both my hands from water and I really couldn't take a photo)
5. Take (yes, totally, "take" /hj) the colour washed right from your hands and wipe it off into your hair.
6. Let it dry
7. And voilà you've wasted your time cause it's almost invisible.

(Also ignore my shitty editing)
(Aaand my weird hair)
Now, pleaaasseee tell me you see the pink ends.
I know it's there.
I know itttt
2 notes
·
View notes
Video
youtube
How to Tie Dye / SUPER SPIRAL / Step by Step Tutorial
3 notes
·
View notes
Text
Importance of color and material in costuming and how to design based on a general concept and no description of a character: pt 1
A ramble that I promise will make sense and be interesting, trust me.
<character is just an off the top of my head dnd npc, like a normal person in town. We will call them Sam.>
So, this is much more important for historical settings or anything set before the 1910s or so, and should still be factored in for other settings in regards to the following concepts:
What dyes are around at the time and how material is generally produced.
I’m going to use a hypothetical DnD type setting for this, but it generally works out the same just as long as you check what colors were common vs rare at the time and place the costume is from.
The wealthy are generally an exception, having access to more rare materials, and this is why vibrant purple was so rare in medieval times. It had to be made from literal snails and took a ridiculously long time to create and use. On top of that, fabrics like brocade are far more complex to make by hand than, say, linen or felted wool or knitwear.
So, let’s make a basic peasants outfit for a human in a medieval fantasy setting. I’m going to start with making “Sam” a quick color reference list. Since I want this accurate, I’m going to look of examples of natural dye colors. As you can see here, you can get a LOT with just a few random little plants, so it’s better to just stay away from neons and jewel tones and things that are “synthetic”

#ac3s costume logic#ac3s lore breakdowns#ac3s tutorials#beginner cosplay tips#cosplay materials#cosplay help#cosplayer#historical costuming#fabric#fabric dye
5 notes
·
View notes
Text
My Go-To method of bleaching/dying my hair is:
Find a vessel for which to mix in (I've used bowls, Teacups, and most recently a wine glass)
Find a sufficiently sized paintbrush
Mix it up
(Bleach only) Almost forget to oil my scalp
(Bleach only) Oil my scalp
Don't listen to instructions and start with my roots instead of finishing with them
Regret not sectioning my hair
Panic as my bleach/dye starts to dwindle
Desperately mix up more
Realize I'm now out of produxt and still have half a head
Ration like it's wartime
Have mom check the back of my head
Stick a plastic back over my hair
Try desperately not to itch anything
#hair dying#hair dye#bleaching my hair#hair bleach#do NOT follow my instructions#this is NOT a tutorial#this is a panic inducing disaster in the making#i would bet you that i for sure missed a spot but you would be dumb to take it#cause i always miss a spot or two
2 notes
·
View notes
Text
Made a cactus farm last night. It took me like 5 hours bc i kept fucking it up
#i didnt wanna follow a tutorial bc ive made one in the past and i wanted to work for it#kinda went wrong with size and water and but heeey its done and working now!!#rare rambling#yeeeas so i can have green dye!!!!!#i also have a functional iron farm now!!#so i also will have tons of red dye
3 notes
·
View notes