#BJD tutorial
Explore tagged Tumblr posts
Visit Tumblr Blog
Explore Tumblr blogs with no restrictions, modern design and the best experience.
Last Seen Tumblr Blogs


Fun Fact
Tumblr has 4 main sources of revenue.
Text
Shoe Stay Last the Broke Way
Or, you’re a cheap bitch like me and have only basic materials at your disposal.
Hello, beautiful people~
Let’s create a shoe stay together.
(I’ve been corrected in my terms, it’s a shoe last. My bad if I confused any of you!)
Most every crafter has - Glue, water, plastic wrap, paper bags (or whatever you may have on hand,) and hot glue; That’s it, that’s your list of supplies. Perhaps a sharp instrument to cut away the mold carefully.
If you are like me, my crew is chronically shoeless. Shoes are expensive! I consider myself a decent seamstress though, so why not try shoe making? When doing this it’s a good idea to have a shoe “last” or a basic mold to help shape the shoes. I’m not a huge fan of handling my dolls every time I try and make something to fit.
Enter shoe lasts stays, the broke way.
First you need a volunteer. I chose the boy who had the bigger feet to basically provide a mold to all my other boys of similar size. This is Harper. His body is an April Story Senior. He’s got his pantlegs rolled up and he’s ready to go.

Let’s get messy now and act like we are in kindergarten. You want to make sure your doll’s feet are wrapped securely in cling wrap, covering a little above the ankle. We are going to paper mache over his feet. There are many recipes online for a mixture, but I personally use a mix of wood and white PVA mixed with a bit of water.

I alternated thin Kraft paper and paper towel for a couple of layers. Make sure each one is thoroughly dry before applying the next. Try and fill out some of the area above the heel and the arch as we want to keep this basic shape but not totally form fitting.


All dry! Now you need to carefully cut off the paper Mache. This can be tricky. Much like the paper Mache dress form we want to avoid doing damage to the doll during removal. Go slow and separate as necessary. I cut down the back of the leg and heel and about halfway down the foot. I was able to wiggle the mold off at this point.


Yay! Now that it’s off, try and ease the split back into place. I use tape as a temporary closure until I can go back and cover it with a final layer of paper Cache. You don’t have to, but I just like the clean look.
This last part is totally optional but I like to fill the cavity with some sort of firm support just to ensure the longevity of the cast. My doll forms are stuffed firm with yarn scraps and dryer lint. These though, I wanted something more solid. I’m not familiar with expanding foam nor do I have any on hand but what I DO have is hot glue. In the past I’ve made hot glue gems for some kids out of molds, so I know what I’m working with.
I cut the molds to an even height and started filling from the toe up to the arch. I let it cool in that upright tiptoe position for a bit before placing it flat and adding my little handle and filling it up to the top. I tapped them on the desk a few times while doing this just to make sure the glue settled firmly. I added handles just because, but you don’t have to. I used a cheap dowel.
Depending on what kind of shoes you plan to make (either soft formed or modern shoes with a formed toe) you can build up the toe areas to give yourself that sleek shape that modern shoes have.
Credit to @dollsahoy for adding on the buildup tip!


There you have it. Let the glue harden and admire your work. If you are going to use these to shape damp leather, remember to seal them with a water resistant sealant!
I hope this provides inspiration to someone.
Cheers and happy crafting.

#bjd#dragonsdelightstudio#abjd#dolls#bjdoll#legit bjd#doll#bjdphotography#legitbjd#dollstagram#bjd tutorial#bjd shoes#shoemaking#doll shoes#miniature shoes
160 notes
·
View notes
Text
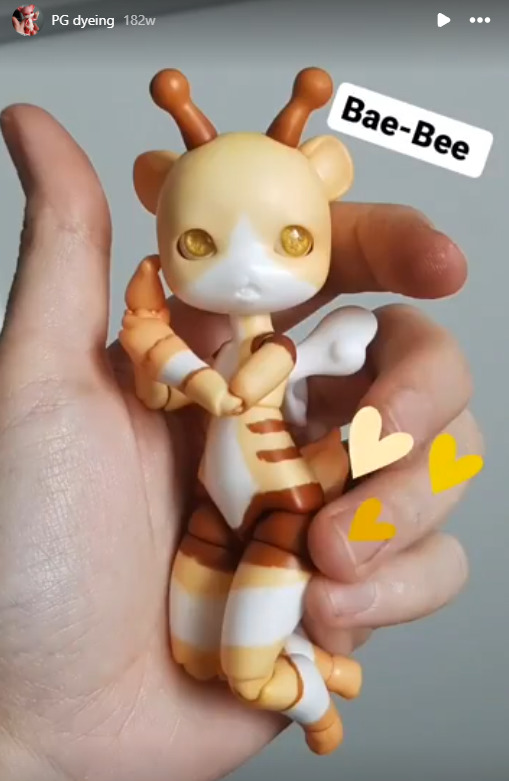
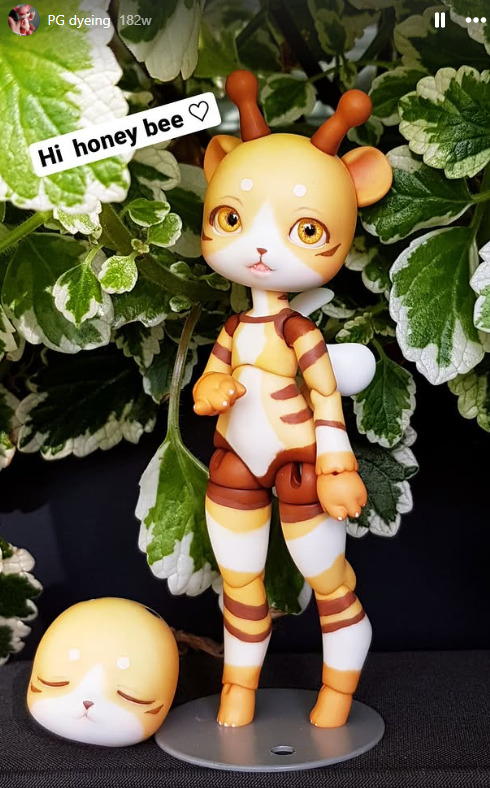
@meanae's Resin Dyeing Tutorial
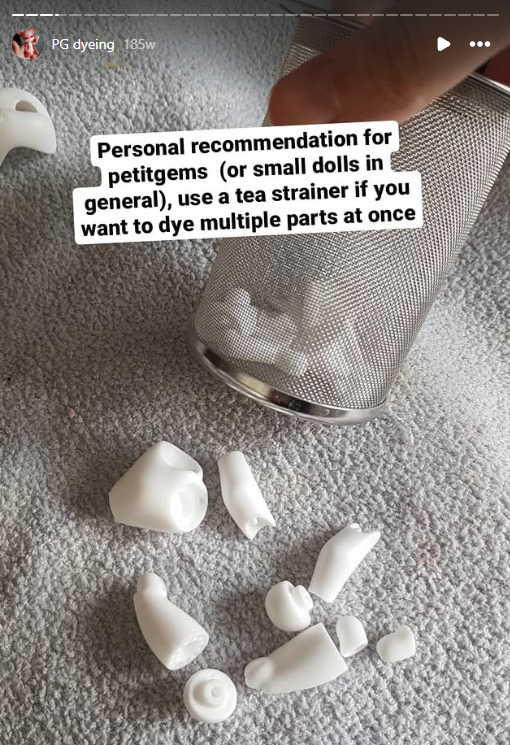
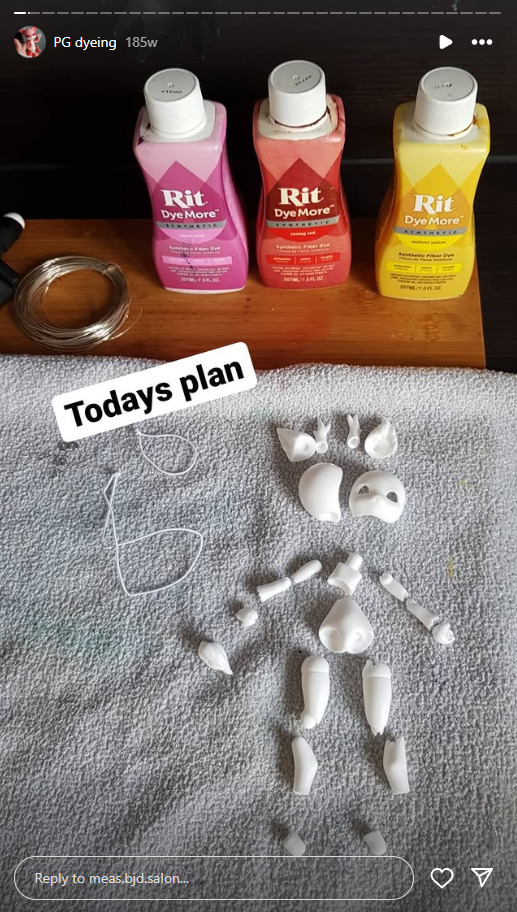
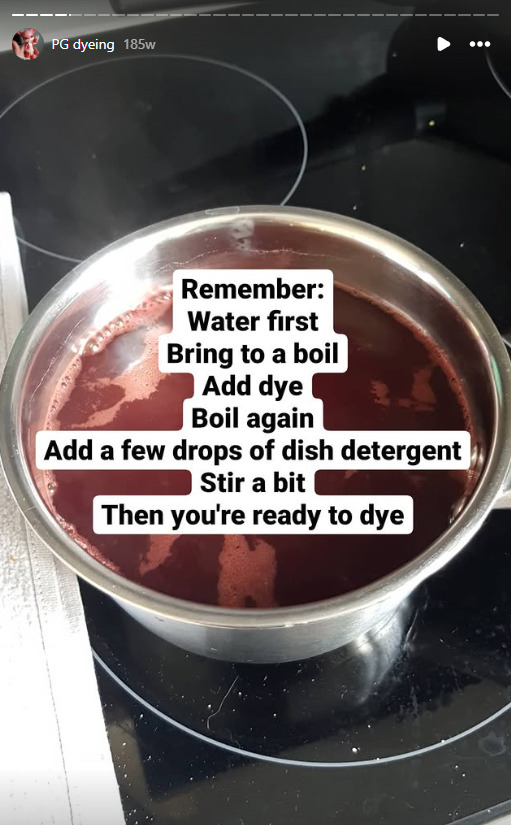
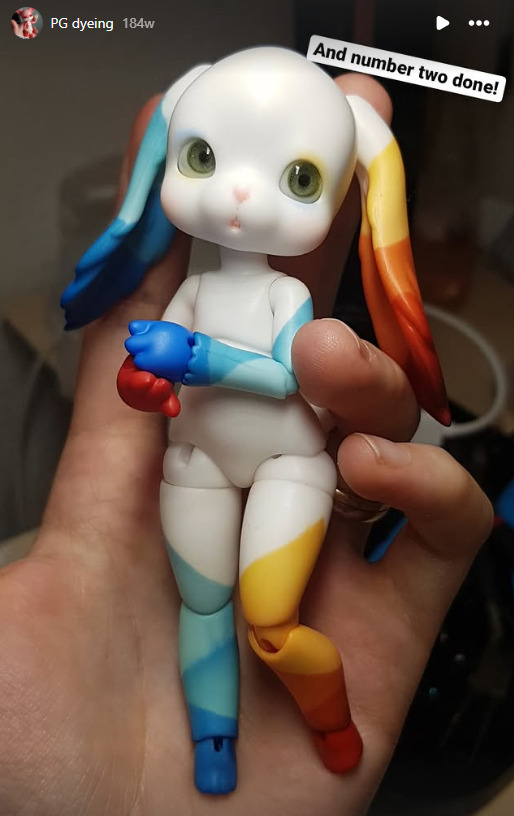
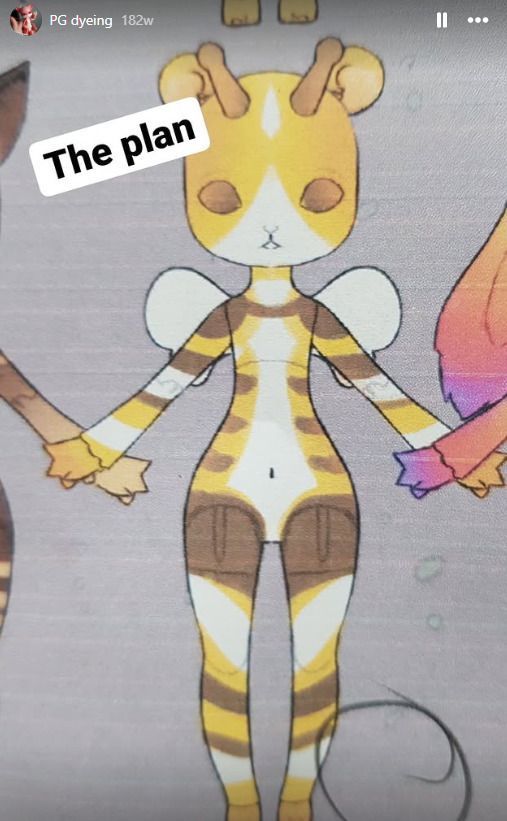
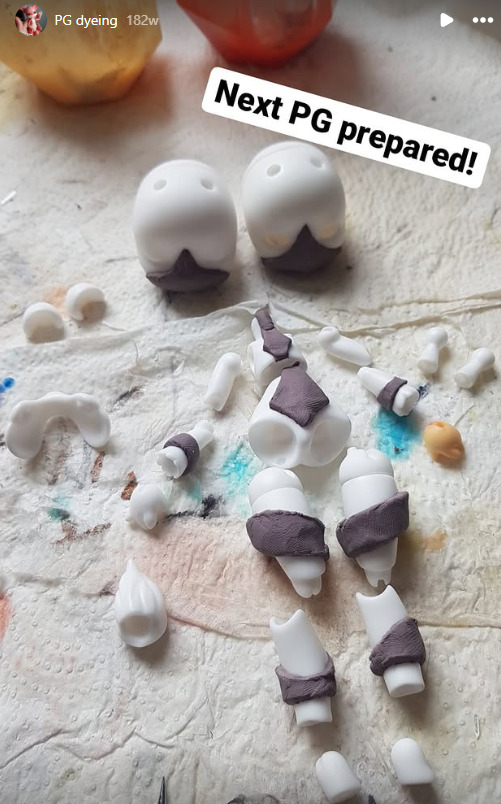
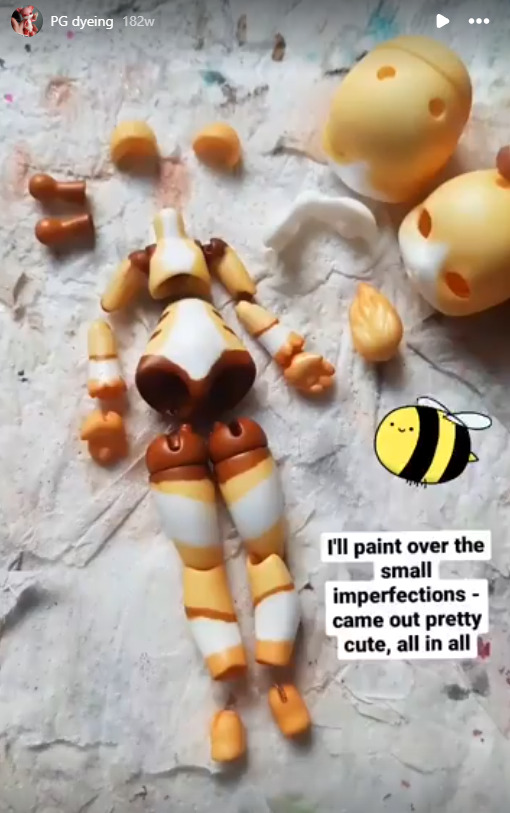
Posting here since they don't have it on their tumblr but PLEASE go give them a look. This is who I commissioned to dye my Sorrow Petit Gem after seeing theirs turn out so amazingly well! I loathe the idea of painting or blushing the colors as it would be absolute suffering with joint friction.


#bjd tutorial#dyeing tutorial#ball jointed doll tutorial#modding tutorial#bjd mods#petit gem#soom petit gem#meanae
12 notes
·
View notes
Text

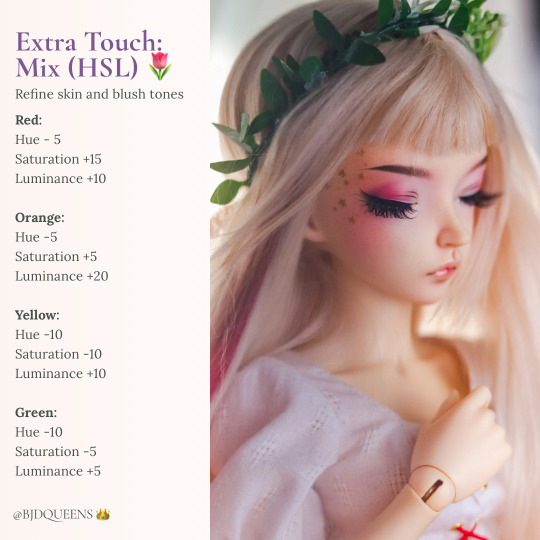
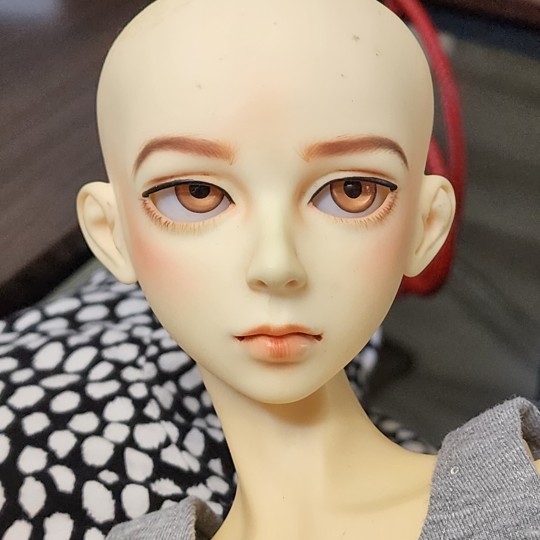
The importance of the eyebrow shape is hard to overestimate. I'd dare to say that the right eyebrows shape is like 50% of faceup success. It's the feature through which you control the facial expression of your doll. You can change expression from joyful or serene to grim or evil just using a different eyebrows shape. It's especially important if you're working on a realistic BJDs made after real persons. While the lip and eyes shape is already defined in the mold itself, the eyebrows can be painted multiple ways. So the faceup artist needs a sharp eye to catch exactly the shape that pulls out the character. This includes: - overall shape of the eyebrow, - hair growth direction, - hair density at the various parts of the eyebrow. I drew a lot of eyebrows in my life and can point out several factors that influence the eyebrow growth: - gender, - age, - ethnicity, - grooming according to fashion. What can you say about the girl you see on the photos? What her facial expression is? Her mood? Her vibe?
24 notes
·
View notes
Text
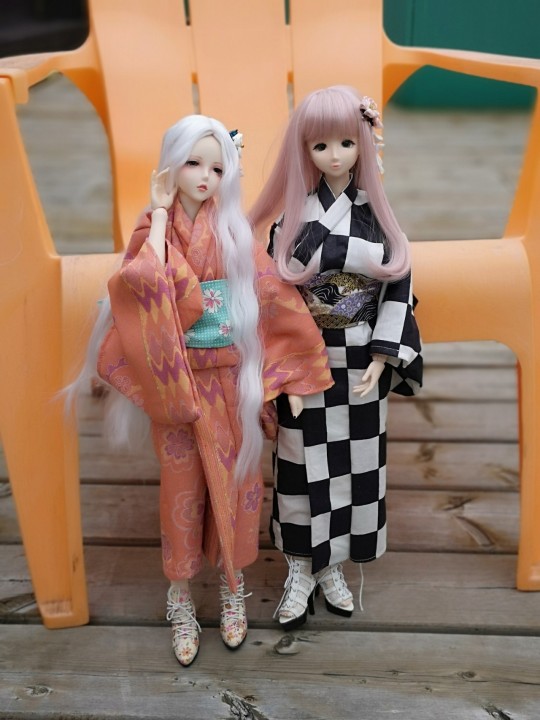
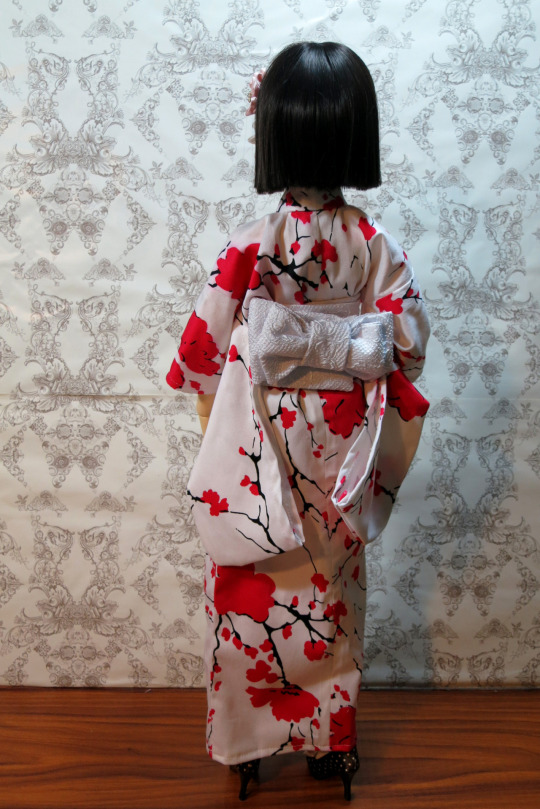
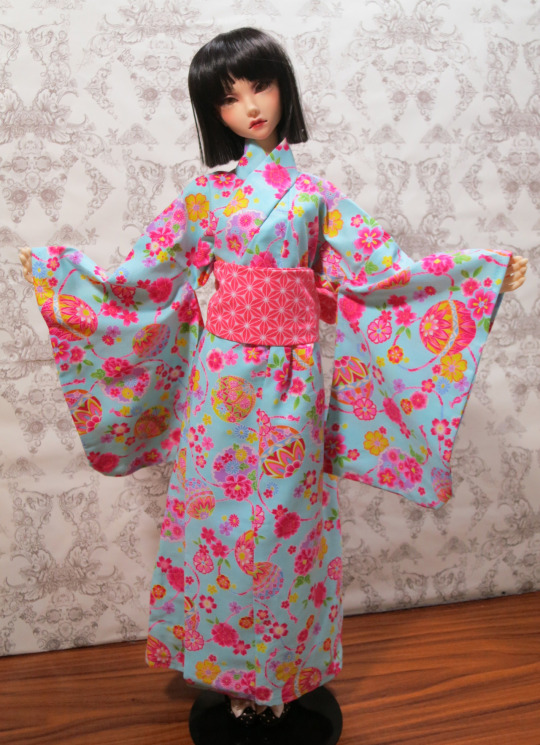
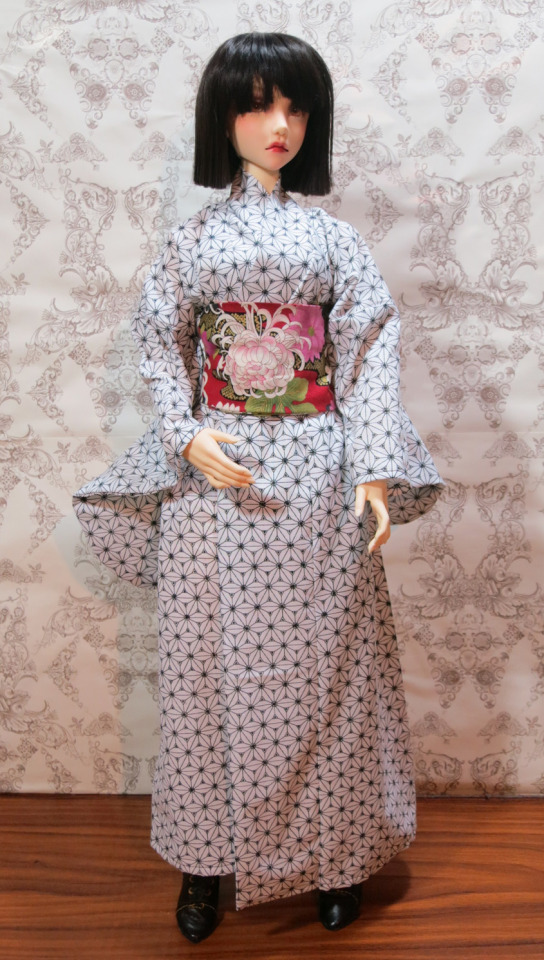
picking patterns for your dolls yukata and obi
i think there was maybe one 'maybe' on actually wanting this but i am posting anyway;;;
i will preface this with that ultimately you can do whatever you want and makes you happy and this is more of an art then a science but if you struggle on deciding on matching fabrics this might help
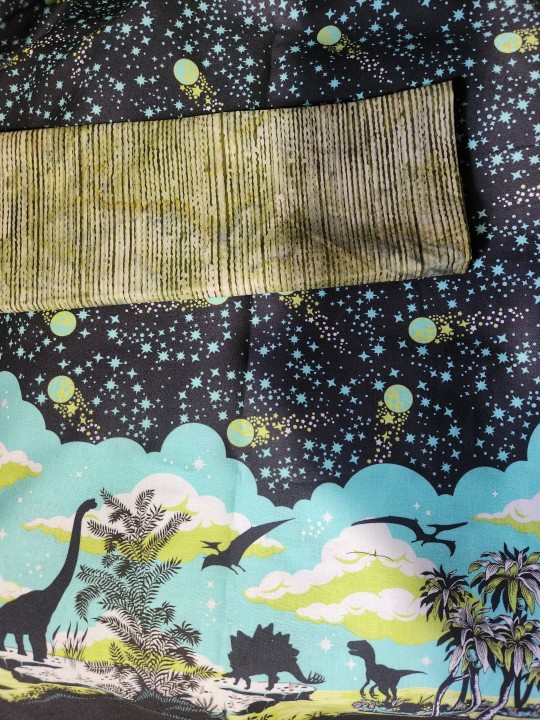
picking fabrics in general for either component, keep in mind your dolls scale and the drape of your fabric, generally you can get away with thicker and heavier fabrics for obi then yukata
if the fabric you have absolutely set your heart on for the obi is not stiff enough for a belt you can add interfacing
with that out of the way on to the print picking! you don't have to stick to traditionally Japanese looking prints like sakura flowers, temari balls, waves and cranes. Anything could be a yukata print if you want as long as it's in scale for your doll, this doesn't exclude large prints! you could get a really cool look with a large print.
generally i decide if a print is too big or not is when i put it up against a doll (or imagine it if my doll is not on hand as the case may be at the fabric store) would a real person look cool wearing this large print? or just odd? sometimes the print could almost work but it repeats too rarely to work.
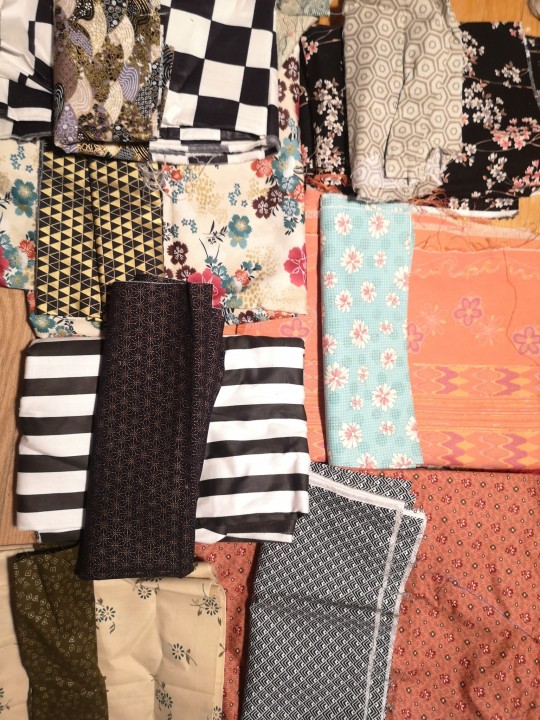
small repeat prints are great! through the really small ones usually work better for obi then the yukata.
the goal is to pick two fabrics that both compliment and contrast one another, this might sound like a bit of a contradiction but i will explain
first consider the patterns, the goal is so the two fabrics don't blend together, so roughly large prints with small and avoid using the exact same print for both even if the colours look nice together
while you don't always have to follow these rules consider this more of a guideline, i no doubt also forgot to list some options that could work as well, these are easy ways to pick a fabric print
if you really can't decide a solid colour is usually a safe choice, to spice it up you could pick something with a subtle printed texture or variation, also don't discount just textured fabrics! they can make great obi even if they are only one solid colour
if your yukata print is large and organic it could look good with a small regular print or a geometric one
if your yukata print is vertical stripes it could look good with an organic design, small regular print, often repeating geometric pattern or small horizontal stripes (if the striped on the yukata it self are not small)
if your yukata has a geometric print it could look good with a small repeat pattern, or medium to larger organic print
now the colours! this is a little more nebulous and objective but here is a few things to consider
having a bit of the yukata colour in the obi or vise versa is a good way to coordinate the fabrics
one option is to have the colour combo pop! by this i mean you see the colours next to each other and go "yes that feels right!" even if they are quite contrasting
generally monochrome prints can be paired with just about any colour, you would pay more attention to the images of the print it self to make a good match
you could follow the colour pallet! if a print is black and green the obi is too, just in different amounts so it stands out with a complementing print
I would also recommend holding prints next to each other even when you doubt it would work, it's a good way of finding striking combos!
hopefully this will help someone 〒▽〒
if you have any questions or suggestions feel free to add
31 notes
·
View notes
Note
Hello!! Your Copia doll is coming along beautifully! The paint is so realistic. Like his bottom lip has texture I have no idea how you do it! Your project got me really curious about doll work myself!! 🫣 but I have no idea where to begin. I have a few questions to start out with-
1. Could you summarize the overall process? What are the general steps from start to finish?
2. What general materials do you need?
3. What paint do you use? What brushes/applicators do you use? How did you achieve those softer/blended contour lines, like in skin tone? If that makes sense. I see some others’ projects that you can clearly see paint lines or the texture of the paint they used, but your Copia almost looks airbrushed!! :0
4. How does putting in the hair work?
5. Where do you buy your base doll? And as far as the reveal in the ~bonus picture~, did he come anatomically correct or was that something you had to add? 👀
6. Where do you recommend buying supplies?
Thank you in advance! 🙏 and happy customizing!
Long Post Incoming💀💀💀💀💀
Thanks for all the fantastic questions! Whether you work on playline vinyl dolls like Monster High or Resin Ball Jointed Dolls, the process is the same. The only difference between them is that with the vinyl dolls you are painting the eyes on yourself. Resin Popia has inset glass and resin eyes.
My tag #Resin Popia BTS has all my Behind the Scenes stuff and progress photos.
All the questions answered below the cut!
1. Could you summarize the overall process? What are the general steps from start to finish?
I will be uploading some vids soon. Try this one first tho.
When you do a faceup, it is a collaboration between you and the sculptor. The sculpture does most of the work. You are bringing the deep parts of the sculpture deeper and the forward parts more forward.
Basically this:
photograph and disassemble doll
wash doll pieces with dawn dish soap and warm water. dry all parts I want to paint.
three coats of Mister Super Clear UV Cut (MSC) sealant on each piece, with a 20 min dry time between coats.
deep freckle/blood vessel texture (optional) with red, blue,brown waterey gouache, spray MSC
dark reddish pink chalk pastel pigments in the deep creases/crevices, areas of blood flow. Correct work with kneaded eraser.
after every layer of pigment that I like, I do another spray of MSC.
lighter pinks or tans (based on skin tone references) on things I want to bring forward (brows, nose tip, cheekbones), another pass in the deep areas, new color on the lips. spray seal
Detail with fine lines under eyes, line texture on lips, wrinkles, lower eyelashes. Check references and experiment. A touch of green in the deepest part of the skull on either side of the nose. You know, where you get sinus headaches.
Pray to Satan and cry as I add eyebrows and hair details with gouache. I start by mapping the brows out with dark chalk pastel then do hairstroke lines with gouache. Personally I am super heavy -handed with my brushes, I need to work on that.
When happy, 2 final coats of MSC
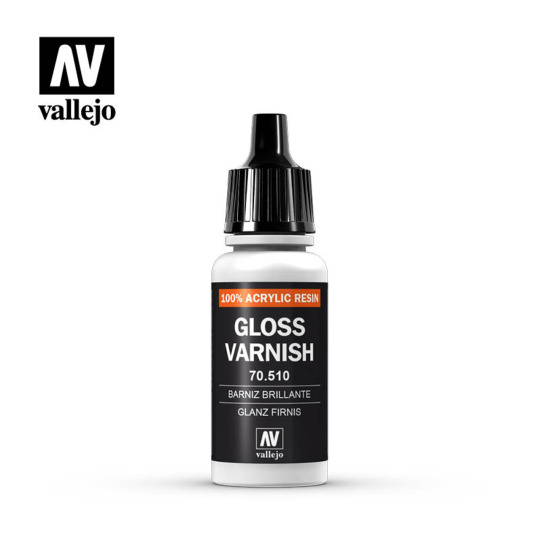
Add Vallejo gloss varnish to water lines of eyes and lips.
2. What general materials do you need?
FYI I have been in this hobby for about 7 years. I have only had to replace Mister Super Clear cans and respirator cartidges in that time. Everything else I have used for nearly a decade. And also used them for other projects!
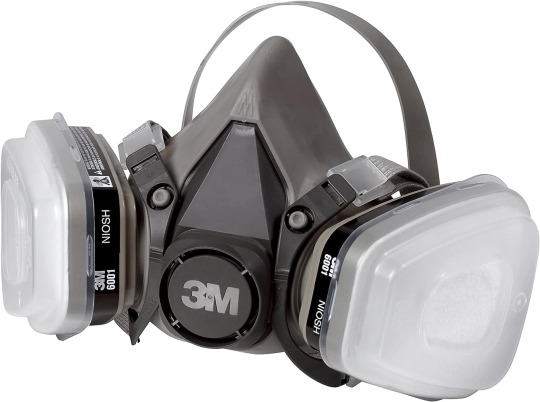
#1 item you need: a proper serious respirator. You will be at risk of inhaling toxic chemicals when you work with sealants or do any sort of dry sanding. Please please please invest in this item.
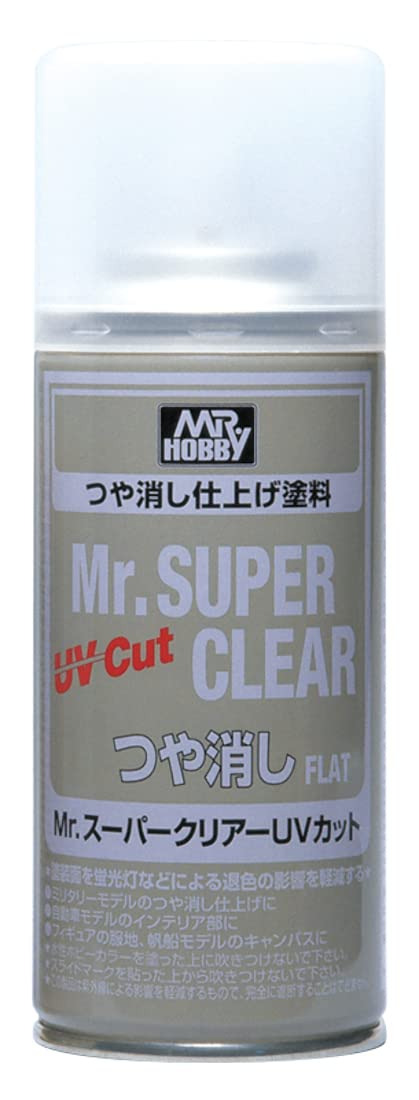
Mr. Super Clear UV Cut sealant spray. This gives the resin or vinyl a toothy surface to apply pastel pigments, watercolor pencil, and gouache paint on. The techniques will not work without this surface.
The sealant also behaves like skin, which is made up of several layers of matte cells So the pigment you apply to the resin is suspended in layers just like real skin.
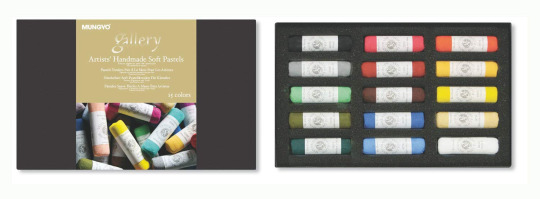
Chalk Pastels I like the mungyo hand-rolled chalk pastel just because when you use a razor to scrape off some pigment it crushes up and mixes better. But any chalk pastel will do. The Xanthi video I will link later has a great idea of just buying a few chalks at a time, because to be honest I don't use all of my chalk.
Small nylon brushes.
A fan brush
A tooth brush (for skin texturing/freckles)
Crappy dollar store makeup brushes (for pigment powders)
Kneaded Erasers
White cloth gloves
ceramic dish for a palette
Some people use watercolor pencils, but I never got the hang of them. I prefer just using brushes. Everyone has their own thing they do.
Paint recs in Next Question
3. What paint do you use? What brushes/applicators do you use? How did you achieve those softer/blended contour lines, like in skin tone?
Goache paint dries flat and matte. It's basically opaque watercolor. I use a damp q-tip to remove it if I make a mistake.
Winsor-Newton is great. I am pleasantly surprised by Arteza's gouache. I have used the same gouache tubes for seven years. You put like a raindrop sized bit on a ceramic dish, that's it. And you can reconstitute gouache endlessly with just a little water.
The trick is to never EVER EVER use true black. nothing is true black unless it's makeup. I use gouache paint on Resin Popia's eye makeup but then soften it with black pastel powder to make it richer.
If you use true black it looks like mud or holes. Dark purples, browns, and greens.
Also don't be afraid to be a bit louder with the colors, the sealant mutes them a lot. Just work slowly and take breaks.
4. How does putting in the hair work?
For resin dolls, you need to make a wig. They are a PITA to make, but it's possible! Check out Mozekyto for how to make wigs. (I'll have more recommended videos further down this post.) Vinyl playline dolls you can reroot, but some people prefer wigs.
5. Where do you buy your base doll? And as far as the reveal in the ~bonus picture~, did he come anatomically correct or was that something you had to add? 👀
The same techniques can use used on vinyl dolls like Rainbow High, Monster High etc. You can get them at goodwill, big box stores, and on ebay. Lots of people sell old toy dolls.
Resin Ball Jointed Dolls are a lot more expensive, so I have spent several years slowly building up my collection. I love vinyl and resin dolls equally.
I bought my base doll from Alice Collections acbjd.com they are a vendor of many resin dolls. I absolutely love Resinsoul.
My favorite doll companies (find them on Alice Collections!) are IslandDoll, Resinsoul, Dollmore, MyouDoll, DollLeaves, 5StarDoll.
Resin Popia is MSD "Mini Super Dollfie" size aka 40cm-52cm. He's 52 cm. SD (Super Dollfie) is around 60-65cm.
I have owned dolls that were considered "prestige artist dolls" in the past, but I always end up selling them because they are so precious I'm afraid to ruin them so they just become dollar signs to me instead of something I love. I'd say $300 would get you a gorgeous resin doll and some clothes for them. Saving up for a doll you really really love is worth it in the end. People also sell used dolls on Instagram. Just please make sure to check the COAs.....
Important Note: I am a Pro-Artist legit BJD collector. AliExpress, Etsy, and Ebay have bootleg dolls that yes, are significantly cheaper, but that is because they steal from the artists that did 99% of the work (and spent tons of their own money) to develop the doll's appearance and engineering. If one cares about supporting artists they should consider the ramifications of purchasing these recasts and propagating the bootleggers. (Especially since a large part of the artist BJD community is from Russia and Ukraine, who have been lately hard hit by war and YET are still making beautiful art for the world to enjoy) I am not pro-bullying though, I am Pro-Education so if anyone wants to have a private, frank conversation about recasts in the BJD hobby feel free to message me.
One silly thing that happened once was I purchased a legit IslandDoll Bru (IslandDoll is always on sale TBH) that was actually cheaper than its recast on ebay. There are a lot of sales during Chinese holidays (11/11, Lunar New Year, Fall Festival) and you usually get a lot of extras like free eyes, beautiful carrying cases, incredible boxes, etc. Resinsoul, the "cheap" BJD company often gives you a gorgeous carrying case for your doll.
Ok enough with the disclaimers now onto doll d!cks haha
Resin dolls are usually realistic when it comes to parts. Realistic in the fact that they add something there...something simple but it's there. Resin Popia has option parts made of silicone that are actually from an action figure company called TB League. Look up "TB League Option Parts" on Ebay. The figures are 1/6 scale making the parts scary and massive at 1/6 scale but funnily enough they make sense at 1/4 scale.
IDK why i got em, I just wanted to have some fun with this doll.
6. Where do you recommend buying supplies?
If you can get to a local hobbyshop that sells models (like miniatures and wargaming figures) please support them first! As vital spaces for geek culture they need all of our support. You can get tiny brushes, Model Paints and sometimes even the sealant from them. Just call ahead they can work something out for you!
Chalk Pastels, Gouache paints I get from art supply stores and as a last resort, Amazon. I use these supplies in other art projects and you will quickly get addicted to gouache painting, i'm sure of it!
Great Videos/Resources
Xanthi's Minimalist Supply List
Xanthi's Male Realistic Faceup (I watch this one so much)
Youtube Channels I like: Enchanterium, Dollymotion, Dollightful, Lomi's Playground, Xanthi
This Book is Great: How to Rock at BJD Faceups
I am answering your additional questions in the comments if you have any! I am @anamelessfool
#bjd copia#toy customization#dollblr#doll customization#bjd tutorial#bjd faceup#q&a#legit bjd#resin popia bts
39 notes
·
View notes
Text
So earlier this week on Instagram I saw a video about dyeing fabric/buttons/wigs using crepe paper. The video specified it wouldn't work on natural fibers so my first thought was "uh, sounds like the products people use to dye bjd".
My second thought was of course "uh, I wonder if it really would work on dolls."
So of course I bought some crepe paper, and did some mad science.
The instructions said to cut the paper in stripes, put it in boil it water, remove it once the dye had leached into the water, and then put the item into the water.

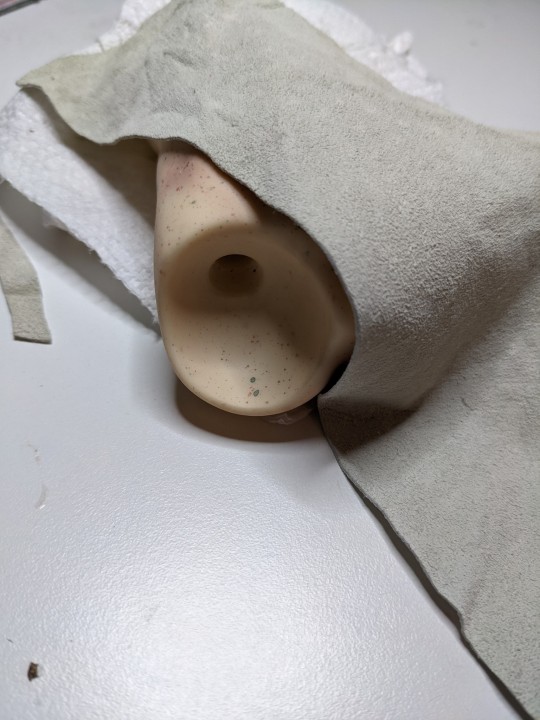
Left is a hand after being dyed, right is the control hand, undyed. I used pink and red paper (because pink alone really wasn't showing anything). So, it does work on resin!
Second step was to check if it could be removed

I've used acetone (left on the picture) and 90 degrees alcohol (right on the picture) and both worked.
Mind you, this was done just a few minutes after the dyeing. I have since redyed the hand, and i'll try again to remove the colour in some days/some weeks to check if this stained the resin, and if it's still easily removed.
I'm not sure how well you can control the saturation and shade with this method, compared to using normal synthetic dyes. But if you feel like experimenting and if things like rit dyemore are hard to find where you are, this can be an option. Just be prepare for a bit of mess, and keep in mind for now I don't know how this affectes the resin long term.
9 notes
·
View notes
Text
BJD - Michael - PART 1 BODY
Hello and welcome to part two of I'm making myself my own BJD cuz they don't look how i want them to and even if there was one I'd be too stingy to buy it.
Mostly making this a tutorial for myself, because this is the second one and maybe I'll make more cuz it's a fun hobby, albeit a bit expensive, mainly because of the materials.

I used white Sculpey, Liquid Sculpy to attach unbaked and backed clay, and all of the above. As absolute necesities considering tools I'd say that circle ruler and those curved knives, get really ones cuz if they aren't sharp enough to cut your fingers when looking at them you won't have a good time. And also the safety gloves to prevent you from cutting your fingers, get those too no discussing. Sculpting tools are nice to have and they improved mine tremendously from this first but you can do without.
Also good to have is a power drill with very small drills ( ~ 1mm - 2 mm), a dremel for sanding, and some isopropyl alcohol to smooth the clay.
Making the body:
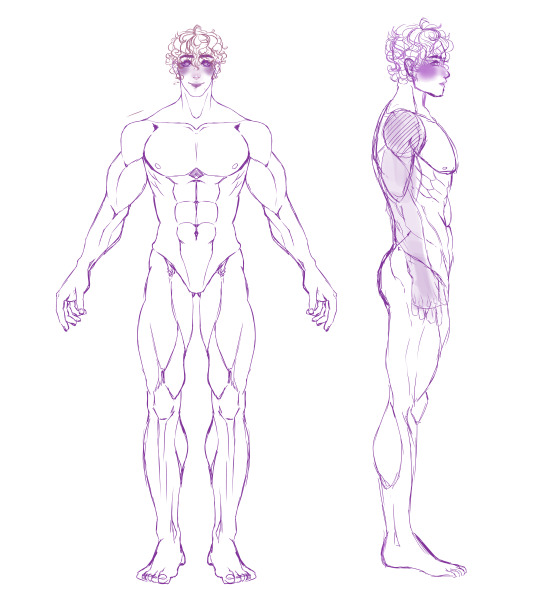
First I made a sketch of my poor OC, facing front and a side view, I could've made a back view but for that I just improvised and looked at some references. This sketch took me month to get right that't why I started with this doll so late I'm planning this one since a year. Whatever.
Then make a little friend from aluminium foil, i also added some wires this time cuz for the last doll i had some troubles removing the foil and this way you already have a little hole. But I ended up using the power drill to clean it up anyways. Maybe i just like drilling into plastic body parts.


The foil friend gets a small layer of clay and then off into the oven at 130C. I should've made the foil base thicker to reduce the amount of clay for this one.


This clay base then just gets the rest of the meat added on top. I just looked at my sketch, several references and added the muscles one by one and then smoothing and evening all out as i went. The toold were really helpful for that and I still don't know how this went that well but idk I just did it somehow and kept going back and forth, it also helps putting it down for a day and picking it back up the next one.

Then when i decided i was done I went over it again and smoothed everything out with isopropyl diluted with a bit of water. It made everything really smooth and this doll already looked better then my last one even without sanding it. So I also didn't sand it and decided to do that when all was done.


And thats the body done already. I say already but this took me a week.
Next step was marking where to cut it apart. And yes I said cut it apart and this hurt me more then you would think because I was really happy with how this came out, but this heavy brick isn't moving and I want it moving.


So I just took 100 pictures of it to calm myself and then just hacked his legs off.
CUT IT WHEN ITS FRESH OUT OF THE OVEN AND STILL HOT IT MAKES IT SO MUCH EASIER AND SMOOTHER. Since the clay is still slightly soft. I just yelled that at myself so don't worry. I tested this for the first time today and it was magical.
Off to make a face now. Part 2
12 notes
·
View notes
Text
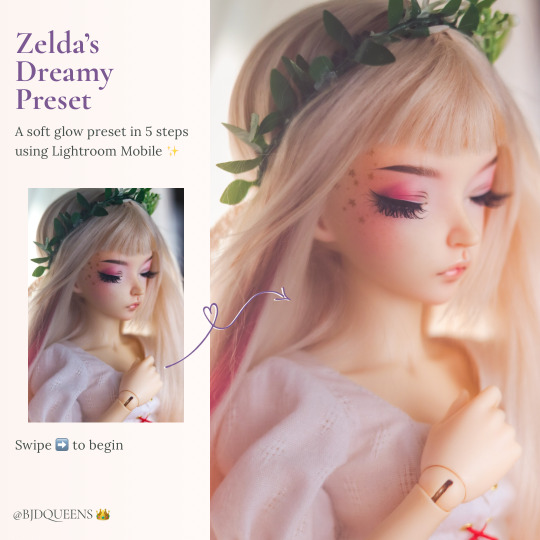

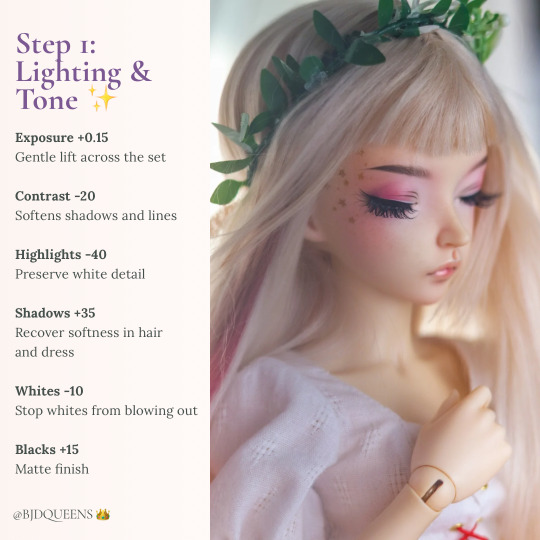
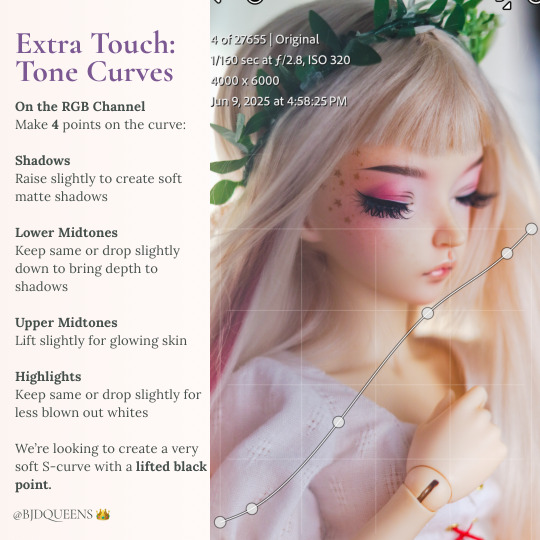


#bjd#dollblr#ball jointed doll#bjdphotography#doll photography#bjd hobby#minifee#minifee liria#bjdqueens#tutorial#photography tutorial#editing tutorial#editing
16 notes
·
View notes
Text
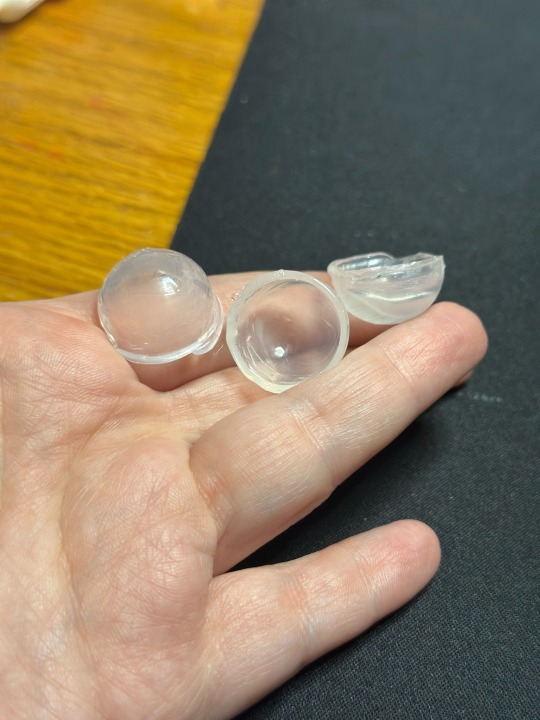
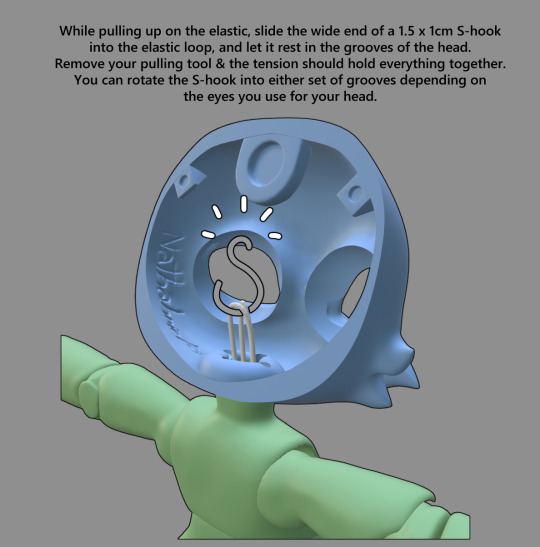
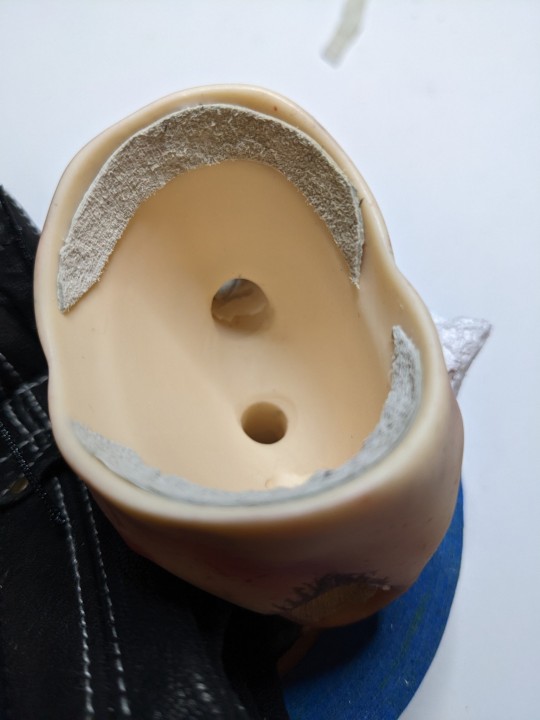
So here is a mini breakdown of how I created the BJD eye cups.
First off, you’re going to need some sort of backing to round out the eyeball. I split wooden beads apart and glued them to the backs. This is going to help the eyeball rotate.

Now you are going to need some half spheres. They need to be larger than your eyeball so the can move freely once padding is added. I made these with hot glue and two metal measuring spoons, one inside the other. This created the mold for the sphere. Have ice water handy because a quick cool down makes it easier to peel the glue out. They don’t have to be perfect, you can always trim if need be.
Fluff time. I gently tugged apart a cotton makeup wipe to create the pillow we need. How much you’re going to need will vary and you will need to experiment with how much is going to work for the eyeball. Lots of trial and error here. You want to set it in the half-spheres lightly, do not pack it in.
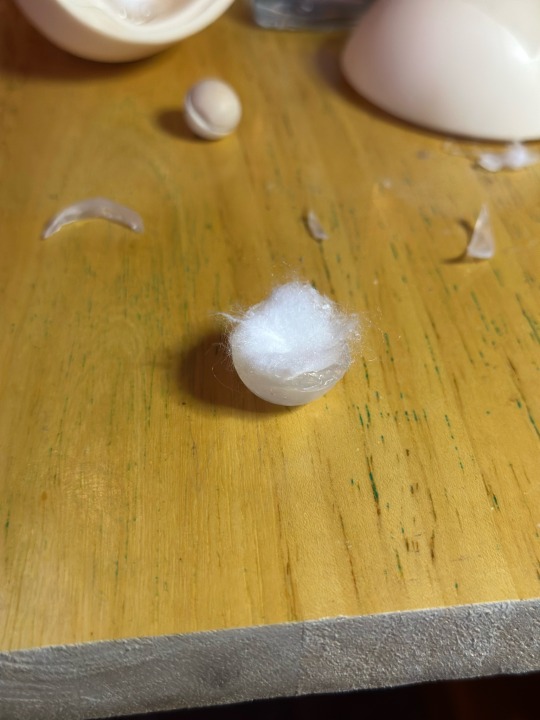

Position your eyeball. This is also trial and error. You want it center with enough room to move. You will have to put the cup on and experiment. Have a toothpick like object and a little bit of tac to do a trial run on the eyeballs movement. Add/remove fluff as needed. You want a semi-firm cushion but not so much to hinder movement. You may need to adjust position of the cup to either side as well for optimal movement.
I very much recommend Faber-Castell blue tac it. It doesn’t leave marks on the pupils as you move the eye around.

Mnnn

Did you find a prime position? Glue the cap in. I know magnets are usually used, but I’m being cheap here. A couple spots of hot glue holds the cup in and is easily pulled out for change and repositioning. Just trim off the excess glue and start again.
Some heads may be more difficult to place the cups side by side. You will have to use your best judgement to trim and move as necessary. For a couple I had to trim some of the side of the cup off because of the angle.

Got them both in? Great! Replace the head and admire your work.
Side note: I did notice some eyewells were deeper than others (looking at you Dante) I did have to do a little bit of pre padding carefully around the eyeball before placing the cap, just to help keep the eye in position. Be sure to check often to make sure there is no stray fluff peeking around the eye.
This was a quick and dirty explanation of how I did this. It isn’t pretty, but it works. Now the dolls have more expression than ever from sultry, to suspicious, to downright deviant.
Feel free to use or make improvements upon this concept. It’s meant to be a cheap and easy project.
#bjd#dragonsdelightstudio#abjd#dolls#bjdoll#legit bjd#doll#bjdphotography#legitbjd#dollstagram#bjd mods#BJD tutorial#BJD eyes
119 notes
·
View notes
Text
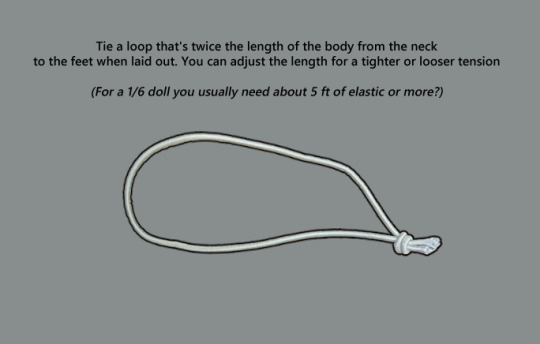
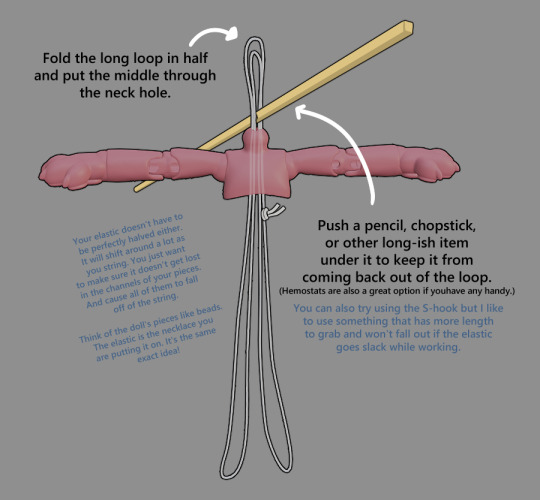
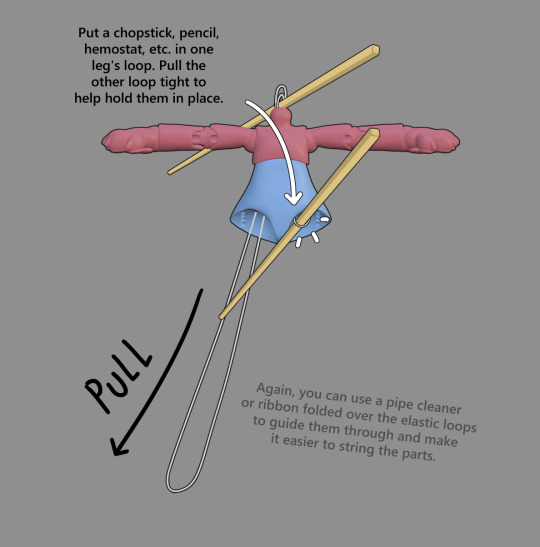
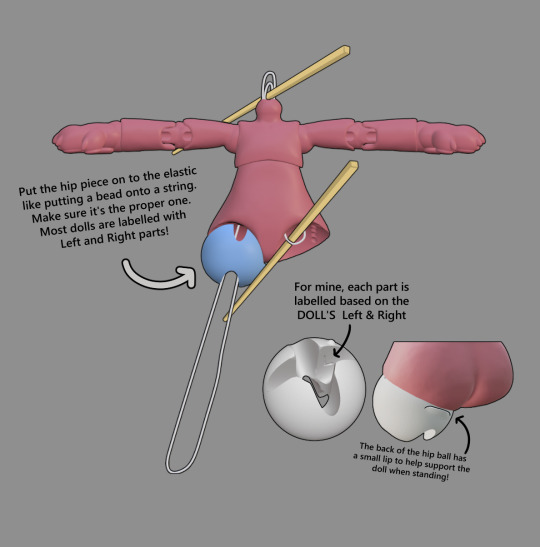
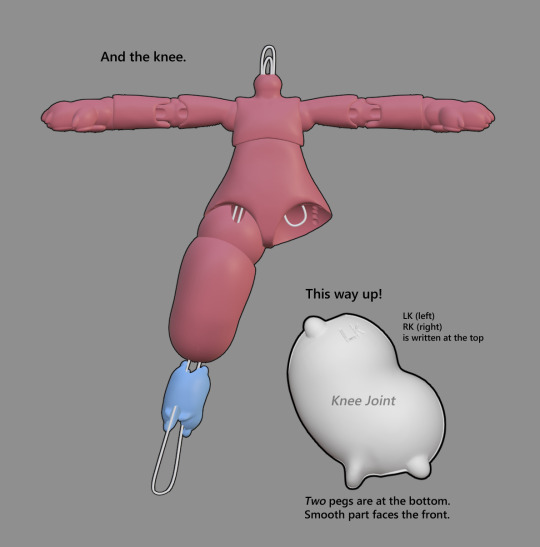
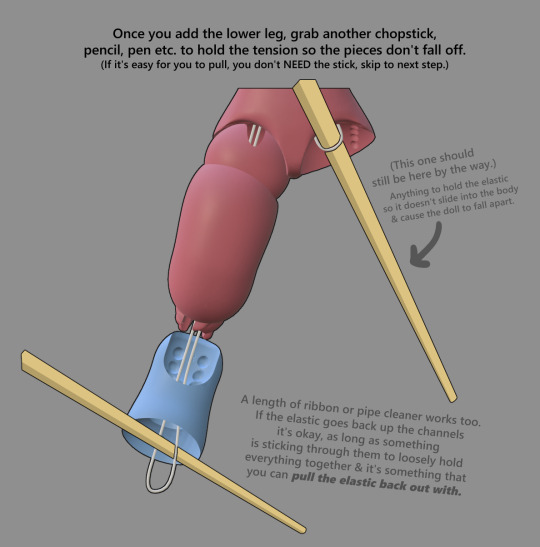
Basic BJD Stringing Tutorial
This is for a doll of my own design, but it is still applicable to most if not all humanoid / bipedal BJDs.
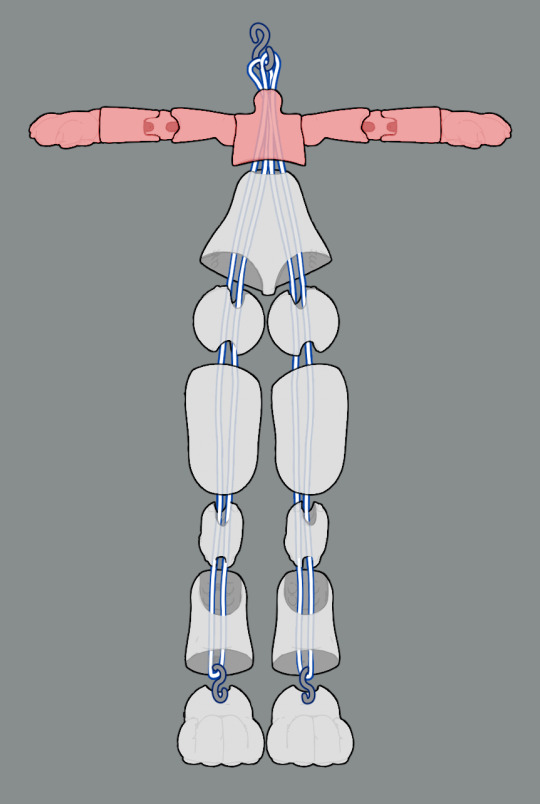


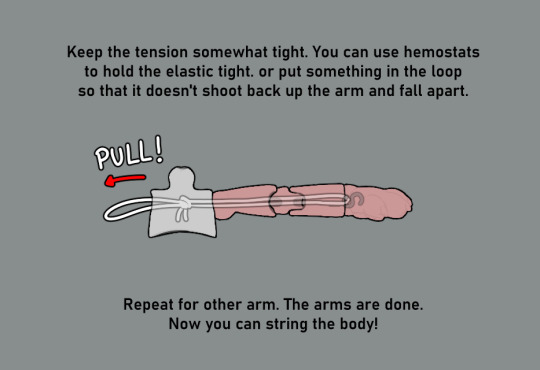
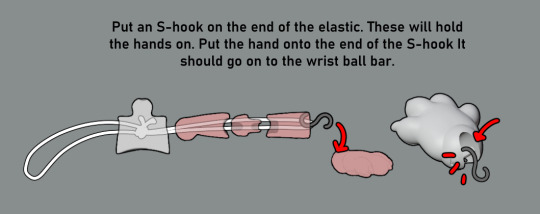
Stringing the Body


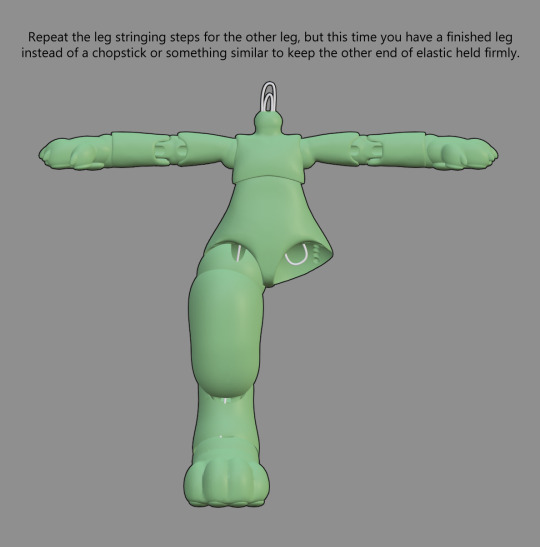
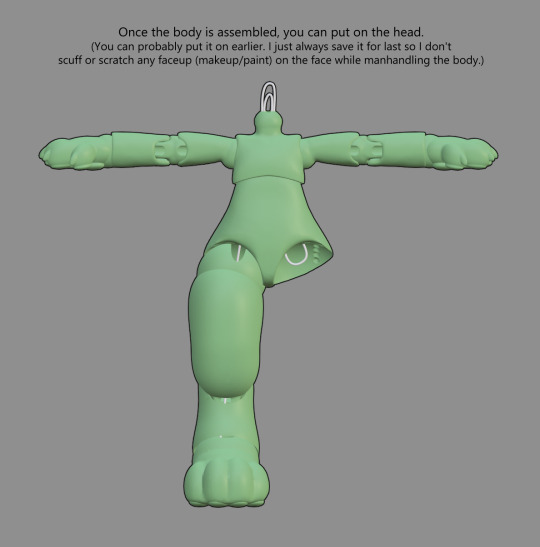
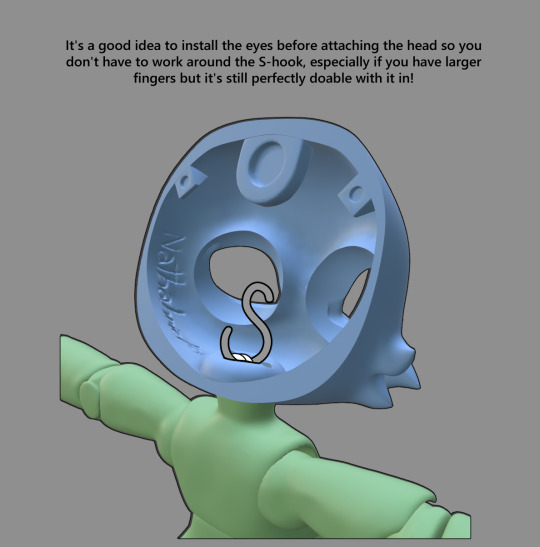
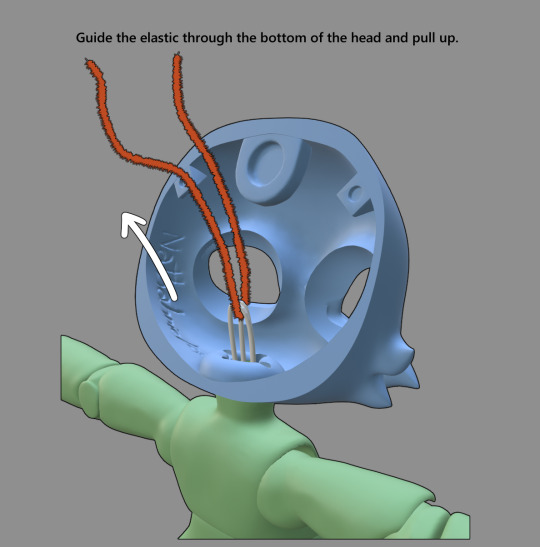
Stringing the Head

14 notes
·
View notes
Text
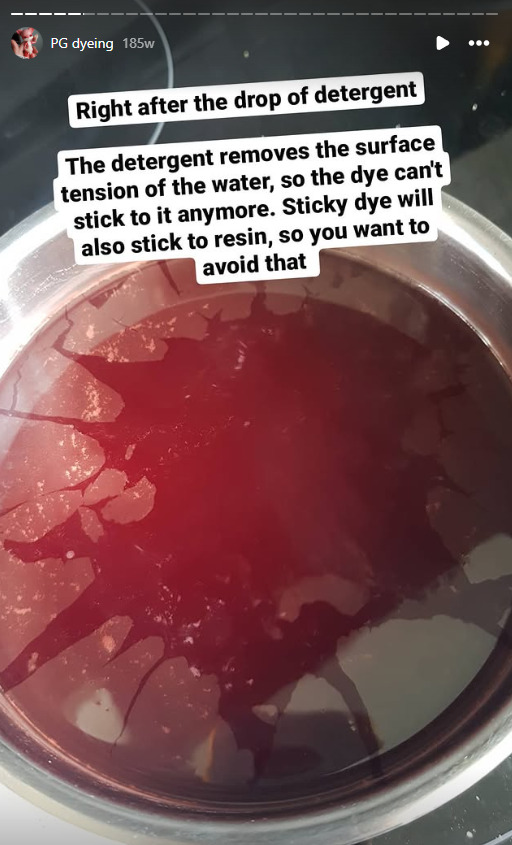
I used the technique from here!
I thought of purple, but I always thought that'd probably be better for white skin. I'm a perpetual bottle blond, so I imagined purple straight on the yellow would make him more white-ish or grey-ish because that's how it reacts on blond hair.
I went with the first formula:

Under the formulas, the article says "Interestingly, this looks like fresh blood" and I think that is the most important part of this dye process, is that remark. I've done it for a ton of dolls now, and I've come to the conclusion that this is a process of half color correction, half "blood replenishment."
When dolls get yellowed, it wouldn't be that much of a problem if they just leaned toward a warmer skin tone honestly. Yellow is a natural part of skin undertones! That's why I often don't realize how yellowed my dolls are sometimes until I see them next to one that isn't.
The real problem is that the light yellow they turn is such an Easter pastel-egg ass yellow that it feels like a corpse that's been drained of all its blood. we need to put the blood BACK IN. so making a mixture that looks like fresh blood is crucial.
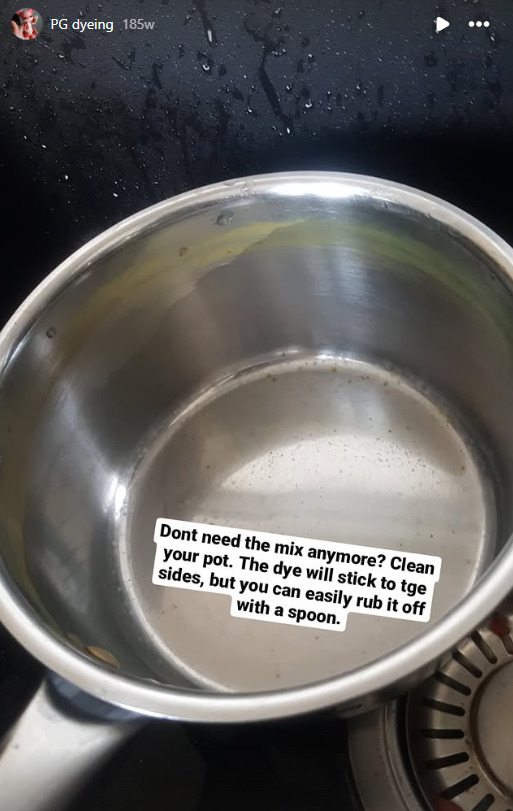
I put my doll blood in glass IKEA bottles for safekeeping. It only takes a few drops to dye a doll.

Lots of people who have de-yellowed their dolls with Rit dye have also reported plain old rose pink to be effective (which makes sense because purple for color correcting+red for blood replenishment=pink) but I would advise against this, especially if you are dyeing french resin or your doll has any scratches from age/ has been sanded.
if there's any translucence, scratches, or dings in your doll, whatever dye you use will sort of "settle" in it. I dyed a french resin doll a while back with pink, and had to completely redo it because all the bubbles in the resin became visible with bright pink rings around them and all the edges of her joints were bright pink. with a more "fresh blood" sort of formula, it just looked like skin texture and free blushing, and it was very beautiful and added a lot to the doll actually!!
When I de-yellowed my last doll and this guy, who are both not french resin, I noticed that, while generally evenly-taking, some areas that I didn't realize had imperfections before had the dye settling in it, but honestly, this has never looked bad. It has only ever looked like a little bit of blushing and skin texture, and it's never been in places that are very visible. I would just keep in mind that it's probably best to clean your dolls thoroughly before the dye process and not worry too much about it.
If you don't like how it comes out, it is removable with acetone or alcohol. <- for everyone who removes faceups with acetone, be wary of this, because you definitely can accidentally wipe off your entire dye job and then be tasked with matching your head back to your body with another dye session. which... isn't hard, but it is a pain in the ass. I use Windsor and Newton Brush Cleaner for all faceup removals on my dyed dolls, as it does not destroy the dye.
Hope this is helpful for you and for everyone else who was interested in how i did this! 💛
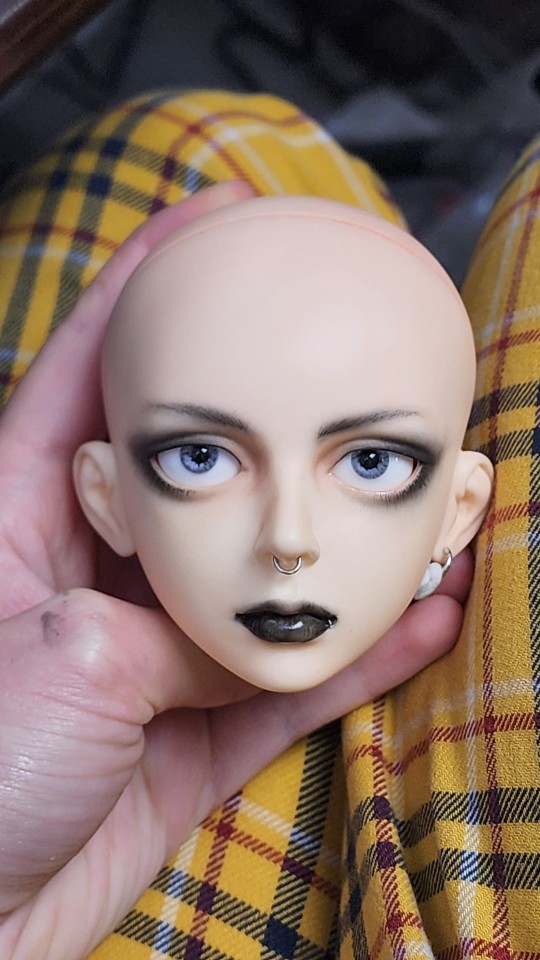
same doll different faceup and eyes. and new piercings. i also de-yellowed him with dye.
he looks.
literally like a different doll.
379 notes
·
View notes
Text


PART 3
since tiktok is ending I needed to make this video well. picture slide for both here and my other social medias. this can be used for the DIY kids or finish dolls that need to be restrung. if there's a better way to do it then you can use that option. but this is how do mine. I'm still selling these dolls. the one in the picture is my personal print. it's a little smaller than the order prints.
thank yoU so mUch for those who have supported me on this app. and thank you for anybody who has purchased anything from me.
To orders you own or other items check out my shop
#bjd#bjddoll#customtoys#resin#customdoll#resin doll#viktor arcane#viktor league of legends#viktor lol#arcane#viktor#viktor fanart#jayce x viktor#arcane viktor#tutorials#tutorial
26 notes
·
View notes
Text
youtube
I made a video guide on restringing my jointed hands for my customers. BJD dolls, as well as jointed hands, should be restrung every now and then to keep the proper elastic tension. Mine should be strung in a not-so-traditional way, so you can restring your pair of Whispering Grass jointed hands on your own. The video is almost half an hour long, please see it on my Youtube
#bjd#jointedhands#jointed hands#whispering grass#ball-jointed doll#doll#tutorial#video guide#Youtube
10 notes
·
View notes
Text
BJD Joint Sueding #Resin Popia BTS
Today I am sueding some of Resin Popia's joints so he can pose better.
It's a pain in the neck to do but I do it for him >:(
How to Suede a BJD below the cut with photos
How to Suede a BJD
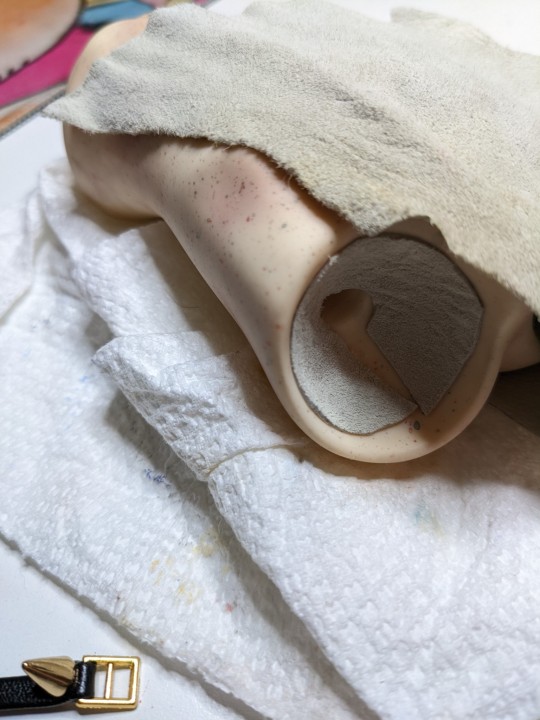
Use glove weight leather or moleskin (the kind you use in your shoes for blisters). I prefer the leather because there isn't sticky residue. I know there's silicone "kips" but they vary in thickness and I don't like how they stick out. The leather has a vintage doll feel to me.
even though I suffer whenever i do it so the dolls that get this treatment are my absolute favorite babies
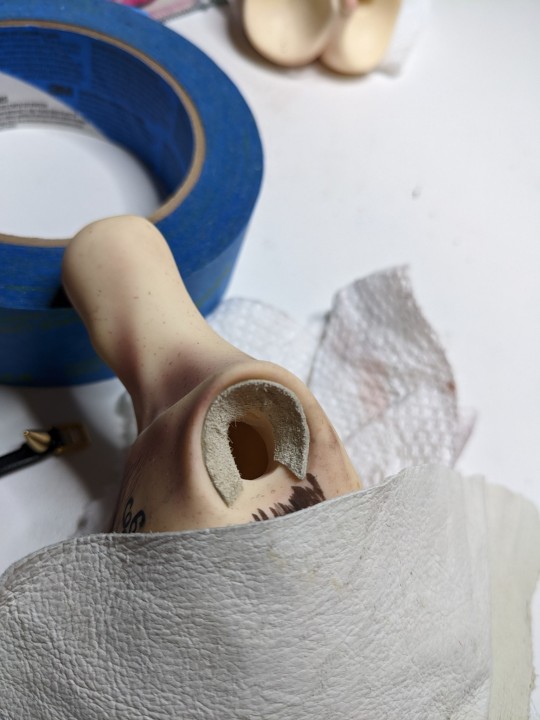
I suede the hip, shoulder and chest area. If the smaller joints need support I usually put a wire in. That's a separate post if I do one.
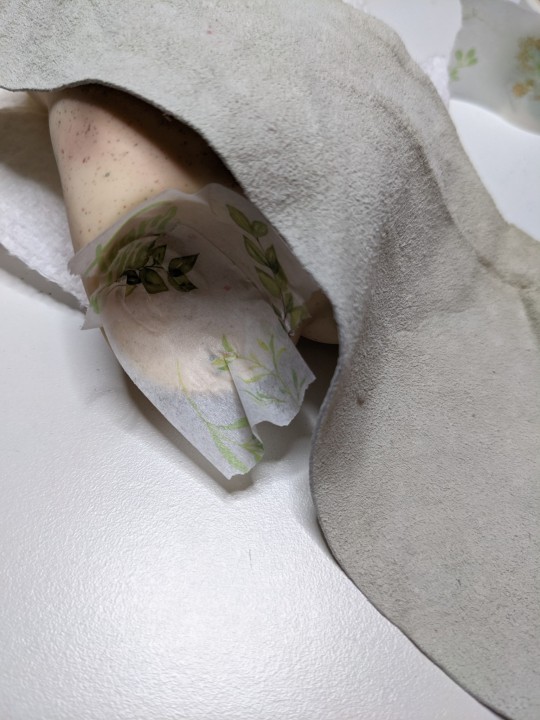
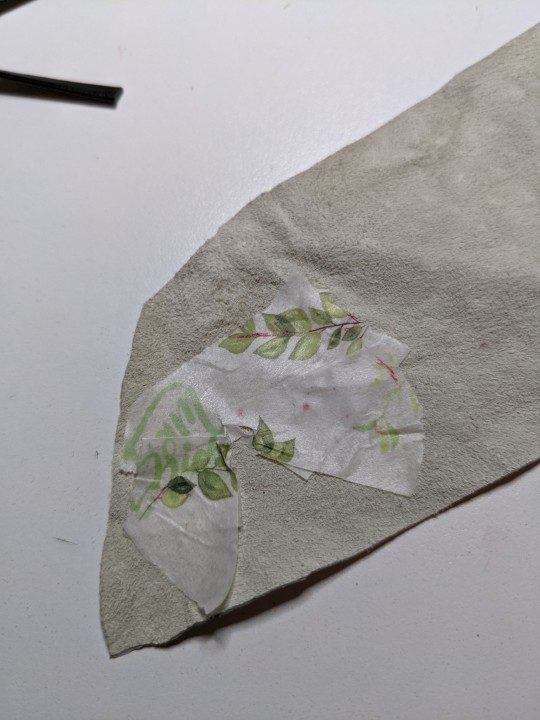
Fill the cavity with weak washi tape. Cut the hole where the string will go and cut the paper so it lays flat. Stick the washi tape onto the leather, smooth side down on the table. We want the rough side of the leather up for friction. I fit it to the socket and cut to adjust with some curved nail scissors.

I add thin strips to the chest right under the ribs. It doesn't have to be pretty, it just has to lay as flat and smooth as possible.
VERY IMPORTANT: Use washable Elmer's Glue for this. You can soak the leather off in warm water if you ever want to redo your doll. Anything else you risk discoloring or damaging your doll.
Be careful restringing him since he now has a bit more material so the strings are a bit tighter.
Feel free to jump into my ask box if you have any doll customizing questions. :D
11 notes
·
View notes
Text
youtube
After 10 years, here's my updated BJD faceup removal tutorial!
I wanted to share how I remove existing doll faceups as well as how I prep blank heads before doing their faceups. This is my preferred method at the moment, chosen for a mix of ease, effectiveness and efficiency. In the video, I explain the steps I take as well as why I do it, so feel free to modify or remove steps if there's good reasons to change it!
I hope this helps anyone doing their own faceups~ If it did, please leave me a like/reblog because it was a lot of effort to put together, and I'll really appreciate it! Thank you :)
9 notes
·
View notes
Text
BJD - Michael - PART 2 HEAD
When the body is done it's off to make the head and I just have to tell myself one thing for that: trust the process. Because it will be bad until it's not. I also look at my sketch size wise and for a reference for the profil but I gave up trying to actually make the face look like I drew it simply because I'm not a good sculpter, I have very bad 3 dimensional view and I don't study faces enough to add subtle differences, I just try to make something that looks good and at least for this one it came out so so much better then the old one, mostly thanks to @michaelgecko who pointed out some stuff that was ugly that I didn't see.

First an aluminium face to make it hollow. I also prepared the eyes as round balls from baked clay, that was way easier then making removable ones that I did for Gabriel.
And then I started to add clay, and yes this is bad.


Just some rough passes to get a general shape and to get the eyes in place and then I just worked on that so I have some steps, don't ask me what exactly I did I don't know either, I just kept checking with my sketch.


This was after my first day of working on it for several hours. I wasn't happy with it but I didn't know why it just looked like an alien. But talking with my friend they pointed out that the nose was totally off and gave me some 3D heads as reference, I also blended the eyelids better since apparently face sculpts look better with less details and more smooth in general, and one of the most important things was adding a forehead to this poor guy, it was small fixed but it really bumped it into looking good territory.


These were some small changes but it turned it so good, I still wanted to change some stuff.


Here I changed the nose to be more realistic, added better nostrils and made them as width as the inner corners of the eyes as well as a more prominent nose bridge. Also helped tremendously.


As a last step I just made his lips bigger because they looked a bit off and lost as well as shortening the gap between the end of the nose and the upper lip, after a final smoothing and making the ears look good too it was done. I don't know how many hours I needed for this and I'm probably happier not knowing but this is the best head I ever made. Well it's the second one but idk if I can do this again.


After baking I only marked where I had to cut as well and was done.
1 note
·
View note