
I am asexual. I made the discovery in April 2011, after years of thinking that I just wasn't any good at being straight. Also, I am a nerd. (Remember that, it might be important.) I run The Asexuality Archive and What Is Asexuality?, and wrote Asexuality: A Brief Introduction.
Last active 60 minutes ago
Don't wanna be here? Send us removal request.
Statistics
We looked inside some of the posts by redbeardace and here's what we found interesting.
Average Info
Notes Per Post
4K
Likes Per Post
3K
Reblog Per Post
903
Reply Per Post
22
Time Between Posts
22 hours
Number of Posts By Type
Text
16
Note
1
Last Seen Tumblr Blogs


Fun Fact
69% of Tumblr users are millennials.
Text
The downside of buying well over a thousand pride flags is that those things take up a lot of room.
9 notes
·
View notes
Text
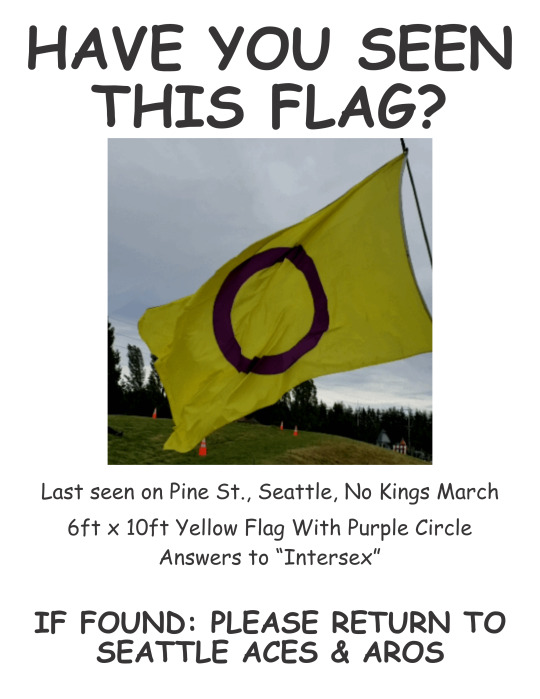
My flag still hasn't come home, and I'm starting to get worried, so I made a poster.
7 notes
·
View notes
Text

Wavy Juneteenth Flag!
24 notes
·
View notes
Text
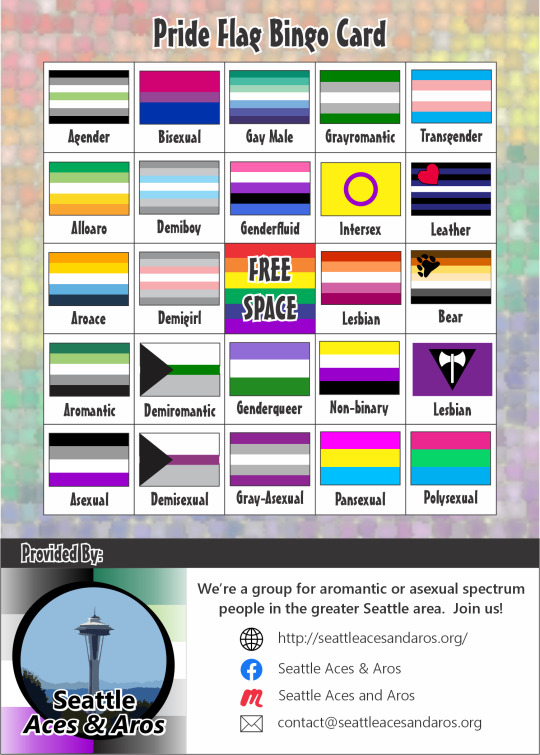
Someone mentioned that it looked like a Pride Flag bingo card, so here's a Pride Flag bingo card. (One of several designs.)


I printed out a copy of the Field Guide to Pride Flags on photo paper, then stuck them together with a ring.
It feels like a set of identification cards that would be standard equipment for any researcher studying the habits of queers in the wild. They'd buy a copy in college and keep it in their field pack for years. It would get all battered and torn, but they'll never, ever replace it because the newer edition changed the typeface and they hate it.
290 notes
·
View notes
Text
I should do a followup titled "How to fly a ginormous flag", which gives practical handling tips, safety suggestions, and warnings about attracting random YouTubers.
24 notes
·
View notes
Note
It's not blurred, but there is a disclaimer up at the top on mobile. I don't know if you still can't see that on your end, but thought I'd mention it since it's easy to miss.
Okay, I see that on mobile. Didn't see anything like that on the regular site. They used to have a flagged content purgatory page where you could see all the stuff that had been flagged, didn't they? And didn't they warn people when they did that?
10 notes
·
View notes
Text
People keep saying this is flagged as Mature, but I don't see that on my end. Is if flagged and just telling me it isn't? Has my entire blog been flagged? How can I still not understand this site after all this time?
How To Make Ginormous Flags
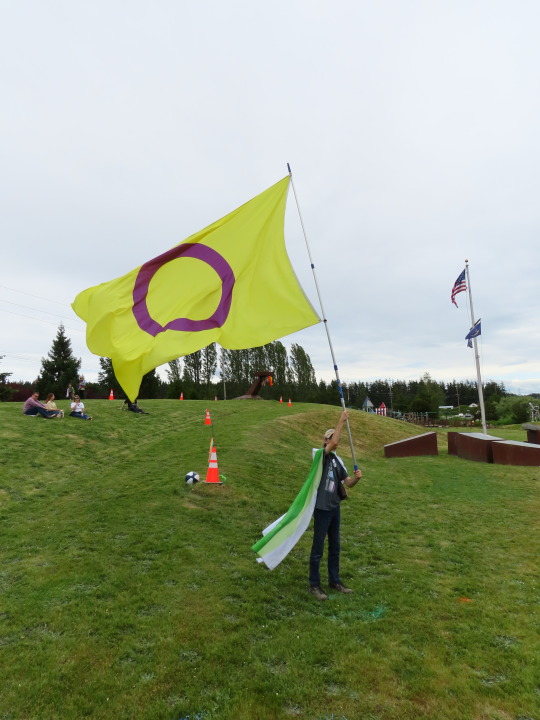
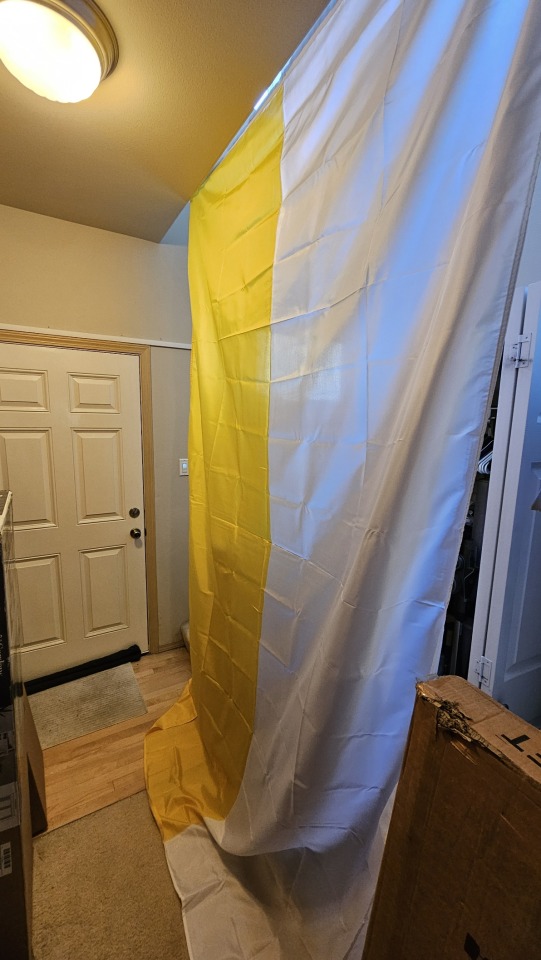
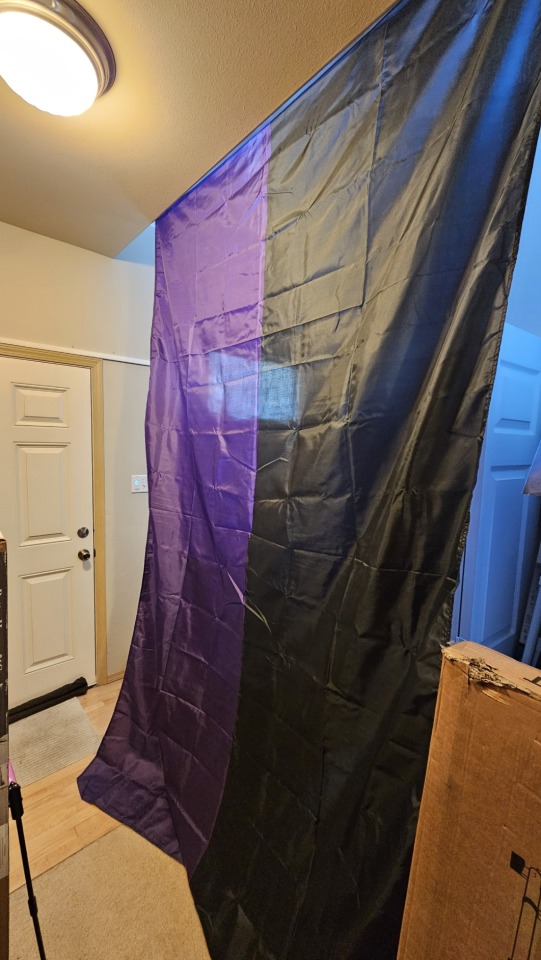
You may have seen the ginormous pride flags I have. If not, here's one:

Many of you have asked where I obtained such large flags. Read on, for I shall reveal all.
These flags are roughly 20 feet wide and 12 feet tall, or around 6m x 4m (I know those dimensions aren't really equivalent, but more on that later...). It actually is possible to just buy flags of that size (and bigger) from a flag maker. It will probably be better quality than these, but also significantly more expensive. It didn't take me long to find a queer-owned flag maker that's selling 50' pride flags, if you've got $1600 to spare. This size, it looks like they have one for about $450, which is cheaper than others I've seen.
I didn't go that route, though. I didn't actually buy a ginormous flag at all. And it still wasn't cheap, each of these flags probably cost $150 for materials and took a couple of hours (at a bit of back pain) to assemble. Keep reading to see what I did.
Part 1: The Four Quarters
If you've followed me for a while (or if you've looked in the Tumblr GIF selector for all manner of pride flags), you've probably noticed that I have some very large flags. These very large flags are "only" 10'x6', or 3m x 2m. Here's an example:
As you can see, that is a very large flag. Large, but not ginormous. However, it's the largest size that digital flag printers seem to do, at least without custom orders that involve talking to salespeople and getting quotes, etc. The rest of this post could be seen as the extremes I will go to in order to avoid having to talk to someone.
I got a bunch of flags this size from a place called Anley. Don't consider that an endorsement, it's just who I used because I didn't have to talk to anyone. Their prices start at $30 for a flag that size, but they have a volume discount to drops it to about $25 if you order four.
Why is that notable? Well, because each of these ginormous flags is actually four of those smaller size flags fabric taped together. If you look at the animated GIF at the top of this post, you can see where the seams are, especially in the middle of the white stripe on the trans flag.
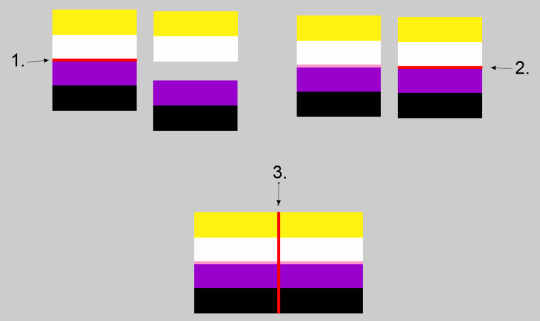
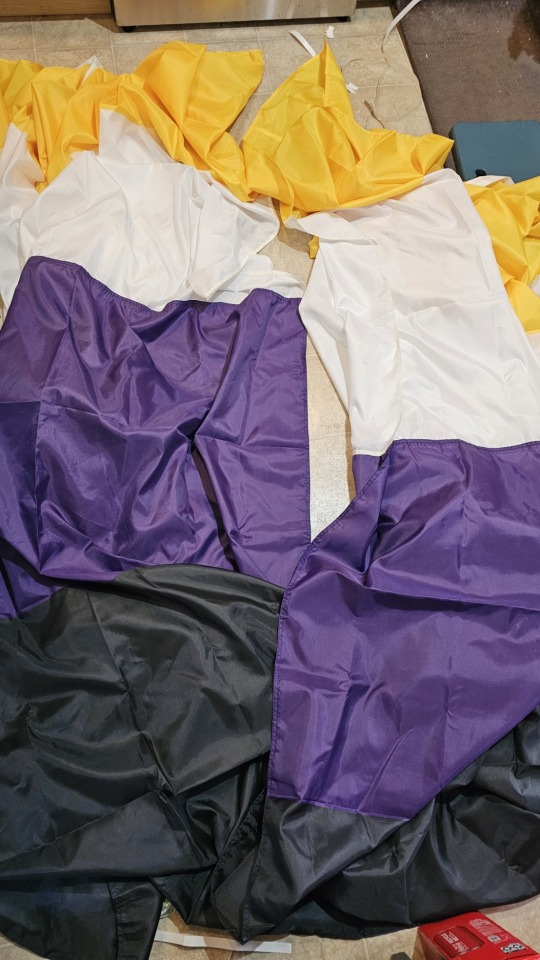
So, the first step is to split the design of the flag you want to make into four quarters, like this:
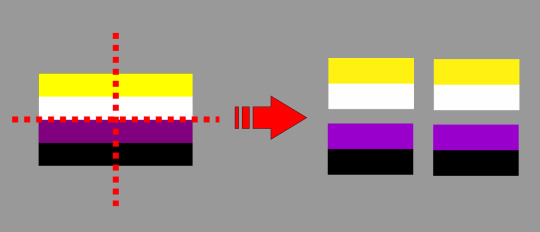
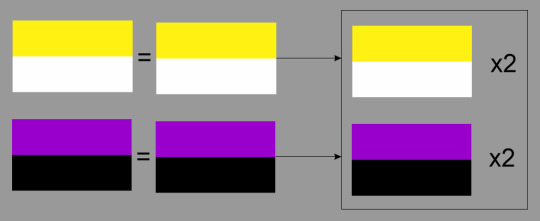
In the case of the non-binary flag here, you can see that the top two quarters are the same, and the bottom two quarters are the same. That's convenient, because you only have to buy two different designs, just buy two copies of each.
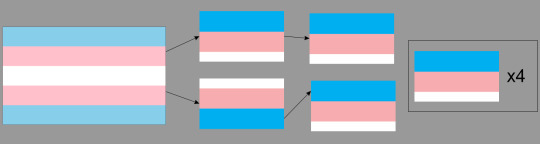
Symmetrical flags, like the trans flag or gray-ace are even easier, because they actually just need four copies of the same design, as seen here:
Some flags, like the demi flags, will end up with four completely different panels.
A note of caution: Any flag with an odd number of stripes will end up with the center stripe being split down the middle. This means that the width of the stripes on each panel will vary, with the center stripe only being half-width. When you order the panels, be sure to tell them that this difference is intentional, and be sure to check the proofs they send you. I learned this from experience. I was three quarters of the way through taping together an aro flag when I realized that the central stripe was twice as tall as it should have been. Wasted a lot of time, tape, and money, on a flag that ended up looking like this:
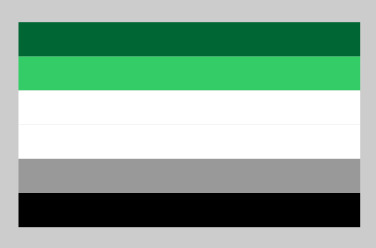
That's clearly not what you want to have happen.
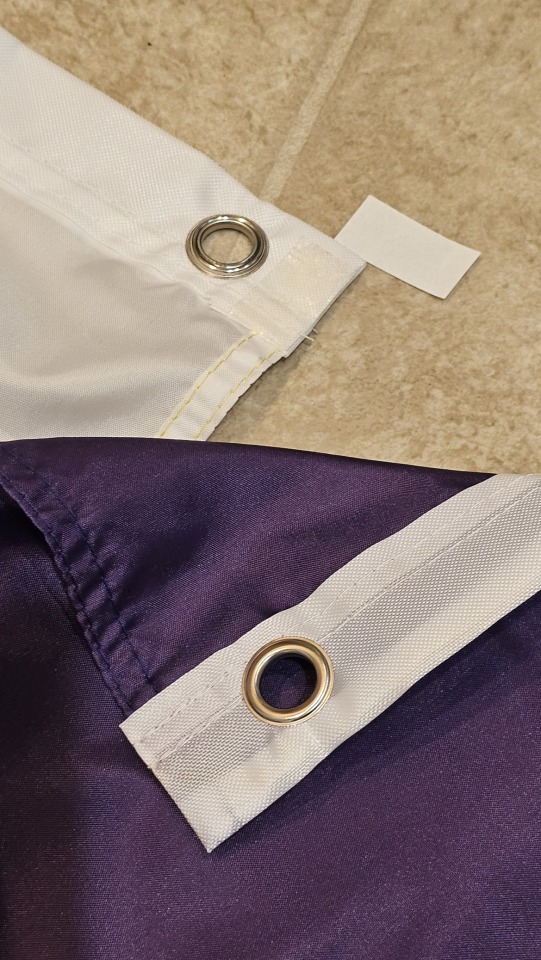
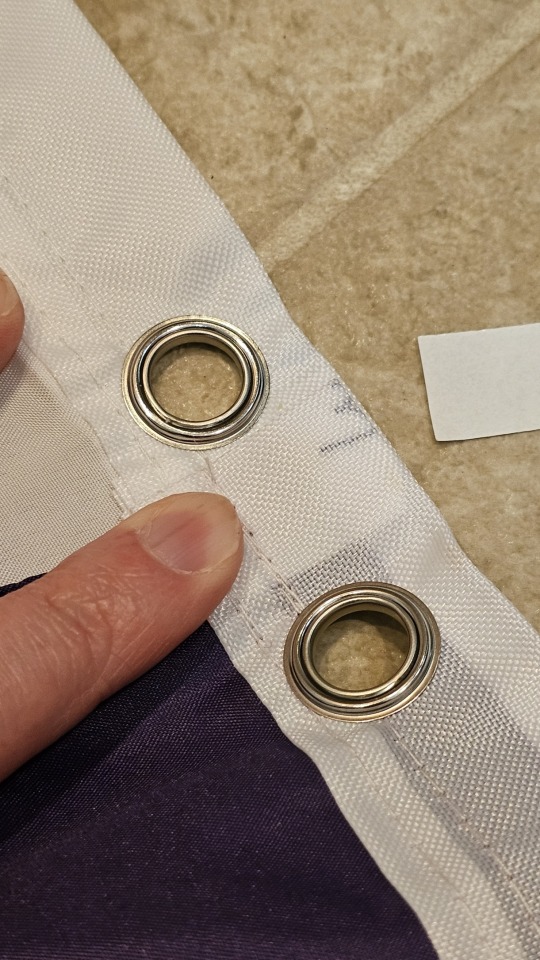
These flag makers will ask whether you want grommets or a sleeve, and where you want the grommets. For the purposes of flying it from a flagpole, you'll want the "Two Side Grommets" option. That should give you a reinforced edge along one side of the panels. (If you had a flag that required four completely different panels like the demi flags, you'll probably have to reverse the images for the right half of the flag so that the reinforced edge doesn't end up in the middle, or you'll have to do "four grommets" or something so there is no edge, or you know what this is too complicated for me to think about right now because I haven't done it so I'm just going to leave that as an exercise to the reader so good luck.)
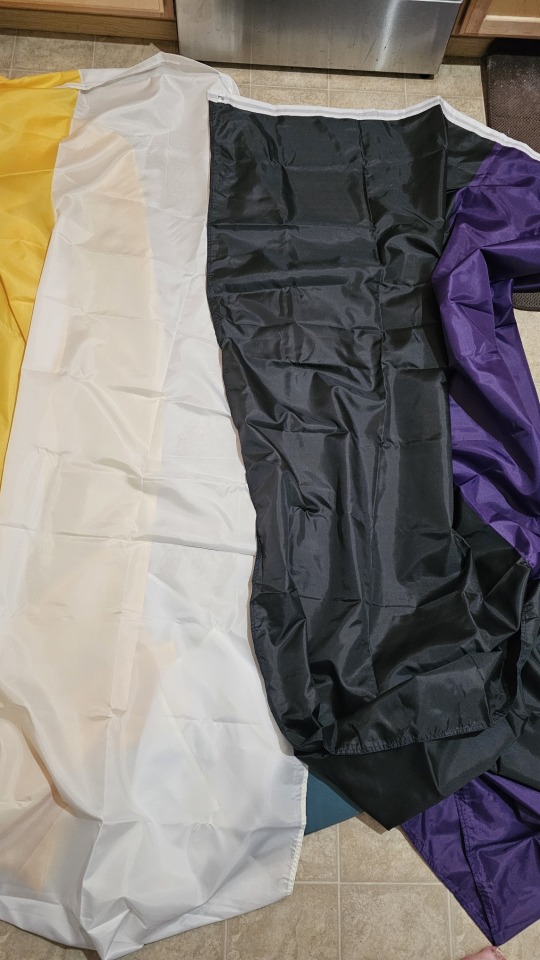
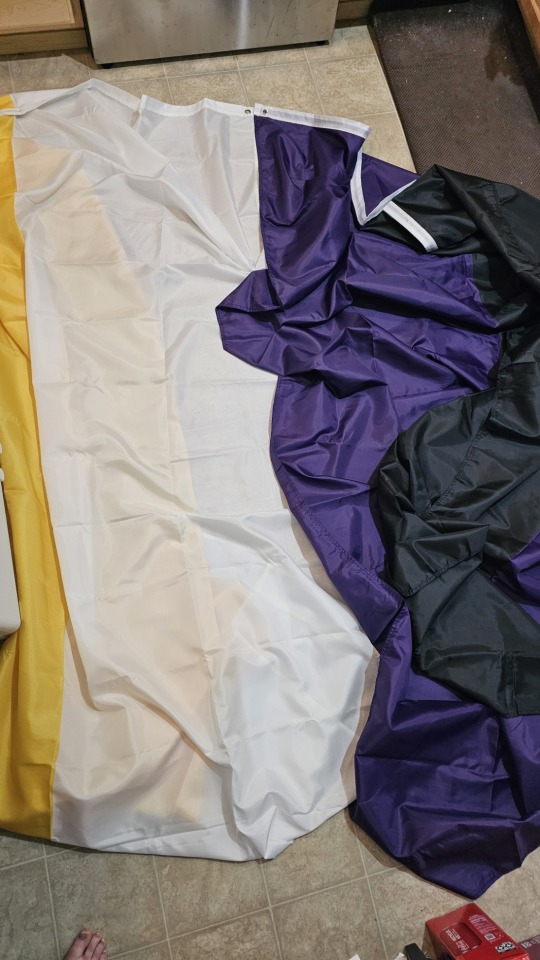
Here's what the panels for the ginormous flag will look like when you get them:
Part 2: Assembly Prep
After you've received the flags, you're ready to assemble. If you have a sewing machine and the skill to sew in long straight lines, then you can do that to connect the panels. I, on the other hand, have zero confidence in my ability to sew like that, so I used some permanent fabric tape that I got at the craft store. Either way, a lot of the same strategies will work.
One thing you don't want to do is use both tape and a sewing machine, unless you want to get your sewing machine all gummed up. Learned that one the hard way...
In order to connect the panels, I taped together the left side panels and the right side panels separately, then taped the left and right halves together. Like so:
The main reason I did it this way is because it keeps each individual run about the same length. Seams 1 and 2 are 10 feet each, and seam 3 is 12 feet. If you taped the tops and bottoms together first, you'd have two 6 foot runs, followed by a monstrous 20 foot run. My assembly room floor (literally my kitchen floor...) isn't nearly big enough for that. It can't even fit the 10 foot runs...
I used permanent fabric tape to stick things together. It looks like this:
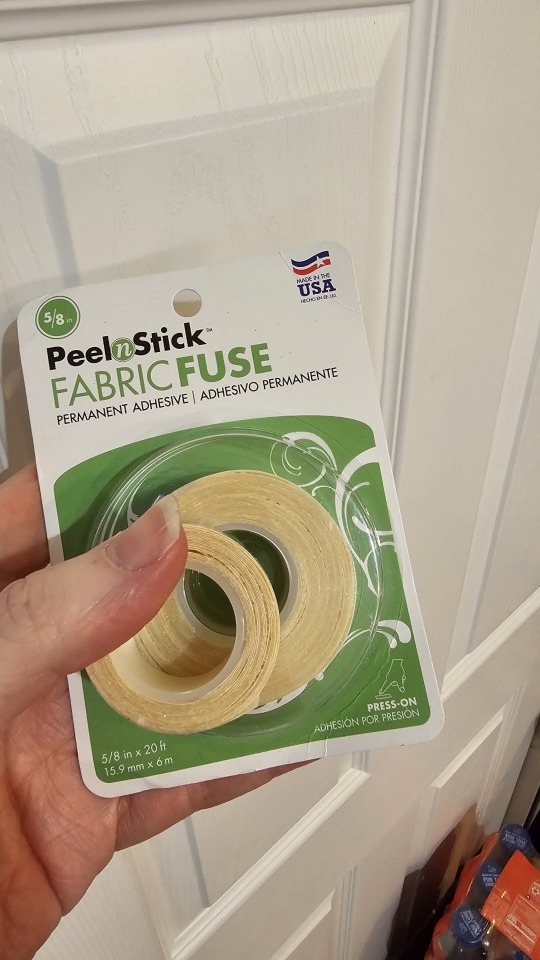
No matter how you decide to put the panels together, you're going to need about 32 feet of this stuff. For this brand, that's about a roll and a half.
Now, get your work area ready. I used the kitchen floor because it was the largest space to work on, and the hard surface meant I could press firmly on the tape and not have it sink into carpet. If you have a large table, that will probably work, too. If you use the floor like I did, be sure to clean it first...
Part 3: Assembly
Before you start taping things together, let's pause for some quick words of advice:
Double check everything before you start taping things together. Be ABSOLUTELY CERTAIN that you have the stripes in the right order and that you're taping the right edges of the flags together. You won't be able to undo.
This tape is very sticky. It will stick the flags, which is great, but it will stick to you, it will stick to itself, it will stick to passing pets or friends, it will stick to the wrong parts of the flags. And if it does stick to any of those things, it may never want to let go. So be very very careful with the stuff. I rarely peel the backing off more than a few inches at a time. Anything more than that is a waiting catastrophe.
Double check everything again.
If you ever twist or fold the flags, make sure that you're taping the same sides together. I'll make a note of that in a bit where I've run into problems with that.
Start by placing the two parts of the flag you want to connect on your work surface and aligning the correct edges.
Okay, now, are you double checking everything? Do you see what's wrong here? I almost connected the wrong sides of this flag, which would have been an expensive mistake. So again, double check EVERYTHING. Even if you think you know the order of the stripes on the flag you're doing, don't wing it here. Go get an example and compare it to make sure.
There we go, that's better.
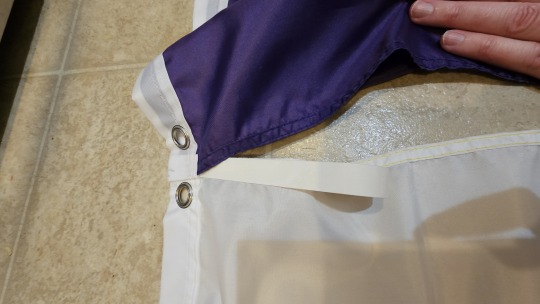
I always start from the reinforced edge, because it's a nice wide thing to connect, and it makes me confirm that I'm taping things the right direction.
Cut about an inch of the tape and press it firmly onto the edge of one of the sides. Peel off the backing and carefully line up the edge of the flags, make sure that you're overlapping the tape entirely, and press firmly to stick the two pieces together.
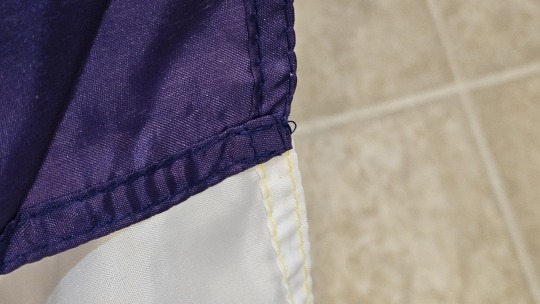
Congratulations, you can't back out now!
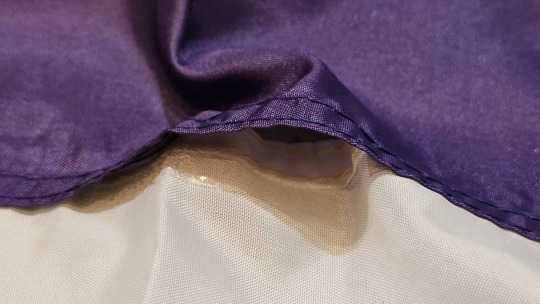
Before you move on, pay very close attention to how the two panels are overlapping. In this case, I did the purple side over the white side, but it doesn't matter which one you choose, just that you're consistent along the entire seam.
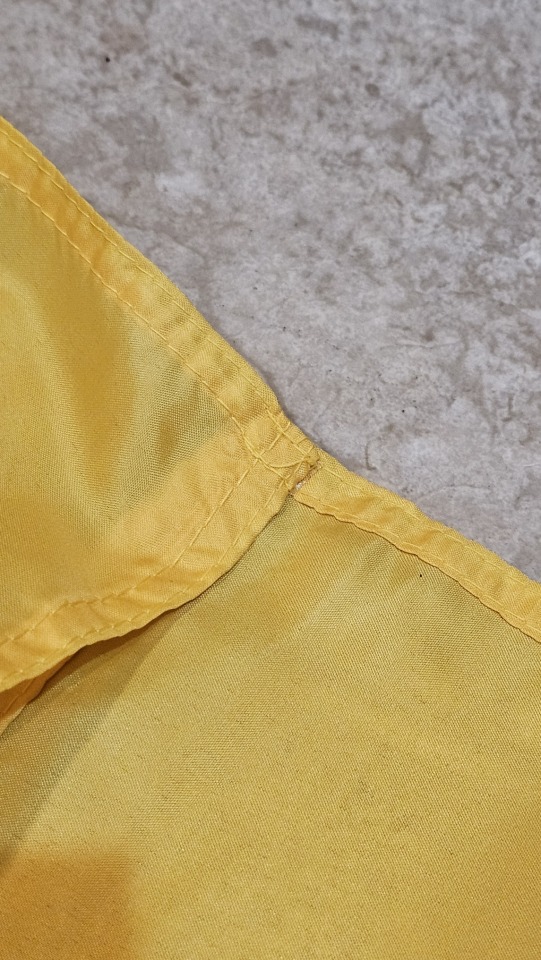
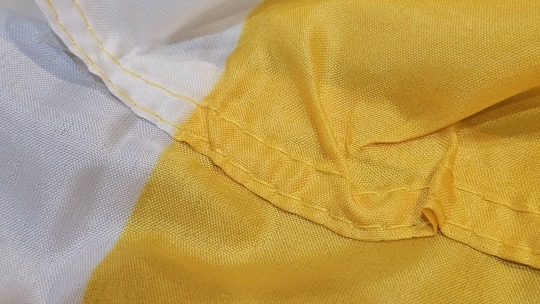
Now, you might be tempted to just continue taping the seam all the way to the other side, but do not do that! I learned from failure that is not a good idea. You'll end up pulling the two flags at different tensions and the two flags are probably slightly different sizes anyway, so the end result of trying to do it all in one big run will be a couple of inches of mistake at the far end. You don't want that.
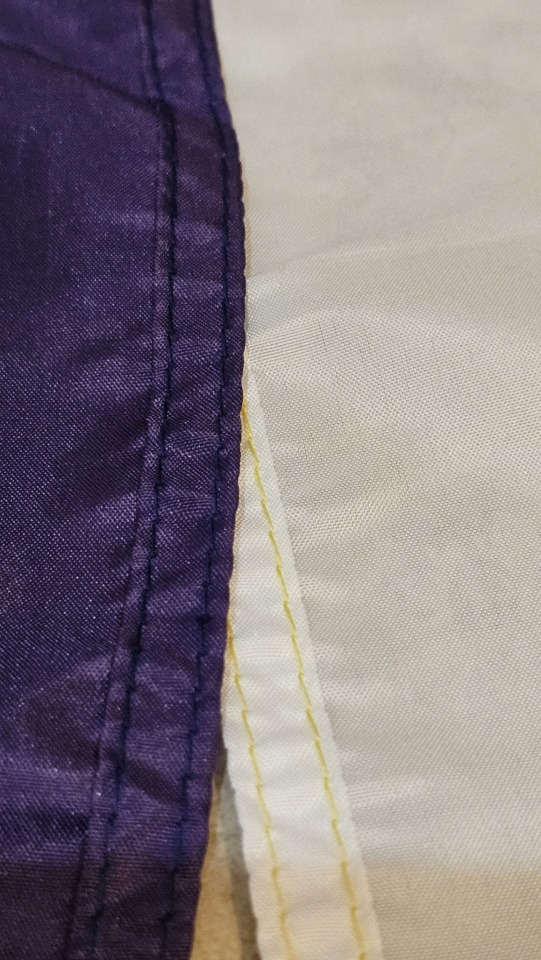
Instead, what you want to do is connect the two flags at the far end first. This ensures that the ends are perfectly aligned, no matter how far off your tensioning is. However, remember how I mentioned that you want to make sure that you pay attention to how the panels are overlapping? This is where that is critical. You have to make sure that you tape the other end the same way you taped the first end. I did the purple on top the first time, so it's purple on top this time, too.

Just to make that point clear: Do both sides the same way! It's easy here because it's purple on top, hiding the white seam. But if you have a flag where both sides are the same color (which you will no matter what, a few steps from now...), you really have to be careful here. Do not press the tape or sew anything until you're sure about it.
Okay, so now you've got the two ends stuck together, and a whole bunch of loose seam in the middle. You still do not want to tape this yet! First, you need to put a couple of "checkpoints" along the way. ?You see, if you just connect the two sides as-is, you'll still have the tension problem. Instead of having the end misaligned by a few inches, you'll have a few inches of slack on one side, just hanging freely. You don't want that.
So what I did was tape together another couple of places along the way. Specifically, I taped together the middle and then the midway point of those two halves. This divided the edge into four sections. Here's a diagram showing where I taped, and the order that I taped in:
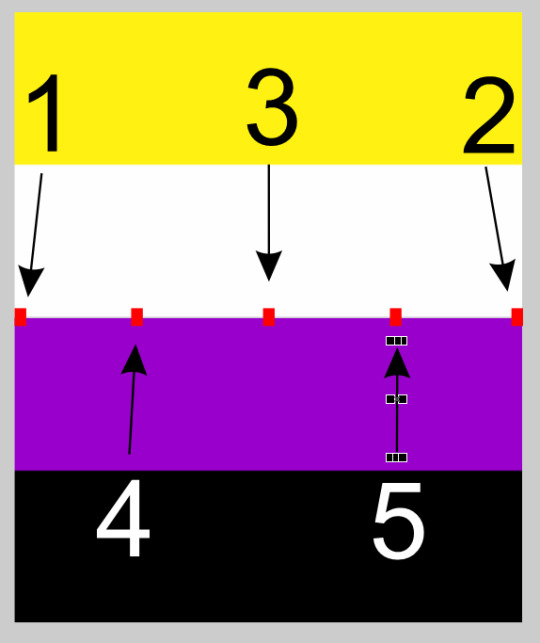
Start with the edges, do the middle, then do the last two. You don't have to be exact, you just want to be close enough. I usually fold the panels in half to get point 3, then unfold it and eyeball where 4 and 5 should go.
What this does is divide the edge into four smaller pieces. Instead of building up the error across 10 feet at a time, you're only going 2.5 feet at a time. That means that any mistake you accumulate will be much smaller, and you'll be able to adjust your taping to make it less noticeable.
Oh, and again, make sure that you're taping things the right way at each of these points. You don't want to have a bit where you suddenly flip which side is on top.
Okay, so now that you've got all the checkpoints in place, you're ready to tape the rest of the seam together. Start by putting the tape on one side, and unroll a few inches.
Be sure that it's aligned with the edge of the panel, then press firmly. You only want to do a few inches at a time. If you unroll too much, the tape has a magical way of sticking to everything, including itself, and you'll end up with a tangled, sticky mess. It's a good idea to press the tape down as you're unrolling, to prevent mishaps.
Run your fingers along it to make sure that it's pressed strongly against the fabric. However, do not peel off the backing just yet. Just unroll a few inches, press, unroll a few more, press, but don't join together the two panels yet. Keep going until you hit the first checkpoint, then cut the tape.
At this point, you have tape firmly pressed against one side. You don't have to get the tape all the way to the existing tape on the checkpoint, but get it close.
Okay, now you're ready to peel off the paper backing, a couple of inches at a time.
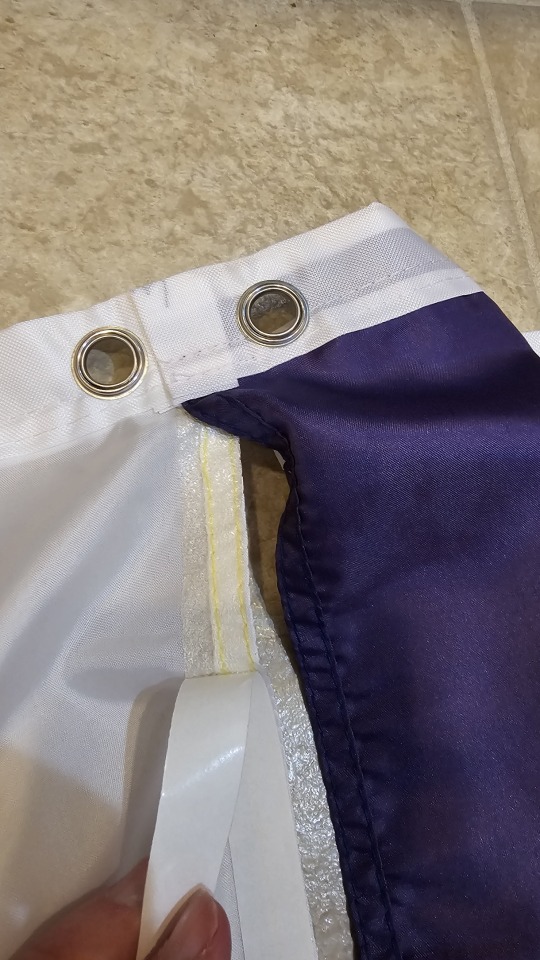
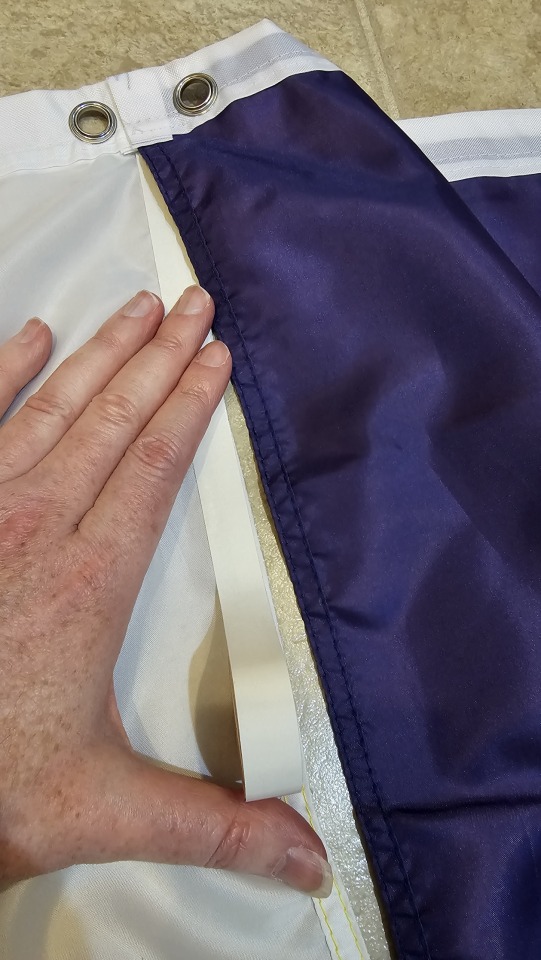
Peel off the backing, then align the second panel with the newly exposed sticky tape, and carefully press it down. There are a couple of things to note:
First, only do this a couple of inches at a time or you end up with a sticky, tangled mess. I know I already said that, but it bears repeating.
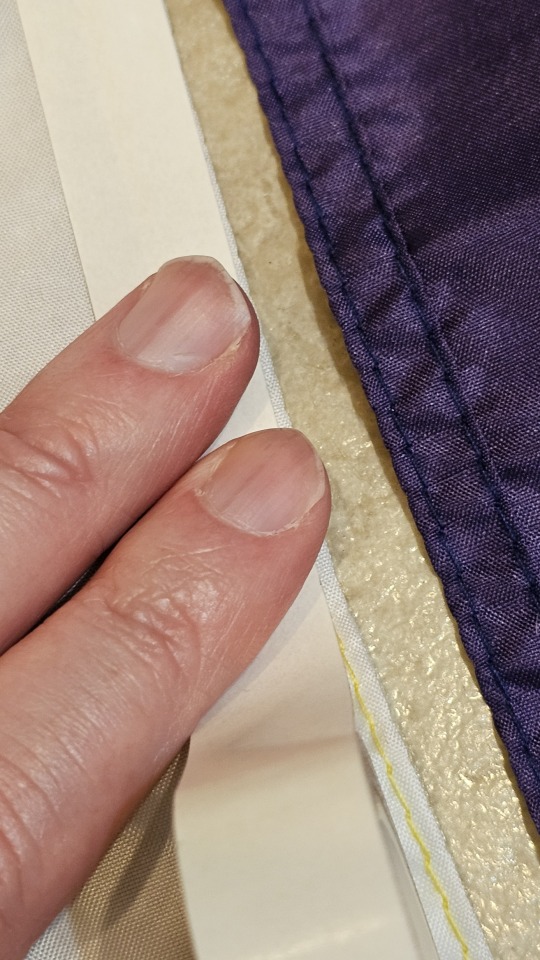
Second, make sure that you align the edge of the panel with the edge of the tap, and NOT the edge of the other hem. You can see in the picture that the tape is nearly twice as wide as the hem is, so use all of that. If you align hem-to-hem, you'll leave a bunch of the tape exposed and, you guessed it, sticky tangled mess.
And finally, watch your tension! You want to pull on both sides equally so that everything aligns properly. If you start getting to the edge of the section, try to see how much fabric you have left to work with, and adjust as you go. You want to try to hit that checkpoint with as little slack fabric as possible.
However...
You should expect to have a little bit of slack on one side or the other when you get there. Try to fold and pinch the fabric a bit to even out the extra as much as you can.
Congratulations! You've now stuck together a quarter of one of the three seams you have to do!
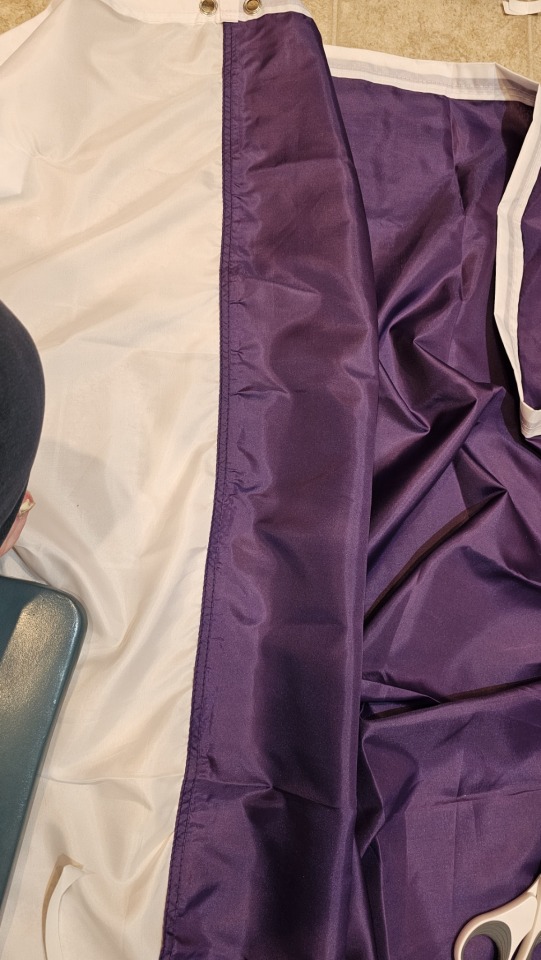
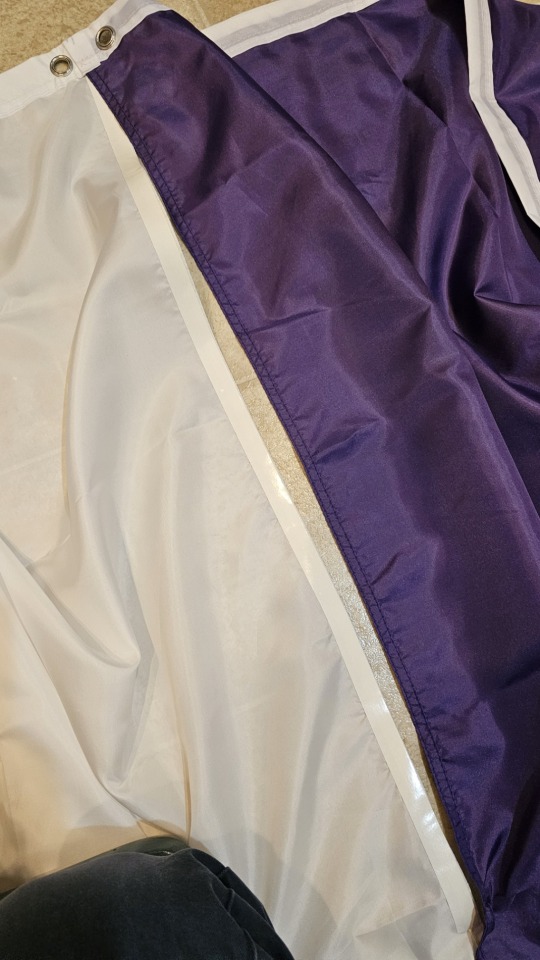
Run your fingers firmly over the part of the seam you've just done several times. Push hard. You want to make sure it's all stuck together well.
Now, repeat these steps until you've gotten the entire seam between the two panels stuck together firmly.
When I have a full edge taped together, I'll pick it up and check that everything is taped well. Look for gaps and fix them. Grab both sides firmly and quickly tug the pieces to make sure they hold together. I go down the whole edge, tugging every foot or so.
You've now assembled half of the flag! Only 22 more feet to go!
Now do the second half the same way, then proceed to the next section when you're ready to join together the two halves.
Part 4: Assembly, Part 2.

You've got two halves of a giant flag, now it's time for the final assembly. This actually ends up being a bit easier than the first part, because you can match the stripes together.
You basically do this the same way you did the first panels. Start with the ends, like you did the first time.
Remember a while back, where I mentioned having a flag where both sides are the same color? And I said you were going to have one no matter what? Well, here's that "No Matter What" moment. You have to be EXTRA cautious here, because both sides of the flag that you're joining are going to be the same color. So be super sure which panel you're putting on top and which you're putting on the bottom as you go.
One thing that's really convenient about doing this last seam is that the stripes themselves can show you where to put the checkpoints. Make sure you align the color transitions exactly as you go.
For the most part, taping the rest of this seam will be the same as the ones you've already done, so all the same tips apply. Go slowly, press firmly, avoid sticky tangles, and always keep track of which side is on top. Then press along the seam firmly several times when you're done, and do the tug test.
Step 5: Victory!
If all went well, then congratulations! You now have a ginormous flag!
I'm apparently out of pictures for this post, which is probably a good thing anyway, because the flag is kinda too big to take a picture of anyhow.
Now that you've got a ginormous flag, you have to fly it somehow. I use a 20 foot tall telescopic painter's pole, and clip the flag to that. It can be very hard to wrangle, so be careful and don't fly it in the middle of a lot of people. You really should have a 40 foot wide safety exclusion zone around the pole to keep people safe...
Anyway, have fun with your new ginormous flag!
(And if you sew, I apologize for my technique...)
305 notes
·
View notes
Text
#my husband is the best husband because he's my husband and i'm gonna snuggle him#life in the gayborhood#i'm never leaving seattle#seattle#vexillology#happy pride 🌈
The binder version of this field guide will be at the Seattle Aces & Aros booth at Cap Hill Pridefest later this month, in case you want to see it in person.
I printed out a copy of the Field Guide to Pride Flags on photo paper, then stuck them together with a ring.
It feels like a set of identification cards that would be standard equipment for any researcher studying the habits of queers in the wild. They'd buy a copy in college and keep it in their field pack for years. It would get all battered and torn, but they'll never, ever replace it because the newer edition changed the typeface and they hate it.
290 notes
·
View notes
Text
Bumping because so many people were asking at No Kings in Seattle yesterday.
How To Make Ginormous Flags
You may have seen the ginormous pride flags I have. If not, here's one:
Many of you have asked where I obtained such large flags. Read on, for I shall reveal all.
These flags are roughly 20 feet wide and 12 feet tall, or around 6m x 4m (I know those dimensions aren't really equivalent, but more on that later...). It actually is possible to just buy flags of that size (and bigger) from a flag maker. It will probably be better quality than these, but also significantly more expensive. It didn't take me long to find a queer-owned flag maker that's selling 50' pride flags, if you've got $1600 to spare. This size, it looks like they have one for about $450, which is cheaper than others I've seen.
I didn't go that route, though. I didn't actually buy a ginormous flag at all. And it still wasn't cheap, each of these flags probably cost $150 for materials and took a couple of hours (at a bit of back pain) to assemble. Keep reading to see what I did.
Part 1: The Four Quarters
If you've followed me for a while (or if you've looked in the Tumblr GIF selector for all manner of pride flags), you've probably noticed that I have some very large flags. These very large flags are "only" 10'x6', or 3m x 2m. Here's an example:
As you can see, that is a very large flag. Large, but not ginormous. However, it's the largest size that digital flag printers seem to do, at least without custom orders that involve talking to salespeople and getting quotes, etc. The rest of this post could be seen as the extremes I will go to in order to avoid having to talk to someone.
I got a bunch of flags this size from a place called Anley. Don't consider that an endorsement, it's just who I used because I didn't have to talk to anyone. Their prices start at $30 for a flag that size, but they have a volume discount to drops it to about $25 if you order four.
Why is that notable? Well, because each of these ginormous flags is actually four of those smaller size flags fabric taped together. If you look at the animated GIF at the top of this post, you can see where the seams are, especially in the middle of the white stripe on the trans flag.
So, the first step is to split the design of the flag you want to make into four quarters, like this:
In the case of the non-binary flag here, you can see that the top two quarters are the same, and the bottom two quarters are the same. That's convenient, because you only have to buy two different designs, just buy two copies of each.
Symmetrical flags, like the trans flag or gray-ace are even easier, because they actually just need four copies of the same design, as seen here:
Some flags, like the demi flags, will end up with four completely different panels.
A note of caution: Any flag with an odd number of stripes will end up with the center stripe being split down the middle. This means that the width of the stripes on each panel will vary, with the center stripe only being half-width. When you order the panels, be sure to tell them that this difference is intentional, and be sure to check the proofs they send you. I learned this from experience. I was three quarters of the way through taping together an aro flag when I realized that the central stripe was twice as tall as it should have been. Wasted a lot of time, tape, and money, on a flag that ended up looking like this:
That's clearly not what you want to have happen.
These flag makers will ask whether you want grommets or a sleeve, and where you want the grommets. For the purposes of flying it from a flagpole, you'll want the "Two Side Grommets" option. That should give you a reinforced edge along one side of the panels. (If you had a flag that required four completely different panels like the demi flags, you'll probably have to reverse the images for the right half of the flag so that the reinforced edge doesn't end up in the middle, or you'll have to do "four grommets" or something so there is no edge, or you know what this is too complicated for me to think about right now because I haven't done it so I'm just going to leave that as an exercise to the reader so good luck.)
Here's what the panels for the ginormous flag will look like when you get them:
Part 2: Assembly Prep
After you've received the flags, you're ready to assemble. If you have a sewing machine and the skill to sew in long straight lines, then you can do that to connect the panels. I, on the other hand, have zero confidence in my ability to sew like that, so I used some permanent fabric tape that I got at the craft store. Either way, a lot of the same strategies will work.
One thing you don't want to do is use both tape and a sewing machine, unless you want to get your sewing machine all gummed up. Learned that one the hard way...
In order to connect the panels, I taped together the left side panels and the right side panels separately, then taped the left and right halves together. Like so:
The main reason I did it this way is because it keeps each individual run about the same length. Seams 1 and 2 are 10 feet each, and seam 3 is 12 feet. If you taped the tops and bottoms together first, you'd have two 6 foot runs, followed by a monstrous 20 foot run. My assembly room floor (literally my kitchen floor...) isn't nearly big enough for that. It can't even fit the 10 foot runs...
I used permanent fabric tape to stick things together. It looks like this:
No matter how you decide to put the panels together, you're going to need about 32 feet of this stuff. For this brand, that's about a roll and a half.
Now, get your work area ready. I used the kitchen floor because it was the largest space to work on, and the hard surface meant I could press firmly on the tape and not have it sink into carpet. If you have a large table, that will probably work, too. If you use the floor like I did, be sure to clean it first...
Part 3: Assembly
Before you start taping things together, let's pause for some quick words of advice:
Double check everything before you start taping things together. Be ABSOLUTELY CERTAIN that you have the stripes in the right order and that you're taping the right edges of the flags together. You won't be able to undo.
This tape is very sticky. It will stick the flags, which is great, but it will stick to you, it will stick to itself, it will stick to passing pets or friends, it will stick to the wrong parts of the flags. And if it does stick to any of those things, it may never want to let go. So be very very careful with the stuff. I rarely peel the backing off more than a few inches at a time. Anything more than that is a waiting catastrophe.
Double check everything again.
If you ever twist or fold the flags, make sure that you're taping the same sides together. I'll make a note of that in a bit where I've run into problems with that.
Start by placing the two parts of the flag you want to connect on your work surface and aligning the correct edges.
Okay, now, are you double checking everything? Do you see what's wrong here? I almost connected the wrong sides of this flag, which would have been an expensive mistake. So again, double check EVERYTHING. Even if you think you know the order of the stripes on the flag you're doing, don't wing it here. Go get an example and compare it to make sure.
There we go, that's better.
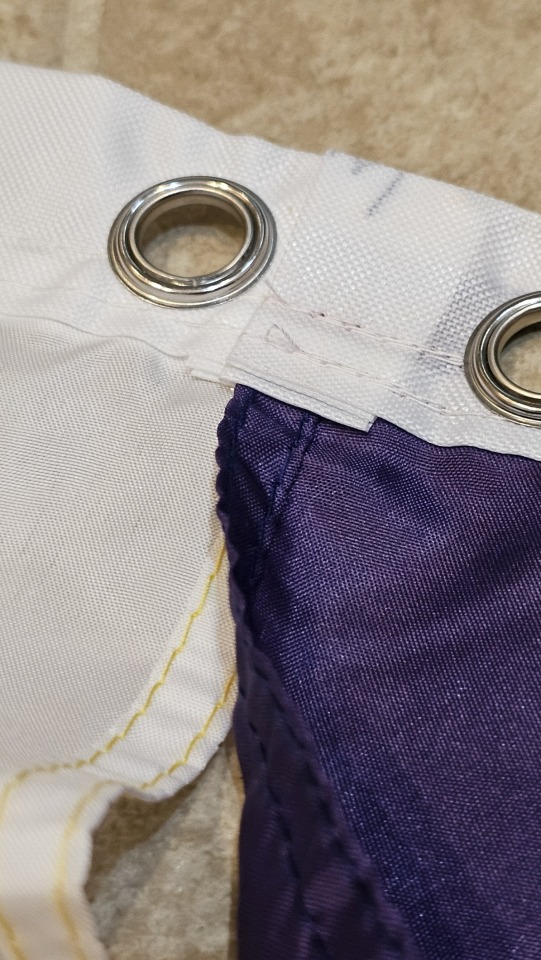
I always start from the reinforced edge, because it's a nice wide thing to connect, and it makes me confirm that I'm taping things the right direction.
Cut about an inch of the tape and press it firmly onto the edge of one of the sides. Peel off the backing and carefully line up the edge of the flags, make sure that you're overlapping the tape entirely, and press firmly to stick the two pieces together.
Congratulations, you can't back out now!
Before you move on, pay very close attention to how the two panels are overlapping. In this case, I did the purple side over the white side, but it doesn't matter which one you choose, just that you're consistent along the entire seam.
Now, you might be tempted to just continue taping the seam all the way to the other side, but do not do that! I learned from failure that is not a good idea. You'll end up pulling the two flags at different tensions and the two flags are probably slightly different sizes anyway, so the end result of trying to do it all in one big run will be a couple of inches of mistake at the far end. You don't want that.
Instead, what you want to do is connect the two flags at the far end first. This ensures that the ends are perfectly aligned, no matter how far off your tensioning is. However, remember how I mentioned that you want to make sure that you pay attention to how the panels are overlapping? This is where that is critical. You have to make sure that you tape the other end the same way you taped the first end. I did the purple on top the first time, so it's purple on top this time, too.
Just to make that point clear: Do both sides the same way! It's easy here because it's purple on top, hiding the white seam. But if you have a flag where both sides are the same color (which you will no matter what, a few steps from now...), you really have to be careful here. Do not press the tape or sew anything until you're sure about it.
Okay, so now you've got the two ends stuck together, and a whole bunch of loose seam in the middle. You still do not want to tape this yet! First, you need to put a couple of "checkpoints" along the way. ?You see, if you just connect the two sides as-is, you'll still have the tension problem. Instead of having the end misaligned by a few inches, you'll have a few inches of slack on one side, just hanging freely. You don't want that.
So what I did was tape together another couple of places along the way. Specifically, I taped together the middle and then the midway point of those two halves. This divided the edge into four sections. Here's a diagram showing where I taped, and the order that I taped in:
Start with the edges, do the middle, then do the last two. You don't have to be exact, you just want to be close enough. I usually fold the panels in half to get point 3, then unfold it and eyeball where 4 and 5 should go.
What this does is divide the edge into four smaller pieces. Instead of building up the error across 10 feet at a time, you're only going 2.5 feet at a time. That means that any mistake you accumulate will be much smaller, and you'll be able to adjust your taping to make it less noticeable.
Oh, and again, make sure that you're taping things the right way at each of these points. You don't want to have a bit where you suddenly flip which side is on top.
Okay, so now that you've got all the checkpoints in place, you're ready to tape the rest of the seam together. Start by putting the tape on one side, and unroll a few inches.
Be sure that it's aligned with the edge of the panel, then press firmly. You only want to do a few inches at a time. If you unroll too much, the tape has a magical way of sticking to everything, including itself, and you'll end up with a tangled, sticky mess. It's a good idea to press the tape down as you're unrolling, to prevent mishaps.
Run your fingers along it to make sure that it's pressed strongly against the fabric. However, do not peel off the backing just yet. Just unroll a few inches, press, unroll a few more, press, but don't join together the two panels yet. Keep going until you hit the first checkpoint, then cut the tape.
At this point, you have tape firmly pressed against one side. You don't have to get the tape all the way to the existing tape on the checkpoint, but get it close.
Okay, now you're ready to peel off the paper backing, a couple of inches at a time.
Peel off the backing, then align the second panel with the newly exposed sticky tape, and carefully press it down. There are a couple of things to note:
First, only do this a couple of inches at a time or you end up with a sticky, tangled mess. I know I already said that, but it bears repeating.
Second, make sure that you align the edge of the panel with the edge of the tap, and NOT the edge of the other hem. You can see in the picture that the tape is nearly twice as wide as the hem is, so use all of that. If you align hem-to-hem, you'll leave a bunch of the tape exposed and, you guessed it, sticky tangled mess.
And finally, watch your tension! You want to pull on both sides equally so that everything aligns properly. If you start getting to the edge of the section, try to see how much fabric you have left to work with, and adjust as you go. You want to try to hit that checkpoint with as little slack fabric as possible.
However...
You should expect to have a little bit of slack on one side or the other when you get there. Try to fold and pinch the fabric a bit to even out the extra as much as you can.
Congratulations! You've now stuck together a quarter of one of the three seams you have to do!
Run your fingers firmly over the part of the seam you've just done several times. Push hard. You want to make sure it's all stuck together well.
Now, repeat these steps until you've gotten the entire seam between the two panels stuck together firmly.
When I have a full edge taped together, I'll pick it up and check that everything is taped well. Look for gaps and fix them. Grab both sides firmly and quickly tug the pieces to make sure they hold together. I go down the whole edge, tugging every foot or so.
You've now assembled half of the flag! Only 22 more feet to go!
Now do the second half the same way, then proceed to the next section when you're ready to join together the two halves.
Part 4: Assembly, Part 2.
You've got two halves of a giant flag, now it's time for the final assembly. This actually ends up being a bit easier than the first part, because you can match the stripes together.
You basically do this the same way you did the first panels. Start with the ends, like you did the first time.
Remember a while back, where I mentioned having a flag where both sides are the same color? And I said you were going to have one no matter what? Well, here's that "No Matter What" moment. You have to be EXTRA cautious here, because both sides of the flag that you're joining are going to be the same color. So be super sure which panel you're putting on top and which you're putting on the bottom as you go.
One thing that's really convenient about doing this last seam is that the stripes themselves can show you where to put the checkpoints. Make sure you align the color transitions exactly as you go.
For the most part, taping the rest of this seam will be the same as the ones you've already done, so all the same tips apply. Go slowly, press firmly, avoid sticky tangles, and always keep track of which side is on top. Then press along the seam firmly several times when you're done, and do the tug test.
Step 5: Victory!
If all went well, then congratulations! You now have a ginormous flag!
I'm apparently out of pictures for this post, which is probably a good thing anyway, because the flag is kinda too big to take a picture of anyhow.
Now that you've got a ginormous flag, you have to fly it somehow. I use a 20 foot tall telescopic painter's pole, and clip the flag to that. It can be very hard to wrangle, so be careful and don't fly it in the middle of a lot of people. You really should have a 40 foot wide safety exclusion zone around the pole to keep people safe...
Anyway, have fun with your new ginormous flag!
(And if you sew, I apologize for my technique...)
305 notes
·
View notes
Text

Seattle!
#seattle#Space Needle#trans#trans flag#trans pride#rainbow flag#pride flag#lgbt#lgbtq#lgbtqia#pride#animated gif#pride month#and the tiny looking (but still actually huge in its own right) ace flag behind them
44 notes
·
View notes
Text
HAVE YOU SEEN THIS FLAG?
Very much a long shot, I know, but worth a try: Were you at No Kings in Seattle today and accidentally left with a giant intersex flag? I would like it back, if that's possible. Would you be able to drop it off at the Seattle Aces & Aros booth, either at Everett Pride next weekend, or at Cap Hill Pridefest on the 28th? Thank you!
If not, I'd like to think that it has found a better home than my personal collection, so use it well and send pictures of its travels!
234 notes
·
View notes

Text
Back from DC.
Now I should be working on getting my pictures in order and trying to find other people's pictures of our group and all that, but my feet are swollen, my legs are sore, and I'm still about three gallons of water short of where I should be, so I'm just gonna hang out and simply not for a bit.
#worldpride#i'm also tempted to go to the hardware store and buy bricks#but that's a different story
9 notes
·
View notes
Text
Those flags were just TOO MUCH PRIDE for those flagpoles, and they did not last the day.

Rocking the flags at WorldPride!
951 notes
·
View notes
Text
Rocking the flags at WorldPride!
#aromantic#aro pride#ace flag#aro#pride flags#lgbtqia#lgbtq#ace pride#asexuality#asexual#worldpride#worldpride dc
951 notes
·
View notes
Text


That's one of my smaller flags, only 6ftx10ft. Also, I had to show off my ace ring to everyone in there.
57 notes
·
View notes
Text

A Lesbian couple and their pet bird, 1938.
14 notes
·
View notes