#&& helpful things
Explore tagged Tumblr posts
Visit Tumblr Blog
Explore Tumblr blogs with no restrictions, modern design and the best experience.
Last Seen Tumblr Blogs


Fun Fact
The average Tumblr user visits about 67 pages every month.
Text

128 notes
·
View notes
Text
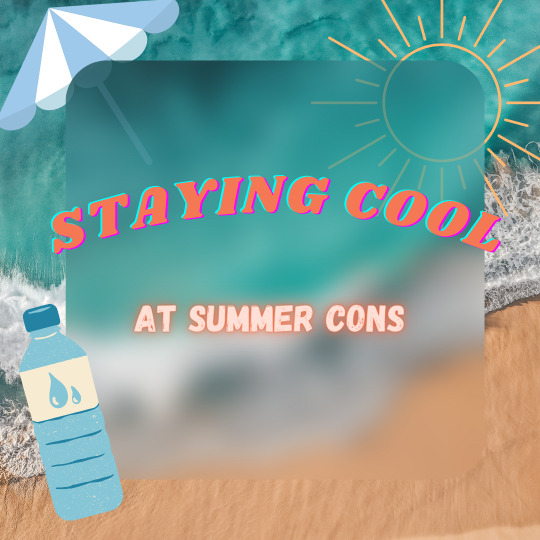


It's coming up to summer con season in the Northern Hemisphere, so I want to post this little infographic I made about staying cool at summer cons!
Don't mess around with heat, since heat stroke can be deadly. Heat exhaustion will make you miserable. Just don't.
Stay cool and hydrated out there, and don't forget to pregame water so you're well hydrated before the con even starts. ;]
#helpful things#cosplay tutorial#cosplay help#cosplay advice#cosplay#anime cons#comic cons#cosplay safety#thinking of the time i got heat exhaustion at a con#and then said “I don't want this to happen again”#so i made bikini armor for my next con lmao
35 notes
·
View notes
Text

My tutorial on painting elf ears appears to be making the rounds on Pinterest again, so I thought I'd share it here. 😊 If you have any questions about the process or if you used the tutorial to paint your own set of ears, let me know!
34 notes
·
View notes
Text
Hi there, with this US election coming up I think it's important to share this. Did you know that you can check your voter registration status and/or register to vote online? It takes less than two minutes to do either!!
5 notes
·
View notes
Text
Different power Levels of Sword Cuts #sword #martialarts #hema
youtube
2 notes
·
View notes
Text
I just recently learned about this and because I am probably not the only person who did not know about it, I thought I share.

Just go down a bit on the homepage of AO3 and you will find a few of the stories you have marked for later!
Very helpful for when you don't really know what to read and your marked for later list is way too long 😀
The results will change every time you add a new fic or mark one as read.
2 notes
·
View notes
Text
Thing I’ve realized: you kind of need to like. Actually intentionally repeat affirmations to yourself for them to stick.
Just reading them isn’t enough.
Whisper them to yourself (or say them louder if you’re alone or somewhere you can talk to yourself). They’ll actually sink in and soothe you that way.
Signed,
A super alexithymic autist
5 notes
·
View notes
Photo
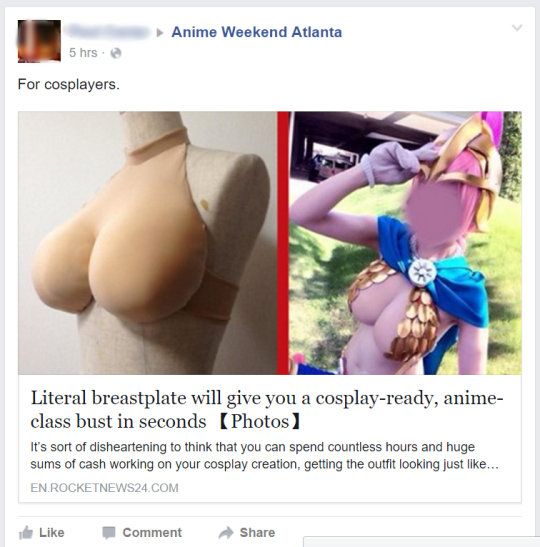
Since I see a lot of people in the replies asking questions about these, here are some answers and resources:
You don't buy this exact version, but you can make them yourself! Here's the article from the screenshot, and here's the original tutorial.
Since you're making them yourself, you can absolutely have them in different skin tones. I'd recommend getting your fabric from Blue Moon, since they have a decent selection of different skin tones of matte spandex. You can also dye your own spandex for a more custom color.
If you are doing multiple characters with unnatural skin tones (say, a green character), yes, you would need to make multiple pairs. You can also make multiple pairs if you want to permanently attach costume pieces to one, which is an advantage of this type of breastplate.
You can buy an extremely similar product, but you need a shopping service. It comes in only three skin tones that don't get very dark, which is unfortunate, but you might be able to airbrush them (never tried myself, but worth a shot). You can get the Neo Oppai Sister from Classe wigs.
I don't recommend this type of product for daily wear or anything you want to look realistic. The shape is extremely anime, they're a bit flat looking due to the fabric (as in, not shaded, not as in flat chested), etc. For daily use for trans women and anyone who just wants big booba for a while, silicone breastplates tend to be better. These have more realistic shapes, skin texture, the neck hides better, there's collarbones molded in, the edges hide well with straps and bra bands... They tend to be uncomfortable since it's like wearing a silicone shirt, but for special occasions and cosplay, they're great, and some brands have them in "cool" versions with an open back (I have this type). I got mine from Roanyer (extremely NSFW website, caters to crossdressing fetishes), and they have good quality and a LOT of styles, but are pricey. Look for seasonal sales. I can't vouch for the quality of cheaper alternatives, but they're out there on places like the River Site -- still pricey but less so. Japanese cosplay brands have also started making this style.
THAT SAID (and keep in mind this is a cosplay blog so that's what I'm focusing on), this style of breastplate is going to be more comfortable and less than half the cost of even a cheap silicone one, so ymmv and it depends on what you value and the look you are going for.
To make these look more realistic: you need to have neck coverage and coverage of the edges (the halter neck sides, the bottom edge) to hide that it's a breastplate. You can also possibly use airbrushing to add some shading and dimension to them. This classic KLK tutorial uses the same method but covers them in liquid latex for a more skin-like texture.
Brands also make no breasts but yes muscles silicone plates! (Same NSFW site as above, different section) Great for transmasc folks, cosplaying muscular male characters, etc. Again, very hot and sweaty (it's wearing a non-breathable silicone shirt), but they're out there.
Hope someone finds this helpful!
#helpful things#breastplates#foundation garments#i have a silicone one#but i want to make some fabric and foam ones#and lmaooooo at anyone who thinks cosplay#is anything other than drag-tier fakery#fabrickind gives unsolicited advice#I sould do a comparison post#of this type vs silicone type vs other breastforms
500K notes
·
View notes
Text

I've got cousins who have lived in Brentwood for the last 50 years, and I was planning on staying with them at a conference in a few months. Well, they don't have a house anymore and I have to coach my mom on what not to say to them when she calls. I know she'll absolutely compare their disaster with another one that somebody in the family experienced. No, nobody died like when Cousin T's wife died in a fire, and yeah everyone can still speak in complete sentences like when that tree fell on K during the floods. Still, not the time.
31 notes
·
View notes
Text
youtube
Not my video, but a video that rewired my brain re: cosplay makeup.
It's in Japanese and only has auto-translated subs, so the subtitles aren't great, but you can generally understand what is happening without knowing Japanese.
The basic idea is ways to make a more typically masculine face look more feminine, but the techniques are for enlarging your eyes and shortening your midface, which are GREAT for cosplay makeup. (Also useful for transfeminine people generally, even if you don't cosplay! The creator is X gender themselves)
Not all the techniques will work for everyone's face shape and skin tone, but if you watch where they place color and what colors they use, and watch carefully to figure out why they make those choices, you can adapt it to your own face. Experiment and see what works on you. <3
83 notes
·
View notes
Text
hey... don't cry.... tesla recall for most cybertrucks, okay? >46,000 vehicles affected <3
#i watch the stock price like a dog watching a squirrel#my jaws ache with the sheer and unholy desire to devour#<3 it's sitting around 235 last i checked <3 it was over 400 in december#<3 peace and love on planet earth#we should really all start a community bet on when we can get that number <140.#i think april 23.#<3 with ur help all things are possible :)
68K notes
·
View notes
Text
Omg this is so helpful, off to create my grid 🥰
How to Handle Having TOO MUCH To Do
So let’s say you’re in the same boat I am (this is a running theme, have you noticed?) and you’ve just got, like, SO MUCH STUFF that HAS to get done YESTERDAY or you will DIE (or fail/get fired/mope). Everything needs to be done yesterday, you’re sick, and for whatever reason you are focusing on the least important stuff first. What to do!
Take a deep breath, because this is a boot camp in prioritization.
Make a 3 by 4 grid. Make it pretty big. The line above your top row goes like this: Due YESTERDAY - due TOMORROW - due LATER. Along the side, write: Takes 5 min - Takes 30 min - Takes hours - Takes DAYS.
Divide ALL your tasks into one of these squares, based on how much work you still have to do. A thank you note for a present you received two weeks ago? That takes 5 minutes and was due YESTERDAY. Put it in that square. A five page paper that’s due tomorrow? That takes an hour/hours, place it appropriately. Tomorrow’s speech you just need to rehearse? Half an hour, due TOMORROW. Do the same for ALL of your tasks
Your priority goes like this:
5 minutes due YESTERDAY
5 minutes due TOMORROW
Half-hour due YESTERDAY
Half-hour due TOMORROW
Hours due YESTERDAY
Hours due TOMORROW
5 minutes due LATER
Half-hour due LATER
Hours due LATER
DAYS due YESTERDAY
DAYS due TOMORROW
DAYS due LATER
At this point you just go down the list in each section. If something feels especially urgent, for whatever reason - a certain professor is hounding you, you’re especially worried about that speech, whatever - you can bump that up to the top of the entire list. However, going through the list like this is what I find most efficient.
Some people do like to save the 5 minute tasks for kind of a break between longer-running tasks. If that’s what you want to try, go for it! You’re the one studying here.
So that’s how to prioritize. Now, how to actually do shit? That’s where the 20/10 method comes in. It’s simple: do stuff like a stuff-doing FIEND for 20 minutes, then take a ten minute break and do whatever you want. Repeat ad infinitum. It’s how I’ve gotten through my to do list, concussed and everything.
You’ve got this. Get a drink and start - we can do our stuff together!
100K notes
·
View notes
Text
10 Non-Lethal Injuries to Add Pain to Your Writing
New Part: 10 Lethal Injury Ideas
If you need a simple way to make your characters feel pain, here are some ideas:
1. Sprained Ankle
A common injury that can severely limit mobility. This is useful because your characters will have to experience a mild struggle and adapt their plans to their new lack of mobiliy. Perfect to add tension to a chase scene.
2. Rib Contusion
A painful bruise on the ribs can make breathing difficult, helping you sneak in those ragged wheezes during a fight scene. Could also be used for something sport-related! It's impactful enough to leave a lingering pain but not enough to hinder their overall movement.
3. Concussions
This common brain injury can lead to confusion, dizziness, and mood swings, affecting a character’s judgment heavily. It can also cause mild amnesia.
I enjoy using concussions when you need another character to subtly take over the fight/scene, it's an easy way to switch POVs. You could also use it if you need a 'cute' recovery moment with A and B.
4. Fractured Finger
A broken finger can complicate tasks that require fine motor skills. This would be perfect for characters like artists, writers, etc. Or, a fighter who brushes it off as nothing till they try to throw a punch and are hit with pain.
5. Road Rash
Road rash is an abrasion caused by friction. Aka scraping skin. The raw, painful sting resulting from a fall can be a quick but effective way to add pain to your writing. Tip: it's great if you need a mild injury for a child.
6. Shoulder Dislocation
This injury can be excruciating and often leads to an inability to use one arm, forcing characters to confront their limitations while adding urgency to their situation. Good for torture scenes.
7. Deep Laceration
A deep laceration is a cut that requires stitches. As someone who got stitches as a kid, they really aren't that bad! A 2-3 inch wound (in length) provides just enough pain and blood to add that dramatic flair to your writing while not severely deterring your character.
This is also a great wound to look back on since it often scars. Note: the deeper and wider the cut the worse your character's condition. Don't give them a 5 inch deep gash and call that mild.
8. Burns
Whether from fire, chemicals, or hot surfaces, burns can cause intense suffering and lingering trauma. Like the previous injury, the lasting physical and emotional trauma of a burn is a great wound for characters to look back on.
If you want to explore writing burns, read here.
9. Pulled Muscle
This can create ongoing pain and restrict movement, offering a window to force your character to lean on another. Note: I personally use muscle related injuries when I want to focus more on the pain and sprains to focus on a lack of mobility.
10. Tendonitis
Inflammation of a tendon can cause chronic pain and limit a character's ability to perform tasks they usually take for granted. When exploring tendonitis make sure you research well as this can easily turn into a more severe injury.
This is a quick, brief list of ideas to provide writers inspiration. Since it is a shorter blog, I have not covered the injuries in detail. This is inspiration, not a thorough guide. Happy writing! :)
Looking For More Writing Tips And Tricks?
Check out the rest of Quillology with Haya; a blog dedicated to writing and publishing tips for authors!
Instagram Tiktok
#hayatheauthor#haya's book blog#haya blogs#writing community#quillology with haya#writing tools#writer things#writing advice#writer community#writing techniques#writing prompt#writing stuff#creative writing#ya writing advice#writing tips and tricks#writer tools#writers of tumblr#writer blog#writers block#quillology with haya sameer#writers on tumblr#writerscommunity#writer stuff#author help#author advice#author#writing inspiration#writeblr#novel writing#on writing
63K notes
·
View notes
Text
Finding Cosplay Photoshoot Locations: Part 1
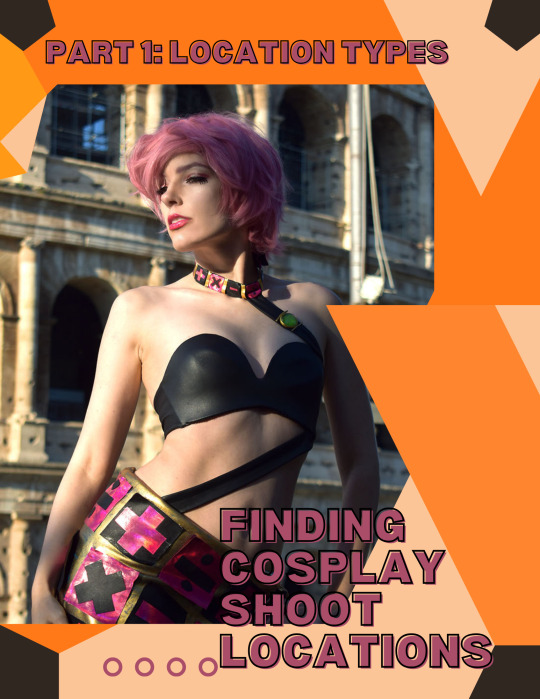


📸Want to do cosplay photoshoots but don't know how to find that perfect place to shoot? This tutorial covers how to brainstorm a location for your shoot, logistical and cost concerns with shoot locations, and how to actually find your dream location.
📸This tutorial can be applied to shoots of all types, including but not limited to self shoots, shoots with friends, and shoots with hired photographers. Self shooting or shooting with friends only requires a camera (a phone works!) and possibly a tripod.
Part 1: Location Types
Coming up with the general type of location you want requires some brainstorming about what you want from the shoot. Think about your specific goals and types of photos you want and how certain types of locations would work for your goal. Remember you can always do multiple shoots for the same costume with different concepts!
For example, if you want big, sweeping shots, you will need a location that allows for wider framing and still looks good, while if you are primarily after shots with closer framing, you can go with a location with only a small usable portion. If you are looking to primarily showcase the costume itself or your posing, a flatter and simpler background works better than a busy background, but if you want cinematic shots or shots where you are existing in the environment as the character, somewhere that can show off the location itself as well as how you exist in it would work better.
Types of Locations
There are three main types of locations for cosplay shoots in relation to the cosplay itself. Of course, you can combine these types and there is a lot of overlap, but thinking of these three location types will help you conceptualize your shoot.
The first type is locations that are similar to something in the series, or an exact location from the series. My cover image is an example of this, where I took photos at the location of the climactic battle of the manga. Most fictional locations don't exist in real life so exactly, however, so think of locations that look similar to where this character might be found. The example on this slide shows a cosplay at a nature preserve with grassy fields and oak trees, which is similar to the locations the character traverses several times throughout the game she is from. This category can also include locations with similar vibes, such as a studio made up to look like a fancy European castle for a character from a series about European royalty, or a shoji screen backdrop for a character who lives in a Japanese-style house.
The second location type is locations with symbolic meaning. These locations showcase something about the themes or character arcs present in the series, and this can be accomplished with anything from specific props and setpieces to the entire background. One shoot I'd love to do with this concept is of Lady Blackpearl staring into a mirror -- this would symbolize her dual personality nature -- or of Lady Oscar wrapped in thorns, with the rose thorns symbolizing her glorious but fragile life. I chose to represent this location type with Ultimecia, a sorceress who wants to compress time so she is the only one who can live in the combined past/present/future, set among ruins. The ruins aren't accurate to the game, but show her crumbling reign marked by the passage of time.
The third location type is locations chosen for pure aesthetics. Obviously all locations are chosen for aesthetics, but these are locations with no deeper meaning and may not represent anything from the series at all. These can range from a simple colored wall backdrop to a sweeping landscape that simply looks good with the colors of the costume. Some examples are the Yasuho Hirose ocean shoot on the slide, where it doesn't represent a particular scene or location in the series but simply looks good with the cut and colors of the costume and the sailor theming, or my Princess White Rose milk bath photoshoot, where again the character never takes a milk bath, but a bathtub full of milk and roses shows off the detail of her floral hat and showcases the opulent nature of a rose-themed princess.
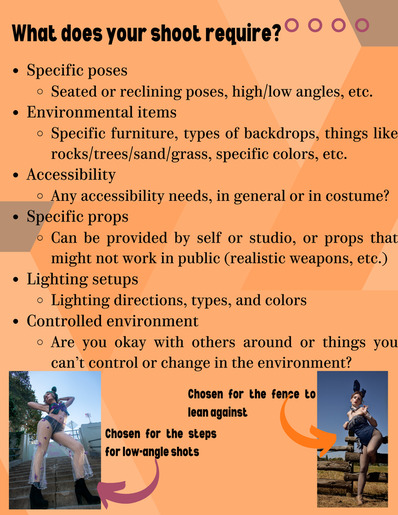
Requirements of your Shoot
Once you have a general concept, think of what is required to fit that concept. This can be as general as specific backgrounds or types of backgrounds to as specific as particular items at the location or particular lighting setups. Some shoots might need specific props, such as furniture to sit or lounge on, and props that won't work in a public location, such as realistic weapons that may cause panic or worse. Also keep in mind any accessibility needs, whether it is an accessible location in general to accommodate a disability or a need that is caused by the costume itself. Check not just the specific area you want to shoot, but how to get there from the parking lot or transit stop. Finally, keep in mind that unsecured outdoor locations, such as a park or beach, are locations where you can't change things about the location and you may encounter other people. Discussion of how to be respectful of such locations is in part 5.
Stay tuned for the rest of the parts~!
Links to other parts: 1 Location Types, 2 Discovering Locations, 3 Indoor vs Outdoor Locations, 4 Location Permissions, 5 Location Logistics
134 notes
·
View notes
Text
it came to my realization that 99% of my fandom related headaches would be cured if everyone understood this
#making this at 2 am was like top 10 autism moment for me#this is helping me make sense of so many things hopefully it helps someone else too idk#user macdenlover drops badly drawn infographic media literacy rates skyrocket theres world peace#anyways#for sunny 1.5 is the sweet spot for me. a sexy medium rare if u will#but it completely depends on the piece of media#with supernatural i was a 2.5 on a good day.
123K notes
·
View notes