#:// FILE : LOADING . . . OPEN STARTER .
Note
hi lourders! do you have any gif tutorials for beginners? i tried searching on your blog to not bother you but nothing showed up :(
Okay so I looked for the tutorial i had made in my other blog but it's not updated so
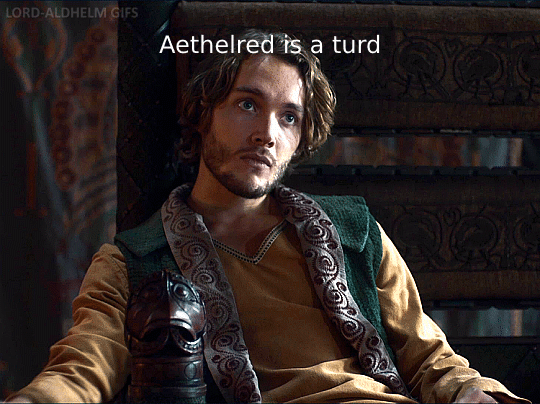
GIF TUTORIAL: argentinagp version - example this gif ⬇️

So for starters, of course, you get your source material: the video. What I use for F1 is: 4kdownloader for youtube videos, some instagram/twitter/tiktok downloader, I torrent dts and I screenrecord with OBS (here are my settings) for some longer youtube videos or the post sessions interviews!
Then you need to get your video in photoshop, there are some ways on doing this, but what I do now is open the video directly: [file -> open...] and then click on the video you want to gif. Once it loads it should look like this

Now you need to adjust the speed of the videos, I put it at 50% if it is not screen recorded, and if it is, I put it at 60% most of the time (other times 50% too)

After that I crop the video, I use W: 540px and any height (beware that more height, the file wheights more, and tumblr has a limit of 10mb), I usually go for 540 x 380 or 540 x 400!

after this you will have to convert the video group to smat object:


Now comes one of the most important parts: SHARPENING!!!!!!!!! What I do here is [Filter -> Sharpen -> Smart Sharpen]

Now you a window will pop up and I use the following settings for starters:


Then I duplicate that layer and in this second one I use the following settings and I change the opacity to 50%:


Then I color the gif for that I use:


CURVES: Okay so this one I use to control a little the big 3 colors and give the gif a bit more light. The thing I do for starters is click on the "D" element and click on a a part of a gif that is the most lighter and then change fron "RGB" to red, blue and green and play around w the "I" element to control the colors a bit.


EXPOSURE: here is basically shadows and highlights. I play around till im okay w how the gif looks! Exposure and gamma correction in positive numbers and offset in negative (the photo is for the names, do not pay attention to these numbers)


SELECTIVE COLOR: okay, lowkey, one of my fave tools. What I do w this always is put more black so the light parts come more alive and the dark parts dont look pixelated! Sometimes, when the skin is too red or too yellow I play around w those colors too and see if I can fix it.


HUE/SATURATION: here basically is giving life to some colors, specially the lips (inspired by @princemick). But basically you put the color you want to pop up/change/make black and play w it. Important part if u want to play w the lips is using the slider in the bottom to make only the most red/pink part of the gif to saturate, bc if u dont change that the face can also saturate!


and sometimes color balance (did not use it in these gif), this one is basically if curves and selective color did not work for me, i just play around w it till i like it
Then, final step, you export the gif [File -> Export -> Save for Web Legacy...] and my settings on the open window is the following one:

and VOILÁ! your gif is done!

#ask#anonymous#gif tutorials#gif resources#photoshop resources#photoshop tutorial#you can ask me more questions if u have them also! or if something is not that well explained
95 notes
·
View notes
Text
Making Gifs Part 2: Photopea
This is part 2 of my own personal gifmaking guide. Please read Part 1 to learn about how I capture the sequential screencaps to make my gifs.
Once you have your screencaps, open Photopea. They have a very simple guide on how to make animations in their help guide. I will be going into much more detail.
Note: ***Tumblr has a limit of 10mb for the filesize of each gif, and recommends no wider than 540 pixels. If your gif is wider than 540 pixels Tumblr will resize it, and it will cause the quality to be reduced, and also take much longer for the gif to load in your post.***
1. RENAME CAPS:
First things first. Rename all of your caps that you will be using for a gif to have the prefix _a_ on your computer. Select all and right-click on the FIRST file and select Rename (windows) and type _a_. Windows will add the numbers.
For most gifs, try not to have more than 60 frames as it will make the gif too large to upload to Tumblr. I usually aim for 45-50 frames max for most of my gifs.
2. IMPORT FRAME #1:
Drag and Drop _a_ (1).png into Photopea. Rename the layer from Background to _a_ (1)
3. IMPORT IMAGES:
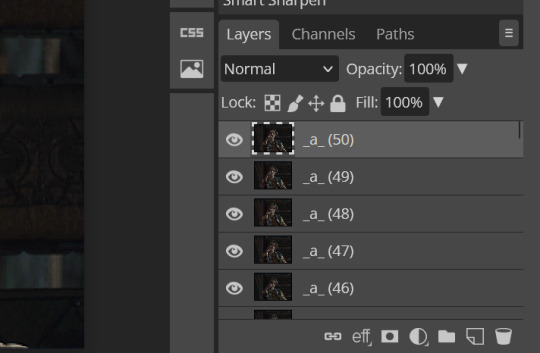
Select all the rest of your images from the folder on your computer, and drag and drop ON TOP OF the image (not the layers section). Make sure the file you grab to drag/drop is the next one in the sequence (so _a_ (2).png in this case. Otherwise they will be out of order. If you do it right, you will see the layers section on the right get populated with your caps in reverse order, with 1 at the bottom and the last one at the top.
4. RASTERIZE:
Next, select all of the layers (on the right, by holding CTRL and clicking on each layer), go to Layer > Rasterize. They are currently Smart Layers, and if you keep them this way the sharpening will not apply (for some reason, I have no idea why that is)
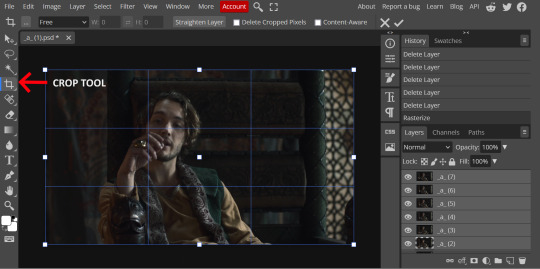
5. CROP:
Next, crop your gif. This tool is on the left menu. You do not have to have all the layers selected for this, it will crop all layers together. Move the blue lines at the edges until the frame is cropped how you like. Be mindful of the character moving in other frames; you may want to check your other layers to make sure nothing important gets cropped off in another frame. Once the blue lines are where you want them, click the checkmark at the top right to finish the crop.
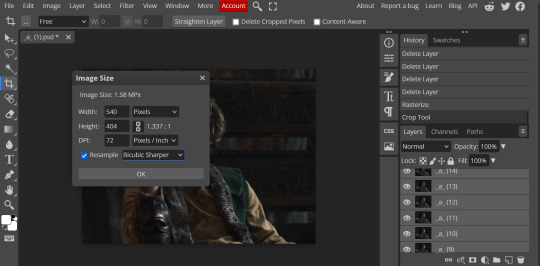
6. RESIZE:
Resize your gif so that it is 540 pixels wide. Go to Image > Image Size in the top menu. Make sure you choose "Bicubic Sharper" as the resample mode. Once this is done, you will see your image is tiny, so go to the Zoom tool (on the left menu, the magnifying glass near the bottom) and select Fit the Area at the top of the screen so you can see what you are doing.
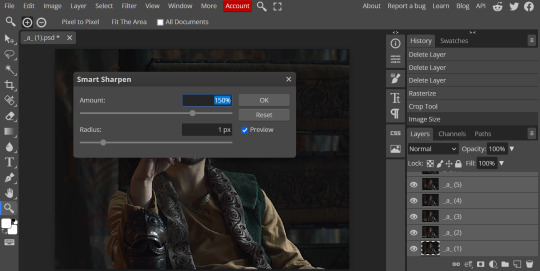
7. SHARPEN:
Next is sharpen. Select all your layers again (on the right), then go to the top menu: Filter > Sharpen > Smart Sharpen. The default settings here are for 150%, and that is good for most things.
8. ADJUSTMENTS
This is the tricky part. You now need to adjust the brightness, contrast, exposure, color balance, and saturation. This will vary from gif to gif how much to adjust these values. I will show how I adjusted this one and you can apply that to whatever gif you are making.
For starters, since this show is SO DARK, you will need to brighten it. There are many ways to do this, but I found the method that works best for me is adjusting the Levels.
First off, in order to make adjustments, make sure you scroll all the way to the top of your Layers panel and make sure only the TOP LAYER is selected. Otherwise the adjustments will only be applied to whatever is BELOW the selected layer. You want all of them.
8a. ADJUST LEVELS
Next, go to Layer > New Adjustment Layer to pull up all your adjustments. For this first example we will use Levels, which is the second from the top.

You will see a histogram like this one:
This is a lot of information about the image, but pay attention to where the curve starts and stops. On the left, you see a "0". That is your dark point. This image is slightly washed out so I need to move that adjustment to the right so that the little square is just below where the curve starts. The third number is "255" and this is your bright point. The images are very dark so most of the graph is shifted to the left (dark) so in order to brighten, move the third square (the white one) so that the second square (grey one) is just at the edge of where the curve drops off on the right.
You can now see the numbers changed. Moving the first dark square will enhance your contrast, and moving the THIRD square will enhance your brightness. It is usually not necessary to move the second square, but you can experiment with this by moving things around and seeing how it affects your image. After this, it may be necessary to also increase the Exposure and Brightness if it is still not bright enough, but most of that can be done here.
8b. ADJUST COLOR BALANCE
Again go to your Layer > New Adjustment Layer > Color Balance to get this tool. This is a neat one with A LOT of variables, so play around with it to get the colors to look how you want. A lot of the raw video tends to have a bluish or greenish cast to it, so you just move the sliders to get rid of the cast and make the colors look how they are SUPPOSED to.
In this case there is a very slight greenish cast to the pictures so I will adjust that slider to compensate. The Range (at the top) you can select Shadows, Midtones, or Highlights, depending on where the color cast is located. Usually I stick to Shadows but sometimes will use Midtones if the color cast is really bad. Make sure Preserve Luminosity is checked.
8c: ADJUST SATURATION
Layer > New Adjustment Layer > Hue/Saturation. This will brighten up your colors. This tool is VERY COOL in that you can select color families to selectively increase or decrease the saturation of. Under Range you can choose Master, which is all colors, or choose only Red, Yellow, Green, Cyan, Blue or Magenta. The slider at the very bottom (when a single color is selected) allows you to set the range of colors to. I chose Master and increased the saturation of all colors, but be careful as this can make skintones look VERY orange. So select other colors in the Range to adjust single colors only.
With this tool you can also change the HUE (which is changing the overall colors to a different color, like shifting all the reds to orange) and Lightness (which may or may not be necessary if you did the Levels correctly)
If you need to go back and change something in your adjustment layers, you can do so by clicking on the white box in the Layers section next to whatever you need to adjust.
There are many other Adjustment Layers you can play with, so have fun and experiment!
9. ADD YOUR WATERMARK AND TEXT
Next, you can add a watermark if you have a premade file, by dragging and dropping it on the image. Then move it around to where you want it, resize it if needed, and change the opacity if it is too bright. Make sure this layer is the TOP layer.
To add text (for subtitles or effects) simply click on the Text icon in the left menu (the T) and click anywhere on the image and start typing. You can change the font, color, size, and style in the menu on the top. Move the text around by using the Select tool (arrow on the left) Again make sure this is the TOP LAYER so that it will be present over the entire gif.
10: EXPORT YOUR GIF
File > Export as > GIF
A pop up dialog will appear and you can change some settings here if you want. I usually don't. Pay close attention to the filesize (at the bottom) and make sure it is under 10mb. Keep the quality at 100%. And most importantly MAKE SURE DITHER is checked! This will prevent compression artifacts from ruining your gif.
Save the file to your computer and VIOLA! Gif!
Have fun!
#gifmaking#gifs#gif makers#gif making resource#gifmakers#gif making#gif#gifmaking resources#gif making resources#my guides#giffing tutorial#gif making tutorial#photopea#photopea tutorial#photopea resources#photopeablr#photopea gifs#long post
30 notes
·
View notes
Text
Fortnite's "Creative 2.0" launched a day or two ago, which is the newest form that game's creative mode has taken. It was originally born as a "Playground" mode that let you explore the Battle Royale map with others, free of timer restrictions, and to build without limits.
Playground Mode then got split between a new "Battle Lab" and "Creative Mode." Creative gave you several blank templates to build your own (relatively small) island and a handful of Mario-Maker-esque machines to place within them in order to build very rudimentary game types. Battle Lab, just to be clear, was still the BR map, but largely just for exploration purposes only. It was phased out in the lead up to the launch of Chapter 4.
Creative 2.0 takes the framework established in the old Creative mode and just lets you use Unreal Editor to make and publish maps. Instead of awkwardly manipulating literal, physical blocks of land using the in-game tools (think Garry's Mod), now you make maps basically using the same software used to create the game in the first place.
Obviously this blows the doors wide open for more complex and dynamic user-generated maps and is another step in the transformation of Fortnite becoming the next Roblox.
And one of the very first things people did with these tools was port over one of the first versions of the Fortnite map. And even in the state it's in right now, it's pretty interesting to see it all here again, almost exactly as I remembered it.
There have been a number of attempts to recreate the original Battle Royale map in Creative mode, but the limitations of the tech were just too much. The old Creative mode was very static and tile-based. There were no terrain tools to speak of, and you were largely stuck using the objects provided by Epic. Which, considering Chapter 1 predated most of Creative mode, meant a lot of things just aren't entirely there, and if they are, they don't work quite the same way they should.
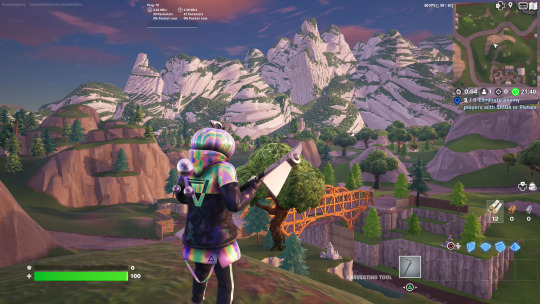
With the new tools, "Atlas Original" aims to not just recreate the old map, but seemingly port it directly from the old files into the new Creative Mode. All the terrain, buildings, all of it is here.
Which is the problem. Creative Mode has limits. Always has, and probably always will. It has to run on PC, PS5, Xbox SX, but also PS4, Xbox One, mobile phones, and even the Nintendo Switch. As such, there are hard memory restrictions Creative mode maps have to abide by. Epic has toyed with how Creative works to give users more space to build bigger maps, but the complete Chapter 1 map obviously slams into those limits pretty hard.
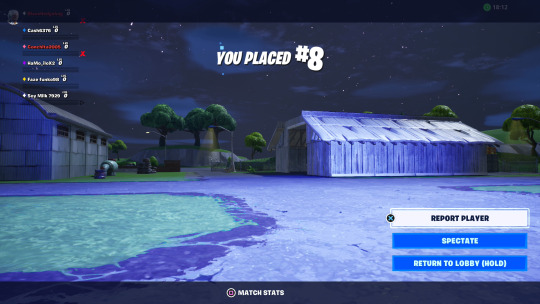
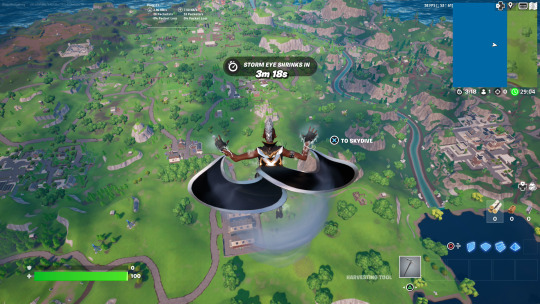
To some degree, I wonder why they even bothered. My very first match on "Atlas OG" dropped me into the starter lobby island already deep in the storm with dozens of other players. With no guns and no way to exit the starter island, everyone just ran around until they died to the storm.
Loading into a private match where I could run around the island presented me with a game mode that was only broadly functional. Though the map is all there, the minimap is more or less non-functional.
The mode opens with a cutscene of the bus approaching the island, after which you are automatically dropped near Loot Lake and must glide to a destination from there. The problem is: the moment you drop, the storm circle is already shrinking. Even if you wanted to visit a place like Moisty Mire, it will already be well covered by the storm by the time you get there. There are just some places you'll probably never get to explore.

Which leads to the next problem: these "Classic Map" recreations always dedicate themselves extra hard to replicating all of old Fortnite's quirks, like disabling vehicles, sprinting, and mantling. Creative mode has let you selectively turn those features off for months (or in some cases, years), but for whatever reason, this "Atlas OG" map does it in a strange way that's guaranteed to glitch out. I instinctively sprint and mantle now, and you can see the animations for these actions trigger, but they often lead to bugged animations and jerky movement.
It's also surprisingly challenging getting around this map. More than any of the other Fortnite chapters, the Chapter 1 map here was clearly and intentionally designed for build mode. There are a lot of attics and upper floors where the only way you'll ever reach them is to build a ramp up. It's incredibly hard to shake the modern Fortnite reflex of just mantling up everything here, especially considering how badly the animation glitches out. It wants to let you mantle, but you just can't do it out of an arbitrary dedication to "classic" gameplay. And I'm of the mind Fortnite definitely plays better today than it used to.
You'll also occasionally find buildings that aren't all there. You get a custom pop-up upon loading in to "Atlas OG" that some things had to be disabled to squeeze under the memory limit, and that makes sense. It's pretty hard to notice, really. The main thing that seems to be missing is the grass, featuring only the flat texture normally hidden underneath.
Really, this long post was just a way for me to setup and explain how weird it is to be able to run around this map again, and how much of it I find myself remembering. I played very little of Fortnite in Chapter 1. Battle Royales were so chaotic and dangerous feeling that it was hard to shake the paralyzing fear they filled me with. Fortnite was something I poked at only occasionally when an interesting story event would shake up the look of the island, but it would be YEARS before I landed my first kill, and longer before I could stand to play it for more than a couple rounds at a time.

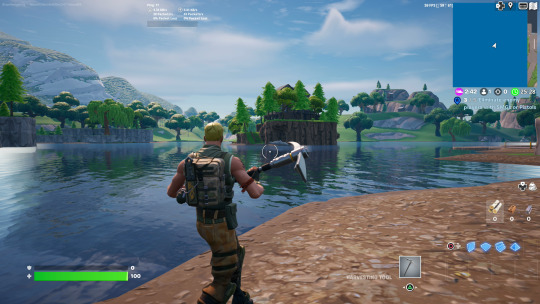
And yet... I remember the tree I hid under, where I got 2nd place for my first time. I remember dropping on the farm for Halloween, where spooky floodlights and fake spider webs really sold the mood. I remember how the map felt so hand crafted that you could tell each and every rock and tree was deliberately placed, because so many of them were arranged in specific patterns. I remember how being out on Loot Lake was a death trap, especially with the storm coming in.
And it's just... weird. To see all of this again. And to remember parts of it so clearly, and to see how much Fortnite as a game has evolved from this.
And, um. I didn't think it'd take me so long to say that. Really, this map should just be functioning more as a museum than something they expect you to shoot other players on. I know they could completely disable the storm if they want to, and the map in its current state would be a lot better for that.
If you feel like fighting against how weird the initial beta version of this Chapter 1 map restoration, punch in island code 2179-7822-3395.
23 notes
·
View notes
Text
@amplifying // unprompted starter
If there was anything SIGMA genuinely detested more than being placed upon field mission rosters… It would have to be failing field missions.
Realistically, who could place a scientist on the field and reasonably expect good results? Especially when said astrophysicist in question had no prior combat training upon joining TALON. These people were absolutely insane for that, alone. Worse yet, that they all seem to eye him with pure disdain when they all load back onto the dropship. Actually, SIGMA isn’t even sure where the mission had ultimately taken a turn for the worse; if anything, he wonders if he’s to blame this time exclusively because of his inexperience. It felt as though they were just looking for someone to blame to make themselves feel better– he had tried so hard this time, to be a good shield, to protect them from harm.
He’d thought that he had done everything right for a change…
… And yet, they all seemed so angry with him…

SIGMA does what he feels he does best; he withdraws into himself once one of the flight crew comes to buckle him into his seat, avoiding meeting the gaze of his irritable coworkers as he quietly works gloved fingers under the edges of his armor reflexively in an attempt to soothe the injuries sustained without drawing attention to himself or his perceived failure. By the time they all arrive back at home, at the TALON facility, he’s convinced– or, perhaps, resigned himself– to the notion that he had botched the mission of his own doing, and all he can imagine are the awful things either Moira or Akande will say when they read the latest report filed on him. How he does not ‘apply’ himself– how he is a ‘liability to the team’.
How he is a ‘waste of resources’ since leaving his original facility.
Once discharged from the craft and hangar, SIGMA is quick to slip away from the others as they filter out in their separate ways, some on their way to unwind elsewhere and some on their way to seek treatment for sustained injuries. Remarkable, how such a large man, especially one unbidden by the shackles of gravity, can maintain such a low profile as to slip away unnoticed… Assumably unnoticed. Because it seemed that someone had taken notice, as the moment he reaches the armory to squeeze out of the greater bulk of his armor without the “assistance” of any staff– he’s still hesitant to allow himself to be directly handled by unfamiliar staff– he practically jumps out of his skin when he hears the door slide open. Whipping his head to the side to identify who had entered, he’s immediately on edge when he recognizes one of the medics from his latest field mission.
… Please don’t say anything…
Initially, he tries to ignore Baptiste’s initial attempt at conversation and following inquiry as to why he had not opted for the clinic, instead– ah, had he noticed that SIGMA had sustained damage? Granted, it was a little silly to assume otherwise… But it was difficult to tell what did and did not go unnoticed when the staff allowed him to act so arbitrarily without consequence or mention of.
‘-- Doing okay? Are you hurt?’

“-- G-great! I am so great! …… Ah, well, a— a-a little, but… I am good! It does not even hurt! There is no cause for concern!” SIGMA insists vehemently, going rigid as he stares the field medic down apprehensively. “I was… merely depositing my armor– a-and then I will quietly return to my quarters to await supper!” If he even deserved it, after today’s performance.
“... I would… prefer not to notify staff, if you please! I feel just fine! Never better!”
#interactions + ғʟɪʀᴛɪɴɢ ᴡɪᴛʜ ɪɴғɪɴɪᴛʏ ; ʏᴏᴜʀ ɢᴇᴏᴍᴇᴛʀɪᴄ ᴘʀᴏɢᴇɴʏ +#amplifying#recall + ʙʟᴜʀ ᴛʜᴇ ʟɪɴᴇs ᴏғ ᴡʜᴀᴛ's ʀᴇᴀʟ ; ʀᴇ ɪᴍᴀɢɪɴᴇ ᴛʜᴇ ᴛʀᴜᴛʜ +
24 notes
·
View notes
Note
will there be a safe file coming for pine spring island?
As I said in the original post (under creator notes), I won’t create a population for PSV, even if it’s in a save file (or, I should say, especially if it’s a save file).
But -and maybe it can help you- here’s how I set up unpopulated worlds with the use of Nraas Porter (I have no idea how many simmers use this mod, but it's an amazing tool to quickly have a populated town ready to play). You can pack/unpack an entire population with a few clicks and have the benefit of maintaining the existing relationships between households.
Mini-tutorial time:
Let's say you want some of the population from Sunset Valley (SV) in Pine Spring Valley (PSV).
Load up a new game in Sunset Valley. Once you get in live mode, pause the game (extremely important), click on the roof / walls of any occupied house and choose Nraas -> Porter -> Pack.
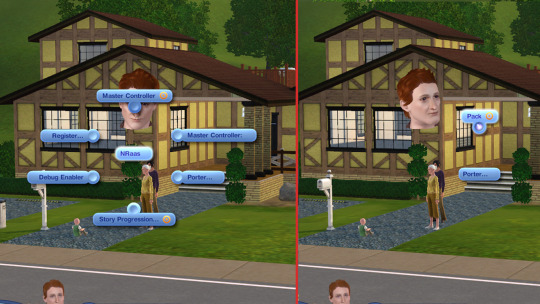
2 The mod will open up a new window listing all the households in town
Choose which households you want to have in your new town. For PSV I'd say you can save up to 16 households which is okay, since Appaloosa Plains has 17 in total (16-18 households is the medium amount of households required for a normal gameplay in any world, regardless of the size of that world).
Also, DON'T choose NPC households like Alien Household or Mermaid Household. These will be generated by the game once you start playing in the new town.
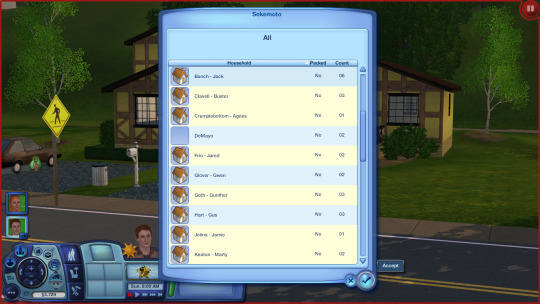
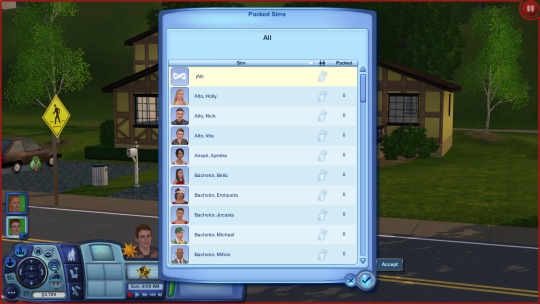
3. After you made you selection, a new window will pop up listing all the sims in the selected households (with names and portraits). Click "all" or select them individually. It’s good to pack up full households though.
4. You’ll be asked to give a name to the new household. I named mine SV_simmies.

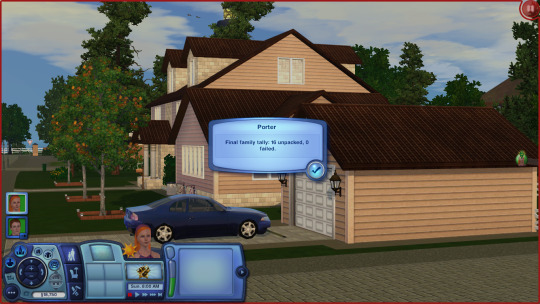
5. Now the mod will start packing up the selected households (for me it took about 5 minutes for the packing to be done, but depending on the size and number of the households the duration will vary).

6. You'll get a message at the end saying that the process has been successful.

This is how the Porter’s saved household looks like in the library:

7. Load up Pine Spring Valley.
Move anyone in town, preferably on an empty lot so the houses will all be available for Nraas Porter to fill them up. The sim(s) you just moved in can be removed afterwards anyway.
Or you can move in the sims you want to play if you already have them, and in this case there’s no need to remove anyone.
8. Pause the game!!! Click on the roof / walls of any empty house and choose Nraas -> Porter -> Unpack and select your saved household from SV.

9. Wait for the unpacking to be done (usually. 1-3 minutes).
At the end you’ll get a pop up telling you how many households have been successfully moved in or failed (rarely the case, given that you have enough houses in the world).
You’ll also get notifications telling you which household moved into which house.

If needed, now you can “Anihilate” the sim(s) you first moved in or go in Edit Town, evict and then delete them (my most preferred method of removing them / haven’t encountered any issues so far).
* You should also check in Edit Town if the houses are suitable for the amount of sims in each individual household (I had a family of 6 being moved into a starter, for instance...repeatedly). Move them around by evicting and moving them into a new house. I’m saying this because if you use Nrass Story Progression they will be audited (if the option is enabled) and will require a proper house later, during gameplay.
** Another advantage of using Porter is that your packed population will stay in the library and can be used over and over again with new unpopulated worlds. Unless you delete it (the same as you would delete any other household saved via game, if anyone was wondering).
Additional tips for safe porting:
1. If you decide you want to move your population after a while of playing in a world to another one:
Sims across town will fill up their “pockets” with all kinds of things so it’s advisable to clean up their inventories after porting them. Not to mention that Porter will also save their fridge inventories (cooked food and ingredients), just like the game does for individual households. So you may end up with hundreds of eggs, tomatoes and apples in the world.
Under City Hall -> Master Controller -> Town -> Object Stats ->Inventory you’re going to see the current inventory of all the sims you’ve just ported. You can delete/flush from here things you don’t want. DO NOT DELETE THEIR PHONES!!!!!!!!! (it will lead to corruption). Additionally, the books and toys you’ll see in this list include the items from bookshelves, toy boxes as well as sims' pockets. The bookshelves will be replenished if you happen to delete the books, I’m not sure about the toys since I never delete them.

2. You might save households containing tombstones (like I did here with the Goths)
The tombstones will always be placed in the mausoleum upon porting so you can send one of your sims to the graveyard to get them out of the mausoleum and place them down or inside their inventory.
OR
Under City Hall -> Master Controller -> Town -> Manage the dead the mausoleum will open and this will allow you to retrieve the tombstones.
3. The house you clicked on to unpack your population will always retain the household’s name you gave it when saving via Porter, in my case: SV_simmies. You can check which household has been moved in there with NRaas MC or Edit Town and rename it accordingly.
To rename it with NRaas MC: click on the house and select NRaas->Master Controller->Change Name.
That’s about it.
Safe porting & happy simming!
49 notes
·
View notes
Text
› achilles, achilles, achilles jump now. you are absent of cause or excuse. ‹
[ this is a rp / base account, for “ antagonist a / antag a. ” , an anon-based oc. ]
[ loading AA's file . . . ]
name : antagonist a .
age : null
gender / sexuality : agender, aroace.
open for asks ? : sure, if you're really interested. typically, it's me sending the asks, though.
extra info ? : what can i say? they're the antagonist. they always will be the antagonist, and nothing more. your story doesn't matter to them, they're only playing their role.
[ closing . . . ]
( be aware, this account may contain swearing, horror adjacent content, rude language / swearing , and gore. )
please refrain from sending :
› nsfw. i am a minor.
› c/lt adjacent text, imagery, or rp starters. there are very few exceptions, and i personally will prompt / invite them if / when needed.
› romantic asks, unless they are jokes.
you may send :
› threats! to the oc. if they are aimed at me, i will delete them.
› fandom characters. meaning, if your rp account is for a fandom, you may still send asks, and i will still answer them.
(… ill add more when i figure things out. )
[ tags : ]
antagonist.txt : answered asks
antagonist.chr : misc posts
antagonist.png : art, if i ever do any.
antagonist.del : any asks involving gore or threats.
god of this world.txt : ooc answers / posts.
#antagonist.txt#oc#oc post#rp account#antagonist.chr#antagonist.png#antagonist.del#god of this world.txt#tadc#the amazing digital circus#<- technically because. the main acc im interacting with is a tadc au acc#so they're half a tadc oc
2 notes
·
View notes
Text
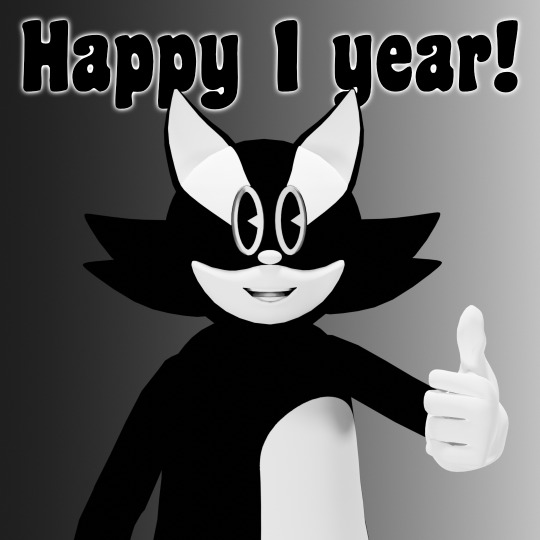
Pouchie The Cat Alpha 0.4.5 ONE YEAR ANNIVERSARY UPDATE!
February 21st marks one year since I first created the project file for Pouchie The Cat, the video game! It's been quite an interesting journey that I started, and it's not over yet! To the people who've been supporting me, especially my close friends, I thank you for your encouragement, your suggestions, and your overall wish to see me succeed with this project. I love you all!
With all that being said, let's look at the update. As the alpha number implies, we're still not at the halfway point (Alpha 0.5 would mark the halfway point), meaning there's still work to be done in World 2. But just because there's work to be done doesn't mean you can't at least peek at what's in the works. This new update of Pouchie The Cat includes the introduction of a new world, with new mobs, some cutscenes, and more!
What's new for Alpha 0.4.5:
SAVE AND LOAD: The game now has a save and load feature where you should be able to save the game and load it from now on. No idea if the feature works for the browser version, so if it's not working, feel free to mention it in your review of the game
OPENING CUTSCENE AND IN-BETWEEN GAME DIALOG: Pouchie now has some cutscenes with and some dialog with a new character. This character, Sasha The Rabbit will provide some context as to Pouchie's mission and motivation to clear the levels and explore the world. Not necessary to enjoy the game, and you can speed through the dialog if you just want to play the levels.
HINT BOXES: Hint boxes have been added to some of the early levels for new players who are unfamiliar with 2D platformer mechanics. More may be added in the future.
NPCS: NPCs have been added for cutscenes and dialog scenes. Annie The Cat, and Sasha the Bunny. Also name-drop of a future foe, Grump The Pug.
WORLD 2: World 2 is officially available for players to explore, up to Level 4! World 2 takes place underground, making it easy for Pouchie to bump his head on cave ceilings, so watch out when jumping!
WORLD MENUS: There is now a World Menu for saving the game, as well as allowing you to go back and forth between World 1 and 2, but only if you've unlocked.
NEW MOBS: Added three new mobs with unique gameplay mechanics. Babas are bats that are drawn to you if you enter their bubble, but they'll stop chasing you if you run far enough away. Crys-Tortles are a creature with a hard shell that spiky crystals have grown onto. They can't be damaged, but they can fall off cliffs. Fun-Guy are sentient mushrooms that'll release spores upon death. These spores will not disappear, so be careful when setting one off!
Bugfixes:
Fixed issue where Boomer would constantly damage Pouchie, even after death, resulting in a looped death animation.
Fixed issue where the player's max health and starter lives didn't reset after turning off no-hit and one-life gamemodes.
Known issues:
There was feedback in the previous builds that gameplay was "too floaty" and "too robotic." I don't know if any of my changes have resolved this issue, but we'll see.
If Pouchie jumps into two spore patches at once, he loses two hearts instead of losing the one.
That's all the updates I have brought for the time being. In a way, it's a lot of things done, but there's a much more impressive battle ahead that I'll be working on for Alpha 0.5. Both figuratively AND literally, as the battle I face is designing and coding the boss battle for World 2. I already have a general idea of how I plan to make that boss look and function. No idea when I'll get it done, but I'll be sure to work out all the kinks before officially releasing that update. Another plan in the works, that'll probably be more on the easy side, would be to create sprites of Pouchie's overarching foe, and the head honcho of all the issues of his journey: Grump the Pug. Grump will be given some animations, and possibly even dialog to establish him as a villain.
These, and more are being thought out during this time. If you wish to keep up to date when the next big update is out, or wish to keep up with when I go live on Twitch, or just ask me some questions, feel free to join the discord! I'm thinking of some future plans to interact with people if there's a good enough community to talk to: https://discord.gg/Cxfzm55RgP
In the meantime, if you wish to know what you can do to help with production of the game, and have some money to burn, I'd appreciate some donations on my Linktree and StreamElements. It helps to have some spare change when you're working more or less solo on a game project.
Something else that I would greatly appreciate is if everyone with a newgrounds account could give a fair review of the game there, as it' more likely to be pushed to others if it receives enough initial attention.
That's all for now, and I don't have any date to give for the next update, as I genuinely don't know when I'll have everything I want for it done, and I would rather not give a date and then not deliver. But for now, feel free to play the game and give me your thoughts!
Until next time!
15 notes
·
View notes
Note
Hey, Can I ask how you edit your gameplay pics? I am a mac user and my ss' are bad and I struggle so hard cause I've never used photoshop before starting a simblr and I can't use reshades to assist me :\
I'd really appreciate any help esp how you blur the backgrounds and make everything look so pretty. TYSM
hi! thanks so much for the compliment!
this is specifically for gameplay posts, but what I do in ps is pretty much using actions then I play around with those settings.
here's a not so little tutorial for you:
here are some actions I've downloaded and use:
smooth by earlygrape // perfect for smoothing out pictures
avonlea // another action that's good for smoothing out pictures, you need topaz clean for 2 of them, but the other 2 you don't (like smooth sharp -- use that one)
sonder by intramoon // these actions will change the color of your pictures and there's a lot of options! it might be a little advanced but these will give you a chance to play around with the style of your pictures once you're more comfortable
sunbloom by fairyfang // these are old but I used them when I was first starting to edit posts myself and they're good to use when playing around and getting the hang of using actions, these are other actions you can play with to change the color/overall vibe of your pictures
how to load actions: you load actions by locating 3 tiny lines on the top right hand of your actions window then drop down to load actions. this will open up finder so you can select the files. the files will have the title.atn, select that and they'll load into photoshop
where to find actions in ps: you find actions by going to window > then select actions, it should be the 2nd one listed after 3D. a little box will pop up and once you have loaded some actions, that's where they will be
how to use the actions: so you downloaded, you located them in ps, now its time to use them. how you do this is by finding the one you want to use > selecting the folder > pick a specific one > then at the bottom of the actions tab will be a little triangle, click that & you will have used the action. it'll either be added on top of your picture in a new layer as a folder, or it'll just change the picture.
tiny tip: if you don't like how it changed your picture, there's a tab called history that you can go to and delete what you did
another tip: it helps to just always make a new layer or copy a layer bc if you make a mistake it's easier to locate where the action started or you can just delete the layer and start over. to copy, it's command+j, for a new layer there's a little + inside of a box at the bottom of your 'layers' window. if you don't have a layers window, you can also find that in window >layers
that's pretty much the basics for actions, now onto blurring:
for starters, there should be a little tool bar on the left side of your screen (that's where mine is) you'll know it's the tool bar bc it'll have a little + with arrows on each corner, a dashed box, a lasso, a magic wand, etc. the tool bar has what you need to begin the blurring background process.
there are multiple ways to blur backgrounds but here's my basic version: right click the magic wand > select quick selection tool.
like in sims, you can make the brush bigger and smaller with [] depending on how big the area that you want to blur is.
then go over the area you want to blur, it'll have the moving dashes around the area once its selected. now go to filter > blur > lens blur (or any other selection you want to play with) > then go to radius & adjust the number to make your selection more blurred or less blurred > hit ok & you're done!
that's pretty much the basics, so I hope this helped! please feel free to reach out again if you need clarity or more help or send me a little chat! ♥️
15 notes
·
View notes
Photo


Skywhim Isle by CupcakeLeaf
""There where rumours since the cave age of simanity, about that you could be sent to a flying isle if you dreamt by a tree, lot's Sims don't belive in it (for obvius reasons) but some are really dedicated to try to find it. Your Sim was in an sunset picnic, and accidentally slept by the tree... you woke up here, how are gonna survive?"
INPORTANT!
When your Sim loads in to the world, it will spawn outside of it, so open the cheat bar and type in "testingcheatsenabled true", then shift + click on the ground of the isle, and click "Teleport Here", and boom, you Sim is there!
EVEN MORE IMPORTANT!
This world is dedicaded ONLY to the Isle Of Midnight Sun challange, so there's no other lots except the islet lot, and if you want to know how this challange works, there's a guide here!
Also the installation of this world is both trough .sims3pack (trough launcher) and trough .world, i included a tutorial on the file for installing it clean (without launcher)
--- Is it a world for the "Isle Of Midnight Sun Challange"? ---
Yes totally, i think it's also the most unique of them, although you cant fish in here, i included some gardening and you can always sell the starter inventory for an easel.
--- Is Supernatural necessary? ---
Only if you want, SN is used for a fog effect around the world's sea
--- Tips for making a house in such a small isle? ---
Try to save space, make the garden maybe be a rooftop, have lots of floors, and use the inslands interior to create a "basement"
That's it!"
More Info + Download @MTS.
13 notes
·
View notes
Text
Rules and Info!

We’re chill here! There are a few rules I ask be respected though!
1. No bigotry
2. Respect the muses.
3. Please try not to reply with one sentence, its very hard to work with. Asks/starters of any length are allowed tho
4. Ocs and Canon allowed :p

Tags:
Kaito.ask - asks for/answered by Kaito
[If true, then: Kaito] - responses featuring Kaito
Fukusei.ask - asks for/answered by Fukusei
[If true, then: Fukusei] - responses featuring Fukusei
Developer.ask - asks for/answered by the mun
[Developer Files] - ooc/mun stuff
[Answer.txt] - answers that don’t feature art/are only text
[Answer.png] - answers that feature art/some sort of image
[\n] - our last reply (you can do a reply but don’t expect another one)
[Dance of Corpses] - general tag for gore/nsfw
[pandas.DataFrame.query] - ask game reblog
[\run] - open starter
[Loading] - Post continuations

Info(to be updated as things are revealed):
Kaito Fujimoto is a 20 year old game developer who created Fukusei. They are nonbinary and on the aro spectrum. They/them
Fukusei Kagemi is a vocaloid created by Kaito. She doesn’t have a set personality, and tends to switch up on people a lot. She loves the thrill of the show and will make a game out of trials. She’s also obsessive. She/her

2 notes
·
View notes
Text
Progress / Issue? - Adding DLSS frame interpolation to my game.

Whilst playing my game, I found that my framerate would drastically decrease which effects the speed the game is running at. Most of my code is based off the "Now" node, which uses system time instead of game time, however code that required tick would fall short and make the code out of sync. This is still currently a issue, however is significantly improved by this feature.
Using the DLSS 3.0 plugin for unreal engine 5.3, I managed to enable DLSS for my game, which provided a near 2x increase in fps. The game still runs below the 60fps threshold, however once the game has been built then this shouldn't be a problem.
To install these features, I had to take advantage of the backup I made... multiple times. I was close to giving up with this feature until a idea came to me on how to fix this, which ended up with me having it within my game. For starters, Nvidia provides a project that showcases what DLSS can do. I first opened that project and right clicked the "content" folder and migrated to my current project. You would think that this is the only thing that I was required to do, however you would be mistaken. The project loaded up completely fine through the unreal engine project, however once trying to compile and launch via my IDE (rider), it either made all the code that linked with unreal engine turn red or didn't compile at all. I came to the discovery that it was because I was importing the camera sequences, which caused the compiler to mess up. To fix this, I deleted the project and grabbed my backup and migrated all the files that did not include the sequence. Once doing this, I found that my IDE would load up normally with minimal issues. I then started the compile and was welcomed to another issue... The engine found multiple versions of the plugin, so I had to delete all the references to that plugin from everywhere apart from the current project. Since doing this, I have encountered no problems and are currently experiencing some great performance increases.
A problem that was occurring when testing this out was when using this on my own project, I found that when using frame interpolation it was duplicating the frames rather than figuring out what the next frame should/could be. I was able to avoid this issue by not using it... However it would of been nice to be able to use it...
0 notes
Text
Top Web Development Tools For Developers in 2023

Web Development Tools enable developers to deal with a wide range of technologies. Web Development Tools can deliver faster mobile development at lower costs. The top web development tools make it easy for developers to establish and design their software platforms.
Yet, with several web application Solution tools being produced and updated regularly, determining which tool is ideal for your needs can be difficult.
Let's take a look at this article's list of the Top Tools For Web Developers.
Web Development Tools:
Here is a list of the most recent Web Development tools that you can learn and master to become a successful Web Developer.
● Chrome DevTools
One of the top tools for Web Development Services, Chrome DevTools is made for both small and large businesses. The DevTools in Chrome allow you to view a performance study of your site while editing HTML or CSS in real-time to speed up loading times. Regular updates are routinely made to these tools.
The built-in capabilities in Chrome for developers enable them to view and alter a web page's layout as well as the Document Object Model (DOM). These tools allow you to inspect messages, debug, run JavaScript commands in the console, and accelerate websites.
● Sass
Sass is a popular open-source Web App Development tool that frequently draws the most recent CSS preprocessors. One of the most developed, potent, stable, and dependable CSS extension languages is this one.
With the help of this tool, you may enhance and utilize existing CSS features like inheritance, variables, functions, mixing, and nested rules. Also, it assists you in creating and producing codes that you can easily maintain, minimizing the requirement for CSS in your coding.
● CodePen
Front-end development design and sharing features are available in the web tool CodePen. CodePen offers all the functionality of an IDE in the browser, so you can use it to construct the full project.
The following four packages are available for this tool:
● Free tool
● The monthly price of US$8 for an annual starter package
● Developer Package for 12 US dollars a month annually
● Super Package for a year at US$26 per month
Since it provides all the essential capabilities of an Integrated Development Environment (IDE) in a web browser, you can also use this tool to construct a whole project.
● Grunt
A JavaScript Task Runner called Grunt is helpful for automation. The majority of the repetitious tasks, including minification, compilation, unit testing, etc., will be carried out by it. Grunt is totally free and very simple to set up.
Additionally, it allows you to create your plugins and provides a variety of plugins for you to use. Also, this Web Development tool helps you automate any procedure with a minimum of effort on your part.
● GitHub
The software development platform is called GitHub. You can handle the projects with its help. You can design a review process for your code on GitHub and integrate it into your workflow. It may be incorporated with the tools you already use. Both self-hosted and cloud-hosted deployment options are available.
Individual packages include:
● Free Package
● Pro Package, the monthly cost of $7
These packages are available for teams:
● Team Bundle at $9 per month per user
● Depending on the specifications and quotes from the businesses, the enterprise package
● BootStrap
The toolkit known as Bootstrap enables HTML, CSS, and JavaScript development. Web projects that are responsive and prioritize mobile use are developed using Bootstrap. An open-source toolkit is this library of front-end components. It provides a unique assortment of various ready-to-use elements to create practical web layouts. Its benefit of being easy to set up makes it a trendy tool.
● Sublime Text
Text editors like Sublime Text can be used for prose, markup, and coding. The split editing mode is supported. You can edit two files simultaneously with the aid of this capability. The same file may be used for editing in two different places.
Other advantages include fast project switching and the ability to personalize anything. The platforms Windows, Mac, and Linux are supported by Sublime Text.
Conclusion:
This blog provides an introduction to a list of the top web development tools that you may use in Web Development Company India in 2023. You should enroll in one of the top Web Development courses if you want to learn these tools and work at a Web Development Company.
1 note
·
View note
Text
Setting up Emulators and Non-Linux/Steam games on the Steam Deck
I just wanted to do a write up of my setup on my steam deck, since I had to look up sources in various places, but not one place documented the problems I ran into lol.
I used these two guides:
https://retrogamecorps.com/2022/10/16/steam-deck-emulation-starter-guide/
https://github.com/suchmememanyskill/steam-deck-addons/tree/main/Launcher-multiplatform-game-launcher#install-steam-deck
Emulation: Retrodeck
So for retro emulation, I used Retrodeck (since I didn’t want all the emulated games showing up among the main steam games, and it kept things simple).
I went into Desktop mode and then opened the “Discovery” app which is an appstore (or flatpack?) for the Linux OS, and looked up Retrodeck under “Emulators” or “Emulation”. I mainly wanted to run PS1 games.
I then used Warpinator (on the deck) and Winpinator (on my PC) to transfer the roms and bios files needed from my computer to the Steam Deck. For the BIOS folder, it’s important to put the bios files under the main folder rather than separating the files in sub-folder (i.e. PS1 bios, etc.). Unless there’s already a sub-folder that was created for it, like the Switch emulator.
After I made sure the bios files and roms were in the correct folders, just booting up Retrodeck from the Steam Library will load into the frontend, where you can access all your retro games.
Non-Linux/Steam Games
I have a ton of itch.io games from one of their charity bundles, and although you can download the official itch.io app, it only lets you download Linux games.
Since the Steam Deck runs all windows games through a Proton translation layer, Windows OS games should work as long as they’re launched through steam.
One method is to manually download itch.io games from the browser, and then manually add them to steam (like on PC).
Another way is to use the Alfae launcher for Linux. Once you download and install Alfae, you can log into itch (and other stores like Epic or GOG), and then use Alfae to download the games and push them to steam using the SteamExporter function of the launcher. It also has the nice function of using your SteamGridDB account to add artwork (albeit cropped) to steam. You can then go from “Desktop Mode” to “Gaming Mode” and the games should show up under non-steam games in your library.
One issue I ran into while using this program is that sometimes it doesn’t unzip the game files it downloads, so while it looks like the game should work, Alfae isn’t mapped to the right .exe game file since the whole folder is still zipped. When this happens, I usually go back into desktop mode, unzip the files, find the game.exe file, and then add that to the Steam library manually. It’s a pain in the ass, but you can then use SteamGridDB’s Boop function to add any art for the games that’s missing. This won’t mess with any of the previously added games.
I’m totally new to linux stuff, but this setup wasn’t too hard! Hopefully this write-up is helpful to someone else too.
1 note
·
View note
Text
Linux Gripes
Just spent three days with Mint as my daily driver. I've had long enough with my office-related Mint install to appreciate it at the clerical level, but there's still one or two annoying hills to crest for the average gamer.
For starters, I needed to deprecate myself to well below even the Nouveau drivers to get display lag issues to settle down on DisplayPort. That was sort of expected, seeing as Nouveau is only decent if you're not a gamer. If you're looking to tax your GPU, you need either the most recent metapackage from NVIDIA or AMD, or the closest non-open source driver you can load. Mint has a handy Additional Drivers panel that lets you pick and choose from a number of potential binaries, and my testing confirmed that the only driver that fixed my screen lag issues in Steam and in-game was deprecated by eight months. That shouldn't happen, honestly. Most driver packages all effectively "talk" to your hardware in the same way, the only thing that changes involves added or refined operations your driver can "translate" to and from the software.
Then, there's the fact that I'm a modder. I tweak my games as much as I do my hardware installs, and needing a combination of Steam, Proton, ProtonGE, Lutris, file path alterations and three consecutive attempts to add a mod to Cyberpunk 2077 in a way that sticks was enough to make me give up.
Add to that the fact that any subsequent bootups of Vortex or other mod managers broke the Wine install's handling of .NET runtimes, and you had enough to send this frustrated gamer back to Windows.
It's a crying shame, too. Some productivity integrations are done simply and smartly on most Linux forks I've tried, and if you're a casual gamer who's only ever going to play games in their Vanilla status, you honestly don't need anything else. My frame counts were about 10% higher on Mint than in Windows 11 for Cyberpunk 2077, and I used 3 GBs less, on average, for tasks you'd define as heavy loads. Booting was insanely zippy, too.
Morally, however, I've never really had any problems with using Windows, seeing as everything else that runs on it has an open-source equivalent which itself runs on Windows. LibreOffice works wonders, and I've long been using Krita and OBS for the Graphic Design-esque instances of my job that rear up once every six to seven months.
Maybe we'll eventually get a FOSS operating system that has effectively a one-to-one parity to a Windows PC in terms of feature sets and usability, and we're so close to it that it's honestly frustrating. It's only edge cases like me who really still grit our teeth at the wider GNU ecosystem, when it's already more than perfect for basically everyone else.
Oh, well. There's always my work PC and my Steam Deck, at least...
0 notes
Text


youtube
"Mid Century Modern Starter" on Sandy Run
Lot info: Sandy Run (Willow Creek)
Lot Size: 20x15
Lot type: Residential 2 beds, 1 bath
§21, 427
Two bedroom (1 is designed as "storage"), 1 bath modern family "starter" home costing less than the §22,000 funds a new Sim starts with.
By using many debug items, I was able to give this build a much fuller and more homey feel than what is usually found in starter homes.
Available for download on the gallery.
My Gallery ID: DaisyDreaming
Tray file can be downloaded here.
(Tray file instructions: Save all files into your Sims4/Tray folder [they should be listed as separate files, not in a folder or in a .zip file]. Open the game, and then go to your gallery. The lot should be there fully furnished! Note that if you don't have all of the packs in that build, the items from that pack will not load.)
#sims4#thesims4#sims4house#sims4home#sims4build#sims4builds#ts4#ts4builds#thesims#sims4life#sims4nocc#simsnocc#nocc#simstagram#simstagrammer#simsyoutube#sims4youtuber#sims4stopmotion#stopmotionsims#sims4speedbuild#simsbuildnocc#sims4buildsnocc#sims4buildnocc#sims 4 starter home#Youtube
1 note
·
View note
Text
download mods for bo2 100% working QQJ!
💾 ►►► DOWNLOAD FILE 🔥🔥🔥🔥🔥
Mods & Resources by the Call of Duty: Black Ops II (CoD:BO2) Modding Community. Download Jiggy Mod Menu for BO2 Customize the title menus and make them look every bit as wacky as the game itself. Install Black Ops 2 Plutonium. Download Plutonium; Download Black Ops 2 · Download _ · Open the folder {BlackOps2_folder}\t6r\data\maps\mp\gametypes\. 7 Menu CabConModding. Forums Premium Latest posts. What's new Latest posts New profile posts Latest activity. Members Current visitors New profile posts. Log in Register. What's new. Latest posts. Log in. Install the app. Dark Theme. Contact us. Close Menu. JavaScript is disabled. For a better experience, please enable JavaScript in your browser before proceeding. You are using an out of date browser. It may not display this or other websites correctly. You should upgrade or use an alternative browser. Release Black Ops 2 Jiggy v4. Thread starter CabCon Start date May 21, Tags black ops 2 mod menu bo2 gsc call of duty: black ops 2 mods jiggy jiggy source 4. CabCon Head Administrator Staff member. Head Staff Team. Messages 4, Reaction score 2, Points 1, Hello guys, since after our source release of the Jiggy Mod Menu many people are asking how to install the mod menu. Here I created a thread about how to use it on the PC. You do not have permission to view link Log in or register now. Last edited: May 21, Pyrex BLJ im done : Staff member. Messages Reaction score Points Pyrex BLJ said:. Click to expand CabCon said:. I compiled it by myself, that's no problem. Messages 1 Reaction score Points Jiro Modder. Messages Reaction score 77 Points Messages 11 Reaction score 10 Points Nice menu, and finally a port for pc! What about the XP lobby function? Last edited: May 22, Squid Veteran. Messages 14 Reaction score 11 Points Squid said:. Its working now i've started loading up the map without injected once. I just would like to mention: You could get banned by using this with steam. Last edited by a moderator: May 24, Ameet New Member. Messages 1 Reaction score 1 Points 3. Lucifer Moderator Staff member. Ameet said:. Post reply. CabConModding is now on facebook! Check the latest Updates, the Site Status and much more now! This site uses cookies to help personalise content, tailor your experience and to keep you logged in if you register. By continuing to use this site, you are consenting to our use of cookies. Accept Learn more….
1 note
·
View note
Last Seen Blogs

mr1ove
mr1ove
gezzaris
Sassia Gezzari

salaharnos
نبض الحروفsalah

wrd2v
V🦇

randyjadekisser
yumeship madness