#1920 x 1080 pixels
Link
HP 2022 Pavilion 17.3 inch IPS FHD Laptop, Intel Core i5-1135G7 (Beats i7-1065G7), Intel Iris Xe Graphics, 32GB RAM, 1TB PCIe SSD, Backlit Keyboard, WiFi 5, Long Battery Life, Webcam, Windows 11 Proe
#hp laptop#hp#notebook#hp notebook#laptop 17inch#cpu 4.20ghz#Intel Core i5-1135G7#17.3 inches#Touchscreen laptop#Intel Iris Xe Graphics#1920 x 1080 pixels#laptops 1920 x 1080 pixels
0 notes
Text
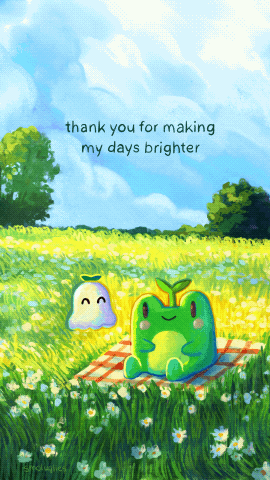
Brighter Days ☀️
Hey everyone! I hope you’re doing well 🫶 I had this idea of adding animated elements to some of my illustrations :) here is one I’ve done recently of a frog and his lily of the valley ghost friend.
This piece is available on my inprnt store (please check the link below if you’re interested!). I’ve also turned it into a phone wallpaper which you can grab for free on my kofi shop ☺️
Wishing you a lovely weekend and bright days (regardless of the weather 😉)
• Prints of this piece are available here: https://www.inprnt.com/gallery/smoluglies/brighter-days/
• Phone wallpaper on kofi: https://ko-fi.com/s/43c4e2b9ec
#digital art#digital illustration#artists on tumblr#digital painting#illustration#cute art#smoluglies#cozy art#frog art#ghost art#lily of the valley#friendship#positive quotes
315 notes
·
View notes
Text


Original Drawing for this DTIYS -> Can be Found Here
Main 5 Character References -> Can be Found Here
NEW FINAL SUBMISSION DATE
IMPORTANT ADD ON
IMPORTANT ADD ON 2
QUESTIONS TAG
A Text version of what i said in the above images will be provided under the cut, incase it was hard to read
It's a but late... BUT! To celebrate Vampiric Equinox's 1 year anniversary im deciding to host a Draw This in Your Style!
I will explain the rules and rewards next
RULES/NOTES
MANDATORY:
All 5 characters must be present/involved
NOTES
You’re free to change up the poses a bit if you’d like
Suggested canvas size is 1920 x 1080 pixels but not mandatory
Digital or Traditional, up to you :)
DTIYS Event ENDS January 20th 2024
If need extended time let me know
TAG ENTRIES AS
#VampiricEquinox1YearAnniversaryDTIYS
aswell as @ me ( @miwachan2 )
Any Questions? Shoot me an ask!
There will be 3 main winners!
1ST PLACE
Full body drawing of their oc, Colored and Shaded
2ND PLACE
Half body drawing of their oc, Colored and Shaded
3RD PLACE
Shoulders up drawing of their oc, Colored and Shaded
Depending how many people decide to participate, as a thank you,
The remaining qualified participants will get an itty bitty sketch of their chosen OC!
#VampiricEquinox1YearAnniversaryDTIYS#Vampire sundrop#vampire moondrop#vampire eclipse#vampire hunter!bee#vampire hunter!Y/N#color
170 notes
·
View notes
Text
lexegender template layers!
lately i've seen quite a few people saying they want to make lexegenders but can't find a template/individual layers, so i went ahead and made the separate layers of the common lexegender template flag by @/epikulupu !


these were made on a base that is 1920 x 1080 pixels, but they can be scaled/changed!
tagging @neopronouns @noxwithoutstars @cocajimmycola @dreamythism @lovesse @flandrizzine @scytheral @revenant-coining @radiomogai @decayedgender @horrgores @blood-moon-night-coining @chocolatey-wonder @begendered-queer @local-yurei @heaveness @bpdette @transfemrui
95 notes
·
View notes
Note
Hi! Your art is amazing!! People probably asked this before but I’ve been wanting to try pixel art but I’m not sure how to set up the canvas, how do you set up yours? :0
hi!!!!! so.
1) use a small canvas
mine is usually 384 x 216, but its pretty big for pixel art, try something like 100 x 100 for your first time ( there's a wonderful video by AdamCYounis about choosing your canvas size )

2) after completing your art multiply the number of your pixels
100 x 100 pixels > 1000 x 1000 pixels ( not 981 x 981 for example, because the pixels will look a bit wonky when enlarging )
i use 384 x 216 canvas size because multiplied by 5 it makes 1920 x 1080

3) enlarge your image with "the nearest neighbour" method using the pixels you've multiplied
let's say you've drawn a 100 x 100 pixels picture and want to make it 1000 x 1000 pixels ( so it doesnt look small and blurry when posting )
its important to use "nearest neighbour" interpolation, because it makes the pixel art image look exactly how it did originally


[ and finally! ] pixel art is a truly unique form of art and it has its own rules, so i recommend going on youtube and searching up "pixel art tutorial"
22 notes
·
View notes
Text
To see in 2024, I made a Freddy Carter Calendar💖It uses pics from various photoshoots from both 2023 & earlier. Each calendar pic is 1920 x 1080 pixels so should work for a desktop background although it might be a bit small for some. There's 2 versions of January, depending on if you want one with Freddy's birthday indicated on it.
Photo sources: Visual Tales (Jan, Apr), Grumpy Magazine (Feb), ODDA Magazine (Mar), Behind The Blinds (May, Aug), Ralph Lauren (Jun), American Studies (Jul), Trunk Clothiers (Sept), 1883 Magazine (Oct), Boys By Girls (Nov), Getty Images/Dave Benett (Dec)
And don't forget to check out @savethegrishaverse (+ their linktree here) for how to help save Shadow and Bone from cancellation!


15 notes
·
View notes
Photo

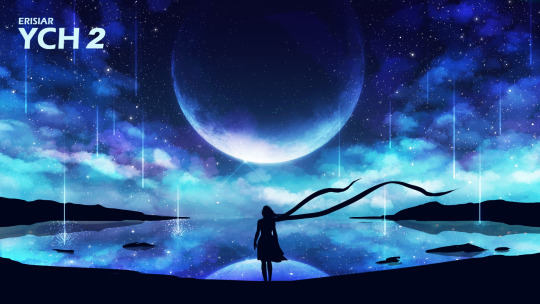


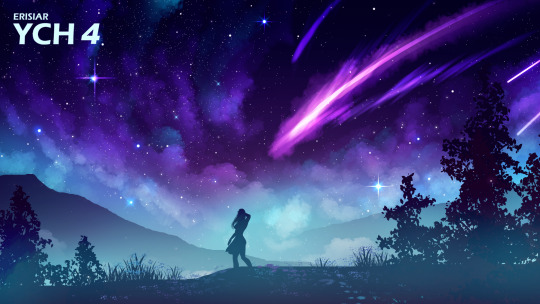
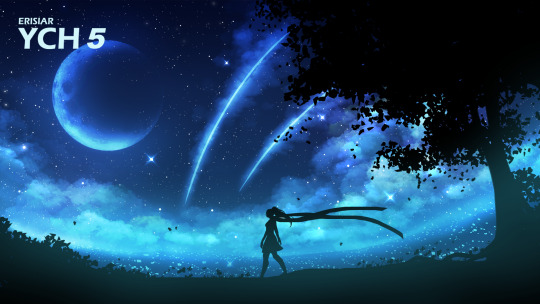
Hi! I have some YCH (your character here) commissions open. Set price, any species, any pose, any gender. No limit on slots at the moment, I will do them until I become too busy to handle more, so please DM to ask about it if interested.
Price - £20
Add extra characters - +£7
Information:
- Character in the original post is for illustration purposes only, any pose, any character, any gender and any species can be requested
- You will receive a detailed silhouette drawing to your specifications
- Final image will be sent by email in highest resolution, 300 DPI, 1920 x 1080 pixels for wallpaper size with no watermarks
- Payment through Paypal only in Great British Pounds
- To claim a slot please DM with references for your character and desired pose (you can describe the pose if no references or I’m also happy to make up the pose myself) and your Paypal address
- I will send you a request for the payment via Paypal once accepted
- Usually completed between 1 - 5 days of payment
#my art#artists on tumblr#ych#ych commission#ych commishes#commission#anime#manga#landscape#scenery#background#anime scenery#anime backgrounds
146 notes
·
View notes
Text
Bigott Dekstop Wallpaper!


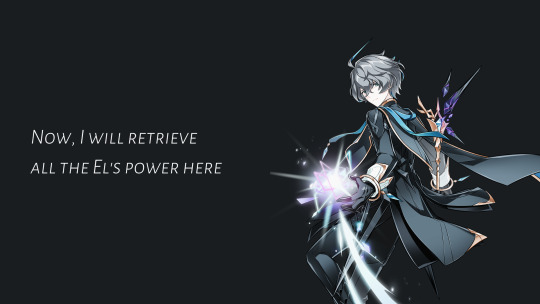
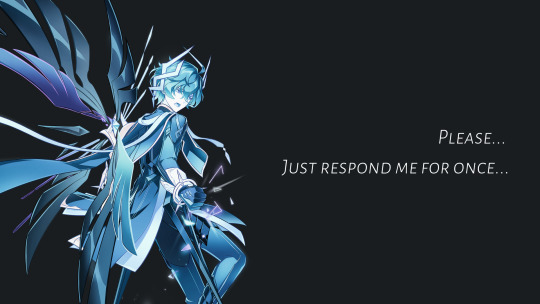
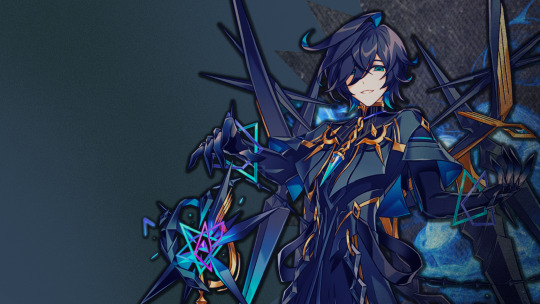


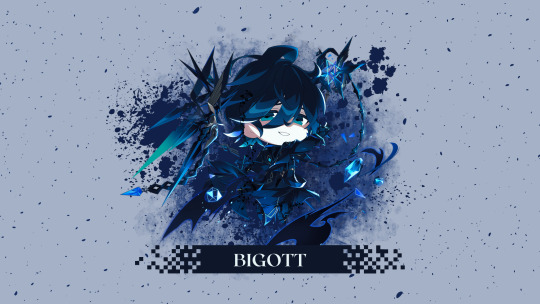
Size: 1920 x 1080 pixel
File type: PNG
Character: Ain - Bigott/Opferung
.
FINALLY! The polling result is here~ And we got 100% Bigott and 0% Dius Aer. Are you all Ain simps fans? #makeelriosgreatagain lol
No worry Chung fans, I will make wallpaper of him soon! In fact it is still work in progress. Feel free to slide into my DM or just comment below to request another size too ;-;
.
I don't own any art used.
Ain Bigott (c) KoG Games-Nexon
#elsword ain#elsword edit#elsword wallpaper#desktop wallpaper#1920 x 1080#feel free to use#feel free to share#feel free to reblog#ainchase ishmael#ain bigott#ain 4th path#ain opferung#wtf they change bigott's name into opferung...
27 notes
·
View notes
Text
Part 1
I am going to start a new 6 second animation, and since I know working with Dreams has been frustrating for some people, I thought this time we could go through it step by step. I’ll be posting updates as we proceed through it from start to finish!
Before we begin there’s a couple things I need to elaborate on. For starters I am not going to do everything in Dreams. I’ve made it very clear numerous times that I regard Dreams as a tool to composite all the elements together on a timeline, not as an animation app to draw in. I’ll be working primarily in Procreate to do the animation part, and we’ll move on to Dreams closer to the end. In this way I hope to help show the animation pipeline that I think works best in Procreate and Dream’s favor.
Every animation needs a baseline to work from. So I found a 6 second audio clip from Minecraft Story Mode Season 2 that featured Petra saving Jessie from a creeper. It sounds dynamic, I like the voice actress, it’s short, and I think it will look really cute when I finish it. Plus I just like Minecraft.
Every animation also needs baseline rules to work from too. I’ll be doing my animation in 24fps, because that’s the industry standard. My screen resolution will be 1920 x 1080. These are the basic settings I usually work from.
The next step for me is to time out the dialogue and sound effects on a dope sheet. I’ll go more into that when I get there.
And lastly I need an art style for the project to pull from. It would be maddening to try and hand draw blocky characters with pixel art faces, so I’m gonna try to emulate someone else’s art style for this project. When you work in 2D animation you have to be able to adjust your art style for whatever project you’re working on. Being artistically flexible is important!
So that’s where we’ll begin! I’ll keep you all updated as I proceed!
#procreate dreams#procreate#animation#2d animation#procreate animation#hand drawn animation#dreams#procreatedreams#classic animation#Minecraft#mcsm
6 notes
·
View notes
Photo


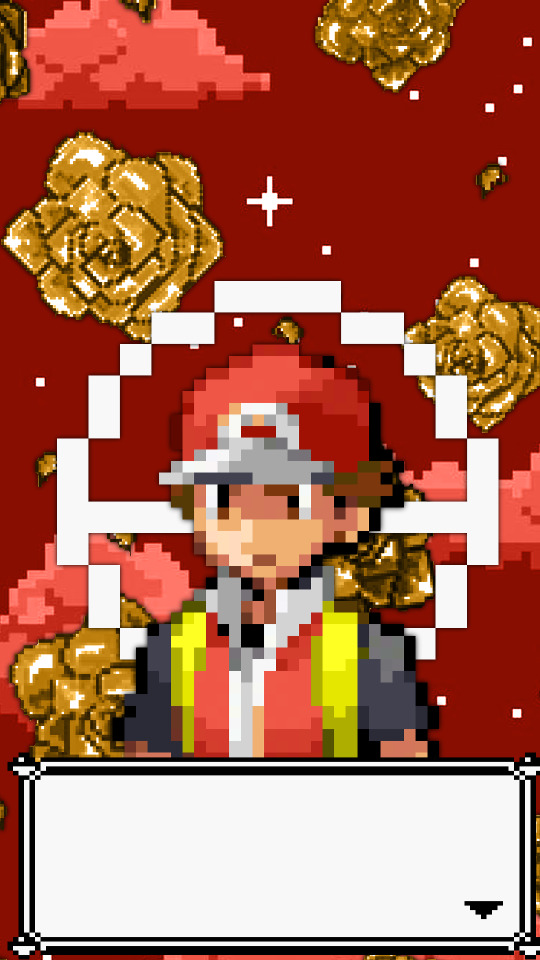

Pixel + Rose Themed Red (Pokemon) Wallpapers (1080 x 1920)
yashiro anon requested: I was wondering if you could make a rose/pixel themed Red (the pkmn red one) wallpaper (either 1080x1920 or 1440×2960) idm if you use the sprites from in game.
feel free to use, but don’t claim as your own! like/reblog if you save or enjoy!
#pokemon#pokemon red and blue#pokemon edit#red pokemon#satoshi pokemon#wallpaper#wallpaper edit#pokemon wallpaper#edit#fandom edit#edit blog#[our edits]#[gundham -🦔🌑🔮]
16 notes
·
View notes
Text
Best Practices for Quality/Best Visual Result When Uploading Gifs to Tumblr
NO MATTER WHAT METHOD YOU USE TO MAKE GIFS
Whether you screencap gifs and load them into GIMP or 🏴☠️ Photoshop, or screencapture and output with Giphy or ScreenToGif, or grab clips and load them into a video editor and then export as GIF, or use ezgif.com, or make your gifs on a command line, here are some of my personal practices (so far) to get the best visual quality from your gifs!

1) If you plan to have gifs in a single column orientation, scale them to be exactly 540 pixels wide.
Or at least do your best! 540 px is the width that single-column oriented images on Tumblr will snap to (unless they are very very small).
If your image is smaller than 540 px wide and you try to put it into a 1 column orientation, Tumblr will scale it up to 540 pixels for you (unless it is VERY small), but your gif/image only has so many pixels—fewer pixels than the size Tumblr is trying to snap it to! So when Tumblr scales it up, your gif will probably look very blurry or fuzzy!
Even if your image is larger than 540 px wide and Tumblr has to scale it down, you may notice (though the difference will not be as intense) that Tumblr does not do as good of a job at scaling your image down to 540 pixels as the software you use to make your gifs does! Scaling your gif down to 540 pixels wide yourself will also reduce its file size!
You can see all the pixel dimensions for the different Tumblr image orientations here!
I have not found, in all cases, that this same advice about scaling down produces noticeable differences for gifs in 2 or 3 column orientations uploaded with widths larger than 268 and 177 pixels wide respectively (though it definitely still matters when scaling up). However, if you know you want to upload your gifs in one of these orientations, do be aware that you could scale them down to those widths to reduce your file size if you need to—just don't make them any smaller than 268 or 177 pixels wide respectively or they are going to be very blurry!
2) Be thoughtful about aspect ratio.
Aspect ratio refers to the width versus the height of your image. For example, if you have a 1920 x 1080p video, that is a 16:9 aspect ratio (the height of the video is is 9/16ths of the width of the video, or 1920/16*9 = 1080). You can see what many common aspect ratios look like in the image below.

Image source
Many videos you'll want to gif will start out in a 16:9 aspect ratio. However, if you upload your gifs with that 16:9 aspect ratio, even in a 1 column orientation, your subjects will often look very small, and the frame may contain objects taking up valuable pixels that could have been used to show more details of the subject you actually wanted people to see!
As an example, consider these two versions of the same frame:


The first image is in its original 16:9 aspect ratio, while the second image has been cropped to a 1:1 (square) aspect ratio (and both have been scaled down to 540 px wide before upload—no sharpening effects or anything). When the first image is scaled down to 540 pixels wide, many of those meager pixels end up being taken over by dark shadows in the left and right sides of the frame! When I crop inward to only capture my subject (Dean) and then scale to 540 pixels, Dean gets to take up those pixels instead, so not only is he closer to the eye so it's easier to see what's going on with him, but he also gets more of those meager pixels all to himself, resulting in finer detail!
Sometimes, you may still want or need a 16:9 aspect ratio, for example, if your subjects are very far apart in the original footage like in this gif I made as the header for a gif set:

But if you can crop to a 3:2 or 4:3 aspect ratio (or even a 1:1 aspect ratio) without part of your subject falling out of frame, it's definitely worth doing so!
Your best practices would be:
Try and use rectangular aspect ratios wider than they are tall only in 1 column orientations (16:9, 4:3, 3:2, etc). If you use them in two or three column orientations, all your gifs will seem very small and short and will be hard to see.
For 2 and 3 column sets, always use square gifs or gifs taller than they are wide (1:1, 2:3, 3:4, etc). This will give you the largest possible gifs in these orientations with the most detail on your subjects.
For 2 and 3 column sets, make sure two images planned to go side by side have the same aspect ratio. If they don't have the same aspect ratio, the "taller" gif will have its top and bottom "cropped" by Tumblr to fit beside the other gif in the set so they are the same width and height. This is especially undesirable if you have captioned your gif, as your captions may end up being cut off.
3) Order of operations matters!
For the finest finish, you almost always want to do operations on your gifs as you make them in the following order (when possible):
Cropping.
Color adjustments (when available).
Scaling.
Captioning.
Sharpening (when available).
8 notes
·
View notes
Note
hi!! love your demo, i just played through all of it like two times in one sitting and damn im obsessed, all the lil details?? spectacular. the art?????? cheffs kiss. my lil point and click loving heart was singing. the colour palette and the whole aesthetic and nature of the demo is so calming, def needed it rn lmao.
i just had one question, i am dyslexic and i found the pixel writing pretty difficult to read most of the time, so were you perhaps thinking of introducing a mode in the settings with like an easier to read font for folks like i? like sometimes i had to go over the text a couple of times to truly understand what is being said because of the font used
(ps i almost cried at the ending. it was so sweet. idk why it isnt even sappy or anything but man. hit me in the guts for some reason)
(ps ps IF WE CANNOT LURE THE MOUSE OUT WITH A VIOLIN LATER AND GIVE HIM A LIL BIT OF CHEESE FROM THE HOUSEKEEPER AND PET HIM I WILL ACTUALLY SUE /lh)
Oh wow thank you so so so muuuuuch lkddjflskdjfdsf After putting so many hours of work into this It's so amazing to hear people's reactions and what they enjoyed. I'm so pleased it was calming, I really want to make something that is joyful and relaxing.
I definitely want to add in the ability to play the violin for the mice, I should have done that in the first place. You can play the violin for the painting above the fireplace, you should definitely be able to play it for the mice! The non-Disney IP mice. *cough*
RE: The fonts and dyslexia, this has been concerning me for a while now. The issue I have is that the game is actually teeny tiny - a whopping 320 x 180 pixels. For reference your average game is probably more like 1920×1080. This gives the retro look, at it also makes developing the game and doing all the animations so much more manageable for me to do all on my own!
The problem is that I have to use a pixel font which is designed to work at such a small size. I've tried really hard to find ones that are comparatively readable, but they're still not very dyslexia friendly.
I've been thinking of looking into whether it's possible to change the resolution of the game to something higher but keep the low resolution graphics, preferably without undoing all my work so far. That would let me use a regular font. I'm going to have a chat with people who know more about using the game engine I'm using and see if they have any tips!
Thank you so much again for the feedback!!!

I'm just going to stick a link to the demo in here in case anyone missed it-
21 notes
·
View notes
Text

Happy Friday everyone! 🥰🫶
just wanted to let you know that my recent illustration is now available as a free wallpaper on my Kofi page 💖
And if you’re interested in getting it as a print, I have recently added it to my inprnt shop along with my lily of the valley mood swings illustration ☺️ I wish you all a great weekend!


#artists on tumblr#digital art#digital illustration#smoluglies#digital painting#illustration#art print#phone wallpaper
50 notes
·
View notes
Note
Hi! Pls how do you merge multiple photos into one??
Hiyaa!!! Sorry for the late replies! I was a bit busy with rl stuff :')
I think Miss Daria explained this before but I'm not sure 🤔 I'll just give you the tutorial on how I did it bcs I learned it from her as well 😊
The tutorial is under the cut! I'm not a good teacher so I'll try my best to show you how I do it 🧎♀️

Step 1: Open your image in photoshop. Click on the lock to unlock the picture from the canvas.

Step 2: Go to image > canvas size, select it. According to miss deer, the height gap that tumblr has in between pictures are 14 pixels (miss deer if you're back and you read this and I got it wrong, pls don't bite me ;___;). Put in 14 in the height box and don't forget to select "relative" too.

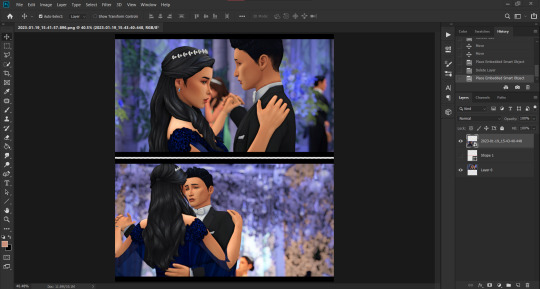
Step 3: Once you click "ok", your current canvas will have a gap on top and below the picture you have at the moment. Move the picture to the top and let it snap into position there. And then go to shapes and click on "straight line" and set the thickness to 14px. Hold shit+click from left to right to make a straight line and put it below the picture. If you do step 2 correctly, the line should align perfectly below it.

Step 4: Go to image > canvas size again. This time, add the height of your original picture. So if the resolution of your picture is 1920 (width) x 1080 (height), take the height of the picture and put it in the height box. Press ok.
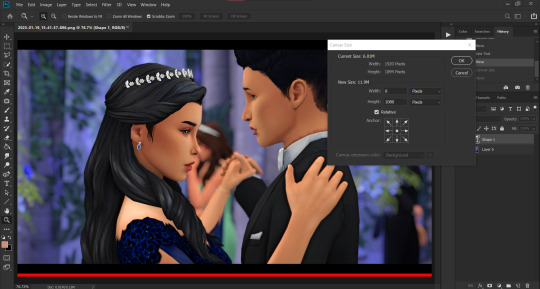
It should look like this. Don't worry about the gap on top and below, just move the picture to the top as well as the red line.

Step 5: Insert the picture you want below it. Uncheck the eye next to the straight line you made and save it as png! Done!
This is the final result! :)

Extra notes: If you want to add more than 2 pictures in one panel, don't forget to put in the 14px gap when you're expanding the canvas. Use the straight line you made in the beginning as a guide to make sure the gap is 14px. And after that, you can add the height of the original picture in the height box so your canvas will expand. Do know that the more you add your pictures in one panel, the more tumblr will make your screenies lose it's quality. The most you can put in one panel is 4 pictures before the quality starts to become doodoo (I tried with 5 before and it was not good 💀 Just go with 4, kids!). Also, I personally try to avoid using the 4 pics in one panel template bcs I do notice that some of the pics will lose their quality so I try my best to keep my screenies to a max 25-30.
Also, if you're the type to make long posts like I do, I suggest you keep a template for each of these panels. I have my own templates for 2, 3, & 4 pics in one panel just so it's easier for me when I'm done editing.
I hope this helps you or anyone! :)
11 notes
·
View notes
Text


Papéis de parede para celular em 1920 x 1080 e em 720 x 1560 pixels em homenagem ao 10º episódio de Os Dez Temidos, de ARKHI. Esta mesa eu não faço parte, haha.
2 notes
·
View notes
Note
What kind of resolution and canvas size are you using for your drawing to give them that semi pixellated look? Also I'm guess you're using a pencil tool or is some specific brush?
Also sorry if I'm asking a lot of question in this period, don't wanna be annoying, just love your work <3
Almost all of my landscape-framed art pieces are 1920 x 1080. It's just the easiest resolution to work with quickly for me, while also being a standard resolution for the most part. And for my brushes, I currently use a combo of G-Pens with varying degrees of smoothness. Some have completely sharp edges without antialiasing which creates that pixel-y feel.
18 notes
·
View notes
Last Seen Blogs

khushikharbanda
khushi kharbanda

mistyhalls
mistyhalls

presenting-at-17
:::::Presenting at 17:::::

pressxtoalex
Press X to Alex

opinionated-b1tch
[insert current obsession] enthusiast