#3D depth camera
Text
I did the donut tutorial! I'm so proud of myself 😭🤩 (lol)
I wanna learn how to create 3D environments in particular, mainly for comic-making purposes. Anyway, this was a great tutorial and I learned a lot as someone without a ton of experience with 3D :>
#blender#blender 3D#3D Art#3D Model#Donut Tutorial#the camera tracking/movement in this is a little janky bc that was. ironically. the part i struggled with the Most lol#or more#the focal depth/length is janky lol
17 notes
·
View notes
Text

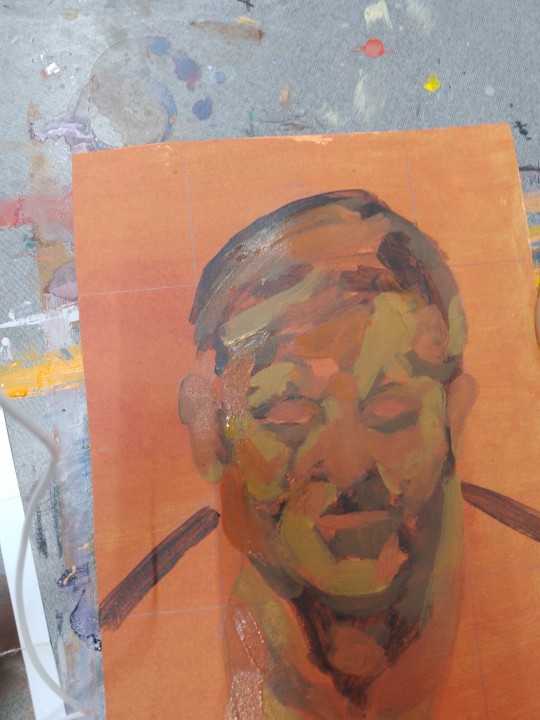

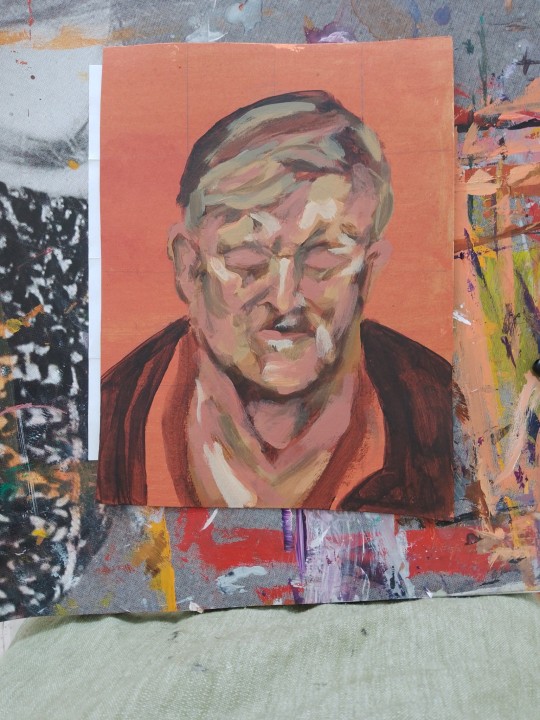

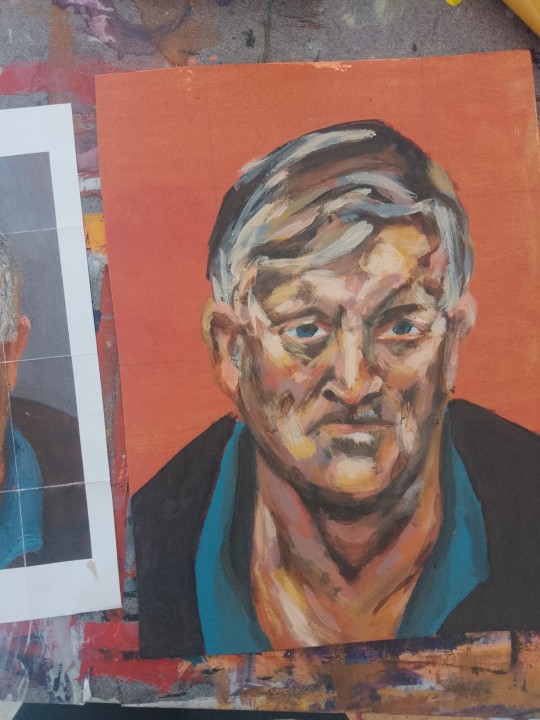
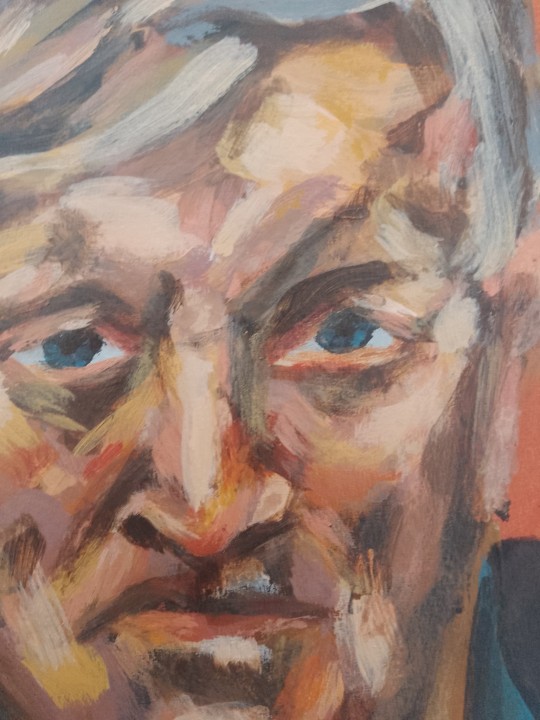
art update fr april part 2/2
#oh just paint a lucian freud they said. just mix skin colour frm 6-8 different tubes not counting varnish water or slowing agent they said.#like itll be a good exercise. idk wth im doing#all of this is progress frm 5 hrs total. i probably spent the first full hour drawing my grid and face in pencil bc i did NOT want to start#like it was too daunting lol. and then the following 2-3 hrs it's still like WHAT AM I DOING I MESSED IT ALL UP#and then you add more depth w dark and light and go like oh. maybe this can still be salvaged after all in time lol ok#it's still a wip i'll continue adding to it next week. apparently when you paint the bg is when i'tll all suddenly click and look solid?#heres to hoping lol. ive never felt more like a painter tho. close up included bc there are like a million brush strokes in there#my reproduction looks nothing like the original guy posing fr his portrait but itsure does look like. some guy in 3D surely#my art#sorry if the positioning is all over the place. those colours did not want to be accurately captured on camera fr
6 notes
·
View notes
Text

despite everything, i guess i made it
#drawn on nintendo 3DS camera like the good old days. i misremembered how much color depth i could colorpick from#hold on imtrying to write a birthday message that sounds the least concerning for my mental health. hm#yeah happy birthday to me. hope the world gets better and i hope i get better. happy birthday catro you silly little pomsky bastard#happy birthday to whatever AC villager i share a birthday with idk i think its phil#mentally well PR statement over. its 1am when im writing this so i guess im gonna chill out for a while here. hi#NTDO Girl
3 notes
·
View notes
Text
bought super mario 3d world on switch bc i needed a new game to 100% and quickly remembered why i didnt like super mario 3d world when i had it on the U
#depth perception ? NONEXISTANT#and the controls are different bc now theres a z axis you can move in#i am however like 60% done with the game already i didnt remember how short it was (its only been like 4 hours)#not a fan of the mario wiiU games that came out bc they were all 3d based but captain toad holds a special place in my heart#even though i could never 100% finish it.. i think i still have like 3 levels left but theyre too hard and im incompetent#but when i hear that music i go crazy#i like the concept for the levels in treasure tracker but the camera makes me very motion sick HAHA
2 notes
·
View notes
Text
Orbbec Femto Bolt ToF Camera
Techie Tech Tech!
The Orbbec Femto Bolt stands strong as a compact and high-performance device, aimed at meeting the demanding needs of AI developers and those engaged in 3D vision applications. This multi-mode Depth and RGB camera, is equipped with a USB-C connection for power and data, presenting itself as a versatile and cost-effective solution. Its capabilities make it an attractive option for developers…
#3D camera for smart retail#3D sensing technology#best AI development camera#compact 3D vision device#crazydiscostu#depth measurement camera#depth-sensing camera for medical use#dev#development#Femto Bolt ToF technology#Femto Bolt vs Azure Kinect#gaming#geek#high resolution depth camera#high-performance depth camera#Nerd#Orbbec 3D vision camera#Orbbec AI camera SDK#Orbbec depth-sensing camera setup#Orbbec Femto Bolt accuracy#Orbbec Femto Bolt applications#Orbbec Femto Bolt for rehabilitation#Orbbec Femto Bolt imaging capabilities#Orbbec Femto Bolt indoor use#Orbbec Femto Bolt integration#Orbbec Femto Bolt performance#Orbbec Femto Bolt review#Orbbec Femto Bolt specifications#Orbbec multi-mode camera#programmable 3D vision camera
0 notes
Text
Apple Vision Pro. Is it a game changer for 3D?

View On WordPress
0 notes
Text
In Super Mario Maker 2, the Super Mario 3D World game style is always seen directly from the side. While objects towards the edges and corners of the screen can be seen to have depth, it is very difficult to judge what that depth actually is.
By modifying the code to move the camera during that mode, we can see how deep into the background the common elements go. Note that the blocks are not actually perfectly cubical as they are in 3D Mario games, but rather elongated into the background to help with the perspective.
Main Blog | Twitter | Patreon | Small Findings | Source: x106E46E8
536 notes
·
View notes
Text
research & development is ongoing
since using jukebox for sampling material on albedo, i've been increasingly interested in ethically using ai as a tool to incorporate more into my own artwork. recently i've been experimenting with "commoncanvas", a stable diffusion model trained entirely on works in the creative commons. though i do not believe legality and ethics are equivalent, this provides me peace of mind that all of the training data was used consensually through the terms of the creative commons license. here's the paper on it for those who are curious! shoutout to @reachartwork for the inspiration & her informative posts about her process!
part 1: overview
i usually post finished works, so today i want to go more in depth & document the process of experimentation with a new medium. this is going to be a long and image-heavy post, most of it will be under the cut & i'll do my best to keep all the image descriptions concise.
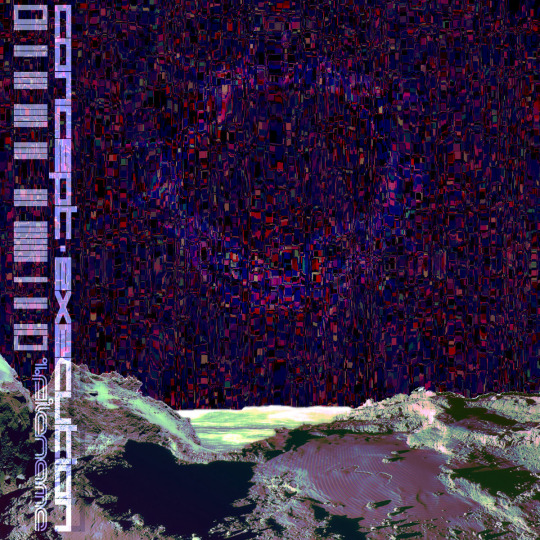
for a point of reference, here is a digital collage i made a few weeks ago for the album i just released (shameless self promo), using photos from wikimedia commons and a render of a 3d model i made in blender:
and here are two images i made with the help of common canvas (though i did a lot of editing and post-processing, more on that process in a future post):

more about my process & findings under the cut, so this post doesn't get too long:
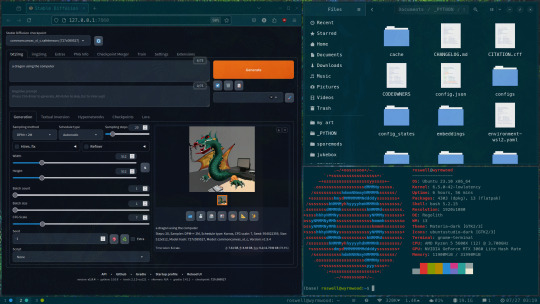
quick note for my setup: i am running this model locally on my own machine (rtx 3060, ubuntu 23.10), using the automatic1111 web ui. if you are on the same version of ubuntu as i am, note that you will probably have to build python 3.10.6 yourself (and be sure to use 'make altinstall' instead of 'make install' and change the line in the webui to use 'python3.10' instead of 'python3'. just mentioning this here because nobody else i could find had this exact problem and i had to figure it out myself)
part 2: initial exploration
all the images i'll be showing here are the raw outputs of the prompts given, with no retouching/regenerating/etc.
so: commoncanvas has 2 different types of models, the "C" and "NC" models, trained on their database of works under the CC Commercial and Non-Commercial licenses, respectively (i think the NC dataset also includes the commercial license works, but i may be wrong). the NC model is larger, but both have their unique strengths:
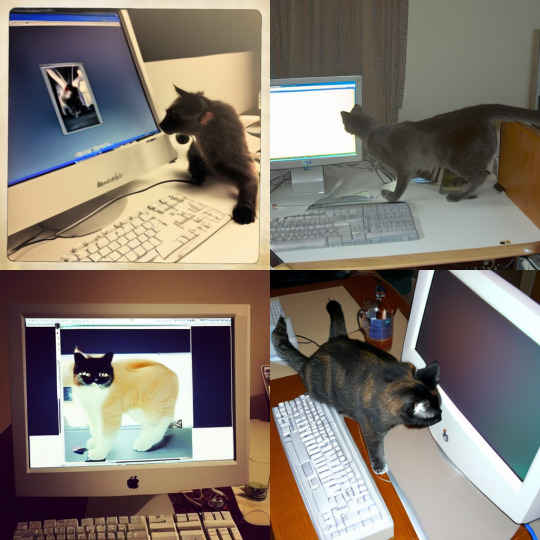
"a cat on the computer", "C" model
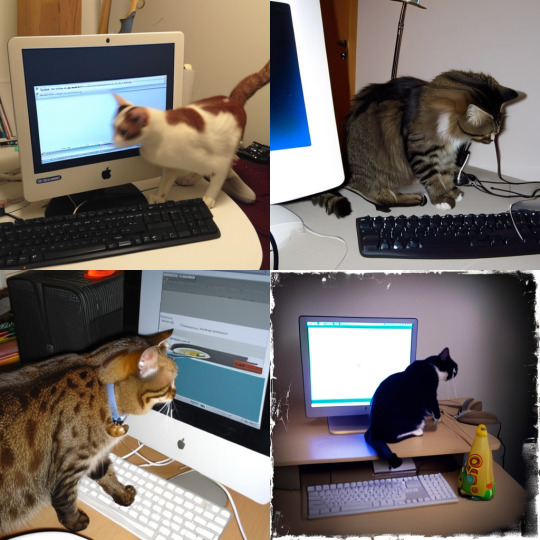
"a cat on the computer", "NC" model
they both take the same amount of time to generate (17 seconds for four 512x512 images on my 3060). if you're really looking for that early ai jank, go for the commercial model. one thing i really like about commoncanvas is that it's really good at reproducing the styles of photography i find most artistically compelling: photos taken by scientists and amateurs. (the following images will be described in the captions to avoid redundancy):
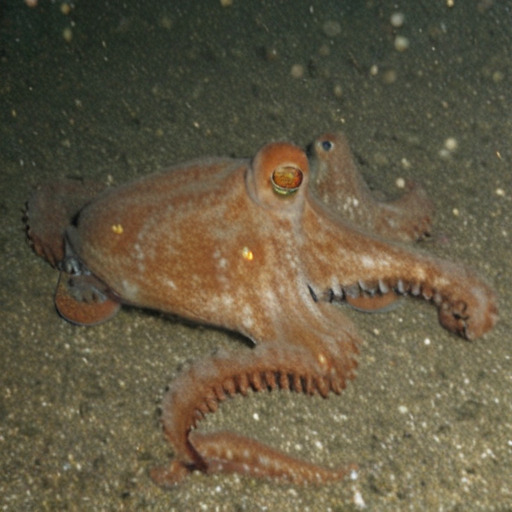
"grainy deep-sea rover photo of an octopus", "NC" model. note the motion blur on the marine snow, greenish lighting and harsh shadows here, like you see in photos taken by those rover submarines that scientists use to take photos of deep sea creatures (and less like ocean photography done for purely artistic reasons, which usually has better lighting and looks cleaner). the anatomy sucks, but the lighting and environment is perfect.
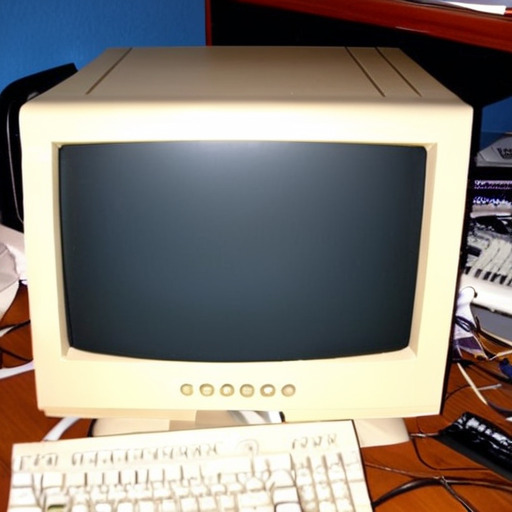
"beige computer on messy desk", "NC" model. the reflection of the flash on the screen, the reddish-brown wood, and the awkward angle and framing are all reminiscent of a photo taken by a forum user with a cheap digital camera in 2007.
so the noncommercial model is great for vernacular and scientific photography. what's the commercial model good for?
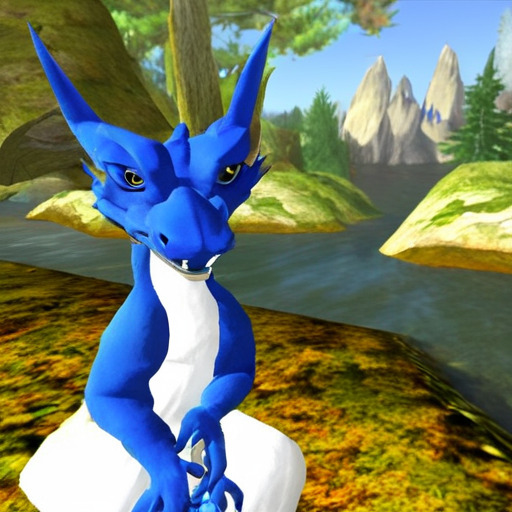
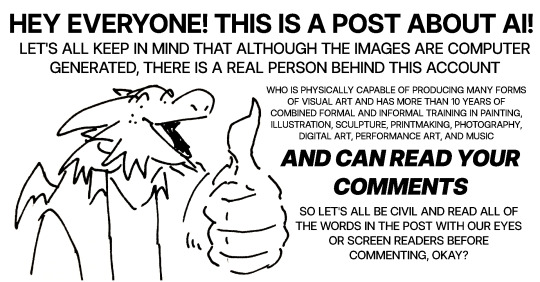
"blue dragon sitting on a stone by a river", "C" model. it's good for bad CGI dragons. whenever i request dragons of the commercial model, i either get things that look like photographs of toys/statues, or i get gamecube type CGI, and i love it.

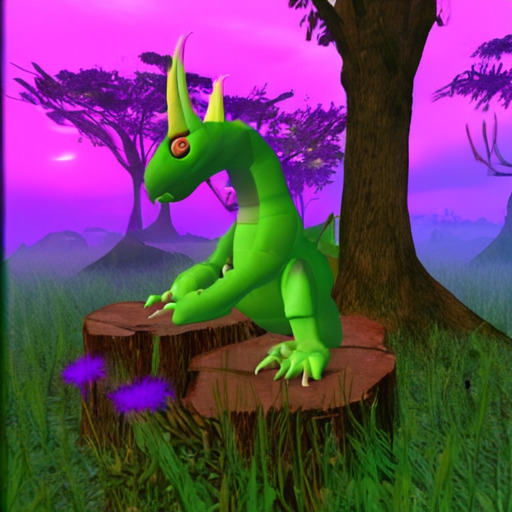
here are two little green freaks i got while trying to refine a prompt to generate my fursona. (i never succeeded, and i forget the exact prompt i used). these look like spore creations and the background looks like a bryce render. i really don't know why there's so much bad cgi in the datasets and why the model loves going for cgi specifically for dragons, but it got me thinking...
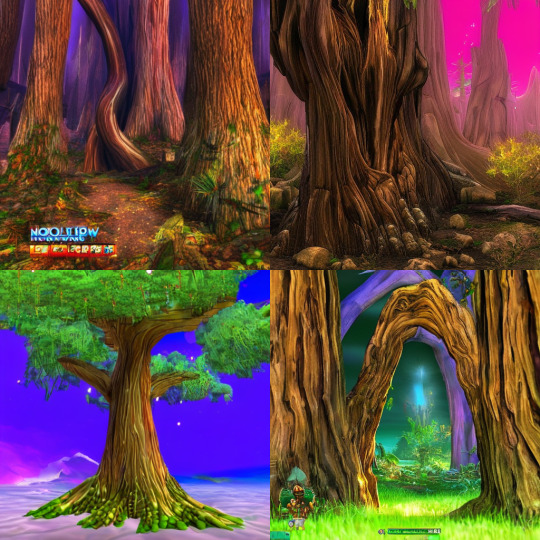
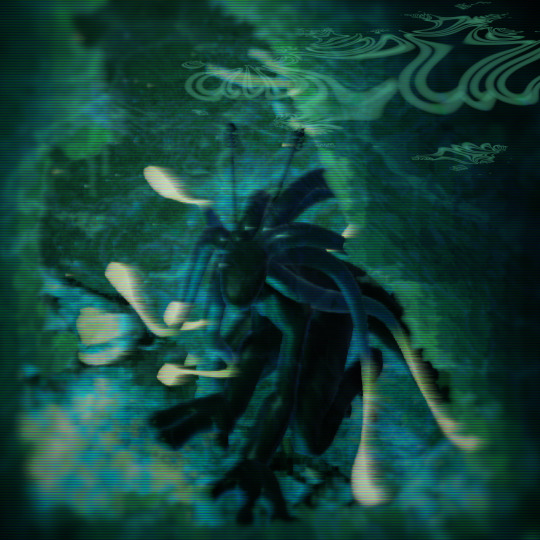
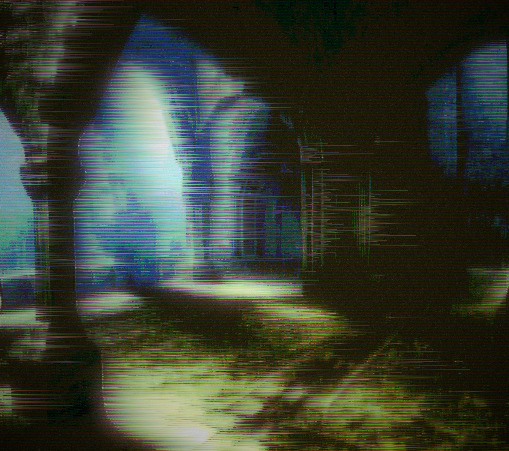
"hollow tree in a magical forest, video game screenshot", "C" model
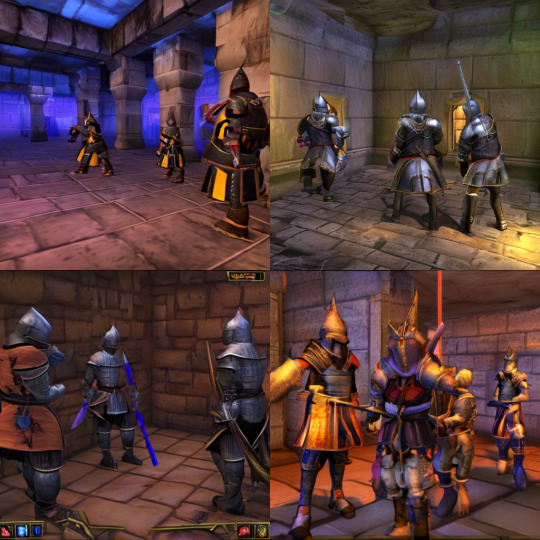
"knights in a dungeon, video game screenshot", "C" model
i love the dreamlike video game environments and strange CGI characters it produces-- it hits that specific era of video games that i grew up with super well.
part 3: use cases
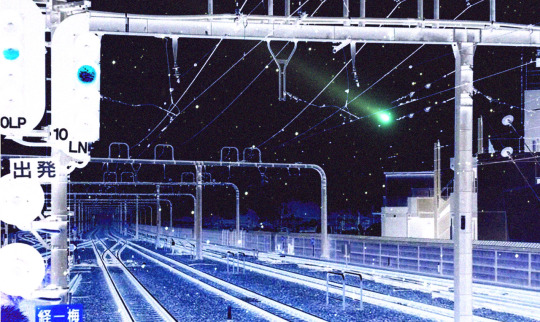
if you've seen any of the visual art i've done to accompany my music projects, you know that i love making digital collages of surreal landscapes:


(this post is getting image heavy so i'll wrap up soon)
i'm interested in using this technology more, not as a replacement for my digital collage art, but along with it as just another tool in my toolbox. and of course...
... this isn't out of lack of skill to imagine or draw scifi/fantasy landscapes.
thank you for reading such a long post! i hope you got something out of this post; i think it's a good look into the "experimentation phase" of getting into a new medium. i'm not going into my post-processing / GIMP stuff in this post because it's already so long, but let me know if you want another post going into that!
good-faith discussion and questions are encouraged but i will disable comments if you don't behave yourselves. be kind to each other and keep it P.L.U.R.
193 notes
·
View notes
Text


Director Wes Ball and Visual Effects Supervisor Erik Winquist shared some step by step images of transforming humans into apes. They said that the crew of Weta FX made vast improvements on performance capture with Avatar The Way Of Water. “From a hardware and technology standpoint, one of the improvements is now we’re using a stacked pair of stereo facial cameras instead of single cameras, which allows us to reconstruct an actual 3D depth mesh of the actors face. It allows us to get a much better sense of the nuance of what their face was doing.”


They also shared some concept art of the post-apocalyptic setting of the film. Winquist shared a book that gave him much inspiration. “One of the things that I was looking at early on was the book ‘The World Without Us’ that hypothesizes what would happen in the weeks, years, decades and centuries after mankind stopped maintaining our infrastructure. You start pulling from your imagination on what that might look like….”
More behind the scenes details were shared in the article on VFX Voice magazine.
#kingdom of the planet of the apes#behind the scenes#planet of the apes#wes ball#owen teague#Noa#Anaya#soona#sunset trio#reboot pota#pota#proximus caesar#Kevin Durand#the world without us#mine#vfx#travis jeffrey#lydia peckham
203 notes
·
View notes
Note
Hey! I was just wondering how you add in live action props into your animations. I assume you film the prop in front of a greenscreen but I was curious as to the process after that as well :]
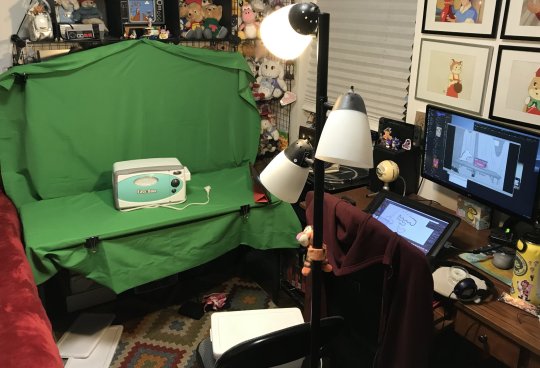


Heyo! Its totally case by case. usually i'm just using Keylight in after effects to key out the green, then animate the characters on top of it, and composite it all together. If theres a moving camera then i'll track it in Blender before adding 2d and 3d elements so it all syncs up. Then usually last step is adding lighting to make the different assets look like theyre in the same space. (good tutorial for that here!) Sorry its not a more in depth answer, thats the basics of it though!
267 notes
·
View notes
Text
alright, the other day i loosely implied that i would make a behind the scenes/tutorial type of thing. momma didn't raise no liar, so here goes nothing i guess!
step 1) rough sketch
honestly i skip this entirely if have a really concrete idea of what i want to do. sometimes compositions are just beamed into my brain from On High and a sketch is unnecessary.
step 2) 3d ref

this is where i refine the composition, lighting, camera angles, props, etc. i use DAZ studio for model posing and blender for almost everything else (props, horns, lighting, rendering).
here's a 10 minute video on how to pose models in DAZ if you're interested in doing something like this! it's not very hard! basic posing requires almost no technical know-how.
i've heard magicposer and virt-a-mate are also good for model posing, but i don't have any experience with either program.

after i'm done posing, i transfer the models to blender so i can work on props, environment, and lighting because doing it in DAZ is ass. you can see that i went overboard on the ref for the paladin i worked on last year by modelling armor.
step 3) lineart

at this stage i'm synthesizing my 3d models, reference images, and style choices into lines.
the 3d likeness of my models is poor because I don't have time for that shit, so this is where my humongous folder full of bg3 screenshots comes into play.
for example: looking at my screenshots, astarion's forehead tilts back towards the back of his skull, much more so than my reference model. his chin and jaw are sharper and longer, and the transition between his brow ridge and nose is almost a straight line. if i combine the information from my 3d model and astarion's face, i get something like this:

3d models aren't fleshy (ie, tummy rolls, wrinkles, muscle deformations, butt squish) unless one puts in A LOT of effort like absolute madman chris jones.
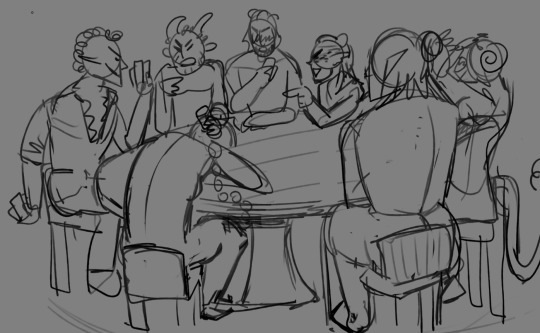
you guys know bernini, right? he has a couple great examples of this. see how hades' hands press in on persephone's leg?
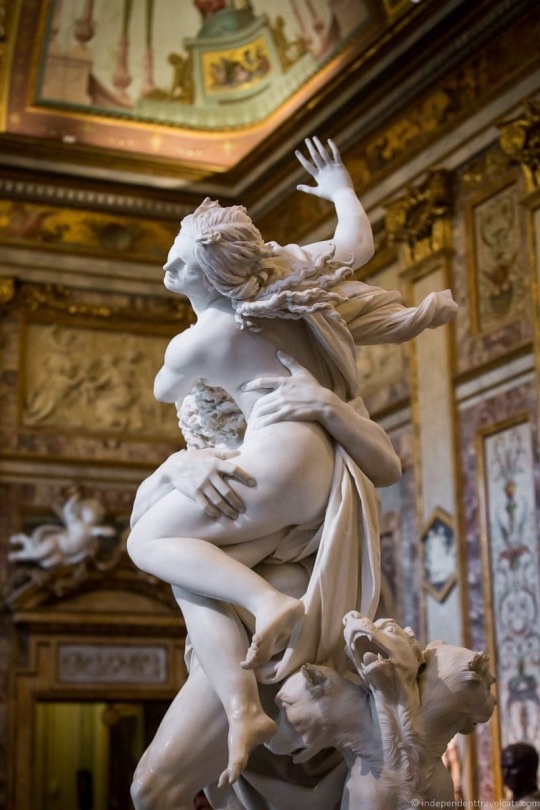

this is what we want to add in the lineart because it's too much effort for 3d. laziness is king.
i guess i draw clothes at this stage too, but for some reason there aren't many in this image. ( ͡° ͜ʖ ͡°)
step 4) base color
i have a little color picked palette that i use for everybody so i get their skintones right before i start messing with colored lighting. i'll use overlay and hard/soft light layers clipped to the base layer during the shading step later.
step 5) shading
if you thought we were done with the 3d part, guess again! i posterize my 3d reference so i can see the shapes of the shadows and highlights better. if i'm not feeling it, i can go back to 3d and change the lighting really easily.
could I make a cel shader for this? yes. am I going to? No. custom shaders are for people with intelligence and I am fresh out. posterization it is.

from there, i do a pretty standard cel shading deal that i usually blur and set to low opacity. (for this image i stuck to no blur because i had been looking at a lot of morebird's art and was really feeling the hard edges)
photoshop is what i use for final rendering because it has bangin tools. the brush customization alone make ps worth it, but i also particularly abuse puppet warp, noise generation, the camera raw filter, and layer styles.

step 6) background
i put the least effort possible into a background and then i blur it into oblivion so you can't fathom the depths of my ineptitude.
and then i have a finished image! ᕕ( ᐛ )ᕗ
#art tutorial#this got long!! the rest is under the cut#i encourage everyone to try out DAZ and blender! theyre both free!!#i love goofing around in 3d
104 notes
·
View notes
Note
We got the earth and the sky, but has anyone asked about what you think of Abzu?

i love abzu!!! another one i have watched the gdc talk for which you can watch here!!
the two big things in abzu are the fish animations and the overall environment lighting - lets start with fish!! there are a lot of them. and when you want to animate a lot of things, your computer will explode. this is specifically when you animate things with bones, how a lot of computer things are animated
luckily one thing that gpus can be really good at is drawing a tonnnn of the same object really fast, using something called instancing. as long as its the same mesh and material, it can be rendered a ton with just a single draw call (like i am talking hundreds of thousands). so lets make 10 thousand fish. unluckily this doesnt work with skeleton animations. luckily you dont need them! especially with fish
even though all the objects need to be the same mesh and material, doesnt mean they cant have different input. not only that but shaders let you modify individual vertexes, so, what if you just take all 10000 fish and wiggle them along an axis, like this

and give them all slightly different inputs so they arent all doing the exact same animation, maybe by giving them each their own unique number. now you have 10 thousand fish swimming around, wiggling, at almost zero rendering cost

these are all individual 3d models and all their animations are running in the shader !
the other way they animated fish without giving them bones was through something called blendshapes - these are usually used for stuff like facial animations, where you move vertices around to your desired "shape" (so like maybe your default face is :| but you edit the vertices so your character goes :> etc), and keep track of the difference between each vertex's position and its original position so you can move it whenever you want
that doesnt need any bones so they used this for things like fish going CHOMP and fish making sharp turns
for the actual environment, they experimented with a bunch of things like using actual volumetric lighting, but in the end they found that just using fog worked best!! they did tweak it a bit though - they had a "zone" between where the fog started to get thick and when the fog just ended up being a solid color where they dimmed any lighting - this really helped the background geometry stick out and give that underwater feel (left is without dimming the lights, right is with dimming the lights!! fun to think about how firewatch did something similar but changing the fog color based on depth rather than literally dimming the lighting)


they also let different volumes have their own fog value, so if there was say a cave off in the distance, it could have less fog than the surrounding area for clarity & also made the fog look a bit more volumetric
and the other huge thing that helped was "portal cards" - not an official term but its what they called them, basically just quads they could stick in any place where they needed to make something "stick out", like a cave, or a hilltop that blended with the background too much. the card sampled the depth of objects behind it, and used that 0 to 1 value to map a color to it. and then the closer youd get to these cards, the more transparent theyd get, until youre right on top of it and you dont need the objects to stick out of the background anymore!! here you can see a Me, but very dark, and then i slide the card over it. the black and white is the camera depth of all objects behind the card, minus the depth of the card. and mapping that to a color makes me stick out way more than i was initially!! then as you swim closer to me, the card fades away, until you pass the card completely

these portal cards were also used to make the light beams poking out from the surface, theyre just animated a bit!! you can see how the portal cards affect the look of things in this frame breakdown
and one other thing thats pretty prominent that wasnt touched on in the talk is all the caustics on the ground, those little wobbly light things you see underwater. but those were probably? just added to every shader as a "add this caustics texture on top based on the with the texture mapped to the world x and z position and only if the object is facing up"
like this !
anyways thats all from me on abzu..!! really pretty game
#anonymous#ask#potion of answers your question#gamedev stuff#long post#i optimize every gif for you guys even if its already under 10mb
294 notes
·
View notes
Note
HEYY FAIRY!! I DID IT !! I MANIFESTED MY DESIRED FACE!!!
okay i really wanna go in depth with this ask since i finally manifested my desired face. So i followed you just because you mentioned about how you manifested your df and i've tried and failed so many times its actually crazy. When i started i would affirm day and night (failed),tried self concept (failed), then i tried to enter the void (failed), tried shifting to a reality where i had my df (failed) and then you started posting edward art stuff and i am not even lying when i say it freed me in ways i didn't know i could be freed, i read all your posts and infact i would eagerly wait for your next post, i'd keep refreshing your blog in hopes that maybe you'd post and when you did i'd read it a thousand times ( i even have all your posts written in my notes just in case you decide to deactivate lol fan girl behaviour? yes) Anyways so i read your "be a doer" post and i decided to actually feel that i was who i wanted to be instead of thinking of it, it lasted a few days but i kept pulling myself back up since my college starts soon and i just cannot go looking and feeling the way i used to, so there was this burning desire to have what i wanted unlike any time before. But i had a hard time persisting and i figured out it was because i wasn't imagining what i want and because i kept switching my df like every other day (i got this from the "feeling and self" post you linked from edward art) so i took my time to figure out a face i loved and when i tell you it got so easy to persist (because i was imagining what i always wanted and it felt so nice that i naturally wanted to keep going back to feeling it) i did have a few doubts here and there but i read your posts and edward art's posts and i'd be back on track. There were alot of things that would bother me like 3d, the future, the past but when i imagined all of this didn't matter, i had my df right here and right now (i also manifested other stuff to build faith that the 3d will reflect no matter what, especially when i had thoughts like "what if it doesn't work?") nothing changed for a few days but i was busy imagining another thing that i did was i was trying to fix my appearance like instead of imaging my new face i'd imagine how i could fix my current appearance but i realized i dont have to do that, i can imagine a completely new face, a face that i loved and felt confident in. AND TODAY I WOKE UP WITH MY DESIRED FACE, I WAS SO SURPRISED LIKE OUT OF NO WHERE??? I LOVE WHEN THE LAW SURPRISES ME LIKE YESTER-NIGHT I WOULDNT HAVE EVEN GUESSED LIKE WTFFF?? UGH I LOVE EVERYTHING RIGHT NOW I AM LITERALLY DANCING IN MY ROOM RIGHT NOWWW!! i dont have to be insecure and hide when someone points a camera at me ?? i am being treated better?? i am soo soo confident and sooo ready for college !! Thank you so much fairy i can feel warm tears roll over my cheek as i write this, i couldn't have done this without you thank you for freeing me, i will always and forever love you !! thank you
hey butterbean!!
wow wow wow this is just amazing honey and your journey feels so close to my heart. I just cannot express how happy i am for you!! So so so proud of you that you did not give up!! i hope your life is full of joy !! sending love!!
#lavendiary#loassumption#loa blog#loa methods#loa motivation#loa success#successtory#law of assumption#affirm and persist#neville goddard#edwardart
840 notes
·
View notes
Note
Do you have any advice on how to get over lack of skill? I want to do the Astarion Lestate trend but I don't think my skills are ready for it. I have references pictures of Astarion pulled up when I'm working, and even have the game launched so I can turn him if I need to (mostly for the attempts I did at his hair) but everytime I tweaked something or started over nothing looked right. I keep getting frustrated 😭
Hi anon-
Sorry this took me a while to get to, i hope you and others can still find this useful! While the basic advise to get over 'lack of skill' is PRACTICE, PRACTICE, PRACTICE! i hope this will help you knowig where to get started with that!
I'm going to put my teacher pants back on, this might be a bit long so buckle up- I'll go over a few areas:
Primitive Shapes
How to Use References
Delete your work (hear me out)
--------------------------------------
Primitive Shapes:
This is your foundation.
Everything starts with this, and while you may find it boring to think of your art in terms of cubes and spheres- i kid you not it will help elevate your work.
If/when you are stuggling to draw a complicated pose, or a specific perspective, refering back to the form in these basic shapes can really help to simplify your process and help you problem solve.
A chill/silly watch for a more in depth discussion on what i mean / how this can help - Give Pikat's 'Draw boxes (correctly) to improve your art' a watch.
They also mention this in the video but @/Uncomfortable on youtube also has some great fundermental videos.
-------------------------------------
How to use references.
Okay so references are great 10/10 very useful. But, unless you know WHAT to study from a reference, they can sometimes fall flat of their usefullness.
Anatomy studies are something a lot of us will be recommended as artists, but actually knowing what to pay attention to can boost your confidence in your work. Start with a goal, what do you want to get out of this sketch session? Do you want to get better at understanding the 3D form of a specific part of anatomy? Better at poses? Try to narrow down your learning each session to make it less overwhelming.
In this i'll focus on understanding the form so, lets start with a reference.
Linking back to Primitives again, start off by braking down your anatomy into forms. Sketching over the top of your references is totally fine. But make sure you are doing so critically, otherwise it may look like a flat/unnatural trace and you're not really learning from it.
Via the first sketch you can see where the primitive shapes fall on the body - think of it like a ball-jointed-doll, hips, knees, shoulders ect are ball socketed whereas arms, legs ect can be made up of tubes.
(See the first image, when sketching your tubes, sketch your contour lines too- this can help determind how clothing / hair will fall over the body, and can help you understand the 3D Form.)
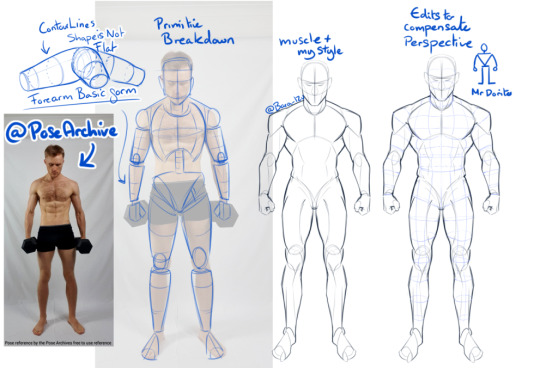
A BIG IMPORTANT SIDE NOTE - When using photo references, do be very aware that they may be distorted due to the height of the camera, or camera focal length - (you can see in my sketch i had to edit the torso and head because the reference was a little top heavy)
A few artists/books for some extra reading / reference :
- Andrew Loomis (OG for body proportions, books are a little outdated but fundermentals are still useful),
- Tenten云画画 (his stylised anatomy breakdowns are very interesting to me)
- Anatomy Essentials (I've had this book for years, it covers lots of areas, is a bit complex though, i myself should reread it again 😅
Also, if you can't find a reference for a specific pose, don't be afraid to use 3D programs!
Anatomy 360, DesignDoll, Clip Studio, Magic Poser - all nifty options~
SO taking when we've learnt from the primitive forms, you can now try applying that to the Lestrat Picture. (which, granted is a complicated pose, as it also has forshortening and an odd top down perspetive of the bottom character- so don't panic if you don't get it the first time!)
-------------------------------------
Final points-
Delete your art (hear me out)
What i mean by this is, sometimes reworking the same face over and over again can bog your down. It can make it very difficult to actually see whats wrong. So, get rid of it and start again. (hide the layer/use a different piece of paper, please don't actually bin it (yet))
Next, redraw it. Use what you've learned the first time, and redraw it from scratch. (in this case, that might be just specifically the head, or the hair, or the eyes ect - you don't have to bin the whole thing, but sometimes it can really help give you a new perspective)
Once you've done this, unhide your original, compare, this may help you understand what you were doing wrong the first time. Or if there are areas of one that you like- its an opportunity to combine them as you see fit! :)
On a side note for Astarion's Hair, the lovely @mistercrowbar actually posted a breakdown yesterday! (i use p much the same method so-)
I HOPE this was of some use- do feel free to ask any questions if you've got them! i'll try to answer in a more timely manner next time 😅
95 notes
·
View notes
Note
How does moon have human senses? (like taste, touch, smell, sound, hearing). Does moon have a tongue that allows them to taste things despite being a robot?
Lucky you, we love thinking about this stuff so we already have a number of explanations for these.
Hearing: Stereo microphones around where the ears connect to the head that feed into an audio processor that determines a noises placement in 3d space from the differences in acoustics.
Sight: Already drew a thing about this a bit ago! She has a spinning array of sonar depth sensors that essentially create a full 360 field of vision albeit without any color or light. The only data from this sensor is simply how close points are that can show the shape of things and their proximity. For the rest of the information there is a hidden camera on her visor to get light and color in front of her.

Smell: Moon actually cannot smell as she has no reason to breathe like a person does.
Taste: Her tongue is lined with sensors that can determine the chemical makeup of things in close proximity, emulating a "taste" sensation by tying a range of compounds to a variety of different signals.
Touch: Her various limbs have extremely sensitive positioning sensors that compare their actual position to their intended position, such that even a slight touch pushes on them enough that the sensors can work together to determine a general position of the point of impact.
#robotposting#oc:moon#Why is she capable of taste?#robot can have a little food sometimes#as a treat
194 notes
·
View notes
Note
hi hi!!!
I'm a CFX artist (I do hair and cloth for 3D animated movies) and I wanted to clarify something!!
the encanto post? we talked about that one at length at work when it was first made, and it is incredibly evident that the guy who posted it is just bad at his job. the exact same effect can be archieved by changing the camera focal length- but animators never reach for technically competent solutions. (this is a roast.)
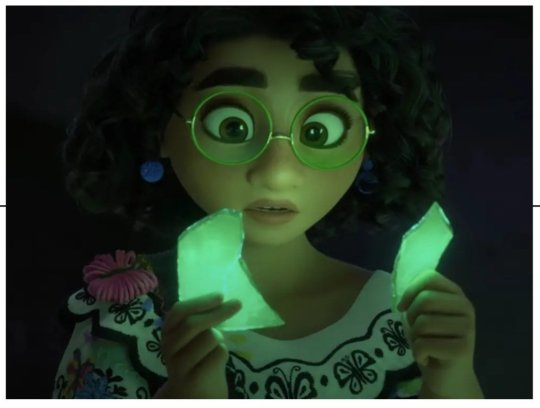
and even if thats not possible, there is NO reason for why her shoulder area or chest are completely crushed or why her feet are inside of her hip bone.
and also, since I am in the department that comes right after animation- if I had gotten that shot, I would have either sent it straight back to the animator to fix it, OR cleaned it up myself, by which I mean it absolutely did not look like this off-camera by the time we send it for final light render.
essentially if animation looks that messed up off-camera, it is not "animation magic", it is actually someone doing a bad job.
I'm going to have to respectfully disagree.
For one thing, the behind the scenes image was not close to a final render so I don't think you can fairly judge what was probably just the animator lining up and blocking the shot. I don't think at that state they were concerned with the shoulders, chest, and feet. I'm betting the final polished version looked much better.
And I also disagree the exact effect could be achieved by changing the focal length.
As a photographer, focal length is not just about cramming everything into the field of view. I don't only use a wide angle because I want more stuff in the photo.
It is also an artistic decision.
Wide angle lenses exaggerate distance and can make foreground objects seem massive and background objects seem tiny.
Look at this super wide angle shot of Otis lusting after a tennis ball.

The ball has a huge presence in the photo. It is only two feet away, but the distance between them seems immense. The ball takes up as much space in the photo as Otis.
Compare that to the ball in this telephoto image.
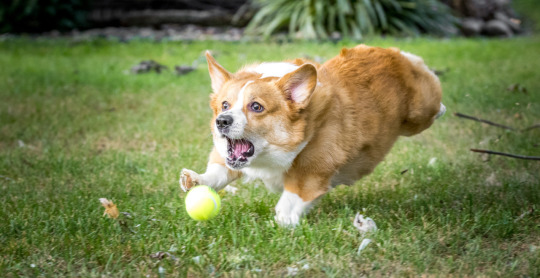
The picture now becomes less about the ball and more about the act of chasing it. The ball is literally only a foot closer to Otis, but it has no commanding presence like in the super wide shot.
So what artistic intention comes from using a telephoto lens like in Encanto?
Telephoto focal lengths compress distance. Background objects appear much larger in the frame. They also flatten the face and give a more flattering perspective of said face. Human faces can look a bit alien at wider focal lengths.
So what if you want the background to look large and encompassing and you want the flattering facial proportions from a telephoto lens, but you also want a foreground object to have a commanding presence like the ball?
You cheat!

This is not a technique confined to the world of 3D animation though. It is actually an old live-action trick. They will actually use another person's hands to do effectively the same thing as above.
In Hellboy II, Guillermo had two problems. He wanted a telephoto feel and depth of field and he also wanted a very intricate practical egg prop that could open mechanically.
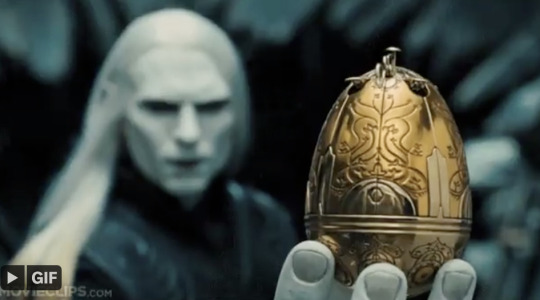

To get the proportions and the framing and the feel of the shot as intended, he double cheated!
He made a big freaking egg with a big freaking fake hand.
(I know there is a picture of the giant hand somewhere but my googling failed me.)
In any case, I think this is just a case of good problem solving over incompetence. I think the director or the animation lead wanted this scene to fit within a specific focal length and it was easier and more efficient to just give her crazy long arms.
I'm not trying to dispute your expertise or animation-splain. Perhaps there was a better way to achieve the same look. But if the final result looked good, I don't think we need to bash someone who was probably under tight deadlines and had a lot of other work to complete. At least not without a lot more information.
55 notes
·
View notes
Last Seen Blogs

linkingnightvale
Linking Together Night Vale

vinaysarupuru-blog
Untitled

slimesfeliz-blog
Sem título

samg6933
U WOT M8

ovesenovesen6-blog
Untitled