#3d cube javascript
Explore tagged Tumblr posts
Visit Tumblr Blog
Explore Tumblr blogs with no restrictions, modern design and the best experience.
Last Seen Tumblr Blogs


Fun Fact
Tumblr was acquired by Yahoo for $1.1B in 2013.
Text

3D Cube Slider JavaScript
#3d cube slider#3d cube javascript#3d cube#html css#codingflicks#frontend#code#learn to code#css#html#css3#frontenddevelopment#javascript project#javascript snippets#javascript slider#javascript#webdesign
3 notes
·
View notes
Text

Hi I saw a demo by Héll Mood and wanted to try coding it on javascript myself :3>
It's kinda slow (bruteforce-raymarching-over-a-3D-array slow) but it's fun to explore randomly generated sierpinski-like sponge fractals.💮 Move with arrow keys, hold shift to go faster.
Credit where credit's due, this was made by closely trying to visually replicate the original demo Atlantis, by Héll Mood.
I learned a lot about ray marching, math, algebra, fractals, and some crazy bs about javascript. Weak typing is chaotic, can't believe the best way to force integer division is to use double bitwise not operator like ~~(a/2)
Anyway hope you like!
#demoscene#fractal#programming#menger sponge#javascript#intro#html#ray marching#algorithm#raytracing#sierpinski sponge#js#was debating if i should post this on main or on my side blog but whatever#to my main it goes
36 notes
·
View notes
Text


Cubed Oscillations 5-8-11
Back to 3D Lissajous structures!
More and less: More oscillations, more curves. No projecting lines shown, no cubes. Less educational, more mysterious, more confusing, more artefacts and Moiré effects.
Rainbow-y sin(5t)/sin(8t)/sin(11t) "built from" its projections to the three co-ordinate planes - 2D Lissajous figures. Showing the same structure from four different viewing angles.
Created with javascript/threejs, no AI.
While harmonic oscillations and the spectral colors have relevance in physics, this combination has not. However, I wanted to combine rainbow colors with white, making the aesthetics feel like my freehand drawings of dispersion prism: White lines and rainbows. Usually I have a vague idea, then start coding / changing parameters. in 90% of experiments I do not like the first attempt, at all. Sometimes I shelve the whole idea after hours of trying. In this case the result was what I had hoped for.
I have swapped the order of colors: The heart is read, the periphery is violet... so if some "particle on a Lissajous trajectory" had something to do with the energy of these photos, at least the more energetic should result in a larger "radius". I was thinking to make the radius dependent on the square root of the frequency or something ... but decided against as this is only "inspired by physics" anyway.
My main motivation is to use rather simple functions, and a simple representation (lines, no "effects") and create something unexpected by using an unfamiliar point of view.
#physics inspired art#physics#digital art#code art#creative coding#lissajous figures#oscillations#mathart
12 notes
·
View notes
Text
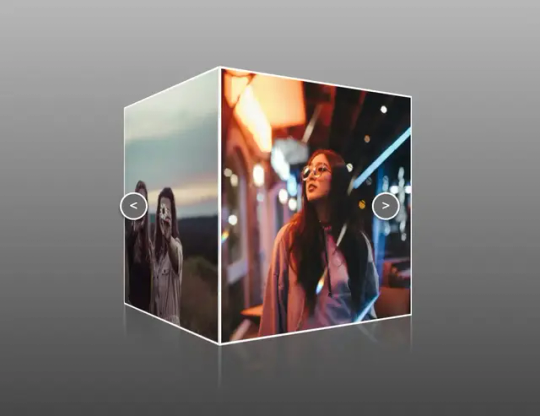
Auto-Rotating 3D Cube Carousel With JavaScript & CSS3
This is a simple 3D cube carousel that supports auto-rotation and pauses when hovered over. Built with HTML, CSS/CSS3, and a little bit of JavaScript, it also allows users to manually navigate through images with next and previous buttons. This 3D carousel provides a fancy way to showcase a set of images, perfect for showcasing product collections, portfolio items, or even as a dynamic visual…
View On WordPress
2 notes
·
View notes
Note
how did you make The Cube?
(i'm assuming this is about the one on my blog theme)
it's all css transforms!
it turns out css just like, has properties for doing 3d transformations on things including perspective?? so it's just 6 divs rotated to form the faces of a cube inside another div that gets rotated to move the whole cube, then just a little bit of javascript to listen for clicks and update the rotation values on that outer div!
also yes that means you can put literally any html element on the cube and it will rotate along with it! if you want to see the code, searching for "cube" in the source code of my blog should show you just about everything lol, it's not very much
glad someone asked about The Cube though, i love The Cube :3
1 note
·
View note
Text
Augmented & Virtual Reality (AR/VR) App Development

Augmented Reality (AR) and Virtual Reality (VR) are transforming the way we interact with digital content. From immersive games to educational simulations and training environments, AR/VR technologies provide dynamic user experiences that bridge the physical and virtual worlds. In this guide, we’ll explore how to start building AR and VR applications and what tools you need.
What is AR and VR?
Augmented Reality (AR): Enhances the real world by overlaying digital content through devices like smartphones or AR glasses.
Virtual Reality (VR): Immerses the user in a completely virtual environment, often using headsets like Oculus Rift, HTC Vive, or Meta Quest.
Popular Platforms and Tools for AR/VR Development
Unity: A powerful game engine with support for AR and VR development using C#.
Unreal Engine: High-fidelity engine great for immersive VR applications.
ARCore (Google): Framework for building AR apps on Android devices.
ARKit (Apple): Framework for creating AR experiences on iOS devices.
Vuforia: A popular AR SDK that works with Unity and supports image tracking.
WebXR: A browser-based API for building AR/VR experiences using JavaScript.
Basic Workflow for AR/VR Development
Choose Your Platform: Decide whether you're developing for mobile (AR), desktop (VR), or standalone headsets.
Set Up Your Development Environment: Install Unity or Unreal Engine and relevant SDKs (ARKit, ARCore, Oculus SDK, etc.).
Create 3D Assets: Use tools like Blender, Maya, or asset libraries to design models and environments.
Program Interactions: Use C# (Unity) or Blueprints/C++ (Unreal) to script behavior.
Test and Optimize: Regularly test on target devices and optimize performance for smooth rendering.
Example: Simple AR App with Unity and Vuforia
Install Unity and add the Vuforia Engine package.
Set up an AR Camera in your scene.
Add an Image Target (e.g., a printed marker).
Place a 3D object (like a cube or model) on the Image Target.
Build and run on your mobile device to see the 3D object appear when the camera detects the marker.
Applications of AR/VR
Gaming: Immersive gameplay experiences and mixed reality adventures.
Education & Training: Virtual labs, simulations, and skill-based training.
Healthcare: Surgical training, anatomy visualization, and therapy.
Retail: Virtual try-ons and interactive showrooms.
Architecture & Real Estate: Virtual property tours and 3D modeling walkthroughs.
Tips for AR/VR Development
Design for comfort: avoid motion sickness in VR with smooth camera transitions.
Keep UI intuitive: use spatial UI elements that are easy to interact with.
Optimize assets: use low-poly models and texture compression for better performance.
Test on multiple devices: ensure compatibility and performance across platforms.
Stay updated: follow AR/VR development communities and keep your tools current.
Conclusion
AR and VR are no longer futuristic concepts—they're actively shaping the way we learn, play, and work. With the right tools and a creative mindset, you can start building powerful immersive applications. Whether you’re designing virtual classrooms or augmented art galleries, AR/VR development offers a thrilling world of opportunities to explore.
0 notes
Video
youtube
🎥 Creative Code Series
Each video in this series is a dynamic collection of small but incredibly creative and useful web projects. Each project is an idea brought to life in code: from animations to adaptive interfaces and 3D graphics. This series is perfect for developers, designers, and anyone seeking inspiration or practical solutions for web development. ✨
Each video is a standalone "collection," but together they form a cohesive series:
✅ Smart Bites, Pack 1: Exploring Essentials ✅ Smart Bites, Pack 2: Beyond Basics Smart Bites, Pack 3: Interactive Wonders Smart Bites, Pack 4: Next-Level Creativity
---------------------------------------------
Smart Bites, Pack 2: Beyond Basics
🌟 The second clip takes a step forward: from task management to interactive 3D effects.
1️⃣ To-Do List A convenient task organizer built with modern web technologies. GitHub: https://github.com/Zorger27/To-Do-list Website: https://zorin.expert/extra/todo
2️⃣ Spinning Cube A mesmerizing cube with translucent, colorful faces that creates a dynamic motion effect directly in the browser. GitHub: https://github.com/Zorger27/Spinning-cube Website: https://zorin.expert/extra/graphics/cube
3️⃣ Typical JS Tasks An interactive trainer to learn and test solutions for popular JavaScript interview tasks. GitHub: https://github.com/Zorger27/Typical-JS-tasks Website: https://zorin.expert/extra/tasks
4️⃣ Blog Site Template A flexible blog site template, easily customizable for any needs. GitHub: https://github.com/Zorger27/Blog-site
Explore the world of code, where each solution is a step towards creating unique projects. Don’t miss the chance to get inspired and learn something new! 🚀
0 notes
Text
なかよしインターネッツ285アペンディックス(その1)
光栄なことにイトッポイドさんのなかよしインターネッツにゲストで出演しました。Spotify・YouTube・Apple Podcastsで聴けます。本当にありがとうございます。このポストでは放送でお話しした内容を補っていけたらと思います。URLもなるべく載せられるものを掲載します。
その本に自分いますよ
紙ラボさんとかるみねさんのPLOTTERや、 佐野章核さんとcube Tanakaさんのjadda+、RebRankさんのDoujin Game Package Design Vol.01の話です。
C-media records
https://www.c-media.org/ 2001年から岡山県で活動しているレーベル、全員デザインも音楽もやる人が集まっています。CDは全て手作りで、2024年の今でもCD-Rを焼いています。CDのデザインはこんな感じです。毎年秋のM3と冬コミに参加しています。最近でたCDはこちら。
ArtPad II Pro
これです。ArtSchool Dabblerがついてきました。その後のタブレット遍歴はArtPad II Pro→bamboo→bamboo→CintiQという感じでした。
DoGA
こちらです。当時の3Dは3D studio max・Lightwave・Softimage 3D・Maya・Shade・trueSpace・Metasequoia・六角大王などなどで、その中でもDoGAは超初心者向けなところから始まっていて遊びやすかったです。Webサイトが当時から変わってなくてちょっと感動しています。
midiを打ったりとか
Music Studio Standardとか使ってました。その後ReBirth RB-338を経てReasonに至ります。
PROJECT-WIVERN
こちらで見れます。当時は動画コンテンツが少なかったので何度も見直してました。ダイジェスト版のBGMもすごい好きでした。
新海さん
彼女と彼女の猫あたりの時代です。これも当時動画コンテンツが少なかったのでめちゃくちゃ見てました。「誰か助けて」のところだけ新海さんじゃない女性の声になるあたりが演出としても非常に印象的でした。
メダロット
2Xの幼少期に多大な影響を与えました。メダ2のストンミラーあたりの話がやばかったです。メダロットのサイトも作ったし初めての同人誌もメダロットのものを買ったし人の繋がりもメダロット起因のものが非常に多いです。
コングルGood
収録後に「あれOH!MYコンブだわ」となりました。大変失礼いたしました。
CSSが未発達時代の個人サイト
Excel方眼紙みたいな作り方かとは思うんですが先日サイトがまだ残っていることを知って久しぶりに読み漁りました。
Flashの道
Flashは4とか5あたりからのユーザーでした。そしてActionScriptを覚えたのはHAKUHINさんのサイトです。このサイトでスクリプトはもとより変数や引数、データ型などスクリプトのいろはを学びました。ActionScriptはJavaScriptと文法が近いのでその後のキャリアにも大きく影響しました。
当時どんなサイト見ていたんですか?
こういうサイトを見ていました。
MONO*crafts(yugop.com)
EYE4U
B L A C K W H I T E
Pale Light
2advanced studios
(mt) Media Temple
Bionic Systems
CBCNet
Shift
04.jp.org
May1stReboot
事前登録して5月1日に一斉にサイトリニューアルするという企画。tatsさん(有馬トモユキさん)とかとああだこうだやってた時期です。FlashにBGMのループを忍ばしてインタラクティブさを出したりなどしていました。今でもインターネットアーカイブに当時のサイトなどがあります。
8月31日までにお絵描き掲示板を使いまくる
使っていたお絵かき掲示板はしぃペインターです。今思うとpixivファンタジアみたいな企画でした。この企画のためにAEで映像作ったり専用の曲を作ったりなどしました。
デザイナーのヒーロー像
今聞き返すとthaのみなさまばかりなのですが川上俊さんやセミトラさんやSLNさんやimage diveさんなどなど他にも多くの方々がいらっしゃいます。そして今もなお読み返すのはQantaさんの「私は広告賞を獲りたかった」です。メチャクチャ熱い記事なのでぜひ読んで欲しいです。
後半はこちら
0 notes
Text
HTML Graphics

HTML provides various ways to include and work with graphics directly on web pages. The most common methods include using Canvas, SVG, and other techniques like CSS and WebGL for advanced graphics.
1. Canvas (<canvas>)
Purpose: The <canvas> element is a container for graphics that can be drawn using JavaScript. It's ideal for drawing shapes, making animations, creating charts, and developing games.
How It Works: The <canvas> element itself is just a container; the drawing is done with JavaScript, using a 2D or 3D context.
Attributes: width, height
Example: Drawing a rectangle on the canvas.<canvas id="myCanvas" width="200" height="100"></canvas><script> var canvas = document.getElementById('myCanvas'); var ctx = canvas.getContext('2d'); ctx.fillStyle = "blue"; ctx.fillRect(10, 10, 150, 80); </script>
Use Cases:
Creating dynamic graphics and animations
Developing browser-based games
Rendering charts and graphs
2. SVG (Scalable Vector Graphics) (<svg>)
Purpose: The <svg> element is used to define vector-based graphics that can be scaled without losing quality. SVG is XML-based, which means each element is accessible and can be manipulated via CSS and JavaScript.
How It Works: SVG graphics are defined in XML format, which makes them easy to edit and manipulate.
Example: Creating a simple circle with SVG.<svg width="100" height="100"> <circle cx="50" cy="50" r="40" stroke="black" stroke-width="3" fill="red" /> </svg>
Use Cases:
Icons and logos that need to be scalable
Creating complex vector illustrations
Responsive designs where graphics need to scale
3. CSS for Graphics
Purpose: CSS can be used to create and manipulate graphics through styles like gradients, shadows, and transformations.
How It Works: By using properties like background-image, border-radius, box-shadow, and transform, you can create graphic effects directly in CSS without using images.
Example: Creating a gradient background with CSS.<div style="width: 200px; height: 100px; background: linear-gradient(to right, red, yellow);"> </div>
Use Cases:
Adding simple graphical effects like gradients or shadows
Creating animations using keyframes
Designing layouts with complex shapes
4. WebGL
Purpose: WebGL (Web Graphics Library) is a JavaScript API for rendering 3D graphics within a web browser without the use of plugins.
How It Works: WebGL is based on OpenGL ES and provides a way to create complex 3D graphics and animations directly in the browser.
Example: WebGL is more complex and typically requires a JavaScript library like Three.js to simplify development.<!-- This is a simplified example, WebGL requires more setup --> <canvas id="glCanvas" width="640" height="480"></canvas> <script src="https://cdnjs.cloudflare.com/ajax/libs/three.js/r128/three.min.js"></script> <script> var scene = new THREE.Scene(); var camera = new THREE.PerspectiveCamera(75, window.innerWidth/window.innerHeight, 0.1, 1000); var renderer = new THREE.WebGLRenderer({ canvas: document.getElementById('glCanvas') }); renderer.setSize(window.innerWidth, window.innerHeight); document.body.appendChild(renderer.domElement); var geometry = new THREE.BoxGeometry(); var material = new THREE.MeshBasicMaterial({ color: 0x00ff00 }); var cube = new THREE.Mesh(geometry, material); scene.add(cube); camera.position.z = 5; var animate = function () { requestAnimationFrame(animate); cube.rotation.x += 0.01; cube.rotation.y += 0.01; renderer.render(scene, camera); }; animate(); </script>
Use Cases:
Creating complex 3D visualizations
Developing 3D games and simulations
Creating immersive virtual reality experiences
5. Inline SVG vs. <img> with SVG
Inline SVG: Directly embeds SVG code into the HTML, allowing for CSS and JavaScript manipulation.
<svg width="100" height="100"> <rect width="100" height="100" style="fill:blue" /> </svg>
<img> with SVG: Embeds an SVG file as an image, which is more static and less interactive.
<img src="image.svg" alt="Description">
Choosing the Right Method
Use <canvas> for dynamic, scriptable graphics.
Use <svg> for scalable, static graphics or when you need fine control over vector elements.
Use WebGL for 3D graphics and complex rendering tasks.
Use CSS for simple shapes, gradients, and animations.
These HTML5 graphics tools enable a wide range of visual possibilities, from simple shapes and icons to complex animations and 3D environments.
Read Me…
0 notes
Text
Top 10 JavaScript Libraries You Must Know in 2024

Hey there, fellow code enthusiasts! 👋 Can you believe we're already halfway through 2024? The JavaScript ecosystem is evolving faster than ever, and keeping up with the latest libraries can feel like trying to catch a greased pig at a county fair. But fear not! I've done the heavy lifting for you and compiled a list of the top 10 JavaScript libraries you absolutely must know this year.
Whether you're a seasoned dev or just dipping your toes into the vast ocean of JavaScript, these libraries will supercharge your productivity and make your code shine brighter than a supernova. So grab your favorite caffeinated beverage, settle into your ergonomic chair, and let's dive in!
1. ReactJS 19.0: The Reigning Champion
Oh, React.Js, how do I love thee? Let me count the ways! 😍 This library needs no introduction, but the latest version is like React on steroids. With improved concurrent rendering and a slick new API, React 19.0 is faster than ever. If you're not using React yet, what rock have you been living under?
Pro tip: Check out the new "Suspense for Data Fetching" feature. It'll change the way you handle asynchronous operations forever!
2. Vue.js 4: The Dark Horse
Vue.js has always been the approachable, easy-to-learn alternative to React. But with version 4, it's no longer playing second fiddle. The composition API is now the default, making your code more organized than Marie Kondo's sock drawer. Plus, the new "reactivity transform" feature is pure magic – it's like your components gained sentience!
3. Svelte 5: The Lightweight Contender
Svelte is the new kid on the block that's been turning heads. Version 5 introduces "runes," a game-changing approach to reactivity. It's so efficient, your bundle sizes will be smaller than my chances of ever completing a Rubik's cube. If you haven't tried Svelte yet, you're missing out on the closest thing to coding nirvana.
4. Three.js r160: Because 3D is the New 2D
Want to add some pizzazz to your web projects? Three.js is your ticket to the third dimension. The latest release includes improved WebGPU support, making your 3D graphics smoother than a freshly waxed Ferrari. Whether you're creating immersive data visualizations or just want to flex your creative muscles, Three.js has got your back.
5. D3.js v8: Data Visualization on Steroids
Speaking of data viz, D3.js is still the undisputed king of the hill. Version 8 brings improved TypeScript support and a more modular architecture. It's like the Swiss Army knife of data visualization – there's nothing it can't do. Fair warning: once you start using D3, you'll find excuses to visualize everything. Your coffee consumption over time? There's a chart for that!
6. Axios 2.0: Because Fetch is So Last Year
RESTful APIs are the backbone of modern web development, and Axios makes working with them a breeze. Version 2.0 introduces automatic request retrying and better browser support. It's like having a personal assistant for all your HTTP requests. Trust me, once you go Axios, you never go back.
7. Lodash 5.0: The Utility Belt You Didn't Know You Needed
Lodash is like that quiet kid in class who always has the right answer. It's a collection of utility functions that make working with arrays, objects, and strings a walk in the park. Version 5.0 is fully modular, letting you cherry-pick only the functions you need. Your bundle size will thank you!
8. Jest 30: Testing Made Fun (Yes, Really!)
I know, I know. Testing isn't exactly the most exciting part of development. But Jest 30 might just change your mind. With improved parallel execution and a new snapshot format, your tests will run faster than Usain Bolt on a coffee binge. Plus, the error messages are so helpful, it's like having a personal coding tutor.
9. Next.js 14: React on Autopilot
If you're using React (and let's face it, who isn't?), Next.js is like strapping a jetpack to your development process. Version 14 introduces "Turbopack," a Rust-based bundler that's faster than a cheetah on roller skates. It's so good at optimizing your app, you'll wonder if it's powered by actual magic.
10. Socket.IO 5: Real-time Has Never Been This Easy
Last but not least, we have Socket.IO. If you're building anything that requires real-time communication (chat apps, live updates, multiplayer games), Socket.IO is your new best friend. Version 5 brings improved performance and better TypeScript support. It's like telepathy for your web apps!
Wrapping Up
There you have it, folks! These 10 JavaScript libraries are your ticket to coding nirvana in 2024. Whether you're building the next big social media platform or just trying to make your portfolio site stand out, these tools will have your back.
Remember, the key to mastering these libraries isn't just knowing how to use them – it's knowing when to use them. Don't be that developer who uses a sledgehammer to crack a nut (we've all been there, no judgment).
So, what are you waiting for? Fire up that code editor, brew a fresh pot of coffee, and start exploring these amazing libraries. Your future self will thank you!
Happy coding, and may your bugs be few and your commits be many! 🚀👨💻👩💻
Would you like me to explain or elaborate on any part of this blog post?
1 note
·
View note
Text
Writing Initiative #4
Describe 2–3 specific strengths your classmates found in your work and their reasons for identifying them.
One of the strengths in my work for the 3D project was the choice of materials for this piece. By using resin, acrylic sheets, string, and glue, I was able to effectively convey my concept of human connection, particularly within the context of networking. As an initial step, I crafted a mock-up version of my 3D piece using toothpicks, string, and superglue. This allowed me to gain an understanding of how I wanted the final piece to be assembled and presented within the transparent acrylic box. Another strength was the mini resin cube, which initially represented people. However, this sparked an idea where the sparkles in the cube resembled the universe in a way where all the sparkles were static/floating in this cube. Through this, I can connect this to the idea of constellations to the universe and how it links to astrology.
2. Describe 1–2 specific ways your classmates thought you might refine or improve your piece going forward.
One of the suggestions provided by my classmates for improving my 3D piece was to consider changing the shape of the cubes. They recommended using a more organic and flowing form to better represent the intricate and diverse relationships that exist among people. This can help add a sense of fluidity to my piece that sets it apart from the structured box and lines.
There was a film recommended that depicted concepts related to connectivity with cause and effect. Synecdoche, New York and Black Mirror: Bandersnatch were interesting films that demonstrated a theme of causality. Particularly with Black Mirror: Bandersnatch, it was an interactive film where the viewer can make a choice that decides what will happen. I found this feedback to be valuable as it challenged me to think beyond connectivity between people and explore deeper for my other pieces, specifically for my 4D and experimental pieces.
Another suggestion was to expand my exploration beyond just personal connections. They encouraged me to delve into other concepts, such as cause and effect. Because personal connections can easily be depicted through a straight line of strings, it would be interesting to arrange the strings in specific ways to represent different types of relationships. Through this, I can make the piece more personal by showcasing my relationship dynamics with certain people in my life.
3.How might this feedback inform your thinking/making going forward? Describe 2–3 specific ways your classmates have informed how you might continue with one of the other assignments (3D, 4D, Experimental, Reflective Piece) through Reading Week and to be presented next.
Based on the feedback, I should explore beyond the red string theory and move away from making the red string a constant element. It seems that it has become repetitive in a sense where all the pieces I create are beginning to blend with one another. Given the broad nature of my theme/word, I think it would be best if I focused on several different concepts rather than narrowing down to one. For instance, I can use different elements to represent the idea of connectivity, such as a string, magnets, puzzle pieces, locks and keys, and more. With my 4D piece, I'm planning to create a game that uses HTML/CSS and a little bit of JavaScript, where it will follow a storyline on connectivity within cause and effect.
0 notes
Text
A Fun Guide to Three.js 3D Web Magic

Ever imagined bringing a splash of 3D wonder to your web pages? Well, you’re about to embark on an exciting journey into the realm of Three.js! In this guide, we’re not just going to explore the magic it holds, but we’re going to have some hands-on fun with its most dazzling features. And rest assured, we’re going to keep it as interactive and enjoyable as a carnival ride!
So, are you ready to kickstart this adventure into the vibrant world of Three.js?
What is Three.js?
Three.js is a JavaScript library that makes it easy to create 3D graphics on the web. Whether you’re building games, visualizations, or interactive experiences, Three.js is your ticket to the third dimension. Let’s embark on this journey!
Cool Features of Three.js
1. Cross-Platform Compatibility
One of the standout features of Three.js is its seamless compatibility with various web browsers. Whether your audience is using Chrome, Firefox, Safari, or Edge, Three.js ensures a consistent and captivating 3D experience across platforms.
2. Abundance of Geometry and Materials
With Three.js, you have access to a rich library of predefined geometries (like cubes, spheres, and planes) and materials (including basic, Lambert, Phong, and more). This makes it easy to create intricate 3D scenes with minimal effort.
3. Lighting and Shadows
Creating realistic lighting and shadows is a breeze with Three.js. To add depth and realism to your scenes, you can experiment with various light sources like ambient, directional, point, and spotlights.
4. Animation and Interactivity
Three.js empowers you to bring your creations to life with animations and interactivity. You can animate objects, control camera movements, and respond to user input to craft dynamic and engaging experiences.
5. Post-Processing Effects
Elevate your visuals with post-processing effects like bloom, depth of field, and vignette. These effects add a layer of polish and professionalism to your 3D scenes.
Getting Started with Three.js
Now, let’s walk through a basic tutorial by making a spinning 3D moon to kickstart your journey with Three.js. Before starting you can view the live demo here!
Step 1: Setting Up Your Environment
Section Breakdown:
Document Type Declaration:
<!DOCTYPE html> declares the document type and version (HTML5 in this case).
2. HTML Root Element:
<html> tags define the root of the HTML document.
3. Head Section:
<head> contains meta-information about the document and external resources like stylesheets and scripts.
4. Character Encoding and Viewport:
<meta charset="UTF-8"> sets the character encoding to UTF-8 for proper text display.
<meta name="viewport" content="width=device-width, initial-scale=1.0"> ensures proper scaling on different devices.
5. Page Title:
<title> sets the title displayed in the browser tab.
6. Internal CSS:
<style> contains CSS rules. In this case, it removes any default margin from the body.
Step 2: JavaScript Section
Section Breakdown:
Loading Three.js Library:
<script src="https://threejs.org/build/three.min.js"></script> loads the Three.js library from an external source.
Script Tags:
<script> tags are used to embed JavaScript code within the HTML document.
Step 3: Setting up the Scene and Camera
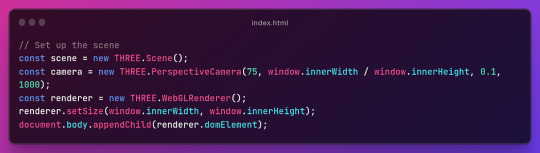
Section Breakdown:
1.Creating a Scene:
const scene = new THREE.Scene(); creates a new 3D scene.
2. Setting up the Camera:
const camera = new THREE.PerspectiveCamera(75, window.innerWidth / window.innerHeight, 0.1, 1000); sets up a perspective camera with specified parameters (field of view, aspect ratio, near and far clipping planes).
3. Initializing the Renderer:
const renderer = new THREE.WebGLRenderer(); creates a WebGL renderer.
4. Setting Renderer Size and Appending to DOM:
renderer.setSize(window.innerWidth, window.innerHeight); sets the size of the renderer to match the window.
document.body.appendChild(renderer.domElement); appends the renderer’s canvas element to the document body.
Step 4: Creating a Sphere and Adding Moon Texture
Section Breakdown:
1.Creating a Sphere:
const geometry = new THREE.SphereGeometry(5, 32, 32); creates a sphere geometry with specified radius and segments.
2.Loading a Texture:
const textureLoader = new THREE.TextureLoader(); creates a texture loader.
const texture = textureLoader.load('path_to_your_image.jpg'); loads an image texture.
3.Applying Texture to the Sphere:
const material = new THREE.MeshBasicMaterial({ map: texture }); creates a material using the loaded texture.
const sphere = new THREE.Mesh(geometry, material); creates a mesh using the sphere geometry and applied material.
scene.add(sphere); adds the sphere to the scene.
Step 5:Animating the Moon
Section Breakdown:
1. Animation Loop:
function animate() { ... } defines an animation loop using a recursive requestAnimationFrame call.
2.Sphere Rotation:
sphere.rotation.y += 0.01; incrementally rotates the sphere around the y-axis. Adjust the value for different rotation speeds.
3.Rendering the Scene:
renderer.render(scene, camera); renders the scene using the defined camera.
Step 6: Setting Camera Position and Handling Window Resizing
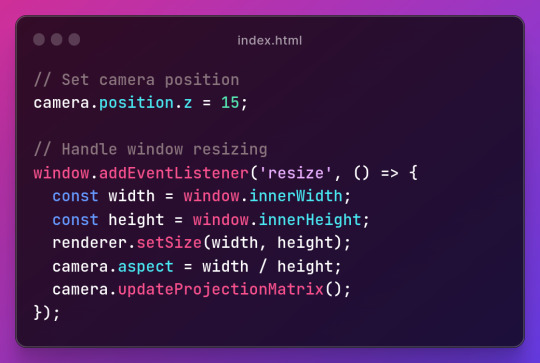
Section Breakdown:
1.Setting Camera Position:
camera.position.z = 15; sets the camera’s position along the z-axis.
2.Handling Window Resizing:
window.addEventListener('resize', () => { ... }); adds an event listener for window resizing.
3.Inside the event handler:
const width = window.innerWidth; and const height = window.innerHeight; retrieve the new window dimensions.
renderer.setSize(width, height); updates the renderer’s size.
camera.aspect = width / height; adjusts the camera’s aspect ratio.
camera.updateProjectionMatrix(); updates the camera’s projection matrix.
Conclusion
And there you have it! You’ve just created a basic 3D scene using Three.js. Customize it further by tweaking textures and rotations. Integrate it into your projects for added charm. Access the full source code here.
In the next part, we will learn to add key, mouse, and touch controls. Happy coding!😃

0 notes
Text

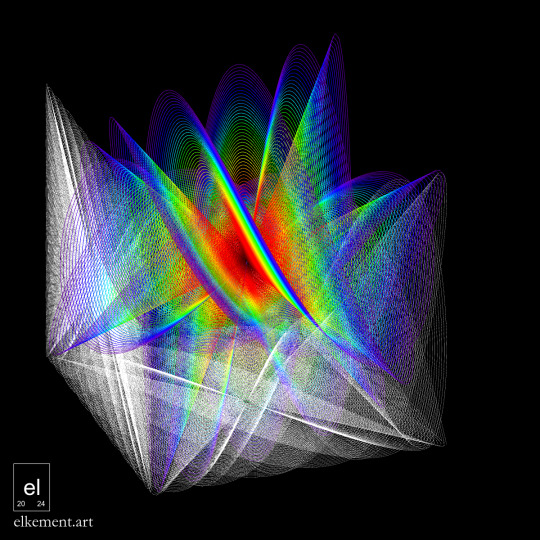
Cubed Oscillations - Awakening
Finally, I've created the high-resolution versions for my mini-series Cubed Oscillations: Rainbow-colored 3D Lissajous figures and their white 2D projections.
Looking at them again, I also give each one a name instead of calling it just Cubed Oscillations #1. This one is: Awakening.
Here is a cut-out at the original resolution - as I really like how the lines / tubes have turned out!

Created with JavaScript Code based on threejs, using tube geometries instead of plain lines. The original images are 6600x6600 pixels, scaled down to 1200x1200 for sharing. The details are 1000x1000 pixels at the original resolution. I had shared images directly created at 1200x1200 pixels in August.
Also available on INPRNT - as fine art print, sticker, poster, metal or acrylic print, mini-print, art card:
#digital art#physics#mathematics#science themed art#creative coding#artists on tumblr#science and art#science side of tumblr#portfolio#threejs#lissajous figures#oscillations#original art#art prints#mathart
8 notes
·
View notes
Text
Build a 3D Cube Carousel with Auto-Rotate
This is a 3D cube carousel that rotates automatically to display images. Built using Vanilla JavaScript, HTML, and CSS/CSS3. The carousel functions as a rotating cube that shows four images on its faces. Users can manually control the rotation or let it run automatically. It also pauses the rotation when the user hovers over the carousel and resumes when the mouse leaves. How to use it: 1. Create…
0 notes
Photo

3D Cube Slider using HTML CSS JavaScript Get code from codingflicks website
#3d cube slider#cube slider#3d cube javascript#javascript cube slider#slider javascript#javascript slider#html css#javascript project#javascript project for beginners#codingflicks
4 notes
·
View notes
Photo

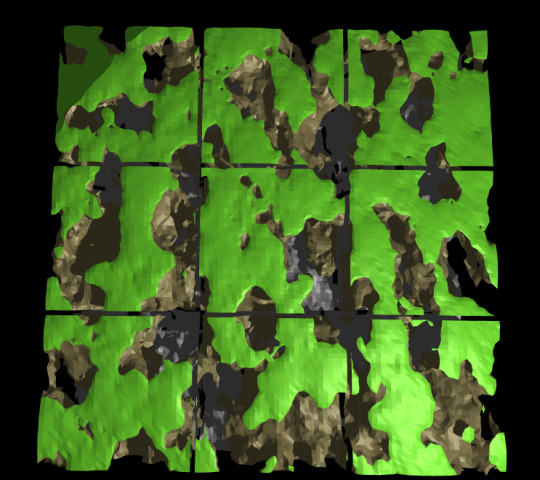
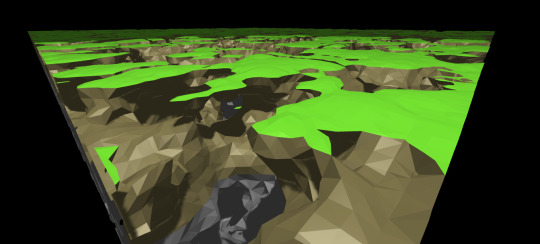
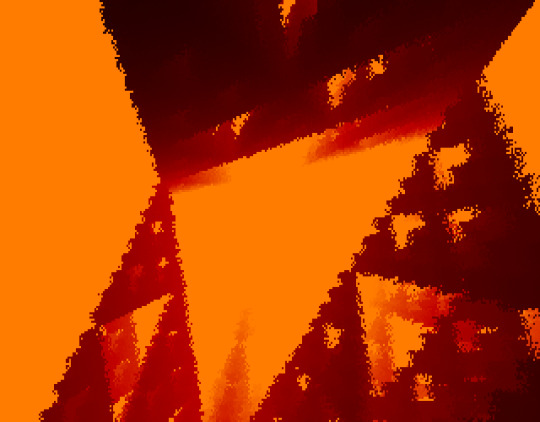
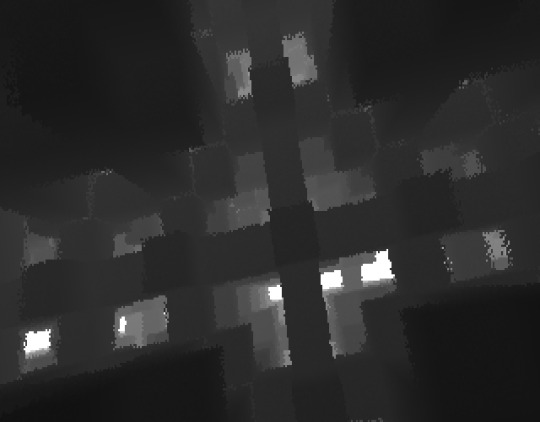
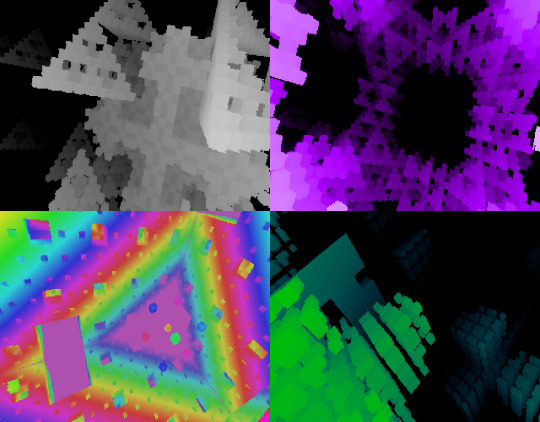
Some more voxel experiments. This is my first time getting one voxel to be a different color than another. Strictly speaking, I did not quite accomplish that. These were colored just by looking at the height of the vertexes -- the top layer green, then dirt colored, and finally something rockier down below. It would be much more interesting to step away from this globby noise generator, and then to color the surfaces based on making volumetric chunks of different materials instead of just coloring by height. That’s what I hope to work on next. Also probably some deformation. This marching cubes foray was inspired by Sebastian Lague’s “Coding Advenutre: Marching Cubes” https://www.youtube.com/watch?v=M3iI2l0ltbE . His project is in Unity and generates terrain (and noise) right in a compute shader.
I took an essentially identical approach but due to the lack of a fancy engine I instead used the cpu to generate vertices, normals, and colors in ye old javascript before handing them to the gpu via webgl. Each chunk here evaluates 32x32x32 voxels and creates a mesh in ~30-40 ms (on a fairly fast computer). That’s too slow for realtime chunk generation on the main thread, though the workload is pretty perfect for using a webworker (it’s all math that produces a float array). After a chunk is generated it’s no problem to render; these particular chunks are so low poly that several of them were able to render at 60 fps on a chromebook with an integrated gpu. I’m pretty new to 3d, and I did not investigate whether Sebastian Lague’s shader could in fact be translated to glsl and run directly on the gpu even in a browser.
Lighting, as always in webgl, remains an ordeal. While it was possible to use a default three.js shadow mapping approach and produce some darkened carverns for the screenshots, ultimately the light looks nothing like what one would get in Unreal or Unity. Naïve/easy lighting is also not performant and instantly fails on my ultra-low-end gpu test case. I think one would have to actually calculate light manually per face via a simplified schema (not a shadow map) or do some shader magic of which I’m unaware (i know nothing of shaders, yet) to stand a chance of getting any sort of visually interesting torch-lit underground aesthetic while still producing something accessible to non-high-end gpus.
#devlog#game development#graphics programming#voxel#procedural content generation#terrain#javascript#webgl
2 notes
·
View notes