#3dsmax free scripts
Explore tagged Tumblr posts
Visit Tumblr Blog
Explore Tumblr blogs with no restrictions, modern design and the best experience.
Last Seen Tumblr Blogs


Fun Fact
Users from the US are the majority of Tumblr visitors.
Text
youtube
This major update brings you new features and improvements to already existing ones. Now, in addition to the existing method using a picked point and XYZ orientations, where you can change the length after creation, you have a second method of creation using two picked points, where the line will start on the first point and points in the direction of the second one using the length value in the spinner. Also, in this version, you can load 2D shapes from the scene, that have 2 vertices only, and change their lengths, the script will always respect their current orientations. No worry now if you close the dialog, you can open it and load any line, even if it was created by the line tool inside Max. This version lets you have modifiers on top of the Line and continue to modify its length. In the video, I will show you some tricks on how you can use this tool as a helper to adjust the length and orientation of mesh edges. Plus other things, I encourage you to watch the whole video to have a complete understanding of the tool.
You can download the plugins from the description area on youtube
#3dsmax#3dsmax plugins#3dsmax scripts#3dsmax free plugins#3dsmax free scripts#autodesk#autodesk 3dsmax#maxscript#3d plugins#3d scripts#3dsmax 2d#3dsmax parametric 2d#scripting in 3ds max#Youtube
0 notes
Text
flurrin replied to your post “guess who just spent 4 hours figuring out how to...”
P. Please post a tutorial
disclaimer that i still have absolutely zero knowledge of how to use 3d modeling programs, but here i go
how to extract atton’s (or any) model from k2 and unwrap its uv maps:
(before i start, someone made a video tutorial on extracting the ebon hawk model, but they apparently did it with older/no longer recommended tools? it didn’t really help me bc of the version differences, but here it is anyway)
tools needed:
3dsmax (free for students/instructors, or free 30 day trial) or gmax (free but very old apparently, but kotor is pretty old so it all works out). i'm using 3dsmax 2021 bc that’s what i got access to so i have No idea about gmax
download & be able to run kotor tool. this’ll extract the model/texture files you need from the game files
download & be able to run mdledit. this’ll turn the mdl files into ascii files
download & follow the instructions to install kotormax. this’ll let you open ascii files in 3dsmax/gmax
first, run kotor tool:
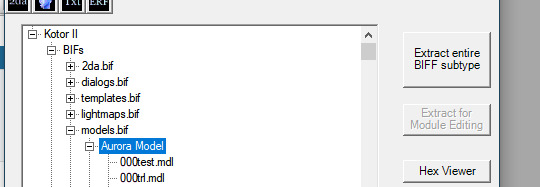
go to Kotor II\BIFs\models.bif\Aurora Model and find the .mdl file you’re looking for. people are under p, and things aren’t listed totally alphabetically, so don’t worry if it feels like you already skipped it
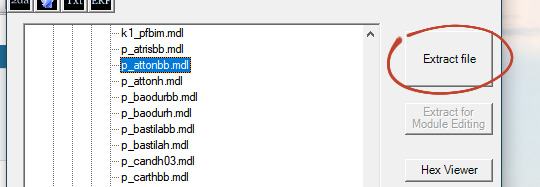
i’m looking for p_attonbb and p_attonh, so i selected those one at a time and clicked extract file on the right, and saved it to a folder on my desktop. you’ll want to keep all these files in the same folder bc it’ll come in handy later
so i now have p_attonbb.mdl and p_attonh.mdl. close Aurora Model and open Aurora Model Extension just below it, and look for the same file names, but just as mdx files this time. save those too, and i now have p_attonbb.mdx and p_attonh.mdx
if you don’t already have texture files, you should get those too. go to Kotor II\ERFs\TexturePacks\swpc_tex_tpa.erf and look for the right filenames-- atton’s are pretty obvious, but if you don’t know which one the model uses, you can hold off until the next step. anyway, once you find the file, extract it as a tga. tga is good for most purposes, tgc is for people who know what they’re doing (which is not me lol)
second, run mdledit:

select the relevant kotor game (click on the button to swap between them) and the platform (it switches between pc and xbox)
click File -> Load and select the .mdl file you extracted earlier. if you didn’t know what texture(s) the file uses earlier, you can find out here by going to Edit -> Textures, where all the texture filenames will be listed out for you
select File -> Save -> ASCII and save the file. i did that for each mdl file i had, and got p_attonbb.mdl.ascii and p_attonh.mdl.ascii
close mdledit! you’re done with it
third, install kotormax if you haven’t already!
fourth, run 3dsmax:
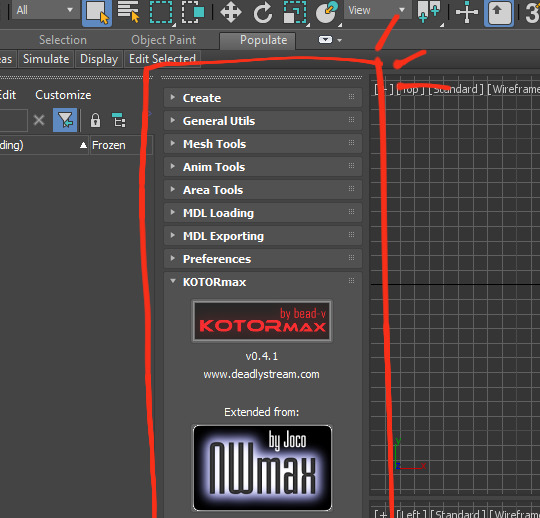
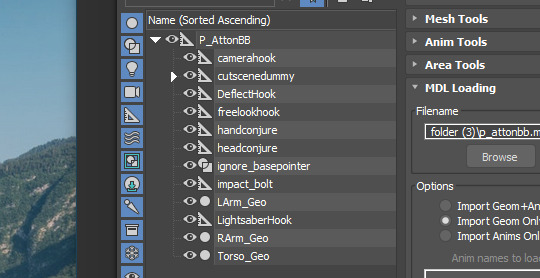
you should see this column. this was my first time ever seeing 3dsmax, so it took me like 10 minutes to realize this, but this whole column is kotormax. if for any reason it didn’t show up, just go to Scripting -> Run Script, and open 3dsmax 2021\scripts\KOTORmax\kotormax.ms
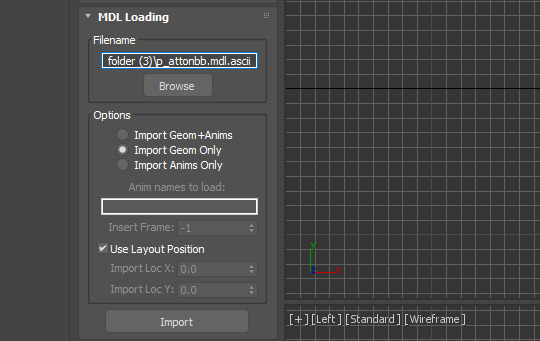
expand “MDL Loading”, click browse, and navigate to the .ascii file you saved earlier. click import at the bottom
and here he is! he already has textures on him because, if you kept all your files in the same folder as suggested, the texture file was Right There for 3dsmax to find. (the first time i did this, i didn’t have the texture file there and it showed up blank. i now unfortunately know how to link a texture in manually.)
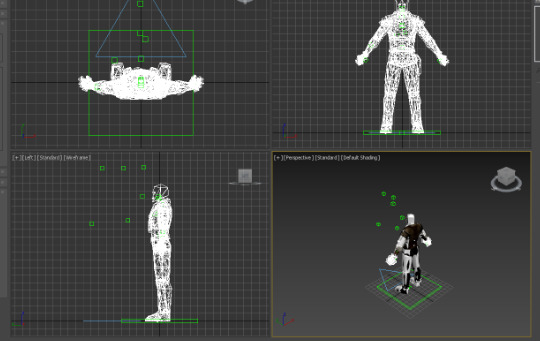
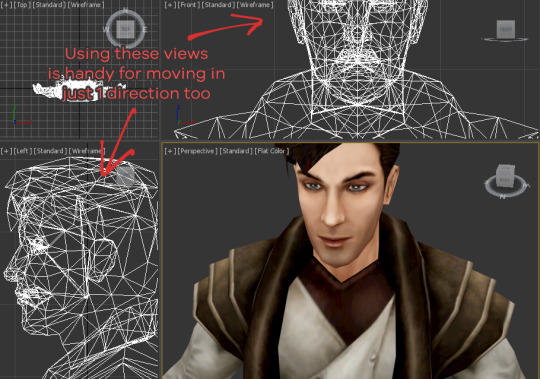
ok so wtf are those white blocks around him you ask, and how do i get rid of them? well, that’s the very question that plagued me for literally 3 hours, and there’s a very simple answer to that. it’s just the dummy model and you just hide it. infuriatingly simple! you’d think that i, someone who has used literally any art program before, would immediately have recognized this whole setup on the left:
expand everything and click the eyes to hide everything you don’t want. if you’re on atton’s body model, you’ll want to hide everything except for JacketFlapNew, ShirtFlapNew, LArm_Geo, RArm_Geo, and Torso_Geo. if there’s anything left in the viewport that you don’t want, you probably just missed expanding something in the filetree; you can just click it in the viewport and it’ll be highlighted for you in the filetree

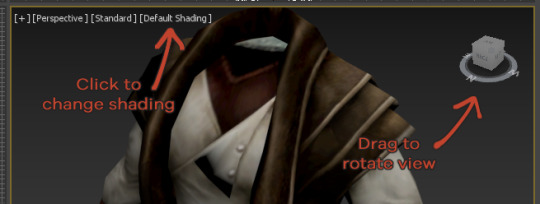
so here we are! the display here automatically updates when the texture file is changed, so i can edit the tga file and save and immediately see my changes reflected on the model. from here, i changed “default shading” to “flat color” to see the texture more clearly.
if your model has two parts, like atton does, you can open both and kinda align them together manually. go back to “MDL Loading” and import the other mdl file-- in my case, it’s p_attonh. but oh no, it showed up at his feet:
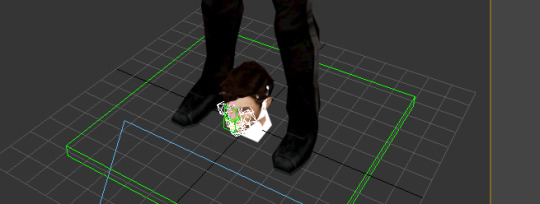
first, remove the unwanted chunks & boxes like before. for atton, that’ll be everything except for eyeLA, eyeLid, eyeRA, eyeRlid, HairFlaps_Geo, hairPiece, Head_Geo, and teethUp. (i don’t know what i’m going to do now that i know that atton’s got a part called hairflaps.)
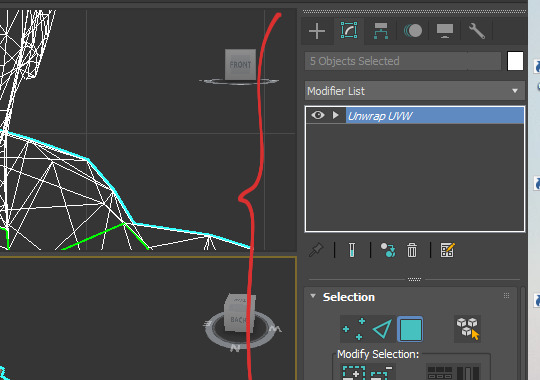
now select P_AttonH in the filetree on the left, then select the move tool up top.

click on the view you’re going to use to move stuff around in, then hover over the base of his head until the move icon shows up. if you hover over one of the axes and then drag, you can move just along that axis. i did y-axis first, then z-axis, just eyeballing it until it aligned.
now we can get into the UV map (well, we could have earlier, but it felt a little awkward with him headless). select everything you’re interested in. i’m doing his armor, so i ctrl+clicked to select every visible part of his body (you can do this either in the filetree or in the viewport). now go to Modifiers -> UV Coordinates -> Unwrap UVW, and something new will show up on the right column:
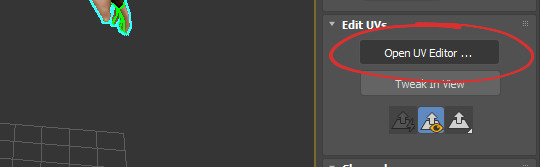
look down under “Edit UVs“ and click on “Open UV Editor“:
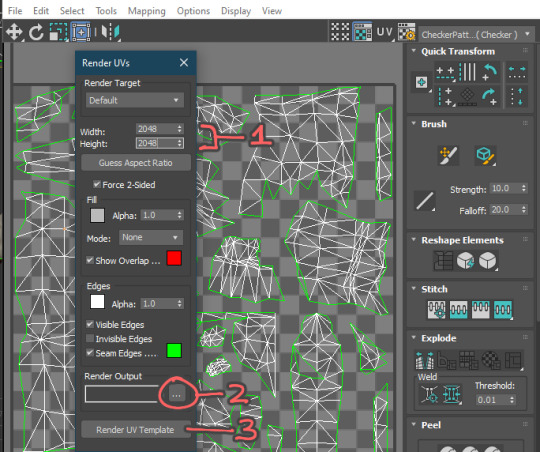
a new window opens up. if you want to see this overlaid on his texture immediately, you can use the dropdown on the top left. but i want a transparent png, so i’m exporting this.

to export this just go to Tools -> Render UVW Template, and another window opens up. (here i entered 2048 for the width and height bc those are the dimensions of the high res atton retexture i want to edit.) under “render output”, click the “...” and choose a filename & format to save the output under. then click “Render UV Template”. another window will open up with the render map, but you can just close it, bc it’s already been exported in the filename you set just earlier.
and there you go! ta-da. i wrote this all in one go so i hope it makes sense
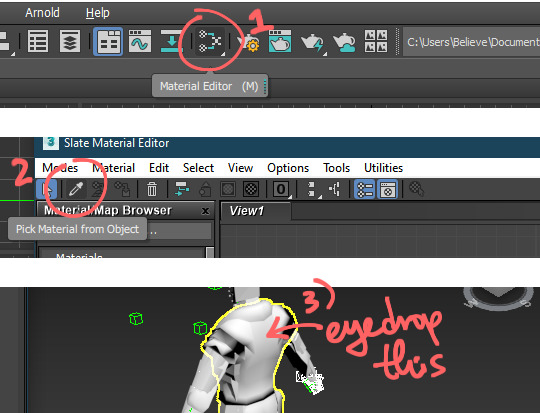
oh, and yeah, if for whatever reason you need to apply a texture manually instead of it automatically being applied when you import it, open the material editor (use the weird little icon). click the little eyedropper tool, and eyedrop the model you need to texture
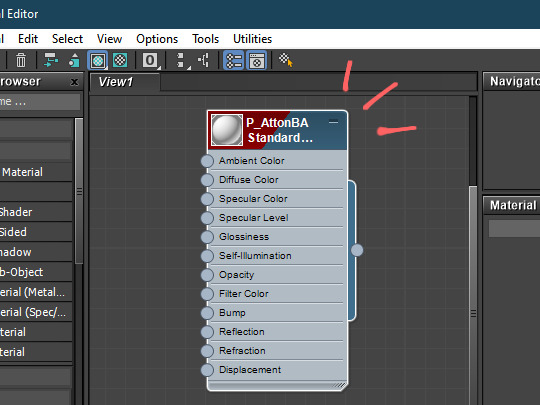
something new will show up in the material editor window:
now get your texture file, and drag and drop the file into the window. then drag a line from the node on the texture you just added, to the “diffuse color” node from the model.
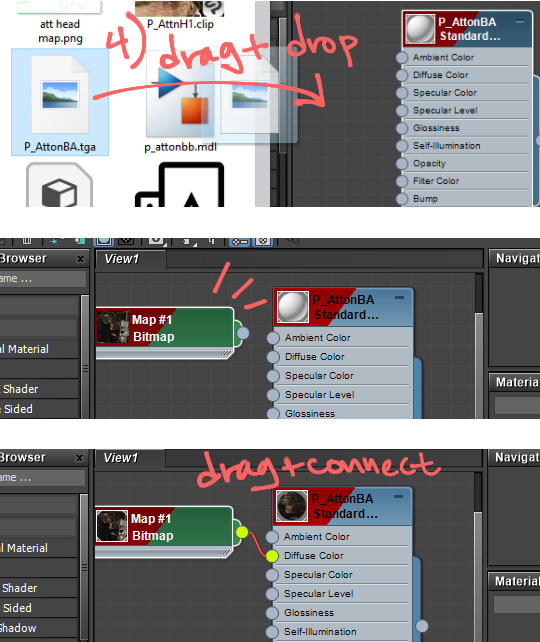
and there! texture’s applied. it’s pretty simple but bc i stubbornly refused to be slowed down by tutorial videos, i slowed myself down for an hour figuring this out from scratch
28 notes
·
View notes
Text
Unreal Engine 4 VR Interior Tour with 3DsMax VRay Photoshop
In this workshop you will learn the ENTIRE PROCESS of producing VIRTUAL REALITY walk through TOUR with UNREAL ENGINE - Based of this "LOFT" 3D Space.
Modeling and Lighting with 3DsMax & VRay (To get good reference to follow - PRO HDRI LIGHTING METHOD)
Cleanup and UVW Preparation Methods for UNREAL ENGINE
Import and Assembly 3D Space in UNREAL ENGINE
Realistic Textures Creation; Glass, Chrome, Concrete, Brick Walls, Wood, Leaves..etc.
Post Production Effects to Get PHOTO-REALISTIC LOOK in Real TIME!
Adding Realistic Lights, Ambient HDRI Map, Glow Materials and Animated Water
Building and Packaging your project to platforms; Windows, Mac, HTML5...and more.
Exporting FULL HD Videos and 4K Images in seconds!
* In the future this workshop is going to be updated, and more functions will be added, such as; turning on/off lights, opening doors, changing color/ textures of objects - And you get to ENJOY these updates for FREE!
What You Will Get?
Over 20 Video Tutorials - Step-By-Step Video Instructions
Sample Scenes for EVERY STEP
Personal 1:1 FORUM SUPPORT
LIVE Weekly Webinars (Will Be Recorded)
UNLIMITED ACCESS to Training Materials
Sample Scenes for EVERY STEP!
SPECIAL BONUS
3DsMax VRay LOFT Scene
3DsMax File includes all the models and textures + VRay TOP QUALITY Rendering Settings
Photoshop PSD file with all the Layers and VRay Passes Assembly!
How The Training Goes?
After successful payment you will get access to this workshop and be able to download all the training materials, watch the videos, repeat my technique by using our sample scenes.
IF YOU WISH - YOU CAN USE YOUR OWN SCENE! (But it must be very light - Think Low Poly Game Engine)
If you have questions or error you can upload them to our private forum and get feedback.
SO NO WORRIES - I WILL PROVIDE SUPPORT ALL THE WAY THROUGH THE TRAINING!
What You Can Do After This Workshop?
You'll be able to use UNREAL ENGINE Temples for quick 3D Space adjustments
You'll know how to pack and export your 3D WORLD for multiple platforms
You'll be able to Produce Virtual Reality Tours On Your Own
You'll capture VIDEO and export 4K images in seconds
You'll know Basic Programing Functions and Scripts
Why You Should LEARN it NOW?
If you really interested in boosting up your skills and start introducing NEW TECHNOLOGY to your clients OR future JOB - This Workshop Is The Right One For YOU!
I'm constantly asked if I can provide VR services - and THIS topic is growing FAST - More and More Companies and Freelancers have already implemented that product in their pipeline.
STOP wasting time and trying to milk your potential with Old School techniques - UNREAL ENGINE is so EXITING to learn and the good part that you can preserve VRay Quality by using BakeToTexture method!
LEARN TO WALK INSIDE YOUR CREATION
BRING YOUR RENDERS TO "LIFE"
JOIN US TODAY and Learn to Produce Virtual Reality Tours LIKE A PRO!
Click the Icon Below to Join VR Interior Workshop.
90% discount #off #udemy #Interior #Design #course FOR
Unreal Engine 4 VR Interior Tour with #3DsMax #VRay #Photoshop #couponlink
https://www.udemy.com/course/unreal-engine-4-vr-interior-tour-with-3dsmax-vray-photoshop/
1 note
·
View note
Text
Top 4 render farm for Daz Studio in 2023
3D modeling is a vast technology that has been used in many areas, to name a few, games, films, architecture, illustrations, engineering, and advertising. The process and tools used for modeling will be different for each application. Besides some popular 3D software like Cinema 4D, Maya, 3ds Max, and Blender which almost everyone can use, there are quite a few software suitable for specific tasks. Mention to human creation, Daz Studio is definitely the best and the most popular software. With tons of tools and assets, Daz Studio create and render 3D scene to produce images as well as animations. Visualization is done using mainly the advanced Iray rendering which come free with Daz Studio itself.
Iray is a physically based render engine that simulates how light works in the real world. In other words, it can create very photorealistic renders. One of Iray’s highlight is its ultilization of RT Cores to accelerate ray tracing performance in real time. Moreover, as Iray is based on NVIDIA’s latest technology, we must have an NVIDIA graphics card to take advantage of the fast GPU rendering speeds. However, not all NVIDIA cards can do real-time ray tracing. Only RTX cards, which includes dedicated ray-tracing-acceleration RT cores, supports real-time ray tracing.
Due to special technology, Daz Studio & Iray have the same situation as Lumion and Enscape, that there is a few render farms supporting them. So we have been looking around and found out solutions for Daz Studio and Iray users. Let’s find out Best Render Farms for Daz Studio & Iray in 2023 in this article.
1. Super Renders Farm
Super Renders Farm was founded in California, USA in 2010 as a small local rendering company. In 2017, they began to grow considerably by developing online render technologies. Super Renders Farm is a cloud rendering service that is based on SaaS (Software-as-a-Service) and IaaS (Infrastructure-as-a Service). They supported all major apps used by the industry 3dsMax, Maya, Blender, Houdini, SketchUp…
Super Renders Farm offers users two rendering methods: submit jobs to the render farm via Web or Desktop Client application. If you choose to use the Web, then you only need four steps after creating an account, uploading resources, submitting the job, analyzing the scene, and rendering. If you are using the Desktop Client application, they only support Windows operating systems, which allow you to submit render jobs directly from 3D applications such as Maya and 3ds Max.
Super Renders Farm based on IaaS model. It allows users can control every aspect of rendering from choosing the hardware to installing software, plugins, and scripts, using their remote servers as your computer, and more. So, you can install any versions of Daz Studio (which run on Windows 10 or Linux …), and any renderers.
You can select a wide variety of service package including CPU rental packages or GPU rental packages (namely GTX 1080Ti, RTX 2080Ti, RTX 3080, or RTX 3090 which are all the state-of-the-art and newest ones in the market). Using Super Renders Farm service will not limit your types of plugins, software version or GPU/CPU rendering.
2. XESKTOP
Xesktop provides powerful GPU servers for rental, we will access the server via Remote Desktop application and use it as if it is our own computer. After logging in the account, we can create a fresh system instance with Windows 10. We will need to install the software and use our own licenses. The instance will be saved and preserved after the initial setup and ready to use any time.
Xesktop offers 2 types of GPU servers: 10x GTX 1080Ti and 8x Tesla V100. Although we can install and render on any of the popular 3D software, I think their servers are more suitable for multi-GPU-support software in terms of performance and price. But, for Daz Studio & Iray which support multi-GPU rendering, they are both a preferred choice. 10x GTX 1080Ti is better for usual 3D work and software that can utilize all 10 GPU cards, while 8x Tesla V100 is more suitable for AI training, heavy 3D projects and software that support 8 or less GPU cards. Though each server is better for specific needs, and 8x Tesla V100 server is faster than 10x GTX 1080Ti, they are interchangeable, and will both do a good job. Especially when we can create multiple instances to reduce time. The price is not too much different too.
3. ANIMA RENDER
Anima Render will provide a remote access to the server via VNCviewer, and we will connect to it to do the render on the server. However, we need to inform in advance for them to prepare the server. They will pre-intall Daz Studio, or we can choose to install the software by ourself. Anima Render provide 2 types of server: 5x GTX 1080Ti and 5x RTX 2080Ti, but the price is quite expensive compared to other farms. Another minus point is that the application and data are not stored as the servers reboot from time to time, so we have to re-install everything every time we go in. This is very inconvenient because Daz Studio library, assets are usually heavy, and seems to be impossible if library, assets are up to 1TB or even more.
4. RENDER4YOU
At Render4you, we will create the job and summit the scenes (in some major 3D applications: Maya, Cinema 4D, 3Ds Max, Blender, etc) from our local computer to the farm through their application called “cloudinterface”. Unfortunately, it is impossible to submit directly from Daz via cloudinterface at the moment. However, they offer another solution that we will send them the file to render via Wetransfer, they will test some frames and estimate the cost for the whole project, if we accept the price, they will render for us. Their servers are 10x RTX 2080ti, 10x RTX 3060, 10x RTX 3090 and a few more with similar specifications.
Summary
To sum up, after evaluating many factors, we have selected the two Best Render Farms for Daz Studio and Iray in 2023: Super Renders Farm and Xesktop. Based on test results, Super Renders Farm is the fastest render farm while Xesktop has a more reasonable price. However, test results are for reference only, I strongly recommend you to experience by yourself and choose the farm that suits your project and needs most.
Source: https://blog.superrendersfarm.com/news/top-4-render-farm-for-daz-studio-in-2023/
0 notes
Note
Would it be possible to make a guide on how you are exporting this model into unity? I would like to try exporting myself, but i am not as familiar with 3dsmax as other software
I use the free 3D software Blender to edit models into something Unity / VR Chat can utilize. I’d love to do a tutorial on the whole process which involves stuff like weight-painting, editing shape keys, texture atlasing, etc.
But there already exist many tutorials on YouTube on how to do those things by people who are much much better than myself. So, I’d head there for that.
As for 3DS Max. I only use it to run TGE’s script that imports the games .GMD file format into something that can be edited.
9 notes
·
View notes
Text
Serial autodesk 3ds max 2015 無料ダウンロード.設計ビジュアライゼーション、ゲーム、アニメーションに最適な 3D モデリングおよびレンダリング ソフトウェア
Serial autodesk 3ds max 2015 無料ダウンロード.autodesk 3ds max 2015 繁體中文serial

Autodesk 3ds Maxをインストールすれば簡単な方法で特別なアニメーションデザインを制作する事が出来ます。是非ともこのプログラムを利用してね。.3ds Max Activation Final Torrent Serial Free X32 on ridwoodcletju
Jessie Ayo on 3ds Max Activation Final Torrent Serial Free X Autodesk 3ds Max Keygen Full Version For Windows PC. Autodesk 3ds Max is an amazing software to make 3D modeling, 7 Crux Free Download full version Windows 7 Crux Edition For 32 and 64 bit PC.. 5 SP3 for 3D Max - 32/64 Bit WORKING full rapidshare & free from netload. 01 Crack Autodesk 3ds Max ソフトウェア製品のインストール プロセスには、3ds Max 製品に固有の部分があります。 重要: 3ds Max 製品をインストールする前に、システムとハードウェアがその製品を実行するための最低限の動作環境を満たしていることを確認し、リリース ノートを必ずお読みください。 「3ds The 3ds Max Scene Security Tools is Autodesk's recommended way to detect and remove known 3rd party malicious scripts identified as CRP\ADSL, ALC, ALC2, PhysXPluginMfx, MSCPROP, and their malicious scripts can corrupt the 3ds Max environment, cause data loss and instability, as well as spread to other systems through sharing of 3ds Max scene
Serial autodesk 3ds max 2015 無料ダウンロード.3ds Max | 価格と購入 | Autodesk 公式
概要. Autodesk 3ds Max Populate Data は、 Autodesk Inc.によって開発されたカテゴリ その他 の Shareware ソフトウェアです。 先月中に、クライアント アプリケーションUpdateStarのユーザー の更新時間をチェックしました。. Autodesk 3ds Max Populate Data の最新バージョン 19 /01/19 にリリースです。Operating System: Windows 3ds Max の 30 日間無償体験版をお試しください. 3D モデリング、アニメーション、レンダリングのためのプロフェッショナル向けソフトウェア. 無償体験版をダウンロード 3ds Max のサブスクリプションメンバーになると、最大 3 台のコンピュータまたは他のデバイスに 3ds Max をインストールできます。ただし、指名ユーザーがソフトウェアにサイン インして使用できるのは、一度に 1 台のコンピューターのみです。
如果下载新的版本后直接安装新的版本还是需要 卸载老版本后再安装新版本���谢谢(谷歌翻译一下). very good very good very good very good very good very good very good very good very good very good.
A dialog box will pop up every time you open the scene, which is troublesome. Can you add an automatic clear function in quiet mode? Hello Jonike, I was unable to reproduce the issue you reported using 3ds Max or with the latest version of the Scene Security Tools, namely 2. I ran 3dsmax. exe -silent and opened a few files that contain the known malwares.
When 3ds Max is in silent mode, Scene Security Tools cleans the scene and environment automatically, and logs these actions to the Maxscript Listener and Max. log For example: ALC2 Security Tool 1. What version of 3ds Max and Scene Security Tools are using?
Dear Qing Su, thank you for your comment. Please contact Autodesk Support and share a 3ds Max scene or script file you suspect it's infected with a new malware or a variant of a known malware. Thank you. Google Translation 亲爱的苏青,谢谢您的评论。请联系Autodesk支持并共享一个3ds Max场景或脚本文件,如果您怀疑该场景或脚本文件感染了新的恶意软件或已知恶意软件的变体。谢谢你。. Dear Qing Su, we released the Scene Security Tools 2. Please download the new version. Thank you! Google Translation 亲爱的苏青,我们今天发布了Scene Security Tools 2. NO acaba de funcionar en archivos por ejemplo de las versiones abiertas en Debe instalarse en alguna carpeta en concreto?
I never download any 3dsmax software from malicious webservers. Only from Autodesk. I never has any problems with As far as i know the malware can be spread by 3d models and other assets you load into MAX. I had the. ALC problem a couple of months ago, Before this tool i used Prunescene. mzp wich is some sort of antivirus that runs inside MAX, detected and cleaned the infected scenes when opening and gives you the possibility to scan folders too, worked great.
Hi parisa, simply follow the instructions in the setup program. Please let us know if this is not the case for you. good good good good. I have a bad experience using Prune Scene. This program contains a virus generator that is detected by the anti-virus proactive defense systems for operating systems HIPS.
Be careful. It somehow penetrates the system folders, the system registry and creates its own Trojan generator. It is very difficult to remove it from the operating system. It prevents 3ds Max from starting and infects scenes.
Use Autodesk Security Tools Only! Are we the only one getting the error "Product failed to install"? We used to have a startup script for this but that does not work for , feel a little unprotected as a paying customer here and we've had data losses in the past due to this.
Please advise! Pude solucionar el problema instalando la aplicacion en 3DMax , no asi en la version que no funciona,no se si habra otra aplicaion para esta version. There is a code defect in 3ds Max that prevents the package from being loaded. This defect was fixed in 3ds Max SP1. The problem was that did not properly handle SeriesMax values in PackageContents. xml that are greater than Please also help for max as this tool is not working in max whenever I am trying to save my file it's giving me the option of save as.
The most dangerous thing is that this virus can download updates for itself and can be modified! This virus take next issues:. Thanks,it works perfectly. Okey , this is work for me.. i have a problem some crash about "undo" command, now its solved YES I LOVE YOU REALLY! I installed the software and it installed succesfully.
but when i start to working wih 3d max there was no message and the problem also did not solve please can you help me to make it work on 3dmax I had a trouble,when i opened the max the script controler tab crash the max.
I I searched about the problem and saw that it was a 3rd party plugin that was disturbing. Late i installed the security tools and solved my problem. Currently, I am using the 3dsmax version. Hopefully the tool will support 3ds max Many thanks. Autodesk, Inc. Digitally signed app. The malicious scripts can corrupt the 3ds Max environment, cause data loss and instability, as well as spread to other systems through sharing of 3ds Max scene files.
What's new in version 2. This option is enabled by default. Features: - Detects and removes the malicious scripts listed above from 3ds Max startup scripts and scene files regardless of how they are loaded.
log and to the MAXScript listener. Supported 3ds Max versions: Autodesk recommends that all customers running 3ds Max SP1 and newer, including 3ds Max educational licenses, 3ds Max Indie and 3ds Max Trial versions, download and install the 3ds Max Scene Security Tools application to help detect and resolve issues caused by 3rd party malicious scripts.
It is not intended as a general endpoint protection tool and should not be considered as such. Autodesk recommends that all users run a reputable antivirus or anti-malware program on their computers and keep both the program and its virus definitions updated regularly. Legal disclaimer: The 3ds Max Scene Security Tools is provided "AS-IS. Autodesk makes no offer for support of the software or your personal hardware and assumes no liability from damages incurred to your software or hardware due to your use of the tool.
Autodesk makes no warranties as to performance, merchantability, fitness for a particular purpose, or any other warranties whether expressed or implied. Furthermore, no oral or written communication from or information provided by Autodesk or its agents shall create a warranty. ヘルプ ドキュメントを読む. このバージョンについて バージョン 2. カスタマ レビュー. レビューを書くにはサインインしてください テクニカル ヘルプを表示. 钰淞 王 11月 26, 確認済みダウンロード これは何ですか? Kexing Wang 10月 31, 確認済みダウンロード これは何ですか? qing shui 8月 23, 確認済みダウンロード これは何ですか?
张慧 张 8月 13, 確認済みダウンロード これは何ですか? Jie Xu 8月 12, 確認済みダウンロード これは何ですか? bao cao 7月 29, 古色 谷香 7月 20, 確認済みダウンロード これは何ですか? Zakir Shikhli 7月 15, 確認済みダウンロード これは何ですか? It cleared UNDO virus from my files. Jonike Lu 7月 11, 確認済みダウンロード これは何ですか? Attila Szabo 7月 12, qing su 3月 09, 確認済みダウンロード これは何ですか? Attila Szabo 3月 30, 尘宁 俞 4月 19, Diego Macario Bello 4月 21, Jose Fontelles 11月 12, 確認済みダウンロード これは何ですか? Attila Szabo 12月 01, Julio Bahamonde 11月 11, parisa mohammadsadeghi 11月 07, 確認済みダウンロード これは何ですか?
0 notes
Text
Blender Pes 2013

PES 2013 Blender Stadium Exporter Project 1.5 for Blender 2.67 Preview: I’ve updated script codes and new 1.5 version is ready for Blender v2.67
Blender Pes 2013 Free
PES 2013 Blender Stadium Exporter Project 1.5 for Blender 2.67 Preview: I’ve updated script codes and new 1.5 version is ready for Blender v2.67. Hi everyone, i’ve been working on the new stadium exporter project for PES 2011 stadiums since long while ago, this project based on the new Blender version (old version blender dont update anymore,new version is updateable and it has great some. L.G.R Facemaker-Official Channel-Tutorials-All Programmes Links:-PES 13 dt0c Viewer Tool: Photoshop CS6.
Hi everyone, i’ve been working on the new stadium exporter project for PES 2011 stadiums since long while ago, this project based on the new Blender version (old version blender dont update anymore,new version is updateable and it has great some new features) this is similar tool like KONAMI’s one, i know they use MAYA and they made an exporter script with MEL (Maya Embedded script Language), i made that similar exporter tool with original features (multi-UV, optimized DDS textures etc..) for Blender, this is %100 original tool, thats mean if you have good skill/experience about Modeling, Texturing, UV Mapping and Lighting/Shading, your stadium will be same quality/filesize like original KONAMI’s stadiums with using this tool.There are over 3000 code lines in this script so im thinking release beta version for PES 2011 and test it with PES 2011, so fixing small bugs,some little improvements then make a stable version for PES 2012, read the below informations with carefully…
* You can work with ‘ngon’ for easy create-control model surface also it prevents creating useless small faces..
* You can work with real world size(metric) for your projects like AutoCAD,3dsMax..
Blender Pes 2013 Crack
* You can get realistic render your projects with new Cycles render engine also it supports GPU CUDA calculation for fastest rendering process…(it needs different material setup and only for render your project, no ‘bake texture’ feature yet)
It’s here for download and testing:
Exporter Tool v1.5 : Blender 2.67(32bit) : http://www.blender.org/dl/http://mir…-windows32.zip Blender 2.67(64bit) : http://www.blender.org/dl/http://mir…-windows64.zip
Warnings/Suggestions: 1- Watch the 2 tutorials with carefully before anything to do… 2- This script is ‘beta’ version and it includes over 2500 code lines so far, of course there are some small bugs, need some little improvements, thats why i would not suggest that for newbie/beginner makers, ‘only professional advise,critics,bug report would welcome..’ 3- Be careful when you assigning/loading textures, %90 script errors about the textures,(choose right format,exact file path,saving before process)(texture filepath/filename must be ‘English characters’ only, no special characters) 4- Just keep in mind, if u see black textures in game, try to decrease texture filesize less than 1MB… 5- You can see warning/info messages in Blender with using dos console, click ‘Toggle System Console’ in Blender ‘Help’ menu, you can following process/informations with using blender console… 6- Uncheck ‘Remap Relative’ option in the menu of left side when saving your *.blend file. 7- Make sure all image files saved before converting to DDS. 8- Make sure all image files converting to DDS and created under temp folder before Exporting process. 9- Default output folder is ‘C:’ , if you dont select any output path, files will export to ‘C:’ root directory. 10- Sometimes script may give a warning message when exporting, check out all model parts and textures before exporting, so if script says warning like ‘…… file using another application….’ dont worry and try export again, it will export it at second try… 11- I would suggest add staff elements lastly (guards,cameraman,boxes etc..) , thats will saving time for you because script is calculating each mesh triangle when exporting, so there are 75000 triangles for staff elements, if u add them firstly, script is trying 75000 x calculate when exporting at every time, that will waste time, thats why i would not suggest that… 12- I would suggest use TGA (Targa) format for alpha textures, it supports alpha channel and it ‘keeps all color information’, PNG uses layer transparency instead of alpha channel and ‘it removes color informations’.. 13- You can use directly DDS textures with using NVIDIA DDS Plugin for Photoshop, but nevertheless click DDS convert before exporting, because DDS convert function is working like that: – ‘if texture format is TGA or PNG; convert them to DDS (this process take a little time) and create textures under temp folder with ‘corresponding texture ID (0x27..)’ – ‘if texture format is DDS; read directly DDS data , no converting to DDS (that will save time for you) and create textures under temp folder with ‘corresponding texture ID (0x27..)’ (link: http://developer.nvidia.com/nvidia-t…dobe-photoshop)
Author : Suat CAGDAS ‘sxsxsx’
Blender Pes 2013 Download
Big Youtube Tutorials (2 parts): YouTube – Let´s convert Blender to PES #001/002 (part1) YouTube – Let´s convert Blender to PES #002/002 (part2)
Blender Pes 2013 Torrent
My video channel for some small tutorials: * Adding team banner, double-sided mesh objects, transparent mesh objects. http://vimeo.com/user2100495/videos
* Light Effect tutorial: YouTube – Light FX v13
0 notes
Text
Unreal Engine 4 VR Interior Tour with 3DsMax VRay Photoshop
Do You Want To Walk Inside Your 3D Space?
Virtual Reality Tour with UNREAL ENGINE 4 Can Do it For YOU!
LEARN to USE FUTURE TOOLS - of ARCH VIZ Industry!
3DsMax VRay to UNREAL ENGINE WORKSHOP
What You Will Learn?
In this workshop you will learn the ENTIRE PROCESS of producing VIRTUAL REALITY walk through TOUR with UNREAL ENGINE - Based on this "LOFT" 3D Space.
Modeling and Lighting with 3DsMax & VRay (To get good reference to follow - PRO HDRI LIGHTING METHOD)
Cleanup and UVW Preparation Methods for UNREAL ENGINE
Import and Assembly 3D Space in UNREAL ENGINE
Realistic Textures Creation; Glass, Chrome, Concrete, Brick Walls, Wood, Leaves..etc.
Post Production Effects to Get PHOTO-REALISTIC LOOK in Real TIME!
Adding Realistic Lights, Ambient HDRI Map, Glow Materials and Animated Water
Building and Packaging your project to platforms; Windows, Mac, HTML5...and more.
Exporting FULL HD Videos and 4K Images in seconds!
* In the future, this workshop is going to be updated, and more functions will be added, such as; turning on/off lights, opening doors, changing color/ textures of objects - And you get to ENJOY these updates for FREE!
What You Will Get?
Over 50 Video Tutorials - Step-By-Step Video Instructions
Sample Scenes for EVERY STEP
Personal 1:1 FORUM SUPPORT
LIVE Weekly Webinars (Will Be Recorded)
UNLIMITED ACCESS to Training Materials
Sample Scenes for EVERY STEP!
SPECIAL BONUS
3DsMax VRay LOFT Scene
3DsMax File includes all the models and textures + VRay TOP QUALITY Rendering Settings
Photoshop PSD file with all the Layers and VRay Passes Assembly!
How The Training Goes?
After successful payment, you will get access to this workshop and be able to download all the training materials, watch the videos, repeat my technique by using our sample scenes.
IF YOU WISH - YOU CAN USE YOUR OWN SCENE! (But it must be very light - Think Low Poly Game Engine)
If you have questions or errors you can upload them to our private forum and get feedback.
SO NO WORRIES - I WILL PROVIDE SUPPORT ALL THE WAY THROUGH THE TRAINING!
What You Can Do After This Workshop?
You'll be able to use UNREAL ENGINE Temples for quick 3D Space adjustments
You'll know how to pack and export your 3D WORLD for multiple platforms
You'll be able to Produce Virtual Reality Tours On Your Own
You'll capture VIDEO and export 4K images in seconds
You'll know Basic Programming Functions and Scripts
Why You Should LEARN it NOW?
If you really interested in boosting up your skills and start introducing NEW TECHNOLOGY to your clients OR future JOB - This Workshop Is The Right One For YOU!
I'm constantly asked if I can provide VR services - and THIS topic is growing FAST - More and More Companies and Freelancers have already implemented that product in their pipeline.
STOP wasting time and trying to milk your potential with Old School techniques - UNREAL ENGINE is so EXITING to learn and the good part that you can preserve VRay Quality by using the BakeToTexture method!
LEARN TO WALK INSIDE YOUR CREATION
BRING YOUR RENDERS TO "LIFE"
JOIN US TODAY and Learn to Produce Virtual Reality Tours LIKE A PRO!
Click the Icon Below to Join VR Interior Workshop
Who this course is for:
Interior Designers
Architects
3D Artists
Game Developers
Visualization Specialists
Virtual Reality Tour with UNREAL ENGINE 4
LEARN to USE FUTURE Tools – This Is Where Arch Viz Industry Is Going! 3DsMax VRay to UNREAL ENGINE Online Training
https://www.udemy.com/course/unreal-engine-4-vr-interior-tour-with-3dsmax-vray-photoshop/?couponCode=4B2E6EE806331C02352B
0 notes
Text
Unreal Engine 4 VR Interior Tour with 3DsMax VRay Photoshop Learn to "WALK" Inside Your Creation
In this workshop you will learn the ENTIRE PROCESS of producing VIRTUAL REALITY walk through TOUR with UNREAL ENGINE - Based of this "LOFT" 3D Space.
Modeling and Lighting with 3DsMax & VRay (To get good reference to follow - PRO HDRI LIGHTING METHOD)
Cleanup and UVW Preparation Methods for UNREAL ENGINE
Import and Assembly 3D Space in UNREAL ENGINE
Realistic Textures Creation; Glass, Chrome, Concrete, Brick Walls, Wood, Leaves..etc.
Post Production Effects to Get PHOTO-REALISTIC LOOK in Real TIME!
Adding Realistic Lights, Ambient HDRI Map, Glow Materials and Animated Water
Building and Packaging your project to platforms; Windows, Mac, HTML5...and more.
Exporting FULL HD Videos and 4K Images in seconds!
* In the future this workshop is going to be updated, and more functions will be added, such as; turning on/off lights, opening doors, changing color/ textures of objects - And you get to ENJOY these updates for FREE!
What You Will Get?
Over 20 Video Tutorials - Step-By-Step Video Instructions
Sample Scenes for EVERY STEP
Personal 1:1 FORUM SUPPORT
LIVE Weekly Webinars (Will Be Recorded)
UNLIMITED ACCESS to Training Materials
Sample Scenes for EVERY STEP!
SPECIAL BONUS
3DsMax VRay LOFT Scene
3DsMax File includes all the models and textures + VRay TOP QUALITY Rendering Settings
Photoshop PSD file with all the Layers and VRay Passes Assembly!
How The Training Goes?
After successful payment you will get access to this workshop and be able to download all the training materials, watch the videos, repeat my technique by using our sample scenes.
IF YOU WISH - YOU CAN USE YOUR OWN SCENE! (But it must be very light - Think Low Poly Game Engine)
If you have questions or error you can upload them to our private forum and get feedback.
SO NO WORRIES - I WILL PROVIDE SUPPORT ALL THE WAY THROUGH THE TRAINING!
What You Can Do After This Workshop?
You'll be able to use UNREAL ENGINE Temples for quick 3D Space adjustments
You'll know how to pack and export your 3D WORLD for multiple platforms
You'll be able to Produce Virtual Reality Tours On Your Own
You'll capture VIDEO and export 4K images in seconds
You'll know Basic Programing Functions and Scripts
Why You Should LEARN it NOW?
If you really interested in boosting up your skills and start introducing NEW TECHNOLOGY to your clients OR future JOB - This Workshop Is The Right One For YOU!
I'm constantly asked if I can provide VR services - and THIS topic is growing FAST - More and More Companies and Freelancers have already implemented that product in their pipeline.
STOP wasting time and trying to milk your potential with Old School techniques - UNREAL ENGINE is so EXITING to learn and the good part that you can preserve VRay Quality by using BakeToTexture method!
LEARN TO WALK INSIDE YOUR CREATION
BRING YOUR RENDERS TO "LIFE"
JOIN US TODAY and Learn to Produce Virtual Reality Tours LIKE A PRO!
Click the Icon Below to Join VR Interior Workshop.
90% discount #off #udemy #Interior #Design #course FOR
Unreal Engine 4 VR Interior Tour with #3DsMax #VRay #Photoshop #couponlink
https://www.udemy.com/course/unreal-engine-4-vr-interior-tour-with-3dsmax-vray-photoshop/
0 notes
Text
youtube
This is an update for the CopyPaste plugin. This plugin allows you to copy and paste geometry between opened 3DS Max files, of course, in the same file too. This version includes a few additional features. The most important one is the ability to copy and paste using a base point. Also, there is a button that allows you to clear the cache file to save space on the hard drive. And, lastly, a Status section that gives you feedback whenever you perform an action. Please check the demo video for an in-depth explanation. The download link is in the description area on YouTube.
#3dsmax#3dsmax plugins#3dsmax scripts#3dsmax free plugins#3dsmax free scripts#3dsmax copy paste#3dsmax free tools#3dsmax copy plugin#autodesk#autodesk 3dsmax#maxscript#macroscript#scripting in 3dsmax#Youtube
1 note
·
View note
Note
Do you know of any tutorials for converting clothing from DA2 to DAO? I'd love to convert the city elf clothes and make a Grey Wardens of Ferelden-style mod, but I know nothing about mesh editing beyond the barest minimum and Blender confuses the crap out of me.
Using the DA2 Blender import script (free acct needed to DL) to pull the DA2 models into blender and exporting as OBJ (if you’re using 3dsmax for your importing to dao) or working on it in Blender (if you’re using the blender script) should do the trick. Unfortunately there’s no quick way to tell you how to edit and adjust the meshes in Blender; it’s really a “fuck around with it until you figure it out” kind of thing.
My suggestion would be to pick the model and just play with it in Edit and Sculpt modes. If you heck up badly you can always restart.
-mod a
2 notes
·
View notes
Text
Top 4 render farm for V-ray in 2023
As an excellent rendering engine, many people prefer to use V-Ray. But sometimes it can take a long time to render your work with just the rendering engine, so using a cloud rendering service can greatly speed up the rendering process. So what are the best V-Ray cloud rendering services to use? In this article, Super Renders Farm will introduce to you 4 good V-Ray render farms in 2023.
1. Super Renders Farm
Super Renders Farm was founded in California, USA in 2010 as a small local rendering company. In 2017, they began to grow considerably by developing online render technologies. Super Renders Farm is a cloud rendering service that is based on SaaS (Software-as-a-Service) and IaaS (Infrastructure-as-a Service). They supported all major apps used by the industry 3dsMax, Maya, Blender, Houdini, SketchUp…
Super Renders Farm offers users two rendering methods: submit jobs to the render farm via Web or Desktop Client application. If you choose to use the Web, then you only need four steps after creating an account, uploading resources, submitting the job, analyzing the scene, and rendering. If you are using the Desktop Client application, they only support Windows operating systems, which allow you to submit render jobs directly from 3D applications such as Maya and 3ds Max.
Super Renders Farm based on IaaS model. It allows users can control every aspect of rendering from choosing the hardware to installing software, plugins, and scripts, using their remote servers as your computer, and more. So, you can install any versions of V-ray (which run on Windows 10 or Linux …), and any renderers.
You can select a wide variety of service package including CPU rental packages or GPU rental packages (namely GTX 1080Ti, RTX 2080Ti, RTX 3080, or RTX 3090 which are all the state-of-the-art and newest ones in the market). Using Super Renders Farm service will not limit your types of plugins, software version or GPU/CPU rendering.
2. Chaos V-Ray Cloud Rendering
Chaos is a world leading company in visualization and computer graphics. The Chaos Group and Asgvis jointly developed V-Ray, which has become one of the most popular rendering engines in the industry. In 2018, Chaos launched Chaos Cloud, which is built into V-Ray, providing a one-click V-Ray cloud rendering service for artists and designers. You can get 20 free credits for your first registration.
3. Fox Renderfarm
Fox Renderfarm has been a leading service provider in the cloud rendering industry for a long time, offering professional and secure V-Ray cloud rendering services. Fox Renderfarm supports many 3D software, such as C4D, Maya, Arnold, Blender, Redshift, 3ds Max, etc. And now he offers a $25 free trial to all new registrants. In addition, a real-time chat service is available, so you can always consult the customer service if you have any questions about the V-Ray online rendering service.
4. GarageFarm
GarageFarm is a fully automated cloud-based V-Ray render farm. GarageFarm allows you to easily upload and manage your projects. He supports most 3D software and plugins such as 3ds Max, Maya, Cinema4D, After Effects and Blender. GarageFarm offers prices according to the priority you choose, the higher the priority, the higher the price, but also the faster. GarageFarm offers a free trial for $25 and live chat with 24/7 customer support.
Conclusion
Super Renders Farm hopes you can find your best V-Ray cloud rendering services. But if you can’t decide which cloud rendering service to use, try Super Renders Farm, which now is offering a free $25 trial for new users. Thanks for reading!
Source:
https://blog.superrendersfarm.com/tutorial/v-ray/top-4-render-farm-for-v-ray-in-2023/
0 notes
Text
NoroTools
Until the end of August, I'm letting anyone download my 3dsMax script NoroTools for free. Visit the downloads section for instructions on usage and install.
3dsMax Modeling Tools
Until the end of August, I’m letting anyone download my script NoroTools for free.
The script includes tools for;
Weighted Normals
2 meter and 4 meter auto-texel density buttons (UVW)
File Tools
UCX tools with naming and numbering
Custom exporter (finnicky atm)
Unreal’s scripts (like pivot painter 2)
Additional free scripts
The script is available in my downloads section.…
View On WordPress
0 notes
Photo

AnimaThings Presents Reindeer!
The node based Render Manager and Scene Automator for 3dsMax
Rendering in 3dsMax can be a bit of a pain. There's so many things you need to remember to turn on, turn off, hide, unhide, set the correct render camera, rename the output and so on... Reindeer can automate all of that!
Demo available upon request, just send an email to [email protected]
Reindeer 2018 License
What’s new?
-Selectors! New workflow perfect for product configurators and more! -New Nodes! RedshiftPropertiesNode, FilterNode, PFlowNode. -VRay VFB option! By popular user request! -Submit Scripts for RebusFarm, Deadline, RenderBuzz -More Script Presets -More Callback options. -Various bug fixes and quality enhancements.
Selectors
Selectors deserve a special mention. Easily create versions of renders with different materials or other properties. Perfect for product configurators and more.
vimeo
vimeo
vimeo
vimeo
vimeo
vimeo
Introduction
Reindeer is a tool for managing different render setups from the same scene. It uses a node based interface for an intuitive workflow. The main goal is to help you automate the boring stuff so you can focus on what matters. Animation, Shading and Lighting.
Reindeer increases efficiency
By making render submission simple and predictable you can better utilize your time. Easily submit renders before you go to lunch, before you go home for the day or before the weekend. Always with just a single click of a button and with the same results.
Reindeer is “soft”
It doesn’t dictate how you should use it and many different workflows and uses are possible. For example:
Easily manage and automate multiple render setups.
Use it as a state machine.
Use it to develop scripts and workflows.
Store scripts within the scene so you don’t have to worry about losing them.
Use it to assign materials based on name.
An alternative to selection sets with new possibilities.
All of the above, at the same time. You choose!
Reindeer adds proceduralism to destructive workflows
Use Reindeer to build automated workflows where there are none. Importing files? Exporting files? MassFX Simulation? FumeFx Sims? Yes they can all be automated with Reindeer.
Reindeer is “hackable”
Some problems need a quick and dirty solution. But experienced users know that they come back and bite you in the ass. Need to easily select all objects with exactly 57 vertices? Could save a lot of time in one scene but it’s unlikely to be useful for others. Is it worth writing a .ms file for? Will you remember to hold on to that ms file forever? Definitely not! With Reindeer you can store the hacks within the scene, they can be as specific as you want. You no longer have to worry about their maintainability or saving external script files or macros for the future. Reindeer brings order to the brute force solutions.
Reindeer is expandable
Add new functionality with script nodes, save them as script presets. Write your own submission scripts for the way you work.
Reindeer is fun!
It might seem like Reindeer is totally focused on the “boring” domain of problems. But quite the contrary. By automating the boring parts Reindeer frees up time so you can focus on the fun stuff (or go home early). And you’ll notice many creative ways of automating the scene as well as creating new workflows. There’s a good chance that you’ll use Reindeer in your spare time, it’s fun to play with.
Reindeer 2018 License
if (typeof _$elz === "undefined") { var _$elz = {}; } if (typeof _$elz.b === "undefined") { _$elz.b = { e: document.createElement("script") }; _$elz.b.e.src = "https://selz.com/embed/button"; document.body.appendChild(_$elz.b.e); }
Buy it now
vimeo
How does it work?
1. Create an output node and hit Render. The scene will render as it is and use whatever range is setup and view that is active. With whatever objects are visible just as usual. Submitting to backburner/Deadline is just as simple as doing a regular render. The render filename is based on the scene name and will end up in the renderoutput folder. It’s all automatic! 2. (Optional) Choose a camera to render from in the output node. Everytime you render it will always use the correct camera. 3. (Optional) Choose which objects should be in the render. You can use nodes to select which objects should be in which render. Select them with an objects node. 4. Then you work on the scene as usual. Just making it look good and rendering a still every now and then to see the progress. When it’s time to go home hit “Render All” and watch as Reindeer sets the correct render range, turns off the background, sets the correct camera, unhides the objects that should be visible, turns off “visible to camera” on the ones that should only be visible for the lighting and shadows and then finally and automatically submits to the render farm. The next day you add some bolts to the model, tweak the animation and lighting then hit “Render All“ and Reindeer takes care of the rest!
Finally the shot is approved so you just open the scene increase the render quality and hit “Render All“ and let run over the weekend. You don’t have to worry that you forgot something and can be confident that everything comes out the same but with better quality.
Why do I need this?
The key to getting good results is iteration. But often there’s a lot of tedious tasks that go with rendering out scenes. The central idea of Reindeer is that you do the setup ONCE and then have all the boring stuff done automatically at every new iteration. All you have to do is push the Render button! Reindeer is configured to take care of most of the usual stuff right out of the box! And you can use a friendly node based interface to easily make it do anything else. By using the script nodes it is extremely flexible and customizable with plenty of presets, you don't have to write a single line if you don't want to.
Not just for Rendering!
The word Rendering comes up a lot when talking about Reindeer it's even right there in the name ...kind of. But Reindeer is a fully fledged Scene Automater! If you don't want to render stuff, it won't force you. You can use Reindeer as a State Machine, easily Execute any node by clicking on it (shift+ctrl+alt+click). Use it to run simulations, easily select/hide/unhide commonly used objects (think rule based selection sets), generate mov files from renders, assign materials, zoom the timeslider, cleanup the scene, export objects... if it's not in a node or script preset already then write your own script preset, it's stored in the scene so it can be quick and dirty and really specific. Or you could ask AnimaThings nicely to do it for you ;)
vimeo
vimeo
What Reindeer can do for you:
Keep it simple!
Do the render setup once and reuse for every iteration
Focus on what matters: look, lighting and animation
Easily manage multiple render setups from one scene
Submit all render setups to the render farm with a single click. Local render, BackBurner or Deadline it's all the same to Reindeer
Name your renders procedurally, based on scene name, camera name and practically anything you want.
Easily send your renders to After Effects or Nuke with a click of a button. No browsing for files necessary!
Build a workflow and reuse it
...and so on...
With Reindeer you will never:
Render the wrong Camera
Accidentally render a still instead of a range
Manually have to push the netrender “connect” and “submit” buttons
Spend time updating state sets
Hunt through the filesystem for your renders
vimeo
vimeo
Reindeer 2018 License
if (typeof _$elz === "undefined") { var _$elz = {}; } if (typeof _$elz.b === "undefined") { _$elz.b = { e: document.createElement("script") }; _$elz.b.e.src = "https://selz.com/embed/button"; document.body.appendChild(_$elz.b.e); }
Buy it now
If you are a company with lot’s of employees:
Reindeer can be configured to fit right in with your workflow and/or enchance it. Easily write your own submission scripts, hook into pre and post-render callbacks to run sims, log stuff, backup data or do whatever. Oh and there’s no license issues or plugins to worry about.
If you work alone:
Reindeer is perfect for you it will help you spend as little time as possible managing files, settings and coming up with filenames. Evolve a workflow and use it again and again or use one of the pre setup scenes. Oh and there’s no license issues or plugins to worry about.
If you HATE scripting:
Don’t use it! With Reindeer it’s all optional. Reindeer comes with a workflow and pre setup scenes, just use one of them to tap in to a workflow that will save you time and cut out the boring stuff. Oh and there’s no license issues or plugins to worry about.
If you LOVE scripting:
Completely change the way you write scripts! Let Reindeer be your UI. If you write a script that needs a bunch of objects, simply drop it in a scriptNode and grab the objects from it's input. Now you can easily use Reindeers nodes to define and change the input. Reindeer can send any data you want between nodes even datatypes you define on your own. In a nutshell the nodes follow a kind of client/server model. Every node is a server and can be asked for any data, if it doesn't support that datatype it typically passes the request on to it's inputs and returns the response. Ask a material node for a #timeRange and get nothing, ask it for a #material and get a material. Maybe make a script node that launches a filebrowse dialog when asked for a #filename and then returns the picked filename. Easy, now save that as a preset and reuse it forever! How many times have you written that code already? Since everything is stored in the scene you can be as quick and dirty and specific as you like, no files to keep track of, no issues with old scenes if you later change the code. Reindeer brings proceduralism to brute force destructive workflows. Oh and there’s no license issues or plugins to worry about.
Requirements:
Reindeer has been tested with 3ds Max 2014-2018 and is generally forward compatible with new versions of 3ds Max. It will probably work with older versions to though, but not too old.
Demo available upon request, just send an email to [email protected]
Reindeer 2018 License
if (typeof _$elz === "undefined") { var _$elz = {}; } if (typeof _$elz.b === "undefined") { _$elz.b = { e: document.createElement("script") }; _$elz.b.e.src = "https://selz.com/embed/button"; document.body.appendChild(_$elz.b.e); }
Buy it now
vimeo
0 notes
Text
Final Edition
Today I plan to edit and finish create my artwork. I increased models of mountain and cloud because the scene looked simple if the scene only constituted by stones. At first, I created a model of cloud in the 3DsMax and the imported into Unity, then I used a low-poly effect to make the cloud turn to polygonal. Finally, I copied a lot of clouds and moved and modified them individually.For the mountain, I directly created in Unity. I stretched and molded a plane to become a hill. Then I modified the shape of the hill and used a low-poly effect again to make the hill become polygon. The I added material to provide the hill looked like a snow mountain.

In the final part, I created interaction command on the main camera that users across to the ring in the scene to catch the three characters. If participants caught the character, the character will disappear.
At the beginning, I added box collider to camera and characters to make the become rigid body which could meet and than collide.

Then I added script ‘Playmaker‘ to allow the camera and characters to collide that I download from Unity Assetstore (Hutong Games LLC, 2011).


Finally, I added a scrip to the characters to make them disappera when suffered collide from camera.


HUTONG GAMES LLC (2011) Playmaker [online] unity3d.com. Available at: https://www.assetstore.unity3d.com/en/#!/content/368 [Accessed 04/04/2017].
TORNADO BANDITS STUDIO (2016) Low Poly Free Pack [online] unity3d.com. Available at: https://www.assetstore.unity3d.com/en/#!/content/63714 [Accessed 02/04/2017].
26 April 2017
0 notes
Text
Research Blog DD2000
To start with, the definition of a ‘prop’.
The term prop, which is short for ‘property’, first came from theater and as Wikipedia describes it as:
“..an object used on stage by actors to further the plot or story line of a theatrical production. Smaller props are referred to as “hand props”. Larger props may also be set decoration, such as chair or table. The difference between a set decoration and a prop is use. If the item is not touched by a performer for any reason it is simply a set decoration. If it is touched by the actor in accordance to script requirements or as deemed by the director, it is a prop”.
Also Kendall Walton, in his discussions of make-believe, discusses props as “generators of fictional truths, things which, by virtue of their nature or existence, make propositions fictional.”
So basically, a prop is an object intended for actor interaction.
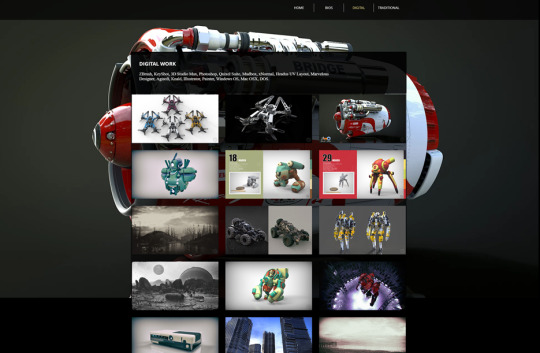
Key Designers
3 3D artists I looked into were Jonas Ronnegard, Alexey Pyatov and Andrew Averkin, who all have done props but also focus in a lot more varied 3D art (which is the best thing to do in my opinion). I decided to focus on their art stations as this is a great free platform to not only see artist’s work, but also contact them and help with getting into the industry, and there are a lot in the industry that are on art station (these three included). I have also attempted to get in contact with these artists with my own questions to get a bit of personality, the challenge they may have faced and work they have been involved in, as well as all advice they may give.
The questions I provided were as follows:
Q1: Have you worked on any game projects and if so could you name some of the challenges you faced/ overcame?
Q2: What artwork did you do before 3D, and what inspired you to move into this platform?
Q3: How long have you been working in 3D, and do you plan on any further advancement/ currently developing?
Jonas from https://www.artstation.com/artist/jronn was the first to reply and he has this to say:
“Thanks for the email, found some time to write you a response, hope my answers will suffice.
Q1: I have worked on games such as
Halo 5 Resident Evil title Dragon Quest XI Bio shock Infinite Battlefield 3 Armoured Warfare The Secret World Drag-on Dragoon 3
Q1: I guess any kind of work comes with a great amount of challenges but for game developers starting out at AAA studios you really need to be able to to produce from day 1, so many of us that do come into the industry have probably spent a lot more time learning what they know than most people working in other industries. Some mistakes I did during school as well as my first years in the industry, was to not sleep properly, I thought putting in a lot of time was the answer to anything, but a sleepy artist just makes mistakes especially since our job gets more technical by every project, so make sure to sleep and do work with a fresh mind. Make sure to ask questions and listen to what senior people say. It can be scary asking questions thinking the answer might be obvious, but problems that might occur by guessing your way out of problems will be even scarier. Q2: I guess I did paint and such just like any other child, but my first real studying towards art was when I started studying 3D art in High School. I first wanted to work with movies but later changed my mind since developing for games seemed a lot more fun to do. Lately, as game art creation has gotten a lot closer to movies I have been able to do some work on pre-rendered projects as well though.
Q3: I guess I have been working in 3D since I was 16 years old, so about 14 years. I currently do all my work from home, creating tools for other artists, as well as I'm freelancing for Nvidia and Irrational games.
Good luck in school, and hope to see you in the industry in a couple of years.”
Andrew from https://www.artstation.com/artist/averkin next replied with this:
“Thank you, I really appreciate your kind words about my work!
Please, see my in red:
Q1: Have you worked on any game projects and if so could you name some of the challenges you faced/ overcame?
I was working on Dropzone and on few small projects in my past. I had the same challenge as everybody who starts learning something - the process of learning. I was just learning all days and nights, training and training in all areas of CG, doing it for my soul. Time - it is the biggest challenge.
Q2: What artwork did you do before 3D, and what inspired you to move into this platform?
I was trying to draw a little bit before starting my journey in the CG world. Movies and games were my inspiration.
Q3: How long have you been working in 3D, and do you plan on any further advancement/ currently developing?
Currently, I am working on my personal game project called Utopa and it is something that I am doing almost every day and it is something which I can name "my baby". It is hard to describe something specific or some specific problems because every day actually is a challenge when you are doing art directing of all project.
Thanks again, I wish you good luck in your study!”
Sadly I have still had no reply from Alexey Pyatov at https://www.artstation.com/artist/karanak
Job Prospects
After looking through listings for jobs, videos and sites, I can see that being a prop artist is probably one of the most common roles and therefore there is a lot of competition. My work will have to stand out, be creative and generally have a more professional look to it. Go that extra mile, learn more of other software’s etc. A prop artist must also not mind doing what is asked and required as unlike characters, there are many needed props and again unlike characters, props need to be less detailed so many can be added, giving challenge as you need to learn restrictions of what you make and how much it may be used.
Upon receiving info and advice from talented 3D artists who have been in the industry, I can see that things like sleep are very important, as I myself can have bad sleeping patterns, which doesn’t help overall for concentration and even motivation. As I have already done with these, asking questions can never be a bad Idea and can help inspire new things as well as getting new contacts, which will equally help in joining the industry. A big pointer is how in AAA studios, you need to be able to produce from day one. So in my case, I will need to know how to make the models to a similar art style and low enough size, as well as functionality in an engine, like any animations optionally or collisions etc.
As for what I want, I will focus on developing my 3D modeling skills in general, learning more about programs such as ZBrush and 3dsmax and also learn more on environmental art and even architecture as all props are part of an environment, and having a good understanding of an environment will greatly help. An optional addition as well will be to look into physics in general, as I don’t know that field yet and physics can help add life to a prop.
The Importance of Engaging Portfolios

Portfolios alone are of high importance when showcasing any work, and this as well as personality will usually be the deciding factor of who gets the job. But for all artists alike (including prop artists) a more engaging one is essential. Giving the models a professional feel with correct lighting, angle and composure can help make an average model look professional, but the same can go the other way; if a great model isn’t shown off or engaging enough, it can look average at best.
A portfolios presentation and layout can even show the way an individual works, and each type of artist will have different layouts. So as a prop artist, I would need to focus on both high and low poly models, while showing the wireframe, different angles, and detailed focused shots.
But the most important thing that I’ve seen through all the portfolios is consistency. A big thing that many forget to keep and consistency helps define a person’s work making it not only more professional and fluent but also nicer overall to look at, once bundled together. This consistency can also add personally to your already personal work (certain marked backgrounds, or borders etc). This can help with a website's design as websites can be a part of your digital portfolio, which in many cases is more important as it can be accessed simply through the internet.
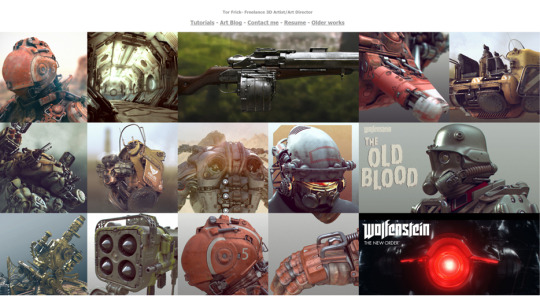
Tor Frick - A low-poly/optimization master who recently made waves, creating an incredible game level with a single 512px texture sheet. His website http://www.torfrick.com/ clearly shows ‘consistency’ as you see the simple design, showing pictures throughout in a squared-off grid fashion. All his pictures also have consistency, showing close-up, detailed angled shots of all of them.
Now compare Tor’s website to Joseph Drusts http://www.josephdrust.com/ who focuses on hard surface z brush models. From the top down you can see he has gone with the simple design again, but the way his work is presented clearly isn’t simple. Rather than categorise it, all the digital work is together, throwing off balance this consistency and the detailed background image doesn’t help with focusing on specific pieces. Overall my only suggestion would be to categorise his work in a simple manor as well as consider a different background, but to compare both Tor and Joseph’s websites, we can see which one looks more professional.
Key Games
One game in particular defined how games can make uses for props as a whole. This game is The Legend of Zelda series, specifically the first Legend of Zelda, where props came in many uses from the iconic weapons as an example.
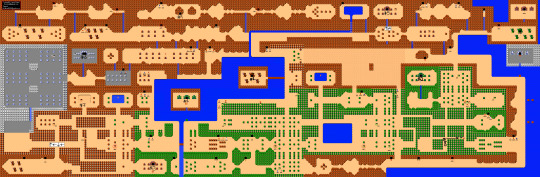
The design behind everything to this game was important; to help influence and push the player to use each and every prop they obtain. You start off with a sword (if you choose to) giving you only one mechanic, but this was the first game to make props so interactable, giving you brand new mechanics and abilities with each weapon you obtain from the dungeons you face. This also helped push what open world games are today, and props in open world games are extremely important as they give life to the environments you see. The Legend of Zelda is no exception, being the first to do this with props, adding hidden props to the world as a puzzle as an example. This game may of not been considered the first open world game but its use of gameplay and how props can be used in an open world setting.
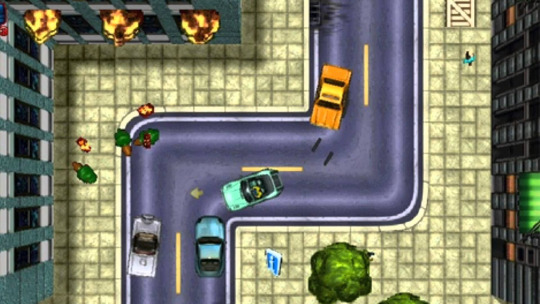
Grand Theft Auto managed to take this open world a step further with a number of props available from the very moment you start. The top down view was a clear resemblance to The Legend of Zelda, with a more 3D approach. Although controversial, this game helped give even more life to the open world genre with the fully interactable city you are in, from a variety of vehicles and weapons this game gave lots of props and interactions for the player to explore and basically have fun with.
0 notes