#scripting in 3dsmax
Explore tagged Tumblr posts
Visit Tumblr Blog
Explore Tumblr blogs with no restrictions, modern design and the best experience.
Last Seen Tumblr Blogs


Fun Fact
Mobile Tumblr US users spend an average of 4.04 minutes per session on the app.
Text
youtube
This is an update for the CopyPaste plugin. This plugin allows you to copy and paste geometry between opened 3DS Max files, of course, in the same file too. This version includes a few additional features. The most important one is the ability to copy and paste using a base point. Also, there is a button that allows you to clear the cache file to save space on the hard drive. And, lastly, a Status section that gives you feedback whenever you perform an action. Please check the demo video for an in-depth explanation. The download link is in the description area on YouTube.
#3dsmax#3dsmax plugins#3dsmax scripts#3dsmax free plugins#3dsmax free scripts#3dsmax copy paste#3dsmax free tools#3dsmax copy plugin#autodesk#autodesk 3dsmax#maxscript#macroscript#scripting in 3dsmax#Youtube
1 note
·
View note
Text
Cara Mengatasi Masalah Umum saat Menggunakan 3DS Max

Menggunakan 3DS Max untuk membuat desain 3D yang kompleks sering kali menjadi pengalaman yang memuaskan. Perangkat lunak ini memiliki fitur-fitur canggih yang memungkinkan para desainer menciptakan model dengan tingkat detail tinggi. Namun, tidak dapat dipungkiri bahwa seperti perangkat lunak lainnya, 3DS Max juga memiliki tantangan dan masalah teknis yang kerap dihadapi penggunanya. Masalah-masalah ini, jika tidak ditangani dengan tepat, dapat menghambat produktivitas dan membuang waktu yang berharga.
Artikel ini bertujuan memberikan solusi praktis dan mudah dipahami untuk mengatasi masalah-masalah yang sering muncul saat menggunakan 3DS Max. Dengan memahami penyebab utama dan langkah-langkah penyelesaian, Anda dapat memaksimalkan kinerja perangkat lunak ini dan memastikan alur kerja tetap lancar tanpa gangguan yang berarti.
Performa Lambat saat Bekerja dengan Model Besar
Salah satu masalah paling umum yang sering dikeluhkan pengguna adalah performa perangkat lunak yang lambat, terutama ketika bekerja dengan model 3D yang sangat kompleks. Hal ini biasanya disebabkan oleh penggunaan sumber daya komputer yang tinggi, seperti RAM dan GPU. Untuk mengatasinya, Anda dapat mengoptimalkan model dengan cara mengurangi jumlah poligon atau menggunakan fitur "Proxy Objects" di 3DS Max. Selain itu, pastikan spesifikasi komputer Anda memenuhi kebutuhan minimal atau ideal perangkat lunak ini.
Jika masalah ini masih terjadi, cobalah untuk mengatur ulang pengaturan viewport menjadi "Wireframe" atau "Shaded View" daripada "Realistic View". Dengan demikian, 3DS Max tidak akan memproses detail berlebih yang sebenarnya tidak diperlukan saat tahap awal desain.
Crash atau Error yang Tidak Terduga
Crash mendadak adalah mimpi buruk bagi siapa saja yang bekerja menggunakan perangkat lunak kreatif. Untuk mencegah kehilangan pekerjaan Anda, biasakan untuk menyimpan proyek secara berkala dan aktifkan fitur autosave di 3DS Max. Jika error tertentu terus muncul, periksa plugin atau script pihak ketiga yang terpasang, karena sering kali masalah ini berasal dari ketidakcocokan versi.
Solusi lainnya adalah memastikan bahwa Anda selalu menggunakan versi terbaru dari 3DS Max. Update biasanya mencakup perbaikan bug yang dapat memperbaiki masalah stabilitas. Jika perangkat lunak tetap tidak stabil, lakukan instalasi ulang setelah mencopot sepenuhnya versi sebelumnya, termasuk membersihkan registry.
Masalah Render yang Tidak Sesuai Ekspektasi
Render merupakan tahap penting dalam proses desain, dan ketika hasilnya tidak sesuai harapan, hal ini bisa sangat mengecewakan. Masalah seperti noise, pencahayaan yang buruk, atau warna yang tidak akurat sering kali menjadi penyebab utama. Untuk mengatasinya, pertama-tama pastikan bahwa pengaturan render, seperti resolusi dan sampling, telah diatur dengan benar.
Gunakan juga "Render Elements" untuk memisahkan elemen seperti pencahayaan, bayangan, dan refleksi, sehingga Anda dapat melakukan koreksi dengan lebih mudah di tahap pasca-produksi. Jangan lupa untuk memanfaatkan sumber daya online dan forum pengguna 3DS Max yang sering memberikan tips dan trik untuk mengoptimalkan hasil render.
Di tengah-tengah proses belajar atau saat menghadapi masalah teknis yang spesifik, Anda juga bisa membeli sekaligus mencari solusi di https://www.teknologika.biz/3dsmax yang menyediakan panduan langkah demi langkah untuk berbagai persoalan yang sering dihadapi pengguna. Ini adalah salah satu sumber daya terpercaya yang dapat membantu Anda menyelesaikan kendala dengan lebih cepat dan efisien.
Kesalahan dalam Penerapan Material
Penerapan material yang salah bisa membuat desain Anda terlihat kurang realistis. Hal ini sering terjadi ketika tekstur tidak terproyeksi dengan benar pada model. Untuk mengatasi masalah ini, gunakan fitur "UVW Map" yang memungkinkan Anda menyesuaikan proyeksi tekstur agar sesuai dengan bentuk model.
Selain itu, pastikan bahwa semua tekstur yang digunakan telah diimpor dengan benar dan berada di folder proyek yang sama. Jika tekstur hilang, Anda dapat menggunakan fitur "Asset Tracking" di 3DS Max untuk melacak dan mengembalikan file yang hilang.
Viewport Tidak Sinkron dengan Render
Sering kali, apa yang Anda lihat di viewport tidak sepenuhnya mencerminkan hasil render. Ini disebabkan oleh perbedaan pengaturan di viewport dan mesin render yang digunakan. Untuk mengatasi hal ini, pastikan bahwa Anda menggunakan mesin render yang sama di viewport dan saat proses rendering final.
Fitur "ActiveShade" di 3DS Max memungkinkan Anda melihat hasil render secara real-time di viewport, sehingga memudahkan Anda dalam menyesuaikan pencahayaan, material, atau elemen lainnya sebelum melakukan render final.
Kesimpulan
Menghadapi masalah teknis saat menggunakan 3DS Max memang tidak bisa dihindari sepenuhnya, tetapi dengan pemahaman yang tepat dan langkah-langkah penyelesaian yang efektif, Anda dapat mengatasinya dengan mudah. Jangan ragu untuk terus mencari sumber daya tambahan dan memperbarui pengetahuan Anda tentang perangkat lunak ini. Dengan begitu, Anda dapat menghasilkan karya desain 3D yang luar biasa tanpa hambatan yang berarti.
0 notes
Text
Story time
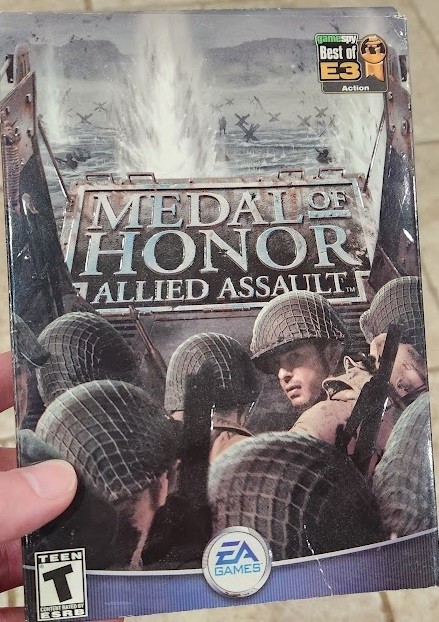
Adam brought to my attention in the last article some of the early goings on at 2015 with MOHAA, We didn't really get to sink our teeth in for some time. He reminded me that we spent time doing a prototype for a second game, which went no where. It was, Scrappy, but I did eventually get to settle in on some work. Trying to Jog my memory a bit by googling Screenshots lead me to this great walk-through Blog, which I am going to borrow some things from (Super Adventures In Gaming Blog)
Out of the gate, when you get past the training you are treated to some of my "fine" terrain work. Couple of things about this, We had developed a dynamic terrain system for the game that was rich in features but could not draw this darned road that curved and bent like this, not without us Flagging a lot of the vertices around the road to not LOD, which subsequently created a ton of polygons and also left terrible lighting artifacts and z-fighting where the curved road and the on-the-grid terrain met.
Only an insane person, would ever go these lengths. If you're keeping up on my articles, you'll recall I had a "Blob" Method in Unreal for creating organic shapes (Story Time About Unreal PSX). That wouldn't apply here but with only convex brushes it looked different! So how do you paint an organic terrain shape using only convex brushes? The secret is in the Cylinder brush, three sided cylinder. It produced the triangle that would be the the terrain surface that you see here. That top triangle could bend and go anywhere I wanted it too, the other surfaces were simply discarded as "No draw" textures.
This would become my bugaboo during MoH:AA and later games too, I worked on many levels but every one that I was assigned to would get a framerate treatment. I wasn't a fan of sub 60hz framerate. Anyway, this guy's commentary on our 2001 game from 2013 is spot-on if not hilarious. He mentions the music early on in his walk through, which I could say was one of the highlights of all of the games I would work on. That first drop of the music, a single line of script placed and suddenly it was "Go time".
During MOHAA times, a level designer was responsible for EVERYTHING in the level. The initial focus was creating the Geometry, and then you had to make it go with some scripting. Mission 2 consisted of 3 levels (some were broken down to a,b,c sections ), they were all my work.
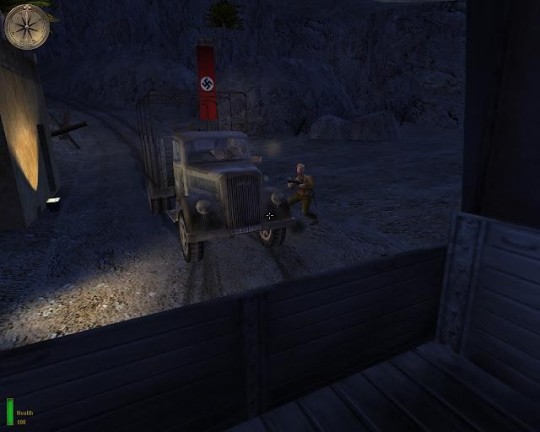
M2L1 was the infiltration of the German Sub-pen, everything was covered in snow and needed some fancy texturing work. The snow was created with No-clip so the feet could go beneath. This area was challenging the engine for me. 60Hz was hard to do on this very "open" space. Once again, insanity led me to a solution where an engineer gave me a technology that we had no term for other than "Manual Vis'ification Technology". I would connect spaces and declare them not visible for the compiler. I remember the engineer coming to my desk, with a grin when He saw how I was breaking the space up,it was a grid of blocks that would get smaller as needed for details, Dude you're basically creating an OctTree.. Huh.. k. Whatever smarty engineer dude. Not much else to say about this space other than there being a time when I wanted to try and introduce some 3dsMax modeling chops and do better rock formations, Quake3's curved patches were very limited. This game had an in-house developed Continuous LOD (Level of Detail) that fought me, On a scale as big as a rock-wall the Rocks would slowly and very visibly morph in. I ended up throwing out that Idea.
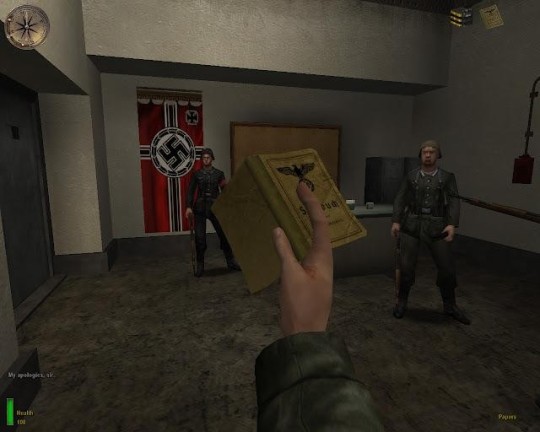
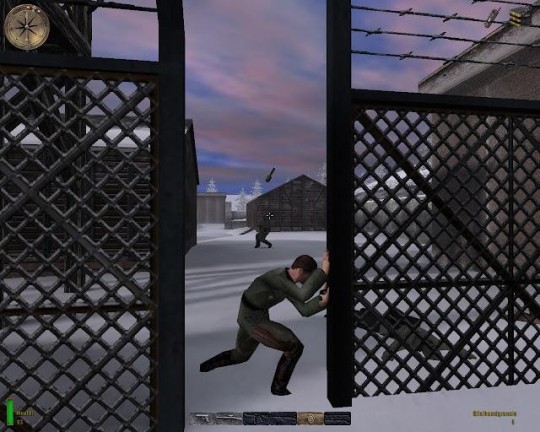
M2L2 was a place where I got to exercise some scripting, It was the first place where any kind of programming would take a foothold. Another designer had a very complex state machine setup for managing the interactions. I ended up throwing it out. All the area needed was some dudes patrolling around that would simply ask you for your papers if you got close, In certain area's you'd have to get close. If you didn't comply, the alarm would sound. It was an opportunity to set up unique scripted animations, We had these dudes at a card table, then we had a guy welding one of the docked subs. The ambient sound did the rest, there were all kinds of details in the sound to suggest more was going on in here.
This U-boat was created for me by the art team, Unfortunately we'd hit by the fact that the engine kind of just took one point as the receptor for the lighting, Submerging the boat too much meant the whole thing turned black. There was a lot of Jiggling the boat to get it to take the light just right ( or right enough )
The entire inside of this boat was donated by the art team. Really cool stuff, unfortunately it was hard to move around in. Players in these games are bound to a box, We had to cheat a lot an make certain things ( the door ) non-clipping. I made sure the scripting inside here was brief.
The sub is pretty basic but I wanted to have some details and I didn't get the full attention of the art team, I don't think we had created map "Prefabs" yet, looking at those wires and things on the ceiling has me recalling a lot of painstaking copy-paste operations, and Re-wiring when I wanted to change the style. The lamps on the ceiling might just be curve brushes. Even when things were simple I wanted go hard. =)
M2L3 isn't captured here, but I remember starting in a ventilation system, We had a cockroach run away at the start that was scripted. the rest is simply set up as shoot-em-up cover is blown escape. Nothing to it.
Here we, good old YouTube! There's actually a lot more detail in this than I remember doing, it really did turn out good: Have a walk down memory lane in this walk-through of Mission 2.
youtube
I was NOT involved with DDay, It was glorious. This is where the artists went. My first E3 had us demoing this to people in a bunker with a long line. Too be fair my memory of E3 blends with Call of Duty so I'm not sure which, but it was awesome to be the surprise hit of the show. I also remember Snoop-dogg himself walking right by. How cool!
There are other missions that I had a hand in, There were some non-technical Level Designers that I would go offer some scripting to and some missions that I would help create destroyed buildings for.

I helped with the Gas Mask sequence of this mission, Creating a timer, overlaying the gas mask, scripting the fog ( gas ).
youtube

I don't know which one's but I got involved with some of the war-torn missions and helped bust up a lot of buildings. If you see a rubble pile, there's a good chance I was in there.
I can't remember, if I was involved with Tanks, I think I may have helped with the geometry for the missions with tanks. Not to reveal too much about CoD, but tanks were my missions there so things are murky, if you remember please do chime in. I'd love to hear.
I think that's it for MOH:AA stay tune for more stories!
0 notes
Text
A Breakdown of The Witch's Quarter
Every project out there is not just a creation but also an opportunity for growth and learning. Kim Se Hun, a talented artist from South Korea, recently shared his journey in crafting a brilliant portfolio piece inspired by Eddie Mendoza's concept art, "The Witch’s Hut." I was very astonished by the techniques Kim employed as they brough to my attention multiple aspects of environment design that I usually ignore. In this blog post I will reflect on his work based on the article he has written on the platform GamesArtist.

Kim's method for environment design began with a thorough reference gathering using tools like PureRef. By studying Tudor houses and smaller props from various angles, he gained insights into their construction and materials. This enabled him to make informed decisions during asset creation. What I found interesting is that he did not limit himself to one platform while searching for references, which is a mistake I tend to make quite often. Looking for images on eBay allowed him to get more views and angles of objects that were being posted there for sale. Another thing that surprised me is the fact that he employed an object-specific technique that included references for details like dirt roads and wood trim sheets.
Then came the blockout phase where Kim used simple shapes in 3ds MAX to set a solid foundation for composition and scale. Iterating on the blockout while referencing the concept art ensured alignment with the intended look and feel, and helped him achieve the final vision that he had in mind. A bad habit of mine is that I tend to skip this part of preproduction as I worry it might slow down my progress. In fact examples such as Kim's help me realise that blocking out my scene in the early stages will help me work faster in the execution stage since the blockout can act as a guideline for asset creation and composition. Having simple test textures allowed him to experiment with different vertex painting methods before finalizing the workflow, which is something I aim to implement in the future.
Learning shader creation within Unreal Engine, Kim developed a versatile master material with exposed parameters for quick iteration. His creation of a flexible and versatile material that could be used on more than one type of asset helped make his pipeline more resource and time-efficient. Creating a second UV channel is not something I ever thought of as an option. By doing that, he was able to separate UV map controls to manipulate additional detail levels such as degradation and dirt through colour variation. This is yet another tip that could help me bump up my realism levels when working on a project, regardless of its art style.
Maintaining uniform Texel density across assets contributed to a cohesive visual experience. Kim leveraged tools like the Advanced UV Normalizer script for 3dsMAX to streamline the resizing process, ensuring consistency while optimizing texture memory usage. I have yet to learn proper Texel density techniques, but knowing there are scripts that could facilitate the process makes me more confident about achieving results of similar quality. Since I use 3dsMAX as my main engine for 3D modelling and UV-ing, this script is going to be very helpful for me to make my workflow even more practical.
Kim Se Hun turned to Quixel Mixer as a key tool in refining the street floor of his scene. Mixer's intuitive interface and procedural texturing capabilities helped create diverse cobblestone variants with ease. In this manner, each patch of cobblestone retained its unique character, especially with the addition of grass and water puddles which add depth to the floor level. I aim to integrate Mixer with Unreal Engine at some point to help bring textures to life in my projects.
Kim's detailing process involved the use of decals to alleviate some pressure from texturing. These decals which he created himself in ZBrush made the building look more convincing as they helped get rid of harsh edges on walls. His approach to foliage involved a blend of Megascan assets and custom creations using SpeedTree. He noticed that the shadows were being cast too deep into the grassy areas, to solve this issue, he created his own shader to change the normal orientation of grass to match the ground normal. For an efficient use of texture memory, he implemented trim sheets for repeated props.
Additionally, he implemented trim sheets, a technique pivotal in accelerating the creation of smaller props such as crates and barrels. Recognizing the time constraints of traditional workflows, Kim merged multiple props onto single texture atlases which helped him achieve better productivity without sacrificing visual quality. Inspired by a tutorial by Matt Battaglia, he Incorporated dynamic elements like flags on ropes by using vertex animation to animate them. After creating a texture atlas in Substance Designer he jumped into Maya for mesh creation and vertex painting, thus enhancing the scene's dynamism.
Since atmospheric elements play a crucial role in enhancing depth and immersion, Kim gained greater control over the scene's atmosphere and mood by opting for a more tailored approach. He created a separate fog material instead of using the standard volumetric fog, which he applied to a cube mesh within the scene. This allowed him to manipulate the fog's density, colour, and distribution, effectively blurring objects in the distance while maintaining visual clarity. While UE 5 offers powerful lighting tools like Lumen, Kim recognized the importance of mastering static light baking for broader compatibility across different game engines. He set up lighting through simple directional lights and skylights and fine-tuned their parameters to achieve a lighting scheme that complemented the scene's composition. He decided to change his initial plan to copy the concept art, as he learned how to embrace lighting configurations that accentuated key focal points, such as the yellow building. This inspired me to prioritise my personal vision's needs over mimicry.
In the end, he applied post-processing effects to refine colour grading and enhance the fusion of colour palettes, leading to a cohesive visual identity. Addressing readability issues with the aqueduct bridge involved modifications to lighting and foliage placement, which resolved visual ambiguities and clarified spatial composition within the scene. The last thing Kim documented is his employment of fine-tuning techniques for the final shot. He used special commands to enhance image clarity and improve the visual fidelity of distant foliage. However, he was cautious with utilizing these commands, as they may have an impact on overall performance.
Reference:
Kim Se Hun. (2024). The Witch’s Quarter. GamesArtist [e-journal] Available at: https://gamesartist.co.uk/witchsquart/
0 notes
Text

How my story in architectural visualization started?
Julian Sadokha here, founder of Suburbia studio. I became interested in design and architecture. I started doing my first visualizations on paper. They were house plans, drawings, and sketches according to my own ideas.
Once, as an architect-freshman at Lviv Polytechnic university, I was amazed by a house visualization that was hanging on the wall near the classroom. To be honest, this work seemed perfect and unattainable to me then. And every time I walked by, I asked myself, "Could I have done better?"
Gradually, this hobby grew into my lifework - architectural visualization.
#archviz#architectural visualization#interiors#interior#architecture#architecturedesign#design#3drendering#3dsmax#vray#render#3dvisualization#renderings#coronarender#cgi scripts#3d#architecturalvisualization#contemporaryarchitecture#architect
1 note
·
View note
Text
“XRefs Selection Sets” is a script to help you to work easier with the XRefs in your scene.
https://todorvankov.com/3ds-max-scripts#XrefsSelectionSets
1 note
·
View note
Photo
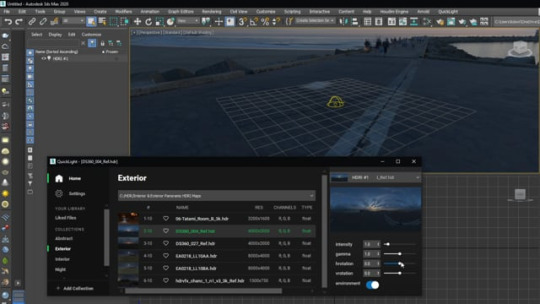
QuickLight для 3DS Max
Krzysztof Dawlud выпустил QuickLight, новый инструмент для 3DS Max, который автоматизирует задачу настройки и регулировки купольных светильников на основе HDRI.
vimeo
В настоящее время плагин поддерживает Max 2020 и V-Ray остальные обещанны в ближайшее время.
Узнайте больше на Gumroad.
(function(w, d, n, s, t) w[n] = w[n] )(this, this.document, "yandexContextAsyncCallbacks");
https://is.gd/z8QMBV
0 notes
Text
flurrin replied to your post “guess who just spent 4 hours figuring out how to...”
P. Please post a tutorial
disclaimer that i still have absolutely zero knowledge of how to use 3d modeling programs, but here i go
how to extract atton’s (or any) model from k2 and unwrap its uv maps:
(before i start, someone made a video tutorial on extracting the ebon hawk model, but they apparently did it with older/no longer recommended tools? it didn’t really help me bc of the version differences, but here it is anyway)
tools needed:
3dsmax (free for students/instructors, or free 30 day trial) or gmax (free but very old apparently, but kotor is pretty old so it all works out). i'm using 3dsmax 2021 bc that’s what i got access to so i have No idea about gmax
download & be able to run kotor tool. this’ll extract the model/texture files you need from the game files
download & be able to run mdledit. this’ll turn the mdl files into ascii files
download & follow the instructions to install kotormax. this’ll let you open ascii files in 3dsmax/gmax
first, run kotor tool:
go to Kotor II\BIFs\models.bif\Aurora Model and find the .mdl file you’re looking for. people are under p, and things aren’t listed totally alphabetically, so don’t worry if it feels like you already skipped it
i’m looking for p_attonbb and p_attonh, so i selected those one at a time and clicked extract file on the right, and saved it to a folder on my desktop. you’ll want to keep all these files in the same folder bc it’ll come in handy later
so i now have p_attonbb.mdl and p_attonh.mdl. close Aurora Model and open Aurora Model Extension just below it, and look for the same file names, but just as mdx files this time. save those too, and i now have p_attonbb.mdx and p_attonh.mdx
if you don’t already have texture files, you should get those too. go to Kotor II\ERFs\TexturePacks\swpc_tex_tpa.erf and look for the right filenames-- atton’s are pretty obvious, but if you don’t know which one the model uses, you can hold off until the next step. anyway, once you find the file, extract it as a tga. tga is good for most purposes, tgc is for people who know what they’re doing (which is not me lol)
second, run mdledit:

select the relevant kotor game (click on the button to swap between them) and the platform (it switches between pc and xbox)
click File -> Load and select the .mdl file you extracted earlier. if you didn’t know what texture(s) the file uses earlier, you can find out here by going to Edit -> Textures, where all the texture filenames will be listed out for you
select File -> Save -> ASCII and save the file. i did that for each mdl file i had, and got p_attonbb.mdl.ascii and p_attonh.mdl.ascii
close mdledit! you’re done with it
third, install kotormax if you haven’t already!
fourth, run 3dsmax:
you should see this column. this was my first time ever seeing 3dsmax, so it took me like 10 minutes to realize this, but this whole column is kotormax. if for any reason it didn’t show up, just go to Scripting -> Run Script, and open 3dsmax 2021\scripts\KOTORmax\kotormax.ms
expand “MDL Loading”, click browse, and navigate to the .ascii file you saved earlier. click import at the bottom
and here he is! he already has textures on him because, if you kept all your files in the same folder as suggested, the texture file was Right There for 3dsmax to find. (the first time i did this, i didn’t have the texture file there and it showed up blank. i now unfortunately know how to link a texture in manually.)
ok so wtf are those white blocks around him you ask, and how do i get rid of them? well, that’s the very question that plagued me for literally 3 hours, and there’s a very simple answer to that. it’s just the dummy model and you just hide it. infuriatingly simple! you’d think that i, someone who has used literally any art program before, would immediately have recognized this whole setup on the left:
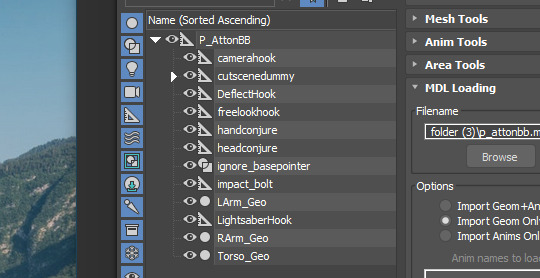
expand everything and click the eyes to hide everything you don’t want. if you’re on atton’s body model, you’ll want to hide everything except for JacketFlapNew, ShirtFlapNew, LArm_Geo, RArm_Geo, and Torso_Geo. if there’s anything left in the viewport that you don’t want, you probably just missed expanding something in the filetree; you can just click it in the viewport and it’ll be highlighted for you in the filetree

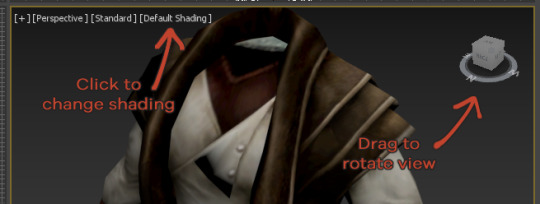
so here we are! the display here automatically updates when the texture file is changed, so i can edit the tga file and save and immediately see my changes reflected on the model. from here, i changed “default shading” to “flat color” to see the texture more clearly.
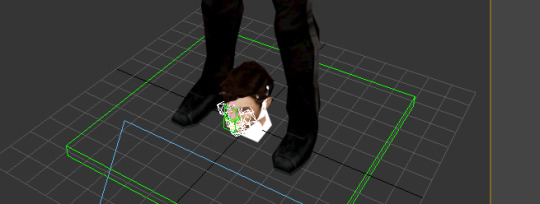
if your model has two parts, like atton does, you can open both and kinda align them together manually. go back to “MDL Loading” and import the other mdl file-- in my case, it’s p_attonh. but oh no, it showed up at his feet:
first, remove the unwanted chunks & boxes like before. for atton, that’ll be everything except for eyeLA, eyeLid, eyeRA, eyeRlid, HairFlaps_Geo, hairPiece, Head_Geo, and teethUp. (i don’t know what i’m going to do now that i know that atton’s got a part called hairflaps.)
now select P_AttonH in the filetree on the left, then select the move tool up top.

click on the view you’re going to use to move stuff around in, then hover over the base of his head until the move icon shows up. if you hover over one of the axes and then drag, you can move just along that axis. i did y-axis first, then z-axis, just eyeballing it until it aligned.
now we can get into the UV map (well, we could have earlier, but it felt a little awkward with him headless). select everything you’re interested in. i’m doing his armor, so i ctrl+clicked to select every visible part of his body (you can do this either in the filetree or in the viewport). now go to Modifiers -> UV Coordinates -> Unwrap UVW, and something new will show up on the right column:
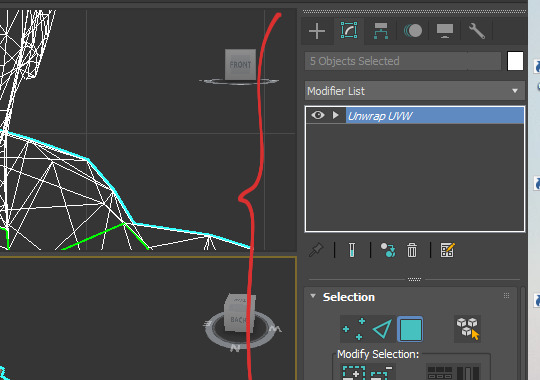
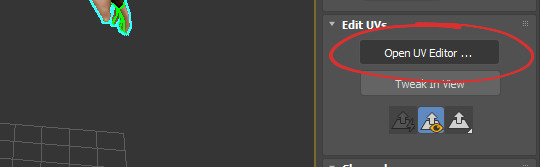
look down under “Edit UVs“ and click on “Open UV Editor“:
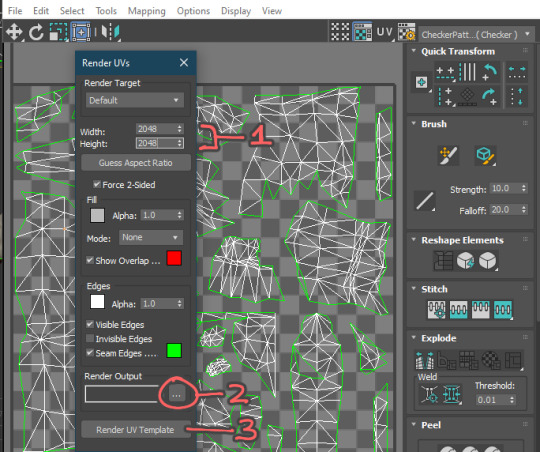
a new window opens up. if you want to see this overlaid on his texture immediately, you can use the dropdown on the top left. but i want a transparent png, so i’m exporting this.

to export this just go to Tools -> Render UVW Template, and another window opens up. (here i entered 2048 for the width and height bc those are the dimensions of the high res atton retexture i want to edit.) under “render output”, click the “...” and choose a filename & format to save the output under. then click “Render UV Template”. another window will open up with the render map, but you can just close it, bc it’s already been exported in the filename you set just earlier.
and there you go! ta-da. i wrote this all in one go so i hope it makes sense
oh, and yeah, if for whatever reason you need to apply a texture manually instead of it automatically being applied when you import it, open the material editor (use the weird little icon). click the little eyedropper tool, and eyedrop the model you need to texture
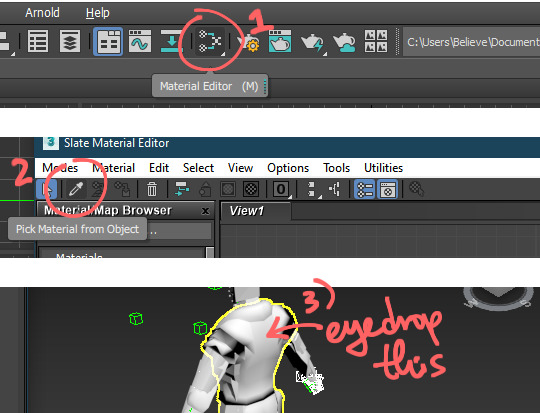
something new will show up in the material editor window:
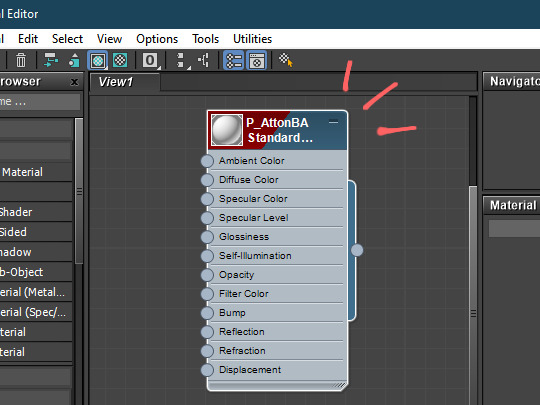
now get your texture file, and drag and drop the file into the window. then drag a line from the node on the texture you just added, to the “diffuse color” node from the model.
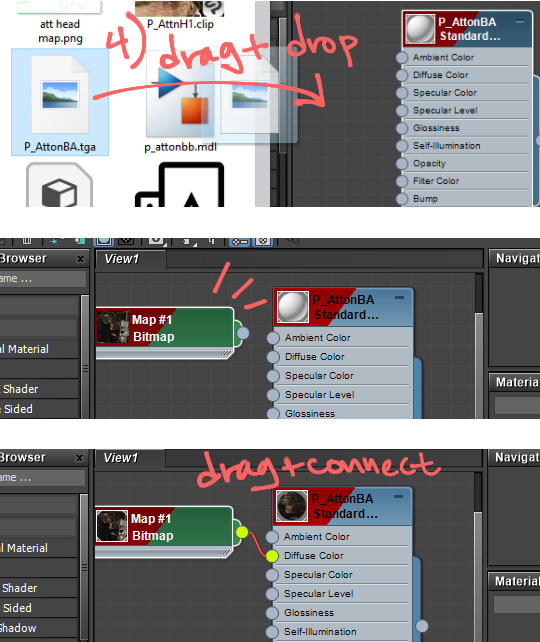
and there! texture’s applied. it’s pretty simple but bc i stubbornly refused to be slowed down by tutorial videos, i slowed myself down for an hour figuring this out from scratch
28 notes
·
View notes
Text
Unreal Engine 4 VR Interior Tour with 3DsMax VRay Photoshop
In this workshop you will learn the ENTIRE PROCESS of producing VIRTUAL REALITY walk through TOUR with UNREAL ENGINE - Based of this "LOFT" 3D Space.
Modeling and Lighting with 3DsMax & VRay (To get good reference to follow - PRO HDRI LIGHTING METHOD)
Cleanup and UVW Preparation Methods for UNREAL ENGINE
Import and Assembly 3D Space in UNREAL ENGINE
Realistic Textures Creation; Glass, Chrome, Concrete, Brick Walls, Wood, Leaves..etc.
Post Production Effects to Get PHOTO-REALISTIC LOOK in Real TIME!
Adding Realistic Lights, Ambient HDRI Map, Glow Materials and Animated Water
Building and Packaging your project to platforms; Windows, Mac, HTML5...and more.
Exporting FULL HD Videos and 4K Images in seconds!
* In the future this workshop is going to be updated, and more functions will be added, such as; turning on/off lights, opening doors, changing color/ textures of objects - And you get to ENJOY these updates for FREE!
What You Will Get?
Over 20 Video Tutorials - Step-By-Step Video Instructions
Sample Scenes for EVERY STEP
Personal 1:1 FORUM SUPPORT
LIVE Weekly Webinars (Will Be Recorded)
UNLIMITED ACCESS to Training Materials
Sample Scenes for EVERY STEP!
SPECIAL BONUS
3DsMax VRay LOFT Scene
3DsMax File includes all the models and textures + VRay TOP QUALITY Rendering Settings
Photoshop PSD file with all the Layers and VRay Passes Assembly!
How The Training Goes?
After successful payment you will get access to this workshop and be able to download all the training materials, watch the videos, repeat my technique by using our sample scenes.
IF YOU WISH - YOU CAN USE YOUR OWN SCENE! (But it must be very light - Think Low Poly Game Engine)
If you have questions or error you can upload them to our private forum and get feedback.
SO NO WORRIES - I WILL PROVIDE SUPPORT ALL THE WAY THROUGH THE TRAINING!
What You Can Do After This Workshop?
You'll be able to use UNREAL ENGINE Temples for quick 3D Space adjustments
You'll know how to pack and export your 3D WORLD for multiple platforms
You'll be able to Produce Virtual Reality Tours On Your Own
You'll capture VIDEO and export 4K images in seconds
You'll know Basic Programing Functions and Scripts
Why You Should LEARN it NOW?
If you really interested in boosting up your skills and start introducing NEW TECHNOLOGY to your clients OR future JOB - This Workshop Is The Right One For YOU!
I'm constantly asked if I can provide VR services - and THIS topic is growing FAST - More and More Companies and Freelancers have already implemented that product in their pipeline.
STOP wasting time and trying to milk your potential with Old School techniques - UNREAL ENGINE is so EXITING to learn and the good part that you can preserve VRay Quality by using BakeToTexture method!
LEARN TO WALK INSIDE YOUR CREATION
BRING YOUR RENDERS TO "LIFE"
JOIN US TODAY and Learn to Produce Virtual Reality Tours LIKE A PRO!
Click the Icon Below to Join VR Interior Workshop.
90% discount #off #udemy #Interior #Design #course FOR
Unreal Engine 4 VR Interior Tour with #3DsMax #VRay #Photoshop #couponlink
https://www.udemy.com/course/unreal-engine-4-vr-interior-tour-with-3dsmax-vray-photoshop/
1 note
·
View note
Video
instagram
3D animation by @mohsen_moradi.cg Description by author: The footage of this work is an alley about two meters wide in #Locarno. I did camera tracking on the video. The camera tracking output is executed in script in 3dsmax program. I used the mate feature to match the model and background in 3dsmax. The final output required a simple composite in aftereffects. Model and motion: Autodesk 3dsmax Cameratracking: syntheyes Render: vray Composite: Adobe After Effects #switzerland #awesome #архитектура www.amazingarchitecture.com ✔ A collection of the best contemporary architecture to inspire you. #design #architecture #picoftheday #amazingarchitecture #style #nofilter #architect #arquitectura #luxury #realestate #life #cute #architettura #interiordesign #photooftheday #love #travel #instagood #fashion #beautiful #archilovers #architecturephotography #home #house #amazing #معماری (en Locarno, Switzerland) https://www.instagram.com/p/CBCczmQlxVL/?igshid=1m9rhgf43e77l
#locarno#switzerland#awesome#архитектура#design#architecture#picoftheday#amazingarchitecture#style#nofilter#architect#arquitectura#luxury#realestate#life#cute#architettura#interiordesign#photooftheday#love#travel#instagood#fashion#beautiful#archilovers#architecturephotography#home#house#amazing#معماری
4 notes
·
View notes
Photo

Blog(8) Dijital Oyun Geliştirme Araçları ve Eğitimdeki Yeri
Gelişen ve değişen teknolojiyle birlikte günümüzde dijital oyunlar karşımıza çıkmaktadır. Bilgisayarların gelişimiyle birlikte bilgisayar oyunları da bu sayede kabul görmeye başlamıştır. Buna paralel olarak şimdilerde geniş bir oyun pazarı oluşmuştur. Bu pazar kişilere online-offline oyunların yanı sıra kendi dijital oyunlarını yapma imkanı da tanımaktadır. Oyunlar, rekabet ve şans gibi özellikleriyle birlikte tahmin edilemeyen sonuç, farklı çözümler, problemin yapılandırılması, takım çalışması gibi problem çözmenin birçok özelliğini de içerirler (Demirel vd.,2003). Bunun bir sonucu olarak da bireylerin büyük bir kısmı zamanlarının çoğunu dijital oyunlar oynayarak geçirmektedirler.
Dijital oyun geliştirme araçları öğrenenlerin kendi oyunlarını tasarlamalarını sağlar. Oyun geliştirme araçları, öğrenenlere gerçek hayattaki ortamlarına aktarılabilen beceriler kazandırır. Eğitim müfredatlarına yönelik oyunların, konuların öğrenilmesinde öğrenci odaklı, basit, eğlenceli ve ilgi çekici olduğu için daha etkili olduğuna inanılmaktadır (Prensky, 2001). Bunu fark ederek eğitim için bir fırsat olarak düşünen oyun tasarımcıları; eğitimciler ve araştırmacıların aynı çatı altında buluşup dijital oyunların eğitim ve öğretimde kullanılması için birtakım çalışmaların yapılmasına katkısı olmuştur. Yapılan bu çalışmaların olumlu sonuçlarına bağlı olarak da dijital oyunların eğitim ve öğretim amaçlı kullanımları günümüzde oldukça önem kazanmıştır. Özellikle Robotik-kodlama, STEM, matematik, coğrafya, kimya, tarih ve yabancı dil... gibi derslerin öğretiminde dijital oyunların eğitsel faydaları gözlenmiştir. Çünkü eğitsel ve eğlenceli içeriği , doğru oyun elementleri ve mekanikleri ile bütünsel olarak iyi tasarlanmış bir oyun, öğrenenlerin eğlenerek, yaşayarak, hata yaparak doğruyu bulmak adına çözümlerle onlara anlamlı ve rekabetçi bir öğrenme ortamı sağlar. Bu durum öğrenenlerin hem iletişim kurma hem de problem çözme becerilerine olumlu katkıları olmasının yanında öğrenmenin daha anlamlı ve kalıcı olmasını da sağlamaktadır.
Oblinger (2004) öğrenmede oyunların gücünü aktarırken (a) oyunların çok algılı, aktif, deneysel ve problem tabanlı olması, (b) oyuncuların ilerlemeleri için eski bilgilerini kullanmaları gerektiği gerçeği, (c) oyuncuların yaptıkları çalışmalardan bir şeyler öğrenmelerini ve varsayımlar yapmalarını sağlayarak hızlı dönütlerde bulunmaları, (d) değişik seviyelere gelerek ve puanlama yaparak, oyunculara bireysel değerlendirme olanağı sağlaması, (e) oyuncu topluluklarından oluşan sosyal ortam oluşturmalarıyla anlatmaktadır. Araştırmacımız oyunların gücüne değinerek bu konunun önemini bizlere hatırlatmıştır. Kısacası günümüzde bilgiyi eğlenceli bir şekilde hikâyeleştirip gerçek yaşamdan bir oyun sahnesi şeklinde işlemek ve sunmak öğrenmede dijital oyunları ve oyun içerikli öğrenmeyi önemli bir ihtiyaç haline dönüştürmüştür.
Unreal Engine, o bildiğimiz yüksek bütçeli oyunların ve filmlerin oyunlarının yapıldığı oyun motoru. Yüksek programlama bilgisi de kullanılabilmesinin yanı sıra kendine has Blueprint teknolojisi ile olayları görsel olarak birbirine bağlayabiliyor ve bir satır kod bile yazmadan oyunu sonlandırabiliyorsunuz. Bir AAA oyun geliştirme motoru olan Unreal Engine programlama yapmadan oyun tasarlamanızı sağlıyor ve üstelik ücretsiz. Link: https://www.unrealengine.com/en-US/
youtube
Pixel Press, size kağıt, kalem ile video oyunu yapabilmenizi amaçlayan bir uygulama. Kullanıcı eskiz kağıdına dağlar, tepeler, hareket eden platformlar hayal gücü ne kadar genişse çiziyor ve kağıdın fotoğrafını çekiyor. Sonrasını Pixel Press üstleniyor kağıdı tarıyor ve ilgili grafik dokümanlarına çeviriyor. Kullanıcılar oyunun tasarımına karar verip kod bilgisi olmadan kısa zamanda kendi oyununu yapabiliyor. İOS ve Android uygulaması vardır. Link: http://www.projectpixelpress.com/faq
youtube
Ceilfire, tamamen ücretsiz olan ve ücretsiz oyun dosyaları mağazası bulunan bir sistem. Ceilfire HTML5 oyunlar yapmak ve yaptığınız oyunları paylaşmak için tasarlanmış. Ceilfire ile oyunları direkt olarak tarayıcınızdan oynayabilir ve geliştirebilirsiniz. Hiçbir programlama sistemini de gerektirmeyen Ceilfire oldukça kolay arayüzü ve hızlı yayınlama imkanı ile öne çıkıyor. Link: https://ceilfire.com/
youtube
GDevelop, herkes için tasarlanmış açık kaynaklı, platformlar arası bir oyun motorudur. Görsel araçlar ile ihtiyacınız olan her şeyi kodlama yapmadan başarabilir ve siteye kendi resim, müzik ve videolarınızı oyununuzda kullanmak üzere yükleyebilirsiniz. Kullanımı basit ve kolaydır. Link: https://gdevelop-app.com/
youtube
Hopscotch, oyun yapmayı vaad etse de aslında oyun yaparak size kodlamayı öğretmek isteyen bir topluluk. Youtube Kanallarında'da Hopscotch ile oyun yapmayı anlattıkları ve birçok güzel oyunun nasıl yapımını gösterdikleri serileri var. Yalnız şunu söyleyeyim Hopscotch'un sadece Apple ürünlerine desteği var, bu da demekki sadece iPhone ve iPad için oyun yapabilir, sadece MacOS X ile oyun yapabilirsiniz. Link: https://www.gethopscotch.com/
youtube
Blender, ücretsiz bir 3D içerik oluşturma motorudur. Animasyon,3D modelleme, parçacık sistemi, fizik ve görüntü oluşturma araçlarını içerir. Program olmadan etkileşimli davranış tanımlama, çarpışma algılama, dinamik simülasyon, araç dinamikleri için destek dahil, Python komut dosyası, çoklu malzemeler, çoklu kompozisyon ve doku karıştırma modları, piksel başına aydınlatma, haritalama modları, hareketli malzemeler ve daha pek çok şey için destek sağlamaktadır. Link: https://www.blender.org/

Hero Engine, MMO tarzı oyunlar için geliştirilmiş bir 3D oyun motoru ve sunucu teknolojisidir. Online oyunlar için tam bir geliştirme platformudur. HeroEngine'i MMO-RPG motoru olarak düşünmeyin. Strateji oyunundan birinci şahıs atıcılara kadar çok çeşitli çevrimiçi oyunlar oluşturabilir. Çevrimiçi bir oyunu doğrudan geliştirme sürecine sokmak için gereken tüm istemci ve sunucu mimarisini sorunsuz bir şekilde bütünleştirir. EA, Bioware ve ZeniMax Online gibi oyun stüdyoları HeroEngine kullanıyor. HeroEngine; dünya yapımı, senaryo yazımı, 3D render ve fizik gibi modern bir oyun motorundan beklediğiniz tüm araçları içerir. Link: http://www.heroengine.com/

Neoaxis 3D Engine, gelişmiş malzeme ve gölgeleme desteği, gerçek zamanlı gölgeler, yerleşik Nvidia physX, mevcut / gelecek nesil render, tam ekran efektleri seti, dahili ağ desteği ve yol bulma bileşenleri gibi modern bir oyun motorunun tüm özelliklerine sahiptir. Kaynak ve harita editörü, Maya ve 3DsMax için ithalat kaynakları dahil olmak üzere eksiksiz bir tasarım hattı SDK ile birlikte gelir. NeoAxis 3D Engine ücretsiz bir üründür. Link: https://www.neoaxis.com/

Ren'Py, dünyadaki binlerce yaratıcı tarafından kullanılan ve bilgisayarlarda ve mobil cihazlarda çalışan etkileşimli hikayeler anlatmak için kelimeler, görüntüler ve sesler kullanmanıza yardımcı olan görsel bir roman motorudur. Bunlar hem görsel roman hem de hayat simülasyonu oyunları olabilir. Öğrenmesi kolay script dili, herkesin büyük görsel romanları verimli bir şekilde yazmasına izin verirken, Python scriptleri karmaşık simülasyon oyunları için yeterlidir. Link: https://www.renpy.org/latest.html

Game Maker Studio, eksiksiz bir video oyun aracıdır. Bu araç sayesinde kullanıcılar Windows, Mac, iOS, Android ya da HTML 5 gibi farklı işletim sistemlerinde mükemmel şekilde oynanabilir kompleks oyunlar oluşturabilirler. Program, video oyununuzun gelişiminin tüm aşamalarını yönetebileceğiniz oldukça sezgisel bir ara yüze sahiptir. Link: https://store.steampowered.com/app/585410/GameMaker_Studio_2_Desktop/

3D Gamestudio, multimedya araçları, video oyunları, simülasyonlar veya diğer herhangi bir yazılım programı gibi etkileşimli 2D ve 3D uygulamalar için dünyanın en hızlı oyun geliştirme sistemidir. Tek bir pakette üç erişim seviyesi sunar. Başlangıç seviyesi : Bu sadece basit oyunlar içindir. Önceden birleştirilmiş oyun şablonlarından 3D yarış veya aksiyon oyunlarını birlikte sunar. Bu şekilde birkaç saat içinde basit bir aksiyon veya araba yarışı oyunu kurulabilir. Gelişmiş: Kolay ve etkili lite-C kodlama dili ile ticari kalitede uygulamalar oluşturulabilir. Profesyonel: Gamestudio'nın A8 motorunu tercih ettiğiniz dili, C veya Delphi kullanarak yazılımınıza dahil edin. MAX ™ veya MAYA ™ gibi yüksek kaliteli editörlerle FBX formatında seviyeler ve modeller oluşturun. Link: http://www.3dgamestudio.com/

KAYNAKÇA
Demirel, Ö., Seferoğlu, S. ve Yağcı, E. (2003). Öğretim Teknolojileri ve Materyal Geliştirme (4. basım). Ankara: Pegem A Yayıncılık.
Oblinger, D. (2004). The next generation of educational engagement. Journal of Interactive Media in Education, 2004(8), 1–18.
Prensky, M. (2001). Digital game-based learning. (p.1-19).New York: McGraw-Hill.
Dijital oyun yapımı hakkında fazla bilgi için aşağıdaki linklere tıklayınız:
https://www.giantbomb.com/profile/michaelenger/blog/game-engines-how-do-they-work/101529/
https://gamedev.stackexchange.com/questions/7870/what-should-a-game-engine-do
https://www.gamecareerguide.com/features/529/what_is_a_game_.php?page=2
https://www.ign.com/articles/2009/07/15/the-10-best-game-engines-of-this-generation
https://en.wikipedia.org/wiki/List_of_game_engines
https://www.gamasutra.com/view/feature/132226/engines_of_creation_an_overview_.php?print=1
https://www.gamasutra.com/view/feature/132587/book_excerpt_game_engine_.php
https://www.gamasutra.com/view/feature/3057/instant_replay_building_a_game_.php?print=1
1 note
·
View note
Text
youtube
In this update, the script will work on sub-object selections. Also, a bug in the first version is fixed, when you switch to another mode other than the Modify Panel, the first version gives an error, this is fixed now in this 1.5 version. To recap on why this plugin: The default Zoom Extents Selected tool in Max has an issue when you're in a sub-object level but no sub-object element is selected, pressing Z(the default shortcut) causes Max to Zoom Extents on the whole scene instead of the selected object.
The download link is in the description area on YouTube
#3dsmax#3dsmax plugins#3dsmax scripts#3dsmax troubleshooting#3dsmax bugs#autodesk#autodesk 3dsmax#3dsmax free plugins#3dsmax free scripts#3dsmax zoom extents#scripting in 3dsmax#maxscript#programming in 3dsmax#Youtube
0 notes
Text
MAXScript errors at 3ds Max startup
Issue
At 3ds Max startup, MAXScript may pop up the following error messages:
Compile error: Can’t find include file: $startupScripts\vrsceneexport.ms
In line include “$startupScripts\\vrscene.export.ms”
“$startupScripts\\vrayinstall.ms”
include "$startupScripts\\vrsceneexport.ms"
include "$startupScripts\\vrayutils.ms"
include "$startupscripts\\vraylightlister.ms"
include "$startupScripts\\vrvismatconvertor.ms"
The errors are usually due to leftover files from previous V-Ray installation or due to incorrect installation/uninstallation of the product.
Solution 1
A quick way to fix such errors is to reset 3ds Max settings to default by following the steps below.
Resetting 3ds Max settings affects all user-made UI customizations. It may also affect other plugins.
Close any running 3ds Max sessions.
Navigate to the following path:C:\Users\%username%\AppData\Local\Autodesk\3dsMax\
Open the folder for the current installation: i.e. 2020 – 64bit.
Rename the ENU folder to ENU_old.
With the launch of 3ds Max, a new ENU folder is created automatically, and the issue should be resolved. However, if the issue is not resolved, you can restore 3ds Max settings by removing the new ENU folder and renaming the ENU_old folder back to ENU.
More information about the 3ds Max resetting process can be found here.
Solution 2
Another solution is to locate the corrupted script and remove it from the 3ds Max startup folder.
Find the script-file-name either from the pop-up message or from the MAXScript Editor.
Navigate to 3ds Max Startup folder: C:\Program Files\Autodesk\3ds Max <Version>\scripts\Startup
Remove the script file.
Reinstall V-Ray.
Source: https://blog.superrendersfarm.com/tutorial/3ds-max/maxscript-errors-at-3ds-max-startup/
0 notes
Video
vimeo
Getreponse Autofunnel from Artur Tamiola on Vimeo.
An explainer animation for Getresponse Autofunnel. It was a great opportunity to tell about the product in rather abstract way. Hope you enjoy it.
Animation / Compositing: Mateusz Klamrowski
Tasks: Script / Design / Animation / Rendering / Compositing / Editing / Color Grading Software used: 3dsmax / Tyflow / Corona Renderer / After Effects / Premiere / Davinci Resolve
0 notes
Note
Would it be possible to make a guide on how you are exporting this model into unity? I would like to try exporting myself, but i am not as familiar with 3dsmax as other software
I use the free 3D software Blender to edit models into something Unity / VR Chat can utilize. I’d love to do a tutorial on the whole process which involves stuff like weight-painting, editing shape keys, texture atlasing, etc.
But there already exist many tutorials on YouTube on how to do those things by people who are much much better than myself. So, I’d head there for that.
As for 3DS Max. I only use it to run TGE’s script that imports the games .GMD file format into something that can be edited.
9 notes
·
View notes
Text
Serial autodesk 3ds max 2015 無料ダウンロード.設計ビジュアライゼーション、ゲーム、アニメーションに最適な 3D モデリングおよびレンダリング ソフトウェア
Serial autodesk 3ds max 2015 無料ダウンロード.autodesk 3ds max 2015 繁體中文serial

Autodesk 3ds Maxをインストールすれば簡単な方法で特別なアニメーションデザインを制作する事が出来ます。是非ともこのプログラムを利用してね。.3ds Max Activation Final Torrent Serial Free X32 on ridwoodcletju
Jessie Ayo on 3ds Max Activation Final Torrent Serial Free X Autodesk 3ds Max Keygen Full Version For Windows PC. Autodesk 3ds Max is an amazing software to make 3D modeling, 7 Crux Free Download full version Windows 7 Crux Edition For 32 and 64 bit PC.. 5 SP3 for 3D Max - 32/64 Bit WORKING full rapidshare & free from netload. 01 Crack Autodesk 3ds Max ソフトウェア製品のインストール プロセスには、3ds Max 製品に固有の部分があります。 重要: 3ds Max 製品をインストールする前に、システムとハードウェアがその製品を実行するための最低限の動作環境を満たしていることを確認し、リリース ノートを必ずお読みください。 「3ds The 3ds Max Scene Security Tools is Autodesk's recommended way to detect and remove known 3rd party malicious scripts identified as CRP\ADSL, ALC, ALC2, PhysXPluginMfx, MSCPROP, and their malicious scripts can corrupt the 3ds Max environment, cause data loss and instability, as well as spread to other systems through sharing of 3ds Max scene
Serial autodesk 3ds max 2015 無料ダウンロード.3ds Max | 価格と購入 | Autodesk 公式
概要. Autodesk 3ds Max Populate Data は、 Autodesk Inc.によって開発されたカテゴリ その他 の Shareware ソフトウェアです。 先月中に、クライアント アプリケーションUpdateStarのユーザー の更新時間をチェックしました。. Autodesk 3ds Max Populate Data の最新バージョン 19 /01/19 にリリースです。Operating System: Windows 3ds Max の 30 日間無償体験版をお試しください. 3D モデリング、アニメーション、レンダリングのためのプロフェッショナル向けソフトウェア. 無償体験版をダウンロード 3ds Max のサブスクリプションメンバーになると、最大 3 台のコンピュータまたは他のデバイスに 3ds Max をインストールできます。ただし、指名ユーザーがソフトウェアにサイン インして使用できるのは、一度に 1 台のコンピューターのみです。
如果下载新的版本后直接安装新的版本还是需要 卸载老版本后再安装新版本。谢谢(谷歌翻译一下). very good very good very good very good very good very good very good very good very good very good.
A dialog box will pop up every time you open the scene, which is troublesome. Can you add an automatic clear function in quiet mode? Hello Jonike, I was unable to reproduce the issue you reported using 3ds Max or with the latest version of the Scene Security Tools, namely 2. I ran 3dsmax. exe -silent and opened a few files that contain the known malwares.
When 3ds Max is in silent mode, Scene Security Tools cleans the scene and environment automatically, and logs these actions to the Maxscript Listener and Max. log For example: ALC2 Security Tool 1. What version of 3ds Max and Scene Security Tools are using?
Dear Qing Su, thank you for your comment. Please contact Autodesk Support and share a 3ds Max scene or script file you suspect it's infected with a new malware or a variant of a known malware. Thank you. Google Translation 亲爱的苏青,谢谢您的评论。请联系Autodesk支持并共享一个3ds Max场景或脚本文件,如果您怀疑该场景或脚本文件感染了新的恶意软件或已知恶意软件的变体。谢谢你。. Dear Qing Su, we released the Scene Security Tools 2. Please download the new version. Thank you! Google Translation 亲爱的苏青,我们今天发布了Scene Security Tools 2. NO acaba de funcionar en archivos por ejemplo de las versiones abiertas en Debe instalarse en alguna carpeta en concreto?
I never download any 3dsmax software from malicious webservers. Only from Autodesk. I never has any problems with As far as i know the malware can be spread by 3d models and other assets you load into MAX. I had the. ALC problem a couple of months ago, Before this tool i used Prunescene. mzp wich is some sort of antivirus that runs inside MAX, detected and cleaned the infected scenes when opening and gives you the possibility to scan folders too, worked great.
Hi parisa, simply follow the instructions in the setup program. Please let us know if this is not the case for you. good good good good. I have a bad experience using Prune Scene. This program contains a virus generator that is detected by the anti-virus proactive defense systems for operating systems HIPS.
Be careful. It somehow penetrates the system folders, the system registry and creates its own Trojan generator. It is very difficult to remove it from the operating system. It prevents 3ds Max from starting and infects scenes.
Use Autodesk Security Tools Only! Are we the only one getting the error "Product failed to install"? We used to have a startup script for this but that does not work for , feel a little unprotected as a paying customer here and we've had data losses in the past due to this.
Please advise! Pude solucionar el problema instalando la aplicacion en 3DMax , no asi en la version que no funciona,no se si habra otra aplicaion para esta version. There is a code defect in 3ds Max that prevents the package from being loaded. This defect was fixed in 3ds Max SP1. The problem was that did not properly handle SeriesMax values in PackageContents. xml that are greater than Please also help for max as this tool is not working in max whenever I am trying to save my file it's giving me the option of save as.
The most dangerous thing is that this virus can download updates for itself and can be modified! This virus take next issues:. Thanks,it works perfectly. Okey , this is work for me.. i have a problem some crash about "undo" command, now its solved YES I LOVE YOU REALLY! I installed the software and it installed succesfully.
but when i start to working wih 3d max there was no message and the problem also did not solve please can you help me to make it work on 3dmax I had a trouble,when i opened the max the script controler tab crash the max.
I I searched about the problem and saw that it was a 3rd party plugin that was disturbing. Late i installed the security tools and solved my problem. Currently, I am using the 3dsmax version. Hopefully the tool will support 3ds max Many thanks. Autodesk, Inc. Digitally signed app. The malicious scripts can corrupt the 3ds Max environment, cause data loss and instability, as well as spread to other systems through sharing of 3ds Max scene files.
What's new in version 2. This option is enabled by default. Features: - Detects and removes the malicious scripts listed above from 3ds Max startup scripts and scene files regardless of how they are loaded.
log and to the MAXScript listener. Supported 3ds Max versions: Autodesk recommends that all customers running 3ds Max SP1 and newer, including 3ds Max educational licenses, 3ds Max Indie and 3ds Max Trial versions, download and install the 3ds Max Scene Security Tools application to help detect and resolve issues caused by 3rd party malicious scripts.
It is not intended as a general endpoint protection tool and should not be considered as such. Autodesk recommends that all users run a reputable antivirus or anti-malware program on their computers and keep both the program and its virus definitions updated regularly. Legal disclaimer: The 3ds Max Scene Security Tools is provided "AS-IS. Autodesk makes no offer for support of the software or your personal hardware and assumes no liability from damages incurred to your software or hardware due to your use of the tool.
Autodesk makes no warranties as to performance, merchantability, fitness for a particular purpose, or any other warranties whether expressed or implied. Furthermore, no oral or written communication from or information provided by Autodesk or its agents shall create a warranty. ヘルプ ドキュメントを読む. このバージョンについて バージョン 2. カスタマ レビュー. レビューを書くにはサインインしてください テクニカル ヘルプを表示. 钰淞 王 11月 26, 確認済みダウンロード これは何ですか? Kexing Wang 10月 31, 確認済みダウンロード これは何ですか? qing shui 8月 23, 確認済みダウンロード これは何ですか?
张慧 张 8月 13, 確認済みダウンロード これは何ですか? Jie Xu 8月 12, 確認済みダウンロード これは何ですか? bao cao 7月 29, 古色 谷香 7月 20, 確認済みダウンロード これは何ですか? Zakir Shikhli 7月 15, 確認済みダウンロード これは何ですか? It cleared UNDO virus from my files. Jonike Lu 7月 11, 確認済みダウンロード これは何ですか? Attila Szabo 7月 12, qing su 3月 09, 確認済みダウンロード これは何ですか? Attila Szabo 3月 30, 尘宁 俞 4月 19, Diego Macario Bello 4月 21, Jose Fontelles 11月 12, 確認済みダウンロード これは何ですか? Attila Szabo 12月 01, Julio Bahamonde 11月 11, parisa mohammadsadeghi 11月 07, 確認済みダウンロード これは何ですか?
0 notes