#Add New Pages To a PDF Document
Explore tagged Tumblr posts
Visit Tumblr Blog
Explore Tumblr blogs with no restrictions, modern design and the best experience.
Last Seen Tumblr Blogs


Fun Fact
Tumblr was acquired by Yahoo for $1.1B in 2013.
Text
How to bookbind your fanfic!
Part 1: From AO3 to printing
The necessary first step is turning your AO3 fanfic into booklets. Your whole book will be a bunch of booklets piled on top of each others and stitched together.
Booklet examples:

Btw, this is the official Word tutorial on how to make a booklet.
You can see there are different options. I usually do 8 pages, which is what you will see in the video. This means that a booklet of 8 pages is two sheets of paper, printed front and back, folded and one put inside the other. To have your word pages in the correct order you will need to format your word document.
Everything is in the video but here is the text for easy reading (btw the fanfic I used is Exit by schwutthing, an amazing Valjean/Javert fic)
Do not download the fanfic on AO3. Click on "Entire work" and copy paste it on word.
Format your word document. Click on File-> Margins. Select "Multiple pages: Book fold" and "Sheets per booklet: 8". Put "Gutter" to 1cm.
Double click on the empty area just above your text, on a random page of the document. This will make the "Do not download the fanfic on AO3. Click on "Entire work" and copy paste it on word.
Format your word document. Click on File-> Margins. Select "Multiple pages: Book fold" and "Sheets per booklet: 8". Put "Gutter" to 1cm.
Double click on the empty area just above your text, on a random page of the document. This will make the "Header and Footer" option appear. You can click on "Footer" and select the format for the pages' number. Always add the pages number, it will make your life easier.
Now you can justify your book. I usually justify (select all text with CTRL+A and click on Justify), but keep in mind that some documents might not enjoy passing through "justify" so double check your final document. For example, if there are lines of poetry and the author wrote into the next line without starting a new paragraph the justify option will make it weird.
Make your book pretty! I added some illustrations and blank pages. I also made the title of the fanfic bigger.
Fix the chapters' titles and notes. I clicked on Home-> Find and searched for "Chapter", so I could select on each chapter title and make it bold, and also delete the "Chapter text" added just after. You can do the same with "notes" in case you want to delete notes.
Now it is time to print! I prefer to save in pdf before, so I will do that.
IF YOU HAVE A PRINTER THAT DOES NOT PRINT BOTH SIDES
Click on print
Select "Microsoft print to pdf"
Select "Manually print on both sides"
This will create two different files pdf, one for the front pages, and one for the back pages.

Click on the file for the front pages and print them all. Do not panic if you see the pages number all over it.
Now take your printed (only on one side) block of pages and load it into your printer again, making sure that you will now print on the blank back. Open your back pages pdf file and print.
(you can do a trial with a few pages to see if everything is lining up correctly).
IF YOU HAVE A PRINTER THAT PRINT BOTH SIDES
"Click on print
Select "Microsoft print to pdf"
Select "Print on one side"
This will create a single pdf that you can print on your both-sides printer. You will see that the page are not in the order you had on the word document, but the whole file will start with page 8 (see video).
Now print!
What you want is this:
You can see that on the front you have page 8 first, page 1 after, because when folded it will end up with page 1 at the start of your booklet! And on the back of this first sheet you have 7 and 2, that will end up in the correct position.
Now you will have a lot of pages... time to fold and create your booklet! Every two sheets... you will fold as you see above.
Next post will be specifically about folding the booklet, making the holes and sewing them together.
2K notes
·
View notes
Text
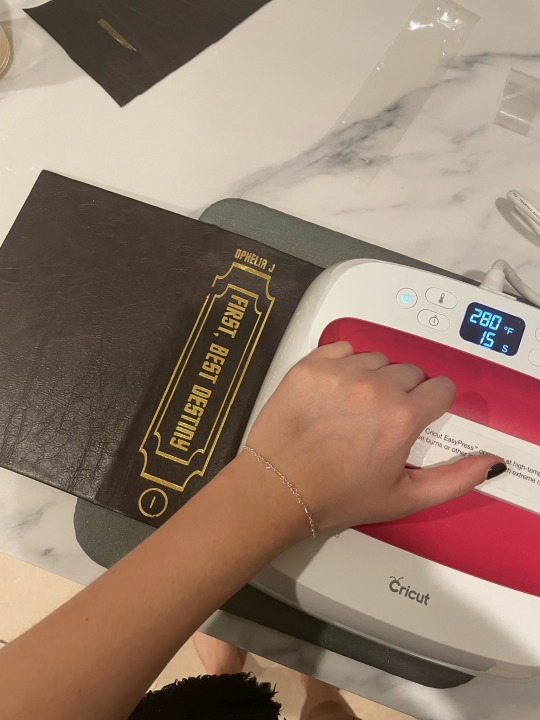
ok so i just finished my book cover for First, Best Destiny - Part 1 by the amazing @ophelia-j !!

admittedly i was going to wait until i actually attached the text block to the cover before i posted this haha, but i was SO excited after making this cover that i decided to just post it and then update with the finished product later!!
this book is absolutely embedded in my soul, and words cannot even describe how gorgeously it’s written. it’s a book that made me realize - hey, the adventure doesn’t end as you grow old.
you can read it here. i promise you won’t regret it!!!
anyways!!! here’s all of my other bookbinding steps for anyone interested.
cam’s somewhat incomplete bookbinding guide
please note that i am an AMATEUR hobbyist. please do not actually use this as a tutorial.
oh also!! bookbinding terminology will have a * by it which will be explained at the end in order to make this flow better. i’ll also link the tutorials i used at the end of this for anyone interested.
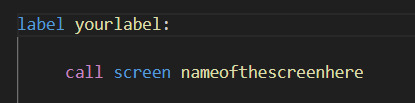
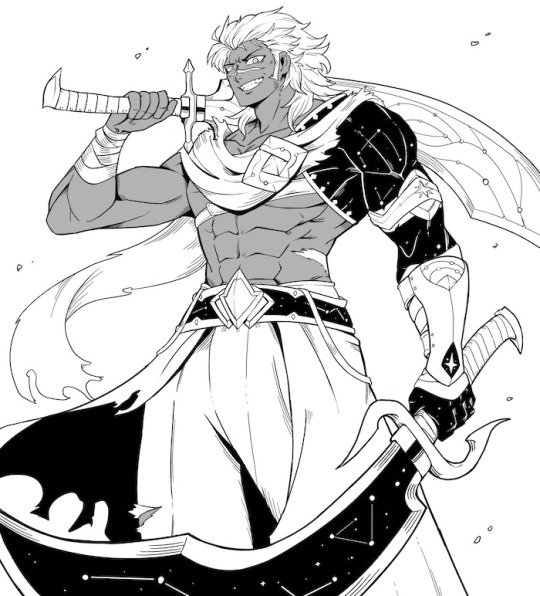
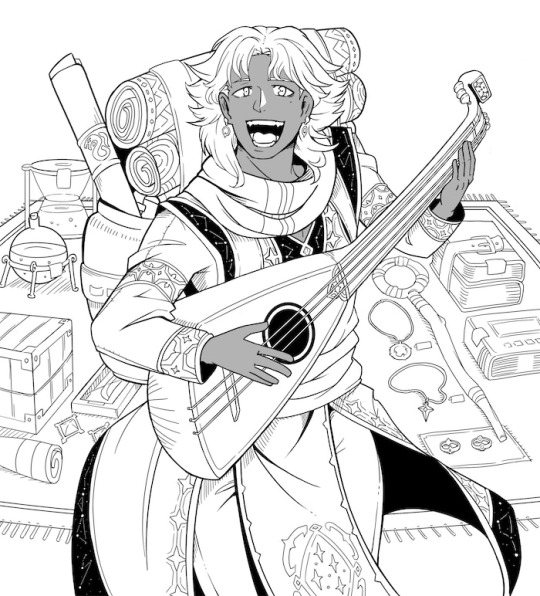
1) Formatting the document! I downloaded the original text as a PDF, and then designed a cover page, grabbed some art from the internet (i know, frowned upon, but this is just a personal copy so it is what it is), and then designed a table of contents and chapter icons!!
*side note! i added which episodes each chapter follows to the table of contents (pictured below) as this book was written as an accompaniment to TOS and the movies.
2) Next, I printed out all NINE HUNDRED PAGES??? admittedly i could have done it in less if I’d used a bigger page size, but sending things out to be printed is expensive so we made do. after printing, i folded them into signatures*.
*there’s an additional note about the paper i used at the end
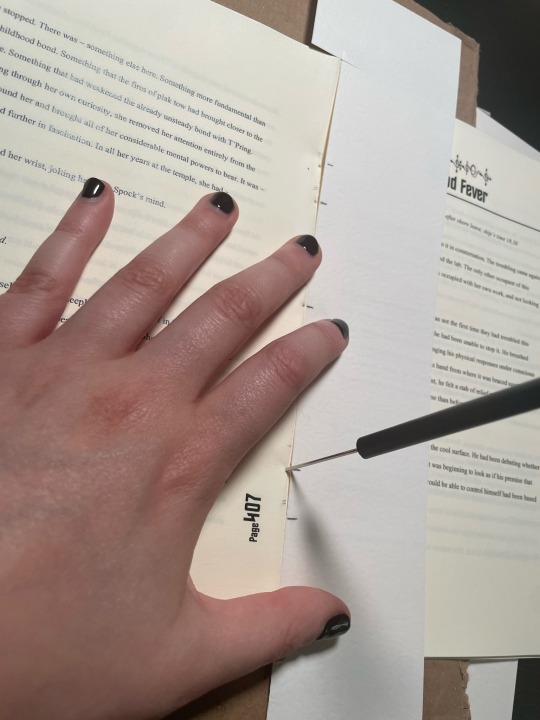
3) punching out holes in all the signatures! although not technically necessary, I honestly don’t think i would’ve been able to sew this behemoth without doing it.
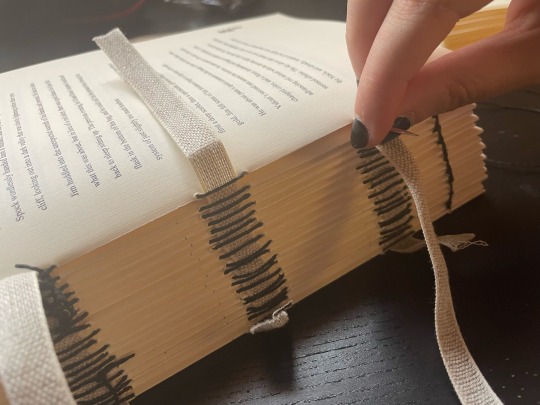
4) sewing the pages into a real!! actual!! book!! this was the part i was most nervous about. i’ve NEVER attempted to sew anywhere near this large of a book before, so i tried out a new method of sewing in hopes of making it a bit more sturdy. we won’t know if it worked until this book endures some wear and tear, but i’m pretty optimistic!
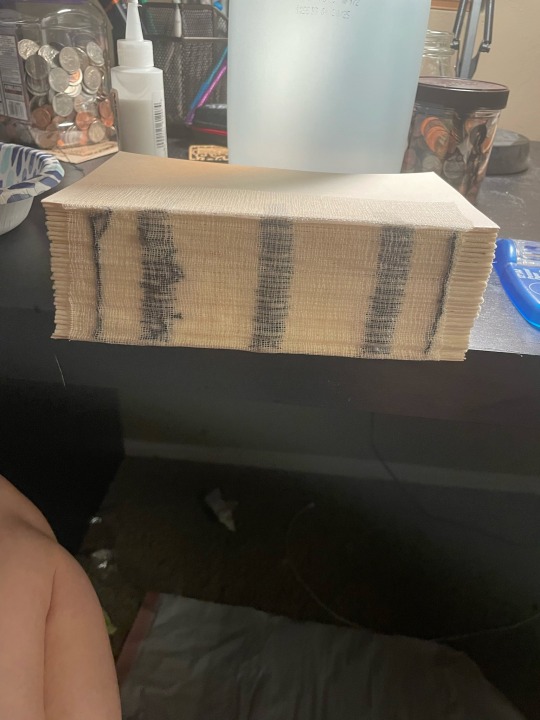
5) next up is glueing the spine! this is where it really hit me that a lot of bookbinding is just…glueing shit together. later i also added cardstock to the spine in hopes of helping it adhere to the cover better, and a book headband* for decoration.
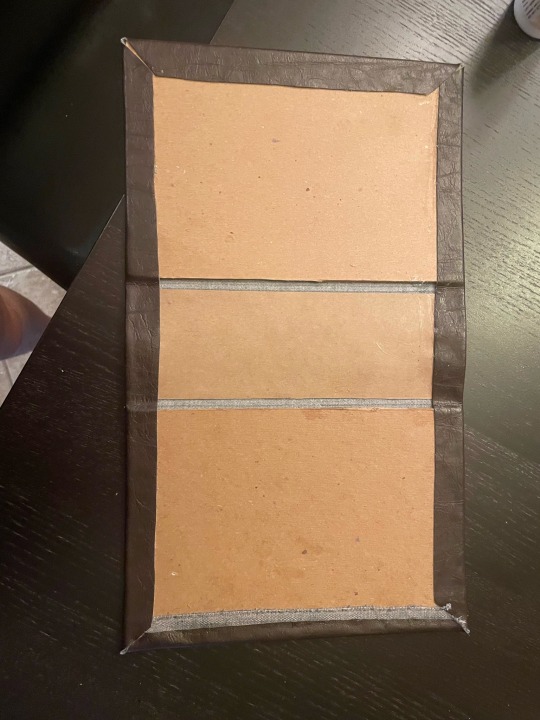
5) now we’re onto the book cover!! they only sell bookboard in minor bulk around here, so we’re not even gonna discuss how much bookboard i now own… anyways! i glued the faux leather onto the bookboard and then let that dry.
6) last up! off to the cricket! a huge thank you to my friend for letting me borrow her cricket AND supplies! anywho, this is where i designed my cover art. i then adhered the design to the cover. after this step, i realized i…definitely need some kind of sealant - so, if any more seasoned bookbinders have suggestions for this i am all ears!!
all in all, this was a super fun project, and a great way to kill some time while i recover from surgery! i absolutely plan to bind the sequel at some point, but that may be a…ways away. i’m a STEM major and school starts back up soon so…time will be in short supply lol!
To be continued...
Terminology
*signature: group of sheets folded in half, to be worked into the binding as a unit.
*book headband: just look up a picture if you’re curious because tumblr says i can't add any more pictures lol.
*about the paper!! i actually got it from a local specialty paper store, but if you want something similar i've heard amazon has some good bookbinding alternatives!
Tutorials
please PLEASE go check out Jess Less on youtube. she's phenomenal. here are her vids and what i used them for.
youtube
don't laugh!! i actually stole MOST of my techniques straight from this video.
youtube
i used this one to help me format the book correctly! although i still ended up with some goofs haha (see: any pages on the left side have the page number in the margin LMAO).
#Youtube#k/s#k/s fanfic#tos spirk#spirk#star trek#i have no creative tags :((#star trek fanart#star trek tos#star trek art#book binding#custom book bind
97 notes
·
View notes
Text


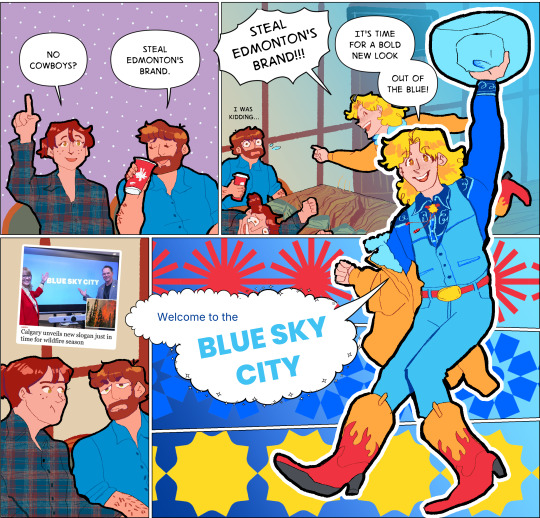


Blue Sky City
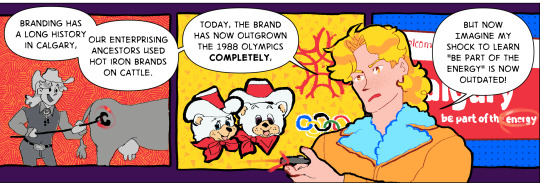
This stupid comic about Calgary's tourism branding has been slow cooking in my head since it was announced last year (and Ed was still in the playoffs at the time, so the beard is still on!)
I just want to yell about how tricky it was to make this comic ENTIRELY out of city (and provincial) branding palettes. If the colours look a bit unusual, that's why! (Although I'm pleasantly surprised with how well some of these colours go together.) The palettes are not just from the cities represented, there's bits and pieces of other cities in there (especially for skin tones, which are pretty limited in the selection.)
I'll dig a bit more into the details but briefly:
Winn / Lucille belongs to @rotivae
Bert / Ralph belongs to ctcsherry
and the rest all live here~
the branding history panel is a tribute to the information that used to be on the City of Calgary website... until around the last election it vanished and now I feel like I've been gas lit. My quick skim of the waybackmachine hasn't turned up the branding page, alas, but luckily i had saved the previous colour palette before.
"outgrowing the olympics" says the man who still sleeps with hidy and howdy
The energy word cloud is very loosely based on a pdf of a presentation i stumbled across by accident several years ago re: Calgary's brand evolution - the Big 5 Personality Test is Entirely based on said presentation. It's the most Calgary quarter life crisis document I've ever seen in my life and I reference it constantly for a laugh.
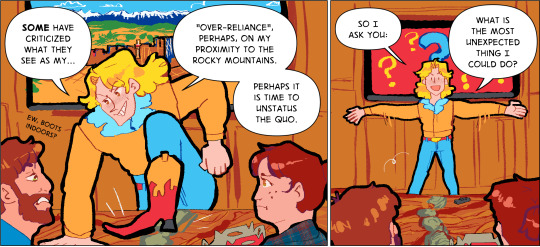
On that note I'm sure you're dying to unstatus the quo and learn more about the Blue Sky City Brand and flip through all those colours and tone of voice notes and not do something irresponsible like download all their fonts and beads to use incorrectly for nefarious purposes
Unfortunately Calvin being the Most American (tm) of the cities (other than maybe Lilith, though she's trying to quit, honest) means he wears shoes indoors if they fit his presentation :/ we should start teaching him otherwise with a spray bottle
Blue Sky City just feels so wrong. On one hand, the entire province of Saskatchewan has based all their marketing on the sky for decades, and likewise the City of Edmonton has long been the blue to Calgary's red (at least so long as I've had a memory)
The Beaverton Article for your convenience

seriously are you guys ok please put your clothes back on
the last bit was inspired by convos with Ro about how Winnipeg, which has traditionally been blue and yellow, is trying something new (although this actually predates Calgary's brand by a couple of years but shh)
Don't kill it at the next social maybe just gently maim a little bit
Anyway, the City of Calgary's official colours are still red and white, but we will see how long this blue tourism thing lasts. Drawing Calvin in blue just seems so wrong, it took me several tries to come up with an outfit for him that didn't completely fill me with despair hahahaha
(That said if you draw him in a blue outfit I want to see it - we can add it to his wardrobe and see how long this phase lasts)
Anyway I had a good time poking fun at Calgary and reading branding stuff - I have a stockpile of brand guides for both cities and their tourism squirrelled away because I love stealing colour palettes, so it would be fun to do a few more of these (though no brand goes into as much depth as Calgary's - save for Edmonton's of course). I just find how cities present themselves endlessly fascinating, especially the more muddled and generic the branding language becomes. (we can never be on Tourism Winnipeg's level anyway so we might as well stop trying)
#projectcanada cities#pc: calgary#pc: edmonton#pc: red deer#pc: winnipeg#pc: alberta#projectcanada#iammatthewian#iamp: alberta#calvin mccall#edward murphy#elaine hartley#lucille larochelle#hapo art#digital art#boab omake#clip studio paint
16 notes
·
View notes
Text
Amateur Translation Programs
So I had a lot of imaginative and informative responses to my post about looking for an amateur translation program -- something where I could load in a foreign language and it would insert a box where I could add a translation every-other-line. The idea was that this way I could practice translation with more advanced texts, and texts I chose, and thus move away from Duolingo, which at this point is good for drilling and daily practice but not for more advanced learning.
I didn't find precisely what was needed but I did get some inspiration for further explanation, and I also learned that adding the term "glossing" (thank you @thewalrus-said) into my searches helped a great deal in terms of weeding out programs that were either "Let this AI translate for you" or just endless promotional links for Babbel and Duolingo and such. I thought I'd collect up the suggestions and post them here; at the end I'm including my best swing at designing what I wanted, and why it doesn't work yet.
Suggestion one, from many people, was various ways to generate a page that is simply fixed Italian text with space underneath each line to add in a translation. This is pretty simple as a process and there are sites that will do it for you, such as this one that @ame-kage suggested. However, most of these don't allow for movement in the Italian text, and many produce a PDF which you would need to print out in order to write on unless you're willing to open it in Acrobat (and deal with Acrobat). A good solution for some but not what I'm looking for purely because I'm trying to make this super frictionless so that (knowing myself as I do) I will actually do it.
I did find this version interesting, suggested by @drivemetogeek: Have one word doc saved as your "template" doc and set the line spacing as 2.0 or higher. Select your text from source and paste it into the template doc as text-only. Ctrl a, ctrl c to select all and copy, then open a new document and "paste special" as picture. Right click and set the "wrap text" as behind text. Now you have a document where you can, basically, type over the existing text because it's the background of the page. This seems like the most frictionless version, because you could set up a bunch of them ahead of time. If you wanted to move between desktop and mobile, however, you'd need to ensure that the pasted image was fairly narrow so that you don't have to sideways-scroll.
Relatedly, people suggested generating a document that is simply the Italian text with empty space beneath it for typing in of the translation. This can be done either semi-automated, using a macro or a language like Python, or find-and-replace on, say, the stops at the ends of sentences. It basically outputs the same as above but with a more digitally accessible format, without any more effort than above. If you were to do this in Google Sheets you could also fix the column width so that it didn't do anything weird when you opened it on your phone. But it is still very friction-y, and does not allow for easy shifting of the Italian as needed. There's high probability of the translation breaking weirdly across the page. Still a top option in terms of simplicity and access.
@smokeandholograms suggested another variation illustrated here where essentially you're converting the text to a series of tables, with each paragraph a row, and an empty cell next to it for the translation. I might play around more with this one eventually, since I think I could possibly make it a three-column and put the Italian in one, the translation in the next, and the auto-translate to let me know where I might be slipping in the third. (Not that I trust auto-translate but comparing a hand translation to an auto translation can be useful in terms of working out when I've messed up the way a tense or mood is read. I tend to read indirect verbs as automatically imperative because I'm a weirdo.)
@wynjara linked to an add-in for Word specifically designed for translators, known as TransTools; this appears to employ a macro to do the same thing, though it does have a format where you can place the translation next to each sentence directly rather than in a separate cell. The full suite of tools is only $45 which is reasonable for my budget, but for what I need I think I could also just create the macro.
Using LaTeX as a tool specially designed for glossing was an option on offer, but I don't know enough about LaTeX to figure out the pros of this one, which is in itself the major con -- there's a learning curve that I think varies widely by person but for me is unfortunately a wall. It came out of a discussion on Reddit about trying to find something like what I want; also in that discussion is a link to a code generator that allows you to…do something…to the initial language, but it's not entirely clear to me (I'm sure it's clear to people who understand coding) what you would then do with it that would allow it to be output in the way I'm hoping for. Like, I could turn a paragraph of text into HTML, I understand that far, but any Italian I find is already on a website.
Moving more into apps that might work, Redditors on the LaTeX discussion suggested SIL Fieldworks, which is a professional language tech tool. Fieldworks isn't a program I'd previously encountered but much as with the ones I had, it looks like the learning curve is fairly steep and it is definitely overkill generally for what I need, though it might also harbor within it the thing I want. It is free, so I may download and play around with it.
@brightwanderer suggested using note-taking or "whiteboard" apps such as Freeform or Nebo; these are generally a kind of "infinite canvas" in which you can drop objects, text boxes, or handwriting. I don't know that Freeform would be measurably different to just using Word and a macro, since I'd still have to input/format all the text and then be stuck with the same "fixed text" setup -- and it's also iOS only -- but for some folks it might be more helpful. Nebo is a similar infinite-canvas with unfortunately the same issues, though on the plus it's available for Android, which is where most of my mobile property resides.
@bloodbright suggested that I was looking for a CAT tool, a professional translation tool mainly used by translators working in the field. This was a concept I'd encountered, but I hadn't found a good starting place. They suggested Smartcat and OmegaT. Smartcat bills itself as an AI translation platform and is HARD pushing the "don't translate it yourself, hire a translator or let AI do it" angle, so it's difficult to tell what it offers in terms of actual tools for translators, and it's also cagey about pricing, so I can't really evaluate it. OmegaT is free and gives off big "some weirdo homebrewed this in their basement" vibe (which I am here for) but I also recognized it from screengrabs that were the reason I veered away from professional-grade software: it looked too complex. Realistically, the major downside of OmegaT is that I don't think I can put it on my phone. One thing I did find interesting is that once you translate a portion of the text, the original language goes away, though I assume you can turn that off if needed. I do kind of like that because it means my distractable brain is looking at Less Stuff.
So where did I end up?
Well, it looked like I was going to have to try a homebrew myself. I had the idea of trying some of the initial suggestions but in reverse -- designing a document where every other line was a single-cell table fixed to the page. You could paste in the Italian, which would wrap around the cells, and then enter the English in the cells.
You can fix a table in place in Google Docs -- you click on the table, then under Table > Style select Wrap Text, Both Sides, and Fix On Page. Getting the whole page set up is a little labor intensive but once you did that, you could just save it as a template and make a duplicate of it each time. And this actually works….on desktop.
Unfortunately, if you open it in the mobile Docs app, the app can't handle the fixed tables and automatically moves them all to after the text that's been pasted in. I tried redesigning it so that it's a table within a table -- one for the Italian, then within that a series of them for the English -- but when you nest a table in Google Docs, it doesn't let you fix the second table in place. And you are also still dealing with the wrap issue, although you can resize the page and add a large right-hand margin as a kludge of a fix for that.
You can build this same kind of document in Word, so I tried building one in Word and then uploading it to Drive, but when you open the Word file in Docs (or in Microsoft Word for Android), it still strips the fixed positioning -- there's just some functionality missing from both apps that doesn't allow them to handle fixed-position tables.
So, the design is sound, just not the final execution. If I could program an app, I could probably remedy the issues with it -- it's simply a series of text boxes nested inside one another with different formatting. I would imagine that's relatively basic to set up, although given that neither Docs nor Word can handle fixed tables in mobile, perhaps I've stumbled on a much bigger problem that everyone is ignoring because nobody actually needs or wants fixed tables in mobile. :D
Experimentation is ongoing, anyway. I might simply have to resign myself to the fact that my translation study is going to have to be in front of a computer, which might be for the best anyway when I inevitably want to compare my translation to an auto-translate to see where I might have read something wrong.
69 notes
·
View notes
Text
I hate to be the bearer of frustrating news, but in case some of you who frequent Founders Online (like I do) and have noticed an extreme spike of 503 “Service Temporarily Unavailable” errors, making access to the site impossible for periods of time, the team posted the explanation below:

Founders Online performance issues
19 May 2025: Founders Online is experiencing periodic degraded performance owing to extreme spikes in traffic caused by excessive website crawling, associated with content scooping from AI platforms and other indexers. We are working on a viable fix within the constraints of our server resources.
This is very unfortunate and very disgusting. I’m glad that they are trying to fix the issue, but it breaks my heart that they even have to put in the effort. From personal experience working as a student technician in my university’s Preservation Department, where my primary task is to digitize all sorts of old materials—books, newspapers, photographs, etc, and collaborate on how those items should be handled and scanned so that their digital copies can be presented and made accessible in the right ways, it takes A LOT of work just to digitize one item. Almost all of the documents you see on Founders Online are digital copies of the book pages from where these transcriptions originated—series’ of the founders papers that were printed in the last 70-80 years by university presses. Books that, when Founders was launched 15 years ago, were all between a few years and many decades old, and difficult for the general public to access. Of course, I don’t know the Founders team’s exact process for making the archive when they first started, nor do I claim to be the preservation expert by any stretch of the imagination, but I have a big hunch that it took many hundreds of hours, and likely continues to do so for the remaining volumes they intend to add to the site, to make Founders Online as it appears and maintain its usually fast performance.
AI in general frustrates me, but to see that this extremely valuable archive has now gotten caught in the scooping net makes me equally sad and angry. If you want to gather documents from the site, but will later be offline, you have the ability through the site to download PDF files of individual documents and print them. Most of the material is also in the public domain as well (not all, however—any annotations to a document are copyright of the institution which originally published those physical volumes I mentioned). AI scooping this archive for information to feed to language learning models is a waste of time, energy, and money, and is a violation of copyright law. At the risk of causing performance issues and affecting the servers that make Founders possible, this activity is potentially detrimental to historic preservation and access to historical knowledge. Those hundreds of hours the teams behind the site have worked also come into play: this site is their baby, their hard work, and it’s being stolen. And as a result, everyone’s ability to easily use the site without issue is being affected.
I am extremely fortunate to be in a position where I have been able to acquire a personal backup system for what I primarily use Founders for (my volumes of The Papers of Alexander Hamilton), and more so in that through my university, I have access to the rest of the physical series that make up the archive. So this current issue with the site being slow on performance and frequently down does not inconvenience me much. But this is a privilege. Founders Online was created to get around that privilege and allow for everyone (with an Internet connection) to access these important historical documents. I cannot hammer down to you just how important and valuable that is. Founders Online is an invaluable resource that deserves to be maintained and protected. I’m thankful that the team behind it are working diligently to do just that, but they should never have had to combat AI stealing their hard work and affecting the usability of the site in the first place.
#okay I’ll get off my soap box now#if anybody wants to look at an AHam document from 1793 or earlier I’d be happy to flip through volumes for you for the time being#just to put the offer out there#important#founders online#founders archives#amrev#founders era#historical documents#historical resources#historical research#important information#not writing#amrev fandom#alexander hamilton#george washington#thomas jefferson#james madison#john jay#john adams#benjamin franklin#founding fathers#18th century history#18th century correspondence
11 notes
·
View notes
Note
Hello hello! It's me DFP
I'm wondering where you learned/are you learning to Code? I find the structure of your game quite entertaining and I like to take a little inspiration from it (If I'm allowed)
And I tried to make images that are options but apparently I'm still a long way from leaving the beta of my projects So I wanted to seek advice from you
(Also, if this is not the correct account to ask this I apologize, but if you have some very good advice that can help me please feel free to go to my DMs)
Hello DFP! :3 (I'm not exactly sure what you mean by structure sorry, but probably yes haha)
I didn't learn coding. In fact, the scariest part of my game is the code itself! I would like to take classes in art and coding someday! It's just not a great time in my country to be spending money atm ahahahaha- (cries in national housing and inflation crisis)
If you're using Renpy to make a VN, smart people would recommend giving the Renpy and Python's offcal guides a good look and watching Renpy tutorials on youtube.
For me, I'm the kinda person that only takes in information by dissecting and breaking things, then learning from the mistakes. I looked at the front page of the Python pdf, and it made my ADHD repossess my body despite being on the max dose of ritalin. I immediately closed it then skimmed through the Renpy quickstart, not really taking in any of the information, jumped right into designing the main menu, minced up the code, caught a bunch of errors, and had to check out fourms for fixes.
Have some random tips that may or may not be helpful since I don't know your skill level and I, am infact, not skilled in Renpy, I have no idea what I'm doing half the time! :3
Make new files for everything, don't just put it all in the script or it's going to get ridiculous.
Scripts get LONG use # and add notes, so you can CTRL + F and find stuff easily.
If you're like me, check out renpy's reddit/lemma soft fourms, if you're not getting good goog search results, it might be the words you're using, I had this issue a lot, try changing up words in your question (options/preferences/choices/decisions)
When you're learning copy and paste the code/answer, once you know the the code and can type it out fast, then starting manually typing it out.
Always check the dates on posts, there's a bunch of old renpy guides/fourms that don't work anymore.
There is more than one way to skin a dingo (sorry kevin), if you've found a fix that seems ridiculous but it's working, keep it!
If you have anger problems prepare to get fuckin' pissed off! Before you start coding have a coffee/bottle of water/energy drink beside you, so you have to walk away to take angry piss breaks and can clear your head.
If you absolutely cannot figure something out, make a copy, put it aside and work on something else until you're a little more skilled.
I have three copies of olie, the one that works, the one that I'm experimenting on, and the one on a USB I copy when I get drunk and forget which is my "fuck around" code and which is my "don't touch it, it works" code and I annihilate my game. Make regular backups to your USB for any emergencies, houses burn down. Limit your drinking while coding.
Compare code to the game base if you're coming up with errors. Goog the exact error that pops up when the game crashes. (renpy expected statement)
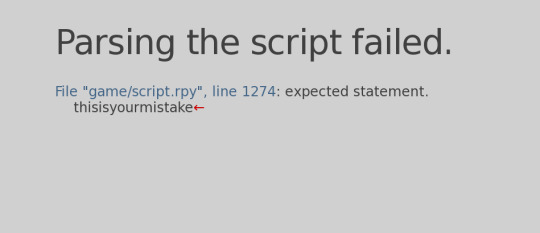
Click the blue text and it'll take you to it. Sometimes it's not very accurate and you need to look a little above or below the line the error happened. 70% of the time your error is a missing space or "," or an extra space!
I also recommend checking out all the shortcuts on your code editing software (I'm using visual studio code!) I was manually adding indents to each line, which was wasting an insane amount of time LMAO ;w;
I'm not exactly sure what you mean by images that are options, but I'm guessing an imagebutton? If you search "renpy imagebutton" there's a few forums and tutorials that will guide you but it's like this.
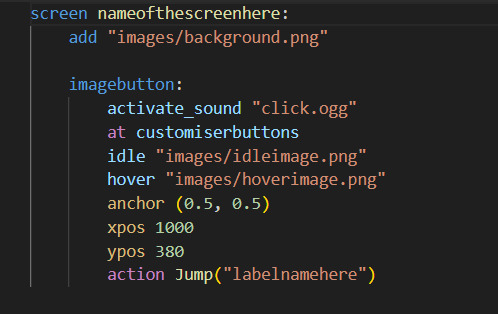
You need a screen for your buttons, an image, if you're feeling funky add transforms to the button, else just use a different image for idle/hover!
Add the anchor before you do xpos/ypos because it messes around with the positions and you'll have to re-adjust the xpos/ypos again. You need anchor for the transitions to work properly.
If you want the button to make a sound on click add activate_sound or remove it if you don't want one, it's optional.
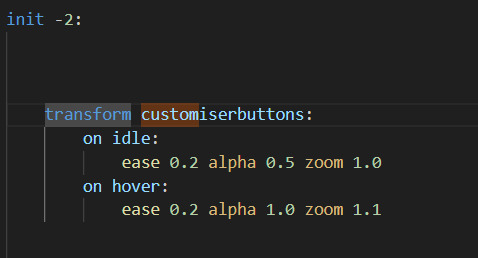
This is how you make the transform, you can do a TON of different transforms. This is a simple idle/hover transform. ease is the animation type/speed, alpha is transparency, 1.0 is fully visible, 0.0 is transparent, at 0.5 on idle, it has a dimmed effect. the zoom makes it bigger. Make a new file for this one!
Buttons have a TON of actions to choose from, this is a time I actually would checkout renpy's offical guides. This one does the same as a jump at the end of a label or choice.
If you want your game to not pause when your buttons are visible, just use "show screen nameofthescreenhere zorder 20" (zorder is the layers, 20 is like usually the top, you can go higher though)
If you want your game to pause while the screen is up, use call screen instead of show!
I probably won't do too many of these coding/renpy support things on my tumblr but, OLIE'S discord server has a few game dev channels for coding support if you'd want to join there! :3
I wish you well and goodluck on your game!!! 💖🫡🍀
22 notes
·
View notes
Text
It's been a month and a half, here's a update for DAWN before the new year.
(This was taken from an update on my Kickstarter)
Hello everyone, and happy holidays!
I'd first like to give an apology for the lack of substantial updates, especially regarding DAWN's progress after the Kickstarter's end. I've shown many small updates on my Twitter and Discord but felt it would be annoying to send out emails for each of those teasers. I've created this post as a bulk progress update before I release a major update to the playtesting material (more on that later).
Art
I would like to share the thing that's taken most of my time and funding since the Kickstarter ended: the ordering and use of new art for the book.
This is only some of the work that's been done so far, but since this art is meant to represent player options, I felt it was good to show you all these as examples of what's been completed, as I assume most of those reading will be looking to play the game as players.
Playtests
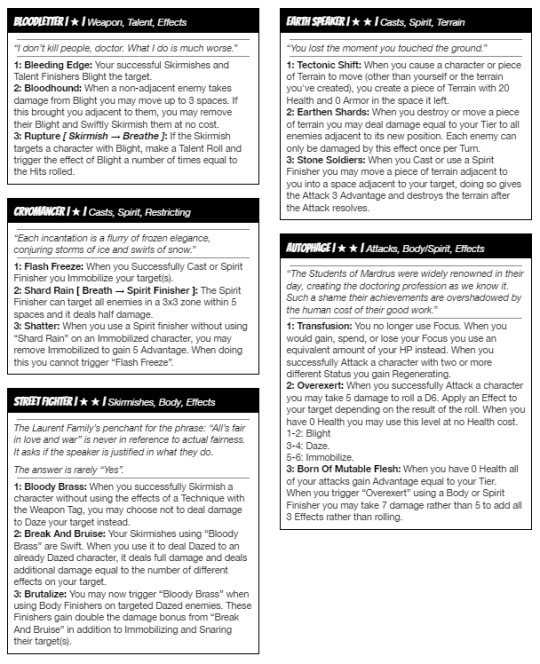
I've been spending a lot of time on balancing the game, with combat tests being hosted on my Discord every week. These have resulted in a lot of reworks and changes to the mechanics that will be apparent if you read the version that was publicly available during the Kickstarter's run. Here’s some examples of reworked Techniques (renamed from Power's since the KS) and new ones that have been well received by testers.
Design and Copy Editing
You may have noticed from these screenshots, but I've also taken a try at reformatting the game to better reinforce the comic book look, with new fonts and improvements to the page layouts, while better managing the negative space.
I feel I've made a lot of progress and I'm getting closer to the final pdf, but there’s still quite a bit of quality checking that needs to be done. (The GM parts of the book especially).
I'll be aiming to release a Final playtest document on my Itch sometime before or around the new year. It'll be the most complete version so far, but will still be missing a lot of art fluff text, and short stories I plan to add at the head of each chapter. As the name implies, this should be the last freely available version I release before 1.0, where I'll start working on the physical layout for printing and start on the supplements funded in the KS.
Conclusion
If you got this far I'd like to thank you. I've spent quite a few years on this project and never thought I'd be able to get this much funding for it, or for any of my books, really. To show my appreciation, here's the current book cover for that final playtest document. I'm not sure if it'll be the same when the update comes out, but I felt like some of you might enjoy seeing its current version.
Again, thank you all so much, I'll be updating you again when this stuff becomes available.
- Joel Happyhil
30 notes
·
View notes
Note
if possible, i'd love to ask a quick follow-up again on your response to my q on apps you use as a law student :) you mentioned xodo & pdfexpert as two apps you use for pdfs. as a fellow law student, i've struggled with finding an appropriate way of reading/organising/annotating long pdfs.. if possible i'd love to ask two quick qs!
could i ask how you use each app? i'm not very organised so i'm thinking of committing to one but not sure which
could you give a step-by-step rundown of your approach to studying a new topic/section of the law? (e.g., do you read before a lecture/annotate handout/notetaking in seminars) my course introduces a new legal area each week per module so was wanting some professional advice on how to manage :') tysm!! <3
Hi again! This is how I use XODO/PDF expert:
(take my advice with a grain of salt I don't really have a stellar academic track record and the only thing I'm good at is spending all my hours studying and coming up with ideas that need a lot of years to perfect. I'm hoping the hard work will pay off in later years but everything's more of a WIP at the moment. I don't have an estimate of my own credibility)
Whenever I have a long 500 page judgement to get through, I break up the long judgement by adding an index in the app. The apps lets me add my own index. If it is a textbook, I already have an index so navigating in between the pages is easier, and it also helps me get a bird's eye view of the subject/topic
After indexing it, I assign a specific color to a specific sub-topic. One judgement, for example, deals with several issues, like Secularism, Federalism, etc. I assign a color to them, and as I'm reading the judgement, I highlight specific lines with their specific colors that basically sum up the argument being made. So I know which paragraphs talk about which sub-topic.
When I've highlighted the main arguments, and then I glance through the document, a little mind map begins to form in my mind. I learn to separate small nuggets of ideas and learn how they're linked to each other.
I also sum up the paragraphs or put in key phrases on the margins when I feel that they have switched to talking about a distinctly separate idea.
Now I switch to other note taking apps for the next step. Usually, I use Obsidian to make my notes.
After understanding the basic framework of whatever text I am reading, I make my own mind map or framework with my own words. This step is very important, because it is very easy to lose yourself in the topic and not know how to make a head or tail out of it. Especially legal text.
Finally, I have personally found that it is important to set up a strict timeline to when you want to be done with a specific topic and move on. The temptation to go deeper into any topic is very real and negatively affects your ability to get a grip with the subject as a whole. Do not give in to it. Whenever you sit down to study a topic, restrict yourself to one document/text/judgement/whatever class notes you're handed. Do not try to look up something, and get trapped in the hyperlink loop.
-----------------------------------------------------
TLDR;
1. I use pdf readers to highlight topics by different colors so I can break up the text into topics and learn how the different ideas are linked.
2. I then make my own framework from the text with my own words and put that in my notes
8 notes
·
View notes
Note
Hey! Correct me if I'm wrong, but I remember you mentioning a few times that you use Scrivener to write? I have been thinking about switching my writing software in the future (I mean I like Word but I don't like the subscription model at all and would like to avoid it in the future lol). If you want, would you mind telling me a bit about what it's like to actually use? I want to learn a bit more before I would commit to anything ^.^"
Sure! I'm always glad to spread the gospel of scrivener!
So here's what my workspace looks like at the moment (there's a bit of a graphic torture scene on there rn but you don't have to read that):
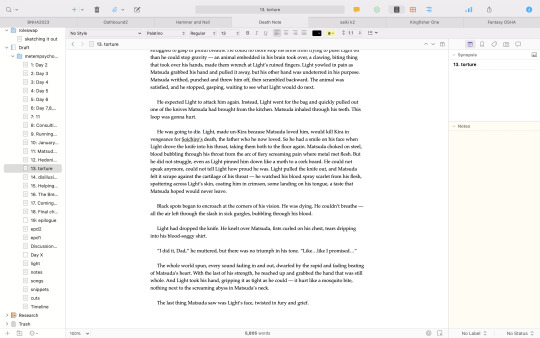
As you can see, there's a lot of tabs and such. It's not organized like a typical word processor. With stuff like Word, every discrete document needs its own file. You can either put Chapter 2 right after Chapter 1 in the wip.docx, or you can create wipchapter1.docx and wipchapter2.docx. Not so with Scrivener. All of my Death Note fic is in the same project — whether its a oneshot or a longfic, I just have to open up that file to write it. As you can see on the left, I have a bunch of different documents for each chapter of Metempsychosis, along with a few documents for snippets, cuts and notes. You can sort those documents into folders as well. It's SO convenient to be able to tab quickly between chapters and notes without having to scroll or open like 17 different files. But if you do need to open different files...as you can see at the top, I've got a bunch more projects open, each with tons of their own documents. If you open an existing project from the File menu, it'll open in a new tab in the desktop you're using. This makes it insanely easy to navigate between projects and navigate between different documents within projects.
There are tons more features, too. Like, on the right is synopsis and notes — you can add a synopsis to each document and write notes about what you're writing. You can also add comments. You can also set project word count goals, either daily or for the project, and set deadlines. Your progress will then show up in a satisfying yet unobtrusive little colored bar at the top as you write. You can open your documents in a notecard view and rearrange them into color-coded timelines — great for stories with multiple points of view. And I don't even use all the features Scrivener has to offer, there's many more.
There are downsides, however. The way the documents are all in the same file makes exporting a lot more complicated. It's still possible to, say, save a single document as a PDF, but it's not as simple as it is in other word processors. Also, it doesn't divide your text into pages. (At least, not by default — there might be an option to have it do that, I don't know). This can be great for workflow, but it means that you can't do stuff like page numbers or headers. There's also the fact that, simply by virtue of not being Word or Google Docs, it's not going to slot well into any professional, class or collaborative work because you're not using the standard file format. This also means that, if you're submitting your creative writing professionally, working in Scrivener will create some problems you'll have to solve. I don't use Scrivener for any of my journalism or class work, just creative writing.
It's also pretty much impossible to get collaborator comments and feedback without just like, putting your text into another word processor. Scrivener does have a function to sync between devices. I recommend avoiding it. It's janky as hell and for some reason uploading an ace attorney fic to that sync function caused one of the documents to contract all of the between-paragraph spaces upon opening the file. No idea why.
So, in conclusion, Scrivener does not work very well as an all-purpose word processor, but it's not trying to. It's trying to be a good workspace for creative writing, and it does a very good job at that. Also, it's a one-time payment that's sometimes on sale, so that's nice.
22 notes
·
View notes
Text
Affiliate Marketing Strategy - The Best Easy Copy-Paste Method
Introduction:

In this blog post, I'm going to share an Affiliate Marketing Strategy which is a completely copy-and-paste technique that anyone can implement, even if they are completely new to online marketing and have no audience. By marketing affiliate products, you'll be able to get daily income using this step-by-step method. So let's get started right away!
Step 1: Finding an Affiliate Product
Finding an affiliate product to promote is the first step to begin in our Affiliate Marketing Strategy, Digistore24 is one of the sites you can use; it provides a large selection of affiliate products. You can create an account and go to the marketplace area. It's critical to select goods that are well-liked, have a strong sales ranking, and take the cancellation rate into account. Let's utilise the "Ultimate Keto Meal Plan" as our affiliate product for the sake of this demonstration and to show you this Affiliate Marketing Strategy.
Step 2: Leading with value
The common error made by most people, which infrequently results in purchases, is to simply spam their affiliate links. Instead, we'll adopt a fresh Affiliate Marketing Strategy and provide potential clients value. The first step is to Google "best-selling [niche] books." If your offering pertains to health and fitness, for instance, look up "best-selling health books." Look for hot books in your niche that are popular right now.
Step 3: Look up the book's title
Using the information you gathered in Step 2. The book will typically be made available for download in PDF format. If not, try other URLs until you locate one that works.
Learn More: Affiliate Marketing Step by Step.
Step 4: Adding Affiliate Links to the Book
Once you have the book's PDF, go to the sodapdf.com website and use their PDF editor tool. Place your affiliate links in the book at key points when you upload the PDF. To increase the likelihood that readers will click on the links, place them every 10 to 20 pages or in each chapter. Use the link feature in the editor to make the text clickable.This will send readers to your highly-converting affiliate offer when they click on the link. Using This Affiliate Marketing Strategy You Can Easily Promote your offer and Earn High Rate Of Commision.
Step 5: Adding the book to Google Drive
Upload the book to Google Drive to make it available to prospective readers. Create a free Google Drive account if you don't already have one. Upload the PDF document that includes your affiliate links. Right-click the file after the upload is finished and choose "Get link." If you want people to be able to view and download the book, select the "Anyone with the link" option. Copy the provided URL.
Step 6: Facebook Book Promotion
It's time to target prospective customers who are interested in your specialised market. Visit Facebook and look for groups in your niche. Join organisations that are active and have a sizable membership. "Hey, I was thinking of trying [your niche product], and I heard that [book name] was good," compose a post providing the free book and include a message like this. If anyone wants to read it, feel free to message me because I have a copy. Reply to messages from people by pasting the Google Drive URL.
If you Really Wanted To Become A Successful Affiliate Marketer And Wanted To Complete Your Dreams. We are Offering a Live webinar For You. Click the Link Below To Learn More.
Learn More : Freedom Asselator Webinar
Conclusion
Even if you're new to the internet world, you can make daily payments as an affiliate marketer by using this copy-paste technique. Don't forget to add value by offering free books and placing your affiliate links properly. To reach your target demographic, use social media groups and platforms like Digistore24. With perseverance and the appropriate strategy, you can begin to make big commissions. Good luck on your path in affiliate marketing.
#affiliate marketing tips#affiliate#affilate marketing#make money online for beginners#passive income#make money online#online business opportunities
16 notes
·
View notes
Text
PALESTINE MASTERLIST
A collection of resources for learning about and helping Palestine, on and off tumblr
(I will be editing this post as I find more resources)
Last updated: 08/27/24
I haven’t been on Tumblr for a while, so if anything on here is incorrect or outdated, let me know
LEARN:
Decolonize Palestine - A site made by Palestinians. Contains the full history of Palestine (pre and post Israeli occupation), debunks common myths about Palestine, and has lists of resources for learning more and taking action
Al Jazeera Coverage - Al Jazeera is a news site based in the Middle East. They have live updates and go into depth on everything going on. (I personally listen to their Live broadcast while I do stuff to stay updated)
Free Ebooks About Palestine - 3 free ebooks from Haymarket. If you’re willing to pay, Haymarket has a lot of non-free books about Palestine as well. They also host events about Palestine - just go to the ‘Events’ page and see if there are any you can attend. Many are free and available online.
Google Drive with 2700 ebooks on Israel/Palestine
Even MORE free ebooks
Yet again more free ebooks
The Palestine Directory - A compilation of free-to-access links to learn about Palestine and its history
Palestine Academy - a website with tons of info about Palestine and what you can do to help
B’tselem - an Israeli human rights organization dedicated to documenting the ongoing Palestinian genocide
Advocating for Palestine - A free pdf of a booklet supported by Bisan explaining and debunking common Israeli propaganda tactics
PDF of South Africa’s application to the UN to investigate Israel for genocide - Provides a TON of info and facts about the genocide, before and after October 7
Here’s a post compiling EVEN MORE resources to learn more
ACT:
US Campaign for Palestinian Rights - If you go to their ‘Act’ page, they have a variety of actions you can take. They provide a script for a phone call to your reps and will patch you in to a call with them, have a list of upcoming protests, and more. You can also donate to them.
Jewish Voice For Peace - Similarly to USCPR, they have several ways you can take action, with campaigns, scripts for your emailing/calling your reps, and more. You can donate to them as well
Donate E-sims to Gaza - Gaza’s communications is under constant threat. Donating e-sims helps Gazans connected.
Archive what you can - Archiving info so that it’s available no matter what happens on Social Media is its own form of activism
Boycott, Divest, and Sanction - There’s a lot of huge lists out there with hundreds of brands to boycott. This isn’t feasible and isn’t what Palestinians are asking for. BDS, run by Palestinians, has its own shorter list of companies that have the greatest impact on Palestine. If you want to boycott other companies, go ahead, but please focus on the ones on the BDS site!
Fax Your Reps - 5 free faxes per day
Join/Donate to Palestine Action - Palestine Action is an organization focused on using direct action to bring down Elbit, a weapons’s manufacturer that sends weapons to Israel
If you have any links you think I should add or have an issue with any of the links I currently have, please let me know!
8 notes
·
View notes
Text
Hi, this is Creative School. Today we share with you how to generate PDF documents from any website. If you want to develop a website and want to provide PDF downloading features, you are exactly in the right place. This video will help you to insert a PDF generator feature in your website on any page of any specific size and shape. GitHub Link: https://github.com/BorhanHosen/How-to-add-pdf-file-download-option-in-your-website.git 0:00 Explanation 3:10 Intro 3:39 Explaining Puppeteer 7:12 Server Side Code Explanation 15:01 Client Side Code Explanation 26:21 Final Touch 28:18 Outro Here are some of our previous tutorial links. You can watch and learn new things and techniques. Enjoy them: How to Send Data from HTML Form Data to Google Sheets | Creative School https://youtu.be/A4TPkOw2Ess Mastering Full Invoice Inventory Management in Microsoft Excel | Creative School Tutorial https://youtu.be/f8BTxan1QTo Motion Graphics in PowerPoint Full Playlist: https://youtube.com/playlist?list=PLsWfHxHIjBT87YgBulwX6X-bnEk4TayQu How to Create the Best Animated Info-graphic in PowerPoint [Part-1] 2020 || Creative School || https://youtu.be/rV-mykyBQIM Awesome Flat Intro Animation In PowerPoint Part 2 || Creative School || https://youtu.be/TafoVSYadEg The Night Sky with a Mountain, fountain, a tree, Bird & Moon Creating in PowerPoint || Creative School || https://youtu.be/jyCTlxJrGyg SAMSUNG Galaxy Boot Animation in PowerPoint [Full Tutorial- 2020] https://youtu.be/pqh-P1mUNp8 How to make an intro video of 10-minute school in PowerPoint 2020. [Part 1] https://youtu.be/I1xObR_SVco Water Animation In PowerPoint Animation! || Creative School https://youtu.be/WfzKTzbGVRA How to add pdf file #download option in your #website https://youtu.be/cNhQ-0VBt5A ===HashTags=== #reactjs #creativeschool #pdfconversion #html #nodejs #vscode #website #javascript #convertpdf #generatepdf #pdfconverter #downloadpdf #puppeteers #mernstack #javascript ===Related Tags=== react pdf generator, generate pdf using react, generate pdfs from html & css with nodejs using puppeteer, certificate generator website, how to create a pdf file using reactjs, html to pdf using javascript, generate pdf from html, generate pdf using javascript, how to add pdf object on a website, how to convert html to pdf in react app using jspdf, easy way to embed pdfs on a website, how to convert html content to pdf in react app using jspdf, generate pdf with react, how to create a pdf with node and puppeteer, generate pdfs from html & css with nodejs using puppeteer, puppeteer, getting to know puppeteer with example, get started with headless chrome and puppeteer, headless chrome and puppeteer, how to generate pdf from html with node.js, how to create a pdf file using reactjs, generate pdf using javascript, how to create pdfs with node js and react, puppeteer examples, puppeteer tutorial, puppeteer html to pdf generation with node.js,
#react pdf generator#generate pdf using react#generate pdfs from html & css with nodejs using puppeteer#certificate generator website#how to create a pdf file using reactjs#html to pdf using javascript#generate pdf from html#generate pdf using javascript#how to add pdf object on a website#how to convert html to pdf in react app using jspdf#generate pdf with react#how to create a pdf with node and puppeteer#javascript#creativeschool#mernstack#puppeteer#website#download
3 notes
·
View notes
Note
Hi there Runic!
I was wondering your opinion on using Scrivner to draft fics vs using Word? Like pros and cons? (Some of the articles online are so confusing! >//<‘)
Thanks so much for the ask, anon! And also thanks for your patience; I wanted to give this some thought, hence the wait.
I primarily use Scrivener and have been using it for a little over a decade. I also use Word during the final phase of edits. I'll list some of my favorite features of each one, followed by the cons.
Scrivener
Organizing a story in Scrivener is where it shines the most. For a longer story, you can break things down by chapter and easily move them around as needed. For me, I use a single file for all my fics and breakdown folders by fandom, then by ships. The use of status markers and labels and custom meta-data, while initially daunting, are also super great to flag what state your draft is in along with any other indicators you wish to use. For me, I like marking if fics are for an exchange or a gift for a friend. I've even customized the meta-data so I can plug in potential tags and ratings as I go!
Snapshots is a neat function that makes a copy of your current file. I use it with each new phase of editing, in case I need to refer to an older version. It's super easy to switch back and forth between snapshots, plus there's a preview to show what has been removed or added from the last version!
There are a ton of compiling options for when you wish to export your story as a Word doc or a PDF or even for epublishing. I don't use this too often, but I have lots of friends who do and it makes proper formatting really simple.
There is a focus mode that removes all the UI stuff and just shows you the words. If this didn't exist, I wouldn't be able to write anything lolsob.
You can set target goals for each document or even the entire file. And if you have multiple documents in a single folder with word count targets applied, Scrivener will add them all up and give you a total target estimate. Really handy for planning out how long your story will be!
THERE IS A DARK MODE THEME.
Word
The grammar/spelling checker is a lot more robust in comparison to Scrivener.
Sharing your Word document and sharing notes/comments with beta readers is a LOT easier in Word. It's similar to how Google Docs works with leaving comments, replying to each other, and marking them as resolved.
Copy-pasting from Word into AO3's rich text preserves the formatting, whereas I've had a lot of wonky issues going from Scrivener to AO3.
Text-to-speech, while kinda weird, is a godsend when I want to read out loud a fic before posting, but don't have the energy to do so.
If you have Word, you likely have a Microsoft subscription, which means you have access to OneDrive, which makes for VERY easy backups. Plus you can get Word on your phone and work off that and your computer seamlessly at no extra cost.
THERE IS ALSO A DARK MODE.
Hokay, now for cons.
Scrivener
Scrivener is not free. It is a one-time fee of $60~. That said, if you participate in NaNo and win, you can get a discount code (I believe it's 50% off?)
It was originally made for Macs, but then a Windows version was developed. The team behind Scrivener is very small and it took… forever to get the Windows version up to speed with the Mac version. There are still some differences between the two, but thankfully both versions are on the same page. Jumping off of this, there is an iOS version, but no Android version.
If you wish to back up your Scrivener stuff, you can only really do that via a Dropbox account. Also, I believe it's not possible to open the same file on different computer types. So if you have two computers (one Mac and one Windows) and want to open the same file on both, it's not really going to work. In my experience, I've also run into issues getting things to sync and open when using two Windows computers. So if you're planning to bounce around different computers/laptops/etc., definitely keep this in mind.
On top of that, for every device you want Scrivener on? You need to pay for that.
Scrivener has got one hell of a learning curve, too. I've been using it for so long and am STILL discovering new ways to use it. It can be intimidating, even after you go through all the tutorials.
Word
This also costs money, but sadly is not a one-time fee AND you need to invest in a bundle plan instead of just getting Word. Home subscriptions range from $70 to $100 a year, depending if you're getting it just for yourself or for your family/friends to use too. For me, I use it with my boyfriend and we use all the programs a bunch, so it works out well for us. This might work for you too if you're interested in having access to things like Excel and OneNote and cloud storage. But if you just want Word, that's not really feasible.
I haven't experienced this because I've stopped writing novel-length stories in Word, but I've heard from friends that the program slows down after 30k words or so, which is unfortunate and frustrating.
Furthermore, you can't really transition from file to file in Word as you can in Scrivener. You'd need to manage the folders on your computer outside of the program.
Word isn't really designed for book formatting. You CAN do it, but it takes some extra work on your end to format things accordingly, whereas Scrivener has a bunch of built-in features to help with that.
Microsoft is A LOT bigger than the Scrivener team, thus there are frequent updates. And because of that, you need to perform more updates to the program and might even need to reacquaint yourself with features and UI changes.
I hope this helps! Regardless of which program you wish to use, I hope it goes smoothly and you have a blast writing your stories on it!
2 notes
·
View notes
Text
Step-by-Step Guide to Setting Up Odoo Learning Management System (LMS)
Odoo offers a powerful eLearning module that allows businesses, educators, and trainers to manage courses, lessons, quizzes, and certifications in one place. Whether you're setting up a training portal for employees or an online academy for learners, Odoo makes it easy to organize and deliver high-quality content. This step-by-step guide will walk you through how to set up your Odoo Learning Management System.
Step 1: Install the eLearning Module
To begin, you need to install the eLearning app in Odoo:
Log in to your Odoo backend with administrator rights.
Go to the Apps module.
Search for eLearning or a Learning Management System.
Click Install on the eLearning module.
Once installed, you will see a new menu called eLearning or Courses on your dashboard.
Step 2: Create a Course
After installing the module, the next step is to create your first course:
Navigate to the eLearning app.
Click Create to add a new course.
Fill in the basic course details:
Title: Name of your course.
Responsible: Assign a person or department.
Description: Write an overview of what the course covers.
Tags: Add categories to group similar courses.
Turn on or off features like Forums, Quizzes, and Certifications as needed.
Once done, click Save.
Step 3: Add Course Content (Lessons)
Courses in Odoo are structured with lessons or content blocks. Here's how to add them:
Open the course you created.
Scroll down to the Content tab.
Click Add Content.
Choose the type of content:
Document (PDF, Word files)
Video (YouTube or upload)
Quiz
Web Page (HTML content)
Enter a title, upload your content, and add any notes or instructions.
You can reorder lessons using drag and drop to match your preferred sequence.
Step 4: Create Quizzes
Quizzes help reinforce learning. To create one:
Go to the Content section of a course.
Click Add Content and select Quiz.
Name the quiz and add a short introduction if needed.
In the Questions tab, click Add a Question.
Choose question type:
Multiple choice
Single choice
Text input
Add answers and mark the correct one(s).
Quizzes can be scored, and you can define passing criteria.
Step 5: Set Up Certification (Optional)
You can provide certificates for course completion:
In the course form, enable the Certification option.
Define the criteria (e.g., complete all lessons or pass the final quiz).
Choose a certification template or create your own.
Certificates will be auto-generated and available for download in the learner's portal.
Step 6: Assign Courses to Users
You can assign users manually or allow them to enrol via the website.
Manual Assignment:
Go to the course.
Under the Participants tab, click Add.
Select users from the list.
Public Access:
Make the course Published.
Set the course as Free or Paid.
Share the link with users or embed it on your site.
Step 7: View Learner's Progress
Track how learners are engaging with your courses:
Go to the eLearning dashboard.
Click on Reports.
View:
Course completions
Quiz scores
Certification status
Time spent on lessons
You can also export reports in Excel or PDF for sharing.
Step 8: Customize the Learning Portal
Odoo allows customization of the portal interface:
Go to Website > eLearning.
Use Odoo's website builder tools to:
Customize fonts, colours, and banners
Organize course listings by categories
Add filters and search options
You can also add a blog, testimonials, or FAQ section to support learners.
Step 9: Enable Email Notifications
Keep learners informed with automated notifications:
Use Automated Actions or Marketing Automation to:
Send welcome emails
Notify learners of new content
Remind about upcoming quizzes or deadlines
Set the conditions and templates for each scenario.
Step 10: Monitor and Improve
After setup, continue improving your LMS:
Collect feedback using forms or surveys.
Analyze popular courses and content.
Update lessons regularly based on learner performance.
Offer new certifications or advanced training.
Conclusion
Odoo Learning Management System is a flexible and user-friendly tool to train employees, teach students, or deliver professional courses. With features like quizzes, certificates, progress tracking, and detailed reporting, you can build a complete learning platform that fits your business needs. Follow these steps to get started and make learning accessible, engaging, and effective for everyone involved.
#odoo learning#odoo learning software#odoo learning software management#Odoo eLearning management software#odoo#odoo app#odoo erp
1 note
·
View note
Text
Best PDF Annotation Tools for Remote Teams in 2025
In the post-pandemic era, remote and hybrid work models have become the norm for many organizations. As teams collaborate across different locations and time zones, the need for efficient digital tools has grown—especially when it comes to reviewing, editing, and sharing documents.
PDF annotation tools have become an essential part of modern remote workflows. Whether you're editing contracts, giving design feedback, or reviewing technical manuals, a good PDF annotation tool can streamline communication, reduce errors, and enhance collaboration.
So, which PDF annotation tools should remote teams consider in 2025? Let’s explore some of the best tools available today, along with key features that make them ideal for distributed teams.
Why Do Remote Teams Need PDF Annotation Tools?
Remote teams face several challenges when it comes to document collaboration:
Difficulty in giving precise feedback on documents
Version control issues
Delays in approvals or changes
Miscommunication due to unclear comments
PDF annotation tools solve these problems by allowing users to highlight text, add sticky notes, draw shapes, insert comments, and track revisions—ensuring everyone stays on the same page (literally and figuratively).
Best PDF Annotation Tools for Remote Teams in 2025
1. Adobe Acrobat Pro DC
Best for: Enterprise-level teams and design-heavy documents
Adobe Acrobat remains the gold standard in PDF editing and annotation. With features like comment tracking, digital signatures, and seamless cloud integration, it's great for collaborative work.
Key Features:
Add comments, notes, and highlights
Real-time collaboration via Adobe Document Cloud
Integration with Microsoft Teams and SharePoint
Supports password-protected PDFs
Cons: Expensive subscription for smaller teams
2. Bugsmash (Recommended for UI/UX, Web & Document Feedback)
Best for: Teams looking for a centralized feedback platform across web pages, apps, and PDF files
Bugsmash is not just a bug reporting tool—it offers powerful PDF and web annotation features designed for remote-first product, design, and QA teams.
Key Features:
Easy annotation on PDFs, images, and web elements
Visual feedback with screen capture and markup
Centralized dashboard for feedback management
Collaborative comments and tagging features
3. Kami
Best for: Education and training teams
Kami is designed for collaborative learning and team onboarding. It enables real-time annotations, audio/video feedback, and integrations with platforms like Google Classroom.
Key Features:
Live collaboration and voice annotations
Works well with Chromebooks and Google Drive
Offline access to documents
Cons: May not be suitable for advanced business documentation
4. PDFescape
Best for: Small businesses looking for a free PDF editor
PDFescape offers basic annotation tools in a free, browser-based format. Great for startups or teams needing simple markup capabilities without heavy installations.
Key Features:
Add text, highlights, and sticky notes
Supports form filling and basic editing
No downloads required
Cons: Limited cloud collaboration features
5. Xodo PDF
Best for: Teams working across mobile and desktop devices
Xodo offers cross-platform syncing and strong annotation tools for Android, iOS, and desktop users. It's fast, intuitive, and great for on-the-go document reviews.
Key Features:
Highlighting, underlining, shapes, and text boxes
Sync with Google Drive, Dropbox, and OneDrive
Real-time collaboration
Cons: UI can feel cluttered for new users
Choosing the Right Tool for Your Team
When picking the best PDF annotation tool for your remote team in 2025, consider the following:
Ease of Use: Intuitive tools reduce the learning curve.
Real-time Collaboration: Enables faster decision-making.
Integration: Check compatibility with Google Workspace, Slack, Teams, etc.
Security: Look for tools with encryption and access controls.
Cost: Choose based on your team size and budget.
Conclusion
PDF annotation tools are no longer just a “nice-to-have”—they’re essential for maintaining productivity, clarity, and speed in remote environments. From enterprise teams to nimble startups, the right tool can dramatically improve collaboration across geographies.
If you're looking for a centralized, powerful, and easy-to-use platform for PDF and web feedback, check out Bugsmash – the all-in-one feedback and annotation solution tailored for modern remote teams.
0 notes
Text
How to Merge PDFs and Adjust Margins for Uniform Layout
When combining multiple PDF files into a single document, you may encounter inconsistent margins—especially if the files come from different sources or have been formatted differently. Uneven margins can make your final PDF look unprofessional and difficult to read. To create a clean, cohesive document, it's important to adjust margins for a uniform layout either before or after merging.
This guide explains how to merge PDFs and standardize margins across all pages for a polished result.
Why Margin Consistency Matters
Margins affect both visual balance and readability. Inconsistent margins can result in:
· Misaligned content or text running too close to the edge
· Uneven page spacing, especially when printed
· Awkward layout transitions between merged sections
Standardizing margins ensures:
· A professional and uniform appearance
· Better user experience, especially for printing
· Compatibility with binding or booklet layouts
Step 1: Merge the PDFs
Start by combining your documents into a single file. Use a browser-based tool like PDFingo.com to:
· Upload and reorder multiple PDF files
· Merge them into one unified document
· Download the final file securely in your browser
Once merged, you can begin adjusting margins across all pages.
Step 2: Adjust Margins Using a PDF Editor
Most PDF editors don’t allow direct margin editing like a word processor, but you can achieve similar results by:
A. Using Page Cropping Tools
Use software like Adobe Acrobat Pro or PDF-XChange Editor:
1. Open the merged PDF
2. Select the Crop Tool or Set Page Boxes
3. Define a consistent margin area by adjusting trim boxes or crop values
4. Apply the settings to all pages or selected ranges
This method trims content edges to simulate margin uniformity.
B. Adding White Margins with Background or Canvas Resize
Some tools allow you to expand the page canvas:
· Increase the page size slightly
· Position the original content centrally
· Add white space around as artificial margins
Tools like Sejda Desktop or Infix PDF Editor support this feature.
Step 3: Apply Changes and Save
Once your margins are adjusted:
· Preview the document to ensure alignment looks correct
· Save the updated file with a new name
· Test print a few pages if the PDF is intended for physical use
Tips for Margin Adjustment
· Use consistent units (e.g., inches or millimeters)
· Apply changes in bulk to avoid manual errors
· Keep content centered after resizing to preserve layout
· Check page numbering and footers—they may shift during cropping
Final Thoughts
Merging PDFs with consistent margins results in a document that looks clean and professional, whether viewed on-screen or in print. Although adjusting margins in PDFs requires a few extra steps, the improved layout and readability are worth the effort.
Use a simple online tool like PDFingo.com to merge your PDFs first, then use a PDF editor to refine the margins for a polished, unified appearance. With the right tools and approach, your final PDF will be both functional and visually consistent.
0 notes