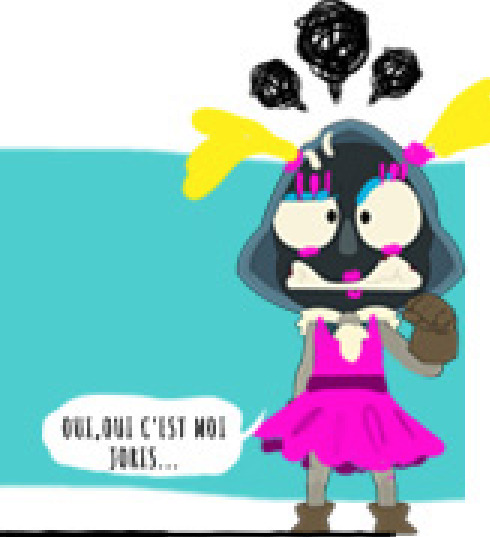
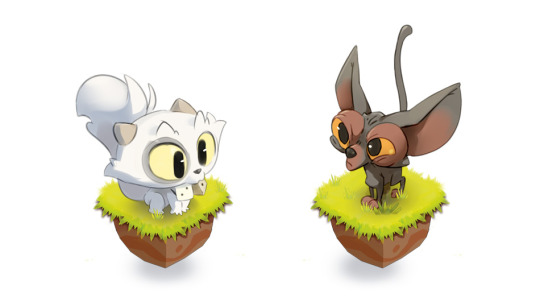
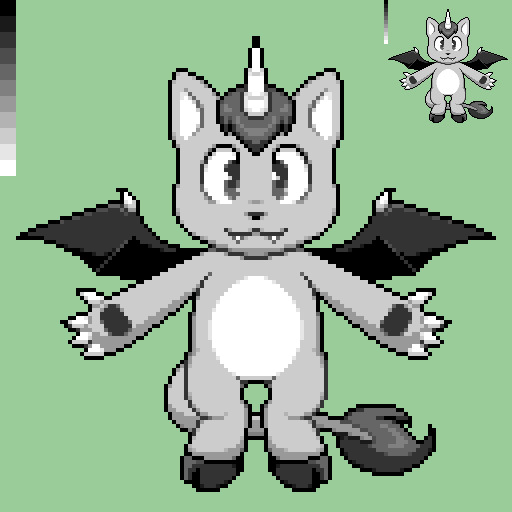
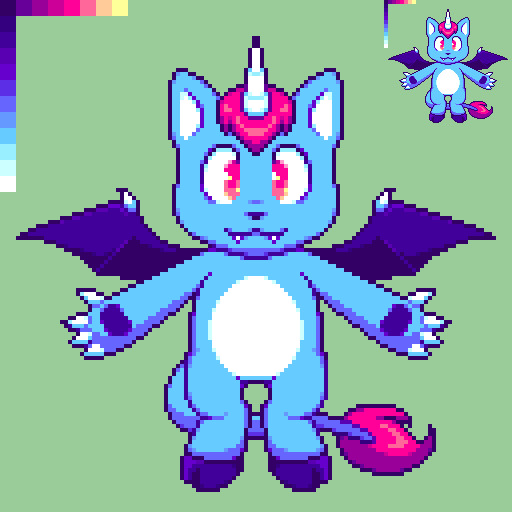
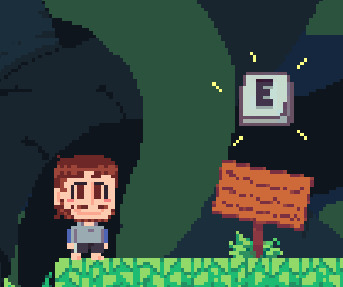
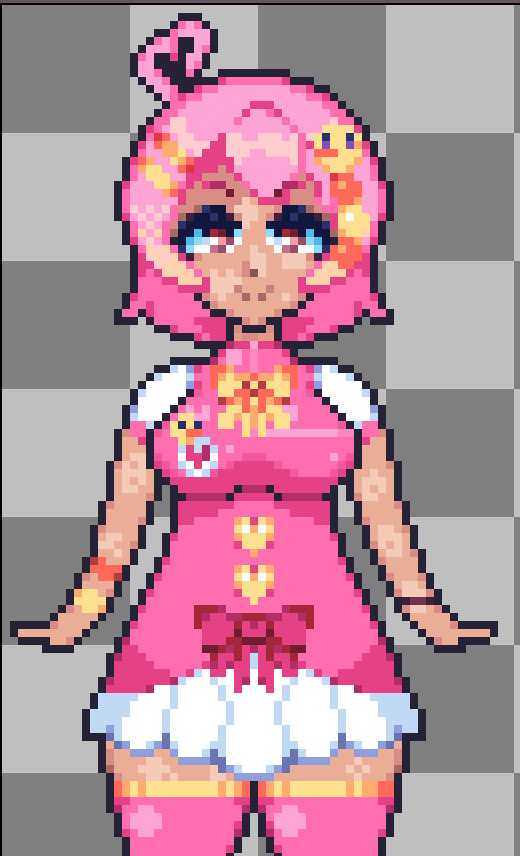
#Also one of the first times using aseprite
Text

I love them your honor
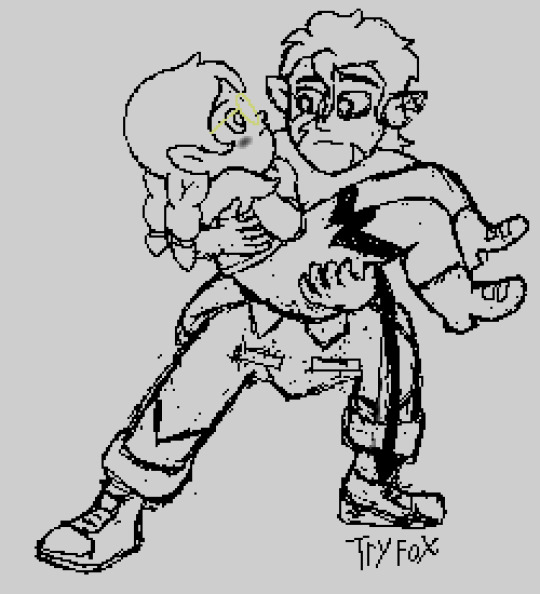
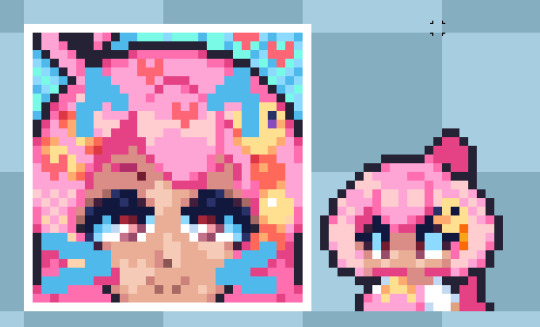
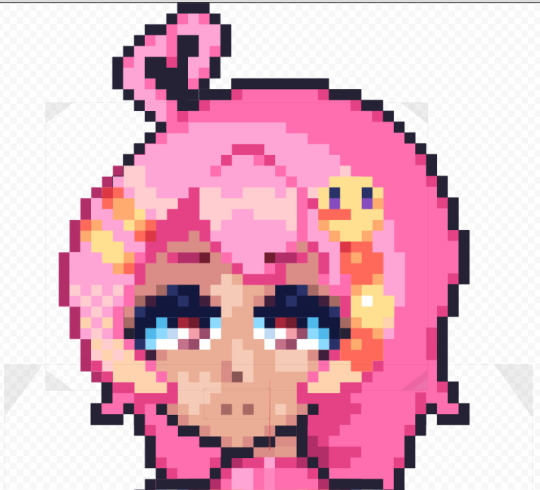
Normal colours and sketch below!
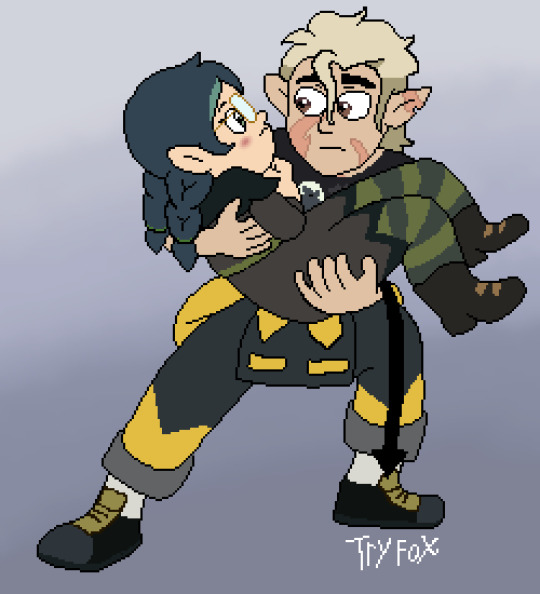
#I AM SO HAPPY#Also one of the first times using aseprite#the owl house#owl house spoilers#the owl house spoilers#huntlow#hunter the owl house#hunter toh#hunter x willow#willow park#willow toh#the owl house willow#winter#the owl house hunter#pixel art#toh fanart#my art#aseprite#I keep winning with my ships#first lumity. then reada. now huntlow#screenshot redraw
71 notes
·
View notes
Note
Do you have any tips for people trying to start learning pixel art and animation?
I really love your work, it all looks so alive!
Hey thank you very much!
And yes! I can give a few tips!
Firstly, don't worry about making things absolutely perfect! Figure things out, mess around with colors, take it easy!
I'd say on top of the basic stuff, figure out and get used to keybinds and shortcuts on your program of choice. Aseprite (which is my go-to) has a lot of shortcuts and the ability to make more depending on preference.
From there, start out small, this'll help a lot in the start, since each pixel makes more of a difference when on a smaller canvas like 16x16 compared to something like 512x512. You should also take in as much info as you can, watch video tutorials, ask around, join communities, etc. (Cafe Dot Discord is a good place for that.)
If you have a preference on what you'd like to work on, like characters, items, weapons, etc. Start there. It's so much easier getting into things if you're starting with something you love. Colors aren't anything you need to specifically worry about right out the gate. One thing to get into a good habit of is using grayscale to work with the values, and then if your program of choice allows it, go over it with a color layer and the colors you want and see the magic happen!
Animation is a little more complex, but when you're ready for it, there's the principles of animation that I'd recommend looking into. Learning how the fundamentals work is necessary for things to go by smoother. I started out making an animation of a slime bouncing up and down, one of the earliest animations I made. Afterwards I went and started making waterfalls, that got me into the mindset of how to loop animations. Once you get the hang of it, animations (looping ones specifically) is just a lot of small parts moving at the same time, that little bit of movement to follow does a lot to a piece comparatively to a still image.
Overall, like I said in the beginning, don't worry about things, and it'll come with time. Expecting yourself to get something on the first try will only make things harder for yourself, you have to allow mistakes and messing up, experimentation and accidents are how a lot of people make things look as good as they do.
If all of this is a bit much, it's cause it is. Take it bit by bit and pretty soon you'll be impressing yourself so much you'll be shocked at the amount of improvement you've made.
(pssst, here's a playlist I made for starting pixel art, and its in order of complexity, so as you go down the list, your ability will improve)
Playlist
29 notes
·
View notes
Text
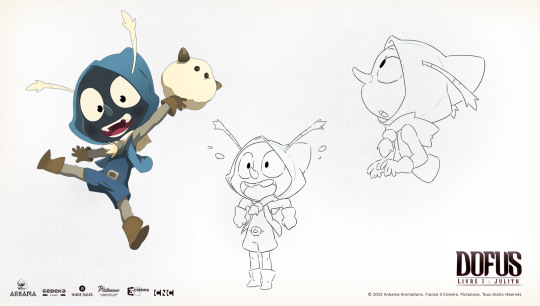
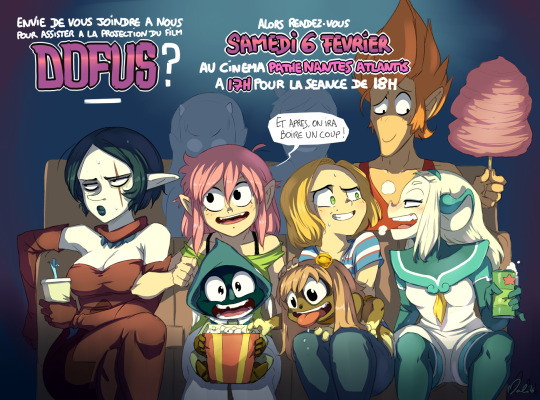
Exploring dofus-le-film.com and talking about movie-related events. [PART 1]
This will not go into the goldmine that is the interview Tot and Xa give about Joris. This is just a little, self-indulgent post. I hope you will enjoy it nevertheless.
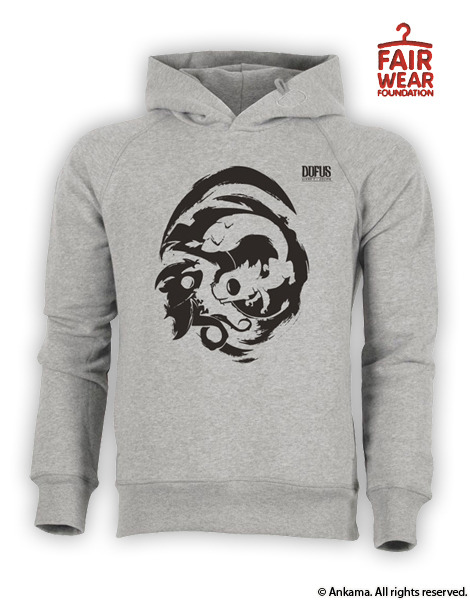
The first silly action I took was extracting the site's icon and enlarging it in Aseprite, so here's your daily dose of cute official Joris pixel art. Anyway.

I love how the movie blurb literally lies about Khan being Joris's life-long idol.
CHARACTER BIOS.
Most of them include the information we already know, so I will only be pointing out things I personally find interesting.
For example - this art here depicts Joris's bald head under the hood as very round. Very useful info for us joris enjoyers. Reblog to slap his bald head, like to slap his bald head.

(Hacks up blood) Deeply caring in nature... papa poule... It is the second time, when Kerubim is called that, in his character bios, and I would like you to remember are these different explanations of this word combo:
I'm insane. I love him a lot.

Bakara is a pleasure to have in class :)

Anyway, I love how non-specific and non-alarming these character bios are. We can't scare the hoes by saying that beneath her cool exterior she wants to kill people around her and also drink 20 gallons of vodka, so "shy and stuck up" it shall be.

Again, it's hilarious how non-threatening these character bios are, considering Lilotte's whole parent thing is basically: (substitute "women" with "kids with families")
Coloring pages + Crayon Contest
A part of me wanted to be "haha, I colored all these coloring pages, for the Full Understanding of The Experience of this movie."

Then I realized that, as a person who is making a Joris painted music video, and had drawn at least 1:07 minutes worth of artwork of him and some other characters of this movie, I would rather-- [remembers that suicide jokes are bad] take cactus for a wife, than draw him for this blog too. I'm sorry.
Not much to be said about the contest, though this is epic:
This little Joris can be found at the bottom of the "win some crayons" page. It's cute.
BLOGPOSTS
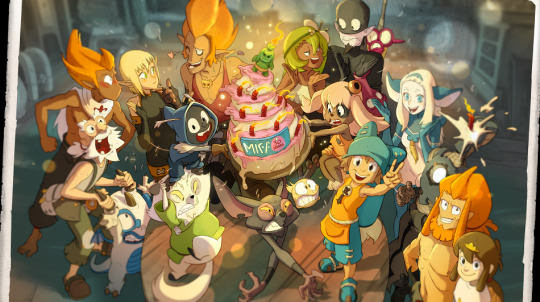
This image was drawn for MIFA.

I want to unpack what is occurring here:
Goultard is holding his dragon boyfriend rather gayly on the shoulder. Interesting.
One of the candles landed in Nox's face?
Atcham, Joris, and Lilotte were holding the cake together. Lilotte is sitting on Yugo's shoulder, while Joris is standing on Kerubim's arms. It is reasonable to assume that Yugo turned to the camera, which made Lilotte turn as well, which made Atcham fall, which made Kerubim step away, and the only people carrying the cake who are still even a bit happy are Joris and Yugo.
Adamai is getting ready to catch Joris when in like 5 seconds all of them are going to be tumblring down Atcham-style.
Incredible. But this illustration is not the only gem that Annecy has brought us!
It also brought us more of Atcham being cool and awesome.
I'm insane.
There's more rare art here: these t-shirts featuring designs from a fan contest.
They were made in limited numbers. I'm including them here because we don't exactly have copies of the artwork, and I am insane about preserving art. It might be somewhere — but that somewhere is probably 2016 french facebook, so as far as I'm concerned, trying to seek these out is a lost cause.
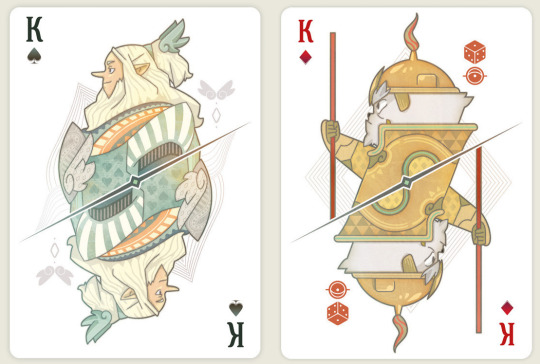
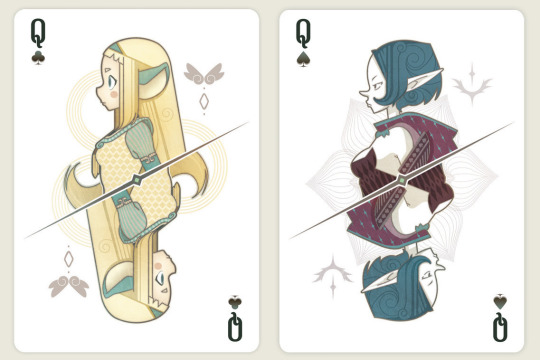
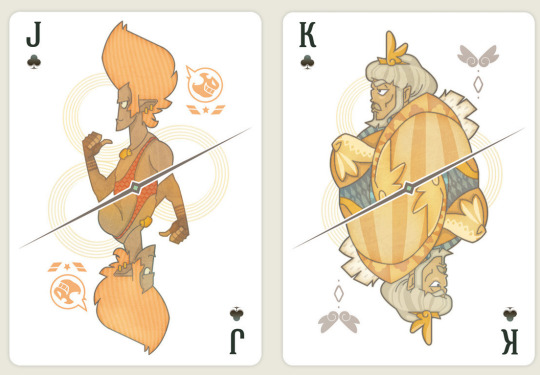
Exclusive Merch

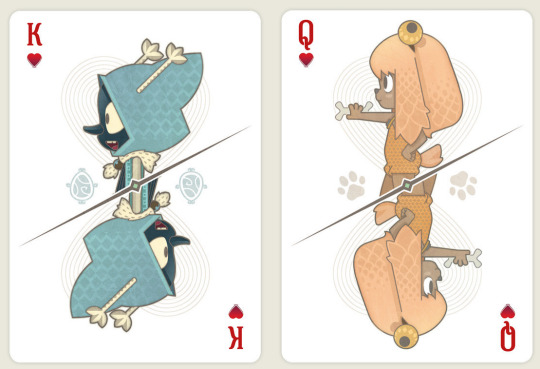
There were playing cards, and I am happy to report we DO have artwork for them in HD:

And also, here's a slightly higher definition little game sprite esque Joris:
This is the future crepinjurgenites want.
Kerubim VS Atcham Rigged Pet Contest
I am sad to report that Atchamheads have lost again, in this rigged contest. Imagine asking:
Would you like a fluffy guy you have watched an entire series about, or this bald guy who appears twice in the franchise?
At the very least, this gives us a canonical kitten Atcham design.
(Also, both of them were added, jsyk... Still salty though.)
Maliki Art
Maliki is a webcomic not made by Ankama, but with a long relationship and connection to Ankama due to being published by them in the past.
It's cute, really.
43 notes
·
View notes
Text
devlog 1 - cursor and the horrors of game making. the agony and such of making a rewrite fangame
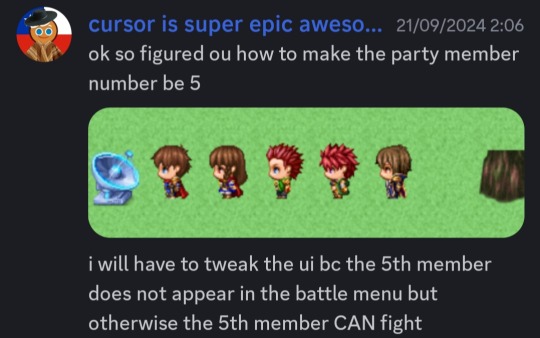
hello!! name's cursor/siffrin and i'm a poor loser making a fangame!! why did i commit to this i could have just made a fic but noooo i gotta pick up rpgmaker again
this devlog is made because. well. all devs do one ithink. also to write down my ocasional progress in this project!! this won't be monthly but whenever i have the time and got something to report yay. spare me from this hellhole
we begin 💥
ever since cookie run the darkest night got cancelled a few months ago and left us with only chapter 1 i did feel sad!! i liked the story!!! gingerbrave cool and fucking awesome moments. BUT!! because i am mentally ill,, i decided to rewrite the game myself and give it the ending it deserved to have!! will the ending be proper i dunno. i am still writing this stuff waugh. but hey it will have an ending at least
to gamedev stuff proper. i got rpgmaker mz around 2022 for the purpose of making a cr game still. an original one!! however after making a few stuff i left it in hiatus bc i had to focus on school (i still do. college is breathing on my neck dear lord). i still plan to continue that one but it will be after i'm done with this rewrite. in either way. i've been changing placeholder stuff for now,, such as menu icons and figuring out how to make the party have five members. also re learning how to use aseprite because i gotta make all sprites haha (breaks down)


i should remind folks that i am an artist/writer first and foremost. i will very likely go through pure trial and error while making and 'coding' all of this (why did i plan 14 chapters oh my godddd),, though i do have notes i took from the rpgmaker tutorial so i can refer to when i'm stuck whenever and hey!! forums are always a thing!! i wouldn't have figured how to have 5 party members if they weren't!!
to writing stuff. i've been planning the prologue and the locations of the first 3 chapters so far. as well as a vague idea of chapter 12 and the epilogue. with point A and point B set,, now i just gotta make the middle point. aka the rest of the game</3
the main party and a few relevant npcs and characters have already been set. as well as brainstoming stuff and showing said stuff to the gingerbrave council (personal friend server) for approval of sillyness. you guys are fucking awesome btw if you're reading this. also hi chat

mentally i've been setting a timeline of events. i plan to write these in a notebook so i can have them at anytime and not have to open my laptop whenever i get a cool idea. or dig through thousands of discord messages just to find an idea i wrote down in the moment. overall i believe writing (in comparison to art making and the game making process) will be the easier part for me. also i gotta decide for a proper name for the rewrite. naming it the same as the og is lame. i need something with more sauce. i'll figure it out. in the meantime. have this goober

i'm sure this should be it for this devlog!! hooray!! what have i gotten myself into!!!
in all seriousness i'm honestly pretty excited,, i really want to make this game work and for people to play it!! even if it might be a bit of a pain i really wanna finish this project so there's tgat
that's all. see you all in the next devlog whenever that might be 💥
#cursor speaks#darkest night rewrite#cookie run#cookie run the darkest night#gamedev#devlog#fangame#rpgmaker
11 notes
·
View notes
Text
Hello everyone! It’s time for another development blog!
Thank you very much for the support I received in the previous post! This time, the focus will be pixel art! In particular, we will talk about the creative process behind the new sprites of the remake.
As some of you may already know, MerúM is the artist in charge of the pixel art in Midnight Train. Let’s ask him some questions about it!
🌙🚂 Interview with MerúM 🚂🌙
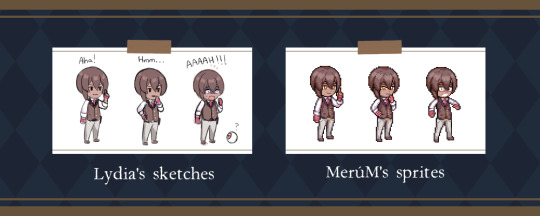
Lydia: First of all, could you introduce yourself?
MerúM: I call myself MerúM. I am the pixel artist of Midnight Train: New Moon, and I am in charge of the sprites and animations of the characters. I also worked on Aria's Story and the previous version of Midnight Train doing the same job.

Lydia: The character sprites in Midnight Train: New Moon look quite different from the original version. Is there any reason for this change?
MerúM: Well, before the switch to RPG Maker MV, I was already working on the new sprites and animations for the Midnight Train remake. However, once we changed programs, I noticed that the character sprites were very small compared to the current screen dimensions. I decided that this was a perfect opportunity to redo the sprites from scratch as well, increasing their dimensions and detailing them more than the previous version allowed me, without wanting to move them too far away from the previous chibi style.
Lydia: Right now, you already completed all the characters sprites for chapter 1. Was there any challenge or something you’re really proud about?
MerúM: After changing the sprites, the expressiveness of the characters has improved a lot. Characters now have many more unique animations and expressions, solidifying their personalities. I think this new style works very well with the aesthetic of Midnight Train’s world and makes them look quite unique from character to character.
Lydia: Could you describe your workflow and what programs you use to create your work?
MerúM: For my sprites, I use Aseprite. Before starting with a specific character, I tend to draw their base sprites and their walking animations. After this, I receive a list of events that will occur in the game related to those characters, and then I create the sprites and animations that fit into said scenes using the base sprites as a reference. Usually, I am in charge of designing how these scenes will look in pixel art, but with some more specific or complicated scenes I have received a quick sketch of how the sprite/animation should look like as a visual aid, and thus arrive at the version that best suits the scene.
Lydia: I’m just curious about something… Who is your favorite character from Midnight Train?
MerúM: I think all the characters are fantastic, maybe I could consider Neil Lawton my favorite. I think, in the end, we should all be a little like Neil. Even if you are afraid at first to move forward, just do it. This is what Neil does, he may be afraid, but he faces this fear to survive.
Lydia: Is there anything else you would like to tell us?
MerúM: What else could I say? I think Midnight Train: New Moon brings a story that will appeal to anyone who is passionate about mystery stories. By the way, it's fun to mention that in addition to Justice, Purity and some secondary characters, I have been the main designer of Larissa, one of the new characters in this remake. I hope you play Midnight Train: New Moon and get to know her!
🌙🚂 Progress 🚂🌙
I hope you liked the interview with MerúM! I wouldn't have been able to create my games without his help, as I'm pretty bad at pixel art. I'm excited to see all the sprites he will create for chapter 2! I personally can't wait to see Apollo's animations.
Now, I want to report about the development of the game.
I’m almost finished with the maps of chapter 2, so I expect to start programming this chapter very soon! Literally, there is only one map left…! I wanted to add a new puzzle to this map, so I’ve been stuck brainstorming ideas… Ahh, it feels like facing a final boss before proceeding to the next step.
Thank you a lot for your support and patience! See you next time~
60 notes
·
View notes
Text

(before anything: yes, I did stay up well past midnight just to work on this. I hope the time was worth the making of this artwork!)
“Above all, video games are meant to just be one thing: Fun for everyone.” - Satoru Iwata
It's been 9 years already.
Thank you for everything, Iwata-san. May you and your legacy still live on <3
Peach is wearing a black version of her normal dress, while sporting her alternative haircut from the first intermission of Paper Mario: The Thousand-Year Door.
Zelda is wearing a black version of her Breath of the Wild dress, which is a reference to when Iwata was alive during the development of the game, as well as the "Satori Mountain" location in said game.
Gardevoir, Delphox and Zero Suit Samus are all wearing originally designed dresses, although Delphox's dress is (very loosely) based on male Byleth's design from Fire Emblem: Three Houses.
Palutena is wearing a black version of her dress from Kid Icarus: Uprising, but with added mesh over her shoulders to make it less suggestive. She is also wearing a magatama bead on her neck, which makes sense given that she's a goddess. I actually decided at the last minute on drawing this to include her here because she was announced to appear in Smash Bros. at E3 2014, where we also got a snippet of Reggie Fils-Aime's and Iwata's Miis fighting each other on Palutena's Temple.
Made with Aseprite v1.3.7. Permission is not required to use, but credit is highly appreciated. Thank you!
#pokemon#fire pokemon#psychic pokemon#fairy pokemon#delphox#mega gardevoir#peach#princess peach#zelda#princess zelda#zero suit samus#samus#samus aran#palutena#kid icarus#kid icarus uprising#satoru iwata#iwata#satoru iwata tribute#super mario#the legend of zelda#metroid#fanart#fan art#pixelart#pixel art#aseprite#aseprite art
18 notes
·
View notes
Text
I realized I'd never made a process breakdown for my pixel art (at least, not one in a long time), so here's one for a test asset for a project I'm working on.
My current software of choice is Aseprite, and I almost exclusively use the pencil brush at 1px and the bucket tool. I use my mouse for everything but the sketch; tablet strokes are too unruly.
Images enlarged x4 for visibility; actual size is in the top right.
Sketch
I tend to start it like any other digital drawing, then scale the sketch down to the size I want the sprite. These aren't usually coloured, but this one wasn't originally intended for pixel art.
Lines & Greyscale blocking
Depending on the sprite, I'll do one or the other of these first, or do them at the same time. This is where I define the basic shapes and values (which parts are light and dark). In this case, I did the lines first and then blocked in the values.
I sometimes work with colour right away, but not usually.


Shading & Anti-aliasing
These are also things I work on simultaneously, usually moving from one area of the sprite to the next. I start by "softening" the internal linework by making it lighter greys depending on how much its meant to blend with the adjacent shape. Next, I block in the shadows and highlights, and add anti-aliasing pixels where I want it to look smoother.
During this step, I often end up making small changes to the shapes and linework as I refine the sprite. Readability is key to a good sprite, and precision is key to readability.


Colours
While on sprites like this I'm not keeping to a super restrictive palette, I do try to use as few colours as possible. I like to use "websafe" colours for the bulk of the sprite, but sometimes I use shades halfway between them for anti-aliasing.
I start by mapping the main gradient I want to use over the grey values. I use the bucket tool with "contiguous" disabled so that every pixel of the same colour is affected. My colour-picking philosophy could get it's own post, so I'm not going to go into detail about that here.
Next, I go over any areas that are meant to be different colours with their own gradients, trying to have at least some overlap with main palette. Finally, I tweak the anti-aliasing where necessary.

And there you have it. Here's the finished sprite at actual size:
Hope you found this helpful!
(Also disclaimer that the project this sprite is for is super early in development and all design elements here are subject to change lol)
#pixel art#art process#art reference#artists on tumblr#pixel art tutorial#Salem's clever art tag#long post
41 notes
·
View notes
Note
Damn I've been using rpg maker mv for a while now and I still don't know what I'm doing. Do you have any recommended tutorials? (Also your progress so far is amazing)
thank you so much! I still didn't know how the whole program works yet but the tutorials I used so far is here
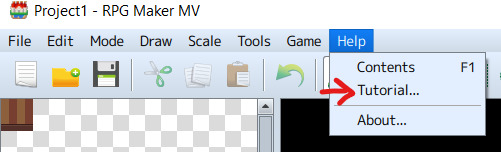

there is tutorial teach you how to use each program's feature step by step click from Help > Tutorial. I recommend going through this first because thee tutorial will prepare you from the start and it's also a very detailed tutorial
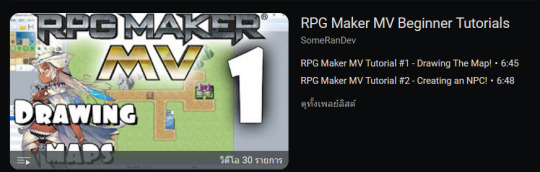
when I'm stuck at some point I mostly look up this guy's channel "SomeRanDev". The videos are straight to the point and easy to understand
I also used plugins from outer sources too (some original features are just not enough for me)
YEP_CoreEngine: help fix bugs in rpg maker and manage overall feature such as changing screen's resolution, character's parameters, change font stc)
YEP_MessageCore: help customize your dialogue more like using text code (similar to CSS) to change text's appearance (size, color, adjust time it takes for words to appear) access parameter to be shown in dialogue)
both plugins from above are made by the same person "Yanfly" and there are many more plugins by them too you can check them all out on their download page [download] [Yanfly wiki]
GALV_MessageStyles: this one help how you want your message box to look like (you can attach message box to characters or change the color, bg for message box) [download] [tutorial video of this plugin]
these are just main ones I used. There are many more plugins that looks really great but I haven't tried all of them yet
since I'm using aseprite to make sprite and tileset I followed these videos for how to make one
youtube
youtube
this is my example result for tileset btw

also be careful because there is many types of tileset (animated tileset, tileset for props and floor) I recommend look up this doc first (RPG Maker MV > Documentation > Asset Standards > Tileset Details) [link to rpg maker mv docs]
I used palettes from this website to draw all the props and tile set. There's ton of cool palette there that made for pixel graphic specially
in case you want to know my resolution set up I set it to 640*480 in YEP_CoreEngine (the original is 816*624) I minimize the size because the original one has window too big and make my character looks too small (you don't have to change it if you ok with original size but I like this one more)

this channel SigmaSuccour also have plugins showcase video and cool rpg maker MV tips too [link]
there's 90% chance that the question you might have maybe there's already peoples ask about it on forum here [link]
yeah I think that's all for me. I'm vey indulge in this program when I got it and look up TON of references (a few mistake there and there but well it's count as experience) I hope you get used to rpg maker soon!
30 notes
·
View notes
Text
First Post
12/9/2023
Hi, I'm Finian, and this is my first blogpost! I'm really into like every single artform, and my main passion is gamedev! I learned it in highschool, I'm working on it in college, and I hope to make it a career someday.
I'm very critical on myself, and I am very embarrassed to share any art I make, but I've wanted to make a blog for a little while. I think personal writing is fun. I recently received some advice that making a blog might strengthen my portfolio, so I was like "what the heck" and now here I am.
With that out of the way, this post will be about what I consider my first finished game. I did some stuff in highschool, but that was all in a website called code.org. I worked in Unity in my final year, but I served the role of mentor more than developer.
This game was created for my final project in my ENC1143 class, and shall be called my Multimodal Artifact. The assignment was to share what we'd learned over the year in any form of medium we wished, so I made a game. I've only previously done 2D games and I consider myself acceptable at pixel art, so I made a simple 2D platformer. All of my artwork was done in Aseprite and all code was written in Unity, with Visual Studio.
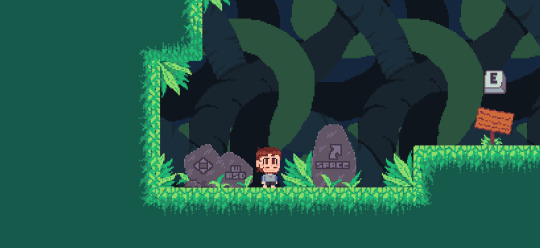
My intentions going into the game were mainly to let the player interact with the sign pictured above, which is something I've never done before. I also wanted the text on the sign to have a scrollbar. I started with an unanimated player sprite, and I made an incredibly simple ground texture, which I stretched to represent a wall. I coded the player's movement and interaction with the terrain. Once I was satisfied with the player's movement, I created some simple animations for idling, running, and jumping.

I then created a tileset of which I am extremely proud, as I've been struggling with grassy and leafy terrain for years. This is the second tileset I've ever made, and the first to perfectly link with itself.

Once I had my tiles in order, I replaced my gaudy primitive, and created the first area of the game as seen in the first image, albeit with significantly less foliage. I created enough level to comfortably house five signs; about half of the game. Finally I began work on the sign itself. The sign was probably the most important part of the game, as its writing is what I was mainly being graded on. There are nine signs in the game, each containing small pieces of the whole final assignment. I created a sprite for the sign in about 20 minutes, and tackled the text with a scroll view. I watched a very helpful video on how it worked, added my TextMeshPro font asset, and made a sign visual behind it all.

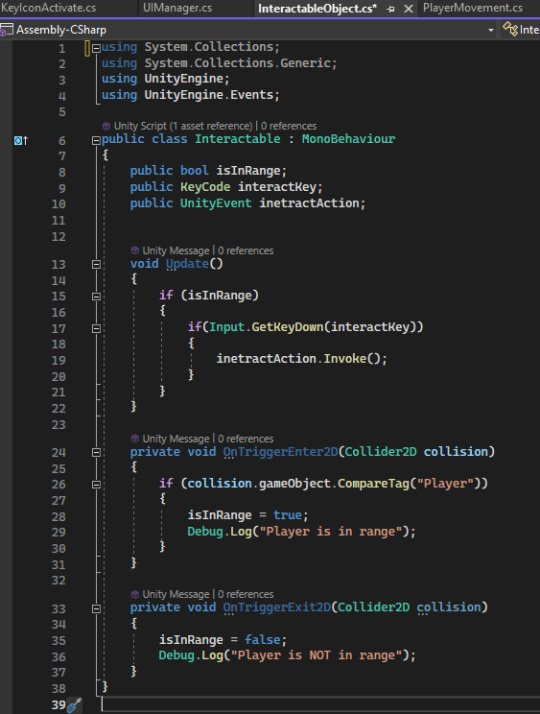
My sign was done, from a visual standpoint. I could finally tackle the code, which I did within two scripts. The first script, "Interactable" would be attached to the sign sprite via a child. The script was actually pretty simple, using OnTriggerEnter and OnTriggerExit in tandem with a circle collider 2D to detect if the player was near enough, and an if statement featuring the UnityEvent Invoke in its body. Invoke calls a function from another script, established in the inspector. In this case, I attached a script to the Canvas which disabled and enabled the sign GameObjects.
I also added to the sign sprite a key icon, again of my own making, to make sure the player definitely knows what to press. It has an animation which activates when the player walks near the sign.
Both the coding and the visuals for the sign are finally finished! My final steps for this game were:
1) finish designing the level
2) add some scenery
3) if I had time, a pause screen and maybe even a start screen
This was a single-level game, and since it was an english assignment that needs to be graded, I figured it ought to be very linear and very non-punishing. There are no enemies and no dying, so the difficulty had to come from platforming. The player can jump exactly three tiles high and seven tiles far. The game features one six tile wide jump and no necessary three tile high jumps. The first area, already completed features very easy one to three tile wide gaps.
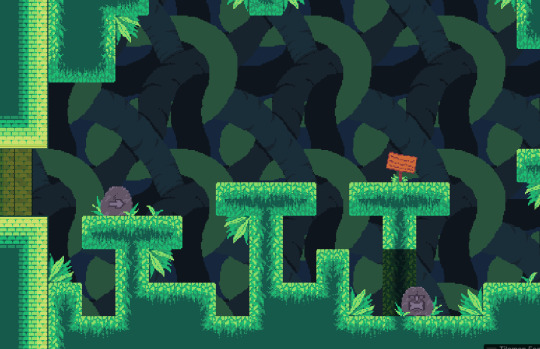
The area has the player go from the left of the level to the right, and eventually upwards and back to the left. Within the first zone, it is possible to fall After every new challenge there will be a sign as the player's reward: after the first jump, , two-tile wide jump, series of one-tile wide jumps (pictured above), series of two-tile vertical jumps, and finally after the first four-tile wide jump. There are some punishing jumps in the upper layer of this zone, which cause the player to lose some progress if missed.
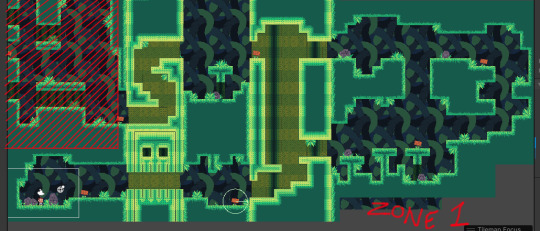
Before making any level past the first sign, I added a second tileset. I took my preciously mentioned first ever tileset, which was a greyish castle brick, and changed it to match my current palette. It's not perfect, but any imperfections are so slight nobody would notice unless they were specifically seeking them out. I added this tileset because I felt continuous jungle would start to get bland, and because I really wanted to get some use out of it. I think it fits in really well.
The second area of my game is a platforming section based off of the loss comic, a suggestion provided to my by my wonderful girlfriend. I think it's a lot of fun to involve others in the gamemaking process, and I think it's fun to work with a specific challenge in mind. I thought of something really fun to do with that idea almost instantly, and got to work.
For those who are unaware, the loss comic is a meme from 2002, which features this character format: I II
II I_
I tried loosely to stay within that format, I don't think it tracks very well, but the intention and setup is there.

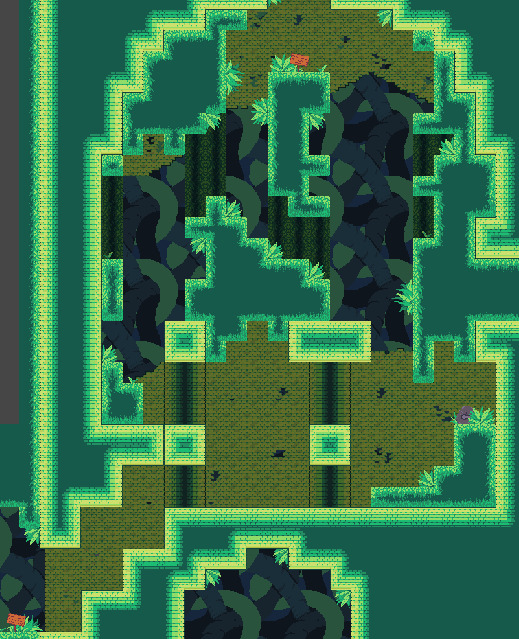
I wanted my third and final segment to be the most challenging, and I wanted it to be inside of the castle/temple setting, in hopes of making the play subconsciously go "oh, this area is different." Each area of the game has its subtle distinctions, but the distinction here is the least subtle.
The final area features a great deal of wide and high jumps, as well as the first and only head-hitter in the game. In the final set of jumps it is possible to fall back down to the start of the section, and the very last jump isn't very difficult. I think it sucks when you think you're almost done with everything in a game, and you mess up at the very end and have to start all over. I didn't want the player to feel that way, hence the easier last jump.
The level was done! My signs (the part I get graded on) were done! I could have some fun with the rest of the game, not that I didn't have fun with the entire previous process, this final bit was just leisure. I love programming.
I started with controls. I put the controls of the game as well as some arrows to point you the right way on rocks, which would not only fit well in the game's environment, but also served well to fill up empty-feeling areas.

After the rocks, I created some bushes. I considered making hanging vines, but I forgot about it somewhere in the creative process. There's obviously not as many of them as the rocks, but trust me when I say these suckers get some crazy mileage. They're everywhere, rotated for the walls and ceiling, flipped, darkened to appear more in the background, placed somewhat behind rocks. These four bushes were super important to the decoration of this game.

After the bushes, I adjusted the hue, saturation, and light of the tilesets to make them appear as background elements. I created the background of the game as a repeating tile. I am not confident in my ability to create a full artpiece, rather than smaller assets, and my wonderful girlfriend added some pixels which I feel made it look significantly better than my rendition. I hue shifted it, and it works excellently as the game's background.
My initial rendition (black was empty) and the final rendition
The final thing to do was to add a pause menu, which is also something I had extremely limited experience with, but found to be super easy. The code is just about the same as making the signs appear and disappear.

The game was not without its bugs, however. There were two that I wanted to fix:
1) sometimes while walking, the player would randomly get snagged and stop. I believed this to be an issue with the ground's collision
2) sometimes upon landing, the player would fly straight through the floor! I also believed this to be an issue with the ground's collision
I had the ground's collider set to a Tilemap Collider 2D, which is a collider designed specifically for tiles. The way a tilemap collider works is that it assigns a square shaped colllider to every individual tile, and would combine all of those collider together in order to save space if it were more efficient on the system. In my game's case it was not more efficient to combine them. However, combining them is exactly what would fix the first issue, the player snagging on the ground. I added a Composite Collider 2D to the tilemap, and viola! No more snagging. The player would still fall through the ground on occasion, but it happened to me so rarely I figured it would be a nonissue. I added a line of code that would set the player's position to the initial spawn if they went too far beneath the map, as well as the reset button in the pause menu which would do the same.
After these fixes I had my incredibly generous roommate playtest for me. He probably played for about thirty minutes, and he relentlessly fell through the map. It was amazing to me how often he just perfectly fell through the ground. Clearly, this was a bigger issue than I anticipated. Thank goodness for playtesters!
After some research, I realized the composite collider actually created an outline of the tiles, rather than completely filling them with collision. The player would fall through the ground because while falling, their velocity would continually increase. Since the collision of the ground was so slim, the player's high velocity would sometimes cause their collider to be on one side of the ground on one frame, and the other side of the ground on the next, not allowing for any collision to happen. The slim outline of the composite collider was not cutting it. There is a setting on the component labeled "Use Delaunay Mesh" which, when clicked, converts the collider from an outline to a full mesh.

The orange lines represent the collider
A Delaunay Mesh is a mesh based on Delaunay Triangulation, which is a complicated math term which can be simplified to mean the mesh has the least amount of big system-taxing triangles possible.
My roommate once again playtested for me, this time with no bugs at all. His thirty minute experience turned into a three minute experience. Magical!
There's more I would have liked to do, but my time ran out and I needed to turn the assignment in. I think I would have liked to make a starting screen, and maybe some hanging vines. If I had as much time as I pleased, I would've added walljumping and maybe some destructible decorations to make the player feel more involved.
I think the game was a success. This is my first game I can say I've actually completed, and I feel proud of how far I've come. If I were to do this again, I'd probably study the games "Getting Over It" and "Jump King," as in hindsight these games were fundamentally very similar.
The end! Thank you for reading my silly blogpost! This took way longer than I thought.
9 notes
·
View notes
Text
How I Rig a Pixel Live2D Model!
You made it! you've Made and Exported your own model! (if not maybe go back to a tutorial?).
We can now start the looongg rigging process, i'm planing on this more being a show and tell type of tutorial,
as live2D is honestly just easier to understand if you can see what im talking about while i do it.
This is part 3 in a line of Tutorials on building your own pixelmodel!
Tutorials on Steam
How to build up your Pixel-Live2D-Model
How to Export a Pixel-Live2D-Model from Aseprite to Live2D Cubism
How to Rig a Live2D Pixel-Model
Tutorials on Newgrounds
How to build up your Pixel-Live2D-Model
How to Export a Pixel-Live2D-Model from Aseprite to Live2D Cubism
How to Rig a Live2D Pixel-Model <- You're here
okay This is the model we're gonna be working on!
(This is HaybleneVT btw, she's pretty cool)

(^ extra stuff, big icon for Vtube Studio + .ico file for desktop deco)
I use a lot of deformers to move around more then one object now, like on the pupils are a good place to place them all in the same deformer and then moving that.
X-Y-Z Head Params
This time i made something different for the front and back hair, i made a front hair and a back hair. but the front hair's outline is split into another layer. like this

this made a cool effect where when the front hair exits the outline of the back hair, then another backup outline reveals it self like in This video


The extra outline works pretty well even up at diagonals, remember to synthesize corners!
The Z axis is very simply just a rotation deformer on a deformer containing all of the head,
(remember that the back hair may be behind the body!)
The Eyes
Now on to the Eyes :>

this is how my eyes look
The Smug is placed Bellow the eye and is moved up one pixel when i want to make a smug expression, i normally set it to eye smile, but it can become messy, so if that happens to you too, then it could good to place it as an expression instead!
I move the Warp deformer of the Pupils around to make the X Y of the eye params.

The eyes frames switch between each other by using opacity and making them overlap into each other, this makes a pretty fluid eye movement,
though if can become messy looking if eye tracking is not set up correctly, when the eyes loose tracking in a program like vtube studio then, it can become ghost-yish[?].
i've set up this type of eyebrows this time


first and formost i set up all the X & Y was set up by moving the Deformers for Eyebrow L and R.
And this time i also made a Eyebrow Angle, the eyebrows snap, as if was on opacity then it would be very easy for it to look *ghosted*. you can use snapping by placing a keyframe on the two end ones,
but then deleting every other keyframe for it. this makes it snap when a keyframe Jumps to another now active one
Mouth Params
The Mouth Params are basicly the same as the eye brows are!


just remember that 1 = Smile 0.5 = in between 0 = frown.
The Body Params
The Body params is what i use to make the Legs and Arms work, when looking up the arms go in-ward to the body, the same is what i do with the legs

Ending off
Thats about it, now just make a texture atlas, and export everything.
Extra Resources
Live2D Docs
I dont have much more for you here! i hope your model turned out fantastic! if not then you can always try again! pratice makes perfect. you can check me out on Twitter and if you have any questions feel free to ask in the comments, or if you want to show me what you've made, then feel free to dm on Twitter! - Grat
20 notes
·
View notes
Note
Hey i was wondering what program / programs you used for your last artwork? ive been wanting to get into pixel art and that weird gradient dot art but i dont know where to start 👍
"weird gradient dot art" djfdfj
i made my last one on flipnote studio 3d, which is an old program for the nintendo 3DS. it gives for a very specific look because of its format and the ability to turn photos into pixel art easily and directly, but apart from that ability it's more about specific restrictions, you could technically recreate everything about it in other programs.
what i use most often for pixel art is a program called aseprite. i used photoshop for a few years but aseprite is specifically made for pixel art so it's much more comfortable and efficient, i really recommend it. it's also made with animation in mind.
iirc, it's cheaper to buy it through steam than directly from their website, but anyway it's a one time purchase and it's very worth it IMO. There's also a free trial where you cannot save but you can try out the program and see if you like it. the interface may be confusing at first but there's a lot of resources online and on their same website.
if you don't want to spend any money, i recommend you either just use ms paint for simplicity (i've seen some people do wonders with it), or use any free digital painting program such as gimp, and draw on small canvases with the pencil tool. you could also try dotpict or pixel studio on a phone or tablet.
as you can see from my wall of text there's many options :) you just have to take the time to see which one works better for you. there's also premade color palettes and tutorials on lospec, and the pixel art community is pretty active on twitter from what i've seen.
hope i could be of help!
12 notes
·
View notes
Text
TheCaptainCoder Game Jam
To start this development blog I will be entering into a game jam hosted by TheCaptainCoder (Twitch Name). Link to the jam below:
This game jam in particular caught my interest because it is geared towards learning over creating the strongest game. So in line with the competition I will be uploading here every day for two weeks, documenting my progress and sharing what I have learned.
This will be my first time entering a jam, and also my first time sharing my work in public of any kind. My goal is to learn the process of making a game, to fully go through planning, development, and releasing a small project and all of the details in between.
For this game jam here are the tools I will be using:
Game Maker Studio 2 -- I have some experience of working with game maker, however I have never got further than a few days into a project, before losing interest, forgetting about it or feeling so stuck and annoyed I didn't want to continue. As I have the most familiarity with this engine, it makes sense to carry on learning how to use it. Also, I have the license for it, which I highly recommend as its one flat payment of around 100.00 GBP
Aseprite -- Aseprite is a fantastic and cheap tool for pixel art. It has everything I need to create simple artwork for a game including animation tools. I love the simplicity of it so that is why I will be using it.
FamiStudio -- I do not know much about this software apart form its good for 8 bit audio, so I will be learning this software as I go through this game jam.
I will also be using google drive to store all the documents I create while working on this project.
I have tried many times in the past to make a game, and I struggle with seeing things through to the end, so I am hoping this really helps me to learn to see my projects through, as well as gaining new skills, and a better understanding of game design and development.
Good luck to everyone taking part and thank you to TheCaptainCoder for hosting the jam.
1 note
·
View note
Text
Learn You a Game Jam: Pixel Edition - Devlog 02
Took that tileset and added duplicates of some of the objects but with a white outline so I can highlight whichever object the player is hovering over or holding.
Currently working through some designs for the ghost, thought this one was funny because if you let your eyes go blurry it looks like he groovin

This was just my first attempt, I literally just used the spray tool in aseprite and made a squiggle. I kind of like the way the white and grey make it look like it has a face split down the middle, ENA style, I'll try to incorporate that into the final design. Might also give it an actual face.
Update:
Think I found a design I like, could change later if I end up having time, but for now this will work

Can't export the gif because it has transparency but I like the blurry effect. Used the same airbrush technique for the bottom wispy bits, then hit the thing with the blur tool.
Previous|Next
0 notes
Text
Group Project Evaluation
Personally I found the group project to be quite a tough, challenging experience that had many difficult moments especially during its first half, but as time went on I found it easier to handle and in the end I would say that it was a positive experience that helped me learn a lot more about modelling and sprite work and helped me be a tiny bit more socially confident.
To start with by far the toughest aspect for me was just trying to reach out to my teammates especially when in person, but once I was able to do that for the first time it became easier, though still difficult, each subsequent time and eventually it reached a point where I didn’t have any issues with communicating through online apps, primarily Discord.
When it comes to positives, no doubt in my mind was the experience with further learning MagicaVoxel and Aseprite one of the best parts. Being familiar with those pieces of software beforehand already made them my preferred choice when it came to actually making models and textures, but I felt I was able to actually improve my skills in a far more noticeable way than any other piece of work I can think of in the last year, especially with the modelling in MagicaVoxel. The main aspect that makes me think this way was that I actually went back to overhaul some of my previous models, which is something I really haven’t done before. Previously with any of my projects, personal or for educational, I’ve generally just made a brand new model when I feel I need more decoration. This wasn’t a bad practice, usually because I ended up making something I didn’t already have, but it did result in a lot of “unique” models looking very similar/having very obvious inspired roots from the other models. With this project I had more confidence with spending more time adding more details, changing massive portions of the models and making them look far less basic while also giving them far more defined identities even if they were very visually similar.
Another skill I feel I more experienced with is the use of tiling sprites in Aseprite. I am incredibly happy with how well all of the tiles sync together and I think they are a beautiful compliment to the models I’ve made. This project is the first time I’ve been able to see sprite textures and voxel models I’ve made combined into an environment in a game engine and I am blown away with how good they look together.
0 notes
Text
Week 3
I simultaneously feel like I did a lot this week and nothing at all. I started off the week not really feeling it, to be honest. I didn't start on the second floor yet, but I did end up doing some small(?) essential things.
First, a new logo! I made a simple thing in Aseprite to use as a splash screen and ended up using some stuff I learned today to make this thingamajig.
I'm only allowed to upload one video per post, so I'll try to talk about everything in order, and maybe I'll do some screenshots.
First up, this proof of concept thing I've been wanting to try for a little while. It is very sloppily put together and not meant to be like a professional level thing. But, basically, I used the 3D space in Godot to make a little logo thing and record it with Godot 4's built-in moviemaker. I will be thinking of ways to use this in the future, probably. I do a lot of graphic design type stuff like that for my steam. I don't know if Godot is easier for this kind of work, but I feel like I can make anything with it. So, I'll probably continue to do just that.
The second part of the video is a Sage Wall ability that I made for practice. Like I said, I wasn't really feeling the project a lot this week and I wanted to just do something adjacent. I don't remember where, but I remember someone saying you should just steal mechanics for practice, so I opened up Valorant and picked one out. Most of the abilities in Valorant are meant to be used on another player, so the wall made the most sense. Also, I think my ultimate goal is to work on an immsim so making random abilities is good practice.

Along with the wall, on this day, I ended up working toward making a sort of modular character controller. I can add abilities to it and all that stuff. I'm pretty happy with it as a start. I'll probably start my controller from scratch at some point, but it is good practice and I really enjoyed this work.
One practical thing I accomplished this week is a working vault system. Previously my system relied on Areas and Signals, which was a super janky solution IMO. And required me to designate vault-able areas and the player was phasing through walls and stuff, it was bad. I was just doing some work in a call with the boys when I started working on using RayCast nodes for the vaulting system. I couldn't figure it out on this night and ended up just really optimizing the previous version (It still wasn't great). So later on in the week I sat down and really worked out the RayCast version, and I'm happy to say, I actually got it working how I wanted. Movement feels a million times better now.
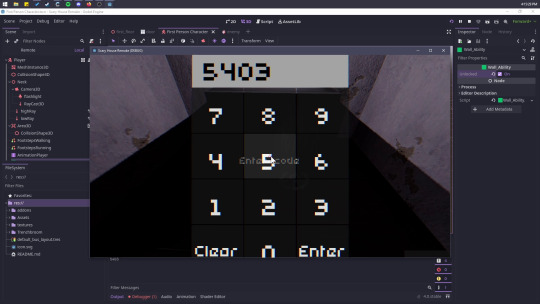
The first thing that I did this week: I didn't feel like doing anything this day and just opened the project to see what I could poke at. Next thing I knew I had a working safe system with a randomly generated code and figured out how to include the code in a note. Very cool. I wanted to kinda scope my way around this, but I think it is necessary for the game, despite how short it is going to be. It adds a small bit of variety to the game, IMO.
I also messed with lighting for like 2 days straight. I practiced baked lighting, which is something I actually haven't messed with since I first started learning game dev on UE5. It looked pretty good and brightened up a lot of dark areas that have been frustrating me. I know how to solve these issues when it is time to finalize lighting, and that's a weight off my shoulders.
I think I'm ready to just build out these levels. It honestly doesn't feel like a lot of work, but all the fun programming stuff is basically done, and I kinda want to move on to doing other things. I feel like I learned a lot this week despite not really feeling like doing anything, and I'm looking forward to applying them to something new. I woke up in the middle of the night to piss and while I was pissing I was thinking of ways to make X mechanic. It is a blessing and a curse. After this project, I think I'll be ready for another Game Jam.
I may start posting more frequently to chip away at this long weekly post. I could probably even be more detailed but at the same time I feel like I'm constantly busy these days so who knows.
0 notes
Text
OMORI SPOILERS
Song : "【Omori Song】 Endless by @OR3O ft. @Kuraiinu"
YT link : https://www.youtube.com/watch?v=xVBbnJZjJ3s
Spotify link : https://open.spotify.com/user/khfje5c59z3ip8hq65302fqy8
Original game : "OMORI" by OMOCAT https://store.steampowered.com/app/1150690/OMORI/
Level editor from "Rhythm Doctor" by 7th Beat Games
https://store.steampowered.com/app/774181/Rhythm_Doctor/
None of the images used for backgrounds are mine (Except for that Blackspace image). Characters are from the game "OMORI", and their sprites in this level are made by me.
Under the cut is just my ramblings in the making of this WIP (Warning : LONG and rambly lol)
A project I hyperfixated on for a week before I dropped it and came back months later having no clue what I just did in the "coding" aspects of it lmao

I dropped it due to the fear of legal issues regarding the use of assets of the game/screenshots as the BG (I asked someone about it, and they said I should avoid using assets directly for the game and I backed off. Well, I still used the Otherworld sky and the Sunny's room, but I'm not distributing the level nor am I profiting off of it)
The Rhythm doctor community is one of the nicest, most welcoming community I've seen, and I honestly respect the amount of discipline it comes with custom levels and the permissions side of things. It takes a lot to get your work recognized somewhat in the non official custom levels community, and from what I saw in their discord, the quality control is pretty good.
This however *chuckles*... is probably not going to be on par, and won't be for a long time. I'm not sure if I'm even cuing things correctly, (People were appalled at one part of the beats I put lmao, I figured a lot of my other beats were probably "illegal" (meaning bad/unfair or not very fun to play) but I was too much of a wuss to ask for more feedback ;_;)
To make a decent level takes a lot of practice, and also decent knowledge of rhythm games and how Rhythm Doctor works as a game. But, as you've heard a million times, I had fun in my high.
Doing the sprites were pretty fun! Well, fun in the beginning when I thought about making this AwEsOmE level, fun in the end as I looked at the work I did, but absolutely hair pulling when I was actually doing it lmao.
The official guide was lacking in resources I needed to pump out these custom character sprites (I attempted to look into trying to code them in manually, matching it with the one on the guide, but as you may have guessed, I never got too far lol). The RD discord is a saint and sent a link to a convenient .json maker and many hours were spent on me messing up the sprite placement, constant revisioning of sprites because I missed a pixel or two like a dumbass, or I had a spontaneous idea and wanted to do some funky things with the sprites.
I used Aseprite's lite version and had to do some bizarre things to get around their "no export" limitations before I learned there was a way to make a free version of it.. somehow. Someone once again on Discord gave me a pretty in depth guide, but I've long since logged back on Discord again and it's probably burried under thousands of messages now. Thanks anyways guy.
Lore notes :
For any of you who's concerned as to why Omori is smiling, it's because I had a headcanon at the time that Omori was originally some sort of self insert/Mary sue character. Sunny hated his own identity, but he still wanted to escape back to his friends again, just with a different name, appearance, and personality.
Omori, Sunny's new identity felt elated at first in the dreamworld. But maybe Sunny regularly experienced breaches of Blackspace more often and was sometimes even stuck in it. He became more jaded as time went on, as more loops happened. He found that the best way he found to numb the pain was just burying it. Not acknowledging the darker parts of his mind when it's all locked away somewhere far away. Omori then sort of evolved as a concept, and what was once under Sunny's control turned into an uncontrollable impulse/habit to run away and bury his problems.
Why did Omori stab himself in the fear sequence and not in White Space? ¯\_(ツ)_/¯ I couldn't think of a better transition lol
Anyways, I was in love with Rhythm Doctor, both in its story and gameplay, and I was kinda obsessed with Omori too, so I attempted to mash 'em together and called it a day. It's got a lot of flaws, you might think it was a random as hell crossover (on brand as always lmao). Dunno if I'll ever pick it up again, but I think it's still an entertaining watch 👀
#omori#rhythm doctor#omori kel#omori aubrey#omori hero#omori mari#omori sunny#omori fanart#abandoned lol#but I'm still really proud of what I created#especially since I looked at my spaghetti code months later and wondered how tf did I make this work?
56 notes
·
View notes
Last Seen Blogs

cardboard-man
Cardboards Empire

alarecherchedelaverite12
Sans titre
carcinc
CG

racquelluv
RacquelLuv

caraudioshopping
Car Audio Shopping