#AutoHotkey User
Explore tagged Tumblr posts
Visit Tumblr Blog
Explore Tumblr blogs with no restrictions, modern design and the best experience.
Last Seen Tumblr Blogs


Fun Fact
Women make up for the other 50% of Tumblr’s audience.
Text
AutoHotkey User Map: Where are you❓
Want to meet other AutoHotkey users like yourself? Take a look below and see if anyone is close to you and be sure to add yourself! This AutoHotkey User Map is a great way to find others that have common interests. AutoHotkey User Map
View On WordPress
0 notes
Text
the rising population of right-wing feminism and gender critical individuals on this website has become a major safety, peace of mind, and mental health issue for transgender individuals who are just trying to blog in peace,
if we could easily block all of them, it could reduce targeted harassment and mass report campaigns.
however it is very tedious to find and then block all of these people.
i started a list that can help us keep track of them and, i made a script to automate the process of blocking them.
the password is password
it is very simple, made in autohotkey. you can right click and open it in any text editor if youre suspicious.
it pulls urls from a text file called "list" and then blocks them all. it takes a few minutes to execute.
keeping the list updated and adding the most dangerous/problematic individuals will have to be a group effort.
the list i created has about 200 people, i tried to prioritize high profile, high aggression , and users i've seen harassing and dogpiling others most. if you know any users like this please use the submit or ask feature to share, so that i can add them.
if you dont trust my script, you can view just the list here, and make your own.
121 notes
·
View notes
Text
the problem is that if you're enough of a power user to benefit from using an autohotkey script, you probably both already use autohotkey extensively and derive a pleasure that rivals the erotic from doing so
4 notes
·
View notes
Text
in my defense my current laptop is nearing a decade old and has two broken keys (AS IN COMPLETELY NON-FUNCTIONAL NOT JUST A KEY CAP BEING OFF) and ONE OF THEM IS THE LETTER E....
ive had to find ways to remap the E key at the very least bc copying and pasting it is a pain. for some reason actually remapping it would do NOTHING so i had to use autohotkey scripts to remap them........
but ofc that only works on windows so when i boot linux idk what to do (im retarded im not really an experienced user w any linux distros) . wlel i just copy and paste but it gets so old. and even copy-pasting is annoying as shit bc the letter V is the other broken one. you know. i cant fucking ctrl+v so its an even BIGGER pain in the fucking ass than normal.
anyway all this to say i fucking splurged because i wanted as much future-proofing as possible. and ofc i also prioritized the build quality a lot bc i dont want to end up dealing with non-functioning keys..... I'd rather it be somewhat viable for 10 years. maybe even more bc apparently the ram and gpu/cpu are upgradeable? well theyre not soldered to the board so it's possible if they're the right size at least ig. but would be amazing bc if i need to upgrade i can just go all out on that shit. i mean the screen isnt super duper amazing (it's like a 2K IPS screen) so idk that may still be a reason upgrade but eeehhh. maybe i will actually be knowledgeable enough to do something about it if possible by that point?? but either way. if it lasts 10 years I'll be happy.
id get a desktop but the issue is uhhh my space is a mess always and I'd rather have something really easy to move around. eventually one day maybe (but idk bc i want to be nomadic anyway.... maybe ill find ways to build my own though)
#I could google how to remap the keys on the distro family of the linux os i use ig but ive been busy with other things lmao#(trying to genericize google trademark so they can lose their rights :3)
3 notes
·
View notes
Text
Consumer ARM is going to be one hell of a sell to non-mac users until there's either a way to efficiently and reliably emulate x86 programs on it or AutoHotKey gets an ARM version
2 notes
·
View notes
Text
The Ultimate Guide to Windows 10 Keyboard Shortcuts
Windows 10 is packed with useful features, but nothing boosts productivity like mastering keyboard shortcuts. These shortcuts save time and make navigating your system a breeze. In this guide, we’ll explore the most essential Windows 10 keyboard shortcuts and some lesser-known ones that can significantly enhance your workflow.

Table of Contents
Introduction
Basic Keyboard Shortcuts
Copy, Cut, Paste
Undo, Redo
Select All
Windows Key Shortcuts
Basic Windows Key Functions
Advanced Windows Key Shortcuts
File Explorer Shortcuts
Navigation
File Management
Virtual Desktops Shortcuts
Creating and Managing Virtual Desktops
Switching Between Virtual Desktops
Command Prompt Shortcuts
Basic Commands
Advanced Commands
Accessibility Shortcuts
Magnifier
Narrator
High Contrast
Browser Shortcuts
Microsoft Edge
General Browser Shortcuts
Customizing Keyboard Shortcuts
Conclusion
1. Introduction
Keyboard shortcuts are a crucial part of using Windows 10 efficiently. By reducing reliance on the mouse, you can perform tasks more quickly and keep your workflow uninterrupted. This guide covers essential shortcuts and dives into more specialized ones, providing a comprehensive resource for users at all levels.
2. Basic Keyboard Shortcuts
Copy, Cut, Paste
Ctrl + C: Copy selected item
Ctrl + X: Cut selected item
Ctrl + V: Paste copied/cut item
Undo, Redo
Ctrl + Z: Undo an action
Ctrl + Y: Redo an action
Select All
Ctrl + A: Select all items in a document or window
3. Windows Key Shortcuts
Basic Windows Key Functions
Windows + D: Show or hide the desktop
Windows + E: Open File Explorer
Windows + L: Lock your PC
Advanced Windows Key Shortcuts
Windows + Tab: Open Task View
Windows + I: Open Settings
Windows + S: Open Search
Windows + X: Open Quick Link menu
4. File Explorer Shortcuts
Navigation
Alt + D: Select the address bar
Ctrl + F or F3: Search in File Explorer
Ctrl + N: Open a new window
File Management
Ctrl + Shift + N: Create a new folder
Alt + Enter: Open properties for the selected item
F2: Rename selected item
5. Virtual Desktops Shortcuts
Creating and Managing Virtual Desktops
Windows + Ctrl + D: Create a new virtual desktop
Windows + Ctrl + F4: Close the current virtual desktop
Switching Between Virtual Desktops
Windows + Ctrl + Left/Right Arrow: Switch between virtual desktops
6. Command Prompt Shortcuts
Basic Commands
Ctrl + C: Copy selected text
Ctrl + V: Paste text
Advanced Commands
Ctrl + Shift + Plus (+): Zoom in
Ctrl + Shift + Minus (-): Zoom out
7. Accessibility Shortcuts
Magnifier
Windows + Plus (+): Open Magnifier and zoom in
Windows + Minus (-): Zoom out
Narrator
Windows + Ctrl + Enter: Turn Narrator on or off
High Contrast
Left Alt + Left Shift + Print Screen: Turn high contrast on or off
8. Browser Shortcuts
Microsoft Edge
Ctrl + T: Open a new tab
Ctrl + W: Close the current tab
Ctrl + Shift + T: Reopen the last closed tab
General Browser Shortcuts
Ctrl + L: Highlight the URL
Ctrl + Tab: Switch to the next tab
Ctrl + Shift + Delete: Open the clear browsing data options
9. Customizing Keyboard Shortcuts
Windows 10 allows customization of certain keyboard shortcuts to better suit your workflow. To customize, you can use third-party tools like AutoHotkey, which provide extensive options for creating and managing your own shortcuts.
10. Conclusion
Mastering Windows 10 keyboard shortcuts can dramatically increase your productivity and streamline your tasks. Whether you are a beginner or a seasoned user, incorporating these shortcuts into your daily routine will save you time and effort. Keep this guide handy as a reference and start practicing these shortcuts today.
External Authoritative Sources
Microsoft Support: Keyboard shortcuts in Windows
How-To Geek: The Ultimate Guide to Windows 10 Keyboard Shortcuts
Lifewire: Essential Windows 10 Keyboard Shortcuts
By incorporating these detailed steps and tips, you can take full advantage of Windows 10 keyboard shortcuts, making your computing experience faster and more efficient.
#1.#Windows10#2.#KeyboardShortcuts#3.#WindowsShortcuts#4.#ProductivityTips#5.#WindowsTips#6.#TechTips#7.#ComputerShortcuts#8.#WindowsGuide#9.#VirtualDesktops#10.#FileExplorer#11.#AccessibilityShortcuts#12.#CommandPrompt#13.#MicrosoftEdge#14.#BrowserShortcuts#15.#TechHacks
0 notes
Text
autohotkey users hard at work making their computer usage more efficient by changing every input on every device to control volume
0 notes
Text
It's not a commercial app. It's by tumblr user neilcicierega
what is that goddamn program that keeps a small timer on your screen and counts your working time/time that you clicked away from your work software
#google images beloved#exact search was: timer AND 'click away' -countdown#may ye eunectes art be complete#I'm assumin#edit: updated the username
14 notes
·
View notes
Text
6 Reasons Why Every Windows User Needs to Learn AutoHotkey
6 Reasons Why Every Windows User Needs to Learn AutoHotkey
6 Reasons Why Every Windows User Needs to Learn AutoHotkey Are you tired of repetitive tasks taking up valuable time on your computer? Do you wish you could easily automate certain processes to increase your efficiency? Look no further than AutoHotkey, the powerful scripting language that allows you to customize and automate actions on your Windows computer. Here are 6 reasons why every Windows…

View On WordPress
0 notes
Text
this worked btw LOL. scrolled to the bottom of my drafts while eating a sandwich 👍
does anyone know if using like autohotkey or smth equivalent to scroll through my drafts would get me banned for botlike behavior or whatever. i’m trying to move a bunch of drafts into my queue after being away for the better part of a week, and i have a ton of drafts, so having to manually scroll back to my place after every time the tab crashes is annoying asf
#text#tumblr please continue to not ban me. i am a simple power user exploring the edge cases of your web app#this is so funny tho. like i used to use autohotkey as a kid to get an advantage in poorly coded web games#i'm glad it still exists
10 notes
·
View notes
Text
Comment Utiliser AutoHotkey pour changer de bureau virtuel dans Windows 10
L’une des meilleures fonctionnalités de Windows 10 est la vue des tâches, que vous pouvez utiliser pour créer des bureaux virtuels. Ces bureaux sont un excellent moyen de distribuer et d’organiser les fenêtres de vos applications ouvertes. Vous pouvez appuyer sur Win + Tab (maintenez la touche Windows enfoncée et appuyez sur Tab) pour les voir dans la vue des tâches.
Cependant, une fonctionnalité non fournie par Microsoft est la possibilité de basculer instantanément vers un bureau virtuel spécifique avec un raccourci clavier. Par exemple, si vous êtes sur le bureau 2 et que vous souhaitez passer au bureau 6, vous devez maintenir Win + Ctrl enfoncé et appuyer quatre fois sur la flèche droite. Il serait beaucoup plus facile d’avoir un raccourci qui passe automatiquement au bureau numéro 6, quel que soit le bureau que vous utilisez.
Ce didacticiel vous montre comment créer des raccourcis clavier pour basculer directement vers n’importe quel bureau virtuel par numéro. Nous accomplirons cela en utilisant l’utilitaire Windows gratuit, AutoHotkey.
Création du script
Le programme d’installation se ferme et un nouveau fichier texte s’ouvre dans le Bloc-notes. Le fichier sera notre script. (Un script est un fichier en texte brut qui contient une série de commandes à exécuter par un autre programme, dans ce cas, AutoHotkey.)
RemarqueLe script de cette page est basé sur Windows Desktop Switcher, un script open source hébergé sur GitHub
Copiez et collez le script suivant dans votre document Bloc-notes:
; Globals DesktopCount = 2 ; Windows starts with 2 desktops at boot CurrentDesktop = 1 ; Desktop count is 1-indexed (Microsoft numbers them this way) ; ; This function examines the registry to build an accurate list of the current virtual desktops and which one we're currently on. ; Current desktop UUID appears to be in HKEY_CURRENT_USER\SOFTWARE\Microsoft\Windows\CurrentVersion\Explorer\SessionInfo\1\VirtualDesktops ; List of desktops appears to be in HKEY_CURRENT_USER\SOFTWARE\Microsoft\Windows\CurrentVersion\Explorer\VirtualDesktops ; mapDesktopsFromRegistry() { global CurrentDesktop, DesktopCount ; Get the current desktop UUID. Length should be 32 always, but there's no guarantee this couldn't change in a later Windows release so we check. IdLength := 32 SessionId := getSessionId() if (SessionId) { RegRead, CurrentDesktopId, HKEY_CURRENT_USER\SOFTWARE\Microsoft\Windows\CurrentVersion\Explorer\SessionInfo\%SessionId%\VirtualDesktops, CurrentVirtualDesktop if (CurrentDesktopId) { IdLength := StrLen(CurrentDesktopId) } } ; Get a list of the UUIDs for all virtual desktops on the system RegRead, DesktopList, HKEY_CURRENT_USER, SOFTWARE\Microsoft\Windows\CurrentVersion\Explorer\VirtualDesktops, VirtualDesktopIDs if (DesktopList) { DesktopListLength := StrLen(DesktopList) ; Figure out how many virtual desktops there are DesktopCount := DesktopListLength / IdLength } else { DesktopCount := 1 } ; Parse the REG_DATA string that stores the array of UUID's for virtual desktops in the registry. i := 0 while (CurrentDesktopId and i < DesktopCount) { StartPos := (i * IdLength) + 1 DesktopIter := SubStr(DesktopList, StartPos, IdLength) OutputDebug, The iterator is pointing at %DesktopIter% and count is %i%. ; Break out if we find a match in the list. If we didn't find anything, keep the ; old guess and pray we're still correct :-D. if (DesktopIter = CurrentDesktopId) { CurrentDesktop := i + 1 OutputDebug, Current desktop number is %CurrentDesktop% with an ID of %DesktopIter%. break } i++ } } ; ; This functions finds out ID of current session. ; getSessionId() { ProcessId := DllCall("GetCurrentProcessId", "UInt") if ErrorLevel { OutputDebug, Error getting current process id: %ErrorLevel% return } OutputDebug, Current Process Id: %ProcessId% DllCall("ProcessIdToSessionId", "UInt", ProcessId, "UInt*", SessionId) if ErrorLevel { OutputDebug, Error getting session id: %ErrorLevel% return } OutputDebug, Current Session Id: %SessionId% return SessionId } ; ; This function switches to the desktop number provided. ; switchDesktopByNumber(targetDesktop) { global CurrentDesktop, DesktopCount ; Re-generate the list of desktops and where we fit in that. We do this because ; the user may have switched desktops via some other means than the script. mapDesktopsFromRegistry() ; Don't attempt to switch to an invalid desktop if (targetDesktop > DesktopCount || targetDesktop < 1) { OutputDebug, [invalid] target: %targetDesktop% current: %CurrentDesktop% return } ; Go right until we reach the desktop we want while(CurrentDesktop < targetDesktop) { Send ^#{Right} CurrentDesktop++ OutputDebug, [right] target: %targetDesktop% current: %CurrentDesktop% } ; Go left until we reach the desktop we want while(CurrentDesktop > targetDesktop) { Send ^#{Left} CurrentDesktop-- OutputDebug, [left] target: %targetDesktop% current: %CurrentDesktop% } } ; ; This function creates a new virtual desktop and switches to it ; createVirtualDesktop() { global CurrentDesktop, DesktopCount Send, #^d DesktopCount++ CurrentDesktop = %DesktopCount% OutputDebug, [create] desktops: %DesktopCount% current: %CurrentDesktop% } ; ; This function deletes the current virtual desktop ; deleteVirtualDesktop() { global CurrentDesktop, DesktopCount Send, #^{F4} DesktopCount-- CurrentDesktop-- OutputDebug, [delete] desktops: %DesktopCount% current: %CurrentDesktop% } ; Main SetKeyDelay, 75 mapDesktopsFromRegistry() OutputDebug, [loading] desktops: %DesktopCount% current: %CurrentDesktop% ; User config! ; This section binds the key combo to the switch/create/delete actions LWin & 1::switchDesktopByNumber(1) LWin & 2::switchDesktopByNumber(2) LWin & 3::switchDesktopByNumber(3) LWin & 4::switchDesktopByNumber(4) LWin & 5::switchDesktopByNumber(5) LWin & 6::switchDesktopByNumber(6) LWin & 7::switchDesktopByNumber(7) LWin & 8::switchDesktopByNumber(8) LWin & 9::switchDesktopByNumber(9) ;CapsLock & 1::switchDesktopByNumber(1) ;CapsLock & 2::switchDesktopByNumber(2) ;CapsLock & 3::switchDesktopByNumber(3) ;CapsLock & 4::switchDesktopByNumber(4) ;CapsLock & 5::switchDesktopByNumber(5) ;CapsLock & 6::switchDesktopByNumber(6) ;CapsLock & 7::switchDesktopByNumber(7) ;CapsLock & 8::switchDesktopByNumber(8) ;CapsLock & 9::switchDesktopByNumber(9) ;CapsLock & n::switchDesktopByNumber(CurrentDesktop + 1) ;CapsLock & p::switchDesktopByNumber(CurrentDesktop - 1) ;CapsLock & s::switchDesktopByNumber(CurrentDesktop + 1) ;CapsLock & a::switchDesktopByNumber(CurrentDesktop - 1) ;CapsLock & c::createVirtualDesktop() ;CapsLock & d::deleteVirtualDesktop() ; Alternate keys for this config. Adding these because DragonFly (python) doesn't send CapsLock correctly. ;^!1::switchDesktopByNumber(1) ;^!2::switchDesktopByNumber(2) ;^!3::switchDesktopByNumber(3) ;^!4::switchDesktopByNumber(4) ;^!5::switchDesktopByNumber(5) ;^!6::switchDesktopByNumber(6) ;^!7::switchDesktopByNumber(7) ;^!8::switchDesktopByNumber(8) ;^!9::switchDesktopByNumber(9) ;^!n::switchDesktopByNumber(CurrentDesktop + 1) ;^!p::switchDesktopByNumber(CurrentDesktop - 1) ;^!s::switchDesktopByNumber(CurrentDesktop + 1) ;^!a::switchDesktopByNumber(CurrentDesktop - 1) ;^!c::createVirtualDesktop() ;^!d::deleteVirtualDesktop()
Enregistrez le fichier.
Ce script, AutoHotkey.ahk, se trouve dans votre dossier Documents. Ouvrez une nouvelle fenêtre de l’Explorateur de fichiers (clavier: Win + E) et accédez à Documents.
Exécutez le script en double-cliquant sur le fichier. Vous ne verrez rien se produire, mais AutoHotkey exécute maintenant le script.
Comment ça marche?
Le script fonctionne en gardant une trace du bureau virtuel que vous utilisez actuellement. Maintenez la touche Windows enfoncée et appuyez sur un nombre compris entre 1 et 9 pour basculer automatiquement vers la gauche ou la droite le nombre correct de fois pour accéder au bureau souhaité. (Si vous appuyez sur le numéro d’un bureau qui n’existe pas encore, rien ne se passera.)
Test de vos nouveaux raccourcis clavier
Pour le tester, créez d’abord un nouveau bureau virtuel. Pour ce faire, cliquez sur l’icône Affichage des tâches dans votre barre des tâches (ou appuyez sur Win + Tab), puis cliquez sur + Nouveau bureau. Ou utilisez le raccourci clavier Win + Ctrl + D.
Faites-le une fois pour chaque nouveau bureau virtuel que vous souhaitez créer. Chaque bureau supplémentaire sera orienté à droite du précédent.
Maintenant, vous pouvez basculer vers l’un de ces bureaux à l’aide des raccourcis clavier définis dans le script. Maintenez Win et appuyez sur un nombre entre 1 et 9, et vous basculerez automatiquement sur ce bureau numéroté. Par exemple, appuyez sur Win + 3 pour basculer vers le troisième bureau virtuel à partir de la gauche.
Arrêt du script
Pour arrêter d’utiliser le script, accédez à votre barre d’état système et cliquez avec le bouton droit sur l’icône AutoHotkey, qui ressemble à un grand « H » vert pour afficher le menu de notification Windows AutoHotkey.
Remarque Si vous ne voyez pas l’icône, utilisez le bouton caret ^ pour afficher les icônes cachées.
Dans ce menu, vous pouvez suspendre les raccourcis clavier, suspendre le script ou quitter complètement AutoHotkey. Chacune de ces actions ramène vos raccourcis à la normale.
Exécution automatique de votre script au démarrage de Windows
Pour exécuter le script automatiquement à chaque démarrage de Windows, déplacez le script dans votre dossier de démarrage.
Sous Windows 10, le dossier de démarrage se trouve à l’emplacement suivant:
[Votre dossier personnel] \ AppData \ Roaming \ Microsoft \ Windows \ Menu Démarrer \ Programmes \ Démarrage
Ce dossier est normalement masqué, vous ne pouvez donc y accéder que dans l’Explorateur de fichiers si vous sélectionnez Affichage → Afficher les fichiers cachés en haut de la fenêtre de l’Explorateur.
Cependant, vous pouvez également accéder directement au dossier de démarrage en entrant le chemin d’accès complet au répertoire dans la zone Exécuter. Appuyez sur Win + R pour ouvrir la zone Exécuter, puis tapez le chemin d’accès complet au répertoire. Vous pouvez utiliser la variable d’environnement% APPDATA% pour remplir automatiquement le début du nom du chemin. Par exemple, vous pouvez saisir ceci dans la zone Exécuter:
% APPDATA% \ Microsoft \ Windows \ Menu Démarrer \ Programmes \ Démarrage
Lorsque vous appuyez sur Entrée, ce dossier s’ouvre dans une nouvelle fenêtre de l’Explorateur de fichiers.
Déplacez maintenant votre script dans ce dossier. Si votre dossier Documents est toujours ouvert dans une autre fenêtre, faites glisser et déposez AutoHotkey.ahk dans le dossier Démarrage.
Si vous décidez de ne pas exécuter le script automatiquement à chaque démarrage de Windows, ouvrez à nouveau ce dossier et déplacez le script ailleurs. Vous pouvez toujours l’exécuter manuellement en double-cliquant dessus, peu importe où il se trouve sur votre ordinateur.
Notes complémentaires
Ce script remplace les raccourcis Windows par défaut pour Win + (Number), qui ouvrent normalement les éléments de votre barre des tâches (Win + 1 ouvre le premier élément, etc.). Cependant, certaines applications Windows intégrées telles que Paramètres ou Store ignorent le script d’AutoHotkey.
Si vous êtes sur l’une de ces fenêtres lorsque vous essayez des raccourcis clavier, il utilise le comportement des raccourcis clavier Windows et ouvre quelque chose à partir de votre barre des tâches au lieu d’un nouveau bureau. Une autre chose à garder à l’esprit est que AutoHotkey bascule rapidement de gauche à droite entre vos bureaux virtuels, un par un. S’il tombe sur un bureau virtuel où l’une de ces applications spéciales est ouverte, il arrêtera de basculer et restera sur ce bureau.
Malheureusement, les raccourcis Windows par défaut ne peuvent pas être désactivés, ce qui n’est pas pratique, mais à moins que l’une de ces fenêtres d’application ne soit ouverte, le script AutoHotkey fonctionne correctement. Vous constaterez que le script fonctionne parfaitement avec 95% de vos autres programmes.
Cependant, si vous préférez, vous pouvez modifier votre script AutoHotkey pour utiliser une combinaison de touches différente.
Modification de votre script AutoHotkey
Ouvrez le Bloc-notes (Démarrer → Accessoires Windows → Bloc-notes).
Dans le Bloc-notes, ouvrez le fichier AutoHotkey. Si le dossier Démarrage est déjà ouvert, vous pouvez faire glisser et déposer l’icône sur la fenêtre du Bloc-notes pour ouvrir le fichier.
Ou, vous pouvez l’ouvrir en allant dans Fichier → Ouvrir dans le bloc-notes et en entrant le nom de fichier% APPDATA% \ Microsoft \ Windows \ Menu Démarrer \ Programmes \ Démarrage \ AutoHotkey.ahk.
Lorsque le fichier est ouvert, vous pouvez apporter des modifications au script en fonction de vos besoins. Par exemple, si vous préférez utiliser la combinaison de touches de raccourci CapsLock + (Number), recherchez ces lignes dans le script:
LWin & 1::switchDesktopByNumber(1) LWin & 2::switchDesktopByNumber(2) LWin & 3::switchDesktopByNumber(3) LWin & 4::switchDesktopByNumber(4) LWin & 5::switchDesktopByNumber(5) LWin & 6::switchDesktopByNumber(6) LWin & 7::switchDesktopByNumber(7) LWin & 8::switchDesktopByNumber(8) LWin & 9::switchDesktopByNumber(9)
In these lines, change LWin to CapsLock:
CapsLock & 1::switchDesktopByNumber(1) CapsLock & 2::switchDesktopByNumber(2) CapsLock & 3::switchDesktopByNumber(3) CapsLock & 4::switchDesktopByNumber(4) CapsLock & 5::switchDesktopByNumber(5) CapsLock & 6::switchDesktopByNumber(6) CapsLock & 7::switchDesktopByNumber(7) CapsLock & 8::switchDesktopByNumber(8) CapsLock & 9::switchDesktopByNumber(9)
Enregistrez vos modifications et double-cliquez sur le script pour le mettre à jour dans AutoHotkey. Si vous avez fait des erreurs dans votre script, AutoHotkey ne l’exécutera pas et vous donnera un message d’erreur. Sinon, il vous demandera si vous souhaitez mettre à jour le script déjà en cours d’exécution:
Choisissez Oui pour que vos nouvelles modifications prennent effet.
Si vous avez une idée pour une combinaison de touches de raccourci différente, vous pouvez la remplacer par n’importe quelle combinaison de touches de raccourci qui n’est pas déjà utilisée.
Choisir une combinaison de touches
AutoHotkey a ses propres mots et caractères spéciaux qu’il utilise pour représenter les touches du clavier dans ses scripts. Par exemple, la touche Ctrl est représentée par un point d’exclamation. Pour utiliser Ctrl + (Number) comme combinaison de raccourcis clavier, vous pouvez remplacer « CapsLock & » par « ! » dans votre script. Ensuite, les lignes ressembleraient à ceci:
!1::switchDesktopByNumber(1) !2::switchDesktopByNumber(2) !3::switchDesktopByNumber(3) !4::switchDesktopByNumber(4) !5::switchDesktopByNumber(5) !6::switchDesktopByNumber(6) !7::switchDesktopByNumber(7) !8::switchDesktopByNumber(8) !9::switchDesktopByNumber(9)
Notez que lorsque vous utilisez un symbole plutôt qu’un mot, vous ne devez pas utiliser « & » dans la syntaxe du script. Cette règle est l’une des règles spéciales qu’AutoHotkey utilise dans son langage de script.
Vous pouvez trouver une liste complète de tous les mots et symboles spéciaux pour les scripts AutoHotkey autohotkey.com/docs/KeyList.htm.
from WordPress https://zuatutos.com/utiliser-autohotkey-pour-changer-de-bureau-virtuel-dans-windows-10/
1 note
·
View note
Link
0 notes
Text
I'm using a combination of autohotkey and lua macros for this bullshit; I've got a dedicated key on my auxilary keyboard for typing [ ‚ ] , among other great hits such as ☭, ß, ♠, ♡, ♣, ♢, —, and ‽. Oh, I should mention I have an auxilary keyboard, something I strongly recommend everyone use for those weird characters that you're always typing but don't just have on your keyboard.
I picked up a fancy programable keyboard to use as an auxilary keyboard, but you can and probably should just use a normal ass keyboard since all the programing is gonna be done using third party software and not the keyboards built in programmability functionality.
This is my current keyboards set up.

I'm putting more details under the read more for those that want to set up something similar.
My setup relies on Lua Macros and Autohotkey as mentioned, and I used this tutorial to help me set it up, but because linkrot is a thing and because I did some things differently, I'll be detailing specifics about my code, which is thankfully short starting with Lua.
LUA MACROS
First thing, comments in lua are made with a double hyphen "––"
lmc.minimizeToTray = true lmc_minimize()
These two lines just get the program out of my way and into my tray when running. Comment them out while working on your code so that you can actually edit it easier.
--lmc_print_devices() lmc_device_set_name('MACROS1', "ID_XXXX") -- lmc_assign_keyboard('MACROS1')
These three lines work towards figuring out your keyboard's ID and assigning it to the variable. start with the first line uncommented and the second line commented. Replace the four Xs in line two wit the ID printed by line one when you run it than swap the commenting on the first and second line. The third line is some black-magic bullshit that helps Lua work if it's being obstinant. I've never needed it but you might. If you're having difficulties try uncommenting it.
if (direction == 0) then return end
This line makes it so that Lua only recognizes when the keys are pressed, and ignores them while they're being held down. Comment out as your use case requires.
filewrite = io.open("output.txt", "w")
This line opens the file output.txt and names it w. Because we will be writing to this file, you'll need run Lua in administrative mode, something which the tutorial linked above doesn't do.
if (button == XXX) then filewrite:write(0) elseif (button == XX ) then filewrite:write(1) . . . else print('Not yet assigned: ' .. button) end
Lua doesn't have anything as convient as a switch, so you have to daisychain ifelses to assign all your buttons. The last line prints the value of any key that hasn't been assigned. To assign keys, press them then add their if else.
Each line in the ifelse chain writes a value to the file based on its index.
filewrite:close()
This line closes the file you're reading from. Close your fucking files Kevin.
fileread = io.open("output.txt","r") print("\nThe contents in the file are: ") print(fileread:read()) fileread:close()
This is debugging code to make sure the file is being written to correctly. It can be commented out.
lmc_send_keys('{F24}') end )
Lastly, these lines press the F24 key, which you're keyboard probably doesn't physically have but your computer understands as a thing that exists, and then ends the macro.
In most programs, F24 doesn't do anything, but if you're running into problems you can change this. What it does here however is signal to the autohotkey script I have running that it's time to send a keystroke.
AutoHotKey
My autohotkey script is simple based on the fact that I'm only using my aux keyboard to type unicode characters. If you're using it for anything more complex than that, your script will reflect that.
#SingleInstance Force
This is the running environment. It just means that only one copy of this script can run at a time.
F24:: FileRead, Input, C:\Users\REDACTED\second-keyboard-master\LuaMacros\output.txt FileReadLine, Output, C:\Users\REDACTED\second-keyboard-master\AutoHotKey\translation_P.txt, Input+1 if (output!= "") SendInput {U+%Output%} return
This is one forth of my entire script, and the other fourths are the exact same thing except "F24" is replaced by "+F24" (shift), "^F24" (ctrl), and "!F24" (alt), meaning it registers it as a different key and the highlighted P in the file_name "Translation_P.txt" is replaced by S, C, and A to match the other file names.
Now, let's break this down.
F24::
This is the hotkey. It means that the script is listening for the F24 key to be pressed, which on my computer only happens when I use my Auxilary keyboard and Lua presses it.
FileRead, Input, C:\Users\REDACTED\second-keyboard-master\LuaMacros\output.txt FileReadLine, Output, C:\Users\REDACTED\second-keyboard-master\AutoHotKey\translation_P.txt, Input+1
I have a txt file on my computer at that location which is very simply, 48 lines long, one for each key, I'm programing. The lines are either blank meaning the key hasn't been assigned, or they contain a unicode code point of the character I want assigned to that key. I have four seporate translation files for whether I'm typing a character with no modifier, shifting, ctrling, or alting. Though you could have up to eight files for each combination shift-ctrl-alt, or sixteen files if you include the win key as a modifier: I thought that was overkill, but maybe it's not enough kill for you, in which case Autohotkey can discriminate between left and right modifiers (left shift/ right shift, etc) meaning 2⁷ files if you really need that many fucking keys.
if (output!= "") SendInput {U+%Output%}
This checks if the line which was read was empty. Then if it wasn't, it sends the unicode character with the value in that line. So if I hit the key 24 on my aux keyboard, it sends the character with the unicode value in the twenty-fifth line of the document (201a) which is [ ‚ ].
return
This indicates that the hotkey's script has finished, and that autohotkey shouldn't keep executing code.
Caveats and Conclusions
The caveats to this set up is that Lua Macros, as it's creator is VERY QUICK to tell you, is a finicky program that sometimes doesn't work perfectly. I'll often find myself typing f‽ because Luamarcros failed to block the keystroke on my auxkeyboard but still managed to send the rest of the code. The creator doesn't know why it happens. If it happens just try rerunning the program, and if that doesn't work try relaunching lua (remember to launch it as an administrator).
The benefits of this set up is its very easy to add, subtract, and move around keys. In my original set up, [ ‚ ] wasn't a character I'd assigned a key to because I hadnt thought I'd use it. Adding it in took a total of three minutes, two and a half of which were spent figuring out it's Unicode code point, and the last thirty seconds were spent opening translation_p.txt typing it into line 25 and saving the txt file. I didn't have to reload lua or my AHK script, it just worked immediately.
This is a great thing that I reccomend everyone do, because we all have those characters not on the standard keyboard that we need to type often enough that it gets annoying. The lower half of the keyboard's just whismical characters for me: the top half where I've ä, æ, ö, ü, ß, é, ñ, Ä, Æ,Ö, Ü,É, and Ñ: that's proper quality of life improvement stuff right there for someone half fluent in german, living in america, who plays magic the gathering.
ok how are you people putting commas in your tags
77K notes
·
View notes
Text
Selecting the best GUI toolkit - part 4: Windows Forms
NOTE: this the fourth part of a series. The previous article was about AutoHotkey. You can find the article here. Windows Forms is a GUI programming framework developed by Microsoft for building Windows desktop applications. It provides a set of pre-built controls that developers can use to create user interfaces for their applications. It was the first Toolkit developed with the release of the…

View On WordPress
0 notes
Text
Best Macro Recorder: Complete List 2023
Are you tired of repetitive tasks while gaming or working? Do you want to increase your productivity and save time?
Then, you need a macro recording tool! Here are the best macro recording tools that you can use for gaming or professional work.
Tip: TG macro is the best macro recorder. You can download TG Macro from here.

What are Macro Recording Tools?
Macro recording tools are software applications that allow you to record a series of actions on your computer and then automate those actions later with a single click.
They can help you automate repetitive tasks, save time, and increase productivity.
Top Macro Recording Tools
1. TG Macro
The TGMacro.io application is a game-changer when it comes to simplifying the creation of macros and automating tasks. With its user-friendly interface and advanced functionalities, this application makes it a breeze to record and replay actions, saving valuable time and effort.
Whether you need to automate data entry, generate reports, or execute complex sequences of commands, TGMacro provides an effortless and efficient solution.
Its powerful scripting capabilities allow for customization, incorporating variables, loops, and conditional statements to tailor macros to specific needs.
By streamlining workflows and boosting productivity, TG Macro empowers users to focus on higher-value tasks and unleash their creativity.

1. AutoHotkey
AutoHotkey is a free and open-source macro recording tool that automates your clicking tasks on your computer.. You can also create complex scripts and macros using its built-in scripting language.
AutoHotkey is highly customizable and versatile, making it a popular choice among gamers and professionals alike.
It can be used to automate various tasks such as filling out forms, opening and closing applications, and even playing games.
Also Read: OP AutoClicker

2. Pulover's Macro Creator
Pulover's Macro Creator is a free and open-source macro recording tool that allows you to automate repetitive clicking tasks on your computer. It has a user-friendly interface and can record mouse clicks, keystrokes, and other actions.
One of the standout features of Pulover's Macro Creator is its ability to create "visual macros" that allow you to automate tasks by recording and replaying mouse movements and clicks.
This feature makes it an excellent choice for tasks that involve a lot of mouse movement, such as image editing or 3D modeling.
3. Macro Recorder
Macro Recorder is a paid macro recording tool that helps with repetitive clicks on your computer. It has a simple and intuitive interface and can record mouse clicks, keystrokes, and other actions.
Macro Recorder's standout feature is its ability to schedule and run macros automatically. This feature makes it an excellent choice for tasks that need to be performed at specific times, such as backups or data entry.
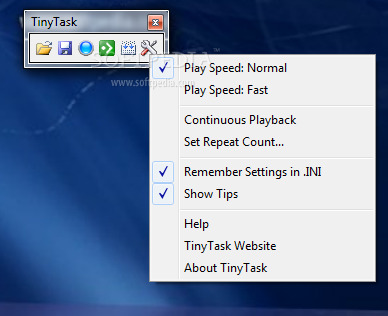
4. TinyTask
TinyTask is a free macro recording tool that allows you to automate repetitive tasks on your computer. It has a simple and straightforward interface and can record mouse clicks and keystrokes.
You can also edit your macros using its built-in editor and add delays, loops, and other commands.
Despite its simplicity, TinyTask is still a powerful macro recording tool that can be used for a variety of tasks. It's particularly useful for gaming like Minecraft or Roblox.
5. Macro Express
Macro Express is a paid macro recording tool that allows you to automate repetitive tasks on your computer. You can also edit your macros using its built-in editor and add conditions, loops, and other commands.
Macro Express's standout feature is its ability to create "smart macros" that can automatically adjust to changes in your system or applications. This feature makes it an excellent choice for tasks that involve interacting with different programs or files.
youtube
Factors to Consider When Choosing a Macro Recording Tool
When choosing a macro recording tool, there are several factors that you should consider, including:
Price: Some macro recording tools are free, while others require payment.
Features: Different macro recording tools have different features, so you should choose one that has the features that you need.
Ease of use: Some macro recording tools are more user-friendly than others, so you should choose one that is easy for you to use.
Customization: Some macro recording tools are more customizable than others, so you should choose one that allows you to customize your macros to your specific needs.
Compatibility: Some macro recording tools may not be compatible with certain operating systems or applications, so you should choose one that is compatible with your system.
Conclusion
Macro recording tools can be a great way to automate repetitive tasks and increase productivity while gaming or working.
There are many macro recording tools available, both free and paid, each with its own set of features and advantages.
When choosing a macro recording tool, consider your specific needs and the factors mentioned above to choose the best one for you. With the right macro recording tool, you can save time and increase your efficiency, making your gaming or professional work experience even better.
1 note
·
View note
Note
theres many users who send .ahk (autohotkey scripts) on the down low all you gotta do is ask in the forums on help or in the discord, people will literally namedrop users who make scripts

0 notes