#Back Press in toolbar
Explore tagged Tumblr posts
Visit Tumblr Blog
Explore Tumblr blogs with no restrictions, modern design and the best experience.
Last Seen Tumblr Blogs


Fun Fact
Tumblr was created by web developers David Karp and Marco Arment.
Text
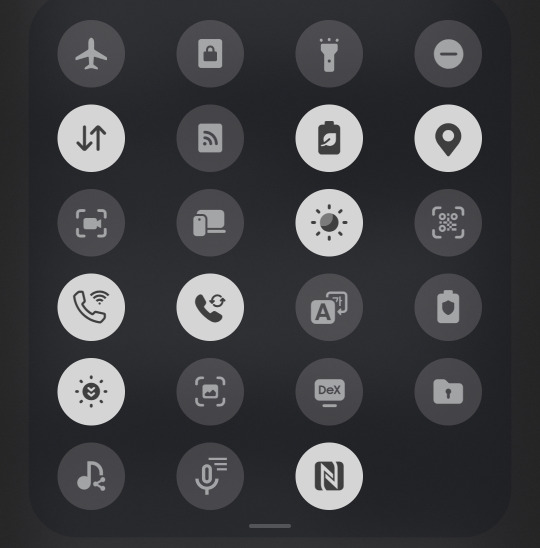
why the fuck would you remove the names of what everything does in the settings. does that not sound like a bad idea
ok updated my phone and its worse now how do i go back
#also. was changing the screenshot toolbar necessary too??? was it really??? and adding the FUCKING AI FEATURE#my muscle memory is now constantly pressing the stupid tag thing#GO BACK. REVERSE REVERSE REVERSE#they fucking. changed the grid from a 4x6 to a 5x6. for no damn reason#quail's wails#why does swiping between my apps being used now feel. bad
4 notes
·
View notes
Text
Blender: Which Buttons Do I press? (Part 1)
There are a lot of tutorials where you already need to know how to "do the basics" like "maneuver the camera." So this tutorial is focusing on the Buttons- not on the sculpt or the object, just on the buttons and shortcuts that I personally use in Blender.
Note: You will need a mouse with 3 buttons / scroll wheel for this.
Before we start, I'm going to explain which shortcuts I use in this, but, not to make myself redundant, there's a shortcut for seeing shortcuts: Press Spacebar + Shift to see all available shortcuts in each mode.
I'm using Blender 3.6 for this tutorial. I recommend you use the same. It's completely free and has a lot of great features! For this tutorial though, 3.4 will likely work as well.
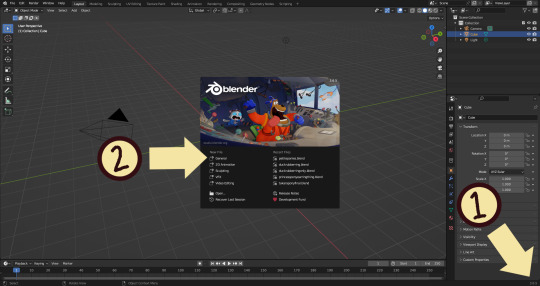
Click "General" under New File.
Your screen should look like this. There are 3 default objects in the file: Camera, Cube, and Light source.
3. This bar indicates that you are in Object mode. This menu will allow you to go into other modes depending on the object you have selected.
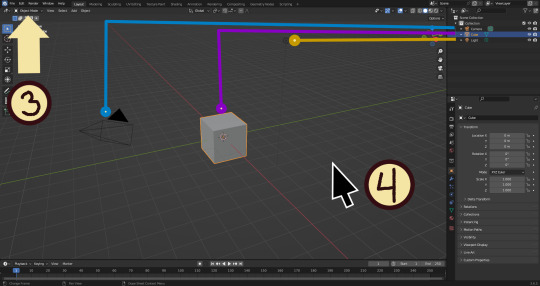
4. Lets talk about shortcuts. You can zoom, rotate, and move the screen using buttons at the top right, but I haven't marked those because I will teach you a better way. Feel free to click them all and see what they do, but I assume you're here because you don't want to explore every button in this godforsaken program the hard way.
Below, the Left and Right buttons are marked as a reminder as well as the Middle button which is also the scroll wheel (press down to click it)
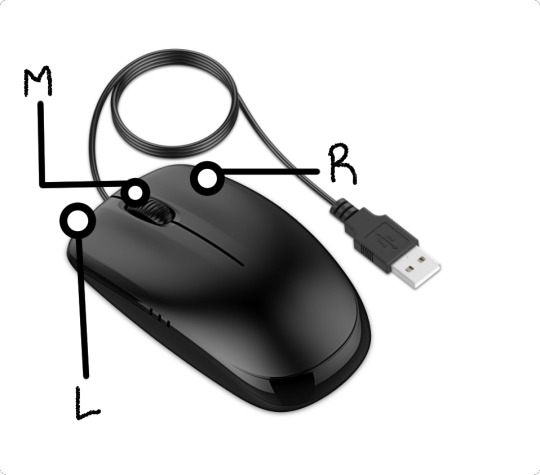
Left click: Select an Object Left click and drag: Selects multiple objects Scroll Wheel: Zoom in and out Middle Click and drag: Rotate your view Shift + Middle Click and drag: Move your view Right click: Brings up a menu that won't be relevant here. Shift + Right Click: Moves the 3D cursor. Not important for this tutorial, but I do it on accident a lot. Hit Shift + C to reset the cursor and also to reset the viewer position to see all objects at once.
Move the viewer around as practice! You're gonna need to do it a lot while modeling. If you have a keyboard with a Numpad (the calculator-looking thing on the right side, says Num at the top) you can use Numpad 1-9 to automatically adjust the view to front, left, right, backwards, and different angles. If not, test out the rotate tool at the top right which does something similar.
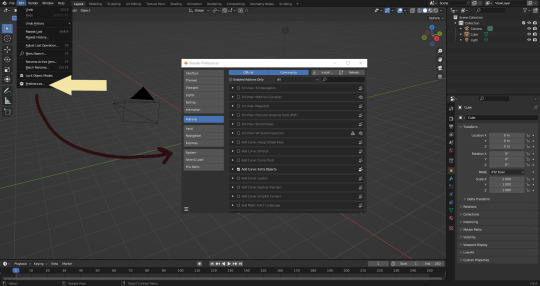
There's a helpful menu I use to switch between Modes (if you hit the dropdown menu where it says "Object Mode" you can do this without the shortcut); click Preferences to enable it.
Hop over to the Keymap section and check "Tab for Pie Menu"

And then close the window. No "Save" button is needed.
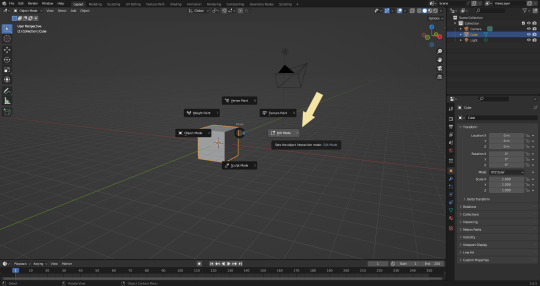
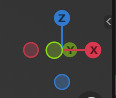
Now that you have the shortcut enabled, select your box with Left Click, hit Tab and Left click "Edit Mode"
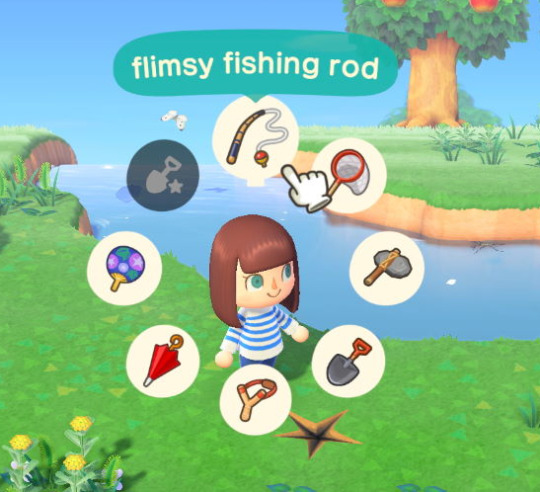
And yes, this is just like the Animal Crossing tool ring:
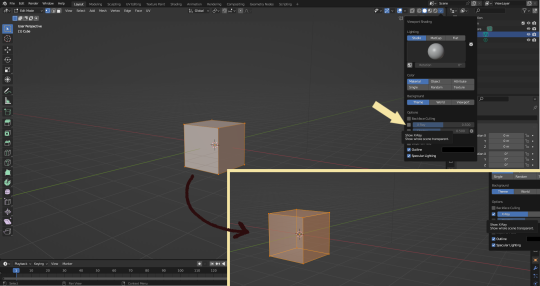
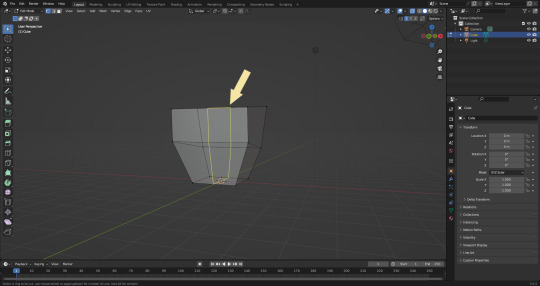
Now that you're in Edit Mode (You can swap back anytime by hitting Tab -> Object Mode), click arrow at the top right to open a menu where you can check the "X-ray" box. You'll be able to see through your cube. As a reminder, Spacebar + Shift will show you the available shortcuts in this mode, but I'll go over the important once momentarily.
What is a 3D object made out of?
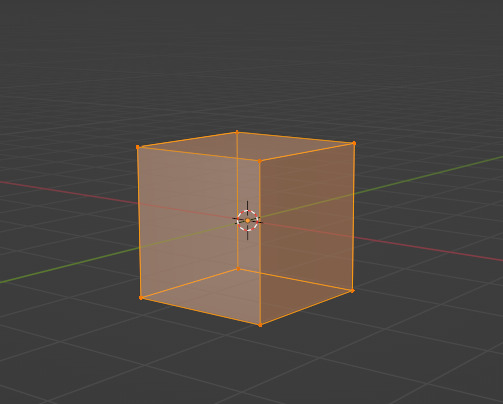
This box is made out of vertices, and each face of the cube has four vertices at each corner- a triangle with three vertices also works, but we'll stick with squares for this tutorial. Moving the vertices will change the shape of the box, like a piece of stretchy fabric over a wire frame.
From now on, I'll be calling the vertices dots, because I hate reading and typing the word vertices over and over again.

5. By all means you can fiddle with the buttons over here but I'm gonna show you the shortcuts I use and the buttons you'll actually need. Don't get intimidated by the amount of buttons. Also press the T key and the toolbar will go away!
(Seriously, though, feel free to play around in this section as much as you want to, but we'll go over the shortcuts a few at a time with examples. at the end of this section will be a summarized list.)
6. Left Click one of the dots and press the G key. You'll see below a whole bunch of additional shortcuts show up at the button. Here are the ones I use:
G key: Grab and move around the dots
R key: Rotate two or more dots*
S key: Size two or more dots*; if two dots are selected, the distance between the dots will change but the angle between them will stay the same.
*Left Click and drag to select multiple dots!
CTRL + Z to Undo edits.
When you move a dot with the G key, imagine that the dot is against a piece of glass at a fixed point ahead of your viewer. The dot will not move farther or nearer to you, but will instead move parallel to your view.
As an example, if you press Numpad 1 and view the object from the front (The -Y green circle will be at front and center in the rotate tool), the dot will only move left and right (X axis) and up and down (Z axis). It will not move farther or nearer on the Y axis by default.
Play around with the G, R, and S tools before moving on.
This little X button at the top right will turn on symmetry. You don't need to use this, but it can be useful.
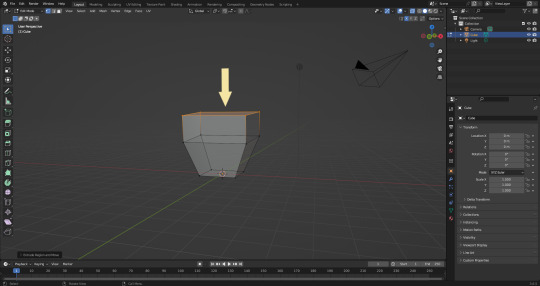
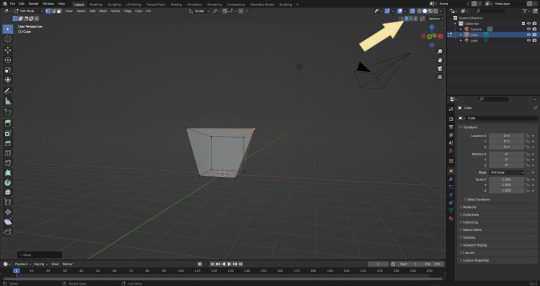
Left Click and drag so that an entire face (flat square) is highlighted and then press the E key to extrude. Extruding will add another set of dots that are automatically connected to the first set.
Ctrl + R adds a loop cut. This will divide the existing faces into two and add more dots. You can also drag loops to slide them to different positions.

The 3 key (not on the Numpad) will switch your Select Mode to Face Select. This is useful for extruding. Essentially it is simply selecting all the dots at the corners of the squares.
The 1 key will switch back to Vertex Select (or Dot Select) mode and the 2 key will switch to Edge Select (the least useful of the three, to me)
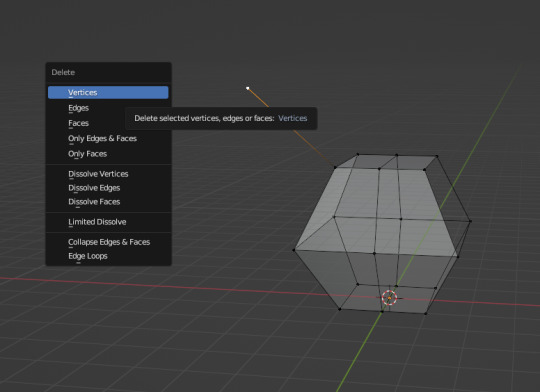
Before we go wild, there are a couple of additional things to know. For the tutorial, focus on working with faces, not vertices. If you accidentally pull a single vertex, select it and press the X key to delete it.

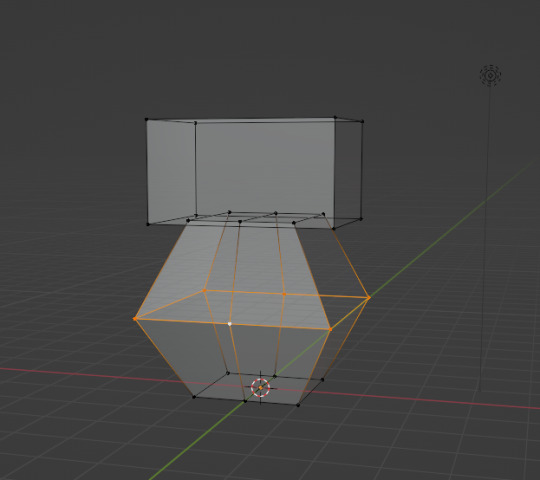
If you want to add shapes, I recommend sticking to cubes for now. Ctrl + A will open the Add Mesh menu and you can add a cube. Feel free to have complete cubes overlap for this tutorial.
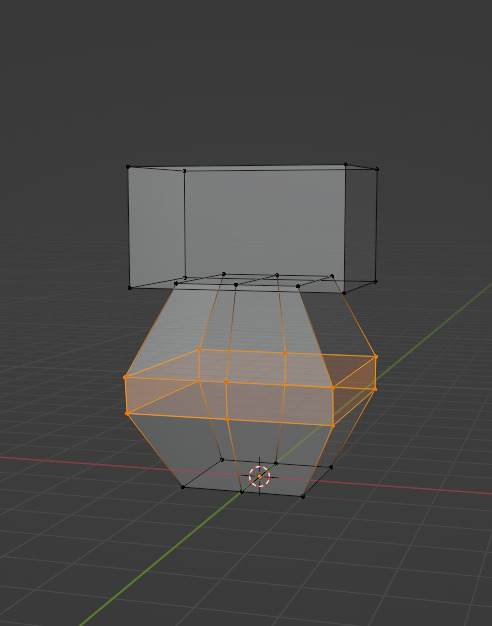
Double Left Click will select a series of dots connected in a loop, and can be helpful for selecting areas all at once.
Ctrl + B is the bevel tool, and when a loop is selected it can turn it into two.
Here is a summary of all of the Edit Mode shortcuts:
G key: Grab and move around the dots R key: Rotate two or more dots* S key: Size two or more dots* *Left Click and drag to select multiple dots Double Left Click will select a series of dots CTRL + Z to Undo E key to extrude faces Ctrl + R adds a loop of dots Ctrl + B splits one loop into two X key -> Vertices to delete dots (vertices) 1, 2, 3 keys to switch Select mode Numpad 1-9 to move viewer automatically Ctrl + A to add a shape
Go play with them. See you back here in a while.
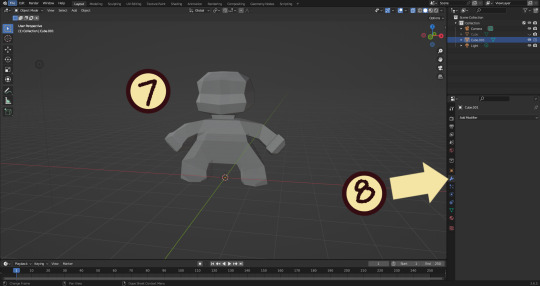
7. I used a single cube to make this figure. It's still very blocky, but that's fine. Loop cuts created additional faces which were extruded to create arms, legs, and a neck. Definition to the face was added by selecting individual dots. Remember, Ctrl + Z (undo) is your friend!
Once satisfied with the shape you made - a boxy figure or object is fine- continue on.
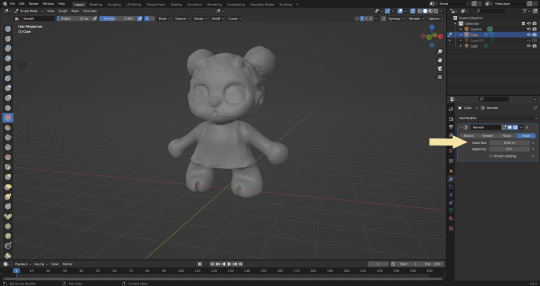
8. Press Tab -> Object Mode. Turn your attention to the right hand bar and make sure the Wrench button is selected. Note the Add Modifier Button.
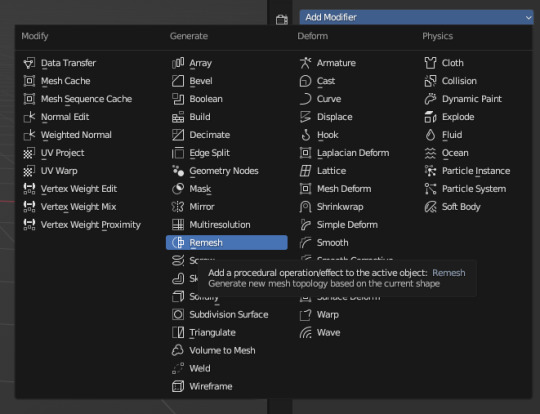
There are a heck of a lot of buttons here that you don't have to worry about- just select Remesh.
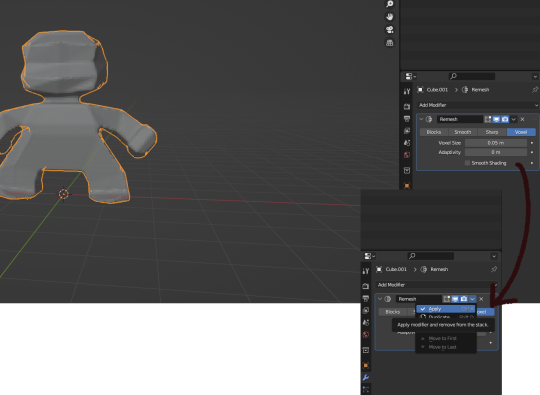
Change the number under Voxel Size to .05m by Left Clicking and typing it (there is a slider, but I find this causes lag). Then, apply the remesh by clicking the down arrow and selecting Apply.
Your figure should be shaped similar to before, but have a slight "graininess". If you have added multiple cubes, it will seamlessly merge them into one. The smaller the Voxel Size you put, the more dots will make up your object. However, I suggest starting with something in the .03-.06 range. We will refine this later.
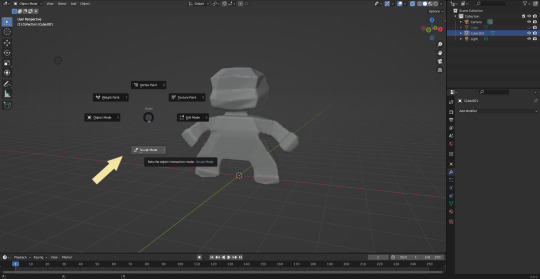
Press Tab and select Sculpt Mode.
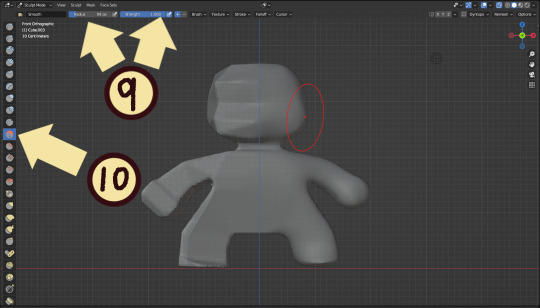
This is a mode where I actually use the tool bar for modifying my sculpt, as there are a lot of brushes . The icons show roughly what the brushes do using small icons (note on adjusting this below)
9. Observe the Radius and Strength bars, which will adjust the... well, the size and radius. Note that although the "brush" looks like a flat circle, the affected area is actually a sphere. Select a brush with Left Click and Left Click and drag on the sculpture.
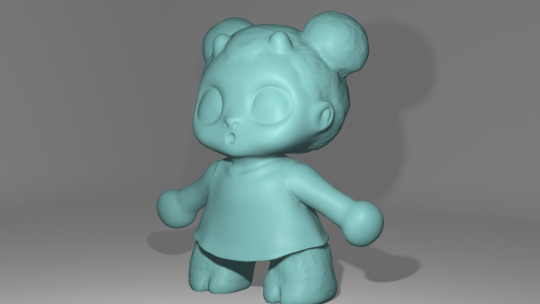
10. This is the smooth tool. I have smoothed out the right side of this figure. Note that I turned off symmetry to do this, but i usually have X-axis symmetry selected.

Although I am used to the small buttons, there is a way to change them. Hover near the toolbar to Left Click + Drag so you can see the names. Hold Ctrl + Middle Mouse button and drag to resize. You will be able to make the size of the menu much larger. This goes for many of the menus in Blender.
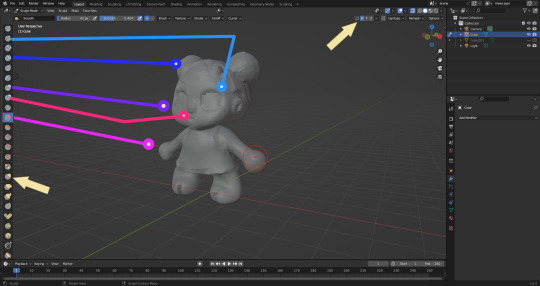
The above arrows point to the symmetry button (Top right) and Grab brush (bottom left). The Grab brush uses the shortcut G Key.
The lines point to which tools were used for each part of the sculpt. The Draw Sharp tool was used to mark out eyes. Clay strips made the hair texture. Round cheeks were added using the Inflate tool and a nose (and buns) were added using the Blob tool. The aforementioned Smooth and Flatten tools were used judiciously to remove sharp edges.
I don't have a shortcut list for you here, but here are all the tools I use the most:
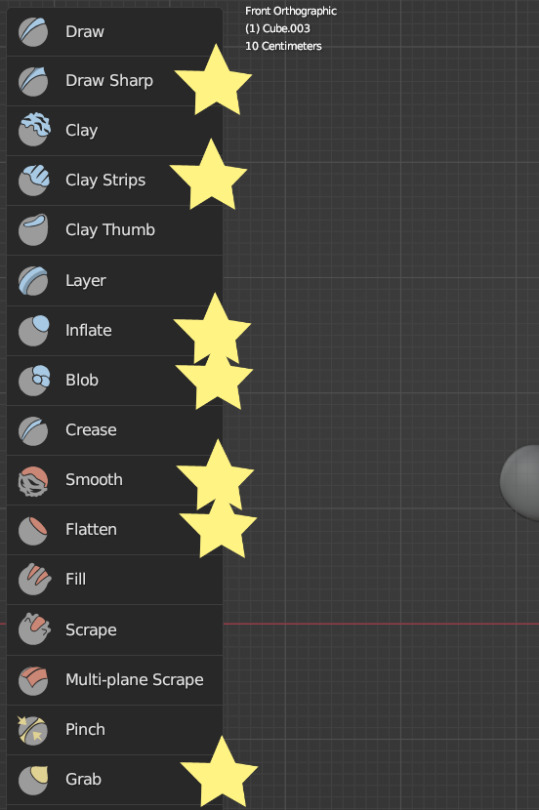
You can hold the Ctrl key while using the brush to reverse its effects. For example, if you hold the Ctrl key while using the Inflate brush, it will deflate the shape instead, creating a concave shape.
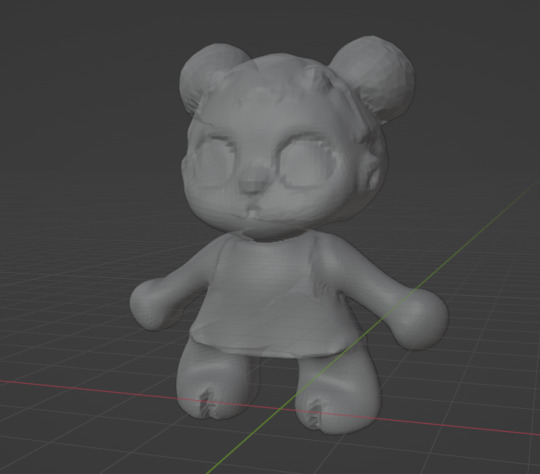
As you can see, my figure is getting a little grainy. So, we're going to remesh this model again and add more dots and therefore detail.
This time, we're putting the Voxel Size to .01m. Apply the remesh as before. Now we have more dots to work with and we're just repeating the process, smoothing, and sharpening the lines.
I was going to add a bit about how to take a photo of your sculpt, but I ran out of photo space. I will add a reblog with this information.
I came up with this little lamb character on the spot because the clay strips created a nice texture. She's by no means perfect, but she did turn out pretty cute so i might make a cleaner version later on.
64 notes
·
View notes
Note
HOW THE FUCK DO YOU DO THAT IN AJ CLASSIC. WHAT. HOW. WHAT DEMON HAVE YOU PROMISED YOUR SOUL TO (referring to your incredible masterpieces)
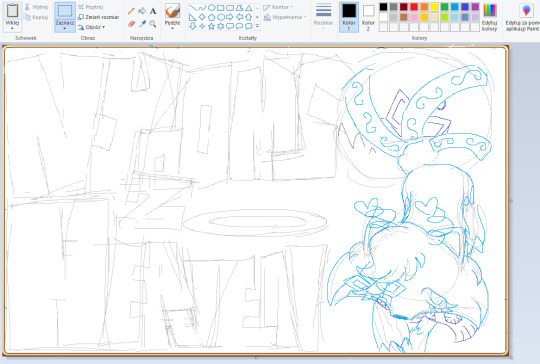
OMG OK i wont gatekeep... im not like that teehee ill let u in a little secret... no demons involved straight up i need to say im using a third party software called glass2k, its a bit old but it works on windows 10 and it makes my life infinitely easier. you can download it here first i take a screenshot of the masterpiece window in game and paste it to mspaint like this (every other art program should work too):

then i sketch the thing i want to draw (im just gonna pull up a sketch of my shop sign because i dont feel like sketching rn)
once im done i go back to ajc art program and open up glass2k and make the animal jam classic window transparent. you can do this by holding down ctrl+shift+numbers between 1-0 on ur keyboard (not numberpad). it should look something like this (after aligning the mp frames in paint and ajc):
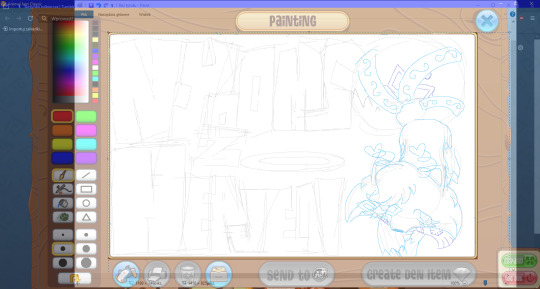
the ajc window is still fully usable so now you can draw to your hearts content. sometimes i have difficulties fitting the mspaint sketch on my screen so i like to right click the toolbar and press the "minimize the ribbon" button. i hope this helps
14 notes
·
View notes
Text
yesterday: hey why was everyone complaining about xkit being broken?
today:

oooooooo
a new icon added to the toolbar that knocks off the OG xkit icon
gotcha
EDIT: coincidence is not causation, double gotcha
to re-enable it:
hamburger menu in browser top right corner
add-ons and themes (or about:addons in new tab address bar)
check bottom of extension list for disabled add-ons/extensions
press button to enable it again
refresh tumblr and wait for the xkit icon to squeeze itself back in
bingo bango bongo you're good to go baybee
#yes i have the xkit rewritten extension for firefox#but i wasn't about to delete og xkit#just in case#so yeah#this new development is weird but uh#that's tumblr for ya#random crap#tumblr#xkit
7 notes
·
View notes
Text
Bringing Highlights to the Open Web

Today we’re launching updates to our extensions for Chrome (including Arc/Edge), Firefox, and Safari. These updates bring support for highlights on the open web, archiving articles after saving, and Send to Kindle.
Highlights
With the updated Instapaper browser extensions, you can easily create highlights on any web page in a few different ways:
Select text and save the article.
After saving an article, any time you select text a small popover will appear with buttons to create a highlight or note.
After saving an article, you can create a Quick Highlight by holding Alt or Option and selecting text.

Your highlights will only be available on the page during that session, are not stored locally in the browser, and will not appear on a refresh. However, when you press the Instapaper button again it will bring all of your highlights back onto the page.
With these updates, pressing the Instapaper button is not only for saving the article, but bringing your highlights, notes, and Instapaper tools directly to the webpage itself.
We built these features to be discreet, however, you can also disable each feature in the extension settings:
Chrome: Right-click Instapaper extension > Options.
Firefox: Right-click Instapaper add-on > Manage Extension > Preferences.
Safari: Instapaper macOS App Settings > Safari Extension.

Archive after Save
We received many feature requests for archiving immediately after saving. We’ve added an archive button to the toolbar that makes it easy to quickly archive after saving.
Send to Kindle
With this update, we’re also bringing support for Send to Kindle directly in the browser extensions. It’s available for Instapaper Premium customers that have a Kindle email address configured in Instapaper Settings.
We recommend migrating Send to Kindle to the browser extensions, however, we will continue to maintain support for the Send to Kindle bookmarklet as well.
Send to Kindle can also be disabled in the extension options page.
Firefox Add-On
Earlier this year, Instapaper was removed from the Firefox Add-On store after attempting a small update to fix saving YouTube videos. After being removed and several subsequent rejections, we decided to self-distribute our Firefox Add-On.
We’re happy to share that we were able to work with Mozilla to resolve the issue, and Instapaper is now available on the Firefox Add-On store again. That said, given the situation we will be continuing to support the Firefox Add-On store and self-distribution of our Add-On.
In either case, your Add-On should automatically update as long as you’re using Firefox version 109 (January 2023) or later.
Safari Extension
For historical reasons, we previously distributed our Safari Extension with the Instapaper Save app. We’re happy to share that the new Safari Extension is now available with the main Instapaper macOS app.
We recommend migrating to the new Safari Settings by doing the following:
Update Instapaper macOS to version 8.6.2.
Open Safari Settings > Extensions
Enable new Instapaper extension (icon with rounded corners).
Disable old Instapaper Extension (icon with square corners).

Instapaper macOS 8.6.2 also ships with an updated Mac Share Extension that is improved from the Instapaper Save app (e.g. saving from Apple News now works properly).
With this update the Instapaper Save app is now deprecated. We plan to remove it from the App Store in the coming weeks. After you successfully migrate, you can delete the Instapaper Save app from your Mac.
Other Minor Fixes & Improvements
In this release, we’re also shipping a number of other minor fixes and improvements:
Fix inline Twitter saving on x.com domain.
Fix for saving Hacker News threads on Firefox.
Lobste.rs inline saving support.
As always, our roadmap is directly informed by your feature requests and bug reports. Please reach out to us at [email protected].
– Instapaper Team
8 notes
·
View notes
Text

Beginner Blender Tutorial Basic Render: Part Two (Posing Our Sim, & Setting up a Scene)
(Continued from Part One)
Welcome back!
In this tutorial, we'll be posing our sim & setting up our scene!
For this tutorial, you'll need Sims 4 Studio, which you can download here!
Step 1: Exporting Poses for Blender
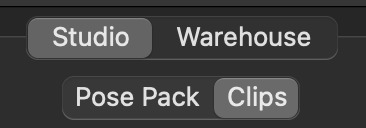
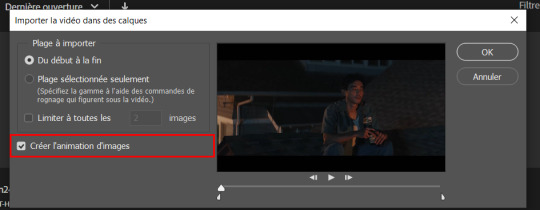
Before we can pose our sim in blender, we need to prepare the pose. I'll be using this pose set by @roselipaofficial for this render! Download your pose and open it in Sims 4 Studio. Click "Clips" at the top
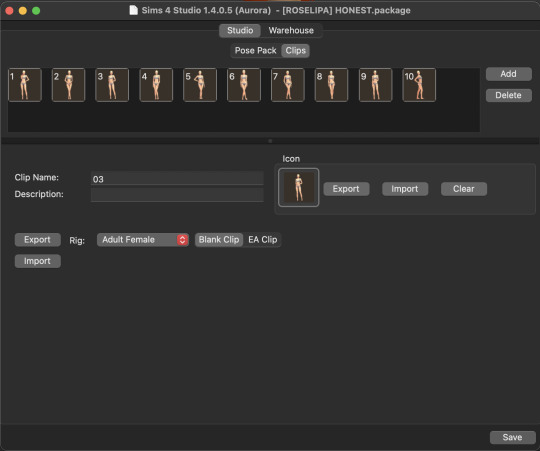
For my render, I'm going to use Pose #3 When you select your pose, the Clip Name will change (Each creator names their poses differently) Before we export, make sure you're set to the right rig! Blender does terrifying things if you export to the wrong rig. I'm posing an Adult Female sim, so we're good to go! Export the pose and save it somewhere that's easy to find! Now let's go back to Blender
Step 2: Posing Our Sim
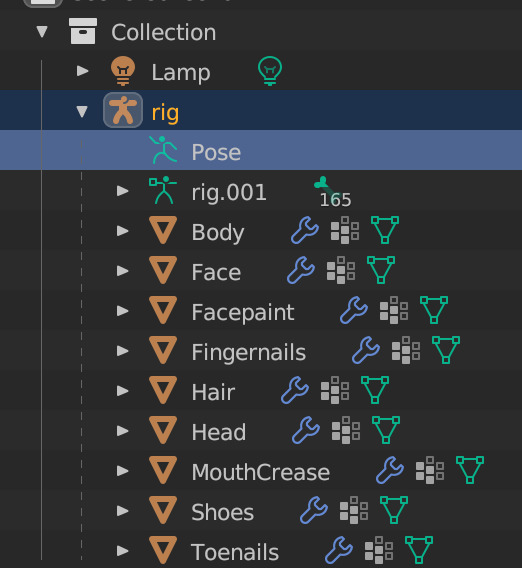
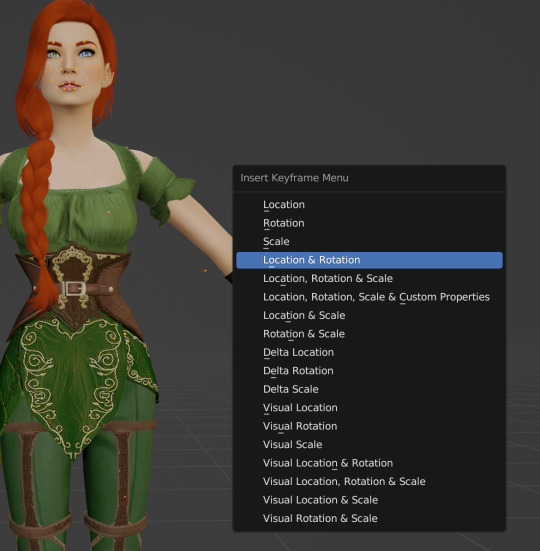
In Blender, click on "Pose" in your Outliner Then hover over your sim/3D viewport area and hit I on your keyboard (not L) to open the Keyframe menu Select "Location & Rotation"
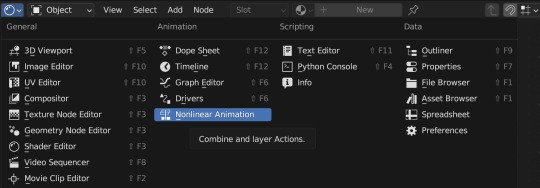
In your right-side workspace, change your editor type (window) to Nonlinear Animation This is where we'll pose our sim!
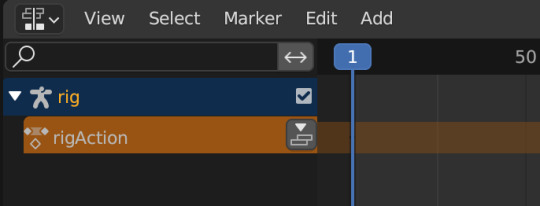
You'll see rig and rigAction. Click the little dropdown arrow next to rigAction, then you'll see a highlighted orange track

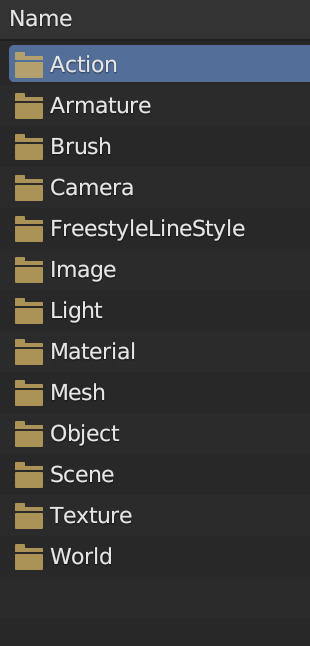
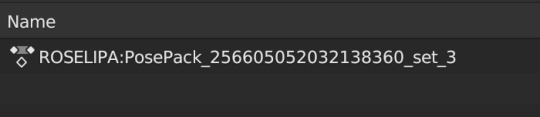
Now let's add in our pose Click File -> Append and navigate to where you saved your pose Double click your pose file, then elect the "Action" folder Double-click the file that comes up under "Action," that's your pose
It'll appear as though nothing happened... but it did! In your Nonlinear Animation window, click "Add" and select "Add Action Strip" Make sure your rigAction line is highlighted orange like mine is!
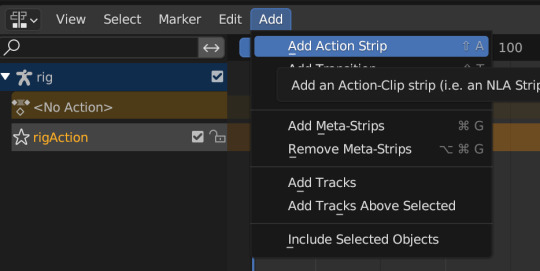

Select the Roselipa pose we added from the list, and TA DA! Our sim is posed!

Step 3: Setting up our Scene
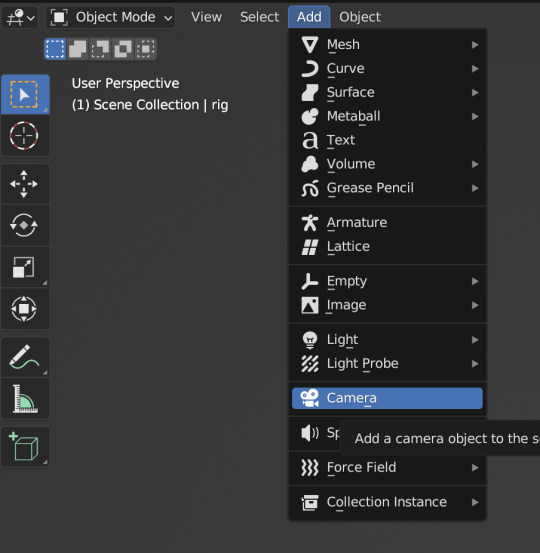
I always add in my camera before doing anything else, that way I can adjust as necessary based on what I want the final render to look like. To add in a camera, you can either select "Add" in the top bar of your 3D viewport window, or hit Shift+A on your keyboard and select "camera"

You'll see that a camera has been added to our Outliner, and we can see it in our 3D Viewport (If you still have a lamp in your Outliner like I do, go ahead and delete it now, we don't need it)


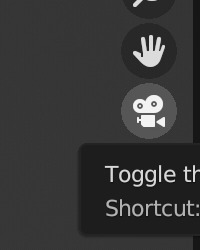
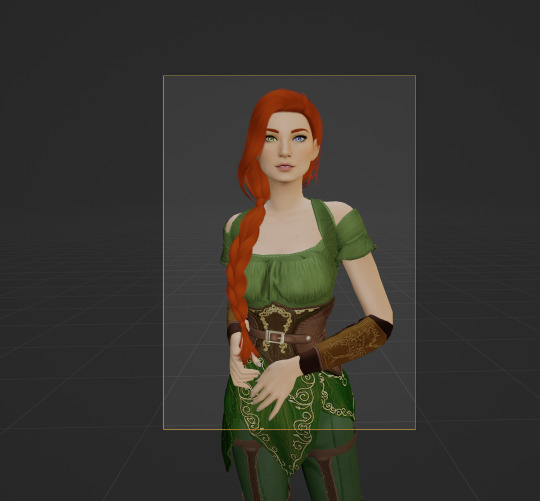
I personally like to move my camera around in real time so I know where it's going. To switch to camera view, click the little camera icon in the right toolbar of your 3D Viewport You'll see that our camera is in a weird spot, but that's ok we're going to fix it
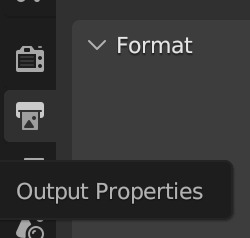
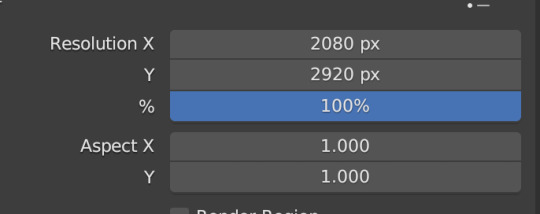
I want a portrait, so I'm going to switch the resolution settings. To do this, go to Output Properties and change the resolution values. The default is 1920x1080, but I like higher resolution renders personally, so I'm changing mine to 2080x2920. Only go up in resolution if your computer can handle it!
Now let's move our camera I like to use the Axis directions on my keyboard to get the camera where I want it Select your camera in the Outliner, then hover your mouse over the 3D Viewport Using the "G" key (the shortcut for move), combine G and "X, Y, or Z" on your keyboard to move the camera where you want it This will be fiddly at first but you'll get better with practice! I've set my camera up like this:
For basic portrait renders, I like to just use lights and a simple cube Remember the default cube we deleted in the beginning, we're going to bring it back now Add it in the same way as the camera, either by selecting "Add" in the top menu and choosing Mesh -> Cube, or by pressing Shift+A on your keyboard and selecting Mesh -> Cube I use keyboard shortcuts, so I'll add mine with Shfit+A like so:

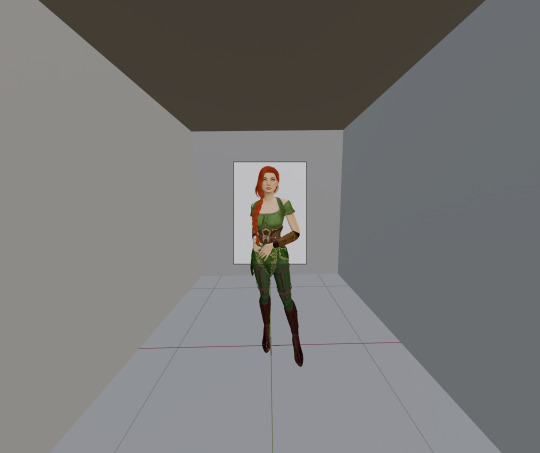
You'll probably have something like this, your sim floating in a box
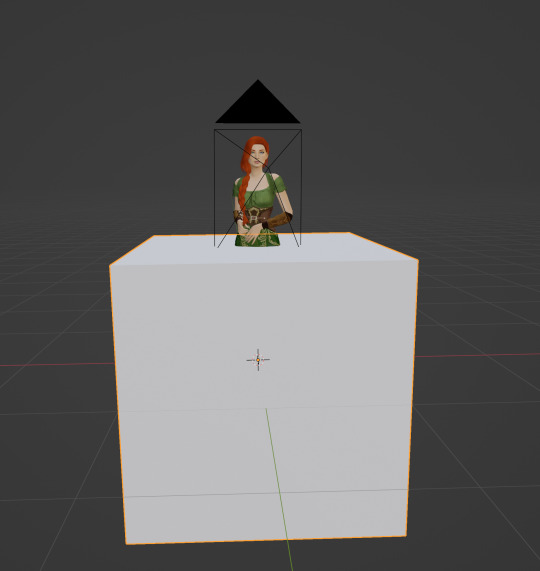
Use the same method you did to move the camera ("G" plus axis directions (X,Y,Z) to move it up and use "S" on your keyboard to scale it up To scale up, hit "S" then move your mouse outward Then center the box over your sim We want to have something like this:

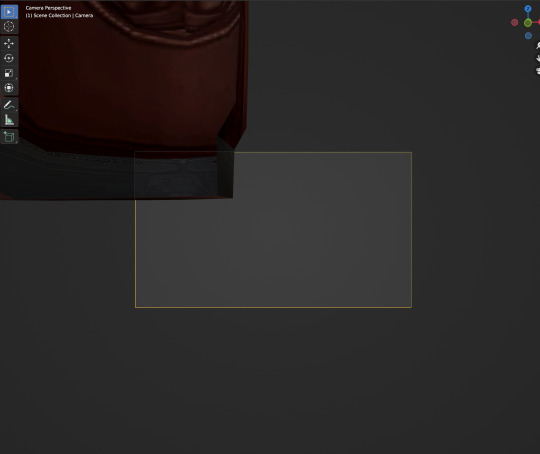
Click into Camera view (click the camera on the right) and you should have something like this:
In Part 3, we'll adjust our render settings, add lights, and render!
I'd wanted to include those in part two, but Tumblr is yelling at me about my photo limit.
If you have any questions, please leave a comment below and I'll help as best I can!
#salemsims tutorial#render school tutorial#sims 4 render tutorial#sims 4 blender tutorial#blender render tutorial#blender#blender tutorial#sims render tutorial
42 notes
·
View notes
Note
Sorry if you’ve answered this question before, but how do you make your gifs?
With an outdated version of photoshop and a lot of patience 😤 my messy process under the cut
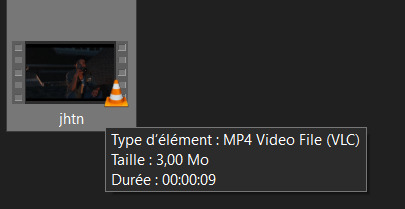
let's say i have this movie downloaded in .mp4 i open it in windows movie maker - or any other software that lets you do quick and easy edits and whatnot but me i use wmm even tho it's obsolete i knoooow leave me alone - cut the scene i want to gif out and save it into this tiny little file
then i open photoshop and go into import > video frames into layers (i may be a little bit off in how things are called on PS in english, but they should be in the same places anyway)
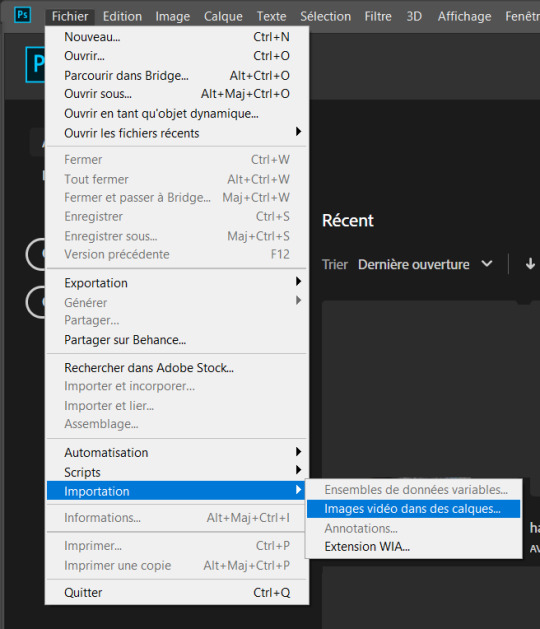
this little popup will open

since my file is exclusively the thing i want to gif i don't need to bother with the little arrow-ish things underneath the video player, they're there if you need to shorten your thing or like cut into it.
this bit here needs to be checked like this, it'll set up the gif animation or whatever. so yeah then click Ok
bim bam boom photoshop will open like this
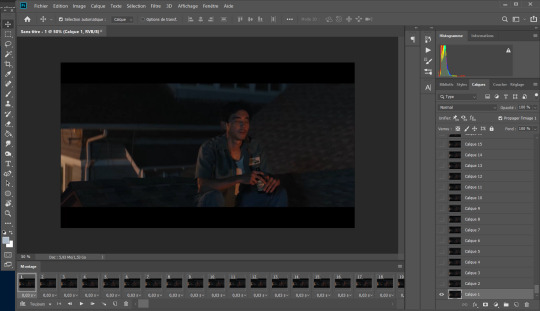
big scary image with many tiny scary images, so first of all what i do is get on the cropping tool

this will show up in the toolbar up top

and in there you set the dimensions of the gif, 1 gif in a gifset that takes up the whole post has to be 540px wide for 2 gif next to each other it's 268px wide and i can't remember 3 by 3 but i never do that so whatever who cares.
once you've set up the dimensions you want, you got this grid thing to move around and set however you want it to be
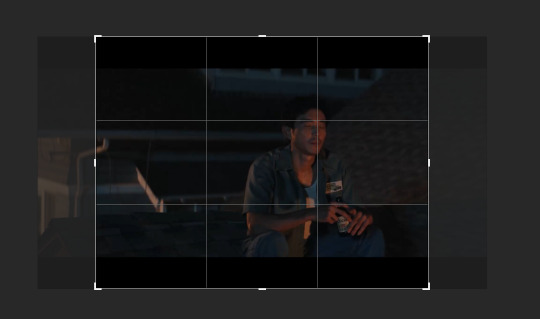
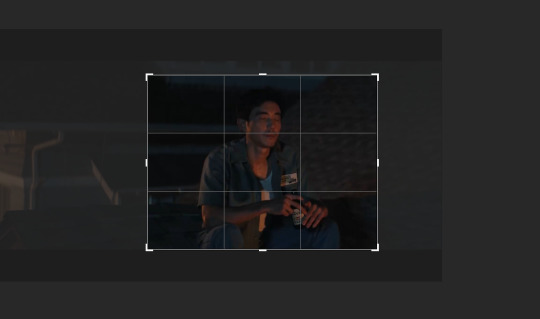
and then you wait as it painstakingly takes its time to do it
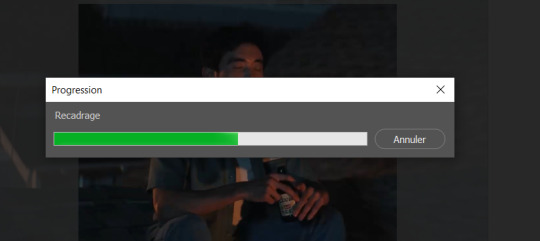
boom! it's done!

so that's your gif raw and unprepared without any filters or whatever, no length, no speed, nothing!
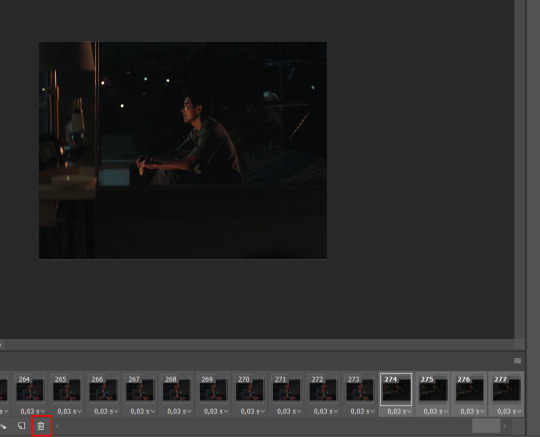
down there you've got the frames of the gif, depending how long is it'll be either a lot or very very short, in this case it's 277 frames, so already you know it's not gonna be just one gif but probably two or three - which i knew btw that's on purpose!!

first thing i do when all the cropping and setting up is done is scroll all the way through the frames to see if there's a bit that won't make it into the gif, and here, there is

these last four frames show a different bit of the scene because i cut shit very messily and don't check before opening photoshop but you know! trust the process! so make sure to select the unwanted bunch and delete them
so now hurray the gif is 273 frames and it's only the one scene i want

and now the fun not fun starts!
to the right you got these, the layers
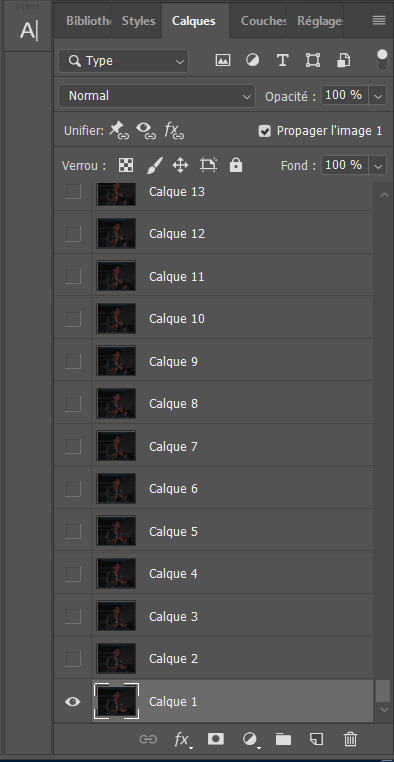
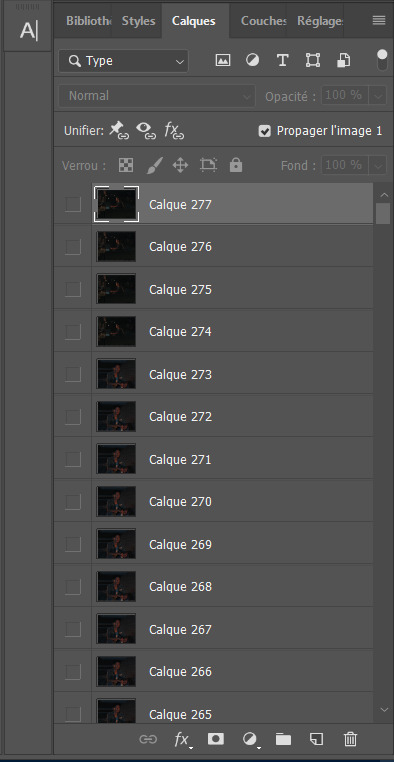
so you gotta scroll all the way up and NOT forget to click on the very last layer before you start playing around with filters and all that

this little guy right here is my bestien he's the only one i use when editing gifs, fuck everybody else on that row. when making gifs i mostly just use a combination of those three things, brightness/contrast, vibrancy and photo filters
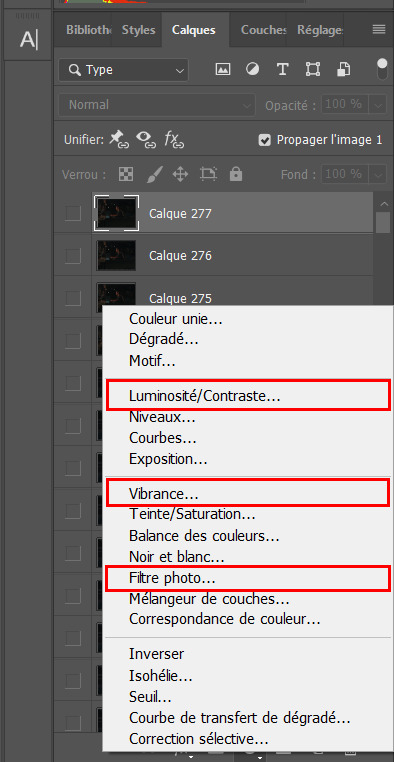
so anyway, let's fool around with those little things and make a gif (i realize now the scene is very dark and it will look very ugly but never mind! we carry on) so there a bunch of random settings added - you gotta make sure they are all the way on top of everything or else they just won't appear on every single frame

what i do then is probably very stupid and there's probably a better way to do it, but MY PROCESS, so i divide the amount of frames i've got by the number of gifs i want to make in a set, so 273/3 that's 91 (thank you google), so we look back down at the frames
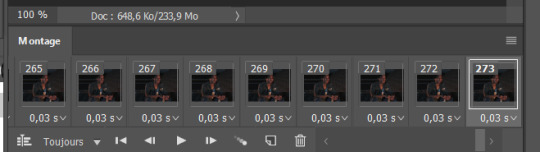
and then scroll aaaaaalllll the way back to frame 91 (if you hold shift and use the wheel it'll be much faster) and while still holding shift pressed down click on frame 92
that will select every frame from the last to that and we delete that shit

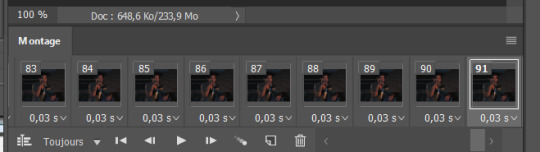
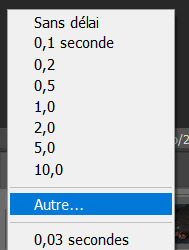
so now we only have 91 frames and that's one gif. so let's save it! but wait, no you forgot to do something! see the 0.03s? that's the gif speed or whatever, idk how it works but 0.03s is too fast, me i usually use 0.05s so what you do next is select every one of those frames you've got left and click the little pointing down arrow, that'll open that

click Other... and then set it as the speed you want
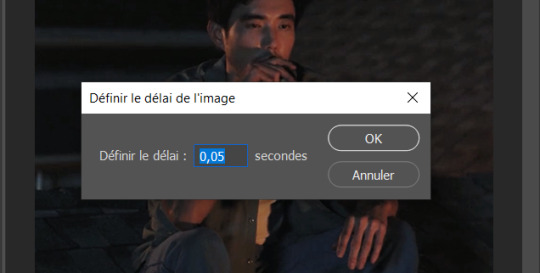
ok so your gif is at the correct speed NOW you can save it so it's file > export > save for web
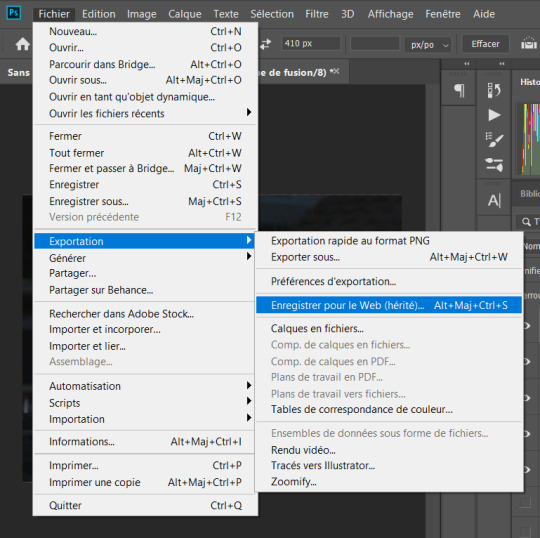
this new popup will appear
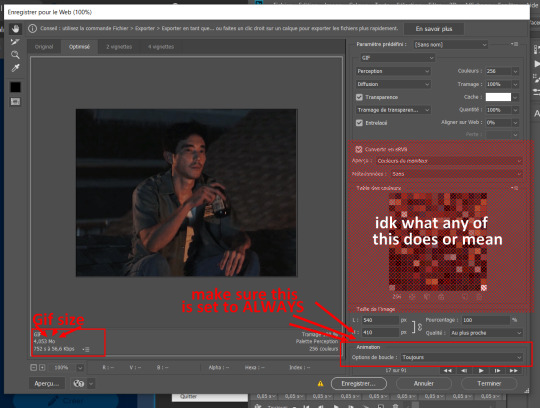
currently as of 2024 gifs can't be bigger than 10Mb/Mo, this one is 4mo

so we're good we're fine. so then you just click save, name the file whatever you want and VOILAAAA, a djeef!

(and then undo the delete and repeat everything for the other two gifs you'd want to make in that set)
7 notes
·
View notes
Text
Am I crazy or did youtube completely remove the comment section?
Edit: You can see comments if you full screen the video and then press the little text bubble icon on the lower left of the screen under the toolbar. It'll open comments to the right of the screen (only in full screen mode) in a pitiful little squashed side section. It's the stupidest fucking thing I have ever witnessed.
Edit2: Comment section is back. Idk if they immediately corrected their idioitic decision or if it was genuinely just a me thing but I'm glad I don't have to jump through hoops just to read comments anymore. Hopefully it stays that way.
3 notes
·
View notes
Note
Hi! I found your blog through your post about new DA fans in the tags! So I played through Origins and DA 2 as a mage for the first time and absolutely loved the combat and the gameplay, but I'm really struggling in Inquisition. It feels so choppy and like I have no control over anything, and on PC, you can't even see what the spells do when you hover over them on your toolbar. Do you have any tips or advice or know of any good add-ons?
Yeah I don't think DAI won game of the year for combat reasons, let's be completely honest here.
I can give you some advice but warning it is HEAVILY colored by my personal preferences when playing the game, which I mostly did on console (I only got the PC version a few weeks ago and haven't had much time to tinker around with it because I've been replaying DAO).
I'll put random bits of advice under the cut!!
Controls
First bit of super biased advice: If you're using the tactical gameplay mode and you hate it--just don't use it. Just don't! Unless it's a skill you want to keep pouring into, I'd just abandon it for now. It's terribly configured and I hate it so much. It's moderately better on PC but on console it was super un-fun to me and I think the only time I used it was to move party members out of the way of AOE attacks because their AI is wacky sometimes.
(That said, if you are a micro-manager who is like "No I need absolute control over this team" then the tactical camera IS for you. I am just a lazy gamer who plays DA games on casual or easy most of the time because I dislike the combat and want to get to cutscenes and dialogues faster. From what I remember about using it, though, it's definitely more like a "set up your next attack and then press play, then pause and set up the next attack, then press play, etc" kind of thing, which sucks for big group fights but works for big dragon fights or whatever.)
To me the game plays much better in live combat mode, but that was on console, where all I had to do was hold down the right trigger for endless attacks and then use the shortcut buttons. This is not the case for keyboard and mouse, because holding down a right click or R is tedious and isn't fun after a while.
Having messed around a tiny bit with DAI PC controls (and being a staunch console player for decades) I can say that I hate the PC controls, but I always tend to hate keyboard and mouse controls. I guess my advice here is to either remap the keyboard to suit you, which you should always do anyway for any game where they make that possible, or try playing with a console controller (which is what I'm planning on doing).
Controls aside, my issue with the combat is that if it isn't choppy, due to controls, it's...boring? At least until you get more abilities and specializations. I definitely played on casual for most of my multiple playthroughs because I just couldn't be bothered to learn the combat system forwards and backwards. I was playing the game because I loved the story and the banter and the open world concept, which was new to DA at the time.
The combat DOES get more fun/better once you start unlocking more abilities to use, but that does take a small bit of time. I'm not sure about any mods at the moment to help with the ability descriptions but maybe someone in the replies will know! For me, I think I just got used to memorizing them...which, now that I think about it, is poor accessibility.
Battle Advice
I can come back later with some PC-specific advice but for now, I can say that if you switch to live-combat mode, then it's a matter of playing the game as a damage control strategy. You're going to get hit, because there are no robust evasion options and no blocking at all (from what I remember), so you have to adapt with that knowledge in mind.
Keep up your Barrier and Guard abilities, because the temporary HP they give you is essential to surviving a fight. Potions suck. There is no healing. So it's better to tack on as much temporary HP through Barrier and Guard before enemies start chipping away at your actual HP.
Focus your efforts on crowd control (freezing enemies, stunning them, etc) and taking down distance fighters (archers, mages) first, because like I said, you're going to get hit, and every distance fighter has a near-perfect homing beacon on you with their projectiles. The squishier mooks need to go down first so they don't pester the hell out of you when fighting bigger things. Bigger things are slower, they can wait.
Also, adjust your companion's tactics (this is worth doing in any DA game) so that they use the abilities and spells you want to see more often. Having Barrier set as a preferred spell so your mages use it more often is honestly an essential tactic choice, and I'd say the same for upper-level Guard abilities.
A balanced party can make or break a battle encounter. The AI isn't always great (I guess that's what tactical view is for) but in general you always want a warrior to be up front taking hits while at least one mage and one other distance fighter (another mage, or Varric/Sera as an archer) is staying out of direct damage but still dishing hits and status effects. Your fourth companion (or you) can make up any difference that needs filling after that.
If you're playing a mage, use Fade Step to get out of range quickly and then get used to being the battlefield controller--you can deal damage, but you can also more quickly apply status effects (freezing, burning, etc) than anyone else. Fade Step + Tactical Camera to readjust + see what's going on the battlefield + then make your next move = might end up being your best friend, if you're a tactical mage player lol
Status effects and elemental damage do way more than you think. Way more than you think.
Don't be afraid to use grenades. They're more effective than they seem, and Jar of Bees is just fun in general.
And lastly, keep up with your weapons and armor. Schematics will be your best friend because they allow you to craft and upgrade weapons and armor until they're almost OP for your level. Nothing you find as loot will top a Masterwork version of a high-tier weapon or armor you make yourself.
I don't know if ANY of that helped, but maybe!! Hopefully you'll hit your stride soon and enjoy various aspects of the game!! <3
#asks#I tried my best#in this case I am actually quite useless at PC advice#I've always preferred DAI as a console game#but hey mutuals!!!#If you have advice or mods please put them in replies!!#we're a community for a reason <3#dragon age#dragon age inquisition#dai
5 notes
·
View notes
Text
For the last week I’ve deleted the tumblr app and using mobile web.
here’s my mini review of what’s good and what’s not so good:
the good
iPhone doesn’t overheat- there’s something seriously wrong in tumblr iOS app that’s causing it to run so hot, it drains battery faster and the heat is also bad for long term battery health
no weird timeline scrolling glitches where it jumps around (yay) and scrolling is super smooth
no ads (because I’m just using safari, and I also have multiple layers of ad blocking enabled)
tags are editable: in iOS if you make a typo in a tag you have to delete the entire tag and start again, in web you can just click into it and edit any part of the tag
less tumblr live: it’s at the top of posts, but quickly scrolls out of view, it’s also in the sidebar navigation but that’s only visible when it’s active
posting photos is fast: on iOS app it takes me a long time for photo picker to open up and load photos, and switching between albums is also slow on iOS app. Always seemed strange to me since it’s just your local photos. On mobile web it’s instant.
reblogs don’t get randomly yeeted: on iOS sometimes I’d be typing a long post and switch apps to look something up and coming back to tumblr app it would be obliterated. Sometimes it would give option to restore a draft and sometimes it wouldn’t. Web doesn’t do that.
not so good
no tab bar, so switching between posts and your activity etc is an extra step and takes longer
If you have multiple blogs it’s even more fiddly to switch between activity for your different blogs
no quick reblog/add to queue: I looooved the long press to add to queue on iOS app, and to easily choose which blog to post/queue in a single question, and miss it dearly on web
no double tap to like a post
accidental swiping between history: this is a safari thing not a tumblr thing, but sometimes safari things you want to swipe to return to a previous page when you’re just trying to scroll down. It’s annoying but not specific to tumblr and same for all web apps
Overall I miss some of the details from tumblr iOS app (including the icon refreshes) but my phone battery thanks me for not using it.
Some of the annoyances with tumblr mobile web are not having the toolbar and using the hamburger/sidebar model navigation but to avoid that you can just have multiple tabs open and switch between tabs instead of using the tumblr navigation.
5 notes
·
View notes
Text
The new Link Cleaner

I released my Link Cleaner web app in 2021 as a way to quickly remove tracking parameters, search queries, and other extra fluff from web links. It was mostly intended for phones and tablets, since editing URLs with a touchscreen keyboard is especially awful, but it was also helpful on desktop browsers.
Link Cleaner is now my most popular software project, with over 44K users and 90K links cleaned just in 2025. I've wanted to give it a proper design overhaul, especially for larger screens, and the big update is now complete.
New design
If you have used Link Cleaner, you know the interface was simple but (mostly) functional. The new version is not a massive change: it's just a lot of usability improvements and a more refined design.
The home page still has the same basic layout, but the URL text box is closer to the center of the screen (more like the Google or DuckDuckGo home pages). There's a new header that I can update with different backgrounds and text—right now it has a Pride Month theme.

The navigation bar has also been moved to the top of the screen, and more closely matches the design of the recent PhotoStack update. The navigation bar (and URL field, if you are on the main page) remain pinned to the top of the screen as you scroll down. The home page also has new explanations of Link Cleaner's core features.
The Bulk Mode page has also been slightly updated, with text fields that now use most of your available screen space. There are many other small changes, like the tab icon (favicon) being more readable in dark browser themes, and improved accessibility on all popup panels.
New features
The navigation bar's History button opens the new Clean History panel, showing all the links you have cleaned recently. This is more secure and (hopefully) more useful than the previous History page, since your links are not actually saved in storage. They're gone if you close the window or switch to another page.

The Install button opens the new Install panel, which can guide you through installing Link Cleaner as a web app, adding the Shortcut to your Apple devices, and using Link Cleaner in custom scripts and automations with the custom share URL. It also includes a new bookmarklet, which you can add to your browser's bookmarks toolbar to instantly get a cleaned URL for the current page in a Link Cleaner popup window.
Link Cleaner now uses the same text field for the URL input and cleaned link output, removing the need to click the back button each time. You just paste in the text field again, or press Enter/Return on your keyboard, to clean the link again. There's still a 'Clear' button for touchscreen devices, since selecting and removing all text is more difficult without a physical keyboard.
If you have a device with a physical keyboard, the merged text field means you can now paste a link with Ctrl+V/Cmd+V, then immediately press Ctrl+C/Cmd+V to copy the cleaned link. No reaching for the mouse or tabbing around required. This update removes the experimental option for automatic clipboard copy, since it was not reliable and difficult to test, and the new keyboard accessibility is a close enough replacement.

The share and copy buttons in Link Cleaner are mostly unchanged, but the QR code option now has a 'Save to Downloads' button. If your browser supports sharing files, you can also quickly share the QR code to another installed application. The QR codes are still generated locally in your web browser, for better privacy and offline support.
Importantly, this update does not remove any functionality, except the experimental automatic clipboard copy that didn't reliably work. If you have a script, bookmarklet, Apple Shortcut, or some other automation using Link Cleaner, it should still work exactly as it always did.
Try Link Cleaner
You can use Link Cleaner by visiting linkcleaner.app in your browser. The code is still open-source on GitHub.
0 notes
Text
Adobe Illustrator Classroom in a Book Chapter 5 & 6 Exercises - VCDM Visual Literacy: Elements of Design
Chapter 5 Review Questions
Name three ways to change the size of an existing active artboard.
2. What is the ruler origin?
3. What is the difference between artboard rulers and global rulers?
4. Briefly describe what the Scale Strokes & Effects option in the properties panel or Transform panel does.
5. Briefly describe what the Puppet Warp tool does.
My Responses
To change the size of an existing artboard, you do any of the following:
Double-click the Artboard tool, and edit the dimensions of the active artboard in the Artboard Options dialog box.
With nothing selected and the Selection tool selected, click the Edit Artboards button in the Properties panel to enter Artboard Editing mode. With the Artboard tool selected, position the pointer over an edge or corner of the artboard, and drag to resize.
With the Artboard tool selected, click an artboard in the Document window, and change the dimensions in the Properties panel. The ruler origin is the point where 0 (zero) appears on each ruler. By default, the ruler origin is set to be 0 (zero) in the upper-left corner of the active artboard.
2. The ruler origin is the point where 0 (zero) appears on each ruler. By default, the ruler origin is set to be 0 (zero) in the upper-left corner of the active artboard.
3. Artboard rulers, the default rulers, set the ruler origin at the upper-left corner of the active artboard. Global rulers set the ruler origin at the upper-left corner of the first artboard, no matter which artboard is active.
4. The Scale Strokes & Effects option, which can be accessed from the Properties panel or the Transform panel, scales any strokes and effects as the object is scaled. This option can be turned on and off as needed.
5. In Illustrator, you can use the Puppet Warp tool to easily twist and distort artwork into different positions while adding pins to hold parts of it stationary.
Chapter 6 Review Questions
By default, what type of path is created by the Curvature tool, curved or straight?
2. How do you create a corner point when working with the Curvature tool?
3. How can you change the way the Pencil tool (✏️) works?
4. Explain how you can redraw parts of a path with the Pencil tool.
5. How do you draw a straight path with the Pencil tool?
6. How is the Join tool different from the Join command (Object > Path > Join)?
My Responses
When drawing paths with the Curvature tool, curved paths are created by default.
2. When drawing with the Curvature tool, either double-click an existing point on a path to convert it to a corner or, while drawing, press Option (macOS) or Alt (Windows) and click to create a new corner point.
3. To change the way the Pencil tool (✏️) works, double-click the Pencil tool in the toolbar or click the Tool Options button in the Properties panel to open the Pencil Tool Options dialog box. There you can change the fidelity and other options.
4. With a path selected, you can redraw parts of it by moving the Pencil tool pointer over the path and redrawing part of it, ending up back on the path.
5. Paths you create with the Pencil tool are freeform by default. To draw a straight path with the Pencil tool, press the Option (macOS) or Alt (Windows) key and drag to create a straight line.
6. Unlike the Join command, the Join tool can trim or extend overlapping paths or the ends of an open path as it joins, and it doesn't simply create a straight line between the anchor points you are joining. The angle created by the two paths to be joined is taken into account.
0 notes
Text
How To Stop Doomscrolling And Rediscover The Rest Of The Internet
Some time ago, I ran across “The Old Web” on Devon.lol, and was gobstruck by the memories.
tl;dr- I got tired of the commercial web, so I went looking for the Old Web. I found it through directories, blogrolls, webrings, and some weird search engines no one has heard of.
Unlike in the days of handbuilt HTML, MUDs, and BBSes, there are a number of reasons why you have to deliberately look for this today. A lack of monetization/capitalism and a relatively high bar to entry come to mind, but regardless of the reason, the end result was that the internet was not dominated by a few “superstores” or a row of cookie-cutter digital McMansions. It was organically grown; you were just as likely to find someone’s NeoPets fansite or collection of essays as you were to find an NFL team’s official web page.
And holy hell, has it just gotten worse and worse.
Whether through aggressive SEO optimization, thumbs on search results, TikTok’s algorithm, or how Meta has pretty successfully done what CompuServe and AOL had hoped to do, the internet has become… homogenized. Rather than a “marketplace of ideas,” it’s become dominated by siloed monocultures of both style and substance.
My delight with truly decentralized social media — Mastodon, Pixelfed, et al — has been with how gloriously strange it can be {1.} as opposed to the fascist midden heap of X and Meta. {2.}
There are folks who are resurrecting older tech forms such as gopher, or trying to craft new tech, to circumvent this problem, but… well, they’re workarounds.
But the old web — the strange and quirky web — is still out there. Accessible from your browser. Right. Now.
But let’s be honest: there’s a reason why the quirky web gets passed by. It can be hard as hell to find. An entire blog industry (such as boingboing grew up around simply finding other neat things to pass along. Some were bought by media conglomerates (see above about silos), some just shut down like StumbleUpon. And sometimes there’s simply linkrot where links or entire directories disappear.
But all is not lost.
There’s several onramps to being able to find the quirky web now. For a larger starting point, check out Onramps To The Old Web; they include blogrolls and obscure search engines. I’m going to focus on “stumblers,” or discovery engines.
WikiTok has gotten some press recently as an infinite-scroll kind of way to rabbithole into Wikipedia. Links open in a new tab, leaving the scroll page open.
Indieblog.page uses lists of blogs with RSS feeds to show you new, random posts that you might not have otherwise seen. Opens pages in a new tab, with no header bar.
Kagi’s Small Web also uses a hand-curated list of blogs with RSS feeds, and not only provides a completely free (and without login) site with a (small, useful, ad-free) toolbar with fediverse-friendly sharing options to let you keep exploring easily, but incorporates the results into their search engine. You can read about their methodology here.
The Forest’s methodology is opaque, and on purpose, as they’re wanting to bring back unpredictability. You are as likely to hit a home page as a blog with this site, which is opened in a new tab.
Cloudhiker does not require a login to use (though it does to submit a site); it uses cookies to select categories if you don’t have a free account. It has a topbar as well with single-line text advertising; it also has a premium version without advertising.
Mix was built (rather literally) using StumbleUpon’s code; it also requires a login, and is the “sleekest” of the bunch, with a strong emphasis on images and graphics. It appears that a lot of it is snagged from Tumblr and Reddit. In my experience, it is less a discovery engine any more than a summary of the Tumblr/Reddit/TikTok/Imgur pipeline.
Each of these six has their strengths and weaknesses, both in terms of user experience and the kinds of things you’ll be exposed to. I’m personally most partial to Kagi’s Small Web; the fediverse sharing options really make me happy, and it tends to offer up things that are eclectic without being utterly chaotic.
That said, all of them are a damn sight better than just doomscrolling.
{1.} Currently this is somewhat skewed because of the trashfire of US politics, and how violently it attacks those who don’t “fit in”; I’m definitely part of the problem there, though I’m making a solid effort to not just add to the doomscroll. {2.} Seriously, why are you still on Meta/X? Are you really that comfortable with a place that thinks bigoted slurs are okay?
Originally posted at https://ideatrash.net/2025/02/how-to-stop-doomscrolling-and-rediscover-the-rest-of-the-internet.html
1 note
·
View note
Text
Converting Google Slides: Simplifying Format Changes for Effective Sharing
High-quality professional Google Slides design: Expert Q&A Insights
1.How do I duplicate a Google slide?
To duplicate a Google Slide, open your presentation, right-click on the slide you want to duplicate in the left sidebar, and select "Duplicate slide." Alternatively, you can select the slide and press Ctrl + D (Cmd + D on Mac) to create a copy. The duplicated slide will appear right after the original.
2. How do I center text in Google Slides?
To center text in Google Slides, select the text box or highlight the text you want to center. Then, click on the "Align" button in the toolbar (it looks like horizontal lines), and choose "Center." Alternatively, you can use the keyboard shortcut Ctrl+E (Cmd+E on Mac) for quick alignment. Your text will now be centered in the text box.
3. How do I import slides in Google Slides?
To import slides in Google Slides, open your presentation, click on "File," then select "Import slides." Choose the presentation you want to import from, select the slides you wish to add, and click "Import slides." The selected slides will be added to your current presentation.
4. How do I convert a Google slide?
To convert a Google Slide, open your presentation, click on "File," then choose "Download." You can select your preferred format, such as Microsoft PowerPoint (.pptx), PDF Document (.pdf), or others. The file will download to your device in the selected format.
5. How do I layer shapes in Google Slides?
To layer shapes in Google Slides, select the shape you want to move. Right-click and choose "Order" from the menu. You can then select "Bring to front," "Send to back," "Bring forward," or "Send backward" to adjust the shape's position relative to others. You can also use the keyboard shortcuts Ctrl + Up/Down Arrow for quicker adjustments.

Visit: VS Website See: VS Portfolio
0 notes
Text
I fucking hate the PS5 and it's only been one day.
/start rant
One. The USB drive is on the back of the console. Meaning I have to move everything else I have around it and turn that huge mofo (even the slim version is fucking huge) around just to access the USB port and put my thumbdrive in it so I can copy videos and screenshots (I don't upload to the social crap they have). Who's fucking brilliant idea was that? Fuck you. I have a normal USB thumbdrive. Not those tiny ass mini shits like on the front of the console. Do they even make thumbdrives with that small of an output? Wtf. And why should I have to buy yet something else just to transfer fucking videos. Jesus Christ.
Two. I hate the PS5 controller. I have smaller hands and carpal tunnel in both wrists and that huge fucking controller cramps my hands and wrists up worse than my mouse does. The PS4 controller is smaller and easier to hold onto and I don't feel like my hand is being stretched out on a torture device. The PS5 controller is fucking huge and has awkward handles. Why? What is the purpose of those weird ass handles? To make people with carpal tunnel stop gaming? Nah it just makes me want to continue using my PC for everything. Yes, I'm aware I can use my PS4 controller on the PS5. But guess what? You can't use it on PS5 games. Meaning I can't play the Last of Us II remastered unless I use that cramp inducing controller. Great. I spent over $400 and an extra $10 to play a game I can't play because the controller sucks. Fuck you Sony. I should've waited for the crappy port to PC. And no using the PS4 controller remotely is only going to make shit worse when playing because it will lag at the most crucial moments - like when you're trying to kill a Clicker and oops you missed by one second because the controller is lagging from how it's set up.
Three. Rockstar games is a bunch of dicks that won't let me transfer my PS4 saved data for GTA Online to the PC version. Let's not be like BHVR and allow cross-progression because that's too much fucking work. So I either upgrade to a shit PS5 for GTA Online or I lose all my cars when PS4 dies. Great. Fuck you Rockstar Games. I don't buy Shark cards. Apparently, I'm even dumber because I bought a $400 console that I hate just to keep my fucking game progress. Again, fuck you Rockstar Games.
Four. What in the modern shitty fuck is this menu on the PS5? The PS4 menu was perfect. When I pressed the PS button it took me back to the main screen. When I do that on the PS5 it fucking brings up a toolbar where I have to search for the home icon and then go to the main menu. What the hell is that bullshit? Why so many steps to get back to the fucking main menu? I swear to god these people don't know how to design shit. Let's just make everything over complicated and ugly modern with ugly pop up windows that are so small no one can see what the hell the text says. The "large" accessibility doesn't fix this for me. Also I can't find the power off button when on the main menu. I have to find that stupid little toolbar piece of crap and then power off my device. Why? Why isn't the power off option up there with the settings and profile buttons? Holy shit what is wrong with these designers? And the widgets thing..oh boy. That went out of style with Windows Vista. What the hell is Sony smoking? Are they on crack? I bet they are.
Five. Why the fuck is the Slim version still so fucking huge? It's two times as large as my PS4 Slim. What in the holy hell where these people on when they designed this shit? And it looks like a fucking Stormtrooper and I've already scuffed the ugly white siding from having it sit on top of my PS4 because I had to keep turning the fucking thing around to get to the back of the ports where the actual USB port is. One day and that ugly piece of shit is already scuffed. Great. Anyone want to buy an ugly scuffed PS5?
Six. Where the fuck are my themes? Oh, there are none. No themes whatsoever. You mean I can't listen to the Firewatch theme while trying to figure out what to play? What's that you say? Install the game? Oh you mean so I can linger on it's icon? That's not a fucking theme. And I don't own Firewatch on PS. I have it on Steam. But I owned the PS4 Firewatch theme because I liked listening to the song on the main menu. I am a picky little shit and I want my themes back. I am not buying a game just so I can linger on an icon and listen to a theme song. No, I don't want previews of every game I highlight. I want to hear my actual theme from you know the theme I fucking chose for the OS. And I have no intention of re-buying the game on PS when I already own and perfected it on Steam. I just want my goddamn themes. I swear every year shit gets more modern and more ugly. No individuality, no creativity, nothing to make anything "you". Shit started going downhill when Facebook arrived. I swear Myspace was the last of actual individuality where you could make something feel like "yours." These days everything is modern and blah and grey and ugly. No bright colors. No creativeness. Just corporate modern blah bullshit. Obviously this rant goes deeper than losing themes on a PS5 but I digress. Everything is shit (especially the internet) and I want to go back to when it wasn't.
Seven. What in the fuck did they do to the trophy screenshots? What was wrong with the screenshots from PS4? A nice screenshot of what you were doing with a small notification on the upper right hand corner. Nice. Sleek. Unobtrusive. PS5 suddenly has some big ass black bar at the bottom cutting off most of the actual image with a dumbass trophy and the name. Um..wtf is wrong with the designers? What in the world were they thinking? "Let's fuck up the trophy screenshots. It will be so fucking funny! This black bar hides half the screenshot. LOL" That's what they were thinking.
Conclusion. The only redeeming quality this console has is that yes it is faster but it's so not worth it to compromise all this annoying shit. It may not be any inconvenience to YOU, but it is to ME and I am a bitch and I like things a certain way. I'm fucking autistic, leave me alone. All this new fangled ugly shit overstimulates me and it ends up pissing me off. I may have to go back to PS4. If not for the controller issue alone. TLOU2 Remastered is coming to PC and while TLOU1 ran like shit on my computer (my computer isn't that bad but for some reason TLOU1 ran like garbage on even the lowest setting) it's still better than having to play part 2 with a controller that is going to make my hands freeze in cramp position permanently. Yes, I'm a picky complaining bitch. Fuck you.
Holy shit, where's the Tylenol?
/end rant
#ps5#playstation#i don't fucking care what YOU like#this is what I have a problem with#i'm legit going back to my PS4 lol#there's hardly any games for PS5 anyway lmfao#I'll take slow loading menus over lack of originality any day
0 notes
Text
Conch AI Review – Pricing, Features, Alternatives, and Ratings
Conch AI stands out as one of the most sophisticated AI-powered writing tools available, capable of generating content that avoids AI detection. Whether you're a student or a researcher, Conch AI can streamline your writing workflow, making you more productive. It offers high-quality content generation and a variety of AI tools to enhance your writing process.
About Conch AI
Imagine having a seamless, tireless assistant that perfects your writing. Technology has made this possible with Conch AI. This tool allows you to write, edit, check for plagiarism, and rewrite content while maintaining the original theme and tone. Conch AI meets various writing demands and excels at transforming sentences and paragraphs, helping you refine and rephrase your content effortlessly. It interacts with your writing, boosting productivity and ensuring high-quality output tailored to your style.
Conch AI Review Summary
Performance ScoreA+Average Load Time0.4 secQuality of ContentPasses AI Detection & PlagiarismAI-Based TechnologyMachine Learning, NLPUser InterfaceHighly Engaging and IntuitiveFeaturesRewrite & Highlight, Summarize text, Chat, Templates, Humanizer, Finder, Boost WritingPricingFree & Paid PlansAccuracy98%SupportGoogle Docs, PDFs, Gmail, LinkedIn, News Websites, etc.
Introduction to Conch AI
Conch AI is an innovative, user-friendly writing tool catering to students, professionals, and content creators. This cutting-edge AI tool helps writers produce top-notch content with ease and efficiency. It offers a range of tools to help students generate quality content for their papers. One of its standout features is its ability to rewrite sentences and paragraphs, allowing users to refine their writing effortlessly. With Conch AI, structuring essays, articles, or any written piece becomes seamless, welcoming writers of all levels.
How Does Conch AI Work?
Conch AI operates on unique algorithms that rewrite content to remain undetectable by AI systems. It assists in crafting the next sentence based on the context of previous writing, ensuring smooth idea flow and preventing creative interruptions. With Conch AI’s advanced detection tools, users can easily bypass AI detectors like GPTZero and Turnitin, adding an extra layer of protection.
Conch AI Capabilities
Here’s an overview of Conch AI’s features and specifications:
Features
Auto-completion: Utilizes Transformer-based architecture like GPT-3 for sentence auto-completion.
Summarization: Offers concise text summarization.
Paraphrasing: Uses Statistical Machine Translation or Back-Translation for paraphrasing.
Grammar & Style Checking: Removes grammatical errors and suggests improvements using NLP.
Content Generation: Generates text based on prompts using GPT-3 and Large Language Models.
AI Detection Bypass: Built-in tools to make content undetectable by AI algorithms.
How to Use Conch AI
Conch AI is a powerful writing tool that enhances productivity and engagement. Here’s a step-by-step guide on how to use it:
Download the Conch AI Extension
Visit the Conch AI official website and click "Get Chrome Extension," or directly search for Conch AI on the Chrome web store and add it to Chrome.
Open the Web Application or Chrome Extension
Access the Conch AI extension from the Chrome toolbar or through the official website.
Highlight & Rewrite Sentences & Paragraphs
Highlight the text you want to rewrite, click on the Conch AI extension, and watch the transformation.
Use Conjunction Key in Google Docs or Gmail
In Google Docs or Gmail, use Ctrl+Shift+Q to get assistance from Conch AI. Select the text and press these keys to generate content based on the previous text.
These steps demonstrate how easy it is to use Conch AI to enhance your writing. The tool also offers an incredible feature to remove AI-generated content and rewrite it to avoid detection.
Bypassing AI-Generated Text with Conch AI
Conch AI’s unique rewrite feature allows you to bypass AI-generated content detection. Here’s how:
Generate text using any AI tool like ChatGPT.
Copy the text and paste it into an AI detector tool like GPTZero to confirm it is AI-generated.
Paste the text into Conch AI, use the rewrite feature, and set the desired length and tone. The rewritten text will pass AI detection checks.
Frequently Asked Questions
What Are The Best Alternatives To Conch AI?
Alternatives include Quillbot, Writesonic, and Copy AI.
Is Conch AI Safe to Use?
Yes, Conch AI is a safe platform.
How To Create An Account On Conch AI?
Use your email address and password to create an account.
Does Conch AI Bypass AI Detection?
Yes, Conch AI can bypass AI detection with its rewrite feature.
Is Conch AI Free?
Conch AI offers free and paid subscription plans.
What Are Tokens In Conch AI?
Tokens represent the number of free words you can use. The free version offers 3000 tokens. For unlimited access, purchase a subscription.
Conclusion
Conch AI revolutionizes the writing process with advanced AI technology. It makes writing more convenient, less tedious, and faster. This guide provides a comprehensive overview of Conch AI’s features, usage, and benefits. Embrace this incredible tool to enhance your writing endeavors.
0 notes