#blender controls
Explore tagged Tumblr posts
Visit Tumblr Blog
Explore Tumblr blogs with no restrictions, modern design and the best experience.
Last Seen Tumblr Blogs


Fun Fact
BuzzFeed published a report claiming that Tumblr was utilized as a distribution channel for Russian agents to influence American voting habits during the 2016 presidential election in Feb 2018.
Text
Blender: Which Buttons Do I press? (Part 1)
There are a lot of tutorials where you already need to know how to "do the basics" like "maneuver the camera." So this tutorial is focusing on the Buttons- not on the sculpt or the object, just on the buttons and shortcuts that I personally use in Blender.
Note: You will need a mouse with 3 buttons / scroll wheel for this.
Before we start, I'm going to explain which shortcuts I use in this, but, not to make myself redundant, there's a shortcut for seeing shortcuts: Press Spacebar + Shift to see all available shortcuts in each mode.
I'm using Blender 3.6 for this tutorial. I recommend you use the same. It's completely free and has a lot of great features! For this tutorial though, 3.4 will likely work as well.
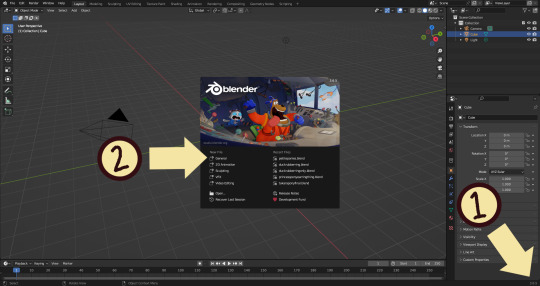
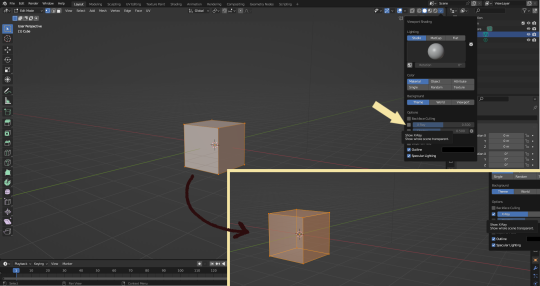
Click "General" under New File.
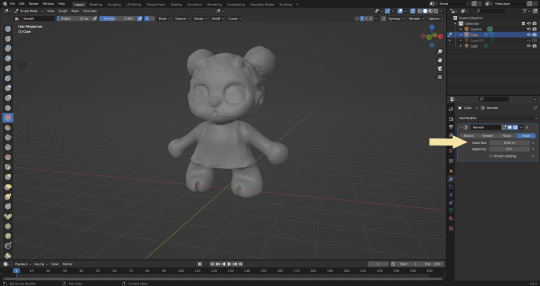
Your screen should look like this. There are 3 default objects in the file: Camera, Cube, and Light source.
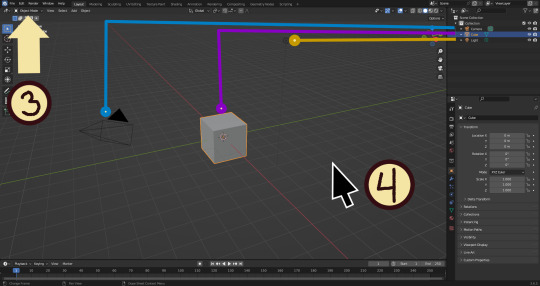
3. This bar indicates that you are in Object mode. This menu will allow you to go into other modes depending on the object you have selected.
4. Lets talk about shortcuts. You can zoom, rotate, and move the screen using buttons at the top right, but I haven't marked those because I will teach you a better way. Feel free to click them all and see what they do, but I assume you're here because you don't want to explore every button in this godforsaken program the hard way.
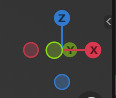
Below, the Left and Right buttons are marked as a reminder as well as the Middle button which is also the scroll wheel (press down to click it)
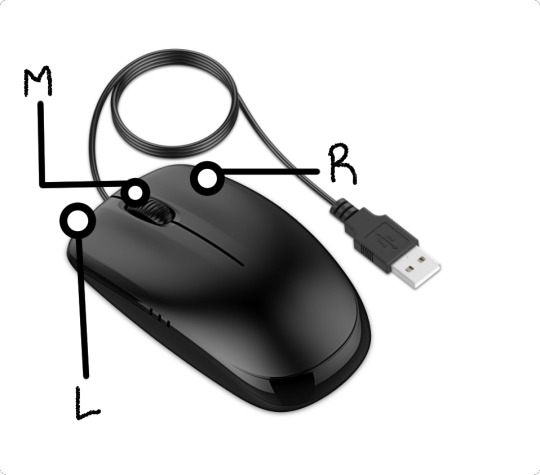
Left click: Select an Object Left click and drag: Selects multiple objects Scroll Wheel: Zoom in and out Middle Click and drag: Rotate your view Shift + Middle Click and drag: Move your view Right click: Brings up a menu that won't be relevant here. Shift + Right Click: Moves the 3D cursor. Not important for this tutorial, but I do it on accident a lot. Hit Shift + C to reset the cursor and also to reset the viewer position to see all objects at once.
Move the viewer around as practice! You're gonna need to do it a lot while modeling. If you have a keyboard with a Numpad (the calculator-looking thing on the right side, says Num at the top) you can use Numpad 1-9 to automatically adjust the view to front, left, right, backwards, and different angles. If not, test out the rotate tool at the top right which does something similar.
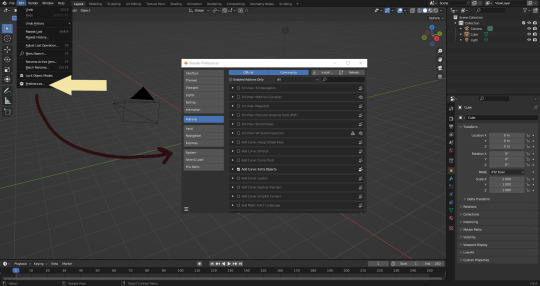
There's a helpful menu I use to switch between Modes (if you hit the dropdown menu where it says "Object Mode" you can do this without the shortcut); click Preferences to enable it.
Hop over to the Keymap section and check "Tab for Pie Menu"

And then close the window. No "Save" button is needed.
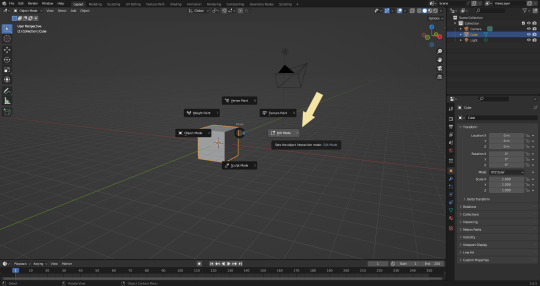
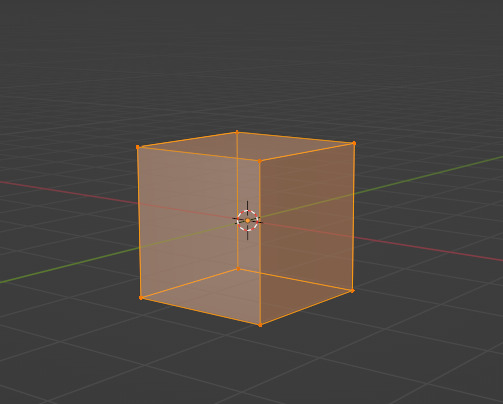
Now that you have the shortcut enabled, select your box with Left Click, hit Tab and Left click "Edit Mode"
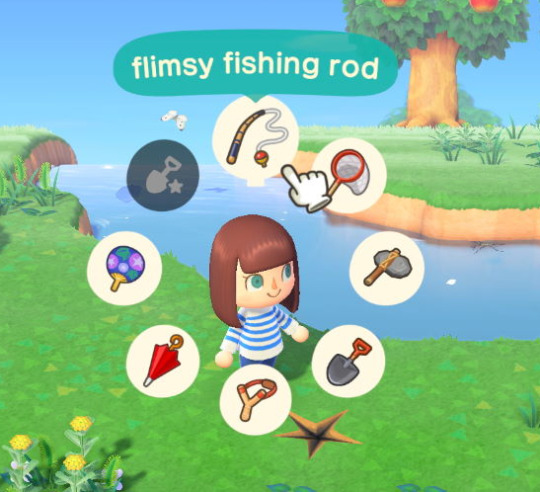
And yes, this is just like the Animal Crossing tool ring:
Now that you're in Edit Mode (You can swap back anytime by hitting Tab -> Object Mode), click arrow at the top right to open a menu where you can check the "X-ray" box. You'll be able to see through your cube. As a reminder, Spacebar + Shift will show you the available shortcuts in this mode, but I'll go over the important once momentarily.
What is a 3D object made out of?
This box is made out of vertices, and each face of the cube has four vertices at each corner- a triangle with three vertices also works, but we'll stick with squares for this tutorial. Moving the vertices will change the shape of the box, like a piece of stretchy fabric over a wire frame.
From now on, I'll be calling the vertices dots, because I hate reading and typing the word vertices over and over again.

5. By all means you can fiddle with the buttons over here but I'm gonna show you the shortcuts I use and the buttons you'll actually need. Don't get intimidated by the amount of buttons. Also press the T key and the toolbar will go away!
(Seriously, though, feel free to play around in this section as much as you want to, but we'll go over the shortcuts a few at a time with examples. at the end of this section will be a summarized list.)
6. Left Click one of the dots and press the G key. You'll see below a whole bunch of additional shortcuts show up at the button. Here are the ones I use:
G key: Grab and move around the dots
R key: Rotate two or more dots*
S key: Size two or more dots*; if two dots are selected, the distance between the dots will change but the angle between them will stay the same.
*Left Click and drag to select multiple dots!
CTRL + Z to Undo edits.
When you move a dot with the G key, imagine that the dot is against a piece of glass at a fixed point ahead of your viewer. The dot will not move farther or nearer to you, but will instead move parallel to your view.
As an example, if you press Numpad 1 and view the object from the front (The -Y green circle will be at front and center in the rotate tool), the dot will only move left and right (X axis) and up and down (Z axis). It will not move farther or nearer on the Y axis by default.
Play around with the G, R, and S tools before moving on.
This little X button at the top right will turn on symmetry. You don't need to use this, but it can be useful.
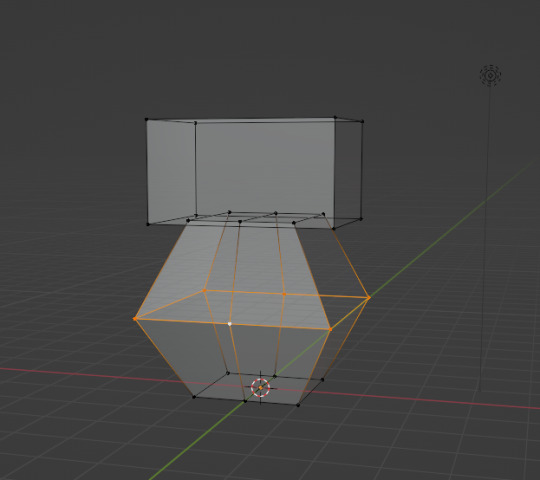
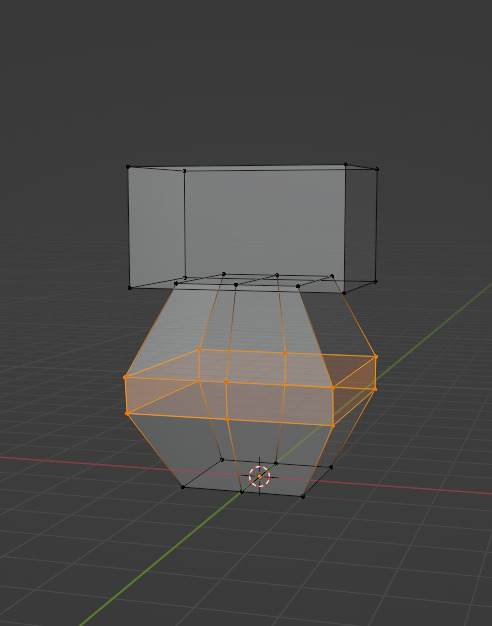
Left Click and drag so that an entire face (flat square) is highlighted and then press the E key to extrude. Extruding will add another set of dots that are automatically connected to the first set.
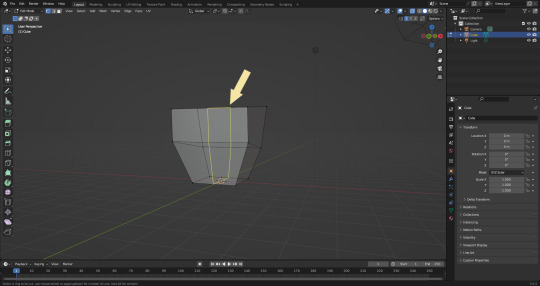
Ctrl + R adds a loop cut. This will divide the existing faces into two and add more dots. You can also drag loops to slide them to different positions.

The 3 key (not on the Numpad) will switch your Select Mode to Face Select. This is useful for extruding. Essentially it is simply selecting all the dots at the corners of the squares.
The 1 key will switch back to Vertex Select (or Dot Select) mode and the 2 key will switch to Edge Select (the least useful of the three, to me)
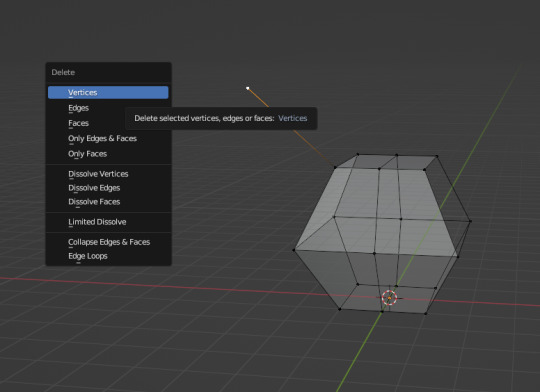
Before we go wild, there are a couple of additional things to know. For the tutorial, focus on working with faces, not vertices. If you accidentally pull a single vertex, select it and press the X key to delete it.

If you want to add shapes, I recommend sticking to cubes for now. Ctrl + A will open the Add Mesh menu and you can add a cube. Feel free to have complete cubes overlap for this tutorial.
Double Left Click will select a series of dots connected in a loop, and can be helpful for selecting areas all at once.
Ctrl + B is the bevel tool, and when a loop is selected it can turn it into two.
Here is a summary of all of the Edit Mode shortcuts:
G key: Grab and move around the dots R key: Rotate two or more dots* S key: Size two or more dots* *Left Click and drag to select multiple dots Double Left Click will select a series of dots CTRL + Z to Undo E key to extrude faces Ctrl + R adds a loop of dots Ctrl + B splits one loop into two X key -> Vertices to delete dots (vertices) 1, 2, 3 keys to switch Select mode Numpad 1-9 to move viewer automatically Ctrl + A to add a shape
Go play with them. See you back here in a while.
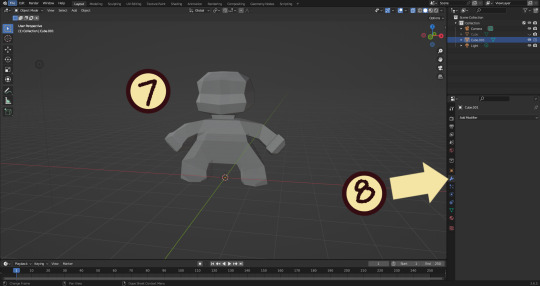
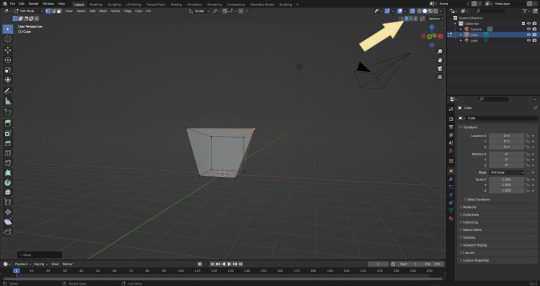
7. I used a single cube to make this figure. It's still very blocky, but that's fine. Loop cuts created additional faces which were extruded to create arms, legs, and a neck. Definition to the face was added by selecting individual dots. Remember, Ctrl + Z (undo) is your friend!
Once satisfied with the shape you made - a boxy figure or object is fine- continue on.
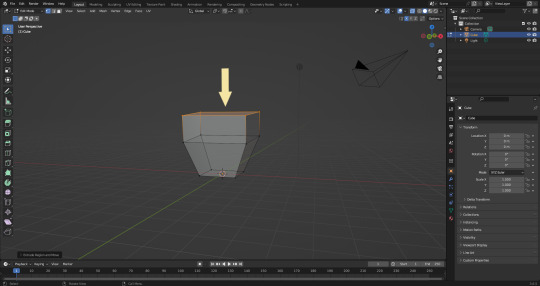
8. Press Tab -> Object Mode. Turn your attention to the right hand bar and make sure the Wrench button is selected. Note the Add Modifier Button.
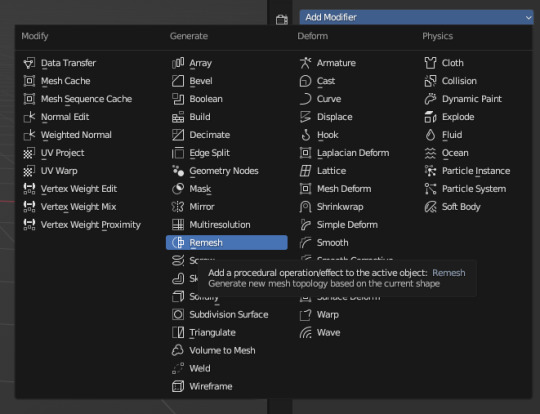
There are a heck of a lot of buttons here that you don't have to worry about- just select Remesh.
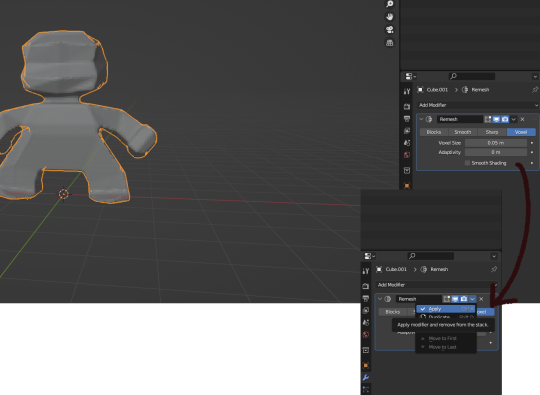
Change the number under Voxel Size to .05m by Left Clicking and typing it (there is a slider, but I find this causes lag). Then, apply the remesh by clicking the down arrow and selecting Apply.
Your figure should be shaped similar to before, but have a slight "graininess". If you have added multiple cubes, it will seamlessly merge them into one. The smaller the Voxel Size you put, the more dots will make up your object. However, I suggest starting with something in the .03-.06 range. We will refine this later.
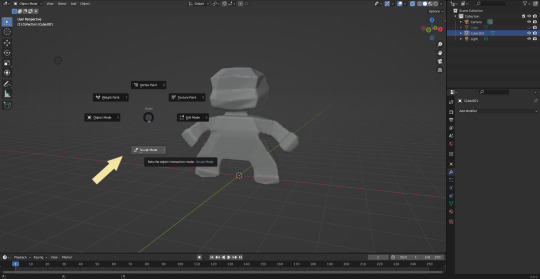
Press Tab and select Sculpt Mode.
This is a mode where I actually use the tool bar for modifying my sculpt, as there are a lot of brushes . The icons show roughly what the brushes do using small icons (note on adjusting this below)
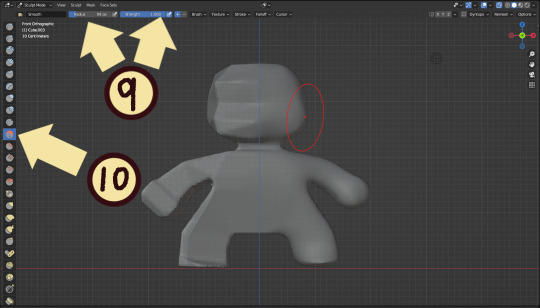
9. Observe the Radius and Strength bars, which will adjust the... well, the size and radius. Note that although the "brush" looks like a flat circle, the affected area is actually a sphere. Select a brush with Left Click and Left Click and drag on the sculpture.
10. This is the smooth tool. I have smoothed out the right side of this figure. Note that I turned off symmetry to do this, but i usually have X-axis symmetry selected.

Although I am used to the small buttons, there is a way to change them. Hover near the toolbar to Left Click + Drag so you can see the names. Hold Ctrl + Middle Mouse button and drag to resize. You will be able to make the size of the menu much larger. This goes for many of the menus in Blender.
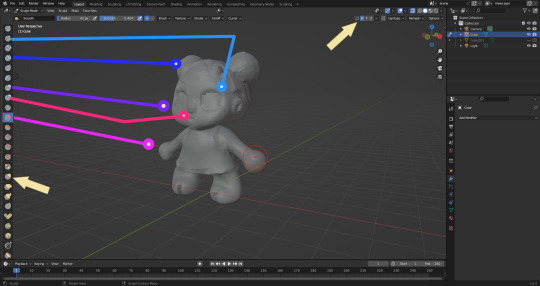
The above arrows point to the symmetry button (Top right) and Grab brush (bottom left). The Grab brush uses the shortcut G Key.
The lines point to which tools were used for each part of the sculpt. The Draw Sharp tool was used to mark out eyes. Clay strips made the hair texture. Round cheeks were added using the Inflate tool and a nose (and buns) were added using the Blob tool. The aforementioned Smooth and Flatten tools were used judiciously to remove sharp edges.
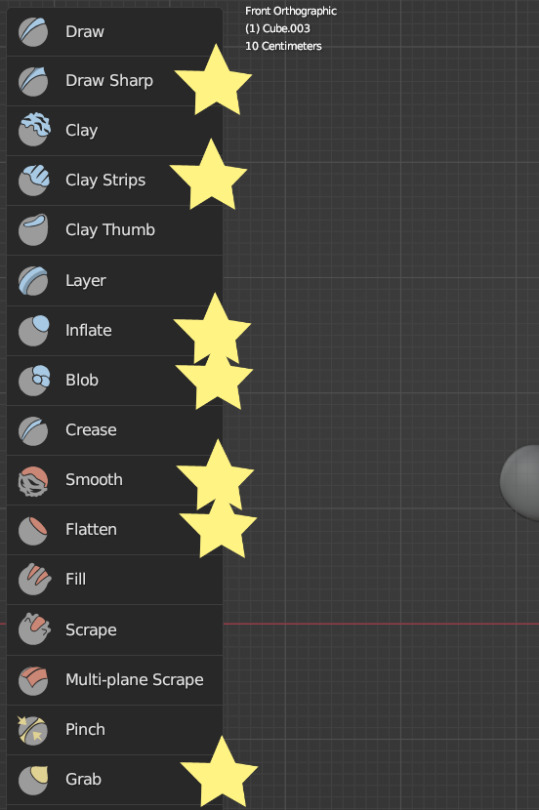
I don't have a shortcut list for you here, but here are all the tools I use the most:
You can hold the Ctrl key while using the brush to reverse its effects. For example, if you hold the Ctrl key while using the Inflate brush, it will deflate the shape instead, creating a concave shape.
As you can see, my figure is getting a little grainy. So, we're going to remesh this model again and add more dots and therefore detail.
This time, we're putting the Voxel Size to .01m. Apply the remesh as before. Now we have more dots to work with and we're just repeating the process, smoothing, and sharpening the lines.
I was going to add a bit about how to take a photo of your sculpt, but I ran out of photo space. I will add a reblog with this information.
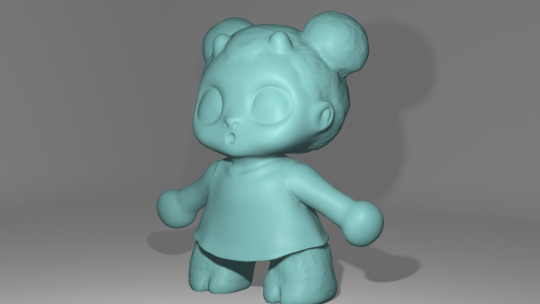
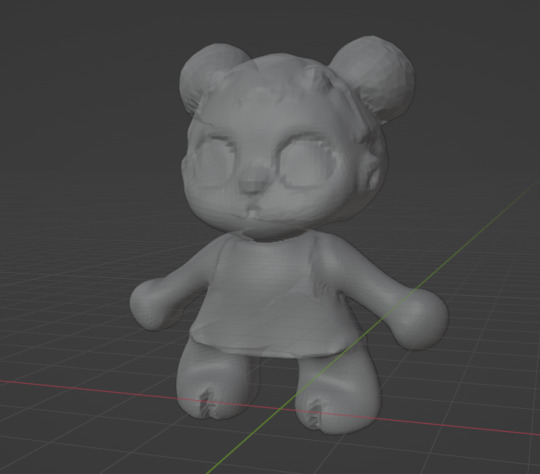
I came up with this little lamb character on the spot because the clay strips created a nice texture. She's by no means perfect, but she did turn out pretty cute so i might make a cleaner version later on.
64 notes
·
View notes
Text
My "hot-take":
FUCK. THESE. THINGS.
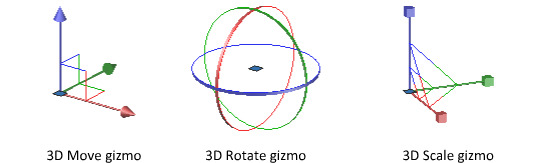
I have never encountered a gizmo nor gimbal that I enjoyed interfacing with, not even once. They are the most cumbersome way to interact with anything in 3D space; I would rather chop off my limbs than have to laggardly click, hold, and drag these teeny tiny little tools (for often subtle and precise transformations!).
It is incredibly common to be at an angle where an entire axis is unavailable or unreasonably difficult for you to manipulate. When you're composing a scene of 3D objects, it's not unusual to want to do it in a way that is informed by the current position of your camera. I could rotate the viewport to reach whatever axis is being obscured, but fuck you! I don't want to! Most programs with gizmos have a way to enlarge the axes for this reason—which is great, if you're a fan of having vast portions of the model you're working on obscured by STUPID COLORFUL ARROWS.
So, if not gizmos, then what? I argue that Blender has the best alternative, but Unreal has a pretty compelling one as well. (There are probably other inventive ways of forgoing gizmos in 3D, but these are the two I'm most familiar with. If you know of any other unique control methods for 3D software, I would love to hear about them.)
For Blender, you simply have to press the X, Y, or Z key to constrain the transformation to the corresponding axis; the following manipulation is controlled entirely by the movement of your mouse. You don't have to hold down anything! It is precise, agile, and ergonomic. These controls might be less immediately intuitive than having a literal, visual representation of the axes, but it SIGNIFICANTLY reduces strain on the hands, and with practice, allows you to model so much faster than any gizmo could ever let you.
Unreal, while not a modelling tool, has a similar method of manipulation available. You hold Ctrl, then press a mouse button and drag—left click controls X, right click controls Y, and both simultaneously control Z. It feels very sexy and sleek, like operating a jet. For me, it isn't perfectly ideal (it still involves holding buttons for extended periods of time, and it occupies both hands), but it is infinitely more enjoyable than dealing with gizmos.
I do feel guilty about the sheer extent of my hatred for these poor things. They're so colorful and visually appealing, and certainly the most intuitive way to represent transformations in 3D space. But they suck. They just suck. And they hurt me.
#I definitely do recognize that the intuitiveness of gizmos is their greatest appeal; I taught a friend Blender basics not that long ago‚#and completely forgot to tell him that gizmos were an option until we were done.#And doing so probably would've alleviated like 75% of the navigation struggle. Oops.#Listen you just have to trust me. Learn this weird control scheme to increase your efficiency in the long term.#And to make you passionately hate any 3D software that doesn't let you use it. This will only benefit you
58 notes
·
View notes
Text


beast compilation. behold my funny dog
#quite honestly the most complex rig ive ever made so far and the first thing even resembling a facial rig#the eyes are 3 layers of mesh w materials hooked up to drivers. thank you guy who made a sonic model for tutorial#steelheart redux#mercury#my art#3d#blender#“for the love of god use custom bone shapes for your controllers” no <3 im lazy#see *i* know what everything does usually. so its fine
134 notes
·
View notes
Text
are we all collectively mature enough now to acknowledge that mcyt is inherently a liiiiittle rpf and thats ok. or is that still too spicy a take
#like. youre GOING to take inspiration from the Actual Guy for their character. this is literally normal and accepted behavior.#real life guy likes/does/has [X] so character guy does too. characters are drawn and modeled off the real ppl. etc#it IS at least partly a fictionalization of that real person. and thats completely fine. who give a shit#its not true blueblooded rpf yeah sure#no streamer or youtuber is being 1000% authentic bc theyre performing to Some level (tho ytbers have more control of the perspective)#and fandom often works in so many headcanons or mc mechanics that it ends up still Distinct from the real life CC#...... it is Still Fictionally Based On Them yknow. like can we acknowledge that now w/o crucifixion#ive been in various youtuber fandom circles over a decade man this isnt my first rpf/rpf adjacent rodeo 🚬#i dont think this is actually much of a hot take NOWADAYS but eh. i still see the sentiment outside my immediate fandom circle on occasion#also i think for a not insignificant amt of ppl 'rpf' automatically equals shipping in their minds which is. not true?#its just. fiction about real people. you can do that abt anything man. could write rpf abt them trying to buy a new blender who CAARES
36 notes
·
View notes
Text

SMILE!
281 notes
·
View notes
Text
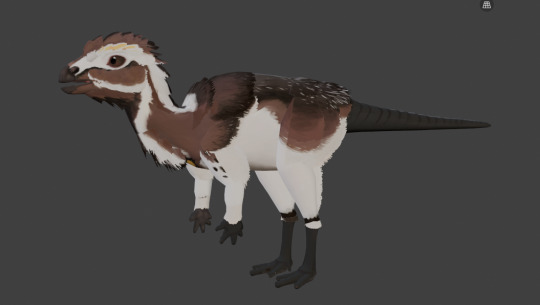
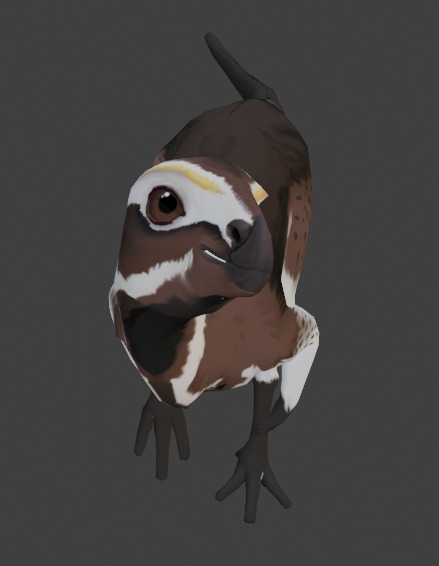
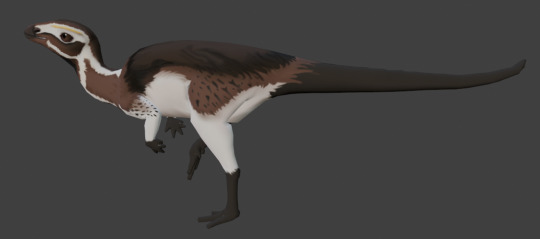
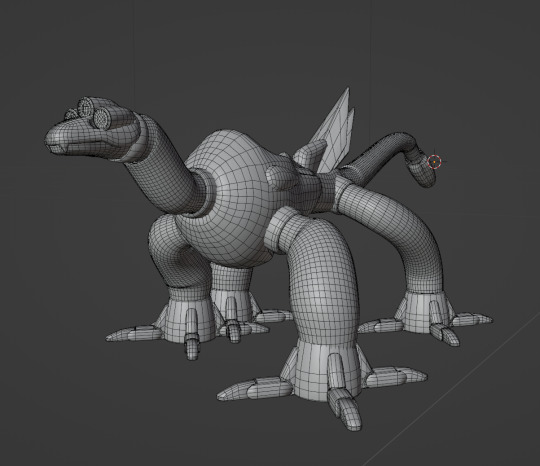
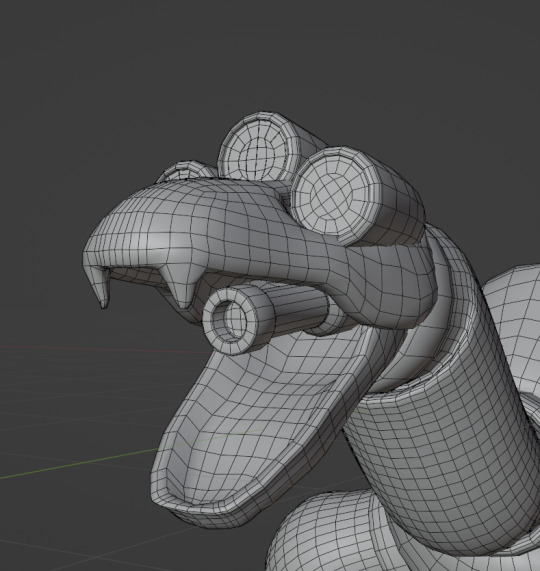
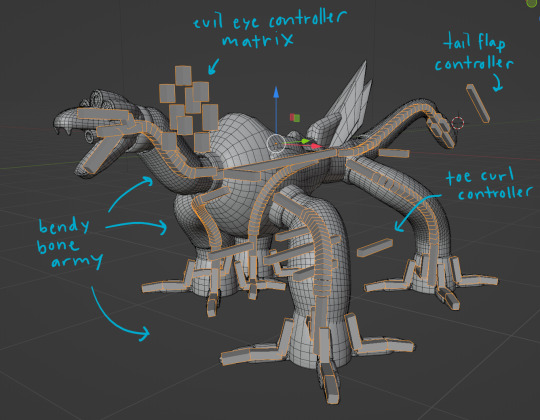
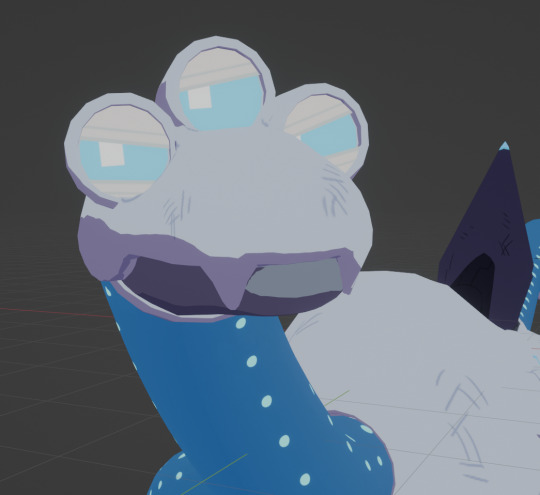
held off on posting this cutie since i wanted to get a render and short animation done, but once again i got carried away! a 3d model of Kulindadromeus as a late Kulinday piece. this ended up turning into some intense rigging practice learning IKs and such, and he still needs a polishing but i'm pretty pleased with how he turned out. Kulindadromeus was described 10 years ago this month!
#fraizer draws#kind of#art#3d#blender#dinosaurs#paleoart#kulindadromeus#kulinday#even tho i didnt finish him i really enjoyed learning more about blender rigging eee#he has inverse kineticd on his legs and arms and controllers for his fingers and toes#i gotta figure out the motion of the leg so it bends the ankle properly is the main thing. but ugh love him#AND another attempt at feather cards. still not perfect but i like the look.#i do still need to fix the textures so they line up perfectly but so far so good
182 notes
·
View notes
Text

He's a dog with a bone
⚠ Keep it PG ⚠
#call of duty#modern warfare#call of duty modern warfare#MWII#CoD MWII#blender renders#Phillip Graves#Philip Graves#Shadow Company#me? and symbolism?#the dog's eye looking kinda reflective slaps if I do say so myself#was kinda unintentional but OUGH#but yes under shepherds control hes a rabid dog#and that post i reblogged a but ago#about that guard dog dynamic#thats Jax and Graves
325 notes
·
View notes
Text

"Wish Gem: Ladies Night"
Patron Suggestion:
"Wish gem – Milf Edition (Helen Parr and Aunt Cass)
Helen and Cass are having a MILF night out. Just want to have a few drinks and have fun, but are constantly being hit on by a creep!
They just want to get rid of him until (one wish later) the two MILF Sluts compete for his attention."
More works at: www.patreon.com/SuperCasket | www.fanbox.cc/
Check out my picture packs at: supercasket.gumroad.com/ | hipolink.me/supercasket
#supercasket#3d#blender#mind control#hypnosis#brainwashing#big hero 6#the incredibles#helen parr#aunt cass#cass hamada
89 notes
·
View notes
Text
▼ take control ▼
19 notes
·
View notes
Text
Retro Style Halo 1 Print ad
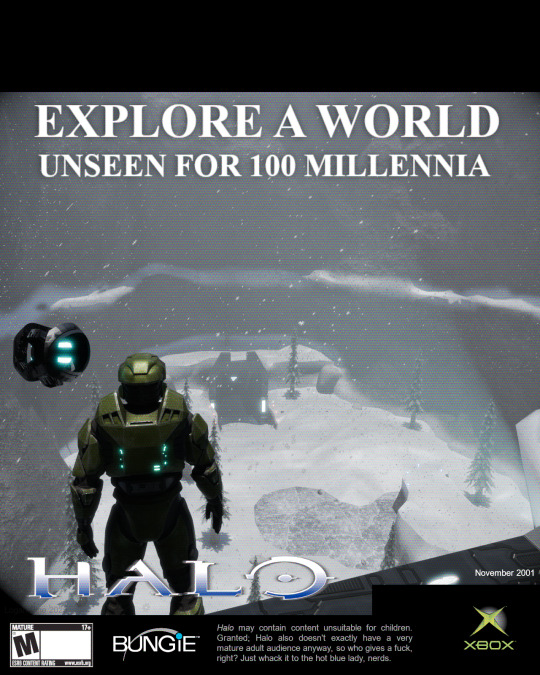
[Rendered in Blender 4.4, edited in GiMP] [Master Chief model by Marcus Lehto]
#halo#halo ce#halo combat evolved#gaming#xbox#halo 2#halo 3#art#fanart#3d render#blender#blender 3d#master chief#guilty spark#343 guilty spark#assault on the control room#two betrayals#vintage#2000s#nostalgia#y2k
17 notes
·
View notes
Text
every period I come closer to a hysterectomy
#I’m considering birth control atp bc this is not it#bc wydm im literally in bed rn in the fetal position feeling like someone put my insides in a blender#I already have the heating pad going but it’s barely helping#already took midol#WHAT ELSE CAN I POSSIBLY DO
27 notes
·
View notes
Text

I got so art blocked I decided to just learn blender and become a 3d artist
Tutorial I used: Low poly cottage by Grant Abbit on YouTube
#I already took 3d classes so I knew what I was doing it was just learning the controls of blender itself was the hard part#my art#3d artwork#3d artist#3d model#3d modeling#low poly
11 notes
·
View notes
Text

Well THat doesn't seem right....
#pre-sleep STRIKES AGAIN#evry time i make stuff like this i wonder if i should put it under the ship tag or the individ tags#bc i am showing a pattern and it involves mashing kuya and yakumo into a paste (via traditional mortar and pestle)#*turns on the blender* we're having yokai stew today. and tomorrow. and the day after that. and the day after tha#i'm tellin u. if they introduced kuya lookin like kuya but with yaku's personality#i would have impregnated him ON SIGHT#and if they started the game with a kuya-personality yaku-looker i probably would have hated him more than anything in the universe#it gives me.....first love interest in every otoge where he looks like an edgelord in red-black and has control issues over protag#anyway i'm glad you two are the way you are... even if my instinct-to-impreg leads me astray#bc kuya in his purple pink flower motif (boss bitch) and yaku in his edgelord goth n bones aesthetic (too soft to live) is just. fun#yakuya#nu carnival yakumo#nu carnival kuya
93 notes
·
View notes
Text


While there's plenty of toil involved, Hilda actually seems to be enjoying her job as as a maid/cook/general servant. She likes cooking, and since there's not that many people living in the manor its easy enough to sneak away and goof off every once in a while. When I sent her to make the beds upstairs she walked up the stiars with such a cheerful, perky gait to her step, it was cute!
She's taken on the job since her older sister Bryanna began working as a midwife. Since she's commited several assaults this season, she's got a hefty fine to pay or she might face jail time 😬 Luckily she doesn't seem too concerned.
I was using the ChristianLov all-in-one NPC controller originally, but it was giving me problems where sims would make too much food and then refuse to clean dirty dishes. The manor was filthy! So here's how I'm playing servants now: I teleport them over using the Simlogical meeting controller, which is nice and convenient and also makes them controllable in one click. Then, to avoid too much micromanagement, I am using MATY macrotastics to direct Hilda to clean or garden. I was controlling her manually at first, but it was feeling like a bit of a chore and breaking my immersion a bit - I want to focus on my gentry family! There's still a bit of micro-management when it comes to serving meals and making sure she eats in the kitchen rather than with the rest of the family, but nothing too bad.
The only issue I've had with this is that sims will age while they are selectable - I changed my aging mod to have sims age up at midnight rather than 6PM to mitigate this since Hilda will always have gone home by then. I also have to pay her manually, but I don't mind that! She's also employed in the cookery career as a scullery maid, so can earn more money when I play her house :)
#Driftwood MCC#i know if you use the sim blender to make sims selectable they dont age but for some reason it wouldnt let her clean dishes if i did that??#i think the medieval defaults might be why i started having problems with dish cleaning but they are sooo pretty so i am keeping them#i think i could also use the slow aging controller to turn off aging for a sim?#Driftwood - Year 1 - Autumn#Driftwood Season 3
26 notes
·
View notes
Text
worldbuilding thing I've been wondering about:
how do you handle gender identity, gender expression, and/or gender stereotypes, within your omegaverse writings?
this goes for ocs and for fanfics!
if alphas are physically male in the way we'd consider a human to be physically male, that's a statement on their sex, yeah? not their gender.
you can have the body parts implied there and still be a gender that is not "man". so how's that work for omegaverse? especially if alphas can be male or female.
how do you describe gender within your omegaverse? is it based more around dynamic / secondary? (alpha/beta/omega) or around sex? (male/female/others if they apply)
do people get gendered expectations assigned to them based on their sex, on their dynamic, on the combination of both?
(ex: is there a difference between the gender roles given to a female omega versus a male omega? are the stereotypes for a male beta like or unlike those of a male omega?)
could there be such a difference between female alphas, female betas, and female omegas, that only some female people are considered women, while others are labeled with some other term due to their dynamic? or are all female people considered to be women? (assuming they're all cisgender...but if you've got trans headcanons I wanna hear those too!)
I'm curious about this because it's reasonable to say something like "our image of what is masculine appearance / behavior is shaped by our society and time period," right? (since male doesn't have to equal man or masculine, but there's often some connection)
but that structure wouldn't be built from the same stuff in omegaverse. since behaviors and such could be associated with different groups.
so...if a male alpha is seen as a feminine presenting person, what does that mean in your verse?
are masculine and feminine less about what exists in your verse and more about the limitations of our own language?
is it something else altogether?
#omegaverse#sfw omegaverse#omegaverse worldbuilding#omegaverse headcanons#everyday the temptation to use neopronouns in omegaverse grows stronger#why would there be 2 genders if there's 3 dynamics and the dynamics are almost more important to the story than the 2 sexes are?#assuming that the dynamics are secondaries and not primaries#gonna throw gender markers into a blender#and throw them at the secondaries and see what sticks#i wanna read a story where being an omega is male coded#male omega? female omega? doesnt matter you're a boy now#simply because the instinct is to code omegas as feminine and turning stuff upside down is neat#i might try it if i can ever stop throwing random tropes into the blender with omegaverse ones to see if its tasty#see previous post#meanwhile my brain: monster taming tropes? plus omegaverse? it would work#also my brain: alpha becomes a magical girl. do it. it would work.#also my brain: mecha series where the pilots start to form a pack bond as they increase their teamwork enough to control their combo mech...#also my brain: i hear you saying that there's no need for a/b/o mh but why not? hunters are already regular people!#...meant to write irregular people in that last tag and too lazy to fix lol
34 notes
·
View notes
Text

Order's Chosen
#arterna#honkai star rail#hsr#hsr sunday#while it didn't come off exactly the way i wanted it and attempt was made#who knows maybe 5 years down the line I will have the skills to draw it the way I envisioned it#anyways sunday's character is making me go a little crazy. A little bonkers. I need him put in a blender#and i swear it is NOT because we have the same name#something about the clipped wings symbolism something about literally being indoctrinated for the role of martyr s something about his-#outlook on life i am aaaarhgegaeghhgghhghgh#aghh the way gopher wood was so controlling of him from a very young age........ Order and control.... oooughh#i don't even play this game but penacony is making me spin around in contemplation
38 notes
·
View notes