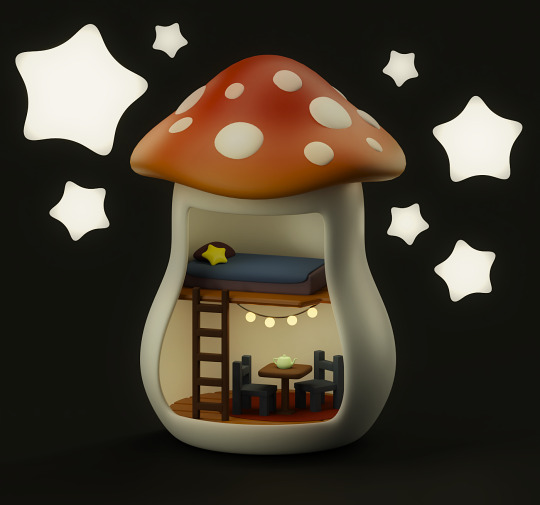
#blender render tutorial
Explore tagged Tumblr posts
Visit Tumblr Blog
Explore Tumblr blogs with no restrictions, modern design and the best experience.
Last Seen Tumblr Blogs


Fun Fact
In 2020, 27% of US Tumblr users had an annual household income of over $100,000.
Text

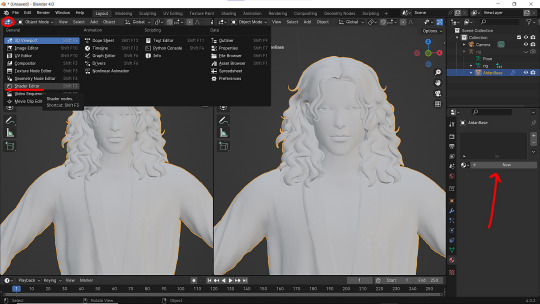
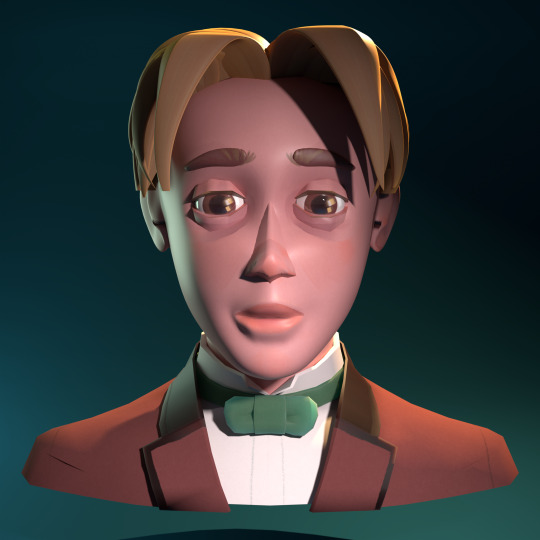
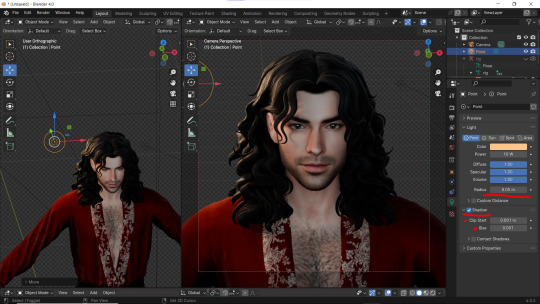
Beginner Blender Tutorial Basic Render: Part Two (Posing Our Sim, & Setting up a Scene)
(Continued from Part One)
Welcome back!
In this tutorial, we'll be posing our sim & setting up our scene!
For this tutorial, you'll need Sims 4 Studio, which you can download here!
Step 1: Exporting Poses for Blender
Before we can pose our sim in blender, we need to prepare the pose. I'll be using this pose set by @roselipaofficial for this render! Download your pose and open it in Sims 4 Studio. Click "Clips" at the top
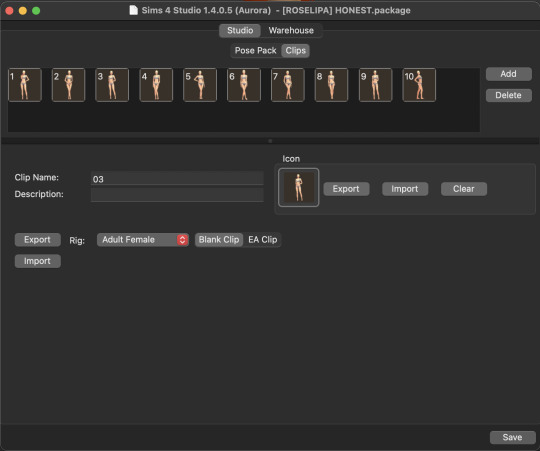
For my render, I'm going to use Pose #3 When you select your pose, the Clip Name will change (Each creator names their poses differently) Before we export, make sure you're set to the right rig! Blender does terrifying things if you export to the wrong rig. I'm posing an Adult Female sim, so we're good to go! Export the pose and save it somewhere that's easy to find! Now let's go back to Blender
Step 2: Posing Our Sim
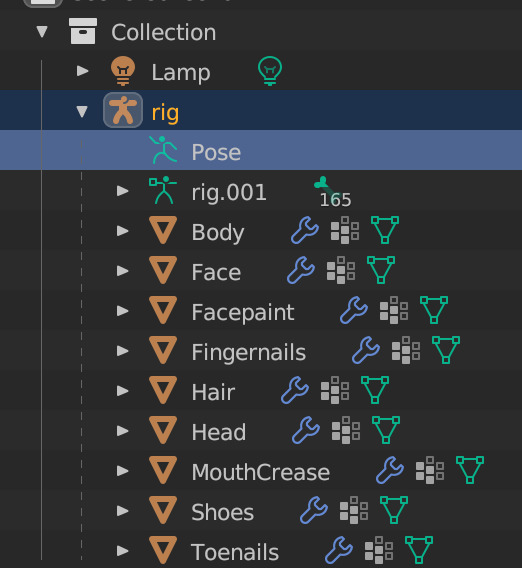
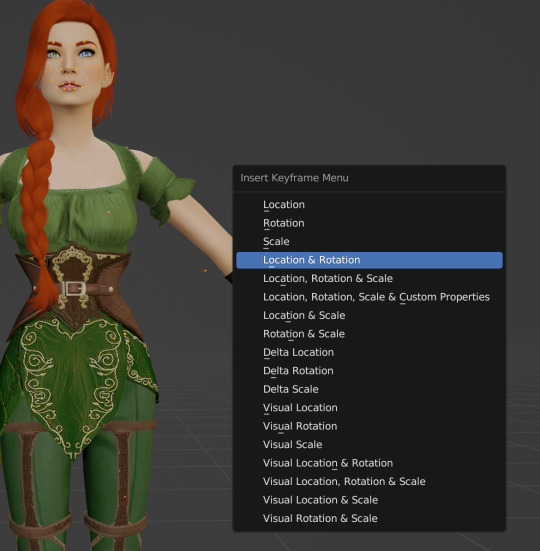
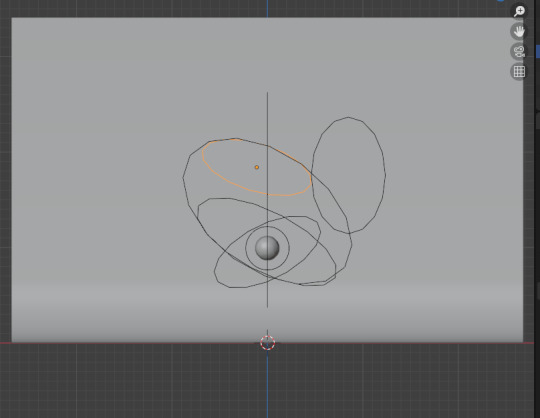
In Blender, click on "Pose" in your Outliner Then hover over your sim/3D viewport area and hit I on your keyboard (not L) to open the Keyframe menu Select "Location & Rotation"
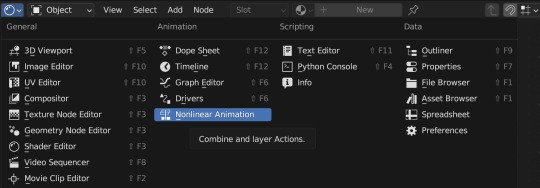
In your right-side workspace, change your editor type (window) to Nonlinear Animation This is where we'll pose our sim!
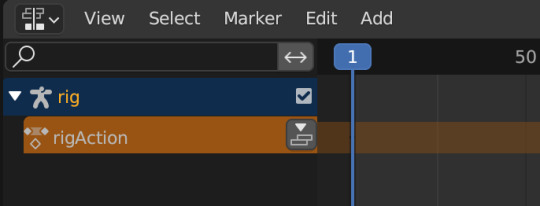
You'll see rig and rigAction. Click the little dropdown arrow next to rigAction, then you'll see a highlighted orange track

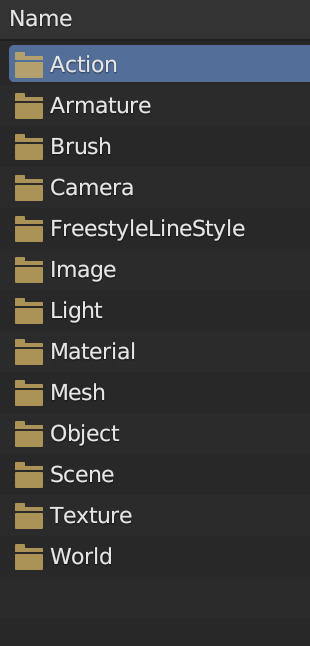
Now let's add in our pose Click File -> Append and navigate to where you saved your pose Double click your pose file, then elect the "Action" folder Double-click the file that comes up under "Action," that's your pose
It'll appear as though nothing happened... but it did! In your Nonlinear Animation window, click "Add" and select "Add Action Strip" Make sure your rigAction line is highlighted orange like mine is!
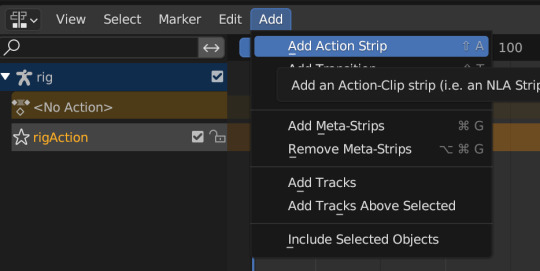

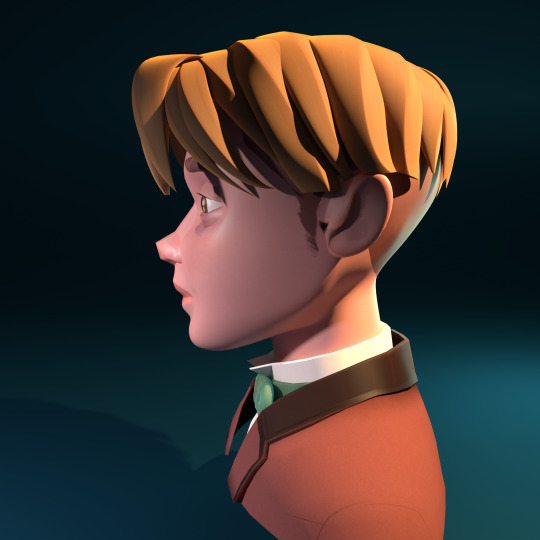
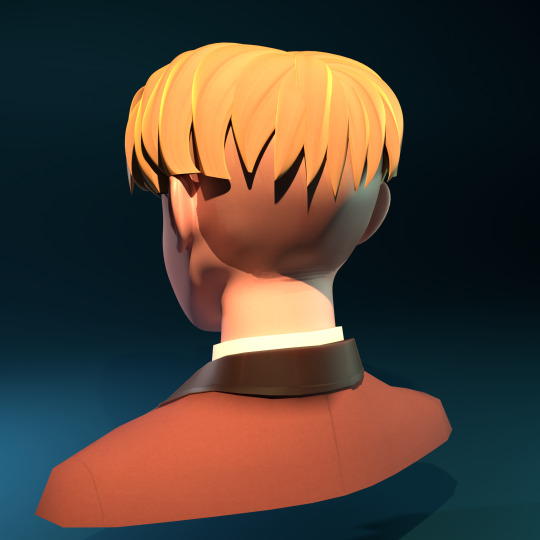
Select the Roselipa pose we added from the list, and TA DA! Our sim is posed!

Step 3: Setting up our Scene
I always add in my camera before doing anything else, that way I can adjust as necessary based on what I want the final render to look like. To add in a camera, you can either select "Add" in the top bar of your 3D viewport window, or hit Shift+A on your keyboard and select "camera"
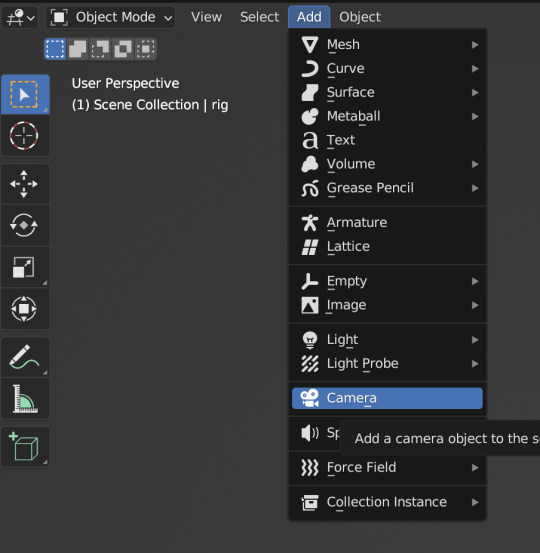

You'll see that a camera has been added to our Outliner, and we can see it in our 3D Viewport (If you still have a lamp in your Outliner like I do, go ahead and delete it now, we don't need it)


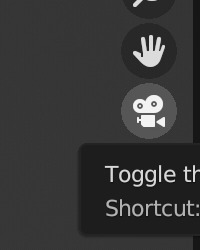
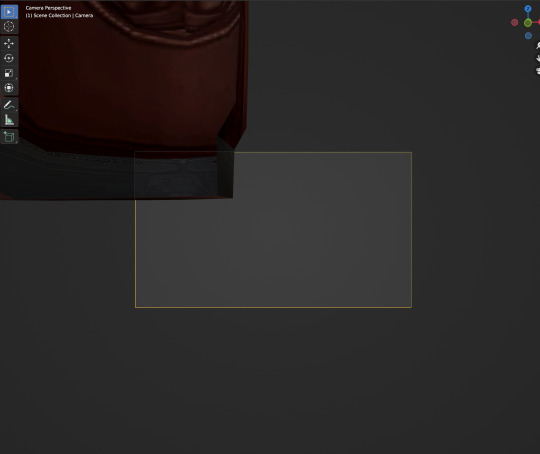
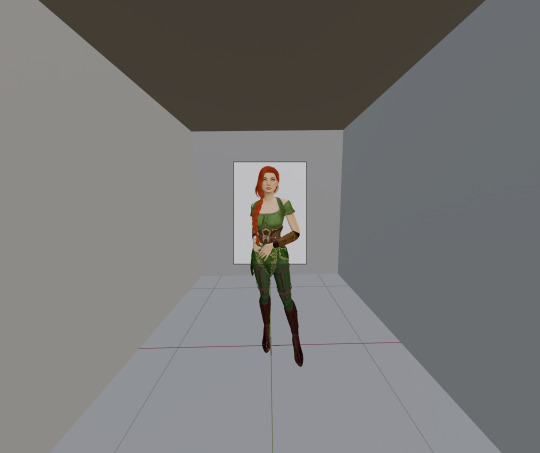
I personally like to move my camera around in real time so I know where it's going. To switch to camera view, click the little camera icon in the right toolbar of your 3D Viewport You'll see that our camera is in a weird spot, but that's ok we're going to fix it
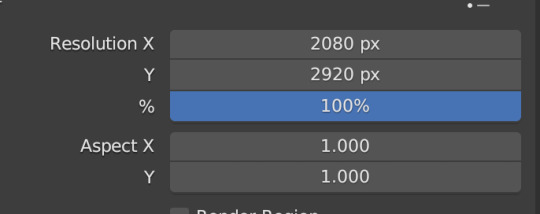
I want a portrait, so I'm going to switch the resolution settings. To do this, go to Output Properties and change the resolution values. The default is 1920x1080, but I like higher resolution renders personally, so I'm changing mine to 2080x2920. Only go up in resolution if your computer can handle it!
Now let's move our camera I like to use the Axis directions on my keyboard to get the camera where I want it Select your camera in the Outliner, then hover your mouse over the 3D Viewport Using the "G" key (the shortcut for move), combine G and "X, Y, or Z" on your keyboard to move the camera where you want it This will be fiddly at first but you'll get better with practice! I've set my camera up like this:
For basic portrait renders, I like to just use lights and a simple cube Remember the default cube we deleted in the beginning, we're going to bring it back now Add it in the same way as the camera, either by selecting "Add" in the top menu and choosing Mesh -> Cube, or by pressing Shift+A on your keyboard and selecting Mesh -> Cube I use keyboard shortcuts, so I'll add mine with Shfit+A like so:

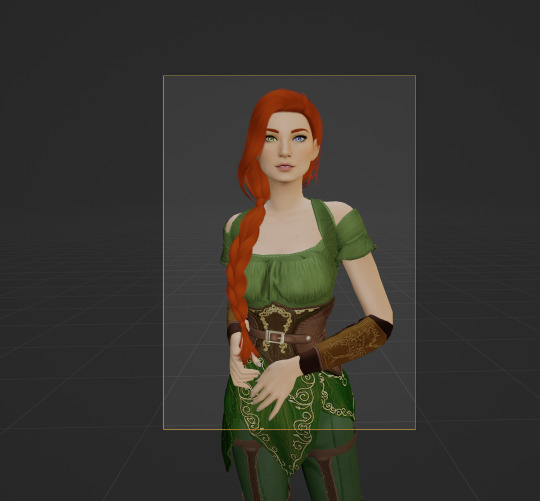
You'll probably have something like this, your sim floating in a box
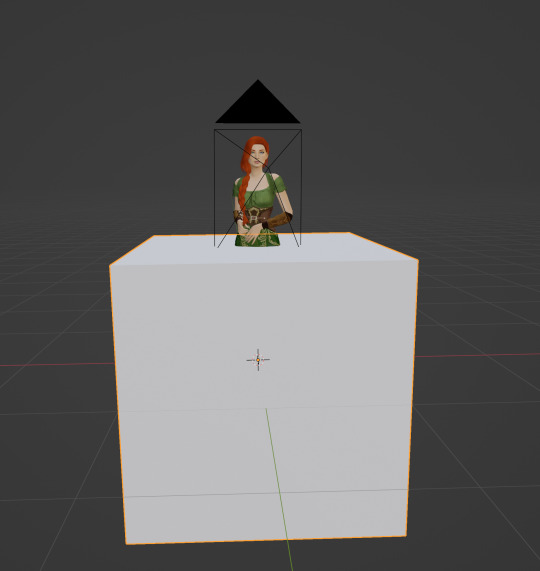
Use the same method you did to move the camera ("G" plus axis directions (X,Y,Z) to move it up and use "S" on your keyboard to scale it up To scale up, hit "S" then move your mouse outward Then center the box over your sim We want to have something like this:

Click into Camera view (click the camera on the right) and you should have something like this:
In Part 3, we'll adjust our render settings, add lights, and render!
I'd wanted to include those in part two, but Tumblr is yelling at me about my photo limit.
If you have any questions, please leave a comment below and I'll help as best I can!
#salemsims tutorial#render school tutorial#sims 4 render tutorial#sims 4 blender tutorial#blender render tutorial#blender#blender tutorial#sims render tutorial
42 notes
·
View notes
Text
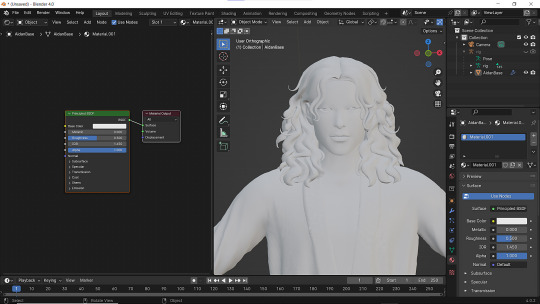
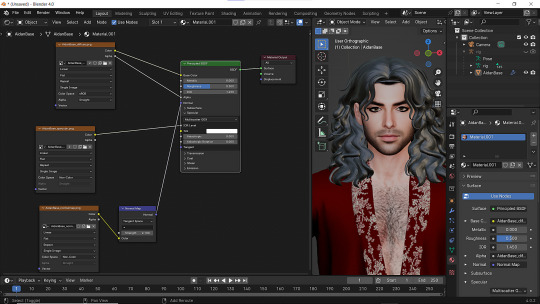
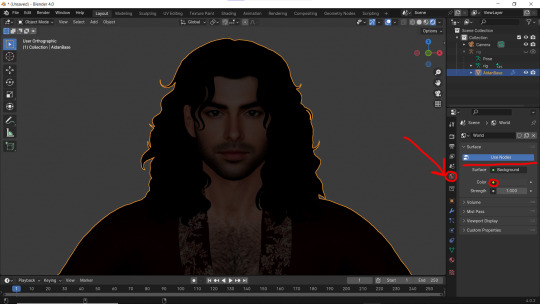
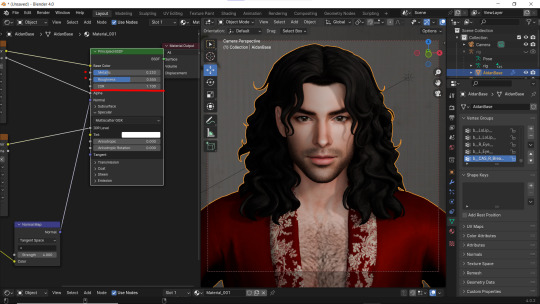
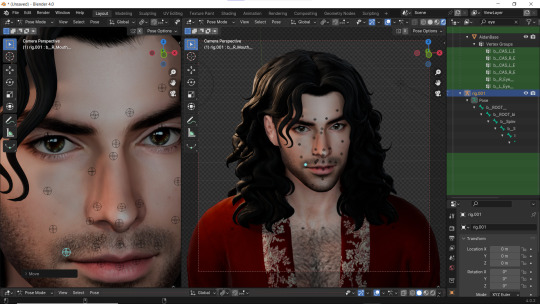
How to apply textures in Blender 4.0 For newbies (´。• ᵕ •。) ♡
So you imported your lovely doll into Blender 4.0, but the textures are messed or missing, here's how to apply base simple textures from the scratch!
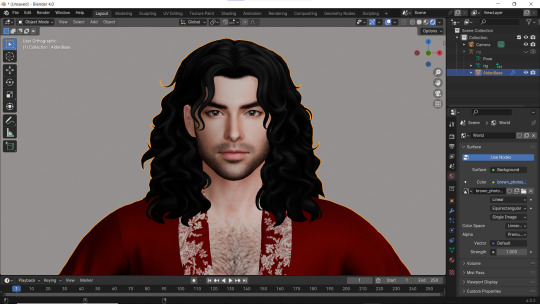
I'm using Blender 4.0.2 (Sorry 4.3, but your EEVEE is currently nothing but tears for me) and my lovely Aidan is here to assist me. SO! Seat your bum comfortable and let's begin!
1 - Split your working space by pulling the corner of the screen:
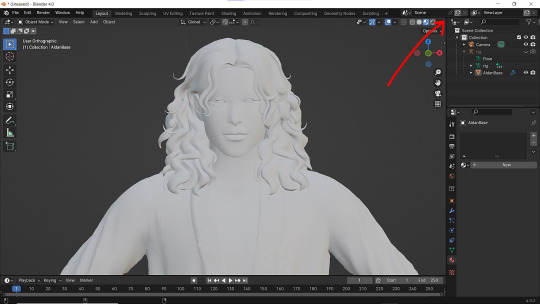
2 - Then click on Material with your mesh selected.
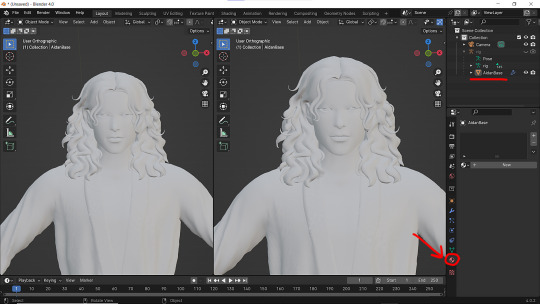
3 - Pick Shader Editor on the left part of the screen and hit New in the Material on the right. You'll get something like this:

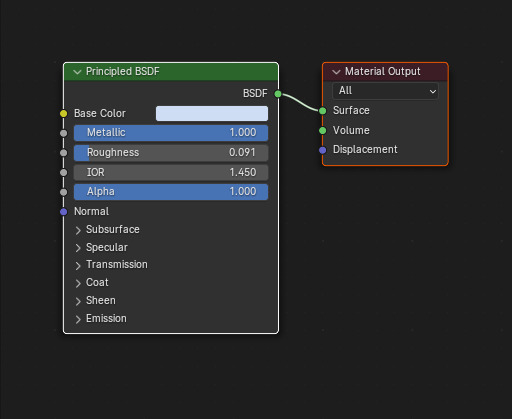
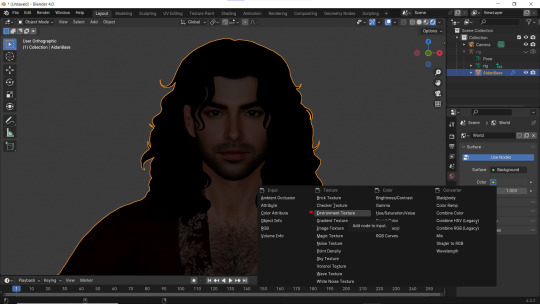
4 - On the left choose Add - Texture - Image Texture. We need three of them at very least :D
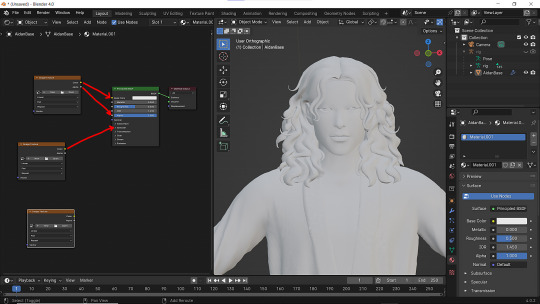
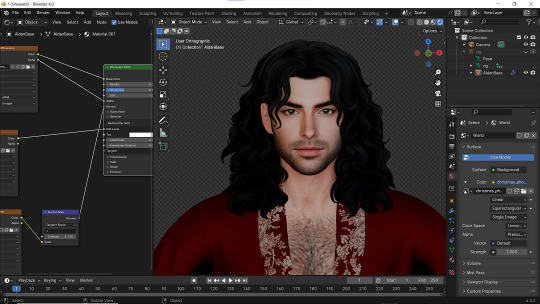
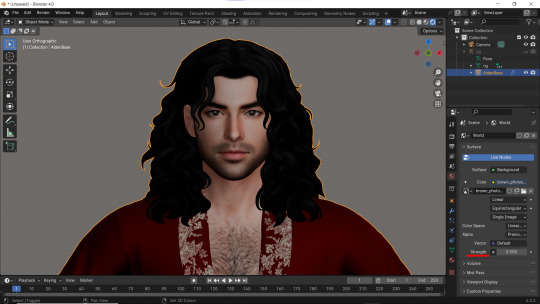
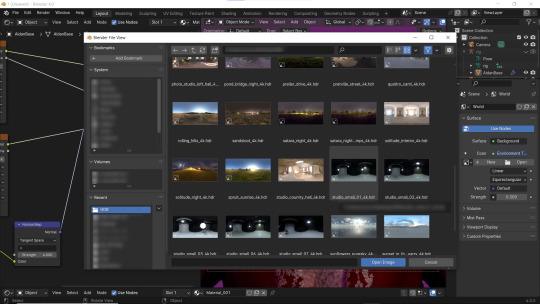
5 - First Image texture: Connect Color to the Base Color and Alpha to Alpha. Second Image texture connect to Specular IOR Level. Don't forget to upload your textures! Color - is well... color pics. Specular looks like Black/White pics and Normal is purple!
6 - Now add Normal Map. And connect it like on the picture below:
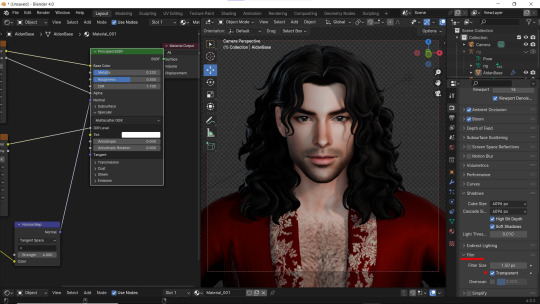
7 - Specular and Normal maps should be NON - COLOR in the Image Texture - Color Space
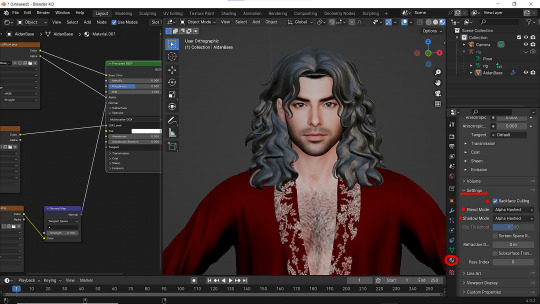
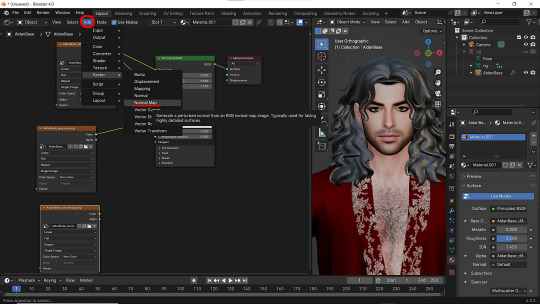
8 - Turn on the alpha. In Material - Settings - Blend Mode/Shadow Mode change on Alpha Hashed + You can check Backface Culling. In some cases it's vital :D
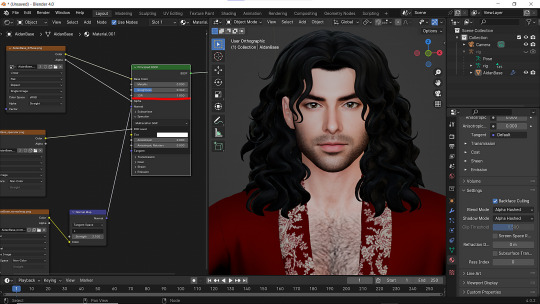
9 - Change the Specular settings in case of weird shining by changing IOR and Roughness parameters.
10 - You did it! (���◕ヮ◕)ノ:・゚✧
#WistfulTutorialSims4#the sims 4 blender#sims 4 blender render#blender 4.0#blender eevee#sims 4 tutorials#blender tutorial#sims 4 blender render tutorial#blender render
289 notes
·
View notes
Text
💧✨based off of this illustration by @passionpeachy!✨💧
video compression muted the colors, so here are a few stills under the cut


tiny bonus: happy pride!

#3d#blender#npr#video#passionpeachy#i actually finished and rendered this out at 2 am but i will schedule this for the morning 😴#thank you azul for letting me use your art!! it made me feel very smart figuring out how to replicate the black shading of the bubble#it's not perfect but it's my first model that wasn't made following a tutorial! so that is to be expected. very fun very charming :]
510 notes
·
View notes
Text
I made donuts in blender following the tutorial, now onto bigger and better things 😏😏😏 wish me luck!

31 notes
·
View notes
Text
our house is a very very very fine house
#blender#3d art#render#art#birdie renders#followed a tutorial by 3D by Sarah on youtube !#this took me way too long 🧍♂️
250 notes
·
View notes
Text
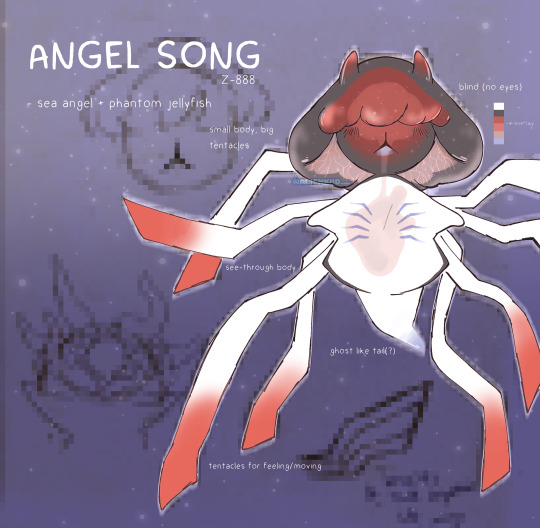
this took way too long to color for no other reason besides i was busy and kept being indecisive with the design
ough anyways, info about this oc + concept sketches below!! (maybe later on i'll make a fake document for it)
basic info -
angel song (z-888)
sea angel + phantom jellyfish
blind (no eyes) + uses tentacles to feel/move around
small physique (2'5 ft)
game mechanics/MO
appears in long hallways/open areas (ex. the rooms where one part is just an open black void); uses tentacles and body to block next door
will "sing" (screech) to player (causes -20 health)
player must back away three rooms to get it to go away
if flashed with flash beacon, it will begin to cry and strangle or stab player with its tentacles (instant death)


#kiid.art#digital art#medibang paint#clip studio paint#original art#original character#roblox pressure#pressure#pressure oc#not giving it a character tag yet cuz idk if it's name will change#i also wanna make a 3d rendering for it#probably just in paint 3d cuz i cant force myself to sit and watch a blender tutorial
25 notes
·
View notes
Text

Blender Breakthrough: Shaders & Grease Pencil Fun!
Hey everyone!
Big news from my Blender bench today—I cracked shaders and played with the grease pencil! This tutorial made it all click. Shaders? Less scary now. Grease pencil? A total game-changer for drawing on 3D models.
youtube
Can't wait to see how I can apply these new tricks in my next project. Stay tuned!
151 notes
·
View notes
Text

blender lighting tutorial + tips.
requested by @thecrimsonsimmer + recommended viewing: youtube video one, two, three, and four. this post will be dealing with newer versions of blender (2.8+) and cycles since that's what i'm more familiar with + commonly used for rendering. this is coming from me as an artist with some dabbling in photography and things i've learned in college!
references and setting the mood
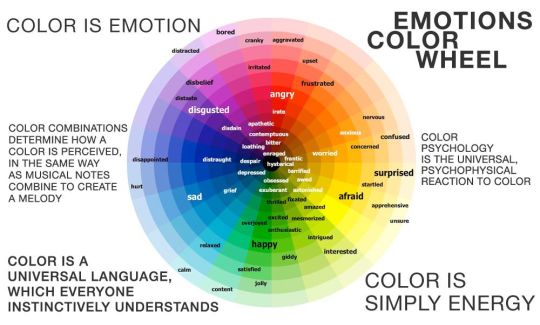
are you basing your render on an existing photo? study the light source and what direction it's coming from: that's what's going to tell you your set up for a similar effect. if you're not basing it on an existing piece, a good start is knowing How you want to set your subject (your sim) up - do you want them to be in the spotlight? are they in a specific environment that has neon lights? are you going for moody or something fresh, bright? definitely look up colors and their meaning (color theory, movie screencaps, etc.) to create a stronger image!
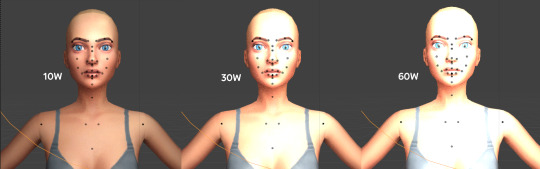
using resources to start the set up
it's always a good thing to mix your tools with different communities, such as the art community! many have lighting tools to figure out how to color their subject, such as this free-to-use head figure that depicts where the lighting source should be placed.

there's also the photography community and teaching people how to set up their lights for certain setups. video three and four linked in the beginning are from photography viewpoints.
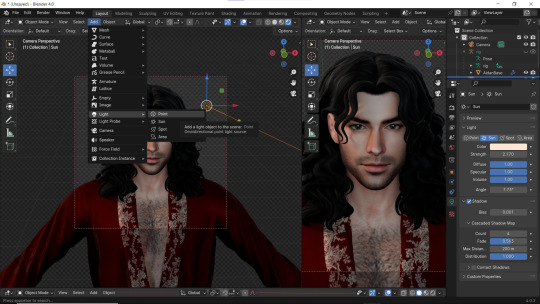
spot? area? point? sun?
let's think of the lighting types as objects - a spot is like a plain lightbulb, area is a reflective sheet, spot is a flashlight, and the sun... well is the sun!
a spot is similar to an area light, but triangular/a cone. think of a helicopter search light, it's focused on a small area with the most light concentration. these can be used for lamps with lampshades, car headlights, or a lighthouse.
an area light is great for lighting up technology. a phone screen, tv screen, tablet, anything that's an LED screen emitting from a surface. the light is not as concentrated as a spot and is meant to cover more flatly (hence the rectangular source)
a point is best used for small pops of colors such as candlelight, lamppost, lightning bug tail, etc. a small source that has nothing covering it.
a sun covers the entire area and can be used as the overall mood setter. it can create filter over the entire render by just shifting the color like you would see in a movie. you'll be given a line with a sun light that gives the direction of where the sun is coming from. basically a spot light just on a much larger scale LOL.
power + coloring

this screenshot is mostly what you'll only use to start off with. watts is the unit of measurement and the higher you go, the brighter the light will be. examples with a white colored point light 10W-20W: general portrait lighting 30W-50W: bright source, close flashlight for example 60W+: blinding
coloring is just like the system for in game lights for ts4. shift it to whatever you want it to be (click the white bar, that's the color preview) and mess around with the vibrancy. the darker, more intense color, the less it's going to appear on the sim.

closeness and intensity
similar to what's shown in the head lighting tool shown earlier, the closer the light is, the more that specific area is lit up. go too close and your sim could be completely washed out. it helps to change the size of the light (change with the radius slider) to better imitate what you're wanting. the larger the radius, the more diffused and softer the light source will be. close + small = very clear of the light source shape, can obviously tell where it is in relation to the subject far away + large = soft lighting, more of a hazy lighting of the color you choose.


to quickly adjust the light, press "G" and hold down your middle mouse button to adjust which axis you'd like to edit along. green is the x-axis, blue is the y-axis, and red is the z-axis. you can also press "G" and type the letter of the axis you want to use. drag the mouse to change the placement on that specific axis to however you want. if you want to freely edit the placement, just press "G" to move it out of the axis bounds.
world lighting
take this step as setting your canvas color before you start painting. in order for the values to look their best, change the world color to the same hue of the color you are mostly using. for example, this is set in a red-toned environment:


this is essentially changing the cast shadow onto the sim. the default is gray and will muddy up your undertones if not changed properly. for this instance, if you were to still use the same red point light in a gray world color it'd look like this:

of course, this will be based on if you have an environment image or not that can affect your lighting overall. this post is based on the fact there is no environment image and what not! if you need a visual demonstration on how to mess with the world lighting, check out this short video.

i hope that helped anyone beginning to render or wanting to light up your own scenes! i'm no rendering expert, but here's some of the helpful tricks i've learned and collected over the years<3 if you have any other questions feel free to send an ask!
#ts4 blender tutorial#sims 4 blender tutorial#ts4 render tutorial#sims 4 render tutorial#lighting tutorial#lyko posts#tutorial#long post
242 notes
·
View notes
Text

youtube
How to make a lollipop in blender! ✨
#blender#3d art#3d illustration#blender render#blendercommunity#art#candy#lollipop#3dfoodart#3d model#blender tutorial#Youtube
10 notes
·
View notes
Text

made a bunny in blender? i thought it might b handy to reference for wierd angles but mainly it was just fun to mess around w 3D kdsfkh
#crime and cricket#bunny manders#idk what im doing and my tutorial was very much NOT for a human figure it was for like. a cartoon animal wizard lmao#so consequently the renders are a bit glitchy in some spots#and im pretty sure this is not remotely riggable for animation#but i think he turned out cute!#havent decided yet if ill do raffles#its a lotta work sdkfhdf#also to be so completely fair this is not the first ever thing ive made in blender#but it has been years and the others were all very simple
14 notes
·
View notes
Text


HOW I MADE THIS CYBER/METALHEART ART IN BLENDER 3D
ADD SOME CIRCLES
Add some circles and begin sketching out how you'd want your piece to look.
ADD YOUR METABALLS

Use to circle sketch to draw out where your metaballs will go. (trust the process...)
SCULPT
Convert the metaballs into a mesh. And play around with these main tools (below)
To smooth/

To shorten/

To sharpen the edges/
YOUR MATERIAL NODE
Very basic. Change the color to your liking.
ADD YOUR LIGHTING
Add your HDRI. Add some cameras and light. Render.

good luck (:
#angel's renders#tutorials#blender 3d#metal heart#blender tutorial#3d tutorial#cyber sigilism#cybercore#sci fi#internetcore#angel's tuts#3d modeling#3d art#3d blender#blue
5 notes
·
View notes
Text
Sims 4 Render Lighting Tutorial

"Environmental Lighting" won my most recent poll, so let's get right into it!
A few notes before we begin:
I render exclusively in cycles!
This tutorial assumes some basic knowledge of blender
Though this tutorial covers the basics, HDRIs can be used in conjunction with any scene/your built scenes
I decided to focus on environmental and other lighting in this tutorial, since they all kind of go hand in hand.
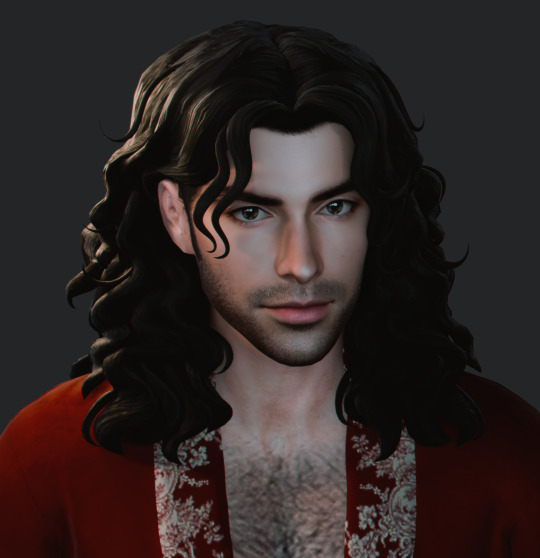
For this tutorial, I'll be using my recent Cupid Sim. Here's a render of her with no additional lighting:

1. Base lighting
In any full body, single sim render (like lookbooks, for example), I really like to use a glowing base. It grounds the sim a bit and casts some interesting lighting on them.
To do this, I add a circle under their feet by pressing shift+A and selecting circle.

An empty circle will appear, but we need it to be a solid disk, so go into Edit mode (by pressing tab while the circle is selected) then hitting F on the keyboard to fill it.


After that, you can go into the Materials tab and add in color and glow.
Mine is adjusted like this:

And gives this rendered result:

2. HDRIs
HDRIs (High Dynamic Range images) are extremely useful when it comes to environmental lighting, I always use them now to add better/more dynamic lighting to my renders.
HDRIs are 3D/panoramic, which makes them extremely useful.
You can find/download HDRIs online in a few diff places: PolyHaven, AmbientCO, and Blender Market.
There are also several available for FREE using BlenderKit (my preferred method).
So how do you use an HDRI?
We can add HDRIs to our render by navigating to the world tab and changing the color to "environment texture".


I chose this vaporware HDRI from BlenderKit, & here it is with no adjustments, but it's looking a little rough so let's adjust it.

By adding vector nodes, we can adjust how the HDRI behaves. Here I mostly use the Z rotation and the background strength:


Here's the same render with the Z-rotation set to 50, 150, 200, & 250.


You can put in any value for the Z-rotation, this is just an example of how the HDRI turns. This is maybe not the best example of the rotation, but putting her in a forest just didn't feel right lmfaooo, hopefully you can see how the light changes on her depending on the rotation.
You can also adjust the strength of the HDRI. Here's the HDRI (rotated to 150) set at .5 and 1.5 strength:


For this tutorial, my favorite lighting is the HDRI set to 150, and the strength set to .5, like this (this is a rendered image):

3. Transparent HDRIs + Point Lights
But I'm not fully happy with the lighting. I don't love how the HDRI is a bit blurry, so I'm going to set it to be transparent.
To do this, go to the Render Tab, scroll down to the Film option, and check Transparent:


The lighting effect from the HDRI will stay the same, but the background will be transparent.
From here, you can add a background (when I do this, I like adding a plane, & moving/shading it until I'm happy (kinda like this):


NOTE that you have to put the plane far enough behind your sim so it doesn't affect the HDRI lighting too much.
SECOND NOTE You can use this same method to use HDRIs in conjunction with scenes. They can provide the perfect backdrop!
This is still really dark, so I'm going to add three point lights: -Two on either side of her head/shoulders that will be smaller (in radius) and brighter -One in front of her to add actual light (so details aren't lost)

Here's how I set up my lights.


The pink light settings are for the two point lights on the sides The white light setting is for the light in front of her
For a basic render, this is almost good enough for me, but I really like the glowing effect I get in my renders.
To achieve this, we have to go to the compositing tab:
4. Compositing
Full disclosure, my compositing tab is set to glow by default (that's how much I love it), so all of the renders in this tutorial have it turned on.
I use the glare node and set it to fog glow.
Here's my preferred setting:

I prefer the fog glow effect, but bloom, ghost, streaks and star are also options.
Here's a guide to the glare node!
Tbh, I never use any of the other settings, so I'll leave this tutorial here for today.
Here's the final result (with no additional editing):

If you have any questions, please don't hesitate to send an ask, message or join my discord (no minors pls) for help! <3
#ts4 render tutorial#ts4 blender tutorial#sims 4 render tutorial#sims 4 blender tutorial#sims render tutorial#sims blender tutorial#salemsims tutorial#render school tutorial#blender
209 notes
·
View notes
Text
How I do my lighting in EEVEE for Blender 4.0 (´。• ᵕ •。) ♡
Are you running your Blender on a toaster? Don't wanna spend much time on rendering in Cycles? Here's some EEVEE tips for you!
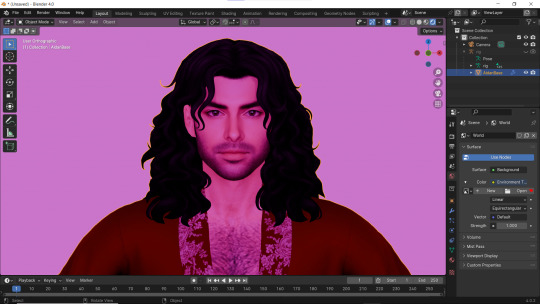
1 - Let's put some HDR lighting on! Go to the Worlds, choose Use Notes and hit that little yellow dot next to the Color.
2 - Pick 'Environment Textures'
3 - You'll see everything in purple. But worry not! It's just bc you haven't applied any textures yet! Just go on and hit Open.
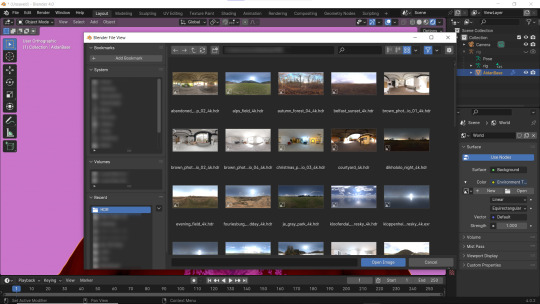
4 - You can find plenty of free, high resolution HDRI textures on Poly Haven. I have almost all of them! Go get some for yourself too and navigate to their location. Pick any you like!
Well... It doesn't look good yet :D
5 - Lower the Strength of the light.

6 - Now. Let's go to the Render Properties and check Ambient Occlusion and Bloom (you can play with it's parameters and see which fits you better). THEN... Go to Shadows and increase the resolution to the max. High Bit Depth and Soft Shadows must be checked too!
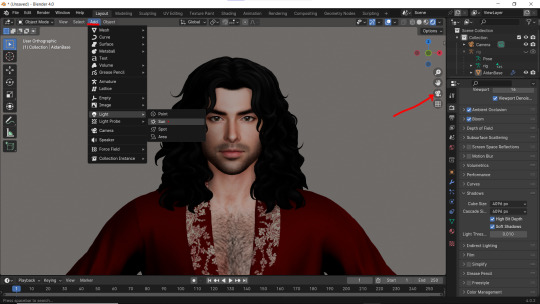
7 - Let's Add our very first light (The Sun)! And go to the Camera Mode.

8 - In the Sun Shadow settings: Soften the light by increasing the Angle; Lower Bias to the max.
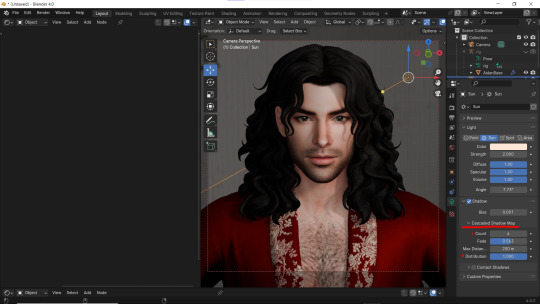
9 - Change the parameters of Cascade Shadow Map the way it looks better for you.
10 - Also don't forget to fix the specular appearance of your model ;3
Now. I don't hate it. But I don't like it much either... So I played and tried several Environment textures for better result.
11 - Looks way better! Now let's go to the Render Properties once again and remove the background in the Film category (in case you don't want one)
12 - It's time to add another light source!
13 - Settings for the new light are quite similar. I made them softer, lowered Bias, changed color, etc.
14 - Preparing for the shoot. ▓▒░(°◡°)░▒▓
15 - You did it! (ノ◕ヮ◕)ノ:・゚✧
#WistfulTutorialSims4#the sims 4 blender#sims 4 blender render#blender 4.0#blender eevee#sims 4 tutorials#blender tutorial#sims 4 blender render tutorial#blender render#blender eevee lighting#blender environment textures#sims 4 blender#blender render eevee#blender light#blender light eevee#eevee#blender#simblr#the sims 4#my sims
156 notes
·
View notes
Text
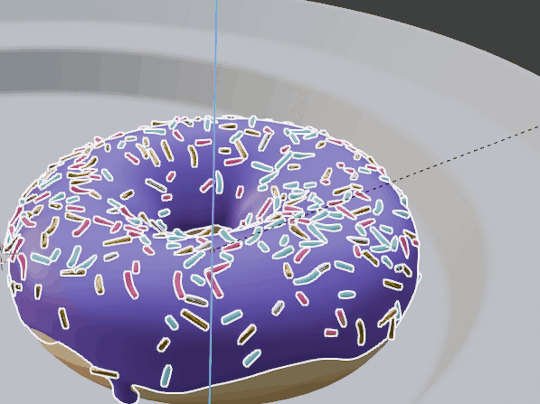
after. way too many hours and getting stuck A Lot. and deeply unhelpful cats. finally completed the blender donut tutorial
#blender#i may need a 3d art tag feels weird to just label it with the other stuff#now i want to learn retopo and rigging and shapekeys and. and and and and.#very mad to learn that doing 1 tutorial hasnt turned me instantly into an expert on all of it. unacceptable frankly#3d#i dont like how holding on the last frame looks too still i shoulda rendered some more at the end to get slightly varying twinkles but i am#Not going back for this. my poor 1070 Chugs through rendering
40 notes
·
View notes
Text

happy pride
#3d#blender#video#if you're not following my main‚ i've been learning 3d modeling!#this is my first tutorial where they let go of my hand‚ so i feel like it's something that is 'mine' enough to post here#sad that some of the lighting was lost in the video render. oh well!
27 notes
·
View notes
Text
Me: Damn, I don't know what to do 😥😓
The unfinished 3d model of the Jamir Tower:
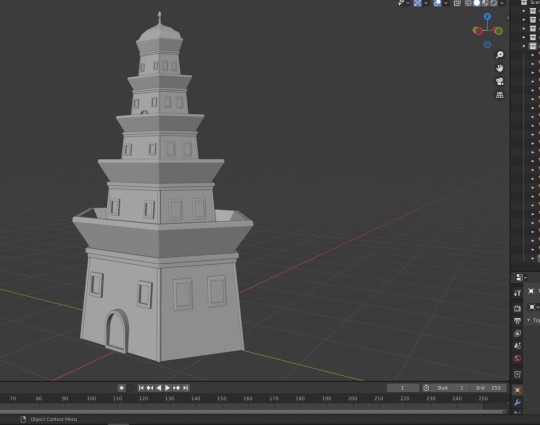
#wren text tag#wren draws stuff#saint seiya#sts#saint seiya fanart#HM. One of the biggest problems is the way I eyeballed the proportions and went with the flow while not knowing how to do stuff in blender#I should've draw a reference and then imported that into the program and started from there#so yeah I might start it again bc there are way too many errors#BUT to be honest... not bad for a first try :)#and I don't know how many “I need to learn blender” I still have in me#definitely I don't have the courage to rewatch again the donut video tutorial#I will try with the low poly tutorials on youtube maybe#Altought I need to start to actually learn blender. That could be SO useful for creating backgrounds and animation layouts#anyway enjoy the lowest possible render of Jamir Tower
7 notes
·
View notes