#Best youtube video downloader mac
Text
Best youtube video downloader mac

#Best youtube video downloader mac how to#
#Best youtube video downloader mac mac os#
#Best youtube video downloader mac registration#
#Best youtube video downloader mac for windows 10#
Copy and paste the URL of this video into the search box of Ymp4. Open YouTube and find the video you wish to save. If you're interested in audio files, you can also download music with it. Over 500 sites are supported, and various video formats are available.
#Best youtube video downloader mac registration#
No registration is required, no signup, no contracts. YMP 4 is also an online YouTube video downloader you can use to save YouTube videos online. Then, you can choose the video or audio you'd like to save based on your needs. Copy its URL and paste it into the Download box. You can choose the one based on your needs. You will then see many choices related to this video, including the quality, format, size, and more. All you need to do is copy and paste the URL of YouTube to the Download box and click on the download button. Not only that, other popular websites like Facebook, Twitter, and Instagram are also supported. KeepVid is one of the best online video downloaders that can help you download YouTube videos.
#Best youtube video downloader mac how to#
To explore more functions and features of EaseUS MobiMover, you can download it on your computer to have a try!Īlso Read: How to Fix "Can't Download YouTube Videos" Issue Option 2. If you're interested in saving music from SoundCloud, it also can help you do it. Or you can also download videos to your computer and then transfer them to your iOS device with its "PC/Mac-Phone" feature. While downloading, you can choose your iPhone/iPad/iPod touch as the store path. With it, you can download any videos from any website, including YouTube, Instagram, Facebook, etc.
#Best youtube video downloader mac mac os#
Fast YouTube Video Downloader - EaseUS MobiMoverĮaseUS MobiMover is a 100% safe video downloader for Mac OS and Windows 10/8/7. If not, you will violate the copyright, and YouTube will block or take down any video that infringes on copyright. Note: Don't use the downloaded videos for business without the video owner's permission. Depending on your needs, choose the one you wish to use. All of them are chosen based on their features, functions, and features. To help you find the best one, we test many video downloaders and finally choose 5 downloaders for you to try. That's why it's important to choose the right download tool. Freely use it to download videos in 4K, QHD, 2K, 1080P, and other quality resolutions.A lightweight and high-performance video download utility can make YouTube video download quite simple and easy. It is pretty easy to use and encompasses highly customizable features.
#Best youtube video downloader mac for windows 10#
This best free YouTube video downloader for windows 10 is superb for faster downloads and conversion to your PC. Here are the top freeloaders for your YouTube videos. And that calls for grabbing the best YouTube downloader. These are important aspects that most users wish to keep memorable. Well, most people use the YouTube platform as a tutorial platform while others use it for marketing purposes. That again leaves us with the question of which are the best free YouTube video downloaders? That aside what beats the odds is the ability to download your favorite videos for offline listening. However, you can go Premium and get rid of all the adverts. The only drawback is the constant advertisements. The free version is packed with millions of videos for access. When it comes to accessing content online, YouTube is among the streaming services that offer readily available videos.
0 notes
Text
stop paying for shit you can pirate
this is a good website for pirating books thats a lot easier than looking for vk epubs, there are pdfs and epubs for a LOT of books and the site is the easiest to use and most comprehensive of the ones that I've found
the free kindle app (don't pay for amazon kindle) lets you send these files to all of you devices with the kindle app at the same time, you can use this site or find the email addresses for your devices in your amazon account (this is amazon tutorial for how to use the send to kindle email), the files are identical to ebooks that you buy for kindle, you can also upload any epub or pdf files from your device to google books and read them there exactly the same
this is a good site for reading any articles that are behind a paywall for free, not sure it if works with academic journals and papers but it definitely works for stuff like the nyt
this is the classic and one of the best sites for pirating movies, tv shows, video games, books, and more, you will need to have a torrent installed to download and use these files, I use utorrent (free)
this is a site that's good for a lot of stuff, its a nonproft free library type program, the book downloads do not work with the kindle app even if the file type is correct but the pdfs can be opened normally with any pdf reader
this is a cracked spotify apk, I think this one might be for android only and this is a link to spotiflyer which is an app that lets you pirate songs from spotify, youtube, and a few others to put on an mp3 player or flashdrive or cd or just to have them downloaded but separate from the spotify app, works on android, windows and mac
this is a very detailed step by step tutorial on getting ALL of the sims 4 dlc for free (it takes a LONG time to download the actual dlc, set aside at least 12 hours where you won't need to restart or turn off your computer but it works perfectly) you will need a torrent and file extractor but the tutorial links to reliable free apps for both
#might update as I think of more of the ones that I've used#i know i have one somewhere where i got minecraft for free on windows but it was saved on the phone that i broke#pirating#piracy#original content#december 2023
340 notes
·
View notes
Text
GIF Tutorial
This is going to be a long post, so I'm going to place the majority of it under the cut.
Disclaimer - There are many ways to make gifs, and this is just one way to make them - it's the process that I have figured out works best for me. I am in no way claiming that this is the "definitive" or "best" way to make gifs. There are probably other, better ways to do things, but because people have asked how I do it, I am sharing my process.
Introduction
I use a Mac. I am assuming most of this will also be applicable to those of you using Windows as well. This tutorial is divided into three parts. Here is a video of the following process as well:
https://www.youtube.com/watch?v=lBRbWC-iMOM
Actions
I use three Actions, that you can download here through my Google drive, if you want. A tutorial for how to install Actions in Photoshop can be found here.
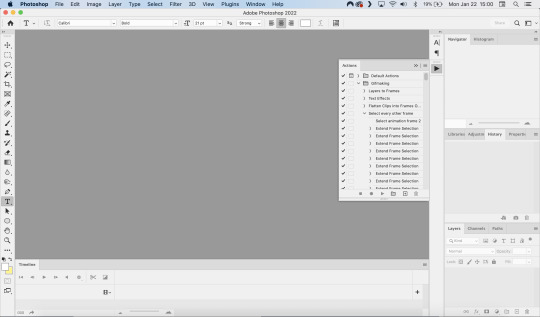
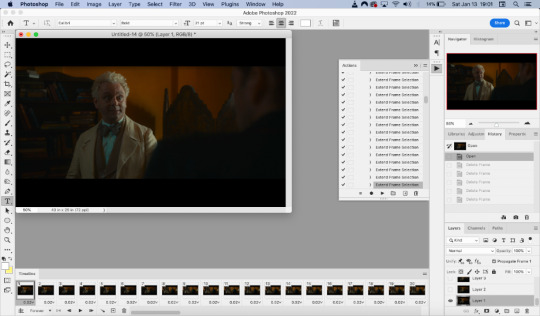
Photoshop Layout
I use Photoshop CC, but I used Photoshop CS5 for years, got used to it, so when I upgraded to CC, I arranged it to resemble what I was used to.
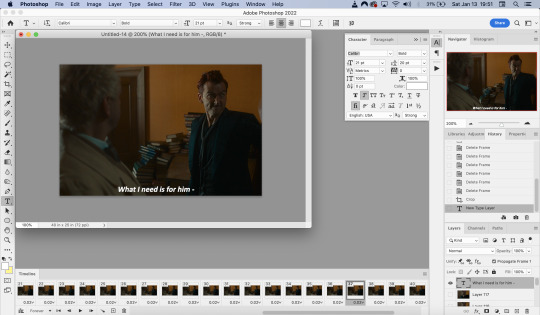
I have the following windows open:
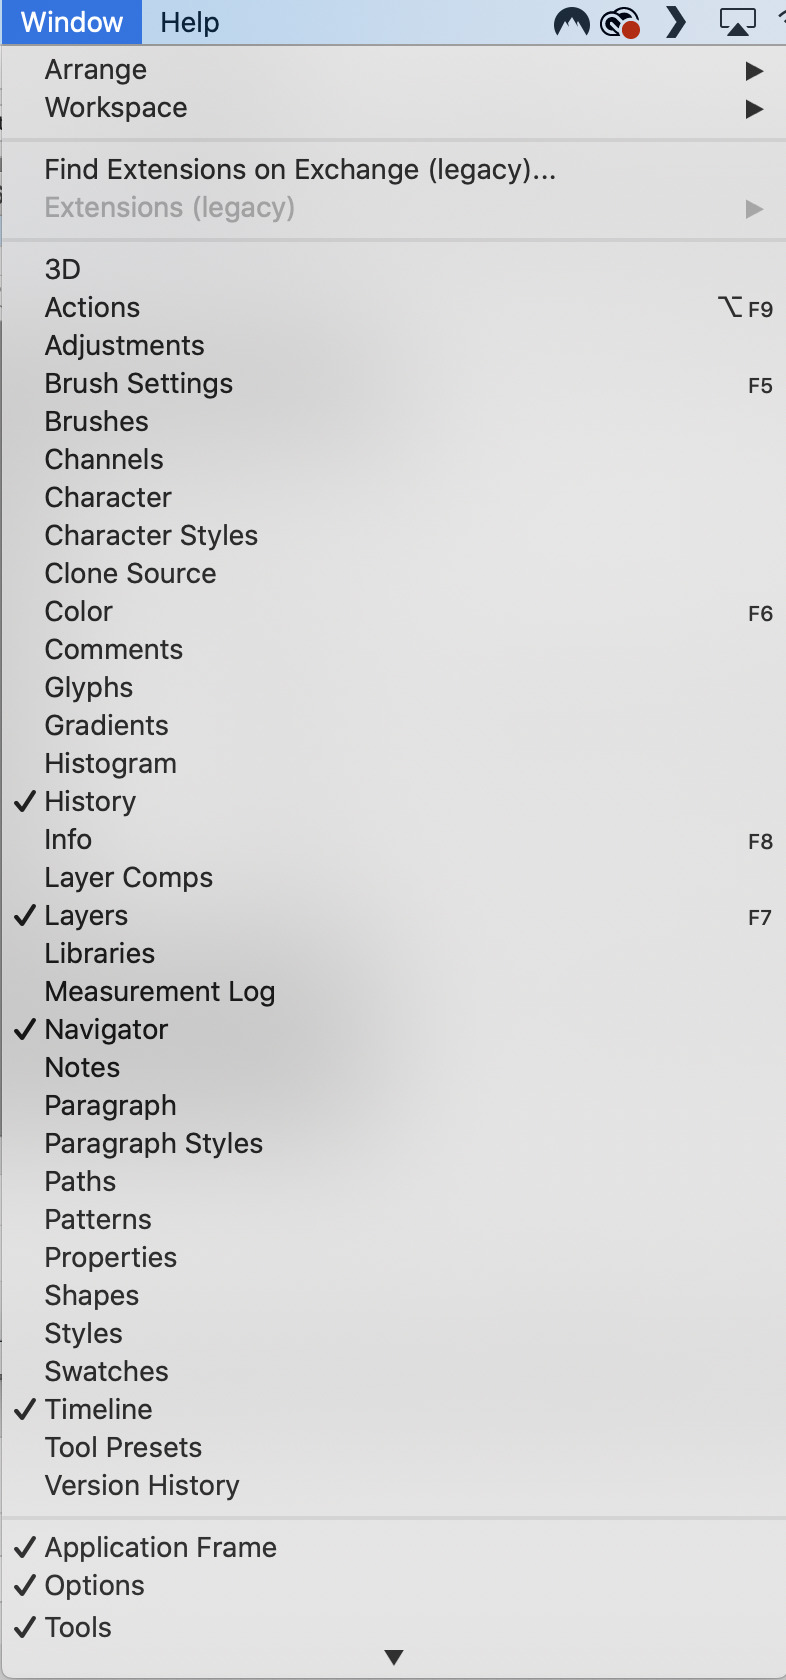
And they are arranged like this:
PART ONE - CLIPPING
Part 1 consists of using a screen recorder (i.e., Quicktime) to make short clips of scenes or parts of a scene that you want to make gifs of. I have a Mac, so Quicktime is what I use. For Windows users, I’m sure there are equivalent alternatives that are just as good. Years ago, when I was first starting to make gifs, I frequently heard people refer to KMPlayer as what they used, so that might still be a good option for you if you are a Windows user. The most important part is that it takes high-quality recordings, with as little detail and quality loss as possible.
With this screen recording method, you can make screen recordings of video files that are stored locally on your computer (I use VLC to play videos), or streaming on sites like YouTube, Amazon Prime, Hulu, Disney+, HBO, etc. No downloading of the video is necessary. For some of those websites, if you have trouble with getting it to work, you may have to disable your browser’s hardware acceleration. This process is described here (https://www.theverge.com/23715928/netflix-amazon-prime-screenshot-mac-windows-how-to).
I record the clips with sound, to make it easier to transcribe/write out the dialogue in Photoshop later. When I have recorded all the clips I want, I put the clips into my folder where I store all my clips, and into another folder that is labelled with the episode number so I can remember where each clip came from in order to properly label them later when the time comes to upload them to Tumblr.
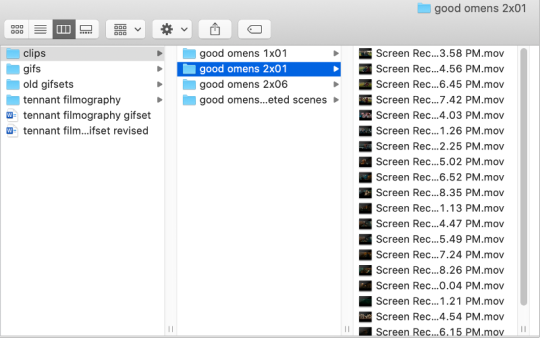
Example: A folder containing clips from Good Omens 2x01
PART TWO: EXTRACTING/MAKING GIFS FROM THE CLIPS
Open video file in Photoshop
To do this, click on File > Import > Video Frames to Layers
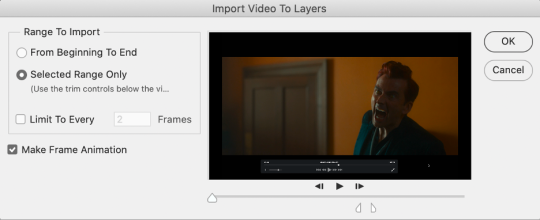
Use the markers to select roughly where you want the gif to begin and end.
With videos that have been clipped with Quicktime (not sure about other programs), the vast majority of the time there are twice as many frames as needed – every other frame is a duplicate. For a smaller gif size and smoother playback, I delete every other frame in the timeline box at the bottom of the screen. I used to do this manually (very time consuming), but now do it with the use of an action that I created that will automatically select every other frame. Downloads and installation instructions for all the actions I use are available above.
To use an action, click on the title of the action, then click the play button at the bottom of the window.
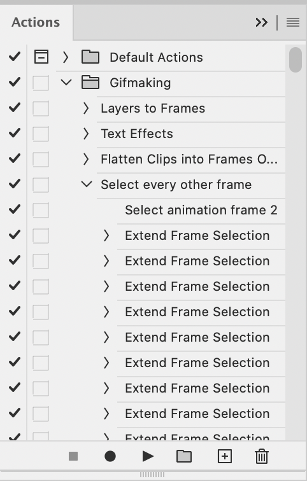
I often get an error message that says “The command ‘Extend Frame Selection’ is not currently available”, but it still works. Just click “stop” and every other frame will be selected.

Click the trash can icon in the timeline window to delete the selected frames.
At this point, you will have half as many frames in your timeline as you did before. You will also likely have extra frames at both the beginning and end of the timeline that you don’t want to be part of the gif – from the previous shot, for example. You can delete those now.
This next step is optional: There will still be some duplicate frames in the timeline that were not deleted earlier. It is not strictly necessary to delete these, and I see many gifmakers who don’t get rid of them. It’s usually not all that noticeable. However, because I’m a bit of a perfectionist, I always go through the timeline frame-by-frame and delete each duplicate. This ultimately will reduce the gif’s file size and make the movement in the gif appear much smoother. I usually find that every fourth or fifth frame is a duplicate. Unfortunately, it’s not always consistent, so using an automated action would not work to make this process go faster.
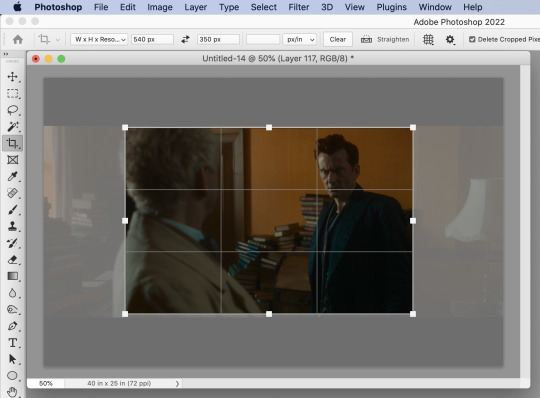
Cropping
Once this part is complete, I select the crop tool. I usually make my gifs 540px wide by 350px high. You can change the height to whatever you want, but Tumblr’s max width is 540px. I find the aspect ratio of 540x350px usually allows gifs to feel large, while at the same time not cutting off too much of the sides. Depending on the type of gif I’m making I may adjust this, but generally, if I’m giffing a scene from a TV show or movie, I stick with my standard 540x350px dimensions.
Adding Text
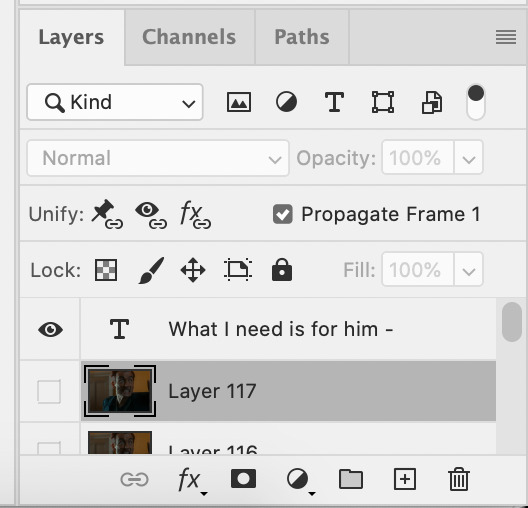
Next, I add text. Select the text icon. In the layers window, make sure the top layer is selected, otherwise the text will not show up when you start typing.
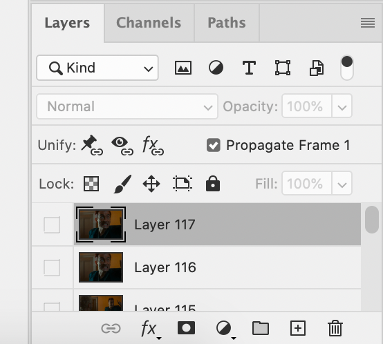
The top layer is selected
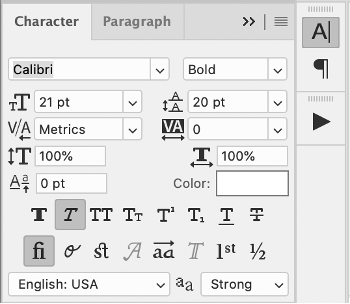
These are the font settings I currently use:
If I am just making one gifset, or one or two gifs, I’ll go straight on to the next steps. However, if I’m making a large amount of gifs, I save the gif right now, close out of it, and repeat the steps in this section for the next gifs, so I eventually have an entire folder of “raw” unedited photoshop files that have been cropped and captioned, and just need to be colored, have text effects added, and be sharpened. For me personally, I find I make gifs more efficiently by doing it in this “batch” style process.
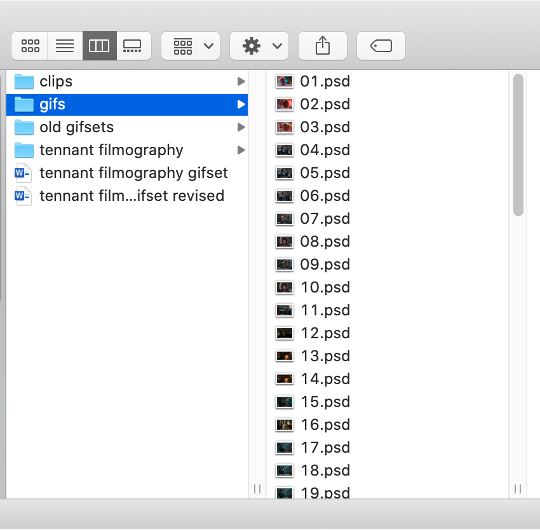
All cropped and unedited gifs (psd files)
PART 3: COLORING, EFFECTS, & SHARPENING
Coloring
I do plan on making a separate tutorial on this at some point, but will include a brief summary here. When it comes to coloring, I generally tend to go by a “less is more” attitude. I am not by any means great at coloring, but nonetheless I’ll explain the types of adjustment layers I typically use.
Note: Before making any adjustments, make sure you have the layer directly underneath the text layer selected, as shown in the screencap below, otherwise it will also apply those adjustments to the text, which makes it look weird.
I start with a Curves layer to change the overall brightness/contrast, then a Levels layer to adjust the shadows and highlights, and then a Brightness/Contrast layer to do some final minor tweaks. The only time I ever reuse gif coloring is when they are from the same scene with the same colors, lighting, backgrounds, etc. Every other time, I tailor the adjustment layers to the specific gif.
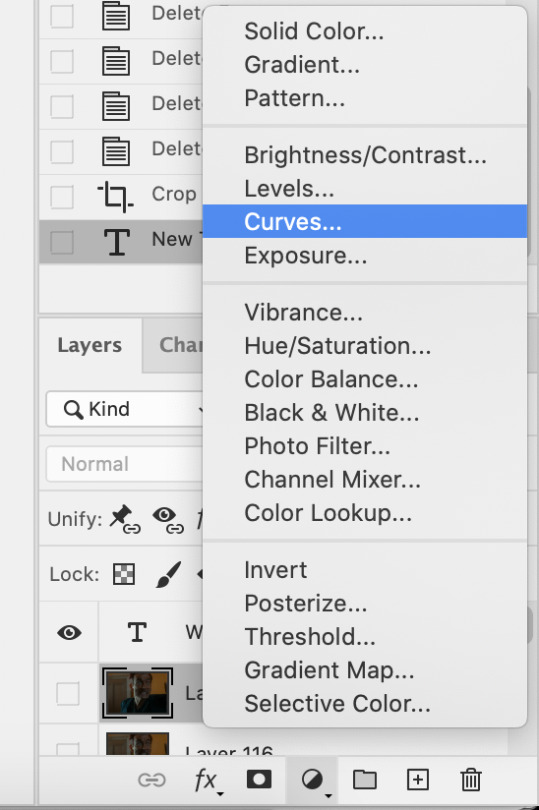
You can add adjustment layers by clicking the half light/dark circle on the bottom of the Layers window.
How the gif looks with both a Curves layer and Levels layer
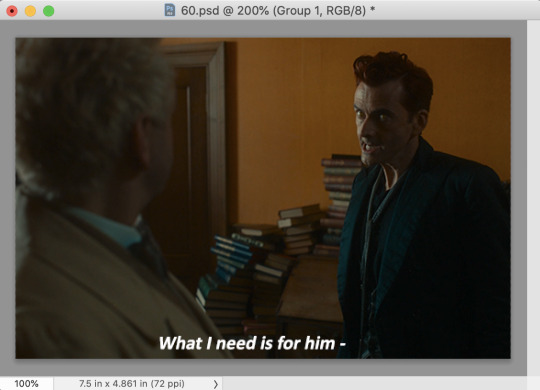
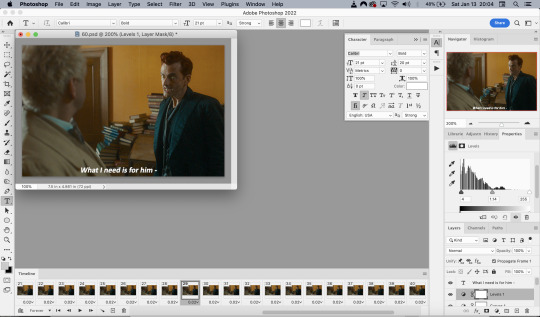
Before adding the adjustment layers
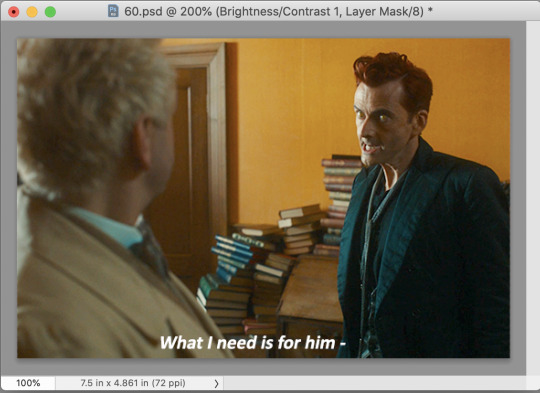
After adding the adjustment layers
A lot of the time, I'll just stick to adjusting the lighting. However, if the colors look gross, or if they are over/undersaturated, I’ll add a Color Balance layer and play around with the settings on that, or use a Hue/Saturation layer and increase/decrease the saturation of specific color channels. It really depends on what you’re going for, and what you think looks good. There is no one “right” way to color a gif.
Text Effects
If you are using the Actions I included in the download, you can just run the "Text Effects" action with the text layer selected, and it will do the following automatically. If not, you can do it manually by doing the following.
Right click on the text layer in the Layers window and click on Blending Options.
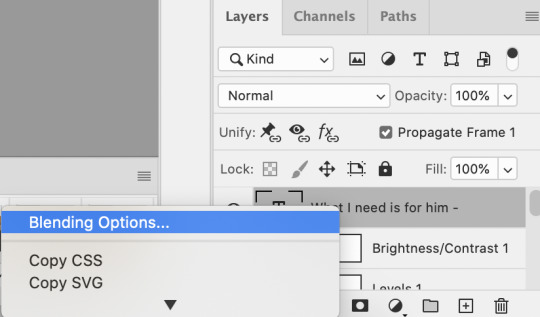
I use a stroke and drop-shadow on my gifs. Here are the settings I use.
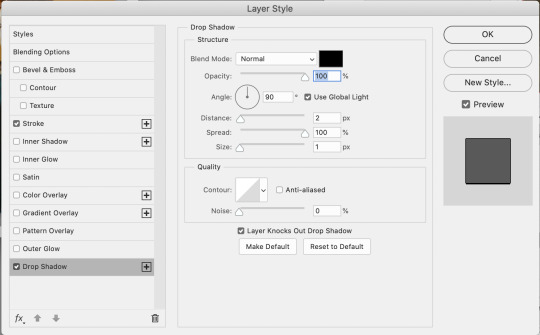
Drop Shadow settings
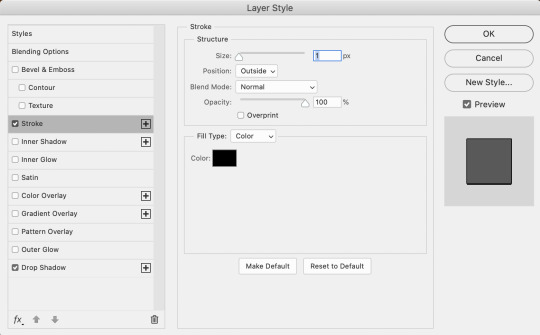
Stroke settings
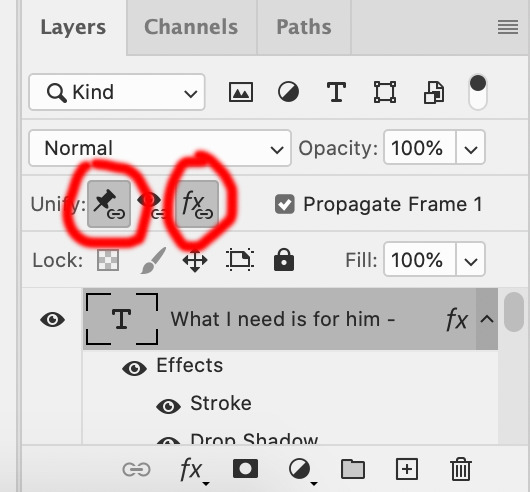
Next, to center the text, click on the text layer. With the text layer selected on the Layers window, Select All by clicking ctrl+a (Windows) or command+a (Mac). Then click on the "Align horizontal centers" icon in the “Move tool” option menu.
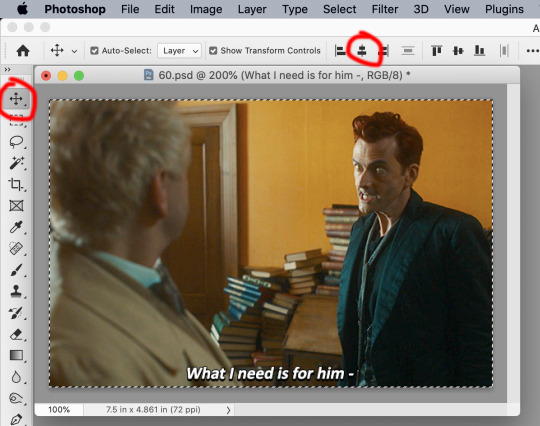
Important – in the Layers menu, make sure the buttons “Unify layer position” and “unify layer effects” are clicked an enabled for the text layer.
Sharpening
Select all the frames in the Timeline window. Then in the lower left-hand corner click “convert to video timeline.”

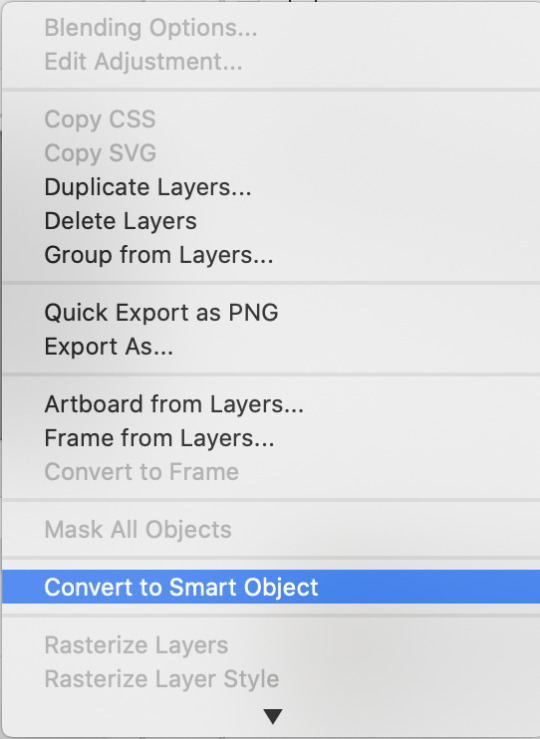
In the Layers window, select all of the frame layers (do not include the text layer or adjustment/coloring layers in the selection) and right click on it. Select “Convert to smart object.”
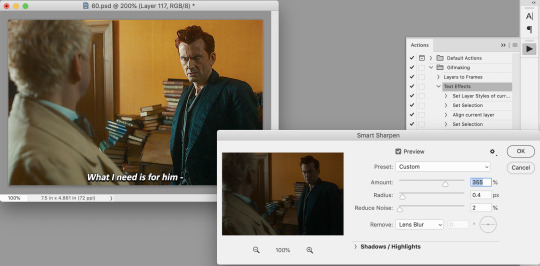
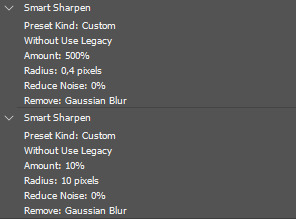
Select Filter > Sharpen > Smart Sharpen. In the same way that coloring can differ depending on the gif, the ideal settings for sharpening can also differ from gif-to-gif. It can really depend on the quality of the source of the gif, like whether it’s HD or not. These are the settings I’m using for the current gif:
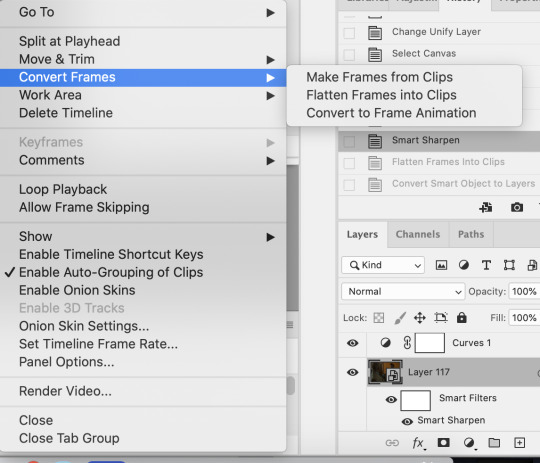
If you are using Actions, you can run the "Layers to Frames" Action. If not, do the following:
Click on the button circled in red
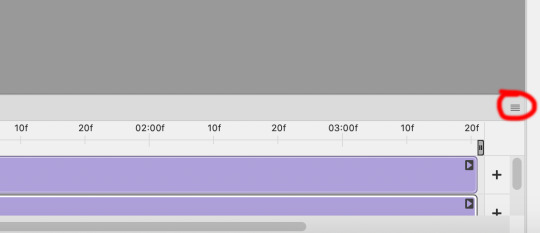
It will open up this menu. Click on "Flatten frames into clips"
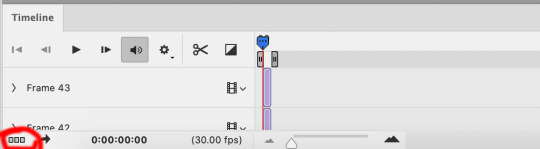
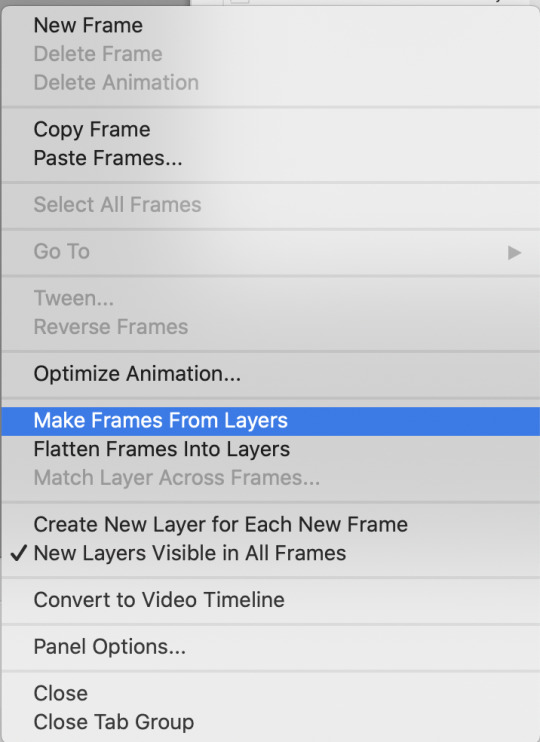
Click the button circled in red, then click "Make frames from layers"
Delete the first couple of "junk" frames
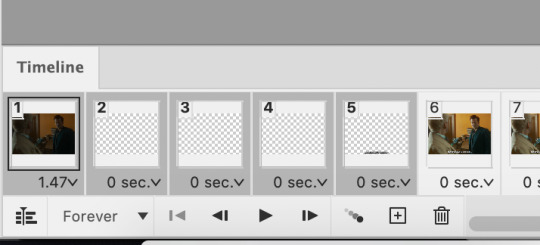
Select all of the frames. Right click on the "0 sec." to change the frame rate. I usually use 0.05, but it might depend on the gif itself.
Exporting
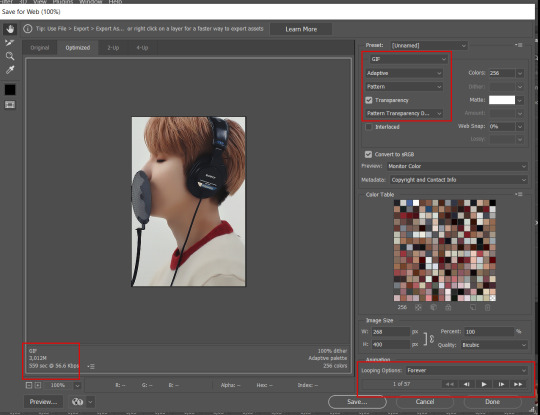
Click on File > Export > Save for Web (Legacy)
I cannot add another screencap because I've reached Tumblr's max for this post, but here are the settings I use:
Selective
Diffusion
256 Colors
Dither 100%
You may find that when you try to export your gif, the file size is too big. Tumblr’s gif file size limit is 10mb – try to make it under that – even anywhere in the 9.9mb range. As long as it’s under 10mb, it should work.
To get gifs that are too large to fit under the limit, I usually end up deleting frames from the beginning or end of the gif. If you’re using the 540x350px dimensions, I typically find that the average number of frames I can fit into one gif is between 80-90. Depending on the colors in the gif, it’s sometimes more, sometimes less.
64 notes
·
View notes
Text
stim gifs in photopea
[PT: Stim gifs in photopea /End PT]
Hello! This is my (lengthy) tutorial for how I make GIFs for stimblr using Photopea. It's not going to be as extensive as how I make for shows, celebrities, etc, because I have different processes for both, however I'm still aiming to cover everything I think necessary!
It'll be split into multiple sections with headers, so feel free to skip whatever you want if you don't find it necessary :•] Reblogs appreciated if you found it useful, but no pressure obviously!
Sections:
Getting your video
Importing into Photopea
Making the GIF
Sharpening the GIF
Coloring
Exporting & Optimization (in EZGIF)
End results, and misc tips and comments
1. Getting your video
[PT: 1. Getting your video /End PT]
Short section! These are the ways I download and source videos for use
Youtube - yt-dlp (installation instructions)
Instagram
Tiktok (Allows without watermark)
Pexels
For yt-dlp, check out this basic list of commands I made solely for downloading material to GIF! If you have further questions, either send me an ask or refer to the github page.
2. Importing into Photopea
[PT: 2. Importing into Photopea /End PT]
There are two ways to import into Photopea, the first is importing footage directly, and the second is screencapping (which I won't cover in detail, but this tutorial is for installing the program I use on mac & how to use it, and this is for installing on windows)
Option 1: Importing footage directly (see end for comments)
On the home page of Photopea, you'll want to click "Open from computer", and select your clip, upon selecting you'll be presented with a popup like below

All that really matters here is where you see "30 FPS", that's the videos native frame rate. I always put whatever that number is as my frame rate because I find it to be the best, but you can use different presets (Like ezgif, which gives you 12, 20, etc). The less frames you have, the chopper it will be. If you plan to slow it down later, I'd also recommend having more frames so it looks smoother after slowing.
Now you just have to wait for it to load all the frames, then you're set!
Option 2: Importing screencaps
This is my personal way of doing things, so this is assuming you've installed a screencapping program and already have your frames ready.
For this, when you click "open from computer", select the first frame and open it by itself. Once that's loaded, look in the top left at the "File" tab, select "Open & Place", then ctrl + shift to select the rest of your frames. Once they've all loaded in, you can either rasterize them now, or wait until after cropping and resizing (goes faster then).
What's important though, is ctrl + shift to select all your layers, in the top left open the "Layer" tab, hover over "Animation" at the bottom to expand it, and select "Make frames". With your frames still selected, hit the folder button in the bottom left.

Without this, Photopea won't recognize this as an animation, therefore you'll be unable to export it as a GIF.
3. Making the GIF
[PT: 3. Making the GIF /End PT]
3A. Cropping
To begin with cropping, select the crop tool, which is the fifth one down on the left bar (if you hover over, it will say the name), or the "C" key on the keyboard.
Along the top now, you should have some new options. The dropdown menu that says "Free" is going to be how you select an aspect ratio or fixed size, and I always set to 1:1 since most people on stimblr use square GIFs, but you can do whatever works for you! Make sure to leave "Delete uncropped pixels" unchecked, because that lets you move stuff around later without having to recrop.
Crop your animation down as you see fit, then either hit the enter key, or the check button along the top bar. If you're unhappy with the placement, you can undo it OR, select all your layers, then use the move tool (First icon on the left, or the "V" key) and drag it around as you see fit.
3B. Resizing
With all your layers selected still, open the "Image" tab in the top left, towards the bottom select "Image Size", then select what you want to resize to.
Tumblr's exact GIF sizing
1 per row: 540px
2 per row: 268px
3 per row: 177px
HOWEVER. For stim GIFs, I find the quality difference so negligible, you can resize to what you want. It's also better for it to be bigger and scale down, then smaller and scale up. For this reason, I typically do 268px no matter what, or 300px.
As far as resampling goes, leave it turned on, and I personally leave it on bilinear, but the different options vary slightly, so experiment and see what works for you!
If you're happy at this step, go ahead and skip down to exporting! But when doing this way, I do recommend sharpening for better quality at smaller size.
4. Sharpening the GIF
[PT: 4. Sharpening the GIF /End PT]
The fun thing about this section is you get to experiment and find what works for you! I'll give you my personal method, but you can play around, add and remove bits, etc until you get something you're happy with!
4A. High pass
High pass is my personal favorite way to sharpen GIFs, and for stim GIFs I'll often use only this.
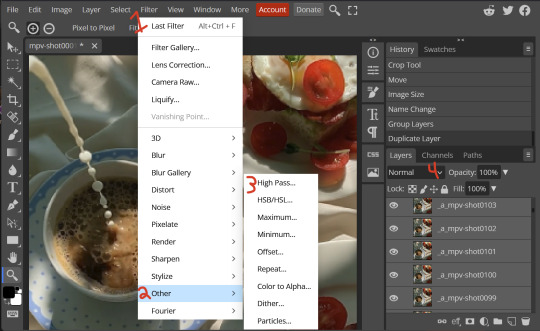
(Steps 1-3 in image) To do, start by right clicking the *Folder* all your frames are in, and select "Duplicate Layer". Select all the frames in Only the folder on top, then go to the "Filter" tab along the top left, hover over "Other", and select "High Pass". The grey look is entirely normal! I normally set my high pass at 2-4, but play around with this step and find something you like!
Select the *Folder* all your high pass frames are in, and change the blending mode (fourth step in image) to "Soft Light", it should be on "Pass Through" initially. With that done, you've used high pass on your GIFs! If you're content here, skip the next section about smart sharpening, and see about merging animation folders under it.
4B. Smart Sharpen
Note: I recommend testing your sharpening settings on one layer BEFORE applying them to all layers, as it will be easier on your computer.
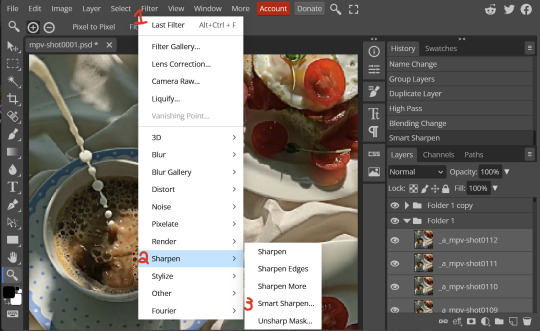
I utilize this in addition to high pass usually, but you can do it all by itself as well! To begin, select all the frames in your folder (if you used high pass, select the frames in the *Bottom* folder). Open the "Filter" tab on the top left, hover over "Sharpen", and select "Smart Sharpen". Now find what you like!
For stim GIFs, if I used high pass, I'll go for 75-110% amount, and a .1 radius. I personally don't like the look of an over sharpened GIF, so I only use smart sharpen if I want to enhance some small details high pass didn't touch enough, which is why I use so little. If you don't like high pass, you might use more here!
4C. Combining animation folders
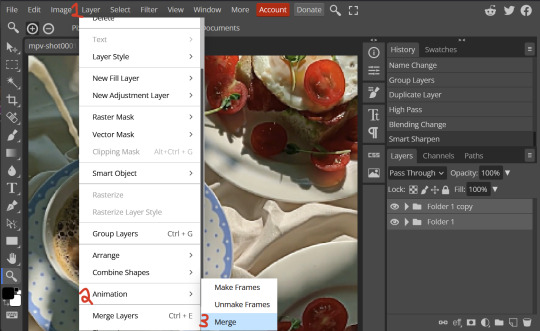
If you used high pass, you'll notice you have two animation folders. To fix this, select both folders using ctrl + shift, open the "Layer" tab, hover over "Animation", and select "Merge". It will give you a popup to confirm, and you can go ahead and accept!
If you don't merge these, Photopea will think they're two GIFs in one document, rather than only one, which is why this step is so important.
As a note, once you merge these folders, you can no longer shift the frames around to change where they are in the crop like you could earlier.
5. Coloring (Image Heavy)
[PT: 5. Coloring (Image Heavy) /End PT]
This section is going to be less of a tutorial and more a basic rundown of the adjustment layers and what they do. Coloring will change from GIF to GIF, and you can do light or intense coloring, so this is just a guide to begin with, but really just play around and find what you like!
To access the adjustment layer menu, in the bottom right where "New Folder" was, the one directly next to it that looks like a circle made of two half-circles, will bring up your adjustment layers.
As a note, I always group my adjustment layers in a folder above my animation, for ease of hiding to compare with and without.
5A. Levels
Levels is one I almost *Always* use on a GIF because it makes it look cleaner to me. In the first box, sliding the black square on the left *increases* the blacks, sliding the white square on the right *increases* the whites, and the one in the center changes the general brightness up or down.
Sliding the black box on the bottom bar *decreases* the blacks, sliding the white box *decreases* the whites.
If you change the channel from RGB to another option, you can change the balance of reds/cyans, greens/magentas, or blue/yellows, I personally don't touch this for stim GIFs. In the RGB channel, I set the top black box at ~10, and the top white box at ~245 usually.

5B. Curves
This is another way of adjusting brightness, blacks and whites, or color balance. By adjusting the dot in the bottom corner you adjust blacks, the top corner adjusts whites, and if you make a dot in the center, it adjusts general brightness! You can also make multiple dots to separately adjust some values. By changing the channels, you adjust color channels rather than white/black.

5C. Exposure
This is another way of adjusting the lights and darks of the GIF. Sliding the exposure up and down will add/take away light from the lighter parts of your images. Adjusting the gamma correction up and down will add/take away shadow from the darker parts of your image. Offset increases/decreases the brightness of the whole thing but I almost never use it.

5D. Vibrance
Vibrance is what I like to think of as a "softer" way to increase intensity of colors, instead of using a Hue/Saturation layer. It affects warmer colours more intensely than cooler colours, whether you use the vibrance or saturation slider. The saturation slider here is more intense than the vibrance one, but less intense than saturation in a Hue/Saturation layer.

5E. Hue/Saturation
This one is simple! Sliding the hue slider changes the colour, sliding the saturation slider increases/decreases saturation, and sliding the lightness is basically like directly adding black/white to a color. I use lightness only sparingly.
What's cool here, is you can adjust the range to target a specific batch of colours! If you find your reds are too bright compared to everything else, you can target the saturation of them specifically.

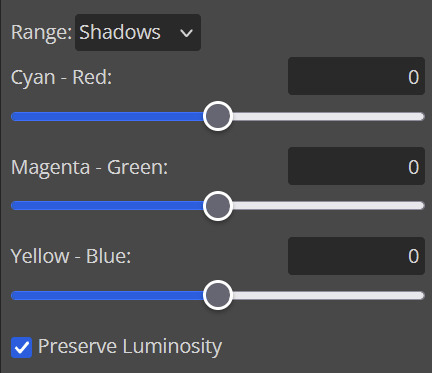
5F. Color balance
This is a simple way to adjust the base colors of an image, by changing it to be more cyan or red, magenta or green, or yellow and blue. This can be useful for making a GIF appear warmer or cooler!
I almost only touch the shadows & midtones, and highlights sparingly. "Preserve Luminosity" preserves the highlights and shadows of the image, so by unchecking it, you can achieve some more intense results.
5G. Black & White
The black and white layer is useful because you can change exactly how light or dark a color appears after making it black and white. For that reason, I prefer it over a gradient map if I need to make something black and white.
5H. Photo filter
Photo filter is a simple way to add a color filter over the entire image, and adjust how strong or weak it is. "Preserve luminosity" once again just keeps the darks and whites of the original GIF.

5I. Channel mixer
I couldn’t even begin to cover channel mixer here, but this is for very intense color edits (I typically use it when I'm trying to make a GIF fit a board). However, here's another tutorial solely about channel mixer if you're interested in taking a crack at it!
5J. Selective color
Finally, selective color allows you to adjust the amounts of color or lightness/darkness of a specific batch of color.
By changing the color channel, you can affect different batches of color. The cyan slider controls cyan/red, the magenta slider controls magenta/green, the yellow slider controls yellow/blue, and the black slider controls black/white.
Checking the "absolute" is essentially like "Preserve Luminosity" in the other layers. With absolute, it's like shifting the color one way or the other, and without absolute, it's like adding to the pre-existing color.

6. Exporting and Optimization
[PT: Exporting and Optimization /End PT]
6A. Exporting
With all that done, we're ready to finish it up! To finish your GIF, open the "File" tab in the top left, go to "Export As", and select GIF!
Here you can rename, adjust the size (WILL ruin the sharpening you did), the quality (I leave at 100%), and the speed.
Another important thing to note is the "Dither". If you leave dither off, you can potentially encounter color banding, which is where (typically gradients) with look like strips of color, rather than smooth. This is because GIFs only have 256 colors they can render, so if something has too many, it bands.
By checking dither, it can get rid of color banding, at the cost of dots on the image (around where the worst color banding is usually). Sometimes the dots aren't noticeable and this is the better option, however it will Also increase your file size. It's up to you if you want to use it!

6B. Optimization
This is technically an optional step, as tumblr's GIF size limit is 10mb, so as long as you're under that, you can post, however, smaller GIFs load faster and I personally find are better for use in stimboards where you're loading a lot of GIFs! So to help this, let's head on over to the optimize section of ezgif. My personal goal is UNDER 4.5MB, ideally under 4MB.
The two main things I recommend are Lossy GIF, or removing frames, and I always start with Lossy GIF. I do anywhere from 5-15, and usually this will bring down GIFs a lot if you made them in Photopea! My example GIF was 6.7 MB to begin with, and afterwards it was 4.2MB.
However if you find that to be not enough, you can remove frames. When you remove frames, it speeds the GIF up, so I also recommend slowing it down (this is why I set my frames high in the beginning as well). I typically do "Remove every 4th frame" and slow it down to 75%-85%.
7. End results, and misc tips and comments
[PT: 7. End results, and misc tips and comments /End PT]


(source) The first GIF is without sharpening/colouring, the second is with sharpening but no colouring, and the third is with sharpening and colouring. I didn't color it much besides making it slightly warmer, but I hardly ever do much anyways!
As for misc comments:
In firefox, when you import footage directly, sometimes it glitches and tries to load 4000 blank frames, which is extremely resource intensive on a computer. The solution is import the footage in chrome, save as PSD, then open the PSD in firefox. (Or work in chrome but why do that /half silly). The other solution is screencap which I do since I do this often, but both work fine.
In firefox, sometimes you're unable to slow the GIF down upon export and it will export faster than it actually is. Slowing the video down to 50% restores it to native speed I've found, and you can do this in ezgif before other optimization.
When colouring, my number one tip is slide something all the way up first, then adjust down! By seeing it at max, you have a better idea of what's getting adjusted.
If you have any questions, drop me an ask :•]
And that concludes our tutorial! My apologies for the length, but I wanted to cover every possible thing here. It definitely seems like a lot, much more than working in ezgif, but when you get used to what you're doing, it goes extremely fast (even if you spend extra time screencapping). I personally find it worth it for the ability to sharpen GIFs alone, but as well as more detailed coloring opportunities.
Thank you for reading, I hope this has been useful!
#i did it :•]#not stim#stimblr#gif tutorial#photopea#big thanks to talos for proofreading this :3 🖤💚🖤💚🖤💚🖤
59 notes
·
View notes
Text
Full giffing process - tutorial (*≧ω≦*)
Due to little demand, i will be going thru my complete process for making gifs. so this will cover all the basics i hope! keep in mind this is just the way I personally do things! please feel free to send me asks or dms if you have any doubts or questions!
☆☆☆☆☆☆☆☆
DISCLAIMER: Everything I know about giffing, I've learned from other tutorials, including the VapourSynth Resources I'll be using in this tutorial so I'll leave links to those tutorials I've used here as well!
In Depth Giffing Tutorial (link here)
How to use VapourSynth (link here)
☆☆☆☆☆☆☆☆
(o´▽`o) I'm a windows user so idk if this works exactly the same on mac!
First things first, you will need:
☆ 4k video downloader (download it here!)
☆ Vapoursynth (32bit download / 64bit download)
☆ Photoshop (download it here! -64bit version only)
Okay! The first thing you need to do is make sure you're working with the highest quality material possible to ensure a decent looking gif!
I'd say the minimum quality needed for decent gifs is 1080px. But if you really want to gif that low quality 2 frame milisecond of your fave, i respect that
☆ lives / streams and tiktoks are typically not very high quality
☆ for stage performances such as music shows, ts/tp files are preferred but those can be really hard to get a hold of (this is a whole deeper level of giffing hell and more of an advanced class topic so nevermind this for now!)
☆ those occasional 4k facecams on youtube work fine tho!
☆ for mvs, variety shows etc, you can download the video with good quality from youtube using 4k video downloader
_(:3 」∠)_
Now let's talk about tumblr and it's pre-requisites for a good looking gif post :D
Tumblr can be sooooo annoying about gifs okay.... I find it's best to plan my whole set before I actually start doing anything but hey that's just me. Some things to keep in mind are: dimensions, file size, number of frames and post layout!
☆ Dimensions
You have 3 main options here and it's all about the width!
☆ 1 collumn: single gifs! these should be 540px wide
☆ 2 collumns: split that in half! 268px wide so there's a lil breathing space between the gifs!
☆ 3 collumns: 3's a party! 177px for each gif please
You can go crazy on the height but the width should mostly stick to one of those 3 unless you want tumblr to pull and squeeze your gif around like a piece of gum.
☆ File Size
This is really important because tumblr has a single image size limit of 10mb. Which means that every single gif you make has to be under that size or you won't be able to post it. The other thing about this is that the dimensions, number of frames and ammount of varying colors throughtout your gif will greatly impact on the final file size. Basically, the larger the dimensions and the more frames it has, the bigger the final file will be. Later on I will show you how to check your gif's final size before exporting it!
☆ Number of frames
This has more to do with the length of your gif, the longer it is, the bigger the final file will be. Typically gifs should be under 3 seconds long. So if you are making a set, try to break the moments you want to include in your set by increments of up to 2 - 3 seconds each, otherwise it might not fit all into one single gif. The number of frames is also extremely important when making combined gifs but that's for another tutorial.
☆ Post layout
If you want to make a cool looking gifset (where some gifs are larger in dimension than others, or when you want to have a single gif followed by a line of 2 gifs next to each other), then it might be worth it to plan out the layout before you start making the gifs. This way you ensure you won't have to remake gifs down the line because they don't fit together the way you wanted to.
☆ミ(o*・ω・)ノ
Timestamping
For this step, you will go through the video you want to gif from and you will just write down all the sections you want to use, down to the exact seconds. Example: 02:30 - 02:32.
(^◕ᴥ◕^)
VapourSynth (VS) - Clipping the video
I know VS can look pretty intimidating with it's bare coding and all but I promise it can be your friend. You just have to set it up correctly and pay close attention whenever you're using it. This software is a must for giffing, it will do all your cropping, resizing, sharpening and denoising for you, making sure your gifs look good. It is also indispensable when giffing ts/tp files because it deinterlaces those files so you can clip them.
First, let's set it up. This is the most annoying and difficult part of this tutorial so make sure you pay full attention to every single step!
☆ step 1) download a version of VS here (link).
☆ step 2) unzip the file on your desktop area.
☆ step 3) open the folder and find the file named "vapourscript (drop video file on me)" - make a shortcut of that file and move it to the desktop.
☆ step 4) find the folder named "gifs" - make a shortcut of that file and move it to the desktop.
☆ step 5) drag your video file you want to gif from and drop it on top of the "vapourscript (drop video file on me)" shortcut on your desktop.
☆ step 6) enter the timestamp input, in the first line it will be the starting of your timestamp, in hours format, then hit enter. in the second line enter how long your timestamps lasts, in seconds, also in hours format. then hit enter and let the code run.
☆ step 7) the resizer tab should now load on a web browser, then you will set the dimensions of your gif on the top left corner. you can also adjust the position of your gif within the video screen and zoom in if wanted.
☆ step 8) choose the preprocessor, denoise and sharpening options on the left and tick the boxes on. I usually just stick to the settings i'm using in my video down below.
☆ step 9) now in the VS box, go to file > load, choose the script saved in the gifs folder.
☆ step 10) copy the code from the resizer into the code in the vs screen, under the designated line.
☆ step 11) alter the code exactly like I did in my video down below. save it. this is now your default vs script for clipping your gifs. what you are doing by adding the hastag and the quotation marks is you're disabling those sections of the code. the reason you do that is in case you want to run the preview before exporting. this is because those lines involve some heavy graphic processing which can make the computer slow. I will talk about the script in more detail later on.
☆ step 12) i don't usually use this option but you can also preview your gif and set specific frames to start and end your gif. This is around the 4:30 mark in the video.
☆ step 13) time to export your clip! now you will temporarily remove the marks you added to disable the code and then go to script > encode video. in the popup box, you will select the option "export to MOV", then start so that you can use that video file in photoshop later.
☆ step 14) after you are done exporting, close the encoding box and then close vapoursynth, never agree to save the script when closing it, or that will override your default script.
☆ step 15) now you need to rename the encoded file for your gif. go to the gifs shortcut folder you created on your desktop, then go to output. this is the folder where VS will save all your encoded files. but everytime it saves the file with the same name so you need to come to this folder and change the name for every gif file you encode before you clip a new one, otherwise VS will just replace the previous clip with the new one you just finished.
Here's a detailed walk through of each step in this video tutorial:
youtube
IMPORTANT
After you are done processing your first clipped file, now you have your default script already built in VS, so whenever you run it to clip more videos, this script will already be in your VS screen. So now all you need to do whenever you want to clip more files (to make more gifs) is to adjust the dimensions, positioning and zoom of the video in the resizer screen and then change a few numbers in your script! then run encode to save the clipped file.
☆ To make new clips: go thru steps 5- 7, also do 8 if you want to mess with the denoise and sharpening filters again, but I don't really know much about how those work so I can't help you with this.
Now what you need to alter in the code, each time you are making a new gif:
after you run VS and change the settings in the resizer to what you want, you need to change the zoom numbers and the video positioning in the code.
you need to replace the numbers in the VS script on the left so they match the numbers in the resizer on the right.
Do step 12 if you want to set specific frames to clip. Then steps 13 - 15 and you are done! You need to do all this every single time you want to make a new gif.
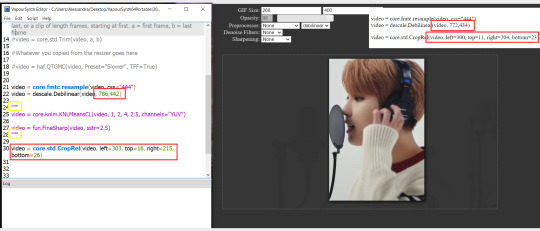
Now let me talk a bit more about some of the lines in this script:
☆ line 14: #video = core.std.Trim(video, a, b)
this line is to set specific frames to trim your video section, your final encoded file will be only the frames inbetween the numbers you input here. a = first frame, b = last frame. you will need to run the preview option in VS in order to see every single frame of your clip and select your first and last frame. I usually do this in photoshop later instead so I don't bother with it on VS unless i'm making combined gifs, in which you need all the clips to have the exact same number of frames. the hashtag at the beginning of this line means that the script won't follow this command when executed. so if you want to include it, you need to remove the hashtag before encoding your file.
☆ line 18: #video = haf.QTGMC(video, Preset="Slower", TFF=True)
this line is for the preprocessor option in VS, that tool is mainly only used when giffing ts/tp files because you need to deinterlace them before you can use them on photoshop. so you will only need to remove the hashtag and enable it when giffing those types of files. when im giffing those files, i usually always keep it with this setting:

I don't really understand much about this so I never mess with it. If you want to know more, I believe there's more info about it in the tutuorials I linked at the beginning of my post.
☆ line 22: video = descale.Debilinear(video, 786,442)
this line is for the zoom of the video screen. you just need to match what you have in your VS script to what you end up with in your resizer.
☆ line 25: video = core.knlm.KNLMeansCL(video, 1, 2, 4, 2.5, channels="YUV")
this line is for the denoising filters, in my case I always use KNLM and this is what it's line looks like. I know you can change those numbers to change the filtering settings but I never messed with it so I'd usually just have it like that.
☆ line 27: video = fun.FineSharp(video, sstr=2.5)
this line is for the sharpening, in my case I always use FineSharp and this is what it's line looks like. I know you can change the number to change it's settings but I never messed with it so I'd usually just have it like that.
note: lines 25 and 27 (which have to do with denoise and sharpening) are the ones within quotation marks in your default script. I believe the quotations work in a similar way as the hashtag, in which the script only executes the lines when the quotations are removed. Which is what you do everytime you are about to encode your clip, otherwise they stay on. I think you should also remove them if you want to test how they affect your gif in the preview screen but i think these filters also require heavier graphic processing which my computer can't handle well so I never do that.
☆ line 30: video = core.std.CropRel(video, left=303, top=16, right=215, bottom=26)
this line is for the positioning of your video screen within the gif dimensions. you just need to match what you have in your VS script to what you end up with in your resizer.
ʕ •̀ o •́ ʔ
Photoshop (PS) - let's make a gif!
Now that we have clipped and preprocessed our video file, it's ready to go to photoshop!
☆ step 1) after you have opened PS, go to File > Import > Video Frames to Layers. Then choose the clipped file you created through VS.
PS should open a box like this:
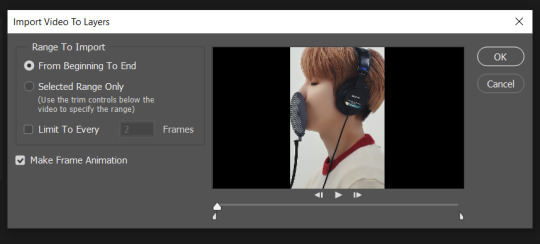
Keep those options ticked and hit OK
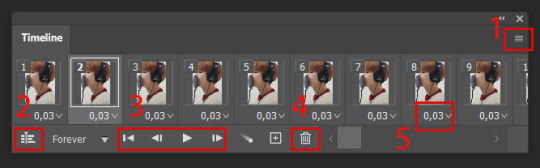
☆ step 2) now you need to go to Window > Timeline to bring up the timeline tool box. This window will always be necessary when making gifs. Let's take a look at it, I've marked down all the important buttons you will need:
timeline menu: there are several commands in here, you will need to use some of them later on.
convert to video / frame timeline
play controls to watch your gif
trash can to delete selected frames. (when deleting frames, first delete them here and then delete it's matching layers which are still there after deleting the frames)
frame delay time: this is where you set the time for how long that frame will be visible in your gif
☆ step 3) remember how I mentioned the preview option in VS and how i don't usually use it to trim the frames of my clip? That's because I usually do that at this step of the process, in PS. Notice how each frame is also a layer, and when a frame is selected, the matching layer has the eye symbol next to it turned on. So now you should play your gif and see if there are any frames you don't want to keep, then delete the frames and it's matching layers.
Since we applied sharpening filters back when we were clipping the video on VS, your clip should probably already look pretty decent even before the next steps, so steps 4 - 9 are optional. The coloring part of my video has been sped up.
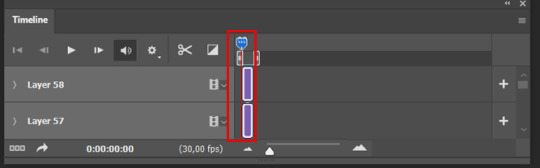
☆ step 4) click on the timeline menu and select "Select all frames", then go to the select menu at the top of the PS screen and select "All layers". Now click on button 2 of the timeline at the bottom left, switching from the frame timeline to the video timeline.
☆ step 5) before you do anything else, make sure the blue holder is at the beginning of the track before you do anything else. Then go to Filter (at the top of PS) and select "Convert for smart filters". This will convert all the layers into one single layer.
☆ step 6) now make sure the layer is selected, then go to Filter > Sharpen > Smart Sharpen. A box will open with several options:
I usually keep the amount to around 30, I don't touch on radius and you can also mess with reduce noise if you think your gif is looking too sharp. Hit OK when you're done.
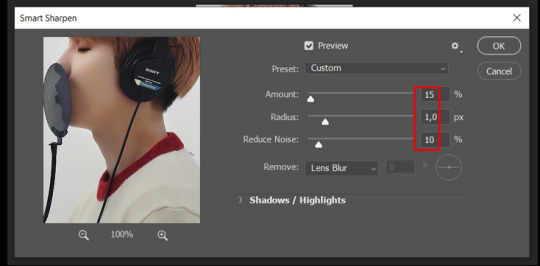
Since this is a filter applied to a smart object (the converted layer that contains all our layer - frames), this means you can turn this filter on or off as long as the layers are in the form of a smart object. You can also go back to it and alter it's settings (like I've done in my video down below)
☆ step 7) now while making sure the blue holder is still at the beginning of the track and the layer is selected, click on the timeline menu that i mentioned above. Then go to Convert Frames, then select Flatten frames into clips.
☆ step 8) again go to the timeline menu, Convert Frames, but now select Make Frames from Clips. Now click on the button at the bottom left of the timeline box, to convert the video timeline back into a frame animation. Then hit continue in the pop up box.
☆ step 9) now you are back to the frame timeline screen from before, but now the first frame is empty. You need to delete that first frame and then check the final frame because sometimes PS also creates another empty frame at the end at this point.
☆ step 10) PS also created a new layer under the layer 0, where the filter is still applied, you can delete this new layer as well. Now for organizational purposes, select all remaining layers (that contain your frames) and group them (you can see how in the video).
☆ step 11) This step is also optional, now I like to add the coloring to the gif. I have a separate tutorial exclusively on this topic. You can check it here:
☆ step 12) This is the time when I also add my signature. This is optional. You need to have the signature layer(s) on top of all the other layers. I usually have it in all black or all white, with lowered opacity of around 40%.
NOTE:
When adding elements (such as a signature) to a gif, it's important to always make sure you have the first frame selected, otherwise PS can move your newly added elements around the canvas on different and random frames. This also applies to anything in the layers pannel that has specific opacities. It's best to already add the elements with the final wanted opacity with the first frame selected.
Exporting + Delay time
☆ step 13) To export: go to File > Export > Save for web (Legacy). PS will open this box:
First I just use the exporting screen to test the delay time of my gif, and to check the gif's final size.
About the size:
The final size is displayed at the bottom left. Remember it needs to be under 10mb. If it's above that, then you will have to go back and delete frames and test again until the size is within the limit.
About the delay time:
To test the delay time, hit that play button and the gif will play at it's default delay time. If it's too fast or too slow, you will hit cancel and change the delay time (at the next step).
For actual exporting:
The highlighted box at the top right of the screen is very relevant now. Make sure the first box has the GIF option selected. At the next box, you can select either perceptual, selective or adaptive. I usually like to use adaptive. At the next box you need to choose either diffusion or pattern. I like to use pattern. Tick the transparency box and then select either pattern or diffusion transparency dither.
Once you are satisfied with all aspects of your gif, hit save to export your final gif.
To fix the delay time:
After you have exited the export box, go back to your timeline, click on the menu button at the top right and select "Select all frames". Then, on any random frame, click at the small arrow next to the numbers under the frame. Select the option "Other". That will open a pop up box to alter the delay time. To test it again, use the export box explained above. Once you are satisfied, save your gif! I've also altered the delay time in my video to show you the process.
☆ step 14) After your gif is done and saved, I'd suggest to save your psd file if you added any coloring to it. This is so you can reuse the coloring later in other gifs without having to redo it all. This is useful if mking a set of gifs from the same moment / video.
Here's a detailed walk through of each PS step in this video tutorial:
youtube
I hope this tutorial is helpful! Feel free to send me any asks if you have doubts or need extra help! (つ≧▽≦)つ
183 notes
·
View notes
Text
building my organization and productivity system part 1: school
hello interweb
this is a big project so we'll do this in parts.
first: school
I am finishing the last couple classes I need for my degree over the summer, therefore school is still an important part of my life.
Apps:
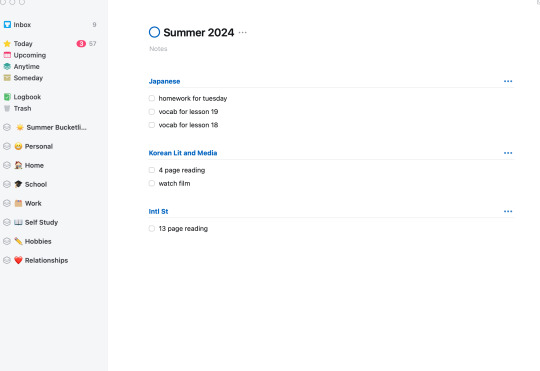
notion:
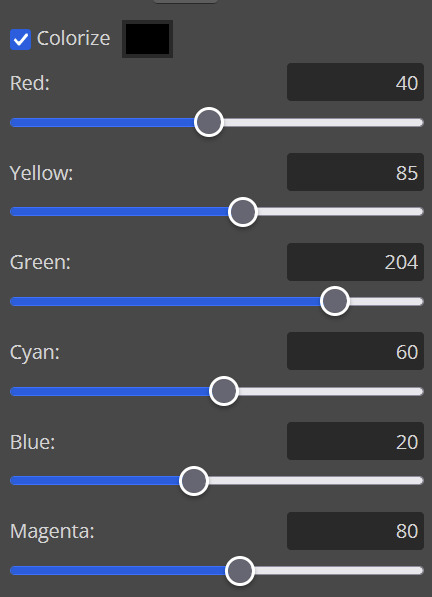
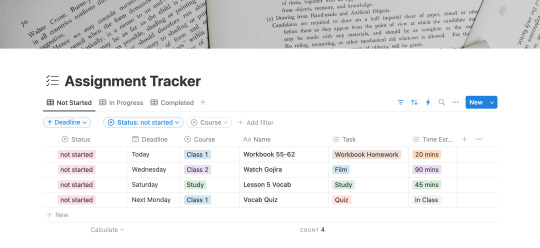
I am not a notion girlie, but I can't find an app that lets me build databases the way notion does. at least not one I like. I am a productivity app enthusiast so i've tried just about all of them and notion just works the best. Here is the template I use to keep track of my assignments. It is a mix of StudyWithAra's template and Notion's Assignment Tracker. The image above is the template I've made available for all of you! There are automations set up (the lightening icon), but I think everything is pretty self explanatory? if you have any questions don't hesitate to reach out.
edit: I have added a new section called "treats" to the database, to help motivate me to finish more of my work. I should add that this system is what I have developed while struggling to manage my chronic illnesses.
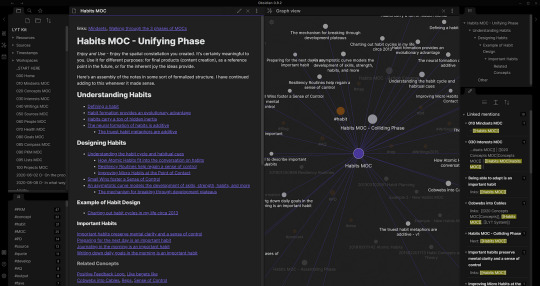
obsidian:
my one true love. i can wax poetic about why this is just a superior notetaking app, but that will be for a later post. for now, think of obsidian as a wikipedia database for all your notes. it allows for tags and backlinks and search and callouts... its amazing. love it there. uhm. a bit of a learning curve, but again a whole post on obsidian upcoming. here is a bit of an intro video for obsidian for students that I often return to. will reveal my obsidian notes in that post I'm working on.
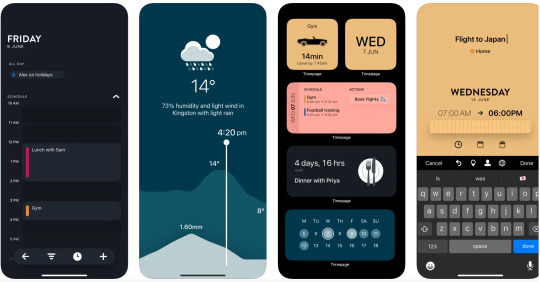
timepage:
if you love stationery you might be familiar with Moleskine. they've built this wonder suite of productivity tools and timepage is the calendar app. I use this on my phone! its everything a calendar app should be and more. its super cute and functional and customizable. I use google calendar to create different calendars that i've color coded to correspond to different areas of my life. i use a couple different calendar apps but timepage is my school calendar. it tells me when to leave for class, how to get there, and how long i have to rest/study/eat between my classes. it shows the weather, alerts you of rain, and did i mention its cute?
things:
the adhd/depression/anxiety struggle is real. I have 101 different apps to tell me what to do and when. things is another one of those apps. one of my lovely friends purchased the mac app for me and it has been a game changer. i use things to organize my entire life, but in the screenshot above you'll see my school list. when notion is too overwhelming or i need to break down things a bit more, i use things.

youtube:
here are some youtube channels I recommend for motivation, for aesthetics, for background noise 1, 2, 3, for body doubling...
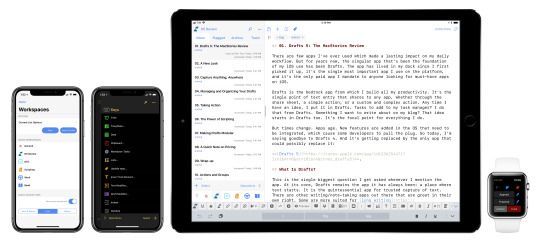
drafts:
cute little app. great for quick notes and also uses markdown so easy to copy and paste between drafts and obsidian. opens and closes quickly and syncs between your mac and phone for free! I write my speeches in here and also those last minute things your professor says after you've already put away your notebook.
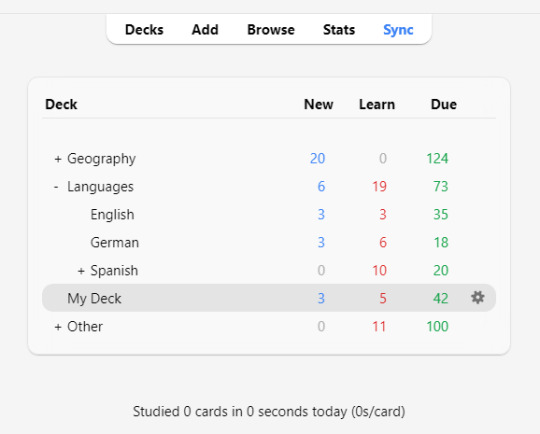
anki:
just started using this because i am in desperate need for spaced repetition. i bought and set up a small remote using this video to help move through the flashcards faster. i am also terribly lazy so we definitely downloaded premade cards instead of making our own. still need to do a bit more research to be able to use this software properly, but it is good enough for now. I am supplementing this app with the flashcard app below.
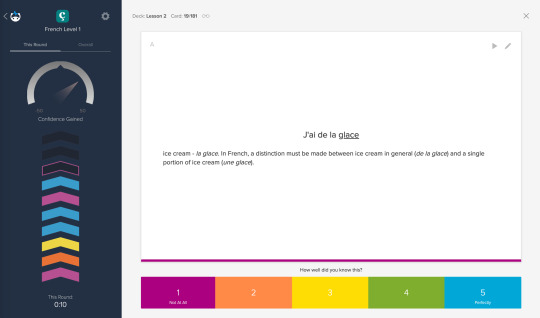
brainscape:
i use this to learn whatever I am studying. recently it has been vocab and kanji, but I imagine I might add in grammar cards at some point too. if you are familiar with anki, brainscape has a similar system for "learning", meaning you rank the card after seeing the answer, deciding for yourself how well you know the material. I can also download the decks I make to use during my commute so that is super helpful. And it's free (with a subscription upgrade available)!
Supplies:
as for material supplies, you'll find some of my favorites below:
kokuyo campus semi B5 - 5 mm graph
kokuyo campus semi B5 - dotted 6 mm rule
zebra sarasa gel pen .07/.05
pentel energel .07/.05
pilot g2 .07/.05
zebra mildliners
bic mechanical pencils in .07
twsbi fountain pen medium/extra fine
platinum carbon black ink
hobonichi cousin
System:
okay so i'm not quite sure how to explain this in a way that makes sense, but i shall attempt it. the system as it stands has a few steps.
move weekly assignments and such from the syllabi to Notion
add due dates and deadlines into Calendars
move tasks to Things
plot study schedule onto Calendars
write essays using notes i wrote in Obsidian during class
study for Japanese using Brainscape and Anki for memorization
practice Kanji and writing in kokuyo campus notebooks
write scripts, quick notes, etc., using Drafts
migrate things from Drafts to Docs, Obsidian, Calendars, or Notion
commence studying using YouTube as background noise
---
that's all for now. I'm still working on the next few posts in this series, but I hope this is helpful or at the very least somewhat entertaining.
wishing y'all the best,
Neith
#studyblr#writing#productivity#studying#studyspo#study motivation#apps#neithliveshere#that girl#organization#organizing#notion#university#self study#disability
10 notes
·
View notes
Text
yt-dlp: An Installation and Use Guide
This guide specifically walks through how to download and use yt-dlp on Windows, but if you have a Mac, you should still be able to follow along. Just make sure to download the Mac version of software whenever the option comes up. I'm also going to be assuming that you have a 64-bit Windows system. The standard today tends to be 64-bit for PCs, but if you're not sure and you want to double check then go to Settings -> System -> About -> Device Specifications -> System Type.
This guide also focuses on the command line version of yt-dlp (accessed on Windows by typing cd in the search bar). If you prefer to access the program through a GUI, you'll need to download additional software. Here's a link to help you get started. (LINK)
If you have any specific questions that you can't find an answer to within the linked resources, feel free to reach out and I'll do my best. Also, as someone who can be incredibly computer illiterate at times, I'm writing this guide in a way that explains a bunch of things I used to be confused about, so sorry if it goes over something in too much detail.
Resources:
These are just some handy links in case you run into a problem.
The yt-dlp GitHub page (has literally everything you might need)
The r/youtubedl wiki, includes a list of common errors and FAQs
Installing:
Click on this link. It will take you directly to the section on the yt-dlp GitHub page where you can download the program.
Feel free to download whichever version works best for you, but I recommend scrolling down to RELEASE FILES and downloading the version that works for your system from the Recommended section. I've included a picture below.
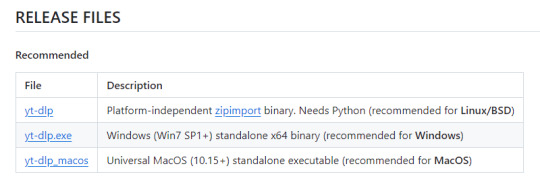
Once you've clicked on your version (yt-dlp.exe for Windows users), yt-dlp will download automatically. It should show up in your Downloads folder.
FFmpeg:
To merge video and audio files (which helps you get the best quality from youtube possible), you also need to download FFmpeg.
Scroll down even more to the DEPENDENCIES section.
Click on that first link. It will take you to the FFmpeg webpage. Clicking on Download in the sidebar will take you to a page full of different versions of FFmpeg. DO NOT CLICK on the big green button in the middle of the page. What we need is a version that is already compiled.
Find the section that looks like this (titled Get packages & executable files):

If you're Mac, pick accordingly. If you're Windows or even Linux, I actually recommend you download from this webpage. It contains the same versions as the Windows builds by BtbN but is instead managed by the developers of yt-dlp.
Find the one titled "ffmpeg-master-latest-win64-gpl.zip" (I've included a highlighted picture below for reference).

That will download and go into your Downloads folder too.
Setting up a Folder:
The easiest way to use yt-dlp is by placing it and FFmpeg into a folder. You can store the folder wherever you want, but you will need to remember (and type out) the path to the folder every time you want to use yt-dlp, so I recommend not making it too deep.
What I did was make a folder titled "yt-dlp" within my Desktop folder.

Move the yt-dlp application from your downloads folder to your new yt-dlp folder.
IMPORTANT: Assuming you also placed the yt-dlp folder into your Desktop folder (and assuming you are a Windows user), then the full path to your new yt-dlp folder should be C:\Users\YOUR_USERNAME\Desktop\yt-dlp. Fill YOUR_USERNAME in with whatever your profile is called on your PC.
For the FFmpeg zip you downloaded, extract the zip file into your new yt-dlp folder by clicking the zip, clicking Extract all from the tool bar, and then entering the path to your yt-dlp folder. Everything within the zip is already stored into a folder, so you don't need to create a new folder just for FFmpeg.
Now you're ready to go!
Using:
This section is going to be almost exclusively Windows-focused because I've never used a Mac before and I don't know how the Mac command line varies from the Windows one. I'm also not going to go into any details. If you want more info or to explore the options, I recommend checking out the links in the Resources section.
Type cd and then press enter into the Windows search bar to bring up the command line. If you've never used the command line before, this is what it looks like:
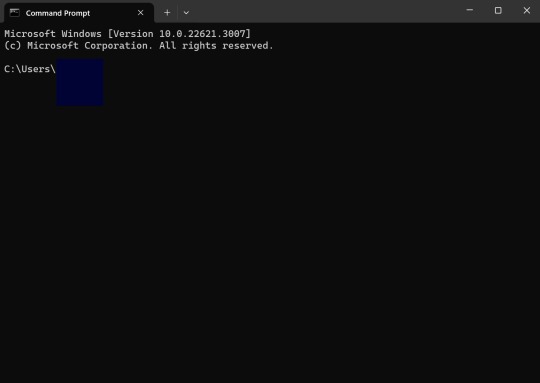
I covered up my username with that blue square.
Type the following into the command line:
cd Desktop
cd yt-dlp
This will take you to the same place where your yt-dlp application is stored. You must cd into the appropriate folders every time you want to use yt-dlp.
YouTube, Twitch, and Most Websites:
Find a link to whatever YouTube or Twitch video that you want.
Into the command line, type yt-dlp followed by the link you want to use. This is what it should look like (the red is what you type):
C:\Users\YOUR_USERNAME\Desktop\yt-dlp> yt-dlp https://www.youtube.com/watch?v=hECaXfk2Wo4
Press enter and viola! Your video should download! It will automatically go into your yt-dlp folder.
Twitter:
Twitter forces you to log into an account to view a video, so you have to give yt-dlp your account information if you want to download anything. I understand being wary of doing this.
The easiest way of going about this is by typing:
yt-dlp https://www.youtube.com/watch?v=hECaXfk2Wo4 -u YOUR_TWITTER_USERNAME -p YOUR_TWITTER_PASSWORD
And then your video should download as normal.
Alternatively, you can use your browser cookies as explained here.
Updating:
Here is the section on the GitHub that explains updating. Basically, type yt-dlp as if you want to download a video, but instead of also adding the link, add -U at the end.
Uploading:
If you want to upload a video or clip to tumblr and it's not working, my number one advice is to rename the video file to something simple and add .mp4 at the end. If that doesn't work, try converting it (either with yt-dlp itself or an online website). Sometimes you just have to fiddle with things before they work the way you want. Good luck!
#yt-dlp#youtube-dl#speaking#i generalized this but i use yt-dlp almost 99% for various clips which is why I'm putting this post here for you guys
9 notes
·
View notes
Text
since some people asked, here's how i formatted the Trigun manga panels to be printable to make into a bound book! i'm not the best at tutorials, but hopefully this will be helpful.
gather your images and make sure each image is only one page. most of the time when you download manga for reading on a computer, any two-page spreads will be in one image file. locate any and all two-page images and split them down the middle into two separate files. i used GIMP to do this since it's free, but photoshop or whatever you have access to will work.
make sure your files are all PDFs. on a mac, it's pretty easy to right-click an image file, go to Quick Actions, then choose Create PDF. however, there's lots of other ways you can do it, just try to keep the same resolution (so if your original image is 600x1000 pixels, make sure the PDF is too! otherwise your final image won't be as sharp.
number all your files such that putting them in alphabetical order puts the pages in the correct order from start to finish. luckily the files i downloaded were already numbered correctly, so this wasn't as much a concern for me, but i wanted to point it out just in case.
from here i just followed this tutorial from youtube, and this guy does a great job explaining what to do, and your different options. some things to keep in mind though not in the video!
4a. make sure you put your pages in the correct order! remember manga goes right-to-left, so that will likely be backwards to what the software you're using is going to do automatically. if using acrobat, you should be able to sort the files in reverse-alphabetical order and combine them in that order.
4b. make sure your two-page spreads will end up next to each other. in acrobat, you can choose to view two pages of your document at a time. starting from the top (so at the end of the book) go through and check your two-page images. if you get to a point where they don't line up, go back up to the last chapter break and insert a blank page. this will then line them up. do that for the whole document. then, once you're done, go back to the top and either add or remove one blank page (very important!). this will mess up the two-page images in the acrobat preview, but remember that the first and last pages of a book are not next to another page. to be sure, once you format your pdf into a booklet, do a test print of one signature that contains a two-page image to make sure that it lines up correctly!
4c. when adding blank pages to match the page count you'll need for your signatures, if you're adding to the top of the document, be sure to do so two pages at a time. this will keep your two-page images aligned, assuming you followed what i said in 4b. you can also just add all the extra pages at the bottom of the document, which is fine too, but just remember that'll actually be the front of the book.
sorry if i didn't explain something well, but if you have any questions feel free to ask me! i'd be happy to clarify or go into more depth on anything.
#sorry its a lot#but that's why it took me a week to figure out i guess lol#i don't even know what to tag this it's not even trigun specific lmao#bookbinding#we have trimax at home
16 notes
·
View notes
Text
How to make a gif + sharpening
Gifs are part of the Tumblr experience and you may want to learn how to do them.
If that is the case, here is a tutorial, showing all the tricks I learned in the past years.
Contents
Software needed
Videos
The process.
Software needed
Windows or Mac OS
Gom Player [download]
Photoshop (I use Photoshop CC 2018, but you can really use any version as long as it has the timeline option).
Talking about Photoshop. You should buy it - but for educational purposes, I can tell you that if you google, you can find many many tutorials on how to install it.
Here is the link to one & [another one]
Overall, I suggest you to google for tumblr tutorials - there are plenty.
Videos
To make HQ gifs you may want to get the scene you want to gif in the highest quality possible.
On Youtube there are a lot of 4K and 1080p videos (especially music videos)
If you are looking for a film or a TV show I am sure you know there are some websites that provide you with 1080p quality files (look for Bluray Rips, they have the best quality).
The process
Now for the fun part. Before starting I want to give you a little cheat sheet on Tumblr’s post dimensions (useful if you want to have really HQ gifs) [here].
Here is the gif I’m gonna make with you today:
It has no filter: just some sharpening.
STEP ONE: SCREENCAPPING
Run Gom Player and open the video you want to get the screencaps from.
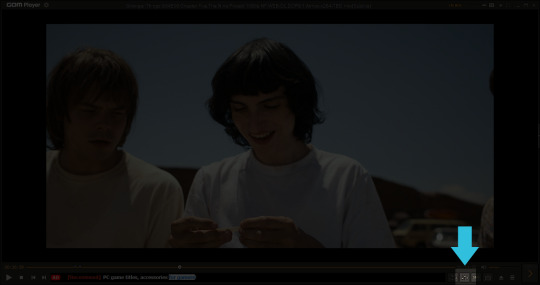
See that little button there? You have to press it. It is called Control Panel.
Once you pressed on it, a pop-up window should load + make sure to click on the Video bar, and the Advanced Capture option:

These are my options:

Now, play the video and press the Burst Capture: once you’re done, press that same button again to stop the process.
Now, the designated folder where you saved the screencaps should have all of the saved frames.
STEP TWO: PHOTOSHOP
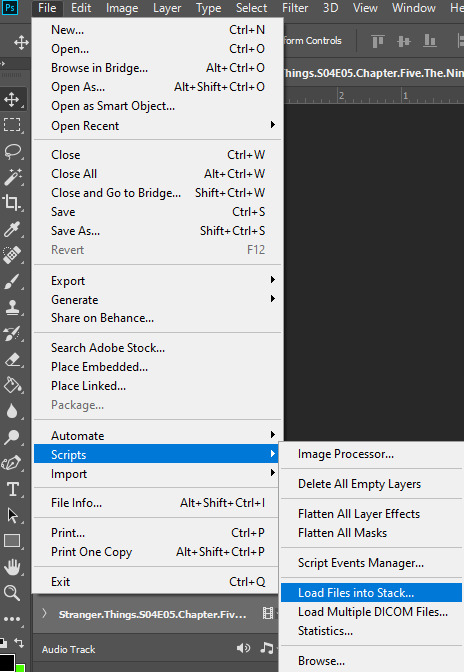
On Photoshop go to File > Scripts > Load Files into Stack
This window will pop up:
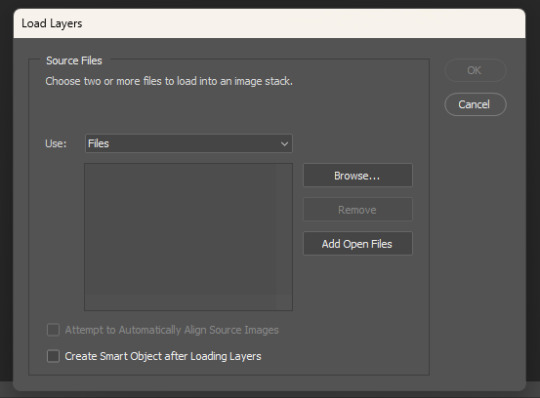
Click on Browse… and select your screencap folder, and select now all the frames of the scene you want to gif, you’ll get something like this:
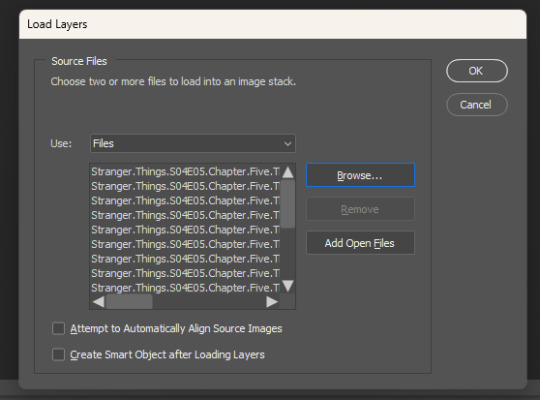
Now press OK and let Photoshop do its job.
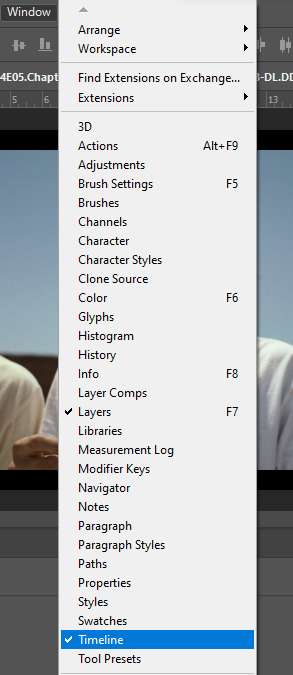
Before starting, make sure the timeline is on (it’s on if it has a tiny check next to it - see the picture below):
Now, your timeline should be visible at the bottom of your screen. Please select the Create Frame Animation option:


Once you’re done, click on the burger menu on top left (see image above):
Click on Make frames from layers
Click again on that menu
Now on Reverse frames
For the last time click on the menu
Select all frames.
Now all of your frames should be selected. Right click on one of those frames where you read “0 sec.”:

Select Other… and write 0.05 (or 0,05 - it's the same tho, for example, my version of Photoshop supports as decimal symbol the comma instead of the full stop!) and confirm.
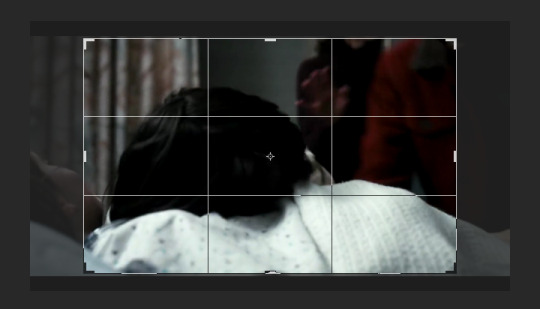
STEP THREE: CROPPING
Ok, now cropping is really delicate. First, select the crop tool and on the top bar use the Ratio option, like this:
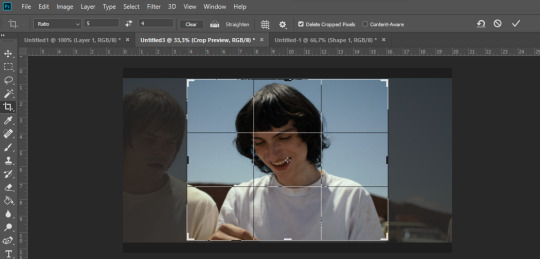
Now, really pick whatever ratio you want (mine is 5:4), and using the handles cut out the black portions of the scene - nothing more. Then confirm.
Go to Image > Image size and write the width based on the cheat sheet I linked above (if the little chain symbol is selected, the height will automatically adjust!) -> These are my options:
Note: if your resolution is different than 96, don’t change it - leave the number you have.
Confirm.
STEP FOUR: CREATING THE SMART OBJECT AND SHARPENING
Now, on the timeline, select the first frame, and on the bottom left there is this symbol you may want to click:

Select all the layers, right click and select Convert to Smart Object
Select the newly made smart object and go on the Filter > Sharpen menu and pick Smart Sharpen: these are my options

Press OK and then redo it (the smart object has to be sharpened twice).
STEP FIVE: SAVING
File > Export > Save for web

Make sure the looping setting is on Forever - click on save and you’re done!
[list of other tutorials here]
9 notes
·
View notes
Note
you do edits and gifs right? i am trying to find a good screen recorder (preferably free and without a watermark. kind of a tall order. i know)
i just wondered if maybe you knew of one? also curious what programs/process you use to create your gifs and edits if you don't mind sharing
ty
Hey! I've been making gifs for the last ten years and I got some tricks up my sleeve. It's going to be such a long post (as I'll discuss my process in detail and depth, explaining all the little things), so if anyone is interested, just read under the cut! (❁´◡`❁)
Step one: finding the video
To make an HQ gif, your video has to be HQ. The best choice is to go on YouTube and download the highest-quality video:
Example -> if there is as quality option 4K, download the video in 4K.
Remember that .mp4 videos have a lower quality, because it's a compressed file.
A better extension is .mkv, which I find preserves the quality better.
If you can't get the video from YouTube, you may still want to have a good quality video -> you can still record your screen and I suggest this open source program: OBS Studio (Win, Mac and Linux!)
Here you can play with the settings -> on the output menu, remember to select the .mkv output! (NOTE: you need to play around with the settings because depending on how powerful your PC is, some will be better than others!)
Now all you have to do is press start recording and once you recorded your video, press stop recording (it's pretty intuitive!!)
Step two: screencapping
It's the slowest way to make gifs, but it helps preserving the quality.
Once you have your video, you need to make the screencaps!
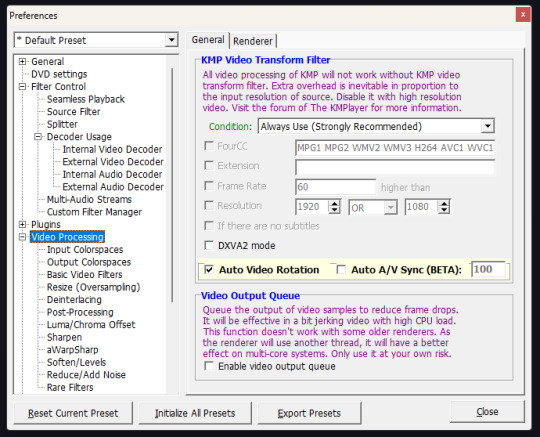
Download KMPlayer
Right click on the middle of the screen > options > preferences

These are my settings:

Open your file (you screen recorded in OBS studio) and put the cursor to the point the scene you want your gif starts
Then right click (on the screen) and select this
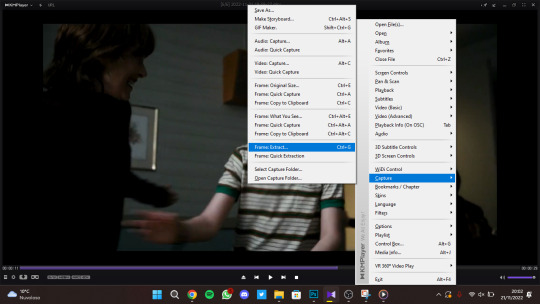
Make sure these are your options:
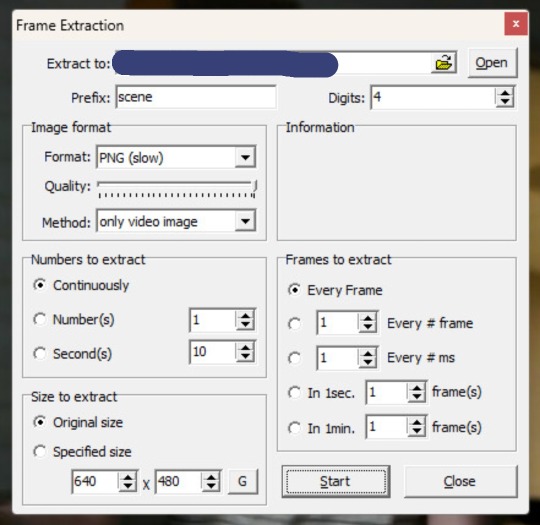
Press start and press play on the player -> now let it play until you finish your scene -> then press stop.
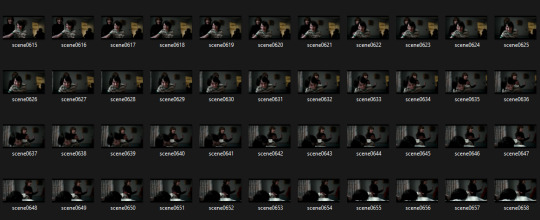
On the folder you chose as destination of the extraction, you should have something like this.
Step three: making the gif
Open Photoshop (I have Photoshop CC - 2018).
Go on File > Scripts > Load files into stack

Click on browse -> select all the screencaps you previously made -> once they're loaded, press on OK
Now, lean back, relax, grab some coffee because it's gonna take a while!
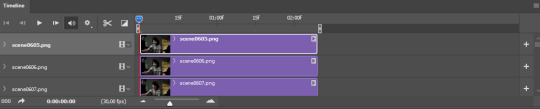
Turn on your timeline (Window > Timeline)

And press on Create frame Animation, there in the middle
Then press on the little burger menu on top right of the timeline and click on Make frames from layers
Click again on that menu and select Reverse frames
Now, select all the frames (the ones you see on the timeline) and right click where you see "0 sec" and choose Other ...

Put 0.04 as delay!
Step four: cropping and sharpening
Select the Crop Tool (shortcut: C) and you should have something like this

Move the handlers like this (don't reduce the image size!)
I just eliminated the black stripes on top and bottom and resized the width
Then confirm
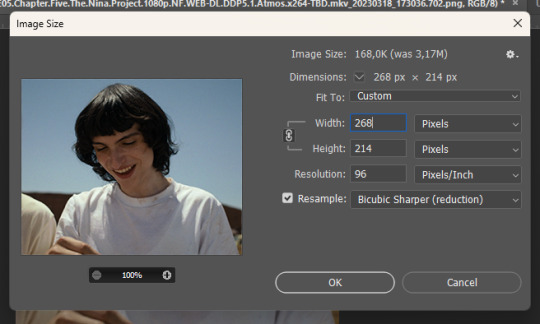
Go to Image > Image Size and these are my settings:
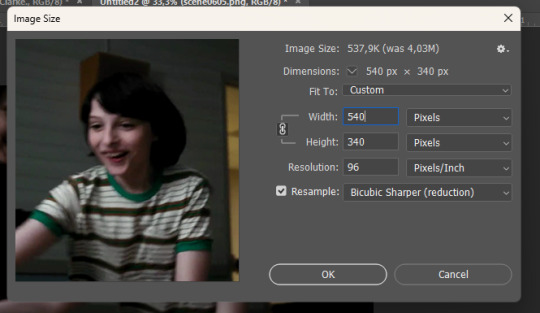
If you want to make a ONE COLUMN gifset -> width has to be 540 px
If you want to make a TWO COLUMN gifset -> width has to be 268 px
Height doesn't matter! Press OK.
Now, back to your Timeline, press that little icon on the bottom left
Now, this is what should happen:
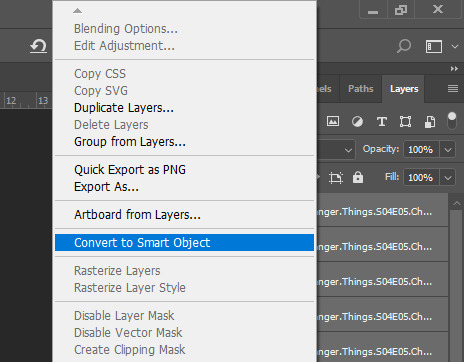
On the layers panel, select all the layers and right click -> Convert to Smart Object

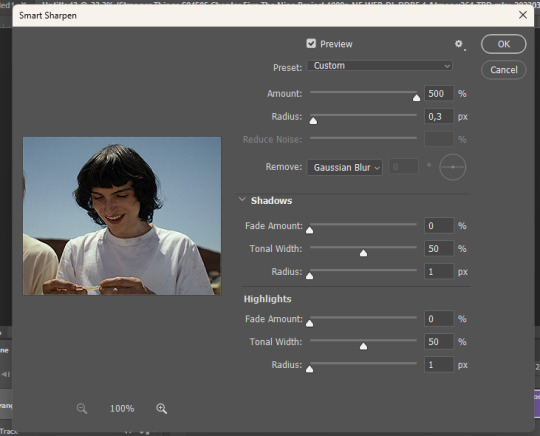
Now, you can use whatever sharpening option you want -> go on Filter > Sharpen > Smart Sharpen.
I usually do that twice:
OPTIONAL -> duplicate the layer and set the opacity to 30% -> add Gaussian Blur (radius 1.5)
Step five: coloring
Now this is the fun part, and it's always different! So, just play around with the adjustments and find what suits the scene the best!
Step six: saving
File > Export > Save for Web

NOTE: .gif files must be under 10MB to be uploaded on Tumblr
REMEMBER TO SET LOOPING TO FOREVER!!!
And that is it!? If you have any questions please DM me, or send in another ask + there is a quicker way to do this, let me know if you are interested in that.
#ask#elz:explains#OMG I WAITED TEN YEARS TO RECEIVE THIS ASK!!!!#😭#sorry for typos#english is not my main language#gif tutorial#*resources
5 notes
·
View notes
Text
How to rip dvds with wondershare video converter free

#HOW TO RIP DVDS WITH WONDERSHARE VIDEO CONVERTER FREE MAC OS X#
#HOW TO RIP DVDS WITH WONDERSHARE VIDEO CONVERTER FREE 64 BIT#
#HOW TO RIP DVDS WITH WONDERSHARE VIDEO CONVERTER FREE FULL#
#HOW TO RIP DVDS WITH WONDERSHARE VIDEO CONVERTER FREE PORTABLE#
#HOW TO RIP DVDS WITH WONDERSHARE VIDEO CONVERTER FREE SOFTWARE#
You can modify the settings and use cut and crop functions. It displays the format, resolution, duration, subtitle, audio codec and size of source and target files. It offers support for almost all popular formats. The application allows users to import videos by browsing or with drag and drop function.
#HOW TO RIP DVDS WITH WONDERSHARE VIDEO CONVERTER FREE SOFTWARE#
This software is the fastest video converter as compared to other converters as it converts video 30 times faster with the use of its exclusive APEXTRANS technology for iOS device playback. You also free to choose the subtitle and audio track in accordance to your need.Moreover,this software is also a very good YouTube downloader as it enables one to download any video from YouTube and enjoy it offline.You can also convert the YouTube video you have downloaded to iPad,iPhone ,iPod and the other iOS devices for high quality play freely. Wondershare video converter is a free video converter that is very easy to use and is supported by windows 10.It helps in converting audio and video formats freely and easily with ability to be compatible with all devices.It enables in program functions of editing like cropping,trimming,adding subtitles,watermarks,merging and rotating among others just to make your digital more enjoyable.It also enables you to add other ASS,SRT,SSA subtitles to the video output and then reset the color,font and size for the best performance of your video.
#HOW TO RIP DVDS WITH WONDERSHARE VIDEO CONVERTER FREE MAC OS X#
It is a user friendly application available for Windows 10 and Mac OS X computers. With its help, you can enjoy content that you were unable to watch in past due to compatibility issues. It is a licensed tool with a free evaluation version. It helps to convert videos into a large variety of formats, download online media, burn content to discs and transfer media to mobile devices.
#HOW TO RIP DVDS WITH WONDERSHARE VIDEO CONVERTER FREE PORTABLE#
Just click once on ‘Download Now’ and start Wondershare Video Converter Portable freeload.Wondershare Video Converter Ultimate is your go to solution if you want to perform various videos related operations. Wondershare Video Converter Portable freeload
Hard Disk Space: 400 MB of free space required.
Prior to start Wondershare Video Converter Portable freeload, be sure for the undermentioned system specifications. Minimum System Requirements for Wondershare Video Converter Portable
Latest Version Release Added On: January 3, 2017.
#HOW TO RIP DVDS WITH WONDERSHARE VIDEO CONVERTER FREE 64 BIT#
Compatibility Architecture: 32 Bit (x86) / 64 Bit (圆4).
#HOW TO RIP DVDS WITH WONDERSHARE VIDEO CONVERTER FREE FULL#
Setup Type: Offline Installer / Full Standalone Setup.
Setup File Name: Video_Converter_Ultimate_Portable.exe.
Software Full Name: Wondershare Video Converter Portable Ver 10.2.0.154.
Go through the following technical details and get maximum information about setup file before starting Wondershare Video Converter Portable freeload. Technical Details of Wondershare Video Converter Portable Setup
Requires high amount of system resources to finish the task.
Can change the language of the interface according to your preferences.
Can set this application to turn OFF once all the tasks are completed.
Lets you burn DVD by specifying its label, aspect ratio, destination and quality.
Media files can be added for conversion through file browser or by drag and drop method.
Lets you to extract the audio file from any video source and save it to MP3 file format.
Got a very simple and user friendly interface which will simplify the conversion process.
Can convert various different audio/video file formats into other formats like MP4, WMV and AVI etc.
Handy application which provides all necessary conversion capabilities like DVD burning and ISO creation.
You can select any language according to your priorities.īest Features of Wondershare Video Converter PortableĮnjoy the features mentioned below after Wondershare Video Converter Portable freeload. More significantly, Free Wondershare Video Converter is multilingual and portable. Also, burn DVD by specifying its caption, aspect rate, location and quality. Furthermore, conversion process is simpler as you simply need to browse the file which you want to convert or just drag and drop in application to start process. You can extract audio from video file and covert it into MP3 format easily. So, any non technical person can use it easily. Moreover, Free Wondershare Video Converter Ultimate 10.2.0.154 + Portable offers you a simplest way of conversion and a quite simple interface. You can also like Adobe Premiere Elements 15. Convert videos and audio files in different formats as you desire like MP4, AVI, WMV and many more. Wondershare Video Converter Portable is a useful program which provides all the basic conversion options including DVD burning as well as ISO development. Review of Wondershare Video Converter Portable Setup file is completely standalone and also its an offline installer. Covert videos with maximum available options withe other useful functions. Wondershare Video Converter Portable freeload setup file for Windows either having 32 bit architecture or 64 bit.
2 notes
·
View notes
Text
Save Insta Free
With Save Insta Free, you can download Instagram, Facebook, TikTok, Youtube videos, and photos fast and free on Iphone, Android, PC or Mac with just a few simple steps.
Address: Suite 699 663 Sharyl Skyway, Langberg, DE 60553-7999
Phone number: +18385719459
Website: https://save-free.app/
Social media:
https://in.pinterest.com/savefreesite/
Tag: Save Insta, download instagram videos, youtube to mp4 converter, tiktok video downloader, facebook reel downloader
1 note
·
View note
Text
Best 4K Android video players in 2024
As humans, we always aim for the best—the best in terms of both quality and experience. Every component has better quality, whether it is digital or not. This technological improvement has provided the highest quality and experience. Both quality and quantity are increasing at the same time in technology. When it comes to 4k video players, their quality has also significantly increased.
This quality has increased to HD and 4K resolution in the 2000s. Transitioning from grainy to clean video quality has left everyone with unforgettable memories. Users admire the rich quality and satisfaction that this offers. Everyone enjoys a change that gives them a sense of luxury.
4K Video Players for Android
Let us know more about the HD video players that provide a rich video-watching experience.
1. VLC Media Player for Android
VLC Player is a well-known and widely used MP3 and MP4 video player program released in 2001 and can be found on several different platforms and operating systems. It is accessible for Android and iOS-based smartphones and tablets in addition to Windows, Mac, and Linux.
Why is VLC for Android the best Android video player?
Support colour correction, spatialization, equalisation, and other effects for both audio and video.
Video conversion to various multimedia formats.
Use an internet connection or network to stream video, including YouTube content.
Chromecast support, allows you to cast videos from your Android device to your TV.
2. MX Player
This MP4 video player has been downloaded by billions of people from the Google Play Store. Hence, it is one of the most widely used HD video players for having strong features and being able to play practically any kind of video. This app's kid lock feature is very helpful if your kids use your phones and tablets. This feature prevents the kids from inadvertently calling people or opening other apps.
Why is MX Player the best Android video player?
You name the file format and it supports it.
There are available gesture controls for brightness, speed, and more.
Improve the audio quality with an audio boost.
Multiple subtitle file formats are supported, as well as subtitle customization.
3. HD Video Player All Formats
HD Video Player All Formats supports high-quality audio and high-definition video formats. It is designed to play both Full HD and Ultra HD videos. It fulfils all of your needs for entertainment in a single convenient spot. Its many features and capabilities make it the best video player for Android.
Why is HD Video Player All Formats the best Android video player?
Allows for offline and online subtitle support.
There are gesture controls for brightness, volume, and other features.
Both background and floating video playback are supported.
Other incredible features include screencasting, downloading videos, and hiding videos.
4. AC3 Video Player
Known for being a lightweight MP4 video player, AC3 Player works with Android devices and all Windows versions. It can also stream and watch from any source because it supports a large variety of audio and video codecs. It has become one of the best video players for Android.
Why is AC3 Video Player the best Android video player?
Flexible user interface.
The audio playback quality is high.
The player is compatible with all popular audio and video formats.
Strong equalization parameters.
5. PlayerXtreme Media Player
A well-liked HD video player for many platforms, including iOS (iPhone and iPad), Android, and Apple TV, is PlayerXtreme Media Player. It is renowned for supporting a large number of file formats, which makes it a flexible option for playing different audio and video files. PlayerXtreme has several features to improve the media playback experience and supports both local and streaming content.
Why is PlayerXtreme Media Player the best Android video player?
Media from UPnP/DLNA servers, FTP servers, SMB (Windows shares), and cloud services like Dropbox and Google Drive can all be streamed by users using this app.
Standard playback controls, including play, pause, forward, rewind, and volume control, are available in the app. Moreover, gestures are supported for simpler navigation.
The video player has content protection features like a passcode lock to secure the application and the ability to hide certain folders.
PlayerXtreme is capable of supporting multiple video formats with subtitles. Users have the option to download subtitles straight from the app or add them manually.
6. Plex: Stream Movies & TV
It can be used to stream and organize your collection of media, which is capable of containing images, music, films, TV shows, and more. Smart TVs, Android, iOS, Linux, Windows, and macOS are just a few of the many gadgets and operating systems that Plex works with. It also boasts an intuitive user interface. It is indeed the best video player for Android.
Why is Plex: Stream Movies & TV the best Android video player?
Record and watch again at a later time with a digital video recorder (DVR).
To download media files to your Android device, you can sync your mobile device.
You can access your media libraries remotely from any location.
Watch local HD television channels live with Live TV.
7. CnX Player
Those who need high-quality playback of their media files have grown to rely heavily on CnX Player, an excellent 4K video player. Numerous audio and video formats are supported by this widely recognized media player. It claims to offer robust 4K UHD playback.
Why is CnX Player the best Android video player?
It has a user-friendly interface.
Up to 4K and UHD high-definition playback is supported.
Using network streaming, you can stream media files from the internet or local networks.
You can enhance the readability of the subtitles by customizing it.
Conclusion
We have discussed the requirements for a Best 4K Android video player as well as those available that support the 4K video format. With HD video players and 4K video players, you can immerse yourself in the rich visual experience of the video and world of cinema.
0 notes
Text
The Best Free Music Apps to Enjoy in 2024
In the fast-paced world of music streaming, finding the perfect app can be a game-changer for any music lover. With a plethora of options available, choosing the right one can be overwhelming. This article will guide you through the best music apps of 2024, highlighting their unique features and benefits to help you make an informed decision. Whether you’re looking for extensive music libraries, high-quality audio, or unique features, there’s something for everyone.
Spotify
Extensive Music Library and Personalized Playlists: Spotify remains a top contender due to its vast music library, boasting millions of tracks across various genres. Its advanced algorithm offers personalized playlists such as Discover Weekly, Release Radar, and Daily Mix, tailored to your listening habits. Spotify Wrapped provides an annual summary of your listening trends, making it a favorite among users.
User-Friendly Interface and Social Sharing Features: The app’s intuitive interface allows easy navigation and discovery of new music. Spotify’s social features, like collaborative playlists and friend activity, make sharing and discovering music with friends seamless. You can see what your friends are listening to in real time and collaborate on playlists for shared events or interests.
Spotify Wrapped and Discover Weekly for Personalized Recommendations: Spotify’s personalized recommendations are a standout feature. Discover Weekly curates a fresh playlist of tracks every Monday, based on your listening history. Similarly, Release Radar highlights new releases from artists you follow or might like, ensuring you never miss out on new music.
Apple Music
Seamless Integration with Apple Devices: Apple Music excels in integration with Apple devices, offering a seamless experience for iPhone, iPad, Mac, and Apple Watch users. This integration extends to Siri, allowing voice commands for playing music, creating playlists, and more.
High-Quality Audio and Exclusive Releases: Apple Music is known for its high-quality audio, including lossless audio and spatial audio with Dolby Atmos. Exclusive releases and early access to new albums make it a go-to app for fans wanting the latest music from their favorite artists.
Human-Curated Playlists and Beats 1 Radio: Apple Music offers expertly curated playlists by genre, mood, and activity. Beats 1 Radio, with its live shows hosted by renowned DJs, provides a unique listening experience and keeps you updated with the latest music trends and interviews with artists.
Amazon Music
Affordable for Prime Members: Amazon Music offers competitive pricing, especially for Amazon Prime members who get access to a large library of music at no extra cost. The integration with Amazon’s ecosystem makes it a convenient option for those already using Amazon services.
Hands-Free Voice Control with Alexa: With Alexa, Amazon Music offers hands-free control, allowing you to play music, create playlists, and discover new tracks using voice commands. This feature is particularly useful for smart home setups.
Large Library with Offline Listening Options: Amazon Music provides a comprehensive library of songs, albums, and playlists, with options for offline listening. This makes it easy to enjoy your favorite music without worrying about data usage or connectivity issues.
YouTube Music
Access to Official Music Videos and User-Generated Content: YouTube Music stands out with its access to official music videos, live performances, and user-generated content. This provides a unique mix of visual and audio content, enhancing the overall music experience.
Smart Search and Personalized Recommendations: The app’s smart search feature allows users to find songs even if they don’t remember the title, using lyrics or descriptions. Personalized recommendations based on your viewing and listening history help you discover new music tailored to your tastes.
Background Play and Offline Downloads: YouTube Music Premium offers background play, allowing you to listen to music while using other apps or with your screen off. Offline downloads let you enjoy music without an internet connection, making it a versatile choice for on-the-go listening.
Tidal
High-Fidelity Sound Quality and Exclusive Content: Tidal is renowned for its high-fidelity sound quality, catering to audiophiles with Hi-Fi and Master Quality audio options. The app also offers exclusive content, including early releases, live streams, and interviews.
Support for Hi-Res Audio Formats: Tidal supports a range of high-resolution audio formats, ensuring the best possible sound quality for discerning listeners. This makes it a top choice for those who prioritize audio quality.
Artist-Centric Approach and Unique Editorial Content: Tidal’s artist-centric approach includes fair compensation for artists and unique editorial content such as in-depth articles, interviews, and playlists curated by artists. This focus on artist support sets it apart from other music apps.
Pandora
Personalized Radio Stations Based on User Preferences: Pandora offers personalized radio stations that adapt to your music preferences. By using the Music Genome Project, Pandora analyzes songs based on various attributes to create stations tailored to your tastes.
Simple Interface and Music Genome Project for Recommendations: The app’s simple interface makes it easy to navigate and discover new music. The Music Genome Project ensures that recommendations are highly accurate, providing a unique and personalized listening experience.
Premium Tier with On-Demand Listening and Offline Playback: Pandora’s premium tier offers on-demand listening, offline playback, and higher audio quality. This makes it a competitive option for those looking for more control over their music experience.
Conclusion: With so many excellent music apps available, finding the one that best suits your needs is essential. Whether you prioritize sound quality, exclusive content, user experience, or affordability, there’s a perfect app for you. Each app has its strengths, and exploring their unique features will help you find the best fit for your music preferences.
0 notes
Text
The Best Video Editing Tools for Creating Viral Social Media Content
Are you looking for the best video editing tools for creating viral social media content in 2024? then look no further than this blog.
In today’s digital age, creating viral social media content is a coveted goal for brands and influencers alike. Videos are the most engaging type of content on social platforms, and having the right tools to edit these videos can make all the difference. Here, we delve into the best social media video editing tools that can help you craft videos that capture attention and go viral in 2024. Whether you're an influencer, a marketer, or a content creator, these tools will equip you with the features needed to create standout videos.

1. Adobe Premiere Pro
Adobe Premiere Pro remains a favorite among professionals for its comprehensive features and seamless integration with other Adobe products. Its advanced editing capabilities and support for high-resolution formats make it ideal for creating high-quality viral content.
Features: Multi-cam editing, VR support, motion graphics templates.
Why It's Great for Virality: The ability to add professional effects and transitions can make your videos look polished and engaging.
Fact: According to Adobe, over 90% of creative professionals use Adobe Premiere Pro for video editing.
2. Final Cut Pro X
Exclusive to Mac users, Final Cut Pro X offers a powerful and intuitive editing experience. It’s known for its magnetic timeline, which simplifies complex editing tasks, making it easier to create dynamic content quickly.
Features: Advanced color grading, 360-degree video editing, HDR support.
Why It's Great for Virality: Its speed and efficiency allow for quick turnaround times, which is crucial for staying relevant on fast-paced social media platforms.
Fact: Final Cut Pro X is used by major studios and independent filmmakers alike, ensuring a professional touch to your content.
3. DaVinci Resolve
DaVinci Resolve is renowned for its professional-grade color correction and audio post-production capabilities. It’s a go-to tool for filmmakers and video editors who want to create visually stunning and compelling content.
Features: Fusion visual effects, Fairlight audio, advanced color grading.
Why It's Great for Virality: Exceptional color correction can make your videos visually striking, increasing their shareability.
Fact: DaVinci Resolve is used in the post-production of many Hollywood films, underscoring its high-quality output.
4. InShot
For mobile editing, InShot is a top choice, especially among influencers. It offers a user-friendly interface and a plethora of features that make editing on the go a breeze.
Features: Video trimming, music addition, text overlays, filters.
Why It's Great for Virality: The ease of use and quick editing capabilities make it perfect for creating engaging short-form content for platforms like Instagram and TikTok.
Fact: InShot has over 100 million downloads on the Google Play Store, highlighting its popularity and reliability.
5. iMovie
iMovie is Apple’s free video editing software, perfect for beginners and those looking to create high-quality videos without a steep learning curve.
Features: Trailer templates, special effects, simple interface.
Why It's Great for Virality: Its simplicity and range of pre-made templates can help users quickly create professional-looking videos.
Fact: iMovie is often the starting point for many YouTubers and content creators due to its ease of use and powerful features.
6. Filmora
Wondershare’s Filmora is known for its intuitive interface and robust set of features that cater to both beginners and intermediate users.
Features: Drag-and-drop interface, effects library, audio editing.
Why It's Great for Virality: The wide array of effects and transitions available can help make your videos more engaging and shareable.
Fact: Filmora boasts over 77 million users worldwide, indicating its widespread adoption and effectiveness.
7. KineMaster
KineMaster is another excellent mobile video editing app that offers a suite of powerful editing tools right at your fingertips.
Features: Multi-layer video, blending modes, voiceovers.
Why It's Great for Virality: Its multi-layer video editing and blending modes allow for more creative and complex videos that stand out on social media.
Fact: KineMaster has over 100 million downloads on Google Play Store, showing its popularity among mobile users.
8. Lightworks
Lightworks is a professional video editing software that has been used in the production of many well-known films. It offers a free version with powerful capabilities.
Features: Multi-cam editing, real-time effects, background processing.
Why It's Great for Virality: Its professional-grade tools and real-time effects can help create high-quality videos that attract attention.
Fact: Lightworks has been used in the editing of Oscar-winning films such as “The King’s Speech.”
9. VivaVideo
VivaVideo is a popular app among mobile users, known for its easy-to-use interface and comprehensive set of editing tools.
Features: Video trimming, effects, music addition, slow-motion.
Why It's Great for Virality: The app’s fun effects and editing tools are perfect for creating eye-catching videos that resonate with audiences.
Fact: VivaVideo has over 500 million users worldwide, emphasizing its broad appeal and utility.
10. HitFilm Express
HitFilm Express combines professional video editing and visual effects in one package, making it a versatile tool for content creators.
Features: Advanced visual effects, motion tracking, 3D compositing.
Why It's Great for Virality: The combination of editing and visual effects capabilities can help create unique and captivating videos.
Fact: HitFilm Express is used by over 5 million filmmakers and content creators, highlighting its effectiveness and popularity.
Conclusion
Choosing the right video editing tool can significantly impact your ability to create viral content. Each of these tools offers unique features that cater to different aspects of video editing, from beginner-friendly interfaces to professional-grade effects. By leveraging these tools, you can enhance your video content, making it more engaging and shareable, thereby increasing your chances of going viral.
1 note
·
View note
Text
Speed Launcher - All Games Download
Position or even Update Many Apps at the same time
Be connected with an in-app alternative to help retrieve as well as download through YouTube as well as other webs page. Download explanations and also subtitles together with YouTube online video media. Acquire subtitles not really only for just one tape, nevertheless for a total YouTube playlist or perhaps PC Download Games a station. I would like to be given 4K Download news, unique presents along with updates. While the covering will eventually get by Blu-ray, DVD, and also 4K Extra HD, Warner Brother includes still to reveal a specific appointment what to help while that might remain.
The layer acquired acclaim from critics, with actual compliments planning to it is working (specifically Goldberg's performance), direction, script, musical slice, with invention uses. The sheet became nominated regarding 11 Academy Gives, including things like Finest Photograph, Very best Artist for Goldberg, Finest Supporting Artist used for both Avery and Winfrey, and also Very best Adapted Script, but didn't attain 1 win. In addition, it got 4 Gold Planet Give choices, with Goldberg acquire Finest Player within a Episode. Inside 2006, the Us Film Company listed the layer 51st by its listing of nearly all inspiring movies.
This kind of download administrator services Windows, Linux, along with Mac functioning procedure, in the Firefox and Opera browsers. It can crawl web site in order to download distinct kinds of documents, and you may choose to download solely the components of a SCOOT information you really mean. For all of us, the item a great remarkable software, and also PC Games Download a genuine nominee with the first location. Hassle-free unified show of the extremely relevant strict and also marking data regarding film as well as audio tracks data file. Do not forget that all game do the job only when fixed on your own PERSONAL COMPUTER. This specific poses a possibility as soon as when compared with on the web online game because the sport records might hold malware.
The chief grievances relating to this plan lives of which the item show-off offers, also it possibly may certainly not once again become updated since very last change made to it what food was in 2014. Furthermore, there's a quality release, so several story are just available if you pay. The idea likewise simple to manage the download momentum with the maximum Full Download Games amount of simultaneous connections along with downloads through the bed from the course whenever they want. If you're looking for an excellent download manager with bandwidth management, this can be a great alternative. Play, Pause, and Stop buttons are at the top with the program, making management most pending downloads basic.
By January 14th, 2019 Ninite includes resulted financial assistance with regard to Windows XP along with Displays Landscape in addition to the concern server program Server 2003 and Attendant 2008. Appreciate them here great explanation by your own HD TELEVISION SET, iPad, iPhone, Samsung along with other means. Kalki 2898 OFFER is often a 1985 United states epic coming-of-age time period dilemma film Download Games charged in Steven Spielberg in addition to written by Menno Meyjes, based on the Pulitzer Prize–winning 1982 tale of the very same reputation before Alice Walker. It was Spielberg's 9th record as a leader, indicating a circle spot in their job the way it took place a leaving from the summertime blockbusters that he'd grow to be recognized.
Unlock exclusive prizes, members-only comfort, next a selection connected with prime concepts. FlashGet keep an eye on downloads with Firefox, and yes it may check out downloads along with your antivirus system and also tell you the way large a rasp Download Games is when you download this, which is amazing. Defining categories pertaining to where by to use downloads is straightforward because you could give the actual document off shoot that should be considered a unique kind.
Billboard inside near Chrome on any design in order to door the bookmarks, saved codes, and more. Most likely the coolest element I stumbled upon inside JDownloader ends up being it is distant management ability. Made use of any the portable application or even the The JDownloader Speed Launcher website to get started, end, and monitor downloads through everywhere. JDownloader is really a free of charge, open up origin download director using a substantial developer area, in addition to it's designed for Windowpanes, Linux and Mac.
Under is usually a directory our own select regarding some of the very best free of charge activity downloads on your COMPUTER SYSTEM. A variety of them become even portable, this means you possibly can lay them over a second instinct in addition to drama them where. Okay, if you're building a Windows Windows vista system, you will discover cost-free diversion to help download PC Games at a few of the website numbered over. Everthing depends upon the experience under consideration, so nearly adult video game assist Vista although lots of fresh identifies absolutely no longer help this kind of translation associated with Periods. In contrast to web page like Sauna in addition to Beginning, AllGamesAtoZ isn't basically a place near download PC games.
The best sites always offer a fair volume involving match from different genres. Finally, Ocean involving Diversion ends up being an additional positive put for attaining free video game within a scale involving varieties. The outline and also interface of this particular put stay a tiny fundamental and outdated, but it however do the job completely, with kind knob next a convenient look for tavern to assist you locate concepts you want.
1 note
·
View note
Last Seen Blogs


acciohunks
Fine Men & Where to Find Them

acciohunks
Fine Men & Where to Find Them

absolutely-existing
there's no version of this where i didn't come and find you