#Choosing Between Google Slides and PowerPoint
Explore tagged Tumblr posts
Visit Tumblr Blog
Explore Tumblr blogs with no restrictions, modern design and the best experience.
Last Seen Tumblr Blogs


Fun Fact
Tumblr posted its first advertisements in May 2012 and subsequently earned $13M in revenue.
Text
https://pitchworx.com/choosing-between-google-slides-and-powerpoint-for-your-presentations/
Choosing Between Google Slides and PowerPoint for Your Presentations

As a presentation design agency, we are frequently asked about the best software for creating presentations. Although we have a slight preference over PowerPoint, the truth is that the success of your presentations depends more on the content you create than the specific program you use.
Regardless of our preferences, let us see which of the two most popular and powerful presentation software, Slides or PowerPoint, fares best and proves beneficial for your presentation needs.
#Google Slides vs PowerPoint#Choosing Between Google Slides and PowerPoint#Google Slides and PowerPoint#PPT Design Tips#Presentation Design Tips#Slides or PowerPoint
0 notes
Text
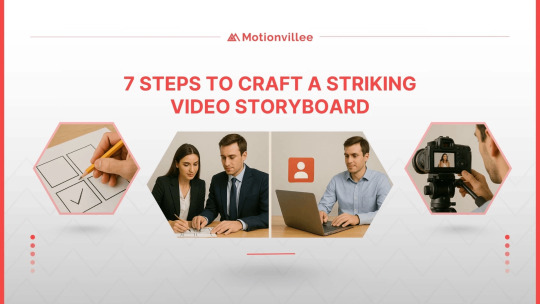
7 Steps of How to Make a Storyboard for a Video: Template, Process, Examples
Before lighting, camera angles, or even voiceovers enter the picture, there’s one foundational step that defines the outcome in any B2B video production project: the storyboard.
It’s one of the most overlooked phases in video production and one of the most valuable. A storyboard does more than visualize ideas. It acts as a roadmap for your entire production team, giving everyone, from scriptwriters to animators to editors, a shared understanding of what the video is trying to say and how it will say it.
Think of it like architectural plans before building a house. Without them, you’re just guessing your way through.
A storyboard sets the pace, tone, and structure of your message.
It breaks your narrative into bite-sized scenes, making complex topics easier to digest.
It prevents costly miscommunication by aligning everyone early on.
When done well, a storyboard brings strategy and creativity together. You’re not just drawing pictures; you’re designing intent.
Let’s walk through the seven essential steps to create a storyboard that delivers clarity, impact, and direction.
https://motionvillee.com/wp-content/uploads/2025/05/The-Storyboard-Cycle-in-Video-Production.webp
1. Understand Your Objective Before You Start Drawing
Every effective storyboard begins with clarity.
Define the purpose of the video: Is it meant to explain a product, introduce a service, or simplify a complex idea?
Identify the core message: What should the viewer walk away remembering?
Pin down your target audience: Knowing who you’re speaking to shapes how you frame the visuals and script.
Before you get to visuals, this step anchors the storyboard in purpose.
2. Write a Script First, Not the Other Way Around
A storyboard without a script is like a map without a destination.
Start with a written script that includes narration, dialogue, and on-screen text.
Break your script into scenes or key moments.
Each scene should have a clear transition and action point.
This script becomes the foundation for what each frame in the storyboard will represent.
3. Choose the Format for Your Storyboard
There’s no one-size-fits-all template, but the structure should always be functional.
Use a grid with sections for visuals, audio, dialogue, and notes.
Digital tools like Google Slides, PowerPoint, or Storyboarder make iteration easier.
Hand-drawn sketches work just as well during brainstorming.
The format isn’t about perfection, it’s about making your vision clear and shareable.
4. Sketch the Visuals, Rough is Fine
You don’t need to be an artist to sketch your storyboard.
Use stick figures or simple shapes to block out scenes.
Focus on camera angles, composition, and movement within the frame.
Annotate visuals with arrows or notes to indicate transitions and actions.
These rough visuals help everyone understand the sequence before investing time in design or animation.
https://motionvillee.com/wp-content/uploads/2025/05/Storyboar-Art-Sketch-the-Visuals.webp
5. Add Notes for Sound, Voice, and Transitions
A storyboard is more than visuals, it’s about how all elements come together.
Include dialogue or voice-over in each frame.
Mark background music cues or sound effects if relevant.
Add direction on how one scene moves into the next (fade, cut, zoom, etc.).
These notes ensure the team isn’t left guessing during production or editing.
6. Review and Refine, With the Whole Team
Storyboards are collaborative by nature.
Share it early with your creative, marketing, and product teams.
Look for alignment between visuals, messaging, and tone.
Ask if each frame adds value or can be simplified.
This step prevents misalignment later and makes everyone feel invested in the outcome.
7. Use the Storyboard as Your North Star During Production
Once approved, your storyboard becomes more than a plan, it becomes a reference.
It guides the animation team, video editors, voice artists, and designers.
It minimizes costly reshoots or redesigns by solving problems early.
It keeps the vision consistent from the first sketch to the final cut.
Think of it as your visual contract with the creative team.
A Basic Storyboard Template You Can Use
Here’s a simple format you can build in any slide deck tool or storyboard app:
Frame Number | Visual Sketch | Voiceover/Dialogue | Notes/Actions
Frame 1: Person at desk, phone rings | “We’ve all been there…” | Zoom in, ring sound
Frame 2: Closer shot of screen | “Important decisions can’t wait.” | Background music starts
Repeat for each key scene. Don’t overcomplicate, focus on clarity and flow.
https://motionvillee.com/wp-content/uploads/2025/05/A-Basic-Storyboard-Template-You-Can-Use.webp
Storyboard Examples from Real Projects
Example 1: Explainer Video for SaaS Product
Visual: Dashboard demo with animated cursor
Voiceover: “Easily manage your entire workflow in one place.”
Notes: Use a clean, minimal UI style
Example 2: Brand Story Video
Visual: Montage of customers using the product in real life
Voiceover: “Here’s how we help teams move faster, together.”
Notes: Natural lighting, energetic background track
Seeing storyboards in action often sparks ideas for your own.
Why a Great Storyboard is a Smart Investment
At first glance, a storyboard might feel like just another layer in the process. But when you look closer, it’s one of the smartest investments you can make in any video project.
It saves time and money.Storyboards aren’t just a pre-production formality. For early-stage teams and startup video production, they’re the tool that gives your vision structure and helps you move fast without costly missteps
It brings clarity to your message.Mapping out scenes visually helps you see where your message lands and where it might fall short. You can quickly spot if something feels redundant, confusing, or off-brand before committing resources to it.
It aligns your team early.When everyone, from the creative lead to the client team, can see the plan frame by frame, there’s less room for misinterpretation. Everyone understands the structure, tone, and pacing from the start.
It prevents surprises.Storyboards help anticipate production challenges before they happen. You avoid moments where you realize a scene is too complex to produce, or that an idea doesn’t translate visually.
It leads to sharper execution.A storyboard gives your production team a clear playbook to follow. The result? A video that feels tighter, more coherent, and visually intentional.
Storyboards aren’t just a pre-production formality. They’re a tool that gives your vision structure and gives your team confidence.
Final Thoughts: Clarity Before Creativity
Whether you’re creating an animated explainer, product demo, or brand film, storyboards bring structure to your vision. They’re how you think visually, align your team, and prevent project drift.
The best videos aren’t just creative. They’re intentional. That clarity starts on the storyboard.
Need Help Turning Ideas Into a Storyboard?
You don’t need to figure it all out alone.
Motionvillee specializes in turning your concepts into clear, compelling storyboards that drive results. Whether you have a rough script or just an idea, our team guides you through every step, from scripting and sketching to the final animated or explainer video.
We help shape your message so it connects visually and strategically.
Each storyboard is crafted to match your tone, brand, and objective.
Every frame is built with purpose, not just polish.
At Motionvillee, we don’t just draw scenes, we help you plan videos that work. Your storyboard becomes the foundation for a video that informs, engages, and performs.
Let’s bring your next idea to life, one frame at a time.
0 notes
Text
Creating Impactful Infographics: Key Elements for Effective Communication
Creative Infographic Designs: Q & A Tutorial
1. What should I look for when selecting an infographic design service?
When selecting an infographic design service, consider their portfolio for style and quality, client reviews for reliability, pricing for budget compatibility, turnaround time for deadlines, and their ability to understand your topic and target audience. Communication and collaboration skills are also important to ensure your vision is accurately represented in the final design.
2. How can I access templates for creating infographics?
You can access infographic templates through various online platforms like Canva, Piktochart, and Venngage. These websites offer free and paid templates that you can customize. Additionally, Microsoft PowerPoint and Google Slides also have built-in templates for creating infographics. Simply sign up for an account on these platforms to start designing.
3. How can color theory be applied to enhance the readability and emotional impact of an infographic?
Color theory enhances infographic readability and emotional impact by using contrasting colors for text and background, ensuring clarity. Warm colors can evoke excitement, while cool colors promote calmness. Consistent color schemes help unify the design, while strategic use of color highlights key information, guiding viewers' attention and influencing their emotional response to the content.
4. What role does typography play in conveying information within an infographic, and how can it be used creatively?
Typography in infographics enhances readability and emphasizes key information. It guides the viewer's eye and establishes hierarchy through font size, style, and color. Creatively, typography can be integrated into the design, using shapes or illustrations, and can convey emotions or themes, making the information more engaging and memorable. Effective typography transforms data into a visually appealing narrative.
5. What are some common mistakes to avoid when creating infographics for data presentation?
Common mistakes to avoid when creating infographics include overcrowding with too much information, using unclear or misleading visuals, neglecting a logical flow, choosing inappropriate colors or fonts, and failing to cite data sources. Additionally, ensure the design is accessible and tailored to the target audience, while maintaining a balance between aesthetics and clarity for effective communication.

Visit: VS Website See: VS Portfolio
0 notes
Text
Joscha Koepke, Head of Product at Connectly – Interview Series
New Post has been published on https://thedigitalinsider.com/joscha-koepke-head-of-product-at-connectly-interview-series/
Joscha Koepke, Head of Product at Connectly – Interview Series
Joscha Koepke, is the Head of Product at Connectly, a code-free platform that lets you create campaigns and interactive bots to easily automate two-way conversations – to both leads and loyal customers – at scale.
Connectly has a vision is to create the AI-powered infrastructure of the future to make this as easy as possible; enabling businesses to operate the full flywheel – marketing, sales, transactions, customer experience -all within the customer’s thread of choice.
What initially attracted you to computer science and AI?
My path to the tech industry, and product management in particular, took a bit of an unconventional turn. Initially, I was immersed in the world of product development within the hair care sector. There was something incredibly rewarding about diving deep into human needs and mastering the art of user-centric design. However, I found myself yearning for a more dynamic environment, which led me to embark on a nearly decade-long journey at Google.
Starting in sales, I gained invaluable insights into customer pain points and the intricacies of building relationships. This experience laid the groundwork for my transition into a product role within the Ads organization.
I’ve always believed that life and career are punctuated by moments that challenge us to choose between safety and risk. Joining Connectly was my leap into the unknown—a decision fueled by the thrill of building something from the ground up. As the fourth employee, armed with little more than a vision and a few PowerPoint slides, I stepped into a journey of immense growth and learning.
You described the challenges of moving to the earliest stages of a startup as being akin to a constant roller coaster traveling at hyperdrive while being thrashed around by a big wave. What was it that attracted you to the hectic lifestyle of startup life?
What initially attracted me to the startup life was the accelerated pace, continuous demands, and the constrained resources and data for decision-making. Recognizing the startup journey as a marathon filled with sprints has been crucial in my experience. There were days I felt on top of the world and others where the path forward was murky at best. Embracing this dynamic, understanding that each day brings its own set of challenges and opportunities has been key. This perspective helped me and Connectly as a whole navigate through uncertain times, especially when we were refining our product-market fit, allowing us to adapt and evolve swiftly. Startups usually do not die because of competition but because of a lack of resilience and focus.
In this same article you also referenced the importance of first principles thinking, what are some ways that first principles are applied at Connectly?
Product Principle 1: Action Provides Information: It’s easy to sit in a room and intellectualize about possible learnings and assumptions (we have spent days doing this), and it’s a trap Product Managers easily fall into. Every experiment we have launched with real customers, regardless of how small, has provided us with more learnings than any theoretical approach. Before any test or launch, we define a set of hypotheses, and every action becomes an experiment. The results, whether they are a success or failure, provide clearer direction for our next steps.
Putting our “First Principles” lens on, we seek foundational data instead of making assumptions or relying on second-hand knowledge. By taking action, we gather this primary information, allowing us to base decisions on direct experience rather than hearsay or theory.
Product Principle 2: Think Big, Start Small: By starting small, with a singular feature or a specific market niche, we can validate our assumptions, refine our approach, and progressively inch closer to our overarching vision. At Connectly, our mission is to automate every sales conversation with AI. But, to avoid being overwhelmed and to ensure consistent forward momentum, we narrow down our focus.
Putting our “First Principles” lens on, we strip Connectly’s product down to its fundamental purpose, which is to solve the needs of a user who requires help in their purchase decision. While our end goal is vast (automating all sales conversations), we begin by addressing a singular, fundamental need (advising a customer interested in buying a white t-shirt). As we validate and learn from this, we can expand, but always stay grounded in the essential truths we’ve uncovered.
Product Principle 3: Simplify Our Customers’ Lives: Our commitment at Connectly is to have every feature we roll out to make interactions more effortless for businesses and end consumers. By constantly asking, “How does this simplify the user journey?” we ensure that our product stays aligned with the needs and desires of our users.
Putting our “First Principles” lens on, we’re prompted to ask: “What is the most direct way we can provide this value?” For example, we noticed an increased usage of our campaign tool via API. We previously directed customers to our API documentation. However, after employing first principles to identify the most straightforward value-add, we integrated a ‘copy’ button within our campaign flowbuilder. This allows users to instantly copy a pre-configured cURL, enabling immediate action without delving into our API documentation first.
Can you briefly discuss how Retrieval-Augmented Generation (RAG) is being used at Connectly to design a conversational sales bot?
Retrieval-Augmented Generation (RAG) is one part of our AI architecture. We have also trained our own models and embeddings that perform better than the benchmark, especially in the multilingual product embedding space. A great conversational sales bot needs access to almost real-time information like stock availability and price updates. This is where RAG comes into play to connect our bot with product catalogs.
How have AI chatbots evolved to better understand and adapt to human language nuances, transforming from mere tools to active partners in digital experiences?
As Connectly’s Head of Product, I’ve observed the transformation of chatbots into proactive, learning agents. These chatbots autonomously perform actions, replicate human decision-making, and learn from interactions. A key development is their enhanced ability to understand human language with greater nuance, thanks to advances in natural language processing and large language models.
Can you elaborate on the ways AI chatbots are becoming integral team members across various industries and the implications for human-AI interaction dynamics?
AI chatbots that are becoming integral team members across industries go beyond mere query responses; they adapt their interactions and have the ability to re-prompt during sales conversations, where the chatbot uses its extensive product catalog knowledge to guide customers through targeted follow-up questions. This method narrows down options effectively, finding the ideal product for the customer’s specific needs. For example, if a customer is looking for a t-shirt, the chatbot would prompt questions like “Is this t-shirt for you or someone else? Do you have a price range and color preference in mind?” mirroring a skilled salesperson’s approach by following a sequence of ideas or steps to solve complex recommendations and answer questions.
How do you see the role of AI chatbots evolving in terms of autonomous decision-making and learning from human interactions?
Mature AI chatbots will be able to seamlessly transition from selling and recommending products in Brazil or California (environmental adaptation) to making decisions on which product SKUs to recommend (decision-making) and improve the sales conversation after receiving pushback or not being able to sell a product (learning).
At Connectly, we’re exploring game-like scenarios for learning, where chatbots engage in simulated conversations to improve their strategies, akin to role-plays in sales training. This continuous learning and adaptation are crucial for successfully deploying and distributing chatbots.
What is your vision for the future of chatbots?
Looking ahead, we anticipate improvements in emotional intelligence, particularly in a multimodal world where AI can interpret emotions from tone and facial expressions. With ongoing hardware innovations and advancement topics like memory from an AI will become a lot more achievable in the near future. This will truly allow for personal shopping AI bots that know your style and preferences over time and can remember what you like and dislike.
For readers who are interested, could you give a brief summary of what Connectly offers with its AI-Powered Marketing Automation Flowbuilder?
Connectly uses proprietary AI models to help businesses automate their communications with their customers and see their products from any messaging platform. Its code-free platform lets you create campaigns and interactive mini-bots to automate two-way conversations – to both leads and loyal customers – easily and at scale.
Thank you for the great interview, readers who wish to learn more should visit Connectly.
#ai#AI-powered#API#approach#architecture#Art#Article#automation#benchmark#bot#bots#Brazil#Building#career#challenge#chatbot#chatbots#code#Color#communications#computer#Computer Science#Connectly#consumers#continuous#curl#customer experience#data#Design#development
0 notes
Text
Roku Screen Mirroring for Android: 1-by-1 Comprehensive Guide
Sort out some way to Roku Screen Mirroring for Android phones or tablet screens to your Roku TV without any problem. Track down the benefits, one small step at a time plan, exploring tips, and that is just a hint of something larger. Introduction:1. Screen Mirroring Android to Roku: A Bit-by-Bit Guide of Roku Screen Mirroring for Android 2. Where Is Screen Mirroring on Android? 3. What Is Screen Mirroring on Android? Conclusion: FAQs Introduction: In the hour of cutting-edge organization, Roku Screen Mirroring for Android phones has transformed into pocket-sized entertainment places. In any case, what if you could take that experience to the big screen? Enter Roku Screen Mirroring for Android — an element that overcomes any barrier between your Android world and your television. Whether you need to share photographs, transfer recordings, or mess around, screen mirroring offers a consistent association. In this associate, we'll explore how to set it up, examine typical issues, and exploit this adaptable part. 1. Screen Mirroring Android to Roku: A Bit-by-Bit Guide of Roku Screen Mirroring for Android Roku Screen Mirroring for Android licenses you to project your Android device's screen directly onto your Roku-related TV. Follow these moves toward begin: Roku Screen Mirroring for Android 1.1 Empower Screen Mirroring on Roku: 1. Navigate to Settings: On your Roku gadget, go to Settings. 2. Access Screen Mirroring Settings: Under Framework, select Screen Mirroring. 3. Choose Screen Mirroring Mode: Set it to Continuously consider consistent associations. 1.2 Set up Your Android Gadget: 1. Same Wi-Fi Association: Assurance your Android phone or tablet is related to a comparative Wi-Fi network as your Roku. 2. Access Android Settings: Go to your Android's Settings. 3. Cast Your Screen: Explore Associated Gadgets> Association inclinations > Cast. 4. Select Your Roku Gadget: Pick your Roku gadget from the rundown. Set up Your Android Gadget 1.3 Mirror Your Screen: When associated, your Roku Screen Mirroring for Android screen will show up on your television. Control everything from your handheld gadget — swipe, type, and explore consistently. 2. Where Is Screen Mirroring on Android? Finding the Roku Screen Mirroring for Android choice on your Android gadget might change marginally founded on the producer's customizations. Here is a general aide: 1. Samsung Gadgets: Go to Settings > Associations > Screen mirroring. 2. Google Pixel Gadgets: Access Settings > Associated gadgets > Cast. 3. Other Android Gadgets: Search for Screen mirroring, Cast, or comparative choices in your settings menu. 3. What Is Screen Mirroring on Android? Roku Screen Mirroring for Android is the course of remotely showing your Android gadget's screen on a bigger showcase, like your television. It's like having a virtual HDMI link interfacing your telephone to the television. Here are a few situations where screen mirroring sparkles: • Sharing Recollections: Remember excursion photographs or hotshot your most recent culinary magnum opus to loved ones. • Real-time Recordings: Watch YouTube, Netflix, or some other web-based feature on the big screen. • Gaming Improved: Play versatile games with a more vivid encounter. • Introductions and Work: Feature PowerPoint slides or reports during gatherings. Gaming Improved 4. Troubleshooting Tips for Smooth Screen Mirroring: Indeed, Roku Screen Mirroring for Android smoothest innovation experiences hiccups in some cases. This is the way to investigate normal issues: • Restart The two Gadgets: On the off chance that things aren't working, have a go at restarting both your Roku and Android gadgets. • Stable Wi-Fi Association: Guarantee your Wi-Fi association is steady. • Application Similarity: An application may not help screen mirroring because of copyright limitations. Conclusion: Roku Screen Mirroring for Android adds flexibility to your amusement arrangement. Whether you're marathon-watching your number one series or sharing a photograph slideshow, this element upgrades your Android experience. In this way, get your popcorn, cast your screen, and have fun! FAQs Q1. Could I at any point reflect my iPhone to Roku?Unfortunately, Roku doesn't uphold local screen mirroring for iPhones. Be that as it may, you can utilize outsider applications like Mirror for Roku or AllCast to accomplish comparative usefulness.Q2. Does screen mirroring influence video quality?Screen mirroring quality relies upon your Wi-Fi association and the application you're utilizing. Some applications enhance mirroring, while others may not give the best goal. For the best insight, guarantee a steady Wi-Fi association.Q3. Might I at any point mess around by means of screen mirroring?Absolutely! Screen mirroring allows you to play versatile games on your television, offering a bigger and more vivid gaming experience. Whether it's easygoing games or serious fights, your Android gadget turns into your gaming console.Q4. How would I stop screen mirroring on Roku?To stop screen mirroring, basically separate your Android gadget from the Roku. On your Android, go to Settings > Associated gadgets > Cast and select Prevent projecting or detach from your Roku gadget.Q5. Is screen mirroring secure?Screen mirroring inside your home organization is for the most part secure. Notwithstanding, try not to utilize public Wi-Fi networks for mirroring, as they might present security gambles. Adhere to your confided-in home organization for a protected encounter.Q6. Could I at any point reflect explicit applications as it were?Yes! Some Android gadgets permit you to reflect explicit applications as opposed to the whole screen. Check your gadget's settings for choices like Shrewd View or Project to pick individual applications for mirroring.Q7. For what reason is my screen mirroring slacking?Lag during screen mirroring can happen because of different variables:Wi-Fi Signal Strength: Guarantee major areas of strength for a Fi signal for smoother mirroring.Gadget Execution: More established gadgets might battle with constant mirroring.Application Streamlining: Some applications handle mirroring better compared to other people.Distance: Keep your Android gadget near the switch for ideal execution. #internetfriends #caseiphone7plus #cairo #iphone7s #iphonegraphic #iphone #internetmagazin #iphone6 #internet #internetfriendneeded #styleblogs #sustainableliving #iphone7 #instablogs #buscablogs #dailypic #laptopseken Read the full article
1 note
·
View note
Text
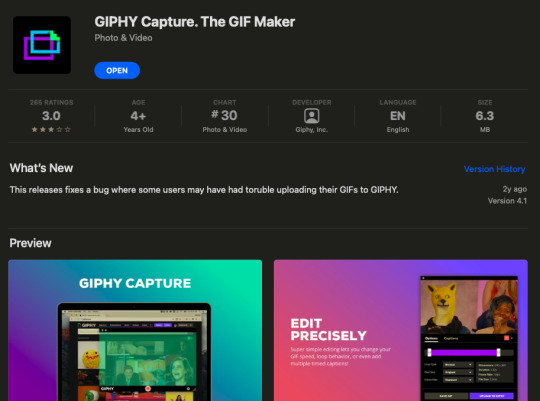
here's a little how-to on my method of making gifs on my macbook, but giphy capture is also available for windows:
1. download an app called giphy capture from the app store, it looks like this:
2. when you open it, it will show you a green rectangle and a record button, the green rectangle represents what portion of your screen will be recorded, and you can change the dimensions with the three lines making a triangle in the bottom right of the window. it should look like this:
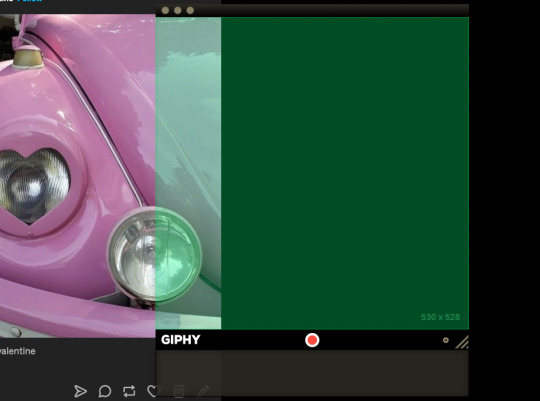
3. press record with whatever you want to make a gif of inside the green rectangle, I've used scrolling through my blog as an example
4. click on the little icon that populates at the bottom bar of the app window, and it will pop out a menu and a preview of your gif. you can trim the video down with the sliders and change the settings for resolution and fps from here
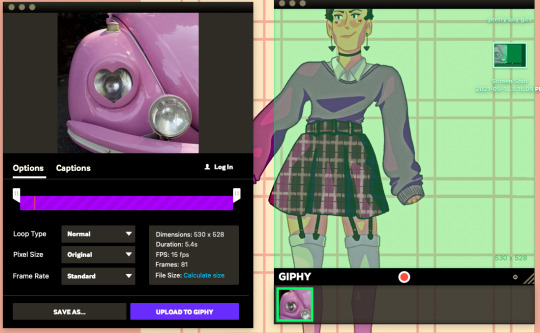
5. click "save as..." and denote what kind of file you want to save it as and to where, you can do "GIF" and be done with this step.
that final gif looks like this:

if you want to edit the gif in any other ways, like maybe more defined trimming or a different resolution, or if you want to make two videos play together as one gif, you need to open keynote, which should come automatically installed as an apple app. those steps are explained below.
6. for this step, I save the giphy capture file as an mp4, but it should work if you save it as a gif too. you can open a blank presentation in keynote and delete the text boxes, then drag your video/gif into it.

7. set the slide background to "no fill" if you want to arrange multiple video files to save as one gif together, so that any space between them will be transparent. we're going to change the size of the slide to exactly fit the gif in the next step though, so you shouldn't have to worry about the background color of the slide if you're doing that.
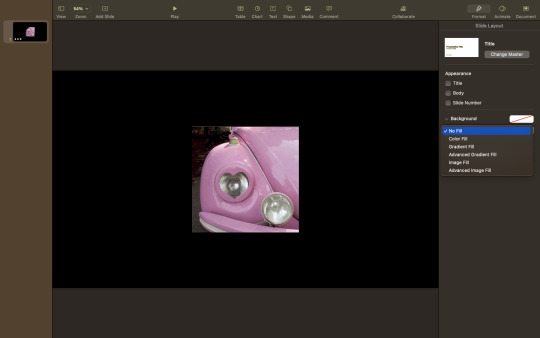
8. by clicking on the video and going to the menu titled "arrange" you can see the size, pixel by pixel, of your video. this should be the same number that was shown on the giphy capture green rectangle, and in the options when you saved it. mine is 530 x 528 in this example.

9. now that you know the dimensions, you can click "document" in the top right corner of keynote, and then click "custom slide size" in the slide size drop-down box. enter the dimensions of your video.
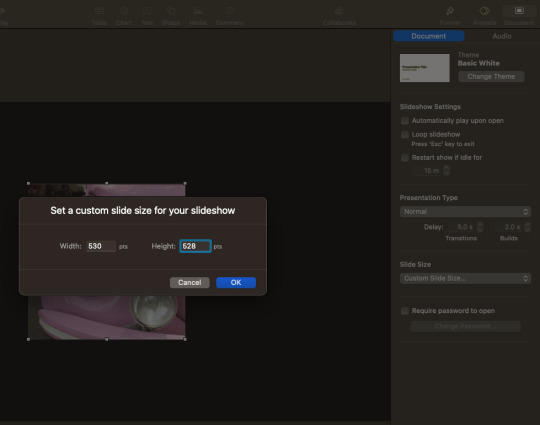
10. your video should now perfectly fit in the slide, and you should see no black outline. if your video looks small, you can drag the edges of it to resize it, staying proportional, to the size of the slide. if you change the slide size before dragging your video in, it should do that part for you.
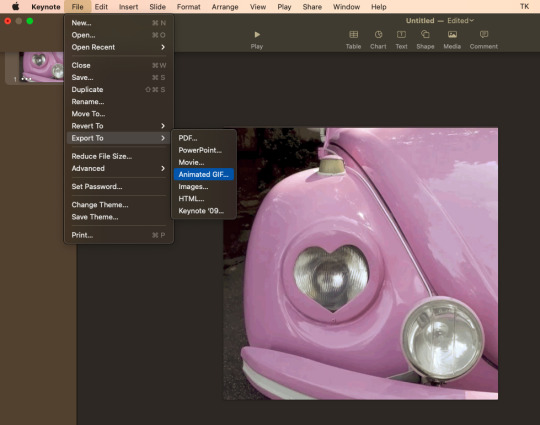
11. from there go to file > export as > animated gif and choose your settings and file download location, the usual.
that final gif looks like this:

but, if you wanted to make a gifset or something with more than 10 images, bc, yknow, tumblr doesn't like that, you could line up two gifs together onto one file using the keynote steps. if youwso, either way works. is too big, so the whole keynote part might not be worth it to you. I believe you can export powerpoint files as gifs too, and there are ways to convert google slides to gifs as well, if you're working on windows.
but, if you wanted to make a gifset or something with more than 10 images, bc, yknow, tumblr doesn't like that, you could line up two gifs together onto one file using the keynote steps. if you wanted to have two different videos play one after the other as one gif, making the second video on a new slide should make it so when you export it, slide 1 plays then slide 2. I think.
this whole process works if you are recording what you want to gif from your screen, but if you have a video file downloaded on your computer already, you can skip right to dragging it into keynote.
#let me know if anyone wants me to gif anything or has any questions#i tried to be really thorough#gif making#gifs
8 notes
·
View notes
Text
Tagxedo For Mac

Tagxedo For Mac Free
Tagxedo For Mac Computer
Tagxedo For Mac And Cheese
Tagxedo is another word cloud generator, one with even more bells & whistles. Like Wordle, the program counts the number of times a word is used. The more it is used, the larger it appears in the graphic. Small words like 'a' and 'the' are not counted. Both Worlde and Tagxedo can make word clouds from text or websites. I prefer Tagxedo for the images it creates, but for analyzing the message of a literary work, Wordle actually works better. See my previous post about Wordle.
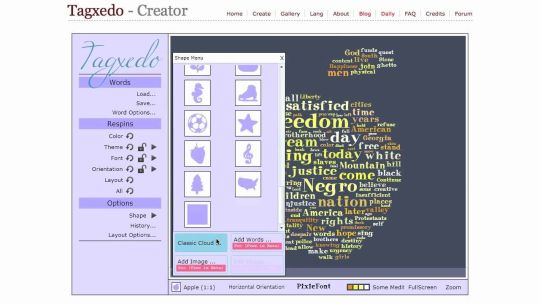
By default, Tagxedo's image editor will put words in the black part of your jpg. Choose 'Add Image' from the 'Shape' options dialog box. When prompted, upload the black on white jpg from your computer. In the resulting dialog box many tiny copies of the word 'Tagxedo' will appear in the area where your word cloud words will show up.
Tagxedo is another excellent choice when searching for websites like Wordle. One of the features that sets Tagxedo apart from the other options here is being able to create word clouds from your Twitter profile, your blog and many other sources online.
Tagxedo can either scan text or sites for words, or you can create a list of your own. Critical Update! Tagxedo is built on Microsoft Silverlight, and Microsoft Silverlight is dying. By April 2015, Chrome browsers will phase out Microsoft Silverlight plugins, but Tagxedo still works fine on Safari, Firefox and Internet Explorer — for now.
Here's my Tagxedo image of this blog.
Tagxedo For Mac Free
Before we could use Tagxedo on our Macs, I had to install Silverlight. Tagxedo provides a link for this installation. Similar to Flash, Silverlight allows the interactive display to function. I've never needed Silverlight before, and this took a bit of time, but it was easy. By the way, don't even think about running Wordle or Tagxedo on on Mac OS 10.3. Our lab has 12 machines with 10.6 'Snow Leopard.' The other 18 have 10.3, so my students take turns using the newer machines. We don't have any 'Tiger' machines anymore, so I can't say if Tagxedo will run on 10.4. Perhaps one of my readers can tell me. I believe you need to install before you can properly view this embedded version. Here's an article about embedding Tagxedo on your web page.
The print function in Tagxedo allows you to save it as a PNG or JPG. The graphic above is a PNG. I was curious about which format is better for this type of thing. I found a very clear explanation on Inverse Karma, the blog of software engineer Ganesh Prasannah. I chose PNG based on his suggestion that if the image contains text and hard lines, PNG is better than JPG.

Tagxedo For Mac Computer
I ask my students to save their work and turn it in to my digital turn-in tray--a 'write only' folder on our server. Not only does that allow us to have a paperless classroom, it gives us the option to add the image to a web page, make a slide show, or print in color when I get the color printer working. Both Wordle and Tagxedo have public galleries for you to share your artwork. Be advised that not there may be graphics in the gallery that are not appropriate for the classroom.
Want some more ideas? Check out '52 Interesting Ways to use Wordle in the Classroom.' This is only one of the 'Interesting Ways' collaborative Google presentations started by Tom Barret.
Tagxedo For Mac And Cheese
Tagxedo has more fonts, allows you to use more than 1 font on your word cloud, and offers more controls in layout. It's best known for pouring that word cloud into a shape, like the one below. This is part of the first chapter from my favorite Sherlock Holmes story, The Sign of Four. Cool!
Tagxedo
Benefits
Free.
No sign-in or e-mail required.
Licensed under a Creative Commons Non-Commercial, Attribution, Share Alike License. (In other words, you may not sell items with images created by the Tagxedo application).
It is very easy to copy and paste text from the Internet or from student work in Word or another program into the Tagxedo application. Text may also be entered directly.
Keeps a history of previous configurations during the creation phase, so you may go back and find an earlier rendition of your word cloud.
Allows you to create word clouds in shapes.
Many options for saving to your local machine and on the web.
Many color / theme options.
Tagxedo has a stemming protocol built into the application which recognizes derivatives of a word. For example, walk, walks, and walking would be recognized as derivatives of the word walk and would only appear in the Tagxedo as the word walk.
Not a dedicated educational site, however, the owner has stated that all Tagxedos showcased in the gallery will be educationally friendly.
Several ads appear on the site.
Not as easy and intuitive as Wordle or ABCya.
Several shape options are available. However, the ability to create custom shapes or some of the shapes featured in the gallery require a premium subscription (which is not yet available, as far as I can tell).
Requires Silverlight (not available for older Mac computers).
The Tagxedo site is not searchable for previously created Tagxedos.
Helpful Hints
This short video tutorial is very helpful when beginning to use Tagxedo
Intro to Tagxedo
Multiple word phrases may be entered by using the Tilda (~) between words, but this is only available when adding text through copying and pasting or direct entry. It does not work when pulling text directly from a website.
By allowing to repeat, you can generate a more solid shape. See the embedded images to the right.
The borders of the shape may be set to a 'hard border' to emphasize the shape or the shape shadow may added for clarity of the shape.
When using the embed code provided by Tagxedo, a small image is generated (and does not include the shape outline if left on the Tagxedo). One of the cool features of the embedded image is that you may actually click on a word and a web search is done on that word so if a student did not know the meaning of a word the Wikipedia or other site would be available for help. See the embedded image to the right.
Tagxedo uses a formula to determine the emphasis of the word in the word cloud that is partly based on the number of times the word appears in the text. See the Tagxedo FAQ page for more information.
Default settings eliminate common English words such as the, a, an, prepositions, etc. are automatically disregarded by the application.
Numbers are eliminated from Tagxedo by default..
Words may be removed from a completed Tagxedo by clicking on the Word / Layout Option link and selecting the Skip tab. Simply select the words you want to eliminate from the Tagxedo and Accept the changes at the bottom. This will cause the Tagxedo to 'respin'.
If you are going to embed your image, either keep a record of the URL of the image or download the image as the Tagxedo gallery is not searchable and the embedded image does not automatically link to the URL as it does in Wordle. When creating a Tagxedo for a class, I recommend saving the Tagxedo on the web making note of the URL and saving the image to your own computer. You may then use the image in either PowerPoint Presentations or on a Website and make the image itself a link to the image on the web where the interactive functions are available. See the example below.
2 notes
·
View notes
Text
Best Laptops for English Majors 2021
One thing all Canadian University students are going to need these days is a laptop. A laptop's main advantage over a stationary Best Laptops for English Majors is its size and portability. For many degree programs, a laptop can be an indispensable tool for most if not all of your classes.
In the modern digital age, most professors or class lecturers are using PowerPoint or Adobe formats for their class notes and presentations. Most provide copies to students via class websites for download and printing and many classes even require them as daily classroom material. While printing the notes or presentations and following along is a perfectly okay way of managing your classes, the use of a laptop puts everything in one place.
Just imagine sitting in class, following along with the notes and typing your own remarks or memory aids just below each slide. At the end of class, hit Save, close the laptop, go to your next class and rinse/repeat. While this may seem obvious it is the not-so-obvious benefits that are causing more and more students to switch from the old paper and pen system to a digital one. While you're following along in class,
you can be catching up on e-mails, using Wikipedia or Google for further explanation on topics you're not 100% sure of, or even participating in real-time class discussions about the very notes you're covering! I had one professor who encouraged laptop usage not only for managing digital notes but also to participate in a live Twitter feed he would set up each day. Rather than raise your hand and ask a question out loud risking embarrassment and ridicule, he would have students Tweet the class Twitter account and answer student questions that way. I've never seen such useful and extensive class discussion as I did in that class, even if it was partially digital! Anyway, on to the tips!
Tip #1 - Choose The Size Wisely!
While 16"+ laptops are easy to look at and very comfortable to use, they really aren't that practical for a student intending on using them in class. Here's why: Many lecture halls and classrooms try to pack in as many desks and students as possible. As a result, personal space is not all that abundant. Some classes have long tables with chairs that can accommodate a large laptop, but most definitely do not. Most lecture halls have chairs with an attached surface which is sometimes as small as 12" wide! They were built with sheets of paper and clipboards in mind, not 16" supercomputer laptops. So beware of larger "entertainment" laptops and always keep in mind what you're really buying this laptop for. I'd recommend going no larger than 15.1" and even then they can be a hassle at times. Try to go as small as you can tolerate.
Tip #2 - Battery Life
For most students, a day at school can be 6 hours or more. While much of your time is spent racing from class to class or grabbing lunch or coffee, the rest is spent sitting in class likely using your brand new laptop. This is where having a laptop with excellent battery life really pays off. If buying from an electronics store, ask the salesman how long you can expect a full charge to last on average. Try to find a laptop that has a battery capable of at least 2 hours. Apple laptops are famous for their long battery lives often lasting 4 hours or more, but they're also famous for being rather expensive and probably won't be an option for anyone choosing a budget laptop. If you've found a laptop you like but you find it has a poor battery life, buying a spare battery is always an option. If your salesman is working on commission, see if he or she will throw one in for free. If all else fails, stuff the power cord into your backpack and keep your laptop charged during breaks between classes.
Tip #3 - Memory
There are two kinds of memory in a computer, RAM and Storage(hard drive) Memory.
RAM is what your computer uses to load programs, play video, music, etc. Think of it like a handyman's work bench. The more room he has, the more projects he can work on simultaneously and the faster he can access each of them. More is always better when it comes to RAM, so don't try to cut costs on this feature but don't break the bank going to large amounts either. 4GB should be plenty.
Storage Memory is what your hard drive is. It's where all the stuff you install and save get stored. If you plan on using your laptop for music, video, games, etc. you'll want as big a hard drive as you can afford. If your laptop is going to be used just for casual web browsing, e-mailing, IM'ing, essay-writing, etc. then this is definitely a feature you can minimize to save some $$. I would advise getting at least a 100GB hard drive as Windows, Microsoft Office, and other essential programs can really add up in memory usage over time.
Tip #4 - Processor Speed
This again depends on your planned usage. If you want to play movies and games you're going to need a processor that's beefy enough to handle it. But if you're just doing casual tasks like web browsing, e-mailing, etc. then this is another feature you can cut costs on to save lots of $$. Don't go lower than 1.6GHz though, this should be your bare minimum.
Tip #5 - Onboard Sound and Video
Do not let a salesman talk you into buying a laptop that has standalone sound and video adapters as these add to the overall cost of a laptop in a huge way. A sound card and video card can often DOUBLE the price of an otherwise suitable laptop. Again, unless you're doing some heavy-duty gaming or video editing these are not necessary and you will never fully utilize them. It's kind of like buying an automatic machine gun when all you need is a slingshot.
Tip #6 - Pre-Installed Software
Make sure your new laptop has at least Windows 7 and some productivity software. If it doesn't have Windows 7 or Microsoft Office you're probably going to want to try to bargain it in with your salesman. If he tries to sell them to you at full price or even slightly discounted, do not, DO NOT buy it from him. Students get large discounts through their on-campus computer and software outlets often in the range of 80% off. For example, I can get a full version of MS Office Home and Student Edition for $60 and Windows 7 Professional for $99. They are regularly priced at $160 for Office and $329 for Windows 7 Pro both at Future Shop. (Time of writing: July 12, 2010) This is another great area to save lots of money on a student laptop.
Tip #7 - Everything Else is Just Extra
As for all features I haven't covered, consider them fluff or extras. Digital card readers, fingerprint scanners, built-in webcams, auxiliary ports, etc. are all stuff that you really don't need to consider. If the model you choose has them and they don't add much to the bottom line, great. If a salesman tries to convince you that you'll get hit by lightning if you don't have them, walk away. Never forget what you're buying this laptop for and don't let words like "premium extras", "limited edition model", or "media-friendly" trick you into opening your wallet any further than you have to. Over the life of your laptop you may use those features once or twice so they're definitely not worth the $100 or $200 they're going to add to the price tag.
Tip #8 - Shop Around!
Don't let the sales people on commission manipulate you into buying right then and there. "This sale ends tomorrow..." is the oldest line in the book. What they're not telling you is that this sale ends but a newer, even better one starts right after it. Never feel pressured to capitalize on what appears to be an unbelievable deal. If they can afford to sell you that laptop at that price today, they can afford to do it again tomorrow, or even next week. Make sure you compare prices with other stores like Future Shop, Best Buy, Wal-Mart, Costco, London Drugs and Staples. Then check online at Canadian sites TigerDirect.ca and NCIX.com to compare how good the deals really are. Often you'll find better deals online while price-checking the deals you found in-store so keep an eye out for those "online only deals".
Tip #9 - Accessories
The only accessories I would recommend are a small mouse and a laptop skin. Note: not a laptop bag, but a rubber skin with a zipper, they're much cheaper. It's like a wet-suit for your laptop. That's all you need to keep it safe from bumps and scratches and it fits nicely in your backpack. I also recommend a mouse for those times when you're in the library or at home and have some space to spread out. The touch pads are great for portability and convenience but nothing beats navigating with an actual mouse you can hold in your hand. Look for the small wireless mice designed specifically for laptops. Some of the nice ones combine a data storage key along with the USB plug-in component of the wireless mouse giving you a great place for keeping documents, resumes, and anything else that you may need fast access to from any computer.
Tip #10 - Warranties
Many electronics stores and computer outlets offer their own store warranties upon the sale of an item. For computers these can be a good thing if the price is right. They'll often tell you how any problem big or small will be taken care of free of charge if you purchase a warranty. What they don't tell you is that there is almost no limit to how long they can keep your laptop to do a repair. The major electronics stores in Canada have central servicing offices where they send their warranty claims for repair. In plain english, you're stuck without a laptop during the time it takes for your computer to be shipped, repaired, and sent back to the store you dropped it off at. Depending on the repair and parts availability, this can take up to 6 months in some cases!! Personally I feel warranties are a waste of money as I've never encountered a problem so grave I couldn't fix it myself. But I'm sure everyone has heard a story of someone who bought a computer only to have it die the next day so it's really all about budget and personal choice. For me I'd rather save the $50-$100 and pay a local repair shop for faster service if anything ever goes wrong.
Conclusion
I hope you've found these tips useful! I write them from experience as a Canadian University student who owns a Hewlett-Packard G10 laptop that I bought with Future Shop gift cards that I received last Christmas! I managed to get it $200 cheaper using the tips above so they definitely work! If you think I've missed something or if you have any comments at all let me know on the forum or comment below. Happy laptop shopping!
1 note
·
View note
Text
The Importance of Reviews and Testimonials in Selecting a Presentation Provider
Best Presentation Services: Frequently Asked Questions Explained
1. How do I choose between different presentation services?
To choose between presentation services, consider factors like ease of use, available templates, customization options, collaboration features, and pricing. Check reviews for user experience and look for integrations with tools you already use. Also, consider your specific needs, such as whether you need offline access or advanced animation features. Test a few options with free trials to see what fits best.
2. Can I see examples of work from the best presentation services?
When looking for presentation services, reviewing past work is crucial to assess quality and style. Leading firms showcase a portfolio demonstrating expertise in creating engaging slides for various audiences. Case studies and testimonials provide insight into creative approach and effectiveness in conveying information, aiding in selecting a service that meets specific needs.
3. What are the top-rated presentation services available online?
Top-rated online presentation services include Canva, Prezi, Microsoft PowerPoint Online, Google Slides, and Slide bean. These platforms offer user-friendly interfaces, a variety of templates, and collaborative features. Canva and Prezi are particularly noted for their design capabilities, while Microsoft PowerPoint and Google Slides are favored for their integration with other tools and ease of use in professional settings.
4. How can I compare different presentation services before making a decision?
To compare presentation services, consider factors like pricing, features, ease of use, customer support, and user reviews. Create a list of your needs and prioritize them. Trial versions or demos can help assess functionality. Additionally, check for integration options with other tools you use. Finally, seek recommendations from colleagues or industry forums to gather insights.
5. Can I schedule a consultation with a presentation service to discuss my needs?
Yes, you can schedule a consultation with a presentation service to discuss your needs. Many services offer initial consultations to understand your requirements better and provide tailored solutions. Check their website or contact them directly to set up an appointment.

Visit: VS Website See: VS Portfolio
0 notes
Text
Two Steps Forward, One Step Back
Summary: Bing takes a step forward to helping Green with his jealousy problem.
“This is such a bad idea,” Chase said as he hunkered in an apartment building, Bing’s voice was in Chase’s earpiece. The two had kindly requested using a fifth floor apartment while the inhabitants were out, from the couple who rented the apartment.
“Hey dude, we’ve got this,” Bing promised as Chase finished setting up a sniper rifle, Oliver had helped design it. It was different than the sharpshooter was used to. Lacking any of the colors or the clearly non lethal look of his usual arsenal.
The rifle would fire a round that would complete a circuit instead of trying to harm a target. It was a bit uncomfortable for Chase to use something that even looked like a real gun, but after examining the rifle and the rounds he was using he agreed to help.
“So what yah plan on doing ta him?” Chase asked, checking the equipment over.” And checking that nothing with a camera attached to it could see him.
“Oh, you know, dude, just a lengthy 420-page PowerPoint about why I love him and how Oliver isn’t going to take my attention away from him,” Bing said. “That and a protocol program that will divert him from being within ten miles of Oliver.”
Chase froze, “Yah know, I don’t think I thank yah enough fer being on our side instead’a just joinin’ Google ta kill us all.”
“Nah, thank yourselves fer not being complete assholes,” Bing told him.
“Did you plan for there to be exactly 420 slides?” Chase chuckled.
“Well I was getting close, man, so I kept going until I just hit the number,” Bing defended.
“Hey sounds reasonable to me,” Chase agreed. “Okay, I’m going dark, tell me when.”
“Sure thing, man,” Bing promised.
Chase just knelt next to the window, watching, waiting for Green and his signal.
As Chase was waiting, his whole body went on edge as he heard a high pitched, staticky drowning sound began to seep into the room.
“Well isn’t that a sight.”
The hairs on Chase’s neck stood on end and his anger boiled as he recognized Dark’s voice. He turned to see Dark sitting on an arm chair close by as if he owned the place.
“Dark,” Chase pulled out one of his modified NERF guns and pointed it at the demon. It was full of some liquidized concoction that the Septics used on Anti to stun him so they could either put distance between them or to get a shot on him.
“Easy,” Dark smiled, as cool as if he was supposed to be there. “Don’t mind me. I’m not here to interfere. I’m here to watch a master at his craft. Whatever lover’s quarrel is going on down there, I couldn’t care less about them.”
“As if I should trust yah,” Chase spat, Dark just smiled at him. It made the marksman realize that his attention was divided and he would eventually have to choose where to put his attention: Green or Dark?
Bing was in a small park that was almost attached to the apartment. There was a wire circle almost set into the ground and painted to hide it.
The orange android was waiting to ambush Green. He was hiding Oliver’s central drive physically on his body but Oliver was completely safe, nestled next to Bing’s drive where he could protect them both.
Thankfully Green didn’t take long to take the bait.
“Bing,” Green stared at Bing, his head turning to look around the area. “Where’s Oliver?”
“Sah, dude. Ollie’s powered down for a bit,” Bing told him. “Yah had an update recently, yah look like you need one.”
“Hand over Oliver, so I can say hello,” Green threatened.
“How’s ‘bout no,” Bing told him as Green stepped into the trap. “Now!”
Nothing.
“Chase,” Bing called out quietly and rushed forward to try and keep Green in the circle.
“Move!” Chase’s voice ordered in Bing’s ear. Bing shot out some nanites at Green before jumping out of the circle and instantly a shot slipped past him and completed the circuit.
Green violently surged with electricity with the after effects of the shock and Bing moved in. He shot some of Oliver’s nanites at Green’s glowing logo and the code he sent was an “emergency shutdown procedure” that Bing had been engineered with. Usually he liked to disguise it as some type of tool.
Green let out and scream and his form almost seemed to fall apart, almost melting as his nanites folded up into his drive, deactivating completely.
Bing was on the drive in an instant, protectively covering the green drive with his nanites. He was already starting to boot up Oliver and the other android pulled his annoyed away from Bing as Chase walked out of the apartment building with the case that he’d bought the rifle in.
“The hell happened, man?” Bing snapped, his nanites swirling around Green’s drive.
“Dark showed up,” Chase admitted.
“You okay, bud?” Bing’s anger immediately evaporated.
“What did he want?” Oliver asked
“He wanted ta watch,” Chase quoted a bit. “Sick fook, might as well ‘a been jerkin’ off while he said it.”
“Did he want anything else?” Oliver asked. “Should I start a scan of the area?”
“Nah he’s gone,” Chase dismissed. “How’s angry lover boy lookin’? He gotten his PowerPoint yet?”
“Yup, I’m just gonna make sure he knows not to mess wit’ Oliver,” Bing admitted, smiling at the yellow android. “Then I’ll let Google have him back. Cover me fer a bit.”
“Gotcha,” Chase set down the rifle case and exchanged the rounds in his gun for ones designed to work on Google instead of Anti.
Oliver folded up his nanites and went back to Bing hiding him. The more docile android didn’t want to be around Google so soon. Especially when he was angry.
Google would be on his way shortly, and Green was mostly unharmed. He would have a couple new documents of information in his drive, but apart from frying some of his nanites the only lasting damage was to his pride.
After being unable to see or yell at Oliver, Google would leave with Green in hand.
#Superhero AU#Masks and Maladies#Markiplier#Jacksepticeye#Bingiplier#Googleplier#Chase Brody#Google Green#Google Yellow#Oliver#Darkiplier#Bingle#jealousy
16 notes
·
View notes
Text
How to create a PowerPoint for school while struggling with executive dysfunction
Note: this is my method it might not work for everyone
Step one: search the topic in google/whatever search engine you use. Scroll thru the websites that pop up and click on the ones that look promising/are talking about your topic. Don’t fall into the “this looks like it could be helpful but I'm not entirely sure so I won't click” trap. Just click everyone that looks somewhat promising and isn’t sus. It's not yet your job to see which ones you’ll actually be able to use. Right now your just gathering websites that COULD be a source. Then bookmark all of this in a folder for your project in your bookmarks bar. Now step away and take a break/ do whatever you want to do.
Step two: Now you're going to sort. Well, start sorting. Do a quick scan thru the website and see if it actually is usable. For example, maybe you searched for “1950s farming techniques” and one of the websites you clicked on is talking only about the pros of their farming techniques but you're talking about the cons? Then un-bookmark that website and throw it away.
Note: you may feel bad about having to get rid of so many sources that you had previously collected. Don’t. those were just sites that you that might help. Some you were correct on and will help, some you were wrong on. Nothing wrong with that.
Step three: go over to PowerPoint and look thru their themes. Bookmark the once that you think looks cool/relate to what you're talking about.
Step four: go thru the themes you bookmarked and narrow them down to two or three.
Step five: choose between the themes and select the one you will use for your PowerPoint and unpin the other one/s/.
Step six: click that theme then click create PowerPoint. After that look at the requirements for the project. Does it have a minimum number of slides? That put that many slides in your PowerPoint.
Note: some themes will come with some premade template slides showing what you can do. Don’t delete them. Just simply move them to the bottom of the PowerPoint. They might be helpful later on.
Note 2: don’t forget to put in a sources/works cited slide at the end. don’t worry you aren’t filling it in yet.
Step seven: label each slide. That’s it. This lets you map out what you are going to talk about and in what order.
Step eight: scan thru the websites. When you see the website talking about something you have a slide for, then place a link to the website on that slide. if the website doesn't talk about anything you have a slide for then get rid of it.
Step nine: choose a slide to start with. Click the links that slide has and copy and paste the relevant raw info onto that slide. It will be rewritten later.
Note: it might be helpful to do something like writing “raw info” or changing the font color so you’ll remember that it needs to be rewritten.
Note 2: don’t forget to put a link to the website on your sources tab while doing this.
Step ten: look at the raw info and turn it into bullet points. Bullet point the main info and any important facts.
Note: while doing this keep an eye out to see if you have any repeating info. Multiple sites may say the same fact. If this is the case then delete the extra info. Step eleven: did your theme come with premade template slides? If it didn’t then you can skip this step, but if it did then look at them and see if you can use any of them. If you can use any of them then do so. It will make your presentation look neater, prettier, and more professional. Delete the slides you can’t use.
Step twelve: go back onto the web and see if you can find any photos related to your topic. If you can then place them in the slide they will fit the best with.
Step thirteen: this is when you should check the requirements. Some teachers prefer for your slides to just have bullet points/ have so many or less words. Some don’t care. If your teacher doesn’t care and you want your slides to be in sentences/ paragraphs then this is when you convert those bullet points into sentences like the english converted everyplace they touched into catholic/christian/protestant/whatever religion they were at the time of contact. With varying degrees of success. But don’t worry about that. Don’t worry if some of your sentences are a bit choppy right now, there will be a time for you to fix them up later. If your teacher wants your presentation as bullet points, then leave them alone on the PowerPoint and use them to write the first draft of your script.
Step fourteen: this is when you edit everything you’ve written that needs fixing and make it flow/sound better.
Step fifteen: add in all of the bells and whistles.
Note: if your using transitions then make sure you use ones that work well together. For example wipe, split, morph, and fade work pretty well together in my personal opinion.
Step sixteen: check to make sure that you have everything that's required in your PowerPoint. If you don’t then make sure to add it in.
Step seventeen: marvel at how easy it was to do this school project.
Note: this was written assuming you have at least 16 days to do the project and can do one step a day. If you have more than 16 days, then you can break the bigger steps up (like steps 2,9,10, and 13) and spread them across two or more days. If you have less time then do some of the smaller steps (like steps 3,4,5,6,7,12,14,15, and 16) in the same day.
Note 2: What I categorized as big steps and small steps is based on my experiences and were included as examples so people could get an idea of what I was talking about. If they are not big steps/small steps for you then don’t treat them as such.
Note 3: Step 2 can actually be a big step, small, step, or a medium-sized step. How long it takes step two to be completed depends on how many websites you gathered in step one. I just like gathering a lot of websites so I know that even if a lot ends up thrown away, there is guaranteed to be a few that will work.
#school#school advice#executive dysfunction#executive dysfunction advise#advice for school#advice for people with executive dysfunction#as you may have noticed#i go to school#and that means a lot of projects#and sometimes those projects are powerpoints#you may have already figured out that i also have executive dysfunction#so here's how i deal with those two facts#enjoy
4 notes
·
View notes
Text
Tech-Interactivity Within Classrooms
We have been talking a lot about interactivity in the classroom, which is to develop a positive, unique and friendly environment for both students and teachers. A survey by CompTIA, a trade association in the IT field, found that 78 percent of educators questioned felt technology had a positive effect on classrooms. Additionally, 65 percent of the educators said technology made their students more productive. Hence, as we are living in such a digital world, innovative technologies are improving the teaching practices in classrooms, which makes the way of teaching and learning gradually change in various aspects.

Photo by BeetSoft on https://beetsoft.com.vn
1. Presentation platforms
Unlike traditional presentations, nowadays we use more complex and effective ways of presenting information within the classroom. Not only PowerPoint, but other methods are also included, namely Prezi, Zoho Show, Google Slides, Keynote, Xtranormal, with the amazing help of animations, charts, infographics, etc. These are the main suggestions for criteria in choosing your own presentation platform: features, design, simplicity, cost, and most importantly, overall performance.
2. Machine learning application & assessment - Why not?
Digital education nowadays is generating new learning opportunities as with modern facilities and equipment, students engage more actively, practice-focused with personalised instruction with the innovative teaching and learning strategies.
Remarkably, learning with video-based learning, blockchain, AI assessments, using augmented reality (AR) and virtual reality (VR) trends are making education technology a compelling experience. As those are increasingly being used to explain complex concepts, Beetsoft has worked as an outstanding education outsourcing services provider for clients in this industry. With the application of technology, especially AR / MR / VR in teaching, we bring innovation to the field.
If the in-house team of your educational institution cannot work on the project, managers can consider using VR outsourcing for the best outcome. With this help of machine learning, the teaching quality will undoubtedly be improved, which is beneficial for teachers, students and also parents.

Photo by Magister on https://magisterco.com
3. The usage of tech devices
The use of technology in education is now undeniable. However, to avoid indiscipline within the learning environment, teachers should establish some policies and procedures including do's and don'ts in which time frame students can use a device. It must be highlighted that technology is used for learning purposes only! How? Be explicit about which behaviors, websites, or apps are allowed in class and which aren't. Teachers also should implement some restrictions on internet usage to prevent students from accessing irrelevant websites that are not for learning and research purposes. This should be an effective way to control the fact that students are distracted and struggle to involve actively during lessons.
Overall, it can not be denied that the use of technology has a huge impact on education. Interactive technology is evolving all the time and its development in the industry can clearly be seen. However, we still have to balance between tech and non-tech use. The use of technology in classrooms should not replace meaningful non-tech activities in total. Students still need time for face-to-face discussion, hands-on creativity and many other team-building classroom activities.
The benefits of interactive technology in EdTech are undoubtedly vast, but it’s important to remember to use it wisely.
Check out more Outsourcing AI Learning Development services here: https://beetsoft.com.vn/education
________________________________________________________________
BeetSoft Co,.LTD - Faster and Better!
https://beetsoft.com.vn
Top global IT Outsourcing and Consulting company
Email: [email protected]
Tel: (+84) 24 3554 5190 (ICT 08.00 – 18.00)
WhatsApp / Telegram / KakaoTalk / Line: (+84) 986 025 497
4 notes
·
View notes
Text
EDIM 502 Project Based Learning (u01a1)
Upon reflecting on the articles videos provided in the course, I discovered that there were very similar principles between them. A few of the principles that stood out in similarity were the role of student, role of teacher, degree of engagement from students, and incorporating technology in the classroom. Despite, the varied age groups, it was evident that a significant amount of the principles could be shared between all of the grade levels.
In all of the examples, it conveyed the role of the teacher to be that of prompting discussion by asking questions, offering guidance and scaffolding, observation of student ability, and making certain that students are afforded the appropriate materials to be successful. The role of the student was to collaborate with peers in groups, be problem solvers, conduct research, communicate findings of such research, application of skill/concept knowledge, presentations of projects and reflection on their work and what they learned.
In addition, the one principle that stood out the most to me was the high level of student engagement, excitement and motivation. In each of the examples, the students were so involved in the classroom learning, taking an active role within the collaborative groups, and appeared very committed in working with peers to achieve a specific goal. Many times, teacher will assign students with work and the students lack interest and motivation because it does not appeal to them. At that point, it is evident that the students have no desire to work to their ability, show no interest in the topic, and this limits the creativity required by the students. By carrying out these type of project within the classroom, learning is being carried into real life. Rather than having students sitting in their desks copying notes from the document camera or PowerPoint, students instead are engaged in hands on activities which allows the students to apply what they know and learned. In the Geometry Students Angle into Architecture Through Project Learning video, it appeared that the students were very enthusiastic about the class project much so that “one girl went home on the first day of the assignment and couldn’t sleep, out of the excitement about her team’s ideas.” (Armstrong, 2002). And as discussed in the “More Fun Than a Barrel of…Worms?! Video, it revealed that the students are not disgusted with the daily question by parents asking “What di you do in school today?” Instead, the students are enthusiastic and want to talk about what they have learned as it is told by the parents, “It gets the kids excited about the subject both inside and outside of school” (Curtis, 2001). Watching the enthusiasm taking place in the classroom was very inspiring.
Each of the videos revealed the use of technology and how it inspired and permitted students to choose to research various topics of information, share creative ideas, or to just put together a digital model of the project they are working on. It was very moving to see in the video “More Fun Than a Barrel of…Worms?! how young the students were and the ability they portrayed to traverse the internet in order to collect additional knowledge as it pertains to worms and Google Slides to provide information about their findings. I also realized how saddening it was that some students desired to research Cystic Fibrosis due to the fact that one of their classmates was suffering from it. I am learning just how important it is to incorporate technology within my classroom as much as possible because it is necessary as educators in the 21st Century, we need to teach and prepare our students to be active members in the real world. Failing to include and inform our students about technology is bottom-line a disservice to them. That being said, I believe that incorporating project-based learning is an excellent way to expose students to the plethora of programs and websites available to them.
Finally, I believe that the articles and videos stand as excellent examples of projects that align with the Buck Institute of Gold Standard. Such projects began through complex multi-faceted questions or problems to solve which kindled a spirit within the students, leading the students to inquire about certain topics and conduct comprehensive research in order to acquire a solid understanding. As revealed in the Gold Standard PBL: Essential Project Design Elements article, “To inquire is to seek information or to investigate- it’s more active, in-depth process than just “looking something up” in a book or online.” (Boss, Larmer, and Megendoller). The examples were real and was comprised of student voice and choice. What amazed me was that the students practiced the strategy of reflection from beginning to end during this project. Such reflections guided them though the project leading them step by step. To finish, the students shared out their final projects to family, friends, and community.
1 note
·
View note
Text
Taking notes in lectures
I don’t think when I went to university I appreciated the point of taking notes in lectures, and I would usually get caught up in writing EVERYTHING down- including what was on the lecturer’s slides. Since then I have streamlined my note taking process, and I thought I would share what I try and do now!
Be prepared: if your lecturer releases the PowerPoint/handout for the lecture in advance, have a quick look at it in advance! This could mean just flicking through five minutes before the lecture, because if you’re aware of the contents and the order of the lecture, you will be prepared for what is to come, and your notes will probably make more sense overall. Plus, you can single out anything that looks particularly difficult in advance, so that you’re not so shocked by it in the lecture.
Find your method: some people love writing lecture notes on paper, others like using their laptop and using Word or PowerPoint. Some people even use Google Docs and share their notes with friends! I started off religiously using notepads, but I found I would write a lot of what was on the slides (which I would look at later anyway), and at the beginning of second year I started to write notes underneath the lecture slides on PowerPoint. This suits my revision note writing method, which involves combining diagrams/information from slides with the my notes from the lecture on paper, and so everything I need to write my notes up after a lecture is in one place. You should keep your revision notes in mind when choosing how you take your lecture notes in order to make things easier for yourself.
Keep focused: this seems easy, but when a lecturer is waffling on or just reading from the slides it can be hard to isolate the information that is worth writing down. Resist the temptation to just transcribe everything the lecturer says, especially if they are giving a long winded explanation. Jot down what is relevant, and ask your lecturer/course mates afterwards if you missed anything.
Don’t stress: missing out information because the lecturer was speaking too quickly is not the end of the world! Don’t let the fear of missing information out ruin the lecture. You just need to move on and keep taking notes on the rest of the lecture. If your course has recommended textbooks, look up the topic and see if you can find the details for yourself. Trying to get everything the lecturer says down shouldn’t be your top priority for lecturers, especially if it means you don’t let yourself absorb and understand the lecture because of it. If you and your course mates want to be as comprehensive as possible, try using Google Docs between you to take lecture notes. This should stop you worrying about missing out information, and will help you out if you enjoy group studying!
557 notes
·
View notes
Text
How To Convert HP Linked Music Information To MP3 Information
Free Video to MP3 Converter is a free tool for extracting audio from video information and allowing you to transform video to MP3 and WAV lossless audio information. Each video converter program listed beneath is freeware - no shareware or trialware right here. I also have not listed any video converters that trim or watermark movies. Find "to MP3" among the many format the buttons. Now take note of the underside of MP4 MP3 conversion app. In case you plan to encode films to songs typically, we advocate adding the format into Favorites by clicking a star signal subsequent to it. Thus if you launch the software subsequent time, you will instantly find the format. The conversion of 1 music format to another music format or one video format to a different video format is sort of straightforward. Nevertheless changing a music file MP3 to a video file MP4 is usually a daunting task should you fail to discover a proper tool. Observe this course of we are about to stipulate, and you will finish changing MP3 to MP4 inside three minutes. In your video conversion wants, you possibly can't go flawed with the free programs Handbrake and VLC. Handbrake (for Home windows, macOS, mp3 to mp4 converter freeware and Linux) takes video files from nearly each conceivable format and converts them into another widespread video type. It is easy to function, and even enables you to decide from normal pre-set modes so as to, say, optimize the movies you're converting for an iPhone X When you're extra snug with the software program, you can even dig deeper into the settings for the codecs—the precise standards by which the video information are saved. Past that, Handbrake rips videos from DVDs and supports subtitles and chapter markers in your conversions. Aside from converting MP4 to MP3, you'll be able to convert another video or audio to MP3 with FonePaw Video Converter Ultimate Also, you can convert video or audio to lossless audio, www.audio-transcoder.com comparable to AIFF and FLAC. Irrespective of you wish to convert videos to MP4 , AVI, MOV, MKV, FLV, convert audio to MP3, M4A, AAC, WAV, or convert video to audio, FonePaw Video Converter Ultimate can meet your requirements. Click on the "Audio" menu and select "Save audio". Select the situation that you want to save the brand new MP3 to. Your original MP4 file will stay in its unique location. Enter Codecs: 3GP, 3G2, ASF, AVI, DV, DRC, FLV, GXF, MKV, MP4, MOV, MPG, TS, RM, SWF, WMV, and WEBM. Once you hit the "Convert Now" button, mp3 to mp4 converter freeware the importing will begin immediately and present you a progress bar, and the conversion will get began immediately the importing full. You will note a download hyperlink enables you to download the converted MP3 when the conversion finished. Switch can convert between more than forty file codecs and is available on Home windows and Mac. This software can batch-convert 1000's of recordsdata quicker than any converter we examined.

The free model of CloudConvert limits you to 25 'conversion minutes' per day. This can be a measure of time spent processing your recordsdata, but if it's more likely to be an issue you're better off using a desktop video converter as an alternative. These codecs give MP4s a lot more flexibility than MP3. For instance, M4A recordsdata (which are MP4 files that only comprise audio) can handle each Advanced Audio Coding (AAC) and Apple Lossless Audio Coding (ALAC). The selection on quality resides with the consumer. Either approach the file will appear as an MP4 file, but the knowledge within the file will differ vastly. I am trying to convert an mp4 file to avi. I've tried this basic ffmpeg script: ffmpeg -i inputFile.mp4 It really works, but the encoded avi file may be very pixelated and doesn't work with Quicktime Participant. I've also tried utilizing these settings (as described right here: -ffmpeg-to-rework-mp4-to-similar-excessive-high quality-avi-file ) ffmpeg -i filename.mp4 -vcodec copy -acodec copy But the issue there may be that the MP4 codec is just copied into an AVI wrapper, and so the resulting video will not play in Quicktime Player or Home windows Media Player. You will see that the converted file within the vacation spot location you chose before and now you can play your MP3 on any appropriate media participant or transportable gadget. Supported Output codecs: MP3, MP4, WebM, 3GP, and F4V. Home windows Media files (.wmv,wma) aren't supported on PowerPoint 2016 for Mac or PowerPoint for Office 365 for Mac. However, if Flip4Mac is put in on your Mac and you already have awmv orwma file inserted on a slide, PowerPoint will provide to convert it in place to anmp4 ormp3 file. Read the Flip4Mac obtain page to see if this plugin helps your version of macOS. In this information I am going to show you learn how to convert video to audio on Android utilizing an app referred to as MP3 Video Converter". Many online video converters we used to recommend have modified over recent months, imposing stricter limits on the number of recordsdata you can convert within a sure timeframe, including watermarks, or that includes so many advertisements it is arduous to search out the place to obtain your converted video. Switch is the quickest audio converter software program we tested. To check the velocity of each converter software program, we timed how lengthy it took to convert a 625MB WAV file to a 26MB MP3 file. - Merge video files: It is potential for you to merge several seperated videos of different formats to one single video with the choosed format from MP4 to WMA converter, so you'll be able to watch all videos in just one video clip with out switch them around. And if you want to convert those videos into your media participant, this merging feature of MP4 to WMA converter could be an awesome helper to make all movies into one single video for watching. Simply load up the audio files you want to convert (either by file or folder), or enter the URL for a web-based file, choose the Codecs tab to select an output format, and click Begin conversion to convert the information. Should you're using Music Manager or Google Play Music for Chrome to upload music to your library, here are the sorts of recordsdata you possibly can upload. Total, Free Video to MP3 Converter is a useful video to MP3 converter that supports a variety of input formats. It is simple to use and is totally free. So, why not download Free Video to MP3 covnerter and check out it for yourself immediately. With Freemake, you possibly can create a group of your favorite tracks for a celebration or everyday listening. What it's essential to do is to add all the MP4 video information and enable the "Be part of" possibility in the high right corner of MP4 MP3 converting app. Then save the result as music and add to a media participant.

1 note
·
View note
Text
How to set up Tableau dashboards to report on financials?
As companies move their systems and data to cloud computing finance departments are often the first to suffer the consequences of the digital transformation. This is why the use of business intelligence (BI) tools within the finance industry has been increasing in recent times. Business intelligence tools allow businesses to visualize their data as part of dashboards, gaining rich information that can boost efficiency and reduce cost.
In this age of technology, many visualization tools are on the market. One of the top BI instruments of today's new age is Tableau. It is a wildly popular data visualization analysis, interaction and interaction tool that allows you to use the power of financial analytics.
In the present, an increasing amount of finance companies around the world are using Tableau to boost operational efficiency and to make data-driven decisions. But, the benefits are multiplied when you implement Tableau dashboards that include financial reports. In this blog you will discover the steps needed to implement Tableau's dashboard for financial reporting. Dashboard in Tableau to facilitate Financial reporting.
Methods to take Tableau dashboards:
Tableau dashboards give accountants and finance teams with an all-encompassing financial reporting system to evaluate financial information using various dimensions. There are generally five steps to set up Tableau reports dashboards. If you want to go beyond this article & dive deeper into Tableau, you can definitely master from Tableau Course.
1. Verify data as it is transferred to the cloud
The first step in creating highly designed financial dashboards is to confirm the accounting and financial data as it moves towards the cloud. Therefore, prior to using Tableau as a Tableau dashboard, it is essential to verify the accuracy of your data. It is also possible to verify the column's values in every table. For tables that are critical you may want to compare the primary keys. It is also recommended to connect the balance sheet as well as the income statement. Verifying the financial data can help improve the accuracy, reliability and credibility.
2. Create workbooks for financial management.
The next method is to break all of your data on financials into smaller pieces and create separate workbooks for each of the fragments. With these workbooks you will be able to work with an enormous amount of data across various dashboards in financial workbooks. It is important to assign each workbook the proper title since you could have a variety of workbooks. For example, a financial workbook may include dashboards that include:
Sales invoiced by the customer
Sales invoiced by brand
Profit and loss
Summary of advertising and promotion
Gross profit margin and ales depending on the location
Summary of administrative and general
Source: Tableau.com
3. Add dashboard objects
The next step is to incorporate dashboard objects to bring more interactivity and interest on your dashboards. There are various types of objects for dashboards. The guidelines about certain of these objects can be found below:
Web Page objects They display the pages of your choice in the view on your screen. However, certain web websites will not grant you with the ability to embed their own pages. For example, Google.
Vertical and horizontal objects They allow you to organize relevant objects by using layout containers. This means that you can adjust your dashboards and allow users to adjust their size when they are in contact with them.
navigation objects They allow you to go between one dashboard or sheet to another. They can display details tooltips, highlight text on the screen, and create boundaries that are custom-made using these objects.
Download object The Download objects will allow users to choose the option for users to make an image in PNG format, a PDF file or PowerPoint slides of your dashboard, or other workbooks that you choose to use.
Extension objects They allow you to include attractive and unique capabilities on your dashboards. You can also connect your dashboards to apps that are not Tableau with these objects.
4. Enable data drill-down
Fourth step: dig into the financial statements to determine the cause of the performance. If you observe any differences on your dashboards, when you follow this process you will be able to pinpoint the reasons behind those differences. When you drill down into the smallest details and analyzing the data, you can identify patterns and trends within the business. For further exploration you should look into your visualization i.e. financial reports.
Metrics for Tableau finance dashboard
Gross profit margin
Operating profit margin
Operating cost ratio
Net profit Margin
Working capital
Berry ratio
Conversion of cash
Turnover ratio of accounts payable
Turnover ratio of accounts receivable
The future of forecasting financials
Finance is a fast-moving field. Therefore, modern businesses need to shift from the traditional financial spreadsheet and into more sophisticated BI solutions such as Tableau to perform financial analysis. There is no need for manual methods of making and transforming financial information. The majority of organizations have shifted to Tableau Dashboards to manage financial reports to track and provide reports on financial KPIs.
0 notes