#Cinema 4D Tutorial
Explore tagged Tumblr posts
Visit Tumblr Blog
Explore Tumblr blogs with no restrictions, modern design and the best experience.
Last Seen Tumblr Blogs


Fun Fact
After the announcement of the deal with Yahoo!, there were 170K signatures of unhappy Tumblr users petitioning to prevent the sale in 2013.
Text


Here's sort of a tutorial:
How to make a visible mesh / wireframe that's looser than its underlying geometry without being low-poly in Cinema 4D. #C4D
(That's also procedural / geometric / spline-based, not texture, and without expensive plugins.)
Different shapes need different approaches, but the basic setups there will work for similar things.
WHY? For gravitational deformations in spacetime, gravitational waves black holes, wormholes, "Mexican Hat" potential, etc. where you need a smooth shape but don't want a dense wireframe. Examples:


Another way I typically do this is using the Vonc Suite Selections plugin:

These are just some fast, cheap, geometry-based methods. There are other ways of doing this. Using textures is one, but has other drawbacks and issues. There's also another plugin that gets recommended: Rocketlasso's Mesh to Spline; I haven't tried it myself and it's ~$100.
#c4d#cinema 4D#3D#3D art#3d artist#science#art#olena shmahalo#natureintheory#physics#astrophysics#particle physics#black holes#gravitational waves#galaxies#tutorial#process#3D modeling#sciart#scientific illustration#science illustration
44 notes
·
View notes
Video
youtube
Cómo utilizar capas en Cinema 4D para una mejor organización
1 note
·
View note
Video
youtube
How to Animate Square Wheels on a Jumping Road in Cinema 4D
#youtube#In this tutorial you'll learn how to animate a car with square wheels running on a jumping road in Cinema 4D without using Expresso. Start b
0 notes
Video
vimeo
Way To The Nautilus from EQUILOUD. on Vimeo.
Way To The Nautilus // Personal Project // 4K UHD
If you liked it, you may also like COTN: vimeo.com/171418330
Sound by: Gerrit Elbrink Motion by: Uwe Schweer-Lambers
Gerrit used NI Synthesizers such as FM8 and Massive for the main sound design. All sounds were created from the initial patch and custom made for this particular animation. All presets can be downloaded from our website. Battery 3 Factory Kits were used for Drum and Percussion elements in the arrangement. humanworkshop.com Uwe used Cinema 4D and its Mograph Tools for the animation. The editing was done in After Effects. He also recorded a few related Tutorials, which were released beforehand: vimeo.com/54797252 vimeo.com/53273330 vimeo.com/61825060.
You can also visit his site: equiloud.de
Download the presets here: http://goo.gl/FRrzhd
Enjoy and have a nice day!
2 notes
·
View notes
Text
3d Y2k in Graphic Designing
Trends come and go in the world of graphic design, but some are hard to forget. Among them, 3D Y2K design is a trend that has caught my attention over the last few years. It's an aesthetic that takes the nostalgia of early 2000s internet culture and the futuristic appeal of three-dimensional digital artistry to a new level. As graphic designers seek fresh ways to captivate audiences, 3D Y2K has emerged as a common trend that speaks to both nostalgia and innovation.
What is 3D Y2K Design?
3D Y2K design is a renewed take on the early 2000s digital aesthetic but with a twist. It has shiny metallic textures, bubble-like typography, neon gradients, and cyber-inspired elements. Imagine a shiny, future-like interface in early computer advertisements, video game graphics, or sci-fi movies from the late '90s and early 2000s. Often, these feel dreamy, surreal, and hyper-digital, with over-the-top lighting effects, smooth curved surfaces, and an overall look of futurism.
Key Elements of 3D Y2K Design
• Glossy and metallic finishes – Reflective, liquid-like surfaces that give a smooth, futuristic look. • Bubble and chrome typography – Thick, shiny letters often thought of as old-school WordArt or futuristic sign billboarding. • Neon and holographic gradients – Bright, high contrast colors giving off the feel of digital aesthetics. • Cyber-inspired motifs – Grid background, wireframe items, and pixelated details • Soft, rounded edges and inflated shapes, such as balloons. Such is the aesthetic blending elements of historical digital culture along with modernistic 3D rendering techniques: bold and graphic.
Why is 3D Y2K Interesting?
The most obvious reason why 3D Y2K design has been quite popular among graphic artists is because of its powerful nostalgic value. Millennials and Gen Z audiences grew up in an era where the internet was born, and so they are heavily attached to visual aesthetics of those times. Retro-futurism reminds them of the first websites, computer games, and advertisements they used to see as kids, thus emotionally attaching itself to them. At the same time, 3D Y2K design is also fantastically futuristic. With cutting-edge techniques used in rendering and lighting effects and digital textures, it's like this design breathes fresh air of forward thinking. It's old-school with digital charm yet matches current innovation, setting it apart from other minimalist and flat designs in the pack.
The other point of attraction would be its high visual drama. A 3D element naturally brings depth and reality, making the design more immersive and engaging. When used in branding, web design, motion graphics, or advertising, the glossy, hyper-digital style of Y2K 3D immediately turns heads.
Why is 3D Y2K a Common Trend in Graphic Design?
The emergence of 3D Y2K as a strong contender for the trend in graphic design can't be far from the following major reasons:
1. Advancements in 3D Design Software Modern AI software such as Blender, Cinema 4D, and Adobe Substance 3D are now giving graphic artists the ability to create stunning 3D graphics more easily than ever before. Simple-to-follow tutorials and an AI-assisted rendering workforce allow only the most brave of artists to try their hands at this aesthetic, no heavy lifting/professional experience needed in 3D modeling at all.
2. Rise of Y2K Aesthetic in Fashion, Culture, and Somewhere in Between The revival of the Y2K aesthetic: it is back and in your face in fashion, music, and media. Celebrities, influencers, and brands affordably sport early 2000s looks, thus allowing themselves to be embraced by digital and graphic design currents.
3. Digital Realism and the Metaverse As the hyper-realistic requirement is growing for digital cinemas, especially in metaverses, for high-end NFTs and digital spaces, the futuristic yet nostalgic appeal of 3D Y2K design establishes its relevance in the dynamic digital world.
4. Social Media and Virals 3D Y2K designs are the definition of viral due to their splashy aesthetics. Many graphic artists express their Y2K vibes on Instagram, TikTok, or Behance, giving rise to more trends.
All in all, 3D Y2K design is not just a fad; it's an active blend of nostalgia and digital postmodernism. It attracts attention and evokes emotion, therefore making itself versatile to be integrated into any creative field-and is for this reason chosen by many graphic designers. As technology grows and the need for immersive digital experiences increases, the 3D Y2K aesthetic will likely be around for decades to come in the graphic arts. This is worth investigating if you're just a designer who would like to take a shot at new stylings and wonder about digital art and 3D Y2K in itself-a fascinating field to look into!
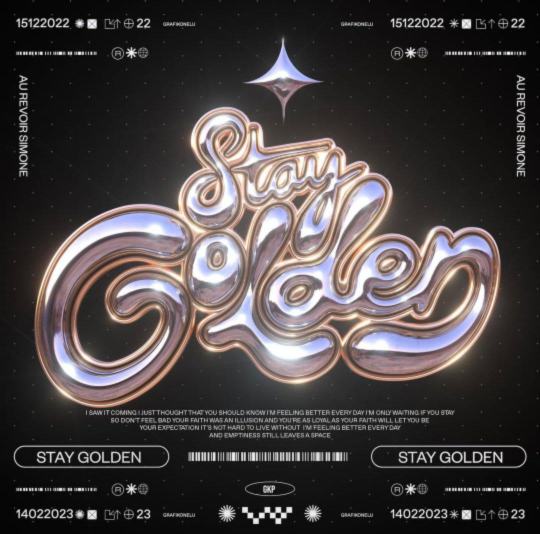
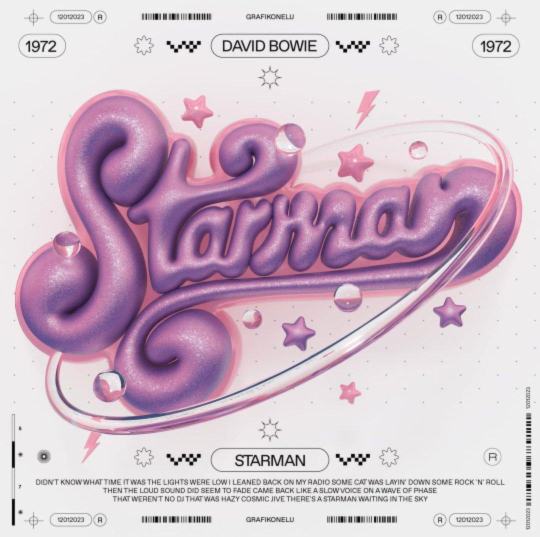
** Stunning 3D Y2K graphic design by @grafikonelu on Instagram, beautifully crafted! Check out their work for more amazing visuals!
4 notes
·
View notes
Text
Thing is, now with the new 3D class (Cinema 4D + After Effects) I am currently taking, my unrealistic wish to make a game myself bubbles up in me again. (I have a horror game idea I got from a dream years ago)
Like I gave up the idea of actually working in a game production company. That's quiet impossible to get in, alone because I live in the corner of germany where entertainment industry doesn't exist except for a old boring linear TV channel... the cool stuff happens on the other sides of germany (I can't move). Also the work conditions aren't worth it....
But knowing that some people do indie games solo on the side, or like Chilla's Art it's just two brothers developing the games.
I mean I was on that way before Corona fucked everything over and I slithered into burnout.
I already started learning Unity engine and Blender (still beginner - mediate level but, all self taught because my profs in uni were an absolute disappointment in that, they just taught the very basics because they weren't further than that themselves... they literally said that...)
Downside is that I hate coding, which i would have to do myself too.... I can learn it when I need it but I would not say I know what I am doing when I just adapt tutorials. lol
Anyways atm I am fine with just getting back into 3D for now and getting my brain out of emergency energy saving mode (your memory and cognitive function really go down during mental illness peaks... it can come back but only after your mental health got better 😑 and you have to train it too).
#oh no my way too big goals are back#but at least I have goals again#wherever they take me#coding is just a bit better than math because you can actually see results from what you are doing... if you do it right
2 notes
·
View notes
Note
Hey! Hope you’re having a good day/night! I came across this gif post on my feed and I can’t get over how beautiful it is! Can you tell me how did you do it?
Hi! Thank you so much for the message - this means a lot to me 💖
This is one of the most resource intensive gifsets that I've made to date, but I've experimented with the following to create the special effects:
Neural Filters (Photoshop): The artistic effects seen in the small component gifs of the gifset make use of Neural Filters, namely the Landscape Mixer & Style Transfer filters. I happen to be working on a comprehensive tutorial on using Neural Filters with gifs, so stay tuned :D
Maxon One plugin (After Effects): The transition effects seen in the even numbered panels are few of the presets from Maxon's Universe Suite (used as a plugin on Adobe After Effects)
Cinema 4D: This is another app that's part of my Maxon One subscription under student discount. The moving 3D shapes (seen in panels 1, 3, 4, 8, 9) were made on this 3D rendering software. I'm still pretty new to Cinema 4D, but this tutorial is very helpful!
Rotoscoping (After Effects): I use the Rotoscoping tools on Adobe After Effects to make the cutout gifs as seen in panel 1 + even numbered panels. I have a detailed tutorial on Rotoscoping here!
I hope this helps and I hope you have a lovely holidays season 🎅
6 notes
·
View notes
Text
3d product renderings and mockups

It seems like you're looking for information or assistance with 3D product renderings and mockups. Creating 3D product renderings and mockups is a crucial step in the design and marketing process for various industries. Here's some information to help you get started:
1. Software for 3D Rendering:
Blender: A powerful and free open-source 3D creation suite.
Autodesk Maya: Widely used in the film and video game industry.
Cinema 4D: Known for its intuitive interface and powerful capabilities.
KeyShot: A standalone 3D rendering and animation application.
2. Creating 3D Models:
CAD Software (Computer-Aided Design): Use software like AutoCAD, SolidWorks, or Rhino to create accurate 3D models.
Sculpting Software: Tools like ZBrush or Blender's sculpting features are great for organic shapes.
3. Texturing and Materials:
Apply realistic textures and materials to your 3D model using UV mapping techniques.
Software like Substance Painter or Quixel Mixer can help create detailed and realistic materials.
4. Lighting:
Proper lighting is crucial for realistic renders. Experiment with different light setups to achieve the desired look.
Consider using High Dynamic Range Imaging (HDRI) for realistic environmental lighting.
5. Rendering:
Choose the appropriate rendering engine for your needs (Cycles in Blender, Arnold, V-Ray, etc.).
Adjust rendering settings such as resolution, quality, and output format.
6. Mockup Tools:
Adobe Dimension: Allows you to create realistic 3D mockups and product visualizations.
Placeit: An online platform that lets you create mockups with your designs on various products.
Mockup World: Offers a variety of free and premium mockups for different products.
7. Tutorials and Learning Resources:
Online platforms like Udemy, Coursera, and YouTube offer tutorials on 3D modeling, rendering, and mockup creation.
Join forums and communities like Blender Artists or Polycount for support and feedback.
8. Considerations for Product Mockups:
Understand the target audience and purpose of the mockup.
Pay attention to lighting, shadows, and reflections to make the mockup realistic.
Test the mockup on different backgrounds to ensure versatility.
9. Outsourcing:
If creating 3D models and renders is outside your expertise, consider outsourcing to professional 3D artists or agencies.
Remember to practice and experiment with different techniques to refine your skills. The field of 3D rendering is vast, and continuous learning is key to staying updated with the latest trends and technologies.

#shirts#shirt design#artist shirts#tees#tshirts#toby's beans#coffee cat#sundew farms#sunflower fox#sugarbritches#apple orchard#vintage logos#logo design#shop#merch#countrycore#farmcore#cottagecore#fashion#my art#horror#slashers#graphic design#the conjuring#the conjuring 3#the conjuring: the devil made me do it#scream#scream 1996#a nightmare on elm street#anoes
2 notes
·
View notes
Text
Mastering Self-Taught 3D Modeling: A Comprehensive Guide
Learning 3D modeling independently can be an immensely rewarding endeavor. Below, you'll find a step-by-step guide to embark on this creative journey successfully:
Define Your Objectives: Begin by clarifying your reasons for learning 3D modeling. Are you interested in game design, animation, architecture, or another specific application? Establishing clear goals will help you stay motivated and focused.
Select Suitable Software: Numerous 3D modeling software options are available, ranging from free to paid. Popular choices include Blender (free and open-source), Autodesk Maya, 3ds Max, Cinema 4D, and ZBrush. Choose software that aligns with your goals and budget.
Grasp the Basics: Start with the fundamentals. Familiarize yourself with the software's user interface, navigation, and basic tools. Most software packages offer introductory tutorials and documentation to facilitate your initial steps.
Access Online Courses and Tutorials: A wealth of online courses and tutorials awaits you on platforms like YouTube, Udemy, Coursera, and Khan Academy. Seek out beginner-level courses that cover the basics of 3D modeling. Follow along and practice consistently.
Regular Practice: Improvement in 3D modeling is directly linked to practice. Dedicate time to create simple objects, experiment with tools, and gradually advance to more intricate projects. Steadfast practice is key.
Study Anatomy and Reference Materials: For those interested in character modeling or organic shapes, in-depth knowledge of anatomy and reference materials is invaluable. This understanding enhances the realism of your creations.
Master Texturing and Materials: Explore texturing techniques and materials. Proficiency in applying textures, shaders, and materials to your 3D models is essential for achieving realistic renders.
Delve into Specializations: 3D modeling encompasses a wide array of specializations, such as character modeling, architectural visualization, product design, and more. Explore various areas to discover your passion.
Engage in Online Communities: Connect with fellow 3D artists and enthusiasts through forums, social media, and 3D modeling communities. Sharing your work, seeking advice, and receiving feedback can be immensely beneficial.
Develop a Portfolio: As your skills evolve, start crafting a portfolio showcasing your finest work. A well-structured portfolio is essential if you aim to pursue a career or freelance opportunities in 3D modeling.
Stay Current: The 3D modeling field is in constant flux. Stay informed about the latest trends, techniques, and software updates by following industry news, blogs, and online courses.
Consider Advanced Training: If you're committed to a career in 3D modeling, contemplate advanced training or pursuing a degree in computer graphics, animation, or a related field. Such education can broaden your horizons.
Innovate and Experiment: Dare to innovate and experiment. Push the boundaries of your creative abilities, and don't be disheartened by setbacks. Learning from your mistakes is an invaluable part of your journey.
Cultivate Patience and Perseverance: Mastering 3D modeling is a gradual process, and each individual progresses at their own pace. The key is to maintain patience, practice consistently, and persist through challenges. Remember that setbacks are a natural part of the learning process.
Recommended Article:
3D Jewelry Rendering For Online Store
Embarking on the path of self-taught 3D modeling can be challenging, but with dedication and the guidance provided above, you can make remarkable progress and achieve your artistic and career goals.
#3dfurniturerendering#3dproduct#3dproductrendering#3dproductvisualization#3dproductvideo#3danimationvideo#3dfurniturerenderingservices#3dproductanimation#3djewelryrenderingservices#3dproductrenderingservices
2 notes
·
View notes
Text
Mastering 3D Design and Rendering: A Beginner's Guide
Embarking on the journey of 3D design and rendering can seem daunting, yet it opens up a world of creative possibilities, especially within the dynamic field of 3D architectural rendering. From conceptualizing breathtaking structures to visualizing intricate interior spaces, the ability to translate ideas into photorealistic imagery is an invaluable skill. This guide from Renderexpo aims to demystify the process, providing a clear roadmap for beginners eager to master 3D design and rendering. Whether you're an aspiring architect, an interior designer, or simply someone fascinated by digital artistry, understanding the fundamentals of 3D design and rendering is your first step towards bringing your visions to life with stunning clarity and precision.
Core Principles of 3D Design and Rendering
Before diving into software, grasping the foundational concepts of 3D design and rendering is crucial for beginners. This involves understanding spatial relationships, perspective, and the importance of scale. Learning about polygons, vertices, and edges forms the basis of 3D modeling, which is the initial step in any 3D architectural rendering project. Familiarity with these core principles will empower you to build accurate and aesthetically pleasing models, setting a strong foundation for your journey in 3D design and rendering. Renderexpo emphasizes this fundamental knowledge for all aspiring visualization artists.
Essential Software Tools for 3D Design and Rendering
Choosing the right software is a pivotal decision for anyone starting in 3D design and rendering. Popular choices include Autodesk 3ds Max, SketchUp, Blender, and Cinema 4D, each offering unique strengths for various applications, particularly in 3D architectural rendering. For beginners, it's often wise to start with a user-friendly option that has ample tutorials and community support. Investing time in learning the interface and basic functionalities of your chosen software will significantly accelerate your progress in mastering 3D design and rendering techniques.
Crafting Detailed 3D Models in Your Design
The art of 3D modeling is where your architectural concepts begin to take shape. This stage involves translating 2D blueprints and sketches into a three-dimensional digital environment. Beginners should focus on creating clean, efficient geometry, ensuring that models are optimized for the subsequent rendering process. Precision in modeling is paramount for 3D architectural rendering, as inaccuracies here will propagate through the entire visualization pipeline. Mastering the tools for extrusion, boolean operations, and subdivision will greatly enhance your capabilities in 3D design and rendering.
Applying Realistic Materials for 3D Design and Rendering
Once your 3D model is complete, the next critical step in 3D design and rendering is applying realistic materials and textures. This transforms a bland digital object into a tangible, lifelike representation. Understanding properties like diffuse color, specularity, reflectivity, and bump mapping is essential. Experimenting with various material libraries and creating custom textures will significantly elevate the visual quality of your 3D architectural rendering. Renderexpo always emphasizes the importance of material realism in achieving compelling visualizations.
Mastering Lighting Techniques for 3D Design and Rendering
Lighting is arguably the most powerful tool in 3D design and rendering, capable of dramatically altering the mood and perception of a scene. Beginners should explore different light types – such as directional, point, and area lights – and understand their impact on shadows and reflections. Learning about global illumination and ambient occlusion will add depth and realism to your renders, particularly in 3D architectural rendering where atmosphere is key. Effective lighting truly brings your 3D designs to life, making them more immersive and engaging.
Post-Production: Enhancing Your 3D Design and Rendering
After the raw render is complete, post-production is where the final magic happens in 3D design and rendering. Using image editing software like Adobe Photoshop, you can refine colors, adjust contrast, and add atmospheric effects such as fog or lens flares. This stage allows for subtle enhancements that significantly boost the overall visual appeal and polish of your 3D architectural rendering. Mastering post-production techniques is crucial for achieving professional-grade results and making your 3D designs truly stand out.
Showcasing Your Portfolio of 3D Design and Rendering
Building a strong portfolio is essential for showcasing your skills in 3D design and rendering, especially if you're aiming for a career in 3D architectural rendering. For beginners, this means compiling your best work, even if it's based on personal projects or re-imaginings of existing designs. Present your renders clearly, with varying angles and lighting conditions, and consider adding brief descriptions of your creative process. A compelling portfolio demonstrates your mastery of 3D design and rendering and opens doors to exciting opportunities.
Conclusion
Mastering 3D design and rendering is an ongoing journey that rewards patience, persistence, and a passion for visual storytelling. This beginner's guide from Renderexpo has illuminated the fundamental steps, from understanding core principles and choosing software to advanced techniques like lighting and post-production, all crucial for high-quality 3D architectural rendering. Remember that practice is key; the more you experiment and create, the more proficient you will become. Embrace the learning process, leverage available resources, and consistently challenge yourself to push the boundaries of your creativity. The world of 3D design and rendering is constantly evolving, offering endless opportunities for those dedicated to transforming imagination into stunning visual realities.
0 notes
Text
Generative Art/Creating Art With Code/p5.js Masterlist
#creative coding#generative art#p5js#p5.js#javascript#coding#open processing#tech#technology#masterlist#creating art with code#informative#educational#artists on tumblr
0 notes
Video
youtube
Cinema 4D: Make Realistic PBR Metallic Materials Effortlessly!
1 note
·
View note
Video
youtube
Creating a Dynamic 3D Text Basic Animation in Cinema 4D
#youtube#Creating easy and unique tutorials in Cinema 4D can help beginners grasp fundamental concepts while also sparking creativity. Here’s a simpl
0 notes
Text
Reliance Animation Academy Andheri – Transform Your Future with Graphic Design Courses in Andheri for the Motion Graphics Era

Reliance Animation Academy Andheri Is Creating Tomorrow’s Design Leaders with Graphic Design Courses in Andheri
Reliance Animation Academy Andheri is shaping the creative revolution in India, one designer at a time. With the world rapidly transitioning to visual-first communication, there’s a massive demand for skilled Motion Graphics Designers who can create, animate, and tell impactful stories through design. This rising industry need begins with a solid foundation—and that’s exactly what our graphic design courses in Andheri are built to offer.
From social media reels to app walkthroughs, animated brand intros to explainer videos—motion graphics is now the language of the digital world. If you want to master this language and stand out in the global creative market, your journey begins at Reliance Animation Academy Andheri.
What Does a Motion Graphics Designer Do in 2025?
A Motion Graphics Designer creates animated visuals that communicate messages clearly and creatively. Unlike traditional animators focused on character or cinematic storytelling, motion designers work with type, shapes, icons, and visual metaphors to create dynamic content for digital platforms.
At Reliance Animation Academy Andheri, our graphic design courses in Andheri cover all aspects of motion graphics—from design theory to professional animation workflows.
Graphic Designer vs. Motion Graphics Designer – What Sets Them Apart?
Graphic Designers craft visual compositions using images, colors, and typography for print or digital use.
Motion Graphics Designers take it a step further—using animation to bring static visuals to life.
Our graphic design courses in Andheri train students to excel in both disciplines, giving them an edge in today’s hybrid job market.
Industries That Can’t Function Without Motion Graphics in 2025
The demand for Motion Graphics Designers is exploding across multiple domains:
Digital Advertising Agencies
OTT Platforms and Media Houses
Mobile App and Game Developers
EdTech Companies and E-Learning Portals
AR/VR Startups and Metaverse Projects
UI/UX Design Studios
By enrolling in our graphic design courses in Andheri, you position yourself at the center of this booming creative economy.
Inside a Motion Designer’s Daily Workflow
At Reliance Animation Academy Andheri, students learn to:
Create storyboards and visualize animated sequences
Animate text, graphics, and characters
Sync visuals with voiceovers, music, or effects
Work across formats like ads, reels, tutorials, and app UIs
Collaborate with marketing, UI/UX, and video production teams
Every assignment in our graphic design courses in Andheri mimics real-world studio workflows.
Software and Tools You’ll Master at Reliance Animation Academy Andheri
Animation & Video Tools
Adobe After Effects
Adobe Premiere Pro
Blender, Cinema 4D, Maya
Design Software
Adobe Photoshop
Adobe Illustrator
Figma and Adobe XD (for UI animation projects)
Our graphic design courses in Andheri ensure you're job-ready with both foundational and cutting-edge tools.
Soft Skills That Matter Just as Much
Creative storytelling
Eye for motion timing and rhythm
Teamwork and communication
Curiosity and self-driven learning
We include collaborative assignments, feedback loops, and client-style project simulations within our graphic design courses in Andheri to build these skills.
Emerging Trends Covered in Our Courses
We don’t just teach what’s current—we teach what’s next:
AI-powered animation platforms (e.g., Runway ML, Adobe Firefly)
Interactive UI/UX motion design
AR and VR animation basics
Generative design for rapid prototyping
These topics are woven into our advanced graphic design courses in Andheri to prepare you for the creative future.
Why 2025 Is the Golden Year for Motion Designers
1. Reels & Shorts Dominate Attention
Brands need scroll-stopping animations for Instagram, TikTok, and YouTube Shorts.
2. Animated Branding Is the Norm
Static logos are old news. Animated identities are in.
3. Digital Products Demand Motion
Apps and websites use motion to onboard, guide, and retain users.
4. AR/VR Content Needs Dynamic Visuals
The metaverse needs artists who can animate immersive environments.
5. A Global Shortage of Skilled Designers
Motion design is still a specialized skill. Our graphic design courses in Andheri bridge this talent gap.
What Career Paths Open Up After Graphic Design Courses in Andheri?
With a portfolio in motion graphics, you can become:
Motion Graphics Designer
UI Motion Specialist
2D/3D Animator
Visual Effects Artist
Multimedia Video Producer
AR/VR Visual Designer
Our graphic design courses in Andheri include placement training, freelancing support, and mentorship from industry professionals.
Salary Outlook for Motion Graphics Designers
India: ₹25,000 to ₹50,000 per month (freshers); ₹1L+ per month with experience
Global Average: $70,000 to $95,000 per year
Freelance Projects: $25–$100/hour depending on niche
Specialists in 3D, AR/VR, or UI motion—trained through our graphic design courses in Andheri—can command top-tier compensation.
What You’ll Learn in Graphic Design Courses in Andheri
Foundational Modules
Principles of Design & Typography
Color Theory and Composition
Raster & Vector Graphics (Photoshop & Illustrator)
Motion Graphics Specialization
Animation Principles
Timeline-based Editing
Syncing with Audio/Voice
Real-World Ad & UI Projects
Professional Development
Portfolio Building
Freelance Training
Resume and Interview Prep
Every student in our graphic design courses in Andheri graduates with a personalized, industry-ready portfolio.
Portfolio Projects You’ll Create at Reliance Animation Academy Andheri
Animated Logos and Brand Openers
Social Media Reels and Ad Snippets
UI Animation for Web and Mobile
Explainer Videos for Startups
Motion Graphics for E-Learning and Gaming
These become your golden ticket to internships, freelance gigs, and full-time jobs after completing your graphic design courses in Andheri.
How Our Students Gain Real-World Experience
Agency-Style Assignments: Simulating client briefs
Live Freelance Projects: Platforms like Fiverr and Behance
Internships with Partner Studios: Right after course completion
Studio Visits and Expert Talks: Learning from industry mentors
Our graphic design courses in Andheri offer exposure, not just education.
What the Future Holds for Motion Designers
🚀 AI + Creativity = Next-Gen Workflows
Designers will use AI not just to speed up tasks, but to innovate.
🌍 The Metaverse Is Hiring
Avatars, digital products, and immersive spaces all need animation.
📲 Micro-Animations Everywhere
Even the smallest button needs motion to feel intuitive and modern.
That’s why our graphic design courses in Andheri evolve every year to keep you future-ready.
Conclusion: Build the Skills That Build the Future
Reliance Animation Academy Andheri is more than a design school—it’s a launchpad for passionate creatives. With the rising demand for motion graphics across the globe, there has never been a better time to upskill. Our graphic design courses in Andheri combine the theory of art with the pulse of technology, helping you create a career that’s flexible, high-paying, and creatively fulfilling.
If you’re ready to tell stories through motion, it’s time to begin your journey.
Enroll Today – Start Creating Tomorrow
Reliance Animation Academy Andheri Center Unit No. 14, 2nd Floor, Shri Alankar CHS Ltd, Nadco Shopping Centre, SV Road, Near Andheri Railway Station, Mumbai – 400058 📞 +91 9326591557 / +91 7400400795 / +91 9920678816 📧 [email protected] 🌐 relianceacademyandheri.com 📍 Google Maps – Navigate Here
👉 Book a Free Counseling Session 👉 Apply for the Next Batch of Graphic Design Courses in Andheri
0 notes
Text
A Beginner’s Guide to Animation Software You Need to Know

Animation has transformed the way we tell stories, market products, and create digital content. Whether you’re an aspiring animator, a marketing professional, or just someone who wants to explore the world of animation, the right software can make all the difference. But with so many tools available, choosing the best one can be overwhelming.
This guide breaks down some of the best animation software for beginners, helping you find the right fit for your creative journey.
1. Understanding Animation Software
Before diving into specific tools, it’s essential to understand the two primary types of animation:
2D Animation – Creates flat, hand-drawn or vector-based animations, often used for cartoons, explainer videos, and advertisements.
3D Animation – Adds depth and realism, often used in movies, video games, and product design.
Both types require different software, so knowing what you want to create will help narrow down your choices.
2. Best Animation Software for Beginners
1. Adobe Animate – Perfect for 2D Animation
If you want to create classic, hand-drawn-style animations, Adobe Animate is a great choice. It allows you to create vector-based animations and is widely used for web-based projects, cartoons, and simple animations. Pros:
Easy-to-use interface
Integration with Adobe Creative Suite
Ideal for beginners in 2D animation
Cons:
Subscription-based pricing
Limited 3D capabilities
2. Blender – The Ultimate Free 3D Animation Tool
For those interested in 3D animation services, Blender is a powerful open-source tool. It offers everything from modeling and rigging to animation and rendering, making it one of the best free animation tools available.
Pros:
Free and open-source
Professional-grade features
Great for 3D modeling and animation
Cons:
Steeper learning curve
Requires a powerful computer for complex projects
3. Toon Boom Harmony – A Professional 2D Animation Tool
Used by professionals in the industry, Toon Boom Harmony is a great tool for those who want to take 2D animation to the next level. Many TV shows and animated films are created using this software.
Pros:
Industry-standard for 2D animation
Offers both vector and bitmap drawing tools
Powerful rigging and effects
Cons:
Expensive for beginners
Requires time to master
4. Moho (Formerly Anime Studio) – Best for Character Animation
If you’re focused on character-based animation, Moho is a great choice. It offers advanced rigging tools that make animating characters much easier compared to frame-by-frame techniques.
Pros:
Great for beginners and professionals
Powerful bone-rigging system
Affordable compared to other professional tools
Cons:
Not ideal for non-character animations
Some limitations in effects and transitions
5. Cinema 4D – User-Friendly 3D Animation Software
For those looking for an easy entry into 3D animation services, Cinema 4D offers an intuitive interface and powerful features. It is widely used in motion graphics, advertising, and film production.
Pros:
Easier learning curve than Blender
Excellent for motion graphics
Great rendering capabilities
Cons:
Expensive
Limited advanced modeling features compared to Blender
3. Choosing the Right Software for You
Here are some key questions to ask before selecting animation software:
What type of animation do you want to create? (2D vs. 3D)
Are you willing to invest in paid software, or do you prefer free tools?
How much time are you willing to spend learning?
Do you need software that integrates with other tools?
4. Tips for Getting Started with Animation
Once you’ve chosen your software, here are some practical tips to help you get started:
1. Learn the Basics First
Don’t try to master everything at once. Focus on the fundamental principles of animation, such as timing, spacing, and movement.
2. Follow Online Tutorials
Platforms like YouTube and online courses offer excellent beginner-friendly tutorials for almost every animation software.
3. Start with Simple Projects
Before creating a full animation, start with small projects like logo animation, simple character movements, or basic transitions.
4. Experiment and Practice Daily
The best way to improve your animation skills is through practice. Set aside time each day to experiment with different tools and techniques.
5. Join Animation Communities
There are many online communities where animators share tips, feedback, and inspiration. Engaging with these communities can help you stay motivated and learn from others.
5. Future of Animation and Career Opportunities
With the rise of animation studio in New York and across the world, animation has become a lucrative career path. Industries like entertainment, gaming, advertising, and education all rely heavily on animation, creating plenty of job opportunities.
Some career paths you can explore include:
2D Animator (TV shows, advertisements, online content)
3D Animator (Movies, video games, simulations)
Motion Graphics Designer (Marketing videos, UI animations)
Storyboard Artist (Pre-production for movies and animation projects)
Visual Effects (VFX) Artist (Film and gaming industry)
Conclusion
Animation is an exciting and creative field with endless possibilities. Whether you want to create engaging cartoons, design animated advertisements, or develop stunning 3D models, the right software can make all the difference.
Start with beginner-friendly tools like Adobe Animate for 2D or Blender for 3D, and as you gain confidence, explore professional-grade software like Toon Boom Harmony or Cinema 4D.The key is to practice, experiment, and have fun! Animation is all about storytelling, creativity, and bringing ideas to life—so dive in and start creating!
#3d animation#animation#graphic design#vr#web graphics#motion graphic#animated#2d animation#motion graphics#character animation
0 notes
Text
youtube
Moana 2 in 4DX Moana 2 is about reuniting the people of the sea. 4DX cinema has moving seats, and special effects like wind, fog, water, lightning, etc that syncs along with the 4D movie, like Moana 2. Have you seen the Moana 2? What's your favorite scene? #OFW #Malaysia #CYBERTITO CYBERTITO – the uncle who loves information technology. From tech tips, web tutorials, poems, OFW life, BPO work, travels, and Catholicism, there's always something new. Explore with CYBERTITO! Subscribe for more videos about Art, Life, Tutorial, Travel, and Catholicism! https://bit.ly/CYBERTITOYouTubeChannel Follow CYBERTITO on social media Facebook Fan Page: https://www.facebook.com/cybertitojj Facebook Profile: https://www.facebook.com/JosephRaymundEvangelistaEnriquez TikTok: https://www.tiktok.com/@cybertitojj Visit CYBERTITO website https://cybertito.com/ Copyright (C) CYBERTITO – All Rights Reserved.
0 notes