#Cleaner Apps for mac
Explore tagged Tumblr posts
Visit Tumblr Blog
Explore Tumblr blogs with no restrictions, modern design and the best experience.
Last Seen Tumblr Blogs


Fun Fact
The most popular pages on Tumblr are about Minecraft, GIFs, and David J. Peterson.
Text
All right, since I bombarded a poor mutual yesterday...
Privacy is not security and security is not privacy. These terms are not interchangeable, but they are intrinsically linked.
While we're at this, anonymity =/= security either. For example, Tor provides the former, but not necessarily the latter, hence using Https is always essential.
It is impossible to have privacy without security, but you can have security without privacy.
A case in point is administrators being able to view any data they want due to their full-access rights to a system. That being said, there are ethics and policies that usually prevent such behavior.
Some general tips:
Operating System: Switch to Linux. Ubuntu and Linux Mint are widely used for a reason. Fedora too. And don't worry! You can keep your current operating system, apps and data. If you're on a Mac computer, you can easily partition your hard drive or SSD by using Disk Utility. If you're on Windows, you can follow this guide.
You want to go a step further? Go with Whonix or Tails. They're Linux distributions as well, but they're both aiming for security, not beauty so the interface might not be ideal for everyone. Many political activists and journalists use them.
You want anonymity? Then you need to familiarize yourself with Tor. Also, Tor and HTTPS and Tor’s weaknesses. When you're using it, don't log in to sites like Google, Facebook, Twitter etc. and make sure to stay away from Java and Javascript, because those things make you traceable.
Alternatives for dealing with censorship? i2p and Freenet.
Is ^ too much? Welp. All right. Let's see. The first step is to degoogle.
Switch to a user-friendly browser like Firefox (or better yet LibreWolf), Brave or Vivaldi. There are plenty of hardened browsers, but they can be overwhelming for a beginner.
Get an ad blocker like Ublock Origin.
Search Engine? StartPage or Duckduckgo. SearXNG too. Like I said degoogle.
Get a PGP encrypted e-mail. Check Protonmail out.
There's also Tutamail that doesn't cover PGP, but uses hybrid encryption that avoids some of the cons of PGP.
Skiff mail is also a decent option.
Use an e-mail aliasing service such as SimpleLogin or AnonAddy.
Check OpenPGP out. Claws Mail is a good e-mail client for Windows and Linux, Thunderbird for Mac OS.
Gpg4win is free and easy to use for anyone that wants to encrypt/decrypt e-mails.
Instead of Whatsapp, Facebook messenger, Telegram etc. use Signal for your encrypted insant messaging, voice and video calls.
Get a metadata cleaner.
Get a firewall like Opensnitch, Portmaster or Netguard which can block Internet for trackers.
Alternatively, go with a private DNS that blocks these trackers. NextDNS is a good paid service. Rethink a good free option.
Replace as many of your applications as you can with FOSS (free and open source) ones. Alternativeto can help you.
Always have automatic updates on. They are annoying af, I know, but they are necessary.
Keep your distance from outdated software.
Always have two-factor authentication (2FA) enabled.
Do not use your administrator account for casual stuff. If you're on Linux, you probably know you can be sudo, but not root.
On Linux distributions use AppArmor, but stay away from random antivirus scanners. Other distributions default to SELinux, which is less suited to a beginner.
Never repeat your passwords. If you can't remember them all, use a password manager like KeePass.
Encrypt your drive.
Honestly, VPNs have their uses and ProtonVPN, Mullvad and Windscribe are decent, but eh. If you don't trust your ISP, why would you trust the VPN provider that claims they don't log you when you can't verify such a thing?
57 notes
·
View notes
Video
youtube
oneplus pad 3 vs Xiaomi pad 7 | xiaomi pad 7 vs one plus pad 3
OnePlus Pad 3 vs Xiaomi Pad 7 | Which Tablet Should You Buy in 2025? OnePlus Pad 3 vs Xiaomi Pad 7 – the ultimate 2025 tablet face-off! Searching for the best tablet for gaming, productivity, or streaming? We compare these mid-range beasts to help you pick the perfect one. In-depth pros and cons for gaming, multitasking, and media. India pricing (~₹27,999–₹39,999) and global availability. Ideal for searches like Android tablets 2025, best tablets under ₹40,000, or gaming tablets. * OnePlus Pad 3 Specifications Display: 13.2-inch IPS LCD, 3.4K (3400x2264), 144Hz, 900 nits, Dolby Vision Processor: Qualcomm Snapdragon 8 Elite (8-core, up to 4.32GHz, Adreno 830 GPU) RAM/Storage: 12GB/256GB, 16GB/512GB (LPDDR5X, UFS 4.0) Battery: 12,140mAh, 80W fast charging Cameras: 13MP rear (4K video), 8MP front OS: OxygenOS 15 (Android 15) Price: ~₹39,999 (India, 12GB+256GB, estimated via Smartprix) Other: Quad speakers, Dolby Atmos, stylus support (OnePlus Stylo 2, ₹4,999), Mac/iPhone sync Pros: Massive 13.2-inch 3.4K display, perfect for movies and multitasking. Snapdragon 8 Elite crushes AAA games (e.g., Genshin Impact at 120 FPS, AnTuTu: ~2,849,493). Huge 12,140mAh battery (~14–16 hours) with 80W charging (0–100% in ~75 minutes). Clean OxygenOS, minimal bloat, supports Open Canvas for productivity. Unique iPhone/Mac compatibility for cross-device users. Cons: Higher price (~₹39,999) compared to Xiaomi’s budget-friendly option. Bulkier design (13.2-inch) may feel less portable. Accessories (keyboard ~₹7,999, stylus) add to cost. No headphone jack, unlike some competitors. Xiaomi Pad 7 Specifications Display: 11.2-inch IPS LCD, 3.2K (3200x2136), 144Hz, 800 nits, Dolby Vision Processor: Qualcomm Snapdragon 7+ Gen 3 (8-core, up to 2.8GHz, Adreno 732 GPU) RAM/Storage: 8GB/128GB, 12GB/256GB (LPDDR5X, UFS 4.0) Battery: 8,850mAh, 45W fast charging Cameras: 13MP rear, 8MP front (with LED privacy light) OS: HyperOS 2 (Android 15) Price: ~₹27,999 (India, 8GB+128GB, Smartprix) Other: Quad speakers, Dolby Atmos, stylus support (Focus Pen, ₹5,999) Pros: Sharper 3.2K display (345 PPI) with 800 nits, great for outdoor visibility. Snapdragon 7+ Gen 3 handles gaming well (90 FPS in PUBG, Geekbench: 1,900 single-core). Budget-friendly at ~₹27,999, excellent value for money. Fast UFS 4.0 storage speeds up apps and editing. HyperOS 2 offers AI tools (e.g., Mi Canvas for sketching). Cons: Smaller 8,850mAh battery (~10–12 hours) vs. OnePlus’ longer runtime. HyperOS has bloatware, less streamlined than OxygenOS. Slower 45W charging (~100 minutes to full). Comparison Highlights Performance: OnePlus Pad 3’s Snapdragon 8 Elite dominates with flagship-grade gaming and multitasking (OpenCL: 18,461 vs. Xiaomi’s 12,500). Xiaomi’s Snapdragon 7+ Gen 3 is solid for mid-range gaming. Display: Xiaomi’s 11.2-inch is sharper (345 PPI); OnePlus’ 13.2-inch is bigger for media. Battery: OnePlus lasts longer and charges faster; Xiaomi is adequate but lags. Software: OxygenOS is cleaner; HyperOS is feature-rich but cluttered. Who Should Buy Which Tablet? Buy OnePlus Pad 3 If: You’re a gamer or professional needing top-tier performance for AAA games (e.g., CODM, Genshin Impact) or heavy multitasking. You prioritize battery life and fast charging for all-day use (~₹39,999). Ideal for: Power users, content creators, or Apple ecosystem users. Buy Xiaomi Pad 7 If: You’re a budget-conscious gamer or student seeking strong gaming performance (90 FPS) under ₹30,000. one plus pad 3 vs Xiaomi pad 7 | xiaomi pad 7 vs one plus pad 3 which tablet you should buy? one plus pad 3 specifications one plus pad 3 specs one plus pad 3 price in INdia one plus pad 3 price one plus pad 3 oneplus pad 3 oneplus pad 3 unboxing oneplus pad 3 release date oneplus pad 3 review oneplus pad 3 leaks oneplus pad 3 launch date in india oneplus pad 3 pro oneplus pad 3 pubg test oneplus pad 3r oneplus pad 3 vs xiaomi pad 7 oneplus pad 3 upcoming one plus pad 3 launch date in india oneplus pad 3 launch date oneplus pad 3 price oneplus pad 3 price in india #jatintechtalks OnePlue Pad 3 Unboxing | Price in UK | Depth Review | Release Date OnePlus Pad 3 & Pad 3 Pro - Official Look | Price | India Launch & all features in hindi one plus pad 3 one plus pad 3 unboxing one plus pad 3 release date one plus pad 3 review one plus pad 3 leaks one plus pad 3 launch date in india one plus pad 3 pro one plus pad 3 pubg test one plus pad 3r one plus pad 3 vs xiaomi pad 7 one plus pad 3 upcoming one plus pad 3 launch date in india one plus pad 3 launch date Investigations by Kevin MacLeod is licensed under a Creative Commons Attribution 4.0 licence. https://creativecommons.org/licenses/by/4.0/
0 notes
Text

OSX 15 und Windows 11
Tipps (04) Kap. 09-14
Kap. 09 In das Betriebssystem integrierte Apps
OSX und Windows (Auswahl) OSX: Pages, Numbers, Keynote, Mail, Facetime uva. Windows: Paint, WordPad, MS Edge uva.
Kap. 10 Screenshots Formate definieren
Z.B. nicht als PNG sondern als jpg speichern. Wie geht das? Vgl.: https://praxistipps.chip.de/mac-screenshot-format-aendern_1399; Screenshot-Format über das Terminal des Macs ändern. Um das Datei-Format für Screenshots dauerhaft umzustellen, gehen Sie den Weg über die Eingabeaufforderung, das sogenannte "Terminal". Öffnen Sie die Spotlight-Suche ("cmd" + "Leertaste") und tippen Sie "Terminal" ein. Bestätigen Sie mit "Enter.
Geben Sie den Befehl "defaults write com.apple. ScreenCapture type JPG; killAll SystemUIServer" ein und drücken Sie erneut die Enter-Taste.
Standard Format ist PNG für diese Screenshots. Sie können auch andere Formate wählen - zum Beispiel PDF, GIF oder TIFF. Hierfür ersetzen Sie "JPG" im Befehl gegen das entsprechende Format. Aber man muss nach dem Terminalbefehl einen Neustart machen,. Dann wird die Änderung angenommen.
Kap. 11 Bildformate konvertieren
Auf macOS 15 können Sie mehrere PNG-Bilder in JPG konvertieren, indem Sie die Vorschau-App verwenden. Öffnen Sie zunächst den Finder, um die Bilder auszuwählen, die Sie konvertieren möchten. Wählen Sie die Bilder aus und öffnen Sie sie in der Vorschau-App. Klicken Sie auf das Symbol "Miniaturen anzeigen", um eine Seitenleiste mit einer Vorschau der ausgewählten Bilder anzuzeigen. Wählen Sie alle Bilder aus, die Sie bearbeiten möchten, und klicken Sie dann auf "Ausgewählte Bilder exportieren" im Menü "Ablage". Wählen Sie den Speicherort und das neue Bildformat (JPG) für die konvertierten Bilder aus. Die Stapel-Bildkonvertierung funktioniert mit verschiedenen Bildformaten wie JPG, GIF, PNG, BMP, PSD, usw.
Kap. 12 Programme von einem unbekannten Entwickler öffnen
Kap. 13: OSX Telecom Mail konfigurieren Unter diesem Suchbegriffen findet sich im Internet diese Information (zitiert im Aufruf aus meinem Brave Browser, 2.5.25):
"Um eine Telekom E-Mail-Adresse auf einem Mac mit dem Betriebssystem OS X zu konfigurieren, folgen Sie diesen Schritten:
Öffnen Sie die App "Mail" auf Ihrem Mac.
Wählen Sie "Mail" > "Konto hinzufügen" aus.
Wählen Sie "Anderer Mail-Account" aus.
Geben Sie den Namen, die E-Mail-Adresse und das Kennwort für Ihr Konto ein.
Wählen Sie unter "Kontotyp" die Option IMAP aus, da IMAP die neueste Variante des E-Mail-Protokolls darstellt und bevorzugt verwendet werden sollte.
Für die Einrichtung der Servereinstellungen müssen Sie die folgenden Informationen angeben:
IMAP-Server: mail.t-online.de oder imap.magenta.de
SMTP-Server: smtp.t-online.de oder smtp.magenta.de
Port für IMAP: 993
Port für SMTP: 465
Sicherheitsverbindung (SSL/TLS): aktiviert"
Kap. 14 LINKS
App Cleaner: https://freemacsoft.net/appcleaner/
Erlauben des Zugriffs von Bedienungshilfen-Apps auf deinen Mac: https://support.apple.com/de-de/guide/mac-help/mh43185/mac
Image Icon: https://img2icnsapp.com/ https://icon-icons.com/search/icons/mac
Mac Terminal: https://ftp-mac.com/de/mac-terminal-commands.html
Tipps: https://www.maclife.de/ratgeber/macos-15-besten-tipps-tricks-100124364.html
Systemeinstellungen: https://www.maceinsteiger.de/woerterbuch/mac-systemsteuerung-systemeinstellungen/
Tags und Etiketten am Mac: Ordnung ist die halbe Miete: https://www.maclife.de/ratgeber/tags-etiketten-am-mac-ordnung-halbe-miete-100104861.html
Tuxera: https://iboysoft.com/de/ntfs-for-mac/tuxera-ntfs-for-mac.html
Xmenu: https://www.devontechnologies.com/download/apps
xxxxxxxxxx
Dr. Andreas U. Korn, 02.05.2025
+ + +
0 notes
Text
How to Declutter Your Digital Space Without Lifting a Finger (Almost)

Digital clutter is sneaky. One day your phone and laptop are running smoothly, and the next, your desktop looks like a file explosion and your cloud storage is screaming for mercy.
The good news? You don’t need to spend hours cleaning it all up.
If you’ve already peeked at the lazy but genius ways to organize your digital life, this guide takes it a step further. These strategies are so effortless, it’s almost like you're not doing anything at all — just the way we like it.
1. Automate Your Cloud Storage Cleanup
Cloud platforms like Google Drive or Dropbox offer easy-to-use filters and automation tools. You can set them to auto-delete trash, auto-archive old files, or even color-label folders for visual clarity.
Try this lazy trick: Use Google Workspace’s "Storage Management" tool to bulk delete large files, duplicates, and old backups.
2. Use Smart Tools Like “Cleanfox” for Your Inbox
Manual unsubscribing is so last year. Tools like Cleanfox or Leave Me Alone scan your inbox, show you a list of all newsletters and subscriptions, and let you unsubscribe with a swipe or click.
Bonus points: They also show you how much CO₂ you save by decluttering your inbox. Lazy + eco-friendly? Yes please.
3. Schedule Your Phone to Auto-Delete Old Media
Most smartphones let you auto-delete photos, screenshots, or downloaded files after a set period. In iOS, enable Optimize iPhone Storage; on Android, use Files by Google to clean junk files in seconds.
Pair this habit with the mindset from the top 10 lazy but genius ways to organize your digital life, and you’ve got a phone that runs smoother without you lifting a finger.
4. Use “Stack” Apps to Organize Notes and Docs Automatically
Apps like Evernote, Notion, or OneNote allow auto-tagging, sorting, and folder rules.
Lazy Genius Tip: Set up templates or automations so that every new note is filed where it belongs — without you doing it manually.
5. Let Your Browser Clean Itself
Use browser extensions like:
OneTab: Closes all open tabs and saves them in a list
Tab Suspender: Auto-pauses inactive tabs
History AutoDelete: Keeps your browser history from becoming a hoarder's paradise
It’s a solid sidekick to the habits in the top 10 lazy but genius ways to organize your digital life post.
6. Set Recurring Reminders That Actually Work
The key word here is “recurring.” Instead of relying on memory, set monthly 10-minute digital cleanup reminders on your calendar. Automate the repeat, and you’ll never have to remember it again.
Use tools like:
Google Calendar (with reminders and checklists)
TickTick or Todoist (with smart recurring tasks)
Siri or Google Assistant (voice commands FTW)
7. Auto-Sort Downloads Using Folder Rules
Tools like Hazel (Mac) or File Juggler (Windows) can auto-organize your downloads folder based on file type, name, or date.
For example:
Move PDFs to Documents
Send images to Pictures
Trash zip files after 24 hours
This lazy automation turns chaos into calm without constant manual effort.
8. Delete Duplicate Files With a Click
Duplicate files = wasted space. Use tools like:
Gemini 2 (Mac)
CCleaner (Windows)
Duplicate Cleaner Free
These apps scan and clean up your hard drive or cloud storage with minimal interaction — perfect for lazy geniuses like us.
9. Use a Dashboard to See Everything at a Glance
Use Notion or Trello to build a minimalist dashboard of your digital world — to-dos, file links, notes, calendar, and tools all in one spot. Bonus: once it’s built, you just update it here and there.
Pair this with any technique from the top 10 lazy but genius ways to organize your digital life and you’ll become the CEO of calm.
10. Empty the Trash — Automatically
Set your system or cloud service to auto-empty the trash every 30 days. No emotional attachment needed.
Go to your system settings or storage settings (Google Drive, iCloud, etc.) and toggle on the auto-delete function.
Final Thoughts: It’s Not About Working Hard — It’s About Working Smart
Decluttering your digital life doesn't have to be a marathon. With these smart, nearly hands-off hacks, your devices can stay organized while you go do... well, anything else.
Think of this post as a deeper dive into the top 10 lazy but genius ways to organize your digital life — because the lazier the hack, the better the result.
1 note
·
View note
Text
A couch
About 60% ish
Normal non-foaming hand soap
Laundry
Dishes. Fucking hate the dishes
Arm brace
[Skip]
A spray cleaner called Awesome
Crochet
Tv
An iPad
14 cups. Im at iHop atm
Car air filter
I don't take baths, i shower
Just the ones i need. What psycho goes down every single one??
Library
I rewatch a lot of movies. I own over 100 DVDs
Is- did you sneeze? Bless you? What is that
Duct tape
Food
Plies in like 2008/2009 ish (now called Two Chains i think)
None. I'm forced to shop walmart tho
Plastic
Lmaoo. Ha! Hahahahahaaaaaa!
Bingo
Porch
Boardgame night
Friends don't send me those. A lot of babies are uglyyyy tho. Look like their parents
Idk what that is
4 i think
Nope. Wrecked my first car after a month. Almost died
Lots of creamer. Some sugar
Nothing now. I used to collect rocks as a kid
[Skip]
Liquor
No
Yep
I honestly don't remember ever changing a filter
Whichever candy bar I'm currently obsessed with
Depends. Sometimes there's a list, sometimes not
A can of air freshener i bought in college (like 10-12 years ago). It was my favorite scent to buy back then and i keep it cuz smelling it always takes me back to my dorm room
[Skip]
The Enchanted Forest Chronicles. I haven't read any thing recently tho
Idk what that is
[Skip]
Magnets
Overhead lighting. Why don't people build houses or apartments with overhead lighting anymore?? They're cheap and lazy that's why!
A live tree right in the center. Like a courtyard or just in the living room idk idc. I just want a big tree in my house
Only if im in the middle of a crochet project. Gotta bring it with me so i can work on it whenever i get a few moments
Anti
5
I never stopped. Still live with mom, but we're best friends now so everything is good
Ive never been to SS office, but I've never had a bad experience at the DMV. I just went there a couple weeks ago and i thought "why does everyone hate this place?" I actually have the same thought every time i go to the DMV
No
Chicken alfredo. Or roast beef with mac and cheese. Everything is made from scratch
Ramen noodles
Mac and cheese
Plastic grocery bag full of plastic grocery bags
Yeah i think so. Im wearing all my favorite clothes rn so i think im good
No. Don't watch the news for weather, just check my app
I don't really brunch
Idk what that is
It's ok i guess
Honestly can't remember. It's been ages
Cleaning
Asap
Yes. Got a triceratops and Appa from ATLA
Atm unscented but i buy scented sometimes too
[Skip]
Ask meme for people in their 30s
What was the first piece of furniture you bought?
What proportion of your meals do you cook?
Foaming hand soap or normal hand soap?
Favorite chore?
Least favorite chore?
Most precious thing one of your pets has destroyed?
Any groceries you've been getting into lately?
What cleaning product do you swear by?
What's your emotional support craft?
Youtube, cable TV, or streaming?
What's something you saved up for and then regretted buying?
How many cups can you see from where you're sitting?
Which filter are you most likely to go "eh, it's probably fine" when you find out you need to change it?
How often do you take baths?
Do you go down each aisle when you grocery shop, or only the ones you know you need stuff from?
Where do you go when you need to get out of the house but it's raining?
What's a movie you saw recently that you liked?
Pro or anti tchotchkes?
What's your go-to tape?
What's in your freezer right now?
Last concert you attended?
Favorite grocery store?
Paper bags, plastic bags, or reusable bags?
Do you get your government mandated 8 hours every night?
Favorite old person activity?
Would you rather sit on the porch drinking sweet tea or sit by the lake drinking beers?
Do you prefer Boardgame Night, Build-Your-Own-Pizza Night, or Movie Night with your friends?
Be honest, do you like all of the pictures of their babies that your friends send you?
Go-to holiday card format?
How many pairs of scissors do you own?
Do you still own your first car?
How do you take your morning coffee/tea?
What's something you collect?
What's your commute like?
Aisle at the grocery store you never bother walking down?
Do you keep a daily journal or agenda?
Do you still listen to the same music you listened to in high school?
What's the last filter you changed?
What little treat do you always get when you run errands?
Grocery list or no grocery list?
What's the oldest thing you own?
What's an unjustifiably expensive appliance that you really want?
Favorite book you've read recently?
Honest feelings on Settlers of Catan?
What's something you wish you had more time for?
What kind of stuff do you keep on the door of your refrigerator?
Lamps or overhead lighting?
If you could build your home from scratch, what outrageous feature would you want to build into it?
Do you bring a bag with you everywhere you go?
Pro or anti throw pillows?
How many blankets do you keep in your living room?
Did your relationship with your parents get better when you stopped living with them?
What's worse, the DMV or the Social Security Office?
Do you decorate your house for holidays? Which ones?
Favorite high-effort meal that you make?
Favorite low-effort meal that you make?
Do you tend to bring an appetizer, entree, dessert, or drinks to a potluck?
What kind of bag do you use for your bag full of bags?
If you died and your ghost was stuck in the outfit you're wearing right now for the rest of time, would you be happy with it?
Do you have an opinion on your local weather reporter?
Do you have a favorite brunch spot?
Where are you on the minimalism-maximalism kinsey scale?
Opinion on Bath and Body Works?
Last time you visited a farmer's market?
Anything you're procrastinating on right now?
Do you get your taxes in as soon as possible, at the last minute, or late?
Do you keep any stuffed animals on your bed?
Are your garbage bags scented or unscented?
What are you looking forward to next week?
4K notes
·
View notes
Text
How to Remove Background from an Image for Free in Seconds

Are you wondering how to eliminate backgrounds from photos? You could be a business owner trying to enhance your product photographs or a blogger wanting to create stunning pictures for the header of your next blog post There are plenty of tools to assist you in getting the task accomplished.
Read on to learn about seven online tools to assist you in removing backgrounds from images swiftly and quickly.
Tools that can help you get rid of the background of an image
1. iOS 16 background removal
The new iOS 16 comes with iOS 16 removing the background from images is now easier than ever before thanks to the innovative and imaginative Removing Background from Image feature!
The feature is accessible via Photos, Screenshot, Safari, Quick Look, the Files app, and much more.
All you have to do is hold and tap the subject or element and it will be lifted off the background! Then you’ll be asked to copy or share the image. The background is not included.
2. Adobe Express
Adobe Express combines the power of Photoshop with the convenience of Canva. If you’re looking to modify your Instagram image or design a fresh invitation flyer or event poster, Adobe Express offers point-and-click online photo editing that competes with the best of the world’s tools.
Adobe Express is available as an online or mobile app making it easy to use while on the move. It also comes with professional editing tools and design tools that can make your newly created image look the best.
3. Microsoft Office
Did you know that you can eliminate backgrounds from photos within Microsoft Office? Yes, Microsoft offers an automatic background removal option for its users.
To remove background images on a Windows PC, just open the image you wish to edit. In the toolbar, click Image Format> Remove Background. Or Format -> Remove. Background.
For those using Mac open the image, and then click on the Picture Format tab. Then, select Remove Background.
4. Photoshop
For those with more knowledge, Adobe Photoshop is a fantastic tool to remove background images. With Photoshop you’re in greater control over your results and can create incredible content.
Utilize Photoshop with Adobe Photoshop to enhance the Instagram photos shine. Remove the background for a banner on a website to create a cleaner photo of the product. There are endless possibilities once you take the background off an image using Photoshop.
Features:
Photo Background removal Services can be manually or automated.
Custom-designed backgrounds using the Brush tool
Professional edge refining equipment
Professional photo editing tools for professionals
How do you remove the background of the image (easy and cost-free method)
Here’s a brief overview of how to get rid of the background from a photo for free with Adobe Express.
To access Adobe Express, simply launch the application within the browser to upload the picture you’d like to modify. Backgrounds will be automatically taken away.
Click Customize to fine-tune the cutout or apply filters, colors, and effects.
Explore Adobe Express’s preset template options to make your picture stand out more. This is, for instance, if you’re using your image to create posters or flyers or for your Instagram Story.
There’s also a variety of design elements to choose from including bokeh borders illustrations as well as overlays and textures which can elevate your work to a new level. Although most templates are available for free, certain choices may only be offered as premium plans.
Icons and geometric shapes are a fantastic way to bring visual interest to images. With the aid of Adobe Express, they’re easy to include. Just select the Shapes tab and choose a shape you’d like to apply. Drag and drop them in place.
If you want to add text simply click Text, and then select from a variety of exciting pre-sets.
When you’re pleased with the design, you can download the design or share it directly with social media.
Read full article here: https://dailybusinesspost.com/how-to-remove-background-from-an-image-for-free-in-seconds/
0 notes
Text
What’s New in the Public Beta 2 Version of Apple’s iOS 17.6?

Introduction to iOS 17.6 Public Beta 2
Apple published the second public beta of iOS 17.6, continuing its iterative and user-focused improvements. This release adds features, speed improvements, and bug fixes to improve user experience. This beta lets customers test and provide input on iOS’s latest features while Apple iOS prepares for the final release.
Highlights of iOS 17.6 Beta 2
User Interface Revamp
The second public beta of iOS 17.6 improves navigation and aesthetics. UI improvements include:
Improved Home Screen: Interactive widgets and changeable wallpapers personalise the user experience.
Cleaner Notification Centre: Better notification grouping and prioritisation keep users organised and focused.
Smoother Animations: Refined animations make interfaces more fluid and responsive.
Better performance
iOS 17.6 Beta 2 prioritises performance to improve user experience. Improvements in performance include:
Optimisations speed up app launches, making commonly used apps easier to operate.
Even with heavy use, advanced power management capabilities extend battery life.
More stable Bug fixes and stability improvements reduce crashes and improve system reliability.
Advanced Security
With various new data and privacy protection features, iOS 17.6 Beta 2 prioritises security. The main security improvements are:
Stronger Data Encryption
Stronger encryption algorithms protect sensitive data.
Privacy Dashboard
A new privacy dashboard gives customers more control over their data by showing app permissions and data consumption.
Real-Time Threat Detection
Better algorithms protect against malware and other security risks.
New, improved apps
Many native apps get major upgrades in iOS 17.6 Beta 2, improving functionality and user experience. Improvements to the app include:
Redesigned Messages App: Better group conversations, message reactions, and multimedia capabilities.
Upgraded Safari Browser: Better performance, privacy, and web standards support improve browsing.
Health App Updates: Better health tracking and third-party app integration.
Creative Features and Integrations
iOS 17.6 Beta 2 adds new features and integrations to improve the iOS Beta 2 experience. Notable innovations include:
Universal Control
Improved Universal Control compatibility streamlines iOS-Mac interaction, making multitasking easier.
Focus Modes
New Focus Modes help users stay productive by tailoring experiences for work, personal time, and sleep.
Augmented Reality Enhancements
More immersive and interactive AR experiences support a wide range of AR apps and games.
Installing iOS 17.6 Public Beta 2
Eligibility, Registration
Apple Beta Software Programme registration is required to participate in iOS 17.6 Beta. Anyone with an iOS smartphone can register for free. Register by following these steps:
Access the Apple Beta Software Programme webpage.
Enter your Apple ID.
Register your iOS device for beta.
Beta download and installation
Registration required to download and install iOS 17.6 Public Beta 2:
Backup Your Device: Before installing the beta, backup your smartphone with iCloud or iTunes.
Download Beta Profile: Access the Apple Beta Software Programme website on your iOS device and download the beta profile.
Install Profile: Install the downloaded beta profile under Settings > General > Profile.
Update Your Device: After installing the profile, download and update iOS 17.6 Public Beta 2 from Settings > General > Software Update.
User Feedback and Future Changes
Giving Feedback
Apple wants beta testers to share their iOS 17.6 Beta 2 experiences. Feedback is essential for finding bugs, improving features, and releasing a polished product. Give feedback:
Launch Feedback Assistant for iOS.
Provide specific comments on concerns and improvement suggestions.
Expected Finish
Apple will make enhancements based on beta testing feedback. Final iOS 17.6 is expected later this year, offering a polished and enhanced OS to all eligible devices.
Features iOS 17.6 Beta 2
It appears that stability and bug fixes will take precedence over a plethora of new features in Apple’s iOS 17.6 update, which is presently undergoing beta testing. This makes sense given that it’s probably the last significant update before to the September 2024 release of iOS 18. Let’s examine what iOS 17.6 has in store for us:
Apple TV’s Catch Up for Sports Fans app
The Apple TV app’s “Catch Up” feature is the most noteworthy change to iOS 17.6. By letting people watch critical moments and highlights from live games they stayed up late to watch, this appeals to sports fans. Get directly into the action instead of waiting to watch the entire match from the start! Now incorporated into the larger Apple TV app, this capability was first unveiled with the MLS Season Pass.
Enhancements to Performance and Stability:
iOS 17.6 seems to be primarily focused on optimising system speed and resolving any remaining bugs. Ensuring a seamless and effective user experience is crucial. Better energy optimisation, more fluid animations, and faster app launches are all to be expected.
Possibility of Undiscovered Jewels:
Even though there haven’t been many features disclosed other than Catch Up, Apple frequently includes some surprises in their final releases. Look for ways to improve the functionality that is already there or make minor adjustments to the user interface.
A Preview of iOS 18
The real excitement is probably in what Apple has in store for a iOS 18, as iOS 17.6 is probably just a polishing update. iOS could witness notable developments in the following areas:
More Personalisation:
iOS 18 may offer more iPhone customisation possibilities as customisation becomes increasingly popular. This includes better lock screen control, widget customisation, and ringtone and notification sound customisation.
Improved Features for Health & Fitness
Apple has long placed a strong emphasis on health and wellness with its products, and iOS 18 may bring further features that make the most of the iPhone‘s potential. Consider cutting-edge stress management techniques, sleep tracking, or even smart gym equipment integration.
Integration of AR and VR
AR and VR can revolutionise technology despite their youth. Apple may improve ARKit and RealityKit frameworks for developers in iOS 18 to create more immersive experiences.
App Store Updates and Enhancements
The App Store may get a makeover to make it simpler to browse across various categories and find high-quality apps. Additionally, they might see updates to the apps themselves, such enhanced multitasking or more connection with Apple’s ecosystem.
Pay Attention to Security and Privacy
iOS 18 is probably going to carry on Apple’s well-known tradition of prioritising customer privacy. More tools to enable users to regulate their online profile, tighter controls over app permissions, and improvements to data protection features are all possible.
Conclusion
Apple’s second public beta of iOS 17.6 shows its dedication to user experience through creative features, performance enhancements, and better security. Users may shape iOS’s future and get early access to new features by joining the beta programme. Apple is refining iOS 17.6 based on user feedback to create a strong and feature-rich operating system that suits the different needs of its worldwide user base.
Read more on Govindhtech.com
#govindhtech#technologynews#technology#technologytrends#technews#ios17#Beta2#ios17beta2#publicbeta#publicdata2
0 notes
Text

The Advantages of IOS Development
IOS development offers numerous advantages that can significantly benefit developers and businesses alike. With its high-quality user experience, robust security features, and stable ecosystem, iOS provides a solid foundation for creating premium applications. The platform’s strong monetization potential, regular updates, and seamless integration with Apple’s wide range of devices ensure that apps can reach a dedicated and loyal user base effectively.
Moreover, the comprehensive set of development tools and stringent App Store quality control help maintain high standards, resulting in reliable and high-performing applications. Leveraging Apple’s innovative technologies allows developers to stay at the forefront of app development, offering unique and advanced features to users.
Premium User Base: IOS users, known for early adoption and higher spending in app stores, offer a significant advantage for apps targeting a specific, high-value audience.
Focus on User Experience: Apple’s rigorous App Store guidelines uphold high design and user experience standards for iOS apps, resulting in a polished, user-friendly experience for your app users.
Security & Performance: Apple’s focus on security and performance in the iOS ecosystem ensures your app runs smoothly and securely on iPhones and iPads, providing peace of mind.
Integrated Development Environment (IDE): Xcode, Apple’s IDE, offers a streamlined development experience with built-in tools and features specifically designed for iOS development
Swift Programming Language: Swift, the main language for iOS development, is praised for its readability, safety features, and modern design, resulting in cleaner code and quicker development.
Navigation of App Store Guidelines: They are familiar with the App Store process well and can help you create an app that meets Apple’s guidelines, ensuring a smooth approval process.
Hardware Optimization: They leverage their understanding of Apple’s hardware to optimize your app for different iPhone and iPad models, ensuring a seamless experience across devices.
Integration with Apple Service: They use Apple services like Apple Pay, HealthKit, and Maps to enhance your app’s functionality and user experience within the Apple ecosystem.
Long-Term Support and Maintenance: A dedicated developer offers continuous support and maintenance for your iOS app, keeping it current with the latest iOS versions and security updates.
Stable Ecosystem: The closed ecosystem ensures compatibility and stability across devices, leading to fewer fragmentation issues than other platforms.
Monetization Potential: iOS users are generally more willing to pay for apps, leading to higher revenue potential for developers.
Regular Updates: Apple provides regular OS updates, ensuring that apps can take advantage of the latest features and improvements.
Integration with Apple Devices: Seamless integration with other Apple products (Mac, iPad, Apple Watch, etc.) enhances the overall user experience.
Developer Tools: Access to a comprehensive set of development tools and resources, including Xcode, Swift, and extensive documentation.
Innovation Opportunities: Developers can leverage Apple’s cutting-edge technologies, such as ARKit for augmented reality and CoreML for machine learning, to create innovative and advanced apps.
In summary, iOS development presents a compelling opportunity for those looking to create high-quality, secure, and innovative apps that can thrive in a competitive market.
Unlock the full potential of iOS development for your business. Our expert team is ready to help you create high-quality, secure, and innovative iOS apps that stand out in the competitive market. Ready to Elevate Your Business with Premium iOS Apps? Schedule a free consultation to discuss your project needs and discover how we can help you achieve your goals.
#ios app development#ios#ios app developers#ios application development#ios app design#app development#app developers#mobile app development#mobile app developer company
0 notes
Text
How to Clear Trash on Mac in 4 different Ways
Managing storage efficiently is essential for maintaining the performance and organization of your Mac. One of the simplest ways to free up space is by regularly emptying your Trash. The Trash can hold a significant amount of deleted files, and over time, this can accumulate and take up valuable disk space. Regularly clearing the Trash not only helps reclaim storage but also keeps your system running smoothly, preventing potential slowdowns caused by an overloaded hard drive. In this guide, we will explore four different methods to clear Trash on Mac, ensuring that you can choose the one that best fits your workflow and preferences.
Whether you prefer a straightforward approach using Finder, a quick solution with Terminal commands, a scheduled cleanup with Automator, or a secure deletion process, we've got you covered. Each method is outlined with step-by-step instructions to help you efficiently manage your Mac's storage. By the end of this guide, you'll be equipped with the knowledge to clear Trash on Mac and keep it clutter-free and operating at its best. Let's dive into these four techniques and discover how easy it is to clear Trash on Mac and keep your storage optimized.
What is Trash on Mac?
On a Mac, the "Trash" is a special folder where files and folders are temporarily stored after you delete them. It's similar to the Recycle Bin in Windows. When you move an item to the Trash, it's not immediately and permanently deleted from your storage drive; instead, it remains in the Trash folder, allowing you to recover it later if you change your mind. Here's an overview of its functions and why you need to empty it:
Functions of Trash
Temporary Storage: The Trash provides a holding area for deleted files and folders, giving you a safety net to recover items if you delete them accidentally.
Recovery Option: You can easily restore items from the Trash to their original location or any other location on your Mac.
Organization: The Trash helps in managing files by letting you group all deletions in one place before deciding to permanently remove them.
Why You Need to Empty Trash
Free Up Disk Space: Files in the Trash still occupy disk space. Emptying the Trash removes these files from your storage drive, freeing up space for other data and applications.
System Performance: Keeping the Trash empty can help maintain optimal system performance, especially if the Trash contains large files or a large number of files.
Privacy and Security: Permanently deleting files from the Trash ensures that sensitive or personal data cannot be easily recovered, protecting your privacy and security.
Housekeeping: Regularly emptying the Trash helps keep your system organized and prevents it from getting cluttered with unnecessary files.
How to Empty Trash on a Mac That Won’t Delete: 4 Ways
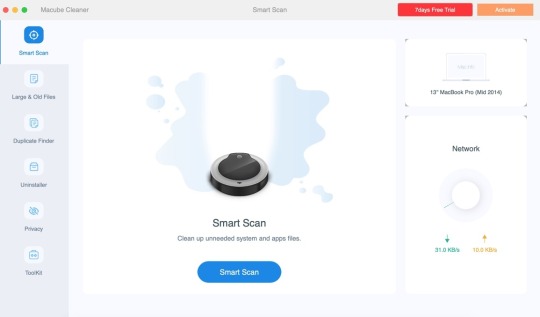
Way 1. Macube Cleaner
Macube Cleaner is a powerful and efficient utility designed to help Mac users effortlessly free up gigabytes of storage space. It provides a comprehensive solution to clear system junk, caches, logs, and, importantly, securely empty the Trash on Mac. With a user-friendly interface and advanced features, Macube ensures that your Mac remains in optimal condition, improving performance and reclaiming valuable disk space. The software offers a 7-day free trial with full functionality and is compatible with macOS 10.11 or later.
Key Features:
Clean System Junk:
Quickly clears system caches, user logs, and outdated system logs to free up space and enhance performance. By regularly removing these files, your Mac can run more smoothly and efficiently.
Smart Scan:
Utilizes an industry-leading algorithm for fast, powerful, and secure scanning. The Smart Scan feature locates junk files across the entire Mac, providing an efficient way to clean up and optimize your storage.
App Cache Removal:
Deletes unnecessary files generated by apps, freeing up additional storage space. This feature ensures that old and unused app data does not clog up your system.
Other Storage Cleanup:
Sorts out and cleans mysterious “Other Storage” files, including caches, archives, and system files, to reclaim more disk space. This helps demystify the "Other" category in your storage and keeps it under control.
Securely Empty Trash on Mac:
Ensures that deleted files are permanently removed from the Trash, freeing up space and preventing data recovery. This feature is essential for maintaining privacy and maximizing available storage on your Mac.
Large and Old Files Finder:
Identifies large and old files that take up significant space, helping users decide what to keep and what to remove. This helps you manage your storage more effectively and remove unnecessary files.
Application Uninstaller:
Completely removes apps and their associated files to ensure no residual data is left behind. This thorough uninstallation process helps keep your system clean and organized.
Duplicate Finder:
Detects and deletes duplicate files and images, saving space and organizing your storage. This feature is particularly useful for cleaning up redundant data and maintaining an orderly file system.
Privacy Protection:
Clears cookies and browsing histories to protect user privacy. This feature is crucial for maintaining security and preventing tracking by websites.
How to Use:
Step 1: Download and Open Macube Cleaner
Begin by downloading and opening Macube Cleaner, a specialized application for cleaning junk files on Mac. This software aids in pinpointing and eliminating redundant files from your system.
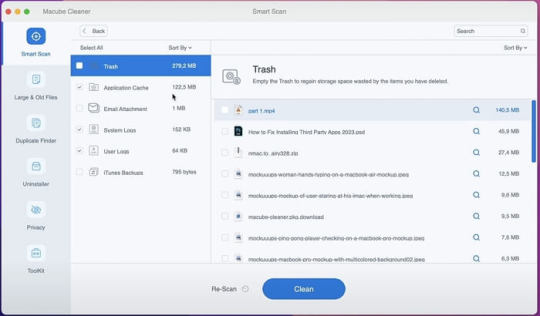
Step 2: Execute a Smart Scan
With Macube Cleaner active, select the "Smart Scan" option. This feature will thoroughly scan your Mac, identifying all unnecessary data such as cache and temporary files. The scan will highlight files that are safe to remove, helping to optimize your system's performance.
Step 3: Clear the Trash
Once the scan is finished, go to the Trash section in Macube Cleaner. Review the items listed and click "Clean" to completely empty the Trash. If you prefer to delete only certain files, select those specific items before proceeding with the cleaning.
Pros and Cons
Pros
Enhanced Security: Ensures deleted files are completely overwritten and unrecoverable.
User-Friendly Interface: Intuitive design makes it easy to navigate and use.
Comprehensive Toolset: Offers additional features for overall system optimization and maintenance.
Configurable Settings: Allows customization of shredding passes for varying levels of security.
Efficiency: Quickly and effectively removes files, improving system performance.
Cons
Cost: Macube Cleaner is a paid utility, which may be a consideration for some users.
Way 2. Using Terminal
Clearing the Trash on a Mac using Terminal is a quick and effective method to delete unwanted files that might not empty properly through the Finder. This approach is particularly useful for troubleshooting issues related to the Trash.
How to Use:
Step 1: Access Terminal
Start by opening the Terminal application. You can find it in the Utilities folder within Applications, or use Spotlight (Cmd + Space) to search for "Terminal".
Step 2: Execute Commands
Navigate to the Trash directory by typing cd ~/.Trash. To delete all items in the Trash, use rm -rf *. This command removes all files and folders within the Trash directory.
Step 3: Confirmation and Administrative Privileges
Ensure the process completes without errors. If issues arise, you can use sudo rm -rf ~/.Trash/* and enter your administrator password when prompted.
Pros and Cons
Pros:
Efficiency: Clears Trash instantly, bypassing graphical processes.
Effectiveness: Can delete stubborn files that Finder struggles to remove.
Cons:
Data Loss Risk: Files deleted via Terminal cannot be recovered from the Trash.
Caution Required: Misuse of commands can lead to unintentional deletion of important files.
Way 3. Using Finder Preferences:
Keeping your Mac tidy and optimizing disk space is crucial for smooth performance. One effective way to manage your Trash is through Finder Preferences, which offers an automated solution for emptying the Trash after 30 days. This ensures your Trash stays clear without needing manual intervention.
How to use
Step 1: Access Finder Preferences
Open Finder either from your Dock or by clicking on your desktop.
Navigate to the top menu bar, click on "Finder," and select "Preferences" from the dropdown.
Step 2: Activate Automatic Trash Removal
Within the Finder Preferences window, switch to the "Advanced" tab.
Check the box next to "Remove items from the Trash after 30 days."
Pros and Cons
Pros
Automated Maintenance: Keeps your Trash clear without manual effort.
Space Optimization: Efficiently manages disk space by regularly deleting old files.
Ease of Use: Simple setup with no ongoing maintenance required.
Cons
Delayed Deletion: Files stay in the Trash for 30 days before removal.
Limited Control: Less control over individual item deletion timing since it's automated.
Way 4. Safe Mode:
Clearing unwanted files from a Mac can sometimes prove challenging, especially when certain files refuse to be deleted. One effective method to tackle this issue is using Safe Mode, which temporarily disables certain software and processes that could hinder file deletion.
How to Use
Step 1: Restart in Safe Mode
Shut Down Your Mac: Click on the Apple menu and select "Shut Down".
Start in Safe Mode: Press the power button, then immediately hold down the Shift key until you see the login window with "Safe Boot" displayed in the top-right corner.
Step 2: Empty the Trash
Open the Trash: Click on the Trash icon located in the Dock.
Empty the Trash: Right-click on the Trash window and choose "Empty Trash". Confirm your action when prompted.
Step 3: Restart Normally
Restart Your Mac: Click on the Apple menu and select "Restart" to exit Safe Mode and return your Mac to its regular operation mode.
Pros and Cons
Pros:
Effective Deletion: Safe Mode can delete files that are otherwise stubborn due to active system processes or applications.
Enhanced Safety: By disabling unnecessary processes, Safe Mode reduces the chance of software conflicts during file deletion.
Cons:
Performance Impact: Safe Mode may run slower because it disables certain drivers and limits functionality temporarily.
Accessibility Issues: Some users might find the process of entering Safe Mode inconvenient, especially if it needs to be done frequently.
Conclusion:
In conclusion, effectively managing your Mac's storage by regularly clearing the Trash is crucial for maintaining optimal performance and organization. This guide has explored four distinct methods using Finder, Terminal commands, Automator, and Safe Mode—that cater to different user preferences and scenarios. Each method offers a straightforward approach to reclaiming disk space and ensuring that deleted files are either securely removed or managed automatically.
By incorporating these techniques into your routine, you can streamline maintenance tasks and keep your Mac running smoothly, free from the clutter that can impede performance. Whether you opt for the simplicity of Finder's preferences or the versatility of Terminal commands, taking proactive steps to clear Trash ensures your system remains efficient and responsive for your everyday tasks.
0 notes
Text
Adulting 101: Essential Life Skills Every College Student Needs
Congrats on making it to college! It's an exciting time for learning, growing, and…adulting. Yes, adulting. Don't worry, you're not alone in this. Mastering these practical skills will set you up for success, both in your dorm room and beyond.
Budgeting 101: Ramen Noodles Don't Have to Be Your Staple
Let's be real, college life can be tight on cash. But fear not, budgeting doesn't have to be a complex spreadsheet nightmare. Here's the lowdown:
Track your expenses: Keep a record of everything you spend, from groceries to that spontaneous late-night pizza (we've all been there). There are budgeting apps or even a simple notebook that works wonders.
Prioritize needs over wants: Rent, food, and textbooks come first. That new video game can wait, especially if it throws your budget off track.
Set realistic spending limits: Be honest with yourself about how much you can realistically afford for fun stuff. Sticking to these limits will save you the stress of ramen-only weeks.
Conquering the Kitchen: Beyond Instant Mac and Cheese
Eating healthy and saving money can go hand-in-hand. Here's how to become a kitchen whiz (without setting off the fire alarm):
Meal prep is your friend: Plan your meals for the week and cook in batches. Leftovers become delicious lunches, and you'll resist the urge to grab unhealthy takeout when you have pre-made options.
Start simple: Master basic recipes like pasta dishes, stir-fries, and baked goods. These can be easily adapted to your budget and dietary needs.
Embrace leftovers: Get creative with your leftovers! Leftover chicken can become a salad topping, and roasted veggies can be transformed into a frittata.
Laundry: The Unsung Hero of Adulting
Let's face it, laundry isn't glamorous. But mastering this skill keeps you looking (and smelling) fresh. Here's the laundry lowdown:
Learn to identify fabric care symbols: This will prevent your favorite shirt from shrinking in the dryer.
Separate lights from darks: This simple step keeps your clothes looking their best.
Don't overload the washer or dryer: This makes your clothes cleaner and prevents them from wearing out prematurely.
Bonus Skills: Adulting All-Stars
These additional skills will have you feeling like a real grown-up:
Time management: Learn to prioritize tasks and create a schedule. This will help you stay on top of your studies, social life, and that ever-growing pile of laundry.
Basic car maintenance: Knowing how to change a flat tire or check your oil can save you time and money.
Simple home repairs: Learn how to fix a leaky faucet or tighten a loose screw. You'll be surprised at what you can accomplish with a screwdriver and a YouTube tutorial.
Remember, adulting is a journey, not a destination. There will be mishaps (burnt dinners, anyone?), but that's okay. Embrace the learning process, and you'll be a pro in no time! Now go forth, conquer those adulting challenges, and make the most of your college experience!
0 notes
Text
Integrating Your Mac with iOS Devices for a Seamless Workflow
MacOS and iOS devices work seamlessly when integrated into one system. Under this ecosystem, they provide users with unparalleled connectivity. iCloud is the platform that brings them into one environment. From there, users can work on documents and transfer files. They can share contacts and sync photos. This ecosystem seamlessly accommodates iPad and Apple Watch too. Discover the different ways to integrate the Mac ecosystem with iOS devices. Through integration, users experience a seamless workflow.
Use continuity features to boost productivity across your Apple devices
Apple’s Continuity feature lets you use your Mac ecosystem combined with other Apple devices. Activating this feature lets you work smarter and connect from one device to the next. You need to sign in with your Apple ID across all to use this feature. Keep your WI-FI and Bluetooth on to keep them interconnected. Here are the different apps that you can use with the Continuity feature.
Open Continuity Camera. Continuity Camera lets you connect your iPhone to a Mac and use it as a webcam. Whenever you take a photo with your iPhone, it appears on the Mac immediately.
Apple integration gives you a unique experience in your workflows. Your devices however may generate more junk files since they are interconnected. More often, many of the junks remain hidden but they affect your devices. Your Apple device maintenance routine should include cleaning them. If your Mac has accumulated junk, use the CleanMyMac app to discover and remove it. The Mac cleaner scans deep into the system to identify any unwanted files. Users can use it within the Mac ecosystem to remove old and broken files across your devices. Cleaning your devices ensures you continue experiencing seamless connectivity.
Make and answer telephone calls. With Apple Integration, you do not need to leave your Mac to make or receive calls. Whenever someone calls you, a notification will be on the Mac screen. Open the notification and answer the call. If you need to call someone, access contacts on Mac and call.
User AirDrop seamlessly. AirDrop lets you share data in an instant. You can use it to share contacts, images, or videos. It does not matter where the photos or videos are located. Just highlight them, drag and drop them into the device you want right from Mac.
Use handoffs. You can start working on a document from one device and later take a break. When you return, you do not continue working on it from the same one. You can access it from another device and complete it.
Use Mac universal control multitask between macOS and iOS devices
When you need to multitask, the Mac universal control lets you do it with ease. This feature works with macOS Monterey and later versions. It lets you use one keyboard to connect between a Mac and an iPhone or iPod. You may connect an iPhone and another Mac and control them from one Mac. The Mac’s trackpad or mouse and keyboard let you do this.
Enjoy seamless entertainment across all devices
Some of the benefits of Apple products are their resilience and power. They are good for entertainment be it music, shows, or TV. With Apple integration, you can sync all the devices for smooth entertainment. To do this with ease, follow these steps.
● Use your Apple ID to log in to each device.
● Sync your Apple Music Library with all the devices.
● Sync them with other third-party entertainment platforms.
● Begin to stream and enjoy entertainment across the entire ecosystem
Share internet and browser tabs
Apple integration with the Mac ecosystem lets you do more. On the System Preferences, you can activate internet sharing. Tap the iPhone’s Hotspot icon to begin sharing. You can also access your Safari browser tabs across the devices. Open iCloud and allow sync for Safari. It does not matter which device you are using, you can access the same Safari tabs on each.
Improve the security of your files with Apple ID
Apple ID allows tight security for your files. The feature demands two-factor authentication to allow access. You may use your biometrics such as Touch ID or Face ID. With this feature, your files remain secure. In case you lose your Mac, you can use Find My to locate it. The computer’s built-in features let you erase your documents remotely. This ensures no unauthorized person access them.
Conclusion
Apple integration across the Mac ecosystem lets you boost your productivity. The process brings your macOS and iOS devices into one environment. This lets you access all files across the devices. You can sync them to access and share music, contacts, and files. Using your Apple ID enhances the security of your data and devices. Syncing them lets you share internet connection and safari tabs within the ecosystem.
Pin or save this post for later!
Share in the comments below: Questions go here
#MacOS#iOS#iCloud#iPad#Apple Watch#Mac ecosystem#iOS devices#Wi-Fi#Bluetooth#AirDrop#universal control#apple integration#max ecosystem#hotspot#Safari#boost productivity
0 notes
Video
youtube
one plus pad 3 vs Xiaomi pad 7 | xiaomi pad 7 vs one plus pad 3
OnePlus Pad 3 vs Xiaomi Pad 7 | Which Tablet Should You Buy in 2025?
OnePlus Pad 3 vs Xiaomi Pad 7 – the ultimate 2025 tablet face-off!
Searching for the best tablet for gaming, productivity, or streaming? We compare these mid-range beasts to help you pick the perfect one. From specs to pros and cons, we’ve got the full breakdown!
Watch to find out which tablet suits you best—gamers, students, or professionals.
Why Watch?
Complete specs showdown: OnePlus Pad 3 (Snapdragon 8 Elite) vs Xiaomi Pad 7 (Snapdragon 7+ Gen 3).
In-depth pros and cons for gaming, multitasking, and media.
India pricing (~₹27,999–₹39,999) and global availability.
Ideal for searches like Android tablets 2025, best tablets under ₹40,000, or gaming tablets.
OnePlus Pad 3 Specifications
Display: 13.2-inch IPS LCD, 3.4K (3400x2264), 144Hz, 900 nits, Dolby Vision
Processor: Qualcomm Snapdragon 8 Elite (8-core, up to 4.32GHz, Adreno 830 GPU)
RAM/Storage: 12GB/256GB, 16GB/512GB (LPDDR5X, UFS 4.0)
Battery: 12,140mAh, 80W fast charging
Cameras: 13MP rear (4K video), 8MP front
OS: OxygenOS 15 (Android 15)
Price: ~₹39,999 (India, 12GB+256GB, estimated via Smartprix)
Other: Quad speakers, Dolby Atmos, stylus support (OnePlus Stylo 2, ₹4,999), Mac/iPhone sync
Pros:
Massive 13.2-inch 3.4K display, perfect for movies and multitasking.
Snapdragon 8 Elite crushes AAA games (e.g., Genshin Impact at 120 FPS, AnTuTu: ~2,849,493).
Huge 12,140mAh battery (~14–16 hours) with 80W charging (0–100% in ~75 minutes).
Clean OxygenOS, minimal bloat, supports Open Canvas for productivity.
Unique iPhone/Mac compatibility for cross-device users.
Cons:
Higher price (~₹39,999) compared to Xiaomi’s budget-friendly option.
Bulkier design (13.2-inch) may feel less portable.
Accessories (keyboard ~₹7,999, stylus) add to cost.
No headphone jack, unlike some competitors.
Xiaomi Pad 7 Specifications
Display: 11.2-inch IPS LCD, 3.2K (3200x2136), 144Hz, 800 nits, Dolby Vision
Processor: Qualcomm Snapdragon 7+ Gen 3 (8-core, up to 2.8GHz, Adreno 732 GPU)
RAM/Storage: 8GB/128GB, 12GB/256GB (LPDDR5X, UFS 4.0)
Battery: 8,850mAh, 45W fast charging
Cameras: 13MP rear, 8MP front (with LED privacy light)
OS: HyperOS 2 (Android 15)
Price: ~₹27,999 (India, 8GB+128GB, Smartprix)
Other: Quad speakers, Dolby Atmos, stylus support (Focus Pen, ₹5,999)
Pros:
Sharper 3.2K display (345 PPI) with 800 nits, great for outdoor visibility.
Snapdragon 7+ Gen 3 handles gaming well (90 FPS in PUBG, Geekbench: 1,900 single-core).
Budget-friendly at ~₹27,999, excellent value for money.
Fast UFS 4.0 storage speeds up apps and editing.
HyperOS 2 offers AI tools (e.g., Mi Canvas for sketching).
Cons:
Smaller 8,850mAh battery (~10–12 hours) vs. OnePlus’ longer runtime.
HyperOS has bloatware, less streamlined than OxygenOS.
Slower 45W charging (~100 minutes to full).
Reflective screen (nano-texture variant costs extra).
Comparison Highlights
Performance: OnePlus Pad 3’s Snapdragon 8 Elite dominates with flagship-grade gaming and multitasking (OpenCL: 18,461 vs. Xiaomi’s 12,500). Xiaomi’s Snapdragon 7+ Gen 3 is solid for mid-range gaming.
Display: Xiaomi’s 11.2-inch is sharper (345 PPI); OnePlus’ 13.2-inch is bigger for media.
Battery: OnePlus lasts longer and charges faster; Xiaomi is adequate but lags.
Software: OxygenOS is cleaner; HyperOS is feature-rich but cluttered.
Price: Xiaomi saves ~₹12,000, appealing to budget buyers.
Who Should Buy Which Tablet?
Buy OnePlus Pad 3 If:
Buy Xiaomi Pad 7 If:
You’re a gamer or professional needing top-tier performance for AAA games (e.g., CODM, Genshin Impact) or heavy multitasking.
You want a large display for movies, productivity, or cross-device workflows (e.g., Mac/iPhone sync).
You prioritize battery life and fast charging for all-day use (~₹39,999).
Ideal for: Power users, content creators, or Apple ecosystem users.
You’re a budget-conscious gamer or student seeking strong gaming performance (90 FPS) under ₹30,000.
You need a sharp, portable display for reading, sketching, or outdoor use.
You value AI features (e.g., Mi Canvas) and can tweak HyperOS.
Ideal for: Casual gamers, creatives, or cost-sensitive buyers.
Our Recommendation: OnePlus Pad 3 is the best choice for power users and gamers due to its Snapdragon 8 Elite, larger display, and longer battery life, despite the higher price (~₹39,999). Xiaomi Pad 7 wins for budget buyers and casual users at ~₹27,999, offering great value and a sharper screen.
0 notes
Text
How to Remove Ads from Facebook

Facebook, with its vast user base and engaging content, has become an integral part of our daily lives. However, the omnipresence of ads on the platform can be a source of annoyance for many users. If you're tired of the constant barrage of advertisements disrupting your scrolling experience, fear not – there are ways to regain control. In this article, we'll explore five effective methods to remove ads from Facebook and enjoy a cleaner, distraction-free browsing experience.
Part 1: Why Remove Facebook Ads?
1.1 Distraction-Free Browsing Facebook's ad algorithms are designed to display content based on user behavior, interests, and demographics. While this personalization aims to make ads more relevant, it can often result in a barrage of sponsored content, causing distractions and disrupting the overall browsing experience. Removing ads allows users to focus on the content that matters most to them – updates from friends and family. 1.2 Privacy Concerns Ads on Facebook are often targeted based on user data collected by the platform. Some users may find this level of personalization unsettling, raising concerns about their online privacy. By removing ads, individuals can take a step towards minimizing the data points that contribute to targeted advertising. 1.3 Improved Page Loading Times Ads, especially those with multimedia content, can significantly slow down page loading times. For users on slower internet connections or less powerful devices, this can be a frustrating experience. Removing ads can lead to faster loading times, creating a smoother and more efficient browsing experience. 1.4 Aesthetic Preferences Every user has a unique preference for how they want their Facebook feed to look. Some find the ads seamlessly integrated into their feed, while others find them visually disruptive. Removing ads allows users to curate their feed according to their aesthetic preferences, creating a more enjoyable and personalized social media space.
Part 2: Five Effective Methods To Remove Ads From Facebook
2.1: Ad Blocker Extensions: Taking Control of Your Browser The most straightforward method to eliminate ads on Facebook is by using ad blocker extensions for your web browser. Popular browsers like Chrome, Firefox, and Safari support a variety of ad-blocking extensions that can significantly enhance your online experience. Here's how you can do it: - Chrome: - Open the Chrome Web Store and search for an ad blocker extension, such as "AdBlock" or "uBlock Origin." - Click on the extension of your choice and select "Add to Chrome." - Confirm the installation, and the extension will be added to your browser. - Firefox: - Navigate to the Firefox Add-ons website and search for an ad blocker like "uBlock Origin" or "AdBlock Plus." - Click on the extension and select "Add to Firefox." - After installation, restart your browser to activate the ad blocker. - Safari: - Open the Mac App Store and search for an ad blocker extension like "AdGuard" or "uBlock Origin." - Click on the extension, and then click "Get" to install it. - Once installed, open Safari, go to Preferences, select Extensions, and enable the ad blocker. By using ad blocker extensions, you can customize your browsing experience and filter out unwanted ads on Facebook and other websites. 2.2: Facebook Ad Preferences: Tailoring Ads to Your Liking Facebook allows users to control the types of ads they see through the Ad Preferences settings. While this method won't remove all ads, it can help tailor them to better match your interests. Here's how to access and customize your ad preferences: - Desktop: - Click on the downward arrow in the top-right corner of Facebook and select "Settings & Privacy," then choose "Settings." - In the left sidebar, click on "Ads." - Explore and adjust your ad settings, including Ad Preferences, Ad Settings, and Advertisers and Businesses. - Mobile: - Open the Facebook app and tap the three horizontal lines in the bottom-right corner. - Scroll down and select "Settings & Privacy," then choose "Settings." - Tap on "Ads" and adjust your preferences under Ad Preferences, Ad Settings, and Advertisers and Businesses. By customizing your ad preferences, you can at least make the ads you encounter on Facebook more relevant and interesting. 2.3: Facebook AdBlock: Targeting Ads Within Facebook If you prefer a more specific approach to removing ads within the Facebook platform itself, using browser extensions like "Facebook AdBlock" can be a game-changer. This extension is designed to target ads specifically on Facebook, giving you control over the appearance of ads on your feed. Here's how you can use Facebook AdBlock: - Install Facebook AdBlock: - Visit the Chrome Web Store and search for "Facebook AdBlock" or a similar extension. - Add the extension to your Chrome browser. - Enable and Customize: - Once installed, click on the extension icon in your browser toolbar. - Customize the settings to suit your preferences. You can choose to hide specific elements like sponsored posts, suggested friends, or trending topics. Using Facebook AdBlock allows you to fine-tune your Facebook experience by removing the specific elements that contribute to the clutter on your feed. 2.4: Third-Party Apps: Streamlining Your Facebook Experience Several third-party applications are designed to enhance your social media experience by providing additional features, including ad removal. One such application is Social Fixer, a browser extension compatible with Chrome, Firefox, Safari, and other browsers. Here's how to use Social Fixer to remove ads from Facebook: - Install Social Fixer: - Visit the Social Fixer website (socialfixer.com) and download the extension for your preferred browser. - Follow the installation instructions provided on the website. - Customize Your Experience: - After installation, open Facebook in your browser, and you'll see a gear icon labeled "Social Fixer" in the top-right corner. - Click on the gear icon to access the settings menu and customize your Facebook experience. You can use Social Fixer to filter out ads, hide sponsored posts, and make various other adjustments to streamline your Facebook feed. 2.5: Browser Settings and Extensions: Fine-Tuning Your Experience Beyond dedicated ad blockers, browsers themselves offer settings and extensions that can contribute to a cleaner, ad-free Facebook experience. - Chrome: - In Chrome, open the Settings menu by clicking on the three vertical dots in the top-right corner. - Navigate to "Privacy and security" and click on "Site settings." - Under the "Content" section, click on "Pop-ups and redirects" and ensure it is blocked. This can help prevent certain types of ads from appearing. - Firefox: - Open the Firefox menu and select "Options." - Go to the "Privacy & Security" tab and scroll down to the "Permissions" section. - Check the box next to "Block pop-up windows" to prevent unwanted pop-up ads. - Safari: - Open Safari and go to Preferences. - Select the "Websites" tab and click on "Pop-up Windows" in the left sidebar. - Adjust the settings to either block all pop-up windows or allow them on a per-website basis. Additionally, browser extensions like Privacy Badger and Disconnect can enhance your privacy and security while reducing the number of ads you encounter online, including on Facebook.
Part 3: Frequently Asked Questions
3.1 Is it Against Facebook's Terms of Service? As of the last available information (knowledge cutoff in January 2022), using ad blockers or browser extensions to remove ads from Facebook is not explicitly against the platform's terms of service. However, it's essential to stay updated with Facebook's policies, as they can change over time. Users should use these tools responsibly and in compliance with the platform's guidelines. 3.2 Will Removing Ads Affect the Content I See? Removing ads will not impact the organic content generated by friends and pages you follow. The primary purpose of ad blockers is to filter out sponsored content and display only the user-generated content on your feed. You will still see updates, photos, and posts from your connections as usual. 3.3 Can I Customize the Types of Ads I See Without Removing Them? Yes, Facebook provides users with the option to customize their ad preferences. By accessing the Ad Preferences settings in your account, you can adjust the type of ads you see based on your interests, demographics, and online behavior. While this won't remove all ads, it can help tailor them to be more relevant and aligned with your preferences. 3.4 Will Removing Ads Affect the Revenue of Content Creators? Content creators, including bloggers, influencers, and businesses, rely on advertising revenue to sustain their online presence. While using ad blockers removes the sponsored content from your view, it doesn't directly impact the revenue generated by content creators. Users who wish to support their favorite creators can do so by engaging with their content and, when applicable, disabling ad blockers on specific websites. 3.5 Can I Remove Ads on the Facebook Mobile App? Yes, ad blockers and browser extensions are available for mobile browsers, allowing users to remove or minimize ads when accessing Facebook through their smartphones or tablets. However, the process may vary depending on the mobile browser and operating system.
Part 4: Responsible Ad Blocking
While the methods mentioned above can significantly reduce or eliminate ads on Facebook, users should approach ad blocking responsibly. Here are some considerations: 4.1 Respect Platform Guidelines Users should familiarize themselves with the terms of service and community guidelines of the social media platform. While as of the last update, using ad blockers on Facebook is generally accepted, users should stay informed about any changes in policies. 4.2 Support Content Creators Content creators, including bloggers, vloggers, and businesses, often rely on advertising revenue to sustain their online presence. Users who appreciate and want to support the content they consume should consider alternative ways of supporting their favorite creators, such as engaging with their content or disabling ad blockers on specific websites. 4.3 Stay Informed About Updates Technology and platform policies evolve over time. Users should stay informed about updates to browser extensions, ad blockers, and platform policies to ensure they are using the most effective and up-to-date tools.
Conclusion: How to Remove Ads from Facebook
In conclusion, reclaiming your Facebook feed from unwanted advertisements is a matter of choice and customization. By employing a combination of ad blocker extensions, adjusting Facebook ad preferences, using platform-specific ad blockers like Facebook AdBlock, exploring third-party applications like Social Fixer, and fine-tuning browser settings, you can curate an ad-free or at least ad-minimized Facebook experience. It's important to note that while these methods can significantly reduce the visibility of ads, they may not eliminate all forms of advertising on the platform. Furthermore, it's essential to respect the terms of service of the platform and to use these tools responsibly. Experiment with these methods to find the combination that works best for you, providing a seamless and distraction-free Facebook experience tailored to your preferences. Remember, technology is here to serve you, and with the right tools, you can regain control over your online environment. Read the full article
0 notes
Text
9 Quick Ways to Stop Your Macbook Overheating

Does your MacBook sound like an airplane taking off as soon as you boot it up? Does it feel like you could fry an egg on it? Do you sometimes notice your MacBook starts to run slow and will often take a long time to respond? If this sounds familiar, you should fix this problem as soon as possible! But how?
Now let’s have a look over some of the simplest methods to fix the battery overheating issue of your MacBook. Take a deep dive in!
01 Restart Your Mac
The simple technique of restarting your Mac may miraculously stop it from overheating. If your Mac has been running for too long, it is possible that it accumulates too many background activities. Restarting your Mac at this point can terminate all those activities and processes that cause overheating. Restarting is like refreshment for electronic devices, and your Mac is not excluded.
02 Check the Vents of Your Mac
Check the vents of your Mac and make sure that they are free from dusts. When dusts accumulate around the vents of your Mac, they can block the vents from allowing the circulation of air. In this case, you should take your Mac to an authorized engineer to professionally clean the vents.
03 Make Sure Your Room Is Well Ventilated
Sometimes, we can liken our electronic devices to our bodies. These gadgets and electronics give you their best at the right temperature. Therefore, wherever you decide to use your Mac, be it your bedroom, sitting room or office, make sure that it is well ventilated. You can do this by tuning the air conditioner to the right temperature, or opening the windows to allow free and fresh air in. 10 to 30 degree Celsius is okay for your Mac to run smoothly without overheating.
04 Use the Official Mac Adapter
If you damaged your in-box adapter recently, and you bought a new one from an unauthorized store, chances are that the adapter will not be compatible with your Mac. If you use an incompatible adapter with your system, apart from damaging your battery, it can also cause your Mac to overheat. It is always best to replace any part of your Mac, including the adapter from an official and authorized Apple store. They are professionals that will give you an original adapter that will work perfectly with your Mac.
05 Update Your Mac
We tend to overlook the impact of system updates on our Mac; but the truth is, each new system update comes with security patches and bug fixes that will improve the general performance of your system. When you fail to update your system, everything becomes old and stale, with junks residing in unwanted places on your system. All these, put together, cause your system to lag and overheat in the long run. To avoid this, simply go to your system’s settings and make sure that all the drives and software components are up to date.
06 Clear Your CPU
You may have too many apps that run in the background, or run at startup, eating up your CPU resources. To remedy this, try to abort and terminate the activities, especially the ones that are not important. Doing this will reduce the tasks on your CPU that are causing your Mac to overheat. You can also select the apps that will run at startup.
07 Clear Junks and Remove Malwares
Over time, when we use our systems, they accumulate junks that can have a negative impact on the general performance of our macs. Also, some websites we visit install malicious apps on our systems without our consent. With one tap, you can remove all these unwanted junks and malicious apps from your Mac with Cleaner apps. The app allows you to selectively and safely delete junk files to get your Mac performing at its peak without overheating.
08 Never block the air vents
No matter how tempting, it’s a bad idea to use a MacBook in bed or to put it on your lap or stomach. When you do this, you cover the air vents and stop the fans from cooling down the processor.
So the easiest way to prevent overheating is to use your MacBook on a hard, flat surface, giving it plenty of ventilation. A desk or a table will do far better than your lap.
09 Reset the System Management Controller (SMC)
If your Mac is still overheating after doing all of the above, then it is time to reset the SMC. This is usually the last on the list of things to do when your Mac won’t stop overheating before considering paying Apple store a visit.
If Nothing Has Worked: Contact a Trusted MacBook Repair Centre
This is an extensive guide listing some of the ways users can solve the MacBook overheating problems on their own. However, it isn’t necessary that it will solve the MacBook heating issue for every user. If you are still facing a heating issue in your MacBook, you should contact a reliable MacBook repair centre around you.
If you don’t have a repair centre nearby, you can contact iFixers. They have tied-up with delivery partners to pick-up the damaged device from your home, fix it, and deliver it to your doorstep. Their team of expert super-techies are experienced in working with MacBook Air and Pro overheating issues and will fix the device properly to make it work like new. To get your Mac overheating problem resolved, contact us now. by ifxers- apple service centre in banglore
1 note
·
View note