#Cmake debug build
Explore tagged Tumblr posts
Visit Tumblr Blog
Explore Tumblr blogs with no restrictions, modern design and the best experience.
Last Seen Tumblr Blogs


Fun Fact
Tumblr’s reach among the 26-to-35-year-olds in the US is 11%.
Text
PSA
If you want to use a Raspberry Pi Pico as a debug probe to program another Raspberry Pi Pico without the annoying BOOTSEL dance, make sure that when you run CMake on the debugprobe firmware (in the picoprobe repository), you pass DEBUG_ON_PICO=ON as option. As in,
cmake -DDEBUG_ON_PICO=ON ..
This flag is described in the Readme of that repository (also note that the repository and tool have been renamed debugprobe from picoprobe), but it's notably missing from Appendix A of the Getting started with Raspberry Pi Pico guide. That guide is probably older, before the firmware was split and renamed like that, and nobody has bothered to update it yet.
If you don't do that, the firmware will expect the SWDIO and SWCLK data on different pins than what the instructions say, and you will find yourself spending hours checking the cable connections because you keep getting "Error: Failed to connect multidrop rp2040.dap0" errors in openocd. Ask me how I know.
(Also, fuck Raspberry Pi for making so much of their otherwise really good documentation PDFs. There are several places where you need to cross-reference things, and if it were HTML, the navigation between the sections would be so much easier.)
Other tip, while we're here: Install ninja (with brew install or apt install), then when doing the cmake generating step, pass "-G Ninja" in addition. Then build by just typing "ninja" instead of "make -j4" or whatever. It's a little extra typing but it is faster and better at utilising many cores on your host computer.
2 notes
·
View notes
Text
VR Project: Week 4 Blog 7;
Compiling the final apk files
So after the scene was done I followed a tutorial titled "How to package your unreal engine 5.4 projects - ANDROID/VR project" by Unreal Engine VR to package the VR project for Android using Unreal Engine 5.4.
youtube
Vid; Unreal Engine VR (2024) How to package your unreal engine 5.4 projects - ANDROID/VR project. YouTube, 25 April. Available at: https://www.youtube.com/watch?v=NfI_WlKFUak (Accessed: 13 March 2025).
I started by launching a VR template in UE 5.4. While that was loading, I checked what SDK, NDK, and JDK versions were needed. According to the official documentation, SDK 33 was recommended, with 30 being the minimum. NDK had to be version 25.1, and JDK needed to be version 17. Android Studio Flamingo 2022.2.1 Patch 2 was required too. Found it in the archives and downloaded it.
I already had Android Studio 4.0 on my system, but the tutorial recommended a clean install without importing previous settings. Uninstalled the old one and installed the new version as suggested.
After setting up Android Studio, I went into the SDK Manager. Selected SDK 33, and under SDK Tools, enabled "Show Package Details" to pick the specific build tools version 33.0.1. Also made sure to download NDK 25.1, CMake 3.10 and 3.22, and the command line tools.
Next step was downloading JDK 17 from the Java archives. Installed it and checked in the command prompt using java -version, which showed 17.0.1. That was good enough according to the tutorial.
With everything installed, I moved back into Unreal Engine to set up the packaging settings. Went into Project Settings, enabled full rebuild, switched to Android platform, set the SDK level to 33, and made sure APK packaging was checked. Then pointed Unreal to the correct paths for SDK, NDK, and JDK based on what I had just installed.
Everything looked good on paper.
But when I hit package… it didn’t work.
I ran into a bunch of errors. Unreal kept throwing issues even though the paths and versions matched what the tutorial asked for. I spent hours trying to troubleshoot but couldn’t get past the errors.
youtube
Vid; Andicox Studio (2024) Fixing Packaging and Cooking Issues in Unreal Engine 5 (UE5). YouTube, 2024. Available at: https://www.youtube.com/watch?v=IdTXHZ0Azqg (Accessed: 13 March 2025).
To resolve these errors, I followed a tutorial that recommended addressing each red error code individually and cleaning them manually. Although it was a time-consuming process, after nearly four hours of debugging, I managed to narrow the issues down to just a few problematic texture maps. These textures were directly imported from Fab, which seemed to be the root cause. I reached out to Ong Jian Wei, who opened the texture files in Photoshop and exported them in a different format. Surprisingly, that simple step fixed the issue — the engine finally accepted them without throwing any more errors.
0 notes
Text
GUI development in C++ | C++ GUI development Tools

These days, modern software applications requires Graphical User Interfaces (GUIs) the most. They enhance user interaction, making applications more user-friendly and visually appealing. C++ has been a popular choice for building robust and efficient software, and when it comes to GUI development in C++, there is a wide array of tools and services available. In this comprehensive guide, we will explore the best tools for C++ development and the essential aspects of C++ GUI development. Whether you're a seasoned C++ developer or just starting, this article will provide valuable insights into creating stunning GUI applications in C++.
The Power of C++ in Software Development Before diving into GUI development, it's essential to understand why C++ is a favoured choice for software development. C++ is a versatile and high-performance programming language known for its:
Efficiency: C++ allows for low-level memory manipulation, making it ideal for resource-intensive applications like games, simulations, and real-time systems.
Portability: C++ code can be compiled for various platforms, ensuring cross-platform compatibility.
Extensibility: It supports both procedural and object-oriented programming paradigms, making it suitable for a wide range of applications.
Community Support: C++ has a robust community of developers, which means extensive libraries and resources are available. Given these advantages, it's no surprise that C++ is a go-to choice for GUI development in many industries. Best Tools for C++ Development Effective GUI development in C++ begins with choosing the right development environment and tools. Let's explore some of the best tools for C++ development.
Integrated Development Environments (IDEs) 1.1. Visual Studio Microsoft's Visual Studio is a widely used IDE for C++ development. It offers a powerful set of tools, including a robust code editor, debugger, and an intuitive user interface. Visual Studio also provides excellent support for GUI development through libraries like MFC (Microsoft Foundation Classes) and Qt. 1.2. Qt Creator Qt Creator is an IDE specifically designed for developing applications using the Qt framework, which is a popular choice for C++ GUI development. It offers a drag-and-drop interface designer and integrated tools for testing and debugging, making it an excellent choice for creating cross-platform GUI applications. 1.3.CLion CLion, developed by JetBrains, is another noteworthy IDE for C++ development. It offers code analysis, refactoring tools, and seamless integration with CMake, a popular build system. CLion's intelligent code completion and debugging features enhance the development process.
GUI Libraries 2.1. Qt Qt is a powerful C++ framework for developing cross-platform GUI applications. It provides a comprehensive set of libraries, tools, and widgets, making it easier to create beautiful and responsive interfaces. Qt's signal-slot mechanism simplifies event handling, while its robust documentation and community support are invaluable resources. 2.2. GTK+ GTK+ is another popular choice for GUI development in C++. It is especially well-suited for developing Linux applications. GTK+ provides a wide range of widgets and is known for its flexibility and ease of use. It also supports multiple programming languages, including C++. 2.3. wxWidgets wxWidgets is a C++ library that allows you to create native-looking GUI applications for various platforms, including Windows, macOS, and Linux. It provides a consistent API across platforms, making it easier to maintain and update your codebase.
3.Build Tools 3.1. CMake CMake is a widely used build system that simplifies the compilation and build process for C++ projects. It is known for its flexibility and the ability to generate build files for various platforms and IDEs, including Visual Studio, Qt Creator, and CLion. 3.2. Make Make is a classic build tool for C and C++ projects. While it may not have the user-friendly features of modern build systems, it remains a powerful choice for managing complex project structures. C++ Software Development Services If you're working on a large-scale project or require specialized expertise, you might consider leveraging C++ software development services. These services can provide you with experienced developers who are well-versed in GUI development and can help you navigate the complexities of C++. Benefits of C++ Software Development Services
Expertise: C++ software development services often employ highly skilled developers with extensive experience in GUI development.
Efficiency: By outsourcing development tasks, you can focus on your project's core goals while experts handle the technical aspects.
TO READ MORE ABOUT IT VISIT OUR WEBSITE - ODITEK
0 notes
Text
so like I’m learning that
there are multiple standards of C++—essentially, specifications of how the language should work?—labeled by the year they came out(?): e.g. C++98, …, C++17, then C++20, now C++23
the C++ standard seems to only be kinda-sorta linked to versions of a C++ compiler that you’re using. A compiler might support some features of a given standard and not others (esp. when the standard is recent) (apparently)
there are several entirely different C++ compilers. sigh.
tangent, not really about C++ per se, but about coding in it: when you work in VS code, you have to specify the standard of C++ you want to use for highlighting and error reporting and the like—all the editor-side stuff. But the setting you use to determine that is separate from the setting used to compile your code used by the ‘run and debug’ button! I need to make a tasks.json file?!
continuing tangent: also the VS code docs page about all this involves a bunch of other specific stuff, and doesn’t have a good template for tasks.json. please. I just want to compile the right language when I click button. don’t make me type something in a terminal (<- this is how you can tell I’m not a Real Programmer)
oh, also, cmake is a thing. cmake is, like, a way to build C++ projects, and lets you specify and tweak the details of how, as far as I can tell. luckily I am only writing a single file of C++ code. phew. or maybe it would be easier to use cmake anyway! I Don’t Know.
oh, also, there are things like cmake which are not cmake. which you could use instead. so that’s another choice you have to (c)make
if you want to use a constexpr—thing that gets evaluated at compile time, not at runtime—in C++20, you can get error messages that just say things like “the expression is not constant” on the definition without telling you which part is not constant or why. which can be confusing when it seems like it is constant! especially since C++20 promises that you can use non constexpr things in constexprs, as long as they could be constexprs. I think all the components can…but actually I need to check the source on this, this info might be dodgy.
also apparently there are hidden rules about memory allocation re: constexprs which are confusing to a newcomer. some SE answers suggest that if you define constexpr type f() { … }, then somehow that’s…sufficient to get a compile-time element of type? this looks like it does the opposite of that. I must be misunderstanding what people are saying or how this works. but the point is it feels quite opaque. no major language gets its evaluation time mechanics quite right (in terms of being intuitive to use) imo. If you know about how to make a constexpr std::array with a fixed size but whose elements are determined by a for loop involving other functions and you like to talk about this feel free to lmk!! I am 🫠
ANYWAY getting there bit by bit (literally)
hhhhh C++ why why why
6 notes
·
View notes
Text
Cmake debug build

#CMAKE DEBUG BUILD MAC OS X#
#CMAKE DEBUG BUILD INSTALL#
#CMAKE DEBUG BUILD FULL#
#CMAKE DEBUG BUILD SOFTWARE#
#CMAKE DEBUG BUILD CODE#
So in micro-services land is key to be cross-platform and as of today C++ is the greatest cross-platform language of all.
#CMAKE DEBUG BUILD SOFTWARE#
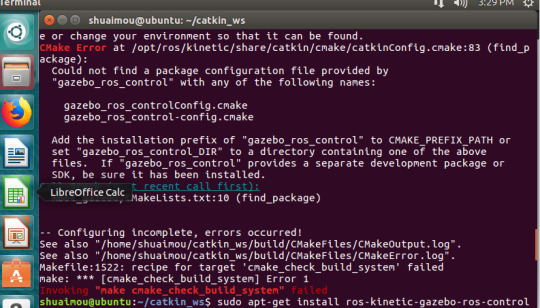
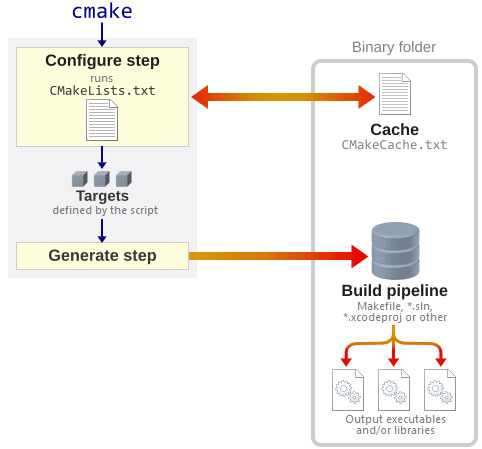
CMake is a command line tool used to control the software compilation process and it can be used for cross-platform software development. In case you wonder, CMakeLists.txt is the input file of CMake. Let’s get started by creating a workspace in VSCĬreate a directory where your project will reside let’s say (in a very informal way) ~/Desktop/hello-vsc and open that directory on VSC (Command + O):
#CMAKE DEBUG BUILD INSTALL#
To Install the Microsoft C/C++ extension:
#CMAKE DEBUG BUILD CODE#
Launch VS Code Quick Open ( ⌘+P) and paste the following commands, then press enter.
In my case I have already installed Xcode that I use for my iOS projects so is convenient, but if you are only interested on pure C++ you can install any of the previously mentioned or both.
A C++ compiler already installed, whether it is clang or gcc.
So this article is about the steps I followed to configure VSC to work with C++, CMake and LLDB.
#CMAKE DEBUG BUILD FULL#
It runs with native performance on Windows, OS X and Linux and with a very adaptive UI that looks and feels native to the OS where it runs, which is a plus.Īt the time I started working on my micro-services project, VSC was quite new and there was not full support for C++ except for the syntax coloring and some very experimental integration with GDB and LLDB, but today after less than a year VSC is quite operational on the C++ development cycle, you can integrate it with CMake and build a C++ project from inside VSC and not only to use CMake but to use a C++ Debugger (GDB or LLDB) inside VSC. Visual Studio Code (VSC from now on) has a similar idea as Emacs has, to provide a very simple editing tool but powerful at the same time providing the full development cycle (editing, building and debugging all inside the tool). This made me think about returning to Emacs which, even when I used it in the past, I would say I’m not an expert and re-loading it in my brain will take me some time to interiorize the shortcut keys and so on, so I thought about looking for something similar but modern, for that I passed through TextMate, Atom, Sublime and Visual Studio Code. I tried disabling all code completion options in preferences without any success. Even when Xcode is a fine tool to work on a C++ project, with a very appealing UI and an not a super good debugging experience but useful IMHO, it has a really annoying feature: it is constantly indexing the code while I’m typing it and, in consequence, spinning my MacBook Pro’s fans up to 5000 rpm and making it really hot.
#CMAKE DEBUG BUILD MAC OS X#
I started using Xcode on Mac OS X (now macOS). Through my journey I’ve seen to emerge quite a bunch of interesting tools to work with C++ on this field (micro-services and Docker). I’ve been working for almost a year implementing micro-services on C++11 running as Docker containers. Building C object trouble/CMakeFiles/trouble.dir/src/crc32.c.C++ Development using Visual Studio Code, CMake and LLDB Building C object trouble/CMakeFiles/trouble.dir/src/rc4.c.o Building C object trouble/CMakeFiles/trouble.dir/src/trouble.c.o Building CXX object cryptor/CMakeFiles/cryptor.dir/src/ Building CXX object madvise/CMakeFiles/madvise.dir/src/ Building CXX object computeChecksums/CMakeFiles/computeChecksums.dir/src/crc32.c.o Building CXX object computeChecksums/CMakeFiles/computeChecksums.dir/src/ Scanning dependencies of target computeChecksums Building CXX object encryptFunctions/CMakeFiles/encryptFunctions.dir/src/rc4.c.o Building CXX object encryptFunctions/CMakeFiles/encryptFunctions.dir/src/ Scanning dependencies of target encryptFunctions Building CXX object fakeHeadersXBit/CMakeFiles/fakeHeadersXBit.dir/src/ Scanning dependencies of target fakeHeadersXBit Building CXX object stripBinary/CMakeFiles/stripBinary.dir/src/ Scanning dependencies of target stripBinary Build files have been written to: /home/albino-lobster/dontpanic/build Check for working CXX compiler: /usr/bin/c++ - works Check for working CXX compiler: /usr/bin/c++ The CXX compiler identification is GNU 5.4.0 Check for working C compiler: /usr/bin/cc - works Check for working C compiler: /usr/bin/cc The C compiler identification is GNU 5.4.0 To compile create a build directory, run cmake, and the type make. I've written all about the techniques used in The binary is a bind shell named Trouble. This project combines a variety of Linux anti-reverse engineering techniques into one binary.
0 notes
Text
A while back, someone clued me in to an obscure, European - exclusive GBA game called Pinky and the Brain: The Master Plan. Some of the tracks were straight fire, so I had to figure out how to listen to them.
My first stop was YouTube. There's only one guy uploading, and the quality leaves much to be desired.
So, I set out to rip the music straight from the ROM. After many dead ends, I was able to get the tracks with:
A UNIX/LINUX setup. Maybe Windows is easier for you, or maybe you're normal like the rest of us. I find the command line far more intuitive, but as long as you have something to compile C++ with, cheers.
CMake-compiled gaxtapper executable (thank you, loveemu on GitHub) because the sound engine wasn't Sappy or Krawallar. It was also Gax 2.x, so I had to account for that as well.
As for listening to them, you're gonna need foobar2000 or a music player that handles .minigsf files. I plan on making converted MIDI copies if possible so I can mess around with mixing, but if you just want the music, stop here.
The first pass at ripping the songs fared well. For some reason, I can't put them in a different folder without a corruption warning in the player. So they're sitting in the build folder with the CMake files. Sometimes, software is straight wizardry.
But, they sound better than YouTube. I plan on extracting the songs again after messing with the constants in the gaxtapper files, and then seeing if I can make a thing or two out of all this.
The game itself seems pretty all right. I've only been viewing it through a debugging lens, but getting the ROM and a GBA emulator isn't too tricky if you wanna give it a spin.
Once this starts sounding nice, I'll see about uploading the songs. You might like them as well.
--------
Music credit goes to Manfred Linzner. It sucks that I only saw this after grabbing the songs, but the composer should get credit for coming up with this, right? Apparently he's composed for quite a few games using the Shin'en sound engine. Pretty cool stuff.

#patb#pinky and the brain#master plan#gaxtapper#gba#rom#rip#unix#dont use windows if you value your sanity#music#soundtrack#animaniacs#first pass#wip
20 notes
·
View notes
Text
Compile C Program In Dosing

Compile C Program In Dosing System
Compile C Program In Dosing Table
Compile C Program In Dosing
When programmers talk about creating programs, they often say, 'it compilesfine' or, when asked if the program works, 'let's compile it and see'. Thiscolloquial usage might later be a source of confusion for new programmers.Compiling isn't quite the same as creating an executable file! Instead,creating an executable is a multistage process divided into two components:compilation
This is a list of operators in the C and C programming languages.All the operators listed exist in C; the fourth column 'Included in C', states whether an operator is also present in C. Note that C does not support operator overloading. Run cmake-gui.exe, which should be in your Start menu under Program Files, there may also be a shortcut on your desktop, or if you built from source, it will be in the build directory. A GUI will appear similar to what is shown below. The top two entries are the source code and binary directories. I would look at the TCC documentation, specifically the quick start guide, provided on the TCC web page. Assuming you have some source code already, a compilation is as simple as tcc -o executable.exe sourcefile.c You can also run a C file directly with the -run option, as in. Code, Compile, Run and Debug C program online. Write your code in this editor and press 'Run' button to compile and execute it.
and linking
Compile C Program In Dosing System

. In reality, even if a program 'compilesfine' it might not actually work because of errors during the linking phase. The total process of going from source code files to an executable might better be referred to as a build.
Compilation
Compilation refers to the processing of source code files (.c, .cc, or.cpp) and the creation of an 'object' file. This step doesn't create anythingthe user can actually run. Instead, the compiler merely produces the machinelanguage instructions that correspond to the source code file that wascompiled. For instance, if you compile (but don't link) three separate files,you will have three object files created as output, each with the name<filename>.o or <filename>.obj (the extension will dependon your compiler). Each of these files contains a translation of your sourcecode file into a machine language file -- but you can't run them yet! You needto turn them into executables your operating system can use. That's where thelinker comes in.
Linking
Linking refers to the creation of a single executable file from multipleobject files. In this step, it is common that the linker will complain aboutundefined functions (commonly, main itself). During compilation, if thecompiler could not find the definition for a particular function, it would justassume that the function was defined in another file. If this isn't the case,there's no way the compiler would know -- it doesn't look at the contents ofmore than one file at a time. The linker, on the other hand, may look atmultiple files and try to find references for the functions that weren'tmentioned. You might ask why there are separate compilation and linking steps. First,it's probably easier to implement things that way. The compiler does itsthing, and the linker does its thing -- by keeping the functions separate, thecomplexity of the program is reduced. Another (more obvious) advantage is thatthis allows the creation of large programs without having to redo thecompilation step every time a file is changed. Instead, using so called'conditional compilation', it is necessary to compile only those source filesthat have changed; for the rest, the object files are sufficient input for thelinker. Finally, this makes it simple to implement libraries of pre-compiledcode: just create object files and link them just like any other object file.(The fact that each file is compiled separately from information contained inother files, incidentally, is called the 'separate compilation model'.)
Compile C Program In Dosing Table
To get the full benefits of condition compilation, it's probably easier to geta program to help you than to try and remember which files you've changed sinceyou last compiled. (You could, of course, just recompile every file that has atimestamp greater than the timestamp of the corresponding object file.) Ifyou're working with an integrated development environment (IDE) it may alreadytake care of this for you. If you're using command line tools, there's a niftyutility called make thatcomes with most *nix distributions. Along with conditional compilation, it hasseveral other nice features for programming, such as allowing differentcompilations of your program -- for instance, if you have a version producingverbose output for debugging.
Compile C Program In Dosing
Knowing the difference between the compilation phase and the link phase canmake it easier to hunt for bugs. Compiler errors are usually syntactic innature -- a missing semicolon, an extra parenthesis. Linking errors usuallyhave to do with missing or multiple definitions. If you get an error that afunction or variable is defined multiple times from the linker, that's a goodindication that the error is that two of your source code files have the samefunction or variable.
Advertising | Privacy policy |Copyright © 2019 Cprogramming.com | Contact | About
Compile is the creation of an executable program from code written in a compiled programming language. Compiling allows the computer to run and understand the program without the need of the programming software used to create it. When a program is compiled it is often compiled for a specific platform (e.g., IBM platform) that works with IBM compatible computers, but not other platforms (e.g., Apple platform).
The first compiler was developed by Grace Hopper while working on the Harvard Mark I computer. Today, most high-level languages include a compiler or have toolkits available to compile the program. Two popular compilers are Eclipse for Java and gcc command for C and C++. Depending on how big the program is, it should take a few seconds or minutes to compile. If no errors are encountered while being compiled, an executable file is created.
Tip
Scripting languages, like Perl and PHP, do not need to be compiled and use an interpreter to run.
What is compile time?
The compile time is the total time it takes a compiler to compile code into a program that can be run by the computer.
A-0, AOP, Assemble, Binaries, Compilation, Intermediate language, Interpreted language, JIT compiler, LLVM, One-pass compiler, Programming languages, Programming terms, Recompile, Transcompiler
1 note
·
View note
Text
Cmake Makefile

Description
Makefile Syntax. A Makefile consists of a set of rules.A rule generally looks like this: targets: prerequisites command command command. The targets are file names, separated by spaces. Typically, there is only one per rule. The concept of CMake. CMake makes your makefile. Cmake relies on a top level file called CMakeLists.txt; now we can first delete our makefile and out in the previous section. First check our cmake version. 1: cmake -version: You can also use the command cmake to check the usage.
This is a very simple C++ Makefile example and associated template, that can be used to get small to medium sized C++ projects up and running quickly and easily. The Makefile assumes source code for the project is broken up into two groups, headers (*.hpp) and implementation files (*.cpp). The source code and directory layout for the project is comprised of three main directories (include, src and build), under which other directories containing code would reside. The layout used in the example is as follows:
Directory Purpose Project / include Header files (*.hpp, *.h, *.hxx, *.h++)Project / src Implementation files (*.cpp)Project / build / objectsObject files (*.o)Project / build / apps Executables
The Makefile
The Makefile supports building of a single target application called program which once built will be placed in the build/apps directory. All associated objects will be placed in the build/objects directory. The following is a listing of the Makefile in its entirety:
The Makefile and a complete example including source code and directory layout can be downloaded from: HERE
Makefile Commands
The following commands can be used with this Makefile:
make all
make clean
make program
make build
make release
make debug
make info
Example Run
The following is the expected output when the command 'make clean all' is executed:
CMake Version
A CMake based build configuration of the above mentioned project structure can be found HERE
Preface Introduction Under the hood of Visual Studio GNU/Linux Equivalent Visual Studio to Make Utility mapping Example Source Structure Build Run Makefile Details Targets Dependencies Contents NMake Conclusion External Links
If you develop software only on Windows using Visual studio, it’s a luxury. Enjoy it while it lasts. Sooner than later, you will come across Makefiles, maybe exploring some software on Linux or the misfortune of having a build system that uses make with Cygwin on Windows.
Now you figure out that Makefiles are text files and open it in an editor hoping to get some insight into its workings. But, what do you see? Lots of cryptic hard to understand syntax and expressions. So, where do you start? Internet searches for make and Makefiles provide a lot of information but under the assumption that you come from a non-IDE Unix/Linux development environment. Pampered Visual Studio developers are never the target audience.
Here I will try to relate to the Visual Studio build system which will hopefully give an easier understanding of Makefiles. The goal is not to provide yet another tutorial on makefiles (because there are plenty available on the internet) but to instill the concept by comparison.
Visual Studio provides features that are taken for granted until you have to read/create a classic Makefile. For example, Visual Studio auto-magically does the following.
Compiles all the sources in the project file
Create an output directory and puts all the intermediate object files in it
Manages dependencies between the source and object files
Manages dependencies between the object files and binaries
Links the object files and external dependent libraries to create binaries
All of the above have to be explicitly specified in a Makefile. The make utility in some ways is the equivalent of Visual Studio devenv.exe (without the fancy GUI).
Visual Studio is essentially a GUI over the compilation and link process. It utilizes an underlying command line compiler cl.exe and linker link.exe. Additionally, it provides a source code editor, debugger and other development tools.
A simple win32 console application project in Visual Studio is shown below. You have a solution file which contains a project file.
Invoking a build on the solution in Visual Studio calls something like the following under the hood. Yes, it looks ugly! But that is the the project properties translated to compiler/linker flags and options.
It is very similar in GNU/Linux. The equivalent of a compiler and linker is gcc, the GNU project C and C++ compiler. It does the preprocessing, compilation, assembly and linking.
Shown below is a very simple Makefile which can be accessed from GitHub https://github.com/cognitivewaves/Simple-Makefile.
Invoking the make command to build will output the following.
Below is a table relating Visual Studio aspects to Make utility. At a high level, the Project file is equivalent to a Makefile.
Visual Studiomake UtilityCommanddevenv.exemakeSource structure Solution (.sln) has project files (typically in sub-directories)Starting at the root, each Makefile can indicate where other Makefiles (typically in sub-directories) existLibrary build dependencySolution (.sln) has projects and build orderMakefileSource files listProject (.vcproj)MakefileSource to Object dependencyProject (.vcproj)MakefileCompile and Link optionsProject (.vcproj)MakefileCompilercl.exegcc, g++, c++ (or any other compiler, even cl.exe)Linkerlink.exegcc, ld (or any other linker, even link.exe)
Download the example sources from GitHub at https://github.com/cognitivewaves/Makefile-Example. Note that very basic Makefile constructs are used because the focus is on the concept and not the capabilities of make itself.
Source Structure
Build
Visual Studiomake UtilityBuilding in Visual Studio is via a menu item in the IDE or invoking devenv.exe on the .sln file at the command prompt. This will automatically create the necessary directories and build only the files modified after the last build.Initiating a build with makefiles is to invoke the make command at the shell prompt. Creating output directories has to be explicitly done either in the Makefile or externally.
Cmake Command Line
In this example, to keep the makefiles simple, the directories are created at the shell prompt.
The make utility syntax is shown below. See make manual pages for details.
Execute the command make and specify the “root” Makefile. However, it is more common to change to directory where the “root” Makefile exists and call make. This will read the file named Makefile in the current directory and call the target all by default. Notice how make enters sub-directories to build. This is because of nested Makefiles which is explained later in the Makefiles Details section.
Run
Once the code is built, run the executable. This is nothing specific to makefiles but has been elaborated in case you are not familiar with Linux as you will notice that by default is will fail to run with an error message.
This is because the executable app.exe requires the shared object libmath.so which is in a different directory and is not in the system path. Set LD_LIBRARY_PATH to specify the path to it.
Makefile Details
The basis of a Makefile has a very simple structure.
The (tab) separator is very important! Spaces instead of a (tab) is not the same. You will see rather obscure error messages as shown below. Makefile:12: *** missing separator. Stop.

Targets
Here target is a physical file on disk. When the target is more of a label, then it has to be tagged as .PHONY to indicate that the target is not an actual file.
Visual Studiomake UtilityVisual Studio by default provides options to clean and rebuild a project or solution.Clean and rebuild have to be explicitly written in a makefile as targets which can then be invoked.

A typical case would be to clean before rebuilding.
Dependencies
Dependencies can be files on disk or other targets (including phony targets).
Visual Studiomake UtilityVisual Studio by default supports implicit dependencies (source to object files) within a project. Library(project) dependencies have to specified in the solution fileEvery dependency has to be explicitly defined in makefiles
Cmake Makefile Generator
For example, the target all, depends on app.exe which in turn depends on libmath.so. If you remove app.exe, make is capable of recognizing that libmath.so need not be built again.
Contents
Cmake Makefile Link
File: Makefile
File: math/Makefile
Cmake Makefile Difference
File: app/Makefile
NMake is the native Windows alternative to the *nix make utility. The syntax is very similar to *nix makefiles. However, this does not mean that *nix makefiles can be executed seamlessly on Windows. See Makefiles in Windows for a discussion.
Makefiles are very powerful and gives a lot of control and flexibility compared to Visual Studio, but the content is not easily understandable. As an alternative, CMake has adopted similar concepts but the script is much easier and more readable. See CMake and Visual Studio.
1 note
·
View note
Text
2019
GET BACK TO WORK
This year, I hit a lot of milestones for this project that I’m really happy with! Cross-platform compile is working now, lots of long-standing issues have been fixed, and a lot of the cruft that was building up around this project has been swept away for a clean entry into the coming year.
I am still not entirely satisfied with the actual workload volume of how much I got done for 2019.
Balancing work priorities, life priorities, and gamedev priorities has been a hell of a ride, and I’ve definitely taken on several sideprojects that took away from my main gamedev focus for large chunks of time.
Hang in there. Keep grinding it out. These games won’t make themselves!
▄ ▄ ▄ ▄ ▄ ▄ ▄ ▄ ▄ ▄ ▄ ▄ ▄ ▄ ▄ ▄ ▄ ▄ ▄ ▄ ▄ ▄ ▄ ▄ ▄ ▄ ▄ ▄ ▄ ▄ ▄ ▄ ▄ ▄ ▄
PROJECT
• Successful reorganization of NPC code to make it easy to expand upon • Successful migration to CMAKE • Successful cross-platform linux build • Online world map (WIP) • Proper website (WIP) • Five years
ENGINE
• Fixed lines of sight behaving strangely in the editor • Fixed bugs with level loader not saving location correctly • Fixed several bugs with screenshots, zoom, and the camera position • Fixed line-of-sight performance bottlenecks in the editor • Map editor UI has its own namespace with tools now for easier cleanup • Fixed several encoding problems with exported maps • Fixed physics bug where ramps weren’t being applied correctly • Fixed crash involving null player sprite when loading map in editor mode • Editor lines less harsh on eyes now • Fixed transparency on debug text and line rendering • Player now dies when falling in pits • Fixed collisions with player and mobile waypoints • Updated SDL_ConvertSurface functions to SDL_ConvertSurfaceFormat • All pixel blitting functions now properly use ARGB8888 • Fixed issues with RamSpider camoflauge failing for certain sprites • Automated gardening implemented • Added waypoint debugging tools • Fixed cached script constructor • Fixed hundreds of illegal func(std::string&) function definitions • Rebuilt newest SDL libraries for project • Fixed around 140 illegal trailing semicolons (after namespaces, etc) • Fixed many illegal enum declarations • Fixed bug involving bad memory access on single frame animations
NPC
• New handler for aquatic wildlife • Aquatic wildlife now correctly pathfinds to destination • Filters available for waypoints to behave like aquatic wildlife • Aquatic wildlife can follow aquatic waypoints to simulate schooling • New handler for terrestrial critters separates floor, wall, and ceiling templates • Terrestrial critters now correctly pathfind to destination • Line-of-sight overhauls so that enemies can dynamically adjust pathing • New species implemented: Urchin Crabs • Terrestrial NPCs now have options for buoyancy • New species implemented: ALIAS Infobot • Fixed bug where enemies wouldn’t always use correct movement style • Enemies now support asynchronous state change callbacks • Fixed bug where paths could be built using filtered nodes • Implemented filtered pathing • Fifth complete overhaul of RamSpider logic - got it right this time • Fixed several scanning bugs for palette swaps
MAP AREAS
• Finished drafting mining tunnels • Began drafting first stretch of thoroughfare • Many smaller maps drafted and implemented • Several testing rooms for various enemy behaviors
ASSETS
• Completed Mining Cavern terrain variations • Completed Thoroughfare terran variations • Completed Blue Caverns terrain variations • Lots of mining tunnel props • Several new enemies fully built out • New small bits of audio for introducing the story or specific areas • Many map transition fixes • Many animation timing tweaks • Updated Hangcap terrain variations • Many dialog and story scripts implemented in first areas • Collectible gems • New Mining Tunnels music (WIP) • Updated editor icons • New ALIAS bots • New promotional art commissioned
BEING AN ADULT
• ...and a full-time job
#Cat Story#GameDev#Game Development#Indie#IndieDev#Platformer#Metroidvania#Progress#C++#Programming#Linux#Steam#Crossplatform#CMAKE#2019#SDL2
21 notes
·
View notes
Text
My first blog and Introduction to Android Studio
Hello,
First, I would like to introduce myself to you, and once more time if you already know me 😊. My name is Nguyen Phan, but I prefer Andrew as my English name. I am an International Student currently taking the Information Technology (IT) program at The Southern Alberta Institute of Technology (SAIT). I’m writing this blog on Sunday, January 26, 2020. When you are reading this blog, it may be a few days, months or years after today (when I’m writing this). The reason for writing this blog is introducing about the technology I will use to build my own first project, which is Android Studio. Moreover, I will give a brief description of the project in later.
Second, as I mentioned it above, Android Studio is the official Integrated Development Environment (IDE) built for Google’s Android Operating System or Android Platform or Android devices. The first version of its was released in December 2014. On January 26, 2020, the newest version is 3.5.3 available for download and install on all three operating system Windows, MacOS and Linux. Before the Android Studio was announced in May 2013 in I/O Google Conference, its predecessor was Eclipse software, an IDE used in computer programming language.
In Android Studio, there are two primary programming languages, they are Java and Kotlin. It’s very simple to understand why Java is one of primary languages. Android Studio is built and developed based on the JetBrains' IntelliJ IDEA software which is another IDE written in Java for developing computer software purpose. Personally, I intend and consider using Java to build my project. The second language is Kotlin. Its first appearance was in 2011. According to the new updates from Google on May 2019, Kotlin is now the official preferred language for Android application developers. Still, Google gives developers options to choose which language for programming in the newest version.
However, developers can also use C/C++ programming language to build their own project. Additionally, we will need to install the Native Development Kit (NDK) and CMake in order to use and compile C/C++. In detail, NDK or the Native Development Kit for the Android Platform is a set of tools allowing the developers to use the native library including the C/C++. CMake is an external build tool working along/side-by-side the Gradle in order to build the native library in Android Studio. This CMake tool is unnecessarily needed if you only want to use the NDK tool only. I would suggest installing both of them because you may need them in near the future. Moreover, you may want to consider LLDB which is used to debug the native code or C/C++. To install them, you can follow this link (https://developer.android.com/studio/projects/install-ndk.md) to learn how to install and configure NDK, CMake, and LLDB as well.
Finally, as I mentioned it above, I will give you a brief introduction about project that I am working on by using Android Studio. Firstly, my idea is creating group chat application, not like Facebook’s Messenger or WhatsApp. My group chat application is more private focusing on the internal operating system of a business. Thus, it is a private group chat application; and there is no advertise included in app. Also, it’s free. Second, there is no 1-to-1 conversation in this application. It will be only group chats between colleagues and colleagues where they can communicate about their jobs. Also, reducing the risk of leaking info is one of reasons that I want to build this application.
Unfortunately, I have to stop here to save details and information for my next upcoming blog. 😉
In conclusion, I would like to thank you for your patience whose have been reading until now. In next blog, I will be giving you more info and details about the project such as how it does look like or work. Once again, Thank you.
Cheers.
Andrew P.
1 note
·
View note
Text
OPC UA server on a FPGA using open62541
Overview
Open Platform Communications Unified Architecture (OPC-UA - IEC62541) is a standardized platform-independent architecture which provides a service-based data exchange. In combination with TSN it allows new possibilities when it comes to high interoperability and deterministic communication.
Based on the open62541 implementation the following steps show how everything has to be setup to get it up and running on a FPGA (Artix7 with MicroBlaze). In combination with NetTimeLogic’s complete FPGA based TSN solution you get the full solution for industrial communication 4.0.
The example FPGA project and the application are available here:
https://github.com/NetTimeLogic/opcua
The open62541 implementation is available here:
https://github.com/open62541/open62541
Introduction
It is not straight forward to get the open62541 OPC UA stack up and running on an embedded system even if FreeRTOS and lwip is supported. The following implementation description is based on the open62541 documentation which describes how to build the library and how to implement a basic OPC UA server. The application creates an OPC UA server thread which is running under FreeRTOS with lwip.
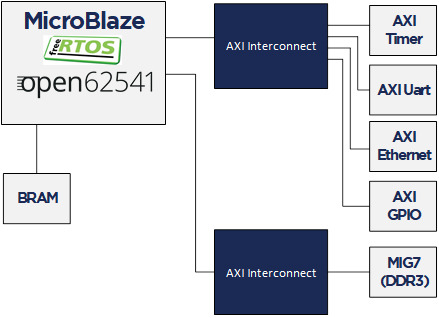
The FPGA use a MicroBlaze softcore with DDR3, Axi Ethernet Lite, Axi Uart Lite AXI GPIO and AXI Timer. As hardware an Arty A7-100T development board from DIGILENT is used.
Required tools
To build the full project, the following tools are required:
Xilinx Vivado 2019.1
Xilinx SDK 2019.1
CMAKE (Python 2.7.x or 3.x)
UA Expert
BSP adjustments for LWIP
Open62541 supports “freertosLWIP” as an architecture. In that case it uses the libraries of the target device which are the ones of the BSP in Xilinx SDK.
To be able to compile the open62541 library some adjustments for the lwipopts.h file are needed:
Line 10-19 https://github.com/open62541/open62541/blob/master/arch/common/ua_lwip.h
Since this file is managed by the BSP in Xilinx SDK, manual modifications are overwritten when the BSP is generated. With the following workaround, it is possible to add the additional defines over the BSP setting GUI.
1. Go to: C:\Xilinx\SDK\2019.1\data\embeddedsw\ThirdParty\sw_services\lwip211_v1_0\data
2. Open the lwip211.tcl
3. Search the proc generate_lwip_opts {libhandle} and go to the end of this procedure
4. Add before the line puts $lwipopts_fd "\#endif" the following code:
#OPEN62541 implementation
set open62541_impl [expr [common::get_property CONFIG.open62541_impl $libhandle] == true]
if {$open62541_impl} {
puts $lwipopts_fd "\#define LWIP_COMPAT_SOCKETS 0"
puts $lwipopts_fd "\#define LWIP_SOCKET 1"
puts $lwipopts_fd "\#define LWIP_DNS 1"
puts $lwipopts_fd "\#define SO_REUSE 1"
puts $lwipopts_fd "\#define LWIP_TIMEVAL_PRIVATE 0"
puts $lwipopts_fd ""
}
5. Save the file
6. Open the file lwip211.mld
7.Add the new Parameter e.g. at line 47:
PARAM name = open62541_impl, desc = "Used as an open62541 implementation?", type = bool, default = false;}
8.Save the file
9. Restart Xilinx SDK
After this change and a restart of Xilinx SDK the new option will be visible in the BSP settings GUI of the lwip.
Design preparation
Before everything is ready to build the open62541 library, the implemented FPGA design from Xilinx Vivado and a software application project in Xilinx SDK is needed. In this example project a MicroBlaze design with DDR3 is used (unfortunately the application does not fit into the available block RAM).
Vivado
The Vivado project can be created with the available tcl script. By running the implementation of the Vivado project the bitstream can be created. With File->Export->Export Hardware the hardware definition can be created.
File->Launch SDK starts the SDK.
Xilin SDK
In Xilinx SDK a new empty Application Project with the OS Platform “freertos10_xilinx” can be created.
File->New->Application Project.
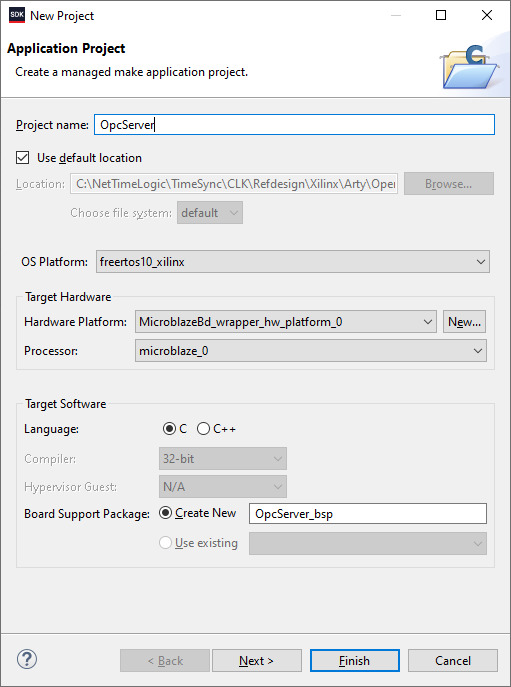
After the project is created some adjustments in the OpcServer_bsp are needed
Select lwip211 as supported libraries
Go to the lwip211 and adjust following parameter:
api_mode = socket_API
open62541_impl = true
Go to the freertos20_xilinx and adjust the following parameters:
Check_for_stack_overflow = 1
total_heap_size = 2097152
Re-generate BSP sources
The environment is now ready to start with CMake.
CMake
The easiest way is to work with the CMake GUI. Later it can be used in Xilinx SDK.
CMake for open62541 is used with following adjustment:
UA_ENABLE_AMALGAMATION = ON
UA_ENABLE_HARDENING = OFF
UA_ARCH_EXTRA_INCLUDES = <path to microblaze/include>
UA_ARCH_REMOVE_FLAGS = -Wpedantic -Wno-static-in-inline -Wredundant-decls
CMAKE_C_FLAGS = -Wno-error=format= -mlittle-endian -DconfigUSE_PORT_OPTIMISED_TASK_SELECTION=0 -DconfigAPPLICATION_ALLOCATED_HEAP=3 -DUA_ARCHITECTURE_FREERTOSLWIP
UA_LOGLEVEL = 100 (optional for debugging)
1. Start the CMake GUI
2. Select the correct source code path where the open62541 GIT repository is located and define the path where you want to build the binaries:

3. Click Configure:
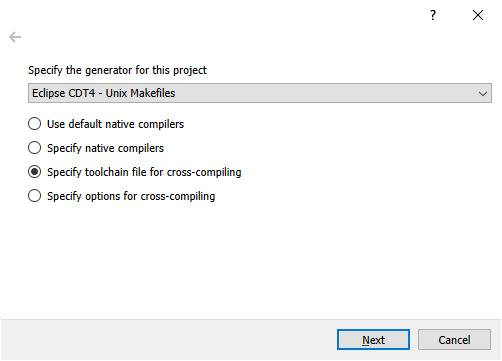
4. Select the CMake file which defines the compilation toolchain and other settings:

5. Click again on Configure and after that on Generate
6. The Unix Makefiles are now ready and can be added Xilinx SDK workspace:
File->Open Projects from File system
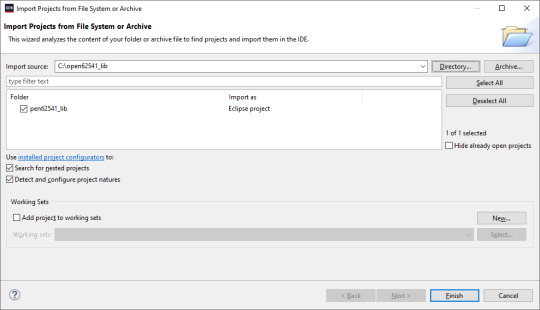
7. Now it should be possible to generate the open62541.c/h file in Xilinx SDK.
Make Target->all
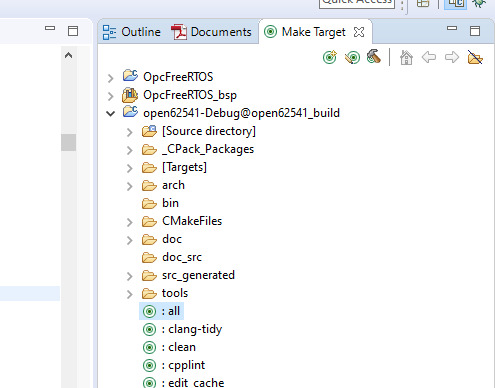
8. The workspace should have now following structure:

Creating the OPC UA server application
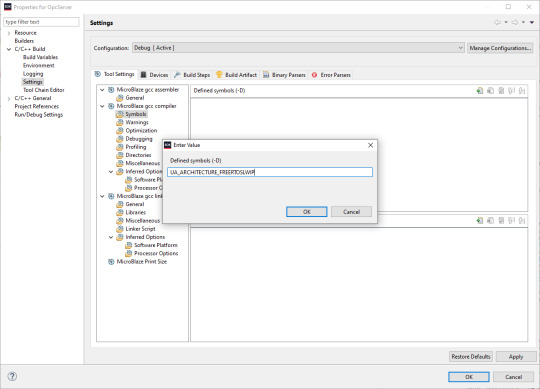
C/C++ Build settings
For a compilation without errors some adjustments in the application project Build settings are required.
1. Add the symbol for UA_ARCHITECTURE_FREERTOSLWIP
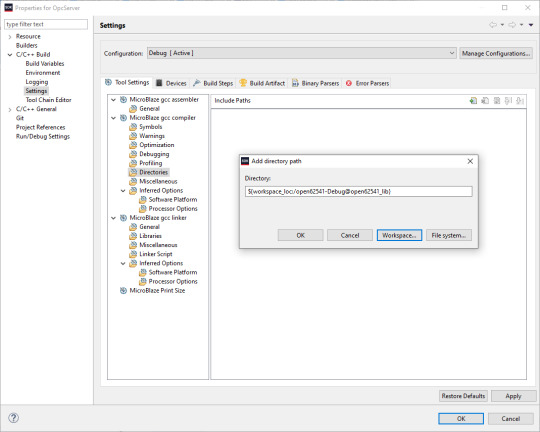
2. Add the open62541 build directory as include path
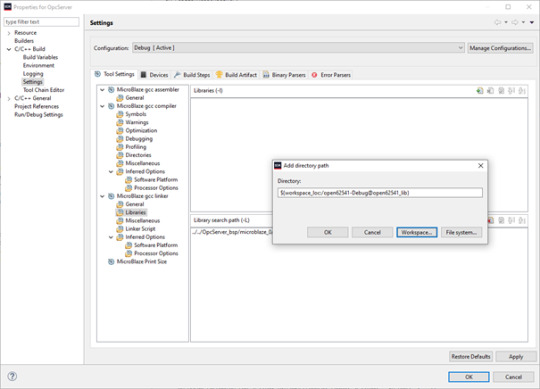
3. Add the open62541 build directory as library search path
4. Link the folder to the source location of open62541.c/h

5. Add an exclusion pattern that only the open62541.c/h are used:

Linker script
The linker script for our OPC UA server application needs some small adjustments.
With Xilinx->Generate linker script a new lscript.ld with following settings can be created:
Heap Size: (min) 1MB
Stack Size: (min) 1MB

Now the application project should be ready for a successful compilation.
OPC UA Server app
The complate Workspace is here available:
https://github.com/NetTimeLogic/opcua/tree/master/Src/Sdk_workspace
In Xilinx SDK the source file OpcServer.c can be imported to the OpcServer application project.
The thread stack size is defined with 4096 it might be possible that the application is not running properly with other values. However, the hook functions for MallocFailed or StackOverflow might be helpful.
In a first step the network initialization is done. This includes auto negotiation, ip configuration, interface binding and starting the lwip receive thread. After that the opcua thread gets started.
Important for a working server is the configuration and especially the buffer size of the network layer. With the following settings, the server was running without any problems:
config->networkLayers->localConnectionConfig.recvBufferSize = 32768; config->networkLayers->localConnectionConfig.sendBufferSize = 32768; config->networkLayers->localConnectionConfig.maxMessageSize = 32768;
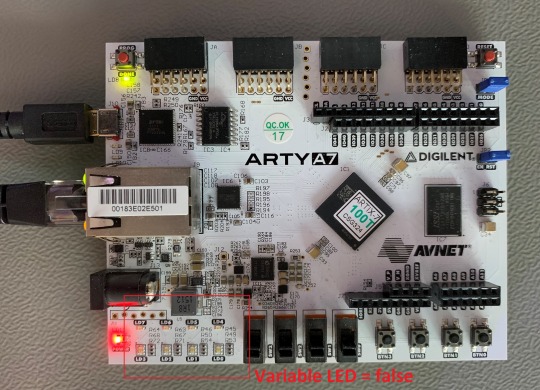
Before the server is started an object and a variable are added to the server. Additionally, a callback for the variable is configured, which allows to control the LEDs on the ArtyA7 board by an OPC client. After that the server gets started and runs until the running variable is set to false (never in this case).
Connecting to the OPC UA Server
After a successful implementation of the MicroBlaze FPGA design, building the open62541 library and compiling the OPC UA server application everything is ready.
The Arty A7 board should be connected to the PC over USB and the RJ45 is connected to a network interface adapter.
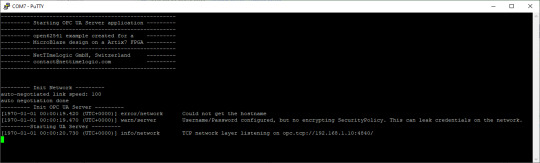
1. Open a serial terminal for the debug print out (baud rate: 115200)
2. Loading the bitstream (from Vivado or SDK)
3. Run the Application (from SDK)
4. If the application has successfully started, in the serial terminal following text is printed out:
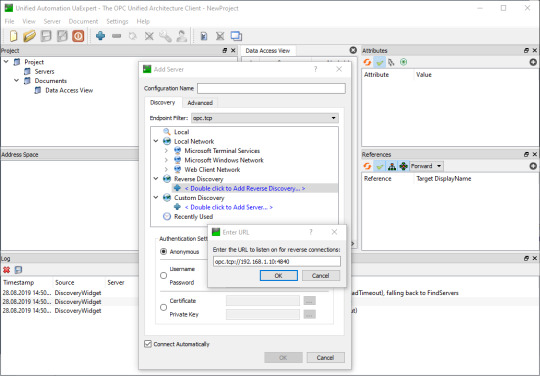
5. Start UaExpert
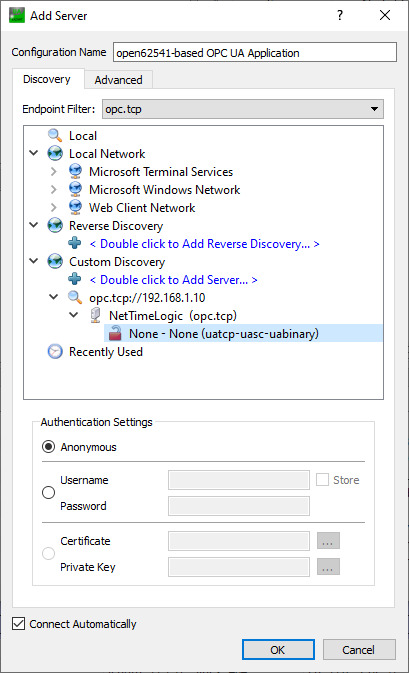
6. Add the server via “Custom Discovery” with the configured open62541 hostname
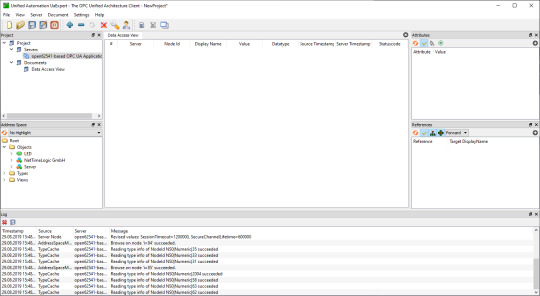
7. Expand the added server to add the connection. In the serial terminal you get already some information that a new connection over TCP was detected
8. After a successful connection in UaExpert the defined object a variable are visible.
9. The variable LED can now be added to the Data Access View via drag & drop
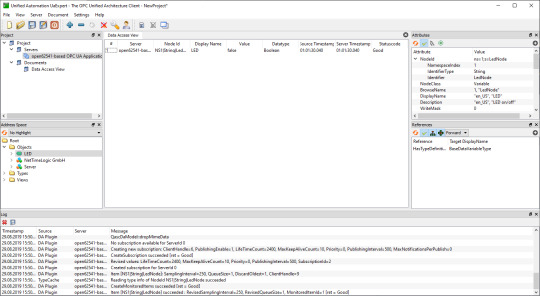
10. By changing the boolean value of the variable, the LEDs on the ArtyA7 can be switched on /off.

Summary
To get an open62541 server running on a MicroBlaze softcore following adjustments are needed:
Add the defines in the lwip BSP for lwipopts.h:
#define LWIP_COMPAT_SOCKETS 0
#define LWIP_SOCKET 1
#define LWIP_DNS 1
#define SO_REUSE 1
#define LWIP_TIMEVAL_PRIVATE 0
Adjust the BSP settings for lwip:
api_mode = socket_API
open62541_impl = true
Adjust the BSP settings for FreeRTOS:
Check_for_stack_overflow = 1
total_heap_size = 2097152
Adjust CMake options for open62541:
UA_ENABLE_AMALGAMATION = ON
UA_ENABLE_HARDENING = OFF
UA_ARCH_EXTRA_INCLUDES = <path to microblaze/include>
UA_ARCH_REMOVE_FLAGS = -Wpedantic -Wno-static-in-inline
-Wredundant-decls
CMAKE_C_FLAGS = -Wno-error=format= -mlittle-endian
-DconfigUSE_PORT_OPTIMISED_TASK_SELECTION=0
-DconfigAPPLICATION_ALLOCATED_HEAP=3
-DUA_ARCHITECTURE_FREERTOSLWIP
UA_LOGLEVEL = 100 (optional for debugging)
Generate a linker script with at least: 1MB heap and 1MB stack
Adjust the C/C++ build settings / include sources/libraries
Define the thread stack size to 4096
Adjust the buffer size of the server config:
config->networkLayers->localConnectionConfig.recvBufferSize = 32768;
config->networkLayers->localConnectionConfig.sendBufferSize = 32768;
config->networkLayers->localConnectionConfig.maxMessageSize = 32768;
1 note
·
View note
Text
Dev Thoughts: CMakeEasy
Whew boy, I feel really confident that not a lot of developers use Tumblr as far as I'm aware. I've been on the platform long enough to know that it's more likely to have a lot of artists, writers, and other creatives.
That being said, I still wanted to share my thoughts on my favorite personal project: CMakeEasy.
For people who don't know, I am currently the development lead and solo developer of CMakeEasy.
CMakeEasy is a C++ based and library-free terminal-based CMakeLists.txt generator. So you might be wondering, "DreamHollow, what the heck is a CMakeLists.txt generator? How is that useful to anyone?"
Well I started the project for my own needs, actually. I'm highly dependent on using a build-system-assistant called CMake. (Honestly I don't know what CMake is classified as, they claim it's not a build system.) But I'm the sort of person that absolutely hates having to constantly look up exact syntax, documentation, and debugging on something that should be relatively simple.
I decided to start development on CMakeEasy in September 2022. It started out with one relatively small Main file that, honestly, barely did anything at all. I dare say it was almost like the alpha version of the project because the scope was not realized.
As of my writing now in May 2023, the repo has grown reasonably large for a solo project.
Where CMakeEasy initially started off barely able to write functional lists, it has blossomed into a more comprehensive project that can write a fairly complex CMakeLists.txt file within seconds to minutes.
Unfortunately, more work still needs to be done. CMakeEasy is functional but can be confusing in terms of usage. I'm going to be overhauling the documentation, syntax, and functionality before the end of the Summer. That's the plan anyway.
The reason I am telling people about this is that I thought it would be a shame if anyone using CMake felt like they had to make the lists the old fashioned way. I promise, you don't anymore. My editor will be continually updated as much as possible to make the process easier for everyone.
Thanks for reading.
1 note
·
View note
Text
Clion tutorial

#CLION TUTORIAL FOR FREE#
#CLION TUTORIAL HOW TO#
#CLION TUTORIAL INSTALL#
#CLION TUTORIAL FULL#
#CLION TUTORIAL SOFTWARE#
Sort the packages using the robotic arm of the factory codingame.
The project details depend on the project type. The screen would look like something similar if you have any already created projects. Voila! We’re on the main window of CLion. Click on the New Project + button to create a brand new project.
#CLION TUTORIAL FULL#
Here, you can easily configure them according to your needs.Īs it’s the first time installation, we have to “Evaluate for free”. CLion exposes the full power of GDB and/ or LLDB (even on Windows, where we have built an MSVC compatible debugger on top of LLDB), and even builds on it wit. In your case, there may be more than one.ĬLion comes up with a default plugin set. My system only includes GCC, so it’s the only entry available. You also have to select the C/C++ compiler you’d like to work with. I’m the original author of Catch and am now working at JetBrains so this seems to be an ideal match As of the 2017.1 release I’m pleased to say that. Catch is a cross-platform test framework for C++.
#CLION TUTORIAL HOW TO#
This tutorial describes how to use CLion as an IDE for developing ROS2 applications built with colcon.If you are working with an older ROS distribution, which uses catkin build tools, please refer to the previous tutorial. CLion is a cross-platform IDE for C++ development (which happens to have a built in test runner). I prefer the darker ones as they’re more comfortable when you’re looking at your code for a longer period of time. ROS2 is the newest version of ROS, Robot Operating System, which is a set of libraries and tools designed for robot applications. You can choose whether you want to share usage statistics with JetBrains or not. Or directly point CLion to a Makefile in the Open dialog. You can open a folder as a project and CLion will search for the top-level Makefile (as well as CMakeList.txt or compilecommands.json files) and suggest opening it as a project. (changes since CLion 2016.2) Learn how to attach for debug to local process started not from the CLion (from CLion v2016.1). with the output of bash commands Code examples and tutorials for C Printf. Here’s a look at some of the core debugging features that are supported. Then, agree with the JetBrains user agreement. To open a Makefile project in CLion: Select the project in File Open. CLion supports the debugging experience using the GDB debugger (and LLDB on OS X since version 1.1 and on Linux since version 2016.2).
#CLION TUTORIAL INSTALL#
sudo snap install clion -classic Using CLion 2021 About DupeTesting Minecraft 1 This tutorial aims to provide a guide on. I prefer this method than the previous one as installing and managing snap packages is easier than working with other package management system. This will start the basic installation of CLion. Depending on your internet speed, the download duration may vary.Īfter the download is complete, it’s time to run the following commands – cd ~/Downloads/Īfter the extraction is complete, it’s time to unleash the beast! /opt/clion-2018.3/bin/clion.sh It is based on CMake configuration files (e.g 'CMakeLists.txt'). CMake uses scripts called CMakeLists to generate build files. It worked perfectly for me To summarize, there are 2 main steps: Firstly, CLion uses CMake to compile your code.
#CLION TUTORIAL SOFTWARE#
CMake is used to control the software compilation process using (simple platform and compiler independent) configuration files, and generate native makefiles and workspaces that can be used in the compiler environment of your choice. For further usage, you have to get a subscription.įor the Linux platform, CLion is available in 2 ways – snap and a compressed package. CMake is a tool used by Clion for development.
#CLION TUTORIAL FOR FREE#
You can enjoy the full service for free up to 30 days. How about JetBrains CLion? It’s one of the finest and sharpest, professional-grade IDEs in the market. It worked perfectly for me To summarize, there are 2 main steps: Firstly, CLion uses CMake to compile your code. In most cases, it should be named as “gcc”.Īs of C/C++ IDE, there are numerous choices. I am using cmake (within clion ide but that should not matter for this discussion). If the result is negative, then search for the suitable C/C++ compiler package for your Linux distro. Find extensive tutorial, questions and answers for clion.
0 notes
Text
Cygwin cmake command not found

When I run make in the specific directory it works as well (BUT: compiler identification is 6.4.0 while my custom compiler id is 6.1.0). Make: *** Fehler 2Īs I see it, the file testCCompiler.c is missing while running gcc-6.1.0.īut when I compile it manually after cmake has failed, it runs successfully. Make: Verzeichnis „/cygdrive/d/programming/cpp/T2D/build/CMakeFiles/CMakeTmp“ wird verlassen I686-w64-mingw32-gcc-6.1.0.exe: error: /cygdrive/d/programming/cpp/T2D/build/CMakeFiles/CMakeTmp/testCCompiler.c: No such file or directory opt/mingw32-1.6.0/bin/i686-w64-mingw32-gcc-6.1.0.exe -o CMakeFiles/cmTC_5e0c4.dir/testCCompiler.c.o -c /cygdrive/d/programming/cpp/T2D/build/CMakeFiles/CMakeTmp/testCCompiler.c Make: Verzeichnis „/cygdrive/d/programming/cpp/T2D/build/CMakeFiles/CMakeTmp“ wird betretenīuilding C object CMakeFiles/cmTC_5e0c4.dir/testCCompiler.c.o usr/bin/make -f CMakeFiles/cmTC_5e0c4.dir/build.make CMakeFiles/cmTC_5e0c4.dir/build Run Build Command:"/usr/bin/make.exe" "cmTC_5e0c4/fast" This is the output from the CMakeError.log file: Determining if the C compiler works failed with the following output:Ĭhange Dir: /cygdrive/d/programming/cpp/T2D/build/CMakeFiles/CMakeTmp (Used -debug-trycompile to keep temporary files) When I try to manually make the temporary files after cmake failed, the make command runs successfully. I have already tried several approaches to fix my problem, until I got to the point where it only fails on finding testCCompiler.c from the directory CmakeTmp. I have a problem while running cmake with a mingw32 custom compiler in a cygwin terminal.
0 notes
Text
Instal python for mac

#Instal python for mac how to#
#Instal python for mac full version#
#Instal python for mac install#
#Instal python for mac upgrade#
#Instal python for mac android#
dmg file appropriate for your version of OS X and double-click it to run the standard installer.Īfter installation, open gedit (it should be in your Applications folder). We are going to use a very good, no-frills text editor called gedit ĭownload the.
#Instal python for mac install#
Your command prompt will now look slightly different: the command line will be preceded by ow we have set up a virtual environment, which is where any Python libraries we decide to install will be stored. Now that we have installed virtualenv, we can create a Virtual Environment - run this in your command prompt: Save it to your home folder (/Users/your_name). For installing the packages, you have to choose the environment whether it’s global or virtual or conda. To install virtualenv on the Mac, download this file: Since the Deadsnakes PPA has almost every version of Python in its database, you can install older versions of Python as well. Download the latest version of Python from the added PPA: sudo apt install python3. Update your systems package list: sudo apt update. Type "help", "copyright", "credits" or "license" for more information.įor the purposes of this workshop, we will install virtualenv, a useful tool for creating isolated development environments (which makes it easier to experiment with various versions of Python code libraries and modules). sudo add-apt-repository ppa:deadsnakes/ppa.
You should see something like the following:.
Test your install by typing this into the command prompt: python.
Open the Terminal application (under Applications > Utilities) and type into the command prompt: hash -r.
dmg file by double-clicking and follow the onscreen instructions to install Python on your computer.
Download the latest version of Python 2.7 for the Mac from /download/releases/2.7.3.
#Instal python for mac full version#
This from XCode (Macs came bundled with the XCode Developer Tools DVD you can also download a full version from ) or the smaller
Before we begin, make sure you have GCC installed to compile Python.
However, using the pre-installed version of Python for this workshop can pose some problems, so we will be installing the "real" version, straight from.
PYTHON3_NUMPY_INCLUDE_DIRS = /usr/lib/python/dist-packages/numpy/core/include/ Note To specify Python2 versions, you can replace PYTHON3_ with PYTHON2_ in the above parameters.īuild.Macs come pre-installed with a special version of Python. Install the latest version of Python Go to and press the yellow Download Python-button.
PYTHON3_INCLUDE_DIR = /usr/include/python.
Double-click the downloaded file to extract the archived contents. First, you need to download Visual Studio Code for macOS from its official website at 2.
set BUILD_EXAMPLES=ON to build all examples In this part of the tutorial, we’re going to install Visual Studio Code for Python development on macOS.
set BUILD_DOCS=ON for building documents (doxygen is required).
to build with modules from opencv_contrib set OPENCV_EXTRA_MODULES_PATH to /modules.
build type: CMAKE_BUILD_TYPE=Release (or Debug).
set the binary build path to your CMake build directory, e.g.
#Instal python for mac upgrade#
Step 3: Upgrade your pip with the latest version to avoid errors during the installation. Step 2: Now check if pip3 and python3 are successfully installed in your system. Follow the below steps to install the PyQt package on macOS using pip: Step 1: Install the latest version of Python3 in macOS.
set the OpenCV source code path to, e.g. Method 1: Using pip to install PyQt Package.
Install folder will be /usr/bin/ by default, submit it by choosing Install command line links.Ĭmake -DCMAKE_BUILD_TYPE=Release -DBUILD_EXAMPLES=ON.
Then, follow the instructions from the pop-up there.
#Instal python for mac how to#
From the CMake app window, choose menu Tools –> How to Install For Command Line Use.
#Instal python for mac android#
Develop apps and games for iOS, Android and using.
Install the dmg package and launch it from Applications. Create and deploy scalable, performant apps using.
Find the version for your system and download CMake from their release's page.
If you XCode and XCode Command Line-Tools installed, you already have git installed on your machine. Note OSX comes with Python 2.7 by default, you will need to install Python 3.8 if you want to use it specifically. This tutorial will assume you have Python, Numpy and Git installed on your machine.
Python 2.7 or later and Numpy 1.5 or later.
The following steps have been tested for MacOSX (Mavericks) but should work with other versions as well. Next Tutorial: Cross compilation for ARM based Linux systems Prev Tutorial: Use OpenCL in Android camera preview based CV application
0 notes