#Create a New File From Your Clipboard
Explore tagged Tumblr posts
Visit Tumblr Blog
Explore Tumblr blogs with no restrictions, modern design and the best experience.
Last Seen Tumblr Blogs


Fun Fact
After the announcement of the deal with Yahoo!, there were 170K signatures of unhappy Tumblr users petitioning to prevent the sale in 2013.
Text
Downloading fanfic from AO3
I've been downloading a lot of fanfic lately for personal archival purposes, and I figured I'd share how I do it in case it's useful to anyone else (and so I have it written down in case I forget!).
There are lots of different ways to save fic, including the file download built into AO3, but I find that this gives me the nicest ebooks in the most efficient way.
(Under a cut cause long.)
Download Calibre: https://calibre-ebook.com/ or (clickable link).
Calibre is about the best ebook management and control program around and it's free. You can get it for windows, mac, and linux or download and run it from a portable storage device (I'm using a windows PC).
Install it and run it. It's gonna ask you where you want to put your library. Dealer's choice on this one. I recommend your internal drive (and then back up to external/cloud), but YMMV.
If you want to keep fanfic separate from the rest of your ebooks, you can create multiple libraries. I do, and my libraries are creatively named 'Books' and 'Fic'.
Customise Calibre
Now you're gonna install some plugins. Go to Preferences on the menu bar (far right), click its little side arrow, then choose 'Get plugins to enhance Calibre'.
At the top right of the box that pops up is 'Filter by name'. The plugins you want to get are:
EpubMerge
FanFicFare
Install them one at a time. It will ask you where you want them. I recommend 'the main bar' and 'the main bar when device is attached' (should be selected by default). When you're done, close and reopen Calibre.
The plugins you just installed should appear on the far right of the toolbar, but if you can't see one or both of them, fear not! Just click Preferences (the button, not the side arrow), then Toolbars and Menus (in the 'Interface' section) then choose the main toolbar from the drop down menu. That will let you add and remove things - I suggest getting rid of Donate, Connect Share, and News. That'll leave you room to add your new plugins to the menu bar.
(Do donate, though, if you can afford it. This is a hell of a program.)
Now you're ready to start saving your fave fanfic!
Saving fanfic
I'll go through both methods I use, but pick whatever makes you happy (and/or works best for what you're downloading).
ETA: if the fics are locked you can't easily use FanFicFare. Skip down to the next section. (It does ask for a username/password if you try and get a locked fic, but it's never worked for me - I had to edit the personal.ini in the configuration options, and even then it skips locked fics in a series.)
Calibre and FanFicFare
You can work from entirely within Calibre using the FanFicFare plugin. Just click its side arrow and pick from the menu. The three main options I use are download from URL, make anthology from a webpage, and update story/anthology.
Download from URL: pick Download from URL (or just click the FanFicFare button) and paste the fic's URL into the box (if you've copied it to your clipboard, it will be there automatically). You can do more than one fic at a time - just paste the URLs in one after the other (each on a new line). When you're done, make sure you have the output format you want and then go.
Make Anthology Epub From Web Page: if you want a whole series as a single ebook, pick Anthology Options, then Make Anthology Epub From Webpage. Paste the series URL into the box (if you've copied it to your clipboard, it will be there automatically), click okay when it displays the story URLs, check your output format and go.
Update series/anthology: if you downloaded an unfinished fic or series and the author updates, you can automatically add the update to your ebook. Just click on the ebook in Calibre, open the FanFicFare menu using its side arrow, and select either Update Existing FanFic Books or Anthology Options, Update Anthology epub. Okay the URLs and/or the output format, then go.
Any fic downloaded using FanFicFare will be given an automatically generated Calibre cover. You can change the cover and the metadata by right clicking on the title and picking edit metadata. You can do it individually, to change the cover or anything else specific to that ebook, or in bulk, which is great for adding a tag or series name to multiple fics. Make sure you generate a new cover if you change the metadata.
Browser plugins, Calibre, and EpubMerge
You can also use a browser addon/plugin to download from AO3. I use FicLab (Firefox/Chrome), but I believe there's others. FicLab: https://www.ficlab.com/ (clickable link).
FicLab puts a 'Save' button next to fic when you're looking at a list of fics, eg search results, series page, author's work list etc. Just click the 'Save' button, adjust the settings, and download the fic. You can also use it from within the fic by clicking the toolbar icon and running it.
FicLab is great if you're reading and come across a fic you want to save. It also generates a much nicer (IMO) cover than Calibre.
You can add the downloaded fic to Calibre (just drag and drop) or save it wherever. The advantage to dropping it into Calibre is that all your fic stays nicely organised, you can adjust the metadata, and you can easily combine fics.
Combining fics
You can combine multiple fics into an anthology using EpubMerge. This is great if you want a single ebook of an author's short fics, or their AUs, or their fics in a specific ship that aren't part of a series. (It only works on epubs, so if you've saved as some other format, you'll need to convert using Calibre's Convert books button.)
Select the ones you want to combine, click EpubMerge, adjust the order if necessary, and go.
The cover of the merged epubs will be the cover of the first fic in the merge list. You can add a new cover by editing the metadata and generating a new cover.
Combing with FanFicFare
You can also combine nonseries fics using FanFicFare's Make Anthology ePub from URLs option by pasting the individual fic URLs into the box.
Where there's more than a few fics, I find it easier to download them with FicLab and combine them with EpubMerge, and I prefer keeping both the combined and the individual versions of fic, but again YMMV.
Reconverting and Converting
Once I'm done fussing, I reconvert the ebook to the same format, to ensure everything is embedded in the file. Is this necessary? YMMV, but it's a quick and easy step that does zero harm.
If you don't want your final ebook to be an epub, just convert it to whatever format you like.
Disclaimers
Save fanfic for your own personal enjoyment/offline reading/safeguarding against the future. If it's not your fic, don't distribute it, or upload it to other sites, or otherwise be a dick. Especially if the author deletes it. Respect their wishes and their rights.
This may work on other fanfic sites, eg FFN, but I've never tried so I don't know.
If you download a fic, do leave the author a kudo or a comment; you'll make them so happy.
This is how I save fic. I'm not pretending it's the only way, or even the best way! This is just the way that works for me.
#fanfic#fic#ao3#ficlab#calibre#fanficfare#epubmerge#downloading fanfic#adding the my fic tag so I can find this again#my fic
1K notes
·
View notes
Text
Krita tutorial the way I know it.
Basics: What is where.
Gimmicks.
Specific advice on specific tools.
Basics: What is where.

Upon opening the program this is what you're met with. First of all, must comment: The layout is HEAVILY editable so you can just drag menus anywhere you want, even leave them floating amidst the sheet you're drawing on.
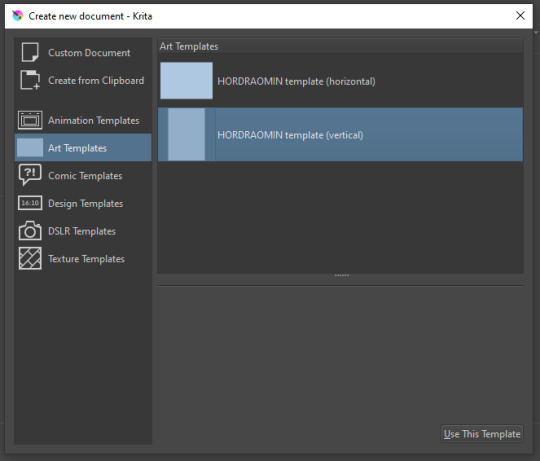
You can create custom art templates, I have two o'mine here as both have my signature background color.
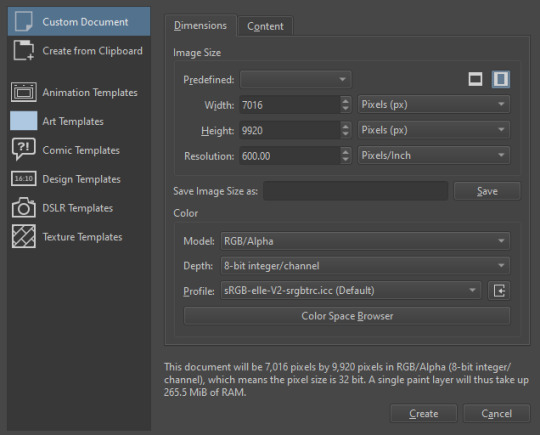
As well, you can edit the custom document settings, as in what size you want it, what resolution, even the initial content of the image. As well you can create from clipboard: Just copy some image from your browser and Krita will recognize it (useful for making meme edits lol).

Now, once you have your file, I will show you what is where.
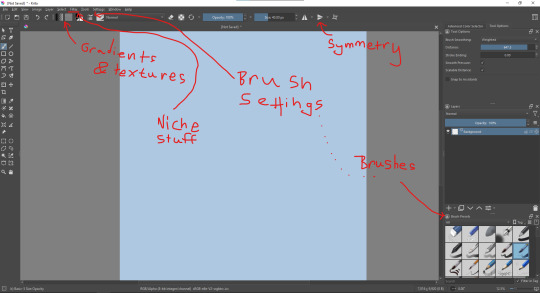
Brushes:
Brushes are easy to edit and there are tons of free bundles to download online. I myself only got one bundle, Jackpack (bit hard to find now due to original source being lost, it is still available but bit tricky to come by).
There. Are. Tons.

Some of these are my custom brushes for calligraphy in neography, you might even guess which ones. You can edit existing brushes, make new ones from the ones you've edited without changing the original, and all sorts of stuff (more below in the third chapter).
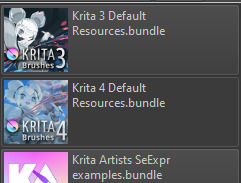
There are numerous packages of brushes once you enter Krita, but only one/two are available when you first open it. To unlock them all, click here:

And make sure all bundles are dark gray in color (example of both dark and light below).
Now Tools Options: those will pop up depending on what tool you're using.
Symmetry: Fun stuff. You can drag the lines depending on how you need them and then center them back to the center of the screen if needed.
Gradients and Textures also have their tools options, you can play with those to get the feeling what they can do (more in third chapter).

The Filters tab is useful too. Blurring, motion blurring, color mapping, artistic filters and all that: Quite fun.
Gimmicks.
Krita allows you to customize your workspace freely. Floating menus, tabs, anything you want. It has quite many drivers at that-
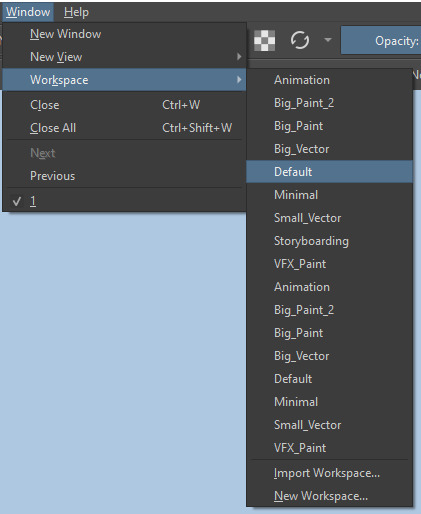
To access the workspace templates, go to Window and choose Workspace.
Krita allows for copy-pasting any image onto the sheet. Though, for me it sometimes crashes if I accidentally copy-paste text into it without choosing the Text tool first.
The software allows for both raster and vector work. It is basically Photoshop sharpened to be used by artists primarily.
There are some interesting mechanics regarding the Eraser (default bind E).

You can use it with any brush, allowing for textured erasure/quick work. Good for sketching.
You can use it on gradients (given there's a transparent point on the gradient preset).
There's a Multibrush tool:

People say Krita is good for animation but my brain can't wrap around it yet honestly @~@.
The keybinds:
B - Brush tool.
E - Erase tool option.
M - Mirror (useful for checking accuracy from a new angle).
Ctrl - Color pick (when used with brush or other color-using tools).
Shift+L.Mouse+drag - Changes the size of the brush by dragging left and right.
Ctrl+E - Merge layer with the one below.
Ctrl+G - Group selected layers.
Ctrl+A - Select whole sheet.
Ctrl+Shift+A - Deselect everything.
F - Bucket tool.
G - Gradient tool.
Ctrl+S - Save document.
Ctrl+Shift+S - Save As document.
Ctrl+N - New document.
Ctrl+O - Open document (will be seen in a new tab on top of the sheet).
Ctrl+C - Copy selected layer or selection.
Ctrl+X - Cut selected layer or selection.
Ctrl+V - Paste copied/cut layer or selection.
Q - Multibrush tool.
R.Mouse - Interesting thing: Opens up a quick selector for brushes and colors you've already used in the piece.
1 - Zoom 100%.
2 - Zoom to fit the piece vertically.
3 - Zoom to fit the piece horizontally.
4, 5, 6 - Turn 15 degrees (4 and 6) or undo the turning whatsoever (5).
Ctrl+I - Negative filter applied to layer.
Ctrl+U - Color editing on the layer.
Ctrl+Y - Soft proofing mode (for color mistakes and stuff like that, mostly annoying for me tbh).
Ctrl+T - Transform selection/layer.
Ctrl+R - Square select tool.
Ctrl+J - Lasso select tool.
Honestly you can just hover your mouse over tools and see their shortcut binds, as well. Or edit them in Settings.
Specific advice on specific tools.
Brush:
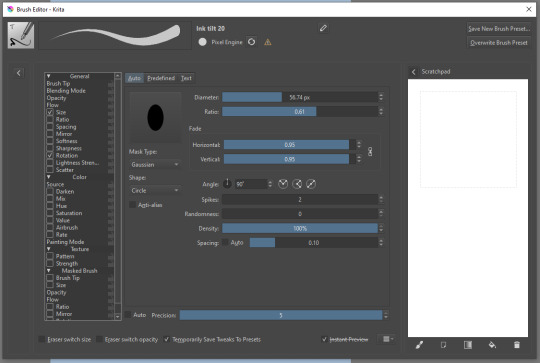
Brush editor is a great tool for making custom brushes, and it even has a sratchpad to test them out. Lots of settings, but no need to be afraid; Most of them you might never use on purpose.
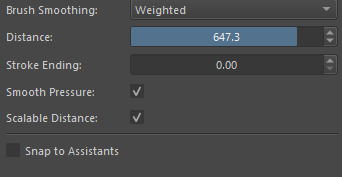
Use Brush Smoothing for great and pretty lines in lining pieces or making calligraphy.
Gradient:
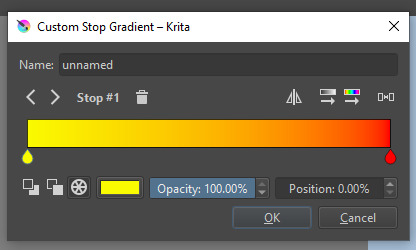
The four icons to the right top are:
Mirror gradient.
Arrange by lightness value.
Arrange by color value.
Space the stops evenly.
Click the gradient to add a new stop. The three things to the left are:
Make the stop use Primary Color.
Make the stop use Secondary Color.
Make the stop use a fixed color.
317 notes
·
View notes
Text
Some learning apps I've liked (in no patrticular order)
Renshuu (japanese): good lessons, a bit slow paced for me
Readibu (chinese reading app): free version is good, paid version includes full sentence audio and translations I think which may be useful.
Pleco (chinese dictionary and reader app): top level app, get it now if you study chinese and use your phone at all. Its free version includes a huge great dictionary, and Clipboard Reader which has ALL the Reader features just that you have to copy and paste the chinese text in (their paid Reader you can upload epub txt files etc directly). Their paid features are nice because they are all 1 time fees: pay 5 dollars once and have the purchased item forever. I hate subscriptions so i love that this app does single purchase instead. I bought some graded readers on this, and expanded dictionaries. Its Dictate Text text to speech feature is nice in the Reader/Clipboard reader because it highlights the word as it reads and shows translation, making it easy to follow along.
Duoreader: a free basic app, has a few parallel language books for many languuages. It includes text to speech audio and click word translation. Excellent for free reading with parallel text set up.
Smart Book by Kursx (also under the name Parallel Translation of books by kursx on the app store): it uses mtl, but you can search for books or import books, and it will show sentence translations or make an entire parallel text for you, it also has click translations, word saving, progress information (which is motivating to me), and text to speech read aloud function. Its currently what i use the most for reading. Trahslations are as good as Lingq or Google Translate so NOT always reliable but useable and the sentence translation helps for figuring out grammar. But Pleco and Readibu have BETTER translations. For chinese this app is good, for japanese its useable if youre upper beginner but if you dont know basic grammar and particles then the japanese individual word translations are often wrong and unreliable - sentence long translations are useable though.
Tofugu: good hanzi study app.
Anki: great app especially if you import decks made by people around the internet. I look up decks by going to a search engine and typing in something like "4000 hanzi mnemonics anki deck" or "common chinese words in sentences anki deck." I have recommended some anki decks I've used on this blog. A tip about anki: their website works fine in mobile browsers, you do not have to pay for any app to use anki on your phone, you can just use the site if you'd prefer. For initial uploads of flashcard decks created by other users, you will need to install anki on a computer, then download the anki deck from the deck's page online, then put it into your computer anki program. After you do that, you can sync your computer anki to the website one. Then you can use anki either online or on the computer or on both. I use anki only on my phone mobile browser. It seems the main benefit of anki phone apps over using the internet mobile browser, is flashcards are easier to Make if you end up wanting to make your own anki flashcards on your phone.
Immersive Chinese: chinese lessons. I haven't used it much but I like the structure
Glossika: I specifically recommend getting the old cds, possibly through your library, or finding the mp3 files online. I think the audio files are easier if youre not good at focusing on consistently doing SRS flashcards, since spaced repetition study sentences are the new glossika model and require a monthly subscription. Plus side to the new model: most languages have around 6000 sentences where the old cd courses often had around 3000 sentences. Plus side to the old cds/mp3s: can be found in many libraries for free, and online, and if you do buy them theyre a one time cost. Excellent resource if you like audio review (i do), with common grammar and vocabulary taught. I like that even the 3000 word old courses will get you at least to upper beginner or lower intermediate, enough knowledge to start learning by reading or watching shows and looking words up, and enough words to have some conversations. Pimsleur is similar but tends to cover less vocabulary, so afterward you need to learn more words on your own before you can immerse and look up words to study.
Japaneseaudiolessons.com: a website with free japanese audio lessons, a free textbook, free notes. They also have nice kanji learning books with pre written mnemonics and sentence examples for sale.
Your local library: a lot of libraries have deals with language learning sites/apps, your specific library may provide some courses for free. In addition, apps Hoopla and Libby have a lot of courses and digital textbooks and audios you can check out. You can use those apps with a library card. If you are a college student, a lot of college ebook collections include MANY textbooks and independent study books for languages. Nearly every Tuttle book I got for studying Japanese and Chinese, I was able to check out the ebook version first using my college library and only bought those books because I ended up finding them so useful I wanted print copies. (For that matter, some under $20 dollar reference books I owe for teaching me hanzi and kanji: Tuttle Learning Chinese Characters: HSK Levels 1-3 - this book gave me a foundation in hanzi and was the easiest guide for learning hanzi for me and learning HOW to remember them. I found it more useful than Heisig's Remember the Kanji/Hanzi books by far, although they utilize a similat idea, and less effort to remember than Kodansha Kanji Learner's Guide - although I like that reference book as a reference. Runner up is Tuttle Learn Japanese Today: The Easy Way to Learn 400 Practical Kanji by Len Walsh. It was more basic than the hanzi book, less in depth, but a very approachable understandable and quick to learn kanji book to start out with when studying Japanese, that will not overwhelm you the way say Heisig or KKLG might. For hanzi I used my Learning Chinese Characters book for a few months, then an anki deck "hanzi 2000 mnemonics pinyin" while also just regularly looking up new words while reading graded readers then chinese show subtitles then webnovels, and making up my own mnemonics which got easier over time. For japanese, I followed up with a vocabulary deck as I found vocabulary easier to remember than isolated kanji, and kanji.koohi.com was a useful site for free user submitted mnemonics to remember kanji when I struggled to remember. Its also a good site for free flashcards and study of kanji generally.
ChinesePronunciationTrainer: a really simple free app. It's biggest usefulness is practicing pronunciation. You can record yourself trying to pronounce a sentence after hearing the chinese pronunciation, then play back your recorded attempt compared to the chinese pronunciation. The app makes shadowing easier to evaluate, so you can compare and notice if you're making pronunciation errors and work on them. It's also very simple low feature speaking practice.
LingoTube: free app, uses machine translation. If you want to watch youtube with dual subtitles, or click translations on subtitles, or instant replay/loop of dialogue lines, this is an app that can do that. Very useful for immersing with youtube videos like youtubers and shows on youtube.
Idiom app: it is orange with an i on the icon. Click skip for the "helm" offer when you first download it, helm is a paid add on for better translations and you may not want it right away. The core app is free (helm add on costs a subscription). This app is basically Lingq but free. Translation quality is the same, which appears to be google translate quality on Lingq and Idiom. So some errors, but useable especially as you hit upper beginner and above and can notice when you may want to reference a word in an external dictionary (like Pleco app for chinese, yomiwa app for japanese, etc).
Satori Reader: a graded reader app for japanese, absolutely amazing quality material. I recommend exploring the free content on the app. If you decide you'll use it a lot, or plan to get into a reading kick for a few months, it's worth getting a subscription for a while. I plan to get a subscription once I have the time to read japanese 1-2 hours a day for a few months. Satori Reader has tons of reading materials branching from approachable to an upper beginner (say you can read Yostuba manga a bit, or are in Genki 2, or know around 2000 words) to you're almost ready to read webnovels or regular japanese novels but the difficulty bump is just a Touch too steep. If you go through the various reading level material on the app, you shpuld be prepared to handle at least some japanese novels for natives once you can handle some of the higher reading level stuff on Satori Reader. In addition: the translations are done by professional translators with in depth notes on grammar points (incredibly useful and the best explanations on Japanese Graded Readers Ive used), fully narrated stories by real people, and many of the graded readers are designed to be enjoyable long reading material in their own right. There's also some multiple difficulty versions of reading material if you'd like to read an easier version before trying a more complex version of the same story. There is so much reading material on the app you can get significant practice and vocabulary/grammar improvement if you have time to read. I lnow a few people who got through a few hundred+ chapters on this app, and generally they went from N4 or N3 reading level to N2 or N1. Then they transitioned to reading novels for natives. As far as high quality well made well explained plentiful graded reading material for japanese, this is one of the best resources I've found. (The other 2 great graded readers I have are textbooks, one being a Tuttle Read Japanese book that goes from basics through to being able to read 2000 kanji, newspapers and documents, formal and informal, and is dry af to read but generally leaves you fairly prepared for japanese reading, and a more basic Beginning Japanese Reading book thats part of a 4 part textbook collection and absolutely drills the basic 500 most common kanji and many words, hiragana and katakana and many words in them, for 500 or so pages).
Microsoft Edge. I know, weird. Edge on computer and mobile internet browser has a Read Aloud tool. It is the best sounding text to speech Ive heard. This Read Aloud tool is also in Microsoft Word if you copy paste text into Word. I find going to sites in my target language, and using the Read Aloud tool, is a nice way to get audio in with my reading when I can't find an audiobook. The tool also highlights the word as it reads, helping you keep up with the reading, and for me it helps improve my reading speed. In addition, ANY web browser (and any phone/tablet Reader app like Kindle, Moonreader, Kybooks etc.) often has the ability to click or tap or highlight a word to look up the translation. So when reading on any of those internet browsers/Readers, you can look up words just like you would on Lingq but free.
Japanese.io: a site with japanese graded reading material, and tools like click translation and saving words.
https://www.sosekiproject.org/about.html If you like the author Soseki, this site is awesome. It features full audio of his works, full parallel text translation, and individual word translation.
43 notes
·
View notes
Text
[off-site question] 'what is your system for tracking Flight Rising info?' (asking in reference to notn prep convo)
saw something about keeping all fr tracking info in their phone's notes app...got me thinking about my system for info tracking for fr + the evolution of it. I used to use my mobile phone notes but then moved to google docs pretty quickly and adapting to sometimes use discord. My current system is a chaotic mess due to my hiatus/return, new things/events I missed, and only recently getting my first very own computer, when everything before was phone or laptop.
My system can be primarily summarized by the following breakdown:
-> s p r e a d s h e e t s - I got back into fr after a long ass hiatus and immediately decided that my lifelong aversion to spreadsheets was over and I locked in to teach myself how to use them in the way that I want to, to replace my 'everything in google docs' trash...
I currently have sheets for: notn prep, hibden tasks, and project tracking (especially) I also use sheets other people have made for FR closest in-game color calculator and other stuff, as well though mostly I make my own so I can go crazy with formatting only I like.
I also use google docs still, such as my recent quick little reference for the multiple secret santa events I am participating in this year. I use it a lot less than I used to, especially as I try to/considering switching from google drive to a different file/bookmark collection platform.
-> private/personal server channel - minimal-info stuff that needs quick access
Not a lot of people, afaik, use the ability to create a discord server for just themselves to their advantage. I throw things from my clipboard to here to grab later/move to other places, keep things super easy to find in-house to share later in a dm/server. I also have a specific thread of name ideas and what I have and haven't used, though it isn't efficient and may be moved somewhere else for formatting. But for (temp) hosting, easy access between devices, easy sharing w others and organization within my most used site/app, it's good.
-> forum threads on flight rising - available to reference by others and share easily
trying to make and use more forum threads since I realized how much I like looking at other people's (lore/dump/journal/tracker, etc) threads as reference/inspo and for fun. It is cool to see how others interact with the game, with it having such diverse options for engaging with it. Especially older threads, like woah!! Time capsule of old fr!! I am interested in internet/media archiving,,,
-> dragon bios - tracker dragons specifically, of which I have a couple
they hold more than they should rn lol...ideally and hopefully in the future, they will just be overviews of the specific dragon's lore, with more fleshed out stuff other places + all related links and art! :) currently my main focus for tracking in dragon bios is tracking each dragon and its associated projects or pairs, and tracking purchase, gening and some outfit plan stuff. Its a good basis for my other, more in-depth trackers to have an easy way to reference on the individual dragon scale (ahhah accidental pun). I reference them a lot.
-> profile/clan bio - I do not put much tracking info in my clan/profile bio, mostly to keep it simple and not overwhelming but also because I find it a little bit more annoying to update and can be confusing when people come across my page for the first time...Currently pending a big old profile bio revamp, trying to come up with formatting ideas and looking for profile bio templates (is it just me or are there so little of them floating around..?) I definitely want to include a selection of specific things,,, I try to prioritize links and commonly referenced info and then general being friendly/intro stuff. also aesthetics....I will be, and others even more, looking at it a lot... I am slowwlyyyy getting to my bigger to-do items I swear, I just procrastinate with making new projects and scrolling aimlessly on forums....
#sorry about wall of text#worm rambles#this was rescued from being a discord chat rant so thank god for that person#who inspired this#I am gonna get banned from everywhere for spam I am so annoying online please spare me#no clutter in MY lair.. <- insane & monstrously inaccurate lie
4 notes
·
View notes
Text
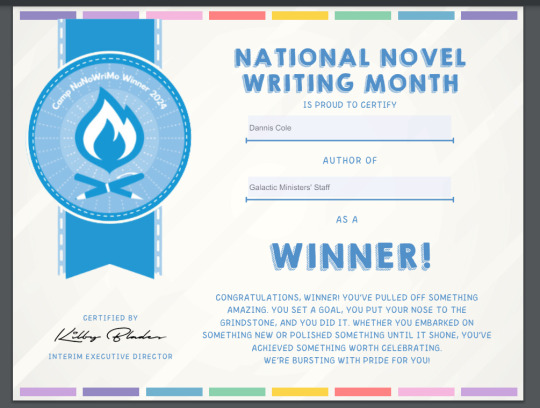
I finally got my 2024 Apr Camp NaNoWriMo Official Winner Certificate!
Did Tech Support finally answer my frantic plea? Well, no. But I had read something about recreating the record to get the record connected with the offical NaNo project. So, I searched in Support and found this.
I followed these directions to create an identical project. I copied every day's entered word count and put it in again.
NOTE: You must go to the Stats menu option
Go to your account's page

My plea for help that went unanswered. This post was actually deleted!

So I created an unofficial certificate on Canva.com and put it on social media. I was very upset.

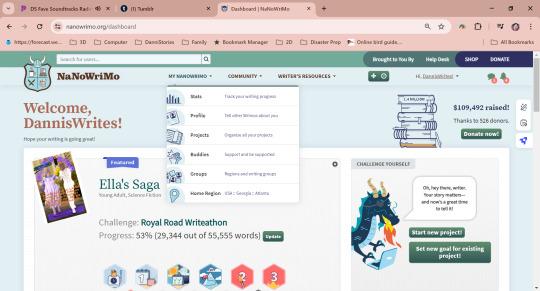
Here was my official project, and I hit my goal and had badges...but no winner graffiti. It wasn't linked as an official project. I'd seen a banner telling me to link it, but when I tried, every project I ever did was listed...except this one, that I just won with.
I looked up on the forums what someone else tried, and they accidentally deleted their project! I posted on the forums about my problem. The other post had been from November. But both that one and mine got deleted! I figured no help was coming, so I made my Unofficial NaNoWriMo Winner Certificate and posted it to Twitter, with a link to the doc for others to create their own if they liked.
But, I'm not one to just give up. So, I tried creating a new project. First, i went to my account main page.
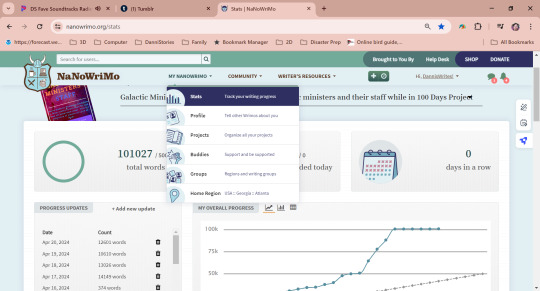
Under My NaNoWriMo on the bar, I chose Projects to get to this one, then Stats to get my word counts per day.
If you left click and drag your mouse so your daily counts are highlighted, you can Ctrl-C [or Control-C] on a Mac to copy this to the clipboard. Open a Notepad file and Ctrl-V to paste. Use this later.
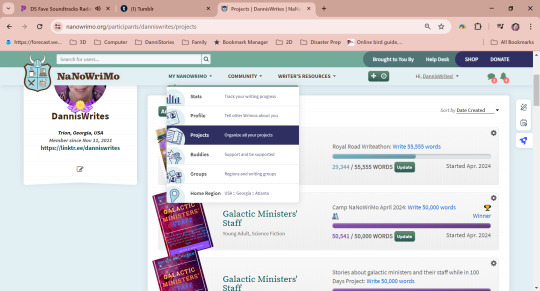
Go back to your Projects page and create a new project. Note that, you must do this before Apr 30 or you can't choose Camp NaNo for your Goal.
I then went in Stats on the NEW project I just created and did Add New Update. Only on the Stats page can you add words for a different day than today!
Now my project says Winner [the top one of the two Galactic Ministers' Staff Projects, on the right side of the bar]
And, I was able to click on it and download my official certificate! Yes, it's a .pdf, but I opened it and did a screenshot with the Game Bar, that's Windows-G if your keyboard has the Windows button on it. It brings up choices for screenshot or movie, and is handy. Find the screenshot in Video->Captures and double click. Use the cropping tool in Photos and save a copy. Now you can post your Winner Certificate to your social media!
That's how I fixed my project so it now says Winner. Good luck to all of you!
Yes, I am upset at what happened on the youth forums. This happens on a lot of forums, and I think the answer is for someone brilliant to write an AI that can detect these vile people! It is bad that it happened, but I still participated, not in support of perverts who took advantage of innocent youth just trying to enjoy writing. I still think the spirit of NaNo is good, and I will continue to set my goal and write 3 times a year.
But now I am adding the also 3 times a year Royal Road Writeathon to my yearly bucket. If you wanna read my latest project, it is
Ella's Saga
Ella stays busy to cope with her chaotic life, but she meets Farley, who gives her a new kind of pocket computer, and she realizes he's connected to SETI's discovery today. Farley also has some unusual knowlege of Ella's future, which makes her realize she needs to rethink her priorities. There is much more to life than good grades and pursuit of her programming career. Her skills are badly needed in Farley's home.

I had 988 views yesterday, so if it sounds interesting, please go read for free! I plan to add chapters daily 'til it's finished, then delete it from Royal Road and put it on Amazon Kindle. Comments and rating greatly appreciated! I love the Royal Road folks and I'm glad to be a member of the Penguins Group [LOL that's the default group for members of Royal Road and there's a forum post explaining it].
#april 2024#nanowrimo#camp nano april 2024#camp nanowrimo#nanowrimo scandal#frustration#solution#problem fixed
2 notes
·
View notes
Text
How CageTalkers Are Revolutionizing Cage-Based Animal Management

A Smarter Way to Care for Animals
In the fast-evolving world of animal research and laboratory care, outdated methods of managing caged animals have long posed challenges. Clipboards, scribbled notes, and lost information have led to miscommunication and inefficiencies. But now, a digital revolution is changing the game. Say hello to Cage-based animal Management powered by the electronic Cage Card—CageTalkers.
These smart systems offer more than just a tech upgrade—they provide clarity, accuracy, and time-saving benefits that improve animal welfare and simplify researcher workflows. It’s not just about going paperless. It’s about going intelligent.
What Are CageTalkers? Meet Your New Digital Assistant
CageTalkers are electronic cage cards equipped with wireless technology. They are designed to display real-time information about each cage—animal data, treatment schedules, environmental conditions, and more. They replace static paper cards with dynamic, interactive displays that automatically update.
Imagine walking into an animal facility where every cage gives you a real-time report at a glance. No need to dig through files or second-guess treatment schedules. CageTalkers do the thinking for you, leaving no room for human error or outdated information.
Why Traditional Cage Management Falls Short
Traditional cage-based animal management relies heavily on manual processes—writing updates, checking binders, or memorizing protocols. It’s labor-intensive and prone to mistakes. Even the most diligent researchers can overlook a change in protocol or miss a note on a cluttered clipboard.
More critically, this outdated system can compromise animal welfare. Delayed updates may lead to missed feedings or incorrect dosages. This is where Cage-based animal Management powered by the electronic Cage Card shines. It transforms clunky, error-prone workflows into smooth, accurate, and reliable operations.
The Magic Behind the Technology
What makes CageTalkers so powerful is their ability to integrate seamlessly with animal management software. Updates made in the central database instantly reflect on each electronic Cage Card. Whether it’s a change in the animal’s health status or a modification in their feeding schedule, the information is pushed directly to the cage.
In addition, these devices can include color-coded alerts, touch-sensitive interfaces, and even QR codes for quick scanning. This interactivity allows animal technicians and researchers to respond faster and more accurately. In many ways, it’s like having a live conversation with each cage—hence the name CageTalkers.
Benefits That Speak for Themselves
The most immediate benefit is efficiency. Staff no longer waste time shuffling through paperwork or double-checking handwritten notes. With CageTalkers, everything is at their fingertips—literally. The streamlined communication between digital cards and central systems creates a smooth flow of information that’s both real-time and reliable.
There’s also a significant boost in animal welfare. When cage data is accurate and up-to-date, animals receive better care. Researchers can quickly spot anomalies in behavior or health and act on them. This makes the environment not only more ethical but also more conducive to reliable scientific outcomes.
The Future of Animal Facilities Is Here
The adoption of Cage-based animal Management powered by the electronic Cage Card is just the beginning. As technology evolves, so too will the capabilities of CageTalkers. Imagine AI-enhanced cards that not only display data but also provide predictive alerts or suggest optimized schedules based on historical trends.
In short, this is more than just a digital upgrade—it’s a paradigm shift. From research institutions to breeding facilities, CageTalkers are setting new standards for transparency, efficiency, and humane care. The future is smarter, and it starts one cage at a time.
0 notes
Text
Life today massively depends on the online transactions and information sharing. Each of such undertakings of confidential information is protected with separate passwords. We are vulnerable in keeping track of all the passwords and require a sophisticated mechanism to manage our authoritative details safely, securely and sagaciously. One which is user-friendly, accessible from anywhere, provides active sync up, backup/restoration if required. Password managers are common on a desktop, however, the need on mobile has increased exponentially in recent years. Especially when you want to create a very secure password that may also be easy to remember. This need has prompted developers to make some of the most advanced applications. Below listed are a few of the best Android apps on google app store. If you are an iPhone user, we have similar password management apps list here. Keeper Password Manager This application provides private digital vault on Android, iOS, Mac and PC platforms that are encrypted and unbreakable. It uses the highest levels of privacy and security (256 bit AES, PBKDF2). Other features include password generator, power sharing, secure file manager, autofill login and password, vault to vault sharing, two-factor authentication, internal controls, Keeper for groups and enterprise. It comes in free and paid versions. Reneph Password Safe Password Safe encrypts stored data securely using 128 bit AES and gives single access only. It doesn’t have any access to the internet. Key functions include categorization of entries, password generator widgets, backup and restore, customized user interface, auto backup,* .csv import/export. Pro version has entry elements reordering facility, encryption up to 256 bit, import/export to excel, auto lock, backup to encrypted CSV, self-destruction. No sync up feature is available on this. LastPass Password Mgr Premium Mobile version of LastPass password manager securely syncs your passwords across all browsers and devices. Essential functions include auto-fill for Android 4.1+ and Chrome (Android 4.3+), earlier versions have “copy” options; auto fill login and forms, biometric authentication (using Samsung S5’s fingerprint reader), password generator, add, update and delete sites, secure notes and form fill, redesigned UI. It offers 14 days free trial and later $12 for a yearly subscription. MSecure - Password Manager Comes with some of the most advanced features, mSecure’s New 3.5 Version of the password manager includes Tablet support, Auto-Login, Auto-sync and more. It is ultra secure, simple & smart and uses 256bit Blowfish encryption. Key features comprise of an auto lock, password generator, sync cloud data protection architecture, auto back on SD and e-mail, user-friendly customized options, categorization of data; sharing via email, SMS or clipboard, auto capture weblog in, can import data from competitor products. 30 days trial and then for $14.99. Dashlane Password Manager Free password manager & secure digital wallet for Android and other devices. By using 256bit AES encryption, it provides firm security to your data, backup/restoration, strong security vault with security breach alerts, password generator, auto fill on Dashlane browser and auto-login for your apps with Dashlane keyboard. Premium version offers features like sync up of all devices; cloud backup, priority user support. Other features are an auto lock after inactivity. The application works in English, Spanish and French. SecureSafe Password Manager SecureSafe protects your passwords and documents from malicious hackers and unauthorized access, using AES-256 and RSA-2048 encryption. Essential functions are one login for all platforms, data sharing between SecureSafe and you is over HTTPS only, additionally encrypted passwords, 24/7 monitoring, data inheritance function if something happens to you, a single login for all devices, offline access to passwords, comes as iPod/iPad app and web app.
Advanced version with premium features comes in PRO, SILVER and GOLD account types. Android Wallet Password Manager aWallet Password manager has features like build in the editor; backup to the Android USB device, CSV format unencrypted data export and auto lock. Professional version contains password generator and CSV Import functions. Security features include user-friendly categorized encryption using AES and Blowfish algorithms with various key sizes. Triple DES with key sizes of 168 and 112 bits. Combinations of multiple criteria to decrypt the data, “Salt” combination with a master keyword to prevent theft, auto-destruction after failed unlocks. It has no internet access permission, however, the only permission it has is to access to the USB device to backup/restore the data files in case your phone is lost. Reneph Password Safe By using AES 128 bit based encryption, Reneph Password Safe doesn’t require permission to access the internet; widgets lets you copy passwords to your clipboard from your home screen. Categorized entries, single master password access, password generator, backup and restore the encrypted database, customized user interface, automatic clearing of the clipboard, auto back up, CSV- import/export and no unnecessary Android rights are some of its key functions. In professional version, entry elements can be defined and reordered, the definition of encryption key size up to 256bit, import/export from/to excel table, auto-lock, encrypted CSV-files, auto-backup to encrypted CSV and self-destruction. It doesn’t have sync up feature. Fasino Password Keeper This app is free. It allows you to store passwords for your accounts safely and securely on your devices. You can export the data and protect them with passwords import from the simple text files. Er.mo My Passwords A simple to use application with AES data storage, multi-window support, strong password generator, backup, restoration of the encrypted database and an offline operating facility to safely store substantial passwords and numbers encrypted. PasswdSafe - Password Safe PasswdSafe is a port of the Password Safe application to Android. Users can sync up the password files from cloud services too by installing the PasswdSafe Sync app. In case of bugs, it is advised to maintain a known good backup NS Wallet This application uses AES cipher algorithm and offers most reliable, secure, theft free and FREE data vault to the users. Works on “privacy are priority” principle, NS Wallet is a fully offline solution. All you need is a master password to it. With “ NS sync” backups in the cloud can also be created. Premium features include various themes, fonts and search criteria. Rhythm Hexise Password Safe Application ensures data privacy without internet permission, auto lock, SD card backup, customized password records on demand, dynamic support, different formats, creating records from pre-defined and new templates, password record management, 90+ icons to categorize, quick search, import/ export data using *.csv file for data exchange with other apps and multi-language support; Password Safe uses 256 bit AES algorithm for encryption. Safe In Cloud Password Manager Facilitates protection to your delicate data with unique and secure passwords, “SafeInCloud” uses 256 bit AES for complete password management. It comes as Free Desktop Application + Mobile Application for Phones and Tablets. Essential functions include strong encryption, cloud sync, password generator and strength analysis, browser integration, cross platform and automatic data import. DataVault Password Manager Ideal app and with unmatched features like multiple data views, flexible template management, on-device backup, password generator, security time out, maximum login attempts and synchronization with DataVault for Mac and DataVault for Windows (sold separately). The interface is optimized for mobile devices & desktop environments. Also, facilitates customized options, SD backup,
sync-ups, smart access control, password hints, online troubleshoot FAQs and personalized settings Ilium E-wallet- Password Manager eWallet application by Ilium software keeps important/authoritative and sensitive details secured behind the 256-bit military-grade AES encryption. PC version eWallet helps sync between multiple eWallets over Wifi. Customize your eWallets with cards, backgrounds, and categories. It auto locks detecting inactivity
0 notes
Text
Weird Image
Okay I'm not one to be weird for no reason but this kind of freaked me out. Two things. -Does anyone recognize this picture and or location?
-Has anyone ever had images they hadn't copied show up when using the "Copy" function(Crt-C/V) on their PC? Reason I'm asking, I was working in Photoshop and while trying to copy an image from one project to another this random damn picture pasted instead?! I double checked all of my open windows and could not find anywhere where this image would have come from. Secondly, I went ahead and created a new project in photoshop and went with the default settings(settings that match what is in your clipboard for scale and resolution) and the image it pasted was the correct image I was originally trying to copy. Anyways super weird and if anyone knows anything about this picture or how this could happen your info would be greatly appreciated. OH lastly, the image is at a resolution of a 100dpi? which is weird because the files I was working with were 300dpi and if it copied from a screen grab i would assume it would be 72dpi by default? Just weird.

0 notes
Text
How to Change the Photo Background on iPhone (iOS 17)

Want to change the background of a photo on your iPhone? Maybe you want more attractive images, or maybe you just need a new backdrop. Well, iOS 17 offers some great tools for you to make that transformation in your photos. In this lesson, we'll show you how to alter an iPhone photo's backdrop in a few different ways. For easier adjustments, use the Photos app, and for more complex customization, utilize PhotoCut's background changer. You can also use GIMP to make backgrounds transparent. Now, let's begin!
How to Change a Photo Background on iPhone Using Apple Photos
Using the Photos app installed on your iPhone, it is quite simple to do simple background editing on photos. The Photos app does not allow for full background replacement but provides a great tool for lifting or isolating a subject from the background. Therefore, this is a fast and easy way to start with the background change.
Steps to Lift a Subject from the Photo Background in iPhone (iOS 17)
Launch the Photos App: On your iPhone, open the Photos app. This software is pre-installed on all iOS devices and provides a variety of editing features.
Select the Picture to Edit: Navigate through your picture collection and pick the picture you want to change the background on.
Lift the Subject: To remove the background, press and hold the main subject of the photo until it is highlighted. The subject will flash white to indicate it has been detected.
Copy and Paste the Subject: Once the subject is isolated, a pop-up will appear with options. Tap Copy to copy the isolated subject to your clipboard. From here, you can paste it into other apps or share it directly through messages or social media platforms.
Use Your Subject in a New Background: Cut your subject and paste it into a design app or a graphic editor to place it on a new background that you want. This step may require a third-party app because Apple Photos does not allow you to change the entire background directly. You can create a Twitter banner and change the background according to your needs.
This method is an excellent starting point for simple background changes and is available on most recent iPhone models, including the iPhone SE 2. While this option is quite basic, it offers a fast and easy way to extract your subject and replace the background.
How to Change a Photo Background Using PhotoCut
For someone seeking a much more versatile background-changing experience with more advanced editing of the background, PhotoCut is an excellent photo app. When it comes to visual design, product photography for e-commerce websites, and social media graphics, it is a far more creatively flexible solution than photos. You can generate art using PhotoCut’s AI and change the background.
Applying special effects, changing a photo's backdrop, or using an AI-generated background is simple using PhotoCut. Using PhotoCut, alter the backdrop of your images by following these steps:
Steps to Change the Background Using PhotoCut
Install PhotoCut: Start by downloading and installing the PhotoCut app from the App Store, if you haven't already. Although you may use PhotoCut for free to perform basic backdrop adjustments, there are in-app charges for more functionality.
Launch the PhotoCut Application: You must launch the PhotoCut app on your iPhone. You may choose from your gallery or upload a new photo when you first open it.
Upload a Picture: Select the "Upload a Photo" option. Choose the image you wish to modify from your iPhone's gallery. It will support the majority of images as it can handle nearly any file type, including JPEG, PNG, and others.
Automatic Background Removal: Once you have uploaded your image, PhotoCut automatically detects and removes the photo's background. AI-based technology isolates the subject, so it is quick, precise, and usually a lot faster than other editors. It will circle and highlight the subject in your photo, so it leaves no doubt about what remains. You can create portraits using PhotoCut’s AI and change the background.
Select a New Background: You are now given the option of selecting a new background. It has plenty of options. PhotoCut offers solid backgrounds, gradients, scenic landscapes, digital patterns, and, if you want to do something unique, an AI background. You can select that or upload your own for the new background.
Adapt the Backdrop to Fit Your Image: After selecting a backdrop, you may resize, reposition, or apply effects to further alter it. You may also use the app's features to adjust your subject's edges so that they fit in with the new backdrop.
Use AI to Add Realistic Shadows: One of the great features of PhotoCut is its ability to add realistic shadows to your subject. Once you have selected a background, PhotoCut can create a shadow that is compatible with the light source in the image, giving your subject a natural-looking position within the new background.
Save and Share Your Edited Photo: Once your modifications are complete, press Save to save the edited photo to your iPhone's gallery. Social networking platforms like Instagram, Facebook, and Twitter now let you share it directly. You may also use it for presentations, e-commerce listings, and other projects.
Benefits of Using PhotoCut for Background Editing
Apple Photos may lift some subjects from backgrounds, but PhotoCut does it all in many ways by offering background selection and fine-tuning photos. Here are some key reasons to use PhotoCut.
AI-Powered Editing: Artificial intelligence helps PhotoCut strip the background from any kind of complex image very fast with accuracy. This will ensure that your photo is professionally looking without taking hours to do manual edits.
Custom Backgrounds: You can decide whatever background you want to use: it may be a solid color, a natural landscape, or a pattern. You are also allowed to upload your custom images for the backgrounds in this app. You can make tattoo designs using PhotoCut’s Tattoo Generator and change the background to white.
Realistic Shadows: The application provides realistic shadows for the subjects to get them more integrated with the new background. In turn, it increases the authenticity of the final image.
Free to Use: PhotoCut also offers a free version of the app with basic background-changing features, so everyone has access to it. It unlocks additional premium features through in-app purchases, but generally speaking, the free version of the app is enough to fulfill most background editing requirements.
Conclusion
Changing the background of a photo on your iPhone has never been easier. Unlike the Apple Photos facility, photo-lifting subjects in the background, PhotoCut takes a more sophisticated leap with the inclusion of AI-assisted background removal, easy customization, and realistic shadows. Improve that social media post, and have fun crafting marketing materials with PhotoCut - simple but effective at making photo edits amazing. Try them out now and make lovely photos effortless!
FAQs
Q1. Can I change the background of a photo for free on an iPhone? Ans. Yes, you can change the background for free using the PhotoCut app. Even though it provides in-app purchases for some premium features, you may change the background for free.
Q2. Is it possible to remove the background in Photos on iPhone? Ans. Yes, with your iPhone, you may remove or cut out a subject by making manual processes. You must copy your subject and then paste it into an application to replace the background.
Q3. Can I use AI-generated backgrounds with PhotoCut? Ans. Yes. PhotoCut accepts and applies AI-generated backgrounds to achieve realistic depth effects such as shadows and reflection lighting that match the subject of your photo.
Q4. Is the background removal feature in PhotoCut automatic? Ans. Yes, PhotoCut makes use of AI technology for automatic detection and removal of the background from your photo. It takes much less time and effort compared to manual editing of the background.
Q5. Can I add my own custom background with PhotoCut? Ans. Of course, you can upload your custom background images. You may choose also one from thousands of pre-made backgrounds ranging from solid colors to gradient and scenic landscapes.
0 notes
Text
TOP 10 TEXT TO SPEECH GOOGLE APPS/airionvez.com
AIRIONVEZ
A free most preferred site for conversion of text to speech
1.Google Text-to-Speech:
Integrates seamlessly with Android apps, offering clear and natural-sounding voices. It supports multiple languages and is widely used for accessibility and productivity.
2.NATURAL READER:
Known for its high-quality, natural-sounding voices, it supports various file formats and offers customization options. Ideal for both personal and professional use.
3.VOICE ALOUD READER:
Reads aloud web pages, news articles, documents, and more. It supports multiple languages and offers various customization options for a personalized listening experience.
4.NARRATORS VOICE:
Offers a variety of voices and languages, with options to add effects to the speech. Great for creating fun and engaging audio content.
5.SPEECH CENTRAL:
Designed for reading aloud web pages, news, documents, books, and emails. It supports multiple languages and offers a user-friendly interface.
6.TALK FREE:
simple and easy-to-use TTS app that supports multiple languages. It’s perfect for quick text-to-speech conversions on the go.
7.TEXT TO SOUND -Read Aloud:
Features a built-in web browser and clipboard reader for easy text conversion. It supports multiple languages and offers high-quality voices.
8.SPEECHIFY:
Popular for its high-quality voices and ability to read PDFs, documents, and web pages. It’s designed for both personal and professional use.
9.VOICE ALOUD READER: Reads aloud text from various sources, including web pages, emails, and documents. It offers multiple language support and customization options.
10.POCKET: Primarily a read-it-later app, it includes a TTS feature to listen to saved articles. It’s great for consuming content on the go.
These apps offer a range of features to enhance your listening experience.
https://airionvez.com # airionvez ,rionvezai ,airionvez.com
1 note
·
View note
Text
How to Design an HTML Inspection Form Using Notepad: A Comprehensive Guide
Ensuring your inspection team has an efficient way to access and complete their tasks is essential. One method to enhance your team’s productivity is by creating an HTML form for your website. But how can you build an HTML inspection form using Notepad? This guide walks you through the process step by step.
Understanding HTML
HTML, short for HyperText Markup Language, is the fundamental language used to design and structure websites and webpages. It forms the foundation of web content, defining the structure for text, images, multimedia, and more. HTML relies on tags (elements enclosed in angle brackets, such as <p> for paragraphs, <h1> for headings, and <a> for links) to determine how content appears on a webpage.
When combined with CSS (Cascading Style Sheets) for styling and JavaScript for interactivity, HTML enables the creation of fully functional, visually appealing, and interactive websites. The current version, HTML5, is widely used for modern web development. Learning HTML may seem challenging at first, but it’s a valuable skill that offers numerous benefits, such as:
Expanding your email subscriber list
Capturing leads effectively
Enhancing sales performance
Streamlining inspection processes
Collecting accurate data
Supporting customer interactions
And more!
Steps to Create an Inspection Form in HTML with Notepad
Providing clear and straightforward inspection forms on your company’s website can improve efficiency, teamwork, and overall workflow. Using Notepad to create an HTML form is a straightforward process. Here are the five key steps:
Step 1: Select an HTML Editor
Numerous HTML editors are available, each with similar features. For simplicity, Notepad, pre-installed on most computers, can serve as your editor.
Step 2: Create Your HTML File
Open Notepad and create a new file. Save this file with a ".html" extension (e.g., inspection_form.html). This ensures that your computer recognizes it as an HTML document.
Step 3: Add Text Fields and Build the Form
Once your file is ready, start by adding the essential elements of your inspection form. Use HTML tags to include text fields, checkboxes, radio buttons, or dropdown menus as needed.
Step 4: Incorporate Placeholders
Placeholders are text prompts inside form fields that guide users on how to respond. They improve form usability and engagement by providing clear instructions.
Step 5: Save and Test
Save your file and open it in a web browser to test your form’s functionality. Adjust as necessary to ensure it meets your requirements.
Drawbacks of Using HTML for Inspection Forms
Although it’s possible to create inspection forms with HTML, this method isn’t always practical. Modern productivity tools, such as DataMyte Digital Clipboard, streamline form creation and offer a more polished user experience.
Why HTML Forms May Not Be Ideal
While building an HTML inspection form can be an enjoyable way to learn coding, it’s not always the most efficient or professional solution for business needs. Without coding expertise, the results may look unrefined, which can impact your company’s image. Additionally, using HTML can be time-consuming, taking attention away from other critical business tasks.
If you’re looking for professional, user-friendly inspection forms, consider leveraging specialized tools that simplify the process and ensure high-quality results.
0 notes
Text
Drawbacks of Paper Check-In for Dental Practices & Solution for Transforming | mConsent
Countless dental offices rely on paper forms and clipboards to register patients. But manual check-in processes lead to major inefficiencies and headaches. This article explores 10 specific challenges of paper check-in and how digital solutions can transform your workflows.
1. Illegible Handwriting Slows Staff Down
Patients complete paper forms by hand, often resulting in messy, tough-to-decipher penmanship. Squinting to interpret sloppy writing wastes valuable staff time and mental energy.
Even worse, illegibility can lead to data entry errors getting patient information into your practice management system.
Digital check-in uses tidy text fields patients complete clearly on tablets or kiosks. The information seamlessly transfers to your system without staff having to puzzle over scribbles.
2. Duplicating Data Entry is Inefficient
Once forms are turned in, staff must manually transcribe all the paper information into digital patient records – a redundant double duty. From names and contact info to health histories, every detail must be laboriously re-typed out.
Digital systems sync directly with your practice management software, eliminating the need to re-enter any data. Information flows instantly without staff having to do the work twice.
3. Difficulty Locating Misfiled Paperwork
In hectic offices, paper forms inevitably get misplaced. Trying to track down a form in overflowing charts or file cabinets eats up time staff could otherwise spend on patient care.
Plus, lost forms mean starting over with new ones. With online registration, forms are always easily accessible from any web-connected device. There's no wasted time rummaging for misfiled documents.
4. Paper Forms Pose Data Security Risks
Paper records can be easily removed, stolen, copied, or lost – compromising sensitive patient data. Online forms offer far greater security with password protection and encryption.
Only authorized staff can access the information, and it can't be physically removed. Digital storage is also more secure if protected properly.Learn More About Important Things About Online Patient Intake Forms.
5. Bulky Files Consume Precious Space
It's not long before stacks of paper forms take over precious real estate in your office. Before you know it, every drawer and cabinet overflows with files.
Digital forms free your office from the constraints of physical storage. This liberates space that can be better utilized for more productive areas like treatment rooms.
6. Staff Cannot Access Simultaneously
Only one team member can view or work with a paper form at a time. If someone needs it, they have to track it down. With instant access from any internet-connected device, multiple staff can view and update electronic forms simultaneously.
Digital registration makes patient information readily available to your whole team.
7. Generic Forms Lack Customization
Off-the-shelf paper forms use basic fields that often don't fit dental office needs. They fail to capture all the details you require.
Digital check-in lets you fully customize forms with your branding, required fields, and tailored language for collecting relevant patient information.
8. Changes Mean Printing New Batches
Updating paper forms requires manually replacing outdated ones – and reprinting expensive batches every time a change occurs.
Electronic forms allow quick updates to forms with just a few clicks. Alterations to questions, fields or branding get pushed out in real-time without any printing costs.
9. Significant Paper Waste Damages Environment
The cumulative environmental impact of mass paper usage is detrimental, generating immense waste and pollution. As eco-consciousness grows, paper forms seem increasingly antiquated.
Digital registration shrinks your office's carbon footprint for a greener operation.
10. Poor First Impression of Patients
Handing patients a clipboard feels outdated and creates an unfavorable first impression. Patients expect more modern service experiences.
Digital check-in with sleek tablets makes your office appear tech-savvy, forward-thinking and higher-end. Patients appreciate the convenience too.
Bring Your Front Office Into the 21st Century
Don't let paper check-in remain a bottleneck limiting your dental practice. Go digital to:
Boost efficiency by eliminating redundant data entry
Improve accessibility of patient information
Enhance security with password protection and encryption
Free up space wasted on bulky files
Fully customize forms for your unique needs
Update forms instantly without printing costs
Embrace eco-friendly registration
Wow patients with a modern digital experience
The frustrations and limitations of paper forms are too significant to overlook. Transitioning to electronic check-in is a high-reward upgrade for your office.
Join the digital dental era and leave clunky paper processes behind for good!
Conclusion
The advantages of transitioning from antiquated paper check-in processes to streamlined digital solutions are clear.
By implementing digital check-ins via mConsent, dental practices can optimize workflows, reduce administrative burdens, improve organization and accessibility, enhance security, save space, customize forms, go green, and delight patients.
As dental technology continues evolving at a rapid pace, offices that fail to modernize check-in routines will lag behind the competition. The time is now to break free of the limitations and headaches of paper forms for good.
0 notes
Text
30 Windows 10 Tips and Tricks You Need to Know

30 Windows 10 Tips and Tricks You Need to Know. Windows 10 is a versatile and feature-rich operating system that powers millions of devices worldwide. Whether you're a seasoned user or new to the platform, mastering Windows 10 can significantly enhance your productivity and streamline your workflow. In this guide, we'll explore 30 tips and tricks to help you make the most of Windows 10, from customizing the interface to optimizing performance and utilizing productivity-enhancing features. - Start Menu Customization: - Pinning Apps: Pin frequently used apps to the Start Menu for quick access. - Live Tiles: Enable Live Tiles to receive real-time updates from your favorite apps directly on the Start Menu. - Resize and Rearrange: Resize and rearrange tiles to organize your Start Menu efficiently. - Taskbar Tweaks: - Pinning Programs: Pin frequently used programs to the taskbar for easy access. - Task View: Use Task View to switch between open windows and virtual desktops. - Customize Taskbar: Right-click on the taskbar to access customization options such as hiding labels and adjusting icon size. - Virtual Desktops: - Multi-Tasking: Use virtual desktops to organize your workspace and switch between different tasks seamlessly. - Keyboard Shortcuts: Use keyboard shortcuts like Windows key + Ctrl + D to create a new virtual desktop and Windows key + Ctrl + Left/Right arrow to switch between desktops. - File Explorer Tips: - Quick Access: Pin frequently accessed folders to Quick Access for easy navigation. - Ribbon Menu: Use the Ribbon menu in File Explorer to access additional features and commands. - Preview Pane: Enable the Preview Pane to preview file contents without opening them. - Task Manager Tricks: - Performance Monitoring: Use Task Manager to monitor system performance, resource usage, and running processes. - Startup Programs: Manage startup programs to improve boot times and system performance. - Cortana Integration: - Voice Commands: Use Cortana for voice commands and natural language searches. - Personal Assistant: Set reminders, create calendar events, and perform tasks with Cortana's assistance. - Snapping Windows: - Snap Assist: Use Snap Assist to snap windows to the sides of the screen for easy multitasking. - Aero Snap: Drag windows to the top of the screen to maximize them or to the sides to snap them to half the screen. - Action Center: - Notifications: Access notifications and quick actions from the Action Center in the system tray. - Customize Quick Actions: Customize quick actions to include your most frequently used settings and shortcuts. - Night Light: - Reduce Eye Strain: Use Night Light to reduce blue light emissions and minimize eye strain during nighttime use. - Schedule Night Light: Schedule Night Light to turn on automatically at sunset and off at sunrise. - Focus Assist: - Distraction-Free Work: Activate Focus Assist to minimize distractions and interruptions during work hours. - Priority List: Customize Focus Assist settings to allow notifications from priority contacts and apps. - Keyboard Shortcuts: - Efficiency Boost: Familiarize yourself with essential keyboard shortcuts such as Windows key + D to minimize all windows and Windows key + L to lock your PC. - Productivity Tools: Explore additional shortcuts for common tasks like copy, paste, and undo to speed up your workflow. - Clipboard History: - Multi-Clipboard Support: Access Clipboard History to view and paste previously copied items for seamless multitasking. - Sync Across Devices: Sync Clipboard History across multiple devices linked to your Microsoft account for easy access to copied content. - Power and Battery Settings: - Power Plans: Optimize power plans to maximize battery life and system performance. - Battery Saver Mode: Enable Battery Saver mode to conserve battery life when the battery is running low. - Windows Sandbox: - Secure Testing Environment: Use Windows Sandbox to run potentially risky software in an isolated environment without affecting your main system. - Disposable Environment: Reset Windows Sandbox to its default state after each use to ensure a clean and secure testing environment. - Snipping Tool and Snip & Sketch: - Screen Capture: Use the Snipping Tool or Snip & Sketch to capture screenshots and annotate them with highlights, arrows, and text. - Delayed Capture: Use the delay feature to capture screenshots of menus and tooltips. - Night Light: - Reduce Eye Strain: Use Night Light to reduce blue light emissions and minimize eye strain during nighttime use. - Schedule Night Light: Schedule Night Light to turn on automatically at sunset and off at sunrise. - Game Mode Optimization: - Gaming Performance: Activate Game Mode to optimize system resources and prioritize gaming performance for a smoother gaming experience. - Xbox Integration: Use the Xbox Game Bar to access gaming features, capture screenshots, and record gameplay. - Remote Desktop Access: - Remote Desktop Connection: Set up and configure Remote Desktop to access your Windows 10 PC remotely from another device. - Secure Authentication: Ensure secure authentication by configuring Remote Desktop settings to require password authentication or Network Level Authentication (NLA). - Privacy Settings: - Data Privacy: Review and customize privacy settings to control data collection and sharing preferences, including location, camera, microphone, and app permissions. - Privacy Dashboard: Use the Privacy Dashboard to monitor and manage your privacy settings across various Microsoft services and devices. - Network and Sharing Center: - Network Management: Access the Network and Sharing Center to manage network connections, troubleshoot network issues, and set up sharing options. - Homegroup: Create or join a Homegroup to share files, printers, and media with other devices on your network. - Troubleshooting Tools: - Troubleshooters: Use built-in troubleshooters to diagnose and resolve common hardware and software issues. - System Restore: Create system restore points to revert your PC to a previous state in case of system errors or instability. - System Backup and Recovery: - Backup Solutions: Set up system backup solutions to protect your data and recover files in case of accidental deletion or hardware failure. - File History: Use File History to automatically back up your personal files and restore previous versions of files if necessary. - Sync Settings Across Devices: - Microsoft Account Sync: Sync settings, preferences, and app configurations across multiple Windows 10 devices linked to your Microsoft account for a consistent and personalized user experience. - OneDrive Integration: Use OneDrive to sync files and folders across devices and access them from anywhere, on any device. - Multilingual Support: - Language Settings: Customize language and keyboard settings to support multiple languages and input methods for multilingual communication and typing. - Language Packs: Install additional language packs to expand language support and enable spell checking, autocorrect, and language-specific features. - Game Bar and Game DVR: - Capture Gameplay: Use the Game Bar and Game DVR to capture screenshots and record gameplay videos with ease. - Broadcasting: Stream your gameplay live to platforms like Mixer or Twitch directly from the Game Bar. - Windows Defender Security Center: - Antivirus Protection: Use Windows Defender Antivirus to protect your PC against viruses, malware, and other security threats. - Firewall Settings: Customize firewall settings to control inbound and outbound traffic and protect your network from unauthorized access. - Ease of Access Features: - Accessibility Options: Explore built-in accessibility features such as Magnifier, Narrator, and Speech Recognition to customize your Windows 10 experience and make it more accessible for users with diverse needs. - High Contrast Mode: Enable High Contrast Mode to improve visibility and readability by adjusting color contrast and reducing eye strain. - Microsoft Edge Browser: - Tab Management: Organize your browsing experience with features like tab groups, vertical tabs, and collections in Microsoft Edge. - Reading View: Use Reading View to declutter web pages and focus on the main content for a distraction-free reading experience. - Windows Update Settings: - Automatic Updates: Ensure automatic updates are enabled to keep your Windows 10 PC up to date with the latest security patches, bug fixes, and feature updates. - Active Hours: Set active hours to specify the times when you're typically using your PC to prevent automatic restarts during those times. - Feedback and Suggestions: - Windows Feedback Hub: Provide feedback and suggestions to Microsoft through the Feedback Hub app to help shape the future of Windows 10 and improve the user experience. - Insider Program: Join the Windows Insider Program to gain early access to preview builds and upcoming features, and provide feedback to Microsoft developers. Conclusion: By implementing these tips and tricks, you can unlock the full potential of Windows 10 and enhance your productivity and efficiency. Whether you're customizing the interface, optimizing performance, or utilizing built-in features, mastering Windows 10 empowers you to work smarter and get the most out of your PC. Experiment with these tips, explore new features, and tailor your Windows 10 experience to suit your needs and preferences for a seamless and enjoyable computing experience. Read the full article
0 notes
Text
Version 568
youtube
windows
zip
exe
macOS
app
linux
tar.zst
I had a good couple of weeks mostly figuring out better behind-the-scenes URL handling.
full changelog
urls
For normal users, tl;dr: URLs better now, you don't have to do anything.
I made a dumb mistake when I first created the downloader engine in how I handle URLs behind the scenes, and today it is fixed. You don't have to do anything, and you shouldn't see any big changes, but in general, URLs and query texts with unusual characters should work better now. You may also notice a URL in the file log or search log will appear one way, e.g. with japanese kanji, but when you copy it to clipboard, it is all encoded to %EF kind of stuff--your browser address bar probably works the same way. It should just mean things copy between your hydrus and other programs with fewer hiccups.
If you regularly use some very odd URLs or downloaders, there might be a hiccup or two. A file that relies of strange encoded characters in its known urls might redownload one time if a subscription hits it, or one extremely strange query text (it'd be a single tag query that has a % character somewhere in the middle) might need to be renamed to %25. If you have a crazy custom downloader that relies on %-encoding tech, please pause it before you update, and then do a test afterwards--it may be the hack you added for the old system is no longer needed. In any case, let me know how you get on, and if we run into a problem with a certain downloader, we'll fix it together. Overall, I'm hoping that working with encoded URLs exclusively will make more complicated downloaders easier to figure out in future, rather than having to fight with odd characters all the time.
I decided to cancel this release last week because I wasn't confident on how I was handling the advanced edge cases of encoding here. I am happy I did, because while all the 'just download from a booru' style downloaders (like the defaults) were fine, the most experimental downloader situations (that e.g. needed encoded parameter keys) needed more work. If you are a downloader maker, then you will be in the guts of these changes, so please check out the changelog. There's new UI in 'manage url classes'--path components and parameters now have their own edit panels with linked text boxes that show the normal and encoded values of the stuff you are entering, and there's also new 'ephemeral token' tech that lets you decide in what ways undefined parameters should be clipped before the URL being sent to the server. The idea of the 'request URL' being different to the 'normalised URL' is broadly elevated and exposed across the program.
other highlights
I also added a 'tag in reverse' checkbox to the new 'manage tags' 'incremental tagger' thing. It adds tags like 5, 4, 3, 2, 1 instead of 1, 2, 3, 4, 5.
And all new system:url predicates have new labels. They are all a bit simpler, and they should copy/paste into the system predicate parsing system. All existing system:url predicates still have their old labels, so if this is a big deal, you'll want to recreate them and re-save your session/search.
Thanks to a user, the new docx, xlsx, and pptx file formats get some nicer thumbnails and a little metadata. It should all recalculate soon after update.
The Client API is now more careful about which files you can undelete, and it also now lets you clear file deletion records.
next week
I want to put proper time into getting a 'future build' working. Last time I tried, I ran into some technical problems related to the newer libraries I wanted to bundle, so I'll see if I can fix it all and have a test release for people to try. Otherwise, I just want to clear out some small jobs that this URL work boshed.
1 note
·
View note
Text
4 Udemy Paid Courses for Free. 100% Free Coupon. Limited Time for Enrollment

1. Adobe Illustrator Course for Graphics Design
Master the Art of Visual Expression: Unleash Your Creativity with Adobe Illustrator
What you'll learn
Workspace and Document Interface
Group Selection Tool, Lasso Tool
Selection Tool, Direct Selection Tool
Magic Wand Tool, Anchor Tool
Take This Course
👇👇👇👇👇👇👇
4 Udemy Paid Courses for Free. 100% Free Coupon. Limited Time for Enrollment
2. Essential Photoshop Course for Beginner to Advanced
Learn Photoshop Layer, Image Color Adjustment, Retouching, Text Style, Shape, Symbol, Content Aware
What you'll learn
Interface and Tools
Retouching
Masking
Layer
Shape and Symbol
Shadow
Transform, Warp & Distort
Export
Color and Adjustment
Content Aware & Cropping
Gradient Stroke & Bevel
Blur & Filters
Take This Course
👇👇👇👇👇👇👇
4 Udemy Paid Courses for Free. 100% Free Coupon. Limited Time for Enrollment
3. The Complete Microsoft Word Course: Master Microsoft Word
Microsoft Office - MS Word - Microsoft Word 2019 - Microsoft Word 2016 - Microsoft Word Advanced - MS Office
What you'll learn
How to Open Microsoft Word
Work with Start Home Page of Microsoft Word
Create New and Black Template of Microsoft Word
Open Existing File in Microsoft Word
Recover Unsaved File in Microsoft Word
Understand Interface of Microsoft Word
Info in File Menu Microsoft Word
Save in File Menu Microsoft Word
Manage Print Settings in Microsoft Word
Share and Export in File Menu Microsoft Word
Manage Clipboard in Home Menu Microsoft Word
Customize Font in Home Menu Microsoft Word
Customize Paragraph in Home Menu Microsoft Word
Clipboard Manager in Microsoft Word
Show Paragraph in Microsoft Word
Set up Fonts in Home Menu Microsoft Word
Set up Paragraph Setting in Home Menu Microsoft Word
Style Fonts in Home Menu Microsoft Word
Editing Options in Home Menu Microsoft Word
Insert Cover Pages in Microsoft Word
Ways of Inserting Tables in Microsoft Word
Manage Tables Design in Microsoft Word
Manage Tables Layout in Microsoft Word
Create Invoice Using Table in Microsoft Word
Create a Certificate Using Table
Create Attendance Using Table
Create CV Using Microsoft Word
Insert Picture in Microsoft Word
Inserting Shapes in Microsoft Word
Create Card Using Text Box in Microsoft Word
Analysis Creation in Microsoft Word
Create Smart Art in Microsoft Word
Inserting Chart in Microsoft Word
Take Screenshot in Microsoft Windows
Link Objects in Microsoft Word
Bookmark in Microsoft Word
Cross Reference in Microsoft Word
Comment in Microsoft Word
Manage Header and Footer in Microsoft
Insert Completion
Documenting Formation in Design Menu Microsoft Word
Page Background in Design Menu Microsoft Word
Page Setup in Reference Menu Microsoft Word
Creating Sections in Microsoft Word
Paragraph Indent in Reference Menu Microsoft Word
Inserting Table of Contents in Reference Menu Microsoft Word
Inserting Citation, Table of Figure and The Rest in Reference Menu
Mailings
Review
View
General setting of Microsoft Word
Display Settings of Microsoft Word
Proofing settings of Microsoft word
Save Settings in Microsoft Word
Ease of Access in Microsoft Word
Advanced Setting of Microsoft Word
Ribbon and Quick Access Toolbar
Shortcut
Draw Menu
Developer
Complete Guide Over Microsoft OneDrive
Take This Course
👇👇👇👇👇👇👇
4 Udemy Paid Courses for Free. 100% Free Coupon. Limited Time for Enrollment
4. ChatGPT : The Complete Bootcamp for Beginner With Practical
ChatGPT: The Ultimate Bootcamp for Beginners - Hands-on Training and Practical Applications
What you'll learn
Progression from novice to expert level using ChatGPT
Maximizing profits through automation with ChatGPT
Unlocking hidden capabilities of ChatGPT
Utilizing ChatGPT to benefit other businesses and generate income
Enhancing current business operations with ChatGPT and artificial intelligence
Efficiently creating new businesses with ChatGPT
Combining ChatGPT with other AI tools for passive income generation
Accelerating learning with ChatGPT for students
Advanced techniques for maximizing ChatGPT's potential.
Take This Course
👇👇👇👇👇👇👇
4 Udemy Paid Courses for Free. 100% Free Coupon. Limited Time for Enrollment
#udemypaidcourseforfree #udemyfreecourse #paidcourseforfree #100%freecoupon
#udemy 100% free coupon#udemy paid course for free#udemy free courses#udemy online courses#udemy#free course
0 notes
Text
5 Best Cricut Office Decor Ideas for a Stylish Workspace
Offices or Home office spaces are important in creating a sense of comfort for the employees to give their best. The office space should also be creative as it helps better organize files and other supplies. Can you imagine being productive in a messy-looking office? It is hard. All you need is a Cricut machine to make the space more lively. Customizing the office and storage space with a Cricut machine is easy. In this blog, we will discuss the top 5 Cricut office decor ideas that you can use to make your office or home office more functional, beautiful, and organized.
1. Templates
There are several printable templates pre-designed for various purposes available on Design Space. You can even upload your design or design a fresh one on the software, so the options are virtually limitless. Further, these templates are great time savers, efforts, and resources while ensuring your office maintains a polished and professional finish.

The common ideas for designing templates include calendars, to-do lists, budget planners, inventory lists, and schedules for meetings and events. So, they cater to all professional needs and ensure the office stays on its goals.
2. Label Containers
You can use the Cricut machine for designing and printing labels for your office bins, boxes, and other containers. The labels will make the office much tidier as they reduce confusion about which item goes were. Further, the employees will find it easier to find the right bin for a project, and they will, in turn, get more productive.

Moreover, you can even label the work-in-progress bins, meaning you will know which projects you and your employees are working on.
3. Design Bins
Bins in an office are a great set of products that helps better organize what’s inside. You can create a quick project with a Cricut machine. Further, you can use cardstock material to create divers in a bin and cut the names on it. So, in the end, you will get a nice-looking cabinet to keep your files and other documents.

Moreover, bins help greatly not just in your cabin but also in your inventory. One of the helpful Cricut office decor ideas is to design inventory labels. From which you can organize the samples, files, receipts, and many more.
4. Custom Clipboards
Clipboards are one of the best ways to organize projects based on their present involvement or number of pages. You can fix them on a wall or file them in a bin. You can make them at less cost, and making them on a Cricut machine can be fun. For this project, it is better to use vinyl because of its water-resistant ability so that the clipboards can be used for a long time.

Further, it is possible to customize the clipboards for every employee so that they will feel appreciated. Moreover, you can use them to organize your tasks or client’s projects so that you can keep track of the progress.
5. Decorative Desk Trays
Another final in this list of Cricut office decor ideas is decorating desk trays. You can design desktops and other office trays that add decor to the office space. Further, you can dress up any tabletop arrangement with many creative vinyl graphics to match the vibe of your office environment.

Further, you can add vibrant colors and floral graphics, giving it an artsy and minimalist touch. Your pens and other gadgets will look more organized with a desktop tray.
Conclusion
Decorating office or home office space will give you and the employees a better sense of control and belonging. An office must be tidy to avoid creating a sense of unease in the employees, who will not be productive. So, in this blog, we have discussed Cricut office decor ideas that you can install in your office and make it more organized.
FAQs
Can you edit a design in Cricut Design Space?
Yes, it is possible to edit on Design Space Space. In the new Project Sharing feature, you can edit your project. If your project includes items that can be edited, then you will see a blue highlight on all items—Double-click on the text to enter the edit mode and make the required changes. Finally, save it as a new file or write on the old file.
What is Cricut Access?
Cricut Access is a subscription service that unlocks unlimited access to a growing library of 700+ fonts, 300,000+ images, and 1000+ ready-to-make projects. Further, you will get exclusive savings from the Cricut shop products and can save money. Also, you will get premium access to features such as Automatic Background Remover, Monogram Maker, and more.
#Cricut office decor ideas#Cricut.com sign in#cricut.com setup mac#cricut design space#cricut.com/setup windows#cricut.com setup download#www.cricut.com/setup
0 notes