#Different ways of writing a React component. Any one of these is valid and still supported in the latest version of React. Nevertheless
Explore tagged Tumblr posts
Visit Tumblr Blog
Explore Tumblr blogs with no restrictions, modern design and the best experience.
Last Seen Tumblr Blogs


Fun Fact
Post activity is at the highest at 4:00 pm EDT; notes peak at 10:00 pm EDT.
Text

#Different ways of writing a React component. Any one of these is valid and still supported in the latest version of React. Nevertheless#nowadays#the functional way is the most popular one.
0 notes
Note
Hey AC! I love your blog and was wondering if I could get your opinion on something. I've seen some people complaining that Ingrid and Hilda are treated by the fandom, with Ingrid stans saying that Hilda is also racist towards Almyrans (which, granted, she is) but doesn't get nearly as much hate about it as Ingrid does. But personally I feel like their attitudes and the way they react towards Dedue/Cyril are wildly different and Hilda generally seems less hateful/irrational about it. Thoughts?
This is... kind of a touchy topic... I like it though! It’s worth discussing, especially since I feel like it’s broke criticism to simply deflect blame onto a character in order to prop up another. Full and obvious disclosure: I very much dislike Ingrid and very much love Hilda. That said, I don’t think it’s fair to compare them for the sake of which is worse. I fall into the trap of character criticism through comparison far too often and it's not really valid unless you can fully explore each character in their own right beforehand. Which is why, while writing this, I came to the conclusion that the ways these two characters are interpreted and the reason people view their racist tendencies differently has far more to do with the characters themselves than their actual beliefs.
From first impressions to subsequent playthroughs, this is pretty much how I feel about Ingrid: she brings up her hatred of the Duscur people and Dedue unprompted and uncontested several times at the very beginning of the game, putting it front and center to her character. This is important, it sets a foundational component for how I could come to view her. According to her introduction, she is honorable and respectful, a model lady knight trope. But, as mentioned, she's really racist. Literally standing around thinking about how awful it is that Dimitri would trust a man of Duscur because they are all bad people. Yikes. And nobody calls her on it. Again, this is very important for perception. People judge Sylvain for his bad behavior in a much more harsh way than they do Ingrid for her vitriolic loathing for another classmate who we have seen as nothing but respectful. It's weird. And then, despite the fact that her close friend Sylvain was able to reason out that it’s not possible for the Duscur people to be at fault for the Tragedy, despite the fact that the prince of the country she supposedly hopes to serve with unwavering respect and loyalty has made it clear that he does not believe that Dedue or Duscar are responsible for the Tragedy, and despite the fact that Dimitri, her close friend and the one most affected by the Tragedy (seriously, she lost a guy she might have married and he lost his best friend, mother, and watched his father be killed in front of his eyes) continuously insists that neither Dedue nor Duscur are at fault, she loudly and openly believes that the ensuing massacre of Duscur was deserved and Dedue is inherently culpable simply because of his race. Her motivations for this hatred feel even more cheap considering her dogged hero worship for Glenn was born out of the fact that she was promised to him, making the fact that she’d use his death as reason enough for the destruction of countless innocent lives even more unsympathetic in my eyes. I mean, seriously, she was around 13 and he was older than her, how close could they have truly been? Dimitri says they were in love, but she was a child. Abandoning my modern sensibilities about age of consent or whatever, kids at that age don't have the emotional or mental capability. Maybe this is just nitpicking, but I have a very hard time caring about that relationship. But, if her actual justification is because of what happened to Faerghus as a result of the Tragedy and feels duty-bound as a knight to find justice through the systematic destruction of the Duscur people, then it just circles back to confusion considering the future leader of said country doesn't hold Duscur or Dedue responsible. The importance of perception comes in because despite these paper thin excuses and her seemingly willfully ignorant hatred, she is never challenged on her racist beliefs. The reason she seems to change her mind about Dedue and consider that maybe excusing a genocide is wrong stems from guilt that Dedue continuously comes to her aid in battle at the potential cost of his own life. I can understand, to a certain extent, why she might feel the way she does. But, again, I have such a hard time with any justification when nobody that she's close to is even nearly as hateful as her, there is plenty of evidence (evidence that the people close to her have found!) to provide a very reasonable counterclaim to Duscur's guilt, and that none of that even matters when it would require her to openly contradict the prince of her country to make the claim that Dedue was in any way complicit in the Tragedy. Which would be fine if she wasn't established as the model Lady Knight archetype, which also brings us into Ingrid's moral high horse. Admittedly, I hate the Lady Knight trope. I have a significant bias against these types of characters. However, I really do think that this moral crusade is where she lost me completely. Without even a shred of empathy or self awareness, she lectures Sylvain about his shitty behavior even though their circumstances are at least somewhat similar and he has his reasons (bad ones, maybe, but ones worth understanding if she actually cares about him), she lectures Felix about not being interested in knightly endeavors (an aspect of his character that is born of the trauma she has appropriated), and she lectures Claude about behavior that is befitting of a man in his position. Not because she cares about the girls Sylvain is hurting, not because she thinks there are any grave stakes from Felix choosing to do his own thing, and not because she knows that Claude's behavior affects his ability to lead, but because she doesn't like these behaviors and thinks they should be fixed. Yet, at the same time, she believes Dedue deserved to lose his family, country, and culture based on his birth and nobody ever does anything to morally correct her, it is something she eventually is forced to acknowledge on her own. It's frustrating, infuriating even, that the game lets her get away with being so grossly hypocritical. And, all the while, she is being painted as sympathetic. Again, I have a hard time feeling sympathy for her about Glenn, and I certainty don't feel sympathetic towards her issues about marriage because there's never any actual tension there. Of course she won't be forced to marry, she's a Lady Knight. Beyond being unsympathetic, I also find her massively unlikable. Awful design, poor voice direction, food-loving-as-a-personality-trait, the fact that she's written as one of those stock "feminist" characters who hate makeup and girly things until it benefits them, and constantly butting in on other characters to give her opinion without taking any criticism herself are all aspects that I just personally dislike. Ultimately, Ingrid being racist is only a symptom of the many reasons her character is one of my least favorites. Most of these points can be countered by someone who doesn't take issue with the things that annoy me and to point out that Ingrid DOES get over her racist beliefs. It's not fair to say that she doesn't change but, for me, the damage was already done by the time she became tolerable so I still have a hard time appreciating her. My assumption would be that there are a lot of other people who feel similarly to me regarding their dislike of Ingrid so they focus on one easy character flaw, her being racist at the beginning of the game, as a reason to validate their dislike of her overall.
On the other hand, Hilda's racism isn't a main trait of her character. It's related to her overarching character flaws, but she doesn't bring it up unprompted and can actually be pretty much missed without the Cyrill supports. Like you said, Hilda does seem less hateful and irrational, it doesn't take willful malice and an active rejection of reason for Hilda to dislike the Almyrans, they pose a genuine and provable threat to her family and territory, seemingly senselessly testing the borders and throwing away lives for the sake of conquest. To be clear, her "you're not like those OTHER Almyrans" schtick is legitimately nasty. Her behavior is gross and condescending and it really underscores the fact that Hilda is ignorant, lazy, inconsiderate, and incredibly comfortable in her privilege. She accepts what she's been told at face value because she's too lazy to look into it further. Cyrill does tell her she's stupid to think that way, though. Which is satisfying because Hilda in those supports is insufferable, it really highlights the worst aspects of her character, dismissive, manipulative, and very selfish. However, for me, she's also very likeable. I'm not interested in going over my opinions on her like I did with Ingrid as I don’t feel it’s as important to my point but a few reasons I really like her is because I think Hilda has a fantastic design, cute supports, amazing voice work, and is secretly sweet in a way that absolutely tickles my fancy. I am sure many people do not agree with me, which is fine. Additionally, just as Ingrid grows out of her racist beliefs, so does Hilda. They both end the game as more tolerant and caring people. Still, for the same reason a person could argue that Ingrid is actually great and I'm being unfair, they could argue that Hilda is terrible and I'm too biased. That's fair and true..... but I think the fact that Hilda is more generally appealing in conjunction with the less obvious nature of her racist attitude makes people less likely to dismiss her as a racist in the same way they do Ingrid. Unless they dislike Hilda, in which case, it’s all fair game.
Anyyyways, a main takeaway from this is that I highly doubt people are truly arguing on the individual basis of who's more racist, but that they're engaging in the age old waifu war. As with many characters in this game, it's easier to argue moral superiority when you can't quite articulate what you like or don't like about a character. Or, even worse, when you're arguing opinion. Even now, as is clear by reading this, I am arguing my opinion of why I don't like Ingrid. Not because she's racist, but because of the character traits and writing choices that make her unlikable to me. I like Hilda because, flaws and all, I find her to be compelling and enjoyable. From the people that I know, at least, that is basically how the Ingrid stans v Hilda racism argument is structured, even if they dress it up in different language.
By the by Hilda never talks about how the Almyrans deserve to be wiped out. I think that probably sours a lot of people's opinions of Ingrid no matter what happened afterward but that’s fine we can just pretend that didn’t happen
#fe3h#fire emblem three houses#mmmm i am sorry if she is your fave#you are valid but i feel like she was the bully volleyball player in highschool and i can't get over it
48 notes
·
View notes
Text
Introduction to Web Components

When you begin your journey as a developer, you learn that you should reuse code as much as possible. For front-end development, though, it is not so easy. When you have to create custom markup structures, they end up in being complex in style and script and using them multiple times can turn your page into a mess. Web Components, that are called the building blocks of web applications, promise to solve such problems.
Web components are a set of web platform APIs that allow us to create custom, reusable and encapsulated HTML tags for web pages and web apps. Such custom components and widgets build on the established standards, can work across various browsers, and can be used with any JavaScript library or framework that works with HTML.
Web components specifications
Web components incorporate four (in certain classifications, three) main technologies that can be used together to create versatile custom elements with encapsulated and reusable functionality:
Custom Elements
Custom elements are in essence fully-valid HTML elements, just like <div>, or <article>, but they have custom templates, behaviors and tag names (e.g. <one-dialog>) made with JavaScript APIs. They would always have a hyphen in their name, like <calendar-slider> and browser vendors have committed to create no new built-in elements containing a dash in their names to prevent conflicts. They can be used out-of-the-box with today’s most popular frameworks, including Angular, React, Vue, etc. with minimal effort. Custom elements contain their own semantics, behaviors, markup that can be checked in the HTML Living Standard specification.
Example:
class ComponentExample extends HTMLElement { connectedCallback() { this.innerHTML = `<h1>Hello world</h1>`; } }customElements.define(‘component-example’, ComponentExample);
As you can see, custom elements (in this case, <component-example>) must in some way extend an HTMLElement in order to be registered with the browser.
Shadow DOM
The shadow DOM is an encapsulated version of the DOM. It isolates DOM fragments from one another, including anything that could be used as a CSS selector and the corresponding styles, in a somewhat similar to <iframe> manner. At the same time, when we create a shadow root, we still have total control over that part of our page, but scoped to a context. It is critically important as it ensures that a component will work in any environment even if the page has other CSS or JavaScript. More information on how to use encapsulated style and markup in web components can be found in the shadow DOM specification.
Example:
To attach a shadow root, we should run something like:
const shadowRoot = document.getElementById(‘shadow’).attachShadow({ mode: ‘open’ });shadowRoot.innerHTML = ' <style> button { color: purple; } </style> <button id=”button”>Switch to use the CSS color purple <slot></slot></button>';
HTML Template
The HTML <template> element allows us to stamp out reusable templates of code inside a normal HTML flow that is not immediately rendered, but can be used at a later time when called upon. You can write a template of any shape or structure that could be created at a later time. To learn how to declare fragments of markup that go unused at page load, but can be instantiated later on at runtime you can check the HTML template element specification.
Example:
<template id=”movie-template”> <ul id=”movies”><li> <span class=”name”></span> — <span class=”year”></span> — <span class=”director”></span> </li></ul> </template>
The example above doesn’t render any content until a script has consumes the template, instantiates the code and tells the browser what to do with it.
ES Modules
ES Modules is the recent ECMAScript standard for working with modules. The standardization of a module system for browsers completed with ES6 and browsers started implementing it, so that now ES Modules are supported in Chrome, Safari, Edge and Firefox (since version 60). Modules as collections of smaller components that can be reused in our application, let developers encapsulate all kinds of functionality, and expose this functionality to other JavaScript files, as libraries. The process of including JS documents in a standards based, modular, performant way is defined in the ES Modules specification.
Example:
// From component folder import { Users } from ‘../components/users.js’; import { Issues } from ‘../components/issues.js’;class Dashboard { loadDashboard(){ // Create new instances const users = new Users(); const issues = new Issues(); console.log(‘Dashboard component is loaded’); } }export { Dashboard }
Benefits of web components
Web Components provide multiple benefits for developers and business.

Benefits for code:
Reusability: Once created, web components can be imported, used and reused in applications;
Readability: Compartmentalized, reusable code reduces the application size, simplified debugging and makes it more readable;
Declaration: You can more easily declare components on your page;
Composability: Shadow DOM allows composing applications with smaller chunks of code;
Extensibility: Custom elements API can extend browser elements or custom web components;
Scoping: Shadow DOM ensures DOM and CSS scoping so that styles don’t leak out and component DOM is local;
Interoperability: Native web components are interoperable at the browsers lowest (DOM) level.
Benefits for project
Brand consistency: Having your front-end application code split up into component libraries or even design systems can ensure brand consistency through the company. It also provides an additional benefit of the ability to be used by all teams, regardless of tech stack;
Cost-efficiency: Developers will have the ability to focus solely on making native reusable components, similar to LEGOs, and use these blocks in other applications across teams, which in the end saves money;
Faster deployments: Having ready-made code blocks, developers will be able to build and deploy applications more quickly. This leads to less time devoted to developing new features;
Quality improvement: As a by-product of reusing and reviewing the same code multiple times, the overall quality will improve in the course of time.
How to use web components?
To use a custom element you can simply import it and use the new tags in an HTML document. The ways to install custom elements, though can vary. Most elements today can be installed with NPM, but it is recommended to look at the README for the commands to install the specific element. NPM also handles installing the components’ dependencies. For more information on NPM, see npmjs.com.
Generally speaking, using a custom element is no different to using a <div> or any other element. Instances can be declared on the page, created dynamically in JavaScript, event listeners can be attached, and so on.
Libraries for building web components
Many libraries already exist that make it easier to build web components, including the following that we find useful:
Polymer provides a set of features for creating custom elements.
Slim.js provides data-binding and extended capabilities for components, using es6 native class inheritance.
Stencil generates standards-compliant web components.
Hybrids is a UI library for creating Web Components.
Angular provides the createCustomElement() function for converting an Angular component, together with its dependencies, to a custom element.
HTML and DOM specs already add features to support web components, letting web developers easily extend HTML with new elements with encapsulated styling and custom behavior. This proves that web components are already our present and it is time we start using them in applications.
3 notes
·
View notes
Link
Angular 12, the most recent production unharness of Google’s widespread TypeScript-based net framework, has received an associate update. Angular 12.1, arrived quarter day, adds compiler support for shorthand property declarations in addition to fixes for the compiler, compiler interface, router, and repair employees.
The Angular twelve.1 purpose unharness additionally introduces Apis to prefer into correct take a look at teardown behavior. The compiler fixes pertain to problems like unterminated interpolation and consider restoration, whereas the service employee fixes pertain to the naming, accessing, and clean-up of service employee caches.
[ additionally on InfoWorld: Angular, React, Vue: JavaScript frameworks compared ]
Published could twelve, Angular twelve is out there on GitHub, following varied beta unharnesses and release candidates. Angular twelve deprecates the heritage read Engine compilation and rendering pipeline in favor of the newer vine technology, a next-generation compilation and rendering pipeline that gives quicker AOT (ahead of time) compilation.
The Angular team noted that read Engines are removed during a future unharness. Current libraries victimization read Engine can still work with vine apps, however, library authors square measure suggested to begin transitioning to the vine.
Also in Angular twelve, the Ivy-based language service, providing capabilities like code completions and hints within templates, moves from opt-in to on by default. different new options and enhancements within the version twelve release:
To improve compiler interface performance, the progressive compilation is allowed within the presence of redirected supply files.
Nullish coalescing, to write down clearer code in matter categories, currently works with Angular templates.
Both Angular CDK and Angular Material expose a replacement Sass API surface designed for consumption with the new @use syntax. once change to Angular twelve, the associate app can mechanically switch to the new API by change via metric weight unit update.
Tools square measure on the market to migrate heritage localization IDs to IDs victimization the most recent algorithms.
Components currently support inline Sass within the designs field of the @component decorator.
Running metric weight unit build currently defaults to production, saving steps, and serving to forestall accidental readying of development builds.
Strict mode, to catch errors earlier within the development cycle, is enabled by default within the interface.
The Webpack five-module bundler is production-ready.
Support for the IE11 browser has been deprecated.
For the compiler, support is obtainable for reworking element vogue resources.
For the language service, Angular property completions square measure provided solely in templates.
For the compiler-cli, a context possibility is introduced for any request that permits the provision of capricious knowledge during a type-safe method. This feature addresses the necessity to piece interceptors in hypertext transfer protocol shopper on a per-request basis.
For animations, DOM components currently square measure properly removed once the basis read is removed. this can be a breaking amendment.
To improve performance, unused strategies are aloof from DomAdapter.
A new format is extra to localize-extract, referred to as legacy-migrate, to get a JSON file which will be wont to map heritage message IDs to canonical ones.
Strict null checks can report on a fraction doubtless being null. this can be a breaking amendment.
The form of the APP-INITIALIZER token has been modified to a lot of accurately replicate the categories of come back values handled by Angular. this can be a breaking amendment.
Support has been extra for disabling animations through BrowserAnimationsModulewithConfig.
The emit event possibility was extra for FormArray and FormGroup. this can be a breaking amendment.
More fine-tuned management has been extra in routerLinkActiveOptions.
Custom router outlet implementations are square measure allowable.
Support has been extra for matter four.2, and support for matter four.0 and matter four.1 has been born.
Implementing the appendAll() technique on HttpParams.
For forms, min and Georgia home boy validators square measure being introduced.
Exporting an inventory of hypertext transfer protocol standing codes.
Addition of a feature to the Angular Language Service that allows accessing the locations for parts that use a templet file.
The addition of nosology to counsel turning on strict templates, providing the way for the language server to retrieve compiler choices nosology.
A patch adding associate API to retrieve the templet type check block for a templet, if any, at a file location, and choice of the TS node within the TCB cherish the templet node at that the request for a TCB was created. this can facilitate debugging.
A variety of bug fixes additionally were featured, moving the compiler, compiler-cli, Bazel build tool, the router, and different elements of Angular. Angular 12 has arrived with a pile of improvements to its performance, language service, compiler, form validation, and much more. The deprecation of the View engine and incorporation of the Ivy ecosystem is certainly one of the major enhancements considered in version 12.
Angular 12 has witnessed improvement in styling, Nullish Coalescing, and shifting from Legacy i18n Message IDs as some other important features that make this release a stable one. AngularJS training in Kochi is one of the trending programs that every developer desires to master in Angular JS. AngularJS training institute in Kochi with all prerequisites is provided by the best Angular JS training.
0 notes
Text
Getting started with C# and Blazor
In this new post, I want to summarize what I understood for getting started with C# and Blazor, the new technology from Microsoft. I briefly spoke about Blazor in some other posts but here I want to introduce it properly.
We live in exciting times, as .NET developer’s life has never been better. We can create apps for any operating system be it Windows, Linux, iOS, Android or macOS. Of course, we can also build amazing web-based applications with ASP.NET. MVC, Razor Pages, and WebAPI have allowed us to create robust scalable and reliable systems for years, but there has long been a missing piece to the puzzle.
One thing all of ASP.NETs web solutions have in common is that they are server based. We’ve never been able to leverage the power of C# and .NET to write client-side applications, this has always been the domain of JavaScript.
So, I’m going to introduce you to a revolutionary client-side framework: Blazor. Built on web standards, Blazor allows us to write rich, engaging user interfaces using C# and .NET. We’ll explore how Blazor can make your development process more efficient and raise your productivity levels, especially if you’re using .NET on the server as well. We’ll cover hosting models, an important concept to understand when starting out with Blazor. We’ll look at both production supported models and the benefits and tradeoffs of each. Next, we’ll introduction components and the benefits of using them to build UIs. Finally, we’ll discuss the reasons why you should consider Blazor for your next project.
Table of contents
Why choose Blazor for new applications?
Pros
Components, a better way to build UI.
What is a component?
The benefits of a component-based UI
Components
Anatomy of a Blazor component
Understanding the code
Blazor, a platform for building modern UI with C#
No installation required
Mobile applications
Understanding hosting models
Blazor Electron
Code example
Mobile Blazor Bindings
Blazor WebAssembly
Process begin
DOM manipulation
blazor.boot.json
dotnet.wasm
Calculating UI Updates
Process explained
Benefits
Tradeoffs
Blazor WebAssembly summarize
Blazor Server
Process begins
Process static files
Calculating UI updates
Process explained
SignalR
DOM
Performance
The test
Testing
Benefits
Tradeoffs
Blazor Server summarize
Why choose Blazor for new applications?
Arguably, the hardest part of starting a new project in recent times has been choosing the tech stack, there is just so much choice available. This is especially true in the front-end world. Pick a framework (Angular, React, Vue), pick a language (TypeScript, CoffeeScript, Dart), pick a build tool (Webpack, Parcel, Browserify). If a team is new to this eco-system, it can seem an almost impossible task to try and work out which combination of technologies will help make the project a success; it’s even hard for teams with experience!
So, first in this getting started with C# and Blazor, let’s cover some of the top reasons for choosing Blazor for your next project and how it can help avoid some of the issues I’ve just mentioned.
Pros
C#, a modern and feature rich language – It’s powerful, easy to learn, and versatile
Great tooling – The .NET community has been fortunate to have some amazing tooling. Visual Studio is an extremely powerful, feature rich and extensible IDE. It’s also 100% free for individuals or non-enterprise teams of 5 or less. If you prefer something more lightweight, then there is Visual Studio Code – one of the most popular code editors today. Both Visual Studio and VS Code are both cross platform:
Visual Studio for Windows and Mac
Visual Studio Code for Windows, Mac and Linux.
.NET Ecosystem – While many new frameworks need to wait for an ecosystem to build up around them, Blazor can tap into the existing .NET ecosystem. Blazor applications target .NET Standard 2.1 and can in theory use any .NET Standard NuGet package.
Unopinionated – There are no preferred patterns or practices for Blazor development, you can write applications using the ones you’re familiar and comfortable with.
Shallow learning curve – If you’re an existing .NET developer then the learning curve for Blazor is quite shallow. Razor, C#, dependency injection, project structure will all look familiar to you. This means you can focus on writing features quicker, rather than learning the framework.
Code sharing – If you’re using C# on the server then Blazor makes an excellent paring. One of the most frustrating problems with different client and server languages is the inability to reuse code. With Blazor, everything is C#. Any shared code can be placed in a common .NET Standard class library and shared easily between server and client.
Open source – As with many projects at Microsoft, Blazor is fully open source and the code is freely available on GitHub for you to browse, download, or fork your own copy.
Components, a better way to build UI.
Blazor, as with many modern front-end frameworks, uses the concept of components to build the UI. Everything is a component, pages, parts of a page, layouts, they’re all components. There are various types of component in Blazor as well as multiple ways to write them all of which will be explored in future chapters. But learning to think in terms of components is essential for writing Blazor applications.
What is a component?
You can think of a component as a building block. You put these building blocks together to form your application. These building blocks can be as big or as small as you decide, however, building an entire UI as a single component wouldn’t be a good idea. Components really show their benefit when you think of them as a way to divide up logical areas of a UI. Let’s look at an example of a user interface structured as components.

Example of a layout divided into components
Each area of the interface is a component and each one has a certain responsibility. You may also notice that there is a hierarchy forming. The layout component sits at the top of the tree, the menu, header, home page and footer are all child components of the layout component. These child components could, and probably would have child components of their own. For example, the header component could contain a logo component and a search component.

Example of nesting components to form a component tree
The benefits of a component-based UI
Many UIs have repeating elements in them, a great advantage to using components is that you can define an element in a component and then reuse the component wherever the element repeats. This can drastically cut down on the amount of repeated code in an application. It also makes the maintainability of the application much better as if the design of that element changes you only need to update it in a single place.
To cater for more advanced scenarios, components can define their own APIs allowing data and events to be passed in and out. Imagine a line of business application, it’s probably safe to assume that within that app there would be lots of places data would be displayed in table format. One approach would be to create each table as its own component, however, this would mean we would end up with a lot of components which displayed data in a table.
A better approach would be to define a single component which took in a dataset as a parameter and then displayed it in a table. Now we have a single component for displaying data in a table that we can reuse all over the application. We could also add features to this component, things such as sorting or paging. As we do, this functionality is automatically available to all the tables in the application as they are all reusing the same component.
Components
Components help speed up the development process. Due to the reusable nature of components, using them often leads to shorter development times. They can be composed together.
While usually self-contained, it’s also possible to have components work together to create more complex UI. For example, let’s take the data table scenario we just talked about, that could be a single component but that could potentially be quite large.
Another approach would be to divide it up into several smaller components, each performing a certain job. We could have a table header component, a table body component even a table cell component. Each of these components are performing a specific job but they are still part of the overall table component.
Anatomy of a Blazor component
Now, in this post getting started with C# and Blazor, we have a better idea of what components are in a general sense, let’s look at an example of a component in Blazor. For this we’re going to grab a component from the Blazor project template.
In figure 1.3 we can see an example of a component from Blazors standard project template, Counter.razor.

The sections of a component in Blazor
This particular component is known as a routable component, as it has a page directive declared at the top. Routable components are essentially a page in the application. When the user navigates to the /counter route in the application, this component will be loaded by Blazor router. It displays a simple counter with a button and when the user clicks on the button the count is incremented by one and the new value displayed to the user.
Understanding the code
While understanding the code isn’t important at this point, we can understand the structure of the component. Figure 1.3 is divided up into three sections each has a certain responsibility.
Section 1 is used to define directives, add using statements, inject dependencies, or other general configuration which applies to the whole component.
Section 2 defines the markup of the component; this is written using the Razor language, a mix of C# and HTML. Here we define the visual elements which make up the component.
Section 3 is the code block. This is used to define the logic of the component. It is possible to write any valid C# code into this section. You can define fields, properties, even entire classes if you wish.
Blazor, a platform for building modern UI with C#
Blazor is a fully featured framework for building modern client-side applications using the power of C# and .NET. Allowing developers to build engaging applications which work across nearly any platform – including web, mobile and desktop.
Blazor is an alternative to JavaScript frameworks and libraries such as Angular, Vue and React. If you’ve had experience working with any of these then you’ll probably start spotting familiar concepts. The most notable influence is the idea of building UIs with components, a concept all these technologies share and something we’ll explore in more detail later in this chapter.
No installation required
Because Blazor is built on top of web standards; it doesn’t require the end user to have .NET installed on their machines or any kind of browser plugin or extension. In fact, with Blazor WebAssembly applications we don’t even need .NET running on the server, this flavor of Blazor can be hosted as simple static files.
Being built on .NET means we have access to the vibrant ecosystem of packages available on NuGet. We also have best in class tooling with Visual Studio and Visual Studio Code, and of course, with .NET being cross platform, we can develop our Blazor applications on whatever our preferred platform is, be that Windows, Mac or Linux.
Mobile applications
Therefore, I want to highlight that Blazors programming model can also be used to build cross-platform native mobile applications via an experimental project called Mobile Blazor Bindings. This is a collaboration between the ASP.NET Core team and the Xamarin team to investigate the potential and demand for using Blazor to build non-web UIs. Microsoft has also announced the future evolution of Xamarin Forms, the Multi-platform App UI framework known as .NET MAUI. This framework will allow developers to build native apps which run on Windows, macOS, iOS and Android. According to the roadmap, Blazors programming model will be offered as an option for building these new .NET MAUI apps. This really makes Blazor a compelling technology to learn as once understood, could allow developers to build UIs for almost any platform or device.
Hopefully, you can already see Blazor is an exciting technology with a lot of potential. But there is a key concept which is important to understand before we go any further, that of hosting models. Let’s tackle that next.
Understanding hosting models
When first getting started with Blazor you will immediately come across the concept of hosting models. Essentially, hosting models are where a Blazor application is run. Currently, Blazor has two production supported hosting models called Blazor WebAssembly and Blazor Server. Regardless of which of these models you choose for your application, the component model is the same meaning components are written the same way and can be interchanged between either hosting model.

Blazor has a separation between hosting models and its app/component model. Meaning components written for one hosting model can be used with another.
The above image shows an abstract representation of Blazors architecture, with the separation between the app and component model and the various hosting models. One of the interesting aspects of Blazor is the potential of other hosting models being made available over time to allow Blazor to run in more places and be used to create more types of UI.
Outside of the two production hosting models we will cover below, there are also two other experimental models Microsoft have been testing, Blazor Electron and Mobile Blazor Bindings.
Blazor Electron
Blazor Electron is the oldest of the two experiments and allows Blazor components to be hosted in an Electron application (https://www.electronjs.org/). Developers write components for this model using HTML and C# in the exact same way as they would for Blazor WebAssembly or Blazor Server.
Code example
An example of a component which can be used by all three of hosting models is shown in the following code.
<div> <p>Current count: @currentCount</p> <button @onclick="IncrementCount">Click me</button> </div> @code { private int currentCount = 0; private void IncrementCount() { currentCount++; } }
Mobile Blazor Bindings
The newer experiment is Mobile Blazor Bindings. This model allows developers to write native mobile applications using Blazors programming model. However, this hosting model can’t use components written using web technologies, components for this hosting model must be written using native controls. The following code contains the same component as the code abode but rewritten for the Mobile Blazor Bindings hosting model.
<StackLayout> <Label> Current count: @currentCount </Label> <Button OnClick="@IncrementCount">Click me</Button> </StackLayout> @code { private int currentCount = 0; private void IncrementCount() { currentCount++; } }
As you can see the programming model is the same between the two code samples. The logic in the code block is unchanged, it’s just C# after all. The only difference is in the markup where web technologies have been swapped for native mobile controls. This does mean that we can’t swap component around between web-based hosting models and native hosting models. However, once we’ve mastered Blazors programming model we can easily use that knowledge to create other types of UI.
Now we’ve talked a little about hosting models in general we’re going to focus in on the two production supported options available in Blazor today, Blazor WebAssembly and Blazor Server.
Blazor WebAssembly
Blazor WebAssembly is the principal hosting model for Blazor applications. Choosing this option will mean your application will run entirely inside the client’s browser making it a direct alternative to JavaScript SPA (Single Page Application) frameworks. To understand how this hosting model works we’re going to walk through the process of initializing a Blazor WebAssembly application shown in following image.
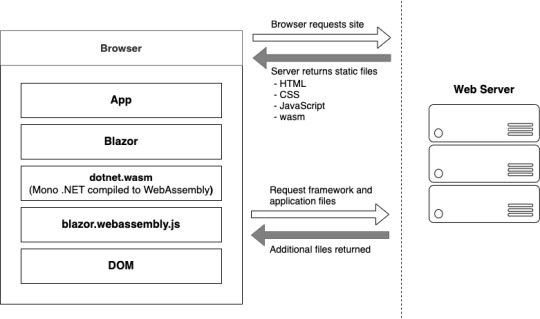
Bootup of a Blazor WebAssembly application showing the interactions between the client’s browser and the web server
Process begin
The process begins when a browser makes a request to the webserver. The web server will return a set of files needed to load the application, these include the host page for the application, usually called index.html, any static assets required by the application such as images, CSS and JavaScript. As well as a special JavaScript file called blazor.webassembly.js.
At this point, you may be wondering why we have a JavaScript file, one of the big selling points of Blazor is the ability to write UI logic using C# instead of JavaScript, right? Yes, that’s true.
But as of right now WebAssembly has a fairly large limitation, it can’t alter the DOM or call Web APIs directly.
DOM manipulation
In order to manage this current limitation, part of the Blazor framework resides in JavaScript called blazor.webassembly.js file. This part of the framework does three main things:
Loads and initializes the Blazor application in the browser.
Provides direct DOM manipulation so Blazor can perform UI updates.
Provides APIs for JavaScript interop scenarios, which we’ll discuss in detail in later chapters.
It’s possible that in the future this file will no longer be required, this will depend on how fast features are added to WebAssembly and adopted by browsers. But for now, it’s an essential part of the framework.
Now, we’ve cleared that up let’s get back to our booting Blazor app. I want to point out that the server returns all static files. They haven’t required any server-side compilation or manipulation. This means that they can be hosted on any service which offers static hosting, there is no requirement for a .NET runtime to be present on the server. For the first time this opens up free hosting options such as GitHub pages to .NET developers (applies to standalone Blazor WebAssembly applications only).
blazor.boot.json
Once the browser has received all the initial files from the web server it can process them and construct the Document Object Model (DOM). Next, blazor.webassembly.js is executed. This performs many actions but in the context of starting a Blazor WebAssembly app it downloads the blazor.boot.json file. This file essentially contains an inventory of all of the framework and application files which are required to run the app.
Most of these files are normal .NET assemblies, there is nothing special about them and they could be run on any compatible .NET runtime. But there’s also another type of file which is downloaded called dotnet.wasm.
dotnet.wasm
The dotnet.wasm file is in fact a complete .NET runtime, the mono .NET runtime to be exact, which has been compiled to WebAssembly.
At this point in time, only the .NET runtime is compiled to WebAssembly, the framework and application are standard .NET assemblies. In the future a feature called AOT (Ahead Of Time) compiling will be introduced which will allow developers to compile parts of their applications into WebAssembly.
The benefit of this will be performance, any code compiled to WebAssembly will be many times more performant than the interpreted approach used today. However, there’s a tradeoff, and that’s size. AOT compiled code will be bigger than the standard assemblies meaning a larger overall download size for the application.
Once the blazor.boot.json file has been downloaded and the files listed in it have been downloaded, it’s time for the application to be run. The WebAssembly .NET runtime is initialized which in turn loads the Blazor framework and finally the application itself. At this point we have a running Blazor application which exists entirely inside the client’s browser. Aside from requesting additional data (if applicable), there’s no further reliance on the server.
Calculating UI Updates
We now understand how a Blazor WebAssembly application boots up. But how do UI updates get calculated? Just as we did for the initialization process, we’re going to follow a scenario to understand how this happens and what Blazor does.
The process of client-side navigation in Blazor WebAssembly from clicking a link to the application of UI updates
For our scenario we have a Blazor WebAssembly application with two pages, home and counter. Neither of these pages have anything on them except a heading saying either “Home” or “Counter”, respectively. The user is on the home page of the application and is going to click on a link to the go to the counter page. We’ll follow the process Blazor goes through to update the UI from that of the home page to the counter page.
Process explained
When the user clicks on the counter link, the navigation event is intercepted by Blazor on the JavaScript side. This event is then passed over to Blazor on the WebAssembly side and is processed by Blazors router component.
The router checks its routing table for any routable components which match the link the user has attempted to navigate to. In our case, it will find a match with the Counter component and a new instance of that component will be created and the relevant lifecycle methods will be executed.
Once complete Blazor will work out the minimum amount of changes that are required to update the DOM to match that of the Counter component. When this is complete, those changes will be passed back down to the Blazor JavaScript runtime and that will in-turn, apply those changes to the physical DOM. At this point the UI will update the user will be on the Counter page.
All of this has happened client-side in the user browser. There was no need for a server during any point in this process. It’s fair to say that in a real world application, you would probably make a call out to a server to some point in this process. This usually happens during the execution of the lifecycle methods of the component being navigated to in order to load some initial data for the component. But this would depend on the individual application.
Benefits
Now we know a bit more about how the Blazor WebAssembly hosting model works, let talk about the benefits and tradeoffs of choosing this model. Let’s start with the benefits.
Applications run on the client. This means that there is much less load on the server, you can offload much of the work to the client. This could lead to significant cost saving on server infrastructure and improve the scalability of an application.
Can work in offline scenarios. As the app runs entirely inside the browser there’s no need for a persistent connection to the server, making applications more tolerant to unstable network connections. It’s also trivial is enable Progressive Web Application (PWA) functionality. In fact, Blazor WebAssembly has this as an option you can select when creating your application.
Deployed as static files. As Blazor WebAssembly apps are just static files, they can be deployed anywhere static hosting is available. This opens up some options which have never been available to .NET developers historically. Services such as GitHub pages, Netlify, Azure Blob Storage, AWS S3 Buckets, Azure Static Web Sites, are all options for hosting standalone Blazor WebAssembly applications.
Code Sharing. Potentially one of the greatest benefits with Blazor WebAssembly is if you’re using C# on the server. You can now use the same C# objects on your client as you use on the server. The days of keeping TypeScript models in sync with their C# equivalent and vice versa, are over.
Tradeoffs
Of course, nothing is a silver bullet so let’s understand some tradeoffs of this model.
Payload. The initial download size for a Blazor WebAssembly app can be considered quite large. The project template weighs in at around 1.8mb when published. This is largely down to the fact Blazor needs to ship an entire .NET runtime to the client which comes in at around 600kb. However, this is a one-time cost as the runtime and many of the framework assemblies are cached on the first load. Meaning subsequent loads can be a small as a few kb.
Load time. A knock-on effect of the payload size can be load time. If the user’s on a poor internet connection the amount of time required to download the initial files will be higher, which will delay the start of the application, leaving the user with a loading message of some kind. This can be offset slightly by using server-side prerendering, however, while this will give the user something more interesting to look at initially, the app still won’t be interactive until all files have been downloaded and initialized. Server-side prerendering for Blazor WebAssembly apps also requires a ASP.NET Core element on the server, which negates any free hosting options.
Restricted runtime. This is arguably not a tradeoff as such, but for existing .NET developers who are used to having a relatively free rein over the machine their apps run on, it’s something to be aware of. WebAssembly applications run in the same browser sandbox as JavaScript applications. This means, for example, that you will not be allowed to reach out to the users’ machine and do things such access the local file system.
Blazor WebAssembly summarize
To summarize, Blazor WebAssembly is the hosting model to choose if you’re looking for a direct replacement for a JavaScript SPA framework such as Angular, React or Vue. While there are a few tradeoffs to consider, there are some substantial benefits to choosing this model.
Blazor Server
Now we’ve seen how Blazor WebAssembly works, let’s turn our attention to the Server hosting model and see how it differs. Blazor Server was the first production supported hosting model for Blazor, being released around 8 months before the WebAssembly version. As we did with the previous model, we’ll walk through initializing a Blazor Server application to help us understand how things work.
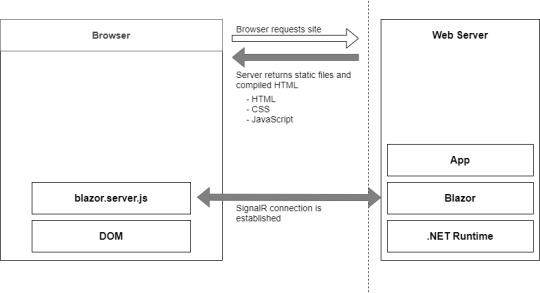
Bootup process of a Blazor Server application
Process begins
The process begins with a request to load the site from the browser. When this request hits the webserver two things could happen, the app is started up, or if the app is already running, a new session is established. Why would the app already be running? Blazor WebAssembly follows the traditional SPA model and runs entirely in the browser, essentially making it like a desktop application. Each user has their own instance of the app which runs locally on their machine. Blazor Server is different, only one instance of the application runs on the server, but it can support many clients. Therefore, the app could already be running, and the new request would just establish a new session.
Process static files
The request is then processed by the application and the initial payload is sent back to the browser. This includes static assets such as CSS and JavaScript files, and images. There is also the initial HTML, but this is compiled rather than static HTML we saw in Blazor WebAssembly. The reason for this is that the hosting page for a Blazor Server application is a Razor Page rather than a static HTML page in the WebAssembly model. The advantage of this is it allows Blazor Server applications to use server-side prerendering out of the box. In fact, this feature is enabled by default when you create this type of Blazor application.
Once the initial payload is returned to the browser the files are processed and the DOM is created – then a file called blazor.server.js is executed. The job of this runtime is to establish a SignalR connection back to the Blazor application running on the server. At this point the application is ready for user interaction.
Calculating UI updates
What happens when a user interacts with the application? We saw earlier that in Blazor WebAssembly the events are processed right there in the browser along with calculating any UI updates and applying them to the DOM. But that can’t happen here as the application is running on the server.
We’ll follow the same scenario as we did with Blazor WebAssembly, we have a Blazor Server application with two pages, home and counter. Neither of these pages have anything on them except a heading saying either “Home” or “Counter”, respectively. The user is on the home page of the application and is going to click on a link to the go to the counter page. We’ll follow the process Blazor goes through to update the UI from that of the home page to the counter page.

Process of updating the UI in Blazor Server
Process explained
The user clicks on the link in the menu and the click event is intercepted by Blazor’s runtime on the client. The runtime then processes the event to understand what has happened. In this case there are two things, a mouse click event and a navigation event, due to it being a hyperlink that was clicked. These two events are then bundled up and sent back to the server over the SignalR connection that was established when the application started.
So, the client sent a the message to the server and the server unpacks and process the message. The Blazor framework then calls any application code necessary. In this case it would instantiate an instance of the counter page component and execute the relevant lifecycle methods.
SignalR
Once complete, Blazor will work out what the minimum amount of changes needed to make the current page transform to the counter page and then send these back to the client via the SignalR connection. Just to be clear, Blazor will not send back an entirely new page to the client. It will only send back the minimum number of instructions needed to update the current DOM to match the Counter page. In our case, the only difference is the heading. Blazor will send back a single instruction to change the text in the heading from “Home” to “Counter”.
DOM
Once back on the client, the client unpacks the changes, and the required changes are applied to the physical DOM. From the user’s perspective, they appear to have navigated to a new page in the application, the counter page. But they are still on the same physical page, it just has a different header.
You may have spotted this already, but the overall process isn’t any different to how Blazor WebAssembly worked, it’s just been stretched out a bit over that SignalR connection. Blazor Server is just as much a SPA as Angular, Vue or Blazor WebAssembly. It just happens to run its logic and calculate UI updates on the server instead of the client. In fact, I would go as far as saying if you were presented with two identical applications, one written in Blazor Server and one in Blazor WebAssembly, you wouldn’t be able to tell the difference between them, as a user.
Performance
Before we talk about benefits and tradeoffs for this model, I want quickly mention performance. With all the network chatter which goes on in this hosting model I’m sure it may have crossed your mind that this might not scale particularly well.
The test
In 2019, the ASP.NET Core team did some testing to establish the performance levels of Blazor Server apps. They setup an application in Azure and tested it on different powered virtual machines, checking the number of active users the application could support. Here are the results.
Standard D1 v2 Instance (1vCPU & 3.5GB Memory). Over 5000 concurrent users
Standard D3 v2 Instance (4vCPU & 14GB Memory). Over 20,000 concurrent users
As you can see, Blazor Server is no slouch when it comes to performance. The main factor they found which effects the number of clients that can be supported is memory. This makes sense as the server needs to keep track of all the clients which are connected to it, the more there are the more information needs to be stored in memory.
Testing
The other major finding from testing was how network latency effected the application. As all interaction are sent back to the server for processing, latency can have a large impact on usability.
If the server is located 250ms away from the client, then each interaction is going to take at least 500ms to be processed as it has to travel to the server (250ms), then be processed, then travel back again (250ms).
Testing found that when the latency went above 200ms then the UI began to feel sluggish and less responsive. As a rough rule you would always want your users to be on the same continent as the server. If you want to have a globally available Blazor Server application, then you need to have your app evenly distributed across the world aiming to keep all clients within 200ms of a server.
Benefits
As we did before, let’s look at the benefits and tradeoffs of choosing a Blazor Server application.
Small payload. As the application is running on the server as opposed to the client, the initial download is significantly smaller. Depending on static assets such as CSS and images a Blazor Server application can be as small as a 100-200kb.
Fast load time. With a much smaller payload the application loads much faster. The server-side prerendering also helps as the user never sees a loading message.
Access to the full runtime. The application code is executing on the server on top of the full .NET runtime. This means that you can do things such as access the servers file system if you require without hitting any security restrictions.
Code security. If you have code which is proprietary, and you don’t want people being able to download and interrogate it then Blazor Server is a good choice. The application code is all executed on the server and only the UI updates are sent to the client. This means your code is never exposed to the client in anyway.
Tradeoffs
Heavy server load. Where Blazor WebAssembly allows us to utilize the power of the client Blazor Server does the complete opposite. Almost all of the work is now being performed by the server. Meaning you might need a larger investment in your infrastructure to support Blazor Server apps.
Doesn’t work offline. Where Blazor WebAssembly takes offline working in its stride Blazor Server does not. The SignalR connection is the lifeline of the application and without it the client can’t function at all. By default, this results in an overlay with a message saying the client is attempting to reestablish the connection. If this fails, the user has to refresh the browser to restart the application.
Latency. Due to its design Blazor Server apps are sensitive to latency issues. Every interaction the user has with the application must be sent back to the server for processing and await any updates that need to be applied. If there is a high latency in the connection between client and server a noticeable lag manifests in the UI and actions quickly feel sluggish. In real numbers a latency above 200ms is going to start causing these issues.
Requires a stable connection. Following on from the need for low latency and tying in with the inability to work offline. Blazor Server apps need to have a stable internet connection. If the connection is intermittent in any way, the user will continually see the reconnecting overlay in their application which quickly becomes very disruptive. An obvious scenario where this could occur is when a user is on a mobile device which has intermittent connection.
Blazor Server summarize
In summary, if you’re looking for a fast loading application and you have users with a fast and stable network connection, then Blazor Server is a great choice.
The post Getting started with C# and Blazor appeared first on PureSourceCode.
from WordPress https://www.puresourcecode.com/dotnet/net-core/getting-started-with-c-and-blazor/
0 notes
Text
How To Fix the "Objects Are Not Valid as a React Child” Error

React, the popular JavaScript library for building user interfaces, has revolutionized the way developers create web applications. However, encountering errors is a normal part of the development process. One such error that React developers often face is the dreaded "Objects Are Not Valid as a React Child" error. This error message can be puzzling, but fear not! In this article, we'll dive into the details of this error, explore its causes, and provide you with actionable solutions to fix it. Let's get started! How To Fix the “Objects Are Not Valid as a React Child” Error So, you're working on your React project, and suddenly you encounter the "Objects Are Not Valid as a React Child" error. This error typically occurs when you're attempting to render an object that React doesn't know how to handle. Here's a step-by-step guide to help you resolve this issue: 1. Understand the Error Message Understanding the error message is the first step in solving the problem. React is letting you know that you're trying to render an object that's not compatible with its rendering process. 2. Check Your Render Method Examine the component where the error originates. Look at the render method and review the code that's responsible for rendering components. Make sure you're not passing an object that React can't render directly. 3. Inspect Nested Components If the error persists, investigate your nested components. Sometimes, the problematic object might be coming from a child component. Check the props you're passing to child components and ensure they're valid React elements. 4. Review JSX Code Review your JSX code for any instances where you might be trying to render a JavaScript object directly. React can't render objects; it needs React elements. 5. Key Prop for Lists If you're rendering a list of elements, make sure each element has a unique key prop. This helps React efficiently update the UI and prevents the error. 6. Convert Objects to JSX If you're trying to render an object, consider converting it into JSX. Create a new React component that can render the object's properties in a meaningful way. 7. Use Conditional Rendering Employ conditional rendering to handle different types of data. This way, you can render specific components based on the type of object you're dealing with. 8. Serialize Objects If you're dealing with complex objects that can't be easily converted to JSX, consider serializing them into a format that React can handle, such as JSON. 9. Update React Libraries Outdated React libraries can sometimes trigger unexpected errors. Ensure that you're using the latest version of React and related libraries. FAQs How do I know which component is causing the error? While the error message might not always provide specific component information, reviewing the stack trace can give you insights into the component hierarchy and help identify the source. Can I render JavaScript objects directly in React? No, React requires you to render valid React elements, which are JSX components. You can't render plain JavaScript objects directly. Why is the "key" prop important for lists? The "key" prop helps React distinguish between different elements in a list. It aids in efficient updates and ensures proper component recycling. What if I'm still encountering the error after trying these solutions? If the error persists, double-check your code and consider seeking help from developer forums or communities. Sometimes, a fresh pair of eyes can spot the issue. Is this error specific to React Native as well? Yes, the error can occur in both React and React Native applications, as the underlying principles are the same. Can I prevent this error proactively? Writing clean, organized code and following React's best practices can minimize the chances of encountering this error. Conclusion Facing the "Objects Are Not Valid as a React Child" error can be frustrating, but with the right strategies, you can overcome it. By understanding the error message, reviewing your code, and implementing the solutions mentioned in this article, you'll be well-equipped to tackle this challenge. Remember, React development is a continuous learning process, and each error encountered is an opportunity to grow as a developer. Keep coding, keep learning, and keep building amazing applications! Read the full article
0 notes
Text
Cyberpunk 2077 Refunds: Why Some Players Are Calling the Game a Failure
https://ift.tt/34xmHnx
We knew fans were going to want to manage their expectations for Cyberpunk 2077, but the post-release conversations and mad dashes for refunds have ensured that Cyberpunk 2077 will contend with The Last of Us Part 2 for the honor of being this year’s most divisive title.
While we’ve previously covered the many, many controversies that impacted Cyberpunk 2077 ahead of its release, few could have predicted that the pre-release debates would only be the start of a much larger argument that has turned Cyberpunk 2077 into a title that has inspired venomous scorn and outright hate from many.
While it would take quite an effort to cover every grievance against Cyberpunk 2077, there are a few key elements of the experience that have attracted the most…passionate responses to CD Projekt Red’s much-anticipated follow-up to The Witcher 3. We’re going to look at some of those elements in an attempt to better understand how we got here.
Cyberpunk 2077 is Nearly Unplayable on PS4 and Xbox One
While this particular collection of grievances is in no particular order, this has to be Cyberpunk 2077’s biggest problem at the moment.
Recent Cyberpunk 2077 delays strongly suggested that the game was going to poorly optimized for PS4 and Xbox One, but nothing could have prepared people for how bad those versions of the game really are. Beyond the downgraded graphics and additional bugs is the plain fact that previous-gen consoles are not equipped to effectively run Cyberpunk 2077.
The constant crashes that plague those versions of the game make it nearly impossible for console gamers to even try and enjoy Cyberpunk 2077. At a time when it’s nearly impossible to find next-gen consoles and new GPUs, the fact that Cyberpunk 2077 is borderline unplayable on the gaming platforms with the largest active install bases is hard to accept no matter how much you’re enjoying the game.
Cyberpunk 2077’s Refund Situation
Recently, Cyberpunk 2077 developer CD Projekt Red issued a statement in which they apologized for the Xbox One and PS4 versions of the game and told players on those platforms that they “can opt to refund” their copies of the game if they don’t want to wait for improvements.
Recently, though, players began reporting that Sony and Microsoft are not necessarily honoring those requests. In an investors’ call, CD Projekt Red followed-up on this situation by essentially noting that they were just pointing people towards those retailers’ standard refund systems rather than any special arrangements that had been made just for them.
While CD Projekt Red has set-up an email address that fans can use for additional refund assistance, it’s not clear how much help they’re actually able to offer. Overall, many fans are seeing this refund situation as an example of CD Projekt Red’s communication problems and subpar support.
Cyberpunk 2077 Is A Very Buggy Game
It honestly wasn’t difficult to guess that Cyberpunk 2077 was going to be a buggy game. There was almos no chance that the game wouldn’t launch with the usual array of open-world bugs even if it was delayed another year.
That said, Cyberpunk 2077 might just be the buggiest game of the modern era. Along with constant visual bugs, Cyberpunk 2077 features a number of glitches that severely hinder the game’s performance and, in some cases, have broken the game and made progress impossible.
CD Projekt Red has already addressed some of those bugs in early patches and promise to target the rest in the coming weeks and months. However, even PC, PS5, and Xbox Series X players are currently having to contend with a nearly constant barrage of bugs that come to define most of the time spent with the game.
Cyberpunk 2077’s Missing Features
One of the most contested talking points of the Cyberpunk 2077 debate involves the game’s missing features.
Fans have brought up features like wall-running, customizable cars, and multiple apartment options as examples of features that are missing from the game. However, others have pointed out that CD Projekt Red did state at different points during the development process that some of those specific features were cut and not intended to be in the final game.
Even then, there’s a popular belief that CD Projekt Red may have oversold the impact of certain elements of the game such as the role of police, expanded hacking options, and the global ramifications of your in-game choices. Players feel that many of the smaller elements of the game were either oversold, altered, or simply delivered in a way that matched expectations associated with some of CD Projekt Red’s previous statements.
Read more
Games
Cyberpunk 2077: Every Ending Explained
By Matthew Byrd
Culture
Link Tank: Cyberpunk 2077’s Release Resurfaced the Worst of Gaming Culture
By Den of Geek Staff
Cyberpunk 2077’s Potentially Offensive Characterizations and Writing
At multiple points during the game’s development, some fans pointed out that aspects of Cyberpunk 2077’s gangs, characters, and world felt stereotypical and potentially offensive. CD Projekt Red downplayed some of those concerns by suggesting that some of them could be attributed to only seeing slices of a game that was still a work in progress.
Now that we’re playing the final (or at least the “retail”) version of the game, though, many of those concerns remain valid. Players have been quick to point out the game’s use of cultural stereotypes and cheap characterizations don’t belong in the year 2020 or 2077. Others have stated that the game’s generally immature tone prevents it from being able to meaningfully address the social commentary elements featured in notable examples of the Cyberpunk genre in different mediums.
The debate surrounding this issue will continue, but it’s important to remember that you can’t tell someone whether they have the “right’ to be offended. At the very least, this topic warrants a conversation involving Cyberpunk 2077’s triumphs and shortcomings in this area and how both can be used as practical examples of doing better in the future.
Cyberpunk 2077’s “Empty” City and Immersion Issues
Cyberpunk 2077’s recreation of Night City was touted as a key component of the game’s overall experience, but some fans are finding that the retail version of the urban hub leaves them feeling cold.
While some have suggested that CD Projekt Red exaggerated certain technical elements of the city (most notably crowd size), the bigger debate concerns the perceived lack of interactive elements in the city itself. Fans lament not being able to play arcade games, lose themselves in city life that exists without their input, or, generally speaking, interact with the city in ways that we’ve seen in other notable large world titles such as the Yakuza and Grand Theft Auto series.
It’s been suggested that the expectation for some of these features were based on wishlists rather than unofficial information, but there’s a popular perception that Night City feels more like a vessel for the missions and collectibles rather than one of the game’s major characters.
Cyberpunk 2077’s Limited Lifepaths
One of the most hyped elements of Cyberpunk 2077 was the game’s multiple optional origin stories. CD Projekt Red told fans that you’d be able to choose between Corpo, Street Kid, and Nomad lifepaths and that the game would play out differently based on your selection.
While those lifepath choices are in the game, some fans feel that this was one of those core experiences that was exaggerated during the build-up period. Each lifepath does offer somewhat unique prologue experiences, but the difference between the various lifepaths largely amounts to which dialog options will be available to you during certain conversations.��
Again, the question is whether this system is working as CD Projekt Red always intended or whether there were more ambitious plans that were somehow cut short by the game’s development.
Cyberpunk 2077’s Broken AI
While there are various “little” aspects of the Cyberpunk 2077 experience that many fans are dissatisfied with, one of the more prevalent concerns involves the game’s AI.
Cyberpunk 2077’s enemy AI is passable (if more than a little buggy and certainly not revolutionary), but the game’s police and civilian NPC AI have both come under fire for their perceived fundamental inadequacies. Specifically, some players have pointed out that NPCs feel much more static in comparison to the NPCs in other open-world games that often follow their own schedules. Most NPCs won’t even react if you steal things from right under their noses. Many of those same fans have noted that the game’s police feel oddly omnipotent and don’t seem to follow any logical patterns based on their position and your criminal activity. In other words, they kind of just spawn around you like in old-school GTA games.
AI is one of those elements of the game that CD Projekt Red absolutely hyped up during the Cyberpunk 2077 pre-release period, so it’s easy to understand why some have pointed out that the final product feels underwhelming.
Cyberpunk 2077’s Limited Character Customizations
In an in-game world that’s practically built around people modifying their bodies and the ways those modifications have reshaped society, it’s more than a little strange that Cyberpunk 2077 won’t even let you get a haircut.
While it’s certainly possible to build a Cyberpunk 2077 character equipped with the best cybernetic implants and perks, you’re seemingly never given the chance to meaningfully modify your character’s physical appearance outside of the initial creation process. For that matter, it’s been pointed out that Cyberpunk 2077’s character creation process feels bare in comparison to other major games that offer similar features.
While CD Projekt Red has noted that features such as car customization were cut during development, this is yet another one of those instances where it’s not clear whether or not we’re experiencing CD Projekt Red’s intended vision for the game or a version of the experience that was compromised by production problems.
Cyberpunk 2077’s Review Process
It’s hardly a surprise that there are fans who disagree with early Cyberpunk 2077 reviews, but Cyberpunk 2077’s review process is further complicated by the restrictions reviewers had to adhere to.
Not only were all reviewers sent a copy of the PC version of Cyberpunk 2077 (which appears to be the only version of the game that’s even close to working as intended) but it seems that reviewers were not allowed to use their own gameplay footage in video reviews. This was seen as an attempt to prevent footage of the game’s buggy performance from leaking ahead of the game’s release.
cnx.cmd.push(function() { cnx({ playerId: "106e33c0-3911-473c-b599-b1426db57530", }).render("0270c398a82f44f49c23c16122516796"); });
There are some who feel that these restrictions and the shape of the game at launch do not currently justify some of the high review scores the game has received so far. At the very least, others are criticizing CD Projekt Red for what they see as an anti-consumer form of damage control.
The post Cyberpunk 2077 Refunds: Why Some Players Are Calling the Game a Failure appeared first on Den of Geek.
from Den of Geek https://ift.tt/2WoQ3zD
0 notes
Text
Free Write 2: A Reflection on Complexity Management Theory: Motivation For Ideological Rigidity And Social Conflict by Jordan B. Peterson and Joseph L. Flanders
Ideological rigidity, a tendency in people to denounce and discredit all competing belief systems other than his or her own, is engendered and maintained at large by our human aversion to unexpected and complex events happening in the physical world. This tendency is rooted deeply in human’s evolutionary instinct to survival. As in primitive societies of our ancestors, people were always under threats from predatory entities lurking in the forests and unexplored territories. As a consequence, the biological instinct to survival forced our ancestors to react strongly to emotions like fear or anxiety so that they could act in time to avoid dangers in the wilderness. Although the development of modern technology has eliminated most threats faced by ancient men, our fear for the unexplored possibilities in life still remains intact. Thus, “our essential existential problem [or existential anxiety] can thus be more accurately conceptualized as vulnerability to complexity” (Peterson & Flanders 431). As a desperate attempt to cope with the overwhelming magnitude of reality, simpler and low-resolution ideologies about the real world are developed by people of modern time. Although these belief systems help to shield us from the complexity of life, we put ourselves in a immensely dangerous situation if we just thoughtlessly and stubbornly rely on our oversimplified perception of the world.
To trace the fundamental cause of ideological rigidity, we first need to bring our attention to how human perception actually operates. There is a general agreement in the limitations of our perceptual power and cognitive processes as we are only consciously aware of a small portion of all the information being constantly presented to us. For instance, when performing a simple task like the action of picking up a cup of tea, we seldom pay any attention to the reflection on the cup or even the set of mechanical motions required to lift up the cup from a surface. Information that is not essential or relevant to our task at hand goes entirely unnoticed unless we consciously direct our attention to them. This is essentially the “frame problem” encountered by many computer scientists who work in the field of artificial intelligence. It was a challenging task for AI researchers to teach the robot how to ignore irrelevant information to the task, as sensors on the robot will non-selectively pick up stimuli from the external environment. Human intelligence only primarily concerns with goal-oriented actions, and much of the reality is reduced and ignored in order for us to perform necessary tasks for our survival. Having goals can effectively reduce the complexity of life, as all components of life beyond the task at hand will be temporarily ignored. Since human life is really essentially goal-oriented, it is reasonable to conclude that a huge portion of an individual’s life operates without his or her conscious perception (Our actions reveal a lot more things about us than what we are consciously aware of, and this is also the reason why we have so many academic studies on sociology and human psychologies). Nonetheless, this ability to simplify the reality and to work with reduced model of the physical world is really a double-edged sword, which may either facilitates the development of our societies or leads to massive destruction of civilizations.
What is it about ideology that makes it so dangerous? and Why do people go so far and even resort to violence in order to defend their ideologies? What is the fundamental cause of a highly polarized society? In order to answer these questions, it may be beneficial to look beyond mere political phenomenon and locate their biological and psychological origin. Ideologies, as low-resolution and oversimplified models, help humans to reduce the complexity of life to a few tangible rules to follow so that we may live our life without being paralyzed by our constant anxiety and fear of unexpected irregularities. However, it is crucially important for us to realize that these ideological representations of the world are highly restricted due to the immense variability of life. When a truly unexpected and tragic event occurs in our life, the false sense of security derived from our oversimplified belief systems will collapse instantly and render us completely defenseless against the magnitude of life. It is not hard to imagine the level of anxiety one may experience when one loses all control of his or her life. These unpleasant feelings and emotions are the exact same kind of reactions our ancestors harbor against unpredictable threats in the forest. In this context, when an unfamiliar stimulus or a different belief system is introduced to our lives, it will inevitably raise our anxiety level due to the fact that our fundamental belief system is under direct attack. It is a lot easier for people to just reject other forms of perceived realities because the mere ackownlgedgment of the existence of “others” can dramatically expand the domain of life that people have to operate within. Thus, it is not surprising to see people who passionately seek to deny the validity and existence of opinions that oppose to their worldview. This point is so well demonstrated if you just listen to the verbal exchanges between people, who have different opinions, in any protests or public demonstrations. What people frequently do at these rallies is that they would demonize the opposite side and try to shut them down instead of creating an environment where different opinions can be shared and openly discussed. It is sad that so many people have become so obsessed with their ideologies and group identities that they would sacrifice opportunities for constructive dialogues just for the preservation of their illusory sense of security provided by their pitiful and insufficient understanding of the world. As a result, nothing meaningful is likely to emerge out these public demonstrations because they are, at its core, motivated by fear and cowardice.
In order to prevent ourselves from being a puppet of our ill-informed belief structures, it is of paramount importance for us to take up our courage to willingly tread upon unknown territories and exam unfamiliar ideas. We must realize that both dangers and opportunities can co-exist in those possibilities that we have yet to explore. By stepping out of our comfort zone voluntarily, we empower ourselves as we realize that those serpents and dragons lurking in the darkness are simply creations of our mind. People will no doubt become a lot stronger and stable as they make voluntary and conscious effort to organize the chaos that surrounds each every one of us. Additionally, in order to combat ideological rigidity, I think it is also necessary for us to see people as individual beings instead of mere representations of their group identity or ideology. As I have mentioned in the previous paragraphs, ideologies are insufficient models created by people to deal with the complexity of the world. They will never be able to provide us a full and objective representation of our reality; therefore, we risk to neglect different possibilities that lie beyond our perception if we entrap ourselves in a particular way of seeing the world. People are more than their ideologies and group identities. We must listen people as if the speaker knows something that we don’t (and it is almost always the case) in order to start a constructive and meaningful conversation. The great person-centered psychologist Carl Rogers put forward the idea that, in order to develop a meaningful and growth-promoting relationship between individuals, people must try to accept the existence of multiple realities as perceived by different individuals. This is not an absurd idea and I do believe that any sensible people would agree with the fact that we all see and understand the world in our unique ways; however, in reality, it is so difficult for people to even want to understand the reality as how others would see and feel about it. I think part of the reason that this is so hard for people is because, by fully accepting the experience of someone else, it is likely that changes will be made to ourselves and our perceptions of the world. Therefore, this process of opening up ourselves to other people directly provokes the existential fear in all of us. Nonetheless, we have to realize that those changes occurring in us can be constructive and beneficial. If we just give people a chance to be themselves and speak forward their beings, we can create a safe place where the opinion of every single individual is valued and appreciated. This sense of security, grounded in mutual understanding and respect, can elevate the spirit of every individual and truly unleash the hidden potential in each one of us.
0 notes
Link

Managing forms in React can easily become painful as your app scales. It could probably be due to the unorganised approach you followed while starting a project or writing the same boilerplate in every component or even sometimes applying hacks for tricky use cases. Speaking of the solutions, there are many form libraries out there and some of them handle forms really well but organising and keeping the code tidy is still up to you. In this article we’re going to solve this problem by building our form as simple as coding forms in vanilla HTML which can be used elegantly in any production app.
To give you an idea, we’ll make this simple code below render our form. We will use React Hook Form, a performant and easy to plug-in library for React forms.
<Form onSubmit={handleSubmit}> <Input name="name" label="Name" /> <Input name="email" label="Email" type="email" /> <RadioGroup name="gender" options={radioOptions} /> <Dropdown name="location" options={dropdownOptions} /> <Checkbox name="terms" label="Accept terms of service" /> <Button>Submit</Button> </Form>
Before we jump into the code, first I’d like you to know the goals that we are trying to accomplish through this approach.
Cutting down the boilerplate - we should be able to render the forms with clean and DRY code
Validations - Perform simple and complex validations easily
Flexibility - we should be able to put input fields at any level nested inside the form
Accessibility - At the very basic level, the form elements should be easily accessible via keyboard
Self detected submit button state - the button should automatically enable/disable or show loader as per the form state
Performance - Last but not the least, it is crucial one especially when rendering large number of fields inside the form.
Set up React app
With the above requirements in mind, let’s begin with setting up our react app by running npx create-react-app react-form && yarn add react-hook-form
Next, we will create our reusable form and input components to cut down all the boilerplate. React Hook Form provides us useForm and useFormContext hooks to get the form context right away and within the nested components respectively. We’ll be using both of these hooks for the communication between the form and input components. First we’ll create the Form component followed by the input components such text fields, checkboxes, radio buttons, etc.
Build the Form component
We’ll initialise the form using useForm hook, and pass on all the methods as props to the form via FormProvider component. This will provide form state to the input components.
import React from 'react' import { useForm, FormProvider } from 'react-hook-form' export const Form = ({ initialValues, children, onSubmit }) => { const methods = useForm({ defaultValues: initialValues }) return ( <FormProvider {...methods}> <form onSubmit={methods.handleSubmit(onSubmit)}> {children} </form> </FormProvider> ) }
Build the form elements
Now that we have our Form component ready, we’ll create the form elements starting with the Input component. Since we don’t know how deeply we would nest the input components, we’ll use useFormContext to hook it up with its parent Form component that we created before.
import React from 'react' import { useFormContext } from 'react-hook-form' export const Input = ({ label, name }) => { const { register } = useFormContext() return ( <label> {label} <input name={name} ref={register} /> </label> ) }
Note: Using useFormContext with FormContext might affect performance by a bit due to re-renders but it should be negligible if you’re not doing any expensive computation within these components. If so, you can use memo to compare the dirty state of the form.
Checkbox Component
We’ll create and hook this component the same way we did in the Inputcomponent, just adding type checkbox to it.
import React from 'react' import { useFormContext } from 'react-hook-form' export const Checkbox = ({ label, name }) => { const { register } = useFormContext() return ( <label> <input type="checkbox" name={name} ref={register} /> {label} </label> ) }
Radio Buttons Component
Since there’s no use case for a single radio button on a web page, we’ll create a RadioGroup component which will accept an array of fields and render a group of radio button
import React from 'react' import { useFormContext } from 'react-hook-form' export const RadioGroup = ({ name, label, options }) => { const { register } = useFormContext() return ( <div> <div>{label}</div> {options && options.map(option => ( <label key={option.value}> <input type="radio" name={name} value={option.value} ref={register} /> {option.label} </label> ))} </div> ) }
Dropdown Component
This will be slightly different from the previous components as we’ll be using a 3rd party plugin for this. Keeping accessibility in mind, the best one I found is downshift by Kent C Dodds. Another good thing about this library is that it only provides functionality for the dropdown and let us code our own UI. Let’s install the plugin using yarn add downshift and create the component as below:
import React, { useEffect } from 'react' import { useFormContext } from 'react-hook-form' import { useSelect } from 'downshift' export const Dropdown = ({ name, options, label, initialValue, placeholder = 'Select...' }) => { const { register, setValue, getValues } = useFormContext() const findInitialItem = () => { const defaultValue = initialValue || getValues()[name] if (defaultValue) { return options.find(o => o.value === defaultValue) } } const { isOpen, selectedItem, getToggleButtonProps, getLabelProps, getMenuProps, getItemProps, } = useSelect({ items: options, initialSelectedItem: findInitialItem() }) useEffect(() => { if (selectedItem) { setValue(name, selectedItem.value); } }, [selectedItem, name, setValue]); return ( <div> <button type="button" {...getToggleButtonProps()}> <label {...getLabelProps()}>{label}</label> <input type="hidden" name={name} ref={register} /> <div> {selectedItem ? selectedItem.text : placeholder} </div> </button> <div {...getMenuProps()}> {isOpen && ( options.map((item, index) => ( <div key={`${item.value}${index}`} {...getItemProps({ item, index })}> {item.text} </div> )) )} </div> </div> ) }
Button Component
The purpose of building the Button component is to make it handle enabled/disabled/loading state itself. Here, we’re simply disabling the button until the form fields are dirty or when the form is being submitted.
import React from 'react' import { useFormContext } from 'react-hook-form' export const Button = ({ children }) => { const { formState: { isDirty, isSubmitting } } = useFormContext() return ( <button type="submit" disabled={!isDirty || isSubmitting}> {children} </button> ) }
Validating the form
Till now, we have made our form functional and able to submit form data. As our next requirement, we need to add validations to our form elements. We’ll allow two types of validations: one is to simply check if a required field is filled or not and other by providing a pattern to validate the value. As an example, the Input component that we created before will now receive two extra props: required and validation.
import React from 'react' import { useFormContext } from 'react-hook-form' export const Input = ({ label, name, required, validation }) => { const { register, errors } = useFormContext() return ( <div> <label> {label} <input name={name} ref={register(validation || { required: !!required })} /> </label> {errors[name] && <i>{errors[name].message}</i>} </div> ) }
The same way we can implement validation in our other components.
0 notes
Text
Steven Universe Review: Seasons 4 and 5 (PART 1)
STEVEN UNIVERSE SPOILERS
Okay, so, I haven’t done one of these in quite some time (I think like two or three hiatuses ago). But we’re once again at a point where we don’t know when SU is coming back to us, so I feel like this is a good time to get caught up on my thoughts of the show. This is gonna be a two-parter since I’ve skipped over so many episodes.
But anyway ON WITH THE REVIEW
Steven’s Dream
This episode doesn’t really tell a whole story so much as mainly set up what’s to come, but that doesn’t mean it doesn’t hit some good points. Steven having some kind of ominous, mystical dream is a great way to get us intrigued with what’s going on. We follow up with an uncomfortable confrontation between Steven and the Gems, and it’s actually kind of cathartic to have Steven finally stand up to Garnet and Pearl like “You know what? Screw you guys. I actually want to be told something straightforwardly for once instead of having to piece it together myself across seventy episodes which then culminate in an earth-shattering plot twist.”
Greg and Steven’s short little montage in Korea was pretty amusing (did not expect that fourth-wall breakage in the Korean animation studio) and it was nice to see Andy is still around and serving the plot. Of course, this is all topped off with the unexpected emergence of Blue Diamond, and her very presence in this episode just creates a huge shift in tone. When Greg actually converses with her, there’s such a feeling of tension, like you couldn’t have put two characters who are on more opposite ends of the threat spectrum together into such an awkward and serious situation.
And of course, it doesn’t end well. Greg gets captured, and this event sets up the rest of the episode. So this wasn’t really a self-contained story and it doesn’t really follow any kind of significant plot or emotional thread, but it was pretty good as setups go. There’s not a lot to say about this aside from that it made me want to keep watching.
Adventures in Light Distortion
This episode isn’t terribly memorable to me as it felt a little all over the place and, again, didn’t feel to me much like a significant story, but I think there are a couple good reasons for that. For one thing, it’s a bit all over the place. Again, this episode doesn’t really feel like a self-contained story so much as a continuation of the last episode and a lead-in for the next one. But that makes sense, because all these episodes are very much meant to blend into one another to create a multi-chapter arc. I almost considered just writing a single review for the whole thing, but I think it’s better to break it up by episode.
Now it’s not a bad episode by any means. It has some fun and creative bits, playing with the effects of the ship on the Gems’ physical forms in a pretty innovative way. It also has a pretty intense sequence where Steven accidentally launches them into faster-than-light travel and you can really feel the helplessness and desperation of his struggle. Especially when he starts crying for his dad. It’s actually one of the few moments in the show (post -first half of season one) where you’re really reminded that he’s a just a kid.
Of course, everything gets resolved by the end and we feel all comfortable and secure and Steven learns his lesson, etc. etc. etc. Again, not really a strong plotline or arc here—just a continuation of the story. You could arguably have cut it out, but I think it helps reinforce the emotional stakes of what’s going on and just how important Steven’s dad is to him, and how he reacts when his dad is threatened. We’ve seen him get worried about and rush after the Gems, but his own biological family has never been threatened in this way, and it’s pretty effective to see just how torn up Steven is over it all.
I wouldn’t say it’s a terrific episode, but certainly not pointless, either.
Gem Heist
Now, again, this episode is another continuation of the previous episode and a lead in to the next one. But, like the last couple episodes, it has some pretty strong moments. Except instead of turbulent, emotional scenes, they’re comical. The title is pretty appropriate because the episode does feel like something of a humorous heist movie plot. Seeing Ruby, Sapphire, Pearl, and Amethyst trip over themselves to fool the Holly Blue Agate is pretty damn funny.
And Holly Blue is a great character. You only have to spend half an episode with her to completely get what she’s about and what her role is at the zoo, and it makes for fantastic dramatic irony when the cast is fumbling about to pull the wool over her eyes.
I actually can’t say much else about this episode. It’s fun and funny and I very much enjoyed it.
The Zoo
This episode feels a bit more like a self-contained story than the other ones do. We’re introduced to a new setting, new characters, a new status quo, and a new conflict that are all contained within this one episode, even if it still ends with a cliffhanger.
At the same time, though, while the premise of the episode is somewhat intriguing, it’s ultimately not that entertaining or engaging. I mean, it’s not boring by any means, but there’s not a whole lot of terrific comedy or drama driving the episode. We’re sort of just observing and learning about this little self-contained world that comes crashing down around them by the episode’s end. There are a few amusing moments and some message in there about choosing freedom over a rigidly dictated security (though I think I feel a bit conflicted over how they seem to trivialize the validity of the zoo-humans’ way of life), but that’s really about all I can say with this episode.
It’s not great, it’s not bad. It’s just somewhat interesting and somewhat amusing.
That Will Be All
This episode feels basically like Gem Heist, except with a couple more dramatic beats and a great payoff to the heist component of the plot. Which is to say, I liked it quite a bit.
First of all, it’s great seeing Amethyst bond with the other Amethyst and Jasper soldiers at the Zoo. Homeworld is always made out to be such a rigid, restrictive and totalitarian society, so it is interesting to see that Gems there are capable of (and perhaps, against their purpose, predisposed to) having individual personalities, being a little rebellious, and developing relationships that foster happiness and unity—not just utility. Also, with Amethyst always being the black sheep of the group, it’s just nice to see her find something akin to a community that she can identify with and that doesn’t judge her for being different (fun trivia: the term “off-colors” is actually first used in this episode as far as I can tell).
And seeing how those Amethysts bond and get along actually just makes Holly Blue out to be even more of a tightwad, which is why her downfall at the end of the episode feels so great.
And of course we get that scene with Blue Diamond and Yellow Diamond, and we get that song. Now, I didn’t love this song when I first heard it, but now I’ve listened to it quite a few times (thanks to the new Steven Universe soundtrack) and I have to say it’s really grown on me. I love how the Pearls provide backup singing, and the song itself is just so strong and somehow weirdly eerie. And really, who saw it coming that Yellow Diamond would get a musical number in this episode? I think this is actually the first song we can consider to be a “Villain song” in this series, and it’s pretty damn great.
The best part of this episode, though, has to be the end where the gang is just trying not to be spotted by Holly Blue as she prattles on about the Diamonds. It’s just so damn comically tense, especially when the Amethyst guards are seeing what’s going on and just look so nervous for them. And then Holly Blue catches them in the act at the very last second in the most compromising position possible. And then if that weren’t enough, we get an awesome scene where Ruby and Sapphire fuse back into Garnet and the Gems fluidly and almost effortlessly take Holly Blue down. That bit where Garnet is like “I’ve been waiting to do this all day” and then just bops her with her un-gloved hand kills me.
And then, and THEN as the cherry on top of the sundae, we get Pearl just totally telling Holly Blue off in the absolute most perfectly vindicating scene for the character ever. I don’t think that sequence could’ve been scripted or animated any more perfectly.
So overall, while this story arc didn’t exactly quite have the emotional gravity I was expecting from a multi-episode arc, it was still pretty damn entertaining. My favorite parts were the heist bits, hands down, and Yellow Diamond’s song. As a plot, maybe it felt a tiny bit contrived and awkwardly paced at moments, but still very entertaining.
The New Crystal Gems
Okay, we are out of the five-episode story arc and are now entering filler territory.
And as light, fillery episodes go, this one is fine. When I first saw it, I actually found it pretty boring and had some disdain for it as I felt that the plot was overly simplistic and seemed like something I’d seen a dozen times in other shows. But, on a second viewing, I more readily accepted the simplicity and lightheartedness of it. It has some playful, self-referential humor that I can appreciate, and it’s interesting seeing Connie interact with Peridot and Lapis. In the end, I still can’t say that I thought it was terrific or hilarious, but I think it’s alright. Not much I can say beyond that.
Storm in the Room
Now this episode is a lot meatier, and it tackles some conflicts going on in Steven that needed to be addressed. Over the course of the series we’ve seen Rose Quartz be built up as this ultra-divine, flawless goddess who serves as the very embodiment of unconditional love, righteousness, and beauty—before being gradually complicated as a Gem who had a darker history than Steven might have thought. I think it was a great idea to have an episode where we have Steven try to reconcile these two seemingly contradictory images of his mother and then bring that conflict to the forefront of the plot.
Using Rose’s room to give a physical manifestation to that conflict was also very creative. I like the idea of Steven creating an ideal version of his mother with whom he kind of lives out this fantasy he’s always had, only to remember that there’s this darker side of his mother that he only just recently has begun to grasp, and it physically transforms her and the room around them. It’s a very appropriately poetic way to convey the war going on inside Steven’s head.
Now, while I’d like to say that I unequivocally loved this episode, I do think it’s bogged down by a couple issues. The biggest one is that I think the episode simply spends too much time on the Connie subplot. It’s like, I get it. I get what you’re doing. Connie’s worried about her mom, the mom comes and gets her, and Steven starts thinking about his own mom and how he’s never had that relationship. I don’t need to spend so much time dwelling on it. Just please do it and move on.
The other thing is that I think the ending of the episode feels really forced. Not the resolution, but the actual ending before it cuts to credits. Having Steven be in this bad mood and then the Gems and Greg suddenly pop in to make everything better—again, it’s like, I get it, Steven still has his family and they’re always gonna be there for him. But do we need to wrap up every episode or heartfelt story like that, now? I feel like this is increasingly becoming a thing, where we have some emotional, possibly sorrowful tale and then we have to end with things on a high note where Steven’s happy to be with family. Bismuth kind of gave me that vibe, this episode gave me that vibe, the most recent episode gave me that vibe—I mean do people remember Rose’s Scabbard? That episode was heavy—possibly the heaviest in the whole series. And it didn’t end with some uplifting note. I mean it kinda does, but it’s still definitely bittersweet. It’s just Pearl and Steven riding on Lion’s back, and Pearl doesn’t even look happy. She’s kind of just sitting there, taking it all in, letting it register. I think the show needs to have more endings like that. Endings which aren’t afraid to just leave you off on a note that doesn’t feel like it was crammed in to make you feel secure by the end.
But that being said, it’s still a pretty good episode. It had some nice atmosphere, a good story to tell, and a creative way to tell it. Maybe it was plagued by a couple awkward notes, but it’s still very well crafted and very well delivered.
Rocknaldo
This episode is an interesting one. Now, I don’t really participate in online discussions of the show, but I think that there is some understanding out there that this episode came across as being at least partially directed at the fans. At the very least, it takes a couple jabs at them (“rock people hate men”). I mean, look, everyone knows it. SU has a some pretty damn toxic fans (everyone remember when that girl was almost driven to suicide because of people harassing her over her SU fanart?).
If this episode is meant to be in any way a commentary on them, it does a pretty good job getting to the heart of the problem. Steven Universe is a show about understanding, acceptance, and being who you want to be. To turn that message against other fans and the show itself completely goes against everything that the show strives toward. Even if this episode isn’t meant to be directed at the fans, though, it still embodies that message and I think it does in some indirect way hold a mirror up to the face of those types of fans (or just those types of people in general who harass and judge in the name of stopping harassment and judgement).
But that all aside, this episode was just sort of…not great. Like from a straight up storytelling perspective. There’s not really any character to root for in this episode. There’s no real conflict to be resolved other than “Ronaldo is acting like a total douche” and then Steven tells Ronaldo off at the end. And, okay, yeah, maybe it’s sort of cathartic, but to me it doesn’t justify the eleven minutes we had to spend with Ronaldo being like “I’M A CRYSTAL GEM! LOOK AT ME! PAY ATTENTION TO ME!” The comedy wasn’t that great and the story is incredibly thin.
The main redeeming qualities to this episode are that 1) it has a message for the show’s toxic fanbase, intentional or not and 2) it finally has some goddamn character progression for Ronaldo. Maybe he won’t be as annoying from now on? Only time will tell. But, yeah, overall, not an episode I think I’ll be watching again anytime soon.
Tiger Philanthropist
This episode’s not bad. It has some cute moments and is generally fairly amusing. I like that it goes back to the whole pro-wrestling plot thread that it sort of left dangling back in season one and never really went back to. Not that this was something I was dying to see addressed again, but I like that it sort of goes back and says “hey, look, Amethyst has undergone character progression since that episode. Let’s see how it affects her relationship with Steven.” There are a couple funny jokes and a somewhat sentimental ending—pretty much just like the last wrestling episode. Not much I can say about this one. It’s just pretty standard as filler-y episodes go. Pretty good, not great.
Room for Ruby
This episode was kinda weird. I wasn’t really sure where it was going, other than that I totally saw it coming that Navy was gonna turn out to be a total troll at the end of the episode. But the whole thing is basically just setting up that plot twist joke at the end. There’s KIND OF a character thing going on with Lapis and how she’s sort of upset at herself for taking so long to adjust to the Earth, but really there’s nothing that strong going on there. It’s mostly absurd gags and that twist at the end. I saw it coming pretty early on, so I can’t say I thought it was mind-blowing or hilarious or anything to that effect. Just kind of another substandard to standard filler-y episode for me.
STAY TUNED FOR PART 2, WHERE I TALK ABOUT MORE FILLER, PLUS SOME EPISODES THAT ARE ACTUALLY INTERESTING!
81 notes
·
View notes
Text
Dear Prime Time Player
Hello, lovely writer!
I’m reconditarmonia here and on AO3 (and have been since LJ days, but my LJ is locked down and I only have a DW to see locked things). I have anon messaging off, but mods should be able to contact me if you have any questions.
Aubrey-Maturin | Discworld | Gekkan Shoujo Nozaki-kun | Legend of Korra | Team Fortress 2
General likes:
– Relationships that aren’t built on romance or attraction. They can be romantic or sexual as well, but my favorite ships are all ones where it would still be interesting or compelling if the romantic component never materialized.
– Loyalty kink! Trust, affectionate or loving use of titles, gestures of loyalty, replacing one's situational or ethical judgment with someone else's, risking oneself (physically or otherwise) for someone else, not doing so on their orders. Can be commander-subordinate or comrades-in-arms.
– Heists, or other stories where there’s a lot of planning and then we see how the plan goes.
– Femslash, complicated or intense relationships between women, and female-centric gen. Women doing “male” stuff (possibly while crossdressing).
– Stories whose emotional climax or resolution isn’t the sex scene, if there is one.
– Uniforms/costumes/clothing.
– Stories, history, and performance. What gets told and how, what doesn’t get told or written down, behavior in a society where everyone’s consuming media and aware of its tropes, how people create their personas and script their own lines.
General DNW: rape/dubcon, torture, other creative gore; unrequested AUs, including “same setting, different rules” AUs such as soulmates/soulbonds; PWP; food sex; embarrassment; focus on pregnancy; Christmas/Christian themes.
A note: I'm generally fine with "/" ships where the fic doesn't contain a kiss, overt declaration of love, etc. I'll trust that you wrote it with shippy intent and don't expect you to force in something that wouldn't fit the story.
—
Fandom: Aubrey-Maturin Series
Ship(s): Clarissa Oakes & Diana Villiers & Sophie Aubrey, Diana Villiers & None, Clarissa Oakes/Diana Villiers
I'm finding myself most excited to read about the women in Aubrey-Maturin. I've always liked Diana, and I'm interested in stuff like, how can I say this, the female household that they're living in when Jack and Stephen are at sea, Diana's longing for and seizure upon any kind of freedom she can find and whether or not she thinks the persona everyone knows is "her", Clarissa's way of seeing and moving in the world. I'd love to read something where any of these combinations (or solo) have something to make choices about and show their strengths and desires. Espionage-related adventures or other small-scale casefic, encountering men in society that Clarissa knows from her previous life, dealing with a problem as a family/household? Diana learning her way around Boston or Sweden, or picking up new extreme sports? AU where women can be in the Navy and we get to see what they'd be like as sailors or officers??? (I'd prefer that we see them at a point where they are not at odds over romantic issues with men.) If writing Clarissa/Diana specifically, I'd love something of their POVs/voices on the idea of lesbianism, if that makes sense, but I also am perennially into the ways that f/f couples could live together in history without occasioning comment (they're raising a child together because they're such good friends and one is a widow while the other's husband is always away, of course).
—
Fandom: Discworld
Ship(s): Magda "Tonker" Halter/Maladict/Tilda "Lofty" Tewt, Magda "Tonker" Halter/Polly Perks/Tilda "Lofty" Tewt, Mildred Froc/Alice "Wazzer" Goom, Polly Perks & Samuel Vimes, Jack Jackrum & Polly "Ozzer" Perks, Maladict/Polly Perks
Tonker/Lofty/Mal or Tonker/Lofty/Polly - These just seemed like ships that would be interesting to see - I guess I imagine them as being short-term given Tonker and Lofty’s one true love, but I’d be interested in seeing why Tonker and Lofty might let someone else in, why Mal or Polly might accept, and how that’d play out. Probably post-canon? How does it come about, if Tonker and Lofty have retired (to be criminals/freedom-fighters, or did they just rob the one bank to get enough to retire on and burn down the one place as personal revenge?) while Mal and Polly are still in the army?
Polly & Jackrum or Polly & Vimes - Just more of Polly and her mentor/s! I love that Monstrous Regiment is about a woman who joins the army in response to an immediate crisis but comes to learn that she’s a cunning bastard and that being a sergeant is what she’s good at. More of Polly learning from Jackrum (or deciding to do things differently, having things to teach) would be great. (She hasn’t heard nearly all Jackrum’s stories - or, even in retirement, there must be some adventure they could have, or something could come up around Jackrum’s big secret, or the book of blackmail.) So would Polly finding a new mentor in Vimes, learning how things work in Ankh-Morpork (as big city - how does she react to all the cultural differences? - or as a power structure where the rules of getting stuff done might be different than in Borogravia) or across periodic meetings when he’s in Borogravia. What are they cynical about, what do they believe in?
Froc/Wazzer - Something with Froc and her loyal secretary/aide, who now has a place in the world, could be really sweet. Wazzer has a connection to the Duchess that could be really meaningful to Froc, but she's also her own person with her own experiences that I'm sure Froc will learn to appreciate, and vice versa.
Mal/Polly - I will always be happy to receive more of this ship. I'm all about the post-canon loyalty kink for them, the different strengths or sacrifices they have at their disposal for each other (Polly’s practicality and cunning, Mal’s intimidating coolness and/or potential berserker rage that Polly might even have to leash in). Polly sends Mal on a dangerous mission; Mal goes off-leash rescuing Polly, or Polly has to bring that potential berserker rage to heel; something about the post-canon rank difference on top of the class difference (Mal is wealthy and cultured and typical commission material and yet is a corporal under Sergeant Perks’s command)...I love high sexual tension in a military context, but also love mutual pining whether from near (if they continue serving in the same regiment, essentially together all the time and unable to act on it) or from far (what if the job separated them - LDR, epistolary?).
I request this fandom constantly, as well as some of the loyalty kink stuff I'm talking about, so I've got more in my "dear author letters" tag.
Fandom-Specific DNW/Exception: gender headcanons, identity musing, or non-canonical pronouns. “He” or “she” for Jackrum are both fine, but I would not want to read the character making a big deal about gender identity or pronouns. Also, er, PWP would probably be fine for the Tonker/Lofty/* ships, although I’m still interested more in the character dynamics than in what would be hot. If writing Mal, please no vampire romance tropes (such as turning or immortality) as focus.
—
Fandom: Gekkan Shoujo Nozaki-kun
Ship(s): Hori Masayuki & Kashima Yuu
I love how ride-or-die obsessed with each other these two are. The bit where Kashima leaves Hori women's clothing in his locker and he's deeply frustrated but also awed by her ability to put an outfit together! How into acting opposite each other and especially dueling each other they get! The coda to the bull scene! I'd be into a story about them acting in a play together or him directing her in a play - working together to create something awesome and intense that shows off both their abilities - or something where they (as per canon) are either intentionally or unintentionally in a tropey situation that may or may not correspond to their gender. Especially (I think, for these two) a trope from a dramatic non-slice-of-life genre. Future fic could also be fun, where they're adults who are still creative collaborators and/or each other's biggest fans in a professional or personal capacity. (Would future!Hori and/or future!Kashima have a girlfriend or wife? Kashima's "ALL THREE OF US WILL HANG" re: Hori's potential future wife is practically memetic in my house.)
I've requested this fandom before, so feel free to check out previous letters in my "dear author letters" tag. (I see from a previous letter that I suggested "give them magical powers" as a potential exception to my unrequested-AUs DNW!)
Fandom-Specific DNW: I would strongly prefer that Kashima's feelings about Hori not be written as overtly romantic or sexual. I think they're probably the most important people to each other, but I don't see her that way. (I'm amused by the possibility of Hori crushing on guy!Kashima, but ultimately, "&" rather than "/".)
—
Fandom: Legend of Korra
Ship(s): Korra & Kuvira, Korra & Zaheer, Lin Beifong/Mako
One thing I enjoyed about seasons 3 and 4 of Korra was the writing team's attempt to write villains who were sincerely committed ideologues with valid points, even if they became evil in pursuit of their goals, and to figure out how Korra could relate to those villains as the Avatar and as the person that she is. I loved how Korra needed to seek help from Zaheer because as an anarchist he truly opposed what Kuvira was doing and wanted to help Korra, and how she was able to empathize with Kuvira at the end of s4 because the two have some big personality similarities. How might they continue to work together or influence each other after the end of s4? I don't need a redemption arc if that's not what you're interested in writing - Zaheer and Kuvira can absolutely continue to believe that their ideals were correct and even that not all of their methods were wrong - but I would be interested in reading about Korra getting more mental/spiritual tutoring from her enemy Zaheer and deciding how much of that she wants to integrate into her practice, seeking Kuvira's advice on how to handle ongoing developments in the Earth Kingdom as it transitions to a republic, sparring or practicing bending with Kuvira, Spirit World meditation adventures with Zaheer... (I haven't read the comics, so you can either take or leave comics canon.)
Or, write me some Lin/Mako! I like that in Mako, Lin finds a mentee who is as cynical and stoic and prickly as she is, with lots of mutual respect for each other's police work. I'd be super into loyaltykink dynamics (whether plotty crimesolving casefic or not - and maybe, like, "of course my feelings for my older mentor/younger protégé are just professional respect and devotion to my team/to the cause of policing" type thing) and/or putting them into scenarios that are Not Dates because they're at the fancy restaurant to bodyguard the candidates, they're undercover, they're just getting takeout because they're working late on a case... They're both terrible at having and expressing emotions so this can only go great. Oh, and absolutely feel free to acknowledge the age difference; Lin deserves a boy toy after everything she's been through, right?
—
Fandom: Team Fortress 2
Ship(s): Administrator/Miss Pauling, Miss Pauling & Spy
Admin/Pauling is a ship that desperately needs some loyaltykink. Pauling has had MULTIPLE speeches in the comics about her devotion to Helen - I especially love the one to Gray Mann. ("Stop her? Why would I stop her? I've worked for her my whole life. I've lied for her. Framed people for her. Killed people for her. Do you think I'd do all that if I didn't know what she is? What she's capable of? Do you think I'm some kind of stupid pawn here? I know exactly what she could do with that kind of power, and I'll be right there with her when she does it.") I would love to get a fic that gets into Pauling's loyalty to Helen and willingness to be the one getting her hands dirty on Helen's behalf, into Helen's appreciation for what Pauling can do and decisions about how to direct all that competence while keeping her safe enough; how far they'd go or what they'd do for each other. Expanding something in their backstory, maybe something alluded to in that speech? Something in the present/future now that Helen is revivified and hot? (Helen trusting Pauling to inherit everything and become the boss herself?)
Alternately, I'm very fond of what we see of Miss Pauling's friendship with the Spy, given that she seems to see him as one of the only competent/sane people she has to work with and vice versa. Per the Tough Break update they go to wine tastings together and he's tried to teach her to play piano; I would love more of their friendship, whether on the job (she's more in the know than he is, but he also seems to see her as a mentee, and they both love guns) or at leisure (wingmanning each other to pick up women, going to the opera or something?) Would also be cool with Femspy.
Fandom-Specific DNW: Please stick to Miss Pauling's canon lesbian orientation if the subject comes up.
0 notes
Note
Obviously you'd have a very pro zucest view on it. In my view it's a bad thing. which is all on zuko. azula just did what she was taught to do, zuko's the bad guy for acting on it. anger turned into lust only applies to zuko. Most people would consider 1-sided incest very bad. He's a coward because he was scared to face azula when she was still in prison. I agree with your last 2 paragraphs. But my point stands zuko is not being done any justice. he's better off as he was in canon.
Oh, I don’t disagree with you. Zuko shouldn’t have acted on it no matter what he may have been feeling at the time. I will have to say though that the clash of emotions between them was conflicting. There is a lot of mistrust between them. That played a part as well as all other components mentioned. Then again, that’s from my perspective. Your view is just as valid as my own. Just like art, writing has many different interpretations. I don’t disagree that a one-sided incest is very bad. There’s too much imbalance. Zuko was being a coward and not facing his sister after only visiting her once. There are many reasons as to why he didn’t but I am fascinated all them same. I like to see how other people would interpret how different characters react in certain situations. In my fanfic “Generating Lightning”, I write Zucest in a more lighter tone. I see Zuko as being concerned for Azula’s well being and visiting or trying to help her. That’s not OOC for Zuko. Then again, it seems that Zuko didn’t visit his sister at all in “The Search” until he realized how fucked up that is and that his family is falling apart.In “Dominion” Zuko is written as a coward to face her but there’s a lot of mistrust. He may see her as a lost cause. At the same time, he was trying to help her but from afar. During that period of time he never stopped caring. He put a safe distance between them. So, is it really OOC? Even though I wrote it totally opposite, I can still see that actually happening as it is written realistically for me. Zuko does annoy me at times but I try to see characters in a different light rather than face value. Aurelia has put in many different reasons why Zuko is the way he is in “Dominion”. But as we both agree, we have different opinions on this. Which is totally kool with me. I can respect your reasoning and understand it :)
8 notes
·
View notes
Text
What I Like About Writing Styles with Svelte
There’s been a lot of well-deserved hype around Svelte recently, with the project accumulating over 24,000 GitHub stars. Arguably the simplest JavaScript framework out there, Svelte was written by Rich Harris, the developer behind Rollup. There’s a lot to like about Svelte (performance, built-in state management, writing proper markup rather than JSX), but the big draw for me has been its approach to CSS.
Single file components
React does not have an opinion about how styles are defined —React Documentation
A UI framework that doesn't have a built-in way to add styles to your components is unfinished. —Rich Harris, creator of Svelte
In Svelte, you can write CSS in a stylesheet like you normally would on a typical project. You can also use CSS-in-JS solutions, like styled-components and Emotion, if you'd like. It’s become increasingly common to divide code into components, rather than by file type. React, for example, allows for the collocation of a components markup and JavaScript. In Svelte, this is taken one logical step further: the Javascript, markup and styling for a component can all exist together in a single `.svelte` file. If you’ve ever used single file components in Vue, then Svelte will look familiar.
// button.svelte <style> button { border-radius: 0; background-color: aqua; } </style> <button> <slot/> </button>
Styles are scoped by default
By default, styles defined within a Svelte file are scoped. Like CSS-in-JS libraries or CSS Modules, Svelte generates unique class names when it compiles to make sure the styles for one element never conflict with styles from another.
That means you can use simple element selectors like div and button in a Svelte component file without needing to work with class names. If we go back to the button styles in our earlier example, we know that a ruleset for <button> will only be applied to our <Button> component — not to any other HTML button elements within the page. If you were to have multiple buttons within a component and wanted to style them differently, you'd still need classes. Classes will also be scoped by Svelte.
The classes that Svelte generates look like gibberish because they are based on a hash of the component styles (e.g. svelte-433xyz). This is far easier than a naming convention like BEM. Admittedly though, the experience of looking at styles in DevTools is slightly worse as the class names lack meaning.

The markup of a Svelte component in DevTools.
It’s not an either/or situation. You can use Svelte’s scoped styling along with a regular stylesheet. I personally write component specific styles within .svelte files, but make use of utility classes defined in a stylesheet. For global styles to be available across an entire app — CSS custom properties, reusable CSS animations, utility classes, any ‘reset’ styles, or a CSS framework like Bootstrap — I suggest putting them in a stylesheet linked in the head of your HTML document.
It lets us create global styles
As we've just seen, you can use a regular stylesheet to define global styles. Should you need to define any global styles from within a Svelte component, you can do that too by using :global. This is essentially a way to opt out of scoping when and where you need to.
For example, a modal component may want to toggle a class to style the body element:
<style> :global(.noscroll) { overflow: hidden; } </style>
Unused styles are flagged
Another benefit of Svelte is that it will alert you about any unused styles during compilation. In other words, it searches for places where styles are defined but never used in the markup.
Conditional classes are terse and effortless
If the JavaScript variable name and the class name is the same, the syntax is incredibly terse. In this example, I’m creating modifier props for a full-width button and a ghost button.
<script> export let big = false; export let ghost = false; </script> <style> .big { font-size: 20px; display: block; width: 100%; } .ghost { background-color: transparent; border: solid currentColor 2px; } </style> <button class:big class:ghost> <slot/> </button>
A class of ghost will be applied to the element when a ghost prop is used, and a class of big is applied when a big prop is used.
<script> import Button from './Button.svelte'; </script> <Button big ghost>Click Me</Button>
Svelte doesn’t require class names and prop names to be identical.
<script> export let primary = false; export let secondary = false; </script> <button class:c-btn--primary={primary} class:c-btn--secondary={secondary} class="c-btn"> <slot></slot> </button>
The above button component will always have a c-btn class but will include modifier classes only when the relevant prop is passed in, like this:
<Button primary>Click Me</Button>
That will generate this markup:
<button class="c-btn c-btn--primary">Click Me</button>
Any number of arbitrary classes can be passed to a component with a single prop:
<script> let class_name = ''; export { class_name as class }; </script> <button class="c-btn {class_name}"> <slot /> </button>
Then, classes can be used much the same way you would with HTML markup:
<Button class="mt40">Click Me</Button>
From BEM to Svelte
Let's see how much easier Svelte makes writing styles compared to a standard CSS naming convention. Here's a simple component coded up using BEM.
.c-card { border-radius: 3px; border: solid 2px; } .c-card__title { text-transform: uppercase; } .c-card__text { color: gray; } .c-card--featured { border-color: gold; }
Using BEM, classes get long and ugly. In Svelte, things are a lot simpler.
<style> div { border-radius: 3px; border: solid 2px; } h2 { text-transform: uppercase; } p { color: gray; } .featured { border-color: gold; } </style> <div class:featured> <h2>{title}</h2> <p> <slot /> </p> </div>
It plays well with preprocessors
CSS preprocessors feels a lot less necessary when working with Svelte, but they can work perfectly alongside one another by making use of a package called Svelte Preprocess. Support is available for Less, Stylus and PostCSS, but here we'll look at Sass. The first thing we need to do is to install some dependencies:
npm install -D svelte-preprocess node-sass
Then we need to import autoPreprocess in rollup.config.js at the top of the file.
import autoPreprocess from 'svelte-preprocess';
Next, let’s find the plugins array and add preprocess: autoPreprocess() to Svelte:
export default { plugins: [ svelte({ preprocess: autoPreprocess(), ...other stuff
Then all we need to do is specify that we’re using Sass when we’re working in a component file, using type="text/scss" or lang="scss" to the style tag.
<style type="text/scss"> $pink: rgb(200, 0, 220); p { color: black; span { color: $pink; } } </style>
Dynamic values without a runtime
We’ve seen that Svelte comes with most of the benefits of CSS-in-JS out-of-the-box — but without external dependencies! However, there’s one thing that third-party libraries can do that Svelte simply can’t: use JavaScript variables in CSS.
The following code is not valid and will not work:
<script> export let cols = 4; </script> <style> ul { display: grid; width: 100%; grid-column-gap: 16px; grid-row-gap: 16px; grid-template-columns: repeat({cols}, 1fr); } </style> <ul> <slot /> </ul>
We can, however, achieve similar functionality by using CSS variables.
<script> export let cols = 4; </script> <style> ul { display: grid; width: 100%; grid-column-gap: 16px; grid-row-gap: 16px; grid-template-columns: repeat(var(--columns), 1fr); } </style> <ul style="--columns:{cols}"> <slot /> </ul>
I’ve written CSS in all kinds of different ways over the years: Sass, Shadow DOM, CSS-in-JS, BEM, atomic CSS and PostCSS. Svelte offers the most intuitive, approachable and user-friendly styling API. If you want to read more about this topic then check out the aptly titled The Zen of Just Writing CSS by Rich Harris.
The post What I Like About Writing Styles with Svelte appeared first on CSS-Tricks.
What I Like About Writing Styles with Svelte published first on https://deskbysnafu.tumblr.com/
0 notes
Text
Mastering Props And PropTypes In React
Props and PropTypes are an important mechanism for passing information between React components, and we’re going to look into them in great detail here. This tutorial will introduce you to the details about props, passing and accessing props, and passing information to any component using props. However, it’s always a good practice to validate the data we are getting through props by using PropTypes. So, you will also learn how to integrate PropTypes in React.
Do props and PropTypes confuse you? You’re not alone. I’m going to guide you through everything about props and PropTypes. They can make your life significantly easier when developing React apps. This tutorial will introduce you to the details about props, passing and accessing props, and passing information to any component using props.
Building React applications involves breaking down the UI into several components, which implies that we will need to pass data from one component to another. Props are an important mechanism for passing information between React components, and we’re going to look into them in great detail. This article would be incomplete without looking into PropTypes, because they ensure that components use the correct data type and pass the right data.
It’s always a good practice to validate the data we get as props by using PropTypes. You will also learn about integrating PropTypes in React, typechecking with PropTypes, and using defaultProps. At the end of this tutorial, you will understand how to use props and PropTypes effectively. It is important that you already have basic knowledge of how React works.
Understanding Props
React allows us to pass information to components using things called props (short for properties). Because React comprises several components, props make it possible to share the same data across the components that need them. It makes use of one-directional data flow (parent-to-child components). However, with a callback function, it’s possible to pass props back from a child to a parent component.
These data can come in different forms: numbers, strings, arrays, functions, objects, etc. We can pass props to any component, just as we can declare attributes in any HTML tag. Take a look at the code below:
<PostList posts={postsList} />
In this snippet, we are passing a prop named posts to a component named PostList. This prop has a value of {postsList}. Let’s break down how to access and pass data.
Passing and Accessing Props
To make this tutorial interesting, let’s create an application that shows a list of users’ names and posts. The app demo is shown below:
See the Pen [Passing and Accessing Props](https://codepen.io/smashingmag/pen/MWyKQpd) by David Adeneye.
See the Pen Passing and Accessing Props by David Adeneye.
The app comprises collections of components: an App component, a PostList component, and a Post component.
The list of posts will require data such as the content and the name of the user. We can construct the data like so:
const postsList = [ { id: 1, content: "The world will be out of the pandemic soon", user: "Lola Lilly", }, { id: 2, content: "I'm really exited I'm getting married soon", user: "Rebecca Smith", }, { id: 3, content: "What is your take on this pandemic", user: "John Doe", }, { id: 4, content: "Is the world really coming to an end", user: "David Mark", }, ];
After this, we need the App component to pull the data, Here is the basic structure of that component:
const App = () => { return ( <div> <PostList posts={postsList} /> </div> ); };
Here, we are passing an array of posts as a prop to the PostList (which we’ll create in a bit). The parent component, PostList, will access the data in postsList, which will be passed as posts props to the child component (Post). If you’ll remember, our app comprises three components, which we’ll create as we proceed.
Let’s create the PostList:
class PostList extends React.Component { render() { return ( <React.Fragment> <h1>Latest Users Posts</h1> <ul> {this.props.posts.map((post) => { return ( <li key={post.id}> <Post {...post} /> </li> ); })} </ul> </React.Fragment> ); } }
The PostList component will receive posts as its prop. It will then loop through the posts prop, this.props.posts, to return each posted item as a Post component (which we will model later). Also, note the use of the key in the snippet above. For those new to React, a key is a unique identifier assigned to each item in our list, enabling us to distinguish between items. In this case, the key is the id of each post. There’s no chance of two items having the same id, so it’s a good piece of data to use for this purpose.
Meanwhile, the remaining properties are passed as props to the Post component ( <Post {...post} /> ).
So, let’s create the Post component and make use of the props in it:
const Post = (props) => { return ( <div> <h2>{props.content}</h2> <h4>username: {props.user}</h4> </div> ); };
We are constructing the Post component as a functional component, rather than defining it as a class component like we did for the PostList component. I did this to show you how to access props in a functional component, compared to how we access them in a class component with this.props. Because this a functional component, we can access the values using props.
We’ve learned now how to pass and access props, and also how to pass information from one component to the other. Let’s consider now how props work with functions.
Passing Functions Via Props
In the preceding section, we passed an array of data as props from one component to another. But what if we are working with functions instead? React allows us to pass functions between components. This comes in handy when we want to trigger a state change in a parent component from its child component. Props are supposed to be immutable; you should not attempt to change the value of a prop. You have to do that in the component that passes it down, which is the parent component.
Let’s create a simple demo app that listens to a click event and changes the state of the app. To change the state of the app in a different component, we have to pass down our function to the component whose state needs to change. In this way, we will have a function in our child component that is able to change state.
Sounds a bit complex? I have created a simple React application that changes state with the click of a button and renders a piece of welcome information:
See the Pen [Passing Function via Props in React](https://codepen.io/smashingmag/pen/WNwrMEY) by David Adeneye.
See the Pen Passing Function via Props in React by David Adeneye.
In the demo above, we have two components. One is the App component, which is the parent component that contains the app’s state and the function to set the state. The ChildComponent will be the child in this scenario, and its task is to render the welcome information when the state changes.
Let’s break this down into code:
class App extends React.Component { constructor(props) { super(props); this.state = { isShow: true, }; } toggleShow = () => { this.setState((state) => ({ isShow: !state.isShow })); }; render() { return ( <div> <ChildComponent isShow={this.state.isShow} clickMe={this.toggleShow} /> </div> ); } }
Notice that we’ve set our state to true, and the method to change the state is created in the App component. In the render() function, we pass the state of the app, as the prop isShow, to the ChildComponent component. We also pass the toggleShow() function as a prop named clickMe.
We will use this in the ChildComponent which looks like this:
class ChildComponent extends React.Component { clickMe = () => { this.props.clickMe(); }; render() { const greeting = "Welcome to React Props"; return ( <div style=> {this.props.isShow ? ( <h1 style=>{greeting}</h1> ) : null} <button onClick={this.clickMe}> <h3>click Me</h3> </button> </div> ); } }
The most important thing above is that the App component passes down a function as a prop to the ChildComponent. The function clickMe() is used for the click handler in the ChildComponent, whereas the ChildComponent doesn’t know the logic of the function — it only triggers the function when the button gets clicked. The state is changed when the function is called, and once the state has changed, the state is passed down as a prop again. All affected components, like the child in our case, will render again.
We have to pass the state of the app, isShow, as a prop to the ChildComponent, because without it, we cannot write the logic above to display greeting when the state is updated.
Now that we’ve looked at functions, let’s turn to validation. It’s always a good practice to validate the data we get through props by using PropTypes. Let’s dive into that now.
What Are PropTypes In React?
PropTypes are a mechanism to ensure that components use the correct data type and pass the right data, and that components use the right type of props, and that receiving components receive the right type of props.
We can think of it like a puppy being delivered to a pet store. The pet store doesn’t want pigs, lions, frogs, or geckos — it wants puppies. PropTypes ensure that the correct data type (puppy) is delivered to the pet store, and not some other kind of animal.
In the section above, we saw how to pass information to any component using props. We passed props directly as an attribute to the component, and we also passed props from outside of the component and used them in that component. But we didn’t check what type of values we are getting in our component through props or that everything still works.
It’s totally upon us whether to validate the data we get in a component through props. But in a complex application, it is always a good practice to validate that data.
Using PropTypes
To make use of PropTypes, we have to add the package as a dependency to our application through npm or Yarn, by running the following code in the command line. For npm:
npm install --save prop-types
And for Yarn:
yarn add prop-types
To use PropTypes, we first need to import PropTypes from the prop-types package:
import PropTypes from 'prop-types';
Let’s use ProTypes in our app that lists users’ posts. Here is how we will use it for the Post component:
Post.proptypes = { id: PropTypes.number, content: PropTypes.string, user: PropTypes.string }
Here, PropTypes.string and PropTypes.number are prop validators that can be used to make sure that the props received are of the right type. In the code above, we’re declaring id to be a number, while content and user are to be strings.
Also, PropTypes are useful in catching bugs. And we can enforce passing props by using isRequired:
Post.proptypes = { id: PropTypes.number.isRequired, content: PropTypes.string.isRequired, user: PropTypes.string.isRequired }
PropTypes have a lot of validators. Here are some of the most common ones:
Component.proptypes = { stringProp: PropTypes.string, // The prop should be a string numberProp: PropTypes.number, // The prop should be a number anyProp: PropTypes.any, // The prop can be of any data type booleanProp: PropTypes.bool, // The prop should be a function functionProp: PropTypes.func // The prop should be a function arrayProp: PropTypes.array // The prop should be an array }
More types are available, which you can check in React’s documentation].
Default Props
If we want to pass some default information to our components using props, React allows us to do so with something called defaultProps. In cases where PropTypes are optional (that is, they are not using isRequired), we can set defaultProps. Default props ensure that props have a value, in case nothing gets passed. Here is an example:
Class Profile extends React.Component{ // Specifies the default values for props static defaultProps = { name: 'Stranger' }; // Renders "Welcome, Stranger": render() { return <h2> Welcome, {this.props.name}<h2> } }
Here, defaultProps will be used to ensure that this.props.name has a value, in case it is not specified by the parent component. If no name is passed to the class Profile, then it will have the default property Stranger to fall back on. This prevents any error when no prop is passed. I advise you always to use defaultProps for every optional PropType.
Conclusion
I hope you’ve enjoyed working through this tutorial. Hopefully, it has shown you how important props and propTypes are to building React applications, because without them, we wouldn’t be able to pass data between components when interactions happen. They are a core part of the component-driven and state-management architecture that React is designed around.
PropTypes are a bonus for ensuring that components use the correct data type and pass the right data, and that components use the right type of props, and that receiving components receive the right type of props.
If you have any questions, you can leave them in the comments section below, and I’ll be happy to answer every one and work through any issues with you.
References
(ks, ra, al, il)
Website Design & SEO Delray Beach by DBL07.co
Delray Beach SEO
source http://www.scpie.org/mastering-props-and-proptypes-in-react/ source https://scpie.tumblr.com/post/626729077522546688
0 notes
Text
Mastering Props And PropTypes In React
Props and PropTypes are an important mechanism for passing information between React components, and we’re going to look into them in great detail here. This tutorial will introduce you to the details about props, passing and accessing props, and passing information to any component using props. However, it’s always a good practice to validate the data we are getting through props by using PropTypes. So, you will also learn how to integrate PropTypes in React.
Do props and PropTypes confuse you? You’re not alone. I’m going to guide you through everything about props and PropTypes. They can make your life significantly easier when developing React apps. This tutorial will introduce you to the details about props, passing and accessing props, and passing information to any component using props.
Building React applications involves breaking down the UI into several components, which implies that we will need to pass data from one component to another. Props are an important mechanism for passing information between React components, and we’re going to look into them in great detail. This article would be incomplete without looking into PropTypes, because they ensure that components use the correct data type and pass the right data.
It’s always a good practice to validate the data we get as props by using PropTypes. You will also learn about integrating PropTypes in React, typechecking with PropTypes, and using defaultProps. At the end of this tutorial, you will understand how to use props and PropTypes effectively. It is important that you already have basic knowledge of how React works.
Understanding Props
React allows us to pass information to components using things called props (short for properties). Because React comprises several components, props make it possible to share the same data across the components that need them. It makes use of one-directional data flow (parent-to-child components). However, with a callback function, it’s possible to pass props back from a child to a parent component.
These data can come in different forms: numbers, strings, arrays, functions, objects, etc. We can pass props to any component, just as we can declare attributes in any HTML tag. Take a look at the code below:
<PostList posts={postsList} />
In this snippet, we are passing a prop named posts to a component named PostList. This prop has a value of {postsList}. Let’s break down how to access and pass data.
Passing and Accessing Props
To make this tutorial interesting, let’s create an application that shows a list of users’ names and posts. The app demo is shown below:
See the Pen [Passing and Accessing Props](https://codepen.io/smashingmag/pen/MWyKQpd) by David Adeneye.
See the Pen Passing and Accessing Props by David Adeneye.
The app comprises collections of components: an App component, a PostList component, and a Post component.
The list of posts will require data such as the content and the name of the user. We can construct the data like so:
const postsList = [ { id: 1, content: "The world will be out of the pandemic soon", user: "Lola Lilly", }, { id: 2, content: "I'm really exited I'm getting married soon", user: "Rebecca Smith", }, { id: 3, content: "What is your take on this pandemic", user: "John Doe", }, { id: 4, content: "Is the world really coming to an end", user: "David Mark", }, ];
After this, we need the App component to pull the data, Here is the basic structure of that component:
const App = () => { return ( <div> <PostList posts={postsList} /> </div> ); };
Here, we are passing an array of posts as a prop to the PostList (which we’ll create in a bit). The parent component, PostList, will access the data in postsList, which will be passed as posts props to the child component (Post). If you’ll remember, our app comprises three components, which we’ll create as we proceed.
Let’s create the PostList:
class PostList extends React.Component { render() { return ( <React.Fragment> <h1>Latest Users Posts</h1> <ul> {this.props.posts.map((post) => { return ( <li key={post.id}> <Post {...post} /> </li> ); })} </ul> </React.Fragment> ); } }
The PostList component will receive posts as its prop. It will then loop through the posts prop, this.props.posts, to return each posted item as a Post component (which we will model later). Also, note the use of the key in the snippet above. For those new to React, a key is a unique identifier assigned to each item in our list, enabling us to distinguish between items. In this case, the key is the id of each post. There’s no chance of two items having the same id, so it’s a good piece of data to use for this purpose.
Meanwhile, the remaining properties are passed as props to the Post component ( <Post {...post} /> ).
So, let’s create the Post component and make use of the props in it:
const Post = (props) => { return ( <div> <h2>{props.content}</h2> <h4>username: {props.user}</h4> </div> ); };
We are constructing the Post component as a functional component, rather than defining it as a class component like we did for the PostList component. I did this to show you how to access props in a functional component, compared to how we access them in a class component with this.props. Because this a functional component, we can access the values using props.
We’ve learned now how to pass and access props, and also how to pass information from one component to the other. Let’s consider now how props work with functions.
Passing Functions Via Props
In the preceding section, we passed an array of data as props from one component to another. But what if we are working with functions instead? React allows us to pass functions between components. This comes in handy when we want to trigger a state change in a parent component from its child component. Props are supposed to be immutable; you should not attempt to change the value of a prop. You have to do that in the component that passes it down, which is the parent component.
Let’s create a simple demo app that listens to a click event and changes the state of the app. To change the state of the app in a different component, we have to pass down our function to the component whose state needs to change. In this way, we will have a function in our child component that is able to change state.
Sounds a bit complex? I have created a simple React application that changes state with the click of a button and renders a piece of welcome information:
See the Pen [Passing Function via Props in React](https://codepen.io/smashingmag/pen/WNwrMEY) by David Adeneye.
See the Pen Passing Function via Props in React by David Adeneye.
In the demo above, we have two components. One is the App component, which is the parent component that contains the app’s state and the function to set the state. The ChildComponent will be the child in this scenario, and its task is to render the welcome information when the state changes.
Let’s break this down into code:
class App extends React.Component { constructor(props) { super(props); this.state = { isShow: true, }; } toggleShow = () => { this.setState((state) => ({ isShow: !state.isShow })); }; render() { return ( <div> <ChildComponent isShow={this.state.isShow} clickMe={this.toggleShow} /> </div> ); } }
Notice that we’ve set our state to true, and the method to change the state is created in the App component. In the render() function, we pass the state of the app, as the prop isShow, to the ChildComponent component. We also pass the toggleShow() function as a prop named clickMe.
We will use this in the ChildComponent which looks like this:
class ChildComponent extends React.Component { clickMe = () => { this.props.clickMe(); }; render() { const greeting = "Welcome to React Props"; return ( <div style=> {this.props.isShow ? ( <h1 style=>{greeting}</h1> ) : null} <button onClick={this.clickMe}> <h3>click Me</h3> </button> </div> ); } }
The most important thing above is that the App component passes down a function as a prop to the ChildComponent. The function clickMe() is used for the click handler in the ChildComponent, whereas the ChildComponent doesn’t know the logic of the function — it only triggers the function when the button gets clicked. The state is changed when the function is called, and once the state has changed, the state is passed down as a prop again. All affected components, like the child in our case, will render again.
We have to pass the state of the app, isShow, as a prop to the ChildComponent, because without it, we cannot write the logic above to display greeting when the state is updated.
Now that we’ve looked at functions, let’s turn to validation. It’s always a good practice to validate the data we get through props by using PropTypes. Let’s dive into that now.
What Are PropTypes In React?
PropTypes are a mechanism to ensure that components use the correct data type and pass the right data, and that components use the right type of props, and that receiving components receive the right type of props.
We can think of it like a puppy being delivered to a pet store. The pet store doesn’t want pigs, lions, frogs, or geckos — it wants puppies. PropTypes ensure that the correct data type (puppy) is delivered to the pet store, and not some other kind of animal.
In the section above, we saw how to pass information to any component using props. We passed props directly as an attribute to the component, and we also passed props from outside of the component and used them in that component. But we didn’t check what type of values we are getting in our component through props or that everything still works.
It’s totally upon us whether to validate the data we get in a component through props. But in a complex application, it is always a good practice to validate that data.
Using PropTypes
To make use of PropTypes, we have to add the package as a dependency to our application through npm or Yarn, by running the following code in the command line. For npm:
npm install --save prop-types
And for Yarn:
yarn add prop-types
To use PropTypes, we first need to import PropTypes from the prop-types package:
import PropTypes from 'prop-types';
Let’s use ProTypes in our app that lists users’ posts. Here is how we will use it for the Post component:
Post.proptypes = { id: PropTypes.number, content: PropTypes.string, user: PropTypes.string }
Here, PropTypes.string and PropTypes.number are prop validators that can be used to make sure that the props received are of the right type. In the code above, we’re declaring id to be a number, while content and user are to be strings.
Also, PropTypes are useful in catching bugs. And we can enforce passing props by using isRequired:
Post.proptypes = { id: PropTypes.number.isRequired, content: PropTypes.string.isRequired, user: PropTypes.string.isRequired }
PropTypes have a lot of validators. Here are some of the most common ones:
Component.proptypes = { stringProp: PropTypes.string, // The prop should be a string numberProp: PropTypes.number, // The prop should be a number anyProp: PropTypes.any, // The prop can be of any data type booleanProp: PropTypes.bool, // The prop should be a function functionProp: PropTypes.func // The prop should be a function arrayProp: PropTypes.array // The prop should be an array }
More types are available, which you can check in React’s documentation].
Default Props
If we want to pass some default information to our components using props, React allows us to do so with something called defaultProps. In cases where PropTypes are optional (that is, they are not using isRequired), we can set defaultProps. Default props ensure that props have a value, in case nothing gets passed. Here is an example:
Class Profile extends React.Component{ // Specifies the default values for props static defaultProps = { name: 'Stranger' }; // Renders "Welcome, Stranger": render() { return <h2> Welcome, {this.props.name}<h2> } }
Here, defaultProps will be used to ensure that this.props.name has a value, in case it is not specified by the parent component. If no name is passed to the class Profile, then it will have the default property Stranger to fall back on. This prevents any error when no prop is passed. I advise you always to use defaultProps for every optional PropType.
Conclusion
I hope you’ve enjoyed working through this tutorial. Hopefully, it has shown you how important props and propTypes are to building React applications, because without them, we wouldn’t be able to pass data between components when interactions happen. They are a core part of the component-driven and state-management architecture that React is designed around.
PropTypes are a bonus for ensuring that components use the correct data type and pass the right data, and that components use the right type of props, and that receiving components receive the right type of props.
If you have any questions, you can leave them in the comments section below, and I’ll be happy to answer every one and work through any issues with you.
References
(ks, ra, al, il)
Website Design & SEO Delray Beach by DBL07.co
Delray Beach SEO
source http://www.scpie.org/mastering-props-and-proptypes-in-react/
0 notes
Text
Mastering Props And PropTypes In React
Props and PropTypes are an important mechanism for passing information between React components, and we’re going to look into them in great detail here. This tutorial will introduce you to the details about props, passing and accessing props, and passing information to any component using props. However, it’s always a good practice to validate the data we are getting through props by using PropTypes. So, you will also learn how to integrate PropTypes in React.
Do props and PropTypes confuse you? You’re not alone. I’m going to guide you through everything about props and PropTypes. They can make your life significantly easier when developing React apps. This tutorial will introduce you to the details about props, passing and accessing props, and passing information to any component using props.
Building React applications involves breaking down the UI into several components, which implies that we will need to pass data from one component to another. Props are an important mechanism for passing information between React components, and we’re going to look into them in great detail. This article would be incomplete without looking into PropTypes, because they ensure that components use the correct data type and pass the right data.
It’s always a good practice to validate the data we get as props by using PropTypes. You will also learn about integrating PropTypes in React, typechecking with PropTypes, and using defaultProps. At the end of this tutorial, you will understand how to use props and PropTypes effectively. It is important that you already have basic knowledge of how React works.
Understanding Props
React allows us to pass information to components using things called props (short for properties). Because React comprises several components, props make it possible to share the same data across the components that need them. It makes use of one-directional data flow (parent-to-child components). However, with a callback function, it’s possible to pass props back from a child to a parent component.
These data can come in different forms: numbers, strings, arrays, functions, objects, etc. We can pass props to any component, just as we can declare attributes in any HTML tag. Take a look at the code below:
<PostList posts={postsList} />
In this snippet, we are passing a prop named posts to a component named PostList. This prop has a value of {postsList}. Let’s break down how to access and pass data.
Passing and Accessing Props
To make this tutorial interesting, let’s create an application that shows a list of users’ names and posts. The app demo is shown below:
See the Pen [Passing and Accessing Props](https://codepen.io/smashingmag/pen/MWyKQpd) by David Adeneye.
See the Pen Passing and Accessing Props by David Adeneye.
The app comprises collections of components: an App component, a PostList component, and a Post component.
The list of posts will require data such as the content and the name of the user. We can construct the data like so:
const postsList = [ { id: 1, content: "The world will be out of the pandemic soon", user: "Lola Lilly", }, { id: 2, content: "I'm really exited I'm getting married soon", user: "Rebecca Smith", }, { id: 3, content: "What is your take on this pandemic", user: "John Doe", }, { id: 4, content: "Is the world really coming to an end", user: "David Mark", }, ];
After this, we need the App component to pull the data, Here is the basic structure of that component:
const App = () => { return ( <div> <PostList posts={postsList} /> </div> ); };
Here, we are passing an array of posts as a prop to the PostList (which we’ll create in a bit). The parent component, PostList, will access the data in postsList, which will be passed as posts props to the child component (Post). If you’ll remember, our app comprises three components, which we’ll create as we proceed.
Let’s create the PostList:
class PostList extends React.Component { render() { return ( <React.Fragment> <h1>Latest Users Posts</h1> <ul> {this.props.posts.map((post) => { return ( <li key={post.id}> <Post {...post} /> </li> ); })} </ul> </React.Fragment> ); } }
The PostList component will receive posts as its prop. It will then loop through the posts prop, this.props.posts, to return each posted item as a Post component (which we will model later). Also, note the use of the key in the snippet above. For those new to React, a key is a unique identifier assigned to each item in our list, enabling us to distinguish between items. In this case, the key is the id of each post. There’s no chance of two items having the same id, so it’s a good piece of data to use for this purpose.
Meanwhile, the remaining properties are passed as props to the Post component ( <Post {...post} /> ).
So, let’s create the Post component and make use of the props in it:
const Post = (props) => { return ( <div> <h2>{props.content}</h2> <h4>username: {props.user}</h4> </div> ); };
We are constructing the Post component as a functional component, rather than defining it as a class component like we did for the PostList component. I did this to show you how to access props in a functional component, compared to how we access them in a class component with this.props. Because this a functional component, we can access the values using props.
We’ve learned now how to pass and access props, and also how to pass information from one component to the other. Let’s consider now how props work with functions.
Passing Functions Via Props
In the preceding section, we passed an array of data as props from one component to another. But what if we are working with functions instead? React allows us to pass functions between components. This comes in handy when we want to trigger a state change in a parent component from its child component. Props are supposed to be immutable; you should not attempt to change the value of a prop. You have to do that in the component that passes it down, which is the parent component.
Let’s create a simple demo app that listens to a click event and changes the state of the app. To change the state of the app in a different component, we have to pass down our function to the component whose state needs to change. In this way, we will have a function in our child component that is able to change state.
Sounds a bit complex? I have created a simple React application that changes state with the click of a button and renders a piece of welcome information:
See the Pen [Passing Function via Props in React](https://codepen.io/smashingmag/pen/WNwrMEY) by David Adeneye.
See the Pen Passing Function via Props in React by David Adeneye.
In the demo above, we have two components. One is the App component, which is the parent component that contains the app’s state and the function to set the state. The ChildComponent will be the child in this scenario, and its task is to render the welcome information when the state changes.
Let’s break this down into code:
class App extends React.Component { constructor(props) { super(props); this.state = { isShow: true, }; } toggleShow = () => { this.setState((state) => ({ isShow: !state.isShow })); }; render() { return ( <div> <ChildComponent isShow={this.state.isShow} clickMe={this.toggleShow} /> </div> ); } }
Notice that we’ve set our state to true, and the method to change the state is created in the App component. In the render() function, we pass the state of the app, as the prop isShow, to the ChildComponent component. We also pass the toggleShow() function as a prop named clickMe.
We will use this in the ChildComponent which looks like this:
class ChildComponent extends React.Component { clickMe = () => { this.props.clickMe(); }; render() { const greeting = "Welcome to React Props"; return ( <div style=> {this.props.isShow ? ( <h1 style=>{greeting}</h1> ) : null} <button onClick={this.clickMe}> <h3>click Me</h3> </button> </div> ); } }
The most important thing above is that the App component passes down a function as a prop to the ChildComponent. The function clickMe() is used for the click handler in the ChildComponent, whereas the ChildComponent doesn’t know the logic of the function — it only triggers the function when the button gets clicked. The state is changed when the function is called, and once the state has changed, the state is passed down as a prop again. All affected components, like the child in our case, will render again.
We have to pass the state of the app, isShow, as a prop to the ChildComponent, because without it, we cannot write the logic above to display greeting when the state is updated.
Now that we’ve looked at functions, let’s turn to validation. It’s always a good practice to validate the data we get through props by using PropTypes. Let’s dive into that now.
What Are PropTypes In React?
PropTypes are a mechanism to ensure that components use the correct data type and pass the right data, and that components use the right type of props, and that receiving components receive the right type of props.
We can think of it like a puppy being delivered to a pet store. The pet store doesn’t want pigs, lions, frogs, or geckos — it wants puppies. PropTypes ensure that the correct data type (puppy) is delivered to the pet store, and not some other kind of animal.
In the section above, we saw how to pass information to any component using props. We passed props directly as an attribute to the component, and we also passed props from outside of the component and used them in that component. But we didn’t check what type of values we are getting in our component through props or that everything still works.
It’s totally upon us whether to validate the data we get in a component through props. But in a complex application, it is always a good practice to validate that data.
Using PropTypes
To make use of PropTypes, we have to add the package as a dependency to our application through npm or Yarn, by running the following code in the command line. For npm:
npm install --save prop-types
And for Yarn:
yarn add prop-types
To use PropTypes, we first need to import PropTypes from the prop-types package:
import PropTypes from 'prop-types';
Let’s use ProTypes in our app that lists users’ posts. Here is how we will use it for the Post component:
Post.proptypes = { id: PropTypes.number, content: PropTypes.string, user: PropTypes.string }
Here, PropTypes.string and PropTypes.number are prop validators that can be used to make sure that the props received are of the right type. In the code above, we’re declaring id to be a number, while content and user are to be strings.
Also, PropTypes are useful in catching bugs. And we can enforce passing props by using isRequired:
Post.proptypes = { id: PropTypes.number.isRequired, content: PropTypes.string.isRequired, user: PropTypes.string.isRequired }
PropTypes have a lot of validators. Here are some of the most common ones:
Component.proptypes = { stringProp: PropTypes.string, // The prop should be a string numberProp: PropTypes.number, // The prop should be a number anyProp: PropTypes.any, // The prop can be of any data type booleanProp: PropTypes.bool, // The prop should be a function functionProp: PropTypes.func // The prop should be a function arrayProp: PropTypes.array // The prop should be an array }
More types are available, which you can check in React’s documentation].
Default Props
If we want to pass some default information to our components using props, React allows us to do so with something called defaultProps. In cases where PropTypes are optional (that is, they are not using isRequired), we can set defaultProps. Default props ensure that props have a value, in case nothing gets passed. Here is an example:
Class Profile extends React.Component{ // Specifies the default values for props static defaultProps = { name: 'Stranger' }; // Renders "Welcome, Stranger": render() { return <h2> Welcome, {this.props.name}<h2> } }
Here, defaultProps will be used to ensure that this.props.name has a value, in case it is not specified by the parent component. If no name is passed to the class Profile, then it will have the default property Stranger to fall back on. This prevents any error when no prop is passed. I advise you always to use defaultProps for every optional PropType.
Conclusion
I hope you’ve enjoyed working through this tutorial. Hopefully, it has shown you how important props and propTypes are to building React applications, because without them, we wouldn’t be able to pass data between components when interactions happen. They are a core part of the component-driven and state-management architecture that React is designed around.
PropTypes are a bonus for ensuring that components use the correct data type and pass the right data, and that components use the right type of props, and that receiving components receive the right type of props.
If you have any questions, you can leave them in the comments section below, and I’ll be happy to answer every one and work through any issues with you.
References
(ks, ra, al, il)
Website Design & SEO Delray Beach by DBL07.co
Delray Beach SEO
source http://www.scpie.org/mastering-props-and-proptypes-in-react/ source https://scpie1.blogspot.com/2020/08/mastering-props-and-proptypes-in-react.html
0 notes