#Disable bitlocker
Explore tagged Tumblr posts
Visit Tumblr Blog
Explore Tumblr blogs with no restrictions, modern design and the best experience.
Last Seen Tumblr Blogs


Fun Fact
Average visit duration of Tumblr.com is 10 mins and 25 secs.
Text
BitLocker Protection off: Update UEFI/BIOS to fix issues
When BitLocker Protection is “off” means that BitLocker encryption is currently disabled on the drive. In my case, it is disabled and the encryption did not succeeded in the first place. Therefore, we will limit our solution to this use-case. In this article, we shall discuss “BitLocker Protection off: Update UEFI/BIOS to fix issues”. Please see How to Disable BitLocker on Windows 10, how to…
#BIOS firmware and BitLocker fix#BIOS update BitLocker error#BIOS update causes BitLocker issue#BitLocker issue after BIOS update#BitLocker protection off#BitLocker protection troubleshooting#disable BitLocker for BIOS update#enable BitLocker after BIOS update#fix BitLocker problems#resolve BitLocker and UEFI issues#secure UEFI BIOS update#troubleshoot BitLocker protection#UEFI BIOS update for BitLocker#update UEFI BIOS for BitLocker#Update UEFI/BIOS to fix issues#Windows#Windows 10#Windows 11#Windows Server#Windows Server 2012#Windows Server 2016#Windows Server 2019#Windows Server 2022
0 notes
Text
12 Windows Services to Disable This 2024
Whether you have a low end PC or a high end PC, if you have unnecessary services running in the computer’s background, this will definitely slow down your machine and you won’t get a good performance out of it. First, click the windows icon at the lower-left part of your screen and click run and search for “services.msc”. Then, it will show you a lot of services with their basic description,…

View On WordPress
#bitlocker encryption#fax#windows biometric#windows service#windows service manager#windows service pack 1#windows service start failure#windows services to disable#xbox
0 notes
Text
Switched my main laptop to Linux
That was A LOT harder than on my cheap laptop that I used for work
It required disabling BitLocker and converting the disk system from RAID to AHCI
All while trying not to break the pre-existing Windows install
Feel mildly proud
17 notes
·
View notes
Text
Windows 11 Patch Notes
Force disabled SFWMS service
Inserted ads into every available bit of screen real estate
Adjusted your mouse sensitivity, screen scaling and microphone volume by 5%
Uninstalled your webcam driver
Set your keyboard to DVORAK
Activated Bitlocker
Force enabled SFWMS again
I think computers should have some sort of a "stop fucking with my settings"-setting. Like when you've set all your settings to your liking, they stay that way. So instead of fucking with all your settings and shifting everything a little bit to the left, your computer would just. not do that.
3K notes
·
View notes
Text
I mean Microsoft Windows, the most used operating system (which Microsoft made that happen by being scum and shutting and bullying out any competition) has so much junk it’s unbelievable. The personal edition of the OS (which used to just mean it didn’t get BitLocker for some reason) comes with literally advertisements in the fucking start menu. Like one wrong click and you’ve got Candy Crush Windows Edition on your pc. Remember back when you installed an OS that you didn’t have to go through the process of disabling and removing all the shit that Microsoft added? I don’t mean the bloat OEMs add. They’ve always done that. I mean Microsoft.
Linux shows this off. If you can figure out how to make it work with hardware that fights it, you can unlock so much power that was lost under a bloated old OS covered in adware and spyware. There’s a reason if you have an old PC that going to Linux is the best option. Suddenly your computer is like a million times faster!
Computers are math boxes. All that junk takes math. There’s a reason micros from the 80s just give you BASIC, if they had put ads in computers back then it literally would not be able to do anything else.
And guess what your computer right now is built on that same architecture.
Evergreen headline.
13K notes
·
View notes
Photo

Disable Hardware-based encryption on BitLocker Removable drives
0 notes
Text
2024/06/18 GPD WIN Max2 2023 BIOSアップデートが複雑なのでまとめる
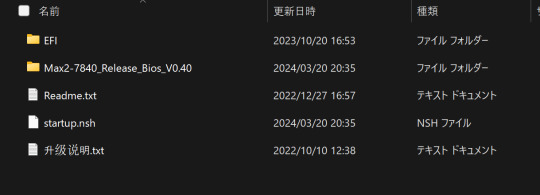
GPD WIN Max2 2023モデルのBIOSアップデート方法の公式の案内適当すぎない??
特に解説されてるサイトが少ないので備忘録に記載。海外サイト見ないとよくわからないのはきつい…。
作業手順
BIOSデータをUSBにダウンロード
BitLockerの番号の確認
BitLockerの解除
セキュアブートの解除(先にBitLocker解除しないとできない)
BIOSの更新(先にセキュアブートを解除しないとできない)
となる。
BIOSデ���タをUSBにダウンロード
2022モデル(無印)と2023&2024モデルはデータ別物扱いなので要注意! 下記GPD公式サイトからダウンロードできる。
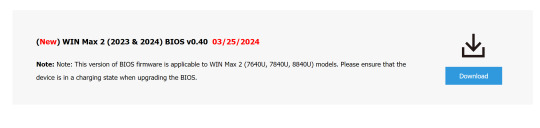
サイト内のDRIVER&BIOSタブを選択、上記の部分からダウンロードできる。
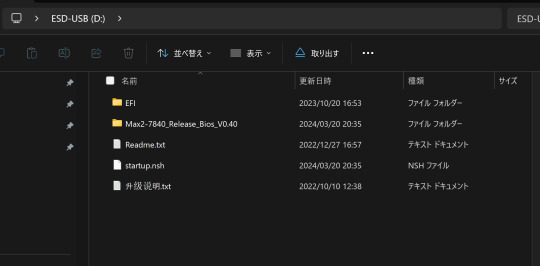
Readmeが適当すぎてフォルダの階層にほんと迷った…。USBに上記の内容をコピーすればOK。
BitLockerの番号の確認
下記のサイトで確認できる。
私の場合は、謎にBitLockerの番号がアカウントに正しくアップロードされておらず、Microsoftアカウントを再度登録し直したら無事に確認ができた。
スマホで番号撮っておこう。
BitLockerの解除
BitLockerは[スタート] > [設定] > [プライバシーとセキュリティ] > [デバイスの暗号化]でOFFにできる。時間がかかるので、寝る前にやると良さそう。
セキュアブートの解除
先にBitLockerを解除しないと操作できません。
PCを再起動、起動前にDELキーを長押し、BIOS画面を出す。 [security] > [SecureBoot] > [SecureBoot]の項目で、SecureBoot自体をDisabledにする。
BIOSの更新
先にセキュアブートを解除しないとUSBメモリを認識しません。
PC起動時にF7キーを長押し、USBメモリを選択して実行。 処理が始まるので、放置すると更新される。
下記サイトがかなり参考になった
0 notes
Text
Windows 11 24H2 will enable BitLocker encryption by default, including Home Edition
Windows11 24H2 will enable BitLocker encryption by default, including Home Edition
Microsoft plans to enable BitLocker encryption by default during the Windows 11 24H2 installation process. This will have two impacts on users: one is affecting the performance of the hard drive, and the other is that if the user does not have the decryption key, related data may be lost.
We noticed the change while testing the installation of Windows 11 24H2 using the newly designed installer, and thankfully users can disable Device Encryption in the Privacy & Security section of Settings.
According to reports, Windows 11 24H2 brings an improved installer. The new installation process no longer starts with a “blue window” but is similar to an in-place upgrade, except that BitLocker encryption of the drive may be performed in the background during the new installation process.

This may not only affect Windows 11 Pro and above, but also Home editions, which may surprise some.
Using BitLocker to encrypt drives is not new on Windows 11 PCs, with some OEMs already implementing it on Pro machines. Of note, there are reports that the default software-based BitLocker encryption on Windows (XTS-AES 128) can cause significant performance degradation even on some of the fastest SSDs, such as PCIe Gen4 NVMe SSDs. Furthermore, unsuspecting users may be completely unaware that their device is encrypted, and if the key is lost or not saved correctly, the encrypted data may not be recovered.
And if you need Windows 11, You can buy it from keyingo.com, it is much cheaper than the Microsoft store !
0 notes
Text
How to prevent macOS from going to sleep
In this article, you will learn the steps on how to prevent macOS from going to sleep despite the consequences and security implications. Mac has energy-saving features, which includes sleep mode. This mode is designed to activate when your device hasn’t been in use for a while. Please see “how to disable the sleep mode in Windows 10 to never turn off the display, “UEFI, TPM, BitLocker FAQs:…
#Disable Sleep Mode#keep Mac Awake#MAC#Mac Sleep Settings#MacOS#MacOS Power Settings#Prevent Display Sleep#Prevent Mac from Sleeping#prevent sleep#Sleep Prevention#stop Mac Sleep
0 notes
Text
Disable bitlocker

manage-bde –unlock drive-letter: -rp 48-digit-numerical-recovery-keyĮ.g.
Once you find the drive letter of the encrypted drive, give the following command to unlock the encrypted drive by using the recovery key. In command prompt, give the following command to view the BitLocker status of all drives:ĥ. Then go to Troubleshoot -> Advanced options -> Command promptĤ.
In the screen you asked for the recovery key, click Skip this drive.ģ. At the first screen click Next and then Repair you computer.Ģ. Boot your system from a Windows 10 Installation Media (USB or DVD).Ģ. After unlocking the drive, follow the instructions at case-1 to turn off the bitlocker encryption. Attach the encrypted drive on another Windows 10 PC and then double click on the drive and type the recovery key to unlock it. If the Bitlocker recovery key, is not accepted at system startup, then you have the following options: Type the bitlocker recovery key (48-digit number) at system startup. Unlock the drive by Entering the Recovery key. If you find the recovery key, proceed to step-2 below, otherwise proceed to step-3. if you use an MSA account to logon to Windows 10, or to download Apps from the Microsoft Store, or to get your emails, or to activate Microsoft Office), then from another device with Internet access, sign in with that Microsoft Account at Microsoft's Bitlocker Recover Key webpage to get the Recovery key for your device. Note for DELL devices: If you own a Dell PC or laptop and you have added a Microsoft account (MSA) on you device, for any reason (e.g.
On your Azure Account if you sign in with an Azure Active Directory account.
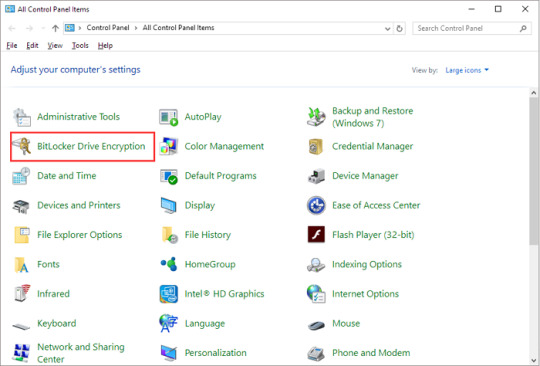
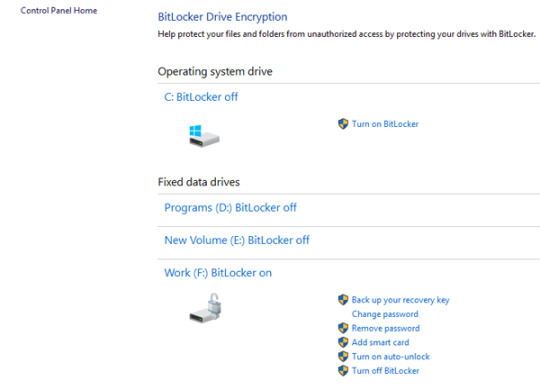
(Plug the USB drive on the locked PC and follow the instructions) (Type the 24-digit number recovery key from the printout) So, If you have enabled the Bitlocker Drive encryption on your system, then look at the following locations to find the bitlocker recovery key: First of all, you should know that there is no way to bypass the Bitlocker encryption, if you don't have the Bitlocker password or the bitlocker recovery key. How to Disable Bitlocker if you Cannot login to Windows. Click Turn off Bitlocker on the encrypted drive.Ĭase 2. At 'Manage Bitlocker' section, click Bitlocker Drive Encryption.ģ. Navigate to Windows Control Panel and open System and Security.Ģ. The normal way to disable the bitlocker encryption in Windows 10 is the following:ġ. How to Disable Bitlocker Encryption If you can login to Windows 10. How to Remove Bitlocker Encryption in Windows 10.Ĭase 1.
Related article: How to Encrypt Drive C: with BitLocker in Windows 10 Pro & Enterprise.
In this tutorial, you 'll find all the available methods to remove the Bitlocker Drive Encryption in Windows 10. In other cases, some users complained that the Bitlocker encryption was enabled automatically, after updating the BIOS on their Dell laptop. Recently, one of my customers, brought his Windows 10 Dell laptop to our service, with the following problem: When the laptop starts, it prompts to enter the BitLocker recovery key, but, as my customer says, it has never enabled the BitLocker encryption on the system.Īfter some research on the Internet, I found that on some Dell devices the bitlocker is starting automatically to encrypt the drive if a Microsoft Account (MSA) is used on the system.
0 notes
Text
How to unlock bitlocker without password and recovery key
How to unlock bitlocker without password and recovery key
Are you locked out of Windows? Do you have no access to your encrypted drive? We can help you unlock and recover data from your Bitlocker encrypted drive. Here is the ultimate BitLocker encrypted drive without a password and recovery key. You will learn how to unlock BitLocker encrypted hard drive or SSD without a password and recovery key in windows 10. According to the report of Acsdata, in…

View On WordPress
#aka.ms/myrecoverykey#bitlocker download for windows 10#bitlocker download windows 10#bitlocker drive encryption#bitlocker drive encryption recovery key#bitlocker encrypted drive#bitlocker encryption#bitlocker enter the recovery key#bitlocker for windows 10#bitlocker get recovery key powershell#bitlocker recovery key#bitlocker recovery key bypass#bitlocker recovery key not working#bitlocker recovery key windows 10#bitlocker unlock without recovery key#bitlocker windows 10#bitlocker windows 10 download#bitlocker windows 10 recovery key#download bitlocker for windows 10#how to disable botlocker in windows 10#how to enable bitlocker in windows 10#how to find bitlocker recovery key#how to get bitlocker recovery key with key id#how to unlock botlocker#recovery key bitlocker#what is bitlocker#what is bitlocker windows 10#windows 10 bitlocker
0 notes
Text
Key Pieces of Bitlocker
At a while, you can want to switch off the encryption on your external encrypted drive. Briefly, encryption is fundamentally the procedure for making any data unreadable by anyone without proper authorization. After the encryption is done, you may see the status which indicates that BitLocker is on for drive C. The genuine encryption of the drive will be dependent on how large it is and the number of files are on it. There are a number of ways to run BitLocker Drive Encryption. It is a pretty advanced and useful feature of Windows and with the latest Windows 10, it's better than ever. After that, it will be turned off on the specific drive and the data is not protected by Bitlocker any more.
It is possible to get rid of a password only once you configure a new procedure of authentication. You will have to use a password you will provide when the system boots. The only issue is that you need to have a password to unlock the system that was specified when encrypt. The password shouldn't be our issue. Moreover, you must make certain you are utilizing a strong password and preferably multi-factor authentication. For passwords you have to create yourself, I prefer the DiceWare method to create strong passwords that are rather easy to remember and difficult to guess. For the reason, you wish to decide on a strong password for the account on your computer.
Your drive is going to be unlocked for as long as it's connected to your computer, but at some point, you might reboot, or will need to eject it. It is imperative to mention that if you wish to eject the USB drive, you want to click the Eject button in the computer software. Note, it is going to take a while particularly if it's a massive drive. If you wish to decrypt your hard disk, all you have to do is turn off BitLocker. So before you begin to encrypt the hard disk, you must do some particular TPM operations, which we are going to discuss in detail a bit later. With BitLocker, you make a digital hard disk, and encrypt it.
You are able to select several various ways of unlocking the drive. Then decide how you want to back up your recovery key, and last, choose how you want the drive encrypted. If you don't have either of them, it's necessary for you to erase the drive at the price of your experiment data. It's possible to also encrypt different drives than only the system drive. The operating system drive should not be encrypted with Symantec PGP or some other drive encryption technology.
The Unexpected Truth About Bitlocker
When the encryption procedure completes you'll be notified by means of a window. Depending on the size of the hard drive and the amount of data, it can take a long time so be patient. It will repartition the disk as necessary. When you discover that the encryption procedure is finished, the drive level should read BitLocker on. In addition, the procedure for establishing a personal VPN is a tiny complex.

When it's already being used, select the second option Encrypt entire drive. Being on the Internet you may take advantage of the absolute most up-to-date troubleshooters from the Windows on-line Troubleshooting Service. After encryption, nobody is going to gain access to such files till they sign in with your account. Read about the techniques you can utilize to restore access to a disk encrypted with BitLocker, and the way to restore data via an encrypted disk which you may no longer access. Also, if somebody else gains access to your passphrase or key, they will finally have the capacity to decrypt your filesso be certain to store it in a secure spot. Please note that anybody may use the recovery key to access the drive, even in case they do not know the password entered in the prior step, so please don't disclose it to others. To disable eDrive, you require physical accessibility to the drive so you may use the PSID printed on the label.
All About Bitlocker
On way it is possible to safeguard your data is by employing encryption. If you're interested in securing your data on your desktop computer or cellular devices, BitLocker is a wonderful option. DRA keys are used if you should get data off an encrypted drive and there's no wise cart readily available to decrypt. As an example, it refuses to encrypt data if you're using a weak password. The only means to guard your data completely is by utilizing encryption. In case the BitLocker metadata data on the drive is now corrupt, you must have the ability to supply a backup key package along with the recovery password or recovery key. It's now feasible to defeat the Windows Bitlocker with merely a very simple trick.
youtube
1 note
·
View note
Text
0 notes
Text
Symantec encryption desktop upgrade reboot

#Symantec encryption desktop upgrade reboot how to#
Click Windows Start and search for regedit. We will disable Symantec Endpoint Protection through the Registry Editor. Disable Symantec Endpoint Protection (SEP) through Registry Editor It will boot your machine into safe mode. Click on OK.ĭo you have Bitlocker enabled? If yes, you will get a message. In the section Boot options, enable Safe boot. Boot into safe modeĬlick on Windows Start and search for msconfig.
#Symantec encryption desktop upgrade reboot how to#
Find out how to disable Symantec Endpoint Protection through the next steps. We can’t stop Symantec Endpoint Protection service through Windows Services. The services of Symantec Endpoint Protection are grayed out. Search for Symantec Endpoint Protection and double click on the name. Disable Symantec Endpoint Protection (SEP) through Windows ServicesĬlick on Windows Start and search for services. We can’t disable Symantec Endpoint Protection through the command. Start the program Run and run the command smc -stop to disable the service. Stop the service Symantec Endpoint Protection (SEP) The security risk is a false positive.��alse positives (false alarms) are harmless files or URLs that are incorrectly identified as malicious by the antivirus program. We know that the file alitajran.exe in the folder is not a malicious file. When browsing to the application, Symantec Endpoint Protection Notification appears on the screen.
Result of Symantec Endpoint Protection (SEP).
Disable Symantec Endpoint Protection (SEP) through Registry Editor.
Disable Symantec Endpoint Protection (SEP) through Windows Services.
Stop the service Symantec Endpoint Protection (SEP).
0 notes
Text
Windows11 24H2 will enable BitLocker encryption by default, including Home Edition
Windows11 24H2 will enable BitLocker encryption by default, including Home Edition
Microsoft plans to enable BitLocker encryption by default during the Windows 11 24H2 installation process. This will have two impacts on users: one is affecting the performance of the hard drive, and the other is that if the user does not have the decryption key, related data may be lost.
We noticed the change while testing the installation of Windows 11 24H2 using the newly designed installer, and thankfully users can disable Device Encryption in the Privacy & Security section of Settings.

According to reports, Windows 11 24H2 brings an improved installer. The new installation process no longer starts with a "blue window" but is similar to an in-place upgrade, except that BitLocker encryption of the drive may be performed in the background during the new installation process.
This may not only affect Windows 11 Pro and above, but also Home editions, which may surprise some.
Using BitLocker to encrypt drives is not new on Windows 11 PCs, with some OEMs already implementing it on Pro machines. Of note, there are reports that the default software-based BitLocker encryption on Windows (XTS-AES 128) can cause significant performance degradation even on some of the fastest SSDs, such as PCIe Gen4 NVMe SSDs. Furthermore, unsuspecting users may be completely unaware that their device is encrypted, and if the key is lost or not saved correctly, the encrypted data may not be recovered.
And if you need Windows 11, You can buy it from keyingo.com, it is much cheaper than the Microsoft store !
1 note
·
View note