#Eliminate render blocking JavaScript and CSS in above the fold content
Explore tagged Tumblr posts
Visit Tumblr Blog
Explore Tumblr blogs with no restrictions, modern design and the best experience.
Last Seen Tumblr Blogs


Fun Fact
Total funding amounts to $125.3M.
Text
Top 10 UX/UI Best Practices for Your Website that transforms User Experience

You build a website, but does it offer the best user experience for optimum conversions? Without the right UX/UI best practices in place, even the most visually appealing sites can suffer from low impressions, poor CTRs, and weak engagement. A lot of it comes down to the front-end designers and developers who fail to factor in key UI/UX metrics, and your business ends up with a mildly aesthetic but otherwise cluttered site.
Inconsistent design, confusing navigation, or unresponsive layouts can quietly undermine user trust, lower engagement, and hurt conversions. Great UI/UX design, on the other hand, is not just about aesthetics — it is about performance, accessibility, responsiveness, and alignment with user behavior.
In this article, we break down 10 essential UX/UI best practices that can transform your website into a high-performing, user-first platform. These are the same principles Altumind follows to help clients build digital experiences that engage, convert, and retain.
Top 10 UX/UI Best Practices
1. Performance: Slow page loads diminish user experience (UX) and increase bounce rates. You must optimize your Core Web Vitals — CLS, FID, and LCP — optimize your database, compress multimedia assets, and use a Content Delivery Network (CDN). Minify CSS, JavaScript, and HTML, reduce server response time, eliminate render-blocking resources, and regularly audit site performance using tools like Lighthouse or GTmetrix.
2. Responsiveness: Frustration from poor mobile experiences leads to drop-offs. Ensure a mobile-first, intuitive design using responsive frameworks like Bootstrap or Tailwind. Optimize for multiple screen sizes, adjust typography for readability, use scalable images and icons, and prioritize essential content for smaller screens.
3. Images: Images breathe life into a webpage, but when used randomly, can bloat the same and diminish user experience. Use icons and visuals meaningfully, use proper formats (JPEG, PNG, WebP, or AVIF), compress images using TinyPNG or ImageOptim, cache images, and reduce dimensions. Avoid using large resolution images unnecessarily, enable HTTP/2 for faster loading, preload key images, use sprites to reduce HTTP requests, try adaptive device-specific delivery, and finally audit image assets and remove unused files.
4. Accessibility for all users: Make your website inclusive. Add descriptive alt-text, transcripts, semantic HTML, and accessible forms. Follow the latest WCAG guidelines. Consider screen reader compatibility, readable color contrast, and structured headings. As Design should not just work for most it should work for everyone.
5. Call-to-Actions (CTA): CTAs get users to buy or drop a lead for your business. So, you want them to be clear and concise. Keep them short & relevant, use action-oriented text such as “Get Started,” “Claim Your Offer,” etc., and maintain consistency across the page, avoid clutter, and have more whitespace instead. Optimize CTAs for mobile devices, position them strategically, and place primary CTAs above the fold. Always A/B test them to arrive at the best converting one.
6. Forms: Keep forms short and user-friendly. Minimize the number of fields, auto-format entries, and use clear validation cues. Consider multi-step flows for complex data and tailor forms for mobile entry. A well-designed form is the difference between a lost lead and a conversion.
7. Whitespace: Whitespace reduces cognitive overload, leading to higher engagement. Whitespace enhances readability and improves user focus. Maintain consistent spacing, avoid clutter, and balance visuals with text and leave sufficient margins between sections and to the left and right of the page content.
8. Videos: Videos are a great way to captivate resources, but they tend to get a bit heavy on the page resources. So, avoid auto-playing videos, only preload the metadata, use compressed formats, implement lazy loading, and optimize thumbnails. Keep load time in check and prioritize usability across devices.
9. Pop-ups: Pop-ups are a great asset for catching user attention and highlighting offers but can disturb user experience. So, limit the number of intrusive pop-ups per session, minimize heavy animations, compress text and image assets in it, make them responsive, use lightweight pop-up scripts, reduce HTTP requests, and use succinct messaging in pop-ups. Further, defer loading non-essential elements, avoid auto-play videos, prefetch resources for critical ones, and update outdated frameworks or libraries used in them.
10. Textual Content: Content is good for SEO and for readers but stick to some hygiene standards. Keep content concise, structured, and SEO-optimized. Use readable fonts, break text into digestible sections, and maintain brand tone. Clear content enhances both usability and discoverability. Further, localize content for multilingual websites, add metadata, use descriptive anchor text, left-align body content, and center-align headings, and fact-check the content.
Final Thoughts: UX/UI Best Practices
Your website is your digital identity, and the UX/UI is the personality and voice that shape how your site is perceived, not just by bots/crawlers for SEO but mainly by users. A bad sitewide UX/UI can leave a terrible first impression, ultimately affecting your branding, revenue, and profits.
54% of users want the content to appeal to their design sensibilities and 45% expect it to work across multiple devices for it to be successful — Adobe
Want to turn casual visitors into buyers? At Altumind, we specialize in building user-first digital journeys backed by data and design expertise. From wireframes to fully responsive designs, we help businesses deliver web experiences that don’t just look good they work, convert, and scale! We bring years of expertise in delivering exceptional data-driven UI/UX experiences that resonate across all touchpoints.
0 notes
Text
How to Remove Unused JavaScript Files on WordPress

Table of Contents
· What are Unused JavaScript Files?
· Why You Should Remove Unused JavaScript on WordPress
· How to Find the Unused JS to Eliminate or Reduce
· How to Remove Unused JS Files on WordPress: Two Methods
· Removing Unused JS Resources with Plugins
· Start Removing Unused JavaScript Right Now
“Remove unused Javascript” (or the latest: “Reduce unused Javascript”) is one of the most daunting PageSpeed Insights recommendations you can come across when testing your WordPress site performance. It’s also one of the most common, so you likely saw it in your performance report.
Let’s understand what unused JavaScript files mean and and what the impact of JavaScript code is on performance. You’ll learn how you can remove or reduce them and improve your WordPress performance.
What are Unused JavaScript Files?
Unused JavaScript code is about files that are not needed for rendering the page — that is, to load and display the main content of the page.
They may not be needed for two reasons:
1. They’re not part of the above-the-fold content — the most important content that needs to be rendered. To load the page faster, the browser should analyze and render only the essential resources – mainly HTML code. On a side note, that’s also why you should eliminate the JS and CSS render-blocking resources that slow down the page’s loading. A typical example of such JS files is third-party code, such as Google Analytics and Facebook tracking codes. Another helpful example for WordPress users is using plugins only when needed. All plugins load scripts that are mainly based on JS. That’s why you should be careful and load them only on the essential pages. Otherwise, the impact of the JavaScript files will be heavy on performance, and there won’t be another easy way to fix the issue. The same goes for themes and page builders that heavily rely on JavaScript.
2. They’re in the code, but they’re not used anymore. They’re completely useless.
Why You Should Remove Unused JavaScript on WordPress
The WordPress unused JavaScript files can hugely affect your site’s performance and user experience. The main metric involved is the First Input Delay (FID), one of the Core Web Vitals metrics.
The First Input Delay measures a page’s responsiveness by taking into account the user interaction — therefore, it can only be calculated on the field.
Total Blocking Time (TBT) replaces FID as the Lighthouse metric determining the page’s interactivity based on user input. TBT metric accounts for 25% of the Lighthouse performance score. It’s easy to see how important it is and why removing unused JavaScript code is essential.
As we explained, unused JavaScript can affect how fast the browser renders and loads the page. And a worse page loading time is no good for users, too.
How to Find the Unused JS to Eliminate or Reduce
There are different ways to analyze and identify the JavaScript files you should take care of.
Let’s go over two easy and straightforward tools: PageSpeed Insights and GTmetrix.
Finding Unused JS via PageSpeed Insights
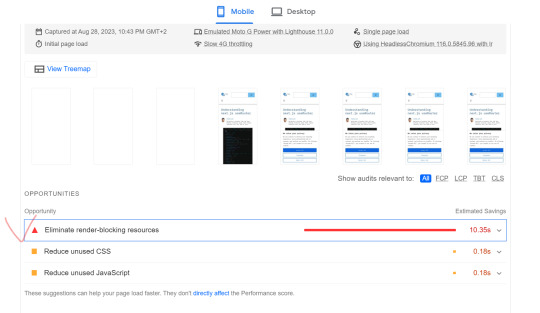
The PageSpeed Insights report makes it very easy to identify the unused JavaScript you should eliminate. Go to the Opportunities section and look for “Remove unused JavaScript”. Here, you’ll find if and what JS resources are affecting your site’s performance. In the example below, the JS script is related to Google Tag Manager.
Finding Unused JS via GTmetrix
Another way to find the JavaScript files is through the Waterfall Chart provided by GTmetrix. After testing your URL’s performance, go to the Waterfall Chart and look at the JS tab. There, you’ll find the list of unused JS you should manage.
As we mentioned above, most heavy JS scripts are related to tracking codes (e.g., Google Tag Manager) and plugins. You can easily understand it by looking at the Domain column.
Let’s now understand how to address the PSI recommendation and tackle the unused JavaScript.
How to Remove Unused JS Files on WordPress: Two Methods
You can remove or reduce unused JS files in two ways:
1. You can delay JavaScript resources. By doing so, the JavaScript files will be loaded only when there’s user interaction, such as scrolling or tapping on a button. If no user interaction takes place, the JS files won’t be loaded at all. Please note that not all the scripts from the PageSpeed recommendation list can be safely delayed. You should only delay the JS files that are above the fold because they’re render-blocking resources. If you delay JavaScript, the Lighthouse tool won’t detect any JS files since they have not been loaded yet. Here’s how you can address the PSI recommendation and ensure that the vast majority of files won’t be included in the report.
2. You can load the JavaScript files only when needed. It means that the JS scripts will be executed only if and when certain pages need them. Once again, you can think about the plugins and specific themes or page builders that you use — it’s likely they are not helpful on all pages.
The two options are complementary as each method tackles a different aspect of managing unused JS.
On the one hand, delaying JS will control when the code is executed. It’s technically a workaround rather than a fix. But it has its effect since it’s making JS non-render-blocking. On the other hand, unloading unnecessary assets will reduce the size of JS on the page. It’s technically reducing unused JS rather than totally removing it.
Note: even using such methods, it’s hard to get rid of the PageSpeed Insights notification. Lighthouse flags any file with more than 20kb of unused JS code.
Since most themes and plugins come with bundled JS files, it’s very likely the above limit will be exceeded in many files. In other words, combining JS will almost guarantee that you will always get the recommendation showing.
That’s why in most cases, the ultimate goal is to reduce the effect of removing unused JS rather than completely fixing it.
A good example is the jQuery library when it can’t be delayed. It will always be flagged for unused JS.
Removing Unused JS Resources with Plugins
You have different options to remove or reduce unused JavaScript by using plugins.
If you want to delay the JavaScript files, you can use the Delay JavaScript Execution feature provided by RocktPress.
The option is straightforward to use and will help you save tons of time and effort!
In the File Optimization tab, go to the Delay JavaScript Execution option and flag it. You don’t have literally to do anything else.
RocketPress will take care of everything, and you’ll see an evident difference in your performance score and the PSI report.
Get RocketPress now and test the improvements right away!
Another way to delay JS files is to use a plugin such as Flying Scripts or WP Meteor.
On the other hand, you can use an asset manager plugin to control where specific files will be loaded, such as:
· Asset CleanUp
· Permatters
· Gonzales
· Plugin Organizer.
Start Removing Unused JavaScript Right Now
Removing or reducing unused JavaScript is an essential step for optimizing the FID grade and improve your site performance — and even score 100% on Google PageSpeed Insights!
Thanks to RocketPress, you can easily manage unused JS and tackle the performance issue.
Not a RocketPress customer yet? Save yourself time and let RocketPressdo the job for you. RocketPress is the easiest way to improve your PageSpeed Insights score.
You can always count on our 100% money-back guarantee. Although we don’t think you’ll ever want one, we’ll gladly provide a refund if you request it within 14 days of purchase.
🚀 The only risk you’ll be taking with our plugin is speeding up your website. RocketPress automatically applies 80% of web performance best practices, instantly boosting your Core Web Vitals scores.
0 notes
Text
Optimizing Front-End Performance: Strategies for Faster Websites

Optimising front-end speed is essential in the digital age because people expect websites to load extremely quickly. In addition to improving user experience, a quicker website boosts conversion rates and ranks higher in search results. These are some essential tactics to make sure your website is loading as quickly as possible.
Cut Down on HTTP Requests Every element on a webpage—stylesheets, scripts, and images—needs an HTTP request. Page load times can be greatly accelerated by lowering the quantity of these queries.
Techniques:
Combine Files: To cut down on requests, combine CSS and JavaScript files. Small CSS and JavaScript Inlines: You should inline small code segments straight into your HTML. Use CSS Sprites: To display the necessary portion of a picture, combine numerous images into a single file and use CSS. 2. Image Optimisation A webpage's loading speed is frequently mostly attributed to its images. Enhancing them can result in significant increases in performance.
Methods:
Choose the Right Format: JPEGs are best for photos; PNGs are best for transparent pictures; SVGs are best for simple graphics and icons. Compress photos: Utilise tools like ImageOptim or TinyPNG to resize photos without sacrificing quality. Images with lazy loading load only after they appear in the viewer. 3. Use a content delivery network, or CDN. A content delivery network stores the static files for your website across several different sites (CDN). This speeds up load times by cutting down on the user's path to the server.
Benefits
By transmitting files from the nearest server, latency is decreased. Enhanced Reliability: Distributed servers reduce the possibility of downtime.
4. CSS, and Utilise Caching in Browsers Browsers can save static files using caching to avoid having to reload them on each visit.
Techniques:
Set expiration dates to specify how long files should be stored in browsers. For static materials like CSS, JavaScript, and pictures, use extended expiration dates. Control Headers for Caches: To define caching policies, use these. 5. Condense and Minify the Code Your code files may download and parse more quickly if they are smaller.
Techniques:
Minify HTML,avaScript: Get rid of extraneous characters, spaces, and comments. Gzip Compression: To compress files before sending them to the browser, enable Gzip on your server.
6. Set priorities Above-the-Fold Content By loading important content above the fold first, visitors to your website will have more time to interact with it.
Techniques:
Important CSS: For material that appears above the fold, extract and inline CSS are needed. JavaScript files that are not necessary should be loaded asynchronously or delayed until the primary content has loaded. 7. Improve Web Fonts Web fonts can speed up a website while also improving its looks.
Techniques:
Subset Fonts: Just add the characters that are required. Preload Fonts: To load fonts ahead of time, use the link rel="preload" element. Employ Contemporary Formats: For optimal compression and performance, use WOFF2.
8. Put Server Side Rendering (SSR) into Practice Server-side rendering can significantly enhance initial load times and SEO for websites with a lot of JavaScript.
Advantages:
Faster First Load: Users see a completely displayed page since HTML is created on the server. Improved SEO: The pre-rendered HTML is easily crawled by search engines. 9. Lessen Scripts from Third Parties Ads, social media widgets, and analytics tools are examples of third-party scripts that can significantly increase load times and cause performance problems.
Techniques:
Third-Party Script Audit: Continually examine and eliminate superfluous scripts. Load Asynchronously: To avoid blocking, make sure third-party scripts are loaded asynchronously.
10. Consistently check and assess performance Performance bottlenecks can be found and fixed with the aid of ongoing testing and monitoring.
Instruments:
Google Lighthouse: Offers recommendations and performance evaluations. WebPageTest: Provides in-depth performance analysis for websites. GTmetrix: Provides thorough insights by combining data from WebPageTest and Google Lighthouse.
In summary Front-end performance optimisation calls for a variety of strategies and constant work. By putting these tactics into practice, you may drastically improve the speed of your website, giving visitors a better experience and improving search engine rankings. Remember that in today's fast-paced digital world, having a quicker website gives you a competitive advantage. Enhance your expertise and stay ahead in the digital game by enrolling in our comprehensive front end developer course at LearNowx. Learn the newest methods and industry best practices to build lightning-fast websites.
0 notes
Text
SEO Coding Best Practices: A Must-Read Guide

SEO Coding: The Key to Unlocking Higher Rankings Search engine optimization (SEO) is an ever-evolving practice, and with Google's algorithms placing more emphasis on page speed and quality code, technical SEO skills are now indispensable. Ignoring your site's underlying code can lead to poor organic visibility. SEO coding refers to the practice of optimizing a website's HTML, CSS, and JavaScript code to improve crawlability, indexation, and ranking performance. While keyword research and link building used to be enough, today's competitive landscape requires expertise in programming efficient, semantically rich pages. According to Moz, over 75% of SEOs say optimising for core web vitals is now one of their top priorities. Tangible Benefits of SEO Coding Implementing SEO coding best practices can yield tangible benefits for your website. By improving page speed metrics like Time to Interactive and Largest Contentful Paint, you can reduce bounce rates by up to 30% - a Google study found bounce rates increased by 32% as page load times went from one to three seconds. Structured data and clean code also lead to better indexing and eligibility for Google's rich snippet features. In fact, pages with structured data are almost twice as likely to rank in the top three search results, according to Tech Wyse. To achieve these results, this comprehensive guide provides a roadmap to mastering SEO coding techniques. Follow our step-by-step instructions to optimize page speed by minimizing render-blocking resources, implement structured data to improverankings, and create a mobile-friendly responsive design. With technical SEO skills, you can gain a competitive edge and earn more organic traffic. Over 50% of businesses say enhancing site speed and core web vitals has led to increased organic keywords and conversions. Optimizing for Core Web Vitals: The Need for Speed Delivering a fast, responsive website is crucial for user experience and search engine rankings. Focusing on Core Web Vitals - metrics that measure loading, interactivity, and visual stability - can unlock tangible SEO benefits and keep users engaged. Optimize for Core Web Vitals Core Web Vitals are Google's set of performance metrics that measure a website's user experience. Optimising these metrics is essential for any website aiming to rank well in 2023 and beyond. In plain English, core web vitals measure how quickly your site loads and displays content to users. We're talking super-fast speeds that keep visitors engaged. No one wants to stare at a spinning wheel while a site takes forever to load! Google has made it crystal clear that page speed and user experience are frontrunners for ranking success. So, let's break down exactly what core web vitals are all about and how you can optimise like a boss. Largest Contentful Paint (LCP) These vital tracks how soon the main content loads. We're talking hero images, big blocks of text - the good stuff above the fold. LCP aims for under 2.5 seconds. A sluggish LCP over 4 seconds will definitely hurt your rankings. Follow these tips to shorten LCP time: - Compress those images! Shrink file sizes through lossless compression. - Minify CSS and JavaScript files. Streamline code to eliminate extra spaces and characters. - Use browser caching to store assets for faster page loads. - Enable text compression and content delivery networks (CDNs). First Input Delay (FID) (Deprecated) Update: First Input Delay (FID) has been officially retired as a Core Web Vital metric. Here's what you need to know: Why FID Was Retired? - Limited Scope: FID only measured the initial delay between a user interaction (like a click or tap) and the browser's response. It didn't capture the full responsiveness experience for users. - Difficult to Optimize In Isolation: Improving FID often required addressing broader performance issues. Focusing on FID alone could have led to overlooking other important optimizations. What Replaced FID? - Interaction to Next Paint (INP): INP is a more comprehensive metric that measures the overall responsiveness of a web page to user interactions. It focuses on the duration of the longest interaction and how quickly the browser updates the UI in response. Why This Change is Important? The shift towards INP reflects the understanding that a good user experience depends on continuous responsiveness, not just an initial quick response. INP helps developers prioritize optimizations that have the most significant impact on how users experience their web pages. How to Focus Your Efforts To optimize your website's responsiveness: - Understand INP: Learn how INP is calculated and what factors influence it. - Optimize for Interactions: Identify the most important user interactions on your site and concentrate on reducing the time it takes for your website to respond. - Minimize Main Thread Work: Since user interactions and browser responses are tied to the main thread, focus on reducing main thread workload by: - Breaking up long JavaScript tasks - Using Web Workers for offloading work - Optimizing third-party code Tools to Help - Chrome DevTools: Utilize the Performance panel for analyzing INP and identifying bottlenecks. - WebPageTest: This tool can provide INP scores and detailed breakdowns. - Lighthouse: This tool audits your website and provides performance insights, including INP. Cumulative Layout Shift (CLS) Ever see page elements like images or buttons pop around as a page loads? That's layout shift, and it creates a jarring user experience. Keep CLS under 0.1 seconds. What is Cumulative Layout Shift (CLS)? - Definition: CLS is a Core Web Vital metric that measures the visual stability of a web page as it loads. It focuses on frustrating, unexpected shifts in page elements while users are trying to interact with the content. - Importance: High CLS scores indicate a poor user experience. Imagine trying to click a button, and as you're about to press it, an image loads above, pushing the button down, and you accidentally click something else. These jarring layout shifts are exactly what CLS aims to quantify. How is CLS Calculated? CLS is a bit complex, but here's the basic idea: - Layout Shifts: The browser detects whenever a visible element changes its position between frames. - Impact Fraction: Measures how much of the screen was impacted by the shift. A large element moving slightly will have a smaller impact than a small element moving a lot. - Distance Fraction: Measures how far the element moved relative to the viewport size. A longer movement indicates a more disruptive shift. - CLS Score: The largest burst of layout shifts within a session window (a series of shifts in quick succession) is your CLS score. It's a unitless number where lower is better. What Causes CLS? - Images without dimensions: If you don't specify width and height attributes, the browser doesn't know how much space to reserve, leading to shifts when images load. - Dynamically injected content: Content added later (ads, pop-ups) can push existing elements around. - Web fonts causing FOUT/FOIT: Swapping between system fonts and custom web fonts can cause text to resize and shift. - Animations without careful planning: Animations, if not implemented thoughtfully, can lead to unexpected layout changes. What's a Good CLS Score? - Good: 0.1 or below - Needs Improvement: 0.1 to 0.25 - Poor: Above 0.25 How to Improve Your CLS Score - Always specify image dimensions: Give the browser a hint about image sizes using width and height attributes. - Reserve space for ads and other dynamic content: Pre-allocate space using CSS or placeholders to avoid shifts. - Choose web fonts wisely: Minimize layout shifts due to font changes by using font-display strategies or preloading fonts. - Use CSS transforms for animations: When possible, use transform for animations as they are less likely to cause layout reflows compared to properties like height and width changes. Wanted to understand Core Web Vitals? There you have it! With this cheat sheet, you're primed to achieve lightning-fast core web vitals and keep your visitors happy. Need a hand getting these technical optimizations implemented? Our expert SEO coding team has you covered there too. Let's talk! Implementing SEO Coding you Will Pump Up Your Pages with Structured Data Ever wonder how some sites get those snazzy little side panels called "rich snippets" in the search results? The answer is structured data, baby! Adding structured data marks up your pages in a way that search engines absolutely love. It's like giving Google extra hints by attaching schema markup to identify people, organizations, events, products, and reviews. Implementing schema, the right way can pump up your rankings and click-through rates. Become a structured data expert by following these steps: Step 1: Select the Appropriate Schema Language: British English With so many schema types to choose from, it can get confusing. Start by identifying the most useful schema for each page. Article schema for blog posts, local business for contact pages, product schema for ecommerce items, and so on. Step 2: Include Schema Markup. Next, neatly add the JSON-LD or microdata markup to define each element. For local businesses, be sure to include the business name, address, phone number, price range, and opening hours. Step 3: Validate Your Schema Implementation Use Google's Structured Data Testing Tool to validate your work. Make sure those rich results are ready to show up in the SERPs! Step 4: Correct Possible Schema Errors. This tool also catches errors in your schema. Common goofs include incorrect data types or missing required fields. Fix those bugs to avoid any Structured Data Penalties. 👉 Ongoing Optimization Get in the habit of adding schema to new pages and updating existing markup. Squeeze the maximum benefits out of structured data. Organizing Your Pages for Structure and Coherence Structured data not only improves search appearance, but also helps Google understand your content. By tagging page elements, you make your site more crawlable. The result? More traffic driven to the right pages. Our schema wizards can implement perfectly optimized structured data across your site. Get ready to impress on the SERPs! Creating for Every Device: User-Friendly and Fantastic on Mobile Let's get real for a sec - most websites don't look so hot on mobile devices. Tiny tap targets, wonky text formatting, and clunky navigation have plagued mobile users for too long! With over 60% of search traffic coming from smartphones, mobile optimization is mission critical. If your site isn't mobile-friendly, Google will pulverize your rankings faster than you can say "hamburger menu". Creating a seamless experience across devices isn't so scary though. Just follow these tips: - Responsive Web Above The FoldA responsive design uses CSS media queries to adapt layouts based on screen size. As you resize the browser, elements should rearrange smoothly. No more pinching and scrolling to read text! - Be cautious of your widthsKeep line lengths in the 50-75 character sweet spot. Any narrower and users have to work to read. Wider means awkward text wrapping. - Hit Those BullseyesFingers need ample space to tap links and buttons. Crank up element sizes so that tap targets are at least 48 CSS pixels. - Prioritize ContentLead with the most important info and navigation links at the top. Nobody wants to endlessly scroll to find basics like contact info. - Test Like CrazyCheck the responsive design on multiple devices. Debug any layout quirks or small-screen mishaps. - Mobile MagicOptimizing for mobile doesn't have to give you a headache. With these fundamentals, you'll give users an excellent experience on any device. Our team of UX all-stars can also help craft a slick mobile-friendly website. Let's talk! Revamp Your Website Architecture for Neatness Your site's architecture is more than just a sitemap - it's the behind-the-scenes blueprint that makes or breaks user experience. Like any good home, a website needs a solid foundation and layout to function. When the underlying structure is messy, pages become frustrating to navigate. Let's explore some renovation tips to create a seamless site architecture: - The Floor PlanA clear URL structure should guide visitors to content in an intuitive flow. Organize pages by category, like: example.com/services/web-development example.com/about-us/team - Interior DecoratingNavigation menus are the doors guiding users between pages. Keep main menus consistent across pages in placement and style. - Don't Get LostBreadcrumb trails provide navigation cues so visitors can retrace their steps. They look like: Home / Services / Web Development - Renovate RoomsReplace generic URLs like "page2.html" with descriptive, keyword-rich URLs.example.com/services/ecommerce-web-design - Curb AppealIs your XML sitemap up to date? This file helps search engines index new pages. - Prevent DuplicationRedirect or update duplicate content to avoid search indexing issues. With the right site architecture, you won't get lost in a maze of disjointed, irrelevant pages. Let our experts provide a blueprint tuned for higher-converting site exploration! Search Engine Optimization through Efficient Coding Let's wrap up our SEO coding tour with some best practices for writing efficient, optimized code. Sure, fancy frameworks like React or Vue can build slick sites. But they can also bloat your code with unnecessary stuff that drags down performance. Follow these tips for clean, lean code: - Cut the CaloriesGet rid of unused libraries, redundant plugins, and overweight code frameworks. Use a minimalist approach instead. - Easy to DigestWell-formatted code with descriptive comments helps future developers modify it without headaches. - Go GreenMinify JavaScript, CSS, HTML, and images to reduce file size. Turn on compression for faster transfer speeds too. - Validator Stamp of ApprovalRun code through validation tools like W3C's for optimal HTML, CSS, etc. Fix errors and warnings! - Function Over FormPick fast-loading, lightweight fonts and images tailored to your needs. Don't overload on resource-hogging elements. - Apply the Marie Kondo method to your code.If code isn't used, delete it! Remove outdated or redundant scripts and assets for a clean foundation. A healthy codebase makes for better user experience and organic performance. Our optimization team knows all the tricks to make your site code shine! Let's connect. Optimizing SEO Code: Adding the Finishing Touches for Success Let's recap the awesome SEO coding skills we've built together: - Optimized core web vitals for lightning page speeds - Implemented structured data for enhanced search appears - Created a slick mobile-friendly responsive design - Organized site architecture for intuitive navigation - Wrote clean, efficient HTML, CSS, and JavaScript With these technical SEO fundamentals mastered, you're ready to climb the rankings! But don't just set it and forget it. Stay on top of new best practices as Google's algorithms evolve: - Monitor your site's core web vitals regularly. - Keep structured data, sitemaps, and URLs updated. - Continually improve page speed as new optimization tricks emerge. - Watch for Google algorithm updates and adjust technical factors accordingly. - Learn something new! Read SEO blogs and attend web development conferences. Thriving in competitive search landscape requires mastering both technical SEO and content creation. But robust coding sets the foundation. Now get out there, inspect some code, and start building a faster, more search-friendly website! Our team of SEO nerds is always here to answer questions or help implement these optimizations. Reach out anytime! Read the full article
0 notes
Text
Mobile-friendliness and website speed
Mobile-friendliness and website speed are crucial factors in on-page SEO.
Mobile-Friendliness:
Responsive Design:
Ensure your website design is responsive, adapting seamlessly to different screen sizes and devices.
Mobile-Optimized Content:
Format content to be easily readable on smaller screens, avoiding the need for users to zoom in or scroll excessively.
Mobile-Friendly Navigation:
Simplify navigation for mobile users with easy-to-tap buttons, clear menus, and a user-friendly interface.
Avoid Flash:
Flash content is not supported on many mobile devices. Use HTML5 or other mobile-friendly alternatives for multimedia elements.
Optimize Images:
Compress and optimize images for faster loading on mobile devices without compromising quality.
Readable Font Sizes:
Ensure text is legible on smaller screens by using appropriate font sizes. Avoid tiny fonts that may be difficult to read on mobile devices.
Touch-Friendly Buttons:
Make buttons and clickable elements touch-friendly, with enough space around them to prevent accidental clicks.
Accelerated Mobile Pages (AMP):
Consider implementing AMP to create stripped-down versions of your pages for faster loading on mobile devices.
Viewport Configuration:
Set the viewport meta tag to ensure your website scales properly on different devices, preventing horizontal scrolling.
Mobile-Friendly Testing:
Regularly test your website's mobile-friendliness using tools like Google's Mobile-Friendly Test.
Website Speed:
Page Loading Time:
Optimize your website to load quickly. Users are less likely to stay on a site that takes too long to load.
Minimize HTTP Requests:
Reduce the number of elements on a page that require separate server requests, such as images, scripts, and stylesheets.
Browser Caching:
Enable browser caching to store static files on a user's device, reducing the need to reload the entire page on subsequent visits.
Compress Images and Files:
Compress images and other files to reduce their size without compromising quality, improving load times.
Minify CSS, HTML, and JavaScript:
Remove unnecessary characters and spaces from code files to reduce their size and speed up loading times.
Use Content Delivery Networks (CDN):
Distribute your website's static content across multiple servers globally to reduce server response time and speed up content delivery.
Optimize Server Performance:
Ensure your web hosting server is optimized for speed, and consider using a reliable hosting provider.
Prioritize Above-the-Fold Content:
Load critical content first, ensuring users see important information without waiting for the entire page to load.
Eliminate Render-Blocking JavaScript and CSS:
Identify and minimize elements that block the rendering of a page until certain scripts or stylesheets are fully loaded.
Regular Performance Monitoring:
Use tools like Google PageSpeed Insights or GTmetrix to regularly monitor your website's performance and identify areas for improvement.
By addressing mobile-friendliness and website speed through on-page SEO, you can enhance the user experience and potentially improve your site's search engine rankings.
#digital marketing#canva#education#social media#canva design#seo#social media marketing#video editing
0 notes
Text
5 Essential Tips for Faster Page Loads and User Experience

The need for a lightning-fast website is undeniable in current fast evolving tech environment. Slow-loading pages can turn away visitors, impact your search engine ranking, and, worst of all, harm the user experience. The question is, how do you optimize your website for faster page loads while ensuring a seamless user experience? Here are five essential tips to rev up your website's speed and enhance user satisfaction.
OPTIMIZE IMAGES FOR SPEED
One of the major culprits of slow-loading web pages is large, unoptimized images. These can put a considerable strain on your website's resources and drive users away. To mitigate this, ensure your images are compressed without compromising quality. Utilize modern image formats like WebP, and consider lazy loading to load images only when needed.
Minimize HTTP Requests
Every element on your web page, from scripts to images, requires an HTTP request. The more requests your page has to make, the slower it loads. Combine CSS and JavaScript files, reduce unnecessary elements, and leverage browser caching to cut down on HTTP requests.
Utilize Content Delivery Networks (CDNs)
Content Delivery Networks are a game-changer when it comes to web speed. CDNs distribute your website's content across multiple servers worldwide, ensuring that users receive data from the server closest to their location. This dramatically reduces loading times and improves user experience.
Compress and Cache Content
Enable Gzip or Brotli compression for your website's content to reduce the size of files that need to be transferred. Additionally, leverage browser and server-side caching to store frequently accessed data, making the loading process faster for returning visitors.
PRIORITIZE CRITICAL RENDERING PATH
Optimizing the critical rendering path ensures that the essential elements of your web page are loaded and displayed quickly. This includes prioritizing above-the-fold content, eliminating render-blocking resources, and using asynchronous loading for non-essential elements.
Mobile Optimization
With a significant portion of web traffic coming from mobile devices, mobile optimization is crucial for faster page loads and user experience. Implement responsive design, reduce unnecessary pop-ups, and consider Accelerated Mobile Pages (AMP) for lightning-fast mobile browsing.
Reduce Server Response Time
A fast server response time is paramount for a speedy website. Minimize server response time by using efficient coding, optimizing databases, and utilizing a reliable hosting provider.
Monitor and Test Your Website
Regular monitoring and testing are key to maintaining a high-speed website. Use tools like Google PageSpeed Insights, GTmetrix, and Pingdom to identify areas for improvement. Regularly audit your website for broken links, outdated content, and redundant scripts.
Today where everyone is in a hurry, it's more important than ever to make sure your website loads quickly. Fast-loading pages not only make your visitors happier, but they also help your website rank higher in search engines. By following the five tips above, you can make your website load faster and give your visitors a seamless and speedy browsing experience.
As someone looking for a development company, I would highly recommend Codiant. Codiant is one of the top development companies, offering a wide range of services, including web development, mobile app development, UI/UX design, and software development.
1 note
·
View note
Text
WordPress: Eliminate Render-Blocking Resources for a Faster Website
In today's fast-paced digital world, a slow website can be a major turn-off for visitors. It's not just user experience that's at stake – search engines like Google also consider website speed as a ranking factor. One common issue that can slow down your WordPress website is render-blocking resources. In this article, we'll delve into what render-blocking resources are, why they matter, and most importantly, how to eliminate them to ensure your WordPress website performs at its best.
Originhttps://worldgoit.com/archives/posts/software-development/wordpress-eliminate-render-blocking-resources-for-a-faster-website/
Table of Contents
- Introduction - Understanding Render-Blocking Resources - Impact on Website Performance - Identifying Render-Blocking Resources - Best Practices for Elimination - 1. Asynchronous Loading - 2. Deferred JavaScript - 3. Browser Caching - 4. Content Delivery Networks (CDNs) - 5. Minification and Compression - 6. Prioritize Above-the-Fold Content - 7. Modern Web Development Tools - Implementing Solutions Step-by-Step - Conclusion - FAQs
Introduction
When a user visits your WordPress website, their browser needs to load various resources like HTML, CSS, and JavaScript. Render-blocking resources are JavaScript and CSS files that prevent the page from loading until they are fully processed. This can significantly slow down the rendering of your web page, leading to a poor user experience.
Understanding Render-Blocking Resources
Render-blocking resources act as roadblocks for your website's rendering process. Browsers pause rendering to fetch and process these resources, delaying the display of the page content. JavaScript files, especially those placed in the header, are major culprits. CSS files can also impact rendering if not handled properly.
Impact on Website Performance
Website speed matters more than ever in a world where attention spans are shrinking. Studies show that visitors tend to abandon sites that take more than a couple of seconds to load. Additionally, search engines consider page speed as a ranking factor, meaning slower websites might rank lower in search results.
Identifying Render-Blocking Resources
To tackle this issue, you must first identify which resources are causing the delay. There are various online tools and plugins available that can analyze your website and provide a list of render-blocking resources. This step is crucial in understanding what needs to be optimized.
Best Practices for Elimination
1. Asynchronous Loading By loading resources asynchronously, you allow the browser to continue rendering the page while fetching the resources in the background. This can greatly improve the perceived loading speed. 2. Deferred JavaScript Deferring JavaScript means postponing its execution until after the initial rendering. This prevents JavaScript from blocking other resources and speeds up the page load. Recommendation Plugin and Youtube Async JavaScript Autoptimize https://youtu.be/ElpcjGBgTGk?si=ue1rvzQPs0YI971R 3. Browser Caching Leverage browser caching to store static resources locally. Returning visitors will then have these resources cached, resulting in faster load times. 4. Content Delivery Networks (CDNs) CDNs distribute your website's resources across multiple servers worldwide. This reduces the physical distance between the user and the server, leading to quicker resource retrieval. 5. Minification and Compression Minify your CSS and JavaScript files by removing unnecessary characters. Additionally, compressing these files reduces their size, making them quicker to load. 6. Prioritize Above-the-Fold Content Load essential resources first, especially those needed for above-the-fold content. This way, users can see and interact with the main content sooner. 7. Modern Web Development Tools Consider using modern build tools like Webpack or Rollup. These tools can bundle and optimize your resources, reducing the number of requests made by the browser
Implementing Solutions Step-by-Step
- Start by analyzing your website's current performance using online tools. - Identify the specific resources causing the delay. - Update your WordPress theme and plugins to their latest versions. - Utilize asynchronous loading for non-essential resources. - Defer JavaScript where possible and optimize CSS delivery. - Leverage browser caching and consider a reliable CDN. - Minify and compress CSS and JavaScript files. - Prioritize above-the-fold content for faster initial rendering. - Explore modern web development tools for advanced optimization.
Conclusion
A fast-loading website is a key factor in retaining visitors and achieving higher search engine rankings. By understanding and addressing render-blocking resources, you can significantly improve your WordPress site's performance. Implementing the strategies mentioned in this article will help you create a smoother, more enjoyable user experience while boosting your website's SEO efforts.
before after
FAQs
Q1: What are render-blocking resources? Render-blocking resources are JavaScript and CSS files that prevent a webpage from rendering until they are fully loaded and processed. Q2: How do render-blocking resources affect my website? Render-blocking resources can slow down your website's loading speed, leading to a poor user experience and potentially lower search engine rankings. Q3: How can I identify render-blocking resources on my WordPress site? There are various online tools and plugins available that can analyze your website and provide a list of render-blocking resources. Q4: What is asynchronous loading? Asynchronous loading allows the browser to continue rendering a webpage while fetching resources in the background, improving perceived loading speed. Q5: Can using a Content Delivery Network (CDN) help with render-blocking resources? Yes, a CDN can distribute your website's resources across multiple servers, reducing the distance between the user and the server and speeding up resource retrieval. Read the full article
1 note
·
View note
Text
تسريع موقعك وردبريس باستخدام ملف الهاتكس Htaccess
تسريع موقعك وردبريس باستخدام ملف الهاتكس Htaccess
يعاني الكثير من المدونين للمواقع العربية أو المواقع الأجنبية من مشكلة سرعة موقعه وسهولة تصفحه ، حيث أن سرعة الموقع من أهم الأمور التي ينبغي الحرص عليها من قِبل صاحب الموقع لعدة أمور من أهمها محركات البحث والزائر ، حيث أن محركات البحث لاترغب بالمواقع البطئية التي تستهلك وقت أكثر لتحميل وقراءة الصفحة فمثلاً محرك بحث قوقل يستخدم خوارزمية تجعل سرعة تحميل الموقع أحد العوامل المؤثرة في موضع الموقع في…
View On WordPress
#.htaccess#Browser Caching#Cache Control#Eliminate render blocking JavaScript and CSS in above the fold content#Gzip#Leverage browser caching#Optimize images#Possible Optimizations#Reduce server response time#Remove render blocking JavaScriptOptimize CSS Delivery#إزالة حظر عرض جافا سكريبت#اكواد تسريع#اكواد تسريع .htaccess#اكواد تسريع الموقع#اكواد تسريع وردبريس#التحكم في ذاكرة التخزين المؤقت#التخزين المؤقت للمتصفح#التخلص من عناصر جافا سكريبت وCSS التي تحظر عرض المحتوى في الجزء العلوي#تحسين التخزين المؤقت للمتصفح#تحسين الصور#تحسين تسليم CSS#تسريع .htaccess#تسريع وردبريس#تطوير وردبريس#تقليل حجم البيانات#تقليل وقت استجابة الخادم#سرعة وردبريس#ضغط الملفات#طريقة تسريع الموقع#كود تسريع
0 notes
Text
10 Tips to speed up your website
Every website owner knows that a fast website is a happy website, but building the fastest website is not always easy. There are so many factors that can slow internet connections to the slowest database servers. Here are 10 tips that will help you speed up the website.
Optimize Images
Image optimization is a great way to speed up the website. You can use a tool like TinyPNG to compress images and make them smaller than they were before, which will result in better loading times and lower bandwidth usage on your server. The program removes unnecessary metadata from images so that Google can recognize them more quickly when searching for their source material online.
Javascript and CSS fly should be minified and combined
Minification and combining are the processes of making your code smaller by removing unnecessary characters, comments, white space, and other non-essential bits. These techniques help improve website loading speed times by reducing the number of requests made to the server.
Enable GZIP Compression
GZIP compression is the most common way to speed up the website. It can reduce the size of HTML, CSS, and JavaScript files by as much as 80%. It means that when you compress your webpages with GZIP compression, they will load faster because less data needs to be transferred over the network.
Prioritize Above-the-Fold Content
It should be prioritized because this is what users see when they visit your website and determines how much time they spend on your site before moving on to other pages. It is beneficial for website loading speed.
Above-the-fold content should be optimized for performance so that website loading speed quickly and does not slow down other pages or cause errors when viewed in different browsers or devices.
Reduce Redirects
Redirects are a common cause of slow page loading. They can be used to point users to the correct URL, or they can be used to redirect a user from one domain name (like yourwebsite.com) onto another domain name that belongs to another company (like www.yourotherwebsite.com).
Eliminate the blocking render javascript
One thing you can do to speed up the website pages is remove render-blocking JavaScript. it means the browser doesn’t wait until all of the JavaScript has loaded before it renders your page. Instead, you can use async and defer attributes to tell the browser that some or all of your script should run asynchronously (or outside of the normal flow).
Benefit from browser caching
One of the most important steps to speed up the website must make sure that caching is enabled. Caching is a technique that allows websites to store information so that it is workable later without having to go through the full server request process all over again. Depending on how much data you cache and the kind of content you serve, this can cut page load times by up to 70%.
Improve Server Response Time
The next step is to improve server response time. Here are some ways to speed up the website;
Use caching plugins or services that cache static resources on your website loading speed and then serve them from there instead of from the server where they were originally hosted (like WordPress does). This saves bandwidth by not requiring images/CSS files to be sent back over again every time someone visits their blog post!
Enable Keep-Alive in HTTP Headers
It’s enabled by default in most web servers, but you can disable it if you want to test whether your site works with Keep-Alive turned off. When enabled, keep-alive requests will be sent using multiple connections; each request uses its IP address, port number, and so forth until all required data has been sent or received before closing the current TCP connection (this is called teardown).
A faster website = increased traffic
For a website to be successful, it needs to have a fast load speed. This means that your site can load quickly and all of its features will be visible as soon as possible. If you want to increase traffic and website loading speed then optimizing for speed will help you get there faster!
Conclusion
Hopefully, we have given you a taste of just how important
the website loading speed can be for your website. If you are unsure how to go about making these modifications, think about hiring a web optimization expert. They will be able to help determine which optimizations will work best for your site and provide guidance on how long those changes take to implement.
Visit: https://www.apisystechnologies.com/ for website development and designing
Email: [email protected]
Tag: Website development company
Location: Vaishali Ghaziabad- Uttar Pradesh
0 notes
Text
Eliminate Render-blocking resources and Reduce Server Response Times (TTFB) to speed up your website

There are a lot of problems that could be plaguing a slow, laggy website. There are a lot of elements that can be optimized to improve your site speed.
Some optimization will result in minor improvements but some optimizations will deliver surprising results. It’s a good idea to first focus on such optimizations that’ll give you good results in less time and effort.
In this article, we’ll discuss two such optimizations that you can perform on your website. These include eliminating render-blocking resources and reducing server response times. These two optimizations can boost your website performance to a whole new level. So, let’s learn a little bit more about these optimizations!
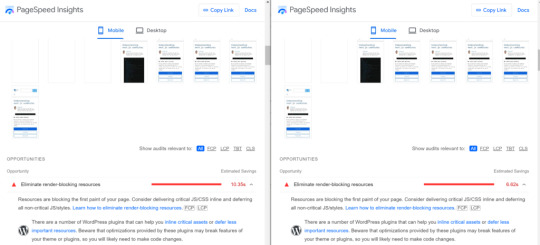
ELIMINATE RENDER-BLOCKING RESOURCES
The Opportunities section of your Google PageSpeed Insights report lists all URLs blocking the first paint of your page. The aim is to reduce the effect of these render-blocking URLs by deferring non-critical resources, inlining critical resources, and removing anything unused.

Lighthouse and PageSpeed Insights flags two types of render-blocking URLs: scripts and stylesheets.
A <script> tag that:
Is in the <head> of the document.
Doesn’t have a defer attribute.
Doesn’t have an async attribute.
A <link rel=”stylesheet”> tag that:
Doesn’t have a disabled attribute. The browser does not download the stylesheet when this attribute is present.
Doesn’t have a media attribute that matches the user’s device.
HOW TO IDENTIFY CRITICAL RESOURCES?
To reduce the impact of render-blocking resources, the first step is to identify the critical resources. Under Chrome DevTools, use the Coverage tab to identify non-critical CSS and JS. When you load a page, the tab tells you how much code was used, versus how much was loaded:

To reduce the size of your pages only ship the code and styles that you need. Click on a URL to inspect that file in the Sources panel. Styles in CSS files and code in JavaScript files are marked in two colors:
Green (critical): This shows styles that are required for first paint; this code is critical to the page’s core functionality.
Red (non-critical): This shows styles that apply to content not immediately visible; this code is not being used in the page’s core functionality.
HOW TO ELIMINATE RENDER BLOCKING SCRIPTS?
After identifying critical code, you must move that code from the render-blocking URL to an inline script tag in your HTML page. Once the page loads, it will have what it needs to control the core functionality of the page.
If there’s code in a render-blocking URL that’s not critical, you can keep it in the URL and then mark the URL with defer or async attributes.
The code that is not being used at all should be removed.
HOW TO ELIMINATE RENDER BLOCKING STYLESHEETS?
Just like inlining code in a <script> tag, you must inline critical styles required for the first paint inside a <style> block at the head of the HTML page. The rest of the styles should then be loaded asynchronously using the preload link.
You can automate the process of extracting and inlining “Above the Fold” CSS using the Critical tool.
Another way of eliminating render-blocking styles is to split up those styles into different files, organized by a media query. Then you’ll have to add a media attribute to each stylesheet link. When loading a page, the browser only blocks the first paint to retrieve the stylesheets that match the user’s device.
Lastly, you’ll want to minify your CSS to remove all the extra whitespace or characters. This ensures that you’re sending the smallest possible bundle to your users.
REDUCE SERVER RESPONSE TIMES (TTFB)
The Opportunities section of your Lighthouse or PageSpeed Insights report reports Time to First Byte. It’s the time taken by a user’s browser to receive the first byte of page content:

You r site fails this audit when the browser has to wait more than 600 ms for the server to respond to the main document request. Users don’t like it when pages take a long time to load. Slow server response times are one probable cause for long page load times.
When users navigate to a URL in their browser, the browser makes a network request to fetch that content. Your server receives this request and returns the page content.
The server may need to do a lot of work to return a page with all of the content that users want. So, if users are searching in their order history, the server needs to fetch each user’s history from a database, and then insert that content into the page.
Optimizing the server to work like this as quickly as possible is one way to reduce the time that users spend waiting for pages to load.
HOW TO IMPROVE SERVER RESPONSE TIMES (TTFB)?
To improve server response times, firstly, you need to identify the core conceptual tasks that your server must complete in order to return page content. Then, you must measure how long each of these tasks takes. Once you have identified the longest tasks, search for ways to speed them up.
There can be many possible causes of slow server response times. Therefore, there can be many possible ways to improve:
Optimize the application logic of the server to prepare pages faster. If you use a server framework, the framework may have some recommendations on how to do this.
Optimize how your server queries databases or migrate to faster database systems.
Upgrade your server hardware to have more memory or CPU.
FINAL WORDS
By eliminating render-blocking resources and reducing server response times, you can see a significant improvement in your website page speed. These two optimizations can help improve your website’s performance just enough for it to be presentable and usable. You must do all you can to provide a good page experience to your visitors. Such optimizations go a long way to improving the page speed of your website!
Got any questions? Let us know in the comments below and we’ll answer you! Alternatively, you can also write to us for more detailed queries.
0 notes
Link
Our professional team provides three separate page speed optimization service plans which will help with your website load at top speeds. A number of the consequences you’ll see after implementing our services, include decreased bounce rate and extended time-on-page.
Why is improving your site speed essential?
More Page Views
Better SEO Rankings
Good Brand Representation
Enhanced User Experience
Reduced Bounce Rates
More Conversions
Our WordPress page speed optimization services improve your website’s speed performance, in order that your visitors get an optimized speed experience.
We do understand that it's your website where potential leads are often converted into while customers, therefore, we make sure that your site loads quickly, thereby having low bounce rates.
We lathiya solutions make sure that you do not face any disadvantages thanks to your slow website.
What We Offer:
Leverage browser caching
Enable compression
Put CSS in the document head
Replace the use of CSS @import
Defer the parsing of and/or asynchronously load JavaScript
Eliminate render-blocking JavaScript and CSS in above-the-fold content
Minify CSS
Minify HTML
Minify JavaScript
Prioritize visible content
Reduce server response time
Optimize images
Implement Full Page Caching
Implement Memory Caching
Implement Fragment Caching
Implement Object Caching
Implement OpCode Caching
Remove query strings from static resources
Specify a cache validator
Specify a character set early
Specify image dimensions
Make sure bad requests are avoided
Minimize request size
Optimize the order of styles and scripts
For More Inquiry:
📞 +91-7878535701
#optimizepagespeed#wordpressspeedoptimization#speedoptimizationsupport#pagespeedoptimization#webpagespeedoptimization#websitespeedcoptimizationservice
0 notes
Link
Google PageSpeed Insights is without a doubt a useful tool for webmasters, developers, and site owners of all types. However, we’ve noticed that a lot of people spend hours obsessing over optimizing their sites, in order to try and score 100/100 on this test. The truth is that this isn’t how Google PageSpeed Insights is meant to be used, nor is it a worthwhile pursuit. When you focus on implementing the platform’s recommendations instead of zeroing in on the number at the top of the page, you’ll be creating a lot more benefits for your site. This post is a comprehensive guide to using Google PageSpeed Insights to your best advantage. We’ll cover how Google uses your score, as well as how to incorporate the recommendations you receive. Let’s get started! An Introduction to Google PageSpeed Insights If you’re not yet familiar with Google PageSpeed Insights, it’s a tool used for testing website performance. You can enter any URL and have it analyzed: Google PageSpeed Insights Google then provides an overall score out of 100 for the website you’ve tested, based on several performance optimization best practices: Google PageSpeed Insights score Along with this result, you’ll also see several recommendations from Google on how to improve your performance (and therefore, your PageSpeed Insights score as well): Google PageSpeed Insights recommendations As of 2018, PageSpeed Insights scores are calculated via Lighthouse, Google’s open source, automated tool for improving the overall quality of web pages. This platform can evaluate all sorts of factors, including performance, accessibility, progressive web apps, and more. To see Lighthouse’s comprehensive assessment of your site, you can use Google’s Measure tool: Google Webmasters Measure auditing tool In addition to conducting a performance audit much like the one Google PageSpeed Insights runs, you’ll get scores for accessibility, best practices, and Search Engine Optimization (SEO). The Truth About Scoring 100/100 in Google PageSpeed Insights As we mentioned at the beginning of this post, we see many site owners and developers who become obsessed over achieving a perfect PageSpeed Insights score. Unfortunately, those folks tend to overlook the more important aspect of the test’s results: the recommendations. While you should certainly strive to improve your website’s loading times as much as possible, getting a 100/100 in Google PageSpeed Insights isn’t actually that important. For starters, it’s not even the be-all-end-all test for performance. Unlike PageSpeed Insights, Pingdom Tools enables you to test your site’s performance from various locations: Pingdom Tools speed test results You can also run tests on platforms such as GTmetrix (which combines your scores from PageSpeed Insights and YSlow) and WebPageTest. Chances are, your scores across these different tools won’t match exactly, which shows you how arbitrary these numbers can be. What really matters is the actual speed of your website. To put it into perspective, we’ve seen sites with average loading times of under 500 milliseconds (which is extremely fast!) that don’t have a 100/100 score on PageSpeed Insights. The other factor that should influence your approach to speed optimization is the perceived performance of your site. Your visitors don’t care what your Google PageSpeed Insights score is. They just want to be able to view your content as quickly as possible. The real purpose of testing your site’s performance with Google PageSpeed Insights isn’t to achieve a high score. Instead, it’s to find problem spots on your site, so that you can optimize them and decrease both your actual and perceived loading times. How Google Uses PageSpeed Insights In addition to influencing your site’s User Experience (UX), performance also plays a role in SEO. Given that PageSpeed Insights is run by the world’s largest and most popular search engine, it stands to reason that your score might have some effect on your Search Engine Results Page (SERP) rankings (at least on Google itself). The reality is that Google does use PageSpeed Insights to determine rankings – kind of. Site speed is a ranking factor, plain and simple. Your performance test score can give you a pretty good idea of where you stand on that front. However, Google takes into consideration more than just the number in the circle at the top of your PageSpeed results. Hitting a 100/100 won’t guarantee you a top spot on the SERPs. With that said, you can still put your PageSpeed Insights results to work when improving your SEO. For example, since 2018, mobile page speed has been a ranking factor for Google. You’ll notice that your performance test provides data for both the desktop and mobile versions of your site: Mobile tab in Google PageSpeed Insights Since more than 73 percent of mobile internet users claim they’ve encountered a site that takes too long to load, the information in the Google PageSpeed Insights Mobile tab is invaluable. Using the recommendations here to decrease loading times on smartphones and other devices should give you a competitive edge. Google PageSpeed Insights Recommendations (24 Ways to Improve Performance) We’ve talked a lot about Google PageSpeed Insights’ recommendations in this post. They’re the real meat of your performance test results, and far more valuable than your actual score. That’s why we’ve dedicated the rest of this post to them. Before we dive into the individual suggestions, however, you’ll need to understand the difference between your Field Data and Lab Data. The former compares your site to others in the Chrome User Experience Report for the last 30 days. There are also two charts that show where your average First Contentful Paint (FCP) and First Input Delay (FID) fall: Google PageSpeed Insights Field Data In the image above, our site’s FCP is about the same as 45 percent of sites in the 75th percentile, and our FID is about the same as 9 percent of the 95th percentile. Lab Data shows specific data for a simulated page load: Google PageSpeed Insights Lab Data You’ll notice that our Field Data and Lab Data don’t match exactly. That’s perfectly normal. The Lab Data is created under fixed conditions, while the Field Data uses actual loading speeds collected over time. When looked at in combination, the Field Data and Lab Data should give you an idea of your site’s actual loading times. As we mentioned earlier, this is even more important than your overall PageSpeed score, so you’ll want to pay attention to these numbers. After you’ve considered this information, it’s time to start improving your site’s performance with Google PageSpeed’s recommendations. 1. Eliminate Render-Blocking Resources One of the more common recommendations from Google PageSpeed Insights is to Eliminate render-blocking resources: Eliminate render-blocking resources recommendation This is referring to JavaScript and CSS scripts that are preventing your page from loading quickly. The visitor’s browser has to download and process these files before it can display the rest of the page, so having a lot of them ‘above the fold’ can negatively impact your site’s speed. You can learn more about this issue in our guide to eliminating render-blocking scripts. As far as Google is concerned, there are two solutions you should consider: If you don’t have a lot of JavaScript or CSS, you can inline them to get rid of this warning. This process refers to incorporating your JavaScript and/or CSS into your HTML file. You can do this with a plugin like Autoptimize. However, this is really only valid for very small sites. Most WordPress sites have enough JavaScript that this method could actually slow you down. The other option is to defer your JavaScript. This attribute downloads your JavaScript file during HTML parsing, but only executes it after the parsing is complete. Also, scripts with this attribute execute in order of appearance on the page. You’ll find a list of the resources that are most affected by this issue below the recommendation in your PageSpeed results. 2. Avoid Chaining Critical Requests The concept of chaining critical requests has to do with the Critical Rendering Path (CRP) and how browsers load your pages. Certain elements – such as the JavaScript and CSS we discussed above – must be loaded completely before your page becomes visible. As part of this suggestion, Google PageSpeed Insights will show you the request chains on the page you’re analyzing: Avoid chaining critical requests recommendation This diagram will show you the series of dependent requests that must be fulfilled before your page becomes visible. It will also tell you the size of each resource. Ideally, you want to minimize the number of dependent requests, as well as their sizes. Several methods for accomplishing these goals are covered by other recommendations discussed in this post, including: Eliminating render-blocking resources Deferring offscreen images Minifying CSS and JavaScript Additionally, you can optimize the order in which assets load, in order to shorten the CRP. This means moving above-the-fold content to the top of your HTML file. You can learn more about optimizing the CRP in our post, “How to Optimize the Critical Rendering Path in WordPress”. It’s important to note that there’s not a magic number of critical request chains that you need to work down to. Google PageSpeed Insights doesn’t count this audit as ‘passed’ or ‘failed’, unlike many of its other recommendations. This information is simply made available to help you improve loading times. 3. Keep Request Counts Low and Transfer Sizes Small The more requests browsers have to make to load your pages, and the larger the resources your server returns in response, the longer your website takes to load. Therefore, it makes sense that Google would recommend that you minimize the number of required requests and decrease the size of your resources. Like the Avoid chaining critical requests recommendation, this one does not result in a ‘pass’ or ‘fail’. Instead, you’ll simply see a list of the number of requests made and their sizes: Keep request counts low and transfer sizes small recommendation There’s no ideal number of requests or maximum sizes to keep in mind. Instead, Google recommends that you set those standards for yourself by creating a performance budget. This is a set of defined goals that may be related to aspects such as: Maximum image sizes The number of web fonts used How many external resources you call to The size of scripts and frameworks Creating a performance budget gives you a set of standards to hold yourself accountable to. When you go over your budget, you can then make decisions about whether to eliminate or optimize resources to stick to your predetermined guidelines. You can learn more about creating one in Google’s own guide. 4. Minify CSS CSS files are often larger than they need to be, in order to make them easier for humans to read. They might include various carriage returns and spaces that aren’t necessary for computers to understand their contents. Minifying your CSS is the process of condensing your files by eliminating unnecessary characters, spaces, and duplications. Google recommends this practice because it reduces your CSS file sizes, and therefore can improve loading speed: Minify CSS recommendation We recommend using a plugin such as Autoptimize or WP Rocket to minify your CSS files. 5. Minify JavaScript Just as you can reduce CSS file size through minification, the same applies to your JavaScript files: Minify JavaScript recommendation Autoptimize or WP Rocket can handle this task for your WordPress site as well. 6. Remove Unused CSS Any code in your stylesheet is content that has to be loaded in order for your page to become visible to users. If there’s CSS on your site that isn’t actually useful, it’s putting an unnecessary drain on your performance. That’s why Google recommends removing any unused CSS: Remove unused CSS recommendation The solution here is essentially the same as that for eliminating render-blocking CSS. You can inline or defer styles in whatever way makes the most sense for your pages. You can also use a tool such as Chrome DevTools to find unused CSS that needs to be optimized. 7. Minimize Main-Thread Work The ‘main thread’ is the primary element of a user’s browser that’s responsible for turning code into a web page that visitors can interact with. It parses and executes HTML, CSS, and JavaScript. Additionally, it’s in charge of handling user interactions. This means that, when the main thread is working through your site’s code, it cannot also handle user requests. If your site’s main-thread work takes too long, this can result in poor UX and slow page loading times. Google PageSpeed will flag pages that take longer than four seconds to complete main-thread work and present a usable web page: Minimize main-thread work recommendation Some of the methods used for reducing main-thread work have already been covered in other sections of this post, including: Minifying your code Removing unused code Implementing caching However, you may also want to consider code splitting. This process involves breaking up your JavaScript into bundles that execute when they’re needed, instead of requiring browsers to load all of them before the page becomes interactive. Webpack is often used to implement code splitting. Note that this is a fairly advanced technique and beginners should usually undertake alone. 8. Reduce JavaScript Execution Time JavaScript execution is often the most prominent contributor to main-thread work. PageSpeed Insights has a separate recommendation to alert you if this task is having a significant impact on your site’s performance: Reduce JavaScript execution time recommendation The methods suggested above for reducing main-thread work should also resolve this warning in your PageSpeed results. 9. Reduce Server Response Times (TTFB) Time to First Byte (TTFB) is a measure of how long it takes for a browser to receive the first byte of data back from your site’s server after making a request. While this isn’t the same as your overall site speed, having a low TTFB is understandably good for your site’s performance. Therefore, reducing server response times is among Google PageSpeed Insights’ recommendations. If you’re able to achieve a low TTFB, you’ll see this message under Passed audits: Server response times are low message There are several factors that can influence your TTFB. Some strategies for lowering it include: Choosing a high-quality web hosting provider Using lightweight themes and plugins Reducing the number of plugins installed on your site Utilizing a Content Delivery Network (CDN) Implementing browser caching Selecting a solid Domain Name System (DNS) provider Our post on TTFB is an excellent resource for more details on optimization in this area. 10. Properly Size Images Media files such as images can be a real drag on your site’s performance. Properly sizing them is a simple way to reduce your loading times: Properly size images recommendation If your page includes images that are larger than they need to be, CSS is used to resize them appropriately. This takes longer than simply loading the images at the right size initially, therefore impacting your page’s performance. To fix this, you can either upload images at the proper sizes, or use ‘responsive images’. This involves creating differently-sized images for various devices. You can do this using the srcset attribute, which is added to tags to specify alternative image files at different sizes. Browsers can read this list, determine which option is best for the current screen, and deliver that version of your image. For example, say that you have a header image and you want to make it responsive. You could upload three versions of it at 800, 480, and 320 pixels wide. Then you would apply the srcset attribute, like this: The srcset attribute specifies the different available files, and the sizes attribute tells browsers which one should be used based on the current screen size. 11. Defer Offscreen Images The process of deferring offscreen images is more commonly known as ‘lazy loading’. This means that instead of making the browser load every image on a page before displaying the above-the-fold content, it will only load the ones that are immediately visible. Less loading before the page becomes visible means better performance, which is why Google recommends this method: Defer offscreen images recommendation There are several WordPress plugins made specifically for lazy loading, including a3 Lazy Load and Lazy Load by WP Rocket. Various image and performance optimization plugins such as Autoptimize also have lazy loading features. Check out our complete guide on Lazy Loading Images and Videos on WordPress. 12. Efficiently Encode Images As we mentioned earlier in this post, images have a significant impact on your site’s performance. One of the most basic optimization best practices you may want to consider is compression, which can help reduce your file sizes so they’ll load faster. It’s also the primary method for following Google’s recommendation to Efficiently encode images: Efficiently encode images recommendation The key is achieving the smallest possible file sizes, without sacrificing the quality of the images themselves. Plugins such as Imagify and Smush can help with this task. You can learn more about them in our guide to image optimization. Other recommendations that influence whether you ‘pass’ or ‘fail’ the Efficiently encode images audit include: Serving images at the correct size Implementing lazy loading (deferring offscreen images) Converting images to next-gen file formats, such as WebP Using video formats for animated content, such as GIFs In addition to compressing your images, you can follow the steps for fulfilling these suggestions as described elsewhere in this post. 13. Serve Image in Next-Gen Formats There are some image file formats that load more quickly than others. Unfortunately, they’re not your commonly-seen PNG or JPEG formats. WebP images are becoming the new standard, and Google PageSpeed will inform you if your images aren’t adhering to it: Serve images in next-gen formats recommendation This may seem like a hard recommendation to meet, since you likely already have plenty images on your WordPress site. Fortunately, there are plugins that can help. For example, Imagify and Smush both offer a WebP conversion feature. 14. Use Video Formats for Animated Content GIFs can be an effective form of visual content in a variety of situations. Tutorial walkthroughs, feature reviews, and even humorous animations can all elevate your posts and make them more enjoyable and valuable to readers. Unfortunately, those benefits come at a cost to your performance. GIFs are demanding to load, which is why PageSpeed Insights recommends serving video content instead: Use video formats for animated content recommendation Unfortunately, converting GIFs to video formats isn’t the most straightforward of processes. First, you’ll have to decide which type of video you want to use: MP4: Produces slightly larger files, but is compatible with most major browsers. WebM: The most highly-optimized video format, although it has limited browser compatibility. Once you’ve made the choice that makes the most sense for your site, you’ll need to convert the file formats. The best way to do this is via the command line. To get started, install FFmpeg. This is an open-source tool for converting file formats: FFmpeg file format conversion tool for video and audio Then, open your command line interface and run the following command: ffmpeg -i input.gif output.mp4 This will convert the GIF with the file name input.gif into an MP4 video with the file name output.mp4. Changing the format is just the beginning, however. You now need to embed the resulting video on your WordPress site in a way that makes it appear like an animated GIF. Embedding Video Content for Animations As you’ve likely noticed if you’ve ever seen a GIF before, they’re slightly different from normal videos. They usually autoplay and run on a loop, and they’re always without sound. Embedding your new MP4 or WebM file on your WordPress site won’t produce these features. However, you can recreate them with some very simple code. Upload your video to your media library, and then add the following to the page or post where you want to include your GIF: This will apply the specified attributes to your video, making it appear more ‘GIF-like’. Simply adapt the file name and type to match that of your resource. For more details on this subject, we suggest reading Google’s guide on converting GIFs to videos. 15. Ensure Text Remains Visible During Webfont Load Like images, fonts tend to be large files that take a long time to load. In some cases, browsers may hide your text until the font you’re using loads completely, which will result in this recommendation from Google PageSpeed Insights: Ensure text remains visible during webfont load recommendation Google advises you resolve this issue by applying the Font Display API swap directive in your @font-face style. To do this, access your stylesheet (style.css) and add the following after the src attribute under @font-face: font-display: swap You can learn more about optimizing web fonts in our post “How to Change Fonts In WordPress” and our in-depth guide to hosting local fonts. 16. Enable Text Compression Google PageSpeed Insights’ Enable text compression recommendation refers to the use of GZIP compression: Enable text compression recommendation In some cases (as you can see in the image above) text compression will be enabled on your server automatically. If this is not the case for your site, you have a couple of options for following this recommendation. The first is to install a plugin with a GZIP compression feature. WP Rocket is a viable solution if you’re willing to pay for it. You can also compress your text manually. This involves editing your .htaccess file, which can be risky, so make sure you have a recent backup on hand. Most WordPress sites run on Apache servers. The code for enabling GZIP compression looks like this: You should add it after #END in your .htaccess file. If you happen to have your WordPress site on an Nginx server, you should add the following code to your nginx.conf file instead: 36 gzip on; 37 gzip_disable "MSIE [1-6]\.(?!.*SV1)"; 38 gzip_vary on; 39 gzip_types text/plain text/css text/javascript application/javascript application/x-javascript; If you’d like to check your site’s text compression, we suggest using a tool such as GiftOfSpeed: GiftOfSpeed GZIP compression check This will let you know if GZIP compression has been successfully implemented, as well as what type of server your site is running on and a few other key details. 17. Preconnect to Required Origins Chances are high that you probably have at least one third-party resource on your site – Google Analytics is a common example. It can take time for browsers to establish a connection to these resources, slowing down your loading speeds. Using preconnect attributes can tell browsers right away that there are third-party scripts on your page that need to be loaded. The process of requesting them can then initiate as soon as possible, improving your performance. If Google feels that your page could benefit from this technique, you’ll see the Preconnect to required origins suggestion: Preconnect to required origins recommendation There are a few ways to go about implementing this optimization strategy. If you’re comfortable with editing your WordPress theme files, you can add a link tag to your header.php file. Here’s an example: In this case, the tag tells browsers that they need to establish a connection to example.com as quickly as possible. Google PageSpeed Insights will list any relevant resources for which you should add link tags with preconnect attributes. The other option is to use a plugin to achieve the same effect. Perfmatters includes a preconnect feature (disclaimer: I’m one of the founders of Perfmatters). WP Rocket and Pre* Party Resource Hints include similar functionality. 18. Preload Key Requests Similar to the Preconnect to required origins recommendation, following this suggestion enables you to minimize the number of requests browsers must make to your site’s server. Rather than connecting to third-party resources, however, Preload key requests refers to loading critical assets on your own server: Preload key requests recommendation Implementing this technique is very similar to the previous recommendation as well. You can add link tags specifying the resources listed in PageSpeed Insights to your header.php file: You can also incorporate this tag using Perfmatters, WP Rocket, or Pre* Party Resource Hints. 19. Avoid Multiple Page Redirects Redirects are used when you want one URL to point to another. They’re commonly employed when you move or delete a page on your site. While there’s nothing wrong with using redirects in general, they do cause additional delays in loading time. If you have too many redirects on your site, you may see this recommendation in Google PageSpeed Insights: Avoid multiple page redirects recommendation The only thing you can do in response to this recommendation is to make sure you’re only using redirects when you absolutely have to. You can learn more about the process of creating them in our post, “WordPress Redirect – Best Practices for Better Performance”. 20. Serve Static Assets With an Efficient Cache Policy If you’ve been using Google PageSpeed Insights for a while, you might know this recommendation better as the Leverage browser caching warning. In Version 5, it’s now labeled as Serve Static Assets With an Efficient Cache Policy: Server static assets with an efficient cache policy recommendation This suggestion has a few layers we need to piece through. The first is what ‘caching’ means. In short, it’s a process in which browsers save copies of your pages, so they can be loaded faster on future visits. The most common way WordPress sites implement caching is with plugins. WP Rocket and W3 Total Cache are popular options. However, some hosting providers – including us here at Kinsta – enable caching via their servers. Make sure to check and see if this is the case for your host before you install a caching plugin. Once you’ve enabled caching for your site, you can worry about the second part of this recommendation, which is your cache policy’s ‘efficiency’. Browsers clear their caches periodically to refresh them with updated copies. Ideally, you want this time period to be higher rather than lower. If you’re clearing your site from browser caches every couple of hours, that defeats the purpose of using this technique in the first place. You can optimize your cache expiration period using Cache-Control and Expires headers. Adding Cache-Control Headers Use the following code to add Cache-Control headers in Nginx: location ~* \.(js|css|png|jpg|jpeg|gif|svg|ico)$ { expires 30d; add_header Cache-Control "public, no-transform"; } You should add this to your server’s configuration file. In the above example, the specified file types are set to expire after 30 days. Those with Apache servers should use this snippet in their .htaccess files instead: Add this code before #BEGIN WordPress or after #END WordPress. In this example, the cache expiration period is set to 84,600 seconds. Adding Expires Headers Cache-Control headers are pretty much the standard now. However, there are some tools (including GTMetrix) that still check for Expires headers. You can add these to a Nginx server by incorporating the following into your server block: location ~* \.(jpg|jpeg|gif|png|svg)$ { expires 365d; } location ~* \.(pdf|css|html|js|swf)$ { expires 2d; } You should set different expiration times based on file types. Apache servers will produce the same results if you add this code to your .htaccess file: ## EXPIRES HEADER CACHING ## Once again, you should add this code either before #BEGIN WordPress or after #END WordPress. Efficient Caching of Google Analytics Ironically, the Google Analytics script you may have added to your pages’ headers in order to track user behavior has a cache expiration period of just two hours. This is likely so that, if updates are made to the platform, users will have access to the changes quickly. This script will appear in the list of resources requiring your attention under the Serve static assets with an efficient cache policy recommendation. Since it belongs to a third party, you can’t change the expiration period with Cache-Control or Expires headers. If this is the only script listed under this recommendation, you can still pass the audit: Passed efficient cache policy audit However, as we’ve noted throughout this post, your PageSpeed score matters less than your actual and perceived performance. In order to serve this resource efficiently, you may consider hosting Google Analytics locally. Plugins like Complete Analytics Optimization Suite (CAOS) and Perfmatters will enable you to do this. You can read more about the process in our complete guide to this PageSpeed suggestion. 21. Reduce the Impact of Third-Party Code We’ve now mentioned a few different ways in which third-party scripts can negatively impact your performance, and result in failed audits from PageSpeed Insights. Ideally, it’s best to limit your reliance on these tools in order to prevent adverse effects. However, in some cases the best solution to a need your site has is to incorporate a third-party script. Google Analytics is an excellent example. Others include: In cases where you deem the use of a third-party script necessary, it’s important to still reduce its impact on your site’s performance, as your PageSpeed analysis results will tell you: Reduce the impact of third-party code recommendation To load third-party code more efficiently, you can consider one of the techniques we’ve already mentioned in this post: Defer the loading of JavaScript Use link tags with preconnect attributes Self-host third-party scripts (as we described with Google Analytics above) These methods should minimize the impact on your site’s performance. 22. Avoid Enormous Network Payloads This recommendation is particularly relevant to your mobile visitors. Large payloads can require the use of more cellular data, thereby costing your users money. Minimizing the number of network requests needed to reach your pages can prevent this: Avoid enormous network payloads recommendation Google recommends keeping your total byte size to 1,600 KB or less. The methods most commonly used to achieve this goal are found throughout this post, including: Deferring CSS, JavaScript, and images that are below the fold Minifying code Compressing image files Using the WebP format for images Implementing caching Follow the relevant steps for these strategies, and you should pass this audit without any additional effort. 23. User Timing Marks and Measures This recommendation is only relevant if you’re using the User Timing API. This tool creates timestamps to help you evaluate your JavaScript’s performance. If you’ve set up the API for your site, you’ll see your marks and measures under this heading in PageSpeed Insights: User Timing marks and measures recommendation As you can see, this is another suggestion from Google that doesn’t result in a ‘pass’ or ‘fail’. PageSpeed Insights simply makes this information easily retrievable, so you can use it to assess areas that may require optimization. If you’re interested in incorporating the User Timing API into your WordPress site, you can learn more in the Mozilla guide on the topic. 24. Avoid an Excessive Document Object Model (DOM) Size In simplest terms, the DOM is how browsers turn HTML into objects. It involves the use of a tree-structure made up of individual nodes that each represent an object. Naturally, the larger your page’s DOM is, the longer it will take to load. If your page exceeds certain standards regarding DOM size, it will recommend reducing the number of nodes as well as the complexity of your CSS styling: Avoid an excessive DOM size recommendation A common culprit if you’ve ‘failed’ this audit in PageSpeed Insights is your WordPress theme. Heavy themes often add large volumes of elements to the DOM, and may also include convoluted styling that slows your site down. If this is the case, you may need to switch themes. Are you struggling to score 100/100 on #Google PageSpeed? Here's a tip: don't obsess over your score and focus on what's truly affecting your page load! 🚀📊 Click to Tweet Summary Google PageSpeed Insights should be a staple in your webmaster toolbox. However, fixating on your score and obsessing over reaching the coveted 100/100 probably isn’t the best use of your time. It may take you away from other important tasks that could provide more significant benefits. In this post, we covered the ways in which your Google PageSpeed Score does and doesn’t matter. We also shared some brief guidelines for putting the platform’s recommendations to work on your WordPress site, in order to improve its performance. Do you have questions about Google PageSpeed Insights or optimizing your site’s performance? Ask away in the comments section below! If you enjoyed this article, then you'll love Kinsta’s WordPress hosting platform. Turbocharge your website and get 24/7 support from our veteran WordPress team. Our Google Cloud powered infrastructure focuses on auto-scaling, performance, and security. Let us show you the Kinsta difference! Check out our plans
0 notes
Text
Why Should A Website Be Optimized?
There are many of the importance of a particular website to be optimized. This is the main reason, why the website optimization services have become very much popular these days. SEO services in Gurugram are currently in a boom.
So, this is considered to be the main reason, why, the Digital Marketing Company Gurugram should focus more on the improvement of the speed and also the traffic of a particular website.
Important Reasons
Generally, there are many of the considerable reasons for this of which the most obvious reason is that the fast page load times help to directly improve the way in which a particular people experience a site. Also, a lesser known benefit of improving the particular speed of the website is considered to be the impact it can have on the search engine rankings.
This is the main reason, why the speed optimization is known to be a very important part of the SEO. Along with that, the page load speed hugely affects the search engine site rankings. The site which generally is not involved in satisfying the requirements related to Google’s mobile user experience might not even appear in the mobile search results.
Furthermore, a slow page speed contributes to having a negative impact on the experience of the users which leads to an increased bounce rate. It also includes the particular signals to the search engine which the people cannot find what they are looking for on your site and as a result, your search engine rankings will decrease. So, this is considered to be the most crucial parts of optimizing your website.
1. Serve Scaled And Also Optimized Images
One should focus on the proper optimization of the image which is considered to be very important for the search engines. This is because the images preferably have a great impact on the page load speeds.
Along with that, you also get penalized for each and every unoptimized image. This is the main reason, why, the image-heavy pages usually have a very bad page speed score.
WordPress is involved in automatically generating additional sizes of the uploaded images. It has in default three extra sizes such as medium, thumbnail and also large. Also, it totally depends on your site design and so, it is considered to be very important to set additional custom image size that is generally being used across the site.
Along with that, the main goal of using optimum sizes is to prevent scaling images on varying screen sizes.
This is the main reason, why, you should focus on compressing the particular images which means making of the file size of an image smaller without reduction of the image quality to an unacceptable label.
In this way, it is possible to lose some of the important details of the image. But, sometimes, it is considered to be very hard to spot the particular differences between uncompressed and also compressed images as long as the amount of compression is correctly set up.
2. Eliminate Render Blocking JavaScript And Optimize CSS Delivery
It needs to be considered that the loading of the important resources such as CSS files and also JavaScript before the ATF (above the fold content) contributes to slow down the page load as the users preferably need to wait for the script files before having a close look on the content of the page.
Loading of the script files at the end of the document can generally help to prevent this. Along with that, it can also be prevented by using defer or asynchronously load which depends on the way in which the scripts are preferably utilized on the page. Most of the CSS styles can be asynchronously loaded with the rest of the document.
Conclusion
In this way, it is particularly evident from the above section that you should look at the good optimization levels on your site after your site has been optimized for the parts which are outlined above. Most of the Digital Marketing companies will preferably help you're to optimize your website for better SEO. Boosting of the SEO score plays a great role in ranking your website.
0 notes
Photo

Faster Sites: Beyond PageSpeed Insights
Posted by BenjaminEstes Google’s PageSpeed Insights is an easy-to-use tool that tests whether a web page might be slower than it needs to be. It gives a score to quantify page performance . Because this score is concrete, the PageSpeed Insights score is often used as a measure of site performance. Similarly to PageRank years back, folks want to optimize this number just because it exists. In fact, Moz has a popular article on this subject: How to Achieve 100/100 with the Google Page Speed Test Tool .
For small sites on common CMSes (think Wordpress), this can be accomplished. If that’s you, PageSpeed Insights is a great place to start. For most sites, a perfect score isn’t realistic. So where do we start?
That’s what this post is about. I want to make three points:
Latency can hurt load times more than bandwidth
PageSpeed Insights scores shouldn’t be taken at face value
Improvement starts with measurement, goal setting, and prioritization
I’m writing with SEO practitioners in mind. I’ll skip over some of the more technical bits. You should walk away with enough perspective to start asking the right questions. And you may make better recommendations as a result.
Disclaimer: HTTP2 improves some of the issues discussed in this post. Specifically, multiple requests to the same server are less problematic. It is not a panacea.
Latency can hurt load times more than bandwidth A first look at PageSpeed Insights’ rules could make you think it’s all about serving fewer bytes to the user. Minify, optimize, compress. Size is only half the story. It also takes take time for your request simply to reach a server. And then it takes time for the server to respond to you!
What happens when you make a request? If a user types a URL into a browser address bar and hits enter, a request is made. Lots of things happen when that request is made. The very last part of that is transferring the requested content. It’s only this last bit that is affected by bandwidth and the size of the content.
Fulfilling a request requires (more or less) these steps:
Find the server
Connect to the server
Wait for a response
Receive response
Each of these steps takes time, not just the last. The first three are independent of file size; they are effectively constant costs. These costs are incurred with each request regardless of whether the payload is a tiny, minified CSS file or a huge uncompressed image.
Why does it take time to get a response? The factor we can’t avoid is that network signals can’t travel faster than the speed of light. That’s a theoretical maximum; in reality, it will take longer than that for data to transfer. For instance, it takes light about 40ms for a round trip between Paris and New York . If it takes twice that time for data to actually cross the Atlantic, then the minimum time it will take to get a response from a server is 80ms.
This is why CDNs are commonly used. CDNs put servers physically closer to users, which is the only way to reduce the time it takes to reach the server.
How much does this matter? Check out this chart (from Chrome’s DevTools ):
The life of a request, measured by Chrome Dev Tools.
All of the values in the red box are what I’m considering “latency.” They total about 220ms. The actual transfer of content took 0.7ms. No compression or reduction of filesize could help this; the only way to reduce the time taken by the request is to reduce latency.
Don’t we need to make a lot of requests to load a page? It’ll take more than one request to load all of the content necessary to render a page. If that URL corresponded to a webpage, the browser will usually discover that it needs to load more resources to render the page. These could be CSS, JavaScript, or font files. It must recursively go through the same steps listed above to load each of these files.
Fortunately, once a server has been found (“DNS Lookup” in the image above), the browser won’t need to look it up again. It will still have to connect, and we’ll have to wait for a response.
A skeptical read of PageSpeed Insights tests All of the PageSpeed Insights evaluations cover things that can impact site speed. For large sites, some of them aren’t so easy to implement. And depending on how your site is designed, some may be more impactful than others. That’s not to say you have an excuse not to do these things — they’re all best-practice, and they all help. But they don’t represent the whole site speed picture.
With that in mind, here’s a “skeptical reading” of each of the PageSpeed Insights rules.
Tests focusing on reducing bandwidth use
Rule
Skeptical reading
Optimize images
Unless you have huge images, this might not be a big deal. This is only measuring whether images could be further compressed — not whether you’re loading too many.
Enable compression
Compression is easy. You should use it. It also may not make much of a difference unless you have (for instance) huge JavaScript files loading.
Minify HTML
Will likely reduce overhead only by tens of KB. Latency will have a bigger impact than response size.
Minify CSS
Will likely reduce overhead only by tens of KB. Latency will have a bigger impact than response size.
Minify JS
Probably not as important as consolidating JS into a single file to reduce the number of requests that have to be made.
Tests focusing on reducing latency Rule
Skeptical reading
Leverage browser caching
Definitely let’s cache our own files. Lots of the files that could benefit from caching are probably hosted on 3rd-party servers. You’d have to host them yourself to change cache times.
Reduce server response time
Threshold on PSI is too high. It also tries to exclude the physical latency of the server—instead looking only at how long it takes the server to respond once it receives a request.
Avoid landing page redirects
Yes.
Eliminate render-blocking JavaScript and CSS in above-the-fold content
A valid concern, but can be frustratingly difficult. Having zero requests on top of the initial page load to render above-the-fold content isn’t necessary to meet most performance goals.
Prioritize visible content
Actually kind of important.
Don’t treat these as the final word on site performance! Independent of these tests, here are some things to think about. Some aren’t covered at all by PageSpeed Insights, and some are only covered halfway:
Caching content you control.
Reducing the amount of content you’re loading from 3rd-party domains.
Reducing server response time beyond the minimum required to pass PageSpeed Insights’ test.
Moving the server closer to the end user. Basically, use a CDN.
Reducing blocking requests. Ensuring you’re using HTTP2 will help here.
How to start improving Measurement The screenshots in this post are created with Chrome DevTools. It’s built into the browser and allows you to inspect exactly what happens when a page loads .
Instead of trusting the Pagespeed Insights tool, go ahead and load your page in Chrome. Check out how it performs. Look at what requests actually seem to take more time. Often the answer will be obvious: too much time will be spent loading ads, for instance.
Goal setting If a perfect PageSpeed Insights score isn’t your goal, you need to know what your goal will be. This is important, because it allows you to compare current performance to that goal. You can see whether reducing bandwidth requirements will actually meet your goal, or whether you also need to do something to reduce latency (use a CDN, handle fewer requests, load high-priority content first).
Prioritizing Prioritizing page speed “fixes” is important — that’s not the only type of prioritization. There’s also the question of what actually needs to be loaded. PageSpeed Insights does try to figure out whether you’re prioritizing above-the-fold content. This is a great target. It’s also not a perfect assessment; it might be easier to split content into “critical” and “non-critical” paths, regardless of what is ostensibly above the fold.
For instance: If your site relies on ad revenue, you might load all content on the page and only then begin to load ads. Figuring out how to serve less is a challenge best tackled by you and your team. After all, PageSpeed Insights is a one-size-fits-all solution.
Conclusion The story so far has been that PageSpeed Insights can be useful, but there are smarter ways to assess and improve site speed. A perfect score doesn’t guarantee a fast site.
If you’re interested in learning more, I highly recommend checking out Ilya Grigorik’s site and specifically this old-but-good introduction deck . Grigorik is a web performance engineer at Google and a very good communicator about site speed issues.
Sign up for The Moz Top 10 , a semimonthly mailer updating you on the top ten hottest pieces of SEO news, tips, and rad links uncovered by the Moz team. Think of it as your exclusive digest of stuff you don’t have time to hunt down but want to read!
http://bit.ly/2rJyvka
#huntingtonbeachseo #blogpower #smallbusinessmarketing #articlewriting #leadgeneration #bestlocalseo #socialmediamarketing #contentwriting #lagunabeachseo #digitalmarketing
#huntingtonbeachseo#blogpower#smallbusinessmarketing#articlewriting#leadgeneration#bestlocalseo#socialmediamarketing#contentwriting#lagunabeachseo#digitalmarketing
1 note
·
View note
Photo

How to Remove Render Blocking JavaScript From Your Website How to Remove Render Blocking JavaScript From Your Website Have you at any point wrapped up a site and adored every little thing about it?
#blocking javascript#Css#css in above-the-fold content php#eliminate#eliminate render blocking#eliminate render-blocking css#eliminate render-blocking javascript#How to Fix#htaccess#JavaScript#javascript and css htaccess#javascript jquery wordpress#javascript wordpress#Plugin#remove render-blocking#Render-Blocking#render-blocking javascript#what is render#WordPress
0 notes
Text
How to Fix Render-Blocking JavaScript and CSS in WordPress
Do you want to eliminate render-blocking JavaScript and CSS in WordPress?
If you test your website on Google PageSpeed insights, then you will likely see a suggestion to eliminate render-blocking scripts and CSS. However, it does not provide any details on how to do that on your WordPress site.
In this article, we’ll show you how to easily fix render-blocking JavaScript and CSS in WordPress to improve your Google PageSpeed score.
What is Render-Blocking JavaScript and CSS?
Render blocking JavaScript and CSS are files that prevent a website from displaying a web page before loading these files.
Every WordPress site has a theme and plugins that add JavaScript and CSS files to the front-end of your website. These scripts can increase your site’s page load time, and they can also block rendering of the page.
A user’s browser will have to load those scripts and CSS before loading the rest of the HTML on the page. This means that users on a slower connection will have to wait a few milliseconds more to see the page.
These scripts and stylesheets are referred to as render-blocking JavaScript and CSS.
Website owners who are trying to achieve the Google PageSpeed score of 100 will need to fix this issue to attain that perfect score.
What is Google PageSpeed Score?
Google PageSpeed Insights is a website speed test tool created by Google to help website owners optimize and test their websites. This tool tests your website against Google’s guidelines for speed and offers suggestions to improve your site’s page load time.
It shows you a score based on the number of rules that your site passes. Most websites get somewhere between 50-70. However, some website owners feel compelled to achieve 100 (the highest a page can score).
Do You Really Need the Perfect “100” Google PageSpeed Score?
The purpose of Google PageSpeed insights is to provide you guidelines to improve the speed and performance of your website. You are not required to follow these rules strictly.
Remember that speed is only one of the many website SEO metrics that help Google determine how to rank your site. The reason speed is so important is because it improves user experience on your site.
Better user experience requires a lot more than just speed. You also need to offer useful information, a better user interface, and engaging content with text, images, and videos.
Your goal should be to create a fast website that offers a great user experience.
During the last WPBeginner redesign, we kept our focus on speed as well as improving user experience.
We recommend that you use Google Pagespeed rules as suggestions, and if you can implement them easily without ruining user experience, then that’s great. Otherwise, you should strive to do as much as you can, and then don’t worry about the rest.
Having said that, let’s take a look at what you can do to fix render-blocking JavaScript and CSS in WordPress.
We will cover two methods that will fix the render-blocking JavaScript and CSS in WordPress. You can choose the one that works best for your website.
1. Fix Render Blocking Scripts and CSS with WP Rocket
For this method, we’ll be using the WP Rocket plugin. It is the best WordPress caching plugin on the market and allows you to quickly improve your website performance without any technical skills or complicated set up.
First, you need to install and activate the WP Rocket plugin. For more details, see our step by step guide on how to install a WordPress plugin.
WP Rocket works out of the box, and it will turn on caching with optimal settings for your website. You can learn more about it in our complete guide on how to properly install and set up WP Rocket in WordPress.
By default, it does not turn on JavaScript and CSS optimization options. These optimizations can potentially affect your website’s appearance or some features, which is why the plugin allows you to enable these settings optionally.
To do that, you need to visit Settings » WP Rocket page and then switch to the ‘File Optimization’ tab. From here, scroll to the CSS Files section and check the boxes next to Minify CSS, Combine CSS Files, and Optimize CSS Delivery options.
Note: WP Rocket will attempt to minify all your CSS files, combine them, and only load CSS needed for the visible part of your website. This could affect your website’s appearance, so you need to thoroughly test your website on multiple devices and screen sizes.
Next, you need to scroll to the JavaScript Files section. From here, you can check all the options for maximum performance improvement.
You can minify and combine JavaScript files like you did for CSS.
You can also stop WordPress from loading jQuery Migrate file. It is a script that WordPress loads to provide compatibility for plugins and themes using old versions of jQuery.
Most websites don’t need this file, but you would still want to check your website to make sure that removing it does not affect your theme or plugins.
Next, scroll down a little further and check the boxes next to ‘Load JavaScript Defered’ and ‘Safe Mode for jQuery’ options.
These options delay loading non-essential JavaScripts, and the jQuery safe mode allows you to load jQuery for themes that may use it inline. You can leave this option unchecked if you are certain that your theme does not use inline jQuery anywhere.
Don’t forget to click on the Save Changes button to store your settings.
After that, you may also want to clear cache in WP Rocket before testing your website again with Google Page Speed Insights.
On our test site, we were able to achieve 100% score on Desktop and render-blocking issue was solved in both mobile and desktop scores.
2. Fix Render Blocking Scripts and CSS with Autoptimize
For this method, we will be using a separate plugin made specifically for improving delivery of your website’s CSS and JS files. While this plugin gets the job done, it does not have the other powerful features that WP Rocket has.
First thing you need to do is install and activate the Autoptimize plugin. For more details, see our step by step guide on how to install a WordPress plugin.
Upon activation, you need to visit the Settings » Autoptimize page to configure the plugin settings.
First, you need to check the box next to ‘Optimize JavaScript Code’ option under the JavaScript Options block. Make sure that ‘Aggregate JS-files’ option is unchecked.
Next, scroll down to the CSS Options box and check the ‘Optimize CSS Code’ option. Make sure that ‘Aggregate CSS-files’ option is unchecked.
You can now click on the ‘Save Changes and Empty Cache’ button to store your settings.
Go ahead and test your website with the Page Speed Insights tool. On our demo site, we were able to fix the render-blocking issue with these basic settings.
If there are still render-blocking scripts, then you need to come back to the plugin’s settings page and review options under both JavaScript and CSS options.
For instance, you can allow the plugin to include inline JS and remove scripts that are excluded by default like seal.js or jquery.js.
Click on the ‘Save changes and Empty Cache’ button to save your changes and empty plugin cache.
Once you are done, go ahead and check your website again with the Page Speed tool.
How does it work?
Autoptimize aggregates all enqueued JavaScript and CSS. After that, it creates minified CSS and JavaScripts files and serves cached copies to your website as async or deferred.
This allows you to fix the render-blocking scripts and styles issue. However, please keep in mind that it can also affect the performance or appearance of your website.
Troubleshooting
Depending on how the plugins and your WordPress theme uses JavaScript and CSS, it could be quite challenging to completely fix all render-blocking JavaScript and CSS issues.
While the above tools can help, your plugins may need certain scripts at a different priority level to work properly. In that case, the above solutions can break the functionality of such plugins, or they could behave unexpectedly.
Google may still show you certain issues like optimizing CSS delivery for above the fold content. WP Rocket allows you to fix that by manually adding Critical CSS required to display the above fold area of your theme.
However, it could be quite difficult to find out what CSS code you will need to display above the fold content.
We hope this article helped you learn how to fix render-blocking JavaScript and CSS in WordPress. You may also want to see our ultimate guide on how to speed up WordPress performance for beginners, and our comparison of the best managed WordPress hosting companies.
If you liked this article, then please subscribe to our YouTube Channel for WordPress video tutorials. You can also find us on Twitter and Facebook.
The post How to Fix Render-Blocking JavaScript and CSS in WordPress appeared first on WPBeginner.
from WPBeginner https://www.wpbeginner.com/wp-tutorials/how-to-fix-render-blocking-javascript-and-css-in-wordpress/
0 notes