#Extend Active Directory AD Schema
Explore tagged Tumblr posts
Visit Tumblr Blog
Explore Tumblr blogs with no restrictions, modern design and the best experience.
Last Seen Tumblr Blogs


Fun Fact
In 2020, Tumblr had 29.4 million users in the US.
Text
How to install Endpoint Configuration Manager on HyperV VM
Microsoft integrates Configuration Manager into the Intune family of products, offering an integrated solution for managing all devices. This integration simplifies licensing and eliminates the need for complex migrations. Users can continue leveraging their existing Configuration Manager investments while tapping into the capabilities of the Microsoft cloud at their own pace. This is a…

View On WordPress
#ConfigMgr#Configuration Manager#ECM Installation#Extend Active Directory AD Schema#Microsoft Endpoint Configuration Manager#Microsoft SQL Server Management Studio#Microsoft Windows#SQl Server 2022#SQL Server Management Studio#SQL Server Management Studio (SSMS)#Windows#Windows 10#Windows 11#Windows ADK#Windows Server#Windows Server 2012#Windows Server 2016#Windows Server 2019#Windows Server 2022#Windows Server 2025
0 notes
Text
How to create the custom attribute in active directory.
Extend the Active Directory Schema by Adding Custom Attributes... read more

3 notes
·
View notes
Text
REHub - Blog / Magazine Affiliate Marketing, Community Theme

About REHub
REHub– Hybrid wordpress template with enhanced all in one combination of profitable features. They made many unique Affiliate, Coupon, Directory, Social, SEO, Comparison and multi Store features. REHub is a modern multipurpose hybrid theme. Theme covers many modern Business models for profitable websites. REHub Each part can be configured and used separately or you can combine them all in one site. They used most actual trends and best unique seo instruments to build advanced wordpress functions which you will not find in other themes. Models are. Themes Basic Details Themes Name REHubAvailable Store ThemeforestThemes Type Blog / MagazineGutenberg SupportYesCompatible BrowsersIE11, Firefox, Safari, Opera, Chrome, EdgeColumns Support 2Layout ResponsiveMobile Friendly Yes DocumentationClick Here To View DocumentationThemes Demo Click Here To View Themes Demo How To Buy REHub - Blog / Magazine Themes From Theme Store First StepIf You Want Buy Themes From Themes forest Market You Need To First Login Or RegisterSecond StepAfter Register Or Login Go To Shop At Themes forestThird StepFind Your Suitable Themes From Variety Of Available Themes At Themes forestFourth StepThis is Timeline description, you can change me anytime click here Fifth StepMake Your Payment From Various Of Payment Mode Available At Themes forest .Final StepOnce Payment Successfully Done . You Will Redirect At Thank You For Your Purchase’ Screen . Now Everything Done . From My Account Anytime To View Your Purchase Details, And Download Your Theme Or Its Updates. How To Install REHub - Blog / Magazine Themes Review The normal installation method is done via your WordPress Dashboard area. From your ThemeForest Downloads Screen, click the Download button next to REHub- Directory & Listings. Select All files & documentation.On your computer, unzip this package you've just downloaded. Within, you'll find a file titled "REHub- Directory & Listings.zip". This is the theme file.In your WordPress Dashboard, navigate to Appearance > Themes.Click the Add New button and then click the Upload button.Select the "REHub- Directory & Listings.zip" file and click Upload.Once you've installed REHub- Directory & Listings , click the Activate button. Some Popular Demo Of REHub - Blog / Magazine Themes Review

Features Of REHub - Blog / Magazine Themes Full support Content Egg helps to make your content more valuable for visitors and search engines. With simple clicks adds content from youtube, google images, books, freebase, flickr, twitter, and much more. Also have affiliate modules. Free version has CJ coupons, Affili.net Coupons and Offer module which can be used to add any links to comparison list. PRO version – Ebay wordpress module, Zanox wordpress.Directory theme optionsYou can use your site also as directory theme or Review theme. The added many functions for this and you don’t need paid plugins now, as we added our RH Frontend PRO plugin for frontend submit and WPF plugin for creating custom search filters. There is no limitations for type of data which you can add to each post. Range slider, select, checkbox, number fields.Special ProductThe added also some special product layouts and custom code areas with examples, so, you can customize look of post and add advanced blocks. Frontend submit has options to make paid submissions and limited submissions. You can sell submition packs and subscription packs.Community theme functionsAll popular websites have community. The added advanced community functions with custom support for Buddypress, MyCred and membership plugin. All functions are in powerful connections with each other like never before. They added seo optimization for Buddypress Profiles and even share options. Modern Design Theme has modern clean design which they update according to current design trends. The included also a lot of unique Elementor modules and library of ready templates. For example, Listing Builder. Unique Better Conversion Rate Tools for wordpress The consulted with best moneymakers and added many instruments to theme for advanced and smart money making. There are many things which you can easily create with theme for top profitable sites. “Top of something”Versus pagesAttribute (specifications) comparison bars with multigroup supportPrice range pages, like “best phones under $200”Top rated, popular set of offersCustom Tables, Top lists and Comparison ChartsAdvanced Search filters and dynamic comparisonsPrice drop widgets by period Attention Attention for using nulled versions – you have limited access to theme functions. Only official buyers from Themeforest have access to frontend posting plugin, multivendor, affiliate extension for deal and coupons, specification extensions, Membership options and many others useful instruments. Be aware of nulled version as it has javascript backdoor injected in jquery.js file. First on Envato. Extended combinations of community functions (BuddyPress), multivendor store (WC Vendor, Dokan, WC Marketplace, WCFM), reputations system (MyCred), Store locator (Geo My Wordpress), paid membership system via WCFM, Price comparisons. Create your deal, idea, business, store, review site in one install. Paid plugins is not required in most of cases, looks awesome with free versions. Also, theme includes Frontend plugin with support of paid submission. Special Schema The added special schema markups to make special product snippets and even some secret schema for advanced snippets. You can also use Auto Top lists in theme and divide whole post on beautiful parts with Autocontents. You can use also special Score widget with smooth button and special Offer Post Layouts with different design (compact, corner offer, comparison post layout). Advanced Mobile Wordpress Theme support Mobile traffic grows a lot nowadays. So, they continue to improve mobile functions and they are in priority for. All our product and post grid and list have Great Compact Stylish look on mobilesProduct Mobile floating panel with button and navigation linksAdvanced Product Filtering panelResponsive Comparison chartsQuick Icon panel in header, compact mobile header layoutAMP support for wordpressGoogle Mobile friendly Well Documentation This documentation is to help guide you through each step of setting up & customizing your theme. Please go through the documentation carefully. Read the full article
1 note
·
View note
Text
Manage MySQL Database Service (MDS) DB Systems with OCI CLI
OCI CLI is a powerful tool that does it all for OCI administration: from creating a compute instance to configuring a Virtual Cloud Network (VCN), from setting up Identity Management Service (IAM) to managing all the different storage flavours. Consult the OCI CLI command reference. MySQL Database Service (MDS) is not an exception, everything related to the new MySQL Server service running over OCI can be easily managed with a set of commands using OCI CLI, check it here. Starting new DB Systems, creating and managing backups, dealing with the configuration or retrieving information…everything together to program complex tasks organised in scripts. All from command line, and we could also forget the web dashboard for a while. OCI CLI does not replace the dashboard but extends it, and makes possible to automate routines. In this short post I’ll cover OCI CLI setup, before we jump into some usage examples. Install OCI CLI Let’s start installing OCI CLI, the documentation show different methods, using Python installer it’s one command to go. pip install oci-cli For more methods, just follow online documents. Configure OCI CLI To give access to your OCI user account, you will need to configure OCI CLI. That’s straightforward. Prepare in advance: User OCID Tenancy OCID Region identifier Check this link to know how to retrieve such information. With this information you are one step away from configuring the access just run: oci setup config And feed the information requested. You will be prompted for a directory to create keys and a passphrase for your private key. Go ahead and see how this command will produce the following files once it completes: bash-3.2$ ll $HOME/.oci total 24 -rw------- 1 mortensi staff 306 28 Nov 12:20 config -rw------- 1 mortensi staff 1766 28 Nov 12:20 oci_api_key.pem -rw------- 1 mortensi staff 451 28 Nov 12:20 oci_api_key_public.pem These are private and public key pair, plus a config file (SDK and CLI config file). The config file holds all the content provided plus the link to the private key. All the information to be used to authenticate to your OCI account. To complete the setup, you will need to feed the public key into your OCI dashboard. Just follow the instructions and… mission accomplished! Use OCI CLI Well, this is immediate. With OCI CLI you can do everything from console. Get information about your DB Systems, create, start, stop and so on. oci mysql db-system get --db-system-id Private key passphrase: { "data": { "analytics-cluster": null, "availability-domain": "EOuL:US-ASHBURN-AD-1", "backup-policy": { "defined-tags": null, "freeform-tags": null, "is-enabled": true, "retention-in-days": 7, "window-start-time": "00:00" }, "compartment-id": "xxxxxxxxxxxxxxxxxxxxx", "configuration-id": "xxxxxxxxxxxxxxxxxxxxx", "data-storage-size-in-gbs": 50, "defined-tags": { "Oracle-Tags": { "CreatedBy": "oracleidentitycloudservice/[email protected]", "CreatedOn": "2020-11-13T11:32:27.803Z" } }, "description": null, "display-name": "mysql20201113123145", "endpoints": [ { "hostname": null, "ip-address": "10.0.1.9", "modes": [ "READ", "WRITE" ], "port": 3306, "port-x": 33060, "status": "ACTIVE", "status-details": null } ], "fault-domain": "FAULT-DOMAIN-1", "freeform-tags": {}, "hostname-label": null, "id": "xxxxxxxxxxxxxxxxxxxxx", "ip-address": "10.0.1.9", "is-analytics-cluster-attached": false, "lifecycle-details": null, "lifecycle-state": "ACTIVE", "maintenance": { "window-start-time": "WEDNESDAY 07:21" }, "mysql-version": "8.0.22", "port": 3306, "port-x": 33060, "shape-name": "VM.Standard.E2.1", "source": null, "subnet-id": "xxxxxxxxxxxxxxxxxxxxx", "time-created": "2020-11-13T11:32:29.593000+00:00", "time-updated": "2020-11-25T07:34:31.055000+00:00" }, "etag": "xxxxxxxxxxxxxxxxxxxxx" } Data migrations using MySQL Shell So far, so good, but once the OCI CLI is working, you can also do more. Use the same setup you already created: that will be using MySQL Shell! By now you probably know very well MySQL Shell, the powerful command line tool to administer MySQL Server in the different flavors: standalone, with ReplicaSets and InnoDB Cluster. Besides that, you can also use MySQL Shell dump utilities to export and import backups from and to OCI Object Storage! You can use MySQL Shell to: Dump full on premise instances, schemas or table from MySQL Server instances and upload data to an Object Storage bucket Export data from an Object Storage bucket into a DB System MySQL Shell needs to read the config file just created, paired to OCI user account via the public/ private key pair (see above). MySQL Shell reads it by default at ~/.oci/config (or is set with parameter ociConfigFile) to gain access to OCI. Read more here. OCI Object Storage is a regional service: to access Object Storage buckets on different regions you will need a configuration per region. Achieve it with different profiles. One profile, one region (see picture). So from your on-premises MySQL Server you will be able to upload dumps to every region where an MDS DB System is present. Complete data migrations smoothly. The post Manage MySQL Database Service (MDS) DB Systems with OCI CLI appeared first on mortensi. https://www.mortensi.com/2020/11/manage-mysql-database-service-mds-db-systems-with-oci-cli/
0 notes
Text
Microsoft Teams roundup Build 2020

Microsoft Teams roundup Build 2020.
Making it easier to build and publish apps
Visual Studio and Visual Studio Code Extension for Teams With the new Visual Studio and Visual Studio Code Teams extension, developers can use the power and familiarity of these tools to quickly build project scaffolding, configure features, create app package manifest and setup hosting, validate app package manifest, and start the app publishing process (for yourself, to your organization’s catalog, or to the Teams app store). Visual Studio Code extension is now available in public preview. Visual Studio extension coming soon! Bringing low-code bots to Teams, with Power Virtual Agents We are partnering with the newest component of the Power Platform – Power Virtual Agents, which is a low-code chatbot platform. There are a number of new features that are rolling out over the coming months that will make it easier to create and manage low-code chatbots from within Teams and more streamlined for end users to use Power Virtual Agents bots in Teams. These new features are: Bot Template: FAQ bot template available in GitHubSingle sign-on: Power Virtual Agents bots will be available, removing the need for users to sign in again when using a Power Virtual Agents bot in Teams Simplified Power Apps and Power Virtual Agents “Add to Teams” We are introducing a new streamlined approach for adding custom solutions to Teams from Power Apps and Power Virtual Agents. Coming soon, Power Apps makers will be able to click a single “Add to Teams” button in Power Apps, which will push the app to the Teams app store. Similarly, the process of adding low-code bots from Power Virtual Agents will be simplified, so developers can spend more time building and less time deploying. Enhanced workflow automation with Power Automate + Teams There are several new Power Automate triggers and actions built specifically for Teams to unlock custom message extensions, allow for automated @mentioning, and provide a customized bot experience. Additionally, to make the process of building automation even easier and more relevant, we are rolling out new business process scenario templates built for Teams. When users create a new flow, they will see these templates when they select the “Create from Template option.”
New Shifts + Power Automate actions There are new actions available via Power Automate so that developers can take information from Shifts and create customized workflows with other apps or perform operations at scale. For example, gathering insights from Shifts such as requests or schedule details and then using this information in other app workflows. Learn more here.
Improved Power BI sharing to Teams To help organizations lead data-driven conversations, we have made it even easier to share Power BI reports to Teams – simply select the report to share and click the new “Share to Teams” button in Power BI. You’ll be prompted to select the user or channel to send the report to, which will automatically be posted to the conversation. Additionally, users can now copy individual charts in a Power BI report, and when they are pasted to a Teams conversation, the chat will include a rich thumbnail preview of the chart, as well as an adaptive card allowing users to take actions on that chart. Activity feed notifications for apps Coming soon to beta, the new activity feed notifications via the Microsoft Graph API gives you a new and simpler way to send app notifications to users across devices. You’ll enjoy the ability to customize and control the notification experience – everything from the notification structure, to what is surfaced to the user after they click the notification.

Granular Permissions We’re pleased to announce the general availability of 24 new granular permissions for the Teams Graph APIs – giving developers more flexibility and granularity. With granular permissions, developers can now narrow the app’s access and scope to team data as opposed to all team data. Mobile device capability for apps Developers will soon be able to connect native mobile device capabilities to their apps, such as camera, location and microphone, empowering developers to extend their Teams user experience to meet specific needs.
New Microsoft Graph APIs for subscribing to notifications for new app messages Using the Microsoft Graph API, we’ve provided developers capabilities to create subscriptions for different event types, such as new/edited/delete messages, replies, reactions, as well as to all or specific channels and chat threads – allowing apps to refresh when new content is available. These are great for development of data loss prevention (DLP) and safety apps. New Teams Graph APIs in v1.0 Coming soon, we have some new Teams Graph APIs coming to the v1.0 endpoint that you’ll be able to explore soon. You’ll soon be able to take advantage of capabilities including sending channel messages and replies (including attachments), finding the general channel without assuming it’s titled general, and lastly finding the SharePoint folder for a channel without assuming folder has same name as channel itself. These APIs, combined with other Teams and Cloud Communications APIs support our new Connected Contact Center and Compliance Recording ISV partner certification programs. Learn more about our contact center and compliance recording integrations, including the current group of partners that are ready to engage customers for each solution area. Graph APIs for Shifts APIs give developers the flexibility to customize the Shifts experience, making it extensible to integrate with any other external workforce management, including their own custom workforce management systems (small businesses). Bringing together a workforce management system and Teams enables customers to leverage logic on the backend, and make Teams the user-friendly, front-end experience. App Studio Update (v1.4.0) With the latest update (v1.4.0), App Studio now has new enhancements such as, support for app manifest schema 1.6, “advanced section” in app details to easily support advanced features, app package validation tool to run tests that extend outside the basic schema validation, and better error handling with bot framework connection with user guidance on how to perform same actions in the bot framework web portal. This is generally available today.

Improving IT Admins’ ability to manage apps
Streamlined process to manage apps IT admins will be able to leverage a streamlined process to manage - review, approve & publish custom apps directly from the Teams Admin Center. New 3rd party subscription purchase experience A new 3rd-party subscription purchase experience will enable IT admins to view and purchase subscriptions associated with the 3rd party Teams apps. IT admins can purchase licenses and later pin the app to targeted employees right from within the Teams Admin Center. Grant Consent to Graph API Permissions IT admins will be able to grant consent to Graph API permissions on behalf of the entire tenant for the permissions an app is requesting such as reading information stored in a team or sending an email on behalf of users, be able to see granular permissions and provide resource-specific consent with the ability to install an app to a specific team New controls to enhance the Teams app discoverability experience New controls will empower administrators to tailor and enhance the Teams app discoverability experience by installing it for individual users in the overflow menu. IT admins can also surface relevant apps to end users by creating Templates in Teams that come with installed apps in addition to a pre-defined channel structure.
Enhancing end users’ experience
Pop-out apps Coming later this year, end users will be able to ‘pop-out’ personal apps. Users will be able to open separate windows for their apps so they can work while easily accessing their team chats to continue to collaborate. Simply right-click on an app to see the pop out option.
Templates in Teams Creating a new team? Now you can get started even faster with a variety of templates for common team types. Options will include event management, crisis response, hospital ward and bank branch, just to name a few. Each template comes with pre-defined channels, apps, and guidance on how to utilize and customize it, helping you get the most out of Teams. IT professionals can also create new custom templates for their organization, allowing them to standardize team structures, surface relevant apps and scale best practices. Templates in Teams will roll out in the next few months and appear automatically. Microsoft Lists in Teams Microsoft Lists is coming to Teams! Microsoft Lists helps you track information and organize work. List are simple, smart, and flexible, so you can stay on top of what matters most to your team. Track issues, assets, routines, contacts, inventory and more using customizable views and smart rules and alerts to keep everyone in sync. With ready-made templates, you will be able to quickly start lists online, on our new mobile app, and directly from within Microsoft Teams. Contextual Search in Microsoft Teams Find information faster with contextual search in Microsoft Teams. Users will have the ability to search for content in a specific channel or chat by pressing CTRL + F. Search results will only contain messages and files found in the selected chat or channel. This feature is coming soon.

Azure Active Directory Single Sign-On (SSO) End users will soon be able to enjoy the benefits of Azure Active Directory Single Sign-On (SSO) for supported Teams apps on both desktop and mobile. After they’re signed into Teams, end users won’t have to sign in again on apps that integrate with single sign-on. Developers will also enjoy a simplified authentication process through a single API call. We’ll roll out with tabs in general availability soon, followed by bots later this year.

Azure Active Directory Conditional Access Coming soon, this capability will enable end users to run apps and tabs even if their IT admin has set up conditional access policies requiring the use of a trusted device. Website tabs on Windows that use Azure AD will automatically sign you in and support device-specific conditional access policies.

Resource-Specific Consent This capability will empower Team owners to install an app for their specific team and restrict the app’s scope and access to data to only that one team. This allows team owners to make decisions versus needing the global IT admin to provision access. This is coming soon to preview.
More powerful Adaptive Cards for Teams Develop a richer and more customizable experience using Adaptive Cards 1.2 in Teams on desktop and mobile. Highly requested features such as @mentions support within cards, allow the ability to direct a user’s attention to cards that are relevant to them – providing you an enhanced notification and engagement capability for your app. RichText Blocks allow you greater flexibility in designing the look and feel of the cards. These are available in general availability and ready for you to explore today. Adaptive Cards with incoming webhooks are another highly requested Teams features. Full support for Adaptive Cards, including support for bot framework cards (hero, profile, lists, and more) will be available in preview coming soon. Messaging actions for mobile Coming soon, we will have message action support for mobile will be coming soon to preview. Message actions can be triggered directly from a message and can be used to enable scenarios such as creating tasks or work items following a discussion within a chat or channel.
Using Teams to Connect with External Audiences
Schedule virtual appointments with Bookings in Teams Teams, which enables HIPAA compliance and is HITRUST certified, will now allow organizations to schedule, manage and conduct business-to-consumer meetings, through the new Bookings app integration. Organizations can now manage multiple departments and staff in a single scheduling experience and can easily schedule virtual appointments with external attendees, such as healthcare virtual visits with patients, job candidate interviews, customer service appointments in retail, and student office hours. In addition, with the Microsoft Graph API organizations can integrate both scheduling and meeting-join links into their unique workflows and existing applications like electronic health records systems in healthcare.
NDI for Teams and Skype TX Interoperability Broadcast events and studio productions from a virtual stage in Teams! We are introducing New Network Device Interface (NDI) support and Skype TX interoperability for Microsoft Teams, which offers a more advanced set of production options for public or private customized, high-scale broadcasts. Coming soon, NDI for Microsoft Teams transforms a Teams meeting into a virtual stage by converting each participant's video into a discrete video source that can be used in the production tool of your choice, OBS, Wirecast, Xsplit, StreamLabs and many more. This functionality enables you to use Teams meetings in other ways, including hosting a professional broadcast. Meanwhile new interoperability of Teams with Skype TX devices—the devices commonly used in broadcast production today—enables production teams to connect in 1:1 calls for interviews and newscasts with professional capabilities including caller queuing and connection quality management. Read the full article
0 notes
Text
AWS Redshift authentication with ADFS for better tracking
Our client has many business users who need access to the Redshift cluster for analysis and it is not really practical to create and maintain users directly on the cluster for every user so they ended up in sharing the same user credentials to everyone now the business users started to abuse the cluster by sending many poorly written queries. We wanted to solve both problems of not creating users directly on the cluster and at the same time, knowing who executed what query on the cluster so that we can educate them to send queries with the right filters. Our customer is already using Active Directory (AD) so we decided to integrate the AD with Redshift using ADFS so I am going to explain more about it in this blog. This blog assumes that you already have knowledge on AWS Redshift, IAM, AD and ADFS and if you are new to these topics then please visit the following blogs first. AWS authenticates from Active Directory with Single Sign OnWhy a Single Sign On ?AWS IAM Policies with ExamplesYou know, Administrator adds the users, the groups, authorises the users for the resources and so on… It is up to an…Amazon Redshift — Connect from your from Windows machineRedshift is a fully managed, petabyte-scale cloud based data warehouse solution from Amazon. You can start with…
Setup

Redshift access with ADFS integration processAWS Redshift SetupConnect to your cluster using your master user and password.Create DB Groups for AD users to join, here we are creating a DB group for read-only access on all the table.CREATE GROUP readonly;-- Following command needs to be run every-time you create new tablesGRANT SELECT on ALL TABLES IN SCHEMA public TO group readonly;-- For non-public schemas you will also need to grant USAGE PRIVILEGESGRANT USAGE ON SCHEMA TO group readonly; GRANT SELECT on ALL TABLES IN SCHEMA TO group readonly; Please use only lower case letters as DB group name otherwise connection errors occur while connecting to redshift using ADFS. You can create more groups as per your use case if you do that you need to map them to your AD groups also using “Relying Party Trust” claim rules.AD Setup If you don’t have AD already then please follow this blog to create it. We recommend you to create separate AD groups to provide access to your AD users to the Redshift cluster as it gives better control on managing access to the cluster. Create an AD group called Redshift-readonly.

Create an AD group with name Redshift-readonly Please note the format for AD group name: Redshift-{DbGroupName}. Redshift- prefix for the AD group name is very important as it will be used in “Relying Party Trust” claim rules while configuring ADFS. AWS IAM Setup Once AD authentication is successful, IAM will provide the temporary AWS credentials. And then we need to call GetClusterCredentials Redshift API with those AWS credentials to get the temporary DB credentials. This API creates the user and adds to a specified DbGroups so we also need to provide “redshift:CreateClusterUser” and “redshift:JoinGroup” permissions to the IAM role. Create an IAM identity provider by the following instruction from this blog.Create IAM policy with Redshift cluster temporary credentials creation permissions.{ "Version": "2012-10-17", "Statement": , "Resource": }, { "Sid": "CreateClusterUserStatement", "Effect": "Allow", "Action": , "Resource": }, { "Sid": "RedshiftJoinGroupStatement", "Effect": "Allow", "Action": , "Resource": } ] }Create an IAM role for ADFS using previously create identity provider with SAML 2.0 federation option.

AWS IAM Role for ADFS to login to Redshift clusterAttribute: SAML:aud Value: https://signin.aws.amazon.com/samlAttach the previously created policy to this role.ADFS Setup In this blog, I am going to talk only about the Redshift authentication related integration with ADFS so in case you are new to ADFS then please go through this blog first to understand concept of integrating ADFS with AWS. Create “Relying Party Trust” claim rule to store the AD groups logging user belongs to a temporary variable: “http://temp/variable” using the Custom rule template.

Expose the user AD groups as a temporary variablec: => add(store = "Active Directory", types = ("http://temp/variable"), query = ";tokenGroups;{0}", param = c.Value);Map AD groups to AWS IAM role, this role will give access to Redshift cluster after the user is successfully authenticated with AD.

AD groups to IAM role with redshift accessc: => issue(Type = "https://aws.amazon.com/SAML/Attributes/Role", Value = RegExReplace(c.Value, "Redshift-", "arn:aws:iam:::saml-provider/RedshiftADFS,arn:aws:iam:::role/Redshift-"));Map Role SessionName and DbUser to user’s email address. This will help us to know the logged in user identity.
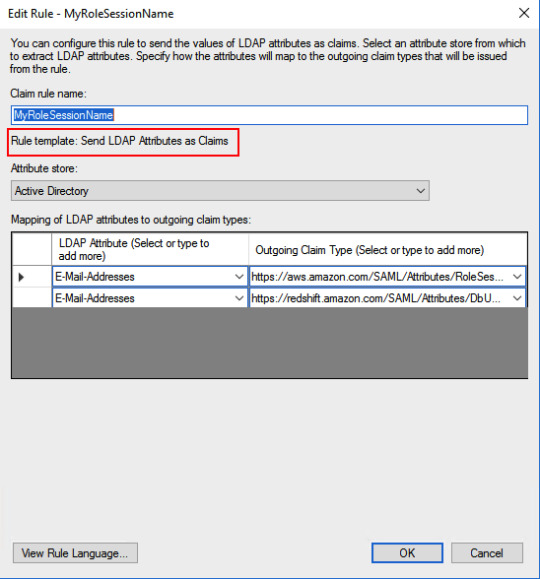
Map RoleSession and DbUser to EmailAddressAD attribute: E-Mail-Addresses -> https://aws.amazon.com/SAML/Attributes/RoleSessionNameAD attribute: E-Mail-Addresses -> https://redshift.amazon.com/SAML/Attributes/DbUserMap AD groups related to Redshift to DbGroups. Here I am using a regular expression to get DbGroups from AD groups which got stored in “http://temp/variable” in the previous rule.
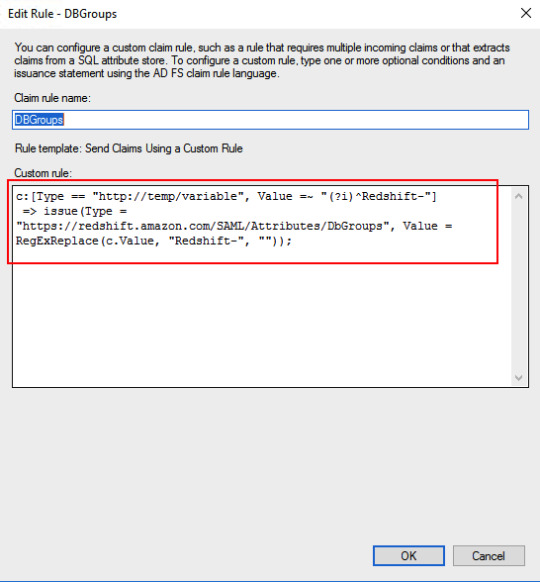
AD groups to Redshift DB groupsc: => issue(Type = "https://redshift.amazon.com/SAML/Attributes/DbGroups", Value = RegExReplace(c.Value, "Redshift-", ""));Add claim rule for Redshift AutoCreate DB user attribute.
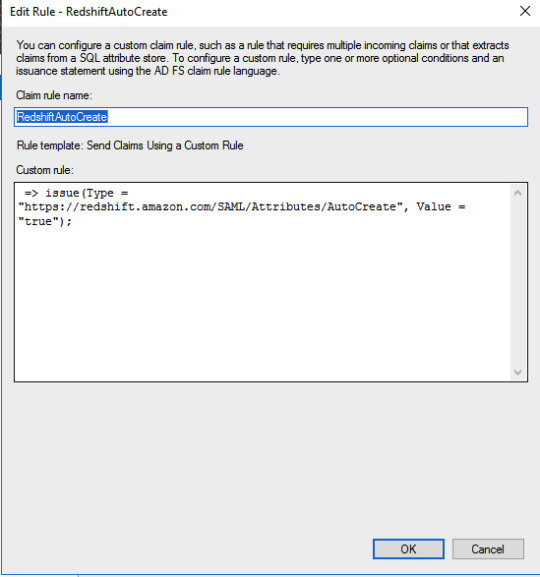
Redshift AutoCreate DB user Claim rule=> issue(Type = "https://redshift.amazon.com/SAML/Attributes/AutoCreate", Value = "true");SQL Workbench/J setup Please setup SQL Workbench to connect with Redshift using this AWS documentation. Make sure that you are using a driver with AWS Java SDK or set it in the classpath. Create credentials profile in /.aws/credentials for ADFS authentication.plugin_name=com.amazon.redshift.plugin.AdfsCredentialsProvideridp_host=idp_port=443preferred_role=arn:aws:iam:::role/Redshift-readonly You need to add ssl_insecure=true to above configuration in case you are using self signed certificates in your test setup. Connect to Redshift using the following JDBC connection.jdbc:redshift:iam://:/?Profile=redshift-adfs-read You can also use Extentend Properties from SQL workbench directly instead of the Profile to set the properties plugin_name, idp_host, idp_port, preferred_role.

Extended Properties for SQL Workbench/J# If you are using extended properties then use the following connection string: jdbc:redshift:iam://:/d

The connection to Redshift is successful using AD authentication Now we can see the queries run by various users from Redshift console directly.

Queries run on the cluster by various usersConclusion We have learned how to use AD authentication to log in to Redshift. This surely helps us to analyze the Redshift performance and educate the user making improper queries to the cluster. I know this is pretty complex setup so you may not get it right in one go so please try it with patience and feel free to contact me for any help or clarifications. Read the full article
0 notes
Text
Thrive on IBM MDM CE
IBM InfoSphere Master Data Management Collaborative Edition provides a highly scalable, enterprise Product Information Management (PIM) solution that creates a golden copy of products and becomes trusted system of record for all product related information.
Performance is critical for any successful MDM solution which involves complex design and architecture. Performance issues become impedance for smooth functioning of an application, thus obstructing the business to get the best out of it. Periodic profiling and optimizing the application based on the findings is vital for a seamless application.
InfoTrellis has been providing services in PIM space over a decade now for our esteemed clientele that is spread across the globe.
This blog post details on optimizing IBM InfoSphere MDM Collaborative Edition application based on the tacit knowledge acquired from implementations and upgrades carried out over the years.
Performance is paramount Performance is one of the imperative factors that make an application more reliable. Application performance of MDM Collaborative Edition is influenced by various factors such as solution design, implementation, infrastructure, data volume, DB configurations, WebSphere setup, application version, and so on. These factors play a huge role in affecting business either positively or otherwise. Besides, even in a carefully designed and implemented MDM CE solution, performance issues creep up over a period of time owing to miscellaneous reasons.
Performance Diagnosis The following questions might help you to narrow down a performance problem to a specific component.
What exactly is slow – Only a specific component or general slowness which affects all UI interactions or scheduled jobs?
When did the problem manifest?
Did performance degrade over time or was there an abrupt change in performance after a certain event?
Answers to the above queries may not be the panacea but provide a good starting point to improve the performance.
Hardware Sizing and Tuning Infrastructure for the MDM CE application is the foundation on top of which lays the superstructure.
IBM recommends a hardware configuration for a standard MDM CE Production server. But then, that is just a pointer towards the right direction and MDM CE Infrastructure Architects should take it with a pinch of salt.
Some of the common areas which could be investigated to tackle performance bottlenecks are:
Ensuring availability of physical memory (RAM) so no or little memory swapping and paging occurs.
Latency and bandwidth between the application server boxes and database server. This gains prominence if the Data Centers hosting these are far and away. Hosting Primary DB and App Servers on Data Center could help here.
Running MDM CE on dedicated set of boxes will greatly help so that all the hardware resources are up for grabs and isolating performance issues becomes a fairly simple process, of course, relatively.
Keeping an eye on disk reads, writes and queues. Any of these rising beyond dangerous levels is not a good sign.
Clustering and Load Balancing Clustering and Load balancing are two prevalent techniques used by applications to provide “High Availability and Scalability”.
Horizontal Clustering – Add more firepower to MDM CE Application by adding more Application Servers
Vertical Clustering – Add more MDM CE Services per App Server box by taking advantage of MDM CE configuration – like more Scheduler and AppServer services as necessary
Adding a Load Balancer, a software or hardware IP sprayer or IBM HTTP Server will greatly improve the Business user’s experiences with the MDM CE GUI application
Go for High Performance Network File System Typically clients go with NFS filesystem for MDM CE clustered environments as it is a freeware. For a highly concurrent MDM CE environment, opt for a commercial-grade, tailor-made high performance network file system like IBM Spectrum Scale .
Database Optimization The performance and reliability of MDM CE is highly dependent on a well-managed database. Databases are highly configurable and can be monitored to optimize performance by proactively resolving performance bottlenecks.
The following are the few ways to tweak database performance.
Optimize database lock wait, buffer pool sizes, table space mappings and memory parameters to meet the system performance requirements
Go with recommended configuration of a Production-class DB server for MDM CE Application
Keeping DB Server and Client and latest yet compatible versions to take advantage of bug fixes and optimizations
Ensuring database statistics are up to date. Database statistics can be collected manually by running the shell script from MDM CE located in $TOP/src/db/schema/util/analyze_schema.sh
Check memory allocation to make sure that there are no unnecessary disk reads.
Defragmenting on need-basis
Checking long running queries and optimizing query execution plans, indexing potential columns
Executing $TOP/bin/indexRegenerator.sh whenever the indexed attributes in MDM CE data model is modified
MDM CE Application Optimization
The Performance in MDM CE application can be overhauled at various components like data model, Server config., etc. We have covered the best practices that have to be followed in the application side.
Data Model and Initial Load
Carefully choose the number of Specs. Discard the attributes that will not be mastered, governed in MDM CE
Similarly, larger number of views, Attribute Collections, Items and attributes slower the user interface screen performance. Tabbed views should come handy here to tackle this.
Try to off-load cleansing and standardization activities outside of MDM solution
Workflow with a many steps can result in multiple problems ranging from an unmanageable user interface to very slow operations that manage and maintain the workflow, so it should be carefully designed.
MDM CE Services configuration
MDM CE application comprises of the following services which are highly configurable to provide optimal performance – Admin, App Server, Event Processor, Queue Manager, Workflow Engine and Scheduler.
All the above services can be fine-tuned through the following configuration files found within the application.
$TOP/bin/conf/ini – Allocate sufficient memory to the MDM CE Services here
$TOP/etc/default/common.properties – Configure connection pool size and polling interval for individual services here
Docstore Maintenance
Document Store is a placeholder for unstructured data in MDM CE – like logs, feed files and reports. Over a period of time the usage of Document Store grows exponentially, so are the obsolete files. The document store maintenance report shall be used to check document store size and purge documents that do not hold significance anymore.
Use the IBM® MDMPIM DocStore Volume Report and IBM MDMPIM DocStore Maintenance Report jobs to analyze the volume of DocStore and to clean up the documents beyond configured data retention period in IBM_MDMPIM_DocStore_Maintenance_Lookup lookup table.
Configure IBM_MDMPIM_DocStore_Maintenance_Lookup lookup table to configure data retention period for individual directories and action to be performed once that is elapsed – like Archive or Purge
Cleaning up Old Versions
MDM CE does versioning in two ways.
Implicit versioning
This occurs when the current version of an object is modified during the export or import process.
Explicit versioning
This kind of versioning occurs when you manually request a backup.
Older versions of items, performance profiles and job history need to be cleansed periodically to save load on DB server and application performance in turn.
Use the IBM MDMPIM Delete Old Versions Report and IBM MDMPIM Estimate Old Versions Report in scheduled fashion to estimate and clear out old entries respectively Configure IBM MDMPIM Data Maintenance Lookup lookup table to hold appropriate data retention period for Old Versions, Performance Profiles and Job History
Best Practices in Application Development
MDM CE presents couple of programming paradigms for application developers who are customizing the OOTB solution.
Scripting API – Proprietary scripting language which at runtime converts the scripts into java classes and run them in JVM. Follow the best practices documented here for better performance
Java API – Always prefer Java API over the Scripting API to yield better performance. Again, ensure the best practices documented here are diligently followed
If Java API is used for the MDM CE application development, or customization, then :
Use code analyzing tools like PMD, Findbung, SonarQube to have periodic checkpoints so that only the optimized code is shipped at all times
Use profiling tools like JProfiler, XRebel, YourKit or VisualVM to constantly monitor thread pools use, memory pools statistics, details about the frequency of garbage collection and so on. Using these tools during resource-intensive activities in MDM CE, like running heavyweight import or export jobs, will not just shed light on inner workings of JVM but offers cues on candidates for optimization
Cache Management
Keeping frequent accessed objects in cache is a primary technique to improvement performance. Cache hit percentage need to be really high for smooth functioning of the application.
Check the Cache hit percentage for various objects in the GUI menu System Administrator->Performance Info->Caches The $TOP/etc/default/mdm-ehcache-config.xml and $TOP/etc/default/mdm-cache-config.properties files can be configured to hold large number of entries in cache for better performance
Performance Profiling A successful performance testing will project most of the performance issues, which could be related to database, network, software, hardware etc. Establish a baseline, identify targets, and analyze use cases to make sure that the performance of the application holds good for long.
You should identify areas of solution that generally extends beyond normal range and few examples are large number of items, lots of searchable attributes, large number of lookup tables.
Frameworks such as JUnit, JMeter shall be used in a MDM CE engagement where Java API is the programming language of choice
About the author
Sruthi is a MDM Consultant at InfoTrellis and worked in multiple IBM MDM CE engagements. She has over 2 years of experience in technologies such as IBM Master Data Management Collaborative Edition and BPM.
Selvagowtham is a MDM Consultant at InfoTrellis and plying his trade in Master Data Management for over 2 years. He is a proficient consultant in IBM Master Data Management Collaborative Edition and Advanced Edition product.
1 note
·
View note
Text
300+ TOP SIEBEL CRM Objective Questions and Answers
Siebel CRM Multiple Choice Questions :-
1. Which Siebel feature enables you to automatically apply a discount to a customer’ s order when the customer adds both a printer and replacement ink cartridges to their online shopping cart? A. Siebel Workflow Policy Program B. Action Sets C. Siebel Assignment Manager D. Rule Sets Ans: B 2. You currently have a Siebel Operation step in a Workflow Process that updates SR priority from Low to High. You now want the Sub Process step to change the priority to Very High rather than High. How do you change this detail? A. Double-click the Siebel Operation step in the Process Designer B. Delete the step and replace it with a new Sub Process step C. Right-click the Siebel Operation step in the Process Designer D. Double-click the Sub Process step in the Process Designer Ans: D 3. Which of the following is an Enterprise Component Group that should be enabled prior to running Siebel Workflow? A. Workflow Process Batch Manager B. Workflow Action Agent C. Workflow Monitor Agent D. Workflow Management E. Workflow Process Manager Ans: D 4. Which of the following is NOT an option with Siebel Workflow’ s Wait Step? A. Pause a process for a specified amount of time B. Pause a process until a specified runtime event occurs C. Include a restart parameter in the process D. Include a timeout parameter in the process Ans: C 5. If an applet has five associated Rule Sets, and the first three rule sets will not return any data for the current user, but the last two rule sets will, how many rule sets are evaluated for this user? A. 4 B. 3 C. 2 D. 5 Ans: A 6. How can you tell if your connectors in a Siebel Workflow process are successfully connecting the steps as you create the Workflow process? Choose two. A. The two ends of the connector will be white in color B. By running the process using Process Simulator C. By right-clicking the connector line D. The two ends of the connector will be red in color Ans: B,D 7. Which of the following describes .dx files? A. Transaction files transferred between the Server and Mobile Client B. Temporary files that are automatically purged upon application exit C. Directory files used by Siebel to organize physical file directories D. Log files used for troubleshooting EIM process errors Ans: A 8. What is stored in the S_DOCK_TXN_LOG table in the Server Database? A. Before and after images of data B. A list of transactions performed while docked C. All of the data that is changed during a remote session D. Remote user information Ans: A 9. In the first time set up of mobile users, what must you do before data can be loaded in the Mobile Client’ s local database? A. Run the dev2prod.ksh script B. Create the database schema for the local database C. Copy the Siebel Database file to the mobile client D. Copy the .cfg and .srf file from the server to the mobile client machine Ans: B 10. Which server task creates the DockingUser directory on the Siebel Server for a new Mobile Client? A. Transaction Router B. Generate New Database C. Synchronization Manager D. Database Extract Ans: D

SIEBEL CRM MCQs 11. What does the Transaction Merger server task do when it encounters a Duplicate Conflict? Choose two. A. Merges the two records together into one record B. Adds the duplicate record and sets a flag to indicate that duplicates exist C. Does not add the duplicate record and logs the conflict in the remote status log D. Notifies the mobile client of the duplicate Ans: B,D 12. When does the Transaction Merger server task override the MRG: System Conflict Resolution system preference? A. Never B. When a Duplicate Conflict occurs C. When an Update Conflict occurs D. When a Delete Conflict occurs Ans: D 13. What action is recommended if a mobile user is going to be unable to synchronize for an extended period of time (leave of absence, for example)? A. Change the synchronization frequency B. Modify the views assigned to the mobile client C. Set a new effective end-date for the mobile client to deactivate it D. Remove the mobile client’ s local database completely Ans: C 14. When initially preparing your target environment for migration, which of the following tasks should you complete? Choose three. A. Check out projects that were changed in development B. Create user accounts C. Install any required client software D. Install database and server software E. Copy the .srf file to server and clients Ans: B,C,D 15. What is dataexp.exe used for when migrating environments? A. To generate a data merge file that contains user and seed data B. To create flat files containing data from non-EIM tables C. To create flat files containing data from EIM tables D. To generate a compressed copy of the source database Ans: D 16. Which of the following must you do to reactivate a mobile client? Choose two. A. Perform a database extract B. Create the mobile client DOCKING sub-directory on the server C. Add the server name to the DockConnString line of siebel.cfg D. Remove the end date for the mobile client Ans: A & D. 17. Which of the following tasks can you perform in the Catalog Manager? A. Set permissions for Web Catalog items B. Manage privileges and rights given to groups and users C. Set authentication options D. Manage Web groups and users Ans: A 18. In workflow, using which of the following step you can invoke assignment manager A. Business Service B. Sub-Process C. Siebel Operation D. Decision Point Ans: A 19. Which server component must be running for a siebel remote client to work: A. Transaction Processor B. Synchronization Manager C. Transaction Router D. Transaction Merger Ans: B 20. You have a Workflow process that evaluates the age of Service Requests and updates the priority of Service Requests that are more than a week old. Which Siebel Workflow step type are you using to change the priority of the Service Request? A. Siebel Update step B. Siebel Operation step C. Decision Point step D. Sub Process step Ans: B 21. The Expression Designer is used to define which of the following types of expressions? A.Dynamic B.Conditional C.SQL D.Rule Ans: B,D 22. When an expression is validated, both the syntax and logic are checked. A. True B. False Ans: b 23. At run-time, the system evaluates personalization expressions. Which of the following is NOT true of the evaluation results? A.The view and applet displays because both view and applet expressions evaluate to True B.The link to the view is not available even though the applet expression evaluates to True because the view expression evaluates to False C.The view and applet displays even though the applet expression evaluates to False because the view expression evaluates to True D.The link to the view is not available because both view and applet expressions evaluate to False Ans: C 24. Personalization expressions override Responsibility in determining whether a user should see a view. A. True B. False Ans: B 25. How are Personalization Expressions applied? A.The Application administrator associates expressions with the appropriate Responsibility B.A property is set on the appropriate view or applet C.The Personalization administrator associates expressions with views and applets Ans: C 26. Which of the following is NOT true of a rule set? A.Consist of one or more rules which are evaluated in sequence B.Defines an expression that is displayed in a salutation applet C.Control the content of an applet based on personalization profile attributes, content attributes, and other factors D.Defines an expression that acts as sort specification Ans: D 27. Which of the following are actions that can be added to an action set? Pick THREE. A.Invoke a method on a business service B.Run a business service C.Set a profile to a new value D.Monitor an event Ans: A,B,C 28. If an exclusion expression evaluates to True, that record is NOT included content, even if the inclusion expression evaluates to True. A. True B. False Ans: A 29. Which of the following is NOT true of how rule sets are evaluated? A.Evaluated in the specified sequence B.Only evaluated if its conditional expression evaluates True and Start Date and End Date, if set, are appropriate C.All rule sets are evaluated before determining content Ans: C 30. Which of the following is true of Personal Salutations? Pick THREE A.Appear at the top of the application home page B.Scripted in rule sets C.Salutation text can contain HTML tags to provide formatting D.Can use only one rule per salutation Ans: A,B,C 31. Siebel eConfigurator, ePricer, and eAdvisor are collectively known as what? A. Siebel MidMarket Edition B. Interactive Selling Suite C. Siebel Employee Applications D. Siebel Sales Ans: B 32. Which entity represents a person external to your company? A. Customer B. Party C. Contact D. Person Ans: C 33. Which entities always belong to a team? Choose three. A. Activity B. Opportunity C. Contact 1 D. Account E. Service Request Ans: B,C,D 34. Which type of product is an internal application used by employees and partners? A. Employee Application B. Partner Application C. Customer Application D. Employee Partner Application Ans: A 35. An Employee Application has the following characteristics? Choose two. A. Used by employees only B. Used by employees and partners C. Internal application D. Used by employees and customers Ans: B,C 36. Marcel found out the area code of his contact, Céline, has changed from 912 to 440. Which of the following is the easiest way for him to change Céline’ s area code? A. Find Céline’ s record in the My Contacts View, delete it, and create a new record B. Find Céline’ s record in the My Contacts View, go to the detail applet, change the area code C. Find Céline’ s record in the All Contacts Across Organizations View, delete her phone number from a primary list, and input the new one D. Find Céline’ s record in the My Contacts View, delete her phone number from a primary list, and then input the new number Ans: B 37. Which of the following objects is used to retrieve data from the database? A. View B. Business Object C. Business Component D. Database table Ans: C 38. How many Business Components can a single list or form Applet reference? A. Two (if using a toggle) B. One C. Unlimited D. Eight Ans: B 39. Complete this statement: A business object contains information about the _________ between business components. A. Differences B. Similarities C. Shared properties D. Relationships Ans: D 40. Which of the following statements is true? A.Form applet data comes from only one table B.Form applet data may come from many tables and columns C.Form applet data may come from many columns in a single table D.Form applet data comes from only one column in a table Ans: B 41.Complete the following statement. A set of related applets may be displayed in a __________. A. Business object B. View C. Screen D. Business component Ans: B 42. Which applet type may simultaneously display more than one record? A. List B. Form C. Child D. Detail Ans: A 43. On a Mobile Web Client using disconnected processing, how is HTML delivered to the browser? A. The HTML is pulled from the Web cache on the Mobile Web Client B. It is not possible for a disconnected client to receive Siebel HTML pages C. The local Web Server with SWSE delivers the HTML to the browser D. The Mobile Web Client must synchronize to receive the HTML from the Siebel Web Engine Ans: C 46. What is the purpose of the Siebel Monitoring Account? A. Used to monitor database capacity and alert DBA when approaching designated thresholds B. Used to run Enterprise Server processes and components C. Required to run Windows processes or start UNIX daemons D. Required by Resonate Central Dispatch connection brokering software Ans: D 47. Which of the following is NOT a valid task when installing and verifying the Enterprise and Siebel Servers? A. Invoke the installation program and follow the installation steps B. Run the install.ksh script C. Verify that the Windows Service and Unix daemon process is started D. Inspect the SESsetup.log file in the Siebel root directory Ans: B 48. How might you verify repository data after installing the Database Server? A. View the SESsetup.log file in the Siebel root directory B. Verify that the Windows Service and Unix daemon process is started C. Run the imprep.ksh script D. Run a query to count the records in the S_VIEW table Ans: D 49. What function does the Siebel Web Engine perform when it receives a URL with a Siebel request? A. Gathers templates and data and builds an HTML page B. Displays the HTML page on the client’ s computer C. Provides access to, and distributes load for Siebel Servers D. Verifies that the client is using an acceptable browser Ans: A 50. What happens when a user enters a URL for a Siebel application into a Web browser? A. The Browser retrieves the appropriate templates and the Siebel Web Engine retrieves the data from the database to build the HTML page B. The Siebel Web Engine recognizes the URL and passes it to the Web Server where the HTML page is built for the user C. The Web Server retrieves the appropriate templates and the Siebel Web Engine retrieves the data from the database to build the HTML page D. The Web Server recognizes the URL and passes it to the Siebel Web Engine where the HTML page is built for the user Ans: D 51. Account is what kind of entity A. Single Organization B. Multiple Organization C. Single User D. Single Position Ans: B 52. A potential client, partner and competitor is represented by which entity in Siebel A. Contact B. Account C. Customer D. Service Request Ans: B 53. What are the different Business objects layers in Siebel, Choose 2 A. Business Object B. Business Service C. Business Component D. Applet Ans: A,C 54. In a view if you display an account form applet as the master and the opportunity list applet as the child then what is TRUE A. Parent business component is used as Account B. Child business component is used for Account C. Parent business component is used as Opportunity D. Child business component is used for Opportunity Ans: A,D 55. Which of the following is TRUE in a view if there are two applets displayed one list and a detail. A. It is based on two different views B. It is based on two different Business Objects C. It can use only one business component D. It may use two business components Ans: C 56. What does Rule set specify for an applet in personalization A. Order condition B. Search Specification C. Set of Actions D. Set of Events Ans: B 57. What determines localization A. Tools Language Mode B. Siebel Tools C. Regional Settings D. OS regional settings Ans: B 58. What does “GetAttribute(‘Me.Country’) = ‘USA’ tell us A. Laptop being used is placed in USA B. Laptops regional setting is set to USA C. It checks for the address as ‘USA’ Ans: C 59. A Screen is a collection of A. Applets B. Business Components C. Views D. Business Objects Ans: C 60. How does Siebel Remote Client connect A. Through Gateway server B. Through Domain Server C. Through Enterprise Server D. Directly Ans: A SIEBEL CRM Questions and Answers pdf Download Read the full article
0 notes
Text
From Static Sites To End User JAMstack Apps With FaunaDB
About The Author
Bryan is a designer, developer, and educator with a passion for CSS and static sites. He actively works to mentor and teach developers and designers the value … More about Bryan Robinson …
To make the move from “site” to app, we’ll need to dive into the world of “app-generated” content. In this article, we’ll get started in this world with the power of serverless data. We’ll start with a simple demo by ingesting and posting data to FaunaDB and then extend that functionality in a full-fledged application using Auth0, FaunaDB’s Token system and User-Defined Functions.
The JAMstack has proven itself to be one of the top ways of producing content-driven sites, but it’s also a great place to house applications, as well. If you’ve been using the JAMstack for your performant websites, the demos in this article will help you extend those philosophies to applications as well.
When using the JAMstack to build applications, you need a data service that fits into the most important aspects of the JAMstack philosophy:
Global distribution
Zero operational needs
A developer-friendly API.
In the JAMstack ecosystem there are plenty of software-as-a-service companies that provide ways of getting and storing specific types of data. Whether you want to send emails, SMS or make phone calls (Twilio) or accept form submissions efficiently (Formspree, Formingo, Formstack, etc.), it seems there’s an API for almost everything.
These are great services that can do a lot of the low-level work of many applications, but once your data is more complex than a spreadsheet or needs to be updated and store in real-time, it might be time to look into a database.
The service API can still be in use, but a central database managing the state and operations of your app becomes much more important. Even if you need a database, you still want it to follow the core JAMstack philosophies we outlined above. That means, we don’t want to host our own database server. We need a Database-as-a-Service solution. Our database needs to be optimized for the JAMstack:
Optimized for API calls from a browser or build process.
Flexible to model your data in the specific ways your app needs.
Global distribution of our data like a CDN houses our sites.
Hands-free scaling with no need of a database administrator or developer intervention.
Whatever service you look into needs to follow these tenets of serverless data. In our demos, we’ll explore FaunaDB, a global serverless database, featuring native GraphQL to assure that we keep our apps in step with the philosophies of the JAMstack.
Let’s dive into the code!
A JAMstack Guestbook App With Gatsby And Fauna
I’m a big fan of reimagining the internet tools and concepts of the 1990s and early 2000s. We can take these concepts and make them feel fresh with the new set of tools and interactions.
A look at the app we’re creating. A signature form with a signature list below. The form will populate a FaunaDB database and that database will create the view list. (Large preview)
In this demo, we’ll create an application that was all the rage in that time period: the guestbook. A guestbook is nothing but app-generated content and interaction. A user can come to the site, see all the signatures of past “guests” and then leave their own.
To start, we’ll statically render our site and build our data from Fauna during our build step. This will provide the fast performance we expect from a JAMstack site. To do this, we’ll use GatsbyJS.
Initial setup
Our first step will be to install Gatsby globally on our computer. If you’ve never spent much time in the command line, Gatsby’s “part 0” tutorial will help you get up and running. If you already have Node and NPM installed, you’ll install the Gatsby CLI globally and create a new site with it using the following commands:
npm install -g gatsby-cli
gatsby new <directory-to-install-into> <starter>
Gatsby comes with a large repository of starters that can help bootstrap your project. For this demo, I chose a simple starter that came equipped with the Bulma CSS framework.
gatsby new guestbook-app https://github.com/amandeepmittal/gatsby-bulma-quickstart
This gives us a good starting point and structure. It also has the added benefit of coming with styles that are ready to go.
Let’s do a little cleanup for things we don’t need. We’ll start by simplifying our components.header.js
import React from 'react'; import './style.scss'; const Header = ({ siteTitle }) => ( <section className="hero gradientBg "> <div className="hero-body"> <div className="container container--small center"> <div className="content"> <h1 className="is-uppercase is-size-1 has-text-white"> Sign our Virtual Guestbook </h1> <p className="subtitle has-text-white is-size-3"> If you like all the things that we do, be sure to sign our virtual guestbook </p> </div> </div> </div> </section>); export default Header;
This will get rid of much of the branded content. Feel free to customize this section, but we won’t write any of our code here.
Next we’ll clean out the components/midsection.js file. This will be where our app’s code will render.
import React, { useState } from 'react';import Signatures from './signatures';import SignForm from './sign-form'; const Midsection = () => { const [sigData, setSigData] = useState(data.allSignatures.nodes); return ( <section className="section"> <div className="container container--small"> <section className="section is-small"> <h2 className="title is-4">Sign here</h2> <SignForm></SignForm> </section> <section className="section"> <h2 className="title is-5">View Signatures</h2> <Signatures></Signatures> </section> </div> </section> )} export default Midsection;
In this code, we’ve mostly removed the “site” content and added in a couple new components. A <SignForm> that will contain our form for submitting a signature and a <Signatures> component to contain the list of signatures.
Now that we have a relatively blank slate, we can set up our FaunaDB database.
Setting Up A FaunaDB Collection
After logging into Fauna (or signing up for an account), you’ll be given the option to create a new Database. We’ll create a new database called guestbook.
The initial state of our signatures Collection after we add our first Document. (Large preview)
Inside this database, we’ll create a “Collection” called signature. Collections in Fauna a group of Documents that are in turn JSON objects.
In this new Collection, we’ll create a new Document with the following JSON:
{ name: "Bryan Robinson", message: "Lorem ipsum dolor amet sum Lorem ipsum dolor amet sum Lorem ipsum dolor amet sum Lorem ipsum dolor amet sum"}
This will be the simple data schema for each of our signatures. For each of these Documents, Fauna will create additional data surrounding it.
{ "ref": Ref(Collection("signatures"), "262884172900598291"), "ts": 1586964733980000, "data": { "name": "Bryan Robinson", "message": "Lorem ipsum dolor amet sum Lorem ipsum dolor amet sum Lorem ipsum dolor amet sum Lorem ipsum dolor amet sum " }}
The ref is the unique identifier inside of Fauna and the ts is the time (as a Unix timestamp) the document was created/updated.
After creating our data, we want an easy way to grab all that data and use it in our site. In Fauna, the most efficient way to get data is via an Index. We’ll create an Index called allSignatures. This will grab and return all of our signature Documents in the Collection.
Now that we have an efficient way of accessing the data in Gatsby, we need Gatsby to know where to get it. Gatsby has a repository of plugins that can fetch data from a variety of sources, Fauna included.
Setting up the Fauna Gatsby Data Source Plugin
npm install gatsby-source-faunadb
After we install this plugin to our project, we need to configure it in our gatsby-config.js file. In the plugins array of our project, we’ll add a new item.
{ resolve: `gatsby-source-faunadb`, options: { // The secret for the key you're using to connect to your Fauna database. // You can generate on of these in the "Security" tab of your Fauna Console. secret: process.env.YOUR_FAUNADB_SECRET, // The name of the index you want to query // You can create an index in the "Indexes" tab of your Fauna Console. index: `allSignatures`, // This is the name under which your data will appear in Gatsby GraphQL queries // The following will create queries called `allBird` and `bird`. type: "Signatures", // If you need to limit the number of documents returned, you can specify a // Optional maximum number to read. // size: 100 },},
In this configuration, you provide it your Fauna secret Key, the Index name we created and the “type” we want to access in our Gatsby GraphQL query.
Where did that process.env.YOUR_FAUNADB_SECRET come from?
In your project, create a .env file — and include that file in your .gitignore! This file will give Gatsby’s Webpack configuration the secret value. This will keep your sensitive information safe and not stored in GitHub.
YOUR_FAUNADB_SECRET = "value from fauna"
We can then head over to the “Security” tab in our Database and create a new key. Since this is a protected secret, it’s safe to use a “Server” role. When you save the Key, it’ll provide your secret. Be sure to grab that now, as you can’t get it again (without recreating the Key).
Once the configuration is set up, we can write a GraphQL query in our components to grab the data at build time.
Getting the data and building the template
We’ll add this query to our Midsection component to make it accessible by both of our components.
const Midsection = () => { const data = useStaticQuery( graphql` query GetSignatures { allSignatures { nodes { name message _ts _id } } }` );// ... rest of the component}
This will access the Signatures type we created in the configuration. It will grab all the signatures and provide an array of nodes. Those nodes will contain the data we specify we need: name, message, ts, id.
We’ll set that data into our state — this will make updating it live easier later.
const [sigData, setSigData] = useState(data.allSignatures.nodes);
Now we can pass sigData as a prop into <Signatures> and setSigData into <SignForm>.
<SignForm setSigData={setSigData}></SignForm> <Signatures sigData={sigData}></Signatures>
Let’s set up our Signatures component to use that data!
import React from 'react';import Signature from './signature' const Signatures = (props) => { const SignatureMarkup = () => { return props.sigData.map((signature, index) => { return ( <Signature key={index} signature={signature}></Signature> ) }).reverse() } return ( <SignatureMarkup></SignatureMarkup> )} export default Signatures
In this function, we’ll .map() over our signature data and create an Array of markup based on a new <Signature> component that we pass the data into.
The Signature component will handle formatting our data and returning an appropriate set of HTML.
import React from 'react'; const Signature = ({signature}) => { const dateObj = new Date(signature._ts / 1000); let dateString = `${dateObj.toLocaleString('default', {weekday: 'long'})}, ${dateObj.toLocaleString('default', { month: 'long' })} ${dateObj.getDate()} at ${dateObj.toLocaleTimeString('default', {hour: '2-digit',minute: '2-digit', hour12: false})}` return ( <article className="signature box"> <h3 className="signature__headline">{signature.name} - {dateString}</h3> <p className="signature__message"> {signature.message} </p> </article>)}; export default Signature;
At this point, if you start your Gatsby development server, you should have a list of signatures currently existing in your database. Run the following command to get up and running:
gatsby develop
Any signature stored in our database will build HTML in that component. But how can we get signatures INTO our database?
Let’s set up a signature form component to send data and update our Signatures list.
Let’s Make Our JAMstack Guestbook Interactive
First, we’ll set up the basic structure for our component. It will render a simple form onto the page with a text input, a textarea, and a button for submission.
import React from 'react'; import faunadb, { query as q } from "faunadb" var client = new faunadb.Client({ secret: process.env.GATSBY_FAUNA_CLIENT_SECRET }) export default class SignForm extends React.Component { constructor(props) { super(props) this.state = { sigName: "", sigMessage: "" } } handleSubmit = async event => { // Handle the submission } handleInputChange = event => { // When an input changes, update the state } render() { return ( <form onSubmit={this.handleSubmit}> <div className="field"> <div className="control"> <label className="label">Label <input className="input is-fullwidth" name="sigName" type="text" value={this.state.sigName} onChange={this.handleInputChange} /> </label> </div> </div> <div className="field"> <label> Your Message: <textarea rows="5" name="sigMessage" value={this.state.sigMessage} onChange={this.handleInputChange} className="textarea" placeholder="Leave us a happy note"></textarea> </label> </div> <div className="buttons"> <button className="button is-primary" type="submit">Sign the Guestbook</button> </div> </form> ) } }
To start, we’ll set up our state to include the name and the message. We’ll default them to blank strings and insert them into our <textarea> and <input>.
When a user changes the value of one of these fields, we’ll use the handleInputChange method. When a user submits the form, we’ll use the handleSubmit method.
Let’s break down both of those functions.
handleInputChange = event => { const target = event.target const value = target.value const name = target.name this.setState({ [name]: value, }) }
The input change will accept the event. From that event, it will get the current target’s value and name. We can then modify the state of the properties on our state object — sigName, sigMessage or anything else.
Once the state has changed, we can use the state in our handleSubmit method.
handleSubmit = async event => { event.preventDefault(); const placeSig = await this.createSignature(this.state.sigName, this.state.sigMessage); this.addSignature(placeSig); }
This function will call a new createSignature() method. This will connect to Fauna to create a new Document from our state items.
The addSignature() method will update our Signatures list data with the response we get back from Fauna.
In order to write to our database, we’ll need to set up a new key in Fauna with minimal permissions. Our server key is allowed higher permissions because it’s only used during build and won’t be visible in our source.
This key needs to only allow for the ability to only create new items in our signatures collection.
Note: A user could still be malicious with this key, but they can only do as much damage as a bot submitting that form, so it’s a trade-off I’m willing to make for this app.
A look at the FaunaDB security panel. In this shot, we’re creating a ‘client’ role that allows only the ‘Create’ permission for those API Keys. (Large preview)
For this, we’ll create a new “Role” in the “Security” tab of our dashboard. We can add permissions around one or more of our Collections. In this demo, we only need signatures and we can select the “Create” functionality.
After that, we generate a new key that uses that role.
To use this key, we’ll instantiate a new version of the Fauna JavaScript SDK. This is a dependency of the Gatsby plugin we installed, so we already have access to it.
import faunadb, { query as q } from "faunadb" var client = new faunadb.Client({ secret: process.env.GATSBY_FAUNA_CLIENT_SECRET })
By using an environment variable prefixed with GATSBY_, we gain access to it in our browser JavaScript (be sure to add it to your .env file).
By importing the query object from the SDK, we gain access to any of the methods available in Fauna’s first-party Fauna Query Language (FQL). In this case, we want to use the Create method to create a new document on our Collection.
createSignature = async (sigName, sigMessage) => { try { const queryResponse = await client.query( q.Create( q.Collection('signatures'), { data: { name: sigName, message: sigMessage } } ) ) const signatureInfo = { name: queryResponse.data.name, message: queryResponse.data.message, _ts: queryResponse.ts, _id: queryResponse.id} return signatureInfo } catch(err) { console.log(err); } }
We pass the Create function to the client.query() method. Create takes a Collection reference and an object of information to pass to a new Document. In this case, we use q.Collection and a string of our Collection name to get the reference to the Collection. The second argument is for our data. You can pass other items in the object, so we need to tell Fauna, we’re specifically sending it the data property on that object.
Next, we pass it the name and message we collected in our state. The response we get back from Fauna is the entire object of our Document. This includes our data in a data object, as well as a Fauna ID and timestamp. We reformat that data in a way that our Signatures list can use and return that back to our handleSubmit function.
Our submit handler will then pass that data into our setSigData prop which will notify our Signatures component to rerender with that new data. This gives our user immediate feedback that their submission has been accepted.
Rebuilding the site
This is all working in the browser, but the data hasn’t been updated in our static application yet.
From here, we need to tell our JAMstack host to rebuild our site. Many have the ability to specify a webhook to trigger a deployment. Since I’m hosting this demo on Netlify, I can create a new “Deploy webhook” in their admin and create a new triggerBuild function. This function will use the native JavaScript fetch() method and send a post request to that URL. Netlify will then rebuild the application and pull in the latest signatures.
triggerBuild = async () => { const response = await fetch(process.env.GATSBY_BUILD_HOOK, { method: "POST", body: "{}" }); return response; }
Both Gatsby Cloud and Netlify have implemented ways of handling “incremental” builds with Gatsby drastically speeding up build times. This sort of build can happen very quickly now and feel almost as fast as a traditional server-rendered site.
Every signature that gets added gets quick feedback to the user that it’s been submitted, is perpetually stored in a database, and served as HTML via a build process.
Still feels a little too much like a typical website? Let’s take all these concepts a step further.
Create A Mindful App With Auth0, Fauna Identity And Fauna User-Defined Functions (UDF)
Being mindful is an important skill to cultivate. Whether it’s thinking about your relationships, your career, your family, or just going for a walk in nature, it’s important to be mindful of the people and places around you.
A look at the final app screen showing a ‘Mindful Mission,’ ‘Past Missions’ and a ‘Log Out’ button. (Large preview)
This app intends to help you focus on one randomized idea every day and review the various ideas from recent days.
To do this, we need to introduce a key element to most apps: authentication. With authentication, comes extra security concerns. While this data won’t be particularly sensitive, you don’t want one user accessing the history of any other user.
Since we’ll be scoping data to a specific user, we also don’t want to store any secret keys on browser code, as that would open up other security flaws.
We could create an entire authentication flow using nothing but our wits and a user database with Fauna. That may seem daunting and moves us away from the features we want to write. The great thing is that there’s certainly an API for that in the JAMstack! In this demo, we’ll explore integrating Auth0 with Fauna. We can use the integration in many ways.
Setting Up Auth0 To Connect With Fauna
Many implementations of authentication with the JAMstack rely heavily on Serverless functions. That moves much of the security concerns from a security-focused company like Auth0 to the individual developer. That doesn’t feel quite right.
A diagram outlining the convoluted method of using a serverless function to manage authentication and token generation. (Large preview)
The typical flow would be to send a login request to a serverless function. That function would request a user from Auth0. Auth0 would provide the user’s JSON Web Token (JWT) and the function would provide any additional information about the user our application needs. The function would then bundle everything up and send it to the browser.
There are a lot of places in that authentication flow where a developer could introduce a security hole.
Instead, let’s request that Auth0 bundle everything up for us inside the JWT it sends. Keeping security in the hands of the folks who know it best.
A diagram outlining the streamlined authentication and token generation flow when using Auth0’s Rule system. (Large preview)
We’ll do this by using Auth0’s Rules functionality to ask Fauna for a user token to encode into our JWT. This means that unlike our Guestbook, we won’t have any Fauna keys in our front-end code. Everything will be managed in memory from that JWT token.
Setting up Auth0 Application and Rule
First, we’ll need to set up the basics of our Auth0 Application.
Following the configuration steps in their basic walkthrough gets the important basic information filled in. Be sure to fill out the proper localhost port for your bundler of choice as one of your authorized domains.
After the basics of the application are set up, we’ll go into the “Rules” section of our account.
Click “Create Rule” and select “Empty Rule” (or start from one of their many templates that are helpful starting points).
Here’s our Rule code
async function (user, context, callback) { const FAUNADB_SECRET = 'Your Server secret'; const faunadb = require('[email protected]'); const { query: q } = faunadb; const client = new faunadb.Client({ secret: FAUNADB_SECRET }); try { const token = await client.query( q.Call('user_login_or_create', user.email, user) // Call UDF in fauna ); let newClient = new faunadb.Client({ secret: token.secret }); context.idToken['https://faunadb.com/id/secret'] = token.secret; callback(null, user, context); } catch(error) { console.log('->', error); callback(error, user, context); }}
We give the rule a function that takes the user, context, and a callback from Auth0. We need to set up and grab a Server token to initialize our Fauna JavaScript SDK and initialize our client. Just like in our Guestbook, we’ll create a new Database and manage our Tokens in “Security”.
From there, we want to send a query to Fauna to create or log in our user. To keep our Rule code simple (and make it reusable), we’ll write our first Fauna “User-Defined Function” (UDF). A UDF is a function written in FQL that runs on Fauna’s infrastructure.
First, we’ll set up a Collection for our users. You don’t need to make a first Document here, as they’ll be created behind the scenes by our Auth0 rule whenever a new Auth0 user is created.
Next, we need an Index to search our users Collection based on the email address. This Index is simpler than our Guestbook, so we can add it to the Dashboard. Name the Index user_by_email, set the Collection to users, and the Terms to data.email. This will allow us to pass an email address to the Index and get a matching user Document back.
It’s time to create our UDF. In the Dashboard, navigate to “Functions” and create a new one named user_login_or_create.
Query( Lambda( ["userEmail", "userObj"], // Arguments Let( { user: Match(Index("user_by_email"), Var("userEmail")) }, // Set user variable If( Exists(Var("user")), // Check if the User exists Create(Tokens(null), { instance: Select("ref", Get(Var("user"))) }), // Return a token for that item in the users collection (in other words, the user) Let( // Else statement: Set a variable { newUser: Create(Collection("users"), { data: Var("userObj") }), // Create a new user and get its reference token: Create(Tokens(null), { // Create a token for that user instance: Select("ref", Var("newUser")) }) }, Var("token") // return the token ) ) ) ))
Our UDF will accept a user email address and the rest of the user information. If a user exists in a users Collection, it will create a Token for the user and send that back. If a user doesn’t exist, it will create that user Document and then send a Token to our Auth0 Rule.
We can then store the Token as an idToken attached to the context in our JWT. The token needs a URL as a key. Since this is a Fauna token, we can use a Fauna URL. Whatever this is, you’ll use it to access this in your code.
This Token doesn’t have any permissions yet. We need to go into our Security rules and set up a new Role.
We’ll create an “AuthedUser” role. We don’t need to add any permissions yet, but as we create new UDFs and new Collections, we’ll update the permissions here. Instead of generating a new Key to use this Role, we want to add to this Role’s “Memberships”. On the Memberships screen, you can select a Collection to add as a member. The documents in this Collection (in our case, our Users), will have the permissions set on this role given via their Token.
Now, when a user logs in via Auth0, they’ll be returned a Token that matches their user Document and has its permissions.
From here, we come back to our application.
Implement logic for when the User is logged in
Auth0 has an excellent walkthrough for setting up a “vanilla” JavaScript single-page application. Most of this code is a refactor of that to fit the code splitting of this application.
The default Auth0 Login/Signup screen. All the login flow can be contained in the Auth0 screens. (Large preview)
First, we’ll need the Auth0 SPA SDK.
npm install @auth0/auth0-spa-js
import createAuth0Client from '@auth0/auth0-spa-js';import { changeToHome } from './layouts/home'; // Home Layoutimport { changeToMission } from './layouts/myMind'; // Current Mindfulness Mission Layout let auth0 = null;var currentUser = null;const configureClient = async () => { // Configures Auth0 SDK auth0 = await createAuth0Client({ domain: "mindfulness.auth0.com", client_id: "32i3ylPhup47PYKUtZGRnLNsGVLks3M6" });}; const checkUser = async () => { // return user info from any method const isAuthenticated = await auth0.isAuthenticated(); if (isAuthenticated) { return await auth0.getUser(); }} const loadAuth = async () => { // Loads and checks auth await configureClient(); const isAuthenticated = await auth0.isAuthenticated(); if (isAuthenticated) { // show the gated content currentUser = await auth0.getUser(); changeToMission(); // Show the "Today" screen return; } else { changeToHome(); // Show the logged out "homepage" } const query = window.location.search; if (query.includes("code=") && query.includes("state=")) { // Process the login state await auth0.handleRedirectCallback(); currentUser = await auth0.getUser(); changeToMission(); // Use replaceState to redirect the user away and remove the querystring parameters window.history.replaceState({}, document.title, "/"); }} const login = async () => { await auth0.loginWithRedirect({ redirect_uri: window.location.origin });}const logout = async () => { auth0.logout({ returnTo: window.location.origin }); window.localStorage.removeItem('currentMindfulItem') changeToHome(); // Change back to logged out state} export { auth0, loadAuth, currentUser, checkUser, login, logout }
First, we configure the SDK with our client_id from Auth0. This is safe information to store in our code.
Next, we set up a function that can be exported and used in multiple files to check if a user is logged in. The Auth0 library provides an isAuthenticated() method. If the user is authenticated, we can return the user data with auth0.getUser().
We set up a login() and logout() functions and a loadAuth() function to handle the return from Auth0 and change the state of our UI to the “Mission” screen with today’s Mindful idea.
Once this is all set up, we have our authentication and user login squared away.
We’ll create a new function for our Fauna functions to reference to get the proper token set up.
const AUTH_PROP_KEY = "https://faunad.com/id/secret";var faunadb = require('faunadb'),q = faunadb.query; async function getUserClient(currentUser) { return new faunadb.Client({ secret: currentUser[AUTH_PROP_KEY]})}
This returns a new connection to Fauna using our Token from Auth0. This token works the same as the Keys from previous examples.
Generate a random Mindful topic and store it in Fauna
To start, we need a Collection of items to store our list of Mindful objects. We’ll create a Collection called “mindful” things, and create a number of items with the following schema:
{ "title": "Career", "description": "Think about the next steps you want to make in your career. What’s the next easily attainable move you can make?", "color": "#C6D4FF", "textColor": "black" }
From here, we’ll move to our JavaScript and create a function for adding and returning a random item from that Collection.
async function getRandomMindfulFromFauna(userObj) { const client = await getUserClient(userObj); try { let mindfulThings = await client.query( q.Paginate( q.Documents(q.Collection('mindful_things')) ) ) let randomMindful = mindfulThings.data[Math.floor(Math.random()*mindfulThings.data.length)]; let creation = await client.query(q.Call('addUserMindful', randomMindful)); return creation.data.mindful; } catch (error) { console.log(error) } }
To start, we’ll instantiate our client with our getUserClient() method.
From there, we’ll grab all the Documents from our mindful_things Collection. Paginate() by default grabs 64 items per page, which is more than enough for our data. We’ll grab a random item from the array that’s returned from Fauna. This will be what Fauna refers to as a “Ref”. A Ref is a full reference to a Document that the various FQL functions can use to locate a Document.
We’ll pass that Ref to a new UDF that will handle storing a new, timestamped object for that user stored in a new user_things Collection.
We’ll create the new Collection, but we’ll have our UDF provide the data for it when called.
We’ll create a new UDF in the Fauna dashboard with the name addUserMindful that will accept that random Ref.
As with our login UDF before, we’ll use the Lambda() FQL method which takes an array of arguments.
Without passing any user information to the function, FQL is able to obtain our User Ref just calling the Identity() function. All we have from our randomRef is the reference to our Document. We’ll run a Get() to get the full object. We’ll the Create() a new Document in the user_things Collection with our User Ref and our random information.
We then return the creation object back out of our Lambda. We then go back to our JavaScript and return the data object with the mindful key back to where this function gets called.
Render our Mindful Object on the page
When our user is authenticated, you may remember it called a changeToMission() method. This function switches the items on the page from the “Home” screen to markup that can be filled in by our data. After it’s added to the page, the renderToday() function gets called to add content by a few rules.
The first rule of Serverless Data Club is not to make HTTP requests unless you have to. In other words, cache when you can. Whether that’s creating a full PWA-scale application with Service Workers or just caching your database response with localStorage, cache data, and fetch only when necessary.
The first rule of our conditional is to check localStorage. If localStorage does contain a currentMindfulItem, then we need to check its date to see if it’s from today. If it is, we’ll render that and make no new requests.
The second rule of Serverless Data Club is to make as few requests as possible without the responses of those requests being too large. In that vein, our second conditional rule is to check the latest item from the current user and see if it is from today. If it is, we’ll store it in localStorage for later and then render the results.
Finally, if none of these are true, we’ll fire our getRandomMindfulFromFauna() function, format the result, store that in localStorage, and then render the result.
Get the latest item from a user
I glossed over it in the last section, but we also need some functionality to retrieve the latest mindful object from Fauna for our specific user. In our getLatestFromFauna() method, we’ll again instantiate our Fauna client and then call a new UDF.
Our new UDF is going to call a Fauna Index. An Index is an efficient way of doing a lookup on a Fauna database. In our case, we want to return all user_things by the user field. Then we can also sort the result by timestamp and reverse the default ordering of the data to show the latest first.
Simple Indexes can be created in the Index dashboard. Since we want to do the reverse sort, we’ll need to enter some custom FQL into the Fauna Shell (you can do this in the database dashboard Shell section).
CreateIndex({ name: "getMindfulByUserReverse", serialized: true, source: Collection("user_things"), terms: [ { field: ["data", "user"] } ], values: [ { field: ["ts"], reverse: true }, { field: ["ref"] } ]})
This creates an Index named getMindfulByUserReverse, created from our user_thing Collection. The terms object is a list of fields to search by. In our case, this is just the user field on the data object. We then provide values to return. In our case, we need the Ref and the Timestamp and we’ll use the reverse property to reverse order our results by this field.
We’ll create a new UDF to use this Index.
Query( Lambda( [], If( // Check if there is at least 1 in the index GT( Count( Select( "data", Paginate(Match(Index("getMindfulByUserReverse"), Identity())) ) ), 0 ), Let( // if more than 0 { match: Paginate( Match(Index("getMindfulByUserReverse"), Identity()) // Search the index by our User ), latestObj: Take(1, Var("match")), // Grab the first item from our match latestRef: Select( ["data"], Get(Select(["data", 0, 1], Var("latestObj"))) // Get the data object from the item ), latestTime: Select(["data", 0, 0], Var("latestObj")), // Get the time merged: Merge( // merge those items into one object to return { latestTime: Var("latestTime") }, { latestMindful: Var("latestRef") } ) }, Var("merged") ), Let({ error: { err: "No data" } }, Var("error")) // if there aren't any, return an error. ) ))
This time our Lambda() function doesn’t need any arguments since we’ll have our User based on the Token used.
First, we’ll check to see if there’s at least 1 item in our Index. If there is, we’ll grab the first item’s data and time and return that back as a merged object.
After we get the latest from Fauna in our JavaScript, we’ll format it to a structure our storeCurrent() and render() methods expect it and return that object.
Now, we have an application that creates, stores, and fetches data for a daily message to contemplate. A user can use this on their phone, on their tablet, on the computer, and have it all synced. We could turn this into a PWA or even a native app with a system like Ionic.
We’re still missing one feature. Viewing a certain number of past items. Since we’ve stored this in our database, we can retrieve them in whatever way we need to.
Pull the latest X Mindful Missions to get a picture of what you’ve thought about
We’ll create a new JavaScript method paired with a new UDF to tackle this.
getSomeFromFauna will take an integer count to ask Fauna for a certain number of items.
Our UDF will be very similar to the getLatestFromFauana UDF. Instead of returning the first item, we’ll Take() the number of items from our array that matches the integer that gets passed into our UDF. We’ll also begin with the same conditional, in case a user doesn’t have any items stored yet.
Query( Lambda( ["count"], // Number of items to return If( // Check if there are any objects GT( Count( Select( "data", Paginate(Match(Index("getMindfulByUserReverse"), Identity(null))) ) ), 0 ), Let( { match: Paginate( Match(Index("getMindfulByUserReverse"), Identity(null)) // Search the Index by our User ), latestObjs: Select("data", Take(Var("count"), Var("match"))), // Get the data that is returned mergedObjs: Map( // Loop over the objects Var("latestObjs"), Lambda( "latestArray", Let( // Build the data like we did in the LatestMindful function { ref: Select(["data"], Get(Select([1], Var("latestArray")))), latestTime: Select(0, Var("latestArray")), merged: Merge( { latestTime: Var("latestTime") }, Select("mindful", Var("ref")) ) }, Var("merged") // Return this to our new array ) ) ) }, Var("mergedObjs") // return the full array ), { latestMindful: [{ title: "No additional data" }] } // if there are no items, send back a message to display ) ))
In this demo, we created a full-fledged app with serverless data. Because the data is served from a CDN, it can be as close to a user as possible. We used FaunaDB’s features, such as UDFs and Indexes, to optimize our database queries for speed and ease of use. We also made sure we only queried our database the bare minimum to reduce requests.
Where To Go With Serverless Data
The JAMstack isn’t just for sites. It can be used for robust applications as well. Whether that’s for a game, CRUD application or just to be mindful of your surroundings you can do a lot without sacrificing customization and without spinning up your own non-dist database system.
With performance on the mind of everyone creating on the JAMstack — whether for cost or for user experience — finding a good place to store and retrieve your data is a high priority. Find a spot that meets your needs, those of your users, and meets ideals of the JAMstack.
(ra, yk, il)
Website Design & SEO Delray Beach by DBL07.co
Delray Beach SEO
Via http://www.scpie.org/from-static-sites-to-end-user-jamstack-apps-with-faunadb/
source https://scpie.weebly.com/blog/from-static-sites-to-end-user-jamstack-apps-with-faunadb
0 notes
Text
From Static Sites To End User JAMstack Apps With FaunaDB
About The Author
Bryan is a designer, developer, and educator with a passion for CSS and static sites. He actively works to mentor and teach developers and designers the value … More about Bryan Robinson …
To make the move from “site” to app, we’ll need to dive into the world of “app-generated” content. In this article, we’ll get started in this world with the power of serverless data. We’ll start with a simple demo by ingesting and posting data to FaunaDB and then extend that functionality in a full-fledged application using Auth0, FaunaDB’s Token system and User-Defined Functions.
The JAMstack has proven itself to be one of the top ways of producing content-driven sites, but it’s also a great place to house applications, as well. If you’ve been using the JAMstack for your performant websites, the demos in this article will help you extend those philosophies to applications as well.
When using the JAMstack to build applications, you need a data service that fits into the most important aspects of the JAMstack philosophy:
Global distribution
Zero operational needs
A developer-friendly API.
In the JAMstack ecosystem there are plenty of software-as-a-service companies that provide ways of getting and storing specific types of data. Whether you want to send emails, SMS or make phone calls (Twilio) or accept form submissions efficiently (Formspree, Formingo, Formstack, etc.), it seems there’s an API for almost everything.
These are great services that can do a lot of the low-level work of many applications, but once your data is more complex than a spreadsheet or needs to be updated and store in real-time, it might be time to look into a database.
The service API can still be in use, but a central database managing the state and operations of your app becomes much more important. Even if you need a database, you still want it to follow the core JAMstack philosophies we outlined above. That means, we don’t want to host our own database server. We need a Database-as-a-Service solution. Our database needs to be optimized for the JAMstack:
Optimized for API calls from a browser or build process.
Flexible to model your data in the specific ways your app needs.
Global distribution of our data like a CDN houses our sites.
Hands-free scaling with no need of a database administrator or developer intervention.
Whatever service you look into needs to follow these tenets of serverless data. In our demos, we’ll explore FaunaDB, a global serverless database, featuring native GraphQL to assure that we keep our apps in step with the philosophies of the JAMstack.
Let’s dive into the code!
A JAMstack Guestbook App With Gatsby And Fauna
I’m a big fan of reimagining the internet tools and concepts of the 1990s and early 2000s. We can take these concepts and make them feel fresh with the new set of tools and interactions.
A look at the app we’re creating. A signature form with a signature list below. The form will populate a FaunaDB database and that database will create the view list. (Large preview)
In this demo, we’ll create an application that was all the rage in that time period: the guestbook. A guestbook is nothing but app-generated content and interaction. A user can come to the site, see all the signatures of past “guests” and then leave their own.
To start, we’ll statically render our site and build our data from Fauna during our build step. This will provide the fast performance we expect from a JAMstack site. To do this, we’ll use GatsbyJS.
Initial setup
Our first step will be to install Gatsby globally on our computer. If you’ve never spent much time in the command line, Gatsby’s “part 0” tutorial will help you get up and running. If you already have Node and NPM installed, you’ll install the Gatsby CLI globally and create a new site with it using the following commands:
npm install -g gatsby-cli
gatsby new <directory-to-install-into> <starter>
Gatsby comes with a large repository of starters that can help bootstrap your project. For this demo, I chose a simple starter that came equipped with the Bulma CSS framework.
gatsby new guestbook-app https://github.com/amandeepmittal/gatsby-bulma-quickstart
This gives us a good starting point and structure. It also has the added benefit of coming with styles that are ready to go.
Let’s do a little cleanup for things we don’t need. We’ll start by simplifying our components.header.js
import React from 'react'; import './style.scss'; const Header = ({ siteTitle }) => ( <section className="hero gradientBg "> <div className="hero-body"> <div className="container container--small center"> <div className="content"> <h1 className="is-uppercase is-size-1 has-text-white"> Sign our Virtual Guestbook </h1> <p className="subtitle has-text-white is-size-3"> If you like all the things that we do, be sure to sign our virtual guestbook </p> </div> </div> </div> </section> ); export default Header;
This will get rid of much of the branded content. Feel free to customize this section, but we won’t write any of our code here.
Next we’ll clean out the components/midsection.js file. This will be where our app’s code will render.
import React, { useState } from 'react'; import Signatures from './signatures'; import SignForm from './sign-form'; const Midsection = () => { const [sigData, setSigData] = useState(data.allSignatures.nodes); return ( <section className="section"> <div className="container container--small"> <section className="section is-small"> <h2 className="title is-4">Sign here</h2> <SignForm></SignForm> </section> <section className="section"> <h2 className="title is-5">View Signatures</h2> <Signatures></Signatures> </section> </div> </section> ) } export default Midsection;
In this code, we’ve mostly removed the “site” content and added in a couple new components. A <SignForm> that will contain our form for submitting a signature and a <Signatures> component to contain the list of signatures.
Now that we have a relatively blank slate, we can set up our FaunaDB database.
Setting Up A FaunaDB Collection
After logging into Fauna (or signing up for an account), you’ll be given the option to create a new Database. We’ll create a new database called guestbook.
The initial state of our signatures Collection after we add our first Document. (Large preview)
Inside this database, we’ll create a “Collection” called signature. Collections in Fauna a group of Documents that are in turn JSON objects.
In this new Collection, we’ll create a new Document with the following JSON:
{ name: "Bryan Robinson", message: "Lorem ipsum dolor amet sum Lorem ipsum dolor amet sum Lorem ipsum dolor amet sum Lorem ipsum dolor amet sum" }
This will be the simple data schema for each of our signatures. For each of these Documents, Fauna will create additional data surrounding it.
{ "ref": Ref(Collection("signatures"), "262884172900598291"), "ts": 1586964733980000, "data": { "name": "Bryan Robinson", "message": "Lorem ipsum dolor amet sum Lorem ipsum dolor amet sum Lorem ipsum dolor amet sum Lorem ipsum dolor amet sum " } }
The ref is the unique identifier inside of Fauna and the ts is the time (as a Unix timestamp) the document was created/updated.
After creating our data, we want an easy way to grab all that data and use it in our site. In Fauna, the most efficient way to get data is via an Index. We’ll create an Index called allSignatures. This will grab and return all of our signature Documents in the Collection.
Now that we have an efficient way of accessing the data in Gatsby, we need Gatsby to know where to get it. Gatsby has a repository of plugins that can fetch data from a variety of sources, Fauna included.
Setting up the Fauna Gatsby Data Source Plugin
npm install gatsby-source-faunadb
After we install this plugin to our project, we need to configure it in our gatsby-config.js file. In the plugins array of our project, we’ll add a new item.
{ resolve: `gatsby-source-faunadb`, options: { // The secret for the key you're using to connect to your Fauna database. // You can generate on of these in the "Security" tab of your Fauna Console. secret: process.env.YOUR_FAUNADB_SECRET, // The name of the index you want to query // You can create an index in the "Indexes" tab of your Fauna Console. index: `allSignatures`, // This is the name under which your data will appear in Gatsby GraphQL queries // The following will create queries called `allBird` and `bird`. type: "Signatures", // If you need to limit the number of documents returned, you can specify a // Optional maximum number to read. // size: 100 }, },
In this configuration, you provide it your Fauna secret Key, the Index name we created and the “type” we want to access in our Gatsby GraphQL query.
Where did that process.env.YOUR_FAUNADB_SECRET come from?
In your project, create a .env file — and include that file in your .gitignore! This file will give Gatsby’s Webpack configuration the secret value. This will keep your sensitive information safe and not stored in GitHub.
YOUR_FAUNADB_SECRET = "value from fauna"
We can then head over to the “Security” tab in our Database and create a new key. Since this is a protected secret, it’s safe to use a “Server” role. When you save the Key, it’ll provide your secret. Be sure to grab that now, as you can’t get it again (without recreating the Key).
Once the configuration is set up, we can write a GraphQL query in our components to grab the data at build time.
Getting the data and building the template
We’ll add this query to our Midsection component to make it accessible by both of our components.
const Midsection = () => { const data = useStaticQuery( graphql` query GetSignatures { allSignatures { nodes { name message _ts _id } } }` ); // ... rest of the component }
This will access the Signatures type we created in the configuration. It will grab all the signatures and provide an array of nodes. Those nodes will contain the data we specify we need: name, message, ts, id.
We’ll set that data into our state — this will make updating it live easier later.
const [sigData, setSigData] = useState(data.allSignatures.nodes);
Now we can pass sigData as a prop into <Signatures> and setSigData into <SignForm>.
<SignForm setSigData={setSigData}></SignForm> <Signatures sigData={sigData}></Signatures>
Let’s set up our Signatures component to use that data!
import React from 'react'; import Signature from './signature' const Signatures = (props) => { const SignatureMarkup = () => { return props.sigData.map((signature, index) => { return ( <Signature key={index} signature={signature}></Signature> ) }).reverse() } return ( <SignatureMarkup></SignatureMarkup> ) } export default Signatures
In this function, we’ll .map() over our signature data and create an Array of markup based on a new <Signature> component that we pass the data into.
The Signature component will handle formatting our data and returning an appropriate set of HTML.
import React from 'react'; const Signature = ({signature}) => { const dateObj = new Date(signature._ts / 1000); let dateString = `${dateObj.toLocaleString('default', {weekday: 'long'})}, ${dateObj.toLocaleString('default', { month: 'long' })} ${dateObj.getDate()} at ${dateObj.toLocaleTimeString('default', {hour: '2-digit',minute: '2-digit', hour12: false})}` return ( <article className="signature box"> <h3 className="signature__headline">{signature.name} - {dateString}</h3> <p className="signature__message"> {signature.message} </p> </article> )}; export default Signature;
At this point, if you start your Gatsby development server, you should have a list of signatures currently existing in your database. Run the following command to get up and running:
gatsby develop
Any signature stored in our database will build HTML in that component. But how can we get signatures INTO our database?
Let’s set up a signature form component to send data and update our Signatures list.
Let’s Make Our JAMstack Guestbook Interactive
First, we’ll set up the basic structure for our component. It will render a simple form onto the page with a text input, a textarea, and a button for submission.
import React from 'react'; import faunadb, { query as q } from "faunadb" var client = new faunadb.Client({ secret: process.env.GATSBY_FAUNA_CLIENT_SECRET }) export default class SignForm extends React.Component { constructor(props) { super(props) this.state = { sigName: "", sigMessage: "" } } handleSubmit = async event => { // Handle the submission } handleInputChange = event => { // When an input changes, update the state } render() { return ( <form onSubmit={this.handleSubmit}> <div className="field"> <div className="control"> <label className="label">Label <input className="input is-fullwidth" name="sigName" type="text" value={this.state.sigName} onChange={this.handleInputChange} /> </label> </div> </div> <div className="field"> <label> Your Message: <textarea rows="5" name="sigMessage" value={this.state.sigMessage} onChange={this.handleInputChange} className="textarea" placeholder="Leave us a happy note"></textarea> </label> </div> <div className="buttons"> <button className="button is-primary" type="submit">Sign the Guestbook</button> </div> </form> ) } }
To start, we’ll set up our state to include the name and the message. We’ll default them to blank strings and insert them into our <textarea> and <input>.
When a user changes the value of one of these fields, we’ll use the handleInputChange method. When a user submits the form, we’ll use the handleSubmit method.
Let’s break down both of those functions.
handleInputChange = event => { const target = event.target const value = target.value const name = target.name this.setState({ [name]: value, }) }
The input change will accept the event. From that event, it will get the current target’s value and name. We can then modify the state of the properties on our state object — sigName, sigMessage or anything else.
Once the state has changed, we can use the state in our handleSubmit method.
handleSubmit = async event => { event.preventDefault(); const placeSig = await this.createSignature(this.state.sigName, this.state.sigMessage); this.addSignature(placeSig); }
This function will call a new createSignature() method. This will connect to Fauna to create a new Document from our state items.
The addSignature() method will update our Signatures list data with the response we get back from Fauna.
In order to write to our database, we’ll need to set up a new key in Fauna with minimal permissions. Our server key is allowed higher permissions because it’s only used during build and won’t be visible in our source.
This key needs to only allow for the ability to only create new items in our signatures collection.
Note: A user could still be malicious with this key, but they can only do as much damage as a bot submitting that form, so it’s a trade-off I’m willing to make for this app.
A look at the FaunaDB security panel. In this shot, we’re creating a ‘client’ role that allows only the ‘Create’ permission for those API Keys. (Large preview)
For this, we’ll create a new “Role” in the “Security” tab of our dashboard. We can add permissions around one or more of our Collections. In this demo, we only need signatures and we can select the “Create” functionality.
After that, we generate a new key that uses that role.
To use this key, we’ll instantiate a new version of the Fauna JavaScript SDK. This is a dependency of the Gatsby plugin we installed, so we already have access to it.
import faunadb, { query as q } from "faunadb" var client = new faunadb.Client({ secret: process.env.GATSBY_FAUNA_CLIENT_SECRET })
By using an environment variable prefixed with GATSBY_, we gain access to it in our browser JavaScript (be sure to add it to your .env file).
By importing the query object from the SDK, we gain access to any of the methods available in Fauna’s first-party Fauna Query Language (FQL). In this case, we want to use the Create method to create a new document on our Collection.
createSignature = async (sigName, sigMessage) => { try { const queryResponse = await client.query( q.Create( q.Collection('signatures'), { data: { name: sigName, message: sigMessage } } ) ) const signatureInfo = { name: queryResponse.data.name, message: queryResponse.data.message, _ts: queryResponse.ts, _id: queryResponse.id} return signatureInfo } catch(err) { console.log(err); } }
We pass the Create function to the client.query() method. Create takes a Collection reference and an object of information to pass to a new Document. In this case, we use q.Collection and a string of our Collection name to get the reference to the Collection. The second argument is for our data. You can pass other items in the object, so we need to tell Fauna, we’re specifically sending it the data property on that object.
Next, we pass it the name and message we collected in our state. The response we get back from Fauna is the entire object of our Document. This includes our data in a data object, as well as a Fauna ID and timestamp. We reformat that data in a way that our Signatures list can use and return that back to our handleSubmit function.
Our submit handler will then pass that data into our setSigData prop which will notify our Signatures component to rerender with that new data. This gives our user immediate feedback that their submission has been accepted.
Rebuilding the site
This is all working in the browser, but the data hasn’t been updated in our static application yet.
From here, we need to tell our JAMstack host to rebuild our site. Many have the ability to specify a webhook to trigger a deployment. Since I’m hosting this demo on Netlify, I can create a new “Deploy webhook” in their admin and create a new triggerBuild function. This function will use the native JavaScript fetch() method and send a post request to that URL. Netlify will then rebuild the application and pull in the latest signatures.
triggerBuild = async () => { const response = await fetch(process.env.GATSBY_BUILD_HOOK, { method: "POST", body: "{}" }); return response; }
Both Gatsby Cloud and Netlify have implemented ways of handling “incremental” builds with Gatsby drastically speeding up build times. This sort of build can happen very quickly now and feel almost as fast as a traditional server-rendered site.
Every signature that gets added gets quick feedback to the user that it’s been submitted, is perpetually stored in a database, and served as HTML via a build process.
Still feels a little too much like a typical website? Let’s take all these concepts a step further.
Create A Mindful App With Auth0, Fauna Identity And Fauna User-Defined Functions (UDF)
Being mindful is an important skill to cultivate. Whether it’s thinking about your relationships, your career, your family, or just going for a walk in nature, it’s important to be mindful of the people and places around you.
A look at the final app screen showing a ‘Mindful Mission,’ ‘Past Missions’ and a ‘Log Out’ button. (Large preview)
This app intends to help you focus on one randomized idea every day and review the various ideas from recent days.
To do this, we need to introduce a key element to most apps: authentication. With authentication, comes extra security concerns. While this data won’t be particularly sensitive, you don’t want one user accessing the history of any other user.
Since we’ll be scoping data to a specific user, we also don’t want to store any secret keys on browser code, as that would open up other security flaws.
We could create an entire authentication flow using nothing but our wits and a user database with Fauna. That may seem daunting and moves us away from the features we want to write. The great thing is that there’s certainly an API for that in the JAMstack! In this demo, we’ll explore integrating Auth0 with Fauna. We can use the integration in many ways.
Setting Up Auth0 To Connect With Fauna
Many implementations of authentication with the JAMstack rely heavily on Serverless functions. That moves much of the security concerns from a security-focused company like Auth0 to the individual developer. That doesn’t feel quite right.
A diagram outlining the convoluted method of using a serverless function to manage authentication and token generation. (Large preview)
The typical flow would be to send a login request to a serverless function. That function would request a user from Auth0. Auth0 would provide the user’s JSON Web Token (JWT) and the function would provide any additional information about the user our application needs. The function would then bundle everything up and send it to the browser.
There are a lot of places in that authentication flow where a developer could introduce a security hole.
Instead, let’s request that Auth0 bundle everything up for us inside the JWT it sends. Keeping security in the hands of the folks who know it best.
A diagram outlining the streamlined authentication and token generation flow when using Auth0’s Rule system. (Large preview)
We’ll do this by using Auth0’s Rules functionality to ask Fauna for a user token to encode into our JWT. This means that unlike our Guestbook, we won’t have any Fauna keys in our front-end code. Everything will be managed in memory from that JWT token.
Setting up Auth0 Application and Rule
First, we’ll need to set up the basics of our Auth0 Application.
Following the configuration steps in their basic walkthrough gets the important basic information filled in. Be sure to fill out the proper localhost port for your bundler of choice as one of your authorized domains.
After the basics of the application are set up, we’ll go into the “Rules” section of our account.
Click “Create Rule” and select “Empty Rule” (or start from one of their many templates that are helpful starting points).
Here’s our Rule code
async function (user, context, callback) { const FAUNADB_SECRET = 'Your Server secret'; const faunadb = require('[email protected]'); const { query: q } = faunadb; const client = new faunadb.Client({ secret: FAUNADB_SECRET }); try { const token = await client.query( q.Call('user_login_or_create', user.email, user) // Call UDF in fauna ); let newClient = new faunadb.Client({ secret: token.secret }); context.idToken['https://faunadb.com/id/secret'] = token.secret; callback(null, user, context); } catch(error) { console.log('->', error); callback(error, user, context); } }
We give the rule a function that takes the user, context, and a callback from Auth0. We need to set up and grab a Server token to initialize our Fauna JavaScript SDK and initialize our client. Just like in our Guestbook, we’ll create a new Database and manage our Tokens in “Security”.
From there, we want to send a query to Fauna to create or log in our user. To keep our Rule code simple (and make it reusable), we’ll write our first Fauna “User-Defined Function” (UDF). A UDF is a function written in FQL that runs on Fauna’s infrastructure.
First, we’ll set up a Collection for our users. You don’t need to make a first Document here, as they’ll be created behind the scenes by our Auth0 rule whenever a new Auth0 user is created.
Next, we need an Index to search our users Collection based on the email address. This Index is simpler than our Guestbook, so we can add it to the Dashboard. Name the Index user_by_email, set the Collection to users, and the Terms to data.email. This will allow us to pass an email address to the Index and get a matching user Document back.
It’s time to create our UDF. In the Dashboard, navigate to “Functions” and create a new one named user_login_or_create.
Query( Lambda( ["userEmail", "userObj"], // Arguments Let( { user: Match(Index("user_by_email"), Var("userEmail")) }, // Set user variable If( Exists(Var("user")), // Check if the User exists Create(Tokens(null), { instance: Select("ref", Get(Var("user"))) }), // Return a token for that item in the users collection (in other words, the user) Let( // Else statement: Set a variable { newUser: Create(Collection("users"), { data: Var("userObj") }), // Create a new user and get its reference token: Create(Tokens(null), { // Create a token for that user instance: Select("ref", Var("newUser")) }) }, Var("token") // return the token ) ) ) ) )
Our UDF will accept a user email address and the rest of the user information. If a user exists in a users Collection, it will create a Token for the user and send that back. If a user doesn’t exist, it will create that user Document and then send a Token to our Auth0 Rule.
We can then store the Token as an idToken attached to the context in our JWT. The token needs a URL as a key. Since this is a Fauna token, we can use a Fauna URL. Whatever this is, you’ll use it to access this in your code.
This Token doesn’t have any permissions yet. We need to go into our Security rules and set up a new Role.
We’ll create an “AuthedUser” role. We don’t need to add any permissions yet, but as we create new UDFs and new Collections, we’ll update the permissions here. Instead of generating a new Key to use this Role, we want to add to this Role’s “Memberships”. On the Memberships screen, you can select a Collection to add as a member. The documents in this Collection (in our case, our Users), will have the permissions set on this role given via their Token.
Now, when a user logs in via Auth0, they’ll be returned a Token that matches their user Document and has its permissions.
From here, we come back to our application.
Implement logic for when the User is logged in
Auth0 has an excellent walkthrough for setting up a “vanilla” JavaScript single-page application. Most of this code is a refactor of that to fit the code splitting of this application.
The default Auth0 Login/Signup screen. All the login flow can be contained in the Auth0 screens. (Large preview)
First, we’ll need the Auth0 SPA SDK.
npm install @auth0/auth0-spa-js
import createAuth0Client from '@auth0/auth0-spa-js'; import { changeToHome } from './layouts/home'; // Home Layout import { changeToMission } from './layouts/myMind'; // Current Mindfulness Mission Layout let auth0 = null; var currentUser = null; const configureClient = async () => { // Configures Auth0 SDK auth0 = await createAuth0Client({ domain: "mindfulness.auth0.com", client_id: "32i3ylPhup47PYKUtZGRnLNsGVLks3M6" }); }; const checkUser = async () => { // return user info from any method const isAuthenticated = await auth0.isAuthenticated(); if (isAuthenticated) { return await auth0.getUser(); } } const loadAuth = async () => { // Loads and checks auth await configureClient(); const isAuthenticated = await auth0.isAuthenticated(); if (isAuthenticated) { // show the gated content currentUser = await auth0.getUser(); changeToMission(); // Show the "Today" screen return; } else { changeToHome(); // Show the logged out "homepage" } const query = window.location.search; if (query.includes("code=") && query.includes("state=")) { // Process the login state await auth0.handleRedirectCallback(); currentUser = await auth0.getUser(); changeToMission(); // Use replaceState to redirect the user away and remove the querystring parameters window.history.replaceState({}, document.title, "/"); } } const login = async () => { await auth0.loginWithRedirect({ redirect_uri: window.location.origin }); } const logout = async () => { auth0.logout({ returnTo: window.location.origin }); window.localStorage.removeItem('currentMindfulItem') changeToHome(); // Change back to logged out state } export { auth0, loadAuth, currentUser, checkUser, login, logout }
First, we configure the SDK with our client_id from Auth0. This is safe information to store in our code.
Next, we set up a function that can be exported and used in multiple files to check if a user is logged in. The Auth0 library provides an isAuthenticated() method. If the user is authenticated, we can return the user data with auth0.getUser().
We set up a login() and logout() functions and a loadAuth() function to handle the return from Auth0 and change the state of our UI to the “Mission” screen with today’s Mindful idea.
Once this is all set up, we have our authentication and user login squared away.
We’ll create a new function for our Fauna functions to reference to get the proper token set up.
const AUTH_PROP_KEY = "https://faunad.com/id/secret"; var faunadb = require('faunadb'), q = faunadb.query; async function getUserClient(currentUser) { return new faunadb.Client({ secret: currentUser[AUTH_PROP_KEY]}) }
This returns a new connection to Fauna using our Token from Auth0. This token works the same as the Keys from previous examples.
Generate a random Mindful topic and store it in Fauna
To start, we need a Collection of items to store our list of Mindful objects. We’ll create a Collection called “mindful” things, and create a number of items with the following schema:
{ "title": "Career", "description": "Think about the next steps you want to make in your career. What’s the next easily attainable move you can make?", "color": "#C6D4FF", "textColor": "black" }
From here, we’ll move to our JavaScript and create a function for adding and returning a random item from that Collection.
async function getRandomMindfulFromFauna(userObj) { const client = await getUserClient(userObj); try { let mindfulThings = await client.query( q.Paginate( q.Documents(q.Collection('mindful_things')) ) ) let randomMindful = mindfulThings.data[Math.floor(Math.random()*mindfulThings.data.length)]; let creation = await client.query(q.Call('addUserMindful', randomMindful)); return creation.data.mindful; } catch (error) { console.log(error) } }
To start, we’ll instantiate our client with our getUserClient() method.
From there, we’ll grab all the Documents from our mindful_things Collection. Paginate() by default grabs 64 items per page, which is more than enough for our data. We’ll grab a random item from the array that’s returned from Fauna. This will be what Fauna refers to as a “Ref”. A Ref is a full reference to a Document that the various FQL functions can use to locate a Document.
We’ll pass that Ref to a new UDF that will handle storing a new, timestamped object for that user stored in a new user_things Collection.
We’ll create the new Collection, but we’ll have our UDF provide the data for it when called.
We’ll create a new UDF in the Fauna dashboard with the name addUserMindful that will accept that random Ref.
As with our login UDF before, we’ll use the Lambda() FQL method which takes an array of arguments.
Without passing any user information to the function, FQL is able to obtain our User Ref just calling the Identity() function. All we have from our randomRef is the reference to our Document. We’ll run a Get() to get the full object. We’ll the Create() a new Document in the user_things Collection with our User Ref and our random information.
We then return the creation object back out of our Lambda. We then go back to our JavaScript and return the data object with the mindful key back to where this function gets called.
Render our Mindful Object on the page
When our user is authenticated, you may remember it called a changeToMission() method. This function switches the items on the page from the “Home” screen to markup that can be filled in by our data. After it’s added to the page, the renderToday() function gets called to add content by a few rules.
The first rule of Serverless Data Club is not to make HTTP requests unless you have to. In other words, cache when you can. Whether that’s creating a full PWA-scale application with Service Workers or just caching your database response with localStorage, cache data, and fetch only when necessary.
The first rule of our conditional is to check localStorage. If localStorage does contain a currentMindfulItem, then we need to check its date to see if it’s from today. If it is, we’ll render that and make no new requests.
The second rule of Serverless Data Club is to make as few requests as possible without the responses of those requests being too large. In that vein, our second conditional rule is to check the latest item from the current user and see if it is from today. If it is, we’ll store it in localStorage for later and then render the results.
Finally, if none of these are true, we’ll fire our getRandomMindfulFromFauna() function, format the result, store that in localStorage, and then render the result.
Get the latest item from a user
I glossed over it in the last section, but we also need some functionality to retrieve the latest mindful object from Fauna for our specific user. In our getLatestFromFauna() method, we’ll again instantiate our Fauna client and then call a new UDF.
Our new UDF is going to call a Fauna Index. An Index is an efficient way of doing a lookup on a Fauna database. In our case, we want to return all user_things by the user field. Then we can also sort the result by timestamp and reverse the default ordering of the data to show the latest first.
Simple Indexes can be created in the Index dashboard. Since we want to do the reverse sort, we’ll need to enter some custom FQL into the Fauna Shell (you can do this in the database dashboard Shell section).
CreateIndex({ name: "getMindfulByUserReverse", serialized: true, source: Collection("user_things"), terms: [ { field: ["data", "user"] } ], values: [ { field: ["ts"], reverse: true }, { field: ["ref"] } ] })
This creates an Index named getMindfulByUserReverse, created from our user_thing Collection. The terms object is a list of fields to search by. In our case, this is just the user field on the data object. We then provide values to return. In our case, we need the Ref and the Timestamp and we’ll use the reverse property to reverse order our results by this field.
We’ll create a new UDF to use this Index.
Query( Lambda( [], If( // Check if there is at least 1 in the index GT( Count( Select( "data", Paginate(Match(Index("getMindfulByUserReverse"), Identity())) ) ), 0 ), Let( // if more than 0 { match: Paginate( Match(Index("getMindfulByUserReverse"), Identity()) // Search the index by our User ), latestObj: Take(1, Var("match")), // Grab the first item from our match latestRef: Select( ["data"], Get(Select(["data", 0, 1], Var("latestObj"))) // Get the data object from the item ), latestTime: Select(["data", 0, 0], Var("latestObj")), // Get the time merged: Merge( // merge those items into one object to return { latestTime: Var("latestTime") }, { latestMindful: Var("latestRef") } ) }, Var("merged") ), Let({ error: { err: "No data" } }, Var("error")) // if there aren't any, return an error. ) ) )
This time our Lambda() function doesn’t need any arguments since we’ll have our User based on the Token used.
First, we’ll check to see if there’s at least 1 item in our Index. If there is, we’ll grab the first item’s data and time and return that back as a merged object.
After we get the latest from Fauna in our JavaScript, we’ll format it to a structure our storeCurrent() and render() methods expect it and return that object.
Now, we have an application that creates, stores, and fetches data for a daily message to contemplate. A user can use this on their phone, on their tablet, on the computer, and have it all synced. We could turn this into a PWA or even a native app with a system like Ionic.
We’re still missing one feature. Viewing a certain number of past items. Since we’ve stored this in our database, we can retrieve them in whatever way we need to.
Pull the latest X Mindful Missions to get a picture of what you’ve thought about
We’ll create a new JavaScript method paired with a new UDF to tackle this.
getSomeFromFauna will take an integer count to ask Fauna for a certain number of items.
Our UDF will be very similar to the getLatestFromFauana UDF. Instead of returning the first item, we’ll Take() the number of items from our array that matches the integer that gets passed into our UDF. We’ll also begin with the same conditional, in case a user doesn’t have any items stored yet.
Query( Lambda( ["count"], // Number of items to return If( // Check if there are any objects GT( Count( Select( "data", Paginate(Match(Index("getMindfulByUserReverse"), Identity(null))) ) ), 0 ), Let( { match: Paginate( Match(Index("getMindfulByUserReverse"), Identity(null)) // Search the Index by our User ), latestObjs: Select("data", Take(Var("count"), Var("match"))), // Get the data that is returned mergedObjs: Map( // Loop over the objects Var("latestObjs"), Lambda( "latestArray", Let( // Build the data like we did in the LatestMindful function { ref: Select(["data"], Get(Select([1], Var("latestArray")))), latestTime: Select(0, Var("latestArray")), merged: Merge( { latestTime: Var("latestTime") }, Select("mindful", Var("ref")) ) }, Var("merged") // Return this to our new array ) ) ) }, Var("mergedObjs") // return the full array ), { latestMindful: [{ title: "No additional data" }] } // if there are no items, send back a message to display ) ) )
In this demo, we created a full-fledged app with serverless data. Because the data is served from a CDN, it can be as close to a user as possible. We used FaunaDB’s features, such as UDFs and Indexes, to optimize our database queries for speed and ease of use. We also made sure we only queried our database the bare minimum to reduce requests.
Where To Go With Serverless Data
The JAMstack isn’t just for sites. It can be used for robust applications as well. Whether that’s for a game, CRUD application or just to be mindful of your surroundings you can do a lot without sacrificing customization and without spinning up your own non-dist database system.
With performance on the mind of everyone creating on the JAMstack — whether for cost or for user experience — finding a good place to store and retrieve your data is a high priority. Find a spot that meets your needs, those of your users, and meets ideals of the JAMstack.
(ra, yk, il)
Website Design & SEO Delray Beach by DBL07.co
Delray Beach SEO
source http://www.scpie.org/from-static-sites-to-end-user-jamstack-apps-with-faunadb/ source https://scpie.tumblr.com/post/620485446847299584
0 notes
Text
From Static Sites To End User JAMstack Apps With FaunaDB
About The Author
Bryan is a designer, developer, and educator with a passion for CSS and static sites. He actively works to mentor and teach developers and designers the value … More about Bryan Robinson …
To make the move from “site” to app, we’ll need to dive into the world of “app-generated” content. In this article, we’ll get started in this world with the power of serverless data. We’ll start with a simple demo by ingesting and posting data to FaunaDB and then extend that functionality in a full-fledged application using Auth0, FaunaDB’s Token system and User-Defined Functions.
The JAMstack has proven itself to be one of the top ways of producing content-driven sites, but it’s also a great place to house applications, as well. If you’ve been using the JAMstack for your performant websites, the demos in this article will help you extend those philosophies to applications as well.
When using the JAMstack to build applications, you need a data service that fits into the most important aspects of the JAMstack philosophy:
Global distribution
Zero operational needs
A developer-friendly API.
In the JAMstack ecosystem there are plenty of software-as-a-service companies that provide ways of getting and storing specific types of data. Whether you want to send emails, SMS or make phone calls (Twilio) or accept form submissions efficiently (Formspree, Formingo, Formstack, etc.), it seems there’s an API for almost everything.
These are great services that can do a lot of the low-level work of many applications, but once your data is more complex than a spreadsheet or needs to be updated and store in real-time, it might be time to look into a database.
The service API can still be in use, but a central database managing the state and operations of your app becomes much more important. Even if you need a database, you still want it to follow the core JAMstack philosophies we outlined above. That means, we don’t want to host our own database server. We need a Database-as-a-Service solution. Our database needs to be optimized for the JAMstack:
Optimized for API calls from a browser or build process.
Flexible to model your data in the specific ways your app needs.
Global distribution of our data like a CDN houses our sites.
Hands-free scaling with no need of a database administrator or developer intervention.
Whatever service you look into needs to follow these tenets of serverless data. In our demos, we’ll explore FaunaDB, a global serverless database, featuring native GraphQL to assure that we keep our apps in step with the philosophies of the JAMstack.
Let’s dive into the code!
A JAMstack Guestbook App With Gatsby And Fauna
I’m a big fan of reimagining the internet tools and concepts of the 1990s and early 2000s. We can take these concepts and make them feel fresh with the new set of tools and interactions.
A look at the app we’re creating. A signature form with a signature list below. The form will populate a FaunaDB database and that database will create the view list. (Large preview)
In this demo, we’ll create an application that was all the rage in that time period: the guestbook. A guestbook is nothing but app-generated content and interaction. A user can come to the site, see all the signatures of past “guests” and then leave their own.
To start, we’ll statically render our site and build our data from Fauna during our build step. This will provide the fast performance we expect from a JAMstack site. To do this, we’ll use GatsbyJS.
Initial setup
Our first step will be to install Gatsby globally on our computer. If you’ve never spent much time in the command line, Gatsby’s “part 0” tutorial will help you get up and running. If you already have Node and NPM installed, you’ll install the Gatsby CLI globally and create a new site with it using the following commands:
npm install -g gatsby-cli
gatsby new <directory-to-install-into> <starter>
Gatsby comes with a large repository of starters that can help bootstrap your project. For this demo, I chose a simple starter that came equipped with the Bulma CSS framework.
gatsby new guestbook-app https://github.com/amandeepmittal/gatsby-bulma-quickstart
This gives us a good starting point and structure. It also has the added benefit of coming with styles that are ready to go.
Let’s do a little cleanup for things we don’t need. We’ll start by simplifying our components.header.js
import React from 'react'; import './style.scss'; const Header = ({ siteTitle }) => ( <section className="hero gradientBg "> <div className="hero-body"> <div className="container container--small center"> <div className="content"> <h1 className="is-uppercase is-size-1 has-text-white"> Sign our Virtual Guestbook </h1> <p className="subtitle has-text-white is-size-3"> If you like all the things that we do, be sure to sign our virtual guestbook </p> </div> </div> </div> </section> ); export default Header;
This will get rid of much of the branded content. Feel free to customize this section, but we won’t write any of our code here.
Next we’ll clean out the components/midsection.js file. This will be where our app’s code will render.
import React, { useState } from 'react'; import Signatures from './signatures'; import SignForm from './sign-form'; const Midsection = () => { const [sigData, setSigData] = useState(data.allSignatures.nodes); return ( <section className="section"> <div className="container container--small"> <section className="section is-small"> <h2 className="title is-4">Sign here</h2> <SignForm></SignForm> </section> <section className="section"> <h2 className="title is-5">View Signatures</h2> <Signatures></Signatures> </section> </div> </section> ) } export default Midsection;
In this code, we’ve mostly removed the “site” content and added in a couple new components. A <SignForm> that will contain our form for submitting a signature and a <Signatures> component to contain the list of signatures.
Now that we have a relatively blank slate, we can set up our FaunaDB database.
Setting Up A FaunaDB Collection
After logging into Fauna (or signing up for an account), you’ll be given the option to create a new Database. We’ll create a new database called guestbook.
The initial state of our signatures Collection after we add our first Document. (Large preview)
Inside this database, we’ll create a “Collection” called signature. Collections in Fauna a group of Documents that are in turn JSON objects.
In this new Collection, we’ll create a new Document with the following JSON:
{ name: "Bryan Robinson", message: "Lorem ipsum dolor amet sum Lorem ipsum dolor amet sum Lorem ipsum dolor amet sum Lorem ipsum dolor amet sum" }
This will be the simple data schema for each of our signatures. For each of these Documents, Fauna will create additional data surrounding it.
{ "ref": Ref(Collection("signatures"), "262884172900598291"), "ts": 1586964733980000, "data": { "name": "Bryan Robinson", "message": "Lorem ipsum dolor amet sum Lorem ipsum dolor amet sum Lorem ipsum dolor amet sum Lorem ipsum dolor amet sum " } }
The ref is the unique identifier inside of Fauna and the ts is the time (as a Unix timestamp) the document was created/updated.
After creating our data, we want an easy way to grab all that data and use it in our site. In Fauna, the most efficient way to get data is via an Index. We’ll create an Index called allSignatures. This will grab and return all of our signature Documents in the Collection.
Now that we have an efficient way of accessing the data in Gatsby, we need Gatsby to know where to get it. Gatsby has a repository of plugins that can fetch data from a variety of sources, Fauna included.
Setting up the Fauna Gatsby Data Source Plugin
npm install gatsby-source-faunadb
After we install this plugin to our project, we need to configure it in our gatsby-config.js file. In the plugins array of our project, we’ll add a new item.
{ resolve: `gatsby-source-faunadb`, options: { // The secret for the key you're using to connect to your Fauna database. // You can generate on of these in the "Security" tab of your Fauna Console. secret: process.env.YOUR_FAUNADB_SECRET, // The name of the index you want to query // You can create an index in the "Indexes" tab of your Fauna Console. index: `allSignatures`, // This is the name under which your data will appear in Gatsby GraphQL queries // The following will create queries called `allBird` and `bird`. type: "Signatures", // If you need to limit the number of documents returned, you can specify a // Optional maximum number to read. // size: 100 }, },
In this configuration, you provide it your Fauna secret Key, the Index name we created and the “type” we want to access in our Gatsby GraphQL query.
Where did that process.env.YOUR_FAUNADB_SECRET come from?
In your project, create a .env file — and include that file in your .gitignore! This file will give Gatsby’s Webpack configuration the secret value. This will keep your sensitive information safe and not stored in GitHub.
YOUR_FAUNADB_SECRET = "value from fauna"
We can then head over to the “Security” tab in our Database and create a new key. Since this is a protected secret, it’s safe to use a “Server” role. When you save the Key, it’ll provide your secret. Be sure to grab that now, as you can’t get it again (without recreating the Key).
Once the configuration is set up, we can write a GraphQL query in our components to grab the data at build time.
Getting the data and building the template
We’ll add this query to our Midsection component to make it accessible by both of our components.
const Midsection = () => { const data = useStaticQuery( graphql` query GetSignatures { allSignatures { nodes { name message _ts _id } } }` ); // ... rest of the component }
This will access the Signatures type we created in the configuration. It will grab all the signatures and provide an array of nodes. Those nodes will contain the data we specify we need: name, message, ts, id.
We’ll set that data into our state — this will make updating it live easier later.
const [sigData, setSigData] = useState(data.allSignatures.nodes);
Now we can pass sigData as a prop into <Signatures> and setSigData into <SignForm>.
<SignForm setSigData={setSigData}></SignForm> <Signatures sigData={sigData}></Signatures>
Let’s set up our Signatures component to use that data!
import React from 'react'; import Signature from './signature' const Signatures = (props) => { const SignatureMarkup = () => { return props.sigData.map((signature, index) => { return ( <Signature key={index} signature={signature}></Signature> ) }).reverse() } return ( <SignatureMarkup></SignatureMarkup> ) } export default Signatures
In this function, we’ll .map() over our signature data and create an Array of markup based on a new <Signature> component that we pass the data into.
The Signature component will handle formatting our data and returning an appropriate set of HTML.
import React from 'react'; const Signature = ({signature}) => { const dateObj = new Date(signature._ts / 1000); let dateString = `${dateObj.toLocaleString('default', {weekday: 'long'})}, ${dateObj.toLocaleString('default', { month: 'long' })} ${dateObj.getDate()} at ${dateObj.toLocaleTimeString('default', {hour: '2-digit',minute: '2-digit', hour12: false})}` return ( <article className="signature box"> <h3 className="signature__headline">{signature.name} - {dateString}</h3> <p className="signature__message"> {signature.message} </p> </article> )}; export default Signature;
At this point, if you start your Gatsby development server, you should have a list of signatures currently existing in your database. Run the following command to get up and running:
gatsby develop
Any signature stored in our database will build HTML in that component. But how can we get signatures INTO our database?
Let’s set up a signature form component to send data and update our Signatures list.
Let’s Make Our JAMstack Guestbook Interactive
First, we’ll set up the basic structure for our component. It will render a simple form onto the page with a text input, a textarea, and a button for submission.
import React from 'react'; import faunadb, { query as q } from "faunadb" var client = new faunadb.Client({ secret: process.env.GATSBY_FAUNA_CLIENT_SECRET }) export default class SignForm extends React.Component { constructor(props) { super(props) this.state = { sigName: "", sigMessage: "" } } handleSubmit = async event => { // Handle the submission } handleInputChange = event => { // When an input changes, update the state } render() { return ( <form onSubmit={this.handleSubmit}> <div className="field"> <div className="control"> <label className="label">Label <input className="input is-fullwidth" name="sigName" type="text" value={this.state.sigName} onChange={this.handleInputChange} /> </label> </div> </div> <div className="field"> <label> Your Message: <textarea rows="5" name="sigMessage" value={this.state.sigMessage} onChange={this.handleInputChange} className="textarea" placeholder="Leave us a happy note"></textarea> </label> </div> <div className="buttons"> <button className="button is-primary" type="submit">Sign the Guestbook</button> </div> </form> ) } }
To start, we’ll set up our state to include the name and the message. We’ll default them to blank strings and insert them into our <textarea> and <input>.
When a user changes the value of one of these fields, we’ll use the handleInputChange method. When a user submits the form, we’ll use the handleSubmit method.
Let’s break down both of those functions.
handleInputChange = event => { const target = event.target const value = target.value const name = target.name this.setState({ [name]: value, }) }
The input change will accept the event. From that event, it will get the current target’s value and name. We can then modify the state of the properties on our state object — sigName, sigMessage or anything else.
Once the state has changed, we can use the state in our handleSubmit method.
handleSubmit = async event => { event.preventDefault(); const placeSig = await this.createSignature(this.state.sigName, this.state.sigMessage); this.addSignature(placeSig); }
This function will call a new createSignature() method. This will connect to Fauna to create a new Document from our state items.
The addSignature() method will update our Signatures list data with the response we get back from Fauna.
In order to write to our database, we’ll need to set up a new key in Fauna with minimal permissions. Our server key is allowed higher permissions because it’s only used during build and won’t be visible in our source.
This key needs to only allow for the ability to only create new items in our signatures collection.
Note: A user could still be malicious with this key, but they can only do as much damage as a bot submitting that form, so it’s a trade-off I’m willing to make for this app.
A look at the FaunaDB security panel. In this shot, we’re creating a ‘client’ role that allows only the ‘Create’ permission for those API Keys. (Large preview)
For this, we’ll create a new “Role” in the “Security” tab of our dashboard. We can add permissions around one or more of our Collections. In this demo, we only need signatures and we can select the “Create” functionality.
After that, we generate a new key that uses that role.
To use this key, we’ll instantiate a new version of the Fauna JavaScript SDK. This is a dependency of the Gatsby plugin we installed, so we already have access to it.
import faunadb, { query as q } from "faunadb" var client = new faunadb.Client({ secret: process.env.GATSBY_FAUNA_CLIENT_SECRET })
By using an environment variable prefixed with GATSBY_, we gain access to it in our browser JavaScript (be sure to add it to your .env file).
By importing the query object from the SDK, we gain access to any of the methods available in Fauna’s first-party Fauna Query Language (FQL). In this case, we want to use the Create method to create a new document on our Collection.
createSignature = async (sigName, sigMessage) => { try { const queryResponse = await client.query( q.Create( q.Collection('signatures'), { data: { name: sigName, message: sigMessage } } ) ) const signatureInfo = { name: queryResponse.data.name, message: queryResponse.data.message, _ts: queryResponse.ts, _id: queryResponse.id} return signatureInfo } catch(err) { console.log(err); } }
We pass the Create function to the client.query() method. Create takes a Collection reference and an object of information to pass to a new Document. In this case, we use q.Collection and a string of our Collection name to get the reference to the Collection. The second argument is for our data. You can pass other items in the object, so we need to tell Fauna, we’re specifically sending it the data property on that object.
Next, we pass it the name and message we collected in our state. The response we get back from Fauna is the entire object of our Document. This includes our data in a data object, as well as a Fauna ID and timestamp. We reformat that data in a way that our Signatures list can use and return that back to our handleSubmit function.
Our submit handler will then pass that data into our setSigData prop which will notify our Signatures component to rerender with that new data. This gives our user immediate feedback that their submission has been accepted.
Rebuilding the site
This is all working in the browser, but the data hasn’t been updated in our static application yet.
From here, we need to tell our JAMstack host to rebuild our site. Many have the ability to specify a webhook to trigger a deployment. Since I’m hosting this demo on Netlify, I can create a new “Deploy webhook” in their admin and create a new triggerBuild function. This function will use the native JavaScript fetch() method and send a post request to that URL. Netlify will then rebuild the application and pull in the latest signatures.
triggerBuild = async () => { const response = await fetch(process.env.GATSBY_BUILD_HOOK, { method: "POST", body: "{}" }); return response; }
Both Gatsby Cloud and Netlify have implemented ways of handling “incremental” builds with Gatsby drastically speeding up build times. This sort of build can happen very quickly now and feel almost as fast as a traditional server-rendered site.
Every signature that gets added gets quick feedback to the user that it’s been submitted, is perpetually stored in a database, and served as HTML via a build process.
Still feels a little too much like a typical website? Let’s take all these concepts a step further.
Create A Mindful App With Auth0, Fauna Identity And Fauna User-Defined Functions (UDF)
Being mindful is an important skill to cultivate. Whether it’s thinking about your relationships, your career, your family, or just going for a walk in nature, it’s important to be mindful of the people and places around you.
A look at the final app screen showing a ‘Mindful Mission,’ ‘Past Missions’ and a ‘Log Out’ button. (Large preview)
This app intends to help you focus on one randomized idea every day and review the various ideas from recent days.
To do this, we need to introduce a key element to most apps: authentication. With authentication, comes extra security concerns. While this data won’t be particularly sensitive, you don’t want one user accessing the history of any other user.
Since we’ll be scoping data to a specific user, we also don’t want to store any secret keys on browser code, as that would open up other security flaws.
We could create an entire authentication flow using nothing but our wits and a user database with Fauna. That may seem daunting and moves us away from the features we want to write. The great thing is that there’s certainly an API for that in the JAMstack! In this demo, we’ll explore integrating Auth0 with Fauna. We can use the integration in many ways.
Setting Up Auth0 To Connect With Fauna
Many implementations of authentication with the JAMstack rely heavily on Serverless functions. That moves much of the security concerns from a security-focused company like Auth0 to the individual developer. That doesn’t feel quite right.
A diagram outlining the convoluted method of using a serverless function to manage authentication and token generation. (Large preview)
The typical flow would be to send a login request to a serverless function. That function would request a user from Auth0. Auth0 would provide the user’s JSON Web Token (JWT) and the function would provide any additional information about the user our application needs. The function would then bundle everything up and send it to the browser.
There are a lot of places in that authentication flow where a developer could introduce a security hole.
Instead, let’s request that Auth0 bundle everything up for us inside the JWT it sends. Keeping security in the hands of the folks who know it best.
A diagram outlining the streamlined authentication and token generation flow when using Auth0’s Rule system. (Large preview)
We’ll do this by using Auth0’s Rules functionality to ask Fauna for a user token to encode into our JWT. This means that unlike our Guestbook, we won’t have any Fauna keys in our front-end code. Everything will be managed in memory from that JWT token.
Setting up Auth0 Application and Rule
First, we’ll need to set up the basics of our Auth0 Application.
Following the configuration steps in their basic walkthrough gets the important basic information filled in. Be sure to fill out the proper localhost port for your bundler of choice as one of your authorized domains.
After the basics of the application are set up, we’ll go into the “Rules” section of our account.
Click “Create Rule” and select “Empty Rule” (or start from one of their many templates that are helpful starting points).
Here’s our Rule code
async function (user, context, callback) { const FAUNADB_SECRET = 'Your Server secret'; const faunadb = require('[email protected]'); const { query: q } = faunadb; const client = new faunadb.Client({ secret: FAUNADB_SECRET }); try { const token = await client.query( q.Call('user_login_or_create', user.email, user) // Call UDF in fauna ); let newClient = new faunadb.Client({ secret: token.secret }); context.idToken['https://faunadb.com/id/secret'] = token.secret; callback(null, user, context); } catch(error) { console.log('->', error); callback(error, user, context); } }
We give the rule a function that takes the user, context, and a callback from Auth0. We need to set up and grab a Server token to initialize our Fauna JavaScript SDK and initialize our client. Just like in our Guestbook, we’ll create a new Database and manage our Tokens in “Security”.
From there, we want to send a query to Fauna to create or log in our user. To keep our Rule code simple (and make it reusable), we’ll write our first Fauna “User-Defined Function” (UDF). A UDF is a function written in FQL that runs on Fauna’s infrastructure.
First, we’ll set up a Collection for our users. You don’t need to make a first Document here, as they’ll be created behind the scenes by our Auth0 rule whenever a new Auth0 user is created.
Next, we need an Index to search our users Collection based on the email address. This Index is simpler than our Guestbook, so we can add it to the Dashboard. Name the Index user_by_email, set the Collection to users, and the Terms to data.email. This will allow us to pass an email address to the Index and get a matching user Document back.
It’s time to create our UDF. In the Dashboard, navigate to “Functions” and create a new one named user_login_or_create.
Query( Lambda( ["userEmail", "userObj"], // Arguments Let( { user: Match(Index("user_by_email"), Var("userEmail")) }, // Set user variable If( Exists(Var("user")), // Check if the User exists Create(Tokens(null), { instance: Select("ref", Get(Var("user"))) }), // Return a token for that item in the users collection (in other words, the user) Let( // Else statement: Set a variable { newUser: Create(Collection("users"), { data: Var("userObj") }), // Create a new user and get its reference token: Create(Tokens(null), { // Create a token for that user instance: Select("ref", Var("newUser")) }) }, Var("token") // return the token ) ) ) ) )
Our UDF will accept a user email address and the rest of the user information. If a user exists in a users Collection, it will create a Token for the user and send that back. If a user doesn’t exist, it will create that user Document and then send a Token to our Auth0 Rule.
We can then store the Token as an idToken attached to the context in our JWT. The token needs a URL as a key. Since this is a Fauna token, we can use a Fauna URL. Whatever this is, you’ll use it to access this in your code.
This Token doesn’t have any permissions yet. We need to go into our Security rules and set up a new Role.
We’ll create an “AuthedUser” role. We don’t need to add any permissions yet, but as we create new UDFs and new Collections, we’ll update the permissions here. Instead of generating a new Key to use this Role, we want to add to this Role’s “Memberships”. On the Memberships screen, you can select a Collection to add as a member. The documents in this Collection (in our case, our Users), will have the permissions set on this role given via their Token.
Now, when a user logs in via Auth0, they’ll be returned a Token that matches their user Document and has its permissions.
From here, we come back to our application.
Implement logic for when the User is logged in
Auth0 has an excellent walkthrough for setting up a “vanilla” JavaScript single-page application. Most of this code is a refactor of that to fit the code splitting of this application.
The default Auth0 Login/Signup screen. All the login flow can be contained in the Auth0 screens. (Large preview)
First, we’ll need the Auth0 SPA SDK.
npm install @auth0/auth0-spa-js
import createAuth0Client from '@auth0/auth0-spa-js'; import { changeToHome } from './layouts/home'; // Home Layout import { changeToMission } from './layouts/myMind'; // Current Mindfulness Mission Layout let auth0 = null; var currentUser = null; const configureClient = async () => { // Configures Auth0 SDK auth0 = await createAuth0Client({ domain: "mindfulness.auth0.com", client_id: "32i3ylPhup47PYKUtZGRnLNsGVLks3M6" }); }; const checkUser = async () => { // return user info from any method const isAuthenticated = await auth0.isAuthenticated(); if (isAuthenticated) { return await auth0.getUser(); } } const loadAuth = async () => { // Loads and checks auth await configureClient(); const isAuthenticated = await auth0.isAuthenticated(); if (isAuthenticated) { // show the gated content currentUser = await auth0.getUser(); changeToMission(); // Show the "Today" screen return; } else { changeToHome(); // Show the logged out "homepage" } const query = window.location.search; if (query.includes("code=") && query.includes("state=")) { // Process the login state await auth0.handleRedirectCallback(); currentUser = await auth0.getUser(); changeToMission(); // Use replaceState to redirect the user away and remove the querystring parameters window.history.replaceState({}, document.title, "/"); } } const login = async () => { await auth0.loginWithRedirect({ redirect_uri: window.location.origin }); } const logout = async () => { auth0.logout({ returnTo: window.location.origin }); window.localStorage.removeItem('currentMindfulItem') changeToHome(); // Change back to logged out state } export { auth0, loadAuth, currentUser, checkUser, login, logout }
First, we configure the SDK with our client_id from Auth0. This is safe information to store in our code.
Next, we set up a function that can be exported and used in multiple files to check if a user is logged in. The Auth0 library provides an isAuthenticated() method. If the user is authenticated, we can return the user data with auth0.getUser().
We set up a login() and logout() functions and a loadAuth() function to handle the return from Auth0 and change the state of our UI to the “Mission” screen with today’s Mindful idea.
Once this is all set up, we have our authentication and user login squared away.
We’ll create a new function for our Fauna functions to reference to get the proper token set up.
const AUTH_PROP_KEY = "https://faunad.com/id/secret"; var faunadb = require('faunadb'), q = faunadb.query; async function getUserClient(currentUser) { return new faunadb.Client({ secret: currentUser[AUTH_PROP_KEY]}) }
This returns a new connection to Fauna using our Token from Auth0. This token works the same as the Keys from previous examples.
Generate a random Mindful topic and store it in Fauna
To start, we need a Collection of items to store our list of Mindful objects. We’ll create a Collection called “mindful” things, and create a number of items with the following schema:
{ "title": "Career", "description": "Think about the next steps you want to make in your career. What’s the next easily attainable move you can make?", "color": "#C6D4FF", "textColor": "black" }
From here, we’ll move to our JavaScript and create a function for adding and returning a random item from that Collection.
async function getRandomMindfulFromFauna(userObj) { const client = await getUserClient(userObj); try { let mindfulThings = await client.query( q.Paginate( q.Documents(q.Collection('mindful_things')) ) ) let randomMindful = mindfulThings.data[Math.floor(Math.random()*mindfulThings.data.length)]; let creation = await client.query(q.Call('addUserMindful', randomMindful)); return creation.data.mindful; } catch (error) { console.log(error) } }
To start, we’ll instantiate our client with our getUserClient() method.
From there, we’ll grab all the Documents from our mindful_things Collection. Paginate() by default grabs 64 items per page, which is more than enough for our data. We’ll grab a random item from the array that’s returned from Fauna. This will be what Fauna refers to as a “Ref”. A Ref is a full reference to a Document that the various FQL functions can use to locate a Document.
We’ll pass that Ref to a new UDF that will handle storing a new, timestamped object for that user stored in a new user_things Collection.
We’ll create the new Collection, but we’ll have our UDF provide the data for it when called.
We’ll create a new UDF in the Fauna dashboard with the name addUserMindful that will accept that random Ref.
As with our login UDF before, we’ll use the Lambda() FQL method which takes an array of arguments.
Without passing any user information to the function, FQL is able to obtain our User Ref just calling the Identity() function. All we have from our randomRef is the reference to our Document. We’ll run a Get() to get the full object. We’ll the Create() a new Document in the user_things Collection with our User Ref and our random information.
We then return the creation object back out of our Lambda. We then go back to our JavaScript and return the data object with the mindful key back to where this function gets called.
Render our Mindful Object on the page
When our user is authenticated, you may remember it called a changeToMission() method. This function switches the items on the page from the “Home” screen to markup that can be filled in by our data. After it’s added to the page, the renderToday() function gets called to add content by a few rules.
The first rule of Serverless Data Club is not to make HTTP requests unless you have to. In other words, cache when you can. Whether that’s creating a full PWA-scale application with Service Workers or just caching your database response with localStorage, cache data, and fetch only when necessary.
The first rule of our conditional is to check localStorage. If localStorage does contain a currentMindfulItem, then we need to check its date to see if it’s from today. If it is, we’ll render that and make no new requests.
The second rule of Serverless Data Club is to make as few requests as possible without the responses of those requests being too large. In that vein, our second conditional rule is to check the latest item from the current user and see if it is from today. If it is, we’ll store it in localStorage for later and then render the results.
Finally, if none of these are true, we’ll fire our getRandomMindfulFromFauna() function, format the result, store that in localStorage, and then render the result.
Get the latest item from a user
I glossed over it in the last section, but we also need some functionality to retrieve the latest mindful object from Fauna for our specific user. In our getLatestFromFauna() method, we’ll again instantiate our Fauna client and then call a new UDF.
Our new UDF is going to call a Fauna Index. An Index is an efficient way of doing a lookup on a Fauna database. In our case, we want to return all user_things by the user field. Then we can also sort the result by timestamp and reverse the default ordering of the data to show the latest first.
Simple Indexes can be created in the Index dashboard. Since we want to do the reverse sort, we’ll need to enter some custom FQL into the Fauna Shell (you can do this in the database dashboard Shell section).
CreateIndex({ name: "getMindfulByUserReverse", serialized: true, source: Collection("user_things"), terms: [ { field: ["data", "user"] } ], values: [ { field: ["ts"], reverse: true }, { field: ["ref"] } ] })
This creates an Index named getMindfulByUserReverse, created from our user_thing Collection. The terms object is a list of fields to search by. In our case, this is just the user field on the data object. We then provide values to return. In our case, we need the Ref and the Timestamp and we’ll use the reverse property to reverse order our results by this field.
We’ll create a new UDF to use this Index.
Query( Lambda( [], If( // Check if there is at least 1 in the index GT( Count( Select( "data", Paginate(Match(Index("getMindfulByUserReverse"), Identity())) ) ), 0 ), Let( // if more than 0 { match: Paginate( Match(Index("getMindfulByUserReverse"), Identity()) // Search the index by our User ), latestObj: Take(1, Var("match")), // Grab the first item from our match latestRef: Select( ["data"], Get(Select(["data", 0, 1], Var("latestObj"))) // Get the data object from the item ), latestTime: Select(["data", 0, 0], Var("latestObj")), // Get the time merged: Merge( // merge those items into one object to return { latestTime: Var("latestTime") }, { latestMindful: Var("latestRef") } ) }, Var("merged") ), Let({ error: { err: "No data" } }, Var("error")) // if there aren't any, return an error. ) ) )
This time our Lambda() function doesn’t need any arguments since we’ll have our User based on the Token used.
First, we’ll check to see if there’s at least 1 item in our Index. If there is, we’ll grab the first item’s data and time and return that back as a merged object.
After we get the latest from Fauna in our JavaScript, we’ll format it to a structure our storeCurrent() and render() methods expect it and return that object.
Now, we have an application that creates, stores, and fetches data for a daily message to contemplate. A user can use this on their phone, on their tablet, on the computer, and have it all synced. We could turn this into a PWA or even a native app with a system like Ionic.
We’re still missing one feature. Viewing a certain number of past items. Since we’ve stored this in our database, we can retrieve them in whatever way we need to.
Pull the latest X Mindful Missions to get a picture of what you’ve thought about
We’ll create a new JavaScript method paired with a new UDF to tackle this.
getSomeFromFauna will take an integer count to ask Fauna for a certain number of items.
Our UDF will be very similar to the getLatestFromFauana UDF. Instead of returning the first item, we’ll Take() the number of items from our array that matches the integer that gets passed into our UDF. We’ll also begin with the same conditional, in case a user doesn’t have any items stored yet.
Query( Lambda( ["count"], // Number of items to return If( // Check if there are any objects GT( Count( Select( "data", Paginate(Match(Index("getMindfulByUserReverse"), Identity(null))) ) ), 0 ), Let( { match: Paginate( Match(Index("getMindfulByUserReverse"), Identity(null)) // Search the Index by our User ), latestObjs: Select("data", Take(Var("count"), Var("match"))), // Get the data that is returned mergedObjs: Map( // Loop over the objects Var("latestObjs"), Lambda( "latestArray", Let( // Build the data like we did in the LatestMindful function { ref: Select(["data"], Get(Select([1], Var("latestArray")))), latestTime: Select(0, Var("latestArray")), merged: Merge( { latestTime: Var("latestTime") }, Select("mindful", Var("ref")) ) }, Var("merged") // Return this to our new array ) ) ) }, Var("mergedObjs") // return the full array ), { latestMindful: [{ title: "No additional data" }] } // if there are no items, send back a message to display ) ) )
In this demo, we created a full-fledged app with serverless data. Because the data is served from a CDN, it can be as close to a user as possible. We used FaunaDB’s features, such as UDFs and Indexes, to optimize our database queries for speed and ease of use. We also made sure we only queried our database the bare minimum to reduce requests.
Where To Go With Serverless Data
The JAMstack isn’t just for sites. It can be used for robust applications as well. Whether that’s for a game, CRUD application or just to be mindful of your surroundings you can do a lot without sacrificing customization and without spinning up your own non-dist database system.
With performance on the mind of everyone creating on the JAMstack — whether for cost or for user experience — finding a good place to store and retrieve your data is a high priority. Find a spot that meets your needs, those of your users, and meets ideals of the JAMstack.
(ra, yk, il)
Website Design & SEO Delray Beach by DBL07.co
Delray Beach SEO
source http://www.scpie.org/from-static-sites-to-end-user-jamstack-apps-with-faunadb/
0 notes
Text
From Static Sites To End User JAMstack Apps With FaunaDB
About The Author
Bryan is a designer, developer, and educator with a passion for CSS and static sites. He actively works to mentor and teach developers and designers the value … More about Bryan Robinson …
To make the move from “site” to app, we’ll need to dive into the world of “app-generated” content. In this article, we’ll get started in this world with the power of serverless data. We’ll start with a simple demo by ingesting and posting data to FaunaDB and then extend that functionality in a full-fledged application using Auth0, FaunaDB’s Token system and User-Defined Functions.
The JAMstack has proven itself to be one of the top ways of producing content-driven sites, but it’s also a great place to house applications, as well. If you’ve been using the JAMstack for your performant websites, the demos in this article will help you extend those philosophies to applications as well.
When using the JAMstack to build applications, you need a data service that fits into the most important aspects of the JAMstack philosophy:
Global distribution
Zero operational needs
A developer-friendly API.
In the JAMstack ecosystem there are plenty of software-as-a-service companies that provide ways of getting and storing specific types of data. Whether you want to send emails, SMS or make phone calls (Twilio) or accept form submissions efficiently (Formspree, Formingo, Formstack, etc.), it seems there’s an API for almost everything.
These are great services that can do a lot of the low-level work of many applications, but once your data is more complex than a spreadsheet or needs to be updated and store in real-time, it might be time to look into a database.
The service API can still be in use, but a central database managing the state and operations of your app becomes much more important. Even if you need a database, you still want it to follow the core JAMstack philosophies we outlined above. That means, we don’t want to host our own database server. We need a Database-as-a-Service solution. Our database needs to be optimized for the JAMstack:
Optimized for API calls from a browser or build process.
Flexible to model your data in the specific ways your app needs.
Global distribution of our data like a CDN houses our sites.
Hands-free scaling with no need of a database administrator or developer intervention.
Whatever service you look into needs to follow these tenets of serverless data. In our demos, we’ll explore FaunaDB, a global serverless database, featuring native GraphQL to assure that we keep our apps in step with the philosophies of the JAMstack.
Let’s dive into the code!
A JAMstack Guestbook App With Gatsby And Fauna
I’m a big fan of reimagining the internet tools and concepts of the 1990s and early 2000s. We can take these concepts and make them feel fresh with the new set of tools and interactions.
A look at the app we’re creating. A signature form with a signature list below. The form will populate a FaunaDB database and that database will create the view list. (Large preview)
In this demo, we’ll create an application that was all the rage in that time period: the guestbook. A guestbook is nothing but app-generated content and interaction. A user can come to the site, see all the signatures of past “guests” and then leave their own.
To start, we’ll statically render our site and build our data from Fauna during our build step. This will provide the fast performance we expect from a JAMstack site. To do this, we’ll use GatsbyJS.
Initial setup
Our first step will be to install Gatsby globally on our computer. If you’ve never spent much time in the command line, Gatsby’s “part 0” tutorial will help you get up and running. If you already have Node and NPM installed, you’ll install the Gatsby CLI globally and create a new site with it using the following commands:
npm install -g gatsby-cli
gatsby new <directory-to-install-into> <starter>
Gatsby comes with a large repository of starters that can help bootstrap your project. For this demo, I chose a simple starter that came equipped with the Bulma CSS framework.
gatsby new guestbook-app https://github.com/amandeepmittal/gatsby-bulma-quickstart
This gives us a good starting point and structure. It also has the added benefit of coming with styles that are ready to go.
Let’s do a little cleanup for things we don’t need. We’ll start by simplifying our components.header.js
import React from 'react'; import './style.scss'; const Header = ({ siteTitle }) => ( <section className="hero gradientBg "> <div className="hero-body"> <div className="container container--small center"> <div className="content"> <h1 className="is-uppercase is-size-1 has-text-white"> Sign our Virtual Guestbook </h1> <p className="subtitle has-text-white is-size-3"> If you like all the things that we do, be sure to sign our virtual guestbook </p> </div> </div> </div> </section> ); export default Header;
This will get rid of much of the branded content. Feel free to customize this section, but we won’t write any of our code here.
Next we’ll clean out the components/midsection.js file. This will be where our app’s code will render.
import React, { useState } from 'react'; import Signatures from './signatures'; import SignForm from './sign-form'; const Midsection = () => { const [sigData, setSigData] = useState(data.allSignatures.nodes); return ( <section className="section"> <div className="container container--small"> <section className="section is-small"> <h2 className="title is-4">Sign here</h2> <SignForm></SignForm> </section> <section className="section"> <h2 className="title is-5">View Signatures</h2> <Signatures></Signatures> </section> </div> </section> ) } export default Midsection;
In this code, we’ve mostly removed the “site” content and added in a couple new components. A <SignForm> that will contain our form for submitting a signature and a <Signatures> component to contain the list of signatures.
Now that we have a relatively blank slate, we can set up our FaunaDB database.
Setting Up A FaunaDB Collection
After logging into Fauna (or signing up for an account), you’ll be given the option to create a new Database. We’ll create a new database called guestbook.
The initial state of our signatures Collection after we add our first Document. (Large preview)
Inside this database, we’ll create a “Collection” called signature. Collections in Fauna a group of Documents that are in turn JSON objects.
In this new Collection, we’ll create a new Document with the following JSON:
{ name: "Bryan Robinson", message: "Lorem ipsum dolor amet sum Lorem ipsum dolor amet sum Lorem ipsum dolor amet sum Lorem ipsum dolor amet sum" }
This will be the simple data schema for each of our signatures. For each of these Documents, Fauna will create additional data surrounding it.
{ "ref": Ref(Collection("signatures"), "262884172900598291"), "ts": 1586964733980000, "data": { "name": "Bryan Robinson", "message": "Lorem ipsum dolor amet sum Lorem ipsum dolor amet sum Lorem ipsum dolor amet sum Lorem ipsum dolor amet sum " } }
The ref is the unique identifier inside of Fauna and the ts is the time (as a Unix timestamp) the document was created/updated.
After creating our data, we want an easy way to grab all that data and use it in our site. In Fauna, the most efficient way to get data is via an Index. We’ll create an Index called allSignatures. This will grab and return all of our signature Documents in the Collection.
Now that we have an efficient way of accessing the data in Gatsby, we need Gatsby to know where to get it. Gatsby has a repository of plugins that can fetch data from a variety of sources, Fauna included.
Setting up the Fauna Gatsby Data Source Plugin
npm install gatsby-source-faunadb
After we install this plugin to our project, we need to configure it in our gatsby-config.js file. In the plugins array of our project, we’ll add a new item.
{ resolve: `gatsby-source-faunadb`, options: { // The secret for the key you're using to connect to your Fauna database. // You can generate on of these in the "Security" tab of your Fauna Console. secret: process.env.YOUR_FAUNADB_SECRET, // The name of the index you want to query // You can create an index in the "Indexes" tab of your Fauna Console. index: `allSignatures`, // This is the name under which your data will appear in Gatsby GraphQL queries // The following will create queries called `allBird` and `bird`. type: "Signatures", // If you need to limit the number of documents returned, you can specify a // Optional maximum number to read. // size: 100 }, },
In this configuration, you provide it your Fauna secret Key, the Index name we created and the “type” we want to access in our Gatsby GraphQL query.
Where did that process.env.YOUR_FAUNADB_SECRET come from?
In your project, create a .env file — and include that file in your .gitignore! This file will give Gatsby’s Webpack configuration the secret value. This will keep your sensitive information safe and not stored in GitHub.
YOUR_FAUNADB_SECRET = "value from fauna"
We can then head over to the “Security” tab in our Database and create a new key. Since this is a protected secret, it’s safe to use a “Server” role. When you save the Key, it’ll provide your secret. Be sure to grab that now, as you can’t get it again (without recreating the Key).
Once the configuration is set up, we can write a GraphQL query in our components to grab the data at build time.
Getting the data and building the template
We’ll add this query to our Midsection component to make it accessible by both of our components.
const Midsection = () => { const data = useStaticQuery( graphql` query GetSignatures { allSignatures { nodes { name message _ts _id } } }` ); // ... rest of the component }
This will access the Signatures type we created in the configuration. It will grab all the signatures and provide an array of nodes. Those nodes will contain the data we specify we need: name, message, ts, id.
We’ll set that data into our state — this will make updating it live easier later.
const [sigData, setSigData] = useState(data.allSignatures.nodes);
Now we can pass sigData as a prop into <Signatures> and setSigData into <SignForm>.
<SignForm setSigData={setSigData}></SignForm> <Signatures sigData={sigData}></Signatures>
Let’s set up our Signatures component to use that data!
import React from 'react'; import Signature from './signature' const Signatures = (props) => { const SignatureMarkup = () => { return props.sigData.map((signature, index) => { return ( <Signature key={index} signature={signature}></Signature> ) }).reverse() } return ( <SignatureMarkup></SignatureMarkup> ) } export default Signatures
In this function, we’ll .map() over our signature data and create an Array of markup based on a new <Signature> component that we pass the data into.
The Signature component will handle formatting our data and returning an appropriate set of HTML.
import React from 'react'; const Signature = ({signature}) => { const dateObj = new Date(signature._ts / 1000); let dateString = `${dateObj.toLocaleString('default', {weekday: 'long'})}, ${dateObj.toLocaleString('default', { month: 'long' })} ${dateObj.getDate()} at ${dateObj.toLocaleTimeString('default', {hour: '2-digit',minute: '2-digit', hour12: false})}` return ( <article className="signature box"> <h3 className="signature__headline">{signature.name} - {dateString}</h3> <p className="signature__message"> {signature.message} </p> </article> )}; export default Signature;
At this point, if you start your Gatsby development server, you should have a list of signatures currently existing in your database. Run the following command to get up and running:
gatsby develop
Any signature stored in our database will build HTML in that component. But how can we get signatures INTO our database?
Let’s set up a signature form component to send data and update our Signatures list.
Let’s Make Our JAMstack Guestbook Interactive
First, we’ll set up the basic structure for our component. It will render a simple form onto the page with a text input, a textarea, and a button for submission.
import React from 'react'; import faunadb, { query as q } from "faunadb" var client = new faunadb.Client({ secret: process.env.GATSBY_FAUNA_CLIENT_SECRET }) export default class SignForm extends React.Component { constructor(props) { super(props) this.state = { sigName: "", sigMessage: "" } } handleSubmit = async event => { // Handle the submission } handleInputChange = event => { // When an input changes, update the state } render() { return ( <form onSubmit={this.handleSubmit}> <div className="field"> <div className="control"> <label className="label">Label <input className="input is-fullwidth" name="sigName" type="text" value={this.state.sigName} onChange={this.handleInputChange} /> </label> </div> </div> <div className="field"> <label> Your Message: <textarea rows="5" name="sigMessage" value={this.state.sigMessage} onChange={this.handleInputChange} className="textarea" placeholder="Leave us a happy note"></textarea> </label> </div> <div className="buttons"> <button className="button is-primary" type="submit">Sign the Guestbook</button> </div> </form> ) } }
To start, we’ll set up our state to include the name and the message. We’ll default them to blank strings and insert them into our <textarea> and <input>.
When a user changes the value of one of these fields, we’ll use the handleInputChange method. When a user submits the form, we’ll use the handleSubmit method.
Let’s break down both of those functions.
handleInputChange = event => { const target = event.target const value = target.value const name = target.name this.setState({ [name]: value, }) }
The input change will accept the event. From that event, it will get the current target’s value and name. We can then modify the state of the properties on our state object — sigName, sigMessage or anything else.
Once the state has changed, we can use the state in our handleSubmit method.
handleSubmit = async event => { event.preventDefault(); const placeSig = await this.createSignature(this.state.sigName, this.state.sigMessage); this.addSignature(placeSig); }
This function will call a new createSignature() method. This will connect to Fauna to create a new Document from our state items.
The addSignature() method will update our Signatures list data with the response we get back from Fauna.
In order to write to our database, we’ll need to set up a new key in Fauna with minimal permissions. Our server key is allowed higher permissions because it’s only used during build and won’t be visible in our source.
This key needs to only allow for the ability to only create new items in our signatures collection.
Note: A user could still be malicious with this key, but they can only do as much damage as a bot submitting that form, so it’s a trade-off I’m willing to make for this app.
A look at the FaunaDB security panel. In this shot, we’re creating a ‘client’ role that allows only the ‘Create’ permission for those API Keys. (Large preview)
For this, we’ll create a new “Role” in the “Security” tab of our dashboard. We can add permissions around one or more of our Collections. In this demo, we only need signatures and we can select the “Create” functionality.
After that, we generate a new key that uses that role.
To use this key, we’ll instantiate a new version of the Fauna JavaScript SDK. This is a dependency of the Gatsby plugin we installed, so we already have access to it.
import faunadb, { query as q } from "faunadb" var client = new faunadb.Client({ secret: process.env.GATSBY_FAUNA_CLIENT_SECRET })
By using an environment variable prefixed with GATSBY_, we gain access to it in our browser JavaScript (be sure to add it to your .env file).
By importing the query object from the SDK, we gain access to any of the methods available in Fauna’s first-party Fauna Query Language (FQL). In this case, we want to use the Create method to create a new document on our Collection.
createSignature = async (sigName, sigMessage) => { try { const queryResponse = await client.query( q.Create( q.Collection('signatures'), { data: { name: sigName, message: sigMessage } } ) ) const signatureInfo = { name: queryResponse.data.name, message: queryResponse.data.message, _ts: queryResponse.ts, _id: queryResponse.id} return signatureInfo } catch(err) { console.log(err); } }
We pass the Create function to the client.query() method. Create takes a Collection reference and an object of information to pass to a new Document. In this case, we use q.Collection and a string of our Collection name to get the reference to the Collection. The second argument is for our data. You can pass other items in the object, so we need to tell Fauna, we’re specifically sending it the data property on that object.
Next, we pass it the name and message we collected in our state. The response we get back from Fauna is the entire object of our Document. This includes our data in a data object, as well as a Fauna ID and timestamp. We reformat that data in a way that our Signatures list can use and return that back to our handleSubmit function.
Our submit handler will then pass that data into our setSigData prop which will notify our Signatures component to rerender with that new data. This gives our user immediate feedback that their submission has been accepted.
Rebuilding the site
This is all working in the browser, but the data hasn’t been updated in our static application yet.
From here, we need to tell our JAMstack host to rebuild our site. Many have the ability to specify a webhook to trigger a deployment. Since I’m hosting this demo on Netlify, I can create a new “Deploy webhook” in their admin and create a new triggerBuild function. This function will use the native JavaScript fetch() method and send a post request to that URL. Netlify will then rebuild the application and pull in the latest signatures.
triggerBuild = async () => { const response = await fetch(process.env.GATSBY_BUILD_HOOK, { method: "POST", body: "{}" }); return response; }
Both Gatsby Cloud and Netlify have implemented ways of handling “incremental” builds with Gatsby drastically speeding up build times. This sort of build can happen very quickly now and feel almost as fast as a traditional server-rendered site.
Every signature that gets added gets quick feedback to the user that it’s been submitted, is perpetually stored in a database, and served as HTML via a build process.
Still feels a little too much like a typical website? Let’s take all these concepts a step further.
Create A Mindful App With Auth0, Fauna Identity And Fauna User-Defined Functions (UDF)
Being mindful is an important skill to cultivate. Whether it’s thinking about your relationships, your career, your family, or just going for a walk in nature, it’s important to be mindful of the people and places around you.
A look at the final app screen showing a ‘Mindful Mission,’ ‘Past Missions’ and a ‘Log Out’ button. (Large preview)
This app intends to help you focus on one randomized idea every day and review the various ideas from recent days.
To do this, we need to introduce a key element to most apps: authentication. With authentication, comes extra security concerns. While this data won’t be particularly sensitive, you don’t want one user accessing the history of any other user.
Since we’ll be scoping data to a specific user, we also don’t want to store any secret keys on browser code, as that would open up other security flaws.
We could create an entire authentication flow using nothing but our wits and a user database with Fauna. That may seem daunting and moves us away from the features we want to write. The great thing is that there’s certainly an API for that in the JAMstack! In this demo, we’ll explore integrating Auth0 with Fauna. We can use the integration in many ways.
Setting Up Auth0 To Connect With Fauna
Many implementations of authentication with the JAMstack rely heavily on Serverless functions. That moves much of the security concerns from a security-focused company like Auth0 to the individual developer. That doesn’t feel quite right.
A diagram outlining the convoluted method of using a serverless function to manage authentication and token generation. (Large preview)
The typical flow would be to send a login request to a serverless function. That function would request a user from Auth0. Auth0 would provide the user’s JSON Web Token (JWT) and the function would provide any additional information about the user our application needs. The function would then bundle everything up and send it to the browser.
There are a lot of places in that authentication flow where a developer could introduce a security hole.
Instead, let’s request that Auth0 bundle everything up for us inside the JWT it sends. Keeping security in the hands of the folks who know it best.
A diagram outlining the streamlined authentication and token generation flow when using Auth0’s Rule system. (Large preview)
We’ll do this by using Auth0’s Rules functionality to ask Fauna for a user token to encode into our JWT. This means that unlike our Guestbook, we won’t have any Fauna keys in our front-end code. Everything will be managed in memory from that JWT token.
Setting up Auth0 Application and Rule
First, we’ll need to set up the basics of our Auth0 Application.
Following the configuration steps in their basic walkthrough gets the important basic information filled in. Be sure to fill out the proper localhost port for your bundler of choice as one of your authorized domains.
After the basics of the application are set up, we’ll go into the “Rules” section of our account.
Click “Create Rule” and select “Empty Rule” (or start from one of their many templates that are helpful starting points).
Here’s our Rule code
async function (user, context, callback) { const FAUNADB_SECRET = 'Your Server secret'; const faunadb = require('[email protected]'); const { query: q } = faunadb; const client = new faunadb.Client({ secret: FAUNADB_SECRET }); try { const token = await client.query( q.Call('user_login_or_create', user.email, user) // Call UDF in fauna ); let newClient = new faunadb.Client({ secret: token.secret }); context.idToken['https://faunadb.com/id/secret'] = token.secret; callback(null, user, context); } catch(error) { console.log('->', error); callback(error, user, context); } }
We give the rule a function that takes the user, context, and a callback from Auth0. We need to set up and grab a Server token to initialize our Fauna JavaScript SDK and initialize our client. Just like in our Guestbook, we’ll create a new Database and manage our Tokens in “Security”.
From there, we want to send a query to Fauna to create or log in our user. To keep our Rule code simple (and make it reusable), we’ll write our first Fauna “User-Defined Function” (UDF). A UDF is a function written in FQL that runs on Fauna’s infrastructure.
First, we’ll set up a Collection for our users. You don’t need to make a first Document here, as they’ll be created behind the scenes by our Auth0 rule whenever a new Auth0 user is created.
Next, we need an Index to search our users Collection based on the email address. This Index is simpler than our Guestbook, so we can add it to the Dashboard. Name the Index user_by_email, set the Collection to users, and the Terms to data.email. This will allow us to pass an email address to the Index and get a matching user Document back.
It’s time to create our UDF. In the Dashboard, navigate to “Functions” and create a new one named user_login_or_create.
Query( Lambda( ["userEmail", "userObj"], // Arguments Let( { user: Match(Index("user_by_email"), Var("userEmail")) }, // Set user variable If( Exists(Var("user")), // Check if the User exists Create(Tokens(null), { instance: Select("ref", Get(Var("user"))) }), // Return a token for that item in the users collection (in other words, the user) Let( // Else statement: Set a variable { newUser: Create(Collection("users"), { data: Var("userObj") }), // Create a new user and get its reference token: Create(Tokens(null), { // Create a token for that user instance: Select("ref", Var("newUser")) }) }, Var("token") // return the token ) ) ) ) )
Our UDF will accept a user email address and the rest of the user information. If a user exists in a users Collection, it will create a Token for the user and send that back. If a user doesn’t exist, it will create that user Document and then send a Token to our Auth0 Rule.
We can then store the Token as an idToken attached to the context in our JWT. The token needs a URL as a key. Since this is a Fauna token, we can use a Fauna URL. Whatever this is, you’ll use it to access this in your code.
This Token doesn’t have any permissions yet. We need to go into our Security rules and set up a new Role.
We’ll create an “AuthedUser” role. We don’t need to add any permissions yet, but as we create new UDFs and new Collections, we’ll update the permissions here. Instead of generating a new Key to use this Role, we want to add to this Role’s “Memberships”. On the Memberships screen, you can select a Collection to add as a member. The documents in this Collection (in our case, our Users), will have the permissions set on this role given via their Token.
Now, when a user logs in via Auth0, they’ll be returned a Token that matches their user Document and has its permissions.
From here, we come back to our application.
Implement logic for when the User is logged in
Auth0 has an excellent walkthrough for setting up a “vanilla” JavaScript single-page application. Most of this code is a refactor of that to fit the code splitting of this application.
The default Auth0 Login/Signup screen. All the login flow can be contained in the Auth0 screens. (Large preview)
First, we’ll need the Auth0 SPA SDK.
npm install @auth0/auth0-spa-js
import createAuth0Client from '@auth0/auth0-spa-js'; import { changeToHome } from './layouts/home'; // Home Layout import { changeToMission } from './layouts/myMind'; // Current Mindfulness Mission Layout let auth0 = null; var currentUser = null; const configureClient = async () => { // Configures Auth0 SDK auth0 = await createAuth0Client({ domain: "mindfulness.auth0.com", client_id: "32i3ylPhup47PYKUtZGRnLNsGVLks3M6" }); }; const checkUser = async () => { // return user info from any method const isAuthenticated = await auth0.isAuthenticated(); if (isAuthenticated) { return await auth0.getUser(); } } const loadAuth = async () => { // Loads and checks auth await configureClient(); const isAuthenticated = await auth0.isAuthenticated(); if (isAuthenticated) { // show the gated content currentUser = await auth0.getUser(); changeToMission(); // Show the "Today" screen return; } else { changeToHome(); // Show the logged out "homepage" } const query = window.location.search; if (query.includes("code=") && query.includes("state=")) { // Process the login state await auth0.handleRedirectCallback(); currentUser = await auth0.getUser(); changeToMission(); // Use replaceState to redirect the user away and remove the querystring parameters window.history.replaceState({}, document.title, "/"); } } const login = async () => { await auth0.loginWithRedirect({ redirect_uri: window.location.origin }); } const logout = async () => { auth0.logout({ returnTo: window.location.origin }); window.localStorage.removeItem('currentMindfulItem') changeToHome(); // Change back to logged out state } export { auth0, loadAuth, currentUser, checkUser, login, logout }
First, we configure the SDK with our client_id from Auth0. This is safe information to store in our code.
Next, we set up a function that can be exported and used in multiple files to check if a user is logged in. The Auth0 library provides an isAuthenticated() method. If the user is authenticated, we can return the user data with auth0.getUser().
We set up a login() and logout() functions and a loadAuth() function to handle the return from Auth0 and change the state of our UI to the “Mission” screen with today’s Mindful idea.
Once this is all set up, we have our authentication and user login squared away.
We’ll create a new function for our Fauna functions to reference to get the proper token set up.
const AUTH_PROP_KEY = "https://faunad.com/id/secret"; var faunadb = require('faunadb'), q = faunadb.query; async function getUserClient(currentUser) { return new faunadb.Client({ secret: currentUser[AUTH_PROP_KEY]}) }
This returns a new connection to Fauna using our Token from Auth0. This token works the same as the Keys from previous examples.
Generate a random Mindful topic and store it in Fauna
To start, we need a Collection of items to store our list of Mindful objects. We’ll create a Collection called “mindful” things, and create a number of items with the following schema:
{ "title": "Career", "description": "Think about the next steps you want to make in your career. What’s the next easily attainable move you can make?", "color": "#C6D4FF", "textColor": "black" }
From here, we’ll move to our JavaScript and create a function for adding and returning a random item from that Collection.
async function getRandomMindfulFromFauna(userObj) { const client = await getUserClient(userObj); try { let mindfulThings = await client.query( q.Paginate( q.Documents(q.Collection('mindful_things')) ) ) let randomMindful = mindfulThings.data[Math.floor(Math.random()*mindfulThings.data.length)]; let creation = await client.query(q.Call('addUserMindful', randomMindful)); return creation.data.mindful; } catch (error) { console.log(error) } }
To start, we’ll instantiate our client with our getUserClient() method.
From there, we’ll grab all the Documents from our mindful_things Collection. Paginate() by default grabs 64 items per page, which is more than enough for our data. We’ll grab a random item from the array that’s returned from Fauna. This will be what Fauna refers to as a “Ref”. A Ref is a full reference to a Document that the various FQL functions can use to locate a Document.
We’ll pass that Ref to a new UDF that will handle storing a new, timestamped object for that user stored in a new user_things Collection.
We’ll create the new Collection, but we’ll have our UDF provide the data for it when called.
We’ll create a new UDF in the Fauna dashboard with the name addUserMindful that will accept that random Ref.
As with our login UDF before, we’ll use the Lambda() FQL method which takes an array of arguments.
Without passing any user information to the function, FQL is able to obtain our User Ref just calling the Identity() function. All we have from our randomRef is the reference to our Document. We’ll run a Get() to get the full object. We’ll the Create() a new Document in the user_things Collection with our User Ref and our random information.
We then return the creation object back out of our Lambda. We then go back to our JavaScript and return the data object with the mindful key back to where this function gets called.
Render our Mindful Object on the page
When our user is authenticated, you may remember it called a changeToMission() method. This function switches the items on the page from the “Home” screen to markup that can be filled in by our data. After it’s added to the page, the renderToday() function gets called to add content by a few rules.
The first rule of Serverless Data Club is not to make HTTP requests unless you have to. In other words, cache when you can. Whether that’s creating a full PWA-scale application with Service Workers or just caching your database response with localStorage, cache data, and fetch only when necessary.
The first rule of our conditional is to check localStorage. If localStorage does contain a currentMindfulItem, then we need to check its date to see if it’s from today. If it is, we’ll render that and make no new requests.
The second rule of Serverless Data Club is to make as few requests as possible without the responses of those requests being too large. In that vein, our second conditional rule is to check the latest item from the current user and see if it is from today. If it is, we’ll store it in localStorage for later and then render the results.
Finally, if none of these are true, we’ll fire our getRandomMindfulFromFauna() function, format the result, store that in localStorage, and then render the result.
Get the latest item from a user
I glossed over it in the last section, but we also need some functionality to retrieve the latest mindful object from Fauna for our specific user. In our getLatestFromFauna() method, we’ll again instantiate our Fauna client and then call a new UDF.
Our new UDF is going to call a Fauna Index. An Index is an efficient way of doing a lookup on a Fauna database. In our case, we want to return all user_things by the user field. Then we can also sort the result by timestamp and reverse the default ordering of the data to show the latest first.
Simple Indexes can be created in the Index dashboard. Since we want to do the reverse sort, we’ll need to enter some custom FQL into the Fauna Shell (you can do this in the database dashboard Shell section).
CreateIndex({ name: "getMindfulByUserReverse", serialized: true, source: Collection("user_things"), terms: [ { field: ["data", "user"] } ], values: [ { field: ["ts"], reverse: true }, { field: ["ref"] } ] })
This creates an Index named getMindfulByUserReverse, created from our user_thing Collection. The terms object is a list of fields to search by. In our case, this is just the user field on the data object. We then provide values to return. In our case, we need the Ref and the Timestamp and we’ll use the reverse property to reverse order our results by this field.
We’ll create a new UDF to use this Index.
Query( Lambda( [], If( // Check if there is at least 1 in the index GT( Count( Select( "data", Paginate(Match(Index("getMindfulByUserReverse"), Identity())) ) ), 0 ), Let( // if more than 0 { match: Paginate( Match(Index("getMindfulByUserReverse"), Identity()) // Search the index by our User ), latestObj: Take(1, Var("match")), // Grab the first item from our match latestRef: Select( ["data"], Get(Select(["data", 0, 1], Var("latestObj"))) // Get the data object from the item ), latestTime: Select(["data", 0, 0], Var("latestObj")), // Get the time merged: Merge( // merge those items into one object to return { latestTime: Var("latestTime") }, { latestMindful: Var("latestRef") } ) }, Var("merged") ), Let({ error: { err: "No data" } }, Var("error")) // if there aren't any, return an error. ) ) )
This time our Lambda() function doesn’t need any arguments since we’ll have our User based on the Token used.
First, we’ll check to see if there’s at least 1 item in our Index. If there is, we’ll grab the first item’s data and time and return that back as a merged object.
After we get the latest from Fauna in our JavaScript, we’ll format it to a structure our storeCurrent() and render() methods expect it and return that object.
Now, we have an application that creates, stores, and fetches data for a daily message to contemplate. A user can use this on their phone, on their tablet, on the computer, and have it all synced. We could turn this into a PWA or even a native app with a system like Ionic.
We’re still missing one feature. Viewing a certain number of past items. Since we’ve stored this in our database, we can retrieve them in whatever way we need to.
Pull the latest X Mindful Missions to get a picture of what you’ve thought about
We’ll create a new JavaScript method paired with a new UDF to tackle this.
getSomeFromFauna will take an integer count to ask Fauna for a certain number of items.
Our UDF will be very similar to the getLatestFromFauana UDF. Instead of returning the first item, we’ll Take() the number of items from our array that matches the integer that gets passed into our UDF. We’ll also begin with the same conditional, in case a user doesn’t have any items stored yet.
Query( Lambda( ["count"], // Number of items to return If( // Check if there are any objects GT( Count( Select( "data", Paginate(Match(Index("getMindfulByUserReverse"), Identity(null))) ) ), 0 ), Let( { match: Paginate( Match(Index("getMindfulByUserReverse"), Identity(null)) // Search the Index by our User ), latestObjs: Select("data", Take(Var("count"), Var("match"))), // Get the data that is returned mergedObjs: Map( // Loop over the objects Var("latestObjs"), Lambda( "latestArray", Let( // Build the data like we did in the LatestMindful function { ref: Select(["data"], Get(Select([1], Var("latestArray")))), latestTime: Select(0, Var("latestArray")), merged: Merge( { latestTime: Var("latestTime") }, Select("mindful", Var("ref")) ) }, Var("merged") // Return this to our new array ) ) ) }, Var("mergedObjs") // return the full array ), { latestMindful: [{ title: "No additional data" }] } // if there are no items, send back a message to display ) ) )
In this demo, we created a full-fledged app with serverless data. Because the data is served from a CDN, it can be as close to a user as possible. We used FaunaDB’s features, such as UDFs and Indexes, to optimize our database queries for speed and ease of use. We also made sure we only queried our database the bare minimum to reduce requests.
Where To Go With Serverless Data
The JAMstack isn’t just for sites. It can be used for robust applications as well. Whether that’s for a game, CRUD application or just to be mindful of your surroundings you can do a lot without sacrificing customization and without spinning up your own non-dist database system.
With performance on the mind of everyone creating on the JAMstack — whether for cost or for user experience — finding a good place to store and retrieve your data is a high priority. Find a spot that meets your needs, those of your users, and meets ideals of the JAMstack.
(ra, yk, il)
Website Design & SEO Delray Beach by DBL07.co
Delray Beach SEO
source http://www.scpie.org/from-static-sites-to-end-user-jamstack-apps-with-faunadb/ source https://scpie1.blogspot.com/2020/06/from-static-sites-to-end-user-jamstack.html
0 notes
Text
Learn How to Extend AD Schema for SCCM | ConfigMgr | MEMCM
[New Post] Learn How to Extend AD Schema for #SCCM | #ConfigMgr | #MEMCM
Let’s dive into installation guide “Extend AD Schema for SCCM.” Do you want to extend AD Schema to ConfigMgr to work? AD schema extension not mandatory but I recommend to extend the schema wherever possible.
NOTE! – What are the changes expected with Active Directory Extension? You can refer to the Schema extensions for Configuration Manager.
Prerequisites – Extend AD Schema for SCCM
SCCM
View On WordPress
0 notes
Text
The Plain English Guide to Google’s Knowledge Graph
Before I began writing at HubSpot, I worked at two small businesses. Really small. Both had fewer than five employees. Honestly, any time “SEO” was mentioned the whole team got anxiety. There was no SEO expert — or even an employee who had vast experience in it. Marketing teams who lack knowledge in SEO often feel like they’re playing catch up and aren’t sure if they can deliver results for their clients. Trust me — I get it.
For example, an old client wanted their business to show up in Google’s knowledge panel. That’s the panel on the right side of a Google results page with a business’s hours, website, contact information, images, and related searches — all data that exists in Google’s Knowledge Graph (more on this in just a minute). The client wanted to show up in that panel because 76% of online users determined that the most important aspect of web design is the ability to quickly access information. This extends to more than just web design — including web search. Unfortunately, no one on our team knew how to do that. That’s why it’s important for marketers to understand the Google knowledge graph and how to create content that winds up in the knowledge panel you see on so many search engine results pages (SERPs) today.
Knowledge Graph
Google’s Knowledge Graph is the database Google uses to gather information on keywords and user intent. The database ensures Google can deliver personalized search results depending on factors such as people, locations, objects, timing, and their association with other content on the web. For example, if you search Tom Cruise, Google’s knowledge graph tells Google you might also be interested in his social media, filmography, biography, or even friends and family like Katie Holmes.
The box you see, where Google synthesizes this information, is known as the knowledge panel, or the Knowledge Graph card. Below is an example of what the Tom Cruise knowledge graph panel looks like on Google. It includes images, biography, family, quotes, and filmography. Google’s Knowledge Graph uses data it has collected on user intent behind the keyword “Tom Cruise” to deliver this panel. Image Source Essentially, the Knowledge Graph gives Google context into user intent so it knows why people are searching for certain information, and can deliver the right results. To gather all this information, Google officially refers to three high-quality sites to collect data: Wikipedia, Wikidata, and CIA World Factbook. Unofficially, Google also takes other factors into consideration when referring to sources, including social media presence, keywords, and a site’s relative authority based on who else links into that domain. While it might seem like the Knowledge Graph card will actually lower your clickthrough-rate, it’s still helpful for your site to be featured here. The main benefit of knowledge panel optimization is that Google will feature somebody here, so even if you don’t receive traffic from it, it’s better that it’s you over a competitor. Additionally, optimizing for Google’s Knowledge Graph has the added benefit of helping Google better understand your site, which will improve your overall rankings. That’s why you should consider optimizing your site for Google’s Knowledge Graph. To do so, Google needs to understand what your site is about. Additionally, your content needs to match the intent of your ideal user. For example, when someone searches “knowledge graph,” they’re probably wondering what Google’s Knowledge Graph is, how it works, and how to show up in the resulting Knowledge Graph card. That’s why the content on this page answers those questions. Your main focus should always be to answer your audience’s questions. If you understand user intent, and write content that solves your audience’s problems, Google’s knowledge graph can help you rank higher on Google. As an aside, other search engines, like Bing, have their own Knowledge Graphs. Optimizing for one can simultaneously help you optimize for the other. However, each search engine is a separate entity with independent algorithms. In Google’s case, the company uses three elements when deciding whether a brand is the right fit for a knowledge panel: User intent: Google’s Knowledge Graph will inform the search engine whether your brand answers user questions. Does your page answer the questions the user has based on historical searches, keywords, and context? Semantic search: Semantic search is what Google uses to understand the intent of a person’s query. At any time, it can use synonyms, context, and natural language processing to sort searches into topics, and produce accurate and relevant results. Entity indexing: Google has a catalog of all related entities to produce factual information about each entity. With entity indexing, Google can produce factual information about your entity to see if it’s a right fit for the knowledge graph panel. Now that we understand the knowledge graph panel, you might be wondering, “How can I create a Google knowledge graph panel for my business?” I want to start by saying that showing up in the Google knowledge graph panel isn’t as easy as creating a page that Google will display. However, there are some strategies you could implement to make it more likely and easier for Google to use your company in the panel.
How to Get a Google Knowledge Panel
Optimize your site for humans. Utilize schema markup and meta tags to optimize your site for Google. Create listings on local directories, including Google My Business. Be present on social media. Make a Wikipedia and Wikidata page. Gather customer reviews. Build authority.
1. Optimize your site for humans. Primarily, Google’s knowledge graph makes it easier for Google to deliver the best results possible for a user’s query. That means your site needs to be optimized for the user. Is your content easy to read? Is it interesting? Does it answer user questions? Google’s knowledge graph will only pull information if it answers a user’s question directly and is easy to read. To make your site optimized for humans, you can use bullet points and H2 or H3 headers to break up the content, making it easier to read. Additionally, each piece of content you produce should be designed based on user intent. When a user searches for “X” keyword, what do they really want to know? Your page needs to answer those questions. 2. Utilize schema markup and meta tags to optimize your site for Google. Once your site is optimized for humans, you can go back and do a few things to optimize it for Google as well. First, you could fill out meta tags. Meta tags help describe important components of a website for Google, including meta description, author, and page title — a critical component of the knowledge graph. You should incorporate your primary keyword in your meta tags naturally including the title, description, URL, image name, and image alt text to indicate to Google what this page is about. Second, you can use schema markup. Schema markup is a template of code you can add to your website that helps search engines understand how your content is structured, and return better results for users. Essentially, it gives vital information to search engines to include in your listing that can improve visibility online, as well as clickthrough rates. Schema markup can include reviews, ratings, pricing, events, location, publish date, and various content types you might want to be described as. 3. Create listings on local directories, including Google My Business. One way Google ascertains whether your business is fit for the knowledge graph panel is by using local listings and directories to ensure your business matches with user intent. For example, if someone searches for “marketing agency orange county,” your local directory listing tells Google your location, website, hours, and contact information. This helps Google produce personalized results. Your company should be listed on basic directories, such as Google My Business, Yelp, Bing Places for Business, and Yahoo Small Business. It’s especially helpful when you’re listed on Google My Business, because that’s Google’s owned property, so your information is already in their database. If applicable, you might also want to get listed on directories that are industry specific. For example, if you work at a school, you might consider a listing on Niche or Great Schools. 4. Be present on social media. Google’s knowledge graph usually produces all the information someone might be searching for when they type in a query. That includes social media profiles. Having an active social media presence helps Google provide all the information a user might be interested in. It also creates authority and helps Google understand your business as a whole. 5. Make a Wikipedia and Wikidata page. Since Google uses Wikipedia and Wikidata to gather information for its knowledge graph, having a presence on these sites is helpful. You don’t need one to inform Google’s Knowledge Graph, but it can help. Creating a Wikipedia page is actually fairly intuitive. All you need to do is create an account, create the page, provide citations, and submit the page for review. After that, it’s important to update it regularly as well. To create a Wikidata page, this is a great resource from Wikidata you can use that outlines the process step-by-step. 6. Gather customer reviews. Customer reviews are also something that a user might be interested in when they search for your company. That’s why it’s important to gather customer reviews, especially on Google Reviews. These reviews are just another element that Google will display to give user’s a full view of your company. 7. Build authority. Google is more likely to show high-authority sites in its results. To build authority for your site, you’ll want to create a backlink building strategy, write guest posts on authoritative sites, and be active on social media — especially sites like YouTube because it’s connected to Google through various products. Additionally, your site should have quality links and contain several pages of relevant and informative information. Google’s Knowledge Graph is one of the top ways that information is disseminated on the popular search engine. That’s why it’s important to optimize your content so you can show up there. Want to learn more about SEO? Click here for our ultimate guide.
Source link
source https://www.kadobeclothing.store/the-plain-english-guide-to-googles-knowledge-graph/
0 notes
Text
The Awesome List: WordPress SEO Plugins
The Awesome List: WordPress SEO Plugins was originally published on BruceClay.com, home of expert search engine optimization tips.
WordPress is a simple-to-use content management system that’s also free. It offers everyone from solo bloggers to the world’s leading brands a platform to create custom and powerful websites. No wonder almost a third of all websites run on WP!
Still, WordPress was made for users, not for Google or SEOs. That’s why SEO plugins exist — to plug in the holes with added functionality that helps your content be indexed by search engines and found by searchers.
As a marketer, content creator or analyst, how do you choose the best SEO plugin for your sites? Here, we’ll take a look at six plugins, their many features, and finally a price comparison chart so that you can compare them:
Yoast SEO
All-In-One SEO Pack
SEO Ultimate
SEO Squirrly
SEOPressor Connect
Bruce Clay SEO WP (our own)
Plugins often come in both free and premium versions; the premium versions unlock more functionality and service. I’ll address both versions where appropriate.
Plugin No. 6 is our soon-to-be-launched WP plugin, Bruce Clay SEO, which fills in the gaps left by other plugins on this list (see our list of what your SEO plugin is missing).
1. Yoast SEO
Yoast SEO is the most popular SEO plugin. It’s easy to use, driven by a simple user interface. The majority of people use the free version.
Here’s what the free version offers (from its plugin page):
XML sitemaps functionality at the push of a button
Full control over site breadcrumbs
Set canonical URLs to avoid duplicate content
Title and meta description templates
Content & SEO analysis to write SEO-friendly text
Snippet preview to show how your post or page will look in the search results (also on mobile)
Cornerstone content and internal linking features help optimize your site structure
Integrates with Google Search Console
Manage SEO roles to give people access to specific sections of the Yoast SEO plugin
Bulk editor to make large-scale edits to a site
Strengths: As a leading plugin, it’s driven by market awareness and brand presence. It’s easy to use. The free version is typically enough for most users. Weaknesses: It’s built for everyone and no one industry in particular. As a result, some users feel the SEO recommendations are too generic. In addition, even though it’s fairly simple to use, the features may seem overwhelming to beginners. Active installations: 5+ million Rating on WordPress: 5 stars
Yoast’s Paid Version
Yoast offers a premium version for annual fees ranging from $89 for one site up to $756.50 for 15 sites. Additional offerings of the premium version include:
News SEO, video SEO, local SEO and WooCommerce SEO extensions
Premium users get one year free access to a support team
Insights tool shows you what your text is focusing on so you can keep your article in line with your keywords
Multiple focus keywords to optimize your article for synonyms and related keywords
Automatic internal linking suggestions of posts to link to
Social previews to help manage the way a page looks when shared on social networks like Facebook and Twitter
Redirect manager to address redirect errors from Google Search Console, deleted pages and changed URLs
2. All-In-One SEO Pack
All-In-One SEO Pack offers entry-level features to assist with SEO for beginners. It also has advanced features and an API for developers.
Here’s what the free plugin offers (from its plugin page):
XML sitemap support
Image XML sitemap submitted to Google and Bing
Google AMP support
Google Analytics support
Support for SEO on custom post types
Advanced canonical URLs
Redirect attachment pages to parent post
Automatically notifies search engines about changes to your site
Built-in API so other plugins/themes can access and extend functionality
Provides SEO integration for e-commerce sites, including WooCommerce
Nonce Security built in
Automatically optimizes titles for search engines
Generates meta tags automatically
Avoids typical duplicate content found on WordPress blogs
For advanced users, fine-tune everything to optimize SEO
Override any title and set any meta description and keywords
Compatible with many other plugins
Translated into 57 languages
PHP 7 100 percent compatible
Strengths: As a leading plugin, it’s driven by market awareness and brand presence. Some users appreciate that you can turn off features you won’t need to use. Weaknesses: This plugin is built for everyone and no one industry in particular. Some people comment that the user interface is not as friendly as they would like it to be, and say that for true beginners, it might be too complex to understand. Active installations: 2+ million Rating on WordPress: 4.5 stars
All-In-One’s Paid Version
All-In-One SEO Pack offers a pro version for annual fees ranging from $97 for an individual to $699 for an agency. Additional offerings of the pro version include:
Advanced support for WooCommerce
SEO for categories, tags and custom taxonomies
Video SEO module
Access to video screencasts
Access to premium support forums
Access to knowledge center
3. SEO Ultimate
SEO Ultimate has the most robust feature set of the all-in-one-type WordPress SEO plugins. Check out its plugin page for more details on each of the following features.
Here’s what the free plugin offers (from its plugin page):
Title tag rewriter and meta description editor
Deeplink juggernaut
Open graph integrator
Rich snippet creator
Author highlighter
Link mask generator
Canonicalizer
404 monitor
Permalink tweaker
Meta robot tags editor
SEO ultimate widgets
Plugin settings manager
SEO/SEM-enhancing custom HTML
.htaccess editor and the robots.txt editor
Textboxes to the end of your posts/pages that contain automatically generated link HTML
Meta keywords for posts, pages, categories, tags, terms and the homepage auto-generated and editable
“Read more” links include the posts’ keyword-rich titles in the anchor text
Rel=”nofollow” settings when migrating from other SEO plugins
Dashboard of green/yellow/red indicators for SEO-friendliness
Buttons that make it easy for visitors to share content on social
Remove customizable “filler words” (like “the,” “with,” “and,” etc.) from post/page URLs
Access search engine webmaster tools
Strengths: This plugin has a nice set of robust SEO features. Also, the ability to import and export data from other sources, including other SEO plugins, is something users find handy. Weaknesses: The free version is no longer being updated for WordPress. Because the tool is advanced, it requires training to get the most out of it. Active installations: 100,000+ Rating on WordPress: 4 stars
SEO Ultimate’s Paid Version
SEO Ultimate+ costs from $49 for one site to $249 for 20 sites annually. $500 will get you unlimited sites. Additional offerings of SEO Ultimate+ include:
Structured data, schema and rich snippets
Global canonical manager
Alt attribute mass editor for images
Improved open graph options for social networks
The code inserter+ module
HTML and XML Sitemaps
Rel previous and next pagination optimization
SEO data transporter
4. SEO Squirrly
SEO Squirrly is an SEO plugin that aims to be an SEO advisor.
Here’s what the free plugin offers (from its plugin page – check it out for more in-depth information on each feature):
Keyword research
SEO Live Assistant
Audit Suite
Briefcase, keyword strategy assistant
Twitter Cards
Facebook Open Graph support for both images and video
LinkedIn titles, images and description for better sharing
Rich Pins for Pinterest
Snippet preview
Customize meta title and description
Sitemap
Blog feeds
SEO settings
Performance analytics
Works with multisites
Blogging assistant to help keep readers on the page longer
Strengths: Robust features. Works well with the WooCommerce e-commerce plugin. Weaknesses: The plugin is free if you do less than five posts per month on one site; otherwise, you need to upgrade to the paid version. Some features that used to be included free are now separate paid products, such as search engine rank tracking. Active Installations: 30,000+ Rating on WordPress: 4.5 stars
SEO Squirrly’s Paid Version
SEO Squirrly offers a premium version for monthly fees of $29.99 for pro and $71.99 for business. Additional offerings of the premium version include:
Up to seven sites
Full access to SEO Live Assistant
Unlimited optimized articles
Research on hundreds of keywords
Free images; find/insert tweets; find/insert wikis; find/insert news; find/insert blog articles
Advanced site analytics
Weekly audits on hundreds of pages
5. SEOPressor Connect
SEOPressor Connect is the most advanced of these SEO plugins, in my opinion.
This is a paid plugin ($9 per month), and just some of the things it offers include:
Multiple keywords analysis
XML Sitemap generator
SEOpressor over-optimization check
Canonical link
Progressive LSI keywords engine
301 URL redirect
SemantiQ density tells you if the content is related to keywords
On-page robot rules
Schema and Dublin Core markup support
SEOpressor site audit
SEOpressor local SEO
SEO trends
Google Knowledge Graph help
SEOpressor score manager for optimization
Optimize the homepage
SEOpressor smart link manager
On-page meta settings
Sitewide link policy
Facebook Open Graph customization
Automatic smart linking
Twitter Card customization
SEOpressor role settings
Strengths: Can be used on multiple domains and works well with other SEO plugins. Many people find it easy to use with a strong user interface. Weaknesses: Computes its own scores and tracks them over time, but lacks a connection to performance analytics data or search results. This means that the trends could be misleading since they don’t reflect how your content is actually performing in the search engines. Active installs & ratings: The plugin does not appear in WordPress’s plugin directory, so this data is not available.
6. Bruce Clay SEO for WordPress (now in beta)
While many of the above plugins compete with each other, our approach is different. Bruce Clay SEO WP is meant to supplement and extend the free versions with powerful needed features.
We gathered input from industry practitioners on what they wanted to see in an SEO plugin. Then we designed our plugin not to replace the plugins you may be using, but to provide much more data than is available today.
Of course, our plugin provides capabilities similar to others as well, but that is just in case you’re not using any other SEO plugins.
What makes this plugin unique: It enriches your publishing workspace with SEO insights based on real-time search results and analytics. In other words, you can see beyond the page you’re working on, without leaving WordPress. It’s the integration with our SEOToolSet and Google Search Console/Analytics that makes this possible.
The Bruce Clay SEO plugin works like software as a service (SaaS). Rather than a static one-size-fits-all checklist approach to optimizing a page or post, our plugin uses a live connection with the SEOToolSet software to analyze your keywords and competition in real time.
As a result, the optimization recommendations you see are customized. So your page can better compete in its specific ranking environment.
There’s no free version, but it’s priced affordably at $24.95/month per domain. (Try it! The first week is free — then you can decide if you want to keep it.)
As a bonus, plugin subscribers can also use the SEOToolSet itself. Data is shared between the plugin in WordPress and the user’s SEOToolSet account. Those who want to can run domain ranking reports and take advantage of many other external tools.
Bruce Clay SEO features are powered by patent-pending technology. WordPress users can:
Optimize a page or post for more than one keyword.
See clearly where keywords appear in the content through color coding.
Know which pages and posts are your top performers.
Identify problems with mobile usability and performance.
Check the site for duplicate content.
Evaluate top-ranked pages for your keywords in real-time.
Get recommendations for keyword usage in tags and content (even word count) based upon competitors.
Find out how much content has been written on your site per keyword.
See how each of your pages or posts is performing, using integrated Google Analytics data.
View top-performing posts or pages per author/contributor to the website as measured by visitors over a selectable period of time.
Find out when there is a possibility of duplicate content, like meta information or the content on a page.
Discover the page or post’s readability and compare it to keyword competitors.
Use along with Yoast, if desired. Compatibility is built in.
Want to be one of the first to get the Bruce Clay SEO plugin? We ship soon. You can watch our preview video and pre-register here!
Comparing Your Options
Now that you have a sense of what these 6 awesome WordPress SEO plugins do, here is a quick price comparison chart:
Plugin Free Version? Paid Version Cost SaaS? Domains Allowed Yoast SEO Y $89-$756.50 annually N 1 to 15 All-In-One SEO Pack Y $97 to $699 annually N 1 to unlimited SEO Ultimate Y $49-$500 annually N 1 to unlimited SEO Squirrly Y $29.99-$71.99 monthly Y 1 to 7 SEOPressor Connect N $9 monthly N 1 to unlimited Bruce Clay SEO WP N (first 7 days free) $24.95 monthly per domain Y 1 to unlimited
I want to know: Have you used any of the plugins in this list? Where do you think they have strengths and weaknesses?
https://ift.tt/2PuHJbL
0 notes
Text
The Awesome List: WordPress SEO Plugins
The Awesome List: WordPress SEO Plugins
The Awesome List: WordPress SEO Plugins was originally published on BruceClay.com, home of expert search engine optimization tips.
WordPress is a simple-to-use content management system that’s also free. It offers everyone from solo bloggers to the world’s leading brands a platform to create custom and powerful websites. No wonder almost a third of all websites run on WP!
Still, WordPress was made for users, not for Google or SEOs. That’s why SEO plugins exist — to plug in the holes with added functionality that helps your content be indexed by search engines and found by searchers.
As a marketer, content creator or analyst, how do you choose the best SEO plugin for your sites? Here, we’ll take a look at six plugins, their many features, and finally a price comparison chart so that you can compare them:
Yoast SEO
All-In-One SEO Pack
SEO Ultimate
SEO Squirrly
SEOPressor Connect
Bruce Clay SEO WP (our own)
Plugins often come in both free and premium versions; the premium versions unlock more functionality and service. I’ll address both versions where appropriate.
Plugin No. 6 is our soon-to-be-launched WP plugin, Bruce Clay SEO, which fills in the gaps left by other plugins on this list (see our list of what your SEO plugin is missing).
1. Yoast SEO
Yoast SEO is the most popular SEO plugin. It’s easy to use, driven by a simple user interface. The majority of people use the free version.
Here’s what the free version offers (from its plugin page):
XML sitemaps functionality at the push of a button
Full control over site breadcrumbs
Set canonical URLs to avoid duplicate content
Title and meta description templates
Content & SEO analysis to write SEO-friendly text
Snippet preview to show how your post or page will look in the search results (also on mobile)
Cornerstone content and internal linking features help optimize your site structure
Integrates with Google Search Console
Manage SEO roles to give people access to specific sections of the Yoast SEO plugin
Bulk editor to make large-scale edits to a site
Strengths: As a leading plugin, it’s driven by market awareness and brand presence. It’s easy to use. The free version is typically enough for most users. Weaknesses: It’s built for everyone and no one industry in particular. As a result, some users feel the SEO recommendations are too generic. In addition, even though it’s fairly simple to use, the features may seem overwhelming to beginners. Active installations: 5+ million Rating on WordPress: 5 stars
Yoast’s Paid Version
Yoast offers a premium version for annual fees ranging from $89 for one site up to $756.50 for 15 sites. Additional offerings of the premium version include:
News SEO, video SEO, local SEO and WooCommerce SEO extensions
Premium users get one year free access to a support team
Insights tool shows you what your text is focusing on so you can keep your article in line with your keywords
Multiple focus keywords to optimize your article for synonyms and related keywords
Automatic internal linking suggestions of posts to link to
Social previews to help manage the way a page looks when shared on social networks like Facebook and Twitter
Redirect manager to address redirect errors from Google Search Console, deleted pages and changed URLs
2. All-In-One SEO Pack
All-In-One SEO Pack offers entry-level features to assist with SEO for beginners. It also has advanced features and an API for developers.
Here’s what the free plugin offers (from its plugin page):
XML sitemap support
Image XML sitemap submitted to Google and Bing
Google AMP support
Google Analytics support
Support for SEO on custom post types
Advanced canonical URLs
Redirect attachment pages to parent post
Automatically notifies search engines about changes to your site
Built-in API so other plugins/themes can access and extend functionality
Provides SEO integration for e-commerce sites, including WooCommerce
Nonce Security built in
Automatically optimizes titles for search engines
Generates meta tags automatically
Avoids typical duplicate content found on WordPress blogs
For advanced users, fine-tune everything to optimize SEO
Override any title and set any meta description and keywords
Compatible with many other plugins
Translated into 57 languages
PHP 7 100 percent compatible
Strengths: As a leading plugin, it’s driven by market awareness and brand presence. Some users appreciate that you can turn off features you won’t need to use. Weaknesses: This plugin is built for everyone and no one industry in particular. Some people comment that the user interface is not as friendly as they would like it to be, and say that for true beginners, it might be too complex to understand. Active installations: 2+ million Rating on WordPress: 4.5 stars
All-In-One’s Paid Version
All-In-One SEO Pack offers a pro version for annual fees ranging from $97 for an individual to $699 for an agency. Additional offerings of the pro version include:
Advanced support for WooCommerce
SEO for categories, tags and custom taxonomies
Video SEO module
Access to video screencasts
Access to premium support forums
Access to knowledge center
3. SEO Ultimate
SEO Ultimate has the most robust feature set of the all-in-one-type WordPress SEO plugins. Check out its plugin page for more details on each of the following features.
Here’s what the free plugin offers (from its plugin page):
Title tag rewriter and meta description editor
Deeplink juggernaut
Open graph integrator
Rich snippet creator
Author highlighter
Link mask generator
Canonicalizer
404 monitor
Permalink tweaker
Meta robot tags editor
SEO ultimate widgets
Plugin settings manager
SEO/SEM-enhancing custom HTML
.htaccess editor and the robots.txt editor
Textboxes to the end of your posts/pages that contain automatically generated link HTML
Meta keywords for posts, pages, categories, tags, terms and the homepage auto-generated and editable
“Read more” links include the posts’ keyword-rich titles in the anchor text
Rel=”nofollow” settings when migrating from other SEO plugins
Dashboard of green/yellow/red indicators for SEO-friendliness
Buttons that make it easy for visitors to share content on social
Remove customizable “filler words” (like “the,” “with,” “and,” etc.) from post/page URLs
Access search engine webmaster tools
Strengths: This plugin has a nice set of robust SEO features. Also, the ability to import and export data from other sources, including other SEO plugins, is something users find handy. Weaknesses: The free version is no longer being updated for WordPress. Because the tool is advanced, it requires training to get the most out of it. Active installations: 100,000+ Rating on WordPress: 4 stars
SEO Ultimate’s Paid Version
SEO Ultimate+ costs from $49 for one site to $249 for 20 sites annually. $500 will get you unlimited sites. Additional offerings of SEO Ultimate+ include:
Structured data, schema and rich snippets
Global canonical manager
Alt attribute mass editor for images
Improved open graph options for social networks
The code inserter+ module
HTML and XML Sitemaps
Rel previous and next pagination optimization
SEO data transporter
4. SEO Squirrly
SEO Squirrly is an SEO plugin that aims to be an SEO advisor.
Here’s what the free plugin offers (from its plugin page – check it out for more in-depth information on each feature):
Keyword research
SEO Live Assistant
Audit Suite
Briefcase, keyword strategy assistant
Twitter Cards
Facebook Open Graph support for both images and video
LinkedIn titles, images and description for better sharing
Rich Pins for Pinterest
Snippet preview
Customize meta title and description
Sitemap
Blog feeds
SEO settings
Performance analytics
Works with multisites
Blogging assistant to help keep readers on the page longer
Strengths: Robust features. Works well with the WooCommerce e-commerce plugin. Weaknesses: The plugin is free if you do less than five posts per month on one site; otherwise, you need to upgrade to the paid version. Some features that used to be included free are now separate paid products, such as search engine rank tracking. Active Installations: 30,000+ Rating on WordPress: 4.5 stars
SEO Squirrly’s Paid Version
SEO Squirrly offers a premium version for monthly fees of $29.99 for pro and $71.99 for business. Additional offerings of the premium version include:
Up to seven sites
Full access to SEO Live Assistant
Unlimited optimized articles
Research on hundreds of keywords
Free images; find/insert tweets; find/insert wikis; find/insert news; find/insert blog articles
Advanced site analytics
Weekly audits on hundreds of pages
5. SEOPressor Connect
SEOPressor Connect is the most advanced of these SEO plugins, in my opinion.
This is a paid plugin ($9 per month), and just some of the things it offers include:
Multiple keywords analysis
XML Sitemap generator
SEOpressor over-optimization check
Canonical link
Progressive LSI keywords engine
301 URL redirect
SemantiQ density tells you if the content is related to keywords
On-page robot rules
Schema and Dublin Core markup support
SEOpressor site audit
SEOpressor local SEO
SEO trends
Google Knowledge Graph help
SEOpressor score manager for optimization
Optimize the homepage
SEOpressor smart link manager
On-page meta settings
Sitewide link policy
Facebook Open Graph customization
Automatic smart linking
Twitter Card customization
SEOpressor role settings
Strengths: Can be used on multiple domains and works well with other SEO plugins. Many people find it easy to use with a strong user interface. Weaknesses: Computes its own scores and tracks them over time, but lacks a connection to performance analytics data or search results. This means that the trends could be misleading since they don’t reflect how your content is actually performing in the search engines. Active installs & ratings: The plugin does not appear in WordPress’s plugin directory, so this data is not available.
6. Bruce Clay SEO for WordPress (now in beta)
While many of the above plugins compete with each other, our approach is different. Bruce Clay SEO WP

is meant to supplement and extend the free versions with powerful needed features.
We gathered input from industry practitioners on what they wanted to see in an SEO plugin. Then we designed our plugin not to replace the plugins you may be using, but to provide much more data than is available today.
Of course, our plugin provides capabilities similar to others as well, but that is just in case you’re not using any other SEO plugins.
What makes this plugin unique: It enriches your publishing workspace with SEO insights based on real-time search results and analytics. In other words, you can see beyond the page you’re working on, without leaving WordPress. It’s the integration with our SEOToolSet
and Google Search Console/Analytics that makes this possible.
The Bruce Clay SEO plugin works like software as a service (SaaS). Rather than a static one-size-fits-all checklist approach to optimizing a page or post, our plugin uses a live connection with the SEOToolSet software to analyze your keywords and competition in real time.
As a result, the optimization recommendations you see are customized. So your page can better compete in its specific ranking environment.
There’s no free version, but it’s priced affordably at $24.95/month per domain. (Try it! The first week is free — then you can decide if you want to keep it.)
As a bonus, plugin subscribers can also use the SEOToolSet itself. Data is shared between the plugin in WordPress and the user’s SEOToolSet account. Those who want to can run domain ranking reports and take advantage of many other external tools.
Bruce Clay SEO features are powered by patent-pending technology. WordPress users can:
Optimize a page or post for more than one keyword.
See clearly where keywords appear in the content through color coding.
Know which pages and posts are your top performers.
Identify problems with mobile usability and performance.
Check the site for duplicate content.
Evaluate top-ranked pages for your keywords in real-time.
Get recommendations for keyword usage in tags and content (even word count) based upon competitors.
Find out how much content has been written on your site per keyword.
See how each of your pages or posts is performing, using integrated Google Analytics data.
View top-performing posts or pages per author/contributor to the website as measured by visitors over a selectable period of time.
Find out when there is a possibility of duplicate content, like meta information or the content on a page.
Discover the page or post’s readability and compare it to keyword competitors.
Use along with Yoast, if desired. Compatibility is built in.
Want to be one of the first to get the Bruce Clay SEO plugin? We ship soon. You can watch our preview video and pre-register here!
Comparing Your Options
Now that you have a sense of what these 6 awesome WordPress SEO plugins do, here is a quick price comparison chart:
Plugin Free Version? Paid Version Cost SaaS? Domains Allowed Yoast SEO Y $89-$756.50 annually N 1 to 15 All-In-One SEO Pack Y $97 to $699 annually N 1 to unlimited SEO Ultimate Y $49-$500 annually N 1 to unlimited SEO Squirrly Y $29.99-$71.99 monthly Y 1 to 7 SEOPressor Connect N $9 monthly N 1 to unlimited Bruce Clay SEO WP N (first 7 days free) $24.95 monthly per domain Y 1 to unlimited
I want to know: Have you used any of the plugins in this list? Where do you think they have strengths and weaknesses?
https://ift.tt/2PuHJbL
0 notes