#File Shares Backup
Explore tagged Tumblr posts
Visit Tumblr Blog
Explore Tumblr blogs with no restrictions, modern design and the best experience.
Last Seen Tumblr Blogs


Fun Fact
Tumblr has a 66 index score for customer satisfaction in the US.
Text
i might get my computer back from repair finally with my original windows account and all my original files (not just ts4 stuff but my photos, music, psc6 and a computer and hopefully a computer with actual better upgraded storage that won’t crash again) but at this point im in full

mode lmfao, im burnt outttt ladthren ...
#shitpost#textpost#im gonna now be fully paranoid and constantly making backups of my folders#and not even just the ts4 folders i lost files in ex; tray/mods/saves/even the damn bin lmfao#but just folders of my photos/music/videos etc#till one day i get the cash to buy one of those epic win hyper boosted run on monster energy drink fuel gaming laptops lol#today was such a mixed day pretty good and reliving things i dont really want to share here happened#but also so fucking stresful and anxious i swear bc of one of those things dude#but tonight was super relieving and a lot of the stress and dumb over anxiety i had felt like were lifted off my back#just kinda drawing stuff the most i can and lounging nothing unusual; i guess ill get my laptop tomorrow so i hope theres zero issues#for at least 6 months bro cause i got a whooping with having to take and get and then take back my laptop for repair im whoplashed#also my sister didnt like i bough the vampires & realm of magic game packs instead of an expansion pack dhdjsnsnsjsjs#she said i couldve bought more fun ones but i told her it was mainly cause gamepacks are a lot cheaper in origin here than the expansions#which i swear expansion packs on origin where i live are $199 almost like $200 bucks which is why im still late on snowy escape/eco life#im rambling again what a surprise ok bye im off ily all
5 notes
·
View notes
Text
i just lost two years worth of writing
#all of my scrivener files are just gone#my backups are gone#the backups of my backups are gone#the backups of THOSE backups are two years old#i lost 150k words of fic and fic outlines#everything i've written for the interactive fiction piece#all the outlining i did over the summer for my original stuff#i have one fic that's okay bc i shared it with a friend a couple days ago but everything else is gone unless i posted it#and i haven't posted much over the past couple of years#there should be ways for me to get it back but everything is just gone#it's like scrivener did a hard reset#brooke rambles
3 notes
·
View notes
Link
The terms “Cloud storage” and “Cloud backup” continue to puzzle many users while they are choosing a service. Both of these services do have some important differences. Cloud backup or online backup services has been for quite some time, earlier the Cloud storage, also called Online storage came into existence. The Cloud storage can be seen as an addition of the Cloud backup only as along with backing up data the Cloud storage does offer some extra features such as access and collaborative sharing.
#back up#cloud storage#online backup#secure cloud storage#file sharing#data transfer#file sharing platform#large file transfer
4 notes
·
View notes
Text
How Slack is Important For Smooth Workflow of your Business
Enterprises always desire to have extra safeguard and segregated backup of their cloud data residing in the software as a service application like a slack cloud-to-cloud backup and G-suite cloud to cloud backup. Slack is an incredible management tool that is important to all big enterprises. Slack is a powerful tool that is very beneficial for your business. Slack is actually considered a messaging app. It is entirely free to use. The main idea here is to make Communication easier. It makes the workflow smoother with advanced features and also improves collaboration. Here are the different benefits of Slack for your business.

Organized Communication:- Slack is famous for its excellent organization of live chat conversations. In Slack, you will find channels, posts, and threads. They all work similarly to what a classic form looks like. The perks of such an organizational chat system come into play when you want to retrieve information or catch up on vital Communication. When you compare this application to other messengers, its benefits will become apparent.
Outstanding Integrations:- Slack is incredible when it comes to integrating with other platforms like Google docs or Facebook. This tool is excellent and centralizes all the essential information. In this way, your team will spend less time finding information and data and more time analyzing it. You don't have to ask who has the passwords and who has access to reset the password email. You have to take the picture from your graphic designer in one Slack channel, and you can repost that picture into another channel.
Remote Work:- Slack is a versatile tool in its offerings. You can access it from the web browser, through apps, iOS, and Android. The apps are amazingly well designed and work as intended. It is easy to do what you need to do immediately. Your team will spend less time thinking about how to get a message across and more time discussing, feeding new ideas, and getting work done.
File-Sharing:- As we are into the WordPress plugin system, we intend to share a number of files regularly. A number of times, this comes in the sort of beta versions of our new plugin releases. Slack makes it easy to share these files instantly with our entire team. It also has Dropbox integration for more in-depth file access. File-sharing is more important for getting more closer to your team.
#slack#software#Gsuit#file sharing#office#office work#office software#data sharing#backup#cloud#cloud storage#cloud backup#network#office tools
3 notes
·
View notes
Text
Sims 2 Archives
I’m trying to make a list of archives of old Sims 2 sites / content / programs. So many old threads point to dead links. Luckily, I know my way around the Wayback Machine so I can help people access stuff.
Sim Wardrobe AKA Paladin’s Palace: https://web.archive.org/web/20171110182145/http://simfileshare.net/folder/15672/
[when you try and download from here, you’ll get a message from the archive saying ‘This site already exists on the web’. Just copy the URL that appears and paste it in a new tab to download the item]
Sims 2 Categoriser No-setup: https://simfileshare.net/download/257955
More links coming soon xx
#sims 2#ts2#ts2 archive#simswardrobe#simwardrobe#sim wardrobe#sims 2 categoriser#sims 2 categorizer#sims 2 program#ts2 backup#sim file share
2 notes
·
View notes
Link
We provide all the services related to Linux Cloud Shared hosting services with cPanel, free website builder, ftp & file manager, video converter, latest scripting support, data security & backup, latest PHP & mysql version & other web related services like infrastructure management, cloud vps, dedicated server, linux cloud shared hosting, windows cloud shared hosting, ssl certificate, malware scanner, website backup, Gmail with Gsuite, business email, PPC Ad management, Search Engine Optimization, Search Engine Marketing, website content marketing, social media marketing, email marketing, responsive website design, mobile app design, e-commerce website design, CMS website, email template design, Amazon Cloud server at a very affordable cost.
1 note
·
View note
Link
StoreSense.io is a new cloud service offering with the goal of empowering small and medium sized businesses by simplifying their IT needs. We will be offering a software-based cloud storage solution in the first half of 2023 while developing our on-premise hardware solutions, set to release later this year. Please see the Products page on our website for more detail.
Link: https://www.indiegogo.com/projects/storesense-io
0 notes
Text
best online backup

Backup service use to back up data from your hard drive to a remote server or computer using a network connection. Open drive https://www.opendrive.com/ provide best online backup services protect you against the loss of valuable data, whether it's the result of crashed hard drive or an unintentional deletion.
#online storage#online storage and backup services#best online backup Online file sharing#best online backup
0 notes
Text
Sorry about the flood of posts over the last few days. Here’s an explanation & general talk about me vs. the Tumblr exodus.
tl;dr I’m going overseas tomorrow, so don’t worry if I disappear for a few weeks. Also, I send you lots of fanart links.
Since Tumblr announced they’d be removing a whole load of posts on Dec. 17, I hurried to reblog pretty much everything in my likes page (several thousand posts) out of fear of losing anything. I’d originally planned to slowly publish these at about 6 posts a day for the next year or two. Ouch.
Tumblr flagged many posts from artists who have long since left the platform (but still have great art, or other things that I care about keeping) leaving no way to appeal the content ban. Also, I have no way of knowing if they’d flag more stuff between now and Dec. 17, so I decided to just reblog everything that was stuck in my “Likes” limbo for use with the backup tool. (you can find it on github at bbolli/tumblr-utils )
It was a real struggle to get everything posted in time before I head to China (even if I had bothered to get a proxy to access Tumblr from over there, it would be an immeasurable pain to try and reblog so many things on a phone with an already busy itinerary).
I created additional dud blogs to hold all the posts because of tumblr’s daily post limit. If you’d like my usual flavour of content fix, this is all you’re going to get from me for a while. (Each blog has about 250~500 posts, but unfortunately, nothing is tagged due to time constraints, so I’m afraid there may be Spicy Things in there)
@meloned-pope @melone-pope @lemon-pope @molon-pope @molen-pope(deactivated) @nomel-pope @nolem-pope @melon--pop @hierophant-queen (special thanks to @lord-of-the-shiny-melons for doing me a solid running the last one there, so I could actually sleep this morning.)
This entire process was HELL and the hatred it instilled in me is powerful enough to light a small village on fire.
I don’t know what I’m going to do with this blog when I return home (Dec. 20) but if a good deal of people end up moving to Pillowfort, I’ve been there for months! (username: MelonPope) I would like to start using it more, but I don’t expect a lot of people are going to go for it until they drop the registration fee. And the kind of blog I run depends on other people using the platform, as my original content is kind of sparse (putting it politely). I might make a twitter, but ehh. I guess I’ll be on Tumblr for a while yet!
Most of my other social networking is done in discord servers:
I use Discord a lot, especially @jotakakdiscord and “JoJo & Chill” owned by @volbeatic. If you check the post on my blog juuust before this one, you should see a link to the application for it.
Until then, have a nice December! I hope you’re having a less stressful time than I am...
#melonstuff#text#i love pillowfort but i acknowledge it's nowhere near ready to take over for tumblr's userbase.#i'm not sure how to categorise all the lovely saved art i've collected here.#it's hard to keep both sourcing and permanent file backup.#i guess pinterest has these sorts of things but#it also seems like a huge disaster.#anyway please let me know if you have good suggestions wrt that because i like sharing galleries with tags that i can send to friends.
3 notes
·
View notes
Text
SlideShare: How to Design a Compliant and GDPR Ready Collaboration System
Latest SlideShare: How to Design a Compliant and GDPR Ready Collaboration System
Users need to collaborate on projects, which means sharing file data with other internal users as well as external business partners. More often than not, to accomplish this file sharing, they leverage cloud-based file-sync and share solutions. The problem is that cloud-based services limit the organization’s visibility into who is sharing that data, how, and with whom they are sharing it. It…
View On WordPress
1 note
·
View note
Photo

⋒ Patch day tomorrow…July 26th ⋒
My to-do list today:
Back up my saves.
Remove all mods - UI mods, script mods-everything that affects core game behavior. In other words, if it makes the game function differently, take it out. (I keep them in numbered folders so I can grab them all and move them outside of the mods folder.)
Delete the file localthumbcache.package from your Sims 4 My Documents folder.
The save I plan to play in after the patch: open it without mods installed and create a new save point using “save as”.
• If you don’t want to deal with things breaking right away, turn off automatic game updates. Go to Origin > Application settings and look for the heading Client Update and make sure it is grayed out to turn off auto updates.
Then, go into offline mode through Origin before you start your game. It won’t prompt you for an update.
• Last but not least, please please be patient with the wonderful creators of custom content and mods. Quite a few things will probably get changed behind the scenes with this patch and EP. They are people, too. They may want to just play the game like you. Give it time, give them grace.
And hopefully, we won’t have too many tears tomorrow ..lol!
The Cats and Dogs EP corrupted all my saves and I have a routine now that has worked for me.
And if you have something to add, please do. I really do believe in “sharing is caring.“ It is how I have learned so much over the years.
↪ Status Updates on Mods - very helpful list
TIPS FROM OTHER SIMMERS
• From @mellindi :: I usually move my saves and mods folder from my Sims 4 folder before I update just to be safe. Not sure if it makes a difference or not but I'm not trying to have none of my saves corrupted lol
• From @gednaaahhh :: I backup my Tray as well as mods and saves folders. I've lost my tray after an update before, which was devastating at the time. All my long time played families gone, never to be seen again... So please backup your tray often! :)
Happy Simming! 😊
1K notes
·
View notes
Photo

– Now even faster upload and download functionality.
The time spent to upload and download the files is so much time-consuming and irritating for everyone. Solving this problem SMAC Cloud gives a lightning speed of downloading and uploading your all valuable files, images, videos, documents, audio, etc. Now, the time-consuming time is wisely spent by all SMAC Cloud users.
– Multiple uploads and downloads via a single click.
Complications with single upload and download in cloud storage. Stay with SMAC Cloud and enjoy the recent feature in which you can select multiple downloading as well as uploading your files and folders. Take a break and enjoy the seamless feature of SMAC Cloud.
– File Sharing Platform.
Unable to share your stored files and folders to your known ones. Take a look at SMAC Cloud and enjoy the experience of sharing all your files and folders securely by just creating a link. SMAC Cloud an enormous file sharing platform that gives various options of file sharing to all the users.
#back up#cloud storage#online backup#secure cloud storage#file sharing#data transfer#file sharing platform#large file transfer
4 notes
·
View notes
Text
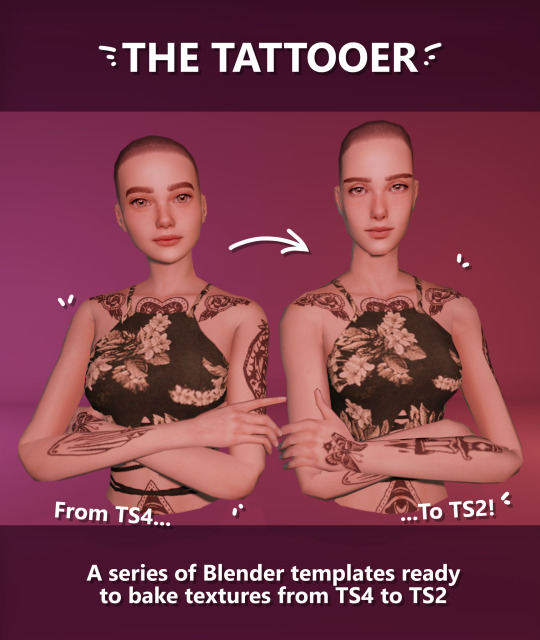
Introducing... The Tattooer!
[This version is OUTDATED! Please, check the new version here. I updated the workflow, skipping a lot of unnecessary Photoshop editing. It's way faster! I'll leave this old version and files up though, for archiving purposes. But yeah I still totally recommend you use the new version!]
Finally! I’ve been working on this for so long and I couldn’t wait to share it. This is a series of Blender template files already set up to quickly bake textures from The Sims 4 to The Sims 2. Really neat for cc creators! The different Blender files will allow you to:
-Bake body textures from TS4 to TS2 (Female) -Bake body textures from TS4 to TS2 (Male) -Bake body textures from TS4 (Female) to TS2 (Male) -Bake body textures from TS2 (Female) to TS2 (Male) [Bonus!] -Bake head textures from TS4 to TS2 (Face + Scalp) [Experimental]
Check the file names to see which one is which, and the resolution of the baked texture it will give. Download! SFS / GD
Everything you see in the render above was converted using those Blender files. I only did a couple tiny edits to the eyes and lips to fix them. These templates were made mainly to bake and convert tattoos, but there’s more you can do with them if you get creative. I have to say, these are NOT perfect. Check out the eyebrows on the render above. They look a bit wonky compared to the original, don’t they? I left them as is to keep your expectations with these as realistic as possible. Results may vary depending on what you are trying to convert, so! With that in mind, this is all the stuff you will be able to convert almost seamlessly from TS4 to TS2:
-Tattoos. -Other body details such as body hair, scars, freckles, supernatural/occult details… -Body painted underwear and swimwear, as well as some other clothing that’s mostly painted on the body. -Socks, stockings and maybe leggings. -Even skintones! In some areas they will look weird, so I recommend editing and blending them with other existing TS2 skins. -Makeup. Kinda bad but hey it works! Eyeliner and anything that is around the eyes looks terrible for now, but other stuff like blush may look just okay. -Eyebrows and maybe beards. A bit of hit or miss with those. -Hair scalps. Very useful when converting some hairs! Although keep in mind part of that texture might also need to be baked on the face mesh, you know, that hairline makeup stuff.
Got your attention? Nice! Editing some of the textures from TS4 to match the UV mapping in TS2 using a 2D editing program can be incredibly hard. That’s where texture baking in Blender comes to the rescue!
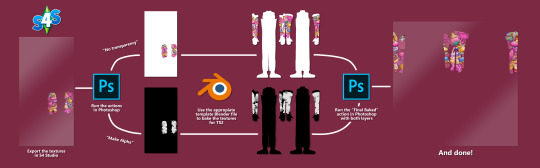
It is recommended you download Blender version 2.91.0, which is the one I use. Don’t worry, it’s free! There’s also 3 Photoshop actions you will need to set up the textures for baking and then putting them back together, because unfortunately Blender doesn’t support transparencies in that baking process, so that takes a couple extra steps to make it work, but I think it’s still pretty fast and easy. And just in case Tumblr manages to blow up or something, I decided to include a pdf with the upcoming tutorial that will guide you step by step with all this process, so if this post gets deleted somehow (I really hope not!), you will still have that pdf as a backup archived.
You can download Blender here. Personally I recommend picking the fourth option, “blender-2.91.0-windows64.zip”, which is a portable version and doesn’t need to be installed. You will also need Sims 4 Studio to extract the original Sims 4 CC textures you want. As for Photoshop… I’m not going to tell you to buy that subscription service and give Adobe some undeserved money, so… yeah, there might be some other options out there to get it (very legit, yes yes).
So, before we begin, let’s clear out some questions you might have. What the heck is this texture baking thing and what does it do? Well, let’s imagine you have a projector and point an image into a blank wall. Then you pick up some brushes and start painting and copying that projected image in that wall. Texture baking is kinda like that when it comes to 3D models. You align two models and match them as closely as you can in shape and form, and once you adjust some parameters and values, Blender does the rest for you: it will give you a new texture for a new model with a different UV map. These files I’m sharing have everything already set up, so it’s a matter of plopping in that Sims 4 texture and you will get that new texture for TS2 in just a few clicks.
This tutorial assumes you know literally nothing about how to use Blender, so if you feel uncomfortable with it, worry no more! This will guide you with pictures showing where you need to click and explaining what is happening. For Sims 4 Studio and Photoshop the process might be a bit less detailed, but still this should be pretty beginner friendly. For this tutorial, I will use some tattoos as an example. Alright, enough with the rambling. Let’s get started!
·EXTRACTING TEXTURES AND EDITING THEM WITH PHOTOSHOP: First things first, you will need to extract as pngs all the textures you want to convert from TS4 using Sims 4 Studio. Once you’ve done that, open them up one by one in Photoshop and run the “No transparency” action. This will remove the alpha channel from the image, getting rid of all the transparency. Go ahead and save a png copy of it. Then run the “Make Alpha” action on those same swatches (from the beginning, make sure you’re not running the action on an already edited swatch!), which will only show the alpha channel of the image in black and white, and save another copy of that. You should have 2 textures for each tattoo swatch. For the “No transparency” action I like to name it BASE (And your swatch number or name), and for the “Make Alpha” action I usually name it ALPHA (And that same swatch number/name). I recommend saving them in different folders named BASE TS4 and ALPHA TS4 respectively to keep it organized. If you want to make this much faster in Photoshop, there’s an automation option in it that allows you to run an action through a batch of files in a folder and then saves it all. I won’t cover how to do it in this tutorial, but you should be able to find it easily on Google by searching something like “Photoshop automate batch”. It’s really powerful and will make your workflow with actions much faster. Definitely recommend learning about that!
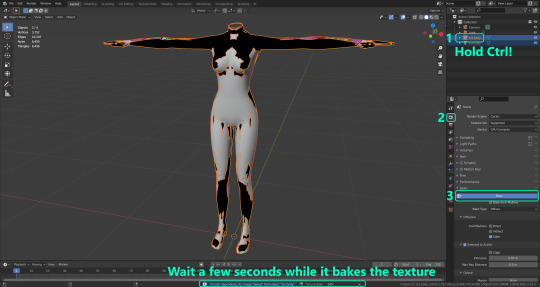
·BAKING THE TEXTURES IN BLENDER: PRELIMINARY STEP 1: CONFIGURING BLENDER’S GRAPHICS SETTINGS: Open your preferred Blender file depending on what you’re going to bake and the desired resolution (in this example I’m going to use the AF-body-4t2-1024 file). Before we start messing around in Blender, there’s one thing you should set up. It is a onetime step, and once it’s done, you won’t need to do it again. So, does your computer have a dedicated graphics card? If you don’t know or you’re not sure, just skip to the next step. Configuring Blender so it uses your graphics card instead of your CPU will make the baking render much faster, so it is recommended you set it correctly. If your computer has a dedicated graphics card, click File (1) > Preferences (2) > and on the window that pops up click System (3) > and select CUDA and make sure your graphics card is there and tick it (4). I have an Nvidia Graphics card but your case may vary. Once you’re done, click on the tiny button on the bottom left corner and Save Preferences (5).
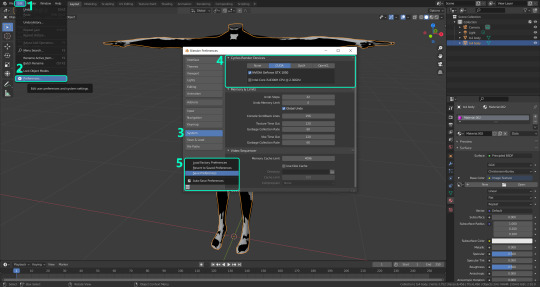
PRELIMINARY STEP 2: CHOOSING THE RENDERING DEVICE: Click on the tiny camera button on the right, called Render Properties (1), and on Device (2) select GPU Compute if it’s not already selected. If you’re not sure if you have a graphics card or not, just select CPU. Then select the Material Properties tab (2) and Save your changes, either by pressing Ctrl + S, or clicking File (4) > Save (5). Okay, time to get into the good stuff!
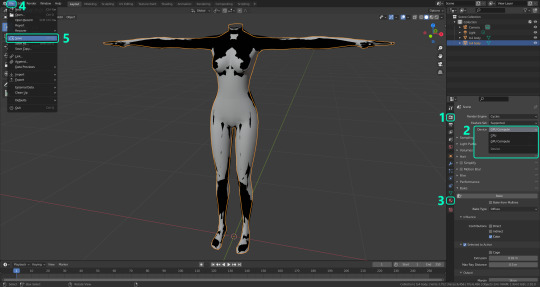
·STEP 1: LOADING YOUR TS4 BASE TEXTURE: In the Material Properties tab, click the folder icon that says Open (1) and on the window that pops up, navigate through your folders and select your first texture. For now we’re going to bake the BASE texture, so go to that folder where you saved the edited “No transparency” image. To navigate easily, the 3 buttons on the top right (2) are for the display mode. They will show your files in list mode, vertical and horizontal, and the one on the right will display the file thumbnails, pretty useful if you want to easily see your images. And the icons on the left side (3) will let you go one folder back and forward, go to the parent directory, and refresh the folder in case you just dropped something new in there. Double click on the image you need and that will load it into the Sims 4 body model, named “ts4 body”.
·STEP 2: SETTING UP YOUR SELECTION AND BAKING THE TEXTURE: On the top right of the screen, you will see the names of the 2 models in the scene. Hold the Ctrl key in your keyboard and left click on the “ts2 body” model (1). If you did it correctly, you should see “ts2 body” in a yellowish orange color, and right down below, “ts4 body” should look more like a red orange. If not, try again by clicking first on ts4 body, and then while holding Ctrl click again on ts2 body. Then switch to the Render Properties tab by clicking the tiny camera icon (2) and click Bake (3). Depending on your screen resolution, you might need to scroll down a bit with your mouse to see the Bake button. Wait a few seconds for it to finish. You will see the progress percentage down on the bottom of your screen. Don’t panic if you notice your computer fans start ramping up, that’s completely normal! As I said in the beginning, using your GPU will bake the textures much faster than the CPU.
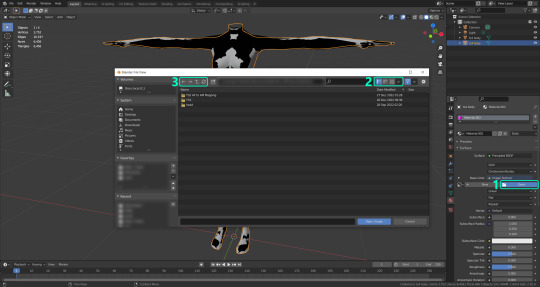
·STEP 3: SAVING YOUR NEW TS2 TEXTURE: Once it’s finished, switch to the UV Editing Mode by clicking “UV Editing” on the top of your screen. And there it is: your new texture! You might have to scroll up your mouse wheel a bit to zoom in and see it in all its glory on the left side of the screen. We’re still not done yet though. You need to save it to yet another new folder (always try to keep your stuff organized!).
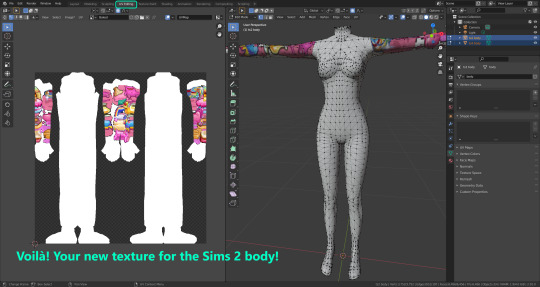
You can save it by pressing Shift + Alt + S, or clicking on Image* (1) and then Save As… (2). That will pop a window where you’ll need to navigate again and save it somewhere. Give it a proper name (3) and hit Enter to save it… well, Enter doesn’t always work for me for some reason, so if that happens just click Save As Image (4). In this case, I personally like to call it something like “BASE TS2”.
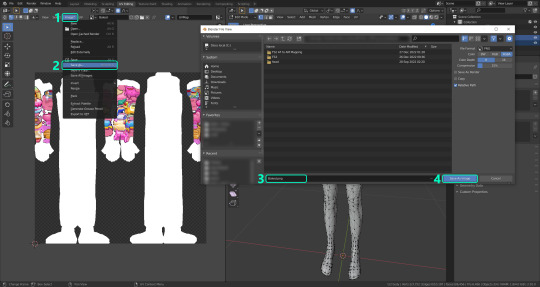
·STEP 4: GOING BACK TO STEP 1: Alright! So you have your new baked base texture, but we still need to bake the alpha channel to give it its transparency. In order to go back to step 1 and start the process once again, click Layout (1), go back to the Material Properties tab (2), select “ts4 body” (3) and click on the folder icon (4) to open and load the alpha texture you did in the beginning in Photoshop.
Then it’s just a matter of repeating the process from step 2: bake the alpha channel and save it again as a new image (watch out, don’t overwrite your previous image!). This one I like to name “ALPHA TS2”. When you’re ready to move on, close Blender without saving. If you see a small check telling you it will save some images, make sure you uncheck it, so you will be able to use it again in the future from the starting point with no issues. I don’t think it really matters if you accidentally save your progress in these files, but I like to keep it clean and fresh so I can do the process where I left it from the beginning the next time I open it. And in case you mess up and save somewhere, you can always just delete the .blend file and download the template files again.
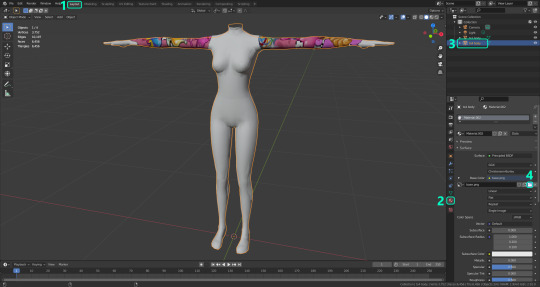
·FINAL STEP: PUTTING EVERYTHING BACK TOGETHER IN PHOTOSHOP: We’re almost done! Open Photoshop and drop in both your 2 new baked textures, “BASE TS2” and “ALPHA TS2”. Keep both layers on top of each other and aligned. For that you can enable the snapping in View > Snap to… > All. Rename these layers so the Alpha layer is “ALPHA” and the Base is “BASE”, and make sure ALPHA is on top.
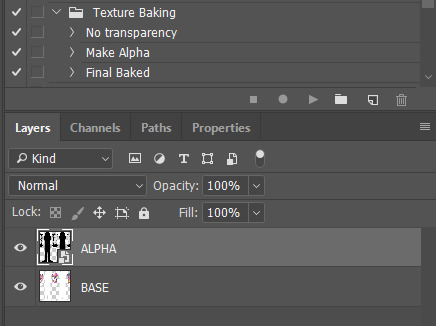
Then run the “Final Baked” action and now for real, it’s finally over! You just fully baked and converted these new textures. Congratulations!
So, to summarize, here’s a small guide with all the steps of the workflow I developed. Once you get the hang of it, baking and converting one swatch of a texture just takes a couple minutes. It really is that easy!
One small note though, some of the baking blend files save the textures with a resolution of 2048x2048 pixels, as clearly stated at the end of their file name. That’s way too overkill, because TS2 only properly supports up to 1024x1024 for most of its textures and you should always resize your final product to that max resolution. I just made those 2048 versions because there might be some really tiny and slim details on some tattoos that may look a little too blurry when baked into a 1024 resolution, so for those cases use that if you want and then resize them in Photoshop. In the Resample mode of the Image Size menu, there are a few options to choose. For the fine details, I like the Nearest Neighbor (hard edges) option, which, even if it looks a bit pixelated, it still preserves most of the texture and quality.

For anything else, I would just directly bake them using the 1024 versions in Blender.
And for the folks who feel comfortable playing around in Blender, this is just the beginning! Texture baking opens a LOT of possibilities, so feel free to move stuff around and edit the models to your liking! If you notice the baked textures look warped or stretched somewhere, or don’t like where some textures are placed in the S2 body, poke around that area moving stuff and then give it another try. The main objective of the baking process is keeping both overlapping models as close in shape as possible. You may also edit and save new copies of the templates, or make new ones from scratch using mine as a reference (keep a close look on those Baking settings and values, I think they work pretty well) and share them if you want to. Go ham, do whatever you want with them! I have plans on making templates to convert body textures from Sims 3 to Sims 2, but for now it’s not on my priorities, so we’ll see when that happens.
Whew! Hope none of this was too confusing. Need help or have any issues with these? Please ask/message me and I’ll be glad to help when I’m able to!
Credits for the CC used in the render demonstration: -Skin by Sims3Melancholic -Eyes by Northern Siberia Winds -Eyebrows by PeachyFaerie -Tattoos by xtc -Top by SerenityCC
And the Tattoo I used for the tutorial can be found here, by ValhallanSim
Last but not least, a huge, special thanks to @elvisgrace for all her help testing this for me. I’ve never shared Blender files, so hopefully everything works as intended and everyone can use them with no weird issues. Fingers crossed! And thank you for reading! Hope you have fun playing with this new toy hehe.
#ts2 tutorial#ts2 resources#ts2 blender#ts2 overlays#ts2 texture baking#4t2 conversion tutorial#i swear blender is the coolest thing ever#yes you can consider this post as blender propaganda
319 notes
·
View notes
Text
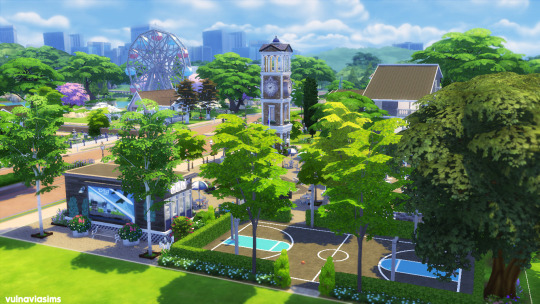
A new SAVE FILE!
Hooray!
Hi everyone! I am glad to introduce you my sims savefile.
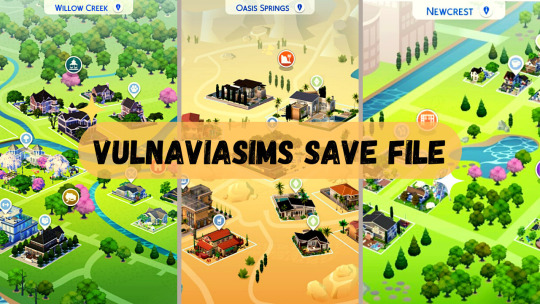
I've been working on it for at least a year, and now it's finished! I had so much fun building and furnishing, I absolutely love every single lot in the game, so I decided to share it with you and opened this tumblr to illustrate this new world.
Without going too far, I summarize the main points:
♡ you can download the save file HERE.
♡ I used all the packs, kits and expansions, updated to 3 january 2023. NO CC or MODS used.
♡ I modified all worlds except Baatu.
♡ no new Sim households have been added, but I changed them a bit and downloaded some from the gallery, special thanks to ObsidianLilith and Simyim, because they make incredibly beautiful sims! I invite you to follow them and see their fantastic creations.
♡ I furnished and built almost all of the lots. Some were so beautiful that I have included them, but there are very few. In this tumblr I will show you all the lots, and I will definitely tell you which ones are not mine (for example the Willow Creek museum).
♡ I always put a sugar skull in my creations. will you be able to find it?
♡ last but not least: every house has an umbrella stand and an air conditioner! it's very important to me LOL
♡ once you have inserted the file in your saves folder, you will have to click on Izzy Fabulous and his sister, as you will see in the image:

Please do tag me if you end up playing in this save file. I’d love to see what you do with it! Thanks for checking this out!
If you have any quastions please feel free to ask.
WHAT IS A SAVE FILE?
"A save file in Sims 4 is essentially a backup file of your playtime in the game. It contains everything that you’ve played up to that point. One save file can be uploaded on the internet and shared among all players. You can also download a save file from someone else and load the game from their save point.
Your Sims 4 save file is located in Documents/Electronic Arts/The Sims 4/Saves, or a similar mods directory, depending on where you’ve installed the game. But generally, you can find your save file in your Saves folder. And if you’re using Mac, you could find it via the finder application that you have installed. Just keep in mind that if you are searching for mods or custom content, you can find them in the Sims 4/Mods directory, however the rooms, the characters, and lots you’ve created can be found in the tray folder.
When you download a save file from the internet, you should paste it into your Saves folder too. Keep in mind that you can have multiple save files in this folder. The important part is to select the save you want to load when you launch the game via the main menu." (source snootysims.com)


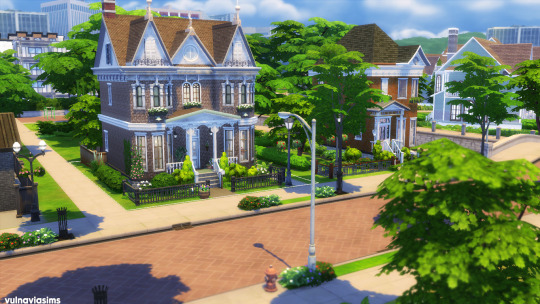
#ts4#ts4dowload#ts4 download#the sims save file#the sims 4#the sims community#the sims screenshots#vulnaviasims#vulnaviasims save file#the sims build#the sims world
310 notes
·
View notes
Text
Online Storage
Open drive https://www.opendrive.com/ provides online storage services for all types of businesses. They strive to be number one in customer support and having a real person to finger every interaction you have with them is just one of the ways they complete this.
#online storage#online storage and backup services#best online backup Online file sharing#best online backup
0 notes
Text
also I have to take a sims break for a bit cause my wrist is starting to get really fucked up. literally what am I going to do with myself
#babys in the full thrall of sims 2 right now i CANNOT think of anything else#and watching other people pisses me off im working through it since its hard to read sims stuff on my phone#and also its hard to find these days unless youre on the ONE backup of SOME exchange stories#whatever im thinking of trying to track down this website i used shortly after the exchange went down#or maybe even while it was in the process. idk i remember going to the site one day and seeing the shut down message#and i was so sad i never went on it again :(((((((#i miss the exchange man. well i mostly miss the ease of storytelling#i probably wouldnt be so into the file sharing aspects of it now lol that part is fucked
0 notes