#Fonts to HTML in Base64 Encoding
Explore tagged Tumblr posts
Visit Tumblr Blog
Explore Tumblr blogs with no restrictions, modern design and the best experience.
Last Seen Tumblr Blogs


Fun Fact
Tumblr’s website traffic is steadily declining.
Text
It's not impossible to embed a font in a standalone HTML document; if you wanted to get a little nuts, you could base64-encode the font file in question and embed the font data in its entirety in a @font-face rule in a CSS block in the HTML document's header.
Just downloaded a PDF off of itch.io that's over 100MB in size in spite of being a whole ten pages long because every single page – even the ones which contain nothing but text – is an uncompressed 300ppi bitmap. Like, buddy.
2K notes
·
View notes
Text
Metered License Support & Export Fonts to HTML in Base64 Encoding in Java Apps
What's New in this Release?
Aspose development team is happy to announce the monthly release of Aspose.Words for Java 17.2.0. This month’s release contains over 51 useful new features, enhancements and bug fixes.Here is a look at just a few of the biggest features and API changes in this month’s release. Support of Metered License, Export fonts to HTML in Base64 encoding, Added HtmlSaveOptions.ResourceFolder and HtmlSaveOptions.ResourceFolderAlias public Properties, Exposed access to Height/Width of Text Frames, Improved control over BiDi text direction elements and Non-bidi fields that contain hided bidi whitespaces are properly resolved. Starting from this version, Aspose.Words for Java provides the functionality to use metered licensing mechanism. Aspose.Words allows developers to apply metered key. It is a new licensing mechanism. The new licensing mechanism will be used along with existing licensing method. Those customers who want to be billed based on the usage of the API features can use the metered licensing. It has introduced new property HtmlSaveOptions.ExportFontsAsBase64. This property allows user to embed fonts resources to HTML in Base64 encoding. This release has introduced new property HtmlSaveOptions.ResourceFolder. This property is used to Specify a physical folder where all resources like images, fonts, and external CSS are saved when a document is exported to HTML. The default value of this property is an empty string. This release has also introduced new property HtmlSaveOptions.ResourceFolderAlias. This property is used to specify the name of the folder used to construct URIs of all resources written into an HTML document. The default value of this property is an empty string. The list of new and improved features added in this release are given below
Support of Metered License
Export fonts to HTML in Base64 encoding
Added HtmlSaveOptions.ResourceFolder and HtmlSaveOptions.ResourceFolderAlias public properties
Exposed access to Height/Width of Text Frames
Improved control over BiDi text direction elements
Non-bidi fields that contain hided bidi whitespaces are properly resolved
Support the dir and the bdo elements
Date Field with mixed bidi/non-bidi formatting.
Add CssFolder property to HtmlSaveOptions
Discrepancy between HtmlSaveOptions and HtmlFixedSaveOptions regarding ImagesFolder and FontsFolder properties.
More horizontal spacing between paragraphs of the same style when exporting to HTML
Review when Word ignores strokes with weight less that 1 pt
Document.UpdateFields updates the INDEX field incorrectly.
List numbering resets when rendering Aspose.Words generated DOCX to PDF with Adlib
Dash symbol is rendered as unknown while saving SVG to PNG.
System.OverflowException while open html document
Metered License
Math equation's alignment is changed in output Pdf
Document.Compare returns incorrect revisions
Left indentation of list items is incorrect in generated ODT
pic:pic element is not written during RTF to DOCX conversion
Cell's background-colors is not correct in output Html/Docx/Pdf
Footnote line renders higher in PDF
/hidden cell break/ When Converted To PDF, text in output file is not on same page like in original Word document.
Page break is lost after re-saving WordML document
Attributes related to FitText are improperly read into the model of the .DOC document.
Docx to Pdf conversion issue with TOC item rendering
Single Solid-line in word document converts double border for the images in HTML
Docx to HtmlFixed conversion issue with table's borders
StyleCollection.addCopy - Breaking the Multi Level List numbering for Heading styles
A text overlaps on top left logo image in PDF
Extra TOC entry is rendered in output Pdf
Bookmark missing after open and resave document using Aspose.Word
Header contents are lost after conversion from Docx to Pdf
Docx to Pdf conversion issue with hyperlinks
When DOCX is saved as PDF by using a FileStream or MemoryStream, then the output document is missing some elements.
Position of SmartArt elements are changed in output Pdf
Docx to Pdf conversion issue with hyperlinks
Document.Compare increases the Table's cells
List numberings changes from alphabets to numbers during rendering
UpdateFields truncates text in bookmark cross-reference
A formula errors to "divide by zero" when calling UpdateFields
Charts become invisible in output HtmlFixed
Word to PDF conversion create "double encodes" hyperlink
Some text content is repeated in rendered document
Rtf to Doc conversion issue with page numbers of TOC field.
When open document, a Aspose.Words.FileCorruptedException occurs.
HTML document has no <link> to external CSS file when callback is used
Horizontal Axis of chart does not render correctly in output PNG
Other most recent bug fixes are also included in this release
Newly added documentation pages and articles
Some new tips and articles have now been added into Aspose.Words for .NET documentation that may guide you briefly how to use Aspose.Words for performing different tasks like the followings.
Export Fonts to HTML in Base64 Encoding
Working with HtmlSaveOptions Properties
Overview: Aspose.Words
Aspose.Words is a word processing component that enables .NET, Java & Android applications to read, write and modify Word documents without using Microsoft Word. Other useful features include document creation, content and formatting manipulation, mail merge abilities, reporting features, TOC updated/rebuilt, Embedded OOXML, Footnotes rendering and support of DOCX, DOC, WordprocessingML, HTML, XHTML, TXT and PDF formats (requires Aspose.Pdf). It supports both 32-bit and 64-bit operating systems. You can even use Aspose.Words for .NET to build applications with Mono.
More about Aspose.Words
Homepage Java Word Library
Download Aspose.Words for Java
Online documentation of Aspose.Words
#Fonts to HTML in Base64 Encoding#access to Height of Text Frames#access to Width of Text Frames#Html Save Options#Java Word Processing#Java Word API#Metered License Support
0 notes
Text
Button text html

Button text html how to#
Button text html pdf#
Button text html generator#
Button text html code#
Button text html Pc#
How Base64 encoding and decoding is done in node.The problem occurs if you try to change the text of a button more than once in the same session (using innerHTML).
Button text html Pc#
Note: The innerHTML method has a problem when run on Netscape 6.2 and 7.02 on the PC (and possibly other versions).
Node.js Image Upload, Processing and Resizing using Sharp package Changing html content using JavaScript and CSS.
Actions must be added to buttons using JavaScript or by associating the button with a form. No action takes place by default when a button is clicked. Any text appearing between the opening and closing tags will appear as text on the button. • Upload and Retrieve Image on MongoDB using Mongoose The element is used to create an HTML button.
Button text html how to#
How to Upload File using formidable module in Node.js ?.
Button text html pdf#
How to display a PDF as an image in React app using URL?.
How React Native Make Mobile App Development Simpler?.
Getting started with React Native? Read this first !.
How to change the text and image by just clicking a button in JavaScript ?.
How to change an input button image using CSS?.
It specifies a link on the web page or a place on the same page where the user navigates after clicking on the link. A href attribute is the required attribute of the tag.
ISRO CS Syllabus for Scientist/Engineer Exam Add a link styled as a button with CSS properties. W3Schools offers free online tutorials, references and exercises in all the major languages of the web.This input can be converted to a toggle button. In web development, an HTML radio (or checkbox) input is used to get true and false value on checked and unchecked events respectively. Basic button and input style The height and vertical alignment of buttons and inputs is determined by the combination of borders, padding, font-size, and line-height. ISRO CS Original Papers and Official Keys A toggle button is a visual element of the user interface that is used to switch between two (true/false) state.GATE CS Original Papers and Official Keys.
Button text html code#
And finally, if you override one of these class names by including the generated css code on your website, everything should work fine as expected. the complete page is loaded, then the anonymous function denoted by function HTML Tutorial » HTML Button onClick. (Perfect for horizontal navigation menus) w3-block. A horizontal bar that can be used to group buttons together. Default color is inherited from parent element in version 4. Default color is light-gray in W3.CSS version 3. Let's say if you enter "btn-primary", the code will generate the css code with this class name. A rectangular button with a gray hover effect. As you know a bootstrap button has css class names like btn-primary, btn-secondary etc. In order to include a button on a Bootstrap website, you just need to enter one of the class names listed on the Bootstrap documentation to the "class name" field under the text settings. Can I use these buttons on Twitter bootstrap? This kind of tasks are out of the button generator's scope. On the other hand, if your button needs to perform an action, let's say an ajax request, then you have to write that piece of code. You only need to include generated CSS and HTML codes to render the button. Do I need to include any javascript or jQuery code on my website?Ībsolutely no. All modern browsers should render your css button properly. To do this, just uncheck the "prefix" checkbox above the generated css code. Covering popular subjects like HTML, CSS, JavaScript, Python, SQL, Java, and many, many more. You can also disable vendor prefixes to get a cleaner code. W3Schools offers free online tutorials, references and exercises in all the major languages of the web. The generated code will include vendor prefixes for following browsers Google Chrome, Firefox, Safari, Opera, Internet Explorer and Edge. In addition to this properties, you can also change button's text and class name. Which CSS properties are available for editing? After completing your css button, click on the button preview or "Get Code" button to view generated CSS and HTML codes. Just select a css button from the library and play its css styles.
Button text html generator#
This css button generator is a free online tool that allows you to create cross browser css button styles in seconds.
0 notes
Text
plugin-category-cloud (A README Experience)

A plugin for Micro.blog that creates a page displaying links to your categories layed out as a category cloud. Its code lives here.
If you feel like viewing its use out in the wild, you can mosey on over to my category cloud:

Cloud
A category cloud weighted by posts per category.
Where It's At
Once installed, the generated page will be found at [SCHEME]://[HOSTNAME]/cloud/. By default, the content file, content/cloud.md, registers a menu item for the page:
+++ title = "Cloud" description = "A category cloud weighted by posts per category." type = "cloud" [menu.main] name = 'Cloud' title = 'Cloud' identifier = 'cloud' url = '/cloud/' weight = 110 +++ {{< plugin-category-cloud >}}
If you'd rather use the native Micro.blog page interface, locate this file and make it look like this:
+++ title = "Cloud" description = "A category cloud weighted by posts per category." type = "cloud" +++ {{< plugin-category-cloud >}}
Parameters, Where TF are the Parameters?
The parameters live in data templates under the data/plugin_category_cloud directory.
data/plugin_category_cloud/Config.toml contains debug and build related parameters:
# Debug and build related parameters. ##################################### # Theme version, printed to HTML comment when the plugin loads. # Version = '6.0.9' # Whether to print HTML comments for debugging purposes. # DebugPrint = false # Whether to provide subresource integrity by generating a # base64-encoded cryptographic hash and attaching a .Data.Integrity # property containing an integrity string, which is made up of the # name of the hash function, one hyphen and the base64-encoded hash sum. # Fingerprint = true # Output style for /assets/sass/category-cloud.scss. # Valid options are nested, expanded, compact and compressed # SassOutput = 'compact'
data/plugin_category_cloud/Names.toml containers parameters relating to how category names will be displayed:
# Configuring the way the cloud displays category names. ######################################################## # Category names are fetched in their anchorized form. # Setting this parameter to true will convert anchorized # forms into capitalized and spaced forms. # # my-category → My Category # Humanize = true # The default path to a category page takes the form: # /categories/my-anchorized-category # # If the category has been lifted into the main menu, # and its path has been altered (perhaps by dropping /categories) # the plugin can try to match a category to its menu item and # use the URL value of the menu item. # MenuItemMatching = true # List of categories to exclude from the category cloud. # # For example: ['Pinned', 'Temporary'] # ExclusionList = [ ] # The plugin fetches the category names in anchorized form. # The 'Humanize' parameter will return the category names # to their capitalized and spaced form. The DisplayNames # parameter allows for direct control over how a category # name will be displayed # [DisplayNames] # To define exactly how to display a specific category name # enter its value below with its anchorized form as the key. # My use case for this option is this category: # # stream-of-consciousness = 'Stream of Conscioussness' #
data/plugin_category_cloud/Style.toml contains mostly stylesheet-related parameters:
# Parameters for styling the cloud. ################################### # ID to set on the wrapper. # WrapperID = 'category-cloud' # Sass (or CSS) to apply to the wrapper. # Wrapper = '' # Sass (or CSS) to apply to links. # Link = '' # Max font size to use in the cloud in rem units. # MaxSize = 2.34 # Min font size to use in the cloud in rem units. # MinSize = 0.9 # Max font weight to use in the cloud. # MaxWeight = 800 # Min font weight to use in the cloud. # MinWeigth = 200 # Whether to display parenthesized page counts along # with the category names. # DisplayPageCounts = false # Whether to wrap category links with <nobr> # UnbreakableLinks = true
Read the comments in the files, I took the time to write them. As far as parameters go, this bunch is fairly straight forward. Setting DisplayPageCounts = true, for example, would land you a cloud kinda like:

Set Humanize = false, and you may end up with a cloud kinda like:

So You're Unhappy with the Style
I knew you would be. That is why I stuck those two hooks in data/plugin_category_cloud/Style.toml, Wrapper and Link. You can stick whatever Sass or CSS you want between the quotes and the plugin will inject it into the build like so…
@import "vendor/rfs"; #category-cloud { display: flex; flex-wrap: wrap; justify-content: center; align-content: center; align-items: baseline; @include rfs(10px, gap); @include padding(0 20px); @include margin(40px auto); /* Wrapper */ a { line-height: 1; padding: 0; margin: 0; /* Link */ span { display: none; } @for $i from 1 through /* TotalSteps */ { &.step-#{$i} { @include font-size((/* MinSize */rem + $i * /* SizeIncrement */rem)); font-weight: /* MinWeight */ + $i * 100; } } } }
where TotalSteps is equal to (MaxWeight - MinWeight) ÷ 100 and SizeIncrement is equal to (MaxSize - MinSize) ÷ TotalSteps.
Planning for Persistence
The downside of ensuring the plugin receives good data by running through Hugo's data template API is that the files in data/plugin_category_cloud will be overwritten every time the plugin is updated. The solution is to move the files outside of the plugin's directory. All my plugins resolve their parameter values by merging what they find in two specific locations. For this plugin these two locations happen to be data/plugin_category_cloud and data/plugin-category-cloud. Files in the dash-cased directory take precedence during the merge. If you have a custom theme, simply create new templates that replicate the plugin files … changing the underscores in the path into dashes.
As an alternative for folks that feel like custom themes are bit much to wrap the head around, I created a plugin solely for the purpose of housing all my plugin's configuration files (with all the values commented out so that overriding parameter values is opt-in (by uncommenting)). The files in that plugin will also be overwritten whenever that plugin updates, but I should hardly ever need to update that repository (at least bump the version of it prompting you to update). If this sounds like the way you want to go, you'll need to create a new plugin and paste the repository address in for cloning (for whatever reason that plugin does not want to register). The process is simple:
Go to the Design section.
Click Edit Custom Themes
Click New Plug-in
Enter whatever title you like.
Enter the repository's URL: https://github.com/moonbuck/plugin-configuration-files.
Make sure the correct blog is selected.
Click Add Plug-in
Locate your new plugin in the list and edit the files to your heart's content.
0 notes
Text
Capital Letters (+ Custom Font?)
Sae, how the capital letters work exactly? I’ve turned on the swatch and they’re showing up only in my description and quotes, but nowhere else. Ah, it’s very easy— capital letters, in essence, look the way they do when a letter is given underline styling. What you need to do is go into your posts, select only the very first letter of paragraphs and underline it (Ctrl+U or if you go into a post’s HTML, envelop it with <u> </u>) like so. There are numerous reasons as to why I decided to go with underline styling over any other, but primarily it’s because if you make use of XKit’s ‘editable reblogs’ function by pressing this button, underline will not persist in reblogged content, unlike strike-through and all others; it only will if that button is never pressed.
Okay, so what if you love the capital letter aesthetic but are interested in using a different font from the default one? It’s very simple, let me run you through it, step by step.
1. Download your font from wherever you prefer, my personal favorite is dafont.com. 2. If it’s in a .zip file, unzip it somewhere you’ll be able to find it back (Winzip, Winrar and 7Zipare all fine programs; I personally use the latter) 3. Head over to Fontsquirrel’s Webfont Generator, click ‘Upload Fonts’ and select the font you downloaded previously. 4. While your font is uploading, click ‘Expert’. The window should expand, scroll down and ensure that to the right of CSS, the box ‘Base64 Encode’ is checked, before clicking ��Yes’ to the agreement at the bottom (the red text). Give the site a few moments and eventually, the option to ‘Download your Kit’ should appear at the bottom of the page, clicking it will prepare a .zip file, which will automatically start downloading a few moments later.

5. The only file that matters in this entire download is a file called ‘stylesheet.css’, this should be temporarily extracted/saved somewhere you’ll remember, I personally always save this file on my desktop. Once you’ve done that, open it with a program similar to Notepad; it may take a moment. 6. You’ll be confronted with a very long document if you’ve properly followed all steps up to this point (if it’s a short document, then you forgot to check ‘Base64 Encode’ in step 4), don’t be overwhelmed, 99,9% of this entire document doesn’t matter for this. In the first line or two, you should see a line that should look say font-family: ‘thefontnamehere’; and what I want you to do is simply copy the font name that you see within the single quotation marks. 7. Now it’s time to put it into your theme. Navigate to your blog and head into Customize, click on ‘Edit HTML’ (don’t worry, you’ll barely have to touch any code, I’ve done most of it for you) and when there, click on the little cogwheel at the top left corner and click ‘Theme Assets’, a little window should appear at the bottom. 8. Within that new window, click on ‘Add File’ and select your stylesheet.css file. 9. Now click on the cogwheel again and click ‘Find and Replace’, put CUSTOMFONTHERE in the box on the left and when it has located it, keep it selected while bringing your cursor down to the window at the bottom, look for the line that says ‘stylesheet.css’ and click insert on the right-hand side. It should have replaced ‘CUSTOMFONTHERE’ and should look somewhat similar to this. Make sure to click ‘Update Preview’ at the very top-right of the code window, followed by a save.

10. Last step! Go out of the Edit HTML page and return to the standard Customization page, then scroll down until you see ‘Custom Capitals Font’, and in the box beneath, paste what you copied in step 6; it should be the font name surrounded by single quotation marks. If you followed every step properly, your new capital letters should appear within mere seconds!
37 notes
·
View notes
Text
Frontend build tool wishlist
For quite a long time now, I have been toying around an idea of a perfect build tool to deploy front-end projects. This article is all about my wishlist from such a tool.
Assuming, you have completed the development work on the frontend of your next web project and are ready to deploy it in production. A typical project involves concatenating and minifying the assets, checking the code for errors, compressing the images and testing it across different combination and breed of browsers, devices and operating system. So, here goes my wishlist,
The typical build process of a project follows,
Compilation > Linting > Concatenation > Compression > Miscellaneous
Hence, I have divided the build task into the following categories,
Compilation
If you use some kind of a pre-processor in your workflow to write your HTML, CSS or JavaScript, the compilation of code into its raw form naturally becomes the first step of any build task.
HAML / MarkDown / Jade / Slim to HTML.
Sass / SCSS / LESS / Stylus to CSS.
Compass / Bourbon to CSS.
CoffeeScript / LiveScript / TypeScript to JavaScript.
Linting
Linting refers to validating your code against errors, suspicous code and checking if the code corresponds to a certain style guidelines.
Lint all .html, .css and .js files.
Should have the ability to configure linting rules and flexiblity to add new style guidelines rules.
Concatenation
Concatenation combines several files of the same type into a single file so that you can reduce the number of HTTP requests to the server.
Combining .css and .js files separately with added flexiblity to choose the order in which the files are merged.
Sprite all background images into a single image file and update the CSS code with the correct background url and position value of each image.
Compression
Compression helps reduce the overall size of the resource being transferred across the network. Following are some of the ways we can achieve compression,
Compress all the .png, .jpg, .gif and .svg images with the ability to choose the compression/optimization level.
Minify the .html, .css and the .js document with optional features like add banner, keep special comments and report useful statistics at the end of the process.
Generate source maps for CSS and JS files to define an exact mapping between the production code and the authored code.
Remove unused CSS rulesets.
Hashing
Using hash-ed filenames in addition to the Expiry headers, can help bust the cache without worrying about old assets wreaking havoc on your site.
Rename assets (.css, .js and images embedded in CSS) with hash-ed filenames to bust the cache and update the references in the source code.
Hashed filename can be a prefix, suffix or a custom naming pattern scheme.
It should also have the ability to choose a pre-defined algorithm like MD5, SHA1, SHA2 etc. or a custom algorithm to generate the hash value.
An added flexibility to define the number of characters, salt of the output value.
Miscellaneous
Some of the tasks that do not belong to any of the aforementioned categories are below,
Add banner at the top of .html, .css and .js files indicating the license, author and the version no of the file with the ability to automatically increment the no. after every iteration.
Resize images to a predetermined width/height to avoid excessive image resize/decode work on the client-side in the browser.
Generate responsive images on demand at different resolutions for use with PictureFill or Srcset.
Convert longhand CSS declarations to shorthand CSS equivalent.
Automatically add vendor prefixes to CSS properties.
Use Google's Closure Stylesheets to rename CSS class names in the generated stylesheet, which helps reduce the size of the CSS that is eventually sent down to the user.
Arrange CSS properties in alphabetical order to improve the performance of the selector.
Convert assets like images and fonts to their equivalent base64 encoded data uris with the ability to choose the threshold size (~4kb).
Integration with unit testing framework like Mocha or Jasmine or QUnit in a headless browser like PhantomJS.
Automatically push static assets (like images) embedded in HTML directly to CDN (like Amazon S3 or CloudFront and update the new url in the source files.
Automatically generate device screenshots on various combination of browsers and operating system via BrowserStack's Screenshot API.
Run through Google's Pagespeed Optimizer API and the Pingdom Tools API to gather Network Utilisation, Web Page Performance audit and other useful statistics that helps you gather significant information about the performance of your website.
Identify all the links (both external/internal) that no-longer exists or doesn't return HTTP 200.
Generate documentation of the entire project supported with CSS Style Guides and JavaScript functions.
Grulp Project
I understand that no build tool would ever be able to meet the outrageous demands of the list above. However, I started with a project on Github to compile a list of ready-to-use grunt/gulp plugins that accomplishes most of the tasks.
0 notes
Text
Getting Started with SVG
Scalable Vector Graphics (SVG) is an image format whose specification is defined by the W3C. SVG describes two-dimensional vector graphics using XML markup. You can think of it as the HTML equivalent for images.
Instead of defining images with columns and lines of pixels, SVG uses geometric primitives such as points, lines, curves and polygons to represent the image. This is what we call vector graphics. The difference is in the way these images work when we increase their size. Since vector images use mathematical expressions to resize the graph, we have no loss in defining the image.
Focusing on SVG, we have other advantages:
As they are text files, we can serve the images with gzip, which has an excellent compression factor.
Works great on high-density screens such as those on the iPhone and MacBook Pro Retina.
It may be manipulated through JavaScript.
But not everything is beautiful. Depending on the browsers you need to support, you might have to fallback to raster images, such as PNG. Internet Explorer only started supporting SVGs from version 9 and in Android 2.3, for example, it is not supported. SVG performance can also be a problem if you need to animate many images simultaneously. This is not the case with raster images.
Creating SVG Files
Although SVG files are only XML, you are much more likely to use a vector image editor to create your graphics. The most common alternatives are Adobe Illustrator and Inkscape, but on the Mac there is another very good alternative called Sketch.
SVG works best when the image is not that complex. This is because its size can increase a lot depending on what you are going to do; solid colors are much smaller than gradients, for example. This does not mean that you cannot have complex graphics but keep the file size issue in mind if you are going to use this SVG on a website.
If you use Adobe Illustrator, there are some things you can do to reduce this complexity when exporting SVG. Other applications may have similar functionality, but I don't know how each of them works.
The first thing to do is to expand the graphics, modifying the attributes that define its appearance and other properties of elements that are within it. This will also help with things like opacity and gradients, although it doesn't always work well.
Select the graph, go to the Object > Expand menu. If the chart has defined appearance attributes, you will need to select Object > Expand Appearance first.
Expanding Graphics in Illustrator
Another thing you can do is put the different parts of the chart together. Display the Pathfinder options panel at Window > Pathfinder and choose the "Merge" option. Sometimes the graph changes (things like opacity stop working) and we undo that option.
Always set the artboard close to the graphic. This can be done easily through the Object > Artboards > Fit to Artwork Bounds option.
Finally, when exporting, there are also some things to do.
Choose the SVG 1.1 profile, which has the greatest compatibility between browsers. The SVG Tiny 1.1 profiles and variations are aimed at mobile devices but do not yet have good support.
If you don't need to manipulate text dynamically, convert all fonts to objects. This will make the text retain the characteristics you have defined, without increasing the final file size, since for all intents and purposes the texts will only be objects.
Files exported by editors can be optimized. The files generated by Illustrator, for example, always have elements that can be removed, in addition to redundant attributes. You can use a tool like SVGO to automate this optimization process.
To install it, you will need Node.js.
npm install -g svgo
Now, run the following command to optimize the SVG:
svgo logo.svg logo.min.svg
Ready! Now just add SVG to your HTML document.
Adding SVG to HTML
There are a few different ways to add SVG to HTML. The simplest way is to use the <img> tag to do this.
<img src="logo.svg" alt="My logo">
The <object> tag also works very well.
<object type="image/svg+xml" data="logo.svg"></object>
Finally, you can add the <svg> tag directly to your document. Just open the file and copy the <svg> element.
This method has advantages and disadvantages. The main advantage is that you can manipulate the background color and borders of SVG elements with CSS, for example.
circle { fill: blue; }
The disadvantage, however, is that you can no longer rely on the browser cache since the element will be added directly to the document.
You can also use SVG as background images. To do this, just reference the file as you already do with PNGs, for example.
.logo { background: url(logo.svg) no-repeat; height: 356px; width: 408px; }
A very common technique is to encode the SVG in Base64 and add it directly to the CSS file. You can do this using the base64 command, available on * nix systems. Sorry, Windows users, I have no idea how that works in Windows.
$ base64 sample.svg | pbcopy
With this content in hand, we can now add this directly to the CSS, using data URIs.
.logo { width: 20px; height: 20px; background: url(data:image/svg+xml;base64,PHN2ZyBpZD0iQ2FwYV8xIiBlbmFibGUtYmFja2dyb3VuZD0ibmV3IDAgMCA1MTIgNTEyIiBoZWlnaHQ9IjUxMiIgdmlld0JveD0iMCAwIDUxMiA1MTIiIHdpZHRoPSI1MTIiIHhtbG5zPSJodHRwOi8vd3d3LnczLm9yZy8yMDAwL3N2ZyI+PGc+PHBhdGggZD0ibTEyMCAyNTZjMC0yNS4zNjcgNi45ODktNDkuMTMgMTkuMTMxLTY5LjQ3N3YtODYuMzA4aC04Ni4zMDhjLTM0LjI1NSA0NC40ODgtNTIuODIzIDk4LjcwNy01Mi44MjMgMTU1Ljc4NXMxOC41NjggMTExLjI5NyA1Mi44MjMgMTU1Ljc4NWg4Ni4zMDh2LTg2LjMwOGMtMTIuMTQyLTIwLjM0Ny0xOS4xMzEtNDQuMTEtMTkuMTMxLTY5LjQ3N3oiIGZpbGw9IiNmYmJkMDAiLz48cGF0aCBkPSJtMjU2IDM5Mi02MCA2MCA2MCA2MGM1Ny4wNzkgMCAxMTEuMjk3LTE4LjU2OCAxNTUuNzg1LTUyLjgyM3YtODYuMjE2aC04Ni4yMTZjLTIwLjUyNSAxMi4xODYtNDQuMzg4IDE5LjAzOS02OS41NjkgMTkuMDM5eiIgZmlsbD0iIzBmOWQ1OCIvPjxwYXRoIGQ9Im0xMzkuMTMxIDMyNS40NzctODYuMzA4IDg2LjMwOGM2Ljc4MiA4LjgwOCAxNC4xNjcgMTcuMjQzIDIyLjE1OCAyNS4yMzUgNDguMzUyIDQ4LjM1MSAxMTIuNjM5IDc0Ljk4IDE4MS4wMTkgNzQuOTh2LTEyMGMtNDkuNjI0IDAtOTMuMTE3LTI2LjcyLTExNi44NjktNjYuNTIzeiIgZmlsbD0iIzMxYWE1MiIvPjxwYXRoIGQ9Im01MTIgMjU2YzAtMTUuNTc1LTEuNDEtMzEuMTc5LTQuMTkyLTQ2LjM3N2wtMi4yNTEtMTIuMjk5aC0yNDkuNTU3djEyMGgxMjEuNDUyYy0xMS43OTQgMjMuNDYxLTI5LjkyOCA0Mi42MDItNTEuODg0IDU1LjYzOGw4Ni4yMTYgODYuMjE2YzguODA4LTYuNzgyIDE3LjI0My0xNC4xNjcgMjUuMjM1LTIyLjE1OCA0OC4zNTItNDguMzUzIDc0Ljk4MS0xMTIuNjQgNzQuOTgxLTE4MS4wMnoiIGZpbGw9IiMzYzc5ZTYiLz48cGF0aCBkPSJtMzUyLjE2NyAxNTkuODMzIDEwLjYwNiAxMC42MDYgODQuODUzLTg0Ljg1Mi0xMC42MDYtMTAuNjA2Yy00OC4zNTItNDguMzUyLTExMi42MzktNzQuOTgxLTE4MS4wMi03NC45ODFsLTYwIDYwIDYwIDYwYzM2LjMyNiAwIDcwLjQ3OSAxNC4xNDYgOTYuMTY3IDM5LjgzM3oiIGZpbGw9IiNjZjJkNDgiLz48cGF0aCBkPSJtMjU2IDEyMHYtMTIwYy02OC4zOCAwLTEzMi42NjcgMjYuNjI5LTE4MS4wMiA3NC45OC03Ljk5MSA3Ljk5MS0xNS4zNzYgMTYuNDI2LTIyLjE1OCAyNS4yMzVsODYuMzA4IDg2LjMwOGMyMy43NTMtMzkuODAzIDY3LjI0Ni02Ni41MjMgMTE2Ljg3LTY2LjUyM3oiIGZpbGw9IiNlYjQxMzIiLz48L2c+PC9zdmc+) }
With this technique we can count on the browser's cache and load the graphics in a single request — but keep an eye on the file size as it can easily get too big.
Compression
Because it is a text-based file, SVG has an excellent compression factor. A 10KB file, for example, drops to 3.2KB when served with gzip.
If you use the Data URI technique, a file containing 13KB drops to 4.9KB when served with gzip.
Fallback
The drawback is that if you need to support IE8, you will need to fallback to PNGs, for example. A simple way to do this is to use the images' onerror event, which is launched when an SVG tries to load. Just add the function below to <head> and define the event in the images.
<script> function toPNG(image) { image.onerror = null; image.src = image.src.replace(/\.svg$/, ".png"); } </script> <img src="logo.svg" alt="Logo" onerror="toPNG(this);">
Another technique that can be used is with the <object> tag. It is possible to define content that will be rendered if the browser does not support SVG. One problem with this technique is that the PNG image is always loaded, even when the browser supports SVG.
<object data="logo.svg" type="image/svg+xml"> <img src="logo.png" alt="Logo"> </object>
In the case of background images, I use Modernizr. When a browser that does not support SVG is detected, a no-svg class is added to the <html> tag, allowing you to display the PNG conditionally.
.logo { background-image: url(logo.svg); } .no-svg .logo { background-image: url(logo.png); } In Conclusion
SVGs are almost always small, do not need a larger version for Hi-DPI screens and they have an excellent compression factor.
The sprite issue may not be that simple, but it is possible. Alternatively, you can use Data URIs, which will also be served with gzip.
Take a test. The chances of you wanting to use it for everything are great!
About the Author
Diogo Souza works as a Java Developer at PagSeguro and has worked for companies such as Indra Company, Atlantic Institute and Ebix LA. He is also an Android trainer, speaker at events on Java and mobile world.
Visit our website here
svg cut files
0 notes
Text
数学公式处理的便捷工具
背景
在阅读专业文献的时候,我们经常遇到复杂的数学公式,理解公式的内涵自然是阅读文献的一大难点。然而,有一个更为基础的问题:我们该如何记录并输入这些公式呢?
通常情况下,数学公式受限于其复杂的版式,我们无法直接选中再复制,直接截图是一个比较简单的办法,但是当我们需要查找公式,再次录入或者需要对公式稍作修改的时候,又变得十分不便。为此,本文将会介绍几个解决这一问题的软件工具,并简单介绍如何利用Matlab写一个识别并处理数学公式的工具。
公式录入
毫无疑问,录入数学公式最为方便的方式是使用Latex语言,但是Latex语言对初学者不同友好,一方面需要安装和设置庞大的软件环境,���一方面也需要记忆一些语法。个人认为,最为实用和便捷的公式记录工具是Typora编辑器,它是一个Markdown语言文本编辑器,支持公式实时预览,安装即用,还可以导出为Word文件,十分强大。

Typora文本编辑器界面,简洁却又不失强大
如果我们需要在熟悉的Word中录入公式的话,推荐一个优秀的国产软件AxMath,它虽然收费,但是仅需20多元即可终身使用,对于需要经常输入公式的人来说,绝对物有所值。AxMath最大的特点在于,它既支���使用Latex语法输入公式,也支持直接点击符号面板输入,另外还有公式记录本功能。它的Word插件功能完善,可以直接在Word中插入公式图片,给公式自动编号以及直接将Latex代码转换为公式。可以说,有了这个软件,公式的录入问题基本就解决了。

AxMath支持Latex代码的双向转换

可以使用内置的种类繁多的符号面板输入公式,还有Latex代码自动提示和补全功能

AxMath的Word插件提供了丰富的功能
公式自动识别
公式录入再方便,遇到复杂的公式,手动输入的话仍然十分耗费精力。有没有什么工具可以自动识别公式图片并将其转换为代码呢?这是一个十分复杂的问题,几年前仍然是无解的,但是,托深度学习技术的福,现在这个问题几经基本解决并且商业化了。Mathpix就是专门提供公式图片转Latex代码服务的公司。如果你对其背后的技术感兴趣,你可以到这个网站查看一个类似的实现。这里我仅仅介绍如何使用它们的服务。
Mathpix提供了跨平台的客户端,下载安装以后,按快捷键截图要识别的公式的图片,它就会自动给出Latex代码,同时直接复制到剪贴板。下图中的三行代码���是一样的,只不过在代码两端加了$号,便于我们直接黏贴到Latex编辑器里去。个人实测,识别的精度相当高。这样,我们就能更方便的录入公式了。
需要注意的是,Mathpix返回的Latex代码语法较为严格,会添加很多空格,并将sin,cos之类的数学名进行单独标注,有的编辑器可能会不支持,需要自己稍作修改。
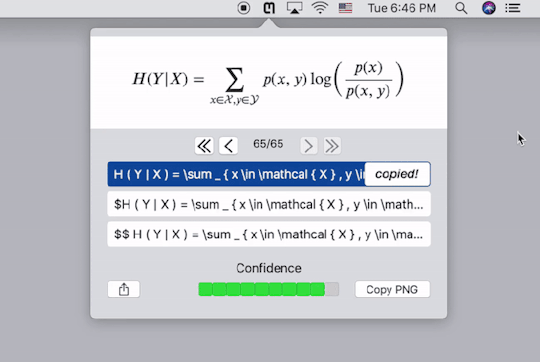
Mathpix的Mac客户端使用界面
使用Matlab编写一个公式识别小工具
Mathpix公司同时提供了API接口,可以使用visa信用卡注册账户,每月有1000次的免费识别额度。虽然其官方客户端已经能够满足日常使用,但是如果我们需要对公式进行更复杂的处理,还是需要自己编写客户端。事实上,国内外常见的搜题软件,比如小猿搜题,使用的正是Mathpix公司的技术。
这里,我将简单介绍一下如何使用Matlab编写一个公式识别app。完整的app界面如下,它除了可以从本地或者剪贴板中打开不同格式的图片,并进行识别���外,还可以将公式代码进行修改并重新渲染成不同格式和字体大小的公式图片。后期还可以再添加其它自动处理功能。

App打开时的界面(请忽略单词拼写错误)
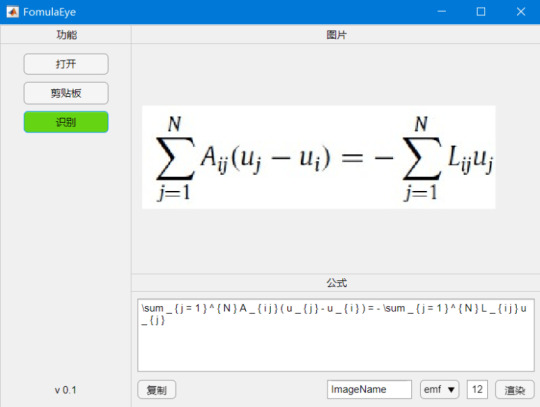
打开并识别公式图片之后的界面
渲染Latex代码
Matlab的绘图功能其实本身就支持Latex代码,我们可以直接使用Latex代码在标题和标签中插入公式,因此我们只需要从现有的代码生成一个只有标题的图片就行了。在渲染之前,我们需要注意将返回代码中的“\operatorname”删除,因为这不是通用的latex代码。
function outputPath = RenderTex(app) equationText=join(['$$',string(app.TextArea.Value),'$$']); fontSize=app.FontSize.Value; format=string(app.OutputFormat.Value); fileName=string(app.RenderImgName.Value); % Create a figure for rendering the equation. hFigure = figure('handlevisibility','off', ... 'integerhandle','off', ... 'visible','off', ... 'paperpositionmode', 'auto', ... 'color','w'); hAxes = axes('position',[0 0 1 1], ... 'parent',hFigure, ... 'xtick',[],'ytick',[], ... 'xlim',[0 1],'ylim',[0 1], ... 'visible','off'); hText = text('parent',hAxes,'position',[.5 .5], ... 'horizontalalignment','center','fontSize',fontSize, ... 'interpreter','latex'); % Render and snap! [lastMsg,lastId] = lastwarn(''); set(hText,'string',equationText); if ispc % The font metrics are not set properly unless the figure is visible. set(hFigure,'Visible','on'); end % We adapt the figure size to the equation size, in order to crop it % properly when printing. The following lines allow to respect the font % size. textDimension = get(hText,'Extent'); figureDimension = get(hFigure,'Position'); newWidth=textDimension(3)*figureDimension(3); newHeight=textDimension(4)*figureDimension(4); set(hFigure,'Position',[figureDimension(1) figureDimension(2) newWidth newHeight]); % Draw the figure drawnow; texWarning = lastwarn; lastwarn(lastMsg,lastId) % and save it saveas(hFigure,fileName,format); outputPath=regexprep(join([pwd,'\',fileName,'.',format]),' ',''); %close(hFigure); end
查询Mathpix API
Mathpix没有提供使用Matlab查询其API的代码,并且查询之前我们需要将图片转换为base64格式,因此实现起来还是颇费一番周折。查询功能主要使用webwrite函数来实现。
function MathpixQuery(app) base_url = 'https://api.mathpix.com/v3/latex'; app_id = '你自己的id'; app_key = '你自己的key'; fid = fopen(app.fullpath,'rb'); bytes = fread(fid); fclose(fid); encoder = org.apache.commons.codec.binary.Base64; imgstring = char(encoder.encode(bytes))'; body = ['{ "src": "data:image/jpeg;base64,', imgstring, '" }']; options = weboptions('HeaderFields', {'app_id', app_id; 'app_key', app_key; 'Content-Type', 'application/json'}, 'RequestMethod', 'post','Timeout',12); app.response = webwrite(base_url, body, options); end
from WordPress https://maphyorg.wpcomstaging.com/3149.html
0 notes
Text
The Federal Government Offers a Case Study in Bad Email Tracking
The U.S. government sends a lot of emails. Like any large, modern organization, it wants to “optimize” for “user engagement” using “analytics” and “big data.” In practice, that means tracking the people it communicates with—secretly, thoroughly, and often, insecurely.
Granicus is a third-party contractor that builds communication tools to help governments engage constituents online. The company offers services for social media, websites, and email, and it boasts of serving over 4,000 federal, state, and local agencies, from the city of Oakland to the U.S. Veterans Administration to HealthCare.gov. In 2016, the company merged with GovDelivery, another government-services provider. It appears that parts of the federal government have been working with GovDelivery, now Granicus, since at least 2012. Last October, we took a closer look at some of the emails sent with Granicus’s platform, specifically those from the whitehouse.gov mailing list, which used the GovDelivery email service until very recently. The White House changed its email management platform shortly after we began our investigation for this article. However, several other agencies and many state and city governments still use Granicus as their mailing list distributors.
The emails we looked at, sent to subscribers of the Whitehouse.gov email list in October 2018, happen to be an exemplary case study of everything wrong with the email tracking landscape, from unintentional and intentional privacy leaks to a failure to adhere to basic security standards.
Not only does Granicus know exactly who is opening which email and when, but in the emails we studied, all of that information is sent without encryption by default, so network observers can see it too. Ironically, even the White House’s Privacy Policy is hidden behind one of the tracking links.
How does it work?
We inspected an email from the White House’s “1600 Daily” newsletter sent October 22, 2018. The email uses two common methods to monitor user behavior: pixel tracking and link tracking. We’ll break them down one at a time, using examples from the email itself to illustrate how those methods work in the common case. In addition, we’ve written guidelines for users, email clients, and email providers to protect against these techniques.
Pixel Tracking
Today, almost all emails are sent and read in HTML. An HTML email is treated much like a static web page, with text formatting, custom fonts, and, most importantly, embedded images. When you open an email, your computer or phone needs to load each image from the Internet, which means, depending on the email client you use, your device might send a request to the server that hosts the image.
In emails, a tracking pixel is an “image” included for the purpose of tracking you. It’s usually small (1 by 1 pixel) and invisible. Trackers will often tag on a bunch of extra identifying information to the end of the “image” URL. For instance, they often include information about which email was opened and which email address it was originally sent to. In the White House newsletter I received, the tracking pixel looks like this:
When you open the email, your email client (like Thunderbird or Apple Mail) might send a request to the URL above. As you can see, it points to links.govdelivery.com, a domain owned by Granicus. The biggest part of the URL is the enid parameter, a base64-encoded string. If we decode my email’s enid, we can read the information that’s sent to the third party:
Every time I open this email, my device sends Granicus my email address and a unique identifier for the email that I opened. Granicus knows exactly who I am, which email I’m reading, and when I opened it—and potentially, so might a network observer.
Link Shims
The email also uses link shimming, the practice of obfuscating URLs in emails for tracking purposes, to track which links you click on. (Link shimming, and link tracking more generally, is commonly used on the web by search engines and social media companies.) Take a look at a sample link from the newsletter. When rendered by your email client, it looks like this:
By inspecting the source code, we can see that the blue text above actually points to the following URL:
The first part of the link, in yellow, is nearly identical to the tracking pixel URL we saw before. The redirect URL, in green, points to the article you intended to click. UTM parameters, in blue, allow whitehouse.gov to collect more contextual information about your click.
That mess will take you on a brief visit to govdelivery.com before being redirected to whitehouse.gov, the location of the real press release. Once again, the redirect sends Granicus the enid data, including information about who you are and where you’re coming from. These data, combined with the pixel data from above, allow Granicus to offer “subscriber segmentation” services to its customers (i.e. the government). According to its website, customers can filter individual subscribers by their “targeted message” activity, including whether they received, opened, or clicked a specific email message within a given time frame.
Privacy or Security: Choose None
It’s frustrating enough that the government has been using a third-party service to surreptitiously monitor who opens emails they send, what they click on, when, and from where. What’s worse, in several of the emails we looked at, the tracking is performed over an unencrypted connection using HTTP. This means that all the requests made to Granicus are legible to anyone who could eavesdrop on your connection. If you open one of the emails on unsecured WiFi at an airport or a coffee shop, anyone could be able to monitor your activity and collect your email address.
Perhaps more concerning, using an unencrypted connection allows Internet service providers (ISPs) to collect that sensitive information no matter where you are. Thanks to recent deregulation, ISPs are now legally permitted to sell data about their customers—which could include your email address, political preferences, and information about which government agencies you interact with. Normally, HTTPS protects sensitive information from ISPs’ prying eyes. But in this case, not only can Granicus see which email user clicks on which links; anyone on the network, including the ISP, can too.
The practice of link shimming poses a subtle security risk as well: it makes users more susceptible to phishing. If users are led to click links that look like garbage, they are much more likely to be duped into clicking links from less-than-reputable sources. 91% of cyber attacks start with a phishing email, including many attacks on the government itself. That means that training users to trust insecure, illegible links to unrecognizable domains is a serious problem.
To top it all off, Granicus’s emails are often sent without STARTTLS, a basic protection against passive dragnet surveillance. That means the emails travel around the Internet backbone without encryption, which is just another channel where data about you and your interests may be exposed to snoops on the network. (We recently launched STARTTLS Everywhere to make email delivery more secure.)
Conflicting Reports
After beginning our investigation on October 22, we reached out to both the White House and Granicus for comment regarding their privacy and security practices. The White House didn’t reply, but we did receive a response from Granicus Chief Product Officer Bob Ainsbury:
The private information of both Granicus govDelivery users and govDelivery subscribers is secure. Any claim to the contrary is a very serious allegation and completely inaccurate. ...
Further, email addresses cannot be identified through HTTP connections. All HTTP requests made for the purposes of tracking are transmitted in unrecognizable data and do not allow users’ private information to be compromised at any time.
The claim that the HTTP requests are secure and “do not allow users’ private information to be compromised” is, as we’ve shown above, demonstrably false. The data Granicus transmits are not encrypted, but encoded in base64, which can be decoded by literally anyone.
Furthermore, the company claimed that:
Granicus govDelivery is one of the few email platform providers that has adopted the highest level of data security standards necessary to deliver digital communications for government agencies. That security standard is FedRAMP, which requires platform providers to:
encrypt all traffic with FIPS 140-2 validated encryption modules, utilizing TLS 1.1 or higher ...
Its continued use of HTTP for email tracking and failure to support STARTTLS for in-transit email encryption indicate that Granicus has not adopted encryption anywhere near “across the board” when it comes to users’ private information. In that context, the reference to “utilizing TLS 1.1” for “all traffic” is baffling, as we have seen evidence the company continues to use unencrypted HTTP for many of its emails.
Schrödinger’s Trackers
In a strange coincidence, it appears that the White House’s newsletter, “1600 Daily,” ceased using Granicus as its service provider on October 30, 2018, two days before we reached out for comment. It now uses MailChimp for email analytics. MailChimp performs similar types of tracking, using invisible pixels to track email opens and link shims to track clicks, but the company does employ industry-standard security practices like HTTPS. The new tracking pixels are a little more compact, but just as potent:
An example of a tracking pixel from a more recent “1600 Daily” newsletter, which sends information to Mailchimp’s list-manage.com domain (in orange) over HTTPS (in blue) contianing a custom tracking string (in yellow)
According to the Privacy Policy, the White house still uses pixels and link shims to collect “automatically generated email data” from subscribers, including:
A list of “automatically generated email data” the White House collects, according to http://bit.ly/2THC2df
Other government agencies still use Granicus, such as the Department of Veterans Affairs’ “My HealtheVet” newsletter, the Social Security administration, and HealthCare.gov Alerts. These mailing lists all perform the same kinds of link shimming and pixel tracking we observed in the original White House emails. Some of the emails we've received from Granicus use HTTPS connections to perform tracking, but others still use insecure HTTP. And the company still does not support outbound server-to-server email encryption with STARTTLS.
Moreover, Granicus’s response, included in full below, shows that it doesn’t understand what “secure” means in the context of sensitive user data. Government agencies should be asking some hard questions about how they continue to handle our information.
Protect Your Users; Protect Yourself
Techniques like pixel and link tracking are extremely common and have been around for decades, and it’s unfortunately rare to see them being used responsibly. If you’re a sender, we implore you to think before you track.
Unfortunately, many federal agencies still use Granicus' services, dubious security and all. These agencies should drop GovDelivery in favor of more ethical, more secure analytics, and evaluate how much information they really need to collect to fulfill their missions. Although the White House is no longer using Granicus, it, too, performs extensive tracking on subscribers to its lists. And the only way it offers to opt out is to unsubscribe.
As a user, there’s no fool-proof way to opt-out of leaky email tracking, but there are ways to practice good email hygiene and prevent most forms of it. At the end of the day, the most effective way to avoid the tracking is to follow the White House’s advice and unsubscribe. Just be aware that the “unsubscribe” link is tracked, too.
On November 1, 2018, we reached out to Granicus to request a comment on the company's use of email tracking in services to the U.S. government. The company's response, attributed to Bob Ainsbury, Chief Product Officer at Granicus, is included in its entirety here:
The private information of both Granicus govDelivery users and govDelivery subscribers is secure. Any claim to the contrary is a very serious allegation and completely inaccurate. Granicus govDelivery is one of the few email platform providers that has adopted the highest level of data security standards necessary to deliver digital communications for government agencies. That security standard is FedRAMP, which requires platform providers to:
encrypt all traffic with FIPS 140-2 validated encryption modules, utilizing TLS 1.1 or higher
provide two-factor authentication to all customers
conduct monthly security scans, providing the results to the FedRAMP JAB for review on a monthly basis
conduct an annual penetration test and audit of controls to ensure compliance.
Like the world’s other leading email platforms – including several other email systems used at the White House - we do use pixels to track open rates and link shims to track click rates. This is an industry standard that has been in use for over 20 years. It’s used by virtually every major commercial and public sector communicator to track simple email opens and link clicks. It is worth noting, that Granicus govDelivery is configurable, allowing customers to turn off activity capture.
Further, email addresses cannot be identified through HTTP connections. All HTTP requests made for the purposes of tracking are transmitted in unrecognizable data and do not allow users’ private information to be compromised at any time.
Granicus is committed to the privacy and security for over 4,000 government clients and the citizens who subscribe to receive digital messages using our software, which is why we’ve made the investment to remain FedRAMP, ISO 27001 and GDPR compliant. Privacy and security are our highest and most important priorities at Granicus.
from Deeplinks http://bit.ly/2RGcwHP
0 notes
Link
Noupe http://j.mp/2zMll8X
In this series, we talk about the things that really accelerate WordPress websites. The goal is not to achieve the infamous 100/100 points on Google Page Speed, as these mentioned aspects often leave a lot of potential behind. We want to get as much speed out of the website as possible and dig into the millisecond area when it comes to loading times. We’ve already laid the foundation in the first and the second part.
Turning Off WordPress Performance Eaters
If you want to get lots of speed out of your WordPress, you should shut down a couple of features of the content management system. WordPress is not really one of the fastest of its kind. Many things have been put into the core, even though they are not thought out, and slow down the CMS more than necessary. That may be unfortunate, but you don’t have to live with it.
1 – WordPress Heartbeat API
The Heartbeat API controls all Ajax calls within WordPress. On top of that, it’s also responsible for the caching while writing an article in the backend. However, it does that very regularly, like a human’s heartbeat. These frequent calls to the server heavily burden the CPU and eat too much performance. At the same time, the Heartbeat API also has its advantages. These can only be taken advantage of when you don’t own a static website, but a blog or a magazine.
Thus, I’m bringing you two code snippets, one allowing you to deactivate the API entirely, and the other allowing you to disable it outside of the posts only. Automatic caching still works with the second one. Additionally, the admin-ajax.php can still be used through plugins. The comment plugin de:comments requires the file, which is why the Heartbeat API is only deactivated using the second snippet on my WordPress. The fragment belongs into the theme’s functions.php or a custom site plugin.
Click Below to Open the Gist at Github
2 – Turning Off wp-cron.php
One of the biggest performance brakes within WordPress is the wp-cron.php which is responsible for planned tasks within the CMS. That means it makes sure that tasks that were defined in advance will be started at a certain time. In general, that wouldn’t be a problem if it didn’t do that on every (!) site view. Every single page call within back and frontend causes a request. Of course, when there is not a lot of traffic on the server, that won’t make too much of a difference. However, with many visitors, this can cause the server to break down.
A much better solution is, to completely stop using the wp-cron.php, and then accessing it every 15 minutes using a real cronjob. Your planned articles might be published 15 minutes later than before, but does that really matter? Remember, in doing so, you really accelerate WordPress websites. Enter the following code in the wp-config.php.
Handling Website Logos
Logos are important. A cool logo gives your site the right kick and makes it unique. If you want speed, there are two ways to handle the logo. You either design it so it perfectly fits the surrounding container and save it lossy, which won’t look beautiful. Or you do it like I do, and display a retina logo which is displayed in a reduced way via CSS, and thus is tack-sharp. However, the original file shouldn’t be too large (file size, not measurements). My website’s logo has the measure 1,160 x 243 pixel, and a size of 13 KB as a PNG.
My website already delivers the logo to the browser via CSS (div with background image). To make sure that the CSS doesn’t have to load the logo file from the folder “images” first, I coded it in Base64 and directly implemented it in the CSS. While this does minimally increase the logo’s file size, it will be loaded significantly faster. Additionally, it doesn’t “jump” anymore while loading. You can find a good converter for this job here. This is what the code for the graphic looks like after the conversion:
The Optimization of a Google Webfont
Google Fonts are extremely popular because even beginners can use them in themes rather easily. But even the great fonts have a notable disadvantage. Depending on the chosen font, the website’s loading time increases measurably. This is joined by potential performance problems of the Google servers. That doesn’t happen often, but now and then, it does. Everything has its advantages and disadvantages. Completely forgoing Google Fonts is definitely the fastest method, but certainly not the prettiest one. I wouldn’t want to forgo the beautiful fonts, but I also don’t want so many things to be loaded via foreign servers. Thus, I’ll show you my way of handling Google fonts today. I have them stored locally on my server, and access the font within my CSS. This accelerates my website measurably.
Storing a Google Font on Your Server
When you download a font and keep it locally on your server, it will generally load faster. So let me show you how to use fonts to really accelerate WordPress websites. First, you should choose a font you’d like to use. Then, you’ll receive a link element which you should copy into the header. But that’s exactly what you won’t do. Instead, you only take the link from the element, enter it in your browser’s URL window, and call it up. Next, you need the font file of the displayed code (only download woff or woff2).
Rename the file. Use a short file name. In my case, I named it “varela-round.woff2”. Move the file into the CSS folder of your theme. Now copy the full @font-face code into you CSS file, and change it as follows:
Click to Open the Gist at Github
Once you’ve done that, the font will be loaded from your server, and should be displayed super fast without delay. Also, if the CSS is cached correctly, it will only be loaded once.
Conclusion
Once again, we’ve completed some necessary tasks on our way to really accelerate WordPress websites. You probably guessed it already; this is far from completed. In the next part of our series (it will most likely have five parts), we’ll take a look at the most labor-intensive part, which will even make advanced users break a sweat: the optimal delivery of CSS and JavaScript. When you want your website to get to the millisecond area, everything has to fit. Most of it will have to be done manually, but I assure you: it will be worth it!
Sources:
Cronjob Instead of wp-cron.php (German)
Deactivating WordPress Heartbeat API (German)
Image base64 Encoder
(dpe)
http://j.mp/1O6aKUo via Noupe URL : http://j.mp/2zMllWv
0 notes
Text
Automatic Tracking of Changes in Word Documents & Getting/Setting Locale of Field inside Cloud Apps
What's New in this Release?
Aspose team is pleased to announce the release of Aspose.Words for Cloud 17.3.0. Aspose team is pleased to announce the release of Aspose.Words for Cloud 17.3.0. This release contains a couple of new features and three enhancements to Aspose.Words for Cloud. Aspose.Words core library has also been updated to version 17.3. It has provided functionality similar to Document.StartTrackRevisions and Document.StopTrackRevisions Methods in Aspose.Words for .NET. The Document.StartTrackRevisions method starts automatically marking all further changes you make to the document programmatically as revision changes. And the Document.StopTrackRevisions method Stops automatic marking of document changes as revisions. Aspose team has added following two new “common request parameters” in Aspose.Words for Cloud API. If usesrs set this parameter and then make some changes to the document programmatically, save the document and later open the document in MS Word you will see these changes as revisions. The date and time to use for revisions. It has added “ExportFontsAsBase64, ResourceFolder and ResourceFolderAlias” to the HtmlSaveOptions class. It is used to specify whether fonts resources should be embedded to HTML in Base64 encoding. it also supports to specify whether fonts resources should be embedded to HTML in Base64 encoding. It is used to specify a physical folder where all resources like images, fonts, and external CSS are saved when a document is exported to HTML. It can be used to specify the name of the folder used to construct URIs of all resources written into an HTML document. Default is an empty string. Aspose team has added a property that allows to get/set field’s locale. You can use it to get or set the LCID of the field. It has added new properties “OfficeMathDisplayType”, “OfficeMathJustification” and “MathObjectType” to the OfficeMath object. It also supports get/set Office Math display format type which represents whether an equation is displayed inline with the text or displayed on its own line. The list of new and enhanced features added in this release are given below
Add HtmlSaveOptions "ExportFontsAsBase64,ResourceFolder,ResourceFolderAlias"
Add a property that allows to get/set field's locale:
Add new properties to OfficeMathObject
Provide functionality similar to Document.StartTrackRevisions and Document.StopTrackRevisions Methods
Add "render page" resource
Start a free trial today – all users need is to sign up with the Aspose for Cloud service. Once signed up, users are ready to try the powerful file processing features offered by Aspose for Cloud.
Overview: Aspose for Cloud
Aspose for Cloud is a cloud-based document generation, conversion and automation platform for developers that offer a unique suite of APIs to work with Word documents, Excel spreadsheets, PowerPoint presentations, PDFs, and email formats and protocols. It supports all features for file processing, document scanning, barcodes creation and recognition, and allows extracting text or images too. Users can also work with SaaSpose APIs using REST SDKs that can be called from .NET, Java, PHP and Ruby etc.
More about Aspose for Cloud
Learn More about Aspose.Words for Cloud
Download latest release of Aspose.Words for Cloud
Online Documentation for Aspose.Words for Cloud
#export fonts in Base64 encoding#Automatic Tracking of Changes Supported#Get/Set Locale of Field#Specify more OfficeMath#Html Save Options#Word REST API#Cloud Document APIs
0 notes
Text
移植Loopback到AWS Serverless架構 Part 1
日前嘗試移植Loopback App到AWS Serverless 架構,雖然目前結果不甚理想,但是覺得其中過程頗值得記錄下來,以備下次可以再派上用場(沒什麼記憶力了)同時也供他人參考。
移植過程比想像中長,估計有不少東西可以寫,所以大膽先將這次標題配上Part 1(其實是有點想睡了,寫多少算多少)
本系列文章不會帶到太多細節,主要想陳述在過程中遇到的問題與解決方法
原本
原本用Loopback開發的POC是部署在Heroku付費機器上,Datastore搭配的是由mLab提供的MongoDB。
後來
POC其實久久才用一次,但又不想每次用的時候又要等待「機器被喚醒」(免費方案的宿命),所以就升到付費��級,移掉休眠的封印。後來接觸到Serverless架構,想說POC的使用狀況剛好很適合用多少算多少這樣的計費模式,所以就來嘗試看看。
Adaptor
在AWS Serverless架構上要處理HTTP Request (API) 基本上就是用Amazon API Gateway搭配AWS Lambda。
API Gateway 在前線接受HTTP Request,然後再將Request傳遞到Lambda Function處理,然後再將Lambda Function的結果透過API Gateway回應給Client。
AWS有提供一個adaptor - aws-serverless-express 給Express-based的Node.js app用,讓開發者方便將API Gateway過來的event轉成HTTP Request再餵進Express-based的app處理並回傳結果,讓移植變得很方便(?)。剛好Loopback也是Express-based的,所以很快就成功地接上了。
Routing & Proxy
API Gateway需要設定規則才能將Request送到對應的Lambda Function。對這次移植而言,不管路徑為何,所有Request都要送進Loopback處理。換句話說真正的Routing還是在Loopback/Express中處理,API Gateway只是Proxy角色。所以我們得設定兩個Resource(API Gateway的說法):
/ /{proxy+}
一開始我以為/{proxy+} 就已經涵蓋了根目錄/,結果卻不然,導致我呼叫 API https://id.execute-api.region.amazonaws.com/stage/ 都會錯誤,最後補上的 / 這個resource才能正確處理根目錄的Request
Content-Encoding: gzip
我們的POC是有支援gzip encoding的,但是套進API Gateway與Lambda Function架構後就要額外處理,因為API Gateway接收的回應目前只支援文字,所以Lambda Function要回傳gzip這種二進制資料時得先把資料轉成Base64編碼的字串,並且標示為Base64 encoded。這點aws-serverless-express也有支援, 在初始化的時候要提供所有會經過gzip處理的mime-type
const binaryMimeTypes = [ 'application/javascript', 'application/json', 'application/octet-stream', 'application/xml', 'application/x-font-ttf', 'font/eot', 'font/opentype', 'font/otf', 'image/jpeg', 'image/png', 'image/svg+xml', 'text/comma-separated-values', 'text/css', 'text/html', 'text/javascript', 'text/plain', 'text/text', 'text/xml', ]; const server = awsServerlessExpress.createServer(app, null, binaryMimeTypes);
但由於HTTP content-type header可以同時帶進charset,所以官方對content-type的比對邏輯是有缺陷的,所以我fork了並自己改了一版
寫廢文也是會累的,今天就先到這。下次有機會再繼續。
未完待續
0 notes
Text
Cyber Espionage is Alive and Well: APT32 and the Threat to Global Corporations
Cyber espionage actors, now designated by FireEye as APT32 (OceanLotus Group), are carrying out intrusions into private sector companies across multiple industries and have also targeted foreign governments, dissidents, and journalists. FireEye assesses that APT32 leverages a unique suite of fully-featured malware, in conjunction with commercially-available tools, to conduct targeted operations that are aligned with Vietnamese state interests.
APT32 and FireEye’s Community Response
In the course of investigations into intrusions at several corporations with business interests in Vietnam, FireEye’s Mandiant incident response consultants uncovered activity and attacker-controlled infrastructure indicative of a significant intrusion campaign. In March 2017, in response to active targeting of FireEye clients, the team launched a Community Protection Event (CPE) – a coordinated effort between Mandiant incident responders, FireEye as a Service (FaaS), FireEye iSight Intelligence, and FireEye product engineering – to protect all clients from APT32 activity.
In the following weeks, FireEye released threat intelligence products and updated malware profiles to customers while developing new detection techniques for APT32’s tools and phishing lures. This focused intelligence and detection effort led to new external victim identifications as well as providing sufficient technical evidence to link twelve prior intrusions, consolidating four previously unrelated clusters of threat actor activity into FireEye’s newest named advanced persistent threat group: APT32.
APT32 Targeting of Private Sector Company Operations in Southeast Asia
Since at least 2014, FireEye has observed APT32 targeting foreign corporations with a vested interest in Vietnam’s manufacturing, consumer products, and hospitality sectors. Furthermore, there are indications that APT32 actors are targeting peripheral network security and technology infrastructure corporations, as well as consulting firms that may have connections with foreign investors.
Here is an overview of intrusions investigated by FireEye that are attributed to APT32:
In 2014, a European corporation was compromised prior to constructing a manufacturing facility in Vietnam.
In 2016, Vietnamese and foreign-owned corporations working in network security, technology infrastructure, banking, and media industries were targeted.
In mid-2016, malware that FireEye believes to be unique to APT32 was detected on the networks of a global hospitality industry developer with plans to expand operations into Vietnam.
From 2016 through 2017, two subsidiaries of U.S. and Philippine consumer products corporations, located inside Vietnam, were the target of APT32 intrusion operations.
In 2017, APT32 compromised the Vietnamese offices of a global consulting firm.
Table 1 shows a breakdown of APT32 activity, including the malware families used in each.
Year
Country
Industry
Malware
2014
Vietnam
Network Security
WINDSHIELD
2014
Germany
Manufacturing
WINDSHIELD
2015
Vietnam
Media
WINDSHIELD
2016
Philippines
Consumer products
KOMPROGO WINDSHIELD SOUNDBITE BEACON
2016
Vietnam
Banking
WINDSHIELD
2016
Philippines
Technology Infrastructure
WINDSHIELD
2016
China
Hospitality
WINDSHIELD
2016
Vietnam
Media
WINDSHIELD
2016
United States
Consumer Products
WINDSHIELD PHOREAL BEACON SOUNDBITE
2017
United Kingdom
Consulting
SOUNDBITE
Table 1: APT32 Private Sector Targeting Identified by FireEye
APT32 Interest in Political Influence and Foreign Governments
In addition to focused targeting of the private sector with ties to Vietnam, APT32 has also targeted foreign governments, as well as Vietnamese dissidents and journalists since at least 2013. Here is an overview of this activity:
A public blog published by the Electronic Frontier Foundation indicated that journalists, activists, dissidents, and bloggers were targeted in 2013 by malware and tactics consistent with APT32 operations.
In 2014, APT32 leveraged a spear-phishing attachment titled “Plans to crackdown on protesters at the Embassy of Vietnam.exe," which targeted dissident activity among the Vietnamese diaspora in Southeast Asia. Also in 2014, APT32 carried out an intrusion against a Western country’s national legislature.
In 2015, SkyEye Labs, the security research division of the Chinese firm Qihoo 360, released a report detailing threat actors that were targeting Chinese public and private entities including government agencies, research institutes, maritime agencies, sea construction, and shipping enterprises. The information included in the report indicated that the perpetrators used the same malware, overlapping infrastructure, and similar targets as APT32.
In 2015 and 2016, two Vietnamese media outlets were targeted with malware that FireEye assesses to be unique to APT32.
In 2017, social engineering content in lures used by the actor provided evidence that they were likely used to target members of the Vietnam diaspora in Australia as well as government employees in the Philippines.
APT32 Tactics
In their current campaign, APT32 has leveraged ActiveMime files that employ social engineering methods to entice the victim into enabling macros. Upon execution, the initialized file downloads multiple malicious payloads from remote servers. APT32 actors continue to deliver the malicious attachments via spear-phishing emails.
APT32 actors designed multilingual lure documents which were tailored to specific victims. Although the files had “.doc” file extensions, the recovered phishing lures were ActiveMime “.mht” web page archives that contained text and images. These files were likely created by exporting Word documents into single file web pages.
Table 2 contains a sample of recovered APT32 multilingual lure files.
ActiveMime Lure Files
MD5
2017年员工工资性津贴额统计报告.doc (2017 Statistical Report on Staff Salary and Allowances)
5458a2e4d784abb1a1127263bd5006b5
Thong tin.doc (Information)
ce50e544430e7265a45fab5a1f31e529
Phan Vu Tutn CV.doc
4f761095ca51bfbbf4496a4964e41d4f
Ke hoach cuu tro nam 2017.doc (2017 Bailout Plan)
e9abe54162ba4572c770ab043f576784
Instructions to GSIS.doc
fba089444c769700e47c6b44c362f96b
Hoi thao truyen thong doc lap.doc (Traditional Games)
f6ee4b72d6d42d0c7be9172be2b817c1
Giấy yêu cầu bồi thường mới 2016 - hằng.doc (New 2016 Claim Form)
aa1f85de3e4d33f31b4f78968b29f175
Hoa don chi tiet tien no.doc (Debt Details)
5180a8d9325a417f2d8066f9226a5154
Thu moi tham du Hoi luan.doc (Collection of Participants)
f6ee4b72d6d42d0c7be9172be2b817c1
Danh sach nhan vien vi pham ky luat.doc (List of Employee Violations)
6baafffa7bf960dec821b627f9653e44
Nội-dung-quảng-cáo.doc (Internal Content Advertising)
471a2e7341f2614b715dc89e803ffcac
HĐ DVPM-VTC 31.03.17.doc
f1af6bb36cdf3cff768faee7919f0733
Table 2: Sampling of APT32 Lure Files
The Base64 encoded ActiveMime data also contained an OLE file with malicious macros. When opened, many lure files displayed fake error messages in an attempt to trick users into launching the malicious macros. Figure 1 shows a fake Gmail-theme paired with a hexadecimal error code that encourages the recipient to enable content to resolve the error. Figure 2 displays another APT32 lure that used a convincing image of a fake Windows error message instructing the recipient to enable content to properly display document font characters.
Figure 1: Example APT32 Phishing Lure – Fake Gmail Error Message
Figure 2: Example APT32 Phishing Lure – Fake Text Encoding Error Message
APT32 operators implemented several novel techniques to track the efficacy of their phishing, monitor the distribution of their malicious documents, and establish persistence mechanisms to dynamically update backdoors injected into memory.
In order to track who opened the phishing emails, viewed the links, and downloaded the attachments in real-time, APT32 used cloud-based email analytics software designed for sales organizations. In some instances, APT32 abandoned direct email attachments altogether and relied exclusively on this tracking technique with links to their ActiveMime lures hosted externally on legitimate cloud storage services.
To enhance visibility into the further distribution of their phishing lures, APT32 utilized the native web page functionality of their ActiveMime documents to link to external images hosted on APT32 monitored infrastructure.
Figure 3 contains an example phishing lure with HTML image tags used for additional tracking by APT32.
Figure 3: Phishing Lure Containing HTML Image Tags for Additional Tracking
When a document with this feature is opened, Microsoft Word will attempt to download the external image, even if macros were disabled. In all phishing lures analyzed, the external images did not exist. Mandiant consultants suspect that APT32 was monitoring web logs to track the public IP address used to request remote images. When combined with email tracking software, APT32 was able to closely track phishing delivery, success rate, and conduct further analysis about victim organizations while monitoring the interest of security firms.
Once macros were enabled on the target system, the malicious macros created two named scheduled tasks as persistence mechanisms for two backdoors on the infected system. The first named scheduled task launched an application whitelisting script protection bypass to execute a COM scriptlet that dynamically downloaded the first backdoor from APT32’s infrastructure and injected it into memory. The second named scheduled task, loaded as an XML file to falsify task attributes, ran a JavaScript code block that downloaded and launched a secondary backdoor, delivered as a multi-stage PowerShell script. In most lures, one scheduled task persisted an APT32-specific backdoor and the other scheduled task initialized a commercially-available backdoor as backup.
To illustrate the complexity of these lures, Figure 4 shows the creation of persistence mechanisms for recovered APT32 lure “2017年员工工资性津贴额统计报告.doc”.
Figure 4: APT32 ActiveMime Lures Create Two Named Scheduled Tasks
In this example, a scheduled task named “Microsoft Scheduled Maintenance” was created to run Casey Smith’s “Squiblydoo” App Whitelisting bypass every 30 minutes. While all payloads can be dynamically updated, at the time of delivery, this task launched a COM scriptlet (“.sct” file extension) that downloaded and executed Meterpreter hosted on images.chinabytes[.]info. Meterpreter then loaded Cobalt Strike BEACON, configured to communicate with 80.255.3[.]87 using the Safebrowsing malleable C2 profile to further blend in with network traffic. A second scheduled task named “Scheduled Defrags” was created by loading the raw task XML with a backdated task creation timestamp of June 2, 2016. This second task ran “mshta.exe” every 50 minutes which launched an APT32-specific backdoor delivered as shellcode in a PowerShell script, configured to communicate with the domains blog.panggin[.]org, share.codehao[.]net, and yii.yiihao126[.]net.
Figure 5 illustrates the chain of events for a single successful APT32 phishing lure that dynamically injects two multi-stage malware frameworks into memory.
Figure 5: APT32 Phishing Chain of Events
The impressive APT32 operations did not stop after they established a foothold in victim environments. Several Mandiant investigations revealed that, after gaining access, APT32 regularly cleared select event log entries and heavily obfuscated their PowerShell-based tools and shellcode loaders with Daniel Bohannon’s Invoke-Obfuscation framework.
APT32 regularly used stealthy techniques to blend in with legitimate user activity:
During one investigation, APT32 was observed using a privilege escalation exploit (CVE-2016-7255) masquerading as a Windows hotfix.
In another investigation, APT32 compromised the McAfee ePO infrastructure to distribute their malware as a software deployment task in which all systems pulled the payload from the ePO server using the proprietary SPIPE protocol.
APT32 also used hidden or non-printing characters to help visually camouflage their malware on a system. For example, APT32 installed one backdoor as a persistent service with a legitimate service name that had a Unicode no-break space character appended to it. Another backdoor used an otherwise legitimate DLL filename padded with a non-printing OS command control code.
APT32 Malware and Infrastructure
APT32 appears to have a well-resourced development capability and uses a custom suite of backdoors spanning multiple protocols. APT32 operations are characterized through deployment of signature malware payloads including WINDSHIELD, KOMPROGO, SOUNDBITE, and PHOREAL. APT32 often deploys these backdoors along with the commercially-available Cobalt Strike BEACON backdoor. APT32 may also possess backdoor development capabilities for macOS.
The capabilities for this unique suite of malware is shown in Table 3.
Malware
Capabilities
WINDSHIELD
Command and control (C2) communications via TCP raw sockets
Four configured C2s and six configured ports – randomly-chosen C2/port for communications
Registry manipulation
Get the current module's file name
Gather system information including registry values, user name, computer name, and current code page
File system interaction including directory creation, file deletion, reading, and writing files
Load additional modules and execute code
Terminate processes
Anti-disassembly
KOMPROGO
Fully-featured backdoor capable of process, file, and registry management
Creating a reverse shell
File transfers
Running WMI queries
Retrieving information about the infected system
SOUNDBITE
C2 communications via DNS
Process creation
File upload
Shell command execution
File and directory enumeration/manipulation
Window enumeration
Registry manipulation
System information gathering
PHOREAL
C2 communications via ICMP
Reverse shell creation
Filesystem manipulation
Registry manipulation
Process creation
File upload
BEACON (Cobalt Strike)
Publicly available payload that can inject and execute arbitrary code into processes
Impersonating the security context of users
Importing Kerberos tickets
Uploading and downloading files
Executing shell commands
Configured with malleable C2 profiles to blend in with normal network traffic
Co-deployment and interoperability with Metasploit framework
SMB Named Pipe in-memory backdoor payload that enables peer-to-peer C2 and pivoting over SMB
Table 3: APT32 Malware and Capabilities
APT32 operators appear to be well-resourced and supported as they use a large set of domains and IP addresses as command and control infrastructure. The FireEye iSIGHT Intelligence MySIGHT Portal contains additional information on these backdoor families based on Mandiant investigations of APT32 intrusions.
Figure 6 provides a summary of APT32 tools and techniques mapped to each stage of the attack lifecycle.
Figure 6: APT32 Attack Lifecycle
Outlook and Implications
Based on incident response investigations, product detections, and intelligence observations along with additional publications on the same operators, FireEye assesses that APT32 is a cyber espionage group aligned with Vietnamese government interests. The targeting of private sector interests by APT32 is notable and FireEye believes the actor poses significant risk to companies doing business in, or preparing to invest in, the country. While the motivation for each APT32 private sector compromise varied – and in some cases was unknown – the unauthorized access could serve as a platform for law enforcement, intellectual property theft, or anticorruption measures that could ultimately erode the competitive advantage of targeted organizations. Furthermore, APT32 continues to threaten political activism and free speech in Southeast Asia and the public sector worldwide. Governments, journalists, and members of the Vietnam diaspora may continue to be targeted.
While actors from China, Iran, Russia, and North Korea remain the most active cyber espionage threats tracked and responded to by FireEye, APT32 reflects a growing host of new countries that have adopted this dynamic capability. APT32 demonstrates how accessible and impactful offensive capabilities can be with the proper investment and the flexibility to embrace newly-available tools and techniques. As more countries utilize inexpensive and efficient cyber operations, there is a need for public awareness of these threats and renewed dialogue around emerging nation-state intrusions that go beyond public sector and intelligence targets.
APT32 Detection
Figure 7 contains a Yara rule can be used to identify malicious macros associated with APT32’s phishing lures:
Figure 7: Yara Rule for APT32 Malicious Macros
Table 4 contains a sampling of the infrastructure that FireEye has associated with APT32 C2.
C2 Infrastructure
103.53.197.202
104.237.218.70
104.237.218.72
185.157.79.3
193.169.245.78
193.169.245.137
23.227.196.210
24.datatimes.org
80.255.3.87
blog.docksugs.org
blog.panggin.org
contay.deaftone.com
check.paidprefund.org
datatimes.org
docksugs.org
economy.bloghop.org
emp.gapte.name
facebook-cdn.net
gap-facebook.com
gl-appspot.org
help.checkonl.org
high.expbas.net
high.vphelp.net
icon.torrentart.com
images.chinabytes.info
imaps.qki6.com
img.fanspeed.net
job.supperpow.com
lighpress.info
menmin.strezf.com
mobile.pagmobiles.info
news.lighpress.info
notificeva.com
nsquery.net
pagmobiles.info
paidprefund.org
push.relasign.org
relasign.org
share.codehao.net
seri.volveri.net
ssl.zin0.com
static.jg7.org
syn.timeizu.net
teriava.com
timeizu.net
tonholding.com
tulationeva.com
untitled.po9z.com
update-flashs.com
vieweva.com
volveri.net
vphelp.net
yii.yiihao126.net
zone.apize.net
Table 4: Sampling of APT32 C2 Infrastructure
from Cyber Espionage is Alive and Well: APT32 and the Threat to Global Corporations
0 notes
Text
Ionic 2 and Angular 2: Using the Native Camera, Take Multiple Photos with Delete Action.
Are you searching for easy camera access for taking multiple pictures in your mobile application? Then here is the post explaining on how to access camera and take pictures. In most recent days, this is achieved easily with the combination of Ionic framework and AngularJS. We have already discussed in my (previous article link on ionic),how easy it is to use pre-built it in components of Ionic with AngularJS and build awesome mobile apps. Today’s article explains Cordova plugin provided by Ionic framework to access camera , take picture and see the output. The most exciting thing about this article is, it explains you to upload multiple images you take in camera. Let’s follow the article and also the video tutorial on this.
Video Tutorial - Ionic 2 Using the Native Camera, Take Multiple Photos with Delete Action
youtube
Install NodeJS You need node.js to create a development server, download and install the latest version. Installing Ionic and Cordova You will find these instructions in Ionic Framework installation document..
$ npm install -g cordova ionic $ ionic start --v2 YourAppName tabs $ cd YourAppName $ npm install $ ionic serve
Open your web browser and launch your application at http://localhost:8100.
Take Photo Delete Photo Launch Camera Use Photo & Retake
Ionic Native Camera API Install Ionic native plugin, you will find more information here
$ ionic plugin add cordova-plugin-camera $ npm install --save @ionic-native/camera
app.module.ts Now go to src/app/app.module.ts and import Ionic camera module.
import { NgModule, ErrorHandler } from '@angular/core'; import {Camera} from '@ionic-native/camera'; import { IonicApp, IonicModule, IonicErrorHandler } from 'ionic-angular'; import { MyApp } from './app.component'; import { AboutPage } from '../pages/about/about'; import { ContactPage } from '../pages/contact/contact'; import { HomePage } from '../pages/home/home'; import { CameraPage } from '../pages/camera/camera'; import { TabsPage } from '../pages/tabs/tabs'; import { StatusBar } from '@ionic-native/status-bar'; import { SplashScreen } from '@ionic-native/splash-screen'; @NgModule({ declarations: [ MyApp, AboutPage, ContactPage, HomePage, CameraPage, TabsPage ], imports: [ IonicModule.forRoot(MyApp) ], bootstrap: [IonicApp], entryComponents: [ MyApp, AboutPage, ContactPage, HomePage, CameraPage, TabsPage ], providers: [ StatusBar, SplashScreen,Camera, {provide: ErrorHandler, useClass: IonicErrorHandler} ] }) export class AppModule {}
home.html Now include your design in src/pages/home/home.html
<ion-header> <ion-navbar> <ion-title> Home </ion-title> </ion-navbar> </ion-header> <ion-content padding class="card-background-page"> <button ion-button full > <ion-icon name="camera"></ion-icon>Take Photo </button> <ion-grid> <ion-row> <ion-col col-6 > <ion-card class="block"> <ion-icon name="trash" class="deleteIcon"></ion-icon> <img src="someimage.png" /> </ion-card> </ion-col> </ion-row> </ion-grid> </ion-content>
home.scss SASS nested styles for home.html page.
page-home { .block { position: relative .deleteIcon { position: absolute !important; color: #ffffff !important; margin-left: 80% !important; } .deleteIcon:before { font-size: 30px !important; } } }
home.ts Now modify home module, here imported ionic camera module. Include functions for takePhoto and deletePhoto.
import { Component } from '@angular/core'; import { NavController } from 'ionic-angular'; import {Camera, CameraOptions} from '@ionic-native/camera'; @Component({ selector: 'page-home', templateUrl: 'home.html' }) export class HomePage { public photos : any; public base64Image : string; constructor(public navCtrl: NavController) { } ngOnInit() { this.photos = []; } deletePhoto(index) { console.log("Delete Photo"); } takePhoto(){ console.log("Take Photo"); } }
Modify Home Constructor Call camera module in constructor.
constructor(public navCtrl : NavController, private camera : Camera) { }
Take Photo This function will help you to capture mobile camera snap, image response will be in base64 encoding format.
takePhoto() { const options : CameraOptions = { quality: 50, // picture quality destinationType: this.camera.DestinationType.DATA_URL, encodingType: this.camera.EncodingType.JPEG, mediaType: this.camera.MediaType.PICTURE } this.camera.getPicture(options) .then((imageData) => { this.base64Image = "data:image/jpeg;base64," + imageData; this.photos.push(this.base64Image); this.photos.reverse(); }, (err) => { console.log(err); }); }
home.html Now loop your HTML design with photos data.
<ion-col col-6 *ngFor="let photo of photos; let id = index"> <ion-card class="block"> <ion-icon name="trash" class="deleteIcon" (click)="deletePhoto(id)"></ion-icon> <img [src]="photo" *ngIf="photo" /> </ion-card> </ion-col>
Delete Photo Simple javascript function for photos array value based on index value.
deletePhoto(index){ this.photos.splice(index, 1); }
Ionic Delete Confirmation Make following changes to import ionic alert confirmation module. home.ts
import {NavController, AlertController} from 'ionic-angular'; constructor(public navCtrl : NavController, private camera : Camera, private alertCtrl : AlertController) { }
Delete Photo Final code for deleting photo with alert confirmation.
deletePhoto(index) { let confirm = this.alertCtrl.create({ title: 'Sure you want to delete this photo? There is NO undo!', message: '', buttons: [ { text: 'No', handler: () => { console.log('Disagree clicked'); } }, { text: 'Yes', handler: () => { console.log('Agree clicked'); this.photos.splice(index, 1); } } ] }); confirm.present(); }
Build iOS App Following commands for executing Xcode build, watch the video tutorial you will understand more.
$ cordova add platform ios $ ionic build ios
Build Android App Open Android build using Android SDK>
$ cordova add platform android $ ionic build android
Video Tutorial - Ionic 2 Using the Native Camera, Take Multiple Photos with Delete Action
youtube
via 9lessons Programming Blog http://ift.tt/2oL9N1k
0 notes
Text
Easy Gradle Integration & Export Fonts to HTML in Base64 Encoding Inside Android Apps
Easy Gradle Integration & Export Fonts to HTML in Base64 Encoding Inside Android Apps
Easy Gradle Integration & Export Fonts to HTML in Base64 Encoding Inside Android Apps It contains over 22 useful new features, enhancements and bug fixes. Here are some important features & enhancements included in this release, improvements to DrawingML shadow, Words for Android is delivered as a single JAR file, size of the file is reduced, easy Gradle integration, full support of digital…
View On WordPress
0 notes
Text
数学公式处理的便捷工具
背景
在阅读专业文献的时候,我们经常遇到复杂的数学公式,理解公式的内涵自然是阅读文献的一大难点。然而,有一个更为基础的问题:我们该如何记录并输入这些公式呢?
通常情况下,数学公式受限于其复杂的版式,我们无法直接选中再复制,直接截图是一个比较简单的办法,但是当我们需要查找公式,再次录入或者需要对公式稍作修改的时候,又变得十分不便。为此,本文将会介绍几个解决这一问题的软件工具,并简单介绍如何利用Matlab写一个识别并处理数学公式的工具。
公式录入
毫无疑问,录入数学公式最为方便的方式是使用Latex语言,但是Latex语言对初学者不同友好,一方面需要安装和设置庞大的软件环境,另一方面也需要记忆一些语法。个人认为,最为实用和便捷的公式记录工具是Typora编辑器,它是一个Markdown语言文本编辑器,支持公式实时预览,安装即用,还可以导出为Word文件,十分强大。
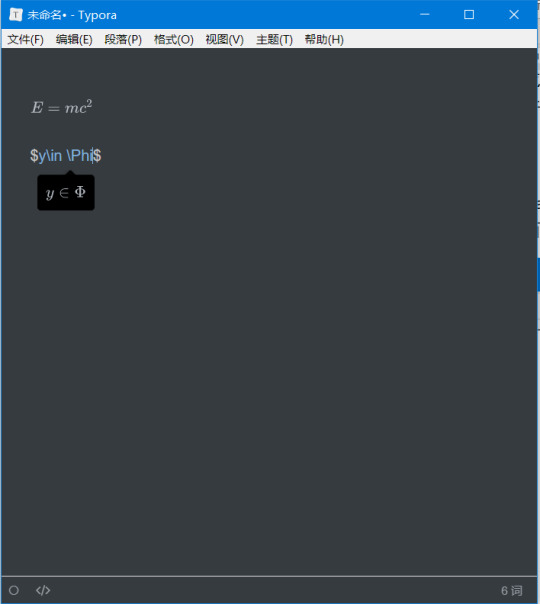
Typora文本编辑器界面,简洁却又不失强大
如果我们需要在熟悉的Word中录入公式的话,推荐一个优秀的国产软件AxMath,它虽然收费,但是仅需20多元即可终身使用,对于需要经常输入公式的人来说,绝对物有所值。AxMath最大的特点在于,它既支持使用Latex语法输入公式,也支持直接点击符号面板输入,另外还有公式记录本功能。它的Word插件功能完善,可以直接在Word中插入公式图片,给公式自动编号以及直接将Latex代码转换为公式。可以说,有了这个软件,公式的录入问题基本就解决了。
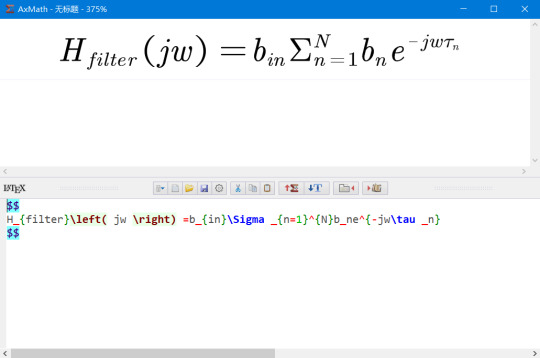
AxMath支持Latex代码的双向转换
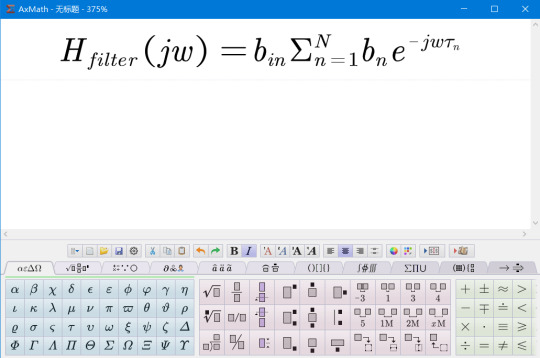
可以使用内置的种类繁多的符号面板输入公式,还有Latex代码自动提示和补全功能

AxMath的Word插件提供了丰富的功能
公式自动识别
公式录入再方便,遇到复杂的公式,手动输入的话仍然十分耗费精力。有没有什么工具可以自动识别公式图片并将其转换为代码呢?这是一个十分复杂的问题,几年前仍然是无解的,但是,托深度学习技术的福,现在这个问题几经基本解决并且商业化了。Mathpix就是专门提供公式图片转Latex代码服务的公司。如果你对其背后的技术感兴趣,你可以到这个网站查看一个类似的实现。这里我仅仅介绍如何使用它们的服务。
Mathpix提供了跨平台的客户端,下载安装以后,按快捷键截图要识别的公式的图片,它就会自动给出Latex代码,同时直接复制到剪贴板。下图中的三行代码都是一样的,只不过在代码两端加了$号,便于我们直接黏贴到Latex编辑器里去。个人实测,识别的精度相当高。这样,我们就能更方便的录入公式了。
需要注意的是,Mathpix返回的Latex代码语法较为严格,会添加很多空格,并将sin,cos之类的数学名进行单独标注,有的编辑器可能会不支持,需要自己稍作修改。
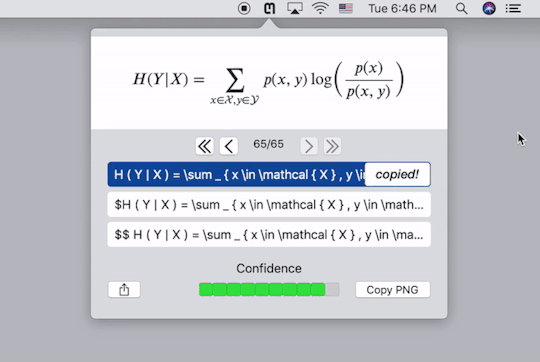
Mathpix的Mac客户端使用界面
使用Matlab编写一个公式识别小工具
Mathpix公司同时提供了API接口,可以使用visa信用卡注册账户,每月有1000次的免费识别额度。虽然其官方客户端已经能够满足日常使用,但是如果我们需要对公式进行更复杂的处理,还是需要自己编写客户端。事实上,国内外常见的搜题软件,比如小猿搜题,使用的正是Mathpix公司的技术。
这里,我将简单介绍一下如何使用Matlab编写一个公式识别app。完整的app界面如下,它除了可以从本地或者剪贴板中打开不同格式的图片,并进行识别之外,还可以将公式代码进行修改并重新渲染成不同格式和字体大小的公式图片。后期还可以再添加其它自动处理功能。
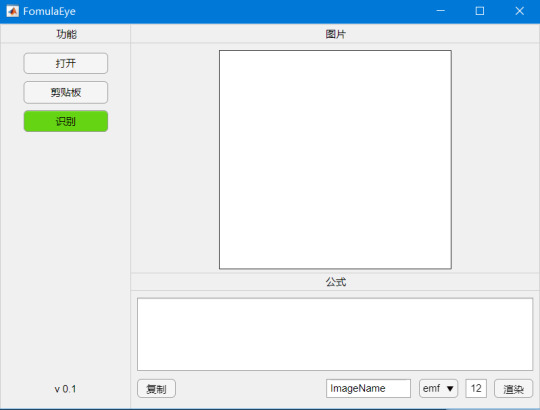
App打开时的界面(请忽略单词拼写错误)

打开并识别公式图片之后的界面
渲染Latex代码
Matlab的绘图功能其实本身就支持Latex代码,我们可以直接使用Latex代码在标题和标签中插入公式,因此我们只需要从现有的代码生成一个只有标题的图片就行了。在渲染之前,我们需要注意将返回代码中的“\operatorname”删除,因为这不是通用的latex代码。
function outputPath = RenderTex(app) equationText=join(['$$',string(app.TextArea.Value),'$$']); fontSize=app.FontSize.Value; format=string(app.OutputFormat.Value); fileName=string(app.RenderImgName.Value); % Create a figure for rendering the equation. hFigure = figure('handlevisibility','off', ... 'integerhandle','off', ... 'visible','off', ... 'paperpositionmode', 'auto', ... 'color','w'); hAxes = axes('position',[0 0 1 1], ... 'parent',hFigure, ... 'xtick',[],'ytick',[], ... 'xlim',[0 1],'ylim',[0 1], ... 'visible','off'); hText = text('parent',hAxes,'position',[.5 .5], ... 'horizontalalignment','center','fontSize',fontSize, ... 'interpreter','latex'); % Render and snap! [lastMsg,lastId] = lastwarn(''); set(hText,'string',equationText); if ispc % The font metrics are not set properly unless the figure is visible. set(hFigure,'Visible','on'); end % We adapt the figure size to the equation size, in order to crop it % properly when printing. The following lines allow to respect the font % size. textDimension = get(hText,'Extent'); figureDimension = get(hFigure,'Position'); newWidth=textDimension(3)*figureDimension(3); newHeight=textDimension(4)*figureDimension(4); set(hFigure,'Position',[figureDimension(1) figureDimension(2) newWidth newHeight]); % Draw the figure drawnow; texWarning = lastwarn; lastwarn(lastMsg,lastId) % and save it saveas(hFigure,fileName,format); outputPath=regexprep(join([pwd,'\',fileName,'.',format]),' ',''); %close(hFigure); end
查询Mathpix API
Mathpix没有提供使用Matlab查询其API的代码,并且查询之前我们需要将图片转换为base64格式,因此实现起来还是颇费一番周折。查询功能主要使用webwrite函数来实现。
function MathpixQuery(app) base_url = 'https://api.mathpix.com/v3/latex'; app_id = '你自己的id'; app_key = '你自己的key'; fid = fopen(app.fullpath,'rb'); bytes = fread(fid); fclose(fid); encoder = org.apache.commons.codec.binary.Base64; imgstring = char(encoder.encode(bytes))'; body = ['{ "src": "data:image/jpeg;base64,', imgstring, '" }']; options = weboptions('HeaderFields', {'app_id', app_id; 'app_key', app_key; 'Content-Type', 'application/json'}, 'RequestMethod', 'post','Timeout',12); app.response = webwrite(base_url, body, options); end
from WordPress https://maphy.org/3149.html
0 notes