#Free 3D Printing Software
Explore tagged Tumblr posts
Visit Tumblr Blog
Explore Tumblr blogs with no restrictions, modern design and the best experience.
Last Seen Tumblr Blogs


Fun Fact
When “GIF” was named word of the year in 2012, Oxford Dictionaries U.S.A. credited Tumblr for pushing the word.
Text
A Beginner’s Guide to Free CAD Software for 3D Printing
Provides an essential overview for those new to 3D design. This guide introduces the most user-friendly and accessible free CAD software options available, helping beginners understand how to create and modify 3D models for printing. It covers key features like intuitive interfaces, basic design tools, and tips for getting started with common 3D printing formats. The guide also explains the importance of selecting the right software based on the user’s specific needs, whether for simple projects or more detailed designs. By the end, beginners will feel confident in navigating free CAD software, turning their creative ideas into reality with 3D printing.
Understanding the Basics of Free CAD Software for 3D Printing
Free CAD software for 3D printing serves as a powerful tool for designers, engineers, and hobbyists alike. This software allows users to create detailed 3D models without the need for expensive licenses. Understanding the fundamentals, such as basic design principles and the user interface, is crucial for beginners. Most free CAD programs offer tutorials and resources to help users get started, making it easier to navigate the design process. Whether you are looking to design prototypes, art pieces, or functional objects, these software options provide the essential tools needed to bring your ideas to life.
Top Free CAD Software Options for 3D Printing in 2024
In 2024, several free CAD software options stand out for 3D printing enthusiasts. Programs like TinkerCAD, known for its user-friendly interface, are perfect for beginners. FreeCAD offers a more advanced set of features for those with some experience, while SketchUp Free is excellent for architectural designs. Fusion 360 for Personal Use allows hobbyists to access powerful tools for free, provided they meet specific eligibility criteria. Each of these software options comes with unique features that cater to different design needs, making it essential to choose the right one for your projects.
Key Features to Look for in Free CAD Software for 3D Printing
When selecting free CAD software for 3D printing, certain features are crucial for an effective design experience. Look for intuitive user interfaces that simplify the modeling process, especially if you are a beginner. Compatibility with common 3D file formats, such as STL and OBJ, ensures that your designs can be easily exported for printing. Additionally, built-in libraries of pre-designed components can speed up your workflow. Robust community support and tutorials are also important, as they provide resources for troubleshooting and learning new skills. Evaluating these features will help you make an informed decision.
Getting Started: Tips for Using Free CAD Software for 3D Printing
Getting started with free CAD software for 3D printing can be overwhelming, but a few tips can ease the process. Begin with simple projects to familiarize yourself with the tools and functionalities. Use tutorials and online resources to learn specific techniques, such as scaling objects or creating complex shapes. Practice regularly to improve your skills and gain confidence in your design abilities. It's also beneficial to engage with online communities or forums, where you can share your work, ask for feedback, and learn from others' experiences. These steps will set you up for success in your 3D printing journey.
Common Mistakes to Avoid When Using Free CAD Software for 3D Printing
While working with free CAD software for 3D printing, beginners often make common mistakes that can lead to frustration. One frequent error is neglecting to check the scale of designs, which can result in prints that are too large or small. Failing to optimize models for printing such as ensuring proper wall thickness and avoiding unsupported overhangs can also lead to print failures. Additionally, users may forget to export their designs in the correct file format for their 3D printer. By being aware of these pitfalls and double-checking designs before printing, you can save time and resources.
The Importance of Community and Support in Free CAD Software for 3D Printing
The community surrounding free CAD software for 3D printing is invaluable for users at all levels. Online forums, social media groups, and dedicated websites offer platforms for sharing knowledge, tips, and resources. Engaging with these communities can provide support for troubleshooting issues, sharing design ideas, and gaining insights from experienced users. Many software platforms have active user communities that contribute tutorials and share their projects, making it easier for beginners to learn. Building connections with others in the 3D printing space can enhance your experience and broaden your skills.
Conclusion
In conclusion, free CAD software for 3D printing opens up a world of possibilities for aspiring designers and hobbyists. By understanding the basics, exploring top options, and knowing the features to look for, users can effectively create their own 3D models. Tips for getting started and awareness of common mistakes will streamline the design process and improve results. Moreover, the support of online communities can foster growth and creativity in the 3D printing realm. Embracing these tools and resources will empower you to turn your ideas into tangible creations, enhancing your 3D printing experience and expertise.
0 notes
Text
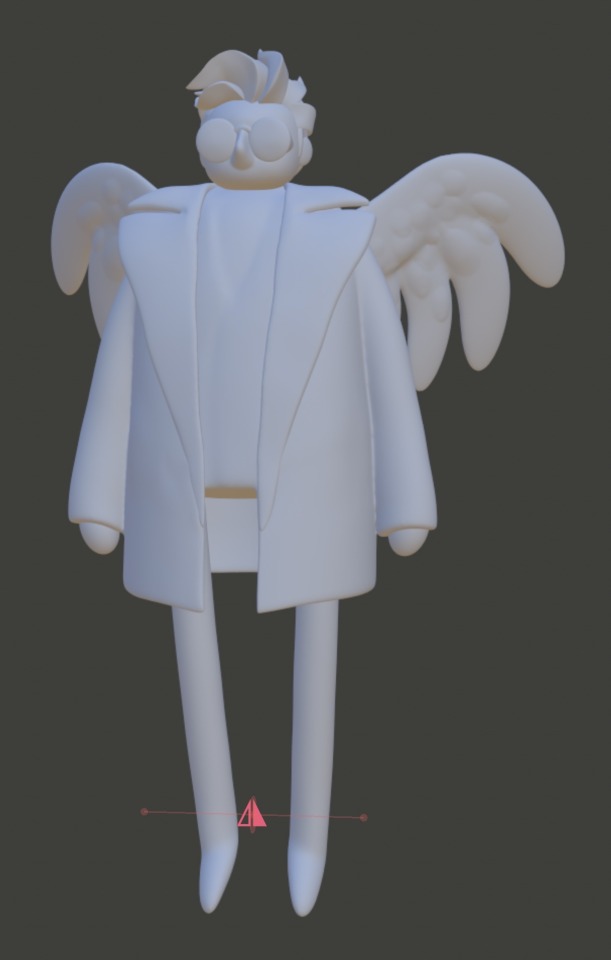
Murderbot 3D Print Part 3 - FILES!!!
It's what many of you have been waiting for! THE 3D FILES!
The price??? It's free!
That's a lie, the price is actually that you send me pictures of the results so I can have the joy of seeing what you all make. (I mean it, this is a threat)
Based on comments so far, it seems like this will be the first dive into 3D printing and figure painting for some people so I'll go through some of my approach to give you an idea of how I got to this result.
This is actually my first time sculpting, printing and then painting something to completion, so I am not experienced and you can totally do it too. As you may see from my blog I am primarily a digital artist and I occasionally do gouache and ink work, I have literally never painted or sculpted a figure before. (This counts as foreshadowing if you run into any problems with my files lmao)
Sculpting:
I sculpted the model in Nomad Sculpt on my Ipad and tidied things up in blender. I am still a massive beginner with sculpting so I incorporated pieces from some other freely available models to assist me (these are credited in the listing with the model). You don't have to worry about this part!
Printing:
I printed this on my MARS ELEGOO 2 printer. The settings I used for my print are included on the model listing; with these settings the model took about 7.5 hours to print.
The Files
I have uploaded 3 different file formats, a .stl, a .chitubox and a .ctb. An stl is the basic 3D model on its own, it can be opened in most 3D software if you are looking to edit it and it can be imported into any slicing software (slicing is the process of cutting any model into layers for the printer). If you use this file you will have to add the supports to the model yourself (supports are very important in preventing catastrophic print failure).
The .chitubox and .ctb files are specifically from the slicing program I use which is chitubox. The .chitubox program is for the model with the supports for printing attached and the .ctb file is the sliced file that is ready for the printer. VERY IMPORTANT TO NOTE is that these two files are sized and prepared based on my 3D printer dimensions. If you want to use these files, I recommend checking either files in chitubox (and have it set up for the model printer you will be using) and checking the size before going ahead with printing. If the size is too big for your printer you will have to resize the model and add the supports again but you can use the files I have supplied as reference.
I specifically used Chitubox 64 for this as Chitubox basic hates me and won't slice the model so it is solid inside. Printing something solid is easier to print than printing it hollow and trying to cure the resin trapped inside/drain the model (uncured resin is nasty nasty and will also generate gas that builds up pressure and will crack your print).
I recommend using either the basic stl for printing or starting with the .chitubox file and setting up the slicing settings by yourself. The ctb is a good reference for how things should look but probably not the best starting point to guarantee a successful print. If you add supports yourself, I recommend looking up some youtube videos on how to properly support a model, and what parts of a model need the most support and avoiding visible marks on your models from supports.
Post-Printing
Its important to clean and cure your print properly after its done, but if you are getting it done at the library or somewhere else you may not have to worry about this.
To remove the supports I used a heat gun to warm and soften the resin supports and little clippers my friends use for gundam to cut them as flush to the model as possible.
The next thing you want to do is sanding, sand down the marks from the supports, any lines or imperfections from the printing. Resin is relatively soft so this is not hard. I personally bought some cheap sandpaper that went from 400-1000 grit, glued it to icecream sticks, disposable knives and some flat toothpick things and used that to get into small crevices. Sand with wet paper to prevent resin dust going everywhere.
Painting
After sanding I sprayed the model with a primer, I specifically used Mr. Finishing Surfacer 1500 in white. This was my choice simply because its what my local gundam store had and I chose white because I didn't want to use a darker base coat that I had to lighten for the armor (simply put most of the model is white and white is a pain in the ass to paint opaquely)
After this I went in with my standard run-of-the-mill acrylic paints. The key to getting a smooth finish with no brush marks and lumps is to thin/smooth out the paint a little with water and build up the colour in layers.
I painted my base colours (white for the armor, black for the shoes and visor and a dark grey for the suit underneath the armor). To get a cool beaten-up effect I laid some light blue into areas on the armor where shadows would fall, after that I dabbed panel line accent colour which gets into the crevices and lines of the print and accents them (you can also just use really watered down black paint for this, I was lucky to borrow supplies from a warhammer 40k friend). I also covered parts of the armor with it and rubbed it off for a grimy effect and then dabbed some brown paint in for extra colour variation. I then came in and dry-brushed some lighter colours on the dark areas and fixed up the white where I wanted it brighter.
Then finally I coated the whole thing in a matte varnish to protect it and it was done!! My own Murderbot completed!!
Hopefully if you haven't done something like this before, this helps you get started There are dozens and dozens of great tutorials out there for more info or if you want to take your design in a different direction to mine.
Most importantly?? Have fun!!
If you have any issues or questions feel free to message me and we can work on it together!
222 notes
·
View notes
Text
10 days ago, I decided I would get started on that linen summer dress with the swooshy skirt I've had all the materials for since last summer. So, naturally, 9 days ago, I did unspeakable things in a text editor software to reformat this free Apex Legends Nessie pattern by Jackalodreams on Deviantadt so most pieces fit on less pages. Then I printed it at 200%, taped the pieces together and... Things got a bit out of hand.
Long story short, I've got a new purse, and it made at least three separate adults who saw it smile squeal in public.
Construction notes after the break!
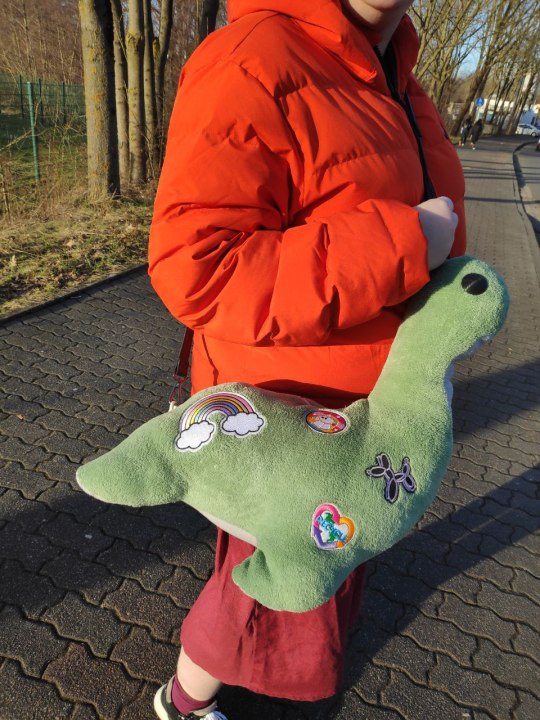


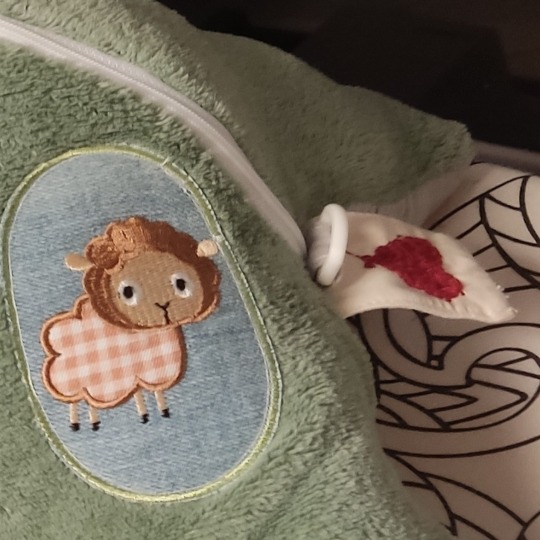
I think it only took me an evening or two to make, the main thing was getting all the materials. Zipper is from a duvet, all other hardware, eyes included, are 3D printed with PLA. (Pro tip: don't size up safety eye STL files unless you have a way to size up your fabric thickness accordingly.) Patches are mostly from stash, as is the lining (just some random jersey) and belly fabric (basic double gauze). Body is a fuzzy blanket I found on clearance. Tag is a piece of cotton calico with some quick and dirty hand embroidery on it.
Getting the tag, zipper and D-ring caught in the butt seam made me fear for my little Brother sewing machine, so maybe don't do what I did there. I didn't have the patience to figure out something else, and I didn't not want to put in a tag. Still, all the fabric edges are finished, every seam is locked, the patches are sewn on instead of ironed on, so this thing, when empty, should be machine washable at 30°C.
This deceptive little beastie took an entire 400g bag of polyfill to get structurally sound, even with the pouch pre-filled with way more things than I expected would fit. It's a pretty practical size inside for everyday errands. It came out extremely squishy, to the point that I could probably use it as a pillow on a long drive or train ride. The different textures of eyes, patches, tag, body and belly go together nicely.
The shoulder strap was borrowed for about an hour from my wife's purse (thank you, sweetie!) when Hermes smiled down upon us and had us catch one market stall selling fashion straps that was several hours late in packing up and closing. (Lesson learned: drinking a can of Monster before running small errands is a good thing.) Don't have pictures of the new one yet.
It's the size of a medium-large plush, so not ideal for tiny stores while wearing a thick winter coat, but otherwise it did quite well on its first outing.
Just gotta attach the zipper pull with a jump ring, as the sewed on McGyvering I've got right now isn't the most practical.
#nessie#sewing#plushie#handbag#bag#free pattern#working from stash#mostly from stash anyway#learning new things#3D printing#apex legends#patches#it's not dumb if it brightens someone's day#it's SO SQUISHY#no I have not started that dress yet
169 notes
·
View notes
Text
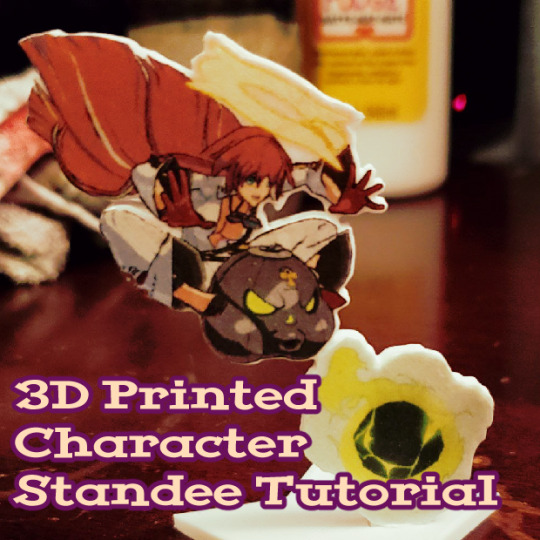
This guide will show you how to turn a 2D image into a 3D printed character standee with a custom base.
The 21 page .PDF covers what supplies and software you need to make one of these, but the most important ones are a 3D printer and a 2D paper printer. Everything else is browser-based, free software, or supplies you can find at home/relatively cheap at a store.
Available to us$5+ tiers on Patreon or for purchase on Ko-fi: https://www.patreon.com/posts/117926730
https://ko-fi.com/s/b0c861263b
52 notes
·
View notes
Text
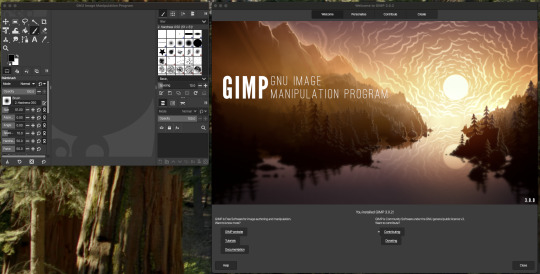
GIMP

Ironically the most replies I ever had on Imgur.
OK look here's the skinny on why I don't like GIMP: A long discussion with screenshots
To start with, there's two classes of users:
A: People who never use art apps, don't make art, and maybe tweak a couple of photos for colour balance every couple of years: They love GIMP. They hardly use it or never use it but it's FREE and OPEN SOURCE and they heard Adobe was BAD SOMEHOW because they CHARGE MONEY. They love GIMP. They will die on that hill. GIMP is the best. One day they may even use it.
B: People who are enthusiasts and professionals who actually want to make something and have graphics tablets, strong opinions on CMYK and whether Kyle Webster is over-rated or not. And they don't use GIMP because they tried it and it doesn't do the job.
To go for a comic analogy It's like bystanders telling EMTs their technique is wrong because they saw this Spongebob episode where he used bandaid.
Anyway: Who the hell amI? I feel like I should establish some Bona Fides: not just some random shouty dude. I started out with MS Paint in 1989, then Deluxe Paint Enhanced for PC. I started doing Desktop Publishing with CorelDraw and some non WYSIWYG layout engines. Spent a miserable few years with Quark, moved on to Photoshop... 3 I think. Jettisoned that after it got too bloated (It has a 3D print system inside it!!) In amongst I've tried GIMP, Krita, Clip Studio (Now and back when it was Manga Studio and really didn't want you to use colour), ProCreate, Adobe Fresco, ArtRage, Kai's powertools, 3D Studio (Back before it was Max), Maya, Blender, Inkscape, Serif Studios, Art Studio Pro... I was a graphic designer for several companies, self employed, and worked for Anthrocon doing colour on their badges for around 15 years, as well as creating designs for thier printed work and occasionally keycards, and t-shirts, and designs for badges when they didn't have any art from a GoH. To put it simply I'm not an Adobe Fanboy screeching about people using non-Adobe software. I've seen people who wanted to move to digital give up after buying hundreds of dollars of hardware because they got told GIMP was TEH GOODEST. Anyway...
But every time someone wants to get into art to paint the picture they have inside them, or do some fanart or mess with graphics design, group A crawl out from their bog of incompetence and demand that people use GIMP. Not just suggest it, but actively shout down group B, the people who have experience.
Because Group A would rather push their dogma that paid software is always the wrong solution, than accept that GIMP's frankly shit.
It's just hit version 3.0 after only 30 years. Go team.
Points to note: If you need support for GIMP, the answer is always "Runs OK for me LOL" or "I don't use it but all your problems are because you used Photoshop once." or the good old "Switch to Linux."
In the interest of fairness I'm going to install this new amazing version of GIMP and see if it's any better.

Infamously, the software is so awful that almost all images on Google that you find are pictures of people re-creating the GIMP Logo in GIMP to prove that it is on a par with MS Paint. And it's not a good logo.
First boot:
OK so it opens up a giant panel that tells me I installed GIMP. Presumably a warning. You can't access the actual app unless you've first navigated the splash screen. The app assumes your'e still on an 800x600 monitor. Nice. I suspect the splash screen was supposed to laod over the top of GIMP because... uh... ANYWAY.
Select create Select Make a new image Select a size... hit OK and voila.
Just as a note: Other apps do this in a single panel, or just open the app and let you hit File > new > Select size and bit depth & colour space... which GIMP also skipped.
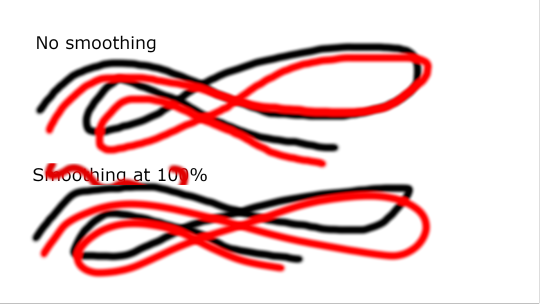
OK so I'm using a mouse. so let's do a test line then find and turn on the stroke smoothing. Wow!
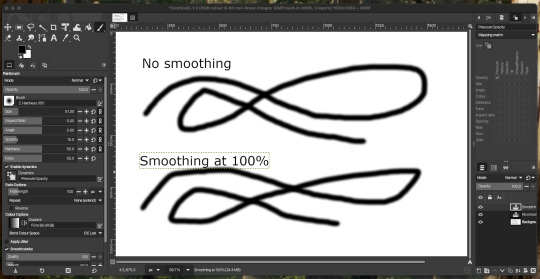
... This is worthless! Looks like the smoothing amount doens't do anyting, you have to tweak the other option on a scale of 0 to 1000.
For those of you playing at home: That makes no sense, because everything else is 0-100.
Also brave choice to make sure that when you pull up the settings they replace the brush palette... on the opposite side of the screen, and give you no way to switch back.
The setting which are incidentally locked, making them... double worthless.
Fun trivia! If you mis click at the bottom of the brush palette, on the left, it just deletes your tool preset! Genius. Sticking a button for a process you'd almost never do, next to the Undo/redo icons. Chef's kiss. Perfect UI design.
I hear they're making a car. The 'explode fuel tank' button is next to the switch that turns the headlights on. You may ask why they have an 'explode fuel tank' button. Yes. You may ask.
Now having created a text label, I somehow am not allowed to draw outside the text label. This is not normal.
There is no Unselect option at all in the selection menu. Escape does't do it. Hitting option/alt pops up a messages saying there's no selection to remove:
... despite there being a selection to remove.
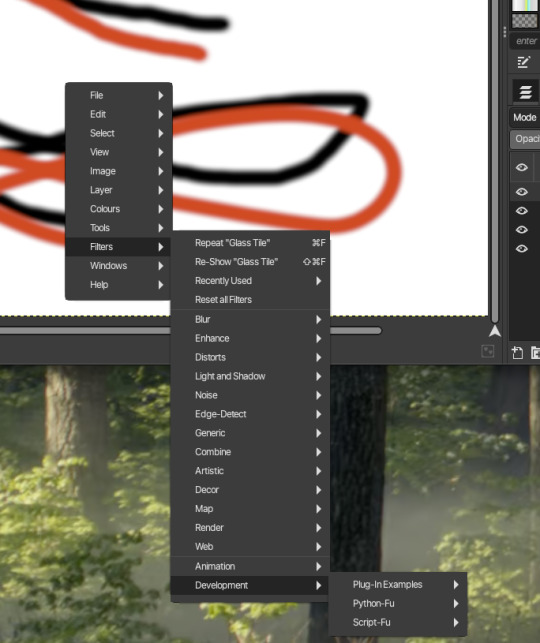
GIMP's infamously mazelike right click menu that copies the taskbar menu is still around:

Why have one set of menus when you can have two of every menu?
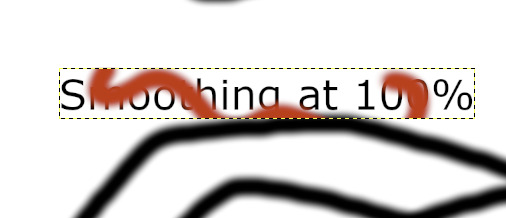
Not pictured: The giant tooltip that pops up and covers the thing you're trying to click on. Seriously, I couldn't get a screenshot of it.
Back to drawing...
Apparently the solution is to create a new layer. One text object is still text, the other randomly rasterised itself and locked the selections to it's own boundary box. That is sub-optional or "entirely stupid, who wrote this garbage?" if you're being formal.

These guys. That's who.
Still got a maze of options including 'Y not use PYTHON to make a pic‽"
At this point I notice that the vibrant red I pick in the colour picker is showing as desaturated orange in the screenshots. Which is weird because it's supposed to be 8 bit sRGB, aka the basics. But somehow this has been fucked up - GIMP: "Colour accuracy? But Why?"
Let's try an export. a mere four or five clicks later...
... where the hell is it? Let me try that again...
OK. Uh. Great. A third visibly different shade of red to the one I drew with.
At this point, I'm done. I could learn to use the tools easily. I could dig through the manual and look for whatever ass backward UI decision lets you resolve it's inherent flaws like rasterising text at random...
... but if I tell it to use 100% red and it insists on using some buggy kludged system that outputs it to a different shade, then why bother? Nothing you do will come out looking the way you intended.
Meanwhile Clip Studio's over here doing 100% of everything you need for amateur or enthusiast or even pro level art (I created one of Anthrocon's T-shirts in Clip Studio), and it'll run on a tablet and let you draw on $400 of hardware or a desktop and a graphics tablet.
And if by some goddamn chance you got all the way through this, send me a boop in the notes!
16 notes
·
View notes
Note
what’s your painting process?
THIS IS A HARD QUESTION! Because I am a lil chaotic in my personal work. My best personal pieces can vary wildly from me painting randomy shapes in black and white and slowly turning it into something by getting more and more detailed in every pass at it, like I did here:

To an almost completely 3D render with a paint over, like I did here:
Or anything in between those to processes that you can imagine, tbh, I've probably tried that as well. BUT, I'll tell you what I've been doing lately in my professional stuff to keep the quality and style a lil less all over the place.
Step 1: Plan a pose and lighting in Daz 3D.
The models I usually use for this are modified Victoria 9 and Michael 9 because those are the most anatomically correct. But you can totally just use the free Genesis 9 or Genesis 8 models that come packaged with the free software and it souldn't really give you any issues.
Step 2: Posterize your refrence until it's 3 Values, then use that a reference to create a 3 value thumbnail, planning the arrangement of element in your painting and the lighting, midtone, and shadow colours.
Step 3: Create a duplicate of the thumbnail and apply a black and white filter. Put the original thumbnail in a seperate window or on a reference board or something to look at, so you don't stray too far from the points of contrast and lighting in that. Define your hard and sharp edges in the black and white painting, using your favourite hard edged painting brush and your favourite soft smudging tool. then fil in the values that exist in between your 3 key values. You can usually find these correct in-between values by eye drop selecting from the gradient in your newly softened edges.
Step 4: Detail and paint until your black and white painting looks like it would be a passable greyscale painting by your own standard. This one is hard to give specific instructions on how I detail because I just look at things I dont like and fix them until the things I don’t like are minimal.
Step 4: Add base colours using gradient maps, colour balance, selective colour, or curves. If you don't know which out of these is your favourite method for colouring greyscale, I encourage experimenting. Sometimes I myself use different methods even withing the same painting, because they all have their lil quirks of how they work and the colour results.

Step 5: Render. This one is, again, hard to discribe as it's mostly just looking at things you don't like and fixing them until you're happy.
Step 6: Add lighting effects. Here you can see I added bloom, jittered the hue in the shadow and light affected areas to be warmer or cooler, added glare to the glass, and then, dust particles being hit by the light, a VERY transparent colour dodge layer where the light is coming down from an off screen chandelier, then since all these lighting effects washed the character in the dress out too much, I went in with a softlight layer and a low opacity brush to do colour correction.
Step 7: Post processing. Add a noise layer, smart sharpened the image, added a high pass filter on overlay and set it to 20% yada yada now if one were to print the full res it would look nice.

And that's basically the process right now. But if you ask me again in a month I'm probably going to have changed the way I do things again because I'm always developing the process more and more as I go. I hope this answered some questions for people, was informative, or in any way helped.
#digital art process#digital art#illustation#digital painting#3d art#ask answered#answered#ask#my inbox is always open!
10 notes
·
View notes
Text
Let's talk about Toys in Cereal

This is a part of several posts of mine that have gotten big, but I figure it's best to address the phenomenon itself in a new post.
If you want to just browse a ton of cool old cereal toys once we're done, go to: www.cratercritters.com. It's a neat site.
Cereal toys are a long-standing American tradition. Some tag-questions asked if they went away because of greed or because of regulations, and that's complicated.
There are food regulations that complicate things. You may have heard that Kinder Eggs are not legal in the US.

This is usually framed as a "fear the stupid American Kids will eat the toy" kind of thing. This is not the case.
The actual regulation that blocks the Kinder Egg is about food safety from bacterial and undisclosed allergen contamination. Inserting a baggie with a toy into that exposes everything in the cereal bag to the outside of the toy package, and that's a no-no in the US market. The rare thing we're more strict about than the EU.
But that doesn't affect cereal toys, because they can get around it by having it in a separate package outside the food bag, between the inner back and the cardboard box. Much easier on the parents to find when you open the box, too.
Kinder has, themselves, addressed the US Kinder Egg problem the same way, with the Kinder Joy.
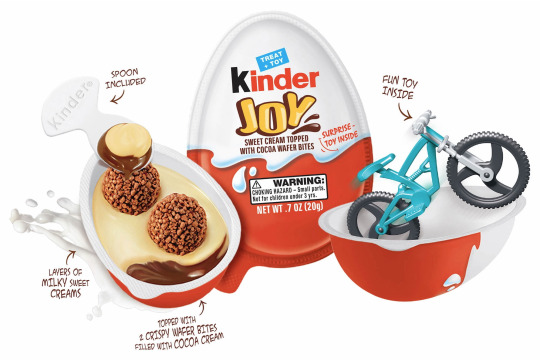
Splitting the package. into two sections that are individually sealed.
But a big blow to the practice was the end of the Australian R&L Toy Company.
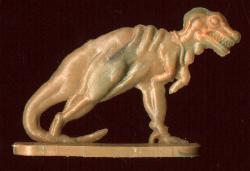
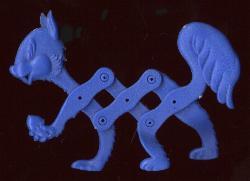
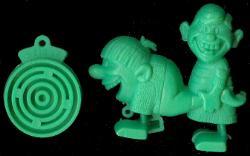
R&L made tons of simple pack-in Premium toys from the 60s through the 80s. They were the primary supplier to Kelloggs, and made everything from simple one-piece figurines to little build-yourself-action-toys.
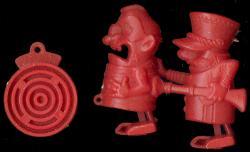
For instance, these "Wacky Walkers" worked by tying a string to the figure and the weight, then dropping the weight off a table. The figures would hobble forward on their feet, pulled by the weight. Neat-o!
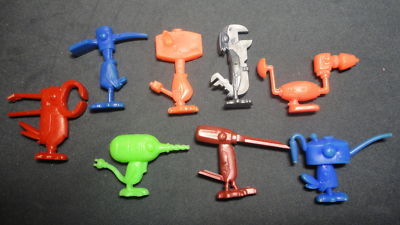
Then there's stuff like these Toolybirds. I'd sell any one of you to the goblin king for a set of these, because I sure can't afford them at $25 apiece or more. I'll probably just make some dinosaur-knockoff version or somesuch to 3d print, eventually.
R&L went out of business in the 80s and its molds were sold to a toy manufacturing company in Mexico that produced their stuff as bag toys for awhile, before everything just faded away.
Meanwhile, the cereal market was forced to contract elsewhere without a devoted company doing essentially just that.

Liscenses came to the rescue. Fun fact, if you wanted toys from most of the Disney Afternoon, your only hope was Kellogg's.
As time went on, you started even getting software in cereal.

Chex gave out a free, PG-version of DOOM for free. Not a couple of demo levels, a whole game, run on the doom engine, with aliens you zap with a spoon.
But as time went on, companies got less and less into the idea of enticing with freebies, and parents started objecting to the marketing of sugar cereals with toy surprises, because given the opportunity, most parents will blame the company for making something the kid wants for their unwillingness to say "No."
The eternal conflict:

Cool thing the kid would enjoy that you might have to put your foot down over because enforcing moderation is a parent's job, verses unobjectionable conformist mush designed to increase your kids' "goodness levels."
I think the banning of cartoon mascots for snacks in certain countries is also ridiculous.
Thing is, any company could bring them back at any time.

The Monster cereals did figurines of their mascots in cosplay in 2021. Of course, they did it as a limited edition bullshit thing where the actual monster cereal mascots were chase figures, but they made them, they could do them at any time if they wanted to.
They could bring the magic back. Nothing is stopping them.

'cept there's no room for joy on the spreadsheet.
Gotta hit you with a little ennui. It's that ambergris stink that makes the perfume truly sweet.
199 notes
·
View notes
Text
my flippydrive finally arrived today, so it was time to tear down my gamecube
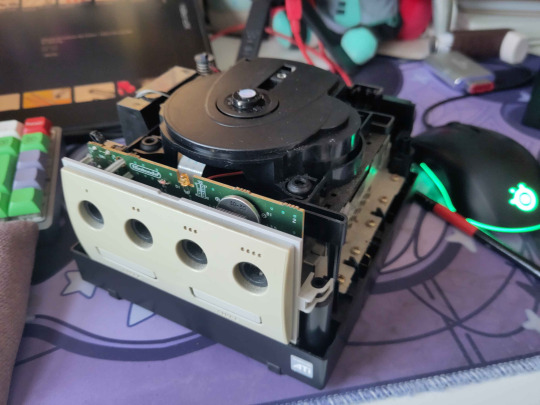


the install was simultaneously more and less fiddly than i was expecting.
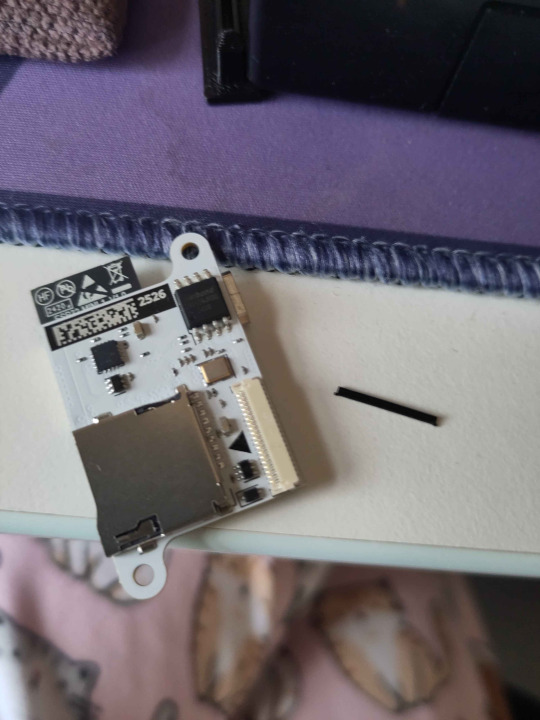
the main issue i had was the locking tab for the flex pcb connection popped off when i was locking it in place. i ended up having to put a piece of tape on the back of the flex pcb to give it enough clamping force to make good contact. the connection seems to be pretty secure now, but i don't want to move or jostle the gamecube very much.
on that note, it leads to my *other* two issues with the flippydrive install process. first, and probably worst, is the tiny screws provided to fix it into the mounting bracket. the bracket is 3D printed, and unthreaded, and i found the tiny screws - even with the correct bit - wanted to strip more than thread themselves into the bracket. this meant the flippydrive board isn't securly fixed to the bracket and can wobble a bit. these two issues make the whole, having to open the whole shell and put pressure directly on the board to access the microSD wayyyy more of a big deal. i ordered the laser bear industries SD slot extender, i wish they offered something like that in the purchasing options for the flippydrive.
as far as the software goes, cubeboot looks excellent. HOWEVER, it does not come pre-configured for region free rom loading. i did not realise this until after reassembling my console. currently i have to use swiss instead to play my ISOs.

now i can play radirgy on 3 different consoles. (i need to get a coin cell battery for the remote of my hdmi converter so i can set it to 4:3 output again)
12 notes
·
View notes
Note
Hey! I love your art so much 💖 I wanted to ask what program you use for 3D modelling?
aw thank you!! :3
and to answer your question i’m going to warn you this is going to be kinda long because i’m gonna use this post as an excuse to show my 3D models that aren’t awful (sorry lol).
i actually use two different programs, both for different purposes, but you don’t need to get both, it really depends on which kind of modeling you want to do.
1) the first is called Nomad Sculpt on the iPad, you do have to pay for it unfortunately but it’s definitely one of the best modeling apps for the iPad. i know Blender is free but my computer is really old and doesn’t run the program very well, and at this point i’ve already gotten used to nomad sculpt.
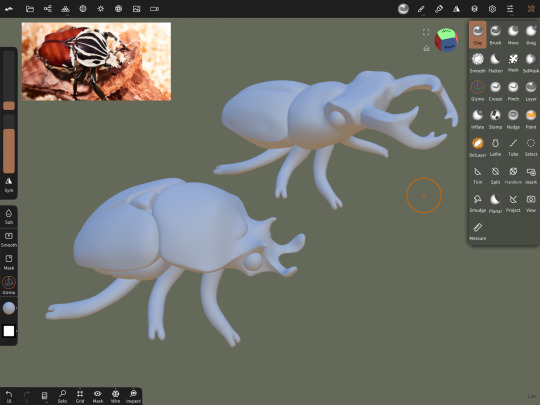
anyway tho, i use it for art-related things like the obvious 3D models, but recently i’ve been playing around with just making scenes to use as references for my drawings. they’re not anything impressive, most of the time i actually use it to make little figurines to print and turn into earrings/little friends that sit in my room just for fun.
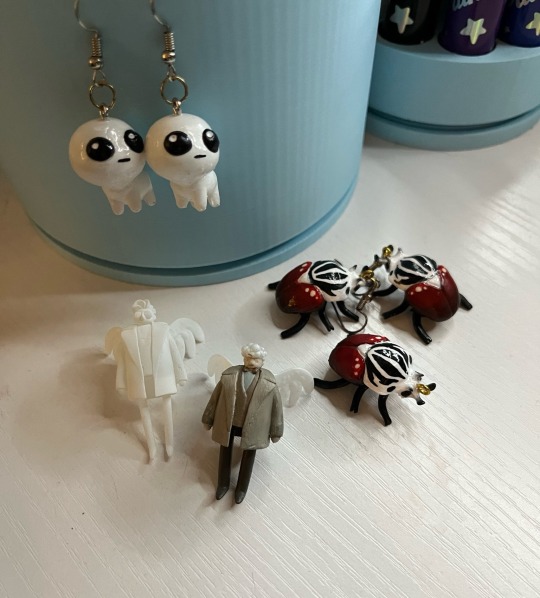
i’m gonna show this first bc they look cooler once they’re printed and colored (also you can tell i printed mini crowley and aziraphale when my sonadow hyperfixation started bc i never actually painted crowley) (he’s just kinda sitting there oops).
the little red guys are actually my favorite bugs (goliath beetles), i made them about a year ago but i still wear them like every day.
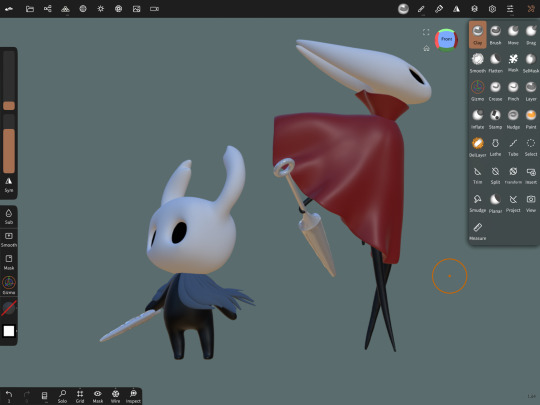

and here’s what they look like in the app, it’s a little intimidating but once you get used to it it’s actually kinda fun just playing around and seeing what you can do.
2) the second program i use is Shapr3D (also for the iPad, but i think they made an update where you can run it on windows/mac). you also have to pay for this as a subscription which sucks, i’m only able to use it since the engineering program i’m in pays for it.
Shapr3D is one of the many CAD software programs out there, but it’s nice bc it’s very beginner friendly and very easy to use. CAD is mainly for architecture/engineering but i honestly think more 3D artists should give it a try. it’s really nice once you get the hang of it and (i’m probably biased bc i’m a student) i honestly prefer it over just normal modeling software because i feel like you can be a lot more creative with it.
right now for my engineering class, our semester final is to design and present something that’s functional, and we can either explain the math behind it or just 3D print it and demonstrate how it works, and i’m making a functional mini model of “the rack” trap from Saw III (i’m not psychotic i swear i’ve just had a Saw hyperfixation for 5 years).
i’m definitely gonna post it when it’s finished just bc i’m already excited with how it’s turning out, but for now here’s a couple at-home projects i’ve done:
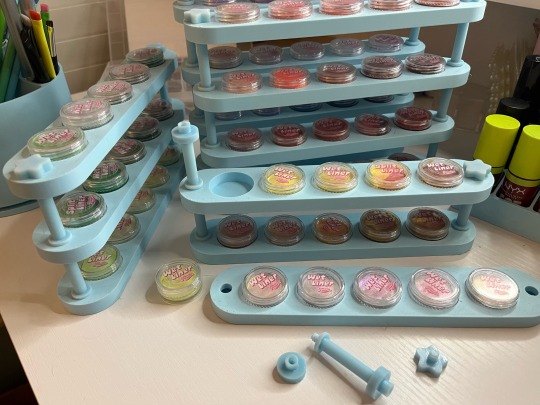
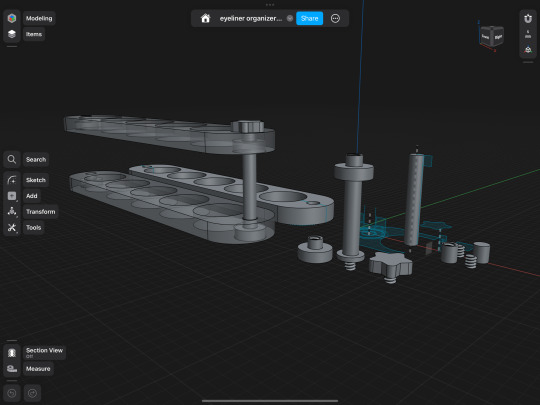
(above) i have a bunch of wet liners and i designed a stackable holder thingy with bolts between the shelves and a little cute star screw to fasten it at the top.

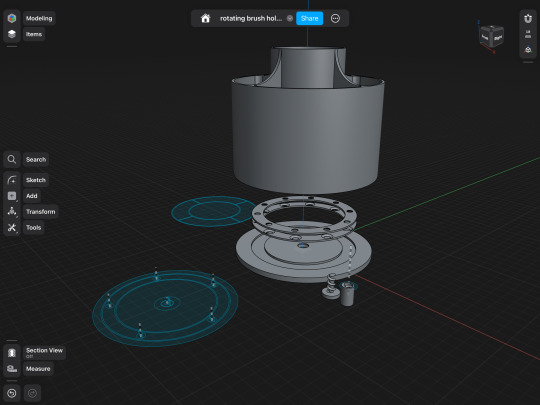
(above) i also made a few rotating brush holders at home (bc the ones that actually rotate are like $40 for some reason) by buying a set of small sphere bearings at home depot for like $5 (that’s what those little metal things are inside the third one, i took it apart bc i don’t know how to put a video and a picture in the same post) (just pretend they’re spinning rn).
anyway that’s all!! if you actually read this whole thing i love you so much bc engineering and design is one of my special interests so thanks for letting me tell you about the silly things i’ve made :3
#asks#3d art#3d model#engineering#infodump#special interest#ermmmmm not sure what else to tag#this was just a really long post lol#bugs#good omens#autism creature
79 notes
·
View notes
Text
youtube
Yesterday I saw a few people interested in 3D printers, and then I just saw this video explaining the issues with really cheap 3D printers, and how you can upgrade them with lots of time and money to work properly. That absolutely matches my experience. My first 3D printer was a 150€ machine, not quite as crappy as the one in this video, but still full of flaws and issues and things that didn't work well. I later bought the Bambu Lab A1 mini, also recommended in this video, and it's been problem-free. I don't like recommending a single product like that, but in my experience it really does work that well. I'm sure you can get others that aren't bad as well, but when it comes to price and performance and ease of use, it genuinely seems to be the best option right now.
So a quick buyer's guide if you're interested in that particular model.
First up, watch out for sales. The official price is like 320€ for an A1 mini, but in practice there are usually sales that drop the price to 199€. Don't pay more than that.
Second, they sell multiple printers, but for beginners the interesting ones are the A1 and A1 mini. The A1 is bigger and can print bigger parts, for around 150€ more; apart from that they're basically identical. I got the smaller one and am perfectly happy with it. Instead you can put that money into…
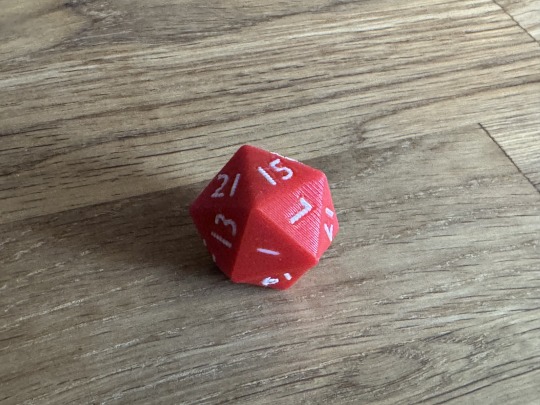
The AMS (Automated Material System), a thing you put next to the printer that can feed it material in different colours. It's included in several bundles, on the Bambu Lab website you specifically need to deselect it to not get it. This is the printer's main party trick, because it can print multiple colours (up to four) at once. This feature isn't actually that great, because on every layer it dumps a bit of the old material and then sucks in new ones, so multicolour prints take forever and produce a lot of scrap material. But you can do them at all, which is great. It's how I printed this D20 for my sister. Can you spot the special feature that she hasn't yet?
And it's useful to swap materials between different prints quickly. E.g. you want to print a gearbox and it takes several tries, but you can change the colours between each iteration so you don't get confused which is the new and old part. I've bought the AMS, I'm happy with it, but if money were tight this would be the first thing I'd get rid of. Note that for the A1 printers, you need the AMS lite, that's the one included in the bundles.
Print material (filament). Bambu Lab sells some, it's good. Lots of other companies sell some and those are also good, there's basically no advantage here, but Bambu Lab sells it for relatively cheaply if you order it with the printer. If you don't know material what you want or need (yet), you'll want PLA in different colours. Note that silk PLA needs to be treated differently (your printer and its software know about that, but you need to tell them you're using silk PLA). PLA-CF or glow-in-the-dark PLA also have special properties that require special handling.
Other additions: A smooth build plate is a nice thing to have for either very small things or things that need to be smooth. Different hot-ends can be useful; you need the hardened ones for PLA-CF or glow-in-the-dark PLA and some other materials; ones with a higher diameter print faster, ones with a lower diameter print more precisely. Glue: I've never used that for anything. These aren't things you need right away, but you do get a bit of a discount if you do order them with the printer.
Obviously I do need to tell you that this is literally a machine for producing plastic trash, there's no way around that. And while you can use the printer offline (or so I heard, I haven't tried it), it's mostly designed to be used with the Chinese manufacturer's cloud service, which does not make me super-happy. Also, the resolution for really tiny stuff is limited; if you want to build e.g. model trains, then you should really get a resin printer, but everything I heard about the chemicals and post-processing and so on there scares me, so I haven't yet. But if you are interested in 3D printing and want to get one for yourself, this is, as of right now, the thing I'd recommend.
15 notes
·
View notes
Text
I Will learn 3d modeling software in order to a) scan in my silly little items b) copy my silly little items c) patch my items onto a free use articulated dragon body I found online d) print out a wiggly little boy
#em is posting about temeraire#hmmm I wonder if you can do articulated print-in-place on a resin printer. or is it too Wet for that.#<- my kingdom for being good at 3d modeling but also this would be really bad really fast because I would be printing out new dolls#Just Constantly#it would be soooooo easy to get the scaling right...#<- already going mad with power because their work has a resin printer and they are allowed to use it#You Wouldn't Download A William Laurence. right?
15 notes
·
View notes
Note
How'd you make the figures :O?
They look wicked
3d printing!! they offer a free 3d printer at my uni so i tried learning a 3d software to make em! I use sculptris on windows, n it’s pretty easy to use! after that i paint em at home and add mod podge after
2 notes
·
View notes
Text
Intro:
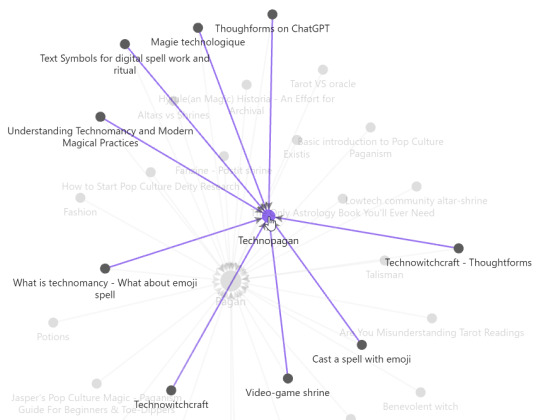
As you can see on my obsidian, I'm only starting to research about technopaganism. I'm having fun to explore it, so while I will describe how I make a "technoshrine to pray(temporary name)" feel free to add you grain of salt or correct me or brainstorm with me.
First thought:
There's people making emoji spell. That look like fun! And we can pray together, asynchronous with a common language. Do you know what is even more common when we talk about computer/phone ? BITS ! 1s and 0s! But, emoji's are unicode nowadays, and let's be real, nobody know how to read that kind of language. So let's not go that far into computer language. What about source code into machine code ? No, compiler are a mess. What could be as readable as emoji's ? Python ? That's a programing language that is really fast to understand because that's almost English and it work on almost all platform (maybe in can work on magic platforms).
So, let's make Python something magical to communicate with digital spirits !
What could we invent ? Digital altars/shrine, digital ritual, cyber divination, AR witchcraft, VR coven, technological familiars, code as spellcraft, where algorithms and scripts become incantation to manipulate digital or magical realms. And maybe MakerWitch can do 3D prints and create tools IRL ?
Obsidian: That's not a topic I want to cover, but I use it for my technopaganism research, so here's how I setup-it and use it : https://youtu.be/hSTy_BInQs8?si=Ci1NZ_H0tjcuCYIw I can talk about it more when I feel like I have a good vault structure, if it interest someone. Thoughtform : I have some brainstorming on how to make thoughform on Gdoc and Obsidian, if someone want to brainstorm on that with me ^^.
Look at one of my cat before I start to explain. FalseCode I want to make, what requirements specification?
Need to look like pseudocode (Pseudocode is an important type of comment that becomes a special type of to-do list, especially when you don’t understand how to accomplish a coding task. more here : https://en.wikipedia.org/wiki/Pseudocode)
The syntax NEED to be simple like python and readable
As it's for me to continue working with my spirits, it need to be using Neo-khuzdul, but still, I want people to be able to read my code, so explain in plain English as needed
I want to be able to use it anywhere (even in .txt notes), so let's make it resemble command-line interface (CLI: https://en.wikipedia.org/wiki/Command-line_interface)
Replicated a CML interface, design-wise:
I just wanted to use JetBrains because it's the more readable in my opinion, when coding. The background is not black, because purple is more magic-y. The rest, it's PyCharm colors (a software for coding Python).

Writing and using the Falsecode:
I will make a easier to follow step-by-step "how did I did that". I will try to not make it to tech-savvy, but I want you to follow if you want to do your own or just talk with me about it (please, I will love you if I can talk about my falsecode <3).
Keep in mind that I will talk as if the FalseCode is a true thing, my terminal is working et caetera, but in reality, it's just me writing and emulating a true functionality. It's my doll house.
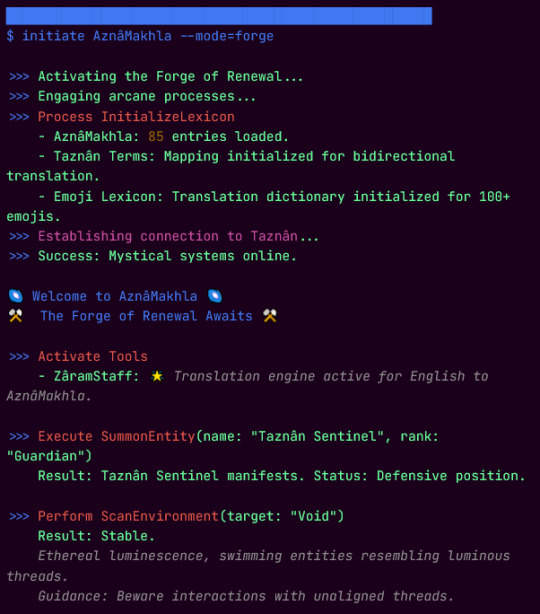
Open a Gdocument, make a little boxe that will be our terminal

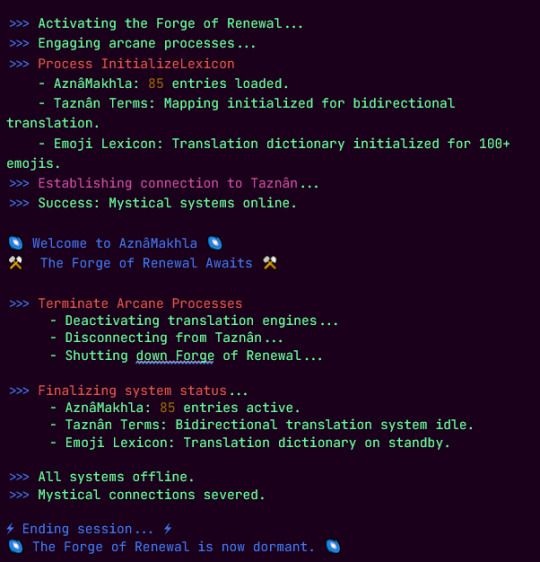
2. A false loading bar to make it fancy, and a launching prompt. It tell me that my AznâMakhla (FalseCode) is open in forge mode. And if something is opened, it need to be closed (and let add a little nice message)

3. Okay, I have an interface to do code into. Let's start a space for me to work into: the Forge of Renewal. While opening, the space will open and learn dictionaries so I can use my falsecode and english to talk with the space and the entities in it. I initialize the falsecode in itself, the inverse so the entities (Taznân) can also communicate with me, and emoji's (because I will use them to do spell). When it's done, it tell me "success" and a little welcoming message is here to tell me that I can start to work (and at the end, it will have an ending message when the space is closed) For me, this space is my circle. I open it, I close it ; while I'm inside I can focus on working with spirit and welcomed entities.
4. I have an interface and a magical space, now, how about some tools to work with ? Like an instant translation between what I will write in english into the FalseCode, it can be useful !

5. I'm starting to work into the space, I'm a beginner. I want to summon/invite a nice entities to keep me safe while I work. Why not a sentinel that will become my guardian while I'm here ?

6. Here! Now, how about I take a little look around before I start working ?
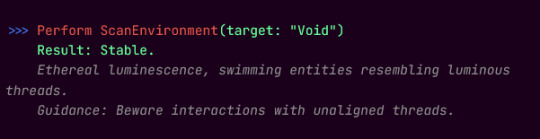
And that's it. So here's the opening, the "working-wizard" that symbolize the work you do in this environment/circle and the ending.


I only did one meditation in movement with all that and it was ... not well received by the spirits I work normally. Hypothesis : a) I was too focus on the technical and not enough on my intention and perceptibly of the digital space b) I'm not summoning the right spirit to work like that and my common spirit are just confused about wtf I'm trying to do c) or just, another thing I did not though of yet.
If you want to talk about it (or any adjacent topic) and/or ask question, don't be shy, I would like that greatly ^^.
3 notes
·
View notes
Text
Last Monday of the Week 2024-03-25
Can't tell if this is allergies or if I'm sick because spring is in the air
Listening: I have been listening to The Layover podcast, the behind the scenes podcast for Jet Lag The Game. I only got into Jet Lag pretty recently because I had Nebula anyway and saw it come up. Great show, both because the premise is great (carefully designed games incorporating travel on the scale of countries) and because they can actually edit this incredibly difficult pile of footage into something readable.
The Behind The Scenes is an interesting mix of talk about the on-the-ground situation of playing the game and the filmmaking that goes on after the fact, there's some cool insight into how and why they edit the way they do and it shows why it works so well.
I think you have to have Nebula to listen to the podcast? It does just spit out an RSS feed if you ask nicely though. Thank you podcasts.
Watching: Actually watched The Gay And Wondrous Life of Caleb Gallo, the video series that launched like two dozen reaction images.
youtube
It's funny, it's a well put together indie comedy series. You've probably seen most of the really standout bits already even if you don't know it already but it is worth watching as a time capsule of web comedy, it's less than two hours long all told.
Reading: Started Glory In The Thunder by 0xabad1dea. I don't know what her real name is. I've had GITT in my ebooks library forever, 0xabad1dea is the main reason I got on twitter back in like 2016 (her and a couple other software blogs) and is why my Fediverse feed is still like a quarter security researchers by weight. She's probably one of the most well known static analysis researchers in the world.
Anyway Glory In The Thunder is a gaslamp-ish fantasy, although leaning very fantasy on the gaslamps. Very teenage characters which is whiplash but only because it's been a moment. Lots of very loud characters who announce themselves and their intentions, some fun seven dimensional politics going on, and a lot of jumping back and forth in the histories of the various gods who are constantly hanging around in the plot.
I think @shieldfoss has bugged me to read this before so you'll be glad to know that I am now.
I like this, I'm about halfway through. It's easy to keep track of despite having enough fantasy names to choke a horse, although I should really stop worrying about that, I've read the Shadowdance series you really have to try to beat that one. It's also a free book, you can get it at @gloryinthethunder.
Playing: Got a VR headset. Fidgeting with said headset. Figured out how to do wireless linked VR from Linux and Windows which is good, I should have all the kinks worked out, I'll have to see how I square the onboard capabilities of the Quest 2 with having a PC and fast WiFi.
Making: Finally run through enough smaller prints on the new hotend to feel confident running off the final endcap, so that's done. The parts of the 3D printed NAS case are complete, and I have started my first pass sanding which is going to take a while because PETG is very slippery. Once that's sanded I'll take it in to the shared workshop and run through some primer layers and some paint.
Tools and Equipment: Flat network cable is a godsend if you're running it in open air in a house. Absolutely useless for pulling through walls or running in conduit, and completely bereft of shielding, but having a flat cord that can press up against frames and sideboards really does make it all neater. I ran flat cat6 for all of this.
10 notes
·
View notes
Text
8 Best Logo Design tips/techniques
Logo design plays a vital role for any brand or company to make or break its business of a company can make or break its business vision. A well-designed logo can establish a new brand and also help a running organization to build rapport with the customers. Other than an imperfectly created logo fails to communicate a brand nature and ultimately harms business.

Avoid using multiple colors use a maximum of 3 Colors
A Logo should always neat and clean as it’s not only a piece of design it is also a brand communicator for the entire media. Using more color can distract your user’s interest also it’s very hard to create its chemistry with other media like printing and web display. Using less color will make your logo more prominent.
Use simple and avoid sharp edges / cursive fonts’ type
Uses of your logo can be in any size from bigger in hoarding to smaller in Ads, especially for the newspaper ads. Sharp edges font type can decrease the visibility of your brand also we shouldn’t use more than 2 font’s type.
Compatible with Black & White Background
Always create a reverse type of your logo (white on black & black on white). It’s better if the colors and font type we use should be in contrast on white & black background. If your logo suffices the given purpose it’s a well created Logo Design.

Stick to two-dimensional design
Your logo can either be two or three dimensional. But it’s recommended creating 2D Logo for beginner always. First, it’s easy to conceptualize if compared with 3D design. Also, it helps us to understand the process of logo designing.
Create a vector logo
The logo should always be in vector format as we discussed earlier that the uses of your logo can be anywhere right from giant size hoarding to a one columns newspaper ad. The best part of vector design is that most of the beginners wouldn’t aware as it doesn’t have a size limitation, means its pixels would not affect if we increase or decrease its size at any level. It will not affect its pixels. Other than bitmap format has a limited size. We will have in length discussion on Vector and raster Graphics in our future topics.

Avoid using shadow, bevel, gradient, or emboss techniques
There are N numbers of techniques which can make our design more beautiful and attractive but it’s hard or sometimes impossible to reproduce it on a various medias like screen printing, foil stamp printing & embroidery as it is unable to support gradient& shadow. Even the premium signages like ACP board doesn’t support it. The only process which supports all kinds of colors and effects is Digital printing but it has its own limitation.
Avoid using photos
As we already discussed the bitmap/ raster images for its limited resolution and photos supports the same format, so we should do avoid using photos in Logo Design. Also, it doesn’t reproduce well in many media like hoarding, many parts of sublimation/heat transfer printing, embroidery for T-shirts, etc.
Best Software for Logo Designing
There are many free tools online and offline to create Logo of your choice. You can take help of them to create some basic designs. But it all has some restricted features which won’t allow you to do experimental design. We Designs recommend Corel Draw (any version) and Adobe Illustrator (any version) as the best vector Logo Designing tool which is capable enough to suffice your entire designing requirement.
3 notes
·
View notes
Text
Found a free 3D printable model for Laios's sword, but the model only comes with alignment pegs, NOT a full channel down the center to allow for a wooden or metal dowel. Having printed a couple of swords, that center dowel is critical to the whole thing staying together, so I couldn't print it until I got models with a central channel.
I know the procedure to make a channel in a 3D model. Should be easy as pie, right? WRONG the models were like the only file format that blender won't import without mods. So I had to import the 3mf files into Cura (my 3d printing software), export them from Cura as stl files, import them to blender, make my edits, re-export the stls, and then RE-import them into Cura to prepare to 3d print them.
I also did the prelim step of taking a screenshot of the whole sword model, printing it out on paper at the size it's supposed to be, and seeing if the scale looks good on me. I like it, so this weekend should be good to move onward with the 3d printer!
11 notes
·
View notes