#Geometry Shader
Explore tagged Tumblr posts
Visit Tumblr Blog
Explore Tumblr blogs with no restrictions, modern design and the best experience.
Last Seen Tumblr Blogs


Fun Fact
There were a total of 171.5 billion posts on Tumblr in 2019.
Text
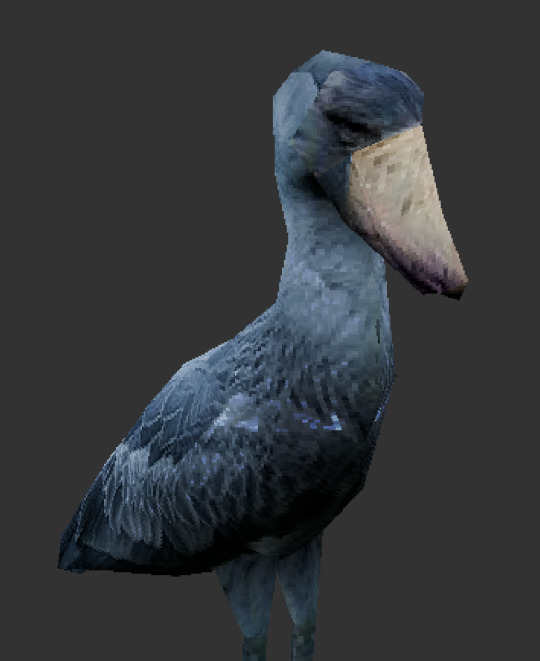
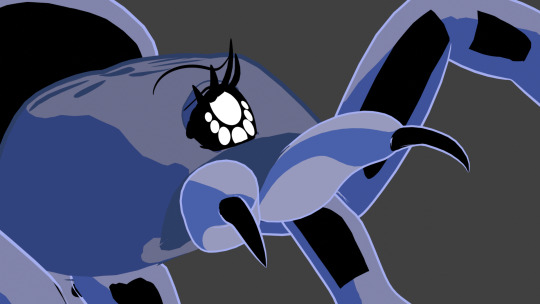
shoebill
#3d#3d art#blender#3d render#shoebill#birds#geometry nodes#shaders#ps1 aesthetic#ps1#ps1 graphics#ps1 style#low poly
257 notes
·
View notes
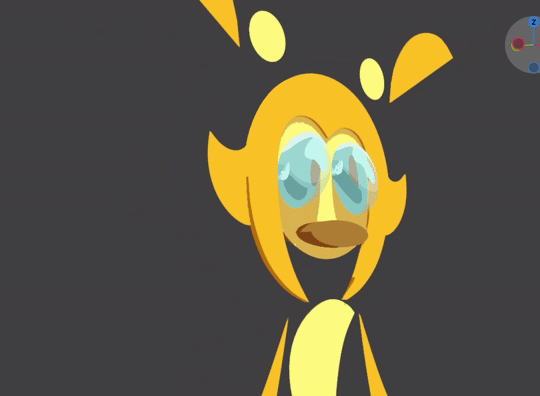
Text
UPDATE FOR THE PROJECT
From 2D to 3D
This is more of a big update for the people following the project than it is for the project itself. Because you see, I haven't told you guys what this short film will be about, haven't I?
BUT FIRST: Blender!!

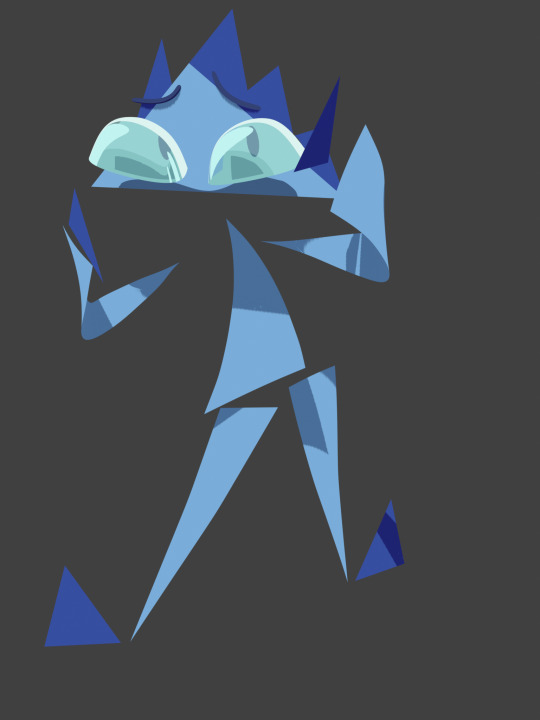

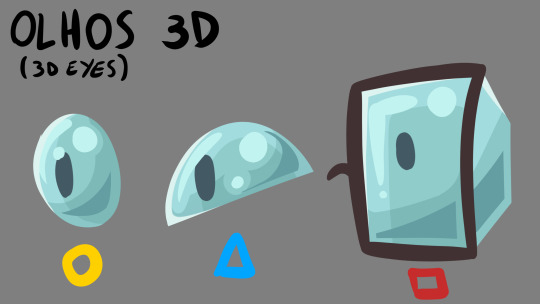
I gave 3D EYES TO THE 2D CAST! Because those eyes are not part of them I wanted to go for a glass-like material, like 3D glasses of some sort. And because I knew I wanted osmething a bit more complicated for the shader I did some concept art:
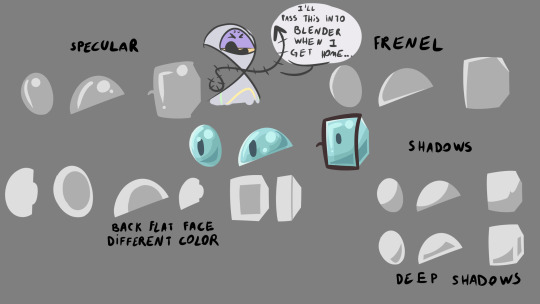
And belive me, trying to put this into blender was HELL!!!!!!! There were just so many shader features that just dont work in eevee... but after suffering a lot I was able to get a result I was very happy with! Here is the shader in action:


Im not going to show the node tree cuz its BIG, and I made something a bit different for each of them, but if you want to know how I did something, feel free to ask!
**Now... for those that are intrested in the story part of this project:
Basically, this film will tell the story of three 2D shapes that were kidnapped by 3D scientists for studies. Why do they need the 2D shapes? They are a dimension higher than them, they should be more capable than them. BUT NO!! Intuition is in the heart of math, mathematicians first feel something in their gut then they try to prove it. So if you have individuals who grew up with a two dimensional math intuition, imagine how much math they could discover?????...
#blendery adventures#my art#art#3D#3d art#blender#from 2D to 3D#circle#square#triangle#2D#glass#glass shader#shader#shaders#blender3d#math#mathblr#geometry
9 notes
·
View notes
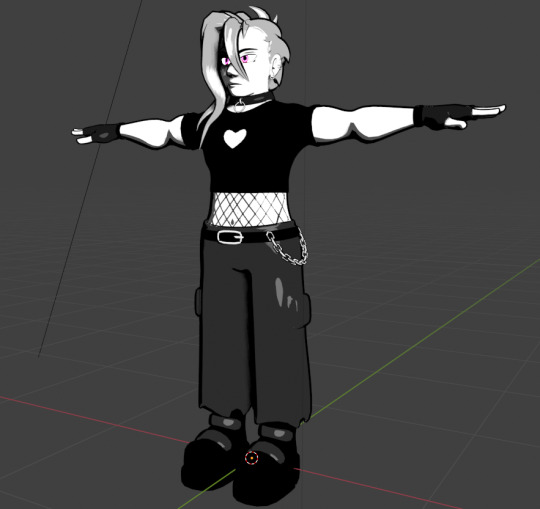
Text
(Re)learning Blender for strictly peaceful purposes

#took a decade but so and i finally got around to starting it#i know solidworks and fusion360 so the modelling part is pretty simple#it's the material and geometry nodes i'm still trying to wrap my head around#really want to do arcane style hand-painted textures/painting-like shaders but that's prolly a ways down the road
2 notes
·
View notes
Text
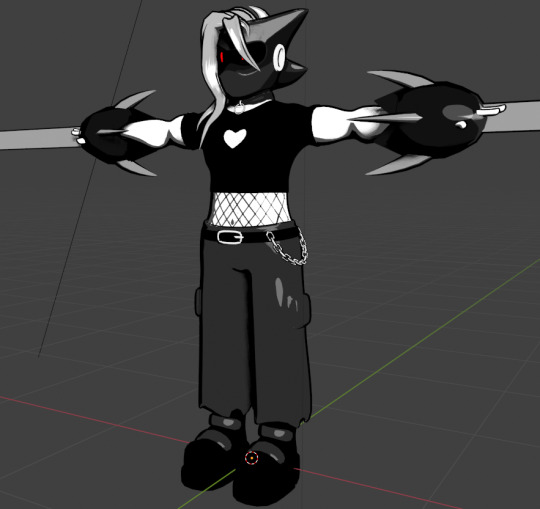
do not ask what the tri count is i don't wanna talk about how high the tri count is
close-up for deets :)
#soda offers you a can#tbf im nowhere close to the horrific beasts of nature that are scanned animal skulls#i looked some up the other day and all of them are 1M+ tris it's terrifying#also the base geometry isn't that bad it's the way the shader does the outlines that almost doubles it#bc it uses the solidy modifier for it and that adds extra geometry for rendering#anyway. rigging next and im terrified at how the chain is going to behave when i get there
7 notes
·
View notes
Text
2023 inktober, day 29
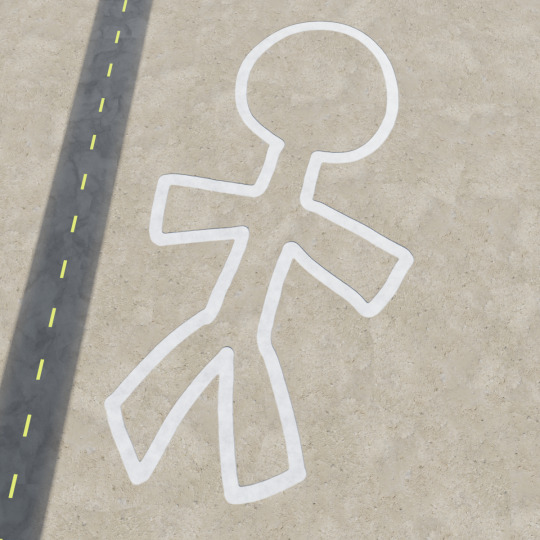
this turned out way better in my head. I added the road for scale and everyone still thought it was like a crime scene or something 😭😭 it's supposed to be the nazca lines
#fun fact:#this is 100% shader work#(yet again)#the only geometry is a large square#inktober#stickman#blender
0 notes
Text
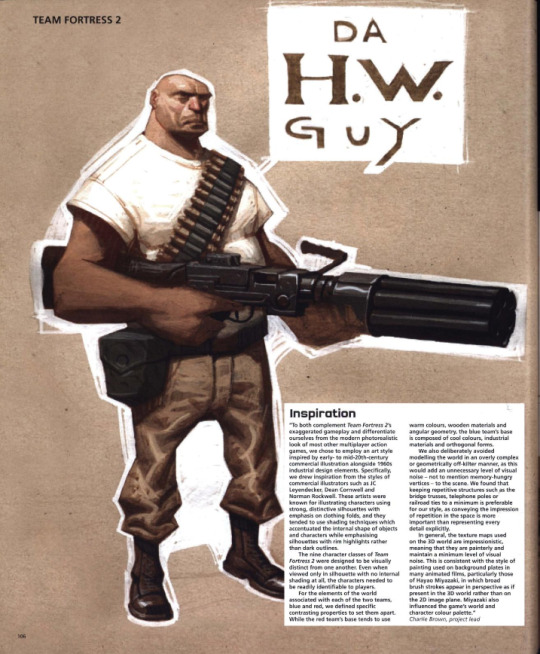

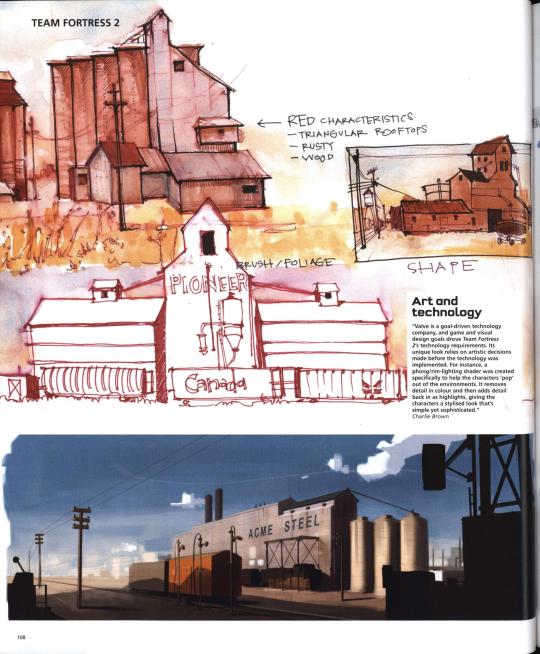

Team Fortress 2's concept art featured in The Art of Videogames (2007)
A transcription of the paragraphs shown can be found below.
Inspiration
"To both complement Team Fortress 2's exaggerated gameplay and differentiate ourselves from the modern photorealistic look of most other multiplayer action games, we chose to employ an art style inspired by early- to mid-20th-century commercial illustration alongside 1960s industrial design elements. Specifically, we drew inspirartion from the styles of commercial illustrators such as JC Leyendecker, Dean Cornwell and Norman Rockwell. These artists were known for illustrating characters using strong, distinctive silhouettes with emphasis on clothing folds, and they tended to use shading techniques which accentuated the internal shape of objects and characters while emphasising silhouettes with rim highlights rather than dark outlines. The nine character classes of Team Fortress 2 were designed to be visually distinct from one another. Even when viewed only in silhouette with no internal shading at all, the characters needed to be readily indeitifiable to players. For elements of the world associated with each of the two teams, blue and red, we defined specific contrasting properties to set them apart. While the red team's base tends to use warm colours, wooden materials and angular geometry, the blue team's base is composed of cool colours, industrial materials and orthogonal forms. We also deliberately avoided modelling the world in an overly complex or geometrically off-kilter manner, as this would add an unnecessary level of visual noise — not to mention memory-hungry vertices — to the scene. We found that keeping repetitive structures such as the bridge trusses, telephone poles or railroad ties to a minimum is preferable for our style, as conveying the impression of repetition in the space is more important than representing every detail explicitly. In general, the texture maps used on the 3D world are impressionistic, meaning that they are painterly and maintain a minimum level of visual noise. This is consistent with the style of painting used on background plates in many animated films, particularly those of Hayao Miyazaki, in whic broad brush strokes appear in perspective as if present in the 3D world rather than on the 2D image plane. Miyazaki also influenced the game's world and character colour palette." — Charlie Brown, project lead
Art and technology
"Valve is a goal-driven technology company, and game and visual design goals drove Team Fortress 2's technology requirements. Its unique look relies on artistic decisions made before the technology was implemented. For instance, a phong/rim-lighting shader was created specifically to help the characters 'pop' out of the environments. It removes detail in colour and then adds detail back in as highlights, giving the characters a stylised look that's simple yet sophisticated." — Charlie Brown
Bold outlines
"The specific characteristics we needed were mostly dictated by Team Fortress 2's gameplay. Foremost, we wanted players to be able to intuit each character's unique gameplay features at a glance. The Heavy Weapons character, for example, had to quickly convey strength, sturdiness, slowness, and the ability to pack a real wallop. To further aid in quick readability, each character class requires a bold, distinct silhouette shape." — Charlie Brown
#Thought this was important to transcript since it contains important information for people who r interested in studying this game's style!#tf2#team fortress 2#concept art#valve#character design#type: concept art#type: environment
412 notes
·
View notes
Note
hi! i wanted to ask if maybe you had an idea how the sparkles on the overwatch 2 iridescent skins work? it looks like they're in a fixed position depending on the character's movement and it's very trippy to me. i made a video, but idk if i can send links through asks - it's at tinyurl "ow2sparkles". hope you have a good day! o7
ohhh interesting..!!


hard to say exactly but it seems like the closeup sparkles are locked to the geometry with a texture.. so i think they might be two different shaders because the zoomed out one Definitely has something going on when you look at it from different angles
it's Possible that it's a screenspace noise texture, but dependent on the object's normal and view direction for making specific noise colors sparkle.. it'd look something like this. wait nevermind not yet i was making the shader to show and example but i made this instead this is #awesome #eyestrain

ok sorry ok so like. here's what it would look like if the sparkle texture was done in screenspace (so just a big texture stretched over the screen), but the computation for when the sparkles should show up are still done relative to the object (like here)

feels close though i dont know if this is the whole story.. it's possible instead of it being screenspace it's some sort of parallax effect, but when i tried it with the parallax effect it looked a little bit too unstable.. though this could be fixed up if you had the budget blizzard has (you can kind of see what it would look like by the way the sparkles move in the eyestrain gif)
it's also possible it's some sort of.. screenspace-object locked effect. like so: where objects closer to the camera have the screenspace texture scaled up, so that the details can scale with the characters. so still the same effect but instead of there being a uniform sparkle texture draped across the screen, it's scaled up or down based on how far away the character is


this is done with some stylized postprocessing effects but i could see it being used here. hard to say for sure though since there is only one genji, though if this is the case then the 1st person shader could be the same shader as the 3rd person one, even with a screenspace texture. but, i tried mousetracking some of the sparkles on the 1st person one and they definitely seemed to followed the object and not the screen.. so either its probably a different shader, or theyre using some sort of parallax instead of screenspace (or some mix of both !?) and its tuned down on the 1st person view
#nurgl3th#potion of answers your question#gamedev stuff#ignore my bad uv mapping i couldnt find the texture thta makes me look normal#eye strain#flashing gif
148 notes
·
View notes
Text
The secret of fluff
There is no secret, only volumes and vectors. Now I will proceed beam the knowledge of simple structures under the details of this drawing straight into your brain.

The best way to achieve fluffy fluff is to get into the right mindset when you go to draw it. It may be made up of thousands of hairs, but unlike long hair, which can be simplified to ribbons, fluff can be simplified to a volume, a solid piece of geometry.

The largest blocks of it are already here, but it's the smaller extra volumes of it that really help sell the illusion.
These distinct groups of fluff create a feeling of some kind of growth pattern, rather than an even fur coat thrown over a statue. They also squish and push each other, which adds that extra 3d feeling to the fluff. At this stage I also decide the growth direction of these volumes, these guides are what prevents me from getting lost in all the fur. Well, honestly I've done this so much that the guides are no longer a necessity, but you get my meaning. It's very useful when you're still figuring it out.

Anyway, scratch and scribble your way along the guides until you're happy. I found it most effective to add more lines to the parts of the fur that are facing away from the camera and fewer to the parts that are viewed straight on. It makes the fluff appear more voluminous and soft. Follow the same logic as a fresnel shader, basically.

That's how the effect looks for those who don't know. (Image snatched from Unreal's documentation on fresnel node.) More guides, now on antennae.

Once again, there is coherent geometry guiding the hairs that can wobble and deform in perspective. First - a simplified ribbon, then - hair detailing.

Lastly, shading. For this step don't follow all the individual hairs you've drawn on the detail pass, what you're shading is the entire volumes, not individual fluff clumps. Doesn't hurt to pick out a few strands of course, but don't over do it or the 3d feeling will be lost.
Thanks for reading my quick and dirty tutorial, I'm going back to work. Control rigs don't set themselves up on their own.
611 notes
·
View notes
Text
Animation Night 189: Nonphotorealistic
There is a funny trend in animation-related terminology to define things by what they aren't. Animation is any technique for creating film that isn't live action. Limited animation is any style of 2D animation that doesn't follow the conventions of Disney's 'full animation' on 1s and 2s - a category that includes a wildly diverse range of approaches and techniques, as this wonderful history by Animation Obsessive describes.
In 3DCG circles, there is a similar term: nonphotorealistic. Which describes, naturally, anything that isn't trying to look like a photograph of a real scene. There has been a real boom in this of late, and just like the other terms, it really doesn't narrow it down very much. Other terms like 'hybrid animation' add a bit more hints.

Of course, if you've been anywhere near animation in the last few years, you'll probably know another term: 'Spiderverse style'.
There is no denying that Spider-Man: Into the Spiderverse (2018) by Sony Pictures Animation was an absolute landmark for animation. (I wrote about it way back on AN21, focusing more on the cultural angle.) The ludicrously stylish film pretty much set the direction for animation in the 2020s - making a bunch of money and awards and thus finally throwing open the door to 3DCG animation that doesn't look like the style set by Pixar/Dreamworks in the 2000s. Its sequel, Across the Spiderverse (2023), was even more ambitious and successful (despite a troubled production involving a lot of needless crunch). We'll be showing that soon in a Spiderverse double bill so look forward to it!
So perhaps not surprising that when people see the use of graphical styles, 2D elements, limited framerates and the like in 3DCG these days, Spiderverse comes to mind. In its wake have come various films and series that apply these and related techniques: 3DCG animation is more varied than ever, and it's cool.
It isn't really a style, tho.
youtube
Here I'm indebted to youtuber Camwing who has made a nice video overview breaking down the animation of recent movies in this vaguely defined paradigm. Among them we have The Mitchells vs the Machines (2021, also Sony), Puss in Boots: The Last Wish (2022, Dreamworks), and Teenage Mutant Ninja Turtles: Mutant Mayhem (2023, animated at the French/Canadian studio Mikros animation), and of course over on Netflix you got the wildly popular League of Legends spinoff series Arcane (2021, Fortiche Productions), and the romance film Entergalactic (2022, DNEG), tying in with an album of the same name.
None of these films has exactly the same style, but they all pull from a related bag of tricks. The core techniques are animating on reduced framerates for a 'snappy', high-clarity feeling, the combination of 2D and 3D elements in some fashion, and taking inspiration from traditional media such as paintings or comic books.
For example, Arcane and Entergalactic both use the trick of 2D backgrounds/projecting paintings onto 3D geometry, inhabited by 3D characters with a stylised shader. Arcane is dripping with 2D visual effects. Puss in Boots drops the framerate during its action scenes - the opposite of the old paradigm of full animation, where fast actions would get more frames. Spiderverse draws 2D expressions onto its 3D models to push them further, and is full of all kinds of colourful stylised rendering - screentone effects, kirby dots, outlines, the works.

It's tempting to link this to 2D-in-3D animation, and certainly many of these films apply this technique - this is the major niche where Blender has found its way into industry pipelines. But using 2D isn't mandatory to count here. For example, TMNT Mutant Mayhem has an incredibly striking storybook-painting style, accomplished largely by clever shader work and a strong sense of graphic design. Genndy Tartakovsky's canned 2014 Popeye project was planning to use a ton of 2D-style posing and squash-and-stretch, accomplished largely with rigged 3D models. There are many paths to take!
And mind you, I haven't even covered one of the biggest angles here. Search for nonphotorealistic 3DCG on Youtube and what you'll probably find most is information about cel-shading - aka 'anime style'. This has also advanced considerably in the last few years, with the techniques pioneered by Arc System Works in Guilty Gear such as editing the normals of characters for more precise control over shading, and minute adjustments to break up the mechanical feeling of 3D, becoming widely copied in both games and films. (And particularly, animated porn.)
youtube
Vtubers in particular have really run with this technique, generally speaking using cel-shaded models with edited normals, inverted eyes, etc. etc. to try and get the feeling of an anime character come to life. [You can see a lot of these state of the art techniques if you download Pixiv's free VRoid Studio software and import the model into Blender using the VRM plugin.]
Naturally this kind of cel-shaded approach has found a particular home in Japan. In anime, the biggest champions of it are certainly Studio Orange, whose hybrid approach involves planning out shots with 2D animation before matching them with the rigs. We've covered their adaptation of Houseki no Kuni in great detail on Animation Night 97; their Trigun reboot was perhaps even more popular. But cel-shaded techniques, 3D previs and the like have also made their way into big films like Eva 3.0+1.0 (AN66).
Although this type of rendering aims to recreate the look and feel of 2D animation as much as possible, it always ends up being something new: character models that would be too complex to draw, an ease to 3D movements and camerawork that would be challenging in 2D, and generally a new hybrid style. This is good! 2D animation is already very good at being 2D animation - it's fascinating to see what 3DCG becomes with that inspiration.
So with that brief overview, where does that take us tonight?
I'm not quite ready to do a Spiderverse double bill tonight, so instead the plan is to check out a couple of recent American franchise films that are taking on the new suite of techniques. I've mentioned them up above, but let me introduce them more fully here.

Puss in Boots: The Last Wish is a sequel to a fairly unpopular spinoff about a side character of the Shrek franchise (AN75). Not, on its face, very promising - which is why it is all the more striking that I was told on all sorts of sides that I must watch this movie. I'm finally going to make good on that.
The title character is a kind of feline musketeer type, now facing the end of his swashbuckling career as he's lost 8 of his 9 lives. Not wanting to hang up his hat, he goes on a quest to restore them. What makes it stand out its the action scenes, which go all in on the anime-influenced, extreme perspective and lighting, limited framerate style that we're discussing above. Apparently it looks sick as shit.

Teenage Mutant Ninja Turtles: Mutant Mayhem is a fresh reboot of the venerable TMNT franchise, which pretty much describes itself in the title: four turtles (named after Renaissance painters, of course!) live in a sewer as ninjas, led by their aging master who is a rat. Starting as a comic book, it became one of the iconic toyline-driven TV shows of the 80s - but it's still going! Indeed, Turtles has been on a roll of late (at least going by animator scuttlebutt), with Australian studio Flying Bark Productions turning a lot of heads with their neo-Kanada School style (and for really stretching the definition of 'storyboard').
This new film takes a different approach to the bombastic action of Rise. It focuses on a new origin story for the turtles, telling a kind of coming of age story - but what makes it unique is the animation style and cinematography. Cinéma vérité is not a phrase you really expect to be associated with ninja turtles, but the film seems to really go all out in a way you wouldn't really expect from a franchise movie, shooting the young turtles in a handheld style and focus heavily on character. Marcel Reinhard's shader work, allowing the animators to isolate lights to specific objects and characters and introducing graphical elements of cross-hatching, stippling, etc. etc. to the lighting, gives it a uniquely painting-like feeling, augmented by a lot of 2D creativity in lighting and effects.
Turtles has never really been my thing, but this film looks unique enough that I really want to see it - and I hear it's a good film too.
So that's our bill for tonight! Puss and Turtles. Let's see what the big studios have been cooking of late...
Animation Night 189 will be starting around 10pm UK time (roughly three hours hence) and carrying on til about 2-3am same! We'll be on twitch.tv/canmom as usual. Hope to see you there!
157 notes
·
View notes
Text
You're smugly proud of the mind control FX in Volume Phenomena II. Sure, the game's barely more than a vertical slice at this point, but the fans loved the Indai in VP1, and when they told your team that the sneaky high-tech psionic faction was going to play a bigger role in VP2, you couldn't wait to start prototyping.
You set up subtle geometry and color distortion shaders to push a game's sense of unreality whenever Indai Controllers were around, trying to get the player off balance before they actually came under psi attack. You added a subsystem to blend the normal tactical UI sounds smoothly into outright commands to the player, slowly turning "Reload!" into "Submit." with every repetition, and the like. The model swaps and UI screws that replaced friendlies with enemies and vice versa were already there from the first game, but you wanted to rub it in, and revamped the effects that taunted the player with their compromise: the infamous pink shader with the twisting fractal spirals looked even better in proper model space, spinning smoky curls off the edges of every object. You were particularly proud of that one.
So you probably shouldn't have been that surprised when you came back from lunch early to find one of your devs smiling blankly into her monitor, which was displaying the latest from the main branch: revamped HUD, orange gas giant rising above the lush green tropical forest of equatorial Midori… and pink spirals everywhere.
"Luna, darlin', you enjoying the new build?"
"Yes, I am."
"Is that the second Indai encounter?"
"Yes, it is."
Her voice was flat, empty. Huge contrast from normal Luna, who loved to drawl a running commentary over every single event in a test playthrough, especially if someone else's new code was involved. And not a bad impression of the player's VA.
"Who tells you what to think?", you joked, delivering one of the taunt lines.
"You do, Controller."
"Pffft. Awesome. Now you think you should take your top off."
Oops. That just slipped out. Too far, probably. The employment contract had some clauses about a "creative work environment" that made that kind of office joke a little more tolerated around here than, say, Microsoft, but you were glad the rest of your team was still at lunch.
You were about to apologize and hope she didn't take it the wrong way, when, without looking at you, she reached down to the hem of her oversized plaid flannel shirt and slowly pulled it and the underlying tank top over her head.
Her long, dark, wavy hair fell back onto bare shoulders. Her bra was blue, and black, and lacy, and cupped Luna's round, full breasts; from the way the fabric tented, her nipples were definitely pierced. There was a little teardrop opal between the cups. Funny what you notice when the higher parts of your brain are busy screaming that if somebody walked in right now, you'd probably lose your job, creative work environment or not.
"Luna! Luna, put your top back on, dammit, that was a joke."
"Yes, Controller," she said, still not looking at you. With no more emotion than before, she slid back into her tank top, then her shirt. A button had come undone at the top, but she didn't seem to notice.
*Well, fuck, now what?*
You bit your lip. The second Indai encounter was bugged. Unfinished. There were three Controllers, but one was placed in an area with a missing nav mesh, and there was no way for the player to reach her and actually take her out yet. Luna wouldn't have been able to do it.
You killed the game, alt-F4, back to the desktop. Luna showed no signs of responding to the change of visuals. She was completely out of it, expression neutral, eyes not quite tracking. You opened the game's asset folder, navigated three levels deep, played raw sound files of Indai death screams. No response. Your team would be back any minute now. Shit, what did the design doc say about accidentally dropping your coworkers?
Actually. Hmm. She had a link to it on her desktop. You nudged Luna's soft, unprotesting hand off her mouse, frantically paged through the Indai section of the huge PDF. The lead designer had written most of the gameplay sections and Priti always had a "Balance Considerations" heading somewhere. Notes from UX studies of the first game, suggesting that some players would prefer a hard counter so they could focus on the boring pure shooty parts…
Well, if this didn't work, you were fired. Worse, probably. You opened the subfolder for UI effects, leaned down to Luna's ear, and in your best sexy suit AI voice, whispered "Psionic interference detected. Null pulse generator discharge in 3… 2… 1…"
You double-clicked. cancel_debuff.flac blasted through her speakers, far too loud.
"Oh, hey," Luna said, suddenly grinning, "back from lunch already?"
You almost jumped out of your skin.
"Yes!"
"Oh, I wanted to show you something, wasn't sure if it was intentional enemy behavior or if the level guy hadn't finished pathing, but looks like your fuckin' hypno shaders crashed the game again," she said. "Gimme a sec, I'll try to get back in there."
"Uh, you don't need to, we have QA for that, it'll be in their next build," you stammered. It absolutely would not be in their next build. You'd figure out some reason to cut the effects down before anyone else saw this.
"QA," she said, "doesn't enjoy this build as much as I did."
"No, really, it's fine…"
She spun her chair around. "QA wouldn't enjoy the guilty blushing as much as I am."
"Luna!?"
The blue-haired engineer held a flash drive between thumb and forefinger. "I've got a pretty nice box at home. More VRAM than this company brick. Bet it runs those shaders juuuust fine. In four hours I'll be getting off the S line five stops from here, 45 Linden Apt. 204, and, you know, given that psi countermeasures aren't implemented yet, who knows what could happen?"
She dropped the drive into her top, buttoned her shirt, and, whistling the theme from VP1, got back to work. □
121 notes
·
View notes
Text
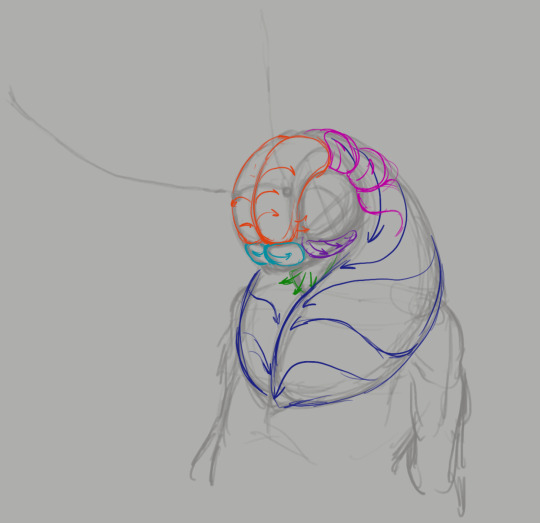
I have done. SO MUCH work on Rose's model this week. Figuring out Geometry Nodes effect to make stylized hairs do what I want, figuring out bone constraints to make her eyelashes behave just so relative to the camera, figuring out Shader Nodes effects so I could convert her eye shines to a texture for better deformation while still able to transform them, correcting her cephalothorax mesh and re-rigging it, merging her leg meshes, completely remeshing her jaws and mouth, tons of other possible methods I discarded...
...and all I have that I can show off yet is the work I've done giving her fangs. (It'll be quite a while before this functionality even comes into play, but I figured I may as well add it while I was fixing everything else.) You'll just have to take my word for it that the other things are going to make a tremendous difference in making her much more expressive and lively for animation!
Jade is making fast work of the soundtrack, per usual! I can tell you now this OST will be more bangers.
And the work on Rose is still not done! Next, her eyes need to be finished...however I decide to do that. I've got a couple ideas. Then, more work on the hair method, and actually making the mesh...and rigging. So, so much rigging. I'll do what I can over the weekend, but again, this may take another week. Another month for work on the other characters. A month for staging, assets, and backgrounds, and anywhere from one to two months on animation...let's bump this up to a May or June release. Hopefully, all the methods I've figured out here will save me time on the future. Until next time!
101 notes
·
View notes
Note
how would u recommend a beginner get into blender? Ima 2D art student but want to fill out my portfolio and it looks super fun and cool!
Yay I'm so glad you want to learn Blender!
Since you're studying 2D, you probably have a lot to learn and practice already. So I'll try to answer in a way that could benefit you the most in both practices.
You probably already heard Blender has a tool called "grease pencil" - it's a 3d object, but they also built it so that if you want to do regular 2D illustration or animation, you can do that too.
Learning grease pencil first could be a good way to familiarize yourself with Blender's interface. And because a lot of the toolsets share how they operate (for instance, adding modifiers to the stack is the same no matter if you're using a grease pencil object, curve, or 3D mesh), you can more easily move to different parts of the program later, like poly modeling or sculpting.
One really great tutorial for 2D Blender is this one by Kevandram - https://www.youtube.com/watch?v=nZyB30-xZFs
From there you can move into tutorials that combine 3D and 2D - or just start with this if you're really excited to learn 3D modeling. Again Kevandram has a really great tutorial for that - https://www.youtube.com/watch?v=ftBFjGy5z08
Something you'll wanna watch out for with Blender tutorials is the version they're using. If your version of Blender is newer, then maybe a button or menu a tutorial tells you to use might have moved. Or some functionality may have changed. Luckily since Blender is open source, they make all versions available to you here: https://download.blender.org/release/
Once you get more familiar with Blender, jumping between versions is easier. But for the sake of learning, if you find a really great tutorial that's using an older version, you can just use that version. You can have multiple Blender versions installed - right now I have 4.4, 4.1, 4.0, and 2.79. So for instance in Kevandram's Bakery Shop tutorial, he's using Blender 3.0 which you can get here - https://download.blender.org/release/Blender3.0/
If you're not interested in grease pencil, or just want to jump straight to 3d, this is a great beginner modeling tutorial from SouthernShotty - https://www.youtube.com/watch?v=C1CFWDWTamo
It mostly sticks to modeling and then gets into basic material stuff. A simplified order to learn things in 3d would be:
Poly/mesh modeling
Modeling with curves
Adding materials/using the shader editor
Unwrapping 3d objects / learning the UV Editor
Texture painting / Painting texture maps (using that unwrapped map from 4) in Blender or some other program (Krita if you want to paint on the 2d map itself. Procreate if you want to paint directly on the model although that'll require a tablet).
A lot of beginner tutorials will take you through steps 1-3 usually, and maybe throw in some basic animation, camera setup, lighting, and rendering. More intermediate/advanced topics would be rigging, animating rigged models, physics simulations, and geometry nodes.
To bring it back to how this could benefit you the most as a 2d artist - something I see a lot of people do is prototype in 3d, and use that 3d render as a base to paint over. Some people strictly use grey boxes, and some people actually model/texture/light certain things and then render that out in layers to use in their painting program later. You can use as much or as little 3d as you want to help 2d painting.
Here's a couple videos showcasing that type of workflow: https://www.youtube.com/watch?v=CHIZtZ2JU3A https://www.youtube.com/watch?v=W5GSyytbABo https://www.youtube.com/watch?v=r5ZyW7K_yP8
Those use Blender's cameras and lights, which you'll pick up as you do modeling/texturing tutorials. Later you can get more advanced with those as well as the different rendering engines within Blender.
This was a lot, but I hope it helps clarify where you can start, and ultimately what you could get out of using 3d!
31 notes
·
View notes
Text
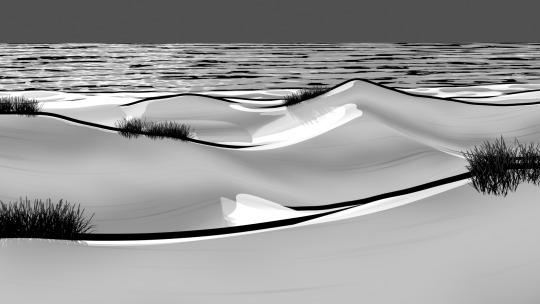
been fiddling with a beach and i think i've got it mostly figured for the toon shaders :) there's definitely some jank i could try addressing when i start building the environments i really need (mainly the textures showing the ground meshes clipping into each other) but at least the rough execution is down now
#soda offers you a can#purp doot#the water is kind of weird and im not super happy with it i think i need to adjust some of the colors and effects on the shader#but the shine from the light source is working basically the way i want it to#this definitely requires a lot more geometry than i'd like it to because of the way i generated the dunes#but that might be fine since these are supposed to be used for still renders in eevee and nothing more intensive than that
4 notes
·
View notes
Text
TIE AGGRESSOR
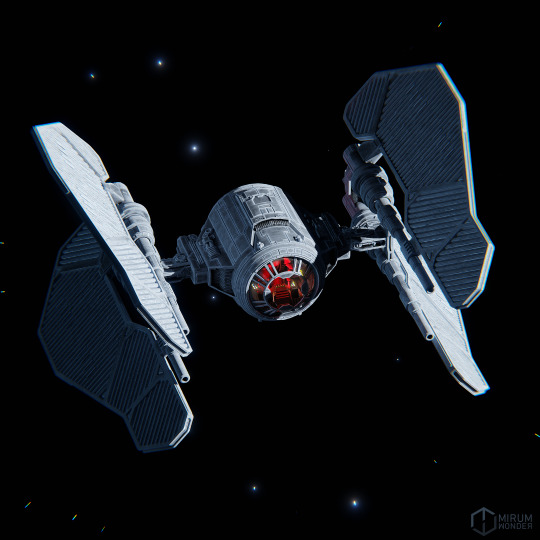
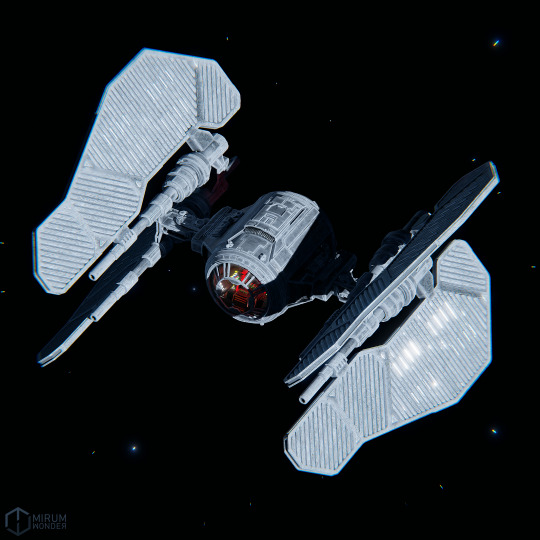
Oh, Snap! 😲 I've accidentally made a TIE fighter, AGAIN! 😱😱😱
I was experimenting with textures and shaders trying to recreate a blueish look of the Star Wars Imperial Tie fighters and some other ships and vehicles paint, and I decided that default cube is not enough to adequately show the shaders nuances and fine details and the way texture/shader is distributed across the model and different geometry, So i decided to quickly come up with a spaceship design just for that, and yeh… That's how I got this one, now I have a new Tie Fighter design 🤔 I should probably make it fly in a video animation next time, since you know, a spare ship with baked textures just laying around is a waste 😅
For more of the art stuff I do feel free to check out my Linktree
#art#artwork#artist#digital artist#digital art#star wars#star wars fan art#star wars art#star wars fan#cyberpunk art#cyberpunk aesthetics#blender modeling#blender art#blender community#blender cycles#blender3d#blender artist#original content#mirum wonder#concept#concept artist#science fiction#space opera#artist on tumblr#artist of tumblr#star wars aesthetic#star wars empire#star wars imperial#tie fighter#star wars tie fighter
122 notes
·
View notes
Note
hey hi i have a question about your game
i know this can't really be a top priority when the game itself doesn't fully exist yet but i've got a cheap ass pc (1.7gb of vram and only 32mb of that are dedicated) and would love to know if you're thinking of optimizing the graphics for toasters or at least adding toggles for the most graphically intensive stuff?
especially if the game's gonna have porn or even just nudity, i can't reasonably buy/download another poorly optimized porn game but also i love being a girl and having a dick and playing games where i can also do those two things
looks great so far btw! i love women 👍
oh yeah i'm doing everything i can to keep performance good, e.g. there's no actual transparency effects (particles etc. just use dithering and most only update at 30fps), level geometry is gonna stay fairly low-poly and texture stuff is either flat colors or tiny (128x128) textures. plus i'm trying to keep even minor things efficient like the UI (stuff only updates when it's changed instead of constantly checking values on the player, UI animations run at 30fps) and interactable stuff (jumpslash targets don't update unless you're actually close enough to jumpslash at them). also some general "every game should pay attention to this" stuff like limiting how many lights get to cast shadows
probably the worst thing performance-wise right now is aldegund herself since her model is actually like. 7 separate skeletal meshes (+1 penis mesh) to update every frame when you have every item, due to her items affecting her appearance, but i plan on fixing that soon (as in, working on it right now) using the dynamic triangle culling shader i came up with semi-recently for Lesser Beast, so she'll just be a single skeletal mesh with bits hidden based on your items. it'll be slightly worse for memory usage on average, since her full 8000~ triangle model will always be loaded instead of just when you have all your upgrades, but ultimately it'll be better for performance
regarding hog stuff though, nothing explicit planned other than a "let aldegund hang cock" toggle. maybe some busty catboy NPCs too
53 notes
·
View notes
Text
Another 3D shader practice~ yippeee~
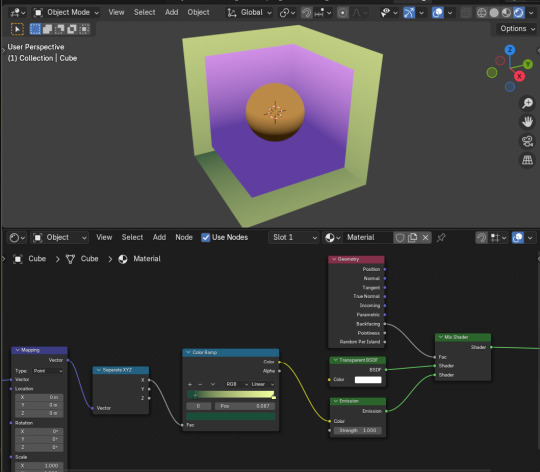
Following different tutorial from the same guy, it's from this video but just the magic transparency part. I wanna try the outlines from a different video instead bc I think that was made before grease pencil?
youtube
youtube
His video titles are clickbaity but they are genuinely good tutorials asdkjnajkds
It's late so I'll put the screenshots for them later
But yeah, the transparency; in the video, he mentioned an Alpha Clip blend mode. That option no longer exist since Blender 4.2 iirc, but you don't need it bc Blender already automatically add them.
So you just need to add the Geometry node to the fac on the mix shader node and ur good to go~ I totally didn't go down a slight rabbit hole trying to figure out how to add that "missing" Alpha Clip function and testing out bunch of alternative placements, before finally reading the comment update
Anyway~
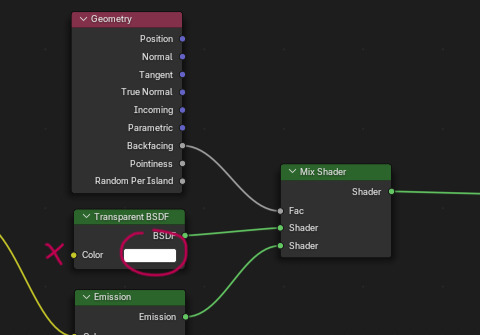
Make sure the color on the Transparency BSDF node stays white. the #FFFFFFFFF kind of white.
I think it works like multiply in drawing programs. If you put white on multiply, nothing shows up. But when there's a slight tint or gray color, it'll turn darker.
Like that, but it adds a layer of tint on the transparency, which is not.. what I'm going with at least? I guess if you want to have that tint, go for it. Just don't forget to increase the samples number for render. Otherwise it'll just be a bunch of dithering qwq

Emission is where you add colors. .. I haven't try it out with actual models and more colors but emission is what gave the color for the box
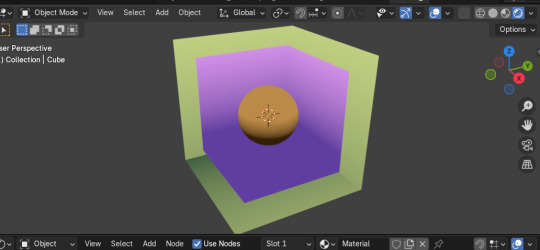
The second box have its own shader material so I can change the color~
Man when shit works it really feels like when you're playing with a robot or electronics n just.. dismantling them n then putting them together~ It's fun.... when it's not frustrating lol
#kc rambles#i wanna giv the gem practice another go#and maybe after that I can either try making a boba with this transparency thing#Youtube
15 notes
·
View notes